

Page 1

18" Built-In Dishwasher
Lave-Vaisselle Incorpere 18”
Lavavajillas Empotrado 18”
User Manual
Guide de l’utilisateur
Manual del usuario
HDBC100AFS
Page 2

Page 3

1
TABLE OF CONTENTS
DISHWASHER SAFETY ........................................................................................ 2
BEFORE USING YOUR DISHWASHER ................................................................... 5
ELECTRICAL REQUIREMENTS .............................................................................5
PARTS AND FEATURES ....................................................................................... 6
START UP GUIDE ................................................................................................. 6
DISHWASHER LOADING .....................................................................................7
Loading Suggestions ..................................................................................................... 7
Loading Upper Rack ....................................................................................................... 8
Loading Lower Rack .......................................................................................................9
DISHWASHER USE ............................................................................................11
Dish Tablet Program ....................................................................................................11
Proper Use of Detergent .............................................................................................11
Rinse Aid ....................................................................................................................... 12
Filling the Rinse Aid Dispenser .................................................................................... 13
Rinse Aid Setting ..........................................................................................................13
Cycle Selection Charts ................................................................................................14
WASHING SPECIAL ITEMS ................................................................................17
DISHWASHER CARE .......................................................................................... 19
Cleaning .......................................................................................................................19
Drain Air Gap ................................................................................................................ 19
Storing .......................................................................................................................... 20
Filtering System ...........................................................................................................20
TROUBLESHOOTING ........................................................................................ 21
LIMITED WARRANTY ........................................................................................26
RECORD KEEPING
Thank you for purchasing this Haier
product. This user manual will help you
get the best performance from your
new dishwasher.
For future reference, record the model
and serial number located on the inside
frame of the dishwasher, and the date
of purchase.
Staple your proof of purchase to this
manual to aid in obtaining warranty
service if needed.
___________________________________
Model number
___________________________________
Serial number
___________________________________
Date of purchase
Page 4

2
DISHWASHER SAFETY
Your safety and the safety of others are very important.
We have provided many important safety messages in this manual and
on your appliance. Always read and obey all safety messages.
DANGER
WARNING
CAUTION
This is the safety alert symbol.
This symbol alerts you to potential hazards that can
kill or hurt you and others. All safety messages will
follow the safety alert symbol and either the word
“DANGER,” “WARNING” or “CAUTION.”
These words mean:
An imminently hazardous situation. You
could be killed or seriously injured if you
don’t immediately follow instructions.
A potentially hazardous situation
which, if not avoided, could result in
death or serious bodily injury.
A potentially hazardous situation
which, if not avoided, may result in
moderate or minor injury.
All safety messages will tell you what the potential hazard is, tell you
how to reduce the chance of injury, and tell you what can happen if the
instructions are not followed.
Page 5

3
IMPORTANT SAFETY
INSTRUCTIONS
WARNING: To reduce the risk of re, electrical shock, injury to persons,
or damage when using the dishwasher, follow basic precautions,
including the following:
•
Use the dishwasher only for
its intended function.
•
Use only detergents or rinse
agents recommended for
use in a dishwasher, and keep
them out of the reach of
children.
•
When loading items to be
washed:
1) Locate sharp items so
that they are not likely to
damage the door seal;
2) Load sharp knives with the
handles up to reduce the
risk of cut-type injuries.
•
Do not wash plastic items
unless they are marked
“dishwasher safe” or the
equivalent. For plastic
items not so marked,
check the manufacturer’s
recommendations.
•
Do not touch the heating
element during or
immediately after use.
•
Do not operate the
dishwasher unless all
enclosure panels are properly
in place.
•
Do not tamper with controls.
•
Do not abuse, sit on, or stand
on the door, lid, or dish racks
of the dishwasher.
•
To reduce the risk of injury, do
not allow children to play in or
on the dishwasher.
•
Under certain conditions,
hydrogen gas may be
produced in a hot water
system that has not been
used for two weeks or
more. HYDROGEN GAS IS
EXPLOSIVE. If the hot water
system has not been used
for such a period, before
using the dishwasher turn
on all hot water faucets and
let the water ow from each
for several minutes, This will
release any accumulated
hydrogen gas. As the gas is
ammable, do not smoke or
use an open ame during this
time.
•
Do not use an extension cord.
READ AND SAVE THESE
INSTRUCTIONS
Page 6

4
GROUNDING INSTRUCTIONS
For a grounded, cord-connected
dishwasher:
The dishwasher must be
grounded. In the event of a
malfunction or breakdown,
grounding will reduce the risk
of electric shock by providing
a path of least resistance for
electric current. The dishwasher
is equipped with a cord having
an equipment- grounding
conductor and a grounding
plug. The plug must be plugged
into an appropriate outlet that
is installed and grounded in
accordance with all local codes
and ordinances.
WARNING: Improper connection
of the equipment-grounding
conductor can result in a risk
of electric shock. Check with a
qualied electrician or service
representative if you are in
doubt whether the dishwasher
is properly grounded. Do not
modify the plug provided with
the dishwasher; if it will not t
the outlet, have a proper outlet
installed by a qualied electrician.
For a permanently connected
dishwasher:
The dishwasher must be
connected to a grounded metal,
permanent wiring system, or an
equipment- grounding conductor
must be run with the circuit
conductors and connected to the
equipment- grounding terminal
or lead on the dishwasher.
SAVE THESE INSTRUCTIONS
WARNING
Tip Over Hazard
Do not use dishwasher until completely installed.
Do not push down on open door.
Failure to follow these instructions can result in serious injury or cuts.
State of California Proposition 65 Warnings:
WARNING: This product contains one or more chemicals known to the
State of California to cause cancer.
WARNING: This product contains one or more chemicals known to the
State of California to cause birth defects or other reproductive harm.
Page 7

5
WARNING
Suffocation Hazard
Before you throw away your old appliance, remove the door or lid so
that children cannot hide or get trapped inside your old appliance.
Failure to follow these instructions can result in death or brain damage.
BEFORE USING YOUR DISHWASHER
•
Install where dishwasher is protected from the elements. Protect against
freezing to avoid possible rupture of ll valve. Such ruptures are not covered by
the warranty. See “Storing” in the “Dishwasher Care” section for winter storage
information.
•
Install and level dishwasher on a oor that will hold the weight and in an area
suitable for its size and use.
•
Remove all shipping plugs from hoses and connectors (such as the cap on
the drain outlet) before installing. See Installation Instructions for complete
information.
ELECTRICAL REQUIREMENTS
WARNING
Electrical Shock Hazard
Electrically ground dishwasher.
Connect ground wire to green ground connector in terminal box.
Do not use an extension cord.
Failure to follow these instructions can result in death, fire, or
electrical shock.
This dishwasher is designed for operation on an adequately wired individual 120V,
60Hz. Use required 15 amp fused electrical supply with copper wire only. Time-delay
fuse or circuit breaker recommended, and provide a separate circuit serving only
this appliance. Outlet should be placed in adjacent cabinet.
Page 8

6
PARTS AND FEATURES
START UP GUIDE
USING YOUR NEW DISHWASHER
1. Rinse aid is essential for good drying. Be sure to ll the dispenser before you use
your new dishwasher. Each lling will last about 1 to 3 months depending on your
usage.
2. Scrape leftover food and hard items (toothpicks or bones) from dishes. You do
not need to pre-rinse your dishes.
3. Load the dishwasher. (See ”Dishwasher Loading”) Load dishes
with space in between so water will reach the soiled surfaces.
Make sure nothing prevents the spray arm(s) from spinning
freely.
a
b
c
d
e
k
l
f
h
i
j
g
a Nonadjustable Upper Rack
b Upper Spray Arm/Lower Spray Arm
c Lower Rack
d Main Filter
e Detergent Dispenser
f Cup Shelf
g Dish Tablet Container
h Removable Silverware Basket
i Coarse Filter
j Rinse Aid Dispenser
k Inlet Valve
l Junction Box
Page 9

7
4. Add detergent. Always use a quality brand detergent. (See “Dishwasher Use”)
5. Close the door.
6. Press the desired cycle and option selections. The dishwasher starts lling when
you press any cycle selection. You can select options as the machine lls. (See
“Dishwasher Use”)
DISHWASHER LOADING
LOADING SUGGESTIONS
•
Remove leftover food, bones, toothpicks and other hard items from the dishes.
To conserve water and energy and save time, it is not necessary to rinse dishes
before putting them into the dishwasher. The wash system is designed to
remove food particles from the water.
•
It is important for the water spray to reach all soiled surfaces.
•
Load dishes so they are not stacked or overlapping if possible. For best drying
results, water must be able to drain from all surfaces.
•
Load heavy pots and pans carefully. Heavy items can dent the stainless steel
interior of the door if they are dropped or bumped.
•
Make sure pot lids and handles, pizza pans, cookie sheets, etc., do not interfere
with the spray arm rotation.
•
Conserve water, energy and save time spent hand-rinsing by running a rinse
cycle to keep dishes moist if you do not plan to wash them soon. Foods such as
eggs, rice, pasta, spinach and cooked cereals may be hard to remove if they are
left to dry over a period of time.
Page 10

8
QUIET OPERATING TIPS
To avoid thumping/clattering noises during operation:
•
Make sure lightweight load items are secured in the racks.
•
Make sure pot lids and handles, pizza pans, cookie sheets, etc., do not touch
interior walls or interfere with the rotation of the spray arm.
•
Load dishes so they do not touch one another.
NOTE: For built-in models, keep sink drain plugs closed during dishwasher operation
to prevent noise transfer through drains.
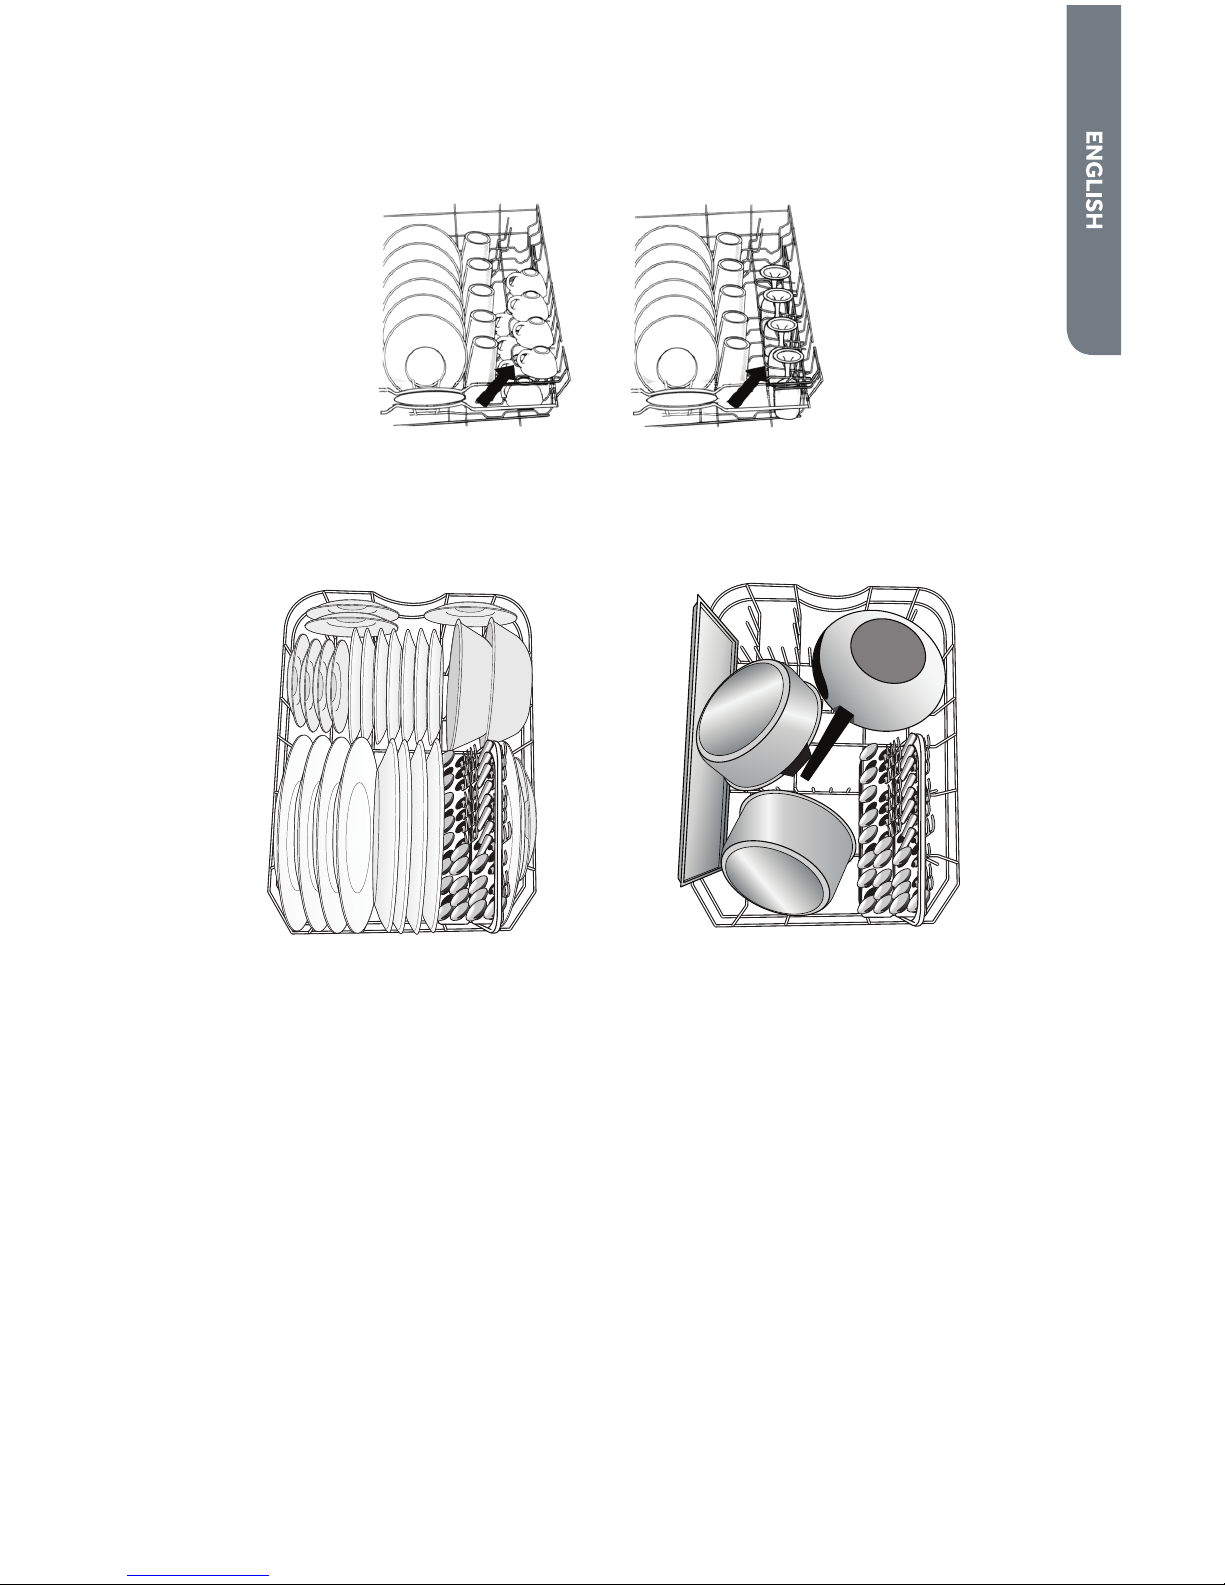
LOADING UPPER RACK
The upper rack is designed for cups, glasses and smaller items. (See recommended
loading patterns shown)
8 place setting Cup and glass load
NOTE: The features on your dishwasher rack may vary from the drawings shown.
•
Place items so open ends face downward for cleaning and draining.
•
Load glasses and cups in upper rack only. The lower rack is not designed for
glasses and cups. Damage can occur.
•
Place cups and glasses in the rows between tines. Placing them over the tines
can lead to breakage and water spots.
•
Small bowls, pans and other utensils can be placed in the upper rack. Load bowls
in the center section for best stability.
•
China, crystal and other delicate items must not touch each other during
dishwasher operation. Damage may occur.
•
Load plastic items in the upper rack only. Only plastic items marked “dishwasher
safe” are recommended.
•
Load plastic items so the force of the spray does not move them during the
cycle.
Page 11
9
CUP SHELF WITH STEM GUARD
Fold down the extra shelf on the right side of the upper rack to hold additional cups,
stemware or long items such as utensils and spatulas.
LOADING LOWER RACK
The lower rack is designed for plates, pans, casseroles, and utensils. (See
recommended loading patterns shown)
Utensil load
•
Do not load glasses, cups, or plastic items in the lower rack. Load small items in
the lower rack only if they are secured in place.
•
Load plates, soup bowls, etc. between tines.
•
Overlap the edges of plates for large loads.
•
Load soup, cereal, and serving bowls in the rack in a variety of ways depending
upon their size and shape. Load bowls securely between the rows of tines.
•
Load cookie sheets, cake pans, and other large items at the sides and back.
Loading such items in front can keep the water spray from reaching the
detergent dispenser.
•
Secure heavily soiled cookware face down in the rack.
•
Make sure pot handles and other items do not stop rotation of the spray arm(s).
The spray arm(s) must move freely.
•
Do not load items between the bottom rack and the side of the dishwasher tub
because they might block the water inlet opening.
NOTE: Spin the spray arms. Be sure items in the basket do not stop the rotation of
the spray arms.
Page 12
10
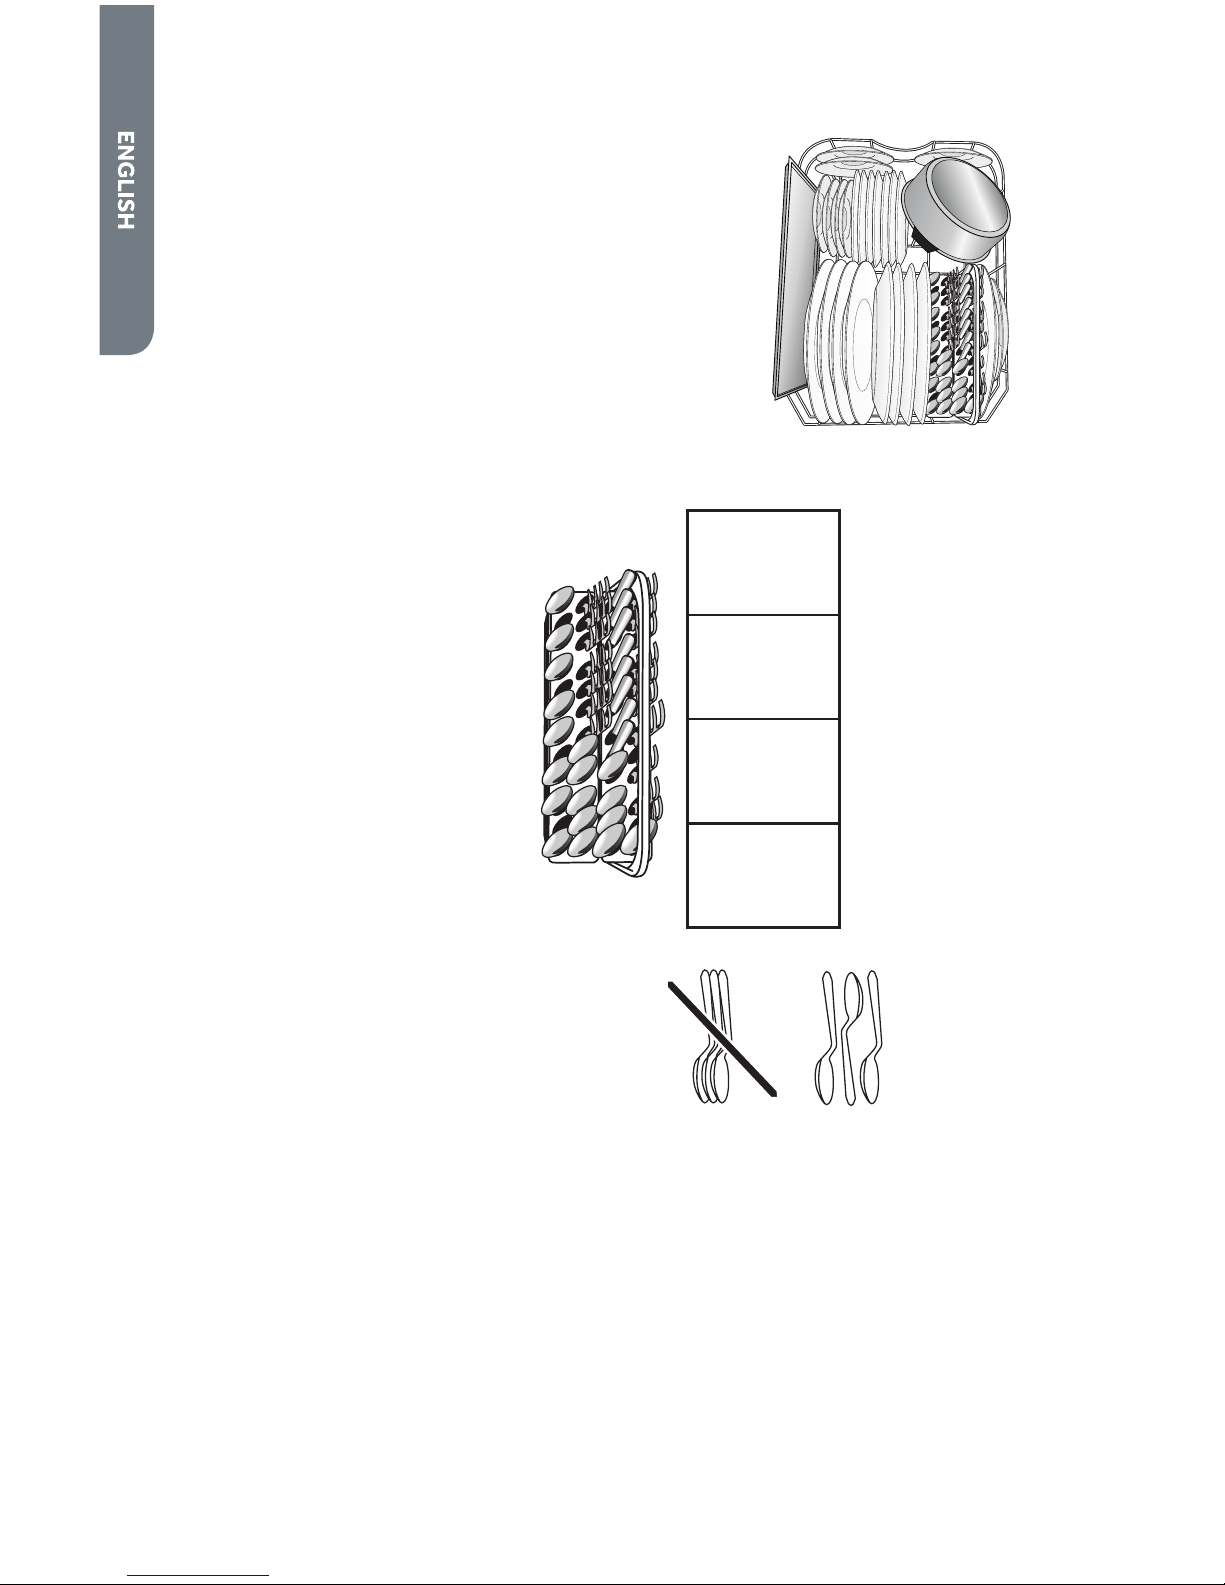
LOADING SILVERWARE BASKET
Load the silverware basket while it is in the bottom rack
or remove the basket and place on a counter or table for
loading. (See recommended loading pattern shown.)
NOTE: Unload or remove the basket before unloading
the racks to avoid water drops from falling on the
silverware.
•
Load items with handles down, using the separators
to prevent silverware nesting
•
Place small items such as baby bottle caps, jar lids,
corncob holders, etc. in the section(s) with hinged
cover(s). Close the cover to hold small items in place.
Mixed load
When handles are up, mix items
in each section of the basket
with some pointing up and some
down to avoid nesting. Spray
cannot reach nested items.
IMPORTANT: Always load sharp
items (knives, skewers, etc.)
pointing down. Be sure that
nothing protrudes through
bottom of the basket or rack
that may block the wash arm.
NOTES:
•
Do not load silver or silverplated silverware with
stainless steel. These metals
can be damaged by contact
with each other during
washing.
•
Some foods (such as salt,
vinegar, milk products,
fruit juices, etc.), can pit
or corrode silverware. Run
a rinse cycle if you do not
have a full load to wash
immediately.
2 4 5 1
4 5 1
2 4 5 1
2 4 5 1
4 5 1
2 4 5 4
2 4 5 7
3 5
2 3 3 1
2 3 3 1
3 3 1
2 3 6 6
1. Salad Forks
2. Teaspoons
3. Soup Spoons
4. Dinner Forks
5. Knife
6. Serving Spoon
7. Serving Fork
Page 13

11
DISHWASHER USE
DISH TABLET PROGRAM
Your dishwasher model has a Dish Tablet program. The Dish Tablet program uses a
Dish Tablet to replace the detergent and rinse aid.
NOTE: Use Only the Dish Tablet program if you use dish tablets. If you use dish
tablets with other Cycle programs the dishwasher will not achieve a good result.
1. Hang the Dish Tablet container from the upper dish rack.
a Dish Tablet Container
2. Rotate the upper spray arm and, if necessary, move the container to ensure the
spray arm is not blocked.
3. Place the dish tablet in the container and start the Dish Tablet program.
If you choose to use detergent and rinse aid, see the following instructions for use.
PROPER USE OF DETERGENT
Use only detergent specically made for use in a dishwasher. Keep your detergent
fresh and dry. Don’t put powder detergent into the dispenser until you’re ready to
wash dishes.
All wash cycles except RINSE ONLY require detergent in the detergent dispenser.
DETERGENT DISPENSER
The detergent dispenser has 2 sections.
a
bc
a Cover Button
b 25 gram section
c 15 gram section
The detergent dispenser automatically empties detergent into the dishwasher
during the wash cycle. (See the “Cycle Selection charts”)
•
Use automatic dishwashing detergent only. Other detergents can produce
excessive suds that can overow out of the dishwasher, leak onto the oor, and
reduce washing performance.
Page 14

12
•
Add detergent just before starting a cycle.
NOTE: Do not use detergent with a rinse cycle.
•
Store tightly closed detergent in a cool, dry place. Fresh automatic dishwasher
detergent results in better cleaning.
FILLING THE DETERGENT DISPENSER
1. If the dispenser cover is closed, open the cover by pushing the cover button
2. Fill the detergent dispenser compartment(s) with detergent.
NOTE: See the “Cycle Selection Charts” for recommended amount of detergent.
a
a Cover Button
3. Close the dispenser cover.
It is normal for the cover to open partially when dispensing detergent.
HOW MUCH DETERGENT TO USE
See “Cycle Selection Charts.”
•
The amount of detergent to use depends on the hardness of your water and
the type of detergent. If you use too little, dishes won’t be clean . If you use too
much in soft water, glassware will etch.
•
Dierent brands of dishwasher detergent have dierent amounts of
phosphorous for softening water. If you have hard water and use a detergent
with a phosphorous content of less than 8.7%, you might need to use more
detergent, or use a detergent with a phosphorous content higher than 8.7%.
RINSE AID
Rinse aids prevent water from forming droplets that can dry as spots or streaks.
They also improve drying by allowing water to drain o of the dishes during the nal
rinse by releasing a small amount of the rinse aid into the rinse water. Your Rinse Aid
dispenser is designed to use a liquid rinse aid. Do not use a solid or bar-type.
Page 15

13
FILLING THE RINSE AID DISPENSER
The rinse aid dispenser holds 3.4 oz ( 100 ml) of rinse aid. Under normal conditions,
this will last for about three months. Rinse aid is released through an opening in the
dispenser. You do not need to wait until the dispenser is empty to rell it. Try to keep
it full, but be careful not to overll it.
To ll the rinse aid dispenser:
1. Make sure the dishwasher door is fully open.
2. Turn the rinse aid dispenser cap counterclockwise and pull up to remove.
a
b
c
a Fill Indicator
b Adjustable Setting
c Dispenser Cap
3. Pour rinse aid into the dispenser until just full.
4. Clean up any spilled rinse aid with a damp cloth.
5. Replace the rinse aid cap, and then turn the cap clockwise to close.
RINSE AID SETTING
The amount of rinse aid released into the nal wash can be adjusted. The factory
setting is at 2. For most water conditions, set the adjuster to 2 or 3. If there are rings
or calcium ( hard water ) spots on dishes, try a higher setting.
a
a Adjustable Setting
To adjust the setting:
Remove the dispenser cap. Turn the adjuster inside the dispenser to the desired setting.
Page 16

14
CYCLE SELECTION CHARTS
Select the wash cycle and options desired. The dishwasher starts lling once the
door is closed and you press a cycle, unless you select a delay wash. After lling,
and a brief wash period, the machine will pause for a 5 minute energy saving soak
interval. During this time, dried and baked on soil is softened for easier removal later
in the cycle. You can select options as the machine is lling.
A “
•
” shows what steps are in each cycle. Temperatures indicate where extra heat is
added. Water usage is shown in U.S. gallons/liters.
This model meets the ENERGY STAR
®
guidelines for energy eciency.
Cycle time does not include dry time. Cycle time might be longer depending on the
temperature of the water entering the dishwasher.
a b c d e f
gh
a Delay Start/Washing Phases
Indicator Lights: When you delay
start (3, 6, 9 or 12 hours), an
indicator light will be lit to show the
delay time. When the dishwasher
is working, an indicator will be lit to
show the phases of the washing
cycle.
b Delay Button: Press to delay the
start.
c Cycle Indicator Lights: To show the
washing cycle.
d Cycle Button: To select one of six
washing cycles.
e Rinse Aid Light: To show when the
rinse aid dispenser needs to be
relled.
f Power Indicator Light: To show
that there is power going to the
dishwasher.
g Power Button: To turn On/O the
power.
h Start/Pause Button: To start the
selected wash cycle, or to pause the
wash cycle after it has been started.
Pre-
Wash
Second
Pre-
Wash
Main
Wash
Rinse Dry Running
Time
(min)
Water
Usage
(gal/L)
127° F (53° C) 154° F (68° C)
120 3.7
Use for all soil types and dish
loads.
Fill both detergent
compartments.
Page 17

15
122° F
(59° C)
127° F
(53° C)
149° F
(65° C)
130 4.6
Use this cycle for
hard-to-clean, baked-on,
cookware and harder than
normal water conditions.
Fill both detergent
compartments.
Pre-
Wash
Second
Pre-
Wash
Main
Wash
Rinse
Final
Heated
Rinse
Dry Running
Time
(min)
Water
Usage
(gal/L)
127° F
(53° C)
149° F
(65° C)
105 3.65
Use this cycle for loads with normal amounts of food
soil. (The energy-usage label
is based on this cycle.) During
the main wash, the wash
action will repeatedly pause
for several seconds.
Fill both detergent compartments.
Pre-
Wash
Main
Wash
Rinse
Final
Heated
Rinse
Dry Running
Time
(min)
Water
Usage
(gal/L)
122° F
(50° C)
140° F
(60° C)
90 3.67
Pre-
Wash
Main
Wash
Rinse
Final
Heated
Rinse
Dry Running
Time
(min)
Water
Usage
(gal/L)
Use this cycle for a light wash. This cycle uses a light
wash and gentle dry. During
the heated dry, the heating
element cycles on and off.
Fill 25 gram compartment.
122° F
(50° C)
131° F
(55° C)
55 2.75
Pre-
Wash
Main
Wash
Rinse
Final
Heated
Rinse
Dry Running
Time
(min)
Water
Usage
(gal/L)
Use this cycle for a quick
wash and light dry to clean
up cookware prior to
entertaining.
Fill 25 gram compartment.
122° F
(53° C)
25 1.9
Use this rinse cycle for rinsing
dishes, glasses and silverware
that will not be washed right
away.
No detergent needed.
Pre-
Wash
Second
Pre-
Wash
Main
Wash
Rinse
Final
Heated
Rinse
Dry Running
Time
(min)
Water
Usage
(gal/L)
•
If the incoming water temperature is less than the recommended temperature
or food soils are heavy, the cycle will automatically compensate by adding time,
heat and water as needed.
Page 18

16
CANCELING A CYCLE
Anytime during a cycle, press START/PAUSE.
Your dishwasher will start a 2-minute drain (if needed). Let the dishwasher
drain completely. The light turns o after 2 minutes.
NOTE: If your dishwasher does not need draining, press START/PAUSE again to turn
o the light. Select a new cycle.
To stop the drain:
Press START/PAUSE again to stop the drain immediately. Remember to drain the
dishwasher before starting a new cycle.
To clear the indicators:
Press START/PAUSE before starting the dishwasher to clear all options and cycles.
CHANGING A CYCLE
During the rst ll of a cycle
1. Press a new cycle.
2. Check the detergent dispensers. They must be lled properly for the new cycle.
After the rst ll of a cycle
1. Press START/PAUSE.
Your dishwasher will start a 2-minute drain (if needed). Let the dishwasher
drain completely. The light turns o after 2 minutes.
NOTE: If your dishwasher does not need draining, press START/PAUSE again to turn
the light o.
1. Check the detergent dispensers. They must be lled properly for the new cycle.
2. Press a new cycle.
ADDING ITEMS DURING A CYCLE
You can add an item anytime before the main wash starts. Open the door and check
the detergent dispenser. If the cover is still closed, you can add items.
To add items:
1. Open the door slightly. Wait for the spraying action to stop before opening the
door completely.
2. If the detergent dispenser cover is still closed, add the item.
3. Close the door rmly until it latches. The dishwasher resumes the cycle after
about a 10 second pause.
DELAY
Select Delay to run your dishwasher at a later time or during o-peak hours.
You can add items to the load anytime during the delay countdown. After
adding items, close the door rmly until it latches.
You can delay the start of a cycle up to 12 hours in 3 hour increments (3, 6, 9 or
12Hr)
Page 19

17
To delay the start:
1. Repeatedly press DELAY until you see the desired hours of delay lighted in LED
indicator on the left. When the delay reaches 12 hours, the delay turns o. Press
DELAY again to select a new number of delay hours.
2. Select a wash cycle.
NOTE: To cancel the delay and cycle, press START/PAUSE. To Cancel the delay and
start the cycle immediately, press Delay Start until there is no light in any of LED
indicators on the left.
WASH SYSTEM
An energy saving soak interval is used for most cycles shortly after the initial water
ll. During the 5 minutes of soaking, dried and baked on food is loosened without
using energy. Later in the cycle the robust wash action removes the softened food
more eciently. The six-level wash system provides excellent cleaning results.
Three levels of ltration and a soil collector system lter the wash water and prevent
food particles from redepositing on the clean dishes.
•
The wash water continuously ows through the lter, trapping food particles.
•
A coarse strainer prevents bones, pits, and other large objects from entering the
pump system.
NOTE: Periodically check the bottom of the tub and remove any objects on the
lter.
WASHING SPECIAL ITEMS
If you have doubts about washing a particular item, check with the manufacturer to
see if it is dishwasher safe.
Material Dishwasher Safe / Comments
Aluminum Yes
High water temperature and detergents can aect nish of
anodized aluminum.
Disposable
Aluminum
No
Do not wash disposable aluminum pans in the dishwasher
These might shift during washing and transfer black marks to
dishes and other items.
Bottles and cans No
Wash bottles and cans by hand. Labels attached with glue can
loosen and clog the spray arms or pump and reduce washing
performance.
Cast Iron No
Seasoning will be removed and iron will rust.
China / Stoneware Yes
Always check manufacturer’s recommendations before
washing. Antique, hand-painted, or over-glaze patterns may
fade, gold leaf can discolor or fade.
Page 20

18
Material Dishwasher Safe / Comments
Crystal Yes
Check manufacturer’s recommendations before washing.
Some types of leaded crystal can etch with repeated
washing.
Gold No
Gold-colored atware will discolor
Glass Yes
Milk glass yellows with repeated dishwasher washing.
Hollow-Handle
Knives
No
Handles of some knives are attached to the blade with
adhesives which can loosen if washed in the dishwasher.
Pewter Brass,
Bronze
No
High water temperatures and detergent can discolor or pit
the nish.
Disposable
Plastics
No
Cannot withstand high water temperatures and detergents.
Plastics Yes
Always check manufacturer’s recommendations before
washing. Plastics vary in their capacity to withstand high
temperatures and detergents. Load plastics in top rack only.
Stainless Steel Yes
Run a rinse cycle if not washing immediately. Prolonged
contact with food containing salt, vinegar, milk products, or
fruit juice can damage nish.
Sterling Silver or
Silver Plate
Yes
Run a rinse cycle if not washing immediately. Prolonged
contact with food containing salt, acid, or sulde (eggs,
mayonnaise, and seafood) can damage nish.
Tin No
Can rust.
Wooden Ware No
Wash by hand. Always check manufacturer’s instructions
before washing. Untreated wood can warp, crack, or lose its
nish.
Page 21

19
DISHWASHER CARE
CLEANING
CLEANING THE EXTERIOR
In most cases, regular use of a soft, damp cloth or sponge and a mild detergent is all
that is necessary to clean outside of your dishwasher.
CLEANING THE INTERIOR
Hard water minerals can cause a white lm to build up on the inside surfaces,
especially just beneath the door area.
Do not clean the dishwasher interior until it has cooled. Wear rubber gloves. Do not
use any type of cleanser other than dishwasher detergent because it may cause
foaming or create suds.
To clean interior:
Make a paste with powdered dishwasher detergent on a damp sponge and clean.
OR
Use liquid automatic dishwasher detergent and clean with a damp sponge.
OR
See the vinegar rinse procedure in “Spotting and lming on dishes” in
“Troubleshooting.”
NOTE: Run a Normal cycle with detergent after cleaning the interior.
DRAIN AIR GAP
Check the drain air gap anytime your dishwasher isn’t draining well. Some state
or local plumbing codes require the addition of a drain air gap between a builtin dishwasher and the home drain system. If a drain is clogged, the drain air gap
protects your dishwasher from water backing up into it.
The drain air gap is usually located on top of the sink or countertop near the
dishwasher.
NOTE: The drain air gap is an external plumbing device that is not part of your
dishwasher. The warranty provided with your dishwasher does not cover service
costs directly associated with the cleaning or repair of the external drain air gap.
To clean the drain air gap
Clean the drain air gap periodically to ensure proper drainage of your dishwasher.
Follow the cleaning instructions provided by the manufacturer. With most types:
1. Lift o the metal cover, and then unscrew the plastic cap.
2. Check for soil buildup and clean if necessary.
Page 22

20
STORING
Storing for the Summer
Protect your dishwasher during the summer months by turning o the water supply
and power supply to the dishwasher.
Winterizing your dishwasher
Protect your dishwasher and home against water damage caused by freezing water
lines. If your dishwasher is left in a seasonal dwelling or could be exposed to near
freezing temperatures, have your dishwasher winterized by authorized service personnel.
FILTERING SYSTEM
For your convenience, we have placed the drain pump and ltering system within
easy reach inside the tub. There are three components of the ltering system: the
main lter, the coarse lter, and the ne lter.
a
b
c
a Coarse Filter
b Main Filter
c Fine Filter
A. Coarse lter
Larger items, such as pieces of bone or glass, that could clog the drain are trapped in
the coarse lter. To remove an item caught in this lter, gently squeeze the tabs on
top of this lter and lift it out.
B. Main lter
Food and soil particles trapped by this lter are pulverized by a special jet on the
lower spray arm and washed down the drain.
C. Fine lter
This lter holds soil and food residue in the sump area and prevents it from being
redeposited on the dishes during a cycle.
Page 23

21
CLEANING THE FILTERS
2
3
1
Open
Step 1. Turn the lter in a counterclockwise direction then lift it up.
Step 2. Lift the Main lter up
Step 3. Lift the Fine lter up
NOTE: Reverse steps 1 through 3 to replace the lter.
TROUBLESHOOTING
Try the solutions suggested here rst and possibly avoid the cost of a service call...
DISHWASHER IS NOT OPERATING PROPERLY
•
Dishwasher does not run or stops during a cycle
It is normal for most cycles to pause for 5 minutes near the start of a cycle to let
the dishes soak. This reduces energy required to clean the dishes.
Is the door closed tightly and latched?
Is the right cycle selected? Refer to the Cycle Selection charts.
Is there power to the dishwasher? Has a household fuse blown or circuit breaker
tripped?
Has the motor stopped due to an overload? The motor automatically resets
itself within a few minutes. If it does not restart, call for service.
Is the water shut-o valve (If installed) turned on? It is normal for certain cycles
to repeatedly pause for 15 to 65 seconds during the main wash.
•
Dishwasher will not ll
Is the overll protection oat able to move up and down freely? Press down to
release.
•
Dishwasher seems to run too long
Is the water supplied to the dishwasher hot enough? The dishwasher runs longer
while heating water. Refer to the “Dishwasher Performance Tips” section. A
delay automatically occurs in some wash and rinse cycles until the water reaches
the proper temperature.
Page 24

22
•
Water remains in the dishwasher
Is the cycle complete and not in a pause?
It is normal to have a small amount of clean water around the outlet in the
bottom of the tub, to keep the water seal lubricated.
If the drain hose is connected to a food waste disposer, make sure the disposer
is empty.
Make sure the knockout plug has been removed from the food waste disposer.
Check to see if the drain hose is kinked.
•
Detergent remains in the covered section of the dispenser
Is the cycle complete?
Is the detergent lump-free? Replace detergent if necessary.
Was a dish item blocking the dispenser?
•
Water residue on the front of the access panel
Was too much detergent used? Refer to the “Detergent Dispenser” section.
Is the brand of detergent making excess foam? Try a dierent brand to reduce
foaming and eliminate buildup.
•
Odor in the dishwasher
Are dishes washed only every 2 or 3 days? Run a rinse cycle once or twice a day
until you have a full load.
Does the dishwasher have an unpleasant smell? Run a vinegar rinse as described
in “Spotting and lming on dishes” later in this troubleshooting guide.
•
Condensation on the kitchen counter (built-in models)
Is the dishwasher aligned with the countertop? Moisture from the vent in
the dishwasher console can form on the counter. Refer to the lnstallation
Instructions for more information.
DISHES ARE NOT COMPLETELY CLEAN
•
Food soil left on the dishes
Is the dishwasher loaded correctly? Refer to the “Dishwasher Loading”
section. Did you choose the cycle that describes the most dicult soil in your
dishwasher? lf you have some items with heavier soils, use a heavier cycle.
Is the water temperature too low? For best dishwashing results, water should be
120ºF (49 ºC) as it enters the dishwasher. Refer to the “Dishwasher Performance
Tips” section.
Did you use the correct amount of fresh detergent? Use recommended
dishwasher detergents only. Refer to the “Detergent Dispenser “ section. Never
use less than 1 tb (15 g) per load. Detergent must be fresh to be eective. Store
detergent in a cool, dry area Heavy soil and/or hard water generally require extra
detergent.
Page 25

23
Is detergent caked in dispenser? Use fresh detergent only. Do not allow
detergent to sit for several hours in a wet dispenser. Clean dispenser when
caked detergent is present.
Is the pump or spray arm clogged by Iabels from bottles and cans? If you wash
bottles and cans in your dishwasher, check for labels clogging the pump or spray
arm.
Is the home water pressure high enough for proper dishwasher lling? Home
water pressure should be 20 to 120 psi (138 to 828 kPa) for proper dishwasher
ll. A booster pump on the water supply can be added if pressure is too low.
Are high suds slowing the wash arm? Never use soap or laundry detergents. Use
recommended dishwasher detergents only.
SPOTS AND STAINS ON DISHES
•
Spotting and lming on dishes
Is your water hard or is there a high mineral content in your water? Conditioning
the nal rinse water with a liquid rinse aid helps eliminate spotting and lming.
Keep the rinse aid dispenser lled. Always use a high-temp option. If your water
hardness is 13 grains or above, it is strongly recommended that you install
a home water softener. If you do not wish to drink softened water, have the
softener installed onto your hot water supply.
Is the water temperature too low? For best dishwashing results, water should be
120ºF (49ºC) as it enters the dishwasher.
Did you use the correct amount of eective detergent? Use recommended
dishwasher detergents only. Refer to the “Detergent Dispenser” section. Never
Use less than 1 tb (15 g) per load. Detergent must be fresh to be eective. Store
detergent in a cool, dry area. Heavy soil and/or hard water generally require extra
detergent.
Is the home water pressure high enough for proper dishwasher lling? Home
water pressure should be 20 to 120 psi ( 138 to 828 kpa) for proper dishwasher
ll. A booster pump on the water supply can be added if pressure is too low.
NOTE: To remove spots and lm from dishes, try a white vinegar rinse. This
procedure is intended for occasional use only. Vinegar is an acid and using it too
often could damage your dishwasher.
1. Put 2 cups ( 500 mL) white vinegar in a glass or dishwasher-safe measuring
cup on the bottom rack.
2. Run the dishwasher through a complete washing cycle. Do not use
detergent. Vinegar will mix with the wash water.
Page 26

24
•
Silica lm or etching (silica lm is a milky, rainbow-colored deposit; etching is
a cloudy lm)
Sometimes there is a water/chemical reaction with certain types of glassware.
This is usually caused by some combination of soft or softened water, alkaline
washing solutions, insucient rinsing, overloading the dishwasher, and the
heat of drying. It might not be possible to prevent the problem, except by hand
washing.
To slow this process use a minimum amount of detergent but not less than 1tbs
(15 g) per load. Use a liquid rinse aid and under load the dishwasher to allow
thorough rinsing. Silica lm and etching are permanent and cannot be removed.
Do not use heated drying.
•
White spots on cookware with non-stick nish
Has the dishwasher detergent removed cookware seasoning? Reseason
cookware after washing in the dishwasher.
•
Brown stains on dishes and dishwasher interior
Does your water have high iron content? Rewash dishes Using 1 - 3 tsp (5-15 ml)
of citric acid crystals added to the covered section of the detergent dispenser.
Do not use detergent. Follow with a Normal wash cycle with detergent. If
treatment is needed more often than every other month, the lnstallation of an
iron removal unit is recommended.
•
Black or gray marks on dishes
Are aluminum items rubbing dishes during washing? Disposable aluminum items
can break down in the dishwasher and cause marking, Hand wash these items.
Remove aluminum markings by using a mild abrasive cleaner.
•
Orange stains on plastic dishes or dishwasher interior
Are large amounts of tomato-based foods on dishes placed in the dishwasher?
It may be necessary to use a stain removal product to remove stains from your
dishwasher. Stains will not aect dishwasher performance.
DISHES DO NOT DRY COMPLETELY
•
Dishes are not dry
Did you load your dishwasher to allow proper water drainage? Do not overload.
Refer to the “Dishwasher Loading” section. Use a liquid rinse aid to speed drying.
Are the plastics wet? Plastics often need towel drying.
Is the rinse aid dispenser empty? Refer to the “Rinse Aid Dispenser” section.
Page 27

25
DISHES ARE DAMAGED DURING A CYCLE
•
Chipping of dishes
Did you load the dishwasher properly? Load the dishes and glasses so they are
stable and do not strike together from washing action. Minimize chipping by
moving the rack in and out slowly.
NOTE: Antiques, feather-edged crystal, and similar types of china and glassware
might be too delicate for automatic dishwashing. Wash by hand.
NOISES
•
Grinding, grating, crunching or buzzing sounds
A hard object or powder detergent granulates have entered the wash module.
When the object is ground up, the sound should stop.
ERROR CODES
When some malfunctions come on, the appliance will display error codes to warn
you.
Codes Meanings Possible Causes
The Quick Wash LED
ickers
Longer inlet time. Faucet is not opened, or
water intake is restricted,
or water pressure is too
low.
The Rinse and Quick
Wash LEDs icker
Longer heating time, but
not reaching required
temperature
Malfunction of
temperature sensor or of
heating element.
The Light Wash and
Quick Wash LEDs icker
Failure of temperature
sensor
Open circuit or break of
temperature sensor
The Light Wash, Rinse
and Quick Wash LEDs
icker
Failure of temperature
sensor
Short circuit or break of
temperature sensor
FOR MORE HELP, VISIT HAIER.COM OR CALL THE CONSUMER
HELP LINE AT 1-877-377-3639.
Page 28

26
LIMITED WARRANTY
IN-HOME SERVICE
FULL TWO YEAR WARRANTY
For 24 months from the date of original retail
purchase, Haier will repair or replace any part
free of charge including labor that fails due to
a defect in materials or workmanship.
Haier may replace or repair at their sole
discretion any part, sub system including the
entire product.
Product must be accessible, without
encumbrance and installed properly to
receive for warranty repair service.
LIMITED WARRANTY
NOTE: This warranty commences on the
date the item was purchased, and the original
purchase receipt must be presented to the
authorized service representative before
warranty repairs are rendered.
Exceptions: Commercial Use Warranty
90 days labor from date of original purchase
90 days parts from date of original purchase
No other warranty applies.
FOR WARRANTY SERVICE
All service must be performed by a Haier
authorized service center. For the name and
telephone number of the nearest authorized
service center, please call 1-877-337-3639.
Before calling please have available the
following information:
Model number and serial number of your
appliance. The name and address of the
dealer you purchased the unit from and the
date of purchase.
A clear description of the problem.
A proof of purchase (sales receipt).
This warranty covers home appliance
services within the contiguous United
States and Canada and where available in
Alaska, Hawaii and Puerto Rico.
What is not covered by this warranty:
Replacement or repair of household fuses,
circuit breakers, wiring or plumbing.
A product whose original serial number has
been removed or altered.
Any service charges not specically identied
as normal such as normal service area or
hours.
Damage incurred in shipping.
Damage caused by improper installation or
maintenance.
Damage from misuse, abuse accident, re,
ood, or acts of nature.
Damage from service other than an
authorized Haier dealer or service center.
Damage from incorrect electrical current,
voltage or supply.
Damage resulting from any product
modication, alteration or adjustment not
authorized by Haier.
Adjustment of consumer operated controls
as identied in the owner’s manual.
Hoses, knobs, plumbing parts and all
attachments, accessories and disposable
parts.
Labor, service transportation, and shipping
charges for the removal and replacement of
defective parts beyond the initial 24-month
period.
Damage from other than normal household
use.
Any transportation and shipping charges.
THIS LIMITED WARRANTY IS GIVEN
IN LIEU OF ALL OTHER WARRANTIES,
EXPRESS ED OR IMPLIED, INCLUDING BUT
NOT LIMITED TO, THE WARRANTIES OF
MERCHANTABILITY AND FITNESS FOR A
PARTICULAR PURPOSE
The remedy provided in this warranty is
exclusive and is granted in lieu of all other
remedies.
This warranty does not cover incidental
or consequential damages, so the above
limitations may not apply to you. Some
states do not allow limitations on how long
an implied warranty lasts, so the above
limitations may not apply to you.
This warranty gives you specic legal rights,
and you may have other rights, which vary
from state to state.
Haier America
Wayne, NJ 07470
Page 29

27
TABLE DES MATIÈRES
SÉCURITÉ DU LAVE-VAISSELLE .......................................................................28
AVANT D’UTILISER VORTE LAVE-VAISSELLE ..................................................31
CONFIGURATION REQUISE POUR L’ÉLECTRICITÉ ............................................. 31
PIECES ET CARACTERISTIQUES ....................................................................... 32
GUIDE POUR METTERE EN MARCHE ................................................................. 32
CHARGEMENT DE VOTRE LAVE VAISSELLE .....................................................33
Suggestions de chargement .......................................................................................33
Chargement du support superieur ............................................................................. 34
Chargement du support inferieur ...............................................................................35
UTILISATION DE VOTRE LAVE-VAISSELLE ....................................................... 37
Programme pour pastilles à lave-vaisselle .................................................................37
Utilisation appropriee de detergent ...........................................................................37
Le distributeur d’aide de rincage ................................................................................39
Remplir le distributeur ................................................................................................. 39
Arrangement de l’aide de rincage ............................................................................... 40
Diagrammes des choix du cycle ..................................................................................40
LAVER DES ARTICLES SPECIAUX ...................................................................... 45
SOINS ET ENTRETIENS DU LAVE-VAISSELLE ................................................... 47
Nettoyez ....................................................................................................................... 47
Vidangez l’espace d’air ................................................................................................47
Emmagasinez ............................................................................................................... 48
Système de ltration ...................................................................................................48
DEPANNAGE ..................................................................................................... 49
GARANTIE LIMITÉE ...........................................................................................54
DOCUMENTS À CONSERVER
Merci d’avoir acheté ce produit Haier.
Ce manuel d’utilisation vous aidera
à obtenir la meilleure performance
possible de votre nouvelle lavevaisselle.
Pour référence ultérieure, inscrire le
numéro de plaque signalétique situé
sur le cadre à l’intérieur du lavevaisselle, et la date d’achat.
Pour faciliter l’obtention d’un service
sous garantie, agrafer la preuve de la
date d’achat à ce manuel.
___________________________________
Numéro de modèle
___________________________________
Numéro de série
___________________________________
Date d’achat
Page 30

28
SÉCURITÉ DU LAVE-VAISSELLE
Votre sécurité et celle des autres est très importante.
DANGER
AVERTISSEMENT
ATTENTION
Voici le symbole d’alerte de sécurité.
Ce symbole d’alerte de sécurité vous signale les
dangers potentiels de décès et de blessures graves à
vous et à d’autres. Tous les messages de sécurité
suivront le symbole d’alerte de sécurité et le mot
“DANGER,” “AVERTISSEMENT” ou “ATTENTION.”
Ces mots signifient :
Une situation de danger
imminent. Vous courez le risque
d’un décès ou de blessures
graves si vous ne suivez pas
immédiatement les instructions.
Une situation potentiellement
dangereuse qui, si vous ne
l’évitez pas, peut provoquer la
mort ou des blessures graves.
Une situation potentiellement
dangereuse qui, si vous ne
l’évitez pas, peut entraîner des
blessures légères à modérées.
Tous les messages de sécurité vous diront quel est le danger potentiel
et vous disent comment réduire le risque de blessure et ce qui peut se
produire en cas de non-respect des instructions.
Nous donnons de nombreux messages de sécurité importants dans ce
manuel et sur votre appareil ménager. Assurez-vous de toujours lire
tous les messages de sécurité et de vous y conformer.
Page 31

29
IMPORTANTES INSTRUCTIONS
DE SÉCURITÉ
AVERTISSEMENT : An de réduire le risque d’incendie, de choc
électrique, de blessures corporelles ou de dommage lors de l’utilisation
du lave-vaisselle, il convient d’observer certaines précautions
fondamentales, notamment :
•
Utilisez cet appareil
uniquement pour l’usage
auquel il est destine.
•
Utilisez les detergents
et agents de sechage
recommendes pour ce
lavevaisselle et gardez les loin
de la portee des enfants.
•
Quand vous chargez votre
lave-vaisselle:
1) Placez les objets
aigus de sorte qu’ils
n’endommagent pas la scel
lure de la porte;
2) Placez les couteaux aux
pointes aigus avec les
manches vers le haut pour
ne pas vous blesser.
•
Ne lavez pas les objets
en plastique dans le lavevaisselle , a moins qu’ils soient
marques “lavez dans le lavevaisselle”. Si les objets ne
sont pas marques, veriez
la recommendation du
fabricant.
•
Ne touchez pas l’element de
chauage durant ou après
l’usage.
•
N’operez pas le lave-vaisselle
a moins que toutes les
fermetures des panneaux
sont en place.
•
N’essayez pas de forcer les
controles.
•
N’abusez pas, ne vous
assoyez pas et ne vous tenez
pas debut sur la porte, sur le
couvert ou les etageres du
lave-vaisselle.
•
Pour reduire le risque des
blessures, ne permettez pas
aux enfants de jouer dans ou
sur le lave-vaisselle.
•
Sous certaines conditions,
le gaz hydrogene peut etre
produit dans un systeme
d’eau chaude qui n’a pas ete
utilise pendant 2 semaines ou
plus. LE GAS HYDROGENE
EST EXPLOSIF. Si le systeme
d’eau chaude n’a pas ete
utilise pour une periode
de temps, avant d’utiliser
votre lave-vaisselle, ouvrez
tous les robinets d’eau
chaude et laissez les couler
pour quelques minutes.
Ceci fera sortir n’importe
quelle accumulation de gaz
hydrogene. Comme le gaz est
enammable, ne fumez pas et
n’ouvrez aucune amme a ce
moment.
•
Ne pas utiliser un câble de
rallonge.
LIRE ET CONSERVER CES
INSTRUCTIONS
Page 32

30
INSTRUCCIONES DE CONEXIÓN
A TIERRA
Para una lavavajillas con cable
eléctrico y conexión a tierra:
La lavavajillas debe estar
conectada a tierra. En caso de
funcionamiento defectuoso o
avería, la conexión a tierra reduce
el riesgo de choque eléctrico al
establecer una ruta de menor
resistencia para la corriente
eléctrica. La lavavajillas viene
equipada con un cable eléctrico
que tiene un conductor para
conexión a tierra y un enchufe
con conexión a tierra. El enchufe
debe ser conectado a un
contacto apropiado que esté
instalado y conectado a tierra de
acuerdo con todos los códigos y
ordenanzas locales.
ADVERTENCIA: La conexión
inadecuada del conductor de
conexión a tierra puede resultar
en riesgo de choque eléctrico.
Pregunte a un electricista
calicado o a un agente de
servicio si no está seguro si la
lavavajillas está adecuadamente
conectada a tierra. No modique
el enchufe que viene con la
lavavajillas. Si no cabe en el
contacto, pida que un electricista
calicado instale un contacto
apropiado.
Para lavavajillas con conexión
permanente:
Esta lavavajillas debe estar
conectada a un sistema de
cableado de metal permanente,
conectado a tierra, o se debe
tender un conducto para la
conexión a tierra del equipo con
los conductores de circuito y
conectado a la terminal de tierra
del equipo o al conductor de
suministro de la lavavajillas.
GUARDE ESTAS INSTRUCCIONES
AVERTISSEMENT
Risque de basculement
Ne pas utiliser le lave-vaisselle jusqu’à ce qu’il soit complètement
installé.
Ne pas appuyer sur la porte ouverte.
Le non-respect de ces instructions peut causer des blessures graves
ou des coupures.
Page 33

31
AVERTISSEMENT
Risque de suffoquer
Avant de jeter votre ancien appareil, retirer la porte ou le couvercle de
façon à ce que les enfants ne puissent pas se cacher ou être coincés
dans l’ancien appareil.
Le non-respect de cette instruction peut causer un décès ou des
lésions cérébrales.
AVANT D’UTILISER VORTE LAVE-VAISSELLE
•
Installez le lave-vaisselle ou il est protege contre les elements. Protegez contre
la congelation pour eviter la possibilite d’une eruption du valve. La garantie ne
couvre pas ces eruptions. Voir la section “Emmagasinage” dan la section du
“Soin du lave-vaisselle” pour les informations d’emmagasinage pendant l’hiver.
•
Installez et levelez votre lave-vaisselle sur un plancher qui supportera le poids et
qui est dans un endroit approprie pour sa taille et son usage.
•
Enlevez toutes les prises de connection des tuyaux et connecteurs (comme
le chapeau sur la sortie d’egout) avant l’installation. Voir les instructions
d’installation pour vos informations.
CONFIGURATION REQUISE POUR L’ÉLECTRICITÉ
AVERTISSEMENT
Risque de choc électrique
Relier le lave-vaisselle à la terre d’une méthode électrique.
Brancher le fil relié à la terre au connecteur vert relié à la terre dans la
boîte de la borne.
Ne pas utiliser un câble de rallonge.
Le non-respect de ces instructions peut causer un décès, un incendie
ou un choc électrique.
Ce lave-vaisselle est conçu pour fonctionner sur un circuit individuel correctement
raccordé de 120 V, 60 Hz. Utiliser une alimentation électrique protégée par un
fusible de 15 A avec conducteurs de cuivre uniquement. L’utilisation d’un fusible
ou disjoncteur temporisé est recommandée, et fournir un circuit séparé pour
l’alimentation de cet appareil uniquement. La prise doit être placée dans le placard
contigu.
Page 34

32
PIECES ET CARACTERISTIQUES
a
b
c
d
e
k
l
f
h
i
j
g
a Panier supérieur non réglable
b Bras d’aspersion supérieur/bras
d’aspersion inférieur
c Panier inférieur
d Filtre principal
e Distributeur de détergent
f Tablette pour tasses
g Récipient pour pastilles à lave-
vaisselle
h Panier à couverts amovible
i Filtre grossier
j Distributeur d’agent de rinçage
k Vanne d’arrivée d’eau
l Boîtier de connexion
GUIDE POUR METTERE EN MARCHE
UTILISATION DE VOTRE NOUVEAU LAVE-VAISSELLE
1. L’aide de rincage est essentielle pour un bon sechage. Assurez vous de remplir le
distributeur avant d’utiliser votre nouveau lave-vaissselle. Chaque remplissage
durera environ entre 1 et 3 mois selon l’usage.
2. Eraez toute nourriture restante dans les plats et tous les articles durs comme
les curredents et les os. Vous n’avez pas besoin de rincer vos plats avant de les
mettre dans le lave-vaisselle.
3. Chargez votre lave-vaisselle correctement. (voir “Chargement
du lavevaisselle”) Placez les assiettes avec un espace entre
elles an que l’eau atteignent les surfaces sales. Assurez vous
que rien n’empeche les bras du jet de tourner librement.
Page 35

33
4. Ajoutez le detergent . Utilisez toujours un detegent de marque de qualite. (Voir
Utilisation du lave-vaisselle)
5. Fermez la porte.
6. Appuyez sur le cycle desire et la selection de votre choix. Le lave-vaisselle
commencera a se remplir quand vous appuyerez sur le cycle. Vous pouvez
choisir vos choix en meme temps que la machine se remplisse. (Voir Utilisation
du lave-vaisselle)
CHARGEMENT DE VOTRE LAVE VAISSELLE
SUGGESTIONS DE CHARGEMENT
•
Enlevez la nourriture restante, les os, les curredents, et tout autre objet des
plats. Pour conserver l’eau, l’energie, et economiser du temps, ce n’est pas
necessaire de rincer les plats avant de les placer dans le lave-vaisselle. Le
système de lavage est conçu pour retirer des particules de nourriture de l’eau.
Le système de lavage inclut un dispositif de hachage qui réduira la taille des
produits alimentaires.
•
C’est tres important que les bras du jet atteignent toutes les surfaces sales.
•
Chargez les plats de sorte qu’ils ne soient pas l’un sur l’autre si possible. Pour un
meilleur sechage, l’eau doit etre capable d’egouter de toutes les surfaces.
•
Chargez les casseroles et les poeles soigneusement. Les articles lourds peuvent
bosseler l’interieur de la porte en acier inoxydable s’ils sont laches.
•
Assurez vous que les couverts et manches des casseroles, les plaques de four
etc., n’interviennent pas avec la rotation du bras du jet.
Page 36

34
•
Conservez l’eau, l’energie et economisez du temps en courant un cycle de
rincage pour garder les plats humides si vous ne projetez pas de les laver
bientot. La nourriture comme les oeufs, le riz, la pate, les epinards et le cereale
cuisine peuvent etre dicile a retirer s’ils sont laisses dans les plats de cote pour
une longue periode de temps.
CONSEILS POUR UNE OPERATION SILENCIEUSE
Pour eviter les bruits bruyants durant l’operation:
•
Assurez vous que les articles legers sont places securement dans les supports.
•
Assurez vous que les couverts, les manches, les plaques de four, les plateaux
de pizza, etc.. ne touchent pas l’interieur des murs du lave-vaisselle et
n’interviennent pas avec la rotation des bras du jet.
•
Chargez les plats de sorte qu’ils ne touchent pas l’un l’autre.
REMARQUE : Pour les models encastres, gardez le bouchon de vidange de l’evier
ferme durant l’operation du lave-vaisselle pour eviter les bruits de transfert a
travers les egouts
CHARGEMENT DU SUPPORT SUPERIEUR
Le support superieur est concu pour les tasses, les verres et les petits objets. (Voir
chargement recommende)
Charge pour 8 couverts Chargement de tasses et de verres
REMARQUE : Les caracteristiques du support de votre lave-vaisselle peuvent varier
des dessins montres.
•
Placez les articles avec l’ouverture vers le bas pour un meilleur nettoyage et
sechage.
•
Chargez les tasses et verres dans le support superieur seulement. Le support
inferieur n’est pas concu pour les tasses et verres. Des dommages peuvent
occurer.
•
Placez les verres et tasses dans les rangees entre les dents. Si vous les placez
sur les dents, vous risquez une rupture et des taches d’eau sur les articles.
•
Les petits bols, le poelles et autres ustensils peuvent etre places sur le support
superieur. Placez les bols au centre pour une meilleure stabilite.
Page 37

35
•
La porcelaine, le cristal et d’autres articles fragiles ne doivent pas se toucher
quand le lave-vaisselle fonctionne. Des dommages peuvent occurer.
•
Placez les verres et tasses dans les rangees entre les dents. Si vous les placez
sur les dents, vous risquez une rupture et des taches d’eau sur les articles.
•
Chargez les articles en plastique d’une facon que la force des jets d’eau ne les
deplace pas durant le cycle.
ÉTAGÈRE DE TASSE AVEC LE DISPOSITIF PROTECTEUR DE TIGE
Rabattre la tablette supplémentaire du côté droit du panier supérieur pour y placer
des tasses ou verres à pied supplémentaires ou de longs articles tels que des
ustensiles et spatules.
CHARGEMENT DU SUPPORT INFERIEUR
Le support inferieur est concu pur les plats, les poelles, les casseroles et ustensils.
(Voir chargement recommende).
Charge de ustensile
•
Ne chargez pas les verres, tasses ou des articles en plastique dans le support
inferieur. Chargez des petits articles dans le support inferieur seulement s’ils
s’ont places securement.
•
Chargez les plats, les bols de soupe etc., dans les entrailles.
•
Recouvrez les bords des plats pour un grand chargement.
•
Chargez les bols de cereale, de soupe, les bols a servir dans le support
dans plusieurs positions dependant de leur taille et forme. Chargez les bols
securement dans les entrailles.
Page 38

36
•
Charger les plaques à biscuits, moules à gâteaux et autres gros articles sur les
côtés et à l’arrière. N’accumulez pas les bols, car le jet ne pourra pas atteindre
toutes les surfaces.
•
Placez les ustensils de cuisine sales securement vers le bas du support.
•
Assurez vous que les manches et autres articles n’atteignent pas les bras du jet.
Les bras doivent tourner librement.
•
Ne chargez pas des articles entre le support inferieur et le cote du baquet du
lave-vaisselle pour ne pas bloquer l’ouverture d’admission d’eau.
REMARQUE : Tournez les bras du jet. Assurez vous que les articles dans le panier
n’arretent pas la rotation du bras du jet.
CHARGEMENT DU PANIER D’ARGENTERIE
Vous pouvez charger le panier d’argenterie tandisqu’il
est dans le support inferieur ou enlevez le et placez
le sur le compteur ou table pour le chargement. (Voir
model de chargement recommende.)
REMARQUE : Videz ou retirez le panier avant de videz les
clayettes pour éviter que des gouttes d’eau ne tombent
sur les couverts.
•
Chargez les article avec couverts vers le bas, en
utilisant les separateurs pour eviter l’accumulation
de l’argenterie.
•
Placez les petits articles, comme les couverts des
biberon, les couvercles des ols, le support des
mais etc… dans les sections aux couverts articules.
Fermez les couverts pour garder les petits articles
en place.
Charge mixte
Quand les couverts sont
ouverts, melangez les articles
dans chaque section du panier,
certains diriges vers le bas,
d’autres vers le haut pour
eviter l’accumulation. Le jet ne
peut pas atteindre les articles
accumules.
IMPORTANT: Chargez toujours
les articles pointus, (couteaux,
brochettes etc...) vers le bas.
S’assurer que rien ne dépasse
du fond du panier qui pourrait
bloquer le bras d’aspersion.
REMARQUES:
•
Ne chargez pas l’argenterie
en argent ou argent plaque
avec l’argenterie en acier
inoxydable. Ces metaux
peuvent etre endomages par
le contact avec l’un l’autre
durant le lavage.
2 4 5 1
4 5 1
2 4 5 1
2 4 5 1
4 5 1
2 4 5 4
2 4 5 7
3 5
2 3 3 1
2 3 3 1
3 3 1
2 3 6 6
1. Fourchettes à
salade
2. Cuillères à thé
3. Cuillères à
soupe
4. Fourchettes de
table
5. Couteau
6. Cuillère de
service
7. Fourchette de
service
Page 39

37
•
Certaines nourritures (comme le sel,vinaigre, produits laiteux, jus de fruits etc...)
peuvent piquer ou corroder l’argenterie. Parcourez un cycle de rincage si vous
n’avez pas assez pour un lavage complet.
UTILISATION DE VOTRE LAVE-VAISSELLE
PROGRAMME POUR PASTILLES À LAVE-VAISSELLE
Votre modèle de lave-vaisselle possède un programme pour pastilles à lavevaisselle Le programme pour pastilles à lave-vaisselle utilise des pastilles à lavevaisselle à la place du détergent et de l’agent de rinçage.
REMARQUE : N’utiliser le programme pour pastilles à lave-vaisselle que si l’on
utiliser des pastilles à lave-vaisselle. Si des pastilles à lave-vaisselle sont utilisées
avec d’autres programmes, le lave-vaisselle n’orira pas de bonnes performances.
1. Accrocher le récipient pour pastilles à lave-vaisselle sur le panier à vaisselle
supérieur.
a Récipient pour pastilles
à lave-vaisselle
2. Faire pivoter le bras d’aspersion supérieur, et, si nécessaire, déplacer le récipient
de manière à ne pas bloquer le bras d’aspersion.
3. Placer la pastille à lave-vaisselle dans le récipient et lancer le programme pour
pastilles à lave-vaisselle.
Si l’on choisit d’utiliser du détergent et de l’agent de rinçage, consulter les
instructions d’utilisation suivantes.
UTILISATION APPROPRIEE DE DETERGENT
Utilisez seulement un detergent fait specialement pour les lave-vaisselles.
Gardez les detergents frais et secs. Ne mettez pas le detergent en poudre dans le
dispenseur jusqu’a ce que vous soyez prets a laver vos plats.
Tous les programmes de lavage, à l’exception de RINSE ONLY (rinçage uniquement)
nécessitent l’ajout de détergent dans le distributeur de détergent.
Page 40

38
DISTRIBUTEUR DE DETERGENT
Le distributeur de detergent a 2 sections.
a
bc
a Bouton du couvercle
b Section pour doses
de 25 grammes
c Section pour doses
de 15 grammes
Le distributeur de détergent libère automatiquement le détergent dans le lavevaisselle durant le programme de lavage. (Voir le “Tableau de sélection des
programmes”)
•
Utilisez un detergent pour un lavage automatique . Autres detergents
peuvent produire une mousse de savon excessive qui pourra deborder hors du
lavevaisselle et reduire l’execution de lavage.
•
Ajoutez le detergent juste avant de commencer le cycle .
REMARQUE : Ne pas utiliser de détergent avec un programme de rinçage.
•
Fermez bien et gardez le detergent dans un endroit frais et sec. Les detergents
frais resultent dans un meilleur nettoyage.
REMPLIR LE DISPENSEUR
1. Si le couvert du distributeur est ferme, ouvrez le en poussant sur le verrou du
couvert.
2. Remplir de détergent le ou les compartiment(s) du distributeur de détergent.
REMARQUE : Voir les “Tableaux de sélection des programmes” pour connaître
les quantités recommandées de détergent.
a
a Bouton du couvercle
3. Fermez le couvert du distributeur.
C’est normal pour le couvert s’ouvre partiellement en distribuant le detergent.
Page 41

39
QUANTITEE DE DETERGENT A UTILISER
Voir “Sélection de cycle” graphique.
•
La quantitee de detergent a utiliser depend de la durete de votre eau et le genre
de detergent. Si vous utilisez tres peu, les plats ne seront pas propres. Si vous
utilisez trop et votre eau est trop douce, les verreries graveront.
•
Les dierentes marques de detergent ont dierente quantitee de phosphore
pour adoucir l’eau. Si votre eau est dure et vous utilisez un detergent contenant
un phospore de moins de 8.7% , il faut augmenter le detergent ou utiliser un
detergent contenant un phosphore de pluse de 8.7%.
LE DISTRIBUTEUR D’AIDE DE RINCAGE
Le distributeur d’aide de rincage empeche l’eau de former des goutelettes qui
peuvent secher comme taches ou stries. Ils ameliorant egalement le sechage en
permettant a l’eau d’egoutter des plats durant le rincage nal et en dechargeant un
peu de l’aide de rincage dans l’eau de rincage. Votre distributeur d’agent de rinçage
est conçu pour utiliser un agent de rinçage liquide. N’utilisez pas le type d’une barre.
REMPLIR LE DISTRIBUTEUR
Le distributeur d’aide de rincage contient 3.4 oz ( 100 ml) d’aide de rincage. Sous
les conditions normales, ceci durera pour a peu pres 3 mois. L’aide de rincage est
relache a trvers une ouverture dans le distributeur. N’attendez pas a ce qu’il soit
vide pour le remplir. Essayez de le garder plein, et faites attention a ne pas le remplir
au dessus du niveau.
Remplissage du distributeur d’agent de rinçage :
1. Assurez vous que la porte du lave-vaisselle est ouverte completement.
2. Tourner le couvercle du distributeur d’agent de rinçage sur la èche gauche
(position ouverte) et retirer en tirant vers le haut.
a
b
c
a Indicateur de
remplissage
b Paramètre réglable
c Couvercle du
distributeur
3. Verser l’agent de rinçage dans le distributeur jusqu’à ce qu’il soit rempli à ras
bord.
4. Nettoyez n’importe quelle aide de rincage renversee a l’aide d’un tissu humide.
5. Remplacer le bouchon de liquide de rinçage, puis tourner le bouchon dans le
sens horaire pour fermer.
Page 42

40
ARRANGEMENT DE L’AIDE DE RINCAGE
Le montant d’aide de rincage relache dans le lavage nal peut etre ajuste.
L’arrangement d’usine est a 2. Pour la plupart des conditions d’eau, arranger
l’ajusteur a 2 ou 3. S’il y a des cercles d’eau ou des taches de calcium (eau
calcareuse), essayez un arrangement plus eleve.
a
a Paramètre réglable
Pour ajuster l’arrangement :
Retirer le bouchon du distributeur. Tournez l’ajusteur en dedans du distributeur a
l’arrangement desire.
DIAGRAMMES DES CHOIX DU CYCLE
Sélectionnez le cycle de lavage et les options désirées. Le lave-vaisselle commence
à se remplir une fois que la porte est fermée et que vous appuyez sur un cycle, à
moins que vous ne sélectionniez le lavage diéré. Après le remplissage, et un bref
temps de lavage, la machine fera une pause de 5 minutes pour un intervalle de
trempage d’économie d’énergie. Pendant ce temps, les particules de saleté séchées
sont ramollies pour un retrait plus facile plus tard durant le cycle de lavage. Vous
pouvez sélectionner les options au fur et à mesure que la machine se remplit.
A “
•
” vous indique combien d’etapes il y a dans chaque cycle. Les temperatures
vous indiquent ou le surplus de chaleur est ajoute. L’usage d’eau est marquee en
U.S gallons / litres .
Ce model rencontre l’ENERGIE STAR des derectives pour l’ecacite energetique.
La durée de cycle n’inclut pas le temps sec. Un asterisque (*) devant la duree du
cycle indique la duree du cycle peut etre plus longue dependant de la temperature
de l’eau penetrant le lave-vaisselle.
Page 43

41
a b c d e f
gh
a Témoins lumineux de mise en
marche diérée/étapes de lavage :
Lorsque l’on programme une mise
en marche diérée (de 3, 6, 9 ou
12 heures), un témoin lumineux
s’allume pour indiquer l’heure de
mise en marche diérée. Lorsque le
lave-vaisselle fonctionne, un témoin
s’illumine pour indiquer les étapes
du programme de lavage.
b Bouton Delay (mise en marche
diérée) : Appuyer pour diérer la
mise en marche.
c Témoins lumineux de cycle: Pour
indiquer le programme de lavage.
d Bouton Cycle : Pour sélectionner l’un
des six programmes de lavage.
e Témoin lumineux Rinse Aid (agent
de rinçage) Pour indiquer le moment
où le distributeur d’agent de rinçage
doit être rempli.
f Témoin lumineux d’alimentation :
Pour indiquer que le lave-vaisselle
est alimenté.
g Bouton On/O (marche/arrêt) :
Pour mettre l’appareil sous ou hors
tension.
h Bouton Start/Pause (mise en
marche/pause) Pour mettre en
marche le programme de lavage
sélectionné ou pour interrompre le
programme de lavage après sa mise
en marche.
Pre-
lavage
En Second
Lieu
Lavage
Lavage
Principal
Rincage Sechage Duree
(min)
Utilisation
d’eau
(gal/L)
127° F (53° C) 154° F (68° C)
120 3.7
Utilisez pour tous les types
de sols et des charges de
vaisselle.
Remplir les deux
compartiments de
détergent.
122° F
(59° C)
127° F
(53° C)
149° F
(65° C)
130 4.6
Utilisez ce cycle difficiles à
nettoyer, cuite au four,
ustensiles de cuisine et plus
difficile que les conditions
normales de l'eau.
Remplir les deux
compartiments de détergent.
Rinçage
nal
chauée
Pre-
lavage
En
Second
Lieu
Lavage
Lavage
Principal
Rincage Sechage Duree
(min)
Utilisation
d’eau
(gal/L)
Page 44

42
127° F
(53° C)
149° F
(65° C)
105 3.65
Utilisez ce programme pour des charges comportant des
quantités normales de débris alimentaires.
(L'étiquette énergie-utilisation est
basée sur ce programme.) Pendant
le lavage principal , l'action de
lavage fera des pauses répétées
pendant plusieurs secondes.
Remplir les deux compartiments de détergent.
Pre-
lavage
Lavage
Principal
Rincage Sechage Duree
(min)
Utilisation
d’eau
(gal/L)
Rinçage
nal
chauée
122° F
(50° C)
140° F
(60° C)
90 3.67
Utilisez ce cycle pour un lavage léger . Ce cycle utilise
un lavage léger et délicat .
Pendant la chauffe à sec , les
cycles des éléments de
chauffage sur et en dehors.
Remplissez 25 compartiment de gramme.
Rinçage
nal
chauée
Pre-
lavage
Lavage
Principal
Rincage
Sechage Duree
(min)
Utilisation
d’eau
(gal/L)
122° F
(50° C)
131° F
(55° C)
55 2.75
Utilisez ce cycle pour un lavage rapide et sec léger
pour nettoyer ustensiles de
cuisine avant de se divertir.
Remplissez 25 compartiment
de gramme.
Rinçage
nal
chauée
Pre-
lavage
Lavage
Principal
Rincage
Sechage Duree
(min)
Utilisation
d’eau
(gal/L)
122° F
(53° C)
25 1.9
Utilisez ce cycle de rinçage pour
rincer la vaisselle , les verres
et l'argenterie qui ne seront
pas lavés immédiatement .
Aucun détergent nécessaire.
Rinçage
nal
chauée
Pre-
lavage
En
Second
Lieu
Lavage
Lavage
Principal
Rincage Sechage Duree
(min)
Utilisation
d’eau
(gal/L)
•
Si la température de l’eau d’arrivée est inférieure à celle recommandée ou
que la vaisselle est très sale, le programme compensera automatiquement en
allongeant la durée du programme et en augmentant la quantité d’eau et le
chauage, au besoin.
Page 45

43
ANNULATION D’UN CYCLE
N’importe quand durant le cycle, appuyez
Votre lave-vaisselle debutera un drainage de 2 minutes (si necessaire).
Permettez au lave-vaisselle de drainer completement. Les lumieres
s’atteigneront après 2 minutes.
REMARQUE : Si votre lave-vaisselle n’a pas besoin d’etre draine, appuyez START/
PAUSE (début/pause) une fois de plus pour eteindre les lumieres. Choisissez un
nouveau cycle et options.
Pour arreter le drainage
Vous pouvez appuyer sur début/PAUSE une fois de plus pour arreter le drainage
immediatement. N’oubliez pas de drainer votre lave-vaisselle avant de debuter un
nouveau cycle.
Pour nettoyer les indicateurs
Appuyez START/PAUSE (début/pause) avant de debuter le lave-vaisselle pour
nettoyer tous lescycles et options.
CHANGER UN CYCLE OU REGLAGE
Durant la premiere susance du cycle
1. Appuyez sur le nouveau cycle.
2. Veriez les distributeurs deterifs. Ils doivent etre remplis proprement pour le
nouveau cycle.
Apres la premiere susance du cycle
1. Appuyez START/PAUSE (début/pause).
Le lave-vaisselle commence une vidange de 2 minutes (au besoin). Laisser
le lave-vaisselle évacuer l’eau complètement. Le témoin s’éteint après
2minutes.
REMARQUE : Si votre lave-vaisselle n’a pas besoin de vidange, appuyer sur START/
PAUSE (mise en marche/pause) encore une fois pour éteindre le témoin.
1. Examiner les distributeurs de détergent. Ils doivent être convenablement
remplis pour le nouveau programme.
2. Appuyer sur un nouveau programme.
AJOUTEZ UN ARTICLE DURANT LE CYCLE
Vous pouvez ajouter un article avant le debut du lavage principal. Ouvrez la porte et
veriez la ported u distributeur deterif. Si la porte est toujours fermee, ajoutez votre
article.
Pour ajouter les articles
1. Soulevez le verrou de la porte pour arreter le cycle. Attendez pour que l’action
de pulverisation s’arrette avant d’ouvrir la porte completement.
2. Ouvrez la porte. Si la porte du distributeur deterif est toujours fermee, ajoutez
votre article.
3. Fermez la porte fermement jusqu’a ce qu’elle se verouille. Le lave-vaisselle
resumera le cycle après une pause de 10 secondes.
Page 46

44
DELAY
Utilisez cette option pour faire fonctionner votre lave-vaisselle plus tard ou
pendant les heures creuses. Vous pouvez ajouter des items au lave-vaisselle
à tout moment avant le démarrage de celui-ci. Après avoir ajouté un item,
refermez la porte jusqu’à ce qu’elle s’enclenche.
Vous pouvez décaler de jusqu’à 12 heures le début d’un cycle de lavage, par
intervalle de 3 heures (3h, 6h, 9h ou 12h).
Pour décaler le démarrage
1. Appuyez sur le bouton “Delay Start” jusqu’à ce que le nombre d’heures voulu soit
illuminé par un indicateur DEL à la gauche. Lorsque le décalage dépasse 12h, il
s’éteint. Appuyez de nouveau sur le bouton pour choisir le nombre d’heures de
décalage voulu.
2. Choisissez le cycle de lavage.
REMARQUE : Pour annuler le décalage et le cycle, appuyez sur le bouton START/
PAUSE. Pour annuler le décalage et démarrer le cycle immédiatement, appuyez sur
Delay Start jusqu’à ce qu’il n’y ait aucun indicateur DEL d’illuminé à gauche.
SYSTEME DU LAVAGE
Un intervalle de trempage économie d’énergie est utilisé pour la plupart des cycles
peu de temps après le remplissage d’eau initial. Pendant les 5 minutes de trempage
les particules de nourriture séchée sont ramollies sans utiliser d’énergie. Plus tard
durant le cycle, l’action de lavage intense retire les particules de nourriture ramollies
de façon plus ecace. Le système de lavage à six niveaux fournit des résultats de
lavage excellents.
Trois niveaux de ltration et un système de collecte des saletés ltre l’eau de lavage
et empêche les particules de nourriture de se redéposer sur la vaisselle propre.
•
L’eau de lavage circule de façon continue dans le ltre, bloquant les particules
alimentaires.
•
Un tamis brut empeche les os, les noyaux et d’autres grands objets de penetrer
dans le systeme de pompe.
REMARQUE : De temps en temps examinez le tamis brut et enlevez n’importe
quels.
Page 47

45
LAVER DES ARTICLES SPECIAUX
Si vous doutez le nettoyage d’un article particulier, demandez au fabricant si cet
article est lavable dans le lave-vaisselle.
Matériel Utilisable au lave-vaisselle/Commentaires
Aluminum Oui
Haute temperature d’eau et detergents peuvent aecter la
nition de l’aluminium anodise.
Aluminium jetable Non
Ne pas laver plateaux en aluminium dans le lavevaisselle. Ils
peuvent se deplacer et tranferer les marques noires sur les
plats.
Bouteilles – Boites Non
Lavez les a la main. Les etiquettes collees peuvent se
detacher et obstruer les bras du jet ou la pompe et reduira
l’execution de lavage.
Fonte Non
L’assaisonnement sera enlenve et le fer se rouillera.
Porcelaine/
Poterie de gres
Oui
Avant de laver veriez la recommendation du fabricant.
L’antiquite les articles peints a la main, les motifs emailles
peuvent se faner et les articles de feuille d’or peuvent se
decolorer et se faner.
Cristal Oui
Avant de laver , veriez la recommendation du fabricant.
Un certain type de cristal plombe peut graver a l’eau forte a
force de laver.
Or Non
L’argenterie coloree en or se decolorera
Verrerie Oui
Les verres pour le lait jaunisseront apres un lavage frequent
dans le lave- vaisselle.
Couteau au
poigne creux
Non
Les poignees de quelques couteaux sont attachees a la lame
avec un adhesif qui pourra se detacher une fois lavees dans le
lave-vaisselle.
Page 48

46
Matériel Utilisable au lave-vaisselle/Commentaires
L’etain, l’eton et le
bronze
Non
Haute temperature d’eau et detergent risquent de decolorer
et trouer la nition.
Plastiques
jetables
Non
Ne peuvent pas supporter la haute temperature d’eau et
detergents.
Plastiques Oui
Avant de laver, verier la recommendation du fabricant.
Les plastiques changent dans leur capacite de resister aux
temperatures elevees de l’eau et detergent.
Acier inoxydable Oui
Parcourez un cycle de rincage si vous n’avez pas l’intention
de les laver immediatement. Le contact de la nourriture
prolongee comme le sel, vinaigre, produits laiteux ou des jus
de fuit peut endommager la nition.
Argent sterling ou
plaqué
Oui
Parcourez un cycle de rincage si vous n’avez pas l’intention
de les laver immediatement. Un contact prolonge avec
la nourriture contenant le sel, l’acidite, sulde, (oeuf,
manyonnaise, fuits de mer) peuvent endommager la nition.
Fer blanc Non
Pourra se rouillert.
Ustensiles en bois Non
Lavez a la main. Avant de laver veriez les instructions du
fabricant. Le bois non traite peut se fendre, deformer ou
perdre sa nition.
Page 49

47
SOINS ET ENTRETIENS DU LAVE-VAISSELLE
NETTOYEZ
NETTOYEZ L’EXTERIEUR
En general, l’utilisation d’un tissu doux,humide ou une eponge avec un detergent
doux est susante pour garder l’exterieur de votre lave-vaisselle propre.
NETTOYEZ L’INTERIEUR
L’eau calcareuse peut causer une accumulation du lme blanc sur les surfaces
interieures , speciallement sous la porte.
Nettoyez l’interieur du lave vaisselle une fois refroidi. Portez des gants en
caouchouc. Utilisez seulement un detergent special pour le lave-vaisselle, pour
ne pas causer une mousse de savon.
Pour nettoyer l’interieur
Faites une pate avec le detergent en poudre du lave-vaisselle sur une eponge
humide et nettoyez.
OU
Utilisez un detergent liquid pour le lave-vaisselle et nettoyez a l’aide d’une eponge
humide.
OU
Voir le proces du vinaigre dans le “Taches et mousses sur les assiettes” dans le
“Depannage “.
REMARQUE : Parcourez un cycle normal avec le detergent apres avoir nettoyer
l’interieur.
VIDANGEZ L’ESPACE D’AIR
Veriez le drain d’espace d’air quand votre lave vaisselle ne draine pas
proprement. Quelques Etats ou les codes de plomberie exigent une addition de
drain d’espace d’air entre le lave-vaisselle incorpere et le systeme du drain de la
maison. Si le tuyau de vidange est bouche, l’espace d’air du vidange protegera
votre lave-vaisselle.
Le drain d’espace d’air est situe au dessus du levier pres du lave-vaisselle.
REMARQUE : Le drain d’espace d’air est un dispositif externe de plomberie qui ne
fait pas partie de votre lave-vaisselle. La garantie de votre lave-vaisselle ne couvre
pas les frais de reparation ou nettoyage du drain d’espace d’air.
Nettoyer votre drain d’espace d’air
Nettoyez votre drain d’espace d’air periodiquement pour assurer un propre
drainage. Suivez les instructions de nettoyage fourni par le fabricant. Pour la plupart
des types de lave-vaisselle:
1. Enlevez la couverture de chrome. Devissez le couvert en plastique.
Page 50

48
2. Assurez vous qu’il n’y a pas une accumulation de salete. Nettoyez si necessaire.
EMMAGASINEZ
Emmagasinez pendant les mois d’ete
Protegez votre lave-vaisselle pendant les mois d’ete en fermant l’approvisionement
de l’eau et electricite.
Destearinisation de votre lave-vaisselle
Protegez votre lave-vaisselle et domicile contre les dommages de l’eau provoques
par la congelation des lignes de ottaison. Si votre lave-vaisselle est dans un
logement saisonier ou pourrait etre expose aux temperatures de congelation, faites
destearniser votre lave-vaisselle par un personnel de service autorise.
SYSTÈME DE FILTRATION
Pour votre confort, nous avons placé la pompe de vidange et le système de ltration
dans la cuve de manière à ce qu’ils soient facilement accessibles. Le système de
ltration comporte trois composants : le ltre principal, le ltre grossier et le ltre
n.
a
b
c
a Filtre grossier
b Filtre principal
c Filtre n
A. Filtre grossier
Les objets plus gros, comme par exemple les morceaux d’os ou de verre pouvant
boucher le système d’évacuation sont retenus dans le ltre grossier. Pour retirer un
objet pris dans ce ltre, pincer doucement les pattes en haut du ltre et soulever.
B. Filtre principal
Les particules d’aliments et de saletés retenues dans ce ltre sont pulvérisées par
un jet spécial du bras d’aspersion inférieur et évacuées dans le système de vidange.
C. Filtre n
Ce ltre retient les résidus de saleté et d’aliments dans le fond de la cuve et les
empêche de se redéposer sur la vaisselle pendant un programme.
Page 51

49
NETTOYAGE DES FILTRES
2
3
1
Ouvert
Étape 1. Tourner le ltre dans le sens antihoraire, puis le soulever.
Étape 2. Soulever le ltre principal
Étape 3. Soulever le ltre n
REMARQUE : Répéter les étapes 1 à 3 à l’envers pour remettre les ltres en place.
DEPANNAGE
Essayez tout d’abord les solutions suggerees ici et evitez les couts pour le service
de reparation...
VOTRE LAVE-VAISSELLE NE FONCTIONNE PAS CORRECTEMENT
•
Le lave-vaisselle ne fonctionne pas ou s’arrête pendant un cycle
Il est normal dans la plupart des cycles qu’il y ait une pause de 5 minutes vers le
début d’un cycle pour laisser la vaisselle tremper. Cela réduit l’énergie nécessaire
pour laver la vaisselle.
Est-ce que la porte est bien fermée et bloquée ?
Est-ce que le bon cycle est sélectionné ? Reportez-vous à la section des
tableaux “Sélection des cycles”.
Est-ce que lave-vaisselle est bien branché? Est-ce qu’un fusible a disjoncté ou le
disjoncteur s’est enclenché ?
Est-ce que le moteur s’est arête à cause d’un débordement? Le moteur se
réenclenche automatiquement en quelques minutes. S’il ne se remet pas en
marche, appelez pour le service de maintenance.
Est-ce que le robinet de sectionnement (si installé) est en marche ? Il est normal
pour certains cycles de faire une pause de 15 à 65 secondes de façon répétitive
pendant le lavage principal.
•
Le lave-vaisselle ne se remplit pas
Si le otteur de protection est capable de bouger de haut en bas librement?
Appuyez dessus pour le relâcher.
•
Le lave-vaisselle semble fonctionner trop longtemps
Est-ce que l’eau fournie au lave-vaisselle est susante? Le lave-vaisselle
fonctionne plus longtemps pendant qu’il chaue l’eau. Reportez-vous à la
section “Conseils de performance du lave-vaisselle.” Un délai se produit
automatiquement dans certains cycles de lavage et de rinçage jusqu’à ce que
l’eau atteigne la bonne température.
Page 52

50
•
L’eau reste dans le lave-vaisselle
Est-ce que le cycle est terminé et pas en mode pause ?
C’est normal qu’il y ait une petite quantité d’eau propre autour de la sortie d’eau
au fond du tube, pour garder le joint d’eau lubrié.
Si le tuyau de vidange est relié à un broyeur à déchets, assurez-vous que le
distributeur est vide.
Assurez-vous que le bouchon pour ouverture de boite de jonction a été retiré du
broyeur à déchets.
Vériez si le tuyau d’évacuation est entortillé.
•
Le detergent demeure dans la section du distributeur
Est-ce que le cycle est au complet?
Est-ce que le detergent est sans grumeaux? Replacez le si necessaire.
Un article de vaisselle bloquait-il le distributeur?
•
L’eau residue sur le devant du panneau d’acces
Avez vous utilisez une grande quantite de detergent? ( Voir la section du
distributeur de detergent )
Est-ce que la marque du detergent fait trop de mousse de savon ? Essayer une
autre marque pour reduire la mousse de savon et eliminez l’accumulation.
•
Une odeur dans le lave-vaisselle
Est-ce que vous lavez les assiettes tous les 2 ou 3 jours? Parcourez le cycle de
rincage 1 ou 2 fois par jour jusqu’a que vous ayez un chargement complet.
Est-ce que le lave-vaisselle a une odeur d’un nouveau plastique? Parcourez un
cycle de rincage avec du vinaigre comme decrit dans le guide de depannage
“Taches et lme sur les assiettes”.
•
Condensations sur le comptoir de la cuisine. (Models incorpores)
Est-ce que le lave-vaisselle aligne proprement avec le comptoir? La vapeur du
passage de la console peut se former sur le comptoir. (Voir Information pour les
instructions d’installation)
LA VAISSELLE N’EST PAS COMPLÈTEMENT NETTOYÉE
•
Résidus de produits alimentaires sur la vaisselle
La vaisselle est-elle chargée correctement? Voir la section “Chargement du
lave-vaisselle.” Avez-vous choisi le programme du lave-vaisselle correspondant
au niveau de saleté le plus élevé? Si certains des articles sont plus sales que
d’autres, utiliser alors un programme plus intensif.
La température de l’eau est-elle trop basse? Pour de meilleurs résultats de
lavage, l’eau doit être à 120 °F (49 °C) à son entrée dans le lave-vaisselle. Voir la
section “Conseils d’ecacité pour le lave-vaisselle.”
A-t-on utilisé la bonne quantité de détergent frais? Utiliser uniquement les
détergents recommandés pour lave-vaisselle. Voir la section “Distributeur
de détergent.” Ne jamais employer moins d’une cuillerée à soupe (15 g) par
charge. Pour qu’il soit ecace, il faut que le détergent soit frais. Remiser le
détergent dans un endroit frais et sec. Une vaisselle très sale et/ou une eau dure
nécessitent généralement un supplément de détergent.
Page 53

51
Y a-t-il des grumeaux de détergent dans le distributeur? Utiliser uniquement un
détergent frais. Ne pas laisser le détergent pendant plusieurs heures dans un
distributeur humide. Nettoyer le distributeur lorsqu’il s’y trouve des grumeaux
de détergent.
La pompe ou le bras d’aspersion est-elle/il obstrué(e) par des étiquettes de
bouteilles et de cannettes? Pour le lavage de bouteilles et de cannettes, veiller à
ce que les étiquettes n’obstruent pas la pompe ou le bras d’aspersion.
La pression d’eau du domicile est-elle susamment élevée pour un remplissage
convenable du lave-vaisselle? La pression d’eau du domicile devrait être de 20
à 120 lb/po2 (138 à 828 kPa) pour un remplissage adéquat du lave-vaisselle.
Si la pression est insusante, il peut être nécessaire d’installer une pompe de
surpression.
Une accumulation de mousse ralentit-elle le bras d’aspersion? Ne jamais
utiliser de savon ou de détergent à lessive. Utiliser uniquement les détergents
recommandés pour lave-vaisselle.
PRÉSENCE DE TACHES SUR LA VAISSELLE
•
Taches et lms sur la vaisselle
L’eau est-elle dure ou contient-elle une concentration élevée de minéraux?
Le conditionnement de l’eau de rinçage nale avec un agent de rinçage liquide
favorise l’élimination des taches et lms. Veiller à ce que le distributeur d’agent
de rinçage soit rempli. Toujours utiliser une option de température élevée. Si
la dureté de l’eau de votre domicile est de 13 grains ou plus, il est fortement
recommandé d’installer un adoucisseur d’eau à votre domicile. Si vous ne
souhaitez pas boire d’eau adoucie, faites installer un adoucisseur d’eau sur votre
alimentation en eau chaude.
La température de l’eau est-elle trop basse? Pour de meilleurs résultats de
lavage, l’eau doit être à 120 °F (49 °C) à son entrée dans le lave-vaisselle.
A-t-on utilisé la bonne quantité de détergent frais? Utiliser uniquement les
détergents recommandés pour lave-vaisselle. Voir la section “Distributeur
de détergent.” Ne jamais employer moins d’une cuillerée à soupe (15 g) par
charge. Pour qu’il soit ecace, il faut que le détergent soit frais. Remiser le
détergent dans un endroit frais et sec. Une vaisselle très sale et/ou une eau dure
nécessitent généralement un supplément de détergent.
La pression d’eau du domicile est-elle susamment élevée pour un remplissage
convenable du lave-vaisselle? La pression d’eau du domicile devrait être de 20
à 120 lb/po2 (138 à 828 kPa) pour un remplissage adéquat du lave-vaisselle.
Si la pression est insusante, il peut être nécessaire d’installer une pompe de
surpression.
REMARQUE: Pour éliminer les taches et lms sur la vaisselle, essayer
un rinçage avec de l’eau vinaigrée. Cette méthode ne doit être utilisée
qu’occasionnellement. Le vinaigre est un acide et son utilisation trop fréquente
pourrait endommager le lave-vaisselle.
1. Verser 2 tasses (500 mL) de vinaigre blanc dans un verre ou une tasse à
mesurer lavable au lave-vaisselle dans le panier inférieur.
2. Faire exécuter au lave-vaisselle un programme de lavage complet. Ne pas
utiliser de détergent à linge. Le vinaigre se mélangera à l’eau de lavage.
Page 54

52
•
Film de silice ou attaque (le lm de silice est un dépôt blanc irisé; l’attaque
produit l’apparence d’un lm translucide)
Il y a parfois une réaction chimique de l’eau avec certains types de verres. Ceci
est habituellement imputable à certaines combinaisons d’eau douce ou adoucie,
à une solution de lavage alcaline, à un rinçage insusant, à un chargement
excessif du lave-vaisselle ou à la chaleur de séchage. Il peut être nécessaire de
laver manuellement ces articles pour éliminer complètement le problème.
Pour ralentir ce processus, utiliser la quantité minimale de détergent, mais
pas moins de 1 cuillerée à soupe (15 g) par charge. Utiliser un agent de rinçage
liquide, et ne pas trop charger le lave-vaisselle pour permettre un rinçage en
profondeur. Il n’est pas possible d’éliminer le lm de silice ou l’eet de l’attaque
chimique qui demeurent en permanence. Ne pas utiliser un séchage avec
chaleur.
•
Taches blanches sur les ustensiles de cuisson à revêtement anti-adhésif
Le détergent du lave-vaisselle a-t-il éliminé la patine? Générer une nouvelle
patine après le lavage au lave-vaisselle.
•
Taches marron sur la vaisselle et les surfaces internes du lave-vaisselle
L’eau comporte-t-elle une concentration de fer élevée? Laver de nouveau la
vaisselle après avoir versé 1 à 3 cuillerées à thé (5 à 15 mL) de cristaux d’acide
citrique dans la section fermée du distributeur de détergent. Ne pas utiliser
de détergent à linge. Exécuter ensuite un programme de lavage Normal avec
détergent. Si ce traitement est nécessaire plus fréquemment que tous les deux
mois, on recommande l’installation d’un dispositif d’élimination du fer.
•
Marques noires ou grises sur la vaisselle
Des articles en aluminium frottent-ils contre la vaisselle durant le lavage?
Les articles en aluminium jetables peuvent se briser dans le lave-vaisselle et
causer des marques. Laver ces articles à la main. Pour éliminer les marques
d’aluminium, employer un produit de nettoyage moyennement abrasif.
•
Taches orange sur les articles de plastique ou les surfaces internes du lavevaisselle
Place-t-on dans le lave-vaisselle de la vaisselle sur laquelle il y a une quantité
considérable de résidus alimentaires à base de tomates? Il peut être nécessaire
d’utiliser un produit d’élimination des taches pour éliminer les taches du lave-
vaisselle. Les taches n’aectent pas la performance du lave-vaisselle.
LA VAISSELLE N’EST PAS COMPLÈTEMENT SÈCHE
•
La vaisselle n’est pas sèche
Le lave-vaisselle a-t-il été chargé de manière à permettre une vidange correcte
de l’eau? Ne pas charger excessivement. Voir la section “Chargement du lavevaisselle.” Utiliser un agent de rinçage liquide pour accélérer le séchage.
Les articles en plastique sont-ils humides? Les articles en plastique doivent
souvent être séchés avec un torchon.
Le distributeur d’agent de rinçage est-il vide? Voir la section “Distributeur
d’agent de rinçage”.
Page 55

53
LA VAISSELLE EST ENDOMMAGÉE AU COURS D’UN PROGRAMME
•
Écaillage de la vaisselle
A-t-on chargé le lave-vaisselle correctement? Charger la vaisselle et les verres
de telle manière qu’ils soient stables et qu’ils ne s’entrechoquent pas lors du
lavage. Minimiser l’écaillage en déplaçant lentement les paniers.
REMARQUE: Les antiquités, le cristal très mince et certains types de faïence et de
verre peuvent être trop délicats pour le lavage automatique. Laver à la main.
BRUITS
•
Émission de bruits de broyage ou de bourdonnement
Un objet dur ou des grumeaux de détergent en poudre se sont introduits dans le
module de lavage. Le bruit devrait cesser une fois que l’objet sera broyé.
CODES D’ERREUR
Lorsqu’un dysfonctionnement se produit, l’appareil ache des codes d’erreur pour
vous avertir.
Code Signications Causes possibles
La DEL Quick Wash
(lavage rapide) clignote.
Arrivée d’eau plus longue
que d’habitude.
Le robinet n’est pas
ouvert, ou l’arrivée
d’eau est obstruée ou la
pression de l’eau est trop
basse.
Les DEL Rinse (rinçage)
et Quick Wash (lavage
rapide) clignotent.
Temps de chauage plus
long que d’habitude,
mais n’atteint pas la
température nécessaire.
Capteur de température
ou élément chauant
défectueux.
Les DEL Light Wash
(lavage léger) et Quick
Wash (lavage rapide)
clignotent.
Erreur du capteur de
température
Circuit ouvert ou
anomalie du capteur de
température
Les DEL Light Wash
(lavage léger), Rinse
(rinçage) et Quick
Wash (lavage rapide)
clignotent.
Erreur du capteur de
température
Circuit ouvert ou
anomalie du capteur de
température
POUR OBTENIR DE L’AIDE SUPPLÉMENTAIRE, VISITER HAIER.
COM OU CONTACTER LA LIGNE D’ASSISTANCE À LA CLIENTÈLE
AU 1-877-377-3639.
Page 56

54
GARANTIE LIMITÉE
SERVICE À DOMICILE
GARANTIE COMPLÈTE DE UN AN
Pendant 12 mois à compter de la date d’achat
d’origine, Haier réparera ou remplacera
gratuitement n’importe quelle pièce (maind’œuvre comprise) comportant un défaut de
matériau ou de fabrication.
Haier peut choisir à sa seule discrétion de
remplacer ou réparer des pièces, des soussystèmes ou le produit tout entier.
Le produit doit être accessible, dégagé et
installé correctement pour bénécier du
service de réparation sous garantie.
GARANTIE LIMITÉE
Au-delà d’un an après la date d’achat d’origine,
Haier fournira gratuitement une pièce
(tel qu’indiqué cidessous) pour remplacer
ladite pièce suite à un défaut de matériau
ou de fabrication. Haier assume l’entière
responsabilité du coût de cette pièce. Tous
autres frais, tels les frais de main-d’œuvre,
de déplacement, etc, sont à la charge du
propriétaire.
Deuxième à troisième année
Pendant 36 mois suivant la date d’achat
initiale, Haier s’engage à orir une pièce de
remplacement pour toute pièce défectueuse
dû à un défaut de fabrication.
Cuve en acier inoxydable et doublure de
porte
La cuve en acier inoxydable et la doublure de
la porte sont garantis contre la perforation par
rouille pour la durée de vie du lave-vaisselle.
REMARQUE : Cette garantie prend eet à
la date à laquelle l’article a été acheté et le
reçu de l’achat d’origine doit être présenté au
représentant de dépannage autorisé avant
qu’une quelconque réparation sous garantie
ne soit eectuée.
Exceptions : Garantie pour usage commercial
90 jours sur la main-d’œuvre à compter de
la date d’achat d’origine
90 jours sur les pièces à compter de la date
d’achat d’origine
Aucune autre garantie ne s’applique.
SERVICE AU TITRE DE LA GARANTIE
Tout dépannage doit être eectué par un
centre de dépannage autorisé Haier. Pour le
nom et le numéro de téléphone du centre de
dépannage autorisé le plus proche de votre
domicile, composer le 1-877-337-3639.
Avant d’appeler le centre, veuillez garder à
disposition les renseignements suivants :
Numéros de plaque signalétique de l’appareil.
Le nom et l’adresse du revendeur auprès
duquel vous avez acheté l’appareil, ainsi que la
date d’achat.
Une description claire du problème rencontré.
Une preuve d’achat (reçu de vente).
Cette garantie est valable pour le service
des appareils domestiques aux États-Unis
contigus et au Canada et lorsque le service
est disponible, en Alaska, à Hawaï et Porto
Rico.
Cette garantie ne couvre pas :
Le remplacement ou la réparation des fusibles,
disjoncteurs, du câblage ou du circuit de
plomberie du domicile.
Un produit dont le numéro de série d’origine a
été enlevé ou modié.
Tous frais de dépannage non identiés comme
étant normaux tel un dépannage dans une
zone ou une tranche horaire normale.
Les dommages liés à l’expédition.
Les dommages liés à une installation ou un
entretien inadapté.
Les dommages causés par l’un des éléments
suivants : Mauvaise utilisation, utilisation
abusive, accident, incendie ou catastrophe
naturelle.
Les dommages résultant d’un dépannage
fourni par une entité autre qu’un revendeur ou
centre de dépannage autorisé Haier.
Les dommages causés par un courant, une
tension ou une alimentation électrique
incorrects.
Les dommages résultant d’une quelconque
modication ou altération du produit ou d’un
ajustement non autorisé par Haier.
Un ajustement des commandes utilisées par
le consommateur tel qu’identiées dans le
manuel de l’utilisateur.
Les tuyaux, boutons, piezas de plomería et
tout accessoire ou pièce jetable.
Les frais de main-d’œuvre, transport pour
dépannage et d’expédition pour le retrait et
le remplacement de pièces défectueuses audelà de la période de 12 mois.
Les dommages liés à une utilisation autre
qu’une utilisation domestique normale.
Tout frais de transport et d’expédition.
CETTE GARANTIE LIMITÉE REMPLACE
TOUTE AUTRE GARANTIE EXPRESSE OU
IMPLICITE, Y COMPRIS LES GARANTIES DE
COMMERCIALISATION OU DE PERTINENCE
À UN USAGE PARTICULIER
Le recours oert dans cette garantie est
exclusif et se substitue à toute autre garantie.
Cette garantie ne couvre pas les dommages
fortuits ou indirects; aussi les limitations
décrites ci-dessus peuvent ne pas s’appliquer
à votre cas. Certains États ne permettent
pas de limitation sur la durée d’une garantie
implicite, aussi les limitations décrites cidessus peuvent ne pas s’appliquer à votre cas.
Cette garantie vous confère des droits
juridiques spéciques. Vous pouvez
également jouir d’autres droits qui peuvent
varier d’un État à l’autre.
Haier America
Wayne, NJ 07470
Page 57

55
ÍNDICE
SEGURIDAD DE LA LAVAVAJILLAS .................................................................. 56
ANTES DE USAR SU LAVAVAJILLAS ................................................................. 59
REQUISITOS ELÉCTRICOS ................................................................................ 59
PIEZAS Y CARACTERÍSTICAS ...........................................................................60
GUÍA DE PUESTA EN MARCHA .......................................................................... 60
CARGA DEL LAVAVA JILLAS ............................................................................ 61
Sugerencias para la carga ............................................................................................ 61
Carga de la rejilla superior ...........................................................................................62
Carga de la rejilla inferior .............................................................................................63
USO DEL LAVAVA JILLAS ................................................................................. 65
Programa dish tablet (pastilla para vajilla) ..................................................................65
Uso correcto del detergente ....................................................................................... 66
Compartimiento para el agente de enjuague .............................................................67
Cómo llenar el compartimiento ..................................................................................67
Conguración del agente de enjuague .......................................................................68
Tablas de selección de ciclos .......................................................................................68
CÓMO LAVAR OBJETOS ESPECIALES ..............................................................72
CUIDADO DEL LAVAVA JILLAS ........................................................................ 74
Limpieza .......................................................................................................................74
Respiradero del desagüe ............................................................................................. 74
Cuidado del lavavajillas en verano e invierno .............................................................75
Sistema de ltrado ....................................................................................................... 75
SOLUCIÓN DE PROBLEMAS .............................................................................. 76
GARANTÍA LIMITADA ........................................................................................ 81
INFORMACIÓN A TENER EN CUENTA
Le agradecemos la compra de este
producto de marca Haier. Este manual
para el usuario le ayudará a obtener
el mejor funcionamiento de su nueva
lavavajillas.
Para referencia futura, anote el número
de modelo y de serie en el cuadro el
marco interior de la lavavajillas, y la
fecha de compra.
Engrape la prueba de compra a este
manual para asistirle cuando necesite
obtener servicio bajo la garantía.
___________________________________
Número de modelo
___________________________________
Número de serie
___________________________________
Fecha de compra
Page 58

56
SEGURIDAD DE LA LAVAVAJILLAS
Su seguridad y la seguridad de los demás es muy importante.
PELIGRO
ADVERTENCIA
PRECAUCIÓN
Este es el símbolo de advertencia de seguridad.
Este símbolo le llama la atención sobre peligros
potenciales que pueden ocasionar la muerte o una
lesión a usted y a los demás. Todos los mensajes de
seguridad irán a continuación del símbolo de
advertencia de seguridad y de la palabra “PELIGRO,”
“ADVERTENCIA” o “PRECAUCIÓN.”
Estas palabras significan:
Se trata de una situación de
peligro inminente. Si no sigue las
instrucciones de inmediato,
usted puede morir o sufrir una
lesión grave.
Se trata de una situación
posiblemente peligrosa que, de
no evitarse, podría causar la
muerte o una lesión grave.
Se trata de una situación
posiblemente peligrosa que, de
no evitarse, podría causar
lesiones moderadas o leves.
Todos los mensajes de seguridad le dirán el peligro potencial, le dirán
cómo reducir las posibilidades de sufrir una lesión y lo que puede
suceder si no se siguen las instrucciones.
Hemos incluido muchos mensajes importantes de seguridad en este
manual y en su electrodoméstico. Lea y obedezca siempre todos los
mensajes de seguridad.
Page 59

57
INSTRUCCIONES IMPORTANTES
DE SEGURIDAD
ADVERTENCIA: Para reducir el riesgo de incendio, choque eléctrico,
lesiones a personas o daños al utilizar la lavavajillas, siga precauciones
básicas, incluyendo las siguientes:
•
Use la lavavajillas solamente
para la función para la que fue
creada.
•
Use solo detergentes
o agentes de enjuague
recomendados para usar
con esta lavavajillas y
manténgalos fuera del
alcance de los niños.
•
Cuando coloca los artículos
que lavará:
1) Ubique los artículos losos
para que no dañen el sello
de la puerta.
2) Coloque los cuchillos
losos con los mangos
hacia arriba para reducir
el riesgo de lesiones
cortantes.
•
No lave artículos de
plástico que no lleven la
indicación “lavables en la
lavavajillas” u otra similar.
Lea las recomendaciones del
fabricante para los artículos
de plástico que no lleven tal
indicación.
•
No toque el elemento
calefactor durante o
inmediatamente después del
uso.
•
No haga funcionar la
lavavajillas a menos que
todos los paneles de la
carcasa estén colocados
debidamente en su lugar.
•
No juegue con los controles.
•
No abuse, ni se siente ni se
pare sobre la puerta, la tapa
o la canastas de platos de la
lavavajillas.
•
Para reducir el riesgo de
lesiones, no permita que los
niños jueguen dentro ni sobre
la lavavajillas.
•
En ciertas condiciones, un
sistema de agua caliente
que no ha sido usado por
dos semanas o más puede
producir gas hidrógeno.
EL GAS HIDRÓGENO ES
EXPLOSIVO. Si el sistema
de agua caliente no ha sido
usado por ese período,
abra todos los grifos de
agua caliente y deje que
corra el agua por varios
minutos antes de usar la
lavavajillas. Esto liberará todo
el gas hidrógeno que se haya
acumulado. Debido a que el
gas es inamable, no fume
ni encienda ninguna llama
abierta durante este tiempo.
•
No use un cable eléctrico de
extensión.
LEA Y GUARDE ESTAS
INSTRUCCIONES
Page 60

58
INSTRUCCIONES PARA LA
CONEXIÓN A TIERRA
Para la conexión de una
lavavajillas mediante cable
eléctrico conectado a tierra:
La lavavajillas debe estar
conectada a tierra. En el caso
de funcionamiento defectuoso
o avería, la conexión a tierra
reducirá el riesgo de choque
eléctrico al proporcionar una
vía de menor resistencia para la
corriente eléctrica. La lavavajillas
está equipada con un cable que
cuenta con un conductor para la
conexión a tierra del equipo y un
enchufe de conexión a tierra. El
enchufe debe conectarse a un
contacto apropiado, que esté
instalado y conectado a tierra de
acuerdo con todos los códigos y
ordenanzas locales.
ADVERTENCIA: La conexión
incorrecta del conductor de tierra
del equipo puede resultar en un
riesgo de descarga eléctrica.
Consulte con un electricista
o representante de servicio
calicado si tiene dudas sobre
si el lavavajillas está conectado
a tierra correctamente. No
modique el enchufe que viene
con el lavavajillas ; si no encaja
en el tomacorriente, instale
una toma adecuada por un
electricista calicado.
Para un lavavajillas conectado
permanentemente:
El lavavajillas debe estar
conectado a un metal con
conexión a tierra , sistema de
cableado permanente , o un
conductor de tierra del equipo
debe correr con los conductores
del circuito y conectado al
terminal de tierra del equipo o
llevar en el lavavajillas.
GUARDE ESTAS INSTRUCCIONES
ADVERTENCIA
Peligro de Vuelco
No use la lavavajillas antes de estar completamente instalada.
No se apoye en la puerta abierta.
No seguir estas instrucciones puede ocasionar heridas serias o
cortaduras.
Page 61

59
ADVERTENCIA
Peligro de asfixia
Antes de deshacerse de su viejo aparato, quítele la puerta o la tapa,
para que los niños no puedan esconderse ni quedar atrapados dentro
del mismo.
No seguir esta instrucción puede ocasionar la muerte o daño al
cerebro.
ANTES DE USAR SU LAVAVAJILLAS
•
Instale su lavavajillas en un lugar protegido de las inclemencias del tiempo.
Protéjala contra las temperaturas bajo cero para evitar posibles roturas de
la válvula de llenado. Dichas roturas no están cubiertas por la garantía. Vea
“Almacenamiento” en la sección “Cuidado de su lavavajillas” para obtener
información acerca de cómo prepararla para el invierno.
•
Instale y nivele la lavavajillas en un piso que pueda soportar su peso y en un área
adecuada para su tamaño y uso.
•
Retire todos los tapones de transporte de las mangueras y los conectores (como
la tapa en la salida de desagüe) antes de instalarla. Vea la información completa
en las Instrucciones de instalación.
REQUISITOS ELÉCTRICOS
ADVERTENCIA
Peligro de Choque Eléctrico
Conecte la lavavajillas a tierra.
Conecte el cable de puesta a tierra al conector verde a tierra en la caja
de terminales.
No use un cable eléctrico de extensión.
No seguir estas instrucciones puede ocasionar la muerte, incendio o
choque eléctrico.
Page 62

60
Esta lavavajillas está diseñada para funcionar en un circuito individual debidamente
cableado de 120 V, 60 Hz. Solo use un suministro eléctrico de 15 amperios con
cable de cobre y protegido con fusibles. Se recomienda el empleo de un fusible
retardador o un cortacircuitos, y se proporciona un circuito separado que preste
servicio únicamente a este electrodoméstico. El tomacorriente debe colocarse en el
gabinete adyacente.
PIEZAS Y CARACTERÍSTICAS
a
b
c
d
e
k
l
f
h
i
j
g
a Estante superior no ajustable
b Brazo rociador superior/brazo
rociador inferior
c Canasta inferior
d Filtro principal
e Depósito de detergente
f Estante para tazas
g Contenedor de pastilla para vajilla
h Canastilla desmontable para
cubiertos
i Filtro grueso
j Depósito de agente de enjuague
k Válvula de entrada
l Caja de empalmes
GUÍA DE PUESTA EN MARCHA
USO DE SU NUEVA LAVAVAJILLAS
1. El agente de enjuague es esencial para un buen secado. Asegúrese de que el
compartimiento esté lleno antes de usar su nuevo lavavajillas. Cada vez que lo
llene le durará entre 1 y 3 meses, dependiendo de su uso.
2. Raspe los restos de comida y los objetos duros (palillos o huesos) de los platos.
No es necesario enjuagar previamente los platos.
Page 63

61
3. Cargue el lavavajillas correctamente. (Consulte Carga del
Lavavajillas”) Introduzca la vajilla con espacio entre un objeto
y otro de forma tal que el agua llegue a las supercies sucias.
Asegúrese de que nada evite que los brazos rociadores se
muevan con libertad.
4. Agregue detergente. Use siempre un detergente de marca de calidad. (Consulte
“Uso del Lavavajillas.”)
5. Cierre la puerta.
6. Presione el ciclo deseado y la selección de opciones. El lavavajillas comienza a
llenarse cuando usted presiona un ciclo. Puede elegir opciones mientras se llena
la máquina. (Consulte “Uso del Lavavajillas”.)
CARGA DEL LAVAVA JILLAS
SUGERENCIAS PARA LA CARGA
•
Quite los restos de comida, huesos, palillos y demás objetos duros de la vajilla.
Para ahorrar agua, energía y tiempo, no es necesario enjuagar los platos y las
fuentes antes de ponerlos en el lavavajillas. El sistema del lavado se diseña
para quitar partículas de la comida del agua. El sistema del lavado incluye un
dispositivo que taja que reduzca la talla de los alimentos.
•
Es importante que el rociador de agua llegue a todas las supercies sucias.
Page 64

62
•
Ubique los platos de manera tal que no estén apilados o superpuestos siempre
que sea posible. Para obtener los mejores resultados en el secado, el agua debe
ser capaz de drenar de todas las supercies.
•
Ubique las ollas y cacerolas pesadas con cuidado. Los objetos pesados pueden
abollar el interior de acero inoxidable de la puerta si se dejan caer o se golpean.
•
Asegúrese de que las tapas y las manijas de las ollas, fuentes para pizzas,
bandejas para hornear, etc., no intereran en la rotación del brazo rociador.
•
Ahorre el agua, la energía y el tiempo que se pierde enjuagando a mano haciendo
funcionar un ciclo de enjuague para que la vajilla se mantenga húmeda si no
planea lavarla a la brevedad. Alimentos tales como los huevos, el arroz, la pasta,
las espinacas y los cereales cocidos pueden ser difíciles de quitar si se los deja
secar durante un tiempo.
CONSEJOS PARA EL FUNCIONAMIENTO SILENCIOSO
Para evitar los ruidos sordos o estruendosos durante el funcionamiento:
•
Asegúrese de que los objetos livianos estén asegurados a las rejillas.
•
Asegúrese de que las tapas y las manijas de las ollas, fuentes para pizzas, bandejas
para hornear, etc., no toquen las paredes internas ni intereran en la rotación del
brazo rociador.
•
Coloque la vajilla de forma tal que no se toque entre sí.
NOTA: Para los modelos empotrados, mantenga los tapones de desagüe del
fregadero cerrados durante el funcionamiento del lavavajillas para evitar que el ruido
se propague por la tubería.
CARGA DE LA REJILLA SUPERIOR
La canasta superior está diseñada para tazas, vasos y objetos más pequeños. (Vea
los siguientes modelos de carga recomendados)
8 puestos Carga de tazas y vasos
NOTA: Las características de la rejilla de su lavavajillas puede variar con respecto a
los dibujos que se muestran.
•
Ubique los objetos de forma tal que los extremos abiertos miren hacia abajo para
la limpieza y el escurrimiento.
•
Coloque los vasos y las tazas sólo en la rejilla de arriba. La rejilla inferior no está
diseñada para vasos y tazas. Se pueden producir daños.
Page 65

63
•
Ubique las tazas y los vasos en las hileras entre las puntas. Si los coloca sobre las
puntas se pueden producir roturas y manchas de agua.
•
Los recipientes pequeños, cacerolas pequeñas y demás utensilios pueden
ubicarse en la rejilla superior. Coloque los recipientes en la sección central para
lograr mayor estabilidad.
•
La porcelana, el cristal y demás objetos delicados no deben tocarse entre sí
durante el funcionamiento del lavavajillas. Se pueden producir daños.
•
Coloque los objetos de plástico sólo en la rejilla superior. Es recomendable
que se laven sólo los objetos de plástico que tengan la indicación “para uso en
lavavajillas”.
•
Coloque los objetos de plástico de forma tal que la fuerza del rociador no los
mueva durante el ciclo.
ESTANTE DE LA TAZA CON EL GUARDIA DEL TRONCO
Baje el estante extra que está en el lado izquierdo o derecho de la rejilla superior para
ubicar más tazas, copas u objetos largos tales como cubiertos y espátulas.
CARGA DE LA REJILLA INFERIOR
La rejilla inferior está diseñada para platos, fuentes, cacerolas y cubiertos. (Consulte
los modelos recomendados de carga que se muestran)
Carga de utensilios
•
No coloque vasos, tazas u objetos de plástico en la rejilla inferior. Coloque
objetos pequeños en la rejilla inferior sólo si están asegurados en su lugar.
•
Ubique los platos, soperas, etc. entre las puntas.
•
Superponga los bordes de los platos para cargas grandes.
Page 66

64
•
Coloque los platos, soperas y tazones para cereales en la rejilla de varias
maneras distintas, de acuerdo con su tamaño y forma. Coloque los recipientes
asegurados entre las hileras de puntas. No superponga los recipientes ya que el
rociador no llegará a todas las supercies.
•
Coloque las bandejas para hornear, molde para pastel y otros objetos grandes en
los costados y atrás. Si ubica estos objetos en la parte de adelante se obstaculiza
la llegada del rociador de agua al compartimiento de detergente.
•
Asegure los utensilios de cocina que estén muy sucios boca abajo en la rejilla.
•
Asegúrese de que las manijas de las ollas y demás objetos no obstruyan la
rotación de los brazos rociadores. Los brazos rociadores deben moverse con
libertad.
•
No ubique objetos entre la rejilla inferior y el costado de la tina del lavavajillas ya
que pueden bloquear la abertura de ingreso del agua.
NOTA: Haga girar los brazos rociadores. Asegúrese de que los objetos en la canasta
no detengan la rotación de los brazos rociadores.
CARGA DE LA CANASTA DE CUBIERTOS
Cargue la canasta de los cubiertos mientras está en
la rejilla inferior o quite la canasta y póngala sobre una
encimera o mesa para cargarla. (Consulte el modelo
recomendado de carga que se muestra)
NOTA: Descargue o quite la canasta antes de desocupar
las rejillas para evitar que caigan gotitas de agua sobre
los cubiertos.
•
Coloque los objetos con las cubiertas hacia
abajo, usando los separadores para evitar que se
superpongan los cubiertos.
•
Ubique los objetos pequeños, tales como tetinas
de mamaderas, tapas de tarros, sujetadores para
mazorca de maíz, etc. en las áreas con cubiertas con
bisagras. Cierre las cubiertas para que los objetos
pequeños se mantengan en su lugar.
Carga combinada
Page 67

65
Cuando las cubiertas están
abiertas, mezcle los objetos
en cada área de la canasta con
algunos hacia abajo y algunos
hacia arriba para evitar que
se superpongan. El rociador
no puede alcanzar los objetos
superpuestos.
IMPORTANTE: Siempre
coloque los objetos con lo
(cuchillos, pinchos, etc.) hacia
abajo. Asegúrese de que nada
sobresalga a través de la parte
inferior de la canastilla o canasta
que pueda bloquear el brazo de
lavado.
NOTAS:
•
No coloque cubiertos de
plata o revestidos con
plata junto con acero
inoxidable. Estos metales
pueden dañarse si entran
en contacto unos con otros
durante el lavado.
2 4 5 1
4 5 1
2 4 5 1
2 4 5 1
4 5 1
2 4 5 4
2 4 5 7
3 5
2 3 3 1
2 3 3 1
3 3 1
2 3 6 6
1. Ensalada
horquillas
2. Cucharaditas
3. Cucharas de
sopa
4. Horquillas cena
5. Cuchillo
6. Cuchara de
servir
7. Tenedor de
servir
•
Algunos alimentos (como la sal, el vinagre, los productos lácteos, los jugos
de fruta, etc.), pueden dejar marcas o corroer los cubiertos. Inicie un ciclo de
enjuague si no tiene una carga completa que lavar inmediatamente.
USO DEL LAVAVA JILLAS
PROGRAMA DISH TABLET (PASTILLA PARA VAJILLA)
Este modelo de lavavajillas tiene un programa Dish Tablet (Pastilla para vajilla).
Este programa Dish Tablet (Pastilla para vajilla) usa pastillas para vajilla en lugar del
detergente y el agente de enjuague.
NOTA: Solo use el programa Dish Tablet (Pastilla para vajilla) si usa pasti las para
vajilla. Si utiliza pastillas para vajilla con otros programas de ciclos, no se obtendrán
buenos resultados.
1. Cuelgue el contenedor de pastilla para vajilla de la canasta de platos superior.
Page 68

66
a Contenedor de pastilla
para vajilla
2. Gire el brazo rociador superior y, de ser necesario, mueva el contenedor para
asegurarse de que el brazo rociador no esté bloqueado.
3. Coloque la pastilla para vajilla en el contenedor e inicie el programa Dish Tablet
(Pastilla para vajilla).
Si decide usar detergente y agente de enjuague, vea las siguientes instrucciones de
uso.
USO CORRECTO DEL DETERGENTE
Use solo detergente especialmente hecho para uso en la lavavajilla. Mantenga el
detergente fresco y seco. No coloque detergente en polvo en el depósito hasta que
esté listo para lavar los platos.
Todos los ciclos de lavado excepto RINSE ONLY (Solo enjuague) requieren
detergente en el depósito de detergente.
COMPARTIMIENTO PARA EL DETERGETE
El compartimiento para detergente tiene 2 secciones.
a
bc
a Botón de la tapa
b Sección de 15 gramos
c Sección de 25 gramos
El depósito de detergente vacía automáticamente el detergente en la lavavajillas
durante el ciclo de lavado. (Vea las “Tablas de selección de ciclos”.)
•
Use detergente para lavado en lavavajillas automático solamente. Los otros
detergentes pueden producir espuma excesiva que puede rebalsar el lavavajillas
y reducir el rendimiento del lavado.
•
Agregue detergente sólo antes de comenzar un ciclo.
NOTA: No use detergente para un ciclo de enjuague.
•
Almacene el detergente bien cerrado en un lugar fresco y seco. Si el detergente
automático está fresco, se obtendrá una mayor limpieza.
CÓMO LLENAR EL COMPARTIMIENTO
1. Si la tapa del compartimiento está cerrada, ábrala empujando la traba de la tapa.
Page 69

67
2. Llene el(los) compartimiento(s) del depósito de detergente con detergente.
NOTA: Vea las “Tablas de selección de ciclos” para conocer la cantidad recomen
dada de detergente.
a
a Botón de la tapa
3. Cierre la tapa del compartimiento.
Es normal que la tapa se abra parcialmente cuando se está distribuyendo
detergente.
CUÁNTO DETERGENTE USAR
Vea las “Tablas de selección de ciclos” para conocer la cantidad recomendada
de detergente.
•
La cantidad de detergente que debe usarse depende de la dureza del agua
y del tipo de detergente. Si usa muy poco, la vajilla no quedará limpia. Si usa
demasiado con agua blanda los utensilios de vidrio se marcarán.
•
Las distintas marcas de detergentes para lavavajillas tienen diferentes
cantidades de fósforo para ablandar el agua. Si usted tiene agua dura y usa un
detergente con contenido de fósforo de menos del 8,7%, es probable que sea
necesario usar más detergente o usar un detergente con contenido de fósforo
superior al 8.7%.
COMPARTIMIENTO PARA EL AGENTE DE ENJUAGUE
Los agentes de enjuague evitan que el agua forme gotitas que cuando se secan
dejan manchas o vetas. También mejoran el secado ya que permiten que el agua
se escurra de la vajilla durante el enjuague nal liberando una pequeña cantidad del
agente de enjuague en el agua del enjuague. El depósito de agente de enjuague está
diseñado para usar un agente de enjuague líquido. No use el que es sólido o en barra.
CÓMO LLENAR EL COMPARTIMIENTO
El compartimiento del agente de enjuague tiene una capacidad de 3.4 oz (100ml)
de agente de enjuague. En condiciones normales, esta cantidad le durará
aproximadamente tres meses. El agente de enjuague se libera por una abertura en
el compartimiento. No es necesario esperar hasta que el compartimiento esté vacío
para volver a llenarlo. Intente mantenerlo lleno, pero tenga cuidado de no llenarlo
demasiado.
Page 70

68
Para llenar el depósito de agente de enjuague:
1. Asegúrese de que la puerta del lavavajillas esté completamente abierta.
2. Gire la tapa del depósito de agente de enjuague hacia la echa izquierda
(posición abierta) y jale hacia arriba para quitarla.
a
b
c
a Indicador de llenado
b Tapa del depósito
c Ajuste regulable
3. Agregue agente de enjuague hasta que se vea lleno en la ventana indicadora.
4. Limpie los restos de agente de enjuague que puedan haberse derramado con un
paño húmedo.
5. Vuelva a colocar la tapa del agente de enjuague y luego, gírela en el sentido de las
agujas del reloj para cerrarla.
CONFIGURACIÓN DEL AGENTE DE ENJUAGUE
Puede cambiarse la cantidad de agente de enjuague liberado en el lavado nal.
La conguración de fábrica es de 2. Para la mayoría de tipos de agua, congure el
regulador en 2 o 3. Si hay anillos o manchas de calcio ( agua dura ) en la vajilla, intente
con una conguración más alta.
a
d Ajuste regulable
Para regular el ajuste:
Quite la tapa del depósito. Gire la flecha que se encuentra dentro del depósito hacia el
ajuste deseado.
TABLAS DE SELECCIÓN DE CICLOS
Seleccione el ciclo de lavado y la opción deseada. El lavavajillas comienza a llenarse
una vez que cierre la puerta y haya seleccionado un ciclo, a menos que elija un lavado
demorado. Luego del llenado y un breve periodo de lavado, la máquina hará una
pausa de 5 min., para ahorrar energía durante el intervalo de remojo. Durante este
periodo, la suciedad seca o resistente será ablandada para facilitar el lavado más
adelante en el ciclo. Puede seleccionar las opciones mientras la máquina se está
llenando.
Page 71

69
Un “•” muestra los pasos que se incluyen en cada ciclo. Las temperaturas indican
cuándo se aumenta la temperatura. El uso de agua se muestra en galones
estadounidenses/litros.
Este modelo cumple con las pautas de ENERGY STAR
®
en cuanto a la eciencia
energética.
La duración de ciclo no incluye tiempo seco. Un asterisco (* ) al lado del tiempo del
ciclo indica que el tiempo del ciclo puede ser mayor de acuerdo con la temperatura
del agua que ingresa al lavavajillas.
a b c d e f
gh
a Luces indicadoras de Inicio diferido/
Fases de lavado: cuando retrasa
el inicio (3, 6, 9 o 12 horas), se
encenderá una luz indicadora para
mostrar el tiempo de retraso. Cuando
la lavavajillas está funcionando, se
encenderá un indicador para mostrar
las fases del ciclo de lavado.
b Botón Delay (Retraso): presione para
retrasar el inicio.
c Luces indicadoras del ciclo: para
mostrar el ciclo de lavado.
d Botón Ciclo: para seleccionar uno de
los seis ciclos de lavado.
e Luz del agente de enjuague: para
mostrar que el depósito de agente de
enjuague debe llenarse.
f Luz indicadora de encendido: para
mostrar que la lavavajillas recibe
energía.
g Botón Power (Encendido): para
encender/apagar.
h Botón Start/Pause (Inicio/Pausa):
para comenzar el ciclo de lavado
seleccionado o para hacer una pausa
en el ciclo de lavado después de que
comenzó.
Pre-
lavado
Segunda
Lavada
Prelavado
Lavado
Principal
Enjuague Secado Tiempo
(min)
Uso de
Agua
(gal/L)
127° F (53° C) 154° F (68° C)
120 3.7
Utilice para todos los tipos de
suelo y cargas plato.
Llene los dos
compartimentos de
detergente.
Page 72

70
122° F
(59° C)
127° F
(53° C)
149° F
(65° C)
130 4.6
Use este ciclo para duro-alimpio, horneada , utensilios
de cocina y más duro que las
condiciones normales de
agua.
Llene los dos compartimentos de detergente.
Enjuague
Final
con Calor
Pre-
lavado
Segunda
Lavada
Prelavado
Lavado
Principal
Enjuague
Secado Tiempo
(min)
Uso de
Agua
(gal/L)
127° F
(53° C)
149° F
(65° C)
105 3.65
Use este ciclo para cargas con cantidades normales de
residuos de comida . (La etiqueta
energética se basa en el uso de
este ciclo.) Durante el lavado
principal , la acción de lavado se
detendrá en varias ocasiones
durante varios segundos.
Llene los dos compartimentos de detergente.
Enjuague
Final
con Calor
Pre-
lavado
Lavado
Principal
Enjuague Secado Tiempo
(min)
Uso de
Agua
(gal/L)
122° F
(50° C)
140° F
(60° C)
90 3.67
Use este ciclo para un lavado ligero . Este ciclo utiliza
una luz lavar y suave seco.
durante la calefacción seca,
el calentamiento ciclos de
los elementos dentro y fuera.
Rellene 25 compartimento gramo.
Enjuague
Final
con Calor
Pre-
lavado
Lavado
Principal
Enjuague Secado Tiempo
(min)
Uso de
Agua
(gal/L)
122° F
(50° C)
131° F
(55° C)
55 2.75
Use este ciclo para un lavado rápido y seco luz para
limpiar utensilios de cocina
antes de entretenimiento.
Rellene 25 compartimento
gramo.
Enjuague
Final
con Calor
Pre-
lavado
Lavado
Principal
Enjuague Secado Tiempo
(min)
Uso de
Agua
(gal/L)
122° F
(53° C)
25 1.9
Use este ciclo de enjuague
para enjuagar los platos,
vasos y cubiertos que no se
lava de inmediato.
No se necesita detergente.
Enjuague
Final
con Calor
Pre-
lavado
Segunda
Lavada
Prelavado
Lavado
Principal
Enjuague
Secado Tiempo
(min)
Uso de
Agua
(gal/L)
Page 73

71
•
Si la temperatura del agua que ingresa es menor que la temperatura
recomendada o si la suciedad de la comida es difícil, el ciclo se compensará
automáticamente agregando tiempo, calor y agua según sea necesario.
CÓMO CANCELAR UN CICLO
En cualquier momento del ciclo, presione START/PAUSE (comienzo/
pausa).
Su lavavajillas comenzará un desagüe de 2 minutos (si fuera necesario).
Permita que el lavavajillas desagüe completamente. La luz se apagará al
cabo de 2 a minutos.
NOTA: Si no es necesario desaguar el lavavajillas, presione START/PAUSE
(comienzo/pausa) nuevamente para apagar la luz. Seleccione un nuevo ciclo y las
opciones.
Para detener el desagüe
Puede presionar START/PAUSE (comienzo/pausa) nuevamente para detener el
desagüe inmediatamente. Recuerde desaguar el lavavajillas antes de dar comienzo a
un nuevo ciclo.
Para borrar los indicadores
Presione START/PAUSE (comienzo/pausa) antes de poner en funcionamiento el
lavavajillas para borrar todas las opciones y los ciclos.
CÓMO CAMBIAR UN CICLO O UNA CONFIGURACIÓN
Durante el primer llenado de un ciclo
1. Seleccione un nuevo ciclo y las opciones.
2. Revise los compartimientos del detergente. Debe llenarlos correctamente para
comenzar el nuevo ciclo.
Durante el primer llenado de un ciclo
1. Presione START/PAUSE (comienzo/pausa).
Su lavavajillas comenzará un desagüe de 2 minutos (si fuera necesario).
Permita que el lavavajillas desagüe completamente. La luz se apagará al
cabo de 2 minutos.
NOTA: Si no es necesario desaguar el lavavajillas, presione START/PAUSE
(comienzo/pausa).
1. Revise los compartimientos del detergente. Debe llenarlos correctamente para
comenzar un nuevo ciclo.
2. Seleccione un nuevo ciclo.
CÓMO AGREGAR OBJETOS DURANTE UN CICLO
Se puede agregar un objeto en cualquier momento antes de que comience el lavado
principal. Abra la puerta y revise el compartimiento del detergente. Si la tapa aún
está cerrada, puede agregar objetos.
Para agregar objetos
1. Levante la traba de la puerta para detener el ciclo. Espere a que la acción de
rociado se detenga antes de abrir la puerta.
Page 74

72
2. Si la tapa del compartimiento del detergente aún está cerrada, agregue el objeto.
3. Cierre la puerta rmemente hasta que se trabe. El lavavajillas reanuda el ciclo
después de una pausa de alrededor de 10 segundos.
DEMORA
Seleccione esta opción para que su lavavajillas se ponga en funcionamiento
en otro momento o durante las horas en las que el consumo no está en
su pico. Puede agregar objetos a la carga en cualquier momento durante
el lapso de la demora. Después de cargar los objetos, cierre la puerta con
rmeza hasta que trabe.
Puede demorar el comienzo de un ciclo hasta 12 horas en opciones que aumentan
de a 3 horas (3, 6, 9 o 12 horas).
Para demorar el comienzo
1. Presione varias veces “Delay Hours” (Horas de demora) hasta que vea las
horas deseadas de demora iluminadas en el indicador de la izquierda. Cuando la
demora llega a 12 horas, se apaga. Presione nuevamente “Delay Hours” (Horas
de demora) para seleccionar una cantidad de horas de demora nueva.
2. Seleccione el ciclo de lavado y las opciones.
NOTA: Para cancelar la demora y el ciclo, presione comienzo/pausA Para cancelar
la demora y comenzar el ciclo de inmediato, presione Delay Start (Comienzo
demorado) hasta que no haya luz en ninguno de los indicadores de la izquierda.
SISTEMA DE LAVADO
Los intervalos de remojo y ahorro de energía suceden en la mayoría de los ciclos
poco después del llenado inicial de agua. Durante los 5 minutos de remojo, la
suciedad seca o la comida pegada se despenden sin utilizar energía. Más adelante
en el ciclo, la efectiva acción del lavado remueve la suciedad restante más
ecientemente. El sistema de seis niveles de lavado proporciona excelentes
resultados de limpieza.
Los tres niveles de ltro y el sistema recolector de suciedad ltran el agua del lavado
y evitan que las partículas de alimento se redepositen en la vajilla limpia.
•
El agua del lavado uye continuamente a través del ltro, reteniendo las
partículas de comida.
•
Un ltro grueso impide que ingresen al sistema de bomba huesos, carozos y
otros objetos grandes.
NOTA: Revise periódicamente el ltro grueso y elimine cualquier objeto del mismo.
CÓMO LAVAR OBJETOS ESPECIALES
Si tiene dudas acerca del lavado de un objeto en particular, consulte al fabricante
para saber si es apto para lavavajillas.
Material ¿Es apto para lavavajillas?/Comentarios
Aluminio Si
La temperatura elevada del agua y los detergentes pueden
afectar el acabado del aluminio anodizado.
Page 75

73
Material ¿Es apto para lavavajillas?/Comentarios
Aluminio
desechable
No
No lave bandejas de aluminio desechable en el lavavajillas.
Pueden alterarse durante el lavado y dejar marcas negras en
la vajilla u otros objetos.
Botellas y latas No
Lave las botellas y las latas a mano. Las etiquetas adheridas
con cola pueden despegarse y obstruir los brazos rociadores
o la bomba y reducir el rendimiento del lavado.
Hierro fundido No
Se perderá la curación y el hierro se oxidará.
Porcelana /
Cerámica de gres
Si
Lea siempre las recomendaciones del fabricante antes del
lavado. Los diseños antiguos, pintados a mano, o pintados
sobre esmalte pueden desteñirse, las láminas doradas
pueden decolorarse o desteñirse.
Cristal Si
Lea las recomendaciones del fabricante antes del lavado.
Algunos tipos de cristal emplomado pueden marcarse con
repetidos lavados.
Dorado No
Los cubiertos dorados pierden el color
Glass Si
El vidrio opalino se torna amarillento con repetidos lavados
en lavavajillas.
Cuchillos de
mango hueco
No
Los mangos de algunos cuchillos están unidos a la hoja con
adhesivos que pueden aojarse si se lavan en lavavajillas.
Peltre, Bronce No
Las altas temperaturas del agua y el detergente pueden
decolorar o dejar oricios en el acabado.
Plásticos
desechables
No
No toleran las altas temperaturas del agua ni los detergentes.
Plásticos Si
Lea siempre las recomendaciones del fabricante antes del
lavado. Los plásticos varían en su capacidad para resistir las
altas temperaturas del agua y los detergentes. Coloque los
plásticos en la rejilla superior solamente.
Acero inoxidable Si
Inicie un ciclo de enjuague si no lo lavará inmediatamente.
El contacto prolongado con alimentos que contienen sal,
vinagre, productos lácteos o jugos de fruta puede dañar el
acabado.
Page 76

74
Material ¿Es apto para lavavajillas?/Comentarios
Plata na o baño
de plata
Si
Inicie un ciclo de enjuague si no la lavará inmediatamente. El
contacto prolongado con alimentos que contienen sal, ácido
o sulfuro (huevos, mayonesa y mariscos) puede dañar el
acabado.
Hojalata No
Puede oxidarse.
Utensilios de
madera
No
Lávelos a mano. Lea siempre las instrucciones del fabricante
antes del lavado. La madera que no ha sido tratada puede
torcerse, partirse o perder su acabado.
CUIDADO DEL LAVAVA JILLAS
LIMPIEZA
LIMPIEZA DEL EXTERIOR
En la mayoría de los casos, el uso frecuente de un paño suave y húmedo o de una
esponja y un detergente suave es todo lo que se necesita para mantener limpio el
exterior de su lavavajillas.
LIMPIEZA DEL INTERIOR
Los minerales del agua dura pueden provocar la formación de una película blanca en
las supercies internas, especialmente debajo de la zona de la puerta.
No limpie el interior del lavavajillas hasta que se haya enfriado. Use guantes de
goma. No utilice otro limpiador que no sea el detergente de lavavajillas ya que se podría
producir espuma.
Para limpiar el interior:
Haga una pasta con el detergente de lavavajillas en polvo en una esponja húmeda y
limpie.
O
Utilice detergente líquido automático de lavavajillas y limpie con una esponja
húmeda.
O
Lea el procedimiento para enjuague con vinagre en “Formación de manchas o
películas en la vajilla” en “Detección y solución de problemas”.
NOTA: Inicie un ciclo Normal con detergente después de limpiar el interior.
RESPIRADERO DEL DESAGÜE
Revise el respiradero del desagüe toda vez que su lavavajillas no desagüe
correctamente. Algunas reglamentaciones locales o estatales sobre tuberías
Page 77

75
exigen que se agregue un respiradero de desagüe entre un lavavajillas empotrado y
el sistema de desagüe de la casa. Si el desagüe se tapa, el respiradero del desagüe
impide que el agua vuelva e ingrese en su lavavajillas.
El respiradero del desagüe está normalmente ubicado arriba del fregadero o
encimera cerca del lavavajillas.
NOTA: El respiradero del desagüe es un dispositivo externo de la tubería que no
es parte de su lavavajillas. La garantía proporcionada con su lavavajillas no cubre
los costos del servicio asociados directamente con la limpieza o reparación del
respiradero del desagüe externo.
Para limpiar el respiradero del desagüe
Limpie el respiradero del desagüe periódicamente para asegurarse que el lavavajillas
desagüe correctamente. Siga las instrucciones de limpieza provistas por el
fabricante. Con la mayoría de los tipos:
1. Retire la cubierta de cromo. Desenrosque la tapa de plástico.
2. Revise si hay suciedad acumulada. Limpie si es necesario.
CUIDADO DEL LAVAVAJILLAS EN VERANO E
INVIERNO
Cómo cuidar el lavavajillas en verano
Protect your dishwasher during the summer months by turning o the water supply
and power supply to the dishwasher.
Cómo acondicionar su lavavajillas para el invierno
Proteja su lavavajillas y su hogar ante los posibles daños causados por el
congelamiento del suministro de agua. Si fuera necesario dejar su lavavajillas en una
vivienda de temporada o si el mismo estuviera expuesto a temperaturas bajo cero,
haga acondicionar su lavavajillas por personal de mantenimiento.
SISTEMA DE FILTRADO
Para su comodidad, hemos colocado la bomba de desagüe y el sistema de ltrado
dentro de la tubería para que sea de fácil acceso. Hay tres componentes en el
sistema de ltrado: el ltro principal, el ltro grueso y el ltro no.
a
b
c
a Filtro grueso
b Filtro principal
c Filtro no
Page 78

76
A. Filtro grueso
Las partículas más grandes como pedazos de hueso o vidrio que pueden obstruir
el desagüe quedan atrapadas en el ltro grueso. Para quitar una partícula atrapada
en este ltro, apriete suavemente las lengüetas de la parte superior del ltro y
levántelo para quitarlo.
B. Filtro principal
Las partículas de suciedad y alimentos que atrapa el ltro se pulverizan con un
surtidor especial ubicado en el brazo rociador inferior y las lava conduciéndolas al
desagüe.
C. Filtro no
Este ltro mantiene los residuos de suciedad y alimentos en el área del sumidero y
evita que se vuelvan a depositar en los platos durante el ciclo.
LIMPIEZA DE LOS FILTROS
2
3
1
Abierto
Paso 1. Gire el ltro en sentido contrario a las agujas del reloj para levantarlo.
Paso 2. Levante el ltro principal.
Paso 3. Levante el ltro no.
NOTA: Siga los pasos del 1 al 3 en sentido inverso para volver a colocar el tro.
SOLUCIÓN DE PROBLEMAS
Pruebe las soluciones sugeridas aquí y posiblemente se evite el gasto de una visita
de servicio técnico...
LA LAVAVAJILLAS NO FUNCIONA CORRECTAMENTE
•
El lavavajillas no se detiene o para durante el ciclo
Es normal que se realice una pausa de 5 minutos en los ciclos, cerca del comienzo de los
ciclos, para permitir el remojado de la vajilla. Esto reduce la cantidad de energía requerida
para limpiar la vajilla.
¿Está bien cerrada y trabada la puerta?
¿Se ha seleccionado el ciclo correcto? Reérase al cuadro de selección de ciclos.
¿Hay energía para que el lavavajillas funcione? ¿Se ha saltado un tapón de la casa, o se ha
cortado la energía?
¿Se ha detenido el motor debido a una sobrecarga? El motor se resetea
automáticamente a los pocos minutos. Si no vuelve a arrancar, llame al servicio.
Page 79

77
¿Está abierta la válvula del agua (si es que está instalada)? ¿Es normal que haya pausas
repetidas de 15 a 65 segundos en algunos ciclos.
•
El lavavajillas no se llena
¿Puede el otante de llenado moverse libremente de arriba abajo? Presiónelo para
liberarlo
•
El lavavajillas parece no detenerse.
¿Está el agua que entra en el lavavajillas lo sucientemente caliente? El
lavavajillas funciona durante más tiempo mientras calienta el agua. Vea la
sección Consejos sobre el Desempeño del Lavavajillas. Automáticamente el
lavavajillas se demorara en algunos ciclos de lavado y enjuague hasta que el agua
alcance la temperatura apropiada
•
Permanece agua en el lavavajillas
¿Se ha completado el ciclo y no esta pausado?
Es normal que haya una pequeña cantidad de agua limpia alrededor del desagüe
en el fondo de la cuba, para mantener el sello de agua lubricado.
Si la manguera del drenaje está conectada a un balde de desperdicios, asegúrese
de que el recipiente este vacío.
Asegúrese de que el tapón haya sido removido del dispensador de desperdicios.
Verique que la manguera de drenaje no esté doblada.
•
Queda detergente en la parte cubierta del compartimiento
¿Ha nalizado el ciclo?
¿El detergente tiene grumos? Cambie el detergente si es necesario
¿Un artículo de la vajilla está bloqueando el despachador?
•
Hay agua en el frente del panel de acceso
¿Se utilizó demasiado detergente? Consulte la sección “Compartimiento del
detergente”.
¿La marca de detergente hace demasiada espuma? Pruebe una marca distinta
para reducir la espuma y eliminar la acumulación.
•
El lavavajillas tiene olor
¿La vajilla se lava solo cada 2 o 3 días? Inicie un ciclo de enjuague una o dos veces
al día hasta tener una carga completa.
¿El lavavajillas tiene olor a plástico nuevo? Realice un enjuague con vinagre tal
como se describe en “Formación de manchas o películas en la vajilla” de la guía
para detección y solución de problemas detallada más adelante.
•
Condensación en la encimera de la cocina (modelos empotrados)
¿El lavavajillas está alineado con la encimera? Se puede formar humedad en
la mesada que proviene de la salida de aire de la consola del lavavajillas. Para
mayor información, consulte las Instrucciones para la Instalación.rincage avec
du vinaigre comme decrit dans le guide de depannage “Taches et lme sur les
assiettes”.
Page 80

78
LOS PLATOS NO ESTÁN COMPLETAMENTE LIMPIOS
•
Residuos de alimentos en los platos
¿Se ha cargado la lavavajillas correctamente? Consulte la sección “Cómo cargar
su lavavajillas”. ¿Ha elegido el ciclo que describe la suciedad más rebelde en su
lavavajillas? Si tiene algunos artículos con suciedad profunda, use un ciclo más
intenso.
¿La temperatura del agua está demasiado baja? Para obtener los mejores
resultados, el agua debe estar a 120 °F (49 °C) cuando ingresa en la lavavajillas.
Consulte la sección “Consejos para el desempeño de la lavavajillas”.
¿Usó la cantidad correcta de detergente nuevo? Use solo detergentes
recomendados para lavavajillas. Consulte la sección “Depósito del detergente”.
Nunca use menos de una cucharada (15 g) por carga. El detergente debe ser
nuevo para ser ecaz. Guarde el detergente en un área fresca y seca. La suciedad
profunda y/o el agua dura por lo general requieren detergente adicional.
¿El detergente se endureció en el depósito? Use solo detergente nuevo. No
permita que el detergente permanezca por varias horas en un depósito húmedo.
Limpie el depósito cuando haya detergente endurecido.
¿La bomba o el brazo rociador está obstruido por las etiquetas de botellas y
latas? Si usted lava botellas y latas en su lavavajillas, asegúrese de que no haya
etiquetas que se hayan despegado y obstruyan la bomba o el brazo rociador.
¿La presión del agua del hogar es lo sucientemente alta para lograr un llenado
adecuado de la lavavajillas? La presión del agua del hogar debe ser de 20 a 120
lb/in² (138 a 828 kPa) para obtener un llenado apropiado de la lavavajillas. Si
la presión es demasiado baja, se puede añadir una bomba intensicadora de
presión en el suministro de agua.
¿El exceso de espuma reduce la velocidad del brazo rociador? Nunca use jabón
o detergentes para lavar ropa. Use solo detergentes recomendados para
lavavajillas.
MARCAS Y MANCHAS EN LOS PLATOS
•
Manchas y formación de películas en los platos
¿El agua es dura o tiene un alto contenido de minerales? Si se acondiciona
el agua del enjuague nal con un agente de enjuague, esto ayuda a eliminar
las manchas y la formación de películas. Mantenga el depósito del agente de
enjuague lleno. Use siempre una opción con temperatura alta. Si la dureza
del agua de su hogar es de 13 granos o mayor, se recomienda que instale un
ablandador doméstico de agua. Si no desea tomar agua ablandada, haga que el
ablandador de agua se instale en el suministro de agua caliente.
¿La temperatura del agua está demasiado baja? Para obtener los mejores
resultados, el agua debe estar a 120 °F (49 °C) cuando ingresa en la lavavajillas.
¿Usó usted la cantidad correcta de detergente ecaz? Use solo detergentes
recomendados para lavavajillas. Consulte la sección “Depósito del detergente”.
Nunca use menos de una cucharada (15 g) por carga. El detergente debe ser
nuevo para ser ecaz. Guarde el detergente en un área fresca y seca. La suciedad
profunda y/o el agua dura por lo general requieren detergente adicional.
¿La presión del agua del hogar es lo sucientemente alta para lograr un llenado
adecuado de la lavavajillas? La presión del agua del hogar debe ser de 20 a 120
lb/in² (138 a 828 kPa) para obtener un llenado apropiado de la lavavajillas. Si
la presión es demasiado baja, se puede añadir una bomba intensicadora de
presión en el suministro de agua.
Page 81

79
NOTA: Para quitar manchas y las películas de los platos, pruebe un enjuague
con vinagre blanco. Este procedimiento está destinado únicamente para uso
ocasional. El vinagre es un ácido y su uso frecuente podría dañar la lavavajillas.
1. Ponga 2 tazas (500 mL) de vinagre blanco en una taza medidora de vidrio o
de otro material apto para lavavajillas en la canasta inferior.
2. Ponga la lavavajillas a funcionar para que haga un ciclo completo de lavado.
No use detergente. El vinagre se mezclará con el agua del lavado.
•
Película de sílice o corrosión (la película de sílice es un depósito blanco e
iridiscente; la corrosión es una película turbia)
A veces se produce una reacción química al agua con ciertos tipos de objetos
de cristal. Por lo general, se debe a una combinación de agua suave o agua
ablandada, soluciones alcalinas para lavar, enjuague insuciente, sobrecarga de
la lavavajillas y el calor del secado. Evitar este problema no sería posible, excepto
lavando a mano.
Para hacer el proceso más lento, use una mínima cantidad de detergente,
pero no menos de una cucharada (15 g) por carga. Use un agente de enjuague
líquido y reduzca la carga de la lavavajillas para permitir un enjuague a fondo. Las
películas de sílice y la corrosión son permanentes y no se pueden eliminar. No
use el secado caliente.
•
Manchas blancas en los utensilios de cocina con acabado antiadherente
¿El detergente de la lavavajillas ha quitado el curado de los utensilios de cocina?
Vuelva a curarlos luego de lavarlos en la lavavajillas.
•
Manchas marrones en los platos y en el interior de la lavavajillas
¿El agua tiene un alto contenido de hierro? Vuelva a lavar los platos usando 1 a
3 cucharaditas (5 a 15 mL) de cristales de ácido cítrico agregados en la sección
con tapa del depósito del detergente. No use detergente. A continuación, use
el ciclo de lavado Normal con detergente. Si el tratamiento llega a ser necesario
más de una vez cada dos meses, se recomienda la instalación de una unidad de
eliminación de hierro.
•
Marcas negras o grises en los platos
¿Hay artículos de aluminio que rozan los platos durante el lavado? Los artículos
de aluminio desechables pueden romperse en la lavavajillas y rayar los demás
artículos. Lave los artículos de aluminio a mano. Quite las marcas de aluminio
usando un producto de limpieza abrasivo suave.
•
Manchas anaranjadas en los platos de plástico o en el interior de la lavavajillas
¿Se han colocado grandes cantidades de platos con restos de comida a base de
tomate en la lavavajillas? Tal vez sea necesario usar un producto quitamanchas
para quitar las manchas de su lavavajillas. Las manchas no afectarán el
desempeño de la lavavajillas.
LA VAJILLA NO SE SECA POR COMPLETO
•
Los platos no están secos
¿Se cargó la lavavajillas de manera que permita el escurrido apropiado del agua?
No la sobrecargue. Consulte la sección “Cómo cargar su lavavajillas”. Use un
agente de enjuague líquido para acelerar el secado.
¿Los objetos de plástico están mojados? Los objetos de plástico a menudo
necesitan un secado con toalla.
Page 82

80
¿Está vacío el depósito del agente de enjuague? Consulte la sección “Depósito
del agente de enjuague”.
LOS PLATOS SE DAÑAN DURANTE UN CICLO
•
Platos despostillados
¿Se cargó la lavavajillas adecuadamente? Coloque los platos y vasos de manera
que estén estables y no se choquen entre sí por la acción del lavado. Reduzca el
desportillado moviendo suavemente el estante hacia dentro y fuera.
NOTA: Algunos objetos de cristal antiguos, con cantos biselados y objetos similares
de porcelana y cristal podrían ser demasiado delicados para lavarse en la lavavajillas
automática. Lávelos a mano.
RUIDOS
•
Se escuchan chirridos, crujidos o zumbidos
Pudo haber ingresado al módulo de lavado un objeto duro o gránulos de
detergente en polvo. El sonido deberá cesar una vez que el objeto se haya
pulverizado.
CÓDIGOS DE ERROR
Cuando aparece algún mal funcionamiento, el aparato mostrará códigos de error
para advertirle.
Codes Signicado Causas posibles
El LED de Quick Wash
(Lavado rápido)
parpadea
Tiempo de entrada más
prolongado.
El grifo no está abierto
o el ingreso de agua es
limitado o la presión del
agua es demasiado baja.
Los LED de Rinse
(Enjuagar) y Quick
Wash (Lavado rápido)
parpadean
El tiempo de
calentamiento es más
prolongado, pero no
alcanza la temperatura
requerida.
Mal funcionamiento del
sensor de temperatura o
del elemento calefactor.
Los LED de Light Wash
(Lavado ligero) y Quick
Wash (Lavado rápido)
parpadean
Falla del sensor de
temperatura.
Circuito abierto o
avería del sensor de
temperatura.
Los LED de Light Wash
(Lavado ligero), Rinse
(Enjuague) y Quick
Wash (Lavado rápido)
parpadean
Falla del sensor de
temperatura.
Corto circuito o avería del
sensor de temperatura.
SI NECESITA MÁS AYUDA, VISITE HAIER.COM O COMUNÍQUESE
CON LA LÍNEA DE AYUDA AL CONSUMIDOR LLAMANDO AL
1‑877‑377‑3639.
Page 83

81
GARANTÍA LIMITADA
SERVICIO EN EL HOGAR
GARANTÍA COMPLETA POR UN AÑO
Durante 12 meses a partir de la fecha de
compra original en la tienda, Haier reparará o
reemplazará cualquier pieza del aparato sin
costo, incluyendo la mano de obra, si la misma
falla debido a defectos en los materiales o en la
mano de obra.
Haier puede reemplazar o reparar, a su sola
discreción, cualquier pieza, subsistema, incluso
el producto entero.
El producto debe ser accesible, sin
inconvenientes, e instalarse de forma adecuada
para recibir el servicio técnico de reparación por
parte de la garantía.
GARANTÍA LIMITADA
Después de un año a partir de la fecha de
compra original en la tienda, Haier proveerá una
pieza sin costo, como se indica a continuación,
para reemplazar la pieza mencionada como
resultado de defectos en los materiales o en
la mano de obra. Haier se hará responsable
solamente por el costo de la pieza. Cualquier
otro costo tales como la mano de obra, los
cargos por viaje, etc., serán responsabilidad del
propietario.
Del segundo al tercer año
Durante 36 meses a partir de la fecha de la
compra original, Haier cambiará sin cargo
cualquier pieza que falle debido a un defecto en
la fabricación.
Tina de acero inoxidable y revestimiento
interior de la puerta
La tina de acero inoxidable y el revestimiento
interior de la puerta tienen garantía por el
período que dure el lavavajillas en el caso de
oxidación.
NOTA: Esta garantía comienza en la fecha de
compra de este producto, y el recibo original
deberá presentarse al representante autorizado
de servicio antes de hacerse las reparaciones
bajo la garantía.
Excepciones: Garantía bajo uso comercial
90 días en la mano de obra a partir de la
fecha de compra original
90 días en las piezas a partir de la fecha de
compra original
No es aplicable ninguna otra garantía.
PARA OBTENER SERVICIO BAJO
LA GARANTÍA
Todo servicio deberá ser realizado por un centro
de servicio autorizado por Haier. Para obtener
el nombre y el número de teléfono del centro
de servicio autorizado más cercano, llame al
1-877-337-3639.
Antes de llamar, tenga a mano la siguiente
información:
Número de modelo y de serie del aparato. El
nombre y la dirección del distribuidor en donde
compró la unidad y la fecha de compra.
Una descripción clara del problema.
Un comprobante de compra (recibo de compra).
Esta garantía cubre servicios para
electrodomésticos dentro de los Estados
Unidos continental y Canadá y donde esté
disponible en Alaska, Hawaii y Puerto Rico.
Lo que no está cubierto bajo esta garantía:
Reemplazo o reparación de fusibles domésticos,
cortacircuitos, cableado o plomería.
Un producto cuyo número de serie original haya
sido removido o alterado.
Cualquier cargo por servicio que no haya sido
identicado especícamente como servicio
normal, como puede ser el área o las horas de
servicio.
Daños a la ropa.
Daños ocurridos durante el transporte.
Daños ocasionados por la instalación o el
mantenimiento inadecuados.
Daños por el uso incorrecto, abuso, accidente,
incendio, inundación o fenómenos de la
naturaleza.
Daños debidos al servicio efectuado por
un distribuidor o centro de servicio que sea
diferente del autorizado por Haier.
Daños ocasionados por la corriente, el voltaje o
el suministro eléctrico incorrectos.
Daños que resulten de cualquier modicación
hecha en el producto, alteración o ajustes no
autorizados por Haier.
Ajuste de los controles manejados por el cliente
según han sido identicados en el manual del
propietario.
Mangueras, perillas, piezas de plomería y todos
los otros aditamentos, accesorios y piezas
desechables.
Cargos por mano de obra, transporte para el
servicio y envío para la remoción y el reemplazo
de las piezas defectuosas que se efectúen
después del período inicial de 12 meses.
Daños ocasionados por un uso diferente al
doméstico normal.
Cualquier gasto de transporte y de envío.
ESTA GARANTÍA LIMITADA REEMPLAZA
TODAS LAS OTRAS GARANTÍAS, EXPRESAS
O QUE INCLUYAN LAS GARANTÍAS DE
COMERCIABILIDAD O DE CAPACIDAD PARA
UN PROPÓSITO EN PARTICULAR
El recurso provisto en esta garantía es exclusivo
y está otorgado en lugar de cualquier otro
recurso.
Esta garantía no cubre daños incidentales o
consecuentes, de modo que las limitaciones
indicadas anteriormente pueden no aplicarse
en su caso. Algunos estados no permiten las
limitaciones acerca de cuánto tiempo dura una
garantía implícita, de modo que las limitaciones
arriba indicadas quizás no le correspondan.
Esta garantía le otorga derechos legales
especícos, y es posible que usted tenga otros
derechos, los cuales varían de un estado a otro.
Haier America
Wayne, NJ 07470
Page 84

IMPORTANT
Do Not Return This Product To The Store
If you have a problem with this product, please contact the
“Haier Customer Satisfaction Center” at
1-877-337-3639.
DATED PROOF OF PURCHASE, MODEL #, AND SERIAL #
REQUIRED FOR WARRANTY SERVICE
IMPORTANT
Ne pas Réexpédier ce Produit au Magasin
Pour tout problème concernant ce produit, veuillez contacter
le service des consommateurs “Haier Customer Satisfaction Center” au
1-877-337-3639.
UNE PREUVE D’ACHAT DATEE EST REQUISE POUR BENEFICIER DE LA GARANTIE.
IMPORTANTE
No regrese este producto a la tienda
Si tiene algún problema con este producto, por favor contacte el
“Centro de Servicio al Consumidor de Haier” al
1-877-337-3639 (Válido solo en E.U.A).
NECESITA UNA PRUEBA DE DE COMPRA FECHADA, NÚMERO DE MODELO
Y DE SERIE PARA EL SERVICIO DE LA GARANTÍA
Made in China
Fabriqué en Chine
Hecho en China
Haier America
Wayne, NJ 07470
HDBC100AFS
Issued: May 2015 Printed in China Part # 00XXXXXXXXX
 Loading...