

Page 1
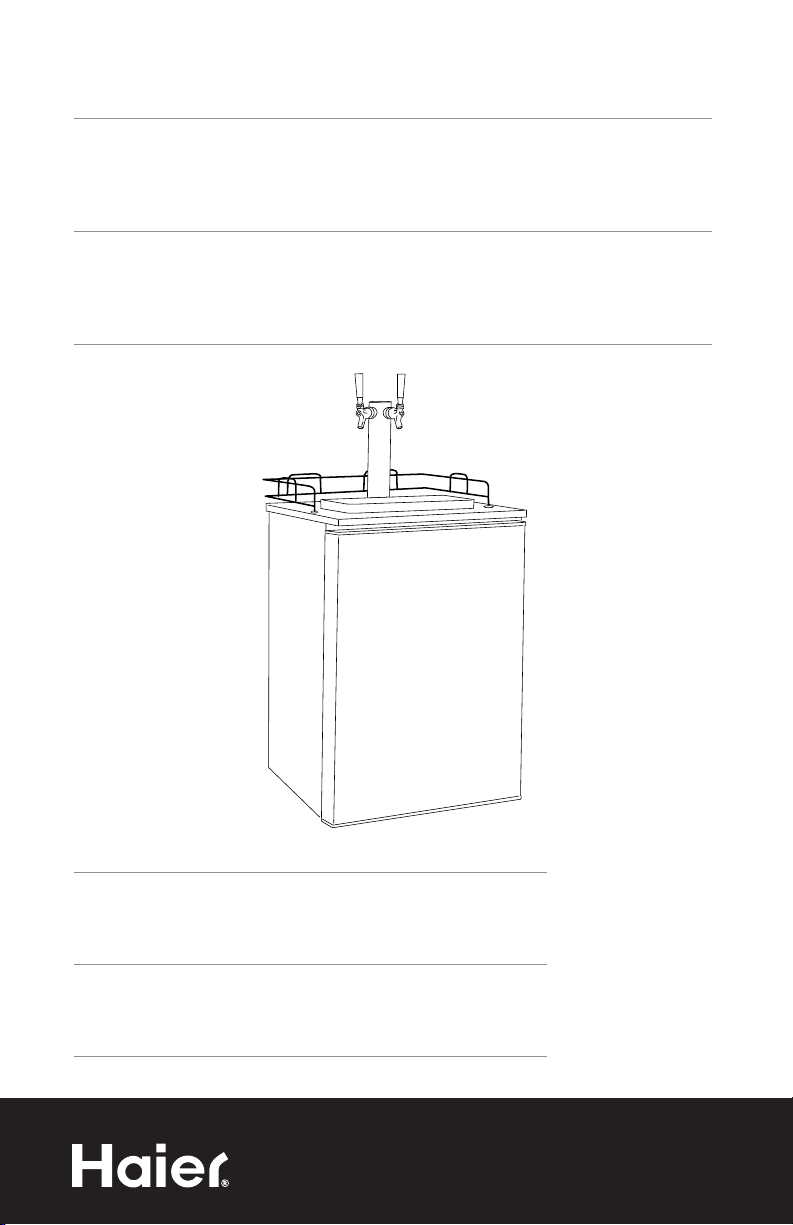
Dual Tap Beer Dispenser BrewMaster
Conjuguent Fontaine à Bière
BrewMaster
Dobla Dispenser De Cerveza
BrewMaster
User Manual
HBF205E
Guide de l’Utilisateur
HBF205E
Manual del Usuario Modelo
HBF205E
Quality n Innovation n Style
Page 2

English
SAFETY PRECAUTIONS
Read all of the instructions before using this appliance.
When using this appliance, always exercise basic safety
precautions, including the following:
1. Use this appliance only for its intended purpose as described in this
operation manual.
2. This appliance must be properly installed in accordance with the installation
instructions before it is used. See the installation section for more details.
3. This appliance must be connected to a proper electrical outlet with the
correct electrical supply.
4. Proper grounding must be ensured to reduce the risk of shock and fire. Do
not cut or remove the grounding plug! If you do not have a three-prong
electric receptacle outlet in the wall, have a certified electrician install the
proper outlet. The wall receptacle must be properly grounded.
5. Never unplug your appliance by pulling on the power cord. Always grasp
the plug firmly and pull straight out from the outlet.
6. Immediately replace worn power cords, loose plugs and power outlets.
7. To reduce the risk of electric shock or fire, do not use extension cords or
adapters to connect the unit to an electrical power source.
8. Unplug your appliance before cleaning or making any repairs.
9. We suggest that a certified technician perform the service if for any reason
this product requires service.
10. If your old appliance is being discarded, we recommend that you remove the
door and leave the shelves in place. This will reduce the possibility of danger
to children.
11. This appliance should not be recessed or built into an enclosed cabinet.
It is designed for freestanding installation only.
12. Do not operate your appliance in the presence of explosive fumes.
13. Do not tamper with the controls.
14. Do not operate this appliance unless all enclosure panels are properly
in place.
15. Do not operate this appliance when parts are missing or broken.
16. Do not use this appliance for commercial use.
17. This appliance is designed for indoor use only and should not be
used outdoors.
18. To reduce the risk of injury, do not allow children to play in or on the
appliance. Close supervision is necessary when the appliance is used
near children.
1
Page 3

English
19. The appliance door must be closed during operation. Do not leave the door
open when children are near the dispenser.
Important Safety Precautions of CO2 (Carbon Dioxide) Gas
1. CO2 gas can be dangerous! CO2 cylinders contain high-pressure
compressed gas, which can be hazardous if not handled properly.
Make sure you read and understand all the procedures for the CO2
cylinders before installation.
2. Always connect the CO2 cylinder to a regulator! Failure to do so may
cause an explosion resulting in possible death or injury when the cylinder
valve is opened.
3. Never connect the CO2 cylinder directly to the product container.
4. Always follow the correct procedures when changing cylinders.
5. Never drop or throw a CO2 cylinder.
6. Always keep CO2 cylinders away from heat. Store extra cylinders in
a cool place (preferably 70˚ F). Securely fasten with a chain in an
upright position when storing.
7. Always ventilate and leave the area immediately if CO2 leakage
has occurred!
8. Always check the D.O.T. (Department of Transport) test date on the cylinder
neck before installation. If it has been over 5 years, do not use. Return the
cylinder to your gas supplier.
9. Never connect a product container unless there are at least two safety
devices in the pressure system: one on the CO2 regulator and the other
on the product container or in the pressure gas line.
SAVE THESE INSTRUCTIONS
FOR FUTURE USE
DANGER!
Risk of child entrapment! Before throwing away your
old appliance, remove the door so that children may
not easily become trapped inside.
Thank you for purchasing our Haier
product. This easy-to-use manual
will guide you in getting the best
use of your beer dispenser.
Remember to record the model and
serial number. They are on a label
in back of the unit.
Model number
Serial number
Date of purchase
2
Page 4

English
TAblE OF CONTENTS
SAFETY PRECAUTIONS ................................................................1-2
General Safety ................................................................................1
CO2 (Carbon Dioxide) Gas Safety .....................................................2
UNPACKING AND ACCESSORIES INVENTORY ..........................4
PARTS AND FEATURES .................................................................5
PROPER LOCATION ......................................................................6
ELECTRICAL CONNECTIONS......................................................... 6
ASSEMBLY INSTRUCTIONS ..........................................................7-11
Installing the Casters ........................................................................ 7
Installing the Beer Tap ......................................................................7
Installing the Guardrail ..................................................................... 8
Installing the CO2 Regulator and CO2 Cylinder ...................................8
Tapping the Beer Keg (Single-Valve Type Barrel) ..................................9
Important Safety Message for Draft Beer Dispensing ............................11
OPERATING YOUR BEER DISPENSER ..........................................12
Dispensing the Beer ......................................................................... 12
Understanding Beer Temperature .......................................................13
Understanding the Temperature Control Setting ...................................13
Normal Operating Sounds ................................................................13
BEER SERVING GUIDE.................................................................. 14
Beer Serving Tips ............................................................................. 14
What a 1/2 Barrel Keg (Full Keg) of Beer Gives You ........................... 14
Tips for Cleaning Beer Glasses .......................................................... 14
2 Simple Tests for Cleaning Beer Glasses ...........................................14
ENERGY SAVING TIPS .................................................................16
PROPER CARE AND CLEANING OF THE BEER DISPENSER ........ 17
Installing the Cleaning Kit ................................................................. 17
Cleaning and General Maintenance ..................................................18
TROUBLESHOOTING GUIDE ........................................................20-23
WARRANTY ..................................................................................24
3
Page 5

English
UNPACkINg ANd ACCESSORIES INVENTORY
1. Remove all packing materials. This includes the foam base and all adhesive
tape holding the accessories both inside and outside.
2. Inspect and remove any remaining packaging, tape or printed materials
before turning on the beer dispenser.
Note: Allow the beer dispenser to stand in an upright position for 2 hours before
turning on the power.
Check all supplied accessories in the carton to be sure that all pieces are present
and in good condition. A checklist of accessories is listed below for your
reference. If you find any accessories that are not in good condition or are
missing, please contact our customer service department for assistance.
Our Toll-Free number is 1-877-337-3639.
2 Keg Couplers (Beer Taps), Low Profile Type
1 CO2 Regulator, Single Gauge, Dual Outlet
1 CO2 Cylinder, 5 lbs.
1 Cleaning Kit, Including: 32 Ounce Bottle With Cap
4 Ounce Powder Cleaner
Faucet / Line Cleaning Brush
Spanner Wrench (For Installing Beer Faucets to
Draft Arm)
1 Draft Arm, 2 Faucet
Type Including: 2 Faucets
2 Red CO2 Lines
4 Hose Clamps
2 Black Knobs
1 3” Lower Gasket
1 CO2 Cylinder Ratainer (Bracket, nut and screw)
1 Guardrail
1 Drip Tray
4 Casters
1 Wrench
4 Large Phillips Head Screws
8 Small Phillips Head Screws
2 Retainer Fixing Screws
1 Keg Joining Bracket Kit
4
Page 6
English
PARTS ANd FEATURES
7
86
5
4
3
2
1. Casters (Total 4)
9
10
11
1
7. Dual Chrome Beer Tap
2. Interior Keg Support
3. Cabinet
4. C02 Tank
5. Work Top
6. Chrome Guardrail
5
8. Adjustable Thermostat (Located in
the rear)
9. Drip Tray
10. 1/4 Barrel Kegs (Not included
shown for illustration purpose only)
11. Keg joining Bracket
Page 7

PROPER lOCATION
• To ensure that your beer dispenser works at the maximum efficiency it was
designed for, install it in a location where there is proper air circulation,
plumbing and electrical connections.
• Choose a location where the beer dispenser will be away from heat and will
not be exposed to direct sunlight.
• This beer dispenser is designed for indoor use only and should not be
used outdoors.
• This beer dispenser is a freestanding design and should not be placed in a
built-in or recessed area.
• The following dimensions are the recommended clearances around the
beer dispenser.
Sides .....................3/4" (19mm)
Back ..........................1" (25mm)
ElECTRICAl CONNECTIONS
Grounding Instructions
This appliance must be grounded. In the event of an electrical short circuit,
grounding reduces the risk of electric shock by providing an escape wire for the
electric current. This appliance is equipped with a cord containing a grounding
wire and a grounded plug. The plug must be inserted into an outlet that is
properly installed and grounded.
English
• Improper use of the plug may result in the risk of electric shock.
• Consult a qualified electrician or service technician if the grounding
instructions are not completely understood or if in doubt as to whether
the appliance has been properly grounded.
Wiring Requirements
This appliance must be plugged into a 15Amp, 115 Volt, 60Hz
GROUNDED OUTLET.
Note: Where a standard two-prong outlet is encountered, it is the personal
responsibility and obligation of the consumer to have it replaced with a
properly grounded three-prong outlet.
Extension Cords
We do not recommend the use of an extension cord with this unit.
Power Interruptions
Occasionally, there may be power interruptions due to thunderstorms or
other causes. Remove the power cor d from wall outlet when a power
outage occurs. When power has been restored, re-plug the power
cord into wall outlet.
6
Page 8
Caster
Wrench
Nut
Large Philip Head
Small Phillips Head
Draft Arm Assembly
Gasket
Beer Hose
Guard Rail
Handle
pilot holes
English
ASSEmblY INSTRUCTIONS
Read carefully and understand all installation instructions before installing the
beer dispenser. If after completing the process you are still unsure whether the
beer dispenser has been properly installed, we recommend that you contact a
qualified installer.
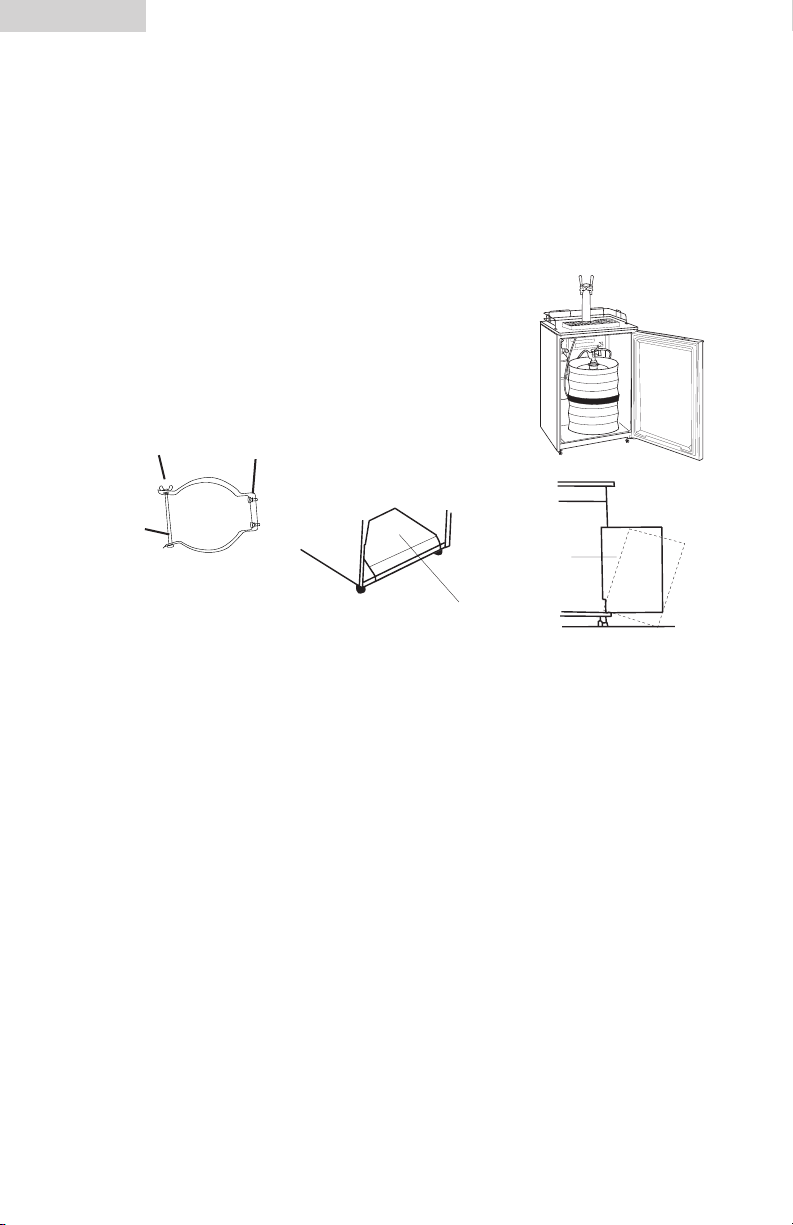
Installing the Casters
Follow the steps below to install the casters.
1. Empty the inside of the cabinet completely
and lay the beer dispenser down sideways.
We recommend that you place a piece of
cardboard or cloth underneath the cabinet to
prevent dents or scratches to the cabinet.
2. Insert the casters into the holes on the bottom
corners of the cabinet. Tighten each caster by turning the nut clockwise with
the wrench provided.
3. Once all four casters have been tightened evenly, stand the cabinet in an
upright position.
Installing the Beer Tap
Follow the steps below to install the beer tap.
1. First, remove the cabinet tap hole cover
Note: Store this plug in a safe place
2. Place the gasket over the hoses on the
3. Pass the beer tubes through the gasket
4. Push both the hoses and the beer
5. Align the holes of the draft arm with the gasket and pilot holes on the worktop
6. Secure the draft arm to the cabinet by inserting four large Phillips Head screws
7
located on the worktop. Firmly grasp
cover, twist and pull upward.
as it will be required when
converting the beer dispenser
into a beverage center.
bottom of the draft arm.
to the base of the draft arm.
hose through the hole in the worktop
until the draft arm is resting on top
of the cabinet.
of cabinet. Make sure that the faucets are facing the front.
into the holes and tightening.
Page 9
Installing the Guardrail
Follow the steps below to install the guardrail on
the worktop.
1. Place the guardrail on top of the cabinet.
2. Align all holes of the guardrail with the holes
of the cabinet.
3. Secure the guardrail to the cabinet with eight
small Phillips-Head screws.
Installation Instructions
Note: Your CO2 cylinder is shipped empty to avoid any possible accidents
during transportation. When you purchase the first keg of beer, have your
CO2 cylinder filled by your local compressed gas supplier. (See Welding
Supply in Yellow Pages)
WARNING!
CO2 can be dangerous! CO2 cylinders contain high-pressured gas, which
can be hazardous if handled improperly.
They must be handled with care.
English
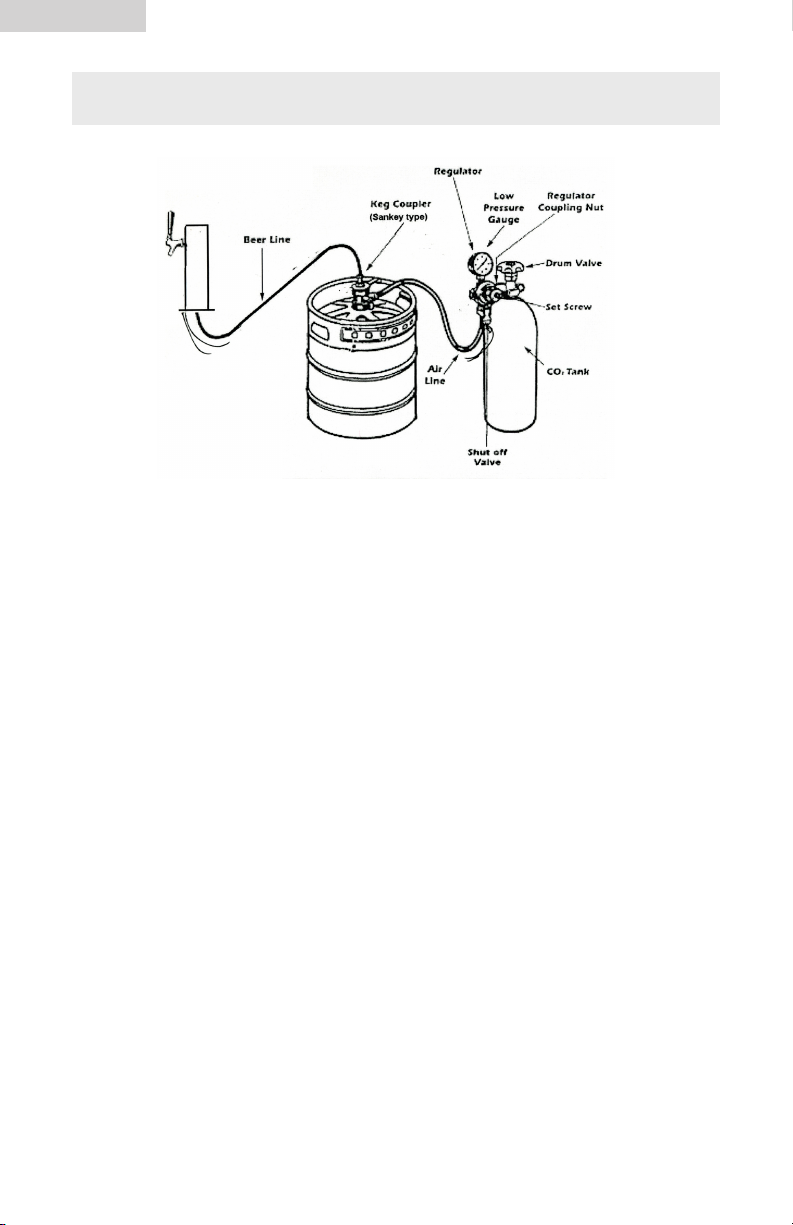
Tapping the Beer Keg (American Sankey Type Barrel)
Your beer dispenser comes with “Lo-Boy Sankey Coupler American Type.”
This brand name is the most widely used in the United States. Before purchasing
a keg, check with your beer distributor to make sure that an American Sankey
Tap can be used. (Replacement and other taps are available at
www.draughttech.com)
Remove and identify the following components from
the parts box:
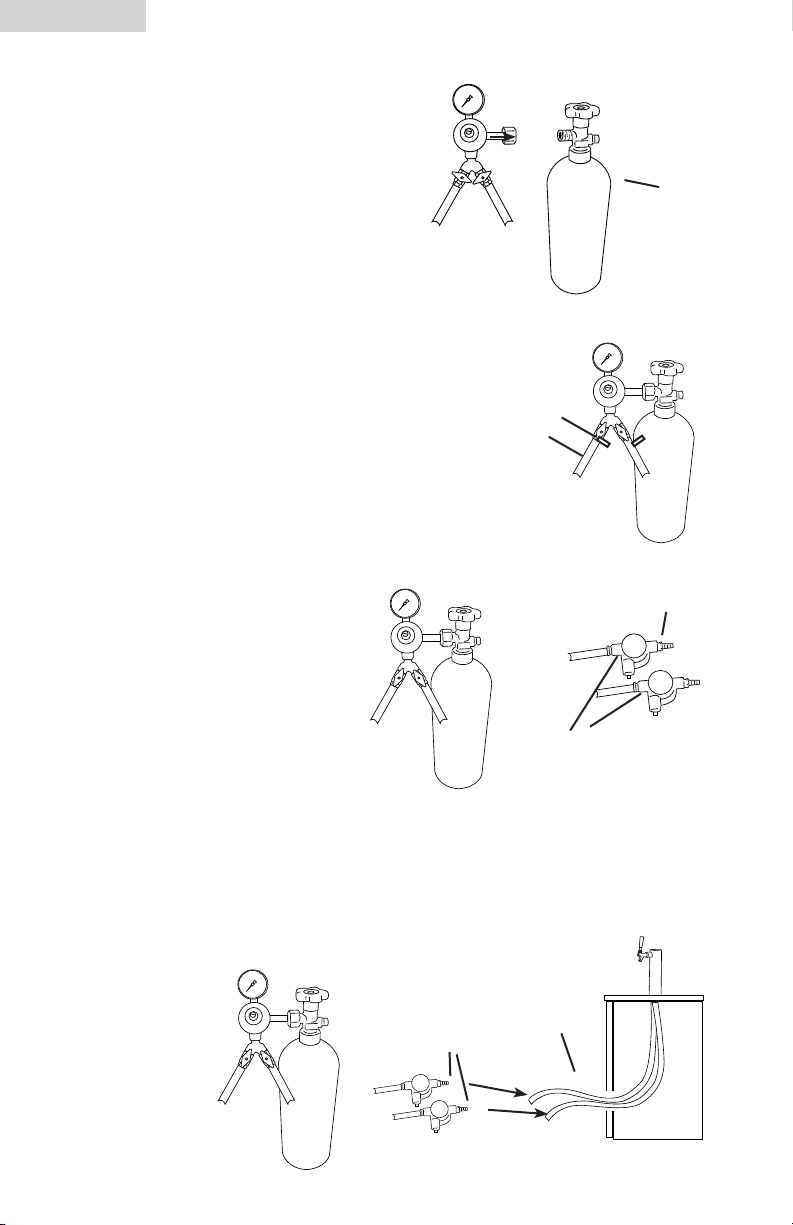
1. (1) CO2 Regulator – single gauge – dual outlet
2. (1) CO2 Tank – 5 pound - EMPTY
3. (2) Keg couplers – low profile type (Lo-Boy Sankey Coupler
American Type)
4. (4) White plastic squeeze clamps
5. (2) 4 foot long red hose
6. (1) Cleaning kit
BE SURE THAT BEFORE INSTALLATION YOU HAVE FILLED YOUR
TANK WITH GAS
8
Page 10
English
STEP 1
DO NOT TURN ON GAS YET
Connect the CO2 regulator to tank by
screwing regulator nut onto threaded tank
valve. HAND TIGHTEN ONLY – it is not
necessary to use a wrench to tighten this
nut. At this point make sure that both the
shut off (black) valves are in the off (sideways) position.
STEP 2
Attach one red gas hose to each of the shut off valve
outlets on the bottom of the regulator and clamp tight
using two of the white squeeze clamps provided.
Clamp
Red
Hose
STEP 3
Attach the other end of each red gas hose to
the LARGER of the two hose barbs
on the keg coupler and secure with
the remaining two white squeeze
clamps.
C02 Cylinder
Keg Coupler
Large Barb
STEP 4
Locate the two clear hoses from the draft arm
installed previously.
(These should be inside the refrigerator at this point). Attach one clear
beer hose to the SMALLER hose barb on each keg coupler being
certain to push the hose completely onto the barb. This connection
does not require a white squeeze clamp.
Small Barb
9
Clear Hose
Page 11
T
U
R
N
C
L
O
C
K
W
I
S
E
PUSH DOWN
THEN
English
STEP 5
Note: Make sure the body of the keg coupler is in the closed (up) position
before installing it on the beer keg.
Install keg joining bracket to the first 1⁄4 barrel keg. Place one of the two keg
couplers onto the first (bottom) keg and turn clockwise to engage. To activate
push down the coupler and turn clockwise. BE SURE THAT THE HOSES ARE
OVER THE KEG JOINING BRACKET. It is normal to have some beer spray from
the keg during this process.
Keg Joining Bracket
1/4 Barrel Keg
STEP 6
Place the second (top) keg into the top of the keg joining bracket
and tighten side screws. Place the remaining keg coupler onto the top keg and
turn clockwise to engage. To activate push down the coupler and turn clockwise.
It is normal to have some beer spray from the keg during this process.
IMPORTANT: The red and white hose of the bottom keg
should be routed over the split of the
joining bracket as shown in the picture.
Note: Be sure keg couplers are engaged completely
prior to inserting kegs in to the beer dispenser.
STEP 7
YOU MAY NOW TURN ON THE GAS AT THE TANK
AND OPEN BOTH BLACK HANDLES TO THE UP/DOWN
POSITION. With a flat head screw driver, turn screw on
top of regulator clockwise until the top gauge reads 8 PSI
STEP 8
At this time check the flow of beer by pulling each of the
taps forward. Make sure you use a container so as not to
spill the beer on the unit.
STEP 9
Remove the nut from the retainer bolt. Use two retainer fixing screws to secure
the retainer to the holes on the back of the cycliner. Then slide the cylinder
through the retainer and place it in the cabinet. Then tighten the retainer nut.
Carefully tilt the two beer kegs combination and rest the edge on the stainless
steel keg floor support on the bottom of the interior cabinet. Slide the kegs in
slowly, ensuring that it is properly located. THIS MAY REQUIRE 2 PEOPLE
TO COMPLETE.
10
Page 12
El Apoyo del barril
El Barril de la cerveza
Levante Vertical
English
Note: If only one keg is to be dispensed you must still complete all the above
steps. Simply leave one keg coupler disconnected in the upright / locked
position. Please make sure that the black shut off valves are on the C02
regulator are in the off position.
When stacking 2 kegs be certain to securely install the included
keg joining bracket with the supplied hardware.
Make sure the hoses are not damaged by the kegs.
Wing Nut
Fixing Screws
Retainer
Screw
CO2 Retainer
Important Safety Message for Draft Beer Dispensing
When CO2 is used for draft beer dispensing, the system must be adequately
protected against excessive pressure build-up. This is accomplished by the
already installed two safety devices with adequate relief capacity in the system.
Safety devices are installed in the following places:
A. On or immediately downstream from the CO2 regulator.
B. On the keg coupler.
11
Page 13

OPERATINg YOUR bEER dISPENSER
Dispensing Beer
Follow the steps below to dispense beer.
1. Make sure that the beer dispenser is plugged in properly to a 120V, 60Hz,
15 Amp grounded AC outlet.
2. Place the drip tray under the beer faucet.
3. Open the beer faucet by pulling the tap towards you quickly and completely
to dispense the beer.
Note: If for any reason the beer does not come out of the tap, refer to the
trouble-shooting guide on page 17.
4. Increase the pressure if the beer runs too slowly. At the correct pressure and
temperature, a 10oz. glass should be filled in 5 seconds.
5. Hold the glass steady at a 45˚ angle. When it is 2/3 full, start straightening
the glass. Proper foam should be a tight creamy head and the collar on an
average glass should be 3/4" to 1" high.
Note: It is normal to see condensation forming on the outer surface of the
faucet. It is caused by the difference in temperature between the cold beer
and the inner surfaces of the faucet when beer is flowing through the line.
English
12
Page 14

English
Understanding Beer Temperature
• The recommended temperature for serving chilled beer is between 34˚ and
38˚F. To maintain this temperature in average room conditions of 70˚F, set the
thermostat to "Normal."
Note: During the summertime when temperatures are warmer, we recommend
that you adjust the control to a cooler setting accordingly.
• Select and maintain the proper temperature inside the refrigerator cabinet.
This is necessary for maintaining the flavor freshness of beer.
• The best temperature for storing a keg is between 38˚ and 40˚F.
• Excessively cold or warm temperatures inside the refrigerator cabinet may
cause a loss of flavor.
Understanding the Temperature Control Setting
The temperature control is located at the rear of the unit on the
bottom left-hand corner. After turning the unit on, you must wait
24 hours for the unit to cool properly. You may then adjust the
temperature setting based on your needs and preferences.
Automatic Defrosting
It is not neccessary to defrost the beer dispenser/refrigerator. Ice that has
deposited on the evaporator is automatically defrosted when the compressor
cycles off. The defrosted water collects in the water collection tray at the rear
of the unit and evaporates.
Understanding Normal Operating Sounds
• Bubbling or gurgling sounds and slight vibrations are the result of the
refrigerant circulating through the cooling coils.
• Sizzling or popping sounds occur during the automatic defrost cycle.
• Dripping sounds occur as ice melts from the evaporator and flows into the
water collection tray during the automatic defrost cycle.
• Cracking or popping sounds are caused by the expanding and/or contracting
of the cooling coils during the automatic defrost cycle.
13
Page 15

bEER SERVINg gUIdE
Beer Serving Tips
The following tips will help you serve the perfect beer.
Before serving beer from the tap, check for the following:
• Cleanliness • Temperature • CO2 pressure
Usable Keg Size Combinations:
1) Two 1/4 barrel kegs
2) Two 1/6 barrels kegs (narrow)
3) One 1/4 barrel (slim) keg One 1/6 barrel (narrow) keg
4) One 1/2 barrel keg
English
14
Page 16

English
Tips for Cleaning Beer Glasses
For the freshest flavor, it is important to serve beer in clean glasses. For your
convenience, the following tips explain how to properly clean beer glasses before
serving beer.
• Do not wash beer glasses together with glasses that have contained milk or
any other fatty substance.
• An excessive amount of germicide build-up will also leave a fatty film on the
glasses, which may cause flat beer.
• Wash glasses thoroughly with a good detergent to remove all fatty substances
(i.e. lipstick).
• Do not use soap.
• Do not wipe glasses dry. Allow glasses to air-dry by placing them on a wire
rack or on corrugated metal.
• Rinse in fresh cold water just before serving beer. It is best to serve beer in a
wet glass.
Two Simple Tests for Clean Beer Glasses
1. Wash the glasses using your usual method. Immerse the glass heel first in
clean water. Empty the glass. If water droplets cling to the glass or if spots
appear on the glass while pouring, the glass has not been cleaned properly.
A clean glass should air-dry crystal clear.
2. Again, wash the glass using your usual method. Pour out the water and then
shake salt into the wet glass. If salt does not cling to the entire inside wall of
the glass and clear unsalted spots remain, the glass is not clean.
15
Page 17

English
ENERgY SAVINg TIPS
Follow the energy-saving tips below for optimum efficiency.
• Limit the opening and closing of the door on hot and humid days. When you
open the door, close it quickly to prevent hot air from entering.
• Check regularly for proper air circulation around the unit to make sure that the
unit receives sufficient airflow.
• Keep the door gasket clean and straight to ensure a proper seal. If the
door gasket is not sealed properly, hot air may easily enter into the unit,
making the interior temperature warmer. The compressor must then run
continuously to keep the unit cool, thus making the energy consumption
very high and inefficient.
Note: Replace a damaged door gasket to restore energy efficiency.
16
Page 18
English
PROPER CARE ANd ClEANINg OF THE bEER
dISPENSER
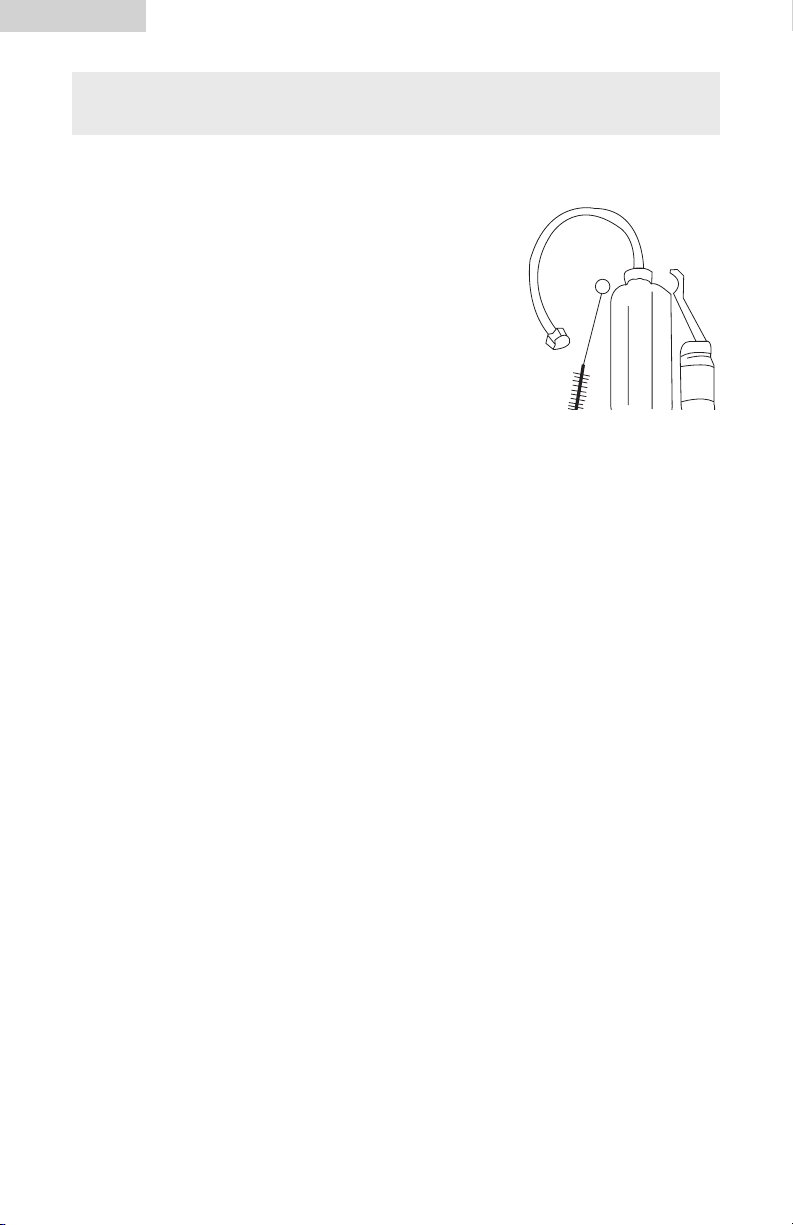
Instructions for Using Cleaning Kit
1. Mix one gallon of warm water and one ounce of
cleaner in a bucket. DO NOT USE SOAP.
2. Remove the cleaner cap assembly, fill the jar and
reassemble. Leave the remaining solution in the
bucket.
3. Turn off the air cock on the regulator and turn off
the valve on the CO2 tank.
4. Disconnect the keg coupler from the keg and then
disconnect the beer line from the tap.
5. Remove the faucet from the draft tower with the wench provided and attach
the fitting from the end of the cleaning bottle in its place. Make sure there is
a washer in the back of the fitting.
6. Hold the cleaning jar upside down until the solution runs through to the
bucket. DO NOT SQUEEZE THE JAR. THIS WILL CAUSE THE SOLUTION
TO LEAK.
7. Fill the jar with clean cool water and repeat the process until clear water
flows into the bucket.
8. Rinse the keg couple in the bucket with the remaining solution and then in
the bucket with the clean water.
9. Remove the cleaning fitting from the tower and replace the faucet. Make
sure the washer is in the back of the faucet.
10. Reattach the beer hose to the keg coupler and attach the keg coupler to
the keg.
Repeat the process for the additional tap system.
17
Page 19
English
Cleaning and General Maintenance
General Interior and Exterior Cabinet Cleaning
1. Prepare a cleaning solution of 3-4 tablespoons of baking soda mixed with
warm water. Use a sponge or soft cloth dampened with the cleaning solution
to wipe down the interior and exterior surfaces of the cabinet.
2. Rinse with clean, warm water and dry with a soft cloth.
Note: Do not use harsh chemicals, abrasives, ammonia, chlorine bleach,
concentrated detergents, solvents or metal scouring pads. Some of these
products may dissolve, damage and/or discolor the cabinet finish.
Door Gasket Cleaning
1. Clean the door gasket with a damp cloth every three months. The gasket must
be kept clean and pliable to ensure a proper seal.
2. Petroleum jelly applied lightly to the hinge side of the gaskets will keep the
gasket pliable and ensure a good seal.
Cleaning Behind the Beer Dispenser
1. We recommend that you clean the rear of the refrigerator at least
twice a year.
Note: Some operating environments may require more frequent cleaning.
2. Use a vacuum or a brush to clean the coils.
WARNING!
To avoid electric shock, always unplug your beer dispenser before
cleaning. Failure to do so may result in possible death or injury.
CAUTION!
Before using cleaning products, always read and follow the
manufacturer’s instructions and warnings to avoid personal injury
and product damage.
18
Page 20
English
kEg CONNECTIONS
How do I replace an empty CO2 tank?
1. Close tank drum valve by turning clockwise.
2. Unscrew adjustment Set Screw (counter-clockwise) as far as it will go and
close shut off valve.
3. Remove regulator from empty tank.
4. Remove dust cap from the new full tank. Open and close drum valve quickly
to blow of the dust from the outlet.
5. With drum valve in closed position, reattach regulator to the tank. Be sure to
check the washer, which is pre-installed on the CO2 regulator.
6. Open drum valve all the way. (This is important because this drum valve seals
in two places.)
7. Readjust regulator pressure by turning set screw and open shut off valve.
Tank Information: Tank must always be fastened in the upright position.
It takes about 1/2 lb. of CO2 to dispense 1/2 barrel keg of
beer. A 5 lb. CO2 tank should dispense between 8-10 1/2
barrel kegs or 18-20 1/4 barrel kegs. Full weight of 5 lb. tank
is appx. 17-1/2 lbs.
19
Page 21

English
TROUblESHOOTINg gUIdE
When dispensing beer into the glass, if you find that the beer is Cloudy, Flat,
Bubbly, Off-Taste, Sour, Wild or Tail-End Beer, refer to some of the following hints.
Beer Condition: Cloudy Beer
The beer in the glass appears hazy, and not clear.
Cause 1
Excessively low temperatures may cause hazy or cloudy beer, particularly when
the beer lies in the cold coil for long periods of time.
Correction
• Make certain that the lines are thoroughly cleaned and then raise the
temperature slightly.
Cause 2
The beer faucet was only opened partially.
Correction
• Open the faucet quickly and completely.
• Replace any worn washers and parts in the faucet when necessary to allow the
faucet to be fully opened.
Beer Condition: Flat Beer
Beer lacks its usual brewery-fresh flavor. The foamy head disappears quickly.
Cause 1
The glass is greasy.
Correction
• Do not wash beer glasses together with glasses that have contained milk or
any other fatty substance. An excessive amount of germicide build-up may
also leave a fatty film, which will cause beer to go flat.
• It is preferable to steam and sterilize glasses where health laws permit.
• Wash glasses thoroughly with a good detergent to remove all fatty substances
(i.e. lipstick).
• Do not use soap.
• Do not wipe the glasses dry. Permit glasses to air-dry by placing them on a
wire rack or on corrugated metal.
• Rinse the glasses in fresh cold water just before serving beer. It is best to serve
beer in a wet glass.
Cause 2
Improper drawing of beer into the glass.
Correction
• Open the faucet quickly and completely.
• Proper foam should be a tight creamy head. The collar on the average glass
should be 3/4" to 1" high. Beer drawn without head has the appearance of
being flat.
20
Page 22

English
Cause 3
Not enough pressure.
Correction
• Increase the pressure if beer runs too slowly. The correct flow should fill a
10oz. glass in 5 seconds.
• Check the pressure source to determine whether there are obstructions in the
air line.
• Replace a sluggish air source or the CO2 regulator and gauge.
• The tank pressure must always be higher than the pressure used on the keg.
• Always apply pressure to the keg before drawing beer.
Beer Condition: Loose Foam
Large soap-like bubbles that settle quickly.
Cause 1
This is generally the same as the Flat Beer condition. See the Flat Beer
causes above.
Beer Condition: Off-Taste Beer
Often bitter and bitey; sometimes completely lacking in flavor and zest. May
also have an oily or foul odor, which carries an unpleasant taste.
Cause 1
Improper cleaning of the tap.
Correction
• Brush and clean the tap properly. It should be scoured using a detergent, then
rinsed clean.
Cause 2
Contaminated gas line.
Correction
• Gas line should be examined. If contaminated, it should be replaced.
Cause 3
Improper type of gas line
Correction
• A rubber hose will absorb and retain odors. Be sure you are using the hoses
supplied with your unit.
General Recommendations for Off-Taste Beer:
Beer lines should be flushed after each keg is emptied. Maintain fresh, clean,
sanitary conditions around the dispenser. Smoke, cooking odors and disinfectants
will harm the taste and flavor of beer. These conditions, as described, may come
from an air source or from actual contact with the glass when drawing beer.
21
Page 23

English
Beer Condition: Sour Beer
Beer tastes and smells extremely yeasty or moldy.
Cause 1
Improper transporting of beer kegs. Beer that is delivered on an open truck
during high summer temperatures may start a secondary fermentation process.
Correction
• If possible, have beer kegs delivered in a closed, refrigerated truck. If an open
truck is used, cover beer kegs with tarpaulin for protection against summer heat
and warm air.
Beer Condition: Wild Beer
Beer that is either all foam, or too much foam and not enough liquid.
Cause 1
Improper drawing of beer into the glass.
Correction
• Open the faucet quickly and completely.
• Proper foam should be a tight, creamy head, and the collar on the average
glass should be 3/4" to 1" high.
Cause 2
Yeast growth or other obstructions in the faucet, which is usually caused by
a non-refrigerated faucet. Worn faucet parts and worn faucet washers.
Correction
• Check for, and replace any kinked, dented, or twisted lines from the barrel to
the faucet.
• Examine for frayed coupling washers behind the faucet that may cause an
obstruction.
Cause 3
The beer was stored in an area that is not cold enough and has thus
become warm.
Correction
• Keep kegs of beer refrigerated at all times at 40°F or below all year round!
Cause 4
Too much pressure.
Correction
• First, check the source of pressure to make sure it is working. Then adjust the
pressure to suit a properly balanced system. The correct beer flow should fill a
10oz. glass in 5 seconds at the proper temperature.
22
Page 24

English
Cause 5
Excessive amounts of CO2.
Correction
• Adjust the CO2 pressure to as low as possible. However, the applied pressure
must remain slightly higher than the internal pressure of the beer. No more
than 18 lbs. should be applied. The proper amount should be between
6 - 9 psi/lbs.
• The colder the beer and the higher the applied CO2 pressure, the more
rapid the absorption of CO2 by the beer. This over-carbonates the beer,
causing Wild Beer.
• Check the pressure regulators periodically to ensure that the operating
pressures remain constant.
Cause 6
Not enough pressure or no pressure at all.
Correction
• Check for defective air vents.
• Always turn the pressure on before drawing beer.
Cause 7
An old keg of beer which has not been stored in cool temperatures has
been used.
Correction
• If beer has been allowed to stand in warm temperatures beyond 45°F for an
excessive length of time, it may begin a secondary fermentation. Store beer at
40°F or below all year round.
Beer Condition: Tail-End Beer
Beer draws well at the beginning of the keg. Towards the bottom, it becomes
flat. This is more likely to occur when beer turnover is slow.
Cause 1
Where air is used as a pressure source, air replaces the CO2 in beer, causing
flat beer. This problem is not evident when beer is being drawn rapidly.
Correction
• Whenever possible, use CO2 Gas as a pressure source.
23
Page 25

lImITEd WARRANTY
English
In-Home Service
What is covered and for
how long?
This warranty covers all defects in
workmanship or materials for a
period of:
12 months labor
12 months parts
5 years sealed system(parts only)
The warranty commences on the date
the item was purchased and the original purchase receipt must be presented
to the authorized service center before
warranty repairs are rendered.
EXCEPTIONS: Commercial or
Rental Use warranty
90 days labor (carry-in only)
90 days parts
No other warranty applies
What is covered?
1. The mechanical and electrical parts,
which serve as a functional purpose
of this appliance for a period of
12 months. This includes all parts
except finish and trim.
2. The components of the sealed system
e.g. hermetic compressor, condenser
and evaporator from manufacturing
defects for a period of 5 years from
the date of purchase. Any
damages to such components
caused by mechanical abuse or
improper handling or shipping will
not be covered.
What will be done?
1. We will repair or replace, at our
discretion any mechanical or
electrical part which proves to be
defective in normal usage during the
warranty period so specified.
2. There will be no charge to the
purchaser for parts and labor
on any covered items during the
initial 12 month period. Beyond
this period only parts are covered
in the remaining warranty. Labor
is not provided and must be paid
by the customer.
3. Contact your nearest authorized
service center. For the name of the
nearest service center please visit
our website at www.HaierAmerica.
com or call 1-877-337-3639 for
more information.
THIS WARRANTY COVERS
APPLIANCES WITHIN THE
CONTINENTAL UNITED STATES,
PUERTO RICO AND CANADA.
IT DOES NOT COVER
THE FOLLOWING:
Damages from improper installation.
Damages in shipping.
Defects other than manufacturing.
Damage from misuse, abuse, accident,
alteration, lack of proper care and
maintenance or incorrect current
or voltage.
Damage from other than householduse.
Damage from service by other than an
authorized dealer or service center.
D ecorative trims.
Transportation and shipping.
Labor (after the initial 12 months).
THIS LIMITED WARRANTY IS GIVEN
IN LIEU OF ALL OTHER WARRANTIES,
EXPRESSED OR INCLUDING THE
WARRANTIES OF MERCHANTABILITY
AND FITNESS FOR A PARTICULAR
PURPOSE.
The remedy provided in this warranty
is exclusive and is granted in lieu of all
other remedies.
This warranty does not cover
incidental or consequential damages,
so the above limitations may not
apply to you. Some States do not
allow limitations on how long an
implied warranty lasts, so the above
limitations may not apply to you.
This warranty gives you specific legal
rights, and you may have other rights,
which vary, from state to state.
Haier America
New York, NY 10018
24
Page 26

Français
CONSIgNES dE SÉCURITÉ
ImPORTANTES
Lisez toutes les instructions avant d’utiliser cet équipement.
Lorsque vous utilisez cet équipement, veuillez respecter les
consignes de sécurité de base suivantes:
1. Utilisez cet équipement uniquement pour l’usage auquel il est destiné comme
indiqué dans ce manuel.
2. Cet équipement installé correctement et conformément instructions
d’installation utilisation. Consultez la section l’installation pour de plus
amples détails.
3. Cet équipement doit être branché sur une électrique d’une tension adéquate.
4. Cet équipement doit être mis à la masse (terre) afin d’éviter tout risque
d’électrocution et d’incendie. Ne pas couper ni retirer la broche de masse!
Si votre prise de courant murale ne peut accueillir une fiche à trois broches,
veuillez faire électricien qualifié en installe une. La doit être reliée à la terre.
5. Ne débranchez jamais cet équipement en tirant sur le cordon d’alimentation.
Saisissez fermement la fiche et tirez tout droit sur cette dernière.
6. Remplacez immédiatement tout cordon, toute fiche ou prise usé(e),
desserré(e).
7. Afin de réduire tout risque d’électrocution et d’incendie, n’utilisez pas de
rallonges ni d’adaptateurs afin de raccorder l’équipement à une source de
courant.
8. Débranchez l’équipement avant de le nettoyer ou de le réparer.
9. Nous vous recommandons de contacter un technicien réparateur breveté si
cet équipement tombe en panne.
10. Si vous comptez jeter votre ancien équipement, nous vous recommandons de
retirer la porte et de laisser les étagères en place. Vous réduirez ainsi tout
risque de danger pour les enfants.
11. Cet équipement ne doit pas être placé dans un renfoncement ni encastré
en aucune façon. Il a été conçu afin d’être placé seul sans l’intégrer à un
espace clos.
12. Ne faites pas fonctionner cet équipement en présence de vapeurs explosives.
13. Ne jouez pas avec les commandes.
14. N’utilisez pas cet équipement à moins que toutes les cloisons soient bien
en place.
15. N’utilisez pas l’équipement lorsque des pièces s’avèrent défectueuses.
16. N’utilisez pas votre équipement à des fins commerciales ou industrielles.
17. Cet équipement a été conçu afin d’être utilisé à l’intérieur et ne doit en aucun
cas être utilisé à l’extérieur.
1
Page 27

Français
18. Afin de réduire tout risque de blessures, ne laissez pas les enfants jouer sur
ou à l’intérieur de cet équipement. Il est nécessaire de surveiller attentivement
les enfants lorsque vous utilisez cet équipement à proximité des enfants.
19. La porte de l’équipement doit être fermée lorsqu’il fonctionne. Ne laissez
pas la porte ouverte lorsque des enfants se trouvent à proximité de la
fontaine à bière.
Consignes de sécurité importantes pour le CO2
(gaz carbonique)
1. Le gaz carbonique ou dioxyde de carbone peut être dangereux! Les bouteilles
de CO2 contiennent du gaz sous pression qui peut être dangereux si vous ne
le manipulez pas correctement. Veuillez lire et comprendre toutes les
consignes
concernant les bouteilles de CO2 avant de procéder à l’installation.
2. Veuillez toujours raccorder la bouteille de CO2 à un régulateur!
Le non-respect de cette consigne risque de provoquer une explosion et
d’entraîner des blessures graves voire mortelles lorsque vous ouvrez la valve
de la bouteille.
3. Ne raccordez jamais la bouteille de CO2 directement sur le contenant,
tonnelet, baril ou fût de bière.
4. Respectez toujours la marche à suivre lorsque vous changez de bouteille.
5. Ne jamais lancer ou laisser tomber une bouteille de CO2.
6. Conservez toujours les bouteilles de CO2 loin des sources de chaleur. Stockez
les bouteilles de rechange dans un endroit frais (de préférence 70°F ou 21°C).
Fixez solidement la bouteille en place avec une chaîne, en la plaçant droite.
7. Assurez-vous que l’endroit possède une bonne ventilation et quittez
immédiatement cet endroit en cas de fuite de CO2!
8. Vérifiez toujours la date à laquelle la bouteille a été testée par le D.O.T.
(Ministère des transports américain) figurant sur le col de la bouteille avant
l’installation. Si cette date est antérieure à 5 ans, n’utilisez pas la bouteille.
Ramenez la bouteille à votre fournisseur.
2
Page 28

Français
DANGER!
Les enfants risquent de se faire pièger et de demeurer bloqués
l'intérieur de l'équipement. Avant de jeter votre ancien
équipement, retirez la porte afin que les enfants ne puissent se
faire pièger à l'intérieur.
Merci pour acheter notre produit
de Haier. Ce manuel facile d'utilise
vous dirigera dans obtenant le
meilleur usage de votre
distributeur de bière.
N'oubliez pas de noter le modèle
et le numéro de série. Ces derniers
se trouvent sur une étiquette au dos
de l'appareil.
Numéro du modèle
Numéro de série
Date d'achat
3
Page 29

TAblE dES mATIÉRES
CONSIGNES DE SÉCURITÉ ..............................................................1-3
La sécurité en général .........................................................................1-2
La sécurité avec le CO2 (gaz carbonique) ..............................................2-3
DÉBALLAGE ET INVENTAIRE DES ACCESSOIRES ............................... 5
PIÈCES ET CARACTÉRISTIQUES .......................................................... 6
CHOISIR UN BON EMPLACEMENT .................................................... 7
INSTRUCTIONS DE MONTAGE .................................................... 8-12
Montage des roulettes ............................................................................8
Montage du robinet de bière ..................................................................8
Montage de la barre de sécurité ............................................................. 9
Montage du régulateur et de la bouteille de CO2 ......................................9
Mise en perce du fût de bière (baril à valve unique) ................................10
Consigne de sécurité importante pour le tirage de la bière .......................10
UTILISATION DE LA FONTAINE À BIÈRE ................................... 13-14
Servir la bière .....................................................................................13
Comprendre la température de la bière ..................................................13
Comprendre la commande de réglage de température.............................13
Dégivrage automatique ........................................................................14
Bruits de fonctionnement normaux ..........................................................14
Français
GUIDE POUR SERVIR LA BIÈRE........................................................15
Conseils pour tirer la bière .................................................................... 15
Équilence pour 1/2 fût de bière ............................................................15
Conseils pour nettoyer les verres de bière ............................................... 15
2 tests faciles pour nettoyer les verres à bière .........................................15
ENTRETIEN ET NETTOYAGE DE LA FONTAINE DE BIÈRE ........... 17-18
Montage du kit de nettoyage ................................................................17
Nettoyage et entretien général ..............................................................18
KEG CONNECTIONS .......................................................................19
GUIDE DE DÉPANNAGE ............................................................. 20-23
GARANTIE ........................................................................................24
4
Page 30

Français
dÉbAllAgE ET INVENTAIRE dES ACCESSOIRES
1. Retirez tous les matériaux d'emballage y compris le socle en mousse et le
ruban adhésif retenant les accessoires à l'intérieur et à l'extérieur. Sortez
l'équipement en le glissant et retirez le plastique ou la mousse de protection
protégeant le compresseur lors du transport.
2. Inspectez l'équipement et retirez tout matériau d'emballage restant, ruban
adhésif ou documentation avant de mettre sous tension la fontaine à bière.
Remarque: Placez la fontaine à bière debout afin qu'elle soit droite pendant 2
heures avant de la mettre en marche.
Vérifiez tous les accessoires fournis avec le carton et assurez-vous que toutes les
pièces sont en bon état. Reportez-vous à la liste ci-dessous. Si un des accessoires
est en mauvais état ou s'avère manquant, veuillez contacter notre service à la clientèle. Notre numéro d'assistance sans frais est le 1-877-337-3639.
2 Coupleurs de tonnelet
1 Détendeur de CO2, double jauge
1 Cartouche de CO2 de 2,270 kg
1 Kit de nettoyage comprenant : 1 Bouteille de 945 ml avec un bouchon
115 g de poudre nettoyante
1 Robinet/Une brosse à nettoyer
1 Clé (pour installer les robinets de bière au
manchon à pression)
1 Manchon à pression
2 Robinets: 2 Robinets
2 lignes de CO2 rouges
4 Serre-joints
2 Boutons noirs
1 Joint d’étanchéité de 76 mm
1 étrier de fixation pour bouteille de CO2 (Le crochet, la noix, et visser)
1 barre de protection
1 bac ramasse-gouttes
4 roulettes
1 clé
4 vis cruciforme Phillips
8 petites vis cruciforme Phillips
2 étagères métalliques
1 parenthèse se joignante de barillet
5
Page 31

PIèCES ET CARACTÉRISTIqUES
7
86
Français
5
4
3
2
1. Roulettes (4)
2. Support baril interne
3. Coffret
4. Cartouche de CO2
5. Plan de travail
6. Protection en chrome
9
10
11
1
8. Thermostat réglable
(Situé à l’arrière)
9. Bac récolte-gouttes
10. Baril Tonnelets (Non inclus, montré
à des fins d’illustration)
11. Dispositif de raccordement du
tonnelet
7. Double robinets en chrome
6
Page 32

Français
CHOISIR UN bON EmPlACEmENT
• Afin d'être certain que votre fontaine à bière fonctionne à son rendement
maximum, montez-la dans un emplacement présentant une bonne circulation
d'air, des points de raccordement adéquats pour la plomberie et l'électricité.
• Choisissez l'emplacement où vous comptez monter la fontaine à bière en
veillant qu'il soit loin de toute source de chaleur et qu'il ne soit pas en
plein soleil.
• Cette fontaine à bière a été conçue afin d'être utilisée à l'intérieur
uniquement et ne doit en aucun cas être utilisée à l'extérieur en plein air.
• Cette fontaine à bière ne doit pas être placée dans un renfoncement ni
encastrée en aucune façon. Elle a été conçue afin d'être placée seule sans
l'intégrer à un quelconque système.
• Les dimensions suivantes sont les distances de dégagement et de sécurité
autour de la fontaine à bière:
Côtés ............... 3/4 po. (19 mm)
Dessus ................. 1 po. (25 mm)
CONNEXIONS ElECTRIqUES
Fonder Instructions
Cet appareil doit être fondé. En cas d'un court-circuit électrique, fonder réduit le
risque de décharge électrique en fournant un fil d'évasion pour le courant
électrique. Cet appareil est équipé avec une corde contenant un fil fondant et un
bouchon fondé. Le bouchon doit être inséré dans une sortie qui est
convenablement installé et est fondé.
• L'usage déplacé du bouchon peut avoir pour résultat le risque de
décharge électrique.
• Consulter un électricien ou un technicien d'entretien qualifié si les
instructions fondant ne sont pas complètement comprises ou si en doute
si l'appareil a été convenablement fondé.
Conditions d'installation éléctrique
Cet appareil doit être connecté à un 15 Ampli, 115 Volt, 60Hz A FONDE
LA SORTIE.
Note: Où une sortie de deux-broche de norme est rencontrée, c'est la
responsabilité et le devoir personnelle du consommateur pour avoir l'a
remplacé avec un a fondé convenablement la sortie de trois-broche.
Extension Cordes
Nous ne recommandons pas l'usage d'une rallonge avec cette unité.
Alimenter des Interruptions
De temps en temps, il peut y avoir les interruptions de pouvoir en raison
des orages ou les autres causes. Enlever le cordon d'alimentation de la
prise murale quand une coupure de courant arrive. Quand le pouvoir a
7
été restauré, re-bouche le cordon d'alimentation dans la prise murale.
Page 33

Clé plate
Noix
La grande Vis
de Tête de Philip
Petite Vis à
tête phillips
Esquisser
l'Assemblée de Bras
Joint
Canal de bière
Garder la Barre
voler la noix
Poignée
piloter des
Français
INSTRUCTIONS dE mONTAgE
Veuillez lire attentivement et comprendre toutes les instructions d'installation de la
fontaine à bière. Si après avoir terminé le montage, vous n'êtes pas certain que
la fontaine à bière a été correctement installée, nous vous recommandons de
contacter un installateur qualifié.
Montage des Roulettes
Suivez les étapes suivantes pour monter les roues.
1. Videz complètement l'intérieur de la caisse et
placez la fontaine à bière à plat, sur le côté.
Nous vous conseillons de placer un morceau
de carton ou de chiffon sous le caisson afin
d'éviter de rayer ce dernier.
2. Introduisez les roulettes dans les trous des coins inférieurs du caisson. Serrez
chaque roue en tournant l'écrou dans le sens des aiguilles d'une montre avec
la clé fournie.
3. Après avoir serré les quatre roues, placez le caisson debout.
Montage du Robinet de Bière
Suivez les étapes ci-dessous pour monter le robinet de bière.
1. Premièrement, retirez le cache-trou du coffret situé sur le plan de travail.
Saisissez fermement le cache, tournez-le et tirez-le vers le haut.
Remarque: Rangez ce capuchon en lieu sûr car il sera nécessaire pour
convertir le distributeur de bière en distributeur de boissons.
2. Placez le joint d’étanchéité sur les tuyaux au
bas du manchon à pression.
3. Passez les tubes à bière à travers le joint à la
base du manchon à pression.
4. Appuyez sur les deux tuyaux et le tuyau de
sortie de la bière à travers le trou dans le
plan de travail jusqu’à ce que le manchon à
pression soit sur le coffret.
5. Alignez les trous du manchon à pression avec
le joint d’étanchéité et les trous des pilotes sur
le plan de travail.
6. Sécurisez le manchon à pression sur le coffret
en insérant quatre large vis Philips dans les trous et en les serrant fermement.
8
Page 34

Français
Montage de la Barre de Sécurité
Suivez les étapes ci-dessous afin d’installer la
barre de sécurité sur la surface de travail.
1. Positionnez la barre sur le dessus du caisson.
2. Alignez tous les trous de la barre sur ceux du
dessus du caisson.
3. Fixez la barre sur le caisson en utilisant huit
petites vis cruciforme Phillips.
Instructions d'installation
Note: Votre CO2 cylindre est expédié vide pour éviter des accidents possibles
pendant le transport. Quand vous achetez le premier fût de bière, avez
votre CO2 cylindre rempli par votre fournisseur de gaz serré local. (Voir
Soudant la Provision dans lesPages Jaunes)
AVERTISSEMENT!
Le CO2 peut être dangereux ! Les bouteilles de CO2 contiennent un
gaz à haute pression qui peut peut être dangereux si ce dernier
n’est pas manipulé correctement. Ces bouteilles doivent être
manipulées précaution.
Taper le Fût de Bière (le Baril de Type de SanKey américain)
Votre distributeur de bière est fourni avec "l'Attelage de Sankey de
Voilà-Garçon Type américain". Ce nom de marque est le le plus largement
utilisé aux Etats-Unis. Avant d'acheter un fût, un contrôle avec votre distributeur
de bière pour s'assurer qu'un Robinet de Sankey américain peut être utilisé.
(Le remplacement et autre robinet sont disponibles à www.draughttech.com)
Retirez les différentes pièces du carton :
1. (1) Détendeur de CO2, double jauge, double prise
2. (1) Cartouche de CO2 de 2,270 kg
3. (2) Coupleurs de tonnelet
4. (4) Attaches blanches
5. (2) Tuyaux rouges de 122 cm
6. (1) Kit de nettoyage
VÉRIFIEZ QUE VOUS AVEZ BIEN REMPLI LE RESERVOIR DE GAZ.
9
Page 35

ETAPE 1
N’ALLUMEZ PAS ENCORE LE GAZ
Connectez le détendeur de CO2 au
réservoir en utilisant les écrous sur
la valve du réservoir. SERREZ A LA
MAIN. Il n’est pas nécessaire d’utiliser
une clé pour serrer cet écrou.
ÉTAPE 2
Attachez un tuyau rouge à chaque sortie de la valve
au bas du détendeur et fixez bien en utilisant les
attaches blanches fournies.
ÉTAPE 3
Attachez l’autre extrémité des
tuyaux rouges à la pointe la plus
large sur les coupleurs et fixez bien
en utilisant les deux autres
attaches blanches.
Français
C02 Cylinder
Clamp
Red
Hose
Keg Coupler
Large Barb
ÉTAPE 4
Trouvez les deux tuyaux transparents du manchon à pression installé
précédemment. (Ils devraient être à l’intérieur du réfrigérateur.) Attachez un tuyau
à bière transparent à la PETITE pointe de chaque coupleur, en faisant bien
attention de pousser le tuyau bien profondément dans la pointe. Cette connexion
ne nécessite pas d’attache blanche.
Small Barb
Clear Hose
10
Page 36

T
U
R
N
C
L
O
C
K
W
I
S
E
PUSH DOWN
THEN
Français
ÉTAPE 5
Note: Assurer que le corps de l'attelage de fût est dans le fermé
(augmente) la position avant de l'installer sur le fût de bière.
Installez le dispositif de raccordement au premier quart du tonnelet. Placez un
des deux coupleurs sur le bas du premier tonnelet et tournez dans le sens des
aiguilles d’une montre. Pour activer, poussez vers le bas et tournez dans le sens
des aiguilles d’une montre. ASSUREZ-VOUS QUE LES TUYAUX SOIENT AU
DESSUS DU DISPOSITIF DE RACCORDEMENT. Il est normal d’avoir de fines
gouttelettes de bière durant la procédure.
Keg Joining Bracket
1/4 Barrel Keg
ÉTAPE 6
Placez le deuxième tonnelet du haut dans le haut du dispositif de raccordement
du tonnelet et serrez les vis. Placez le coupleur restant sur le tonnelet du haut et
tournez dans le sens des aiguilles d’une montre. Il est normal d’avoir de fines
gouttelettes de bière durant la procédure.
IMPORTANT: Le tuyau rouge et blanc du fût inférieur
devrait être mis en déroute la division de
rthe de ove du crochet joignant selon
l'image.
Note: Etre attelages de fût sûr que les sont
complètement engagés avant insérer de fûts
dans au distributeur de bière
ÉTAPE 7
VOUS POUVEZ A PRESENT OUVRIR LE GAZ ET OUVRIR
LES DEUX POIGNEES NOIRES. Avec un tournevis plat
tournez le détendeur dans le sens des aiguilles d’une
montre jusqu’à ce qu’il soit inscrit sur la jauge
55 kPa (8 PSI).
ÉTAPE 8
Vérifiez maintenant le débit de la bière en appuyant sur les languettes. Utilisez un
récipient pour ne pas que de la bière coule sur l’appareil.
11
Page 37

Support du füt
Füt de Biére
Sou;evez le Füt
Français
ÉTAPE 9
Enlever le mais du boulon de retenue. Utiliser deux vis réparant de retenue pour
obtenir le de retenue aux trous sur le dos du cycliner. Alors glisser le cylindre
bien que le reatiner et l'arpente dans le cabinet. Alors resserrer la noix de
reatiner. Soigneusement pencher la deux combinaison de fûts de bière et reposer
le bord sur le soutien de plancher de fût d'acier inoxydable sur le fond du
cabinet intérieur. Glisser les fûts dans, s'assurant lentement qu'il est
convenablement localisé. CE MAI EXIGE que 2 GENS POUR aient COMPLETE
Note: Si seulement un fût va être dispensé vous doit toujours complète toutes les
étapes ci-dessus mentionnées. Simplement partir un attelage de fût
débranché dans le montant/la position fermée à clef. S'il vous plaît
s'assurer que le noir a éteint des soupapes sont sur le CO2 régulateur est
dans le de la position.
En empilant 2 fûts sont certains installer assurément le fût inclus
joignant le crochet avec le matériel fourni. Assurer que les tuyaux
ne sont pas écrasées par les fûts.
Wing Nut
Retainer
Screw
C02 Retainer
Fixing Screws
Le Message important de Sûreté pour la Bière Pression
Dispense
Quand CO2 est utilisé pour la bière pression dispense, le système doit être
suffisamment protégé contre l'accumulation de pression excessive. Ceci est
accompli par l'a installé déjà deux appareils de sûreté avec la capacité de
soulagement suffisante dans le système.
Les appareils de sûreté sont installés dans les endroits suivants:
A. Sur ou tout de suite en aval du CO2 régulateur.
B. Sur l'attelage de fût.
12
Page 38

Français
l'OPÉRATION dE VOTRE dISTRIbUTEUR dE bIèRE
Bière dispensant
Suivre les étapes au dessous de dispenser la bière.
1. S'assurer que le distributeur de bière est branché sur convenablement à un
120V, 60Hz, 15 Ampli a fondé la sortie de courant alternatif.
2. Placer le plateau de goutte sous le robinet de bière.
3. Ouvrir le robinet de bière en tirant le robinet vers vous rapidement
et complètement dispenser la bière.
Note: Si pour n'importe quelle raison que la bière ne sort pas du robinet, se
référer au dépanner le guide à la page 17.
4. Augmenter la pression si la bière court aussi lentement. A la pression et à la
température correctes, un 10 once. le verre devrait être rempli de 5 seconde.
5. Tenir le verre assure à un 45° l'angle. Quand c'est 2/3 plein, commencer
àredresser le verre. La mousse correcte doit être une tête crémeuse tendue et le
col sur un verre moyen doivent être 3/4" à 1" haut.
Note: C'est normal pour voir former de condensation sur la surface extérieure
du robinet. Il est causé par la différence dans la température entre la
bière froide et les surfaces intérieures du robinet quand la bière coule par
la ligne.
13
Page 39

La Température de Bière de compréhension
• La température recommandée pour servir a refroidi la bière est entre 34° et
38°F. Pour maintenir cette température dans les conditions de pièce de
moyenne de 70°F, régler le thermostat à “Normal.”
Note: Pendant l'été quand les températures sont plus chaudes, nous
recommandons que vous ajustiez le contrôle à un cadre plus frais en
conséquence.
• Choisir et maintenir la température correcte dans le cabinet de réfrigérateur.
Ceci est nécessaire pour maintenir la fraîcheur de parfum de bière.
• La meilleure température pour emmagasiner un fût est entre 38° et 40°F.
• Excessivement froid ou chauffer des températures dans le cabinet
de réfrigérateur peuvent causer une perte de parfum.
Note: La bière aigre est produite à la suite de la fermentation secondaire
au-dessus de 45°F.
La compréhension du Cadre de Régulation de la
Température
La régulation de la température est localisée à l'arrière de
l'unité sur le coin à gauche inférieur. Après avoir allumé
l'unité, vous devez attendre 24 heures pour l'unité pour
refroidir convenablement. Vous pouvez ajuster alors lat
empérature réglant a basé vos besoins et vos préférences.
Français
Dégivrer automatique
Ce n'est pas neccessary pour dégivrer le distributeur/réfrigérateur de bière.
Glacer cela a déposé sur l'évaporateur est automatiquement dégivré quand le
compresseur va à vélo de. L'eau dégivrée recueille dans le plateau de collection
d'eau à l'arrière de l'unité et évapore.
La compréhension Opération Normale Semble
• Le glouglou ou gargouiller semblent de le et les vibrations insignifiantes sont le
résultat du réfrigérant circulant par les bobines de refroidissement.
• Grésillant de ou le son sautant arrivent pendant l'automatique dégivre le cycle.
• Dégouttant des sons arrivent comme la glace fond de l'évaporateur et des fluxs
dans le plateau de collection d'eau pendant l'automatique dégivre le cycle.
• Craquant de ou le son sautant sont causés par l'augmenter et/ou contractant
des bobines de refroidissement pendant l'automatique dégivre le cycle.
14
Page 40

Français
gUIdE POUR SERVIR lA bIèRE
Conseils pour tirer la bière
Les conseils suivants vous aideront à servir une bière parfaite.
Pour servir une bière à partir du robinet de la même qualité que celle tire
directement des cuves de l’usine, verifies les points suivants:
• Propreté • Température
• Pression • Utilisez le CO2 à chaque fois que c’est possible.
Les Combinaisons utilisables de Taille de Fût:
1) Deux 1/4 fûts de baril
2) Deux 1/6 fûts de barils (réduit)
3) Un 1/4 baril (mince) le fût Un 1/6 baril (réduit) le fût
4) Un 1/2 fût de baril
15
Page 41

Français
Conseils pour Nettoyer les Verres de Bière
Pour une fraîcheur optimale, il est important de servir la bière dans des verres
propres. Pour faciliter les choses, les conseils suivants vous expliquent comment
nettoyer correctement les verres avant de servir la bière.
• Ne lavez pas les verres de bière en même temps que les verres ayant contenu
du lait ou toute autre substance grasse.
• Toute accumulation excessive d'agent antiseptique et de germicide dans
laissera une pellicule grasse sur les verres et risque d'éventer la bière et de
rendre plate.
• Lavez les verres attentivement en utilisant un bon liquide-vaisselle afin
de retirer toute trace de corps gras (par ex: rouge à lèvres, etc.)
• N’utilisez pas de savon.
• N’essuyez pas les verres. Laissez les verres sécher à l’air libre en les plaçant
sur un égouttoir ou une tôle ondulée.
• Rincez les verres avec de l’eau propre juste avant de servir la bière. Il est
recommandé de servir la bière dans un verre mouillé.
Deux tests faciles pour nettoyer les verres de bière
1. Lavez les verres en utilisant votre méthode habituelle. Trempez toujours le pied
du verre en premier dans l’eau propre. Videz le verre. Si des gouttes d’eau
collent au verre ou si des traces apparaissent sur le verre lorsque vous videz
soncontenu, le verre n’a pas été lave correctement. Un verre propre devrait
sécher sans laisser de traces.
2. Lavez à nouveau le verre en utilisant votre méthode habituelle. Versez l’eau
contenu dans le verre et saupoudrez du sel dans le verre mouillé. Si le sel ne
colle pas à toute la paroi intérieure du verre et des endroits clairs non-salés
demeurent, le verre n’est pas propre.
16
Page 42

Français
ENTRETIEN ET NETTOYAgE dE lA FONTAINE à bIèRE
Instructions pour l’utilisation du kit de nettoyage
1. Mélangez 3,80 litres d’eau chaude et 30 g de nettoyant dans un seau.
N’UTILISEZ PAS DE SAVON.
2. Retirez le bouchon, remplissez le bocal et réassemblez.
3. Fermez l’air du détendeur et fermez la valve de la cap-
sule de CO2.
4. Déconnectez le coupleur du baril et déconnectez ensuite
la ligne de bière du robinet en tournant l’écrou dans le
sens contraire des aiguilles d’une montre.
5. Retirez le robinet de la tour avec la clé fournie et attachez
à la place
l’accessoire à l’arrière de la bouteille de nettoyage.
6. Tenez la bouteille de nettoyant à l’envers jusqu’à ce que la solution coule dans
le godet. NE PRESSEZ PAS LA BOUTEILLE. CELA PROVOQUERAIT DES FUITES
DE LA SOLUTION.
7. Remplissez la bouteille avec de l’eau tiède et recommencez le processus
jusqu’à ce que l’eau qui coule dans le seau soit de l’eau propre.
8. Rincez le coupleur dans le seau avec le reste de la solution et ensuite dans le
seau avec de l’eau propre.
9. Retirez l’accessoire de nettoyage de la tour et remettez le robinet en place.
Assurez-vous que le nettoyant est à l’arrière du robinet.
10. Rattachez le tuyau de la bière au coupleur et attachez le coupleur au
tonneau.
17
Page 43

Français
Nettoyage et Entretien Général
Nettoyage de l'habillage intérieur et extérieur
1. Préparez une solution de 3 à 4 cuillères de bicarbonate de soude avec de
l'eau tiède. Utilisez une éponge ou un chiffon humidifié de solution afin
d'essuyer les surfaces intérieures et extérieures du caisson.
2. Rincez avec de l'eau propre tiède et séchez avec un chiffon doux.
Remarque: N'utilisez pas de produits chimiques puissants, de produits de
nettoyage abrasifs, de l'eau de Javel, de la lessive au chlore,
des détergents concentrés, de solvants ou des tampons récureurs.
Certains de ces produits risquent de dissoudre, d'endommager et
de décolorer le fini de l'habillage.
Nettoyage du joint de porte
1. Nettoyez le joint de porte avec un chiffon humide tous les trois mois. Le joint
doit demeurer propre et souple afin d'assurer l'étanchéité de la porte.
2. Appliquez une fine couche de vaseline (pétrolatum) sur le côté du joint où se
trouve les charnières afin que ce dernier demeure souple et assure une bonne
étanchéité.
Nettoyage du dos de la fontaine
1. Nous vous conseillons de nettoyer l'arrière du réfrigérateur au moins deux fois
par an.
Remarque: Certains environnements d'exploitation risquent de devoir être
nettoyés plus fréquemment.
2. Utilisez un aspirateur ou une brosse afin de nettoyer les serpentins.
AVERTISSEMENT!
Pour éviter tout risque d'électrocution, débranchez toujours votre
fontaine à bière avant de la nettoyer. Le non-respect de cette
consigne risque d'entraîner des blessures graves voire mortelles.
ATTENTION!
Avant d'utiliser des produits de nettoyage, veillez à toujours lire et
respecter les instructions et les mises en garde du fabricant afin
d'éviter tout risque de blessure et de dommages matériels.
18
Page 44

Français
CONNEXIONS dE FUT
Comment remplace-t-j'un vide C02 réservoir?
1. La soupape proche de tambour de réservoir en tournant dans le sens des
aiguilles d'une montre.
2. Dévisser la Vis de Série d'ajustement (opposé dans le sens des aiguilles d'une
montre) aussi loin qu'il ira et fermera a éteint la soupape.
3. Enlever le régulateur du réservoir vide.
4. Enlever la casquette de poussière du nouveau réservoir plein. Ouvrir et la
soupape proche de tambour rapidement pour souffler de la poussière de la
sortie.
5. Avec la soupape de tambour dans la position fermée, rattacher le régulateur
au réservoir. Etre sûr de vérifier la rondelle, qui est pré-a installé sur le C02
régulateur.
6. La soupape ouverte de tambour complètement. (Ceci est important parce que
cette soupape de tambour scelle dans deux endroits.)
7. Rajuster de la pression régulatrice en tournant la vis de série et ouvre a éteint
la soupape.
Information de réservoir: Le réservoir toujours doit être attaché dans la position
debout. Il prend environ 1/2 livre de C02 pour
dispenser 1/2 fût de baril de bière. Un 5 livre. C02
réservoir doit dispenser entre 8-10 1/2 fûts de baril ou
18-20 1/4 fûts de baril. Le poids plein de 5 livre le
réservoir est appx. Le 17-1/2 livres.
19
Page 45

Français
gUIdE dE dÉPANNAgE
Lorsque vous tirez la bière dans un verre, si vous trouvez que la bière est trouble,
plate, aigre, incontrôlable, pétille ou a un faux-goût, reportez-vous aux conseils
suivants.
État de la bière: la bière est trouble
La bière dans le verre parait trouble, elle n'est pas claire.
Cause no.1
Toute température excessivement basse risque de rendre la bière trouble, surtout
lorsque cette dernière demeure dans un serpentin froid pendant longue période.
Mesure Corrective
• Nettoyez complètement les conduites et augmentez légèrement la température.
Cause no.2
Le robinet de bière n'était pas complètement ouvert.
Mesure Corrective
• Ouvrez rapidement et complètement le robinet.
• Remplacez toute rondelle usée ainsi que les pièces à l'intérieur du robinet
lorsque cela s'avère nécessaire afin que le robinet puisse s'ouvrir
complètement.
État de la bière: la bière est plate
La bière n'a pas son bon goût habituel, son goût n'est pas celui d'une bière
qui provient directement de la brasserie.
Cause no.1
Le verre est sale et graisseux.
Mesure Corrective
• Ne lavez pas les verres de bières avec d'autres verres car ils peuvent avoir
contenu du lait ou toute autre substance grasse.
• Toute accumulation excessive d'agent antiseptique et de germicide dans l'eau
laissera une pellicule grasse sur les verres et risque d'éventer la bière et de la
rendre plate.
• Il est préférable de nettoyer les verres au jet de vapeur (ou dans une autoclave
à vapeur) ou de stériliser les verres lorsque la réglementation le permet.
• Lavez les verres attentivement en utilisant un bon liquide-vaisselle afin
de retirer toute trace de matière grasse (par ex: rouge à lèvres, etc.)
• N’utilisez pas de savon.
• N’essuyez pas les verres. Laissez les verres sécher à l’air libre en les plaçant
sur un égouttoir ou une tôle ondulée.
• Rincez les verres avec de l’eau propre juste avant de servir la bière. Il est
recommandé de servir la bière dans un verre mouillé.
20
Page 46

Français
Cause no.2
La bière n'a pas été tirée correctement dans le verre.
Mesure Corrective
• Ouvrez rapidement et complètement le robinet.
• La mousse devrait être fine et compacte et le col de mousse devrait mesurer
1,9 cm à 2,5 cm d’épaisseur. Une bière tirée sans chapeau de mousse donne
l'impression que cette dernière est plate.
Cause no.3
Il n'y a pas suffisamment de pression.
Mesure Corrective
• Augmentez la pression si la bière coule trop lentement. Le flux de bière devrait
pouvoir remplir un verre de 29 ml en 5 secondes.
• Vérifiez la source de pression afin de déterminer si la conduite d'air est
bouchée ou obstruée.
• Remplacez toute source de pression trop lente ou le régulateur de CO2 et le
manomètre.
• La pression de la bouteille doit toujours être supérieure à celle utilisée avec le
fût de bière.
• Mettez toujours le fût sous pression avant de tirer la bière.
État de la bière: la mousse se détache
La mousse est caractérisée par des grosses bulles semblables à des bulles de
savon et elle tombe rapidement.
Cause no.1
Ce cas est généralement semblable à celui de la bière plate. Voir les raisons et
causes de la bière plate.
État de la bière: la bière a un faux-goût
La bière peut avoir un goût amer ou fade. Elle peut également avoir un goût
huileux ou un mauvaise odeur et un goût déplaisant.
Cause no.1
Le robinet n'a pas été nettoyé correctement.
Mesure Corrective
• Brossez et nettoyez correctement le robinet. Récurez-le en utilisant
un détergent, puis rincez-le à l'eau claire.
Cause no.2
Ligne de gaz contaminée
Mesure Corrective
• La conduite gazer la ligne doit être examinée. Si elle est contaminée, elle doit
être impérativement remplacée.
21
Page 47

Français
Cause no.3
La conduite gaz est d'un type erroné.
Mesure Corrective
• Un tuyau en caoutchouc absorbera et conservera les odeurs. Etre sûr que vous
utilisez les tuyaux fournis avec votre unité.
Recommandations Générales en cas de Faux-goût:
Les conduites de bière doivent être rincées après chaque fin de fût. Veillez à ce
que le périmètre autour de la fontaine à bière demeure propre. La fumée, les
odeurs de cuisine et les désinfectants nuiront au goût et à la saveur de la bière.
Ces conditions peuvent être causées par la source d'air ou par le contact direct
avec le verre lorsque vous servez la bière.
État de la bière: la bière est aigre
La bière a un fort goût de levure et une forte odeur de levure ou de moisi.
Cause no.1
Les fûts n'ont pas été transportés correctement. La bière qui est livrée sur un
camion ouvert pendant les chauds mois d’été risque de provoquer seconde
fermentation.
Mesure Corrective
• Si possible, faites-vous livrer des fûts de bière par camion frigorifique fermé.
Si la livraison est effectuée par un camion ouvert, couvrez les fûts de bière
avec une bâche afin de les protéger contre la chaleur de l'été.
État de la bière: bière incontrôlable.
La bière est soit constituée exclusivement de mousse, soit presque uniquement de
mousse avec très peu de liquide.
Cause no.1
La bière a été mal tirée dans le verre.
Mesure Corrective
• Ouverte rapidement et complètement le robinet.
• La mousse devrait être fine et compacte et le col de mousse devrait mesurer
1,9 cm à 2,5 cm d’épaisseur.
Cause no.2
Le robinet est bouché par des résidus de levure ce qui est souvent dû au fait que
le robinet n'est pas réfrigéré. Les pièces du robinet et les rondelles sont usées.
Mesure Corrective
• Assurez-vous que les conduites allant du fût de bière au robinet ne sont pas
pliées ni endommagées et remplacez-les si nécessaire.
• Vérifiez que les rondelles du manchon de raccordement situées derrière le
robinet ne s'éffilochent pas car cela risquerait d'obstruer le robinet.
Cause no.3
Cette bière a été stockée dans un endroit qui n'est pas suffisamment froid et la
bière est à présent tiède.
22
Page 48

Français
Mesure Corrective
• Conservez les fûts de bière dans un local réfrigéré d’une température de 40°F
(4.4°C) toute l'année!
Cause no.4
La pression est trop forte.
Mesure Corrective
• Tout d'abord, vérifiez la source de pression afin de vous assurer qu'elle
fonctionne. Ensuite, réglez la pression afin qu’elle corresponde à la taille et à
l'équilibre du circuit. Le débit de bière devrait pouvoir remplir un verre de 29 ml
en 4 secondes à la bonne température.
Cause no.5
Trop de CO2.
Mesure Corrective
• Réglez la pression de Co2 le plus bas possible. Cependant, la pression doit être
légèrement supérieure à celle de la pression interne de la bière. Ne dépassez
pas une pression de 18 livres (8 kg). La pression adéquate devrait être entre
10 et 12 psi/lb.
• Plus la bière est froide et plus la pression de Co2 est forte, et par conséquent
plus vite la bière absorbera le Co2. Cette gazéification excessive de la bière
donnera une bière incontrôlable.
• Vérifiez régulièrement les régulateurs de pression afin de vous assurer que la
pression de fonctionnement est constante.
Cause no.6
Il n'y a pas suffisamment de pression ou pas du tout.
Mesure Corrective
• Vérifiez que les ouvertures d'aérations ne sont pas endommagées.
• Ouvrez toujours la pression avant de servir une bière.
Cause no.7
Vous venez d'utiliser un vieux fût de bière qui n'a pas été stocké à une
température suffisamment froide.
Mesure Corrective
• Si vous avez laissé la bière reposer trop longtemps dans un local à une
température supérieure à 45°F (7°C), la bière risque de fermenter à nouveau.
Conservez les fûts de bière dans un local réfrigéré à 40°F (4.4°C) toute l'année.
État de la bière: bière de fin de fût.
La bière est facile à tirer au début du fût. Vers la fin du fût, est devient plate. Ceci
arrivera plus souvent si la consommation de bière est faible.
Cause no.1
Lorsque l'air est utilisé en tant que source de pression, l'air remplace le CO2 dans
la bière et la rend plate. Ce problème n'est pas toujours évident lorsque la bière
est tirée rapidement.
Mesure Corrective
• À chaque fois que cela est possible, utilisez le CO2 en tant que source de
pression.
23
Page 49

gARANTIE lImITÉE
Français
Dans le Service de Maison
Eléments sous garantie et durée
de la garantie:
Cette garantie couvre tous les défauts
de main-d’œuvre et de matériaux pour
une période de:
12 mois pour la main d’oeuvre
12 mois pour les pièces
5 ans pour le système
d’étanchéité
La garantie prend effet le jour de
l’achat de l’article. Le ticket de caisse
d’origine doit être présenté au centre
de
réparation agréé pour toute réparation
sous garantie.
EXCEPTIONS: Garantie pour
usage commercial ou location.
90 jours pour la main d’œuvre
(service en atelier uniquement)
90 jours pour les pièces
Aucune autre garantie n’est
applicable
Couverture.
1. Les pièces électriques et mécaniques
servant au fonctionnement de
l’appareil, pour une période de 12
mois. Ceci comprend l’ensemble
des pièces, à l’exception de la
finition et des garnitures.
2. Les composants du système
d’étanchéité, tels que le
compresseur hermétique, le
condenseur et l’évaporateur, contre
tous défauts de fabrication, pour
une période de 5 ans à compter
de la date d’achat. Tout dommage
concernant ces composants et
résultant d'un abus d’ordre
mécanique, d’une utilisation
incorrecte, ou de méthodes
d’expédition inadéquates, ne sera
pas compris dans la garantie.
Réparations qui seront
effectuées:
1. Nous nous engageons à réparer ou
remplacer, à notre discrétion, toute
pièce électrique ou mécanique
s’avérant défectueuse dans des
conditions normales d’utilisation,
au cours de la période de
garantie spécifiée.
2. L’acheteur ne subira aucun frais
pour les pièces et la main-d’œuvre
couvertes par la garantie, au cours
de la première période de 12 mois.
Au-delà de cette période, seules les
pièces seront couvertes par la
durée restante de la garantie. La
main-d’œuvre n’est pas pourvue
et est à la charge du client.
3. Contacter le centre de réparations
agréé le plus proche. Pour obtenir
les nom et adresse du centre le plus
proche, appeler le 1-877-337-3639
LES APPAREILS SONT COUVETRS
PAR LA GARANTIE SUR LE
TERRITOIRE CONTINENTAL DES
ETATS-UNIS, Á PUERTO RICO ET
AU CANADA:
Les dommages résultant d’une
installatio incorrecte. Les dommages
survenus pendant le transport. Les
défauts ne résultant pas de la
fabrication.Les dommages résultant
d’un usage incorrect ou abusif, d’un
accident, de modifications, d’un
manque d’entretien ou de
maintenance, ou d’une tension
incorrecte. Les dommages résultant
d’un usage autre que l’usage
ménager. Les dommages résultant
d’un entretien ou de réparations par
quiconque autre qu’un distributeur
ou centre de réparations agréé.
Garnitures décoratives ou ampoules
pouvant être remplacées. Transport et
Frais d’envoi. Main d’œuvre (après la
période initiale de 12 mois)
CETTE GARANTIE LIMITÉE REMPLACE
TOUTE AUTRE GARANTIE EXPRESSE
OU IMPLICITE, Y COMPRIS LES
GARANTIES DE VALEUR
MARCHANDE OU D’ADÉQUATION A
UN USAGE PRECIS.
Le recours offert dans cette garantie est
exclusif et est accordé à l’exclusion de
tout autre.
La garantie ne couvrant pas les
dommages directs et indirects, les
limitations ci-dessus peuvent ne pas
s’appliquer à tous les cas. Certains
états ne permettant pas la limitation de
la durée des garanties implicites, les
limitations ci-dessus peuvent ne pas
s’appliquer à tous les cas.
Cette garantie confère à l’acheteur des
droits spécifiques et celui-ci peut
bénéficier d’autres droits qui varient
selon les états.
Haier America
New York, NY 10018
24
Page 50

Español
PRECAUCIONES DE SEGURIDAD
Lea todas las instrucciones antes de utilizar este producto.
Siempre tenga en cuenta las precauciones básicas seguridad
cuando utilice el dispenser, incluyendo las siguientes:
1. Utilice éste producto sólo para su uso entendido como se describe
este manual.
2. Este artefacto debe estar correctamente instalado de acuerdo a las
instrucciones provistas por este manual antes de utilizarse. Vea la sección de
Instalación para mayor detalle.
3. Este artefacto debe ser conectado a la toma de corriente adecuada con el
adecuado voltage.
4. Debe realizarse la conexión a tierra para reducir el riesgo de shock
eléctrico y fuego. No corte o retire el cable de la conexión a tierra!! Si
usted no posee una entrada o toma para 3 patas llame a un electricista
para que haga la instalación adecuada. La toma de corriente de la pared
debe estar conectada a tierra.
5. Nunca desenchufe la unidad tirando del cable. Siempre agarre el enchufe
firmemente y retire hacia fuera.
6. Inmediatamente reemplace los cables pelados o desgastados, enchufe flojo
o toma de corriente floja.
7. Para reducir el riesgo de shock eléctrico no utilice alargues o adaptadores
para conectar la unidad a una fuente de energía.
8. Desenchufe siempre antes de la limpieza o de reparación.
9. Sugerimos que un técnico especializado realice el service de la unidad en
caso de que el producto lo requiera.
10. En caso de que estuviese desechando el artefacto viejo recomendamos que
retire la puerta del mismo y deje los estantes en el lugar. Esto reduce el
riesgo de daños en presencia de niños.
11. Este artefacto no debe instalarse o ubicarse en un lugar o gabinete
cerrado. Está diseñado solamente para la instalación en lugares libres.
12. No opere esta unidad en presencia de gases explosivos.
13. No fuerze los controles.
14. No opere la unidad a menos que todos los cerramientos y paneles estén
en su lugar.
1
Page 51

Español
15. No opere esta unidad cuando haya partes rotas o que falten.
16. No utilice para uso comercial.
17. Este artefacto está diseñado para uso interno solamente y no debe operarse
al aire libre.
18. Para reducir el riesgo a lesiones no permita que los chicos jueguen con este
artefacto. Se necesita de extrema supervisión cuando la unidad se utiliza
cerca de los niños.
19. La puerta del dispenser debe estar cerrada mientras este en uso. No deje la
puerta abierta mientras se encuentren niños cerca.
Importantes Instrucciones de Seguridad del Dioxido de
Carbono (CO2)
1. El dióxido de carbono (CO2) puede ser peligroso! Los cilindros de CO2
tienen gas comprimido de alta presión, el cual puede ser peligroso si no
está sujeto correctamente. Asegúrese de leer y entender todos los pasos
para la correcta instalación del cilindro.
2. Siempre conecte el cilindro de CO2 a un regulador de gas! Si esto no se
tiene en cuenta existe el riesgo de daños o muerte en caso de que ocurra
una explosión cuando se abra la válvula.
3. Nunca conecte el cilindro de CO2 directamente al contenedor del producto.
4. Siempre siga las instrucciones correspondientes antes de cambiar
un cilindro.
5. Nunca deje caer o arroje un cilindro de CO2.
6 Siempre mantenga el cilindro alejado del calor. Almacene cilindros extras
en lugares frescos (preferentemente 70˚ F). Mantenga los cilindros de forma
vertical, boca arriba, amarrados para evitar que se caigan.
7. Siempre ventile y deje el área despejada en caso de que haya ocurrido una
pérdida del gas.
8. Siempre chequee el test DOT (departamento de transporte) y la fecha en el
cilindro antes de la instalación. Si la fecha fuera mayor a 5 años atrás no
utilice ese cilindro. Devuélvalo a su proveedor de gas.
9. Nunca conecte el contenedor del producto a menos que haya mínimo dos
mecanismos de seguridad en el sistema de presión, uno en el regulador del
CO2 y el otro en el contenedor del producto o en la línea de presión del
gas.
GUARDE ESTAS INSTRUCCIONES
PARA USO FUTURO
2
Page 52

Español
PELIGRO!
Riesgo para niños! Antes de deshacerse de un dispenser viejo
retire la puerta del mismo de modo de asegurarse que ningún
niño jugando se haya quedado atrapado dentro.
Gracias por comprar nuestro
producto HAIER. Este manual
de fácil uso lo guiará para
poder realizar el mejor uso
de su Dispenser.
Recuerde de tomar nota del
modelo y número de serie. Estos se
encuentran en la etiqueta en la
parte trasera de la unidad.
3
No. de modelo
No. de serie
Fecha de compra
Page 53

TAblE dE CONTENIdOS
PRECAUCIONES DE SEGURIDAD ....................................................1-2
Precauciones generales .......................................................................1-2
Dióxido de carbono ............................................................................2-3
INVENTARIO DE ACCESORIOS .......................................................... 5
PARTES Y CARACTERISTICAS .............................................................6
UBICACIÓN APROPIADA .................................................................. 7
INSTRUCCIONES DE ENSAMBLAJE.............................................. 8-11
Instalando las ruedas ............................................................................. 8
Instalación del grifo................................................................................ 8
Instalación de la guía ............................................................................. 9
Instalación del regulador de CO2 y el cilindro........................................... 9
Colocando el barril o tanque de cerveza ...............................................10
Importante memsaje de precaución. ....................................................... 11
UTILIZANDO EL DISPENSER ...................................................... 11-13
Sirviendo cerveza ................................................................................11
Temperatura de la cerveza ....................................................................12
Control de la temperatura .....................................................................12
Descongelado automático .....................................................................12
Sonidos de la operatoria normal ...........................................................13
Español
GUIA PARA SERVIR ...................................................................13-14
Consejos para servir ............................................................................13
Rendimiento de medio tanque de cerveza ..............................................13
Consejos para limpiar los vasos ............................................................14
2 pruebas simples para lavar los vasos ..................................................14
CONSEJOS DE AHORRO DE ENERGÏA ............................................15
CUIDADO Y MANTENIMIENTO DEL DISPENSER ....................... 19-18
Instalación del Kit de limpieza ...............................................................17
Limpieza y mantenimiento general .........................................................18
PROBLEMAS FRECUENTES ......................................................... 19-25
GARANTIA .......................................................................................26
4
Page 54

Español
dESEmPAqUE E INVENTARIO dE ACCESORIOS
1. Retire todos los materiales del embalaje. Esto incluye la base de telgopor o
goma espuma y todas las cintas adhesivas que contienen los accesorios fuera
y por dentro.
2. Inspeccione y retire cualquier otro material del embalaje como cintas y
material impreso antes hacer andar el dispenser.
Nota: Deje que el dispenser haya estado por lo menos 2 horas en la posición
vertical antes de encender.
Controle todos los accesorios para asegurarse de que todas las partes estén
presentes y en buena condición. A continuación hay una lista de todos los
accesorios para referencia. Si faltara alguna pieza o estuviese rota, por favor,
contacte nuestro departamento de servicio para asistencia. El número
es 1 877 227 3639.
2 Acopladores para el barril (grifos de cerveza) que ocupan poco espacio
1 Regulador de dióxido de carbono, calibrador dual
1 Cilindro de dióxido de carbono, 5 libras
1 Equipo de limpieza, que incluye: Botella con tapa de 32 onzas
Limpiador en polvo de 4 onzas
Cepillo para la limpieza de la línea y
el grifo Llave de tuercas (para la conexión
de grifos de la cerveza con el
dispositivo surtidor)
1 dispositivo surtidor con 2 grifos que incluye:
2 grifos
2 líneas de dióxido de carbono rojas
4 abrazaderas para manguera
2 perillas negras
1 junta inferior de 3”
1 cable conductor de aire CO2
2 precintos
1 soporte de cilindro
1 guía de cromo
1 bandeja de goteo
4 rueditas
1 llave
4 tornillos cabeza phillips largos
8 tornillos cabeza phillips cortos
2 cables
1 corchete que ensambla del barrilete
5
Page 55

PIEzAS Y CARACTERíSTICAS
7
86
Español
5
4
3
2
1
1. Ruedecillas (4 en total)
2. Soporte interior del barril
3. Gabinete
4. Tanque de dióxido de carbono
5. Superficie de trabajo
6. Barandilla de cromo
7. Grifo de cerveza doble de cromo
9
10
11
8. Termostato ajustable (ubicado en la
parte trasera)
9. Bandeja de goteo
10. Barriles (no incluidos, se los
muestra sólo con propósitos
ilustrativos)
11. Soporte para la unión de los
barriles
6
Page 56

Español
UbICACION AdECUAdA
• Para asegurar que su dispenser de cerveza opere al máximo de eficiencia
instale el mismo en un lugar donde haya circulación de aire, instalación de
tuberías y conexiones eléctricas.
• Elija una ubicación donde el dispenser esté lejos del calor y no esté expuesto
a la luz del sol.
• Este Dispenser está diseñado solamente para utilizar en interiores, no
debe ser utilizado al aire libre.
• El dispenser no debe colocarse sobre superficies edificadas o en áreas
cerradas.
• Las siguientes dimensiones son el espacio recomendado alrededor del
dispenser:
Laterales ................3/4" (19mm)
Espalda .....................1" (25mm)
CONEXIONES ElECTRICAS
Molió las Instrucciones
Este aparato se debe moler. En caso de un cortocircuito eléctrico, molió reduce
el riesgo de calambre proporcionando un alambre del escape para la corriente
eléctrica. Este aparato se equipa con una cuerda que contiene un molió alambre
y un molió tapón. El tapón se debe meter en una salida que se instala
apropiadamente y es molido.
• El uso Impropio del tapón puede tener como resultado el riesgo de
calambre.
• Consulta un técnico calificado de electricista o servicio si el molió las
instrucciones no se entienden completamente o si dudoso en cuanto a
si el aparato se ha molido apropiadamente.
Alambrar los Requisitos
Este aparato se debe tapar en un 15 amperios, 115 Voltio, 60 Hz MOLIERON
SALIDA.
La nota: Dónde una salida de dos-punta de estándar se encuentra, es la
responsabilidad y la obligación personales del consumidor para
tenerlo reemplazó con un molió apropiadamente salida de tres-punta.
Alargadores
Nosotros no recomendamos el uso de un alargador con esta unidad
Accione las Interrupciones
Ocasionalmente, puede accionar las interrupciones debido a tormentas
u otras causas. Quite la cuerda del poder de la salida de pared cuando
un apagón ocurre. Cuándo poder se ha restaurado, re-tapa la cuerda del
poder en la salida de pared.
7
Page 57

Instrucciones de Ensamble
La ruedecilla
La llave inglesa
La nuez
El Tornillo grande de la
Cabeza de Philip
El Tornillo pequeño
de la Cabeza de Phillips
Redacte la Asamblea
de Brazo
La junta
de culata
El conducto de
la cerveza
Proteja Baranda
la nuez
del ala
El asidero
los hoyos
pilotos
Lea cuidadosamente y trate de comprender todas las instrucciones antes de
comenzar con la instalación del dispenser. Si luego de terminado usted no
estuviese seguro de haber instalado correctamente el dispenser, nosotros
recomendamos que contacte a un técnico especializado.
Instale las Rueditas
Siga los siguientes pasos.
1. Vacíe el interior de la cabina
completamente y recueste el dispenser en el
piso. Recomendamos que utilice un cartón
o tela para apoyar el dispenser y prevenir
raspones o abolladuras.
2. Inserte las rueditas en los hoyos a los extre-
mos de la base. Ajuste las tuercas de cada
ruedita utilizando la llave provista.
3. Una vez colocadas las cuatro ruedas coloque el dispenser de pie.
Instalación del grifo
Siga los siguientes pasos.
1. Primero retire el enchufe que se encuentra sobre la superficie de trabajo.
Sostenga firmemente el enchufe, gire y tire hacia arriba.
Nota: Guarde este enchufe en un
2. Coloque la arandela en la parte
inferior del grifo o canilla.
3. Pase el tubo conductor de cerveza
a través de la arandela y hasta el
borde del grifo.
4. Inserte el tubo por el agujero que
se encuentra en la superficie de
manera que el grifo quede
apoyado sobre la misma.
5. Alinee los agujeros del grifo con
la arandela y agujeros en la superficie.
6. Ajuste utilizando 4 tornillos phillips largos.
lugar seguro ya que usted
lo necesitará cuando quiera
convertir el dispenser en un
refrigerador.
Español
8
Page 58

Español
Instalación de la Guía
Siga los siguientes pasos.
1. Coloque la guía en la superficie de la cabina
como se muestra en el dibujo.
2. Alinee los agujeros de la guía con los de la
superficie.
3. Ajuste con 8 tornillos pequeños philllips.
Instalación del regulador de CO2 y el cilindro de CO2
Siga los siguientes pasos. Usted debe entender todas las instrucciones antes de
realizar la instalación.
Nota: Su cilindro de CO2 es provisto vacío para evitar cualquier accidente
durante el translado del aparato. Cuando usted compre el primer barril/
tanque de cerveza haga llenar el cilindro de CO2.
PRECAUCION!
El CO2 puede ser peligroso! Los cilindros contienen gas de alta
presión, que puede ser dañino si no se maneja con sumo cuidado.
9
Page 59

Español
El de Utilizar Barril de Cerveza (Barril de tipo SanKey
Americano)
Su abastecedor de la cerveza viene con “Acoplador de Aquí-Chico
Sankey el Tipo Americano”. Este nombre de marca es el la mayoría del
extensamente utilizado en los Estados Unidos. Antes comprar un barril, el cheque
con su
distribuidor de cerveza para cerciorarse que una Canilla Americana de Sankey
se puede utilizar. (El reemplazo y otra canilla están disponibles en www.draughttech.com)
Quite e identifique los componentes siguientes de las partes
encajonan:
1. (1) Regulador CO2 – el calibrador doble
2. doble de salida. (1) el Tanque CO2 – 5 libra - VACIA
3. (2) acopladores de Barril – bajo de tipo perfil (Acoplador de Aquí-Chico
Sankey el Tipo Americano)
4. (4) el estrujón plástico Blanco sujeta
5. (2) 4 pie 6. rojo largo de manga. (1) Limpiando juego
ESTE SEGURO QUE ANTES INSTALACION USTED HA LLENADO
SU TANQUE CON GAS
10
Page 60

Español
PASO 1
AÚN NO ENCIENDA EL GAS
Conecte el regulador de dióxido de
carbono al tanque enroscando la
tuerca del regulador en la válvula
roscada del tanque – SÓLO
AJUSTE CON LA MANO - no es necesario
utilizar una llave de tuercas para ajustar
PASO 2
Conecte una manguera de gas roja con cada una de
las salidas de las válvulas de cierre en la parte inferior
del regulador y ajuste bien usando dos de las
abrazaderas de compresión blancas provistas.
PASO 3
Conecte el otro extremo de cada
manguera de gas roja con el
MÁS GRANDE de los dos
adaptadores para manguera del
acoplador para el barril y asegure
con las dos abrazaderas de
compresión blancas restantes.
C02 Cylinder
Clamp
Red
Hose
Keg Coupler
Large Barb
PASO 4
Ubique las dos mangueras transparentes del dispositivo surtidor previamente
instalado. (En este momento, deberían estar dentro del refrigerador). Conecte
una manguera de cerveza transparente con el adaptador para manguera MÁS
PEQUEÑO de cada acoplador para el barril, asegurándose de presionar la
manguera completamente en el adaptador. Para esta conexión no es necesaria
una abrazadera de compresión blanca.
Small Barb
11
Clear Hose
Page 61

T
U
R
N
C
L
O
C
K
W
I
S
E
PUSH DOWN
THEN
Español
PASO 5
Conecte la ménsula de unión de los barriles con el primer barril de. Ubique uno
de los dos acopladores para el barril en el primer barril (inferior) y gire hacia la
derecha para sujetar. Para activar el mecanismo, presione el acoplador y gire
hacia la derecha. ASEGÚRESE DE QUE LAS MANGUERAS ESTÉN SOBRE LA
MÉNSULA DE UNIÓN DE LOS BARRILES. Es normal que algo de cerveza salga
del barril durante este proceso.
Keg Joining Bracket
1/4 Barrel Keg
PASO 6
Ubique el segundo barril (superior) en la parte superior de la ménsula de unión
de los barriles y ajuste los tornillos laterales. Ubique el acoplador para el barril
restante en el barril superior y gire hacia la derecha para sujetar. Para activar el
mecanismo, presione el acoplador y gire hacia la derecha. Es normal que algo
de cerveza salga del barril durante este proceso.
IMPORTANTE: La manga blanquirroja del barril inferior
se debe dirigir ove la separación de rthe
del paréntesis de la unión como
mostrado en el retrato.
La nota: Esté que acopladores seguro del barril se
comprometen completamente antes de meter
los barriles en al abastecedor de la cerveza.
PASO 7
EN ESTE MOMENTO PUEDE ENCENDER EL GAS DEL
TANQUE Y ABRIR LAS DOS MANIJAS NEGRAS HASTA
LA POSICIÓN ARRIBA/ABAJO. Con un destornillador de
punta plana, gire el tornillo de la parte superior del
regulador hacia la derecha hasta que en el calibrador
superior muestre 8 PSI (libras por pulgada cuadrada).
PASO 8
En este momento, controle el flujo de cerveza jalando de cada uno de los grifos.
Asegúrese de usar un recipiente para no derramar cerveza sobre la unidad.
12
Page 62

Keg Support
Beer Keg
Lift Upright
Español
PASO 9
Quite el pero del cerrojo de iguala. El uso dos iguala que fija los tornillos para
asegurar la iguala a los hoyos en la espalda del cycliner. Entonces deslice el
cilindro aunque el reatiner y lo mide en el gabinete. Entonces apriete la nuez de
reatiner. Incline con cuidado la dos combinación de barriles de cerveza y
descanse la orilla en el apoyo inoxidable de piso de barril de acero en el fondo
del gabinete interior. Deslice los barriles en lentamente, asegurando que se localiza apropiadamente. ESTE MAYO REQUIERE A 2 PERSONAS A COMPLETAR
Nota: Si solamente un barril deberá ser distribuido usted debe completar
todavía todo el encima de pasos. Salga simplemente un acoplador del
barril desconectado en el vertical/la posición cerrada. Cerciórese por
favor que el negro apagó válvulas están en el regulador C02 están en el
de la posición.
Al amontonar 2 barriles son cierto instalar
seguramente el barril incluido que une
aréntesis con el hardware suministrado.
Cerciórese las mangas no son aplastadas por
los barriles.
Wing Nut
Retainer
Screw
C02 Retainer
Fixing Screws
El Mensaje importante de la Seguridad para Cerveza de
barril que Distribuye
Cuándo CO2 se utiliza para cerveza de barril que distribuye, el sistema se debe
proteger adecuadamente contra aumento excesivo de presión. Esto es alcanzado
por el ya instaló dos dispositivos de la seguridad con la capacidad adecuada
del alivio en el sistema.
Los dispositivos de la seguridad se instalan en los lugares siguientes:
A. En o inmediatamente río abajo del regulador CO2.
B. En el acoplador de barril.
13
Page 63

Español
UTIlIzANdO El dISPENSER
Sirviendo Cerveza
Siga los pasos siguientes:
1. Asegúrese de que el dispenser este correctamente conectado a un enchufe de
120V, 60Hz y 15 amp.
2. Coloque la bandeja de goteo sobre la superficie debajo de la canilla.
3. Abra la canilla tirando rápidamente y completamente de la palanca hacia
uno para servir.
Nota: Si por alguna razón la cerveza no saliera lea la sección de
problemas frecuentes de este manual.
4. Regule o suba la presión en caso de que la cerveza bajara muy despacio.
En condiciones de temperatura y presión correctas un vaso de 10oz debe
llenarse en 4 segundos.
5. Sostenga el vaso con una inclinación de 45 grados. Cuando este 2/3 lleno
comience a enderezar el vaso.
Nota: Es normal ver que se forme condensación en la superficie de la canilla.
Esto se debe a las diferentes temperaturas.
14
Page 64

Español
Temperatura de la Cerveza
• La temperatura recomendada para servir cerveza tirada es entre los 34˚ y 38˚
F. Para mantener esta temperatura en un ambiente con promedio 70˚F
seleccione la opción “Normal” del termostato.
Nota: Durante épocas de verano cuando hace mucho calor
recomendamos que ajuste el termostato a un nivel mas alto.
• Seleccione y mantenga la temperatura correcta dentro del gabinete. Esto es
esencial para no perder la frescura y el sabor de la cerveza.
• La temperatura recomendada para guardar un tanque o barril de cerveza es
entre 38˚ y 40˚F.
• El frío excesivo o temperaturas bajas excesivas pueden hacer que la cerveza
pierda sabor.
Nota: A temperaturas mayores a 45˚F la cerveza puede pasarse o volverse
agria motivo de una fermentación secundaria.
Control de Temperatura
La perilla de control de temperatura se encuentra en la parte
trasera de la unidad en el fondo en la esquina izquierda.
Luego de encender la unidad usted deberá esperar
aproximadamente 24 horas para que enfrie correctamente.
Deberá ajustar el nivel de temperatura deseado de acuerdo
a sus necesidades y preferencias.
Descongelado Automático
No es necesario descongelar el dispenser- refrigerador. El hielo que se acumula
en el evaporador es automáticamente descongelado cada vez que el compresor
se detiene. El agua del hielo va hacia la bandeja de descongelado en la parte
trasera de la unidad y se evapora.
Entendiendo los Sonidos de la Operatorio Normal
• Sonido de burbujeo y leves vibraciones son comunes a la circulación de la
refrigeración.
• Sonido de chisporroteo o pequeños golpes ocurren durante el ciclo de
descongelado.
• Sonido de goteo es atribuible al agua que cae en la bandeja de goteo
durante el período de descongelado.
• Un crujido puede escucharse debido a la contracción y expansión de las
bobinas de enfriamiento durante el ciclo de descongelado.
15
Page 65

gUíA dE PORCIóN dE CERVEzA
Servir de cerveza Inclina
Las puntas siguientes lo ayudarán a servir la cerveza perfecta.
Para servir cerveza de la canilla la manera dejó el iva, el cheque para lo
Siguiente:
• La Limpieza • la Temperatura
• la Presión • Utiliza CO2 siempre que posible
Las Combinaciones utilizables del Tamaño del Barril:
1) Dos 1/4 barriles de barril
2) Dos 1/6 barriles de barriles (estrecha)
3) Un 1/4 barril (delgado) el barril Un 1/6 barril (estrecha) el barril
4) Un 1/2 barril de barril
Español
16
Page 66

Español
Consejos para Limpiar los Vasos de Cerveza
Para que el sabor no tenga alteraciones lo más conveniente es servir la cerveza
en vasos limpios. Los siguientes consejos le servirán para limpiar
adecuadamente los vasos y servir la cerveza.
• No lave los vasos para la cerveza conjuntamente con otros que contengan
leche u otra sustancia grasosa.
• Un excesivo uso de detergente puede dejar una película en los vasos y alterar
el sabor.
• Utilice un buen detergente de modo que pueda eliminar todo tipo
de sustancias grasas (por ejemplo: lápiz de labio).
• No utilice jabón
• Deje que los vasos se sequen con le aire, no utilice repasador.
• Lave los vasos con agua fresca antes de servir. Es recomendable servir la
cerveza en un vaso húmedo.
Dos Pruebas Simples para Lavar los Vasos
1. Lave los vasos del modo usual. Inmersa primero el vaso en agua limpia. Vacíe
el vaso. Si gotas de agua quedaran en el vaso dejando rastros o
manchas es porque el vaso no ha sido lavado correctamente.
2. Nuevamente lave el vaso de modo usual. Llene con agua y un poco de sal y
agite de manera que salgan las manchas o rastros de las paredes del vaso.
17
Page 67

Español
CONSEjOS dE AHORRO dE ENERgíA
Siga los siguientes consejos para el ahorro de energía y una óptima eficiencia.
• Limítese a abrir y cerrar la puerta del refrigerador sólo lo necesario en días de
mucho calor y humedad.
• Controle regularmente que alrededor haya una adecuada corriente
o circulación de aire.
• Mantenga los bordes y contornos de la puerta limpios para asegurar que la
puerta se selle al cerrar. Si no sellara correctamente puede filtrarse aire cálido
aumentando la temperatura interna del mismo. De esa manera el compresor
deberá trabajar continuamente para mantener el frío haciendo mayor
el consumo de energía.
Nota: Reemplace una junta de culata dañada de puerta para restaurar la
eficiencia de la energía.
18
Page 68

Español
CUIdAdO Y mANTENImIENTO dEl dISPENSER dE CERVEzA
Instalando el Kit de limpieza
Lea las siguientes instrucciones antes de comenzar con la instalación del kit de
limpieza.
1. Mezcle un galón de agua tibia con una cucharada de
limpiador en un balde.
Nota: No utilizar colada, el jabón o el agua caliente.
2. Retire la tapa, llene la jarra con la solución anterior y
tape nuevamente. Deje el resto de la misma en el balde.
3. Cierre la llave de paso de aire del regulador o la
válvula en el tanque de CO2.
4. Desconecte el grifo del barril. Luego desconecte la manguera de cerveza de
la canilla girando la tuerca en dirección contraria al reloj. Coloque el grifo y
la punta de la manguera en el balde.
5. Retire la canilla con la llave y coloque el extremo del envase limpiador en
ese lugar.
Nota: Cerciórese hay una arandela en la espalda del apropiado.
6. Sostenga el jarro o envase de limpieza inclinado hacia debajo de manera
que la solución corra hasta el baldo como muestra la figura de arriba.
7. Llene luego la jarra con agua fría y repita el proceso hasta que el agua
salga limpia.
8. Lave la canilla con agua limpia.
9. Desconecte el extremo del kit de limpieza y coloque el grifo en su lugar.
10. Reubique la manguera de cerveza y ajuste nuevamente el grifo al barril.
Nota: Las líneas de la cerveza se deben limpiar después que cada barril se
vacía.
19
Page 69

Español
Limpieza y Mantenimiento General
Limpieza general interna y externa del gabinete
1. Prepare una solución de aproximadamente 3 o 4 cucharadas de bicarbonato
de sosa mezcladas con agua tibia. Utilice una esponja o un paño suave para
repasar el interior y l a parte externa del gabinete.
2. Repase son agua limpia y tibia y seque con un paño suave.
Nota: No utilice químicos, abrasivos, amoníaco, detergentes concentrados,
cloro, solventes o esponjas de metal. Algunos de estos productos pueden
dañar o decolorar el acabado de la unidad.
Limpieza de las juntas de la puerta
1. Limpie las juntas de las puertas con un paño húmedo cada 3 meses
aproximadamente. Estas deben mantenerse limpias para que la puerta selle
correctamente al cerrarse.
2. Puede utilizar parafina para aplicar a los costados de la junta y mantener el
sellado correcto.
Limpieza por detrás del dispenser
1. Nosotros recomendamos que realice una limpieza por detrás del dispenser
por lo menos dos veces al año.
Nota: Algunos ambientes requerirán de una limpieza constante.
2. Utilice una aspiradora o un cepillo para limpiar las bobinas.
ADVERTENCIA!
Para evitar el riesgo a shock eléctrico siempre desenchufe el
dispenser antes de la limpieza. En caso contrario correrá
peligro de daños lesiones.
PRECAUCION!
Antes de utilizar productos de limpieza siempre lea y siga las
instrucciones de uso del producto.
20
Page 70

Español
CONEXIONES dE bARRIl
Cómo reemplazo yo un tanque C02 vacío?
1. La válvula cercana del tambor del tanque girando a la derecha.
2. Destornille el ajuste el Tornillo Fijo (a la izquierda) por lo que irá y cerrará
cerrado de válvula.
3. Quite regulador del tanque vacío.
4. Quite polvo la tapa del nuevo tanque repleto. Abra y cierre tambor válvula
para soplar rápidamente del polvo de la salida.
5. Con válvula de tambor en cerró la posición, reconecta regulador al tanque.
Esté seguro verificar la arandela, que es pre-instalado en el regulador C02.
6. Abra válvula de tambor completamente. (Esto es importante porque estes
sellos de válvula de tambor en dos lugares.)
7. Ajuste de nuevo la presión de regulador girando el tornillo fijo y abra cerrado
de válvula.
La Información del tanque: El tanque siempre se debe abrochar en la posición
vertical. Toma acerca de 1/2 l. de C02 para
distribuir 1/2 barril de barril de cerveza. Una 5 l. El
tanque C02 debe distribuir entre 8-10 1/2 barriles de
barril o 18-20 1/4 barriles de barril. El peso repleto
de 5 tanque de l. es appx. Lbs. de 17-1/2.
21
Page 71

Español
PROblEmAS FRECUENTES
En caso de que esté sirviendo cerveza y ésta estuviese turbia, o de color
apagado, con burbujas, sin gusto, o agria, refiérase a algunos de los siguientes
puntos.
Condición de cerveza: Turbia
La cerveza en el vaso tiene un color nublado, pareciera no limpia.
Causa 1
Excesivas temperaturas bajas pueden causar estos efectos a la cerveza,
especialmente si la cerveza permaneciera en la cadena de frío por un período.
Correccion
• Asegúrese que las líneas y tubos estén limpios y luego suba de a poco la
temperatura.
Causa 2
La canilla de cerveza fue sólo abierta parcialmente.
Correccion
• Abra rápidamente y completamente la canilla.
• Reemplace arandelas o cualquier accesorio necesario para permitir que la
canilla abra completamente.
Condición de cerveza: Pasada, de color apagado
La cerveza carece de su frescura y sabor original. La capa de espuma
desaparece rápidamente.
Causa 1
El vaso presenta suciedad o grasa.
Correccion
• No lave el vaso junto a otros que hayan contenido leche u otra sustancia
grasa.
• Es preferible esterilizar los vasos cuando sea necesario
• Lave los vasos utilizando un buen detergente de modo de eliminar todas las
sustancias grasas.
• No utilice jabón.
• No seque los vasos con un paño o repasador. Permitan que se sequen
con el aire.
• Enjuague los vasos con agua fresca antes de servir la cerveza.
Causa 2
La cerveza no se sirve de modo adecuado.
Correccion
• Abra la canilla rápidamente y de forma completa.
• La espuma de la cerveza debe ser una capa espesa de aproximadamente de
3⁄4”a 1”de espesor. La cerveza tirada sin espuma da la apariencia de estar
pasada.
22
Page 72

Español
Causa 3
No hay demasiada presión.
Correccion
• Aumente la presión si la cerveza cayese muy despacio. Lo normal es llenar
un vaso de 10oz. en 4 segundos.
• Controle la fuente de presión para determinar si estuviese obstruída.
• Reemplace la fuente de aire inactiva o el regulador de CO2.
• La presión del tanque debe ser siempre más alta que la presión utilizada
en un barril.
• Siempre aplique la presión al barril antes de dibujar cerveza.
Condición de cerveza: Sabor malo
Generalmente cuando está amarga, a veces carece de sabor y frescura.
Causa 1
Limpieza inadecuada del grifo.
Condición de la cerveza: Sabor malo
Generalmente cuando está amarga, a veces carece de sabor y frescura. Puede
tener olor extraño o grasoso, lo que le confiere un gusto no placentero.
Causa 1
Limpieza inadecuada del grifo.
Correccion
• Cepille y lave el grifo y canilla adecuadamente. Es necesario utilizar detergente y luego enjuagar con agua limpia.
Causa 2
Conducto de aire contaminado.
Correccion
• El conductor o línea de aire debe ser examinado. Si estuviese contaminado
debe ser reemplazado.
Causa 3
Tipo de manguera o conductor de aire impropio.
Correccion
• Un conductor de goma puede absorver y retener olores. Pruebe utilizar una
manguera plástica o de cobre.
La manguera conductora de cerveza debe limpiarse con agua cada vez que el
tanque o barril es reemplazado. Mantenga las condiciones sanitarias adecuadas
alrededor del dispenser. Humo, olores de la cocina o desinfectantes pueden
interferir en el gusto y olor de cerveza. Estos factores nombrados pueden
provenir del aire o del contacto con el vaso.
23
Page 73

Español
Condición de la cerveza: Agria
La cerveza huele y sabe extremadamente a levadura y a humedad.
Causa 1
Transporte inadecuado del barril o tanque de cerveza. La cerveza que fuese
entregada en un camión abierto durante días de altas temperaturas puede
comenzar en un proceso de fermentación secundaria.
Correccion
• Si es posible trate de que las cervezas les sea entregada en un camión cerrado con refrigeración. De otro modo cubra con una lona los tanques o barriles
de cerveza para protegerlos del calor.
Condición de la Cerveza: Salvaje
La cerveza posee muchísima espuma y poco líquido.
Causa 1
La cerveza no se sirve de modo adecuado.
Correccion
• Abra el grifo rápidamente y de forma completa
• La espuma de la cerveza debe ser una ca pa espesa de aproximadamente de
3⁄4"a 1"de espesor.
Causa 2
Se crea alguna obstrucción en el grifo pro causa de la levadura de la cerveza y
la no refrigeración del grifo y canilla.
Correccion
• Controle que no haya ninguna manguera o conducto desde el tanque o barril
a la canilla que esté abollado, torcido o enroscado.
• La prueba para deshilachó arandelas que se emparejan atrás el grifo que
puede causar una obstrucción.
Causa 3
La cerveza ha estado almacenada en algún lugar no lo suficientemente fresco.
Correccion
• Mantenga la cerveza refrigerada a una temperatura de 40˚F durante todo
el año.
Causa 4
Demasiada presión del aire.
Correccion
• Primero controle que la fuente de presión este trabajando correctamente. Luego
ajuste la presión a un nivel balanceado deseado. Con la corriente normal de
cerveza a la temperatura adecuada debe poder llenarse un vaso de 10oz. en
4 segundos.
24
Page 74

Español
Causa 5
Excesiva cantidad de CO2.
Correccion
• Ajuste la presión de CO2 a la menor medida posible. De todos modos
la presión aplicada debe mantenerse un poco más alta que la presión de la
misma cerveza. Más de 18 lbs. deben aplicarse.
• Cuanto más fría esté la cerveza y cuanto mayor sea la presión de CO2
aplicada, más rápida es la absorsión del CO2 por parte de la cerveza. Esto
hace que el estado de la cerveza sea más salvaje.
• Controle los reguladores de presión periodicamente para asegurarse que los
niveles de presión sean constantes.
Causa 6
No hay suficiente presión o no hay presión del todo.
Correccion
• Controle si hay entradas de aire defectuosas.
• Siempre encienda la presión antes de tirar la cerveza
Causa 7
Se utilizó un tanque de cerveza o barril viejo que no ha sido guardado en las
condiciones correctas.
Correccion
• Si la cerveza estuvo en lugares donde la temperatura es mayor a 45˚F por un
largo período de tiempo puede que se haya producido una fermentación
secundaria.
Condición de la Cerveza:
Al comienzo del tanque o barril la cerveza se sirve sin inconvenientes.
Cuando se va acabando el barril la cerveza se convierte en.
Causa 1
Cuando se utiliza aire como fuente de presión éste reemplaza el CO2 en la
cerveza y la misma se torna apagada. Este problema no es evidente cuando
la cerveza se tira rápidamente.
Correction
• Cuando sea posible es mejor utilizar el CO2 como fuente de presión.
25
Page 75

gARANTIA lImITAdA
Español
Servicio en su casa
Qué cubre y por cuanto tiempo?
Esta garantía cubre todos los defectos
en el funcionamiento y los materiales
por un período de tiempo de:
12 meses
12 meses parts
5 años (partes unicamente)
La garantía comienza a partir de la
fecha en que el producto fue
comprado, la factura original de
compra debe presentarse ante el
Centro de servicios.
EXCEPTIONES: Garantías
comercial o de uso rentado
90 días labor (part unicamente)
90 días partes
No oteres warrantiés appliés
Lo que cubre la garantía.
1. Las partes mecánicas y eléctricas
en un período de 12 meses. Esto
incluye todas las partes menos el
acabado y otros arreglos.
2. Los componentes del sistema por
ejemplo compresor, condensador y
evaporador, que posean defectos
de manufactura por un período de
5 años desde la fecha de compra.
Cualquier daño a dichas partes provenientes de translado
inadecuado o abuso no son
alcanzados por la garantía.
Qué se hará?
1. Nosotros repararemos o
reemplazaremos cualquier parte
mecánica o eléctrica que se
compruebe esté defectuosa en el
funcionamiento
normal y mientras se esté en el
período de garantía antes
especificado.
2. No habra cargos al comprador por
la reparación de las partes
especificadas y por el período
inicial de 12 meses. Luego de este
período la labor deberá abonarse.
3. Contacte el Centro de servico
autorizado más cercano. Para
conocer el centro más cercano
visite website www.HaierAmerica.
com. lame al 1-877-337-3639 para
mayor información.
ESTA GARANTIA CUBRE A LOS
PRODUCTOS DENTRO DE LOS
ESTADOS UNIDOS, PUERTO RICO
Y CANADA. NO SIGUIENTE:
Dañor por instalación inadecuada.
Daños en el translado.
Defectos que no sean de manufactura.
Daños por desuso, abuso, accidente,
alteración, falta de cuidado y
mantenimiento o uso del incorrecto.
Daños causados por otro uso que no
sea el doméstico.
Daños causados por reparaciones que
no hayan sido realizadas por un
service
autorizado o fuera entro de servcio.
Decoración o arreglos.
Embarque y transporte.
Labor (luego de los 12 meses
iniciales).
ESTA GARANTIA LIMITADA ESTA
DADA EN LUGAR DE TODA OTRA
GARANTIA, INCLUYENDO LA
GARANTIA DE COMERCIALIZACION
POR PROPOSITOS PARTICULARES.
La solución provista en esta garantía es
exclusiva y está otorgada en lugar de
toda otra garantía.
Esta garantía no cubre daños
ocacionales o incidentales, es por ello
que las limitaciones anteriores pueden
no ser aplicables en su caso.
Esta garantía le da derechos
específicos y usted tendrá otros
derechos que pueden variar de Estado
a Estado.
Haier America
New York, NY 10018
26
Page 76

IMPORTANT
Do Not Return This Product To The Store
If you have a problem with this product, please contact the
"Haier Customer Satisfaction Center" at 1-877-337-3639.
DATED PROOF OF PURCHASE REQUIRED FOR WARRANTY SERVICE
IMPORTANT
Ne pas Réexpédier ce Produit au Magasin
Pour tout problème concernant ce produit, veuillez contacter le service des
consommateurs ‘Haier Customer Satisfaction Center’ au 1-877-337-3639.
UNE PREUVE D’ACHAT DATEE EST REQUISE POUR BENEFICIER DE LA GARANTIE.
IMPORTANTE
Si tiene algún problema con este producto, por favor contacte el "Centro de Servicio al Consumidor de
NECESITA UNA PRUEBA DE COMPRA FECHADA PARA EL SERVICIO DE LA GARANTIA
No regrese este producto a la tienda
Haier" al 1-877-337-3639 (Válido solo en E.U.A).
115V, 60 Hz
HBF205E
100547
Made in China
Fabriqué en Chine
Hecho en C hina
Haier America Trading
New York, NY 10018
Printed in China
part # RF-9999-297
 Loading...