

Page 1
MODEL HBF165
REFRIGERATOR
OPERATING
INSTRUCTIONS
The manufacturer is continuously developing
*
their products and reserves the right to modify
designs, products and technical data without further
notice.
Page 2
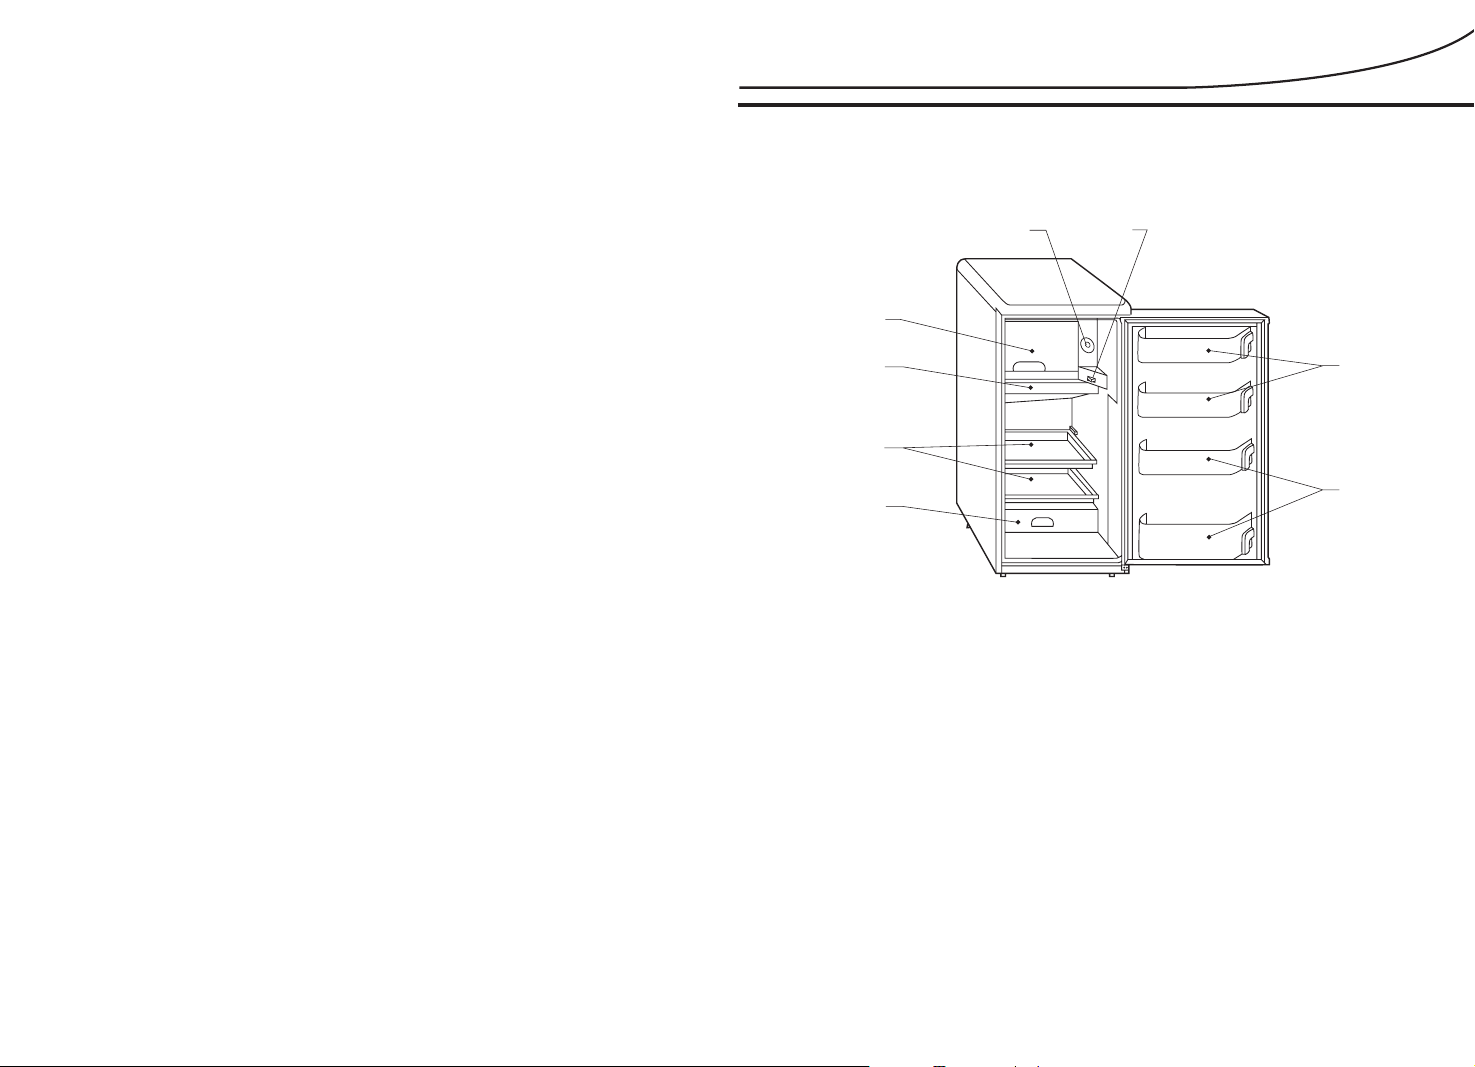
PARTS DESCRIPTION
0
1
2
3
4
5
5
6
4
3
2
1
7
8
1. Bottle Shelves
3. Vegetable Bin
5. Drip Tray
7. Thermostat
2. Tall Bottle Storage
4. Shelves
6. Ice Box
8. Light Switch
1
Page 3

NOTICE
The power supply for
this appliance is
220-240V, 50Hz
Single phase.
It is not
recommended
to use extension
cords.
Connect the appliance to a properly
earthed three pin socket.
SETTING UP
The fridge cannot be installed with its
rear panel directly against the wall. For
good air circulation it should have a
gap of 100mm. Install the machine on a
flat and firm ground to minimize noise.
Never store anything dangerous
in this unit, such as
combustibles, explosives,
strong acid or alkali etc.
LAMP
Lamp: 220-240V,15W
Lamp holder: E14 (lamps exceeding 15W must not be used).
When replacing the lamp:
LAMP
REPLACEMENT
To replace the lamp:
* Unplug the appliance and remove the
water tray from under the ice box.
* Press on the front of the lamp cover
while pulling it down to release it from
the lamp holder.
* To remove the lamp, turn it anti-
clockwise.
* Replace the lamp and cover then refit
the water tray.
WIRING DIAGRAM
Poorly ventilated rooms
are unsuitable. Avoid
installing the appliance in
direct sunshine or exposed
to other similar sources of
eat.
2
7
Page 4

I
n the event of a fault occurring during operation, check below to see if
t
y
he fault is due to an operator error. You can repair the following faults
ourself.
The appliance does
not run.
1. It is not switched on properly,
or the plug is not inserted properly
into the socket.
2. The thermostat knob is set on “0”.
3. The supply voltage is too low.
THERMOSTAT
The knob graduations
The numbers on the thermostat do not stand for the
actual temperature. The larger the number, the colder
the temperature inside and vice versa.
Usually, it is best to start the thermostat in position
1 - 3 then turn it to a higher setting if required.
Position ‘0’ is off.
are: 0, 1, 2, 3, 4, 5, 6, 7.
STORING FOOD
The temperature inside
the appliance is not
cool enough.
2. The appliance is located too near
a source of heat.
3. The door is not properly closed or
is opened too frequently.
1. The appliance is too full of food.
Excessive noise
from the appliance.
The appliance is not standing
securely on the ground.
If none of these circumstances applies and you are not able to repair
the fault, please contact a service agent:-
PHONE 1300 729 948
6
The temperatures in different positions
inside the refrigerator vary. Thus when
storing food, select the appropriate
position to meet your needs.
The coldest position is ‘1’ and the
warmest is ‘5’.
ICE-MAKING
When making ice,add water to the ice tray
until 4/5 full with the grid in it and place it
on the bottom of the icebox. Twist the tray
or place it briefly in warm water to remove
the ice cubes.
NOTE
Do not use a knife or sharp
instrument when removing the ice
tray.
3
1
5
2
4
3
Page 5

4~6mm
N
OTES ON STORAGE
C
A
C
D
DEFROSTING
Where necessary, food should be
packed in bags to avoid giving off
strong odours or getting freezer
burn.
Do not overstock the appliance with
food. Allow space among the
packages of food for air circulation
and better cooling.
Hot food or liquid must be allowed to
cool to room temperature
before placing in the refrigerator.
LEANING
lways remove the plug before cleaning.
lean with lukewarm water containing a little detergent.
o not use hot water, corrosive scouring agent or anything rough.
Remove food from the ice box, wrap it and
store in a chilly bin.
Switch off the appliance at the wall and
leave the ice box door open, it will defrost
automatically. When the defrosting process
has finished, empty the drip-tray under the
ice box and wipe the ice box dry. Replace
the food and switch on the appliance.
DO NOT USE A KNIFE OR SHARP
INSTRUMENT TO ASSIST WITH ICE
REMOVAL.
NOTES
If the appliance is going to be out of use for any length of
time or put into storage, unplug and clean the interior as
described in the previous page.
Dry thoroughly and store with the door open.
To reduce energy consumption, do not leave the door open
for too long and dont’t open it too often.
In the event of a power failure, try to keep the door closed to
keep the cool air inside for as long as possible.
4
5
 Loading...