

Page 1

Front Load Clothes Washer
Lavadora de Ropa Carga Frontal
User Manual
Model # HBF1055TVE
Guide de l’Utilisateur
Modéle # HBF1055TVE
Manual del Usuario
Para Modelo de # HBF1055TVE
Quality ß Innovation ß Style
Page 2

English
IMPORTANT SAFETY
INSTRUCTIONS
Warning – To reduce the risk of fire, electric shock, or injury
to persons when using your appliance, follow basic
precautions, including the following:
1. Read all instructions before using the appliance.
2. Use this appliance only for its intended purpose as described in this use and
care guide.
3. This appliance must be properly installed in accordance with the
installation instructions (see pages 7-11).
4. Replace immediately worn power cords and loose plugs/power outlets.
5. Before the appliance is removed from service or discarded, remove the door.
6. Do not operate your appliance in the presence of explosive fumes.
7. Do not wash articles that have been previously cleaned in, washed in,
soaked in, or spotted with gasoline, dry-cleaning solvents, or other flammable
or explosive substances, as they give off vapors that could ignite or explode.
8. Do not add gasoline, dry-cleaning solvents or other flammables or explosive
substances to the washer. These substances give off vapors that could ignite
or explode.
9. Do not reach into the appliance if the tub or agitator is moving.
10. Do not tamper with controls.
11. To reduce risk of injury do not allow children to play in or on the appliance.
Close supervision of children is necessary when the appliance is used
near children.
12. Do not install or store this appliance where it will be exposed to the weather.
13. Hydrogen gas may be produced if the water heater has not been used in
more then 2 weeks. This could be explosive and can explode under certain
circumstances. If this is the case, before using this appliance turn on all
the hot faucets and let the hot water run for a few minutes. This will let the
trapped hydrogen escape. During this process do not turn on an electric
appliance, smoke, light a match/lighter or use a flame to avoid an accident,
as hydrogen gas is flammable and can explode.
14. Do not repair or replace any part of the appliance or attempt any servicing
unless specifically recommended in the user-repair instructions that you
understand and have skills to carry out.
SAVE THESE INSTRUCTIONS
Page 3

English
GROUNDING INSTRUCTIONS
This appliance must be grounded. In the event of malfunction or breakdown,
grounding will reduce the risk of electric shock by providing a path of least
resistance for electric current. This appliance is equipped with a cord having an
equipment-grounding conductor and a grounding plug. The plug must be plugged
into an appropriate outlet that is properly installed and grounded in accordance
with all local codes and ordinances.
Warning – Improper connections of the equipment-grounding conductor can
result in a risk of electric shock. Check with a qualified electrician or serviceman
if you are in doubt as to whether the appliance is properly grounded.
DANGER
Risk of child entrapment. Before you throw away your old
appliance, take off the door so that children may
not easily get trapped inside.
Thank you for purchasing our Haier
product. This easy-to-use manual
will guide you in getting the best
use of your washer.
Remember to record the model and
serial number. They are on a label
in back of the washer.
Staple your receipt to your manual. You will need it to obtain
warranty service.
Model number
Serial number
Date of purchase
21
Page 4
English
ELECTRICAL CONNECTIONS
This appliance must be grounded. In the event of an electrical short circuit,
grounding reduces the risk of electric shock by providing an escape wire for
the electric current. This appliance is equipped with a cord having a grounding
wire with a grounded plug. The plug must be inserted into an outlet that is
properly installed and grounded.
• Improper use of the plug can result in a risk of electric shock.
• Consult a qualified electrician or service person if the grounding
instructions are not completely understood or if doubt exists as to
whether the appliance is properly grounded.
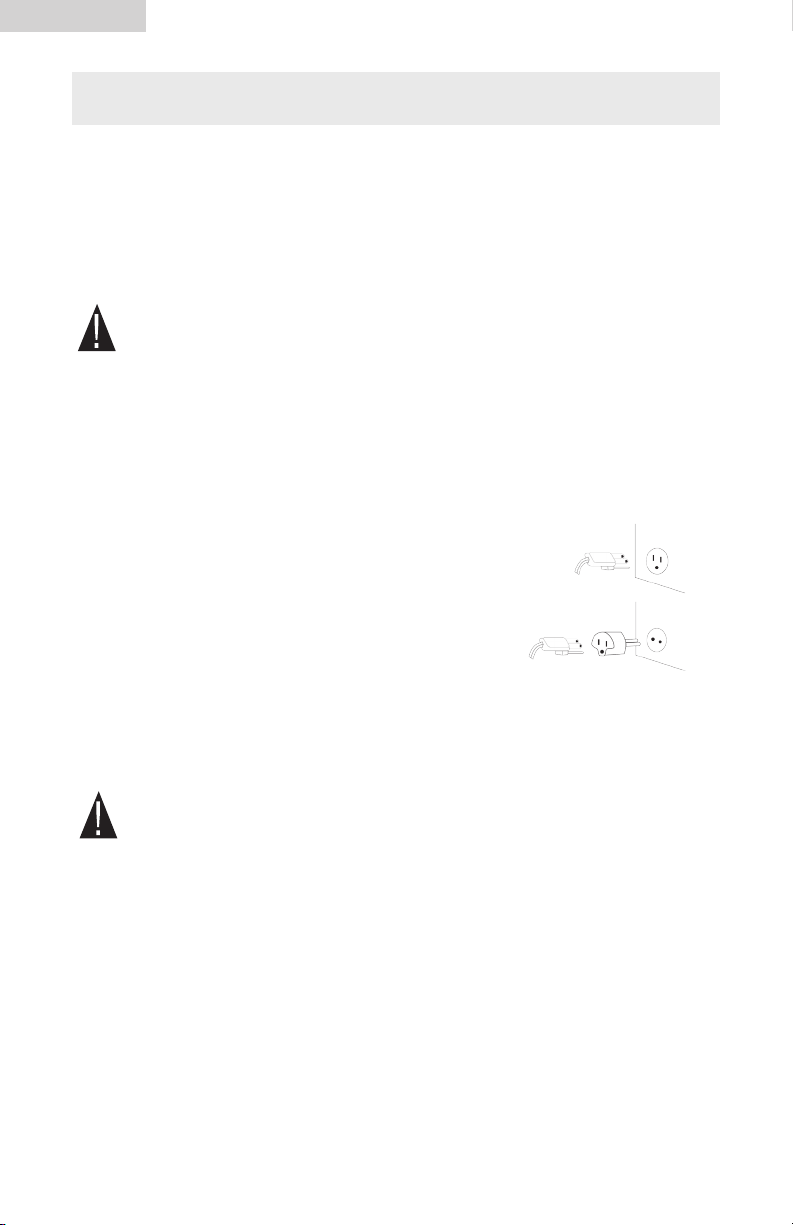
Wiring Requirements:
• This appliance must be plugged into at least
15 AMP 120 VOLT, 60 HZ GROUNDED OUTLET.
Note: Where a standard two-prong outlet is
encountered, it is the personal responsibility
and obligation of the consumer to have
it replaced with a properly grounded
three-prong outlet.
X
Extension Cords:
We do not recommend that you use an extension cord.
Power Interruptions
Occasionally there may be power interruptions due to thunderstorms or other
causes. Remove the power cord from AC outlet when a power outage occurs.
When power has been restored re-plug power cord to AC outlet. If outage is for
a prolonged period, clean washer before using it again. For details see "other
functions" - "Power-Off memory function" Page 18.
3
Page 5

TABLE OF CONTENTS
SAFETY INSTRUCTIONS ................................................................. 1
GROUNDING INSTRUCTIONS ....................................................... 2
ELECTRICAL CONNECTING ............................................................. 3
PARTS AND FEATURES ................................................................... 5
Front ................................................................................................. 5
Back ................................................................................................. 6
INSTALLATION INSTRUCTIONS ..................................................... 7
Tools and Materials Required .............................................................. 7
Unpacking Your Washer .................................................................... 8
Installation .......................................................................................10
OPERATIONAL INSTRUCTIONS ................................................... 12
Control Panel .................................................................................. 12
Program Selection ............................................................................ 14
Loading .......................................................................................... 16
Proper Use of Dispenser ...................................................................16
Washing Methods ............................................................................17
Normal Operating Sounds ................................................................ 18
CARE AND CLEANING GUIDE .....................................................19
Cleaning and Maintenance ...............................................................19
Moving and Vacationing ..................................................................20
Storage of Your Washer ...................................................................20
English
Troubleshooting .......................................................................... 21
Technical Specification ................................................................23
Warranty ..................................................................................... 24
4
Page 6
English
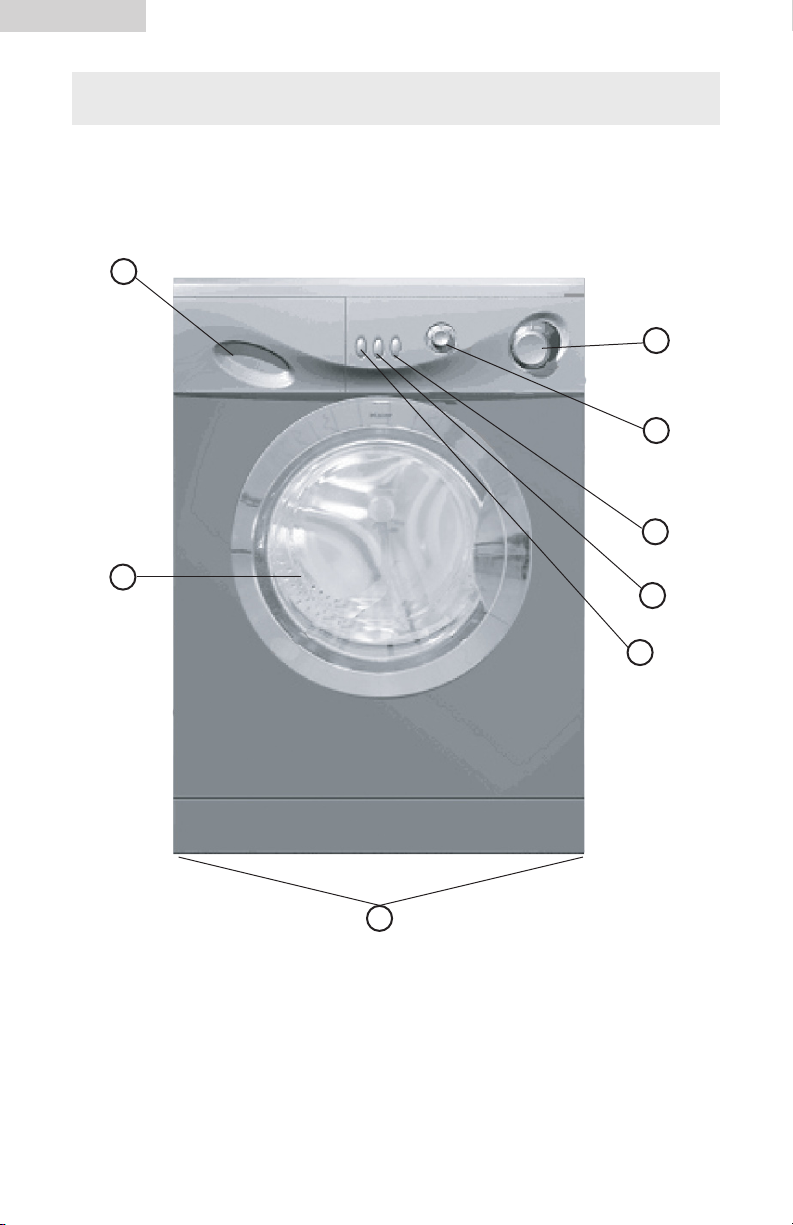
PARTS AND FEATURES
Front
1
3
4
5
2
1. Detergent / Softner Dispenser
2. See-through Glass Door
3. Cycle Selector Knob
4. Spin Speed Selector Knob
5
6
7
8
5. Operation Button (Pause / Start)
6. Extra Rinse Button
7. Extended Spin Bottom
8. Adjustable Leveling Legs
(Not Shown)
Page 7

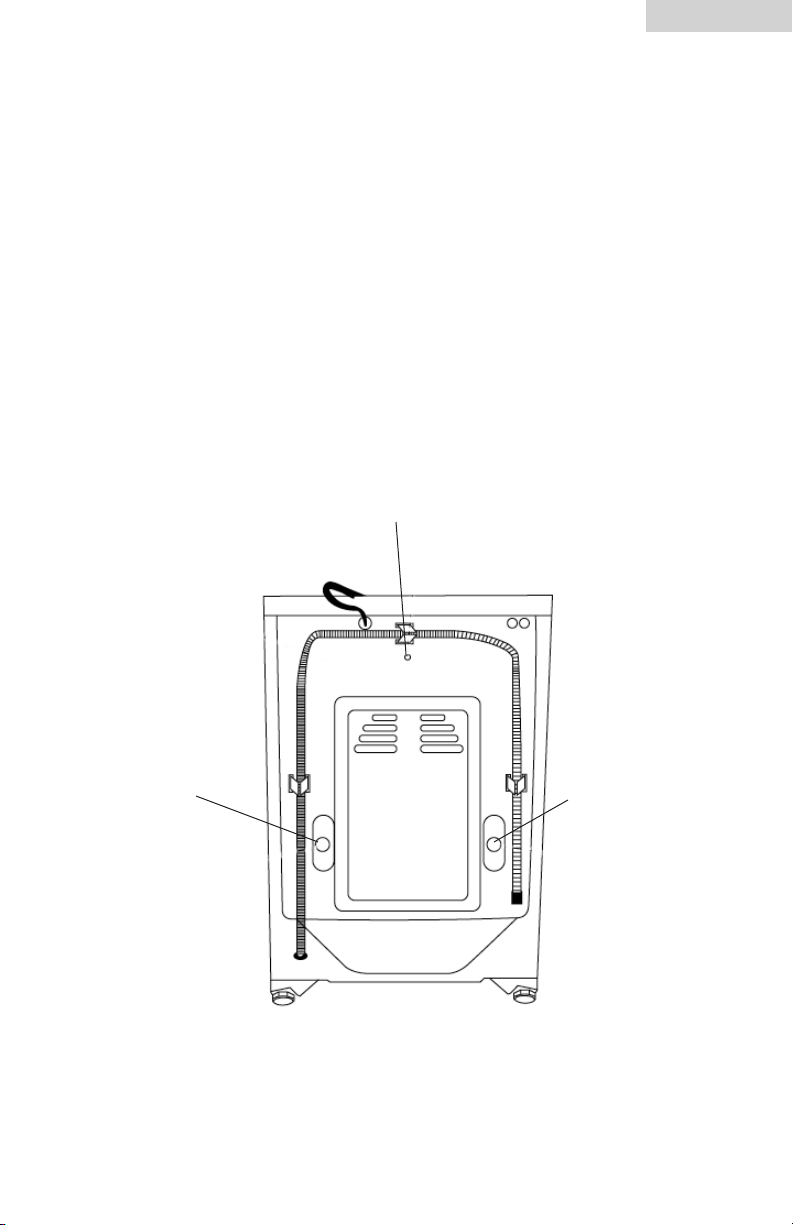
PARTS AND FEATURES
Back
1
2
English
8
4
5
3
1. Power Supply Cord
2. Back Plate Screw (3)
3. Drainage Hose
4. Drainage Hose Clip (3)
5. Transportation Bolt (3)
6
7
6. Back Plate
7. Adjustable Leveling Legs
(Not Shown)
8. Valve (Hot and Cold)
6
Page 8

English
INSTALLATION INSTRUCTIONS
Tools and Materials Required
You will need to have the following tools
to help you in the installation of your washer:
• Scissors
• Standard Screwdriver
• Pliers
• Wrench
• Tape Measure
• Gloves
• Level
Accessories Supplied Quantity
1. Hot & Cold Water Inlet Hoses 2
2. Pressure Regulator 2
(Attached to Hot & Cold Water Inlet Hoses)
3. Flat Water Inlet Hose Washers 4
(Installed in each end of water inlet hoses)
4. Use & Care Guide (Not Shown) 1
5. Plastic Plugs to cover 3
transportation bolt holes
6. Goose Neck 1
1
3
4
USER MANUAL
2
5
6
7
Page 9
Unpacking Your Appliance
• Remove all packing materials including transportation bolts.
• Inspect and remove any remains of packing, tape or printed materials before
using the washer.
• Transportation Bolts must be removed before using the machine. Once
removed, save them so when moving you can reinstall to protect the machine
from damage during shipping.
• Water inlet hoses and other accessories are packed and placed in the drum.
Center bolt
English
Bolt
Bolt
8
Page 10
English
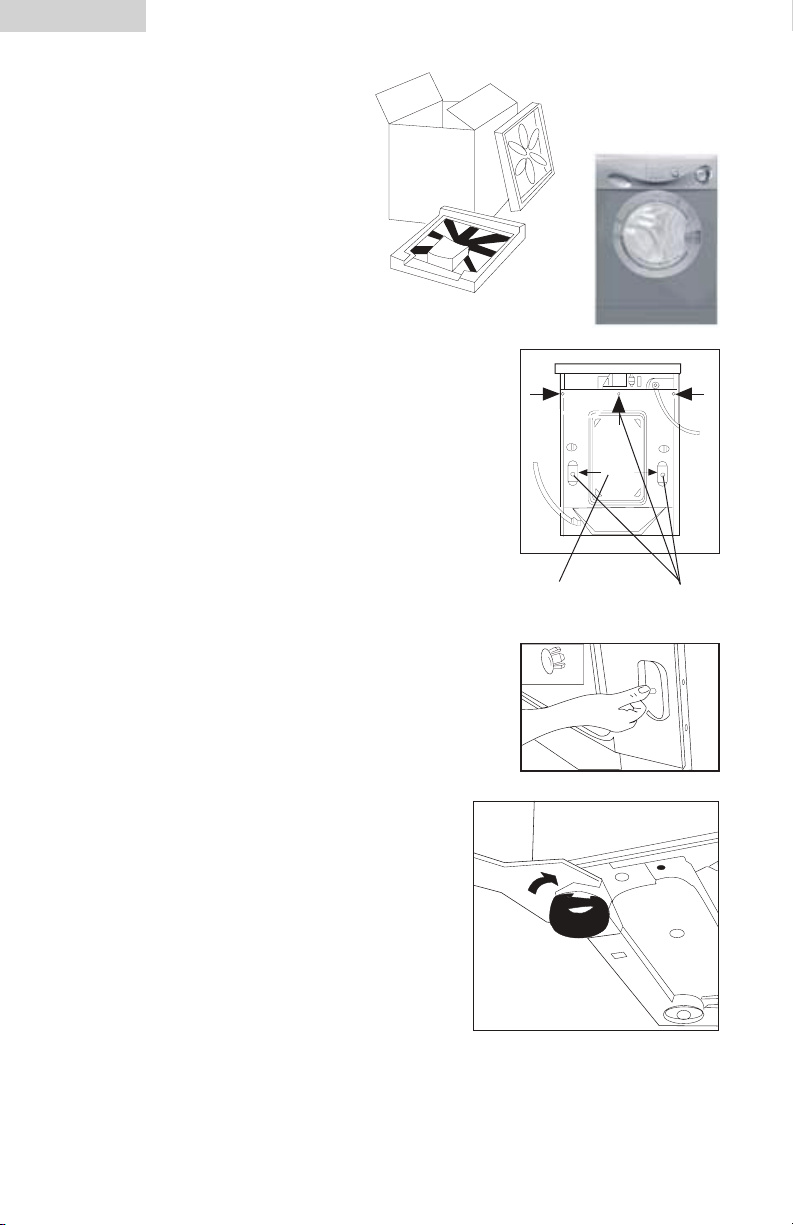
• As shown in figure1, remove all
the packing materials (including
the foam base).
Upon opening of the package,
water drops may be seen on the
plastic bag and the porthole. This
is a normal phenomenon resulting
from water tests in the factory.
• Remove three transportation bolts as shown in
figure 2A. The bolts protect the appliance
from shock during transportation. The steps below
should be followed before using the appliance:
1. Remove the back plate of the washing
machine. To remove this you must remove
three screws holding the panel.
Fig. 1
2. Remove the three bolts from the rear of the
washing machine. Then remove the rubber
hose which are behind the transportation
bolts inside the unit.
3. Reinstall the back plate.
4. Fill the holes left by the bolts with plastic plugs.
(Attention: The bolts and rubber hose should
be kept in a safe place for later use.) (Fig. 2B)
Fig. 2
• Leveling the washing machine: There are
adjustable feet under the bottom of the
washing machine. Before use, the washing
machine should be adjusted, as shown in
figure 3, so that it is level.
• Leveling legs can be adjusted by turning them
counterclockwise to raise your washer or
clockwise to lower your washer.
Fig. 3
Back Plate
A
Bolt
B
9
Page 11
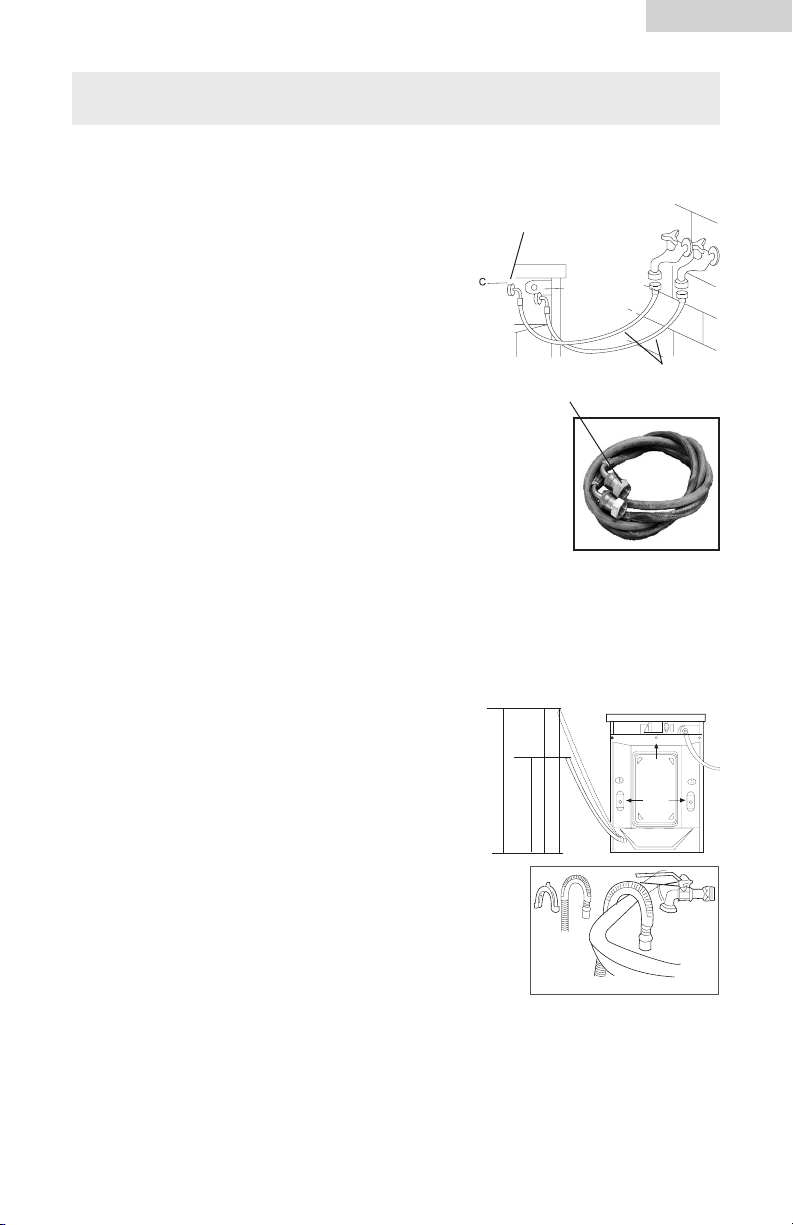
INSTALLATION
H
100cm
80cm
Connection of water inlet hose and
washing machine
English
• Connect the straight coupling of the inlet hose
to the water tap and make sure to tighten it.
• Install the pressure regulator to each inlet valves
of the unit. Make sure the flat rubber washer
is placed in the pressure regulator.
• Connect the elbow coupling of the inlet hose
to the valve and make sure to tighten it.
Note: • Please be sure that the COLD inlet hose is
connected with the valve for cold water
(marked with "C").
• Please be sure that the HOT inlet hose is
connected with the valve for hot water
(marked with "H").
Note: A flat rubber washer must be present inside each end of the inlet hoses.
Over tightening may cause damage to the valve.
Pressure Regulator
Water Inlet Hoses
Pressure Regulator
Water Drainage Hose
• The height of the pipe for the water drainage
hose should be between 2'6" to 3'3". The
water drain hose must be securely placed
on the clip on the back of the washing machine.
• Use the water drainage support (gooseneck)
supplied as an accessory for proper installation.
If the water drain hose needs to be extended,
it should not be extended more than 8'2".
(Longer extension will result in concurrent water
inflow and outflow.) The diameter of the extension
hose should be the same as the original hose.
Caution: Water drainage hose must not be immersed in water. The original and
extension hoses should be tightly connected.
10
Page 12
English
Power Supply
• Unit should be connected to a regular 120V~60 Hz 15A grounded
outlet. Make sure local city codes are followed.
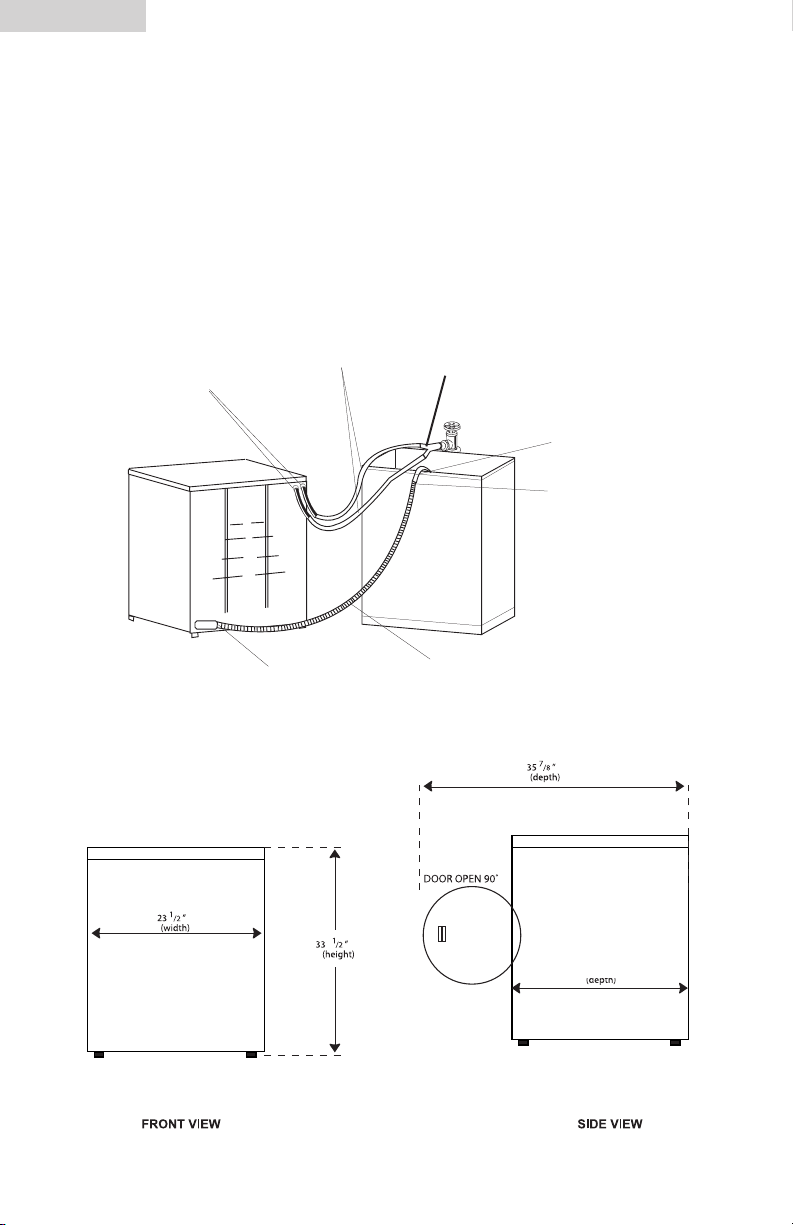
Y Adapter Connection
Note: “Y Adapter” shown in below figure is only for illustration. It is not
provided in the box as an accessory. If you need to utilize this type
of hookup, you can purchase a “Y Adapter” from your nearest
hardware store.
Water Inlet
Valves
Water Supply Hose
Hose Bend
Unit Dimensions
Y Adapter
Goose Neck
Hose Bend
SINK
Drain Hose
11
22 13/16"
Page 13
OPERATIONAL INSTRUCTIONS
NO
MAX
MID
LOW
SPIN
Warning - To reduce the risk of fire, electric shock, or injury to persons,
read the IMPORTANT SAFETY INSTRUCTIONS before operating
this appliance.
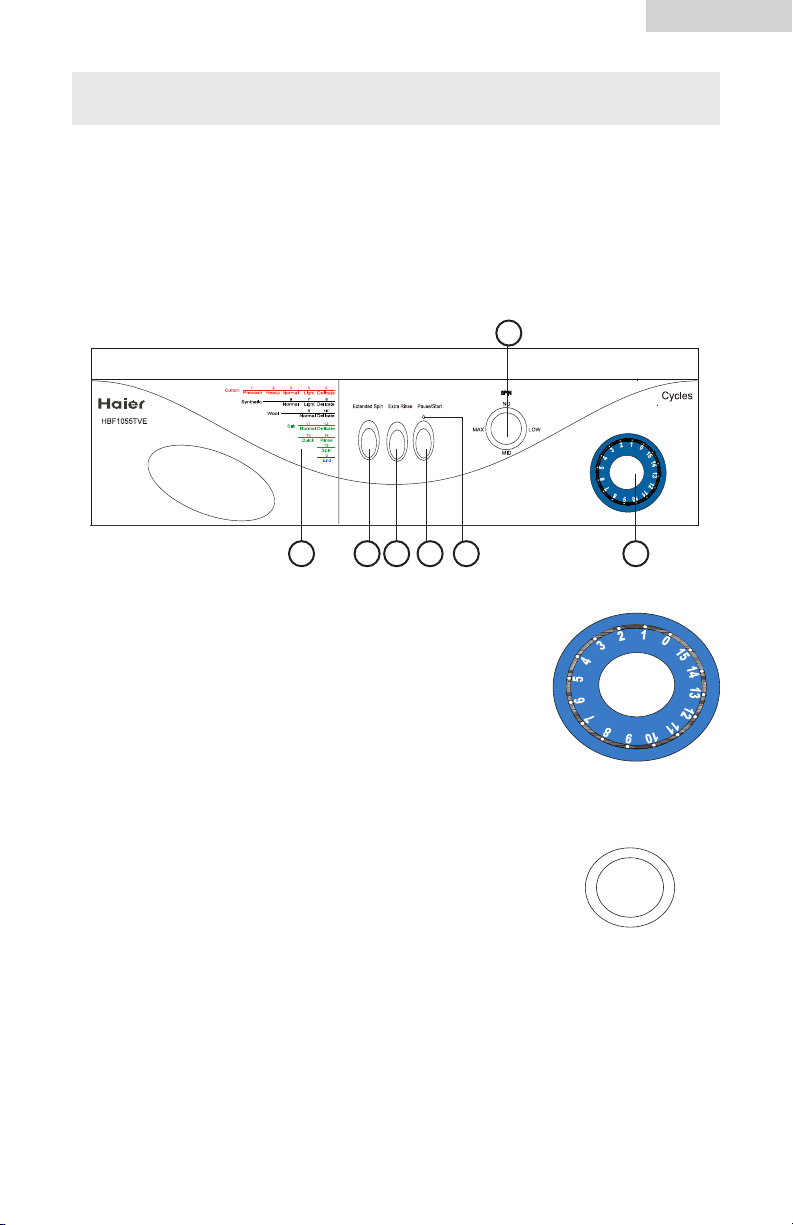
Control Panel
B
English
C D E F
A. Washing Program
To set the desired wash program, turn the knob to
“0” first. This will reset the timer. Then select a program
from the list on the detergent dispenser. Now press the
"Pause/Start" button to start operation.
B. Spin Speed Selection Knob
By turning this knob, the required spinning speed can
be selected.
The maximum speed will vary when a different program
is selected.
AG
12
Page 14

English
C. Detergent Distributor
Program descriptions are printed on the handle of the
detergent distributor. There are three detergent
compartments numbered 1, 2, 3.
1: Pre-washing detergent
2: Detergent
3: Softening agent
D. Extended Spin Button
Activate ths function by pressing this button. This option could be used for heavy
fabrics or special care items. Adding spin time will lead to removal of excess
water to shorten the dry cycle thus saving energy.
E. Extra Rinse Button
By pressing this button, an additional rinse operation will be activated before the
spin cycle is reached.
F. Pause/Start Button
After a program and spin speed are selected, press this button to begin wash.
During a wash cycle, press this button to pause operation. Press again to
resume operation.
G. Door Light
The light will illuminate when the door is locked.
13
Page 15
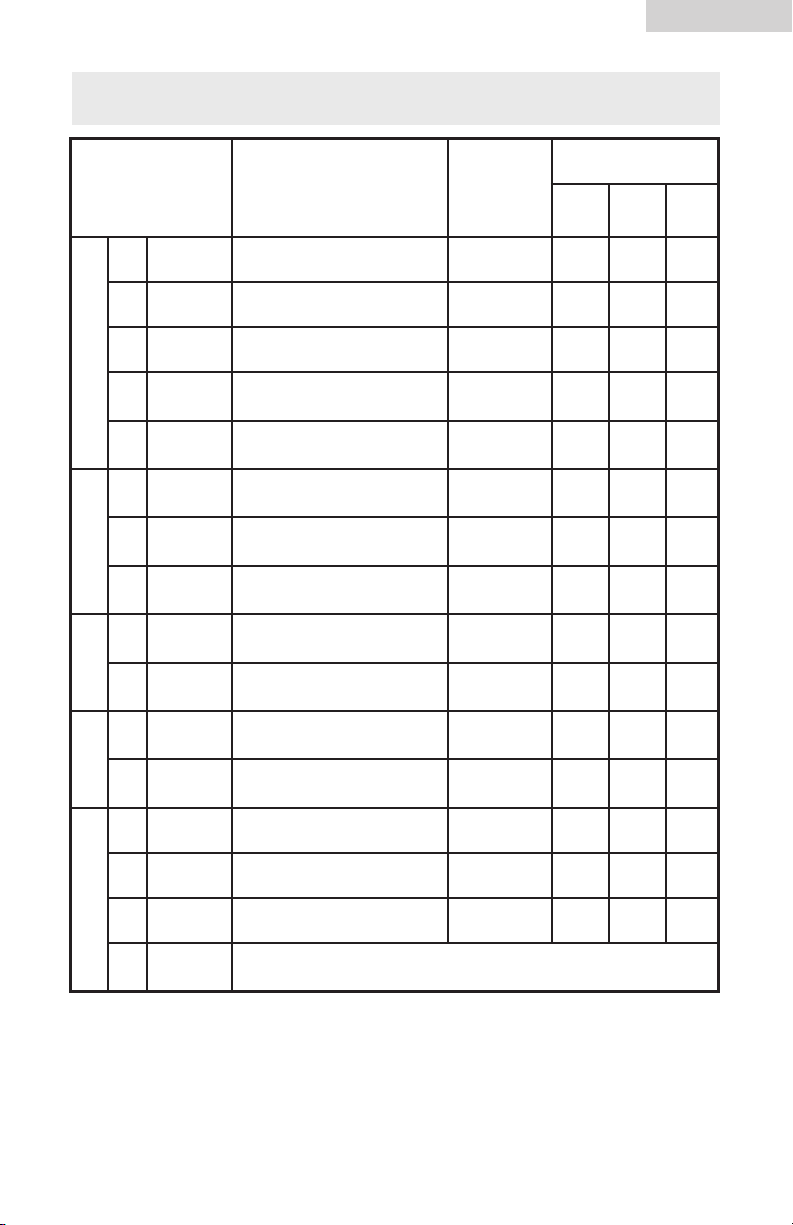
PROGRAM SELECTION
English
Program Setting Laundry
1 Prewash Very Heavy Soil Hot
2 Heavy Heavy Soil Hot
3 Normal Soiled Cotton Warm
Cotton
4 Light
5 Delicate
6 Normal
7 Light
Synthetic
8 Delicate
9 Normal
Wool
10 Delicate
11 Normal
Silk
12 Delicate
Non-fade and medium
soiled cotton
Fading and medium soiled
cotton
Non-fade heavily soiled
synthetic fiber
Non-fade and medium
soiled synthetic fiber
Fading and medium soiled
synthetic fiber
Non-fade heavily soiled
woolen fabrics
Fading and Medium soiled
woolen fabrics
Non-fade heavily
soiled silk fabrics
Fading and medium soiled
silk fabrics
Water
Temperature
Warm
Cold
Warm
Cold
Cold
Cold
Cold
Cold
Cold
Detergent
Comp.1
Comp. 2
Prewash
Detergent
Detergent
Í Í ô
– Í ô
– Í ô
– Í ô
– Í ô
– Í ô
– Í ô
– Í ô
– Í ô
– Í ô
– Í ô
– Í ô
Comp. 3
Softner
13 Quick Medium-soiled laundry Cold
14 Rinse Cold
15 Spin *
0 End
Turn the program knob at "0" position and turn off the power. The
wash program ends and the washing machine stops operatation.
– Í ô
– – ô
– – –
Nota: "Í" Means liquid detergent can be added when necessary.
"ô" Means softner can be added when necessary.
"–" Means no detergent can be added.
Important: When prewash detergent is added in compartment 1, do not add
detergent in compartment2.
14
Page 16

English
Cotton Cycle:
Pre-Wash Cycle: The purpose of this cycle is that if you want to pre-wash
heavily soiled clothes before the actual wash cycle begins. This cycle is
configured in such a manner that it will go through Normal, Light, Delicate wash
cycles time mode including rinse and spin cycles automatically to complete the
wash. The total time for this cycle is approximately 125 minutes when selected.
Do not use liquid detergent in this cycle.
Heavy Wash Cycle: This cycle is used for washing heavy duty items, such as
pants & other heavy clothes. Here water will be hot during the process to clean
clothes. The total time for this cycle is approximately 106 minutes long when
selected.
Normal Wash Cycle: This is used for work & play, household linens, normal
to lightly soiled and cotton clothes. This cycle is approximately 96 minutes.
Light Wash Cycle: This is used for a small load of lightly soiled items that
needs to be washed quickly. This cycle is approximately 90 minutes.
Delicate Wash Cycle: This is also used for small load of lightly soiled items
that needs to be washed quickly. This cycle is approximately 80 minutes.
Synthetics Cycle:
Normal Wash Cycle: This cycle is used for soiled permanent press, silks,
woolens, nylon and acrylic fabrics. This cycle is approximately 90 minutes.
Light Wash Cycle: This is used for a small load of lightly soiled items that
needs to be washed quickly. This cycle is approximately 80 minutes.
Delicate Wash Cycle: This cycle is same as quick wash cycle except the time
difference. This cycle is approximately 70 minutes.
Wool Cycle:
Normal Wash Cycle: This cycle is used for delicate fabrics that are often
washed by hand. This cycle is approximately 70 minutes.
Delicate Wash Cycle: This cycle is used for small loads of lightly soiled items
that need to be washed quickly. This cycle is approximately 60 minutes long.
15
Page 17

English
Silk Cycle:
Normal Wash Cycle: This cycle is used for household linens and normal to
lightly soiled silk clothes. The total time for this cycle is approximately 60 minutes
long.
Delicate Wash Cycle: Use this cycle for lightly soiled and delicate silk clothes
that need washing. Total time for this cycle is approximately 50 minutes long.
Quick Cycle: This cycle is used for small loads of lightly soiled items. This cycle
is approximately 36 minutes long.
Note: If the Spin Cycle is at “OFF” position before starting a cycle, the machine
will automatically switch to drain and shut off.
Loading
• Load each item loosely.
• Seperate the white and colored clothes. Separate heavy clothes from
light clothes.
• Carefully check all pockets and cuffs for small items. They can easily slide into
the tub and damage the tub.
• Pre-treat all stains and heavily soiled areas for best results.
• Do not overload your washer.
• Close the door properly after loading clothes.
Proper Use of Dispenser
The detergent/softener dispenser is located on the upper left corner
of the washer. Open the dispenser by pulling it out. You will see that there
are three compartments.
1. Prewashing Detergent
2. Detergent
3. Softening Agent
16
Page 18

English
Proper Use of Fabric Softener:
• Pour liquid fabric softener into compartment as recommended by
the manufacturer.
• Do not exceed the level in the compartment to avoid overflow.
Warning: • Never pour fabric softener directly onto clothes because it will stain
your clothes or you may get spots on your clothes.
• Do not use powder form of softener into dispenser, or it will clog
up the dispenser. This dispenser is only designed for liquid form.
Proper Use of Detergent:
When pre-wash cycle is selected do not use liquid detergent.
Low-Sudsing detergent is recommended for front load style washers. This type of
detergent prevents damage to your washing machine, which may be caused by
excess amount of suds entering the condensing compartment.
Note: You can use less or more detergent depending on the size of the load,
water type in your area whether it is soft or hard and whether the clothes
are heavily soiled or lightly soiled. Besides the performance of the
washing machine, the quality of the detergent also effects the
washing result.
WASHING METHODS
Washing Program Setting
To set the desired wash program, turn the knob to "0" first. This will reset the
timer. Then select a program from the list on the detergent dispenser. Now press
the "Pause/Start" button to start operation.
Caution: If you want to choose another program, first turn project knob to “0”,
then turn off the power. Now set the program knob to the
desired setting.
End
Wait 2-3 minutes after the washing process is finished. Open the door to take out
the laundry.
Caution: When the washing program finishes, the door lock light will blink.
Only then can the door be opened.
17
Page 19

English
Additional Information
Energy and Water Saving During Wash Process
1. Collect clothes for one full wash load.
2. Do not overload the washing machine.
3. Prewash heavily soiled clothes.
4. Choose fast or minimal washing programs for lightly soiled clothes.
5. Choose a proper spin speed.
6. Do not use more detergent than required.
7. Softening agent makes clothes feel softer and easier to iron.
Other Functions
Power-off memory function:
This machine has a power-off memory function. In case of abrupt power failure or
if the power must be cut off during a program cycle, the present settings will be
saved, and operation will resume when the power is switched on again.
Normal Operating Sounds
The following sounds are normally heard during the
operation of the washer:
• Tumbling sounds: This is normal as the heavy wet clothes in the washer are
continuously being tossed around.
• Air rushing noise: This happens when the washer tub spins at a very high RPM.
• Wash and rinse cycles going on and off will also make clicking sounds.
18
Page 20
English
CARE AND CLEANING GUIDE
Warning: Always unplug your appliance to avoid electric shock before
cleaning. Ignoring this warning may result in death or injury.
Before using cleaning products, always read and follow
manufacturer’s instructions and warnings to avoid personal injury
or product damage.
Cleaning and Maintenance
Use a damp or sudsy cloth for cleaning control panel.
• To avoid any kind of damage to cabinet finish, wipe appliance cabinet as
needed. If you spill liquid/powdered softener, bleach or detergent on the
cabinet, wipe cabinet immediately because it can damage the finish.
• Do not use any abrasive, harsh chemicals, ammonia, chlorine bleach,
concentrated detergent, solvents or metal scouring pads. Some of these
chemicals may dissolve, damage and/or discolor your appliance.
• Remove pins or other sharp objects from clothes to prevent scratching
interior parts.
• The Detergent Dispenser Compartment has a removable insert. Over time,
this compartment may accumulate dried detergent, dirt and debris. You must
remove the insert, then rinse in a sink or remove debris with a soft brush.
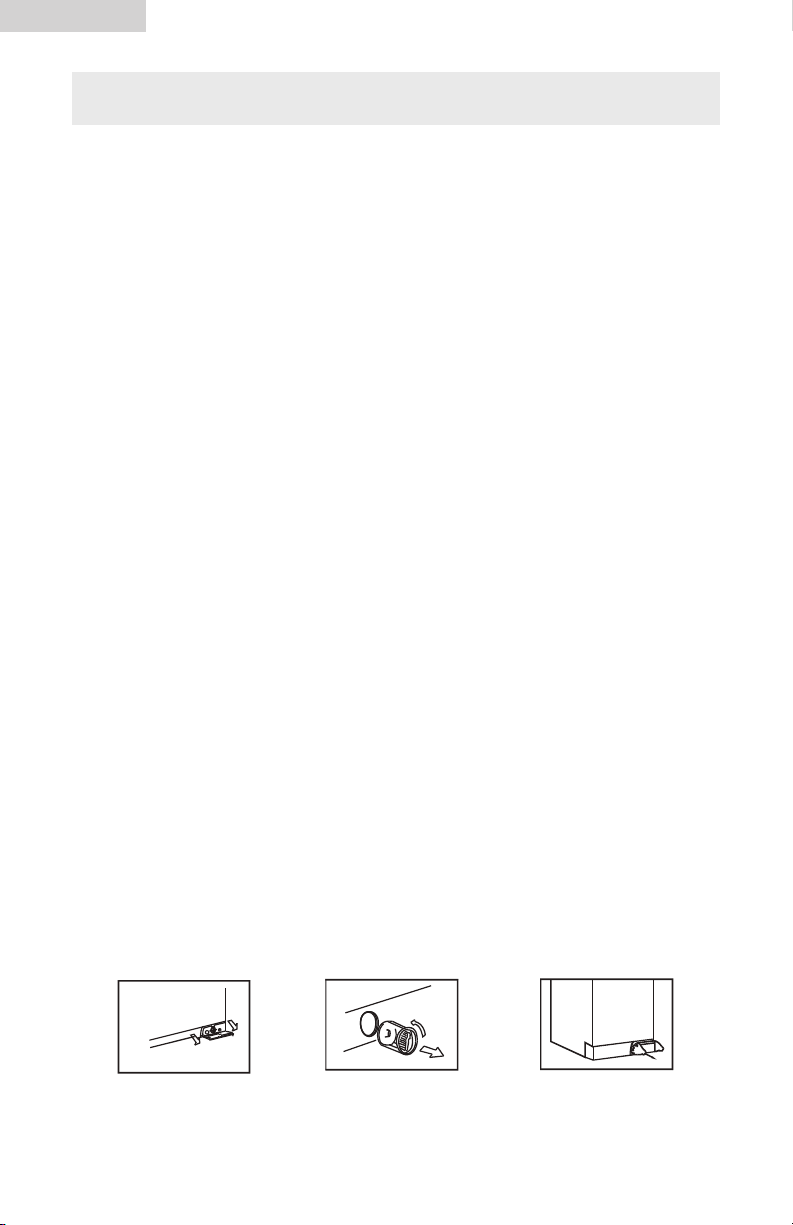
Cleaning the Filter (once a quarter)
This filter is used to trap buttons, coins, or other loose objects that may be
forgotten in pockets of clothing.
Press the lower edge of the filter compartment cover to open; Remove the filter
by turning counterclockwise; clean for any foreign objects. To replace reverse of
removal process.
Caution: Attention must be paid to ensure that the filter is replaced correctly to
avoid possible leakage.
Note: It is recommend to use a shallow pan or place a towel below the filter
when cleaning as there will be water being dispensed.
19
Page 21
English
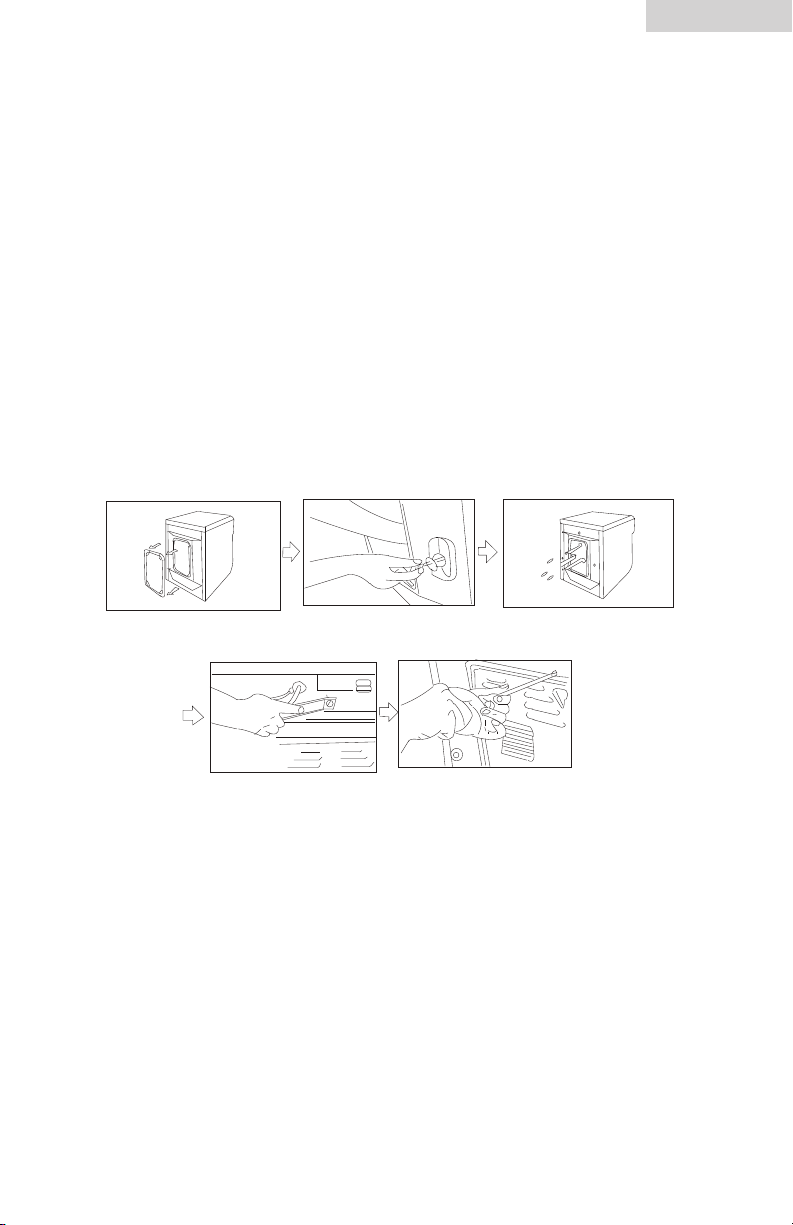
Remove the back cover. Replace the rubber hoses.
Tighten the bolt
with a spanner.
Replace the back cover.
Insert the bolts.
Moving & Vacationing
• Turn off water supply faucets and disconnect hoses. Drain water from all hoses.
This will prevent from damaging due to water leakage if the hoses accidentally
get ruptured or they become loose.
• Unplug the electrical cord from the wall outlet.
• Dry inner wash tub. If moving washer, disconnect drain hose.
• Turn the leveling legs clockwise all the way in.
• To prevent mold or mildew, leave door open so moisture inside machine
can evaporate.
• Reinstall the transportation bolts and the rubber hoses in the back to prevent
internal parts from shaking when appliance is moved to another location.
• If the machine is to be moved to a distant location, replace the transportation
bolts and the rubber hoses which were removed during installation as shown
below.
Storage of Your Appliance in Cold Environment
• This appliance must be stored at room temperature.
• If you just got delivery of this appliance when outside temperature is below
freezing, do not operate until this appliance has warmed to room temperature.
• Do not install or operate this appliance in the area where room temperature is
below freezing.
20
Page 22

English
TROUBLESHOOTING
Washer does not operate:
• Check if unit is plugged in. The plug may have come loose.
• Check if the electrical wall outlet is of proper voltage.
• Check if the circuit breaker needs to be reset or if the fuse needs to be
replaced.
• Check if the unit is in "Off" or “Pause” mode.
• Check if the washer is overloaded: load may need to be re-balanced and
clothes may need to be redistributed.
• Check if the door is open. You may have to close the door properly.
• Check if the control knob is set properly. You may have to adjust the control
knob.
• The washer pauses in some cycles. This is normal in delicate or hand-washable
cycle, which has short soak period where your clothes are being soaked for
very short period of time. You will not hear washer operation for a short period
of time. When the soak time is over, it will start automatically.
Problems with water:
• Not enough water coming out: Water faucet may need to be turned on fully.
Water hoses may be tangled up or wrinkled up. Straighten up hoses.
• Water temperature is incorrect: Check your water heater temperature. Hot
water needs to be at a temperature at least 120˚F -140˚F (49˚C – 60˚C).
Check to make sure the inlet hoses are properly connected. (e.g. hot to hot &
cold to cold)
• Water leaks: This is due to not properly installing drain hose or fill hoses. Your
home drain may be clogged or having constant water pressure. You may need
to tighten hoses; check the plumbing or call a plumber.
• Water will not drain: This is due to not installing your drain hose properly.
You may need to connect the drain hose properly. Check the position of the
drain hose. In order to drain properly, make sure that top of drain outlet is less
than 2'6" above the floor.
Washer is making noise:
• Washer may need to be reinstalled. (Check washer installation section.)
• Washer load may need to be re-balanced, as the load may be uneven.
• Coins, loose change, buttons or other heavy objects could make noise
(read Operating Guide – Normal Operating Sounds).
• Squealing Sound: Due to overloaded wash tub.
• Vibration Noise: Due to not leveling washer properly on the floor and uneven
distribution of clothes in the tub.
21
Page 23

English
Problems with clothes:
• Clothes are too wrinkled: This is due to improper sorting, overloading and
washing in too hot water repeatedly. Avoid overloading and resort your load.
Do not mix heavy clothes such as work clothes with light clothes such as
blouses, light shirts and delicate items. You may need to wash in warm or cold
water.
• Soap residue: Detergent may not be dissolving in water. Check water
temperature. Use less detergent.
• Spots or stains on your clothes: This is due to incorrect use of fabric softener.
You may need to read proper instructions on the detergent container and
follow proper directions for using the softener.
• Clothes are grayed or yellowed: This is due to not pouring enough detergent
for large loads. You may have to add more detergent to the load.
• Clothes are ripped & have holes/excessive wear & tear: This is due to sharp
objects such as pins and belt buckles left in pockets. You will need to remove
small loose sharp objects. Fasten belts, zippers, metal snaps etc.
Trouble messages: Judge the malfunctions from the door lock light.
Error 1: The door lock light does not illuminate.
Cause: Door is not properly shut.
Correction: Shut the door properly.
Error 2: The door lock light flashes 2 times and stops for 4 seconds
repeatedly
Cause: Drainage error, water not emptied within 4 minutes.
Correction: Clean the filter and check the drain hose for blockage. If error still
exists, please contact an authorized service personnel.
Error 3: The door lock light flashes 5 times and stops for 4 seconds
repeatedly. Cause: Water level not met in 8 minutes.
Correction: Make sure that tap is turned on, and water pressure is normal. If
problem still exists, please contact an authorized service personnel.
Error 4: The door lock light flashes 6 times and stops for 4 seconds
repeatedly.
Cause: Timing control damage.
Correction: Contact an authorized service personnel.
Error 5: The door lock light flashes 7 times and stops for 4 seconds
repeatedly.
Cause: Motor overheat protection or damage.
Correction: Contact an authorized service personnel.
Error 6: The door lock light flashes 8 times and stops for 4 seconds
repeatedly.
Cause: Water exceeds protective level.
Correction: Contact an authorized service personnel.
22
Page 24

Français
TECHNICAL SPECIFICATION
Item
Maximum Current (A) 12
Water Pressure (MPa) 0.05 ≤ P ≤ 1
Washing Power (W) 400
Spinning Power (W) 1200
Washing Program 15
Size (H x D x W) (Inches) 33-1/2" x 22-13/16" x 23-1/2"
9900178
Model
Power Supply 120V~/60Hz
Weight (lbs.) 159
HBF1055TVE
ETL LISTED
CONFORMS TO UL STD. UL2157
CERTIFIED TO CSA STD.
CSA - C22.2 NO. 169
23
Page 25

LIMITED WARRANTY
English
In Home Service
Full ONE Year Warranty
For 12 months from the date of original
retail purchase, Haier will repair or replace
any part free of charge including labor
that fails due to a defect in materials or
workmanship.
Limited Warranty
After one year from the original retail
purchase date, Haier will provide a part at
no cost, as indicated below, to replace said
part as a result of a defect in materials or
workmanship. Haier is solely responsible
for the cost of the part. All other costs
such as labor, trip charge, etc are the
responsibility of the owner.
Second through Fifth Year
Haier will provide the cabinet assembly
should the cabinet rust through.
Second through Tenth Year
Haier will provide the inner stainless steel
wash tub.
NOTE: This warranty commences on
the date the item was purchased and the
original purchase receipt must be presented
to the authorized service representative
before warranty repairs are rendered.
Exceptions: Commercial or Rental
Use Warranty
90 days labor from date of original
purchase
90 days parts from date of original
purchase
No other warranty applies
For Warranty Service
Contact your nearest authorized service
center. All service must be performed by
a Haier authorized service center. For the
name and telephone number of the nearest
authorized service center please call 1-877337-3639.
Before calling please have available
the following information:
Model number and serial number of your
appliance.The name and address of the
dealer you purchased the unit from and
the date of purchase. A clear description
of the problem. A proof of purchase (sales
receipt).
This warranty covers appliances
within the continental United States,
Puerto Rico and Canada. What is
not covered by this warranty:
Replacement or repair of household fuses,
circuit breakers, wiring or plumbing.
A product whose original serial number has
been removed or altered.
Any service charges not specifically
identified as normal such as normal
service area or hours.
Damage to clothing.
Damage incurred in shipping.
Damage caused by improper installation
or maintenance.
Damage from misuse, abuse accident, fire,
flood, or acts of nature.
Damage from service other than an
authorized Haier dealer or service center.
Damage from incorrect electrical current,
voltage or supply.
Damage resulting from any product
modification, alteration or adjustment
not authorized by Haier.
Adjustment of consumer operated controls
as identified in the owners manual.
Hoses, knobs, lint trays and all attachments,
accessories and disposable parts.
Labor, service transportation, and shipping
charges for the removal and replacement
of defective parts beyond the initial
12-month period.
Damage from other than normal
household use.
Any transportation and shipping charges.
THIS LIMITED WARRANTY IS GIVEN
IN LIEU OF ALL OTHER WARRANTIES,
EXPRESSED OR, INCLUDING THE
WARRANTIES OF MERCHANTABILITY AND
FITNESS FOR A PARTICULAR PURPOSE
The remedy provided in this warranty is
exclusive and is granted in lieu of all
other remedies.
This warranty does not cover incidental or
consequential damages, so the above
limitations may not apply to you. Some
states do not allow limitations on how long
an implied warranty lasts, so the above
limitations may not apply to you.
This warranty gives you specific legal rights,
and you may have other rights, which vary,
from state to state.
Haier America
New York, NY 10018
24
Page 26

Français
CONSIGNES DE
SÉCURITÉ IMPORTANTES
Avertissement – Afin d’éviter les risques d’incendie, décharge
électrique ou blessures lors de l’utilisation de votre appareil,
respectez les précautions de base dont les suivantes:
1. Lisez toutes les instructions attentivement avant d’utiliser
cet appareil.
2. Utilisez uniquement cet appareil pour les fonctions prévues et décrites dans ce
guide d’utilisation et d’entretien.
3. Cet appareil doit être installé conformément aux instructions d’installation
avant de l’utiliser (voir pages 7-11).
4. Remplacez immédiatement cordon d’alimentation usé et fiches lâches.
5. Retirez la porte avant réparations ou avant de vous débarrasser de l’appareil.
6. N’utilisez pas votre laveuse en présence de flammes explosives.
7. N’utilisez pas la laveuse pour laver des vêtements qui ont été lavés, nettoyés,
trempés ou détachés avec de l’essence, des solvants secs ou d’autres produits
inflammables car leurs vapeurs peuvent créer un départ de feu ou une
explosion.
8. N’ajoutez pas de l’essence, des solvants de nettoyage à sec ou autres
matières inflammables ou explosives à la laveuse. Ces substances dégagent
des vapeurs qui peut s’enflammer ou exploser.
9. Ne mettez pas la main dans la laveuse si le tube ou l’agitateur est en train de
tourner.
10. Ne jouez pas avec les réglages de la laveuse.
11. Afin de réduire les risques de blessures ne laissez pas les enfants jouer dans
ou sur la laveuse. Lorsque la laveuse est utilisée en présence d’enfants il faut
surveiller les enfants attentivement.
12. N’installez et n’entreposez pas la laveuse où elle sera exposée aux
conditions climatiques.
13. De l’hydrogène peut être produit si le chauffe-eau n’a pas été utilisé
pendant plus de 2 semaines. Cela peut causer une explosion dans certaines
circonstances. Si cela se produit avant d’utiliser la laveuse ouvrez les robinets
d’eau chaude et laissez-la couler pendant quelques minutes. Pour éviter
les accidents durant ce processus ne mettez aucun appareil électrique en
marche, ne fumez pas, n’allumez pas une cigarette ou un briquet et n’utilisez
pas de flammes car l’hydrogène est inflammable et peut exploser.
Page 27

Français
14. Ne réparez pas et ne remplacez aucune pièce de cet appareil et n’essayez
pas de l’entretenir à moins que ce ne soit spécifiquement recommandé dans
les instructions de réparations et que vous compreniez ces instructions et êtes
capable de les suivre.
CONSERVEZ CES CONSIGNES
INSTRUCTIONS DE MISE À LA TERRE
Cet appareil doit être mis à la terre. Au cas où il y aurait un problème de mauvais fonctionnement ou de panne, la mise à la terre réduira le risque de courant
électrique. Cette laveuse est équipée d’un cordon qui a un conducteur de protection et une prise de mise à la terre. La prise doit être insérée dans une prise
murale appropriée qui est correctement installée et mise à la terre conformément
à tous les codes et règlements locaux.
Avertissement – Un raccordement incorrect du conducteur de protection peut
causer un risque de choc électrique. Vérifiez avec un électricien agréé ou un
représentant de service ou du personnel de service si vous avez des doutes quant
à la bonne mise à la terre de la laveuse.
DANGER
Risque de suffocation et de confinement des enfants.
Avant de jeter vos vieux appareils électroménagers,
retirez la porte pour que les enfants ne puissent pas
grimper à l’intérieur facilement.
ENREGISTREMENT DU PRODUIT
Merci d’avoir choisi ce produit
Haier. Ce guide facile à utiliser
vous permettra d’utiliser votre appareil au maximum de ses capacités.
N’oubliez pas de noter le modèle et
le numéro de série. Ils sont sur une
étiquette au dos de votre laveuse.
Agrafez votre reçu à votre mode d’emploi. Vous en aurez besoin
pour faire valoir votre garantie.
Numéro du modèle
Numéro de série
Date d’achat
2625
Page 28

Français
RACCORDEMENTS ELECTRIQUES
Cet appareil doit être mis à la terre. En cas de court circuit, la mise à la terre
réduit le risque de décharge électrique en fournissant une porte de sortie au
courant électrique. Cet appareil est équipé d’un cordon avec une fiche de
mise à la terre. Cette fiche doit être insérée dans une prise électrique qui est
correctement installée et mise à la terre.
• Une mauvaise utilisation de la fiche polarisée peut résulter en un
choc électrique.
• Contactez un électricien qualifié ou un réparateur agréé si les
instructions de mise à la terre ne sont pas totalement comprises ou si
vous avez un doute quant à la mise à la terre de cet appareil.
Exigences de câblage:
• Cet appareil doit être branché dans une PRISE MURALE MISE
A LA TERRE d’au moins 15 AMPERES, 120 VOLTS, 60 HZ.
Note: Quand la prise murale est une prise à deux trous,
il est de la responsabilité du client et son obligation
de la faire remplacer avec une prise murale à 3
trous correctement mise à la terre.
X
Rallonges:
Nous ne recommandons pas l’utilisation de rallonges.
Coupures de courant
Occasionnellement il se peut qu’il y ait des coupures de courant dues à des
orages ou autres. Retirez le cordon d’alimentation de la prise électrique.
Lorsque le courant est rétabli rebranchez le cordon d’alimentation dans la prise
électrique. En cas de coupure prolongée nettoyez l’appareil avant de le réutiliser.
Pour plus de détails, voir « Autres fonctions » - « Power-off memory function »
page 18.
27
Page 29

Français
TABLE DES MATIÈRES
CONSIGNES DE SÉCURITÉ ........................................................... 25
INSTRUCTIONS DE MISE À LA TERRE .......................................... 26
RACCORDEMENTS ÉLECTRIQUES ................................................. 27
PIECES ET CARACTERISTIQUES .................................................... 29
Avant .............................................................................................29
Arrière ............................................................................................ 30
INSTRUCTIONS D’INSTALLATION ............................................... 31
Instructions et matériels nécessaires .................................................... 31
Déballage de votre laveuse ...............................................................32
Étapes d’installation .........................................................................34
INSTRUCTIONS DE FONCTIONNEMENT ..................................... 36
Tableau de commande .....................................................................36
Sélection du programme ................................................................... 38
Chargement .................................................................................... 40
Bonne utilisation du distributeur ......................................................... 40
Méthodes de lavage ........................................................................ 41
Bruits de fonctionnement normal ........................................................ 42
GUIDE DE NETTOYAGE ET ENTRETIEN ........................................43
Nettoyage et maintenance ................................................................ 43
Déménagement et vacances .............................................................. 44
Entreposage de votre laveuse ............................................................ 45
Problèmes et solutions ...............................................................46
Caractéristiques techniques .......................................................48
Garantie .....................................................................................49
28
Page 30

Français
PIÈCES ET CARACTÉRISTIQUES
Avant
1
3
4
5
2
1. Distributeur détergent/adoucissant
2. Porte en verre transparent
3. Bouton de sélection du cycle
4. Bouton de sélection de la
vitesse d’essorage
29
6
7
8
5. Bouton de fonctionnement
(Pause/Start)
6. Bouton de rinçage extra
7. Bouton d’essorage prolongé
8. Pieds réglables (non montrés)
Page 31

PIÈCES ET CARACTÉRISTIQUES
Arrière
1
2
Français
8
4
5
3
1. Cordon d’alimentation
2. Vis de la plaque arrière (3)
3. Tuyau de vidange
4. Collier de serrage du tuyau de
vidange (3)
6
7
5. Pêne de transport
6. Plaque arrière
7. Pieds réglables (non montrés)
8. Valve (chaud et froid)
30
Page 32

Français
INSTRUCTIONS D’INSTALLATION
Outils et matériels nécessaires
Vous aurez besoin des outils suivants pour vous aider à
installer votre laveuse:
• Ciseaux
• Tournevis standard
• Pinces
• Clé à molette
• Mètre à ruban
• Gants
• Niveau de menuisier
Accessoires fournis Quantité
1. Tuyaux d’arrivée d’eau chaude et froide 2
2. Détendeurs de pression (Attachés aux tuyaux
d’arrivée d’eau chaude et froide) 2
3. Joints des tuyaux plats d’arrivée d’eau (installés à chaque extrémité
des tuyaux d’arrivée d’eau) 4
4. Guide d’utilisation et d’entretien (non montré)
5. Bouchons en plastique pour couvrir les trous
des boulons de transport 3
6. Col de cygne 1
1
3
4
USER MANUAL
2
5
6
31
Page 33

Français
Déballage de votre appareil
• Retirez tous les matériaux d’emballage dont les boulons de transport.
• Vérifiez et retirez tous les restes d’emballage, adhésif ou documentation avant
d’utiliser la laveuse.
• Les boulons de transport doivent être retirés avant d’utiliser la machine. Une
fois retirés, conservez-les pour pouvoir les réinstaller pour protéger la machine
durant le transport quand vous déménagerez.
• Les tuyaux d’arrivée d’eau et les autres accessoires sont emballés et placés
dans le tambour.
Boulon central
Boulon
Boulon
32
Page 34

Français
• Comme montré sur la figure 1,
retirez tous les matériaux
d’emballage (dont la mousse).
Après avoir ouvert l’emballage,
il se peut que vous voyiez des
gouttelettes d’eau sur le sac en
plastique et le hublot. C’est un
phénomène normal provenant des
tests d’eau en usine.
• Retirez les trois boulons de transport comme
montré sur la figure 2A. Les boulons protègent
l’appareil des chocs pendant le transport. Les
étapes suivantes doivent être suivies avant
d’utiliser l’appareil:
1. Retirez la plaque arrière de la laveuse. Pour
retirer la plaque vous devez retirer les vis
retenant le panneau.
Fig. 1
2. Retirez les trois boulons à l’arrière de la laveuse.
Retirez ensuite le tuyau en caoutchouc qui est
derrière les boulons de transport à l’intérieur
de l’appareil.
3. Réinstallez la plaque arrière.
4. Bouchez les trous laissés par les boulons avec
les bouchons en plastique. (Attention : les
boulons et le tuyau en caoutchouc doivent
être gardés en lieu sûr pour un usage
ultérieur.) Fig. 2B
Fig. 2
• Mettre la laveuse à niveau : il y a des pieds
réglables au bas de la laveuse. Avant d’utiliser l
a machine il faut l’ajuster comme montré sur
la figure 3.
• Les pieds réglables peuvent être ajustés en les
tournant dans le sens contraire des aiguilles
d’une montre pour monter votre laveuse ou
dans le sens des aiguilles d’une montre pour
Fig. 3
abaisser la laveuse.
Plaque arrière
A
Boulon
B
33
Page 35

INSTALLATION
H
100cm
80cm
Raccord du tuyau d’arrivée d’eau et de la
laveuse
Français
• Raccordez le manchon du tuyau d’arrivée au
robinet d’eau et assurez-vous de bien serrer.
• Installez le détendeur de pression à chaque
valve d’arrivée de l’appareil. Assurez-vous que
le joint en caoutchouc est placé dans le détendeur
de pression.
• Raccordez le coude du tuyau d’arrivée à la valve
et assurez-vous de bien serrer.
Note: • Assurez-vous que le tuyau d’arrivée d’eau
FROIDE est raccordé à la valve pour eau froide
(marquée « C »).
• Assurez-vous que le tuyau d’arrivée d’eau
CHAUDE est raccordé à la valve pour eau froide
(marquée « H »).
Note: Un joint en caoutchouc doit être présent à l’intérieur de chaque
extrémité des tuyaux d’arrivée. Serrer trop fort peut endommager la
valve.
Détendeur de pression
Tuyaux d’arrivée d’eau
Détendeur de pression
Tuyau d’évacuation d’eau
• La hauteur de la pipe pour le tuyau d’évacuation
d’eau doit être comprise entre 2'6" pouces et
3'3" pouces ( 6,6 cm et 8,4 cm). Le tuyau
d’évacuation d’eau doit être placé en sécurité
sur la bride à l’arrière de la laveuse.
• Utilisez le support d’évacuation d’eau (col de
cygne) fourni en tant qu’accessoire pour une bonne
installation. Si le tuyau d’évacuation d’eau a besoin
d’être allongé, il ne doit pas être allongé à plus de
8'2" pouces soit 20,8 cm. (Allonger le tuyau peut
résulter en une entrée d’eau et sortie d’eau
concourantes.) Le diamètre du tuyau de rallonge
doit être identique à celui du tuyau d’origine.
Attention: Le tuyau d’évacuation d’eau ne doit pas être immergé dans l’eau. Le
tuyau d’origine et le tuyau de rallonge doivent être fermement raccordés.
34
Page 36

Français
Alimentation
• L’appareil doit être raccordé à une prise murale standard de 120 volts, 60 Hz,
15 A. Assurez-vous que les codes locaux sont correctement respectés.
Raccordement adaptateur Y
Note: L’« Adaptateur Y » montré dans la figure ci-dessous est uniquement à but
d’illustration. Il n’est pas fourni comme accessoire dans la boîte. Si vous
avez besoin d’utiliser ce type de branchement, vous pouvez acheter un «
Adaptateur Y » dans votre quincaillerie la plus proche.
Tuyau d’alimentation
valves d’arrivée
d’eau
d’eau
Adaptateur Y
Col de cygne
Coude du tuyau
Coude du tuyau
Dimensions de l’unité
largeur
hauteur
VUE AVANT
35
ÉVIER/LAVABO
Tuyauterie souple
de vidange
Porte Ouverte À 90°
profondeur
VUE LATÉRALE
22 13/16"
profondeur
Page 37

INSTRUCTIONS D’UTILISATION
NO
MAX
MID
LOW
SPIN
Avertissement - Afin de réduire les risques d’incendie, de choc électrique et
de blessures corporelles, lisez les CONSIGNES DE SÉCURITÉ
IMPORTANTES avant de faire fonctionner cet appareil.
Tableau de commande
B
Français
C D E F
A. Programme de lavage
Pour régler le programme de lavage désiré, tournez
d’abord le bouton sur « 0 ». Cela réinitialisera la minuterie.
Sélectionnez ensuite un programme de la liste sur le
distributeur de détergent. Appuyez maintenant sur
« Pause/Start » pour commencer l’opération désirée.
B. Bouton de sélection de la vitesse d’essorage
En tournant ce bouton, la vitesse d’essorage requise peut
être sélectionnée.
La vitesse maximale va varier quand un programme
différent est sélectionné.
AG
36
Page 38

Français
C. Distributeur de détergent
Les descriptions de programmes sont imprimées sur la
poignée du distributeur de détergent. Il y a trois
compartiments de détergent numérotés 1, 2,3.
1 : Détergent prélavage
2 : Détergent
3 : Agent adoucissant
D. Bouton d’essorage prolongé
Activez cette fonction en appuyant sur ce bouton. Cette option peut être utilisée
pour les tissus lourds ou les articles nécessitant des soins particuliers. Ajouter un
temps d’essorage retirera l’excès d’eau pour raccourcir le cycle de séchage et
ainsi économiser de l’énergie.
E. Bouton de rinçage extra
En appuyant sur le bouton, un temps de rinçage supplémentaire sera activé avant
que le cycle d’essorage ne commence.
F. Bouton Pause/Start
Après qu’un programme et un cycle d’essorage ont été sélectionnés, appuyez sur
ce bouton pour commencer le lavage. Pendant un cycle de lavage, appuyez sur
ce bouton pour pauser le fonctionnement de la laveuse. Appuyez de nouveau sur
ce bouton pour reprendre le fonctionnement.
G. Lumière de la porte
La lumière s’allumera quand la porte est bloquée.
37
Page 39

SÉLECTION DE PROGRAMMES
Français
Réglage de
programme
1 Prélavage Très sale Chaud
2 Lourd Sale Chaud
3 Normal Coton sale Assez chaud
Coton
4 Léger
5 Délicat
6 Normal
7 Léger
Synthétique
8 Délicat
9 Normal
Wool
10 Délicat
11 Normal
Silk
12 Délicat
Type de linge
Coton qui ne décolore pas
et moyennement sale
Coton qui décolore et
moyennement sale
Fibre synthétique très sale
et qui ne décolore pas
Fibre synthétique
moyennement sale et qui
ne décolore pas
Fibre synthétique
moyennement sale et qui
décolore
Tissu en laine très sale et
qui ne décolore pas
Tissu en laine
moyennement sale et qui
décolore
Tissu en soie très sale et
qui ne décolore pas
Tissu en soie moyennement
sale et qui décolore
Température
de l’eau
Assez chaud
Assez chaud
Froid
Froid
Froid
Froid
Froid
Froid
Froid
Détergent
Comp.1
Comp. 2
Détergent
Détergent
prélavage
Adoucissant
Í Í ô
– Í ô
– Í ô
– Í ô
– Í ô
– Í ô
– Í ô
– Í ô
– Í ô
– Í ô
– Í ô
– Í ô
Comp. 3
13 Rapide Linge moyennement sale Froid
14 Rinçage Froid
15 Essorage *
0 Fin
Nota: "Í" signifie que le détergent liquide peut être ajouté quand nécessaire.
"ô" signifie que l’adoucissant peut être ajouté quand nécessaire.
"–" signifie qu’aucun détergent ne peut être ajouté.
Important: Quand le détergent de prélavage est ajouté dans le compartiment 1,
n’ajoutez pas de détergent dans le compartiment 2.
Tournez le bouton de programme sur la position « 0 » et éteignez.
Le programme de lavage s’arrête et la laveuse arrête de fonctionner.
– Í ô
– – ô
– – –
38
Page 40

Français
Cycle coton:
Cycle prélavage: Le but de ce cycle est de prélaver les vêtements très sales
avant que le cycle de lavage véritable commence. Ce cycle est configuré de
façon à ce que les cycles de lavage Normal, Léger (Light), Délicat (Delicate)
incluent les cycles de rinçage et d’essorage automatiquement pour compléter le
lavage. La durée totale de ce cycle est d’à peu près 125 minutes quand il est
sélectionné. N’utilisez pas de détergent liquide pour ce cycle.
Cycle lavage lourd: Ce cycle est utilisé pour laver des articles lourds comme
les pantalons et autres vêtements lourds. L’eau sera chaude durant le processus
pour laver les vêtements. La durée totale de ce cycle est d’à peu près 106
minutes quand il est sélectionné.
Cycle lavage normal: Ce cycle est utilisé pour laver des articles de tous
les jours, du linge de maison, des vêtements peu ou moyennement sales et les
vêtements en coton. La durée totale de ce cycle est d’à peu près 96 minutes
quand il est sélectionné.
Cycle lavage léger: Ce cycle est utilisé pour laver peu d’articles à la fois, des
vêtements peu sales qui ont besoin d’un lavage rapide. La durée totale de ce
cycle est d’à peu près 90 minutes.
Cycle lavage délicat: Ce cycle est également utilisé pour laver peu d’articles
à la fois, des vêtements peu sales qui ont besoin d’un lavage rapide. La durée
totale de ce cycle est d’à peu près 80 minutes.
Cycle synthétiques:
Cycle lavage normal: Ce cycle est utilisé pour laver des articles sales en
apprêt permanent, en soie, en laine, en nylon et en acrylique. La durée totale de
ce cycle est d’à peu près 90 minutes.
Cycle lavage léger: Ce cycle est utilisé pour laver peu d’articles à la fois, des
vêtements peu sales qui ont besoin d’un lavage rapide. La durée totale de ce
cycle est d’à peu près 80 minutes.
Cycle lavage délicat: Ce cycle est également utilisé pour laver peu d’articles
à la fois, des vêtements peu sales qui ont besoin d’un lavage rapide, seule la
durée est différente. La durée totale de ce cycle est d’à peu près 70 minutes.
Cycle laine:
Cycle lavage normal: Ce cycle est utilisé pour laver des vêtements en
matières délicates qui sont souvent lavés à la main. Ce cycle est d’à peu près 70
minutes.
Cycle lavage délicat: Ce cycle est utilisé pour laver peu d’articles à la fois,
des vêtements peu sales qui ont besoin d’un lavage rapide. La durée totale de ce
cycle est d’à peu près 60 minutes.
39
Page 41

Français
Cycle soie:
Cycle lavage normal: Ce cycle est utilisé pour laver du linge de maison et des
vêtements en soie peu ou normalement sales. La durée totale de ce cycle est d’à
peu près 60 minutes.
Cycle lavage délicat: Ce cycle est utilisé pour laver des vêtements en soie peu
sales qui ont besoin d’être lavés. La durée totale de ce cycle est d’à peu près 50
minutes.
Cycle rapide: Ce cycle est utilisé pour laver une petite quantité de vêtements en
soie qui sont peu sales. La durée totale de ce cycle est d’à peu près 36 minutes.
Note: Si le cycle d’essorage est sur la position « OFF » avant de
commencer un cycle, la machine passera automatiquement en
vidange et s’éteindra.
Chargement
• Placez chaque vêtement dans la machine séparément.
• Séparez les vêtements blancs des couleurs. Séparez les vêtements lourds des
vêtements légers.
• Vérifiez attentivement toutes les poches et revers des vêtements pour vérifier
qu’il n’y a pas d’objets oubliés. Ces objets peuvent facilement lisser dans le
tube et endommager le tube.
• Pour obtenir de meilleurs résultats prétraitez les taches et les endroits très sales.
• Ne surchargez pas votre laveuse.
• Fermez la porte ou le couvercle supérieur correctement après voir mis les
vêtements dans la machine.
Bonne utilisation du distributeur
Le distributeur de détergent/adoucissant est situe sur le côté supérieur de la
laveuse. Ouvrez le distributeur en tirant dessus vers vous. Vous verrez qu’il y a
trois compartiments.
1. Détergent prélavage
2. Détergent
3. Agent adoucissant
40
Page 42

Français
Bonne utilisation de l’assouplissant:
• Versez le liquide assouplissant dans le compartiment comme recommandé par
le fabricant.
• Ne dépassez pas le niveau du compartiment pour éviter les débordements..
Avertissement: • Ne versez jamais de l’assouplissant directement sur les vête-
ments par ce que cela va tacher vos vêtements ou vous pouvez avoir des marques sur vos vêtements.
• N’utilisez pas un assouplissant en poudre dans le distribu-
teur car cela va boucher le distributeur. Le distributeur est
uniquement conçu pour des liquides.
Bonne utilisation du détergent:
Lorsque le cycle de prélavage est sélectionné, n’utilisez pas de détergent liquide.
Un détergent peu savonneux est recommande pour les laveuses a chargement
frontal. Ce type de détergent empêche d’endommager votre laveuse, ce qui peut
causer des quantités excessives de savon entrant dans le compartiment de condensation.
Note: La quantité de détergent dépend de la taille de ce que vous lavez,
le type d’eau, dure ou douce, et si les vêtements sont très sales ou
peu sales. En plus de la performance de la laveuse, la qualité du
détergent affecte aussi le résultat du lavage.
MÉTHODES DE LAVAGE
Réglage du programme de lavage
Pour régler le programme de lavage désiré, commencez par tourner le bouton
sur « 0 ». Cela réinitialisera la minuterie. Sélectionnez ensuite le programme
dans la liste sur le distributeur de détergent. Appuyez maintenant sur le bouton «
Pause/Start » pour commencer l’opération.
Attention: Si vous voulez choisir un autre programme, tournez d’abord le bou-
ton sur « 0 » puis éteignez. Réglez maintenant le programme désiré
en tournant le bouton de programme.
Fin
Attendez 2-3 minutes après que le lavage est terminé. Ouvrez la porte pour
retirer le linge.
Attention: Quand le programme de lavage est terminé, la lumière de la fer-
meture de la porte clignotera. La porte peut être ouverte seulement
après cela.
41
Page 43

Français
Information supplémentaire
Économie d’énergie et d’eau durant le processus de lavage
1. Réunissez les vêtements pour un chargement complet de la machine.
2. Ne surchargez pas la machine.
3. Prélavez les vêtements très sales.
4. Choisissez des programmes de lavage rapides ou minimes pour les
vêtements peu sales.
5. Choisissez la vitesse d’essorage adéquate.
6. N’utilisez pas plus de détergent que nécessaire.
7. L’assouplissant rend les vêtements doux et plus faciles à repasser.
Autres fonctions
Fonction mémoire « power-off »:
Cette machine possède la fonction mémoire « power-off ». En cas de brusque
coupure de courant ou si le courant doit être coupé pendant un cycle de
programme, les réglages actuels seront enregistrés et le lavage reprendra là où il
s’est arrêté quand le courant est de retour.
Bruits de fonctionnement normal
Les bruits suivants sont des bruits de fonctionnement normal
de la laveuse:
• Bruit de tambour. Ceci est normal car les vêtements mouillés et lourds sont
continuellement en mouvement dans la laveuse.
• Bruit d’air. Cela se produit lorsque le tambour de la laveuse tourne
très rapidement et que l’air passe très rapidement à travers le tambour
de la laveuse.
• Les cycles de lavage et rinçage commençant et finissant font aussi un bruit
de « click ».
42
Page 44

Français
NETTOYAGE ET ENTRETIEN
Avertissement: Débranchez toujours votre appareil avant le nettoyage pour
éviter un choc électrique. Ignorer cet avertissement peut provoquer la mort ou des
blessures. Avant d’utiliser des produits de nettoyage, lisez toujours les instructions
du fabricant et suivez-les et lisez les avertissements pour éviter des blessures et
d’endommager le produit.
Nettoyage et maintenance
Utilisez uniquement un chiffon humide ou savonneux pour nettoyer le tableau de
commande.
• Afin d’éviter d’abîmer la carrosserie nettoyez la carrosserie de la laveuse aussi
souvent que nécessaire. Si vous renversez de la lessive liquide/en poudre, de
l’adoucissant ou de l’eau de javel sur la carrosserie nettoyez-la immédiatement
car cela peut endommager les finitions.
• N’utilisez pas de produits abrasifs, produits chimiques très forts, de
l’ammoniaque, de l’eau de javel, des détergents concentrés, des solvants ou
des éponges en métal. Ils peuvent se dissoudre, endommager et/ou décolorer
votre appareil.
• Retirez les épingles et autres objets tranchants des vêtements pour éviter de
rayer les parois internes.
• Le compartiment du distributeur de détergent possède un encastrement
amovible. Avec le temps, le compartiment peut accumuler du détergent séché,
de la saleté et des débris. Vous devez retirer l’encastrement, le rincer dans
l’évier et retirer les débris avec une brosse douce.
Nettoyage du filtre (chaque trimestre)
Ce filtre est utilisé pour attraper et retenir les boutons, les pièces de monnaie ou
tout autre objet oublié dans la poche d’un vêtement.
Appuyez sur le côté inférieur du couvercle du compartiment à filtre pour ouvrir.
Retirez le filtre en le tournant dans le sens inverse des aiguilles d’une montre,
nettoyez tout objet étranger. Pour remettre le filtre en place, effectuez l’opération
à l’envers.
Attention: Il convient de bien faire attention de replacer le filtre en place
correctement afin d’éviter une fuite potentielle.
Note: Il est recommandé d’utiliser une poêle ou de placez une serviette sous le
filtre quand vous le nettoyez car de l’eau peut couler.
43
Page 45

Français
Remove the back cover. Replace the rubber hoses.
Tighten the bolt
with a spanner.
Replace the back cover.
Insert the bolts.
Déménagement et vacances
• Fermez l’arrivée d’eau et déconnectez les tuyaux. Videz l’eau de tous les
tuyaux. Cela empêchera la laveuse de s’abîmer à cause d’une fuite d’eau si les
tuyaux se rompent accidentellement ou deviennent lâches.
• Débranchez la machine de la prise murale.
• Séchez la cuve de lavage. Si vous bougez la laveuse, débranchez le tuyau de
vidange.
• Tournez complètement les pieds réglables dans le sens des aiguilles d’une
montre.
• Afin d’éviter les moisissures laissez la porte ouverte pour que l’humidité à
l’intérieur de la machine s’évapore.
• Réinstallez les boulons de transport et les couvercles en caoutchouc à l’arrière
de l’appareil pour empêcher les pièces internes de secouer quand la machine
est transportée dans un autre lieu.
• Si la machine doit être déplacée dans un autre lieu éloigné, replacez les
boulons de transport et les couvercles en caoutchouc qui ont été retirés pendant
l’installation comme montré ci-dessous.
Retirez le couvercle arrière
Serrez le boulon avec
une clé à molette
Replacez les couvercles
en caoutchouc
Insérez les boulons
Replacez le
couvercle arrière
44
Page 46

Français
Entreposage de votre appareil dans un environnement froid
• Cet appareil doit être placé à température ambiante.
• Si vous avez reçu cet appareil lorsqu’il gelait dehors, ne le faites pas
fonctionner jusqu’à ce que l’appareil se soit réchauffé et ait atteint la
température ambiante.
• N’installez pas et n’utilisez pas cet appareil dans un lieu où la température
ambiante est inférieure au gel.
PROBLEMES ET SOLUTIONS
La laveuse ne fonctionne pas:
• Vérifiez si l’appareil est bien branché. La fiche est peut être mal enfoncée.
• Vérifiez si la tension de la prise murale est adéquate.
• Vérifiez si le disjoncteur a besoin d’être touché ou si un fusible doit être
remplacé.
• Vérifiez si l’appareil est sur « Off » ou en mode « Pause ».
• Vérifiez si la laveuse est trop remplie. Remplissez-la de nouveau et redistribuez
le linge afin d’équilibrer la machine.
• Vérifiez si la porte est ouverte. Vous devez peut-être fermer la porte
correctement.
• Vérifiez si le bouton de contrôle est bien réglé. Vous devez peut-être ajuster le
bouton de contrôle.
• La laveuse se met en pause dans certains cycles. Cela est normal en cycle
délicat et en cycle lavage à la main, qui ont des périodes de trempage courtes
où les vêtements sont trempés pendant peu de temps. Vous n’entendrez pas le
fonctionnement de la laveuse pendant un court moment. Lorsque le trempage
est terminé, la laveuse commencera automatiquement.
Problèmes d’eau:
• Il n’y a pas assez d’eau qui entre : Le robinet d’eau a peut-être besoin d’être
tourné à fond sur ON. Les tuyaux d’eau peuvent être tordus ou emmêlés. Faites
en sorte qu’ils soient bien droits et raides.
• La température de l’eau est incorrecte : Vérifiez la température de votre
chauffe-eau. L’eau chaude a besoin d’être à une température d’au moins
120ºF-140ºF (49ºC-60ºC). Vérifiez que les tuyaux d’arrivée sont correctement
raccordes (c’est- à -dire que le chaud est sur le chaud et le froid sur le froid).
45
Page 47

Français
• Fuites d’eau : C’est causé par une mauvaise installation du tuyau d’évacuation
ou du tuyau de remplissage. Votre drain peut être bouché ou a une pression
d’eau constante. Il faut peut-être que vous resserriez les tuyaux, vérifiez la
plomberie ou appeliez un plombier.
• L’eau ne s’écoule pas - C’est causé par une mauvaise installation du tuyau
d’évacuation. Vous avez peut-être besoin de raccorder le tuyau d’évacuation
correctement. Vérifiez la position du tuyau d’évacuation. Afin d’évacuer
correctement, assurez-vous que le haut du tuyau d’écoulement est à moins de
2,6 pouces soit 80 cm du sol.
La laveuse fait du bruit:
• La laveuse peut avoir besoin d’être réinstallée. (Reportez-vous à la section
installation.)
• La laveuse peut avoir besoin d’être rééquilibrée, car le linge à l’intérieur de la
machine peut être placé de façon inégale.
• Les pièces de monnaie, les boutons ou d’autres objets lourds peuvent faire du
bruit. (Lisez le Guide d’utilisation – Bruits de fonctionnement normal.)
• Un son de crissement : du à un tube de lavage trop plein.
• Des bruits de vibration : dus à une mauvaise mise à niveau de la laveuse ou à
une distribution inégale des vêtements dans le tube.
Problèmes avec les vêtements:
• Les vêtements sont trop froissés : Cela est du au fait que les vêtements ont mal
été mis dans la machine ou la machine a été trop remplie. Évitez de surcharger
la machine et ressortez le linge et triez-le. Ne mélangez pas les vêtements
lourds comme les vêtements de travail avec des vêtements légers comme des
corsages, chemises et des articles délicats. Vous avez peut-être besoin de laver
dans de l’eau chaude ou de l’eau froide.
• Les vêtements ont des résidus de savon : Le détergent n’a peut-être pas
bien dissous dans l’eau. Vérifiez la température de l’eau. Utilisez moins de
détergent.
• Les vêtements sont tachés : Cela est du au fait de mal utiliser l’assouplissant.
Vous avez peut-être besoin de lire les bonnes instructions sur l’emballage
du produit et vous devez suivre les recommandations d’utilisation de
l’assouplissant.
46
Page 48

Français
• Les vêtements sont jaunis ou ont une teinte grise : Cela est du au fait de ne pas
utiliser assez de détergent pour des grandes quantités de linge. Vous devez
peut-être ajouter plus de détergent à votre linge.
• Les vêtements sont déchirés ou troués – Des objets tranchants comme des
épingles et des boucles de ceinture ont été laissés dans le tube de lavage.
Vous devez retirer les objets petits, lâches et tranchants. Fermez les fermetures
éclairs, les ceintures, les attaches en métal, etc.
Messages d’erreur : jugent les mauvais fonctionnements de la
lumière de la porte.
Erreur 1: La lumière de fermeture de la porte ne s’allume pas.
Cause: La porte n’est pas bien fermée.
Correction: Fermez correctement la porte.
Erreur 2: La lumière de la porte clignote 2 fois et s’arrête pendant 4 secondes
de façon répétitive.
Cause: Eerreur de drainage, l’eau n’est pas évacuée en 4 minutes
Correction: Nettoyez le filtre et vérifiez le tuyau d’évacuation pour voir s’il est
bouché. Si le problème persiste, contactez un agent de service
autorisé.
Erreur 3: La lumière de la porte clignote 5 fois et s’arrête pendant 4 secondes
de façon répétitive.
Cause: Le niveau d’eau n’est pas atteint en 8 minutes.
Correction: Assurez-vous que le robinet est ouvert et que la pression d’eau est
normale. Si le problème persiste, contactez un agent de service
autorisé.
Erreur 4: La lumière de la porte clignote 6 fois et s’arrête pendant 4 secondes
de façon répétitive.
Cause: Minutage contrôle des dommages.
Correction: Contactez un agent de service autorisé.
Erreur 5: La lumière de la porte clignote 7 fois et s’arrête pendant 4 secondes
de façon répétitive.
Cause: Protection de surchauffe du moteur ou dommages.
Correction: Contactez un agent de service autorisé.
Erreur 6: La lumière de la porte clignote 8 fois et s’arrête pendant 4 secondes
de façon répétitive.
Cause: L’eau dépasse le niveau de protection.
Correction: Contactez un agent de service autorisé.
47
Page 49

CARACTÉRISTIQUES TECHNIQUES
Français
Article
Courant maximum (A) 12
Pression d’eau (MPa) 0.05 ≤ P ≤ 1
Puissance de lavage (W) 400
Puissance d’essorage (W) 1200
Vitesse d’essorage 15
(HxPxL) (pouces/cm)
Poids (lbs) / kg 159 / 72
9900178
Modèle
Alimentation 120V~/60Hz
Dimensions
33-1/2" x 22-13/16" x 23-1/2"
HBF1055TVE
82,5 x 53,8 x 57
ETL LISTED
CONFORMS TO UL STD. UL2157
CERTIFIED TO CSA STD.
CSA - C22.2 NO. 169
48
Page 50

Français
GARANTIE LIMITÉE
Service à domicile
Garantie complète d’UN an
Pendant 12 mois à partir de la date d’achat
de l’appareil, Haier réparera ou remplacera
toute pièce, gratuitement dont le travail
résultant d’un défaut de matériels ou de
main-d’œuvre.
Garantie limitée
Après un an à compter de la date d’achat,
Haier fournira une pièce gratuitement,
comme indiqué au-dessus, pour remplacer
la pièce défectueuse ou la main d’œuvre.
Haier est entièrement responsable du coût
de la pièce. Tous les autres coûts tels que
travail, transport, etc. sont à la charge du
client.
De la deuxième à la cinquième
année
Haier fournira le bloc carrosserie si la
carrosserie doit rouiller.
De la deuxième à la dixième année
Haier fournira le tube de lavage intérieur en
acier inoxydable.
NOTE: Cette garantie commence à la date
d’achat de l’appareil et le reçu d’achat
original doit être présenté au service agréé
avant que les réparations de la garantie ne
soient effectuées.
Exceptions : Garantie de l’appareil
pour usage commercial ou location
de l’appareil
90 jours pour la main-d’œuvre à partir de
la date d’achat original
90 jours pour les pièces.
Il n’y a pas d’autres garanties.
Pour obtenir le service de garantie
Contactez votre centre de service agréé
le plus proche. Tout service sera effectué
par un centre de service agréé Haier. Pour
le nom et numéro de téléphone le plus
du centre de service agréé le plus proche
veuillez appeler le 1-877-337-3639.
Avant d’appeler veuillez vous
assurer d’avoir à votre disposition
les informations suivantes:
Numéro du modèle et numéro de série
de votre appareil. Le nom et l’adresse du
revendeur ou vous avez acheté l’unité et
la date d’achat. Une claire description du
problème. Une preuve d’achat (reçu/ticket
de caisse).
Cette garantie couvre les appareils
en Amérique continentale, Porto
Rico et au Canada. Ce qui n’est pas
couvert par cette garantie:
Le remplacement ou la réparation des
fusibles, des disjoncteurs, l’installation
électrique ou la plomberie du lieu
d’utilisation de l’appareil. Un produit dont
le numéro de série original a été retiré ou
altéré. Tous frais de service qui ne sont pas
spécifiquement identifiés comme des heures
de service normales ou de zones de service
normales.
Les dommages aux vêtements.
Les dommages causés lors du transport.
Les dommages dus à une mauvaise
installation ou à une mauvaise maintenance
de l’appareil.
Les dommages dus à une mauvaise
utilisation, un accident du à un abus,
un incendie, une inondation, ou des
catastrophes naturelles.
Les dommages résultant d’une modification
du produit, altération ou ajustement non
autorisé par Haier.
Les ajustements des contrôles comme
identifiés dans le guide d’utilisation.
Les tuyaux, les boutons, les bacs à peluches
et tous les attachements, accessoires et les
pièces jetables.
Le travail, le service de transport et les
frais d’expédition pour le retrait et le
remplacement des pièces défectueuses audelà de la période initiale de 12 mois.
Les dommages dus à une utilisation autre
que domestique. Tout frais de transport et
d’expédition.
CETTE GARANTIE LIMITÉE EST DONNÉE
À LA PLACE DE TOUTE AUTRE GARANTIE
EXPRIMÉE, OU IMPLICITE INCLUANT LES
GARANTIES DE QUALITE MARCHANDE
ET DE COMPATIBILITE À UNE FIN
PARTICULIÈRE.
Le recours offert dans cette garantie est
exclusif et est accordé à la place de tout
autre. Cette garantie ne couvre pas les
dommages secondaires ou conséquents et
donc les limitations ci-dessus peuvent ne
pas s’appliquer pas à vous. Certains États
n’autorisent pas les limitations sur la durée
d’une garantie donc les limitations ci-dessus
ne vous concernent peut-être pas. Cette
garantie vous donne des droits légaux et il
se peut que vous ayez d’autres droits qui
varient d’un État à l’autre.
Haier America
New York, NY 10018
49
Page 51

Español
IMPORTANTES INSTRUCCIONES
DE SEGURIDAD
Advertencia - Para reducir el riesgo de incendio, descarga
eléctrica, o lesiones a personas mientras utilizan este
aparato, siga precauciones básicas, incluyendo las siguientes:
1. Lea todas las instrucciones antes de usar este electrodoméstico.
2. Use este aparato solo para su uso previsto según está descrito en esta
guía de uso y cuidado.
3. Este aparato debe ser correctamente instalado de acuerdo con las
instrucciones de instalación (vea páginas 7-11).
4. Remplace inmediatamente cables eléctricos gastados y enchufes/
tomacorrientes flojas.
5. Antes de que el aparato sea puesto fuera de servicio o deshecho, quite
la puerta.
6. No use su aparato en la presencia de gases explosivos.
7. No lave artículos que han sido previamente limpiados con, lavados,
remojados en, o goteados con gasolina, solventes de lavado a seco, u
otras sustancias inflamables o explosivos, ya que emiten vapores que
podrían encenderse o explotar.
8. No añada gasolina, solventes de lavado a seco, u otras sustancias
inflamables o explosivas a la lavadora. Estas sustancias emiten vapores
que podrían encenderse o explotar.
9. No extienda la mano dentro del aparato si está andado la tina
o la agitadora.
10. No manipule los controles.
11. Para reducir el riesgo de lesiones no permita que los niños jueguen
dentro o cerca del aparato. Supervisión cuidadosa de los niños es
necesario cuando el aparato se utilice cerca de los niños.
12. No instale ni guarde este aparato donde será expuesto al tiempo
ambiental.
13. Gas de hidrógeno se podría producir si el calentador de agua ha
estado fuera de uso por más de 2 semanas. Esto podría ser explosivo
y explotar bajo ciertas circunstancias. Si este es el caso, antes de
usar este electrodoméstico prenda todos los grifos de agua caliente
y deje que fluya el agua caliente por algunos minutos. Esto permitirá
que el hidrógeno atrapado pueda escapar. Durante este proceso, no
encienda ningún aparato electrónico, ni fume, ni encienda un fósforo
o mechero ni use una llama para evitar un accidente, ya que el gas
de hidrógeno es inflamable y puede explotar.
50
Page 52

Español
14. No repare ni remplace ninguna parte del electrodoméstico,
tampoco intente serviciarlo de manera alguna a menos que este
específicamente recomendado en la guía de reparos por el usuario y
que usted tenga el conocimiento y destreza de cumplirlos.
GUARDE ESTAS INSTRUCCIONES
INSTRUCCIONES PARA CONEXIÓN A TIERRA
Este aparato hay que conectarla a tierra. En un caso de fallo o avería, la conexión a tierra reduce el riesgo de descarga eléctrica al proporcionar un camino de
menos resistencia para la corriente de electricidad. Este aparato viene equipado
con un cable que tiene un conductor de conectar equipos a tierra y un enchufe
de conexión a tierra. El enchufe debe colocarse en un tomacorriente apropiado
que este correctamente instalado y conectado a tierra de acuerdo con todo
código y ordenanza local.
Advertencia – La conexión incorrecta del conductor e conectar equipos a tierra
puede resultar en un riesgo de descarga eléctrica. Asegúrese con un electricista
o personal de servicios cualificado si tiene dudas acerca de si el aparato está
correctamente conectado a tierra.
PELIGRO
Riesgo de que los niños se atrapen. Antes de deshacerse de
su electrodoméstico viejo, quite la puerta para que los niños
no puedan quedarse atrapados adentro fácilmente.
Gracias por comprar nuestro producto Haier. Este manual fácil-deusar lo guiará en sacarle el mejor
uso a su lavadora.
Recuerde tomar nota de los
números de modelo y serie. Están
ubicadas en la etiqueta en la parte
de atrás de la lavadora.
Grape su recibo al manual. Lo necesitará para obtener servicio según la
garantía.
51
Número de modelo
Número de serie
Fecha de compra
Page 53

Español
CONEXIONES ELÉCTRICAS
Este aparato necesita estar conectada a tierra. En un caso de un corto
circuito eléctrico, la conexión a tierra reduce el riesgo de descarga eléctrica
al proporcionar un alambre de escape para la corriente de electricidad. Este
aparato viene equipado con un cable que tiene un alambre de conexión a
tierra y un enchufe con conexión a tierra. El enchufe debe colocarse en un
tomacorriente apropiado que este correctamente instalado y conectado a tierra.
• Uso incorrecto del enchufe puede resultar en el riesgo de descarga
eléctrica.
• Consulte a un electricista o personal de servicio si la instrucciones
de conexión a tierra no se dejan entender por completo o si existen
dudas acerca de que si el aparato ha quedado bien conectado a
tierra.
Requisitos de Instalación Eléctrica:
• Este aparato debe enchufarse en UN TOMA
CORRIENTE CONECTADO A TIERRA DE POR
LO MENOS 15 AMP 120 VOLT, 60HZ.
Nota: Donde se encuentre un tomacorriente
estándar para dos clavijas, es la
responsabilidad personal y obligación del
consumidor hacer que se reemplace con un tomacorriente de
tres clavijas correctamente conectada a tierra.
Cables de Extensión:
No se recomienda el uso de cables de extensión.
X
Interrupciones de Corriente
De vez en cuando puede haber apagones a causa de tormentas de electricidad
u otras cosas. Desenchufe el cable de electricidad del tomacorriente AC cuando
ocurre un apagón. Cuando la corriente haya sido restaurada, vuelve a enchufar
el cable de electricidad en el tomacorriente AC. Si el apagón se prolonga por
un tiempo, limpie la lavadora antes de volverla a usar. Para detalles vea “Otros
Usos”-“Función de Memoria Apagar” en la página 18.
52
Page 54

Español
ÍNDICE DE MATERIAS
INSTRUCCIONES DE SEGURIDAD ................................................ 50
INSTRUCCIONES DE CONEXIÓN A TIERRA ................................ 51
CONEXIÓN ELÉCTRICA ................................................................52
PIEZAS Y ATRIBUTOS ..................................................................54
Parte delantera ................................................................................ 55
Parte de atrás .................................................................................... 6
INSTRUCCIONES DE INSTALACIÓN .............................................56
Herramientas y materiales necesarios ................................................. 56
Desempacar su lavadora ..................................................................57
Pasos para la instalación .................................................................. 59
INSTRUCCIONES DE FUNCIONAMIENTO.................................... 61
Panel de manejo ..............................................................................61
Selección de programa .................................................................... 63
Cargar ...........................................................................................65
Uso correcto del dispensador ............................................................ 65
Métodos de lavado .......................................................................... 66
Sonidos Normales de Operación ..................................................... 67
GUÍA DE LIMPIEZA Y CUIDADO .................................................. 68
Limpieza y mantenimiento .................................................................68
Mudanzas y Vacaciones ................................................................... 69
Almacenaje de su lavadora ..............................................................69
LOCALIZACIÓN Y RESOLUCIÓN DE PROBLEMAS ......................70
ESPECIFICACIONES TÉCNICAS ..................................................... 73
GARANTÍA ...................................................................................74
53
Page 55

PIEZAS Y ATRIBUTOS
Parte delantera
1
Español
3
4
5
2
1. Dispensador de Detergente/
Suavizante
2. Puerta Transparente
3. Palanca seleccionadora de ciclos
4. Palanca seleccionadora de la
velocidad de centrifugar
6
7
8
5. Botón operativo (Pausa/ Empezar)
6. Botón de enjuague adicional
7. Fondo hecho para centrifugo
extendido
8. Patas Niveladoras Ajustables
(No Mostradas)
54
Page 56

Español
PIEZAS Y ATRIBUTOS
Parte de atrás
1
2
8
4
5
3
1. Cable de alimentación
2. Tornillo para placa dorsal (3)
3. Manguera de drenaje
4. Pinza para manguera de drenaje
(3)
55
6
7
5. Perno de transporte
6. Placa dorsal
7. Patas niveladoras ajustables
(No Mostradas)
8. Válvula (Caliente y Fría)
Page 57

Español
INSTRUCCIONES DE INSTALACIÓN
Herramientas y Materiales Necesarios
Ud. Necesitará las siguientes herramientas para ayudarle en la
instalación de su lavadora:
• Tijeras
• Destornillador estándar
• Alicates
• Llave inglesa
• Cinta de medidas
• Guantes
• Nivel
Accesorios Proveídos Quantity
1. Mangueras de entrada para agua fría y caliente 2
2. 2. Regulador de presión 2
(Adjuntado con las mangueras de entrada para agua fría y caliente)
3. Lavadores planos para mangueras de entrada de agua 4
(Instaladas en cada punto de las mangueras de entrada de agua)
4. Guía de uso y Cuidado (No Mostrado) 1
5. Tapones plásticos para cubrir los huecos 3
de los pernos de transporte
6. Cuello de cisne 1
1
3
4
Manual
2
5
6
56
Page 58

Español
Desempacar su electrodoméstico
• Quite todo material de empaque, incluyendo a los pernos de transporte.
• Inspeccione y quite cualquier resto de material de empaque, cinta adhesiva, o
materiales estampados antes de utilizar la lavadora.
• Pernos de transporte se deben quitar antes de usar la máquina. Una vez
que se quiten, guárdelos para que cuando se mude pueda reinstalarlos para
proteger al aparato de daños durante el transporte.
• Mangueras de entrada de agua y otros accesorios son empacadas y
colocadas dentro de la cavidad.
Perno Central
57
Perno
Perno
Page 59

• Como muestra la figura 1, quite
todos los materiales de empaque
(incluyendo a la base de espuma
de caucho).
Al abrir el paquete, posiblemente
se verán gotas de agua en la bolsa
de plástico y en la portilla. Este es
un fenómeno normal que resulta de
pruebas con agua que se realizan
en la fábrica.
• Quite los tres pernos de transporte como muestra
la figura 2ª. Los pernos protegen al aparato de
los impactos durante el transporte. Se deben seguir
los pasos indicados abajo antes de usar el aparato:
1. Quite la placa dorsal de la lavadora. Para hacer
esto necesitará quitar tres tornillos que sostienen
la placa.
Español
Fig. 1
2. Quite los tres pernos de la parte de atrás de la
lavadora. Entonces quite la manguera de goma
que está ubicada detrás de los pernos de
transporte dentro del módulo.
3. Vuelve a instalar la placa dorsal.
Fig. 2
4. Llene los huecos que quedan donde estaban
los pernos con tapones de plástico.
(Ojo: Los pernos y la manguera de goma
se deben conservar en un lugar seguro
para uso más luego.) (Fig. 2B)
• Nivelar la Lavadora: Debajo de la lavadora
se encuentran patas ajustables. Antes de usar,
la lavadora debe ser ajustada, como muestra
la figura 3, para asegurar que esté nivelada.
• Las patas niveladoras se pueden ajustar al
girarlas en el sentido contrario a las agujas
del reloj para subir la lavadora, o en el
sentido de la agujas del reloj para volverla
a bajar.
Fig. 3
Back Plate
A
Perno
B
58
Page 60

H
100cm
80cm
Español
INSTALACIÓN
Conexión de Manguera de Entrada de Agua
y la Lavadora
• Conecte el gancho de unión liso de la manguera
de entrada con el grifo de agua y asegúrese
de apretarlo.
• Instale el regulador de presión a cada válvula
de entrada del módulo. Esté seguro de que la
arandela de goma llana se ubique en el regulador
de presión.
• Conecte el gancho de unión en forma de codo
a la manguera de entrada y asegúrese de apretarlo.
Nota: • Por favor estése seguro de que la manguera de
entrada COLD (Fría) esté conectada a la válvula
para agua fría (tachada con “C”).
• - Por favor estése seguro de que la manguera de
entrada HOT (Caliente) esté conectada a la válvula
para agua caliente (tachada con “H”).
Nota: Una arandela de goma llana debe estar presente dentro de cada punto
de las mangueras de entrada. Apretar excesivamente podría provocarle
daños a la válvula.
Regulador de presión
Mangueras de entrada de agua
Regulador de presión
Manguera de Drenaje de Agua
• La altura del tubo para la manguera de drenaje
de agua debe ser entre 2’6” a 3’3”. La
manguera de drenaje de agua se debe colocar
de manera segura en la pinza en la parte de
atrás de la lavadora.
• Uso el soporte de drenaje de agua (cuello de
cisne) incluido como accesorio para la instalación
correcta. Si necesita extender la manguera de drenaje
de agua, no debería exceder más de 8’2”. (Una
extensión más larga resultará en entrada y salida
concurrente de agua.) El diámetro de la manguera
de extensión debe ser igual a la de la manguera original.
Aviso: La manguera de drenaje de agua no se debe sumergir en agua. La
manguera original y la de extensión deben quedar apretadamente conectadas.
59
Page 61

Fuente de Energía
• Módulo debería conectarse a un tomacorriente regular con conexión a
tierra de 120V~60 Hz 15A. Asegúrese de que códigos locales de la ciudad
se sígan.
Conexión de Adaptador Y
Nota: “Adaptador Y” mostrado en la figura de abajo es solo para ejemplo.
No se incluye en la caja como accesorio. Si necesita utilizar este tipo de
conexión, puede comprar y “Adaptador Y” de su ferretería más cercana.
Manguera de Suministro
Válvulas de Entrada
de Agua
de Agua
Adaptador Y
Cuello Cisne
Codo de Manguera
Fregadero
Español
Codo de Manguera
Dimensiones del Módulo
Ancho
Alto
Vista del frente
Manguera de Drenaje
Ondo
Puerta Abierta 90˚
Vista de lado
22 13/16"
Ondo
60
Page 62

NO
MAX
MID
LOW
SPIN
Español
INSTRUCCIONES DE FUNCIONAMIENTO
Advertencia: Para reducir el riesgo de incendio, descarga eléctrica, o
heridas a personas, lea las INSTRUCCIONES DE SEGURIDAD
IMPORTANTES antes de utilizar este aparato.
Panel de Manejo
B
C D E F
A. Programación de Lavado
Para seleccionar el programa de lavado deseado, gire la
palanca primero a “0”. Esto reajustará el temporizador.
Después, seleccione un programa de la lista que está
ubicado en el dispensador de detergente. Ahora presione
el botón “Pause/Start” para ponerla en marcha.
B. Palanca para seleccionar velocidad del centrifugo
Al girar esta palanca, la velocidad necesaria del ciclo de
centrifugo se puede seleccionar.
La velocidad máxima puede variar dependiendo del
programa que esté seleccionado.
AG
61
Page 63

Español
C. Distribuidor de Detergente
Descripciones de las programaciones están imprimadas en
la manilla del distribuidor de detergente. Hay tres
compartimientos de detergente numerados 1, 2, 3.
1. Detergente para el pre-lavado
2. Detergente
3. Suavizante
D. Botón Para Ciclo de Centrifugo Extendido
Active está función presionando este botón. Esta opción se podría utilizar para
telas gruesas o artículos de cuidado especial. Añadir tiempo al ciclo de centrífugo tiene el efecto de exprimir el exceso de agua, lo cual acorta el tiempo en
la secadora y así ahorra energía.
E. Botón de Enjuague Adicional
Al presionar este botón, un ciclo adicional de enjuague será activado antes de
llegar al ciclo de centrífugo.
F. Botón de Pausa / Empezar
Después de que se haya seleccionado un programa de lavado y una velocidad
de centrífugo, presione este botón para empezar a lavar. Durante un ciclo de
lavado, presione este botón para pausar el funcionamiento. Presione nuevamente
para continuar el funcionamiento.
G. Luz de la Puerta
La luz se iluminará cuando la puerta esté asegurada.
62
Page 64

Español
SELECCIÓN DE PROGRAMA
Ajuste de Programa Tipo de Colada
Prelavado Bastante y Muy Sucio
1
Grueso Muy Sucio
2
Normal Algodón Sucio
3
Algodón
4
5
6
7
Sintético
8
9
Lana
10
11
Seda
12
Ligéro
Delicado
Normal
Ligéro
Delicado
Normal
Delicado
Normal
Delicate
Algodón medio sucio, o
que no pierden intensidad
de color
Algodón medio sucio, o
que sí pierde intensidad
Tela sintética bastante
sucia que no se destiñe
Tela sintética media sucia
que no se destiñe
Tela sintética media sucia
que destiñe
Tela de Lana bastante
sucia que no se destiñe
Tela de Lana media sucia
que destiñe
Telas de seda bastante
sucias que no destiñen
Telas de seda media
sucias y que destiñen
Temperatura
del Agua
Caliente
Caliente
Tibia
Tibia
Fría
Tibia
Fría
Fría
Fría
Fría
Fría
Fría
Detergente
Comp.1
detergente
de prelavado
Comp. 2
detergente
Suavizante
Í Í ô
– Í ô
– Í ô
– Í ô
– Í ô
– Í ô
– Í ô
– Í ô
– Í ô
– Í ô
– Í ô
– Í ô
Comp. 3
Rápido Colada media sucia
13
14
15
0
Enjuague
Centrifugo
Terminar
Gire la palanca de programaciones hasta la posición “0” y
apague la energía. El ciclo de lavado termina y la lavadora para
funcionamiento.
Fría
Fría
*
– Í ô
– – ô
– – –
Nota: "Í" Indica que detergente en líquido se puede añadir como sea necesario.
"ô" Indica que suavizante se puede añadir como sea necesario.
"–" Indica que no se puede añadir nada de detergente.
Importante: Cuando se añada el detergente del pre-lavado en el compartimiento 1,
no añada detergente en el compartimiento 2.
63
Page 65

Español
Ciclo de algodón:
Ciclo de pre-lavado: El propósito de este ciclo es enjuagar ropa que esta
demasiado y bastante sucia antes de antes de seguir adelante con el lavado
regular. Este ciclo va configurado de tal manera que pasará por cada ciclo
de lavado; Normal, Ligero, Delicado tiempo y modo, incluyendo los ciclos de
enjuague final y centrifugo automáticamente para completar el lavado. El tiempo
total para este ciclo es de aproximadamente 125 Minutos cuando está seleccionada. No use detergente en líquido con este ciclo.
Ciclo de Lavado Tela Gruesa: Este ciclo se usa para lavar ropa de telas
gruesas, como pantalones y otras prendas gruesas y pesadas. Aquí, el agua
estará caliente durante el proceso para lavar la ropa. El tiempo total para este
ciclo es de aproximadamente 106 minutos cuando está seleccionada.
Ciclo de Lavado Normal: Este se usa para trabajo y diversión, household
linens, y prendas de algodón medio sucia o un poco sucias. Este ciclo es de
aproximadamente 96 minutos.
Ciclo de lavado ligero: Este se utiliza para cargas de ropa más pequeña y
no muy sucia que necesitan ser lavadas rápidamente. Este ciclo es de aproximadamente 90 minutos.
Ciclo de lavado delicado: Este también se utiliza para cargas de ropa más
pequeña y no muy sucia que necesitan ser lavadas rápidamente. Este ciclo es de
aproximadamente 80 minutos.
Ciclo para sintéticos:
Ciclo de lavado normal: Este ciclo se utiliza para permanent press, telas de
seda, lana, nylon, y acrílico. Este ciclo es de aproximadamente 90 minutos.
Ciclo de Lavado Ligero: Este se utiliza para cargas de ropa más pequeña y
no muy sucia que necesitan ser lavadas rápidamente. Este ciclo es de aproximadamente 80 minutos.
Ciclo de lavado delicado: Este ciclo es igual al del lavado rápido excepto la
diferencia en tiempo. Este ciclo es de aproximadamente 70 minutos.
Ciclo de Lana:
Ciclo de lavado normal: Este ciclo se usa para telas delicadas que se suelen
lavar a mano. Este ciclo es de aproximadamente 70 minutos.
Ciclo de lavado delicado: Este se utiliza para cargas de ropa más pequeña
y no muy sucia que necesitan ser lavadas rápidamente. Este ciclo es de aproximadamente 60 minutos de largo.
64
Page 66

Español
Ciclo de Seda:
Ciclo de lavado normal: Este ciclo se usa para ropa de cama y mantelería
y ropa de seda normal o un poco sucia. El tiempo total para este ciclo es de
aproximadamente 60 minutos de largo.
Ciclo de Lavado delicado: Usa este ciclo para ropa de seda un poco sucia,
o que es delicada y necesita lavado. Tiempo total pata este ciclo es de aproximadamente 50 minutos de largo.
Ciclo Rápido: Este ciclo se usa para cargas pequeñas y solas un poco sucias.
Este ciclo es de aproximadamente 36 minutos de largo.
Nota: Si el ciclo de centrífugo está en la posición “off” (apagado) antes
de empezar un ciclo, la maquina automáticamente se convertirá al
modo de drenaje y se apagará.
Cargar
• Carga cada artículo ligeramente.
• Separe la ropa de color de la ropa blanca. Separe ropa gruesa de la ropa
ligera.
• Revise cuidadosamente todos los bolsillos, puños y dobladillos para objetos
pequeños. Estos pueden fácilmente rodarse dentro de la tina y dañarla.
• Hágale un tratamiento inicial a las manchas y áreas bastante sucias para
obtener os mejores resultados.
• No sobrecargue su lavadora.
• Cierre la puerta correctamente después de cargar la ropa.
Uso correcto del dispensador
El dispensador de detergente/ suavizante está ubicado el la esquina superior del
lado izquierdo de la lavadora. Abra el dispensador jalándolo hacía afuera. Verá
que hay tres compartimientos.
1. Detergente de pre-lavado
2. Detergente
3. Suavizante
65
Page 67

Español
Uso correcto de Suavizante de Tela:
• Vierta el suavizante en líquido dentro del compartimiento de la manera recomendada por el fabricante.
• No llene el compartimiento más de su límite indicado para evitar el reboso.
Advertencia: • Nunca le eche suavizante directamente a la ropa porque
puede descolorar la ropa o mancharla.
• No use polvo o suavizante en el dispensor o se tapa. El dis-
pensor es solo para liquidos.
Uso correcto del detergente:
Cuando esté seleccionado el ciclo del pre-lavado no use detergente en
líquido. Se recomienda detergente que crea poca espuma para lavadores
de estilo carga frontal. Este estilo de detergente evita daños a su lavadora
que pueden resultar cuando un exceso de espuma llega a entrar a al compartimiento comprendedor.
Nota: Ud. puede usar mas o menos detergente dependiendo del tamaño
de la carga , el tipo de agua disponible en su área, si es agua
dura o agua suave, y si la ropa está muy sucia o solo un poco.
Además del rendimiento de la lavadora, la calidad del detergente
afecta el resultado del lavado.
MÉTODOS DE LAVADO
Ajuste del Programa de Lavado
Para fijar el sistema de lavado que deseé, gire la palanca a “0” primero. Esto
reajustará el temporizador. Entonces, seleccione un programa de la lista en el
dispensador de detergente. Ahora presione el botón “Pause/Start” (“Pausa/
Empezar”) para empezar el funcionamiento.
Cuidado: Si quiere escoger otro programa, primero gire la palanca de pro-
gramaciones a “0”, y quite la energía. Ahora ajuste la palanca de
programación al ajuste deseado.
Terminar
Espere 2-3 minutos después de que haya acabado el proceso del lavado. Abra
la puerta para sacar la colada.
Cuidado: Cuando termine el programa de lavado, la luz de seguridad de la
puerta pestañará. Solo entonces es que debe abrir la puerta.
66
Page 68

Español
Información Adicional
Ahorramiento de energía y de agua durante el proceso del
lavado
1. Coleccione ropa suficiente para una carga llena y completa.
2. No sobrellene la lavadora.
3. Hágale y tratamiento inicial a ropa que esté demasiado sucia.
4. Escoja programas de lavado rápido o mínimo para ropa no muy sucia.
5. Escoja una velocidad de centrífugo apropiada.
6. No use más detergente de lo necesario.
7. Suavizante hace que la ropa se siente más suave y que sea más fácil de
planchar.
Otra Funciones
Función de Memoria-Apagar:
Está máquina tiene una función de memoria-apagar. En un caso de un apagón
de repente o si hay necesidad de cortar la corriente durante un ciclo de lavado,
los ajustes presentes serán guardadas, y operación continuará cuando se
restauré la corriente.
Sonidos Normales de Funcionamiento
Es normal escuchar los siguientes sonidos durante el funcionamiento de la lavadora:
• Sonidos de que algo se revuelca: Esto es normal ya que la ropa pesada y
mojada que está en la lavadora está continuamente siendo tirada.
• Sonido de aire corriente: Esto sucede cuando la tina de la lavadora gira a un
rpm muy alto.
• Lo cambios entre programas y modos—entre lavado y enjuague final—provocan sonidos clic.
67
Page 69

Español
GUÍA DE USO Y CUIDADO
Advertencia: Siempre desenchufe su aparato antes de limpiar para evitar
la descarga eléctrica. Ignorar esta advertencia podría resultar
en muerte o lesiones. Antes de usar productos para limpieza,
siempre lea y siga las instrucciones del fabricante y las
advertencia para evitar lesiones personales y daños al producto.
Limpieza y mantenimiento
Use un trapo húmedo o espumoso para limpiar el panel de funciones.
• Para evitar daños al acabado del gabinete, pásele el trapo al gabinete de la
lavadora solo cuando sea necesario. Si le cae suavizante en polvo o líquido,
blanqueador, o detergente, pásele un trpo inmediatamente porque esto podría
dañar el acabado.
• No uso sustancias abrasivas y duras, amonio, blanqueador de cloro,
detergente concentrado, solvente o almohadillas de metal para restregar.
Algunos de estas sustancias se pueden disolver, dañar, o mal colorear su
aparato.
• Quite hebillas o pinchas de la ropa para evitar aruñar las piezas interiores.
• El compartimiento del dispensador de detergente tiene una inserción
desmontable. A partir del tiempo, este compartimiento podría accumular
detrgente reseco, tierra, y escombros. Hay que sacar la inserción y enjuagarla
en un fregadero o quitar los escombros con un cepillo suave.
Limpiar el Filtro (una vez cada trimestre)
Este filtro se utiliza para atrapar botónes, monedas, u otros objetos sueltos que
se pueden haberse quedado olvidados dentro de los bolsillos de la ropa.
Apriete la orilla inferior del la cubierta del compartimiento para abrir; desmonte
el filtro girandola de la manera opuesta a la agujas del reloj; limpiale de
cualquier objeto extraño. Para volver a montar, siga los pasos en manera
contraria.
Cuidado: Se debe presatr atención para asegurar que el filtro se vuelva a
montar correctamente para evitar la posibilidad de escapes.
Nota: Se recomienda usar una bandeja poco profunda o colocar una toalla
debajo del filtro cuando se esté limpiando ya que habre agua dispensandose.
68
Page 70

Remove the back cover. Replace the rubber hoses.
Tighten the bolt
with a spanner.
Replace the back cover.
Insert the bolts.
Español
Mudanzas y vacaciones
• Apague la fuente de agua que llega a los grifos y desconecte las magueras.
Escurra el agua de todas las mangueras. Este evitará daños a causa de
escapes de agua si por un caso las mangueras se rompen o se sueltan.
• Desenchufe el cable eléctrico del tomacorriente en la pared.
• Seque la tina interior de lavado. Si va a mover la lavadora, desconecte la
maguera de drenaje.
• Gire las pata nivelizadoras de la manera de las agujas del reloj hasta que
estén completamente metidas.
• Para prevenir los ongos y mohos, deje la puerta abierta para que la humedad
dentro de la lavadora se pueda evaporar.
• Vuelva a instalar los pernos de transporte y las mangueras de goma en la
parte de atrás para prevenir que las partes internas de la máquina se sacudan
cuando el aparato se lo mueve de un sitio a otro.
• Si va a llevar la máquina a un lugar muy lejos, vuelva a instalar los pernos de
transporte y las mangueras de goma que se quitaron para la instalación como
se ve en la imagen de abajo.
Quite la placa dorsal
Aprete el tornillo con
una llave de tuercas
Vuelva a instalar las
mangueras de goma
Almacenaje de su electrodoméstico en un ambiente frío
• Este aparato se debe almacenar a temperatura de ambiente.
• Si recibe la entrega a domicilio de este aparato cuando la temperatura de
afuera esta bajo el punto de congelación, no ponga en marcha este aparato
hasta que se haya calentado a la temperatura de ambiente.
• No instale y no use este aparto en una area donde la temperatura de
ambiente es más bajo que el punto de congelación.
69
Vuelva a instalar
los tornillos
Vuelva a poner
la placa dorsal
Page 71

Español
LOCALIZACIÓN Y RESOLUCIÓN DE PROBLEMAS
La Lavador no Funciona:
• Asegurese de que este enchufada. El enchufe puede haberse soltado.
• Compruebe que el tomacorriente de la pared sea del voltaje correcto.
• Revise a ver si el interuptor diferencial necesita reajustamiento o si la fusila
necesita ser reemplazada.
• Asegurese de que el aparato no esté en los modos “Off” o “Pause.”
• Revise a ver que la lavadora no esté sobrecargada: la carga de prendas
puede necesitar ser rebalanceada y la ropa puede necesitar ser redistribuida.
• Asegurese de que la puerta no esté abierta. Quizas necesite cerrar y asegurar
bien la puerta.
• Asegurese de que la palanca de control este correctamente ajustada. Es
posible que la tenga que volver a ajustar.
• Si la lavadora se queda en pausa durante ciertos ciclos. Esto es normal en
los ciclo de prendas delicadas y usualmente lavadas a mano, porque tienen
un periodo corto de remojo donde la ropa se está remojando por un corto
periodo de tiempo. Por este corto periodo de tiempo no se escuchará a la
máquina funcionando. Cuando el periodo de remojo acabe, la máquina
empezará automáticamente.
Problemas con el agua:
• No hay suficiente agua saliendo: Puede que el grifo de agua lo haya que
abrir completamente. O las mangueras pueden esar enredadas o arrugadas.
Desenredelas.
• La temperatura del agua esta incorrecta: Revise la temperatura de su
calentador de agua. El agua caliente necesita que este a una temperatura de
por lo menos 120F-140F (49C-60C). Asegurese de que las mangueras de
entrada este bien colocadas. (ejemplo: caliento con caliente, fría con fría).
• Escapes de Agua: Esto se debe a la mala instalación de manguera de drenaje
y de entrada. El desagüe de su casa puede estar bloqueado o tiene presión
de agua constante. Pude ser que necesite apretar las mangueras; revise las
tuberías o llame a un fontanero.
70
Page 72

Español
• El Agua no se Escurre; esto se debe a la instalación incorrecta de la manguera
de drenaje. Puede ser que necesita conectar coreectamente la manguera de
drenaje. Fijese en la posición de la maguera. Para hacer drenaje apropiado,
asegurese de que la parte superior de la salida de drenaje est’e menos de
2’6” arriba del piso.
La lavadora esta haciendo ruido:
• La Lavadora puede necesitar ser instalada nuevamente. (Revise la sección sobre
la instalación)
• La carga dentro de la lavadora puede necesitar que la rebalancean, ya que la
carga puede estar dispareja.
• Los ruidos pueden ser a causa de monedas, cambio suelto, botónes u
otros objetos pesados. (Lea la guía de funcionamiento-sonidos normal de
funcionamiento).
• Sonido de chillido: Se debe a tina de lavado sobrecargada.
• Sonido de vibración: Se debo a no nivelar la lavadora correctamente sobre el
piso y la distribución dispareja de ropa dentro de la tina.
Problemas con la ropa:
• La ropa está muy arrugada: Esto se deba a separación incorrecta, sobrecargo,
y lavando en agua demasiado caliente múltiples veces. Evite sobrecargar y
vuelva a clasificar y separar su ropa. No mezcle ropa gruesa como ropa de
trabajo con ropa ligéra como blusas, camisa ligéras, y artículos delicados. Es
posible que tenga que usar agua fría o tíbia.
• Residuo de jabón: Puede ser que el detergente no se esté disolviendo en el
agua. Compruebe la temperatura del agua. Use menos detergente.
• Pecas y manchas en la ropa: Esto se debe al uso incorrecto de suavizante.
Quizas necesite leer las instruccions correctas en el envase del detergente y
seguir los pasos correctos paar el uso del suavizante.
• La ropa se ha vuelto gris o amarilla: Esto se debe a no haber usado sufiente
detergente para una carga muy grande. Puede necesitar añadir más
detergente a la carga.
• La ropa está rasgada o tiene hoyos/ uso y rotos excesivos: Esto se debe a
objetos afilados cono hebillas de cinturones y pinzas olvidados dentro de
los bolsillos. Necesitará quitar objetos sueltos pequeños. Asegure cinturones,
cremalleras, broches de metal, etc.
71
Page 73

Mensajes de Problemas: Juzga la disfunción según la luza del
seguro de la puerta.
Error 1: La luz del seguro de la puerta no se enciende.
Causa: La puerta no está bien cerrada.
Corregir: Cierre bien la puerta.
Error 2: La lus del seguro de la puerta pestañea 2 veces y para por 4
segundos repetidamente.
Causa: Error con el drenaje, el agua no se ha escurrido en 4 minutos.
Corregir: Limpie el filtro y revise la maguera de drenaje por alguna
obstrucción. Si el problema sigue, por favor póngase en contacto
con un personal de servicio autorizado.
Error 3: La luz del seguro de la puerta pestañea 5 veces y para por 4
segundos repetidamente.
Causa: El nivel del agua no se ha alcanzado en 8 minutos.
Corregir: Asegúrese de que el grifo esté abierto, y que la presión del agua
sea normal. Si el problema sigue, por favor póngase en contacto
con un personal de servicio autorizado.
Error 4: La luz del seguro de la puerta pestañea 6 veces y para por 4
segundos repetidamente.
Causa: Daños con el control del cronometraje.
Corregir: Póngase en contacto con un personal de servicio autorizado.
Español
Error 5: La luz del seguro de la puerta pestañea 7 veces y para por 4
segundos repetidamente.
Cause: El motor tiene daños de sobrecalentamiento, o la máquina se está
protegiendo de tales daños.
Correction: Póngase en contacto con un personal de servicio autorizado.
Error 6: La luz del seguro de la puerta pestañea 8 veces y para por 4
segundos repetidamente.
Cause: El agua excede el nivel protectivo.
Correction: Póngase en contacto con un personal de servicio autorizado.
72
Page 74

Español
ESPECIFICACIÓNES TÉCNICAS
Artículo
Fuente de Energía 120V~/60Hz
Corriente Máxima (A) 12
Presión de Agua (MPa) 0.05 ≤ P ≤ 1
Potencia de Lavado (W) 400
Potencia de Centrífugo (W) 1200
Programa de Lavado 15
Dimensiones
(Alto x Ondo x Ancho) (Pulgadas)
Peso (libras) 159
Modelo
33-1/2" x 22-13/16" x 23-1/2"
HBF1055TVE
9900178
73
ETL LISTED
CONFORMS TO UL STD. UL2157
CERTIFIED TO CSA STD.
CSA - C22.2 NO. 169
Page 75

GARANTÍA LIMITADA
Español
Servicio Domicilario
Garantía Completa por UN año
Por 12 meses desde la fecha de la compra
original, Haier reparará o remplazará cualquier
pieza sin cargo adicional, incluyendo labores
que fallan a causa de defectos en los materiales
o mano de obra.
Garantía Limitada
Despúes de un año de la compra original,
Haier proporcionará piezas sin costo alguno,
como se indica abajo, para remplazar la pieza
en cuestión como resultado de un defecto
en materiales o mano de obra. Haier se
responsabiliza únicamente por el costo de la
pieza. Todos los otros gastos asi como de labor,
transportación, etc. Son la responsabilidad del
dueño.
Segundo hasta el Quinto año
Haier ofrece el montaje de el gabinete por si el
gabinete de gasta en óxido.
Segundo hasta el Décimo año
Haier proporcionará la tina de lavado interior
hecha de acero inoxidable.
Nota: La garantía comienza el día en que
el aparato es comprado y el recibo original
de la compra tiene que ser presentada a un
personal autorizado de servicios antes de que se
actualizen reparos bajo la garantía.
Excepciones: Garantía Para Uso Rentado
o Commercial
Labores por 90 días de la fecha de compra
original.
Piezas por 90 días de la fecha de compra
original.
Ningúna otra garantía aplica.
Para Servicio de garantía
Póngase en contacto con su centro de servicios
autorizado más cercano. Todo servicio debe
ser proporcionado por un centro de servicios
autorizado Hair. Para obtener el nombre y
número de teléfono de su centro de servicios
autorizado más cercano, por favor llame al
1-877-337-3639.
Antes de llamar, por favor tenga a
mano la siguiente información:
Número de modelo y número de serie de su
electrodoméstico. El nombre y la dirección del
comerciante que le vendio el aparato, y la
fecha de la compra. Una descripción clara del
problema. Una prueba de la compra (el recibo
de compra).
Esta Garantía cubre electrodomésticos
dentro de los Estados Unidos
continentales, Puerto Rico, y Canadá.
Que es lo que no cubre esta garantía:
Remplazo o reparación de fusibles caseros,
interuptor diferencial, instalaciónes eléctricas, o
túberias. Un producto que no tiene su número de
serie original, siendo quitada o cambiada.
Cualquier gasto de servicio no específicamente
identificado como normal, ais como horas de
servicio o areas de servicio normales.
Daños a ropas.
Daños contraidos durante el transporte
Daños causados por instalación o mantenimiento
incorrecto.
Daños causados por mal uso, abuso, accidentes,
incendios, inundaciones, o fuerzas de la
naturaleza.
Daños causados por intentos de reparo hechos
por personas fuera de centros de servicio o un
comerciante de Haier autorizado.
Daños resultando de uso de voltaje incorrecto,
corriente eléctrico inapropiado, o fuente.
Daños resultando de modificaciones, o
alteraciones al producto no autorizadas por
Haier.
Ajuste de los controles operados por el
consumidor a como se identifican en el manual
del usuario. Mangueras, pomos y palancas,
bandejas de pelusas y todo accesorio y piezas
deshechables. Labor, transportacion de los
servicios, y cargos de transporte para quitar
y remplazar piezas con defectos más alla del
periodo inicial de 12 meses. Daño causado
por usos fuera de los normales y cotidianos.
Cualquier cargo adicional de transportación y
transporte.
ESTA GARANTÍA LIMITADA SE DA EN LUGAR
DE CUALQUIER OTRA GARANTÍA, ÉXPLICITO O
INCLUYENDO LA GARANTÍAS DE COMERCIO
Y DE BUENA FORMA PARA UN PROPÓSITO
PARTICULAR.
El remedio propocionada en esta garantía
es exclusiva y dada en lugar de cualquier
otro remedio. Está garantía no cubre daños
secundarios o consecuentes, entonces es posible
que las limitaciones anteriores no le apliquen a
Ud. Algunos estados no permiten limitaciones
en el tiempo que dura una garantía implicita,
entonces las limitaciones anteriores puede que
no le apliquen. Esta garantía le da derechos
legales específicos, y podría tener tener otros
derechos que varian de estado en estado.
Haier America
New York, NY 10018
74
Page 76

IMPORTANT
Do Not Return This Product To The Store
If you have a problem with this product, please contact the "Haier Customer
Satisfaction Center" at 1-877-337-3639.
DATED PROOF OF PURCHASE REQUIRED FOR WARRANTY SERVICE
IMPORTANT
Ne pas Réexpédier ce Produit au Magasin
Pour tout problème concernant ce produit, veuillez contacter le service des
consommateurs ‘Haier Customer Satisfaction Center’ au 1-877-337-3639.
UNE PREUVE D’ACHAT DATEE EST REQUISE POUR BENEFICIER DE LA GARANTIE.
IMPORTANTE
No regrese este producto a la tienda
Si tiene algún problema con este producto, por favor contacte el "Centro de Servicio al
Consumidor de Haier" al 1-877-337-3639 (Válido solo en E.U.A).
NECESITA UNA PRUEBA DE COMPRA FECHADA PARA EL SERVICIO DE LA GARANTIA
120V~60Hz
Made in China
Fabriqué en Chine
Hecho en China
Haier America
New York, NY 10018
Printed in China
HBF1055TVE
PART # WD-9999-53
Issued: March 2008
©2008 Haier America Trading, LLC. All Rights Reserved. 100340 0308
 Loading...