

Haier HSU-12HEA03/R2, HSU-22HEA03/R2, HSU-18HEA03/R2, HSU-09HEA03/R2, HSU-24HEA03/R2 Operation Manual
...
0010526880
Pleasereadthisoperationmanualbeforeusingtheairconditioner.
●
Keep this operation manual for future reference.
SPLIT TYPE ROOM AIR CONDITIONER
OPERATION MANUAL
....................................................
1
2
................................................................
3
......................................................................
6
..........................................................
7
PARTS AND FUNCTIONS
OPERATION
MAINTENANCE
TROUBLE SHOOTING
CAUTIONS
Contents
....................................................
....................................................
1
....................................................................
9
................................................................
10
......................................................................
13
..........................................................
14
Índice
PRECAUCIONES
COMPONENTES Y FUNCIONES
FUNCIONAMIENTO
MANTENIMIENTO
RESOLUCIÓN DE PROBLEMAS
....................................................
1
....................................................................
16
................................................................
17
......................................................................
20
..........................................................
21
Contenuti
AVVERTENZE
PARTI E FUNZIONI
FUNZIONAMENTO
MANUTENZIONE
RISOLUZIONE DEI PROBLEMI
....................................................
1
....................................................................
23
................................................................
24
......................................................................
27
..........................................................
28
Table des matières
AVERTISSEMENTS
PIÈCES ET FONCTIONS
OPÉRATION
MAINTENANCE
DÉPANNAGE
HSU-07HEA03/R2
HSU-09HEA03/R2
HSU-12HEA03/R2
HSU-18HEA03/R2
HSU-22HEA03/R2
HSU-24HEA03/R2
H2SM-(9+9)HEA03/R2
H2SM-(9+12)HEA03/R2
HSU-09HEA103/R2
HSU-12HEA103/R2
2
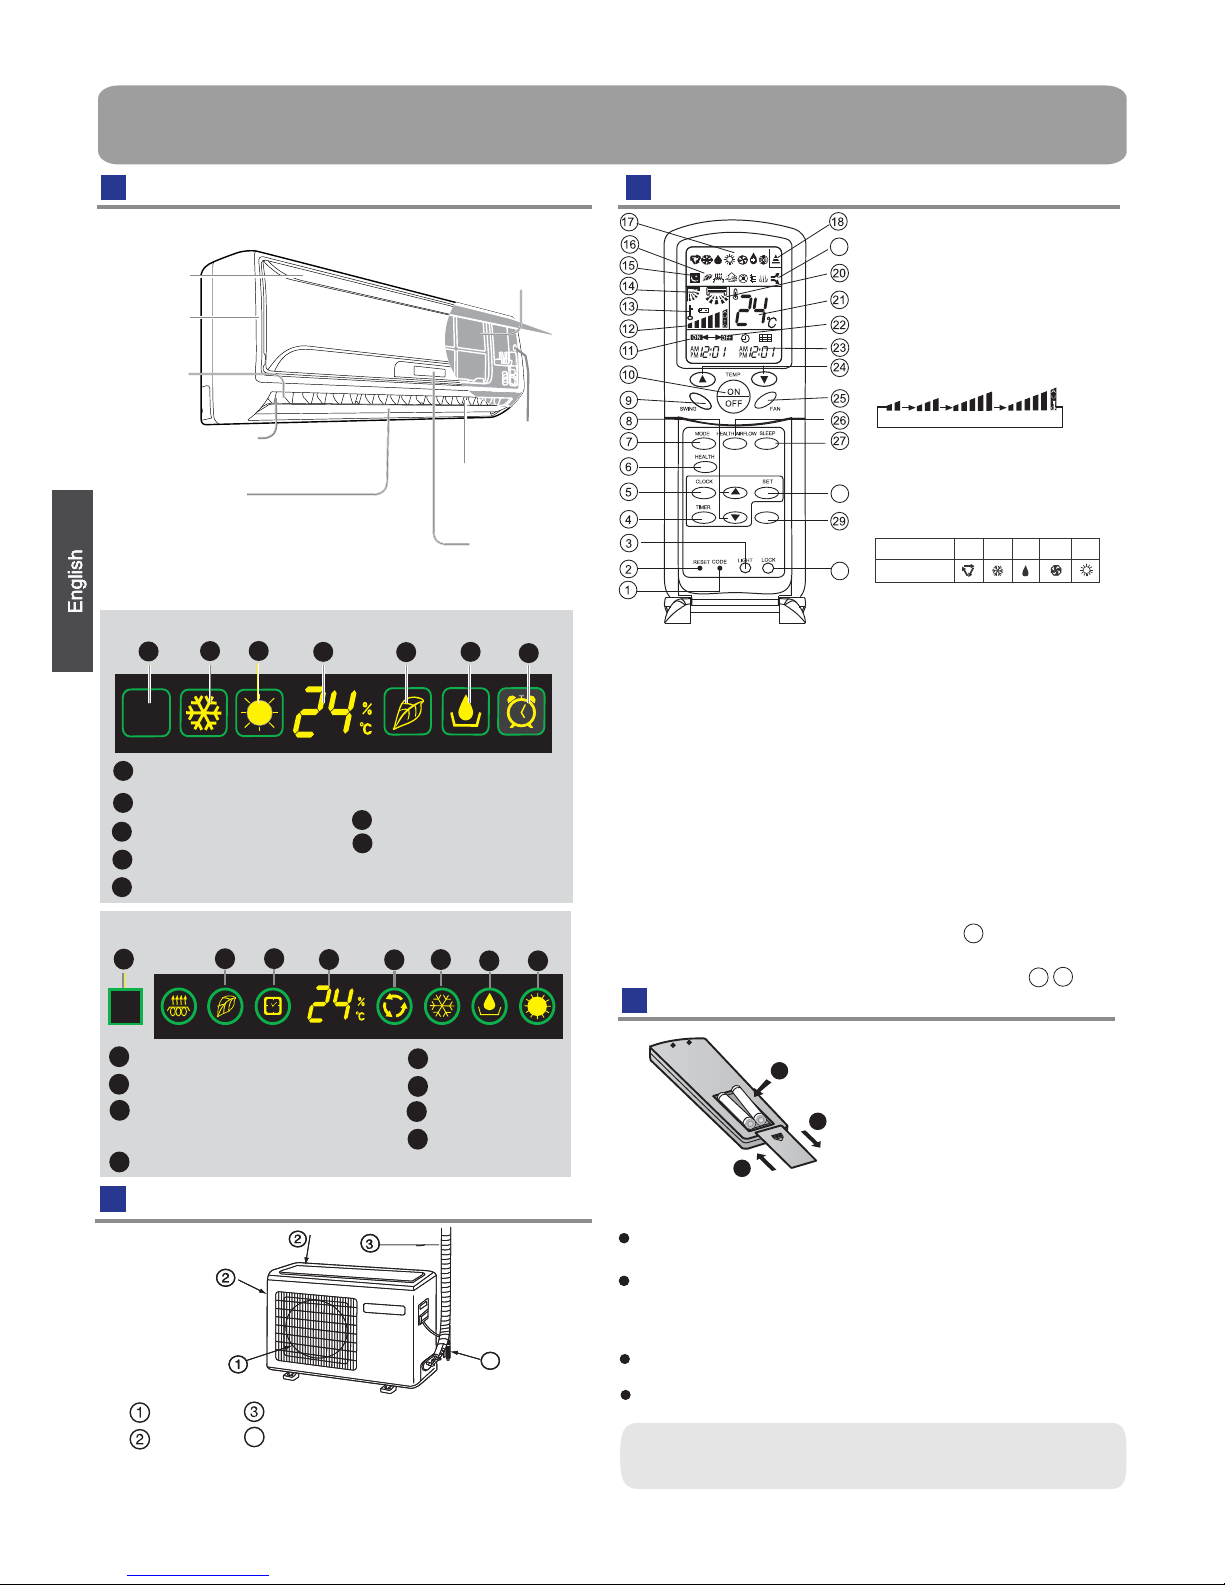
Outdoor Unit
Loading of the battery
1
2
3
4
Parts and Functions
Indoor Unit
OUTLET
INLET
CONNECTING PIPING AND ELECTRICAL WIRING
DRAIN HOSE
Remote controller
Remove the battery cover;
Load the batteries as illustrated.
2 R-03 batteries, resetting key
(cylinder);
Be sure that the loading
is in line with th
e" + "/"-";
Load the battery,then put on the cover again.
Inlet grille
Inlet
Air Purifying Filter
Outlet
Horizontal flap
Display board
(adjust up and down air flow
Don't adjust it manually)
(adjust left and
ow)
Vertical blade
Emergency
Switch
Anion generator
(inside)
11.TIMER ON display
12.FAN SPEED display
LOW HI
MED AUTO
13. LOCK display
14. SWING display
Use to select CODE A or B
which will be displayed on
LCD.Please select A without
special explanation.
1.CODE
5.
7. MODE button
CLOCK button
15
.
SWING
When the remote controller
2.
RESET
button
The distance between the signal transmission head and the receiver hole should be within 7m without any obstacle as well.
When electronic-started type fluorescent lamp or change- over
wireless telephone is installed in the
ver is apt to be disturbed in receiving
the signals,
so the distance to the indoor unit should be shorter
type fluorescent lamp or
room, the recei
Note:
Full display or unclear display during operation indicates the
ries have been used up.
Please change batteries.
If the remote controller can't run normally during operation, please
reload several minutes later.
batte
remove the batteries and
Remove the batteries in case unit won't be in usage for a long period.
If there are any display
after taking-out, just need to press reset key.
Hint:
appears abnormal,use a
sharp pointed article to
press this button to reset the
remote controller normal.
9
.
SLEEP display
10. ON/OFF button
6. HEALTH button
button
4.TIMER
button
Please be subject to the actual produce purchased the
above picture is just from your reference
right air fl
Please be subject to the actual produce purchased the
above picture is just from your reference
19
28
30
POWER/SOFT
3.LIGHT button
Control the lightening and
extinguishing of the indoor
LED display board.
8. HOUR button
16
.
HEALTH display
17. Operation mode display
Operation mode
AUTO
FAN
COOL DRY
Remote controller
HEAT
19
. POWER/SOFT display
20
. Left/right air flow display
21. TEMP display
22
. TIMER OFF display
23. CLOCK display
24
. TEMP button
25. FAN button
26. HEALTH AIRFLOW button
27
. SLEEP button
28. SET button
29. POWER/SOFT button
If pressed, the other buttons will
be disabled Press it once again,
lock will be cancelled.
30. LOCK button
18.Singal sending display
TEMP
display
COOL display
HEAT display
HE
ALTH display
Dry display
TIMER OFF display
TIMER ON display
SLEEP display
AUTO display
Remote signal receiver
Display board
Singal receiver hole
COOL display
HEAT display
TEMP display
Dry display
(If the unit which you purchased
has healthy function,follow it.
TIMER OFF display
TIMER ON display
SLEEP display
If not,please ignore.)
Display board
HEALTH display
The following displays are not available:
20
The following functions and related displays are only
4
19
29
available for model HSU-22HEA03/R2ǃHSU-24HEA03/R2 :
3
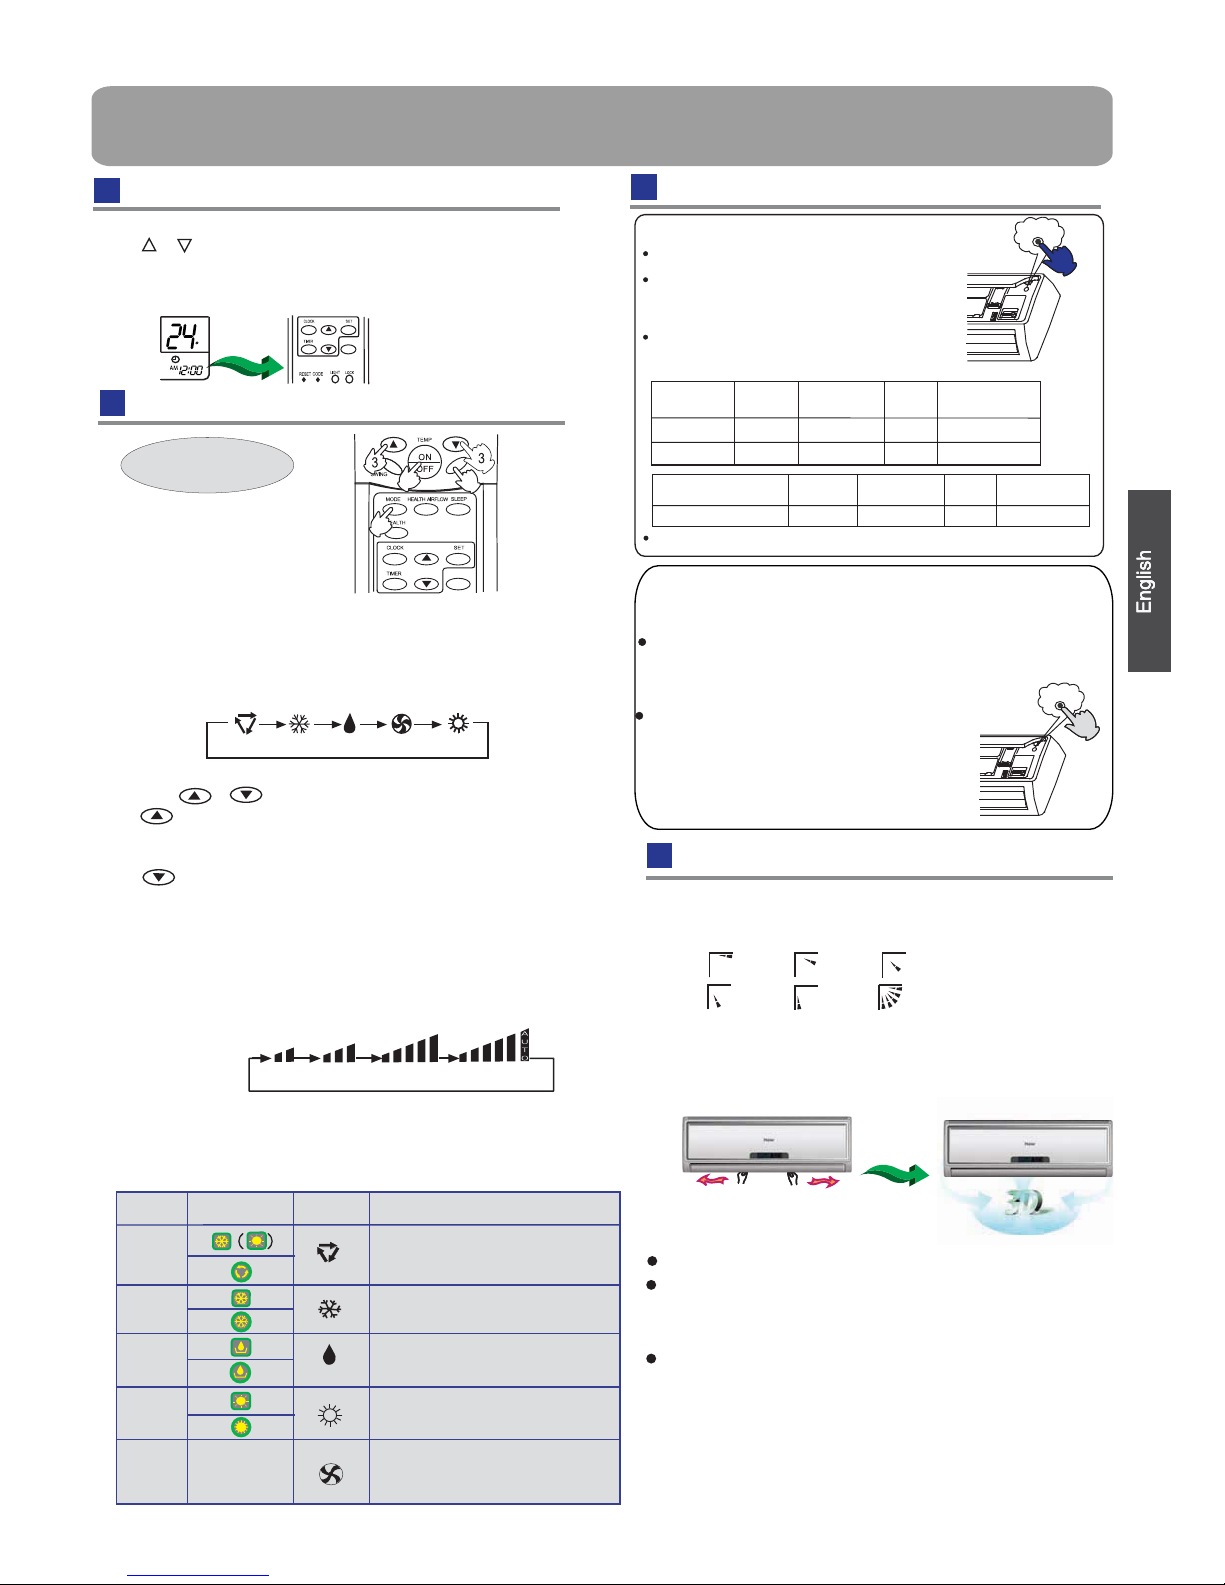
Operation
Air Flow Direction Adjustment
AUTO COOL DRY FAN HEAT
2.Select operation mode
Press FAN button. For each press, fan speed changes as
follows:
Press MODE button. For each press, operation mode
changes as follows:
Remote controller:
Remote controller:
Press
button
Every time the button is pressed, temp.setting
increase 1
o
C,if kept depressed, it will increase
rapidly
Every time the button is pressed, temp.setting
decrease 1
o
C,if kept depressed, it will decrease
rapidly
Select a desired temperature.
4.Fan speed selection
3.Select temp.setting
Air conditioner is running under displayed fan speed.
When FAN is set to AUTO, the air conditioner
automatically adjusts the fan speed according to room
temperature.
LOW
MED
HI
AUTO
1. Unit start
Press ON/OFF on the remote controller, unit starts.
Clock set
Operation
Mode
AUTO
Display Board
Remote
Controller
Note
COOL
DRY
HEAT
FAN
nothing
In DRY mode, when room temperature becomes
lower than temp.setting+2
o
C,unit will run intermittently
at LOW speed regardless of FAN setting.
Under the mode of auto operation, air conditioner will
automatically select Cool or Heat operation according
to room temperature.
air conditioner
automatically adjusts the fan speed
temperature.
When FAN is set to AUTO, the
according to room
In FAN operation mode, the unit will not operate in
COOL or HEAT mode but only in FAN mode ,AUTO is
not available in FAN mode.And temp.setting is disabled.
In FAN mode,SLEEP operation is not available.
Vertical flap
Pos.1
Pos.2
Pos.3
Pos.4
Pos.5
Pos.6
(Auto swing)
1.Status display of air flow
When restart after remote turning off, the remote
memorize the previous
Move the vertical blade by a knob on air
to adjust left and right direction referring to Fig.
2.Left and right air flow adjustment
(manual)
Cautions:
When adjusting the flap by hand,turn off the unit.
When humidity is high,condensate water might occur
adjusted to left or
It is advisable not to keep horizontal flap at downward
position for a long time in COOLor DRY
otherwise, condensate water might occur.
conditioner
temperature is below 16
o
C, do not use it in the
Test operation:
Use this switch in the test operation when the room
normal operation.
your finger from the switch: the cooling
Continue to press the test operation
switch for more than 5 seconds. After
you hear the "Pi" sound twice,
release
Test operation switch is the same as emergency switch.
operation starts with the air flow speed "Hi".
Emergency operation and test operation
Pi Pi
at air outlet if all vertical louvers are
right.
mode ,
controller will automatically
Note:
set swing position.
Remote controller
Base Operation
Press CLOCK button, "AM" or "PM" flashes.
Press or to set correct time. Each press
change quickly.
After time setting is confirmed,press SET,
"AM "and "PM" stop flashing,while clock starts working.
or decrease 1min. If the
button is kept pressed,time will
will increase
POWER/SOFT
C
Emergency Operation:
Use this operation only when the remote controller
is defective or lost.
When the emergency ope
ration switch is
pressed,the" Pi "sound is heard once
, which
the start of this operation.
In this ope
ration, the system automatically selects
the
operation modes
,cooling or fan or heat,
according to the room temperature.
.
It is not possible to operate in dry mode.
Room
temperature
Operation
mode
Designated
temperature
Timer
mode
Air flow
ABOVE 23
O
C
BELOW 23
O
C
COOLING
HEAT
23
O
C
26
O
C
NO
NO
AUTOMATIC
AUTOMATIC
Pi
(cooling only uint)
Room temperature
Operation
mode
Designated
temperature
Timer
mode
Air flow
BELOW 23
O
C
FAN
26
O
C
NO
AUTOMATIC
means
POWER/SOFT
1
2
4
4
Operation
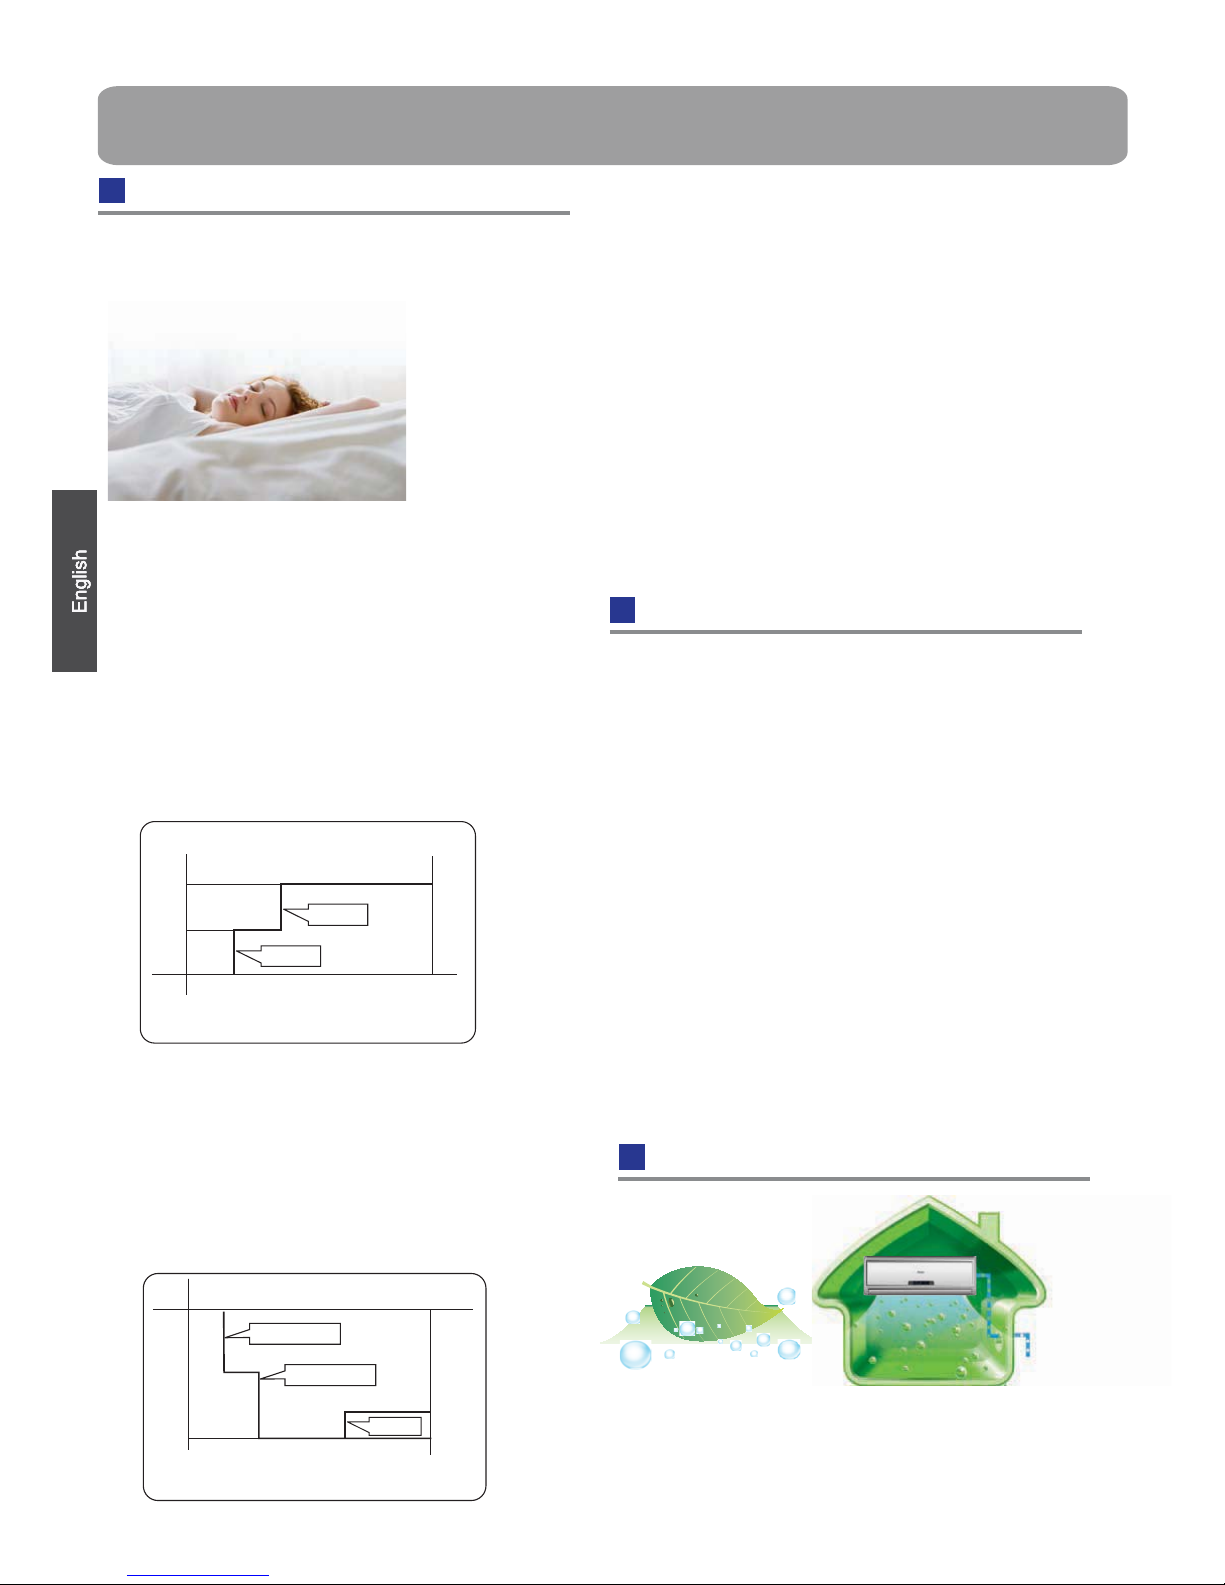
Sleep Operation
If the wind speed is high or middle before
setting for the sleep, set for lowing the wind
speed after sleeping.
If it is low wind, no change.
5.Set the wind speed change when sleeping
Use of SLEEP function
Operation Mode
1. In COOL,DRY mode
SLEEP operation starts SLEEP operation stops
SLEEP
operation starts
SLEEP
operation stops
Approx.6hrs
1 hr
1 hr
1 hr
3 hrs
3 hrs
Rises 1OC
Rises 1
O
C
Rises 1OC
Temp.setting
Temp.setting
Unit stop
Unit stop
In COOL, DRY mode
In HEAT mode
Decreases 2OC
Decreases 2
O
C
1 hr
2.
3.
In HEAT mode
In AUTO mode
4. In FAN mode
It has no SLEEP function.
Note
When TIMER function is set, the sleeping function
can't be set up .After the sleeping function is set up
,
if user resets TIMER function, the sleeping function
will be cancelled;the machine will be in the state of
timing-on.
POWER/SOFT Operation
(1)
POWER Operation
(2)
SOFT Operation
To cancel POWER or SOFT operation
The POWER / SOFT symbols on the remote controll
will be disappeared after 15 minutes, the unit continues to
run according to the original state. Press POWER/SOFT
button again, POWER or SOFT disappears.
Note˖
HEALTHY Operation
Healthy Negative ions
Before going to bed,you can simply press the SLEEP
button and unit will operate in SLEEP mode and bring
you a sound sleep.
After the unit starts,set the operation status,
then press SLEEP button before which the
clock must be adjusted and time being set.
1 hours after SLEEP mode starts,temp.will become
1 higher than temp.setting.After another 1 hours,
temp.rises by 1 futher.The unit will run for further
6 hours then stops Temp. is higher than temp.
setting so that room temperature won’t be too low
for your sleep.
1 hours after SLEEP mode starts,temp will
become 2 lower than temp.setting.After
another 1 hours,temp decrease by 2
futher.After more another 3hours,temp.rises
by 1 futher.The unit will run for further 3
hours then stops.Temp.is lower than temp.
setting so that room temperature won’t be
too high for your sleep.
The unit operaters in corresponding sleep mode
adapted to the automatically selected operation
mode.
The anion generator in the airconditioner can
generate a lot of anion effectively balance the
quantity of position and anion in the air and also
to kill bacteria and speed up the dust sediment in
the room and finally clean the air in the room.
During POWER operation, in rapid HEAT or COOL mode,
the room will show inhomogeneous temperature distribution.
During SOFT operation will cause effect of not too cool
or not too warm.
O
C
O
C
O
C
O
C
O
C
When you need rapid heating or cooling, you can use
this function. In COOL mode, fan speed automatically
takes high speed of AUTO fan mode. In HEAT mode,
fan speed antomatically takes high speed of AUTO
fan mode.
You can use this function when silence is needed for rest
or reading. In SOFT operation mode, fan speed
antomatically takes low speed of AUTO fan mode.
5
Operation
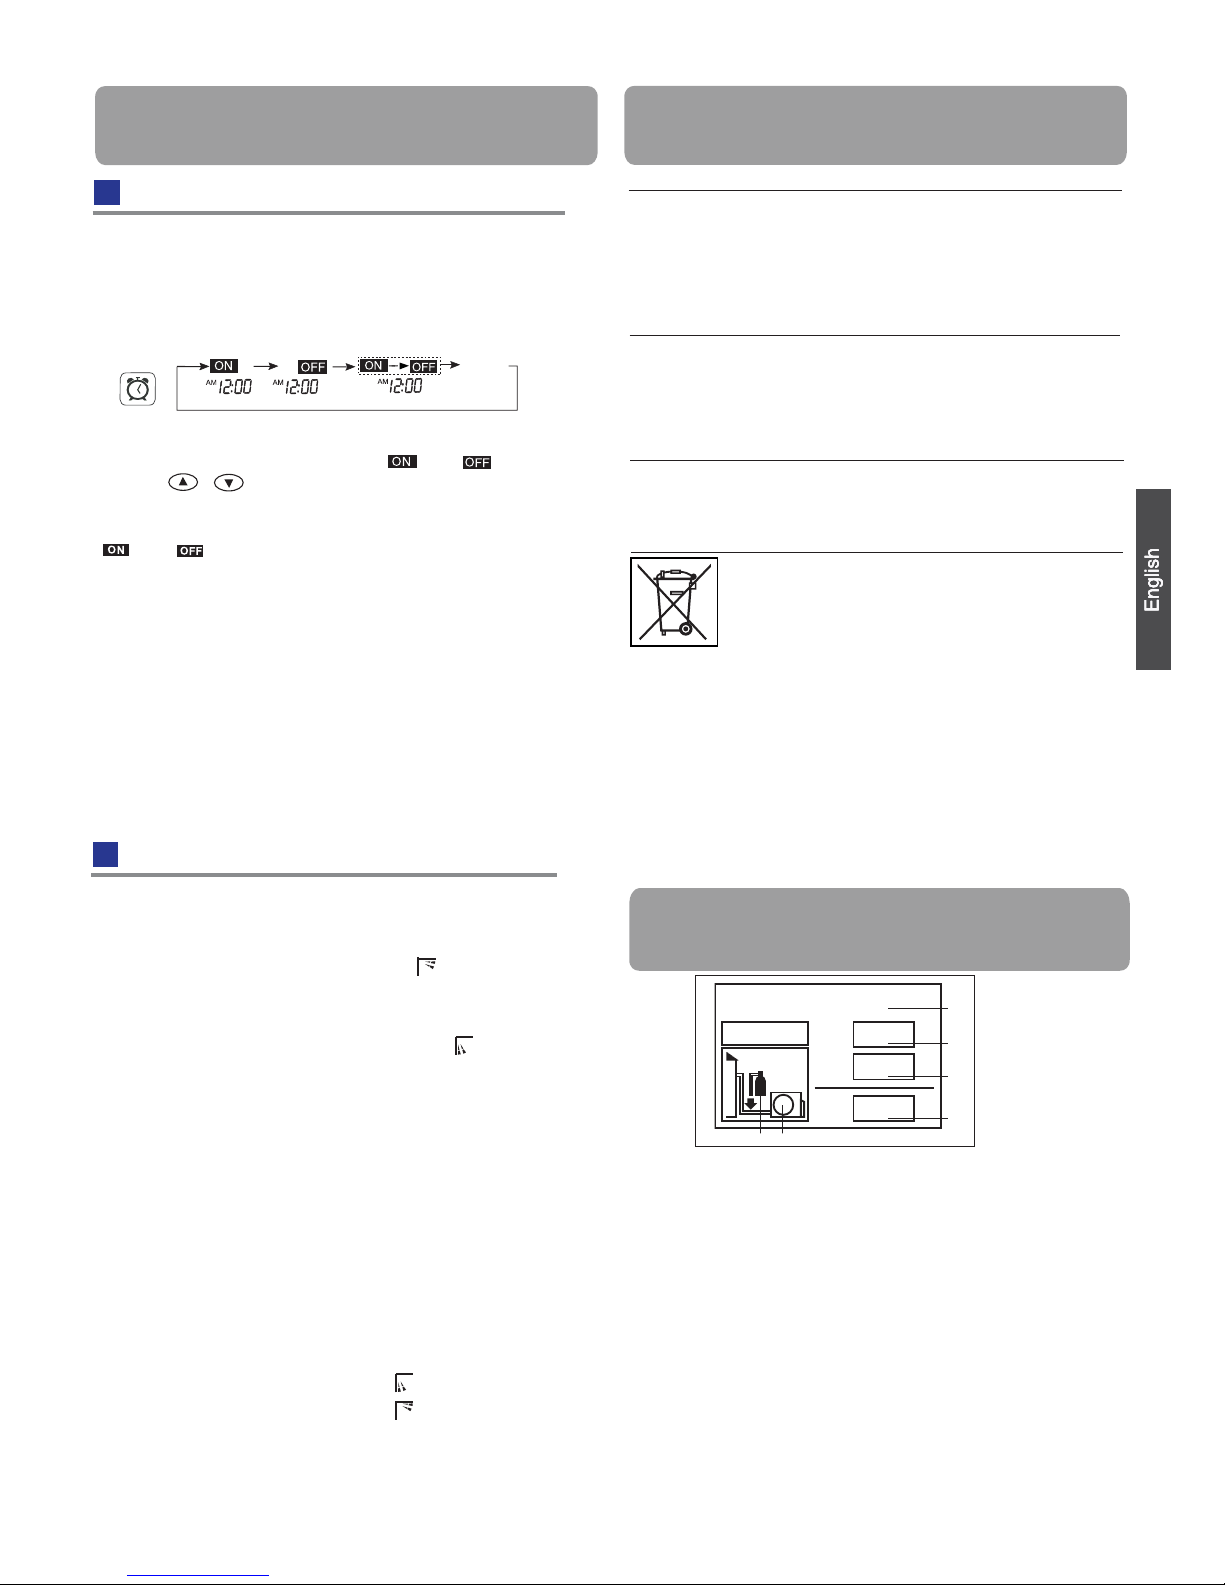
Set clock correctly before starting TIMER operation.
1.After unit starts, select your desired operation mode.
2.Press TIMER button to change TIMER mode. Every
time the button is pressed, display changes as follows:
Remote controller:
BLANK
TIMER ON TIMER OFF TIMER ON-OFF
Then select your desired TIMER mode (TIMER ON or
TIMER OFF or TIMER ON-OFF). " "or " "will flash.
3.Press / button to set time.
It can be adjusted within 24 hours.
4.After setting correct time, press SET button to confirm
" "or" " on the remote controller stops flashing.
5.Cancel TIMER mode
Just press TIMER button several times until TIMER mode
disappears.
Hints:
After replacing batteries or a power failure happens, time
setting should be reset.
Remote controller possesses memory function,when use
TIMER mode next time, just press SET button after mode
selecting if time setting is the same as previous one.
According to the Time setting sequence of TIMER ON or
TIMER OFF, either Start-Stop or Stop-Start can be
achieved.
Timer On/Off On-Off Operation
CE
All the products are in conformity with the following
European provision:
- Low Voltage Directive 73/23/EEC
- Low Voltage Directive 2006/95/EC
-Electomagnetic CompatibilitY 89/336/EEC
-Electomagnetic CompatibilitY 2004/108/EC
ROHS
The products are fulfilled with the requirements in the
directive 2002/95/EEC of the European parliament and of
council on the Restriction of the use of Certain Hazardous
Substances in Electrical and Electronic Equipment (EU
RoHS Directive)
WEEE
DISPOSAL REQUIREMENTS:
Your air conditioning product is marked with this
symbol.This means that electrical and electronic
products shall not be mixed with unsorted
household waste. Do not try to dismantle the
system yourself : the dismantling of the air
EUROPEAN REGULATIONS
CONFORMITY FOR THE MODELS
1
1+2=
kg
R410A
2
kg
2=
1=
B
C
D
FE
kg
A
This product contains fluorinated greenhouse gases covered by
the Kyoto Protocol. Do not vent into the atmosphere.
Refrigerant type:R410A
GWP* value:1975
GWP=global warming potential
Please fill in with indelible ink,
• 1 the factory refrigerant charge of the product
• 2 the additional refrigerant amount charged in the field and
• 1+2 the total refrigerant charge
on the refrigerant charge label supplied with the product.
The filled out label must be adhered in the proximity of the product
charging port (e.g. onto the inside of the stop value cover).
A contains fluorinated greenhouse gases covered by the Kyoto
Protocol
B factory refrigerant charge of the product: see unit name plate
C additional refrigerant amount charged in the field
D total refrigerant charge
E outdoor unit
F refrigerant cylinder and manifold for charging
IMPORTANT INFORMATION REGARDING THE REFRIGERANT USED
In accordance with the directive 2002/96/CE of the European
parliament, herewith we inform the consumer about the dis-
posal requirements of the electrical and electronic products.
conditioning system,treatment of the refrigerant, of oil and of
other part must be done by a qualified installer in accordance
with relevant local and national legislation. Air conditioners
must be treated at a specialized treatment facility for reuse,
recycling and recovery. By ensuring this product is disposed
of correctly, you will help to prevent potential negative consequences for the environment and humen health. Please
contact the installer or local authority for more information.
Battery must be removed from the remote controller and disposed of separately in accordance with relevant local and
nationl legislation.
Contains fluorinated greenhouse gases
covered by the Kyoto Protocol
Healthy airflow Operation
1.Press ON/OFF to starting
Setting the comfort work conditions.
2.The setting of healthy airflow function
1).Press the button of healthy airflow
, appears on the
display. Horizontal airflow sending.
Avoid the airflow
blows direct to the body.
2).Press the button of healthy airflow again, appears on
the displa
y
. Downward airflow sending.
Avoid the airflow
Note:
1.After setting the healthy airflow function, the position
grill is fixed.
4.In cooling and dry, using the air conditioner for a long
time under the high air humidity, condensate water may
occur at the grille .
3.The cancel of the healthy airflow function
Press the button of healthy airflow again,
the unit
goes on
working under the condition before the setting of healthy
airflow function.
Notice: Do not direct the flap by hand. Otherwise, the
grille will run incorrectly. If the grille is not run correctly, stop
for a minute and then start, adjusting by remote
controller.
blows direct to the body.
2.In heating, it is better to select the
3.In cooling, it is better to select the
mode.
mode.
 Loading...