

Page 1
AS182ATNDA
AU182AFNBA
(HSU-18CW03/R1)
AS162ATNCA
AU162AFNAA
(HSU-16CW03/R1)
AS072AZBDA
AU072ABBAA
(HSU-07HW03/R1)
AS072AZNDA
AU072ABNAA
(HSU-07CW03/R1)
Page 2

Contents
Cautions
Parts and functions
Operation
Maintenance
Trouble shooting
1-2
3-6
7-14
15-17
18
Page 3

Cautions
Disposal of the old air conditioner
Before disposing an old air conditioner
that goes out of use, please make sure
it's inoperative and safe. Unplug the air
conditioner in order to avoid the risk of
child entrapment.
It must be noticed that air conditioner
system contains refrigerants, which
require specialized waste disposal. The
valuable materials contained in a air
conditioner can be recycled. Contact your
local waste disposal center for proper
disposal of an old air conditioner and
contact your local authority or your dealer
if you have any question. Please ensure
that the pipework of your air conditioner
does not get damaged prior to being
picked up by the relevant waste disposal
center, and contribute to environmental
awareness by insisting on an appropriate,
antipollution method of disposal.
Disposal of the packaging of your
new air conditioner
All these valuable materials may be taken
to a waste collecting center and used
again after adequate recycling.
Consult your local authorities for the name
and address of the waste materials
collecting centers and waste paper
disposal services nearest to your house.
Safety Instructions and Warnings
Before starting the air conditioner, read
the information given in the User's Guide
carefully. The User's Guide contains very
important observations relating to the
assembly, operation and maintenance of
the air conditioner.
The manufacturer does not accept
responsibility for any damages that may
arise due to non-observation of the
following instruction.
Damaged air conditioners are not to be
put into operation. In case of doubt, consult
your supplier.
All the packaging materials employed in
the package of your new air conditioner
may be disposed without any danger to
the environment.
The cardboard box may be broken or
cut into smaller pieces and given to a
waste paper disposal service. The
wrapping bag made of polyethylene and
the polyethylene foam pads contain no
fluorochloric hydrocarbon.
Use of the air conditioner is to be carried
out in strict compliance with the relative
instructions set forth in the User's Guide.
Installation shall be done by professional
people, don't install unit by yourself.
For the purpose of safety, the air
conditioner must be properly grounded in
accordance with specifications.
Page 4
Cautions
Always remember to unplug the air
conditioner before opening inlet grill.
Never unplug your air conditioner by
pulling on the power cord. Always grip
plug firmly and pull straight out from the
outlet.
All electrical repairs must be carried
out by qualified electricians. Inadequate
repairs may result in a major source of
danger for the user of the air conditioner.
Do not damage any parts of the air
conditioner that carry refrigerant by
piercing or perforating the air
conditioner's tubes with sharp or pointed
items, crushing or twistings off the
surfaces. If the refrigerant spurts out and
gets into eyes, it may result in serious
eye injuries.
Do not obstruct or cover the ventilation
grille of the air conditioner. Do not put
fingers or any other things into the
inlet/outlet and swing louver.
Do not allow children to play with the
air conditioner. In no case should children
be allowed to sit on the outdoor unit.
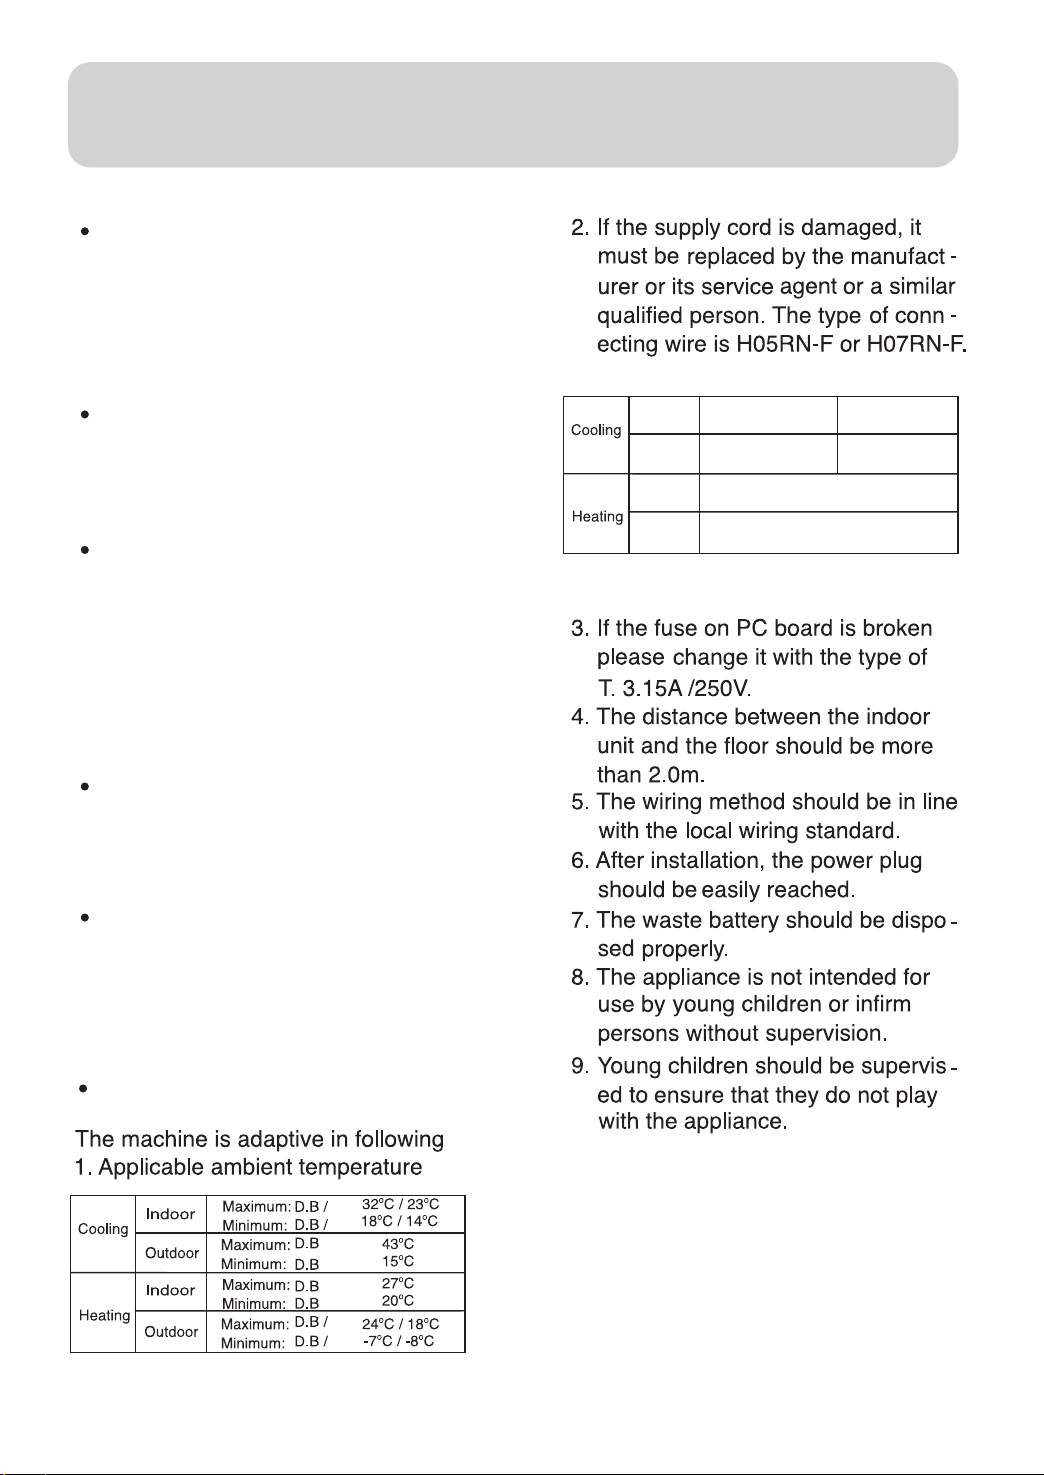
Series
type
Series
type
07
3G1.5MM
07
3G1.5MM +2G0.75MM
2 2
2 2
16,18
3G2.0MM
Specifications
The refrigerating circuit is leak-proof.
10. The wiring diagram is attached in side the machine.
11. The appliance must be installed on
strong enough supporter.
Page 5
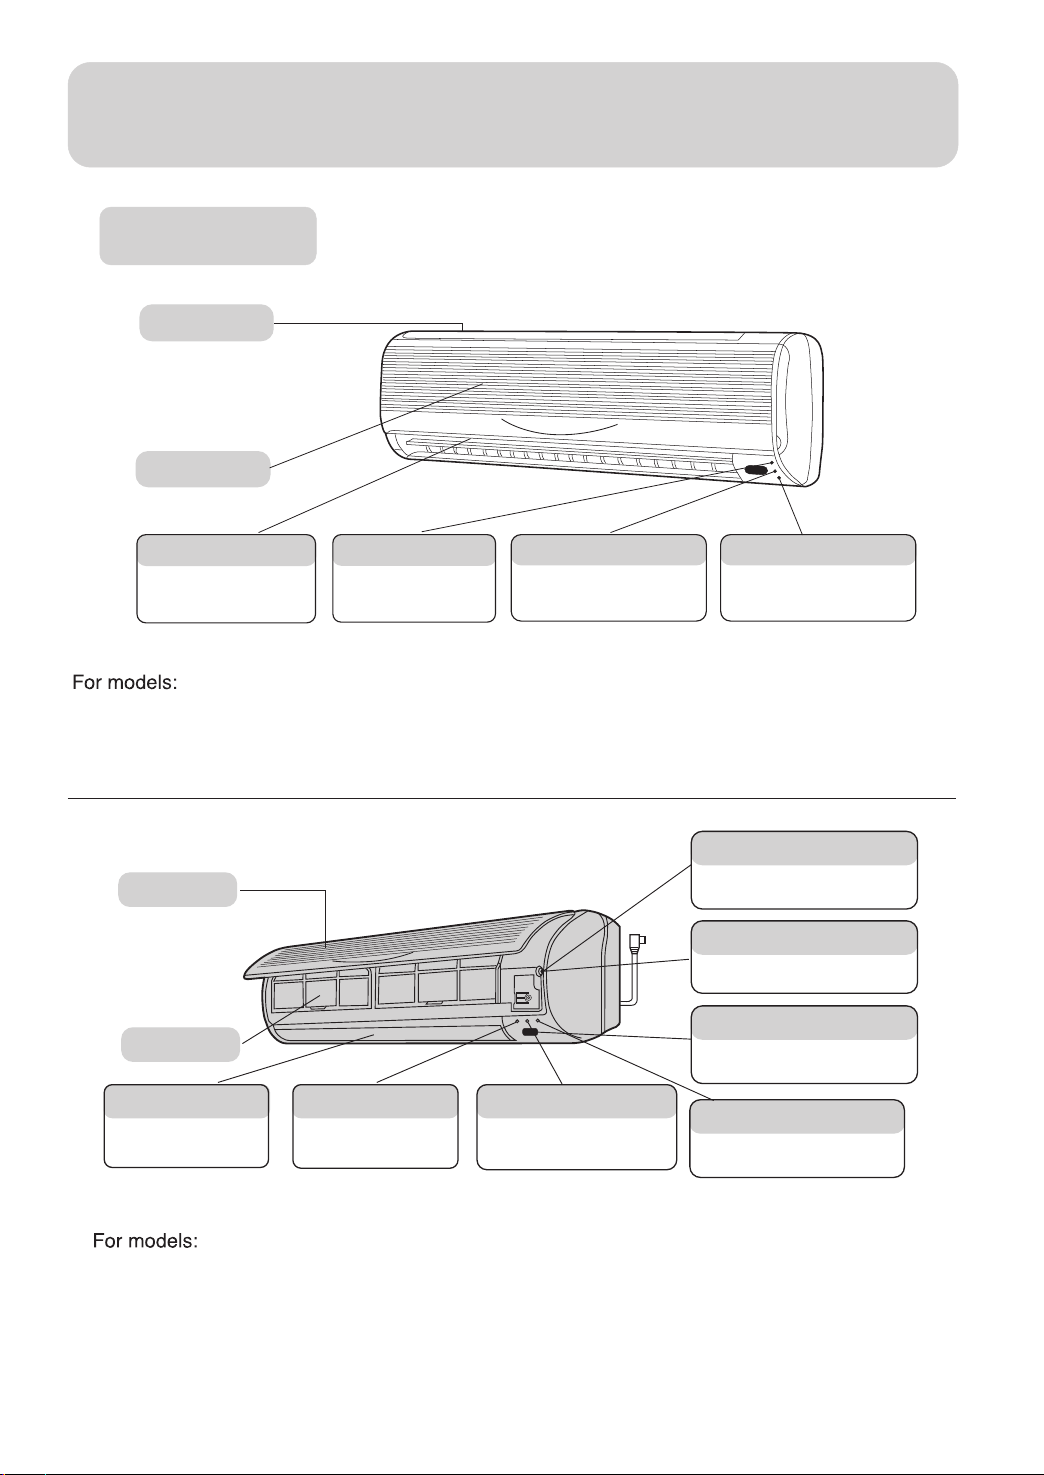
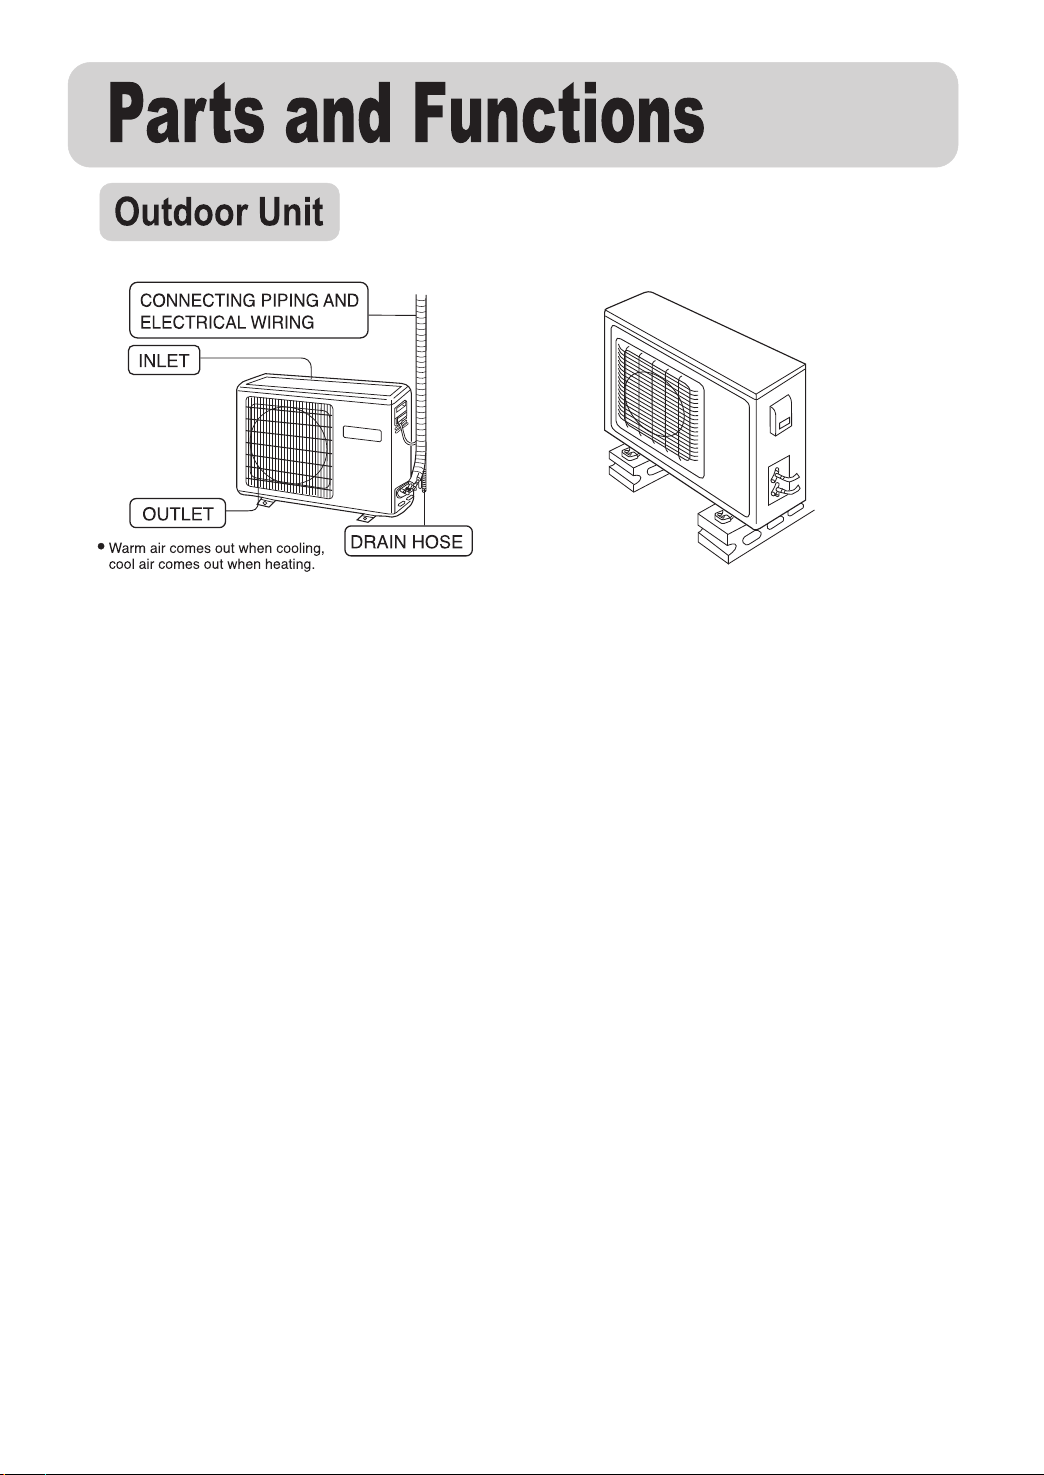
Parts and Functions
Indoor Unit
Inlet grill
Air filter
Vertical flap
Use remote controller to
adjust up and down air flow.
(Don't adjust it manually.)
AS072AZBDA
AU072ABBAA
(HSU-07HW03/R1)
Inlet grill
Air filter
Vertical flap
Use remote controller to
adjust up and down air
flow.
Power
Lights up when unit starts.
AS072AZNDA
AU072ABNAA
(HSU-07CW03/R1)
Power
Lights up when unit starts.
Timer mode indicator
Lights up when Timer
operation is selected.
Timer mode indicator
Lights up when Timer
operation
Operation mode indicator
Lights up during compressor
running.
Test running
Used only for test running in cooling
when room temp. is below 16 .
Don't use it in normal operation.
Emergency
Used when remote controller is lost or
defective. Unit will run temporarily.
Remote signal
A beeping sound is generated when
a signal from remote controller is
received.
Operation mode
Lights up during compressor
running.
AS182ATNDA
AU182AFNBA
(HSU-18CW03/R1)
AS162ATNCA
AU162AFNAA
(HSU-16CW03/R1)
Page 6
For models: For models:
AU072ABBAA
(HSU-07HW03/R1)
AU072ABNAA
(HSU-07CW03/R1)
AU182AFNBA
(HSU-18CW03/R1)
AU162AFNAA
(HSU-16CW03/R1)
Power Failure Resume (to be applied for a necessary situation):
After the power failure compensation is set, if power failure suddenly occurs while the air
conditioner is working, it will resume the previous working state when the power is
again.
Setting Method: When the remote controller is on (excluding timer mode and fan mode),
press the " SLEEP " button on the remote controller 10 times within 5
seconds, and after the buzzer rings 4 times, the air conditioner will enter
the state of power failure resume.
Cancel Method: Press the " SLEEP " button on the remote controller 10 times within 5
seconds, and after the buzzer rings 2 timer, the power failure compensation
mode will be cancelled.
Notes: When a power failure suddenly occurs during the air conditioner is working after
the power failure resume is set, if the air conditioner will not be used for a long time, please
cut off the power supply to prevent its operation from being resumed after the power is
supplied again, or press the "
ON/OFF
" button after the power comes again.
Page 7

Parts and Functions
Operation
Power
Used for unit start and
stop.
SWING
Used to set auto
fan
MODE
Used to select AUTO run,
COOL,DRY,HEAT and
FAN operation.
CLOCK
Used to set correct Used to set correct time
Buttons and display of the remote
AUTO
AM
PM
AM
PM
SWING
MODE
CLOCK
TIMER
LOCK
ON
TEMP
ON
OFF
RESET
AM
PM
OFF
FAN
SLEEP
SET
TEMP.
Used to select
your
FA
Used to select fan
speed:
SLEEP
Used to select sleep
mode.
SET
Used to confirm Timer
and Clock settings.
CODE
TIMER
Used to select
TIMER ON, TIMER
OFF,
LOCK
Used to lock
buttons
Cautions:
On cooling only unit, heating mode is not available.
After replacing batteries, press ON/OFF, and display
becomes as follows:
Operation mode: AUTO, Temp. :No
Timer mode: No, Fan speed: AUTO
Used to select code A or
B ,A or B will be displayed
on LCD. Please select A
without special explanation.
HOUR
Used to set clock
and
RESET
Used to reset the controller
back to normal condition.
Note:
The above information is the
explanation of the displayed
information, therefore varies
with those displayed in actual
operation.
Page 8

Parts and Functions
Operation
DR
COOL
AUT
SWING
FAN
HI
MED
AUT
AUT
LO
Buttons and display of the remote
AUTO
AM
PM
AM
PM
SWING
MODE
CLOCK
TIMER
LOCK
ON
TEMP
ON
OFF
RESET
AM
PM
OFF
FAN
SLEEP
SET
HEA
FAN
SIGNAL SENDING
TEMP
CLOCK
LOCK
TIMER OFF
TIMER ON
SLEEP
Clock
When unit is started for the first time and after replacing batteries in remote controller,
clock should be adjusted as follows:
Press CLOCK button, "AM" or "PM" flashes.
Press or to set correct time. Each press will increase or decrease 1min. If the
button is kept depressed, time will change quickly.
After time setting is confirmed, press SET, "AM " and "PM" stop flashing, while clock
starts working.
Hints
After replacing with new batteries, remote controller will conduct self-check, displaying
all information on LCD. Then, it will become normal.
Page 9

Page 10

Operation
Auto run, Fan operation
(1) Unit start
Press ON/OFF button, unit starts.
Previous operation status appears on
display.
(Not Timer setting)
(2) Select operation mode
Press MODE button. For each press,
operation
AUT DR HEA FA
Unit will run in selected mode.
Stop display at " " AUTO or " " FAN.
(3) FAN
Press FAN button. For each press, fan speed
changes
LO
COOL
MED
HI
AUT
AUT
Enjoy yourself by just a gentle press.
AUTO
AM
TEMP
ON
OFF
SWING
2
4
MODE
CLOCK
TIMER
LOCK
RESET
1
SLEEP
SET
FAN
3
Unit will run at selected fan speed.
Note:AUTO is not available in FAN mode.
Adjust air flow direction if necessary, referring to page10.
(4) Unit stop
Press ON/OFF button.
Only time remains on LCD.
All indicators on indoor unit go out.
Vertical flap closed automatically.
Hints
Remote controller can memorize settings in each operation mode. To run it
next
time just select the operation mode and it will start with the previous setting.
Page 11

Operation
COOL, HEAT and DRY operation
Recommendations:
Use COOL in summer.
Use HEAT in winter.
Use DRY in spring, autumn and in damp climate.
(1) Unit start
Press ON/OFF button, unit starts.
Previous operation status appears on display. (Not Timer setting)
Power indicator on indoor unit lights up.
(2) Select operation mode
Press MODE button. For each press,
operation
AUT DR HEA FA
COOL
Unit will run in operation mode displayed on
LCD.
(3) Select temp.setting
Press TEMP. button
Every time the button is pressed, temp. setting increases 1oC
Every time the button is pressed, temp. setting decreases 1oC
Unit will start running to reach the temp. setting on
AUTO
AM
TEMP
SWING
MODE
CLOCK
TIMER
LOCK
ON
OFF
6
RESET
5
2
1
SLEEP
SET
FAN
3
4
(4) Fan speed selection
Press FAN button. For each press, fan speed
changes
LO
Unit runs at the speed displayed on LCD.
MED
HI
AUT
AUT
COOL operation starts when room
temp. is higher than temp. setting.
In HEAT mode, warm air will blow out after a short period
of time due to cold-draft prevention function.
In DRY mode, when room temp. becomes 2oC higher than
temp. setting, unit will run intermittently at LO speed
regardless of FAN setting.
Temp. setting+2oC
Temp.
On reaching temp. setting,unit
will run in mild DRY mode.
Hints
Remote controller can memorize each operation status. When starting it next time,
just press ON/OFF button and unit will run in previous status.
On cooling only unit, heating mode is not available.
Ultra-low air flow
Page 12
Operation
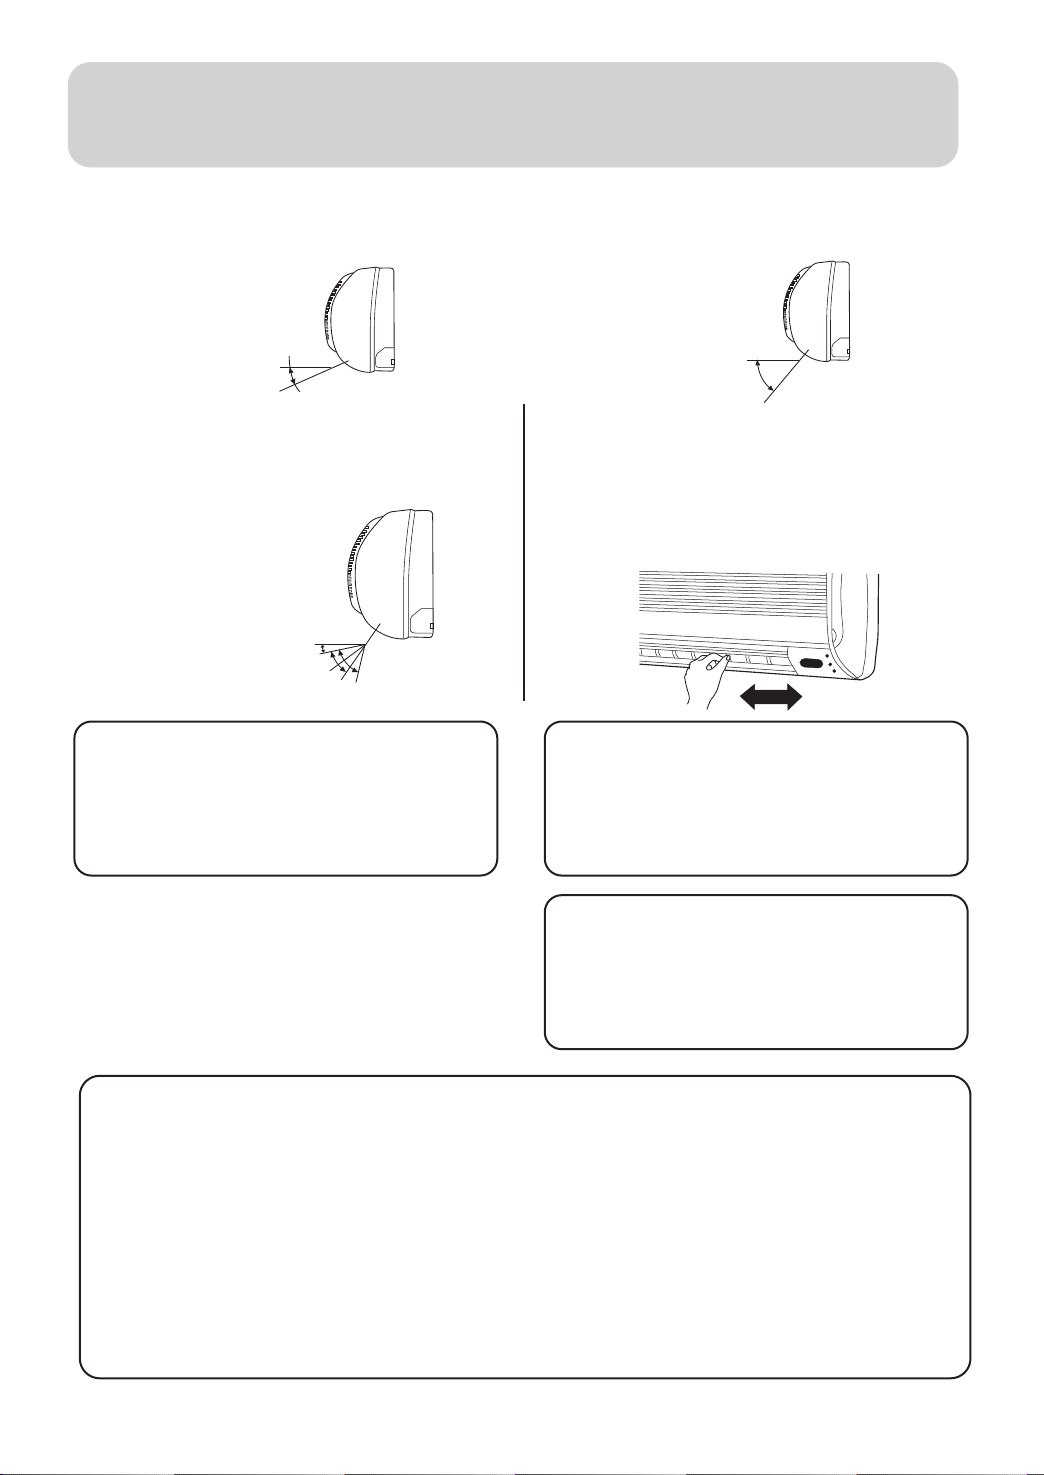
(5) Air flow direction adjustment
After operation mode is selected, vertical flap will open automatically according to the mode.
Referring to the Fig.
COOL HEAT
About 10
o
Up and down (Use remote controller)
Press SWING button, vertical flap will move within
the range shown in the Fig. Press SWING button
stop it at a fixed position.
About 10
COOL About 45
HEAT About 60
o
o
o
Cautions:
It is advisable not to keep vertical flap at
downward position for a long time in COOL
or DRY mode, otherwise, condensate
(6) Unit stop
Press ON/OFF button.
Only time remains on LCD.
All indicators on indoor unit go out.
Vertical flap closes automatically.
About 60
o
Left and right air flow adjustment
(manual)
Move the horizontal blade by a knob on
air
conditioner to adjust left and right direction
Cautions:
When humidity is high, condensate water
might occur at air outlet if all horizontal
louvers are adjusted to left or right.
Cautions:
Unit won't restart until 3 minutes have
elapsed, due to system protection.
HEAT mode is not available on
cooling only unit.
Hints
As cold air flows downward in COOL mode, adjusting air flow horizontally will be much more
helpful for a better air circulation.
As warm air flows upward in HEAT mode, adjusting air flow downward will be much more
helpful for a better air circulation.
Be careful not to catch a cold when cold air blows downward.
It is harmful to your health in summer to go frequently in and out of places where temp. difference
is above 7oC. Temp. difference of 3-5oC will remove your fatigue.
More than this, unit's load can be reduced and power consumption cut down as well. So, you'd
Page 13
Operation
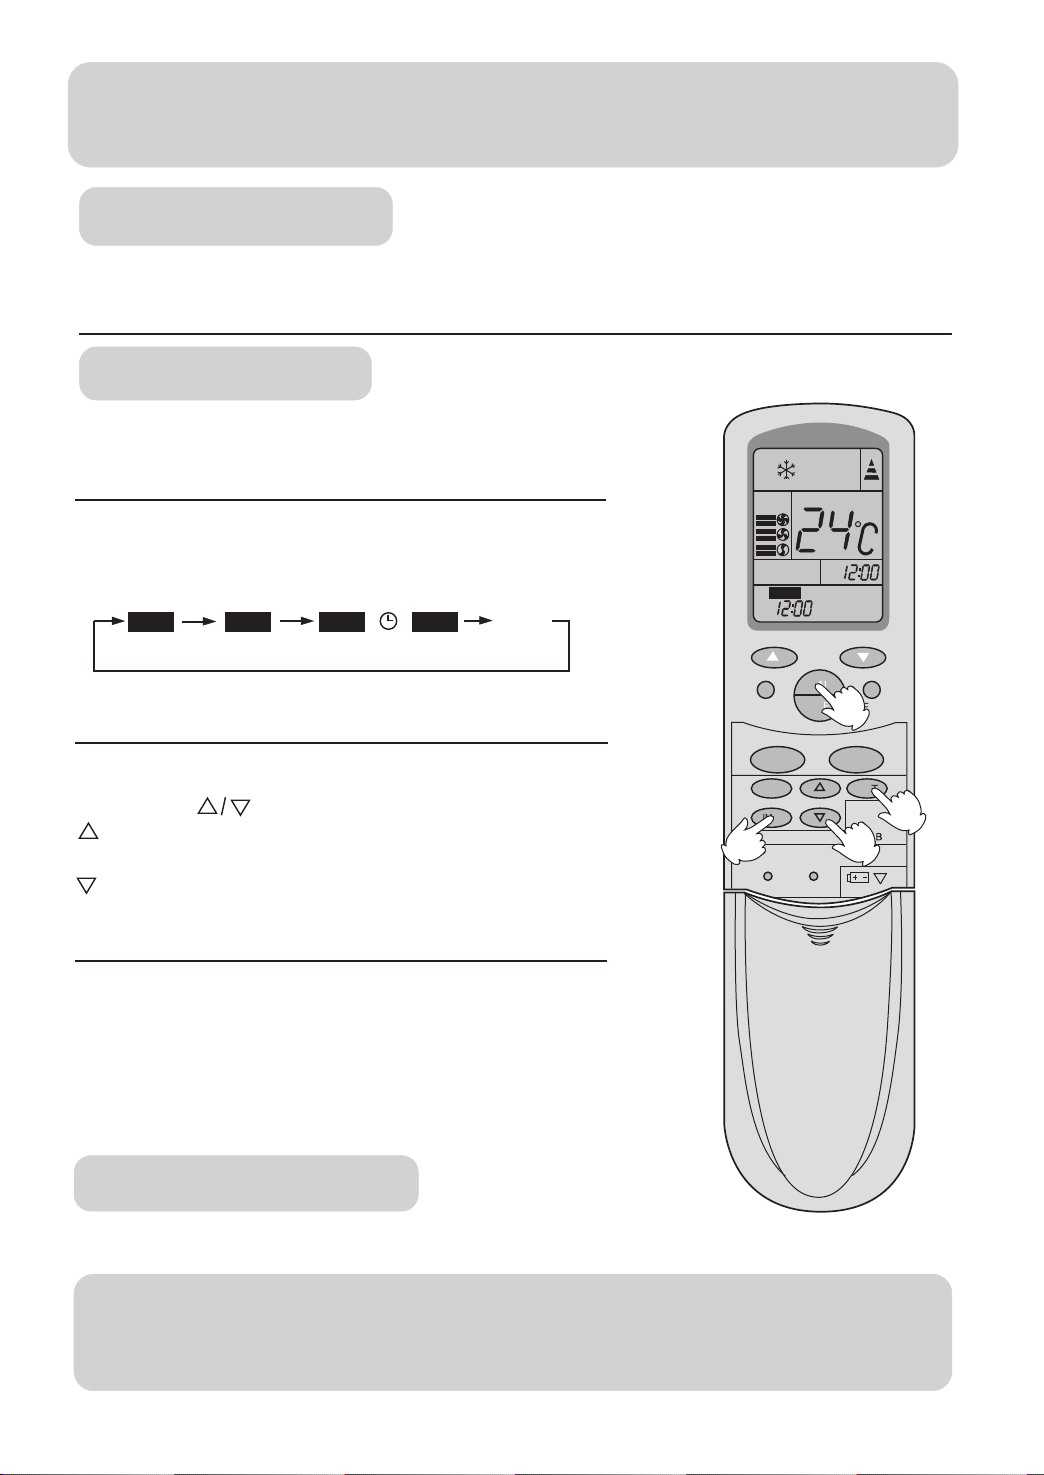
TIMER operation
Set Clock correctly before starting Timer operation(referring to page 6)
You can let unit start or stop automatically at following times: Before you wake up in
the
TIMER ON/OFF
(1)After unit start, select your desire operation mode.
Operation mode will be displayed on LCD.
Power indicator on indoor unit lights up.
(2)TIMER mode selection
Press TIMER button to change TIMER mode.
2
AM
SWING
MODE
CLOCK
TIMER
LOCK
ON
Every time the button is pressed, display changes as
ON
TIMER ON
OFF
TIMER OFF
ON
TIMER ON-OFF
OFF
blan
Select your desired TIMER mode (TIMER ON or TIMER
OFF) ON or OFF will flash.
(3)Timer setting
Press HOUR
Every time the button is pressed, time increases 10 min.
If button is kept depressed, time will change quickly.
Every time the button is pressed, time decreases 10 min.
If button is kept depressed, time will change quickly. Time
will be shown on LCD. It can be adjusted within 24 hours.
TEMP
ON
OFF
RESET
AM
1
SLEEP
SET
3
FAN
4
(4)Confirming your setting
After setting correct time, press SET button to confirm, "ON"
or "OFF" stops flashing.
Time displayed: Unit starts or stops at x hour x min. (TIMER
ON or TIMER OFF).
Timer mode indicator on indoor unit lights up.
To cancel TIMER mode
Just press TIMER button several times until TIMER mode
Hints
After replacing batteries or a power failure happens, Time setting should be reset.
Remote controller possesses memory function, when use TIMER mode next time,
just
Page 14
Operation
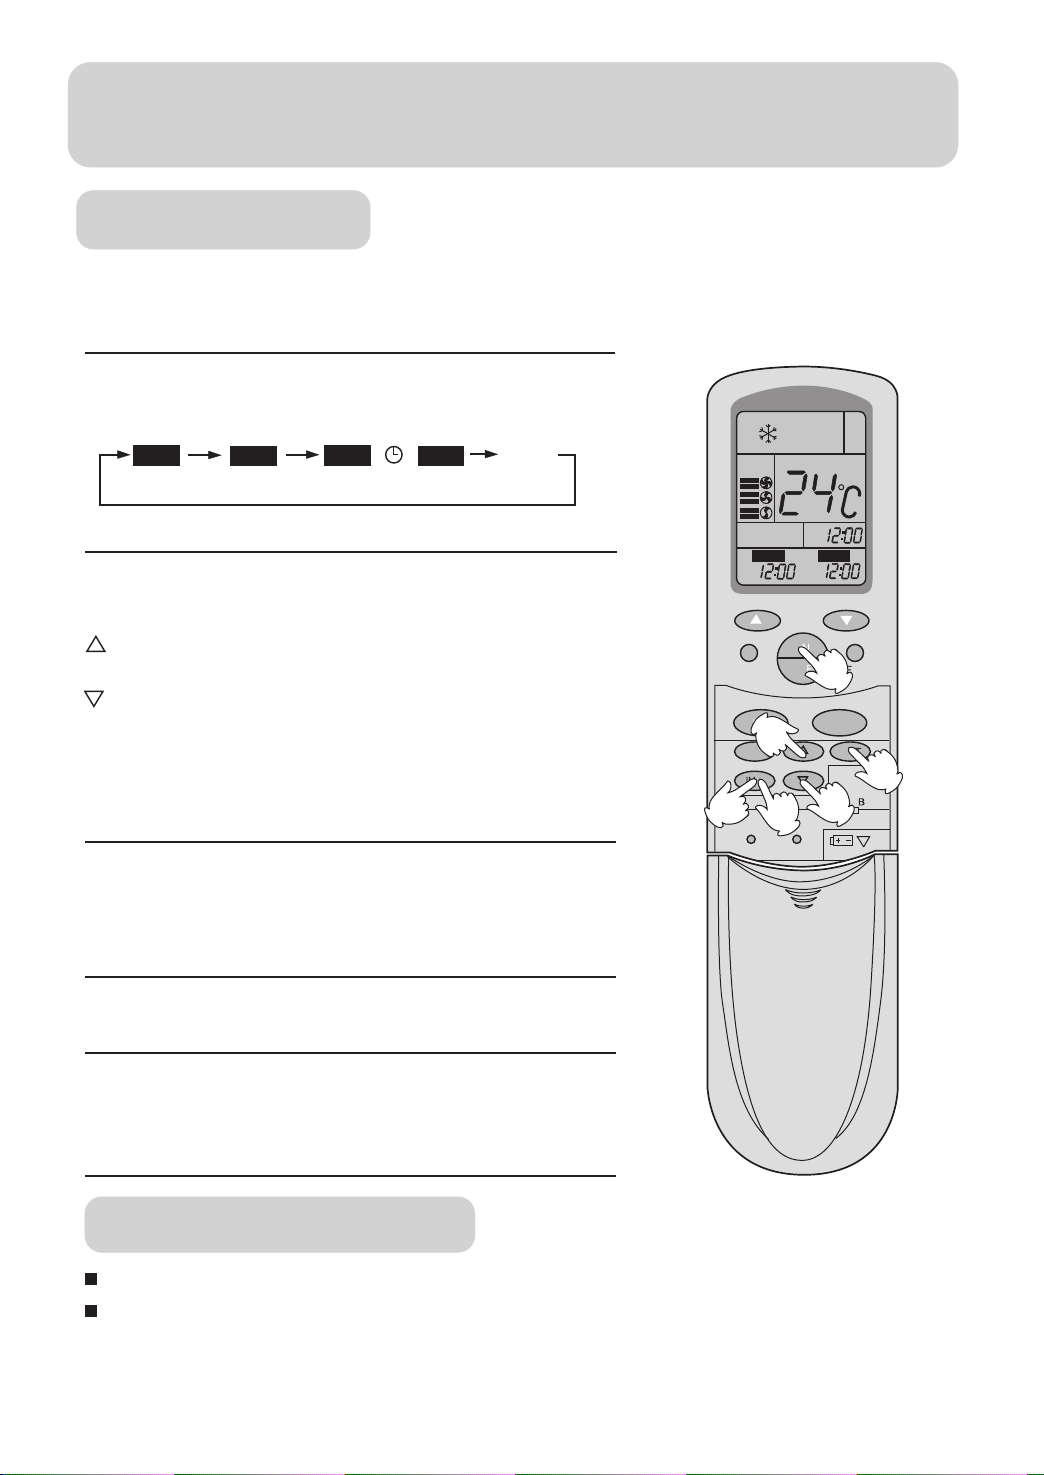
TIMER ON-OFF
(1)After unit start, select your desired operation mode
Operation mode will be displayed on LCD.
Power indicator on indoor unit lights up.
(2) Press TIMER button to change TIMER mode.
Every time the button is pressed, display changes as follows:
ON
TIMER ON
OFF
TIMER OFF
ON
TIMER ON-OFF
OFF
blan
Select TIMER ON-OFF. "ON" will
(3)Time setting for TIMER ON
Press HOUR
Every time the button is pressed, time increases 10min.
If button is kept depressed, time will change quickly.
Every time the button is pressed, time decreases 10min.
If button is kept depressed, time will change quickly.
Time will be shown on LCD.
It can be adjusted within 24 hours.
AM refer's to morning and PM to afternoon.
(4) Time confirming for TIMER ON
After time setting, press TIMER button to
confirm.
Time displayed: Unit starts at x hour x min.
(5) Time setting for TIMER OFF
Follow the same procedures in "Time setting for TIMER
2
AM
SWING
MODE
CLOCK
TIMER
LOCK
ON
5
4
TEMP
ON
OFF
RESET
AM
AM
OFF
1
SLEEP
SET
3
FAN
6
(6)Time confirming for TIMER
After time setting, press SET button to confirm, "OFF" stops flashing.
Time displayed: Unit stops at X hour X
To cancel TIMER mode
Just press TIMER button several times until TIMER mode
According to the Time setting sequence of TIMER ON or TIMER OFF, either Start-Stop or
Stop-Start can be achieved.
Page 15

Operation
Emergency operation and test operation
Emergency
Carry out this operation only when the remote controller is defective or lost.
When the emergency operation switch is pressed, a " Pi " sound starts once,
which
means the start of this operation.
In this operation, it is not possible to change the
settings of temperature and air flow speed, it is
also impossible to do an operation by the timer.
Room
temperature
More than 23oC
Less than 23oC
If an air conditioner is a model for both cooling and heating.
Cooling when the room temperature at the start of operation is above 23oC.
Heating when the room temperature at the start of operation is less 23oC.
Designated
Designated
temperatur
temperatur
26oC
23oC
Timer
mode
Air
Operatio
flow
AUT
AUT HEA
n mode
COOL
Test operation:
Use this switch in the test operation when the room
temperature is less 16oC, do not use it in the normal
operation.
Continue to press the test operation switch for more
than 5 seconds. After you hear the "Pi" sound twice,
release your finger from the switch, the cooling
operation starts with the air flow speed setting "Hi".
Removal of the restriction of emergency or test
Press once more the emergency operation switch, or manipulate through the remote
controller, a "Pi" sound causes the restriction of emergency or test operation to be
removed.
When the remote controller is manipulated for the removal, then the selected operation
by the remote controller.
Page 16

Operation
Comfortable SLEEP
AM
Before going to bed at night, you can simply press
the SLEEP button and unit will bring you a sound
sleep in selected mode.
In COOL mode
One hour after SLEEP mode starts, temp. will
become 1oC higher than temp. setting. After
running for another 1 hour, temp. rises by 1oC
further. Unit will run for 6 hours then stops
automatically. Temp. is higher than temp.
setting so that room temp. won't be too low
for your sleep.(As shown in Fig.1)
In HEAT mode
One hour after SLEEP mode starts, temp. will
become 2oC lower than temp. setting. After
running for another 1 hour, temp. decreases
by 2oC further. Unit will run for 3 hours at this
temp. then increases another 1oC and stops
automatically 3 hours later. Temp. is lower
than temp. setting so that room temp. won't
be too high for your sleep.
(As shown in Fig .2)
SLEEP operation starts
1 hr
1 hr
Temp.
SWING
MODE
CLOCK
TIMER
LOCK
Rises 1
Fig.1
TEMP
ON
OFF
FAN
SLEEP
SET
RESET
SLEEP operation stops
Approx. 6
Unit stop
Note:
In AUTO mode, unit will run in SLEEP
function according to operation mode.
In FAN mode, comfortable sleep is not
available.
Temp.
1 hr
1 hr
SLEEP mode starts
Decreases 2
Decreases 2
3 hrs
Fig.2
Unit stop
Approx. 3
Rises 1
SLEEP mode stops
Page 17

Maintenance
Cleaning of unit casing
Cut off power supply
before cleaning wipe unit casing with soft cloth.
In case of heavy stain, clean it with neutral detergent.
squeeze water in the cloth, wipe off the detergent on
unit
Cleaning of remote controller
Cleaning of air filter
Don't use water to wash unit casing, please use dry cloth.
Don't use glass cleanner or cloth soaked with chemicals.
Page 18

Maintenance
Page 19

Maintenance
Better use of air conditioner
Proper room
Proper
temperature
Closing of doors and windows
during operation.
Curtains or blinds
for windows
Never fail to observe the
Cleaning of the air filter.
every
Effective use of the
Avoid timewasteful
Once
Do not sprinkle water over
the unit.
Do not block the inlet or
outlet.
Do not use for other Do not pull power plug.
Such as food preservation,
plant cultivation, or animal
breeding.
Page 20

Trouble Shooting
Before asking for service, check the following first.
Normal
Performanc
e
Phenomenon
The system does not restart
immediately.
Noise is heard.
Smells are
Mist or steam are blown
Cause or check
When unit is stopped, it won't restart
immediately until 3 minutes have elapsed
to protect the system.
When the electric plug is pulled out and
reinserted, the protection circuit will work
for 3 minutes to protect the air conditioner.
During unit operation or at stop, a swishing
or gurgling noise may be heard. At first 2-3
minutes after unit start, this noise is more
noticeable. (This noise is generated by
refrigerant flowing in the system.)
During unit operation, a cracking noise may
be heard. This noise is generated by the
casing expanding or shrinking because of
temperature changes.
Should there be a big noise from air flow in
unit operation, air filter may be too dirty.
This is because the system circulates smells
from the interior air such as the smell of
furniture, cigarettes.
During COOL or DRY operation, indoor unit
may blow out mist. This is due to the sudden
cooling of indoor air.
Multiple
check
Does not work at all.
Poor
Is power plug inserted?
Is there a power failure?
Is fuse blown out?
Is the air filter dirty? Normally it should be
cleaned every 15 days.
Are there any obstacles before inlet and outlet?
Is temperature set correctly?
Are there some doors or windows left open?
Is there any direct sunlight through the
window during the cooling operation?(Use
curtain)
Are there too much heat sources or too many
people in the room during cooling operation?
 Loading...