

Page 1
H2R465SF
Upright fridge
User Manual
Skříňová chladnička
Návod k obsluze
Kühlschrank
Bedienungsanleitung
Congelador vertical
Manual del usuario
Réfrigérateur vertical
Manuel de l’utilisateur
Frigorifero Verticale
Manuale d'uso
Vrijstaande koelkast
Gebruikershandleiding
Lodówka pionowa
Instrukcja obsługi
Frigorífico vertical
Manual do utilizador
EN
CZ
DE
ES
FR
IT
NL
PL
PT
Page 2

User Manual
Upright Fridge
H2R465SF
EN
Page 3

Thank You
Thank you for purchasing a Haier Product.
Please read these instructions carefully before using this appliance. The instructions contain important information which will help you get the best out of the appliance and ensure
safe and proper installation, use and maintenance.
Keep this manual in a convenient place so you can always refer to it for the safe and proper
use of the appliance.
If you sell the appliance, give it away, or leave it behind when you move house, make sure
you also pass this manual so that the new owner can become familiar with the appliance
and safety warnings.
EN
ARNING: Risk of fire/flammable material.
W
since flammable materials are used. Take care to avoid causing a fire by ingniting flammable material.
Manufacturer: Qingdao Haier Special Icebox Co., Ltd.
Address : Haier Garden, Qianwangang Road,Economic
Development Zone, Qingdao 266555, Shandong, P.R.China
The symbol indicates there is a risk of fire
www.haier.com.au
www.haier.co.nz
2
Page 4

EN
1 - Safety ............................................................................................................................................... 4
Content
2 - Intended Use
3 - Product Description .....................................................................................................................12
4 - Use ................................................................................................................................................... 13
5 - Equipment ..................................................................................................................................... 17
6 - Care and Cleaning ........................................................................................................................ 18
7 - Troubleshooting ...........................................................................................................................20
8 - Installation ................................................................................................................................... 23
9 - Technical Data ............................................................................................................................ 27
.................................................................................................................................
11
3
Page 5

1 - Safety
Before switching on the appliance for the first time, read the following safety
hints!
WARNING!
Before first use
Make sure there is no transport damage.
Remove all packaging and keep out of children´s reach.
Wait at least 2 hours before installing the appliance in order to ensure the refrigerant circuit is fully effcient.
Handle the appliance always with at least two persons because it is
heavy.
Installation
The appliance should be placed in a well-ventilated place. Ensure a
space of at least 5 cm above and around the appliance.
WARNING: Keep ventilation openings in the appliance or in the in-
built structure clear of obstruction.
Never place the appliance in a damp area or location where it mi-
ght be splashed with water. Clean and dry water splashes and stains
with a soft clean cloth.
Do not install the appliance in direct sunlight or in the near of heat sou-
rces (e.g. stoves, heaters).
Install and level the appliance in an area suitable for its size and use.
Make sure that the electrical information on the rating plate agrees with the power supply. If it does not, contact an electrician.
The appliance is operated by a 220-240 VAC/50 Hz power supply.
Abnormal voltage fuctuation may cause the appliance to fail to start,
or damage to the temperature control or compressor, or there may be
an abnormal noise when operating. In such case, an automatic regulat-
or shall be mounted.
Do not use multi-plug adapters and extension cables.
WARNING: Do not locate multiple portable socket outlets or por-
table power supplies at the rear of the appliance.
WARNING:When positioning the appliance, ensure the supply cord
is not trapped or damaged.
Do not step on the power cable.
Ensure that the power cable is not trapped by the freezer.
Do not cover air vent openings.
Use a separate earthed socket for the power supply which is easy acc-
essible. The appliance must be earthed.
EN
4
Page 6

EN
1 - Safety
WARNING!
WARNING:
Do not damage the refrigerant circuit.
Daily use
This appliance can be used by children aged from 8 years and above
and persons with reduced physical, sensory or mental capabilities or
lack of experience and knowledge if they have been given supervision
or instruction concerning use of the appliance in a safe way and understand the hazards involved.
Children shall not play with the appliance.
Children aged from 3 to 8 years are allowed to load and unload refrige-
rating appliances, but not allowed to clean and install the refrigerating
appliances.
Keep away children under 3 years of age from the appliance unless
they are constantly supervised.
Cleaning and user maintenance shall not be made by children without
supervision.
The appliance must be positioned so that the plug is accessible.
lf coal gas or other inflammable gas is leaking into vicinity of the appliance, turn off the valve of the leaking gas, open the doors and windows
and do not unplug or plug in the power cable of the freezer or any other
appliance.
Notice that the appliance is set for operation at the specific ambient
range between 10 °C and 43°C. The appliance may not work properly if
it is left for a long period at a temperature above or below the indicated
range.
Do not place unstable articals (heavy objects, containers filled with water)
on top of the freezer,to avoid personal injury caused by falling or electric
shock caused by contact with water.
Do not store or use inflammable, explosive or corrosive materials in the
appliance or in the vicinity.
Do not lift the appliance by its handles.
Never place the appliance horizontally on the ground when moving it.
Before any operation, first unplug the appliance from the mains.
Do not tilt the appliance more than 45 ° to prevent damage of the cooling system when moving the appliance.
Unplug the appliance in the event of a power interruption or before
cleaning. Allow at least 7 minutes before restarting the appliance, as
frequent starting may damage the compressor.
Check the condition of food if a warming in the freezer has taken place.
5
Page 7

1 - Safety
WARNING!
Do not pull on the door shelves. The door may be pulled slant, the door
shelves , may be pulled away, or the appliance may topple.
Open and close the door only with the handles. The gap between the
door and the cabinet is very narrow. Do not put your hands in these
areas to avoid pinching your fingers. Open or close the appliance doors
only when there are no children standing within the range of door movement.
WARNING: Do not use electrical devices inside the food storage co-
mpartments of the appliance, unless they are of the type recommended by the manufacturer.
WARNING: The lamps can only be replaced by manufacturer, togeth-
er with a part of the appliance.
WARNING
plate in the unit.
It is hazardous for anyone other than an Authorized Service Person to
service this appliance.
In Queensland – the authoriz – ed Service Person MUST hold a Gas
Work Authorization for hydro
-carbon refrigerants, to carry out Servicing or repairs which involve the
removal of covers.
:If you are unsure of the refrigerant type check the rating
EN
6
Page 8

EN
WARNING!
Maintenance / cleaning
▶ Make sure children are supervised if they carry out cleaning and
maintenance.
▶ Disconnect the appliance from the electrical supply before un-
dertaking any routine maintenance. Allow at least 7 minutes before restarting the appliance, as frequent starting may damage
the compressor.
▶ Hold the plug, not the cable, when unplugging the appliance.
▶ Do not clean the appliance with hard brushes, wire brushes, de-
tergent powder, petrol, amyl acetate, acetone and similar organic solutions, acid or alkaline solutions. Please clean with special
freezer detergent to avoid damage.
▶ Do not scrape o frost and ice with a sharp objects. Do not use
sprays, electric heaters like heater, hair dryer, steam cleaners or
other sources of heat in order to avoid damage to the plastic
parts.
▶ WARNING: Do not use mechanical devices or other means to ac-
celerate the defrosting process, other than those recommended
by the manufacturer.
▶ If the supply cord is damaged, it must be replaced by the manu-
facturer, its service agent or similarly qualied persons in order to
avoid a hazard.
▶ Do not try to repair, disassemble or modify the appliance by your-
self. In case of repair please contact our customer service.
▶ Eliminate the dust on the back of the unit at least once in the year
to avoid hazard by re, as well as increased energy consumption.
▶ Do no
▶ Do not use water spray or steam to clean the appliance.
▶ Do not clean the cold glass shelves or glass door with hot water.
Sudden temperature change may cause the glass to break.
Disconnect the applianc
▶
▶ In case of heating check the condition of fr
▶
▶ Before maintenance, deactivate the appliance and disconnect
the mains plug from the mains socket.
▶ Electrical equipment should be serviced only by qualifed electri-
cal experts, because improper repairs can cause considerable
consequential damages.
t spray or ush the appliance during cleaning.
e from the power supply before cleaning.
1 - Safety
ozen goods.
7
Page 9
1 - Safety
EN
Refrigerant gas inf
WARNING!
The
appliance contains the ammable refrigerant ISOBUTANE
(R600a). Make sure the refrigerant circuit is not damaged during
transportation or installation. Leaking refrigerant may cause eye
injuries or ignite. If a damage has occurred, keep away open re
sources, thoroughly ventilate the room, do not plug or unplug the
power cords of the appliance or any other appliance. Inform the
customer service.
In case of eyes get into contact with the refrigerant, rinse it immediately under running water and call immediately the eye specialist.
WARNING: The refrigeration system is under high pressure. Do not
tamper with it. Since the ammable refrigerants are used, please,
install, handle and service the appliance strictly according to the instruction and contact the professional agent or our after-sales service to dispose of the appliance.
WARNING!
▶ Taking care t
▶ WARNING: When positioning the appliance, ensur
cord is not trapped or damaged.
▶ WARNING: Do no
portable power supplies at the rear of the appliance.
▶ Do not st
ammable propellant in this appliance.
▶ For ammable r
ful when installing, handling, serving and recycling the appliance.
▶ Please contact to the servic
cause the ammable blowing gas was used.
ormation
o avoid causing a re by igniting ammable material.
e the supply
t locate multiple portable socket-outlets or
ore explosive substances such as aerosol cans with a
efrigerants is used in the freezer, please be care-
e agent to dispose the appliance be-
8
Page 10

EN
Intended use
This appliance is intended to be used in household and similar app-
plications such as
ments;
- farm houses and by clients in hotels, motels and other residential type environments;
- bed and breakfast type environments;
- catering and similar non-retail applications.
If the appliance is not used for an extended period of time.
- Take out the food.
- Unplug the power cord.
- Clean the appliance as described above.
- Keep the doors open to prevent the creation of bad odours inside.
To ensure the safe preservation of foodstuffs, please comply
with this instruction for use.
The details on the most appropriate part in the compartment of
sidering the distribution of temperature that can be present in
1 - Safety
-
-
of the manual.
To avoid contamination of food, please respect the following instructions:
- crease of the temperature in the compartments of the appli-
ance.
- Clean regularly surfaces that can come in contact with
accessible drainage systems.
On refrigerating mode without a 4-star compartment: this
refrigerating appliance is not suitable for freezing
foodstuffs.
food and
9
Page 11

1 - Safety
- If the refrigerating appliance is left empty for long periods,
switch off, defrost, clean, dry, and leave the door open to prevent mould developing within the appliance.
Disposal
The symbol on the product or on its packaging indicates that
this product may not be treated as household waste. Instead it shall
be handed over to the appliacable collection point for the recycling
of electrical and electronic equipment. By ensuring this product is
disposed of correctly, you will help prevent potential negative consequences for the environment and human health, which could
otherwise be caused by inappropriate waste handling of this product. For more detailed information about recycling of this product,
please contact your local city oce, your household waste disposal
service or the shop where you purchased the product.
Since the ammable insulation blowing gases are used, please contact the professional agent or our after-sale service to dispose of
the appliance.
EN
WARNING!
Risk of injury of suffocation!
Refrigerants and gases must be disposed of professionally. Ensure
that the tubing of the refrigerant circuit is not damaged before being properly disposed of. Disconnect the appliance from the mains
supply. Cut o the mains cable and dispose of it. Remove the trays
and drawers as well as the door catch and seals to prevent children
and pets to get closed in the appliance.
10
Page 12

EN
2-Intended use
2.1 Intended Use
“This appliance is intended to be used in household and similar applications such as
– farm houses and by clients in hotels, motels and other residential type environments;
– bed and breakfast type environments;
– catering and similar non-retail applications.
This appliance is intended for storing fresh food. It has been designed exclusively for use
in dry-interior house-holds. It is not intended for commercial or industrial use.
ards and loss of warranty claims.
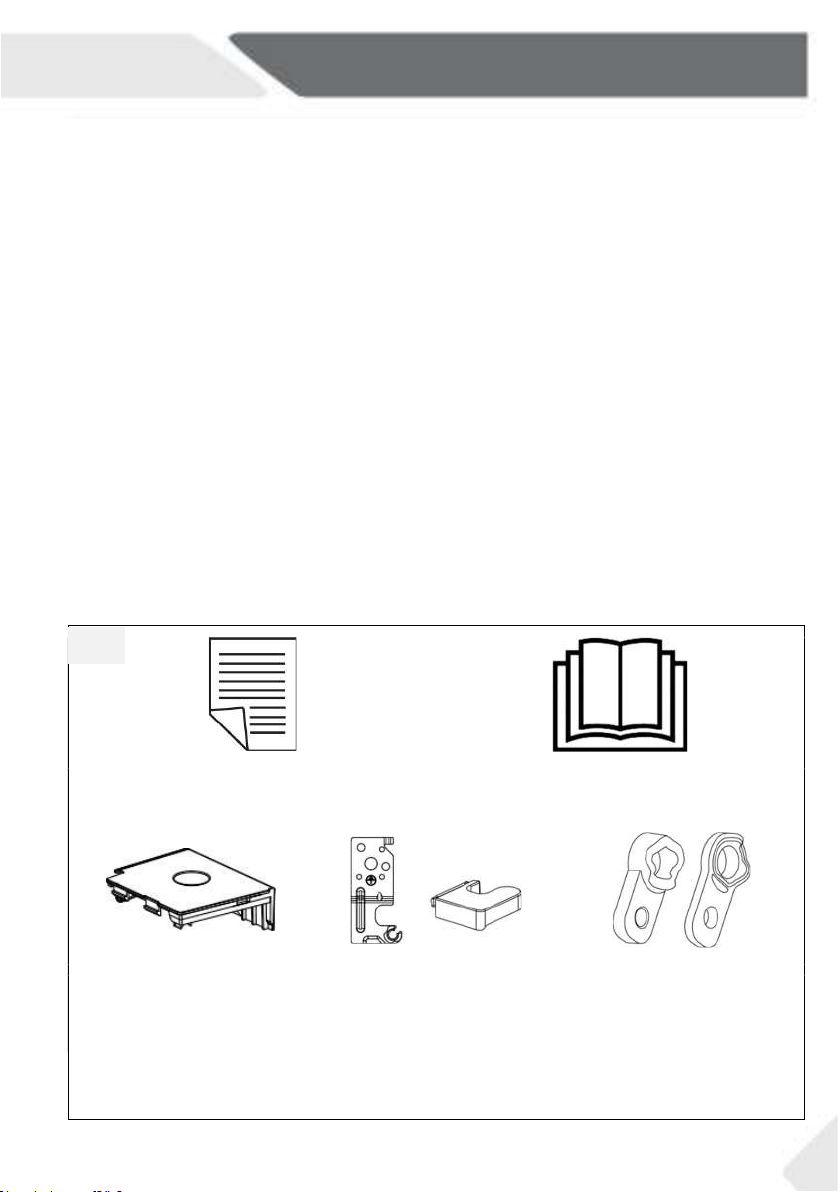
2.2 Accessories
Check the accessories and literature in accordance with this list:
2.2
User manualWarranty card
-
Top left trim
end cover
Upper right
hinge for door
reversibility
Upper right
hinge cover
Axe covers
11
Page 13

3-Product description
Notice: Difference
EN
1
2
3
4
5
6
7
8
12
1 LED light
2 Air-duct cover
3 Glass shelves
4
Freeze storage bins
5 Adjustable feet
6 Adjustable door shelves
7
Rating plate
8 Door handle
Page 14

EN
4-Use
4.1 Before first use
Remove all packaging materials, keep them out of children reach and dispose them
in an environmentally friendly manner.
Clean the inside and outside of the appliance with water and a mild detergent before
putting any food in it.
After the appliance has been levelled and cleaned, wait for at least 2 hours before
connecting it to the power supply. See Section INSTALLATION.
Precool the compartment for 2 hours at high settings before loading with food.
The function Super Freeze helps to cool down the compartment quickly.
Different foods should be placed in different
areas according to their properties (Fig: 4.1).
2
1
1 Pickled foods, canned food, fruit, vegetables,
salad, etc.
2 Eggs, canned food, spices, drinks and bottled
foods, etc.
3 Meat products, snack foods, etc.
3
4.2
The appliance is in operation as soon as it is connected to the power supply.
The fridge temperature is automatically set to 4 °C. This is the recommended set
-ting and the ideal temperature for storing fresh goods. If desired, you can change
the temperature manually. Please see ADJUSTING THE TEMPERATURE.
Notice: Presettings
1.The appliance is preset to the recommended temperature of 4 °C. Under no
ambient condition you don´t need to change the temperature.
2. When the appliance is switched on after being disconnected from the main
power supply, it may take up to 12 hours for the correct temperature to be reached.
f
4.3 Standby-mode of display
operation. The display locks automatically. It lights up automatically when any key
or opening the door.
pressing
rmal
13
Page 15

4 - Use
A
B
C
D
F E
a
G
b
c
d
e
f
EN
Control panel
4.4
(Fig. 4)
4
Icons Description
a:Temperature display icon
b:
Super Cool icon
c:Daily function icon
d:Holiday icon
e:Auto Set icon
f: Lock icon
Key Description
A:Decreasing temperature setting key:Press to decrease the temperature
:Super Freeze key :Press to active the Super Cool function
B
C:Daily function key:Press to active Daily functions
D:Holiday key :Press to active Holiday function
E:Auto Set key :Press to active Auto Set function
F: Lock key :Press and hold for 3 seconds to lock or unlock
G: Increasing temperature setting key: Press to increase the temperature
4.5 Display lock and unlock
Automatic locking
The control panel can automatically enter theLock function. Display is automatically locked
after 30 seconds without operation.
Manual locking
When the display is unlocked, press “ Lock” (F) and hold for 3 seconds, after a beep, “ Lock”(f)
icon is light, display is locked. When the display is locked, press “Lock " (F) and hold for 3
seconds, after a beep, the " Lock " (f) icon is off, and the display is unlocked.
Notice: Display lock
When display is locked, functions such as temperature adjustment or function setting are
disabled. When above operation is attempted, “Lock”(f) icon will blink for 3 times to remind
that the display is locked.
14
Page 16
EN
4 - Use
4.6 Temperature setting
The temperature range of this fridge can be set between 2℃ ~ 8℃.
When display is unlocked, under daily function, press "Decreasing temperature setting"
(A), after a beep, "Temperature display icon" (a) starts to flash and the display enters
temperature setting mode. And then every time you press "Decreasing temperature
setting" (A), the buzzer beeps and the temperature lowers by 1°C, and the minimum
temperature is 2°C. When the temperature is set , the “Temperature display icon”(a)
will stop flashing after 5 seconds without operation.
When display is unlocked, under daily function, press "Increasing temperature setting"
(G), after a beep, the "Temperature display icon" (a) starts to flash and the display enters
the temperature setting mode, and then every time you press "Increasing temperature
setting " (G), the buzzer beeps, the temperature increases by 1°C, and the maximum
temperture is 8°C. When the temperature is set, the “Temperature display” icon(a) will
stop flashing after 5 seconds without operation.
4.7 Daily function (C)
The appliance is under Daily function as soon as it is connected to the power supply for the
first time, and “Daily” icon (c) lights up. Only under this function, the temperature can be
set.
4.8 Super Cool function (B)
When display is unlocked, by touching "Super Cool " (B), Super Cool icon (b) will be light,
the fridge works in Super Cool mode. To exit Super Cool functio n manually , repeat steps
above. If not exit manually, the function will exit automatically after 3 hours.
Under Super Cool mode, fridge operates with the temperature set point of 2°C, until
Super Cool cycle completes (3hrs).
Under the Auto Set function, the fridge operates at the 4℃ setting.
Notice: Super Cool
1.In Super Cool mode, temperature could not be adjusted. If you do so, Super Cool
icon will flash for 3 times to remind that the fridge is in Super Cool mode.
2.In Super Cool mode, if the Auto Set function or Holiday is set, Super Cool icon (b) is off,
the Super Cool function automatically exits, andAuto Set or Holiday function is entered.
4.9 Holiday function (D)
When display is unlocked, by touching "Holiday" (D), the Holiday icon (d) will be light, the
fridge works in Holiday function. In Holiday mode, touching "Holiday" (D), the Holiday
icon (d) is off, and the fridge exits the Holiday function. In t he Holiday mode, the temper
-ature is automatically set to 17 ° C, so that your fridge will not generate odor, and also
save energy.
15
Page 17
4 - Use
Notice: Holiday function
1. In Holiday mode, temperature could not be adjusted. If you do so, Holiday icon will blink
for 3 times to remind that the freezer is in Holiday mode.
2. In Holiday mode, if Auto Set, Daily or Super Freeze function is set, Holiday icon (d) is off,
Holiday function automatically exits, and enters Auto Set, Daily or Super Freeze function.
EN
4.10 Auto Set function (E)
When display is unlocked, by touching "Auto Set" (E), "Auto Set" icon (e) is light, the freezer
works in Auto Set function. In Auto Set mode, by touchi ng "Auto Set" (E), icon (e) is off, and
the freezer exits the Auto Set function.
Under the Auto Set function, the freezer
Notice: Auto Set function
1. In Auto Set mode, temperature could not be adjusted. If you do so, Auto Set icon will blink
for 3 times to remind that the freezer is in Auto Set mode.
2. In Auto Set mode, if the Holiday, Daily or Super Freeze function is set, “Auto Set” (e) is off,
the Auto Set function automatically exits and enters Holiday, Daily or Super Freeze function.
operates at -18 ° C setting.
4.11 Display control function
When the door is closed the display screen turns off automatically 30 seconds after without
operation. The display locks automatically. It lights up automatically when touching any key
or opening the door.
4.12 Power-off memory
tion. Lock is not memorized, after power is back on, display is unlocked.
4.13 Door open alarm
When freezer is kept open for more than 1 minute, beeper will make 3 beeps with interval
of 0.5 second. The beeps will be repeated every 30 seconds if door is kept open. The
beeps will stop until door is closed or after 7 mins of door opening. The beeper stops
beeping and freezer light goes off.
4.14 Error indication
When the display icon shows E1, E2 and other codes and flashes, it indicates that the
fridge is faulty. In this situation, the freezer could still cool food but user should contact
aftersales service as soon as possible for optimal control of the fridge.
16
-
Page 18

EN
4-Use
4.16 Energy saving tips
Make sure the appliance is properly ventilated (see INSTALLATION).
Do not install the appliance in direct sunlight or in the near of heat sources (e.g.
stoves, heaters).
Avoid unnecessarily low temperature in the appliance. The energy consumption in-
creases the lower the temperature in the appliance is set.
Allow warm food to cool down before placing it in the appliance.
Make sure the door always closes correctly and unimpaired by food position. Keep
door gasket clean.
Defreeze frozen food in a fridge.
Clean the
The most energy-saving configuration requires drawer, food box and shelves to be
positioned in the appliance on factory-fresh condition, and food to be placed without
blocking the air outlet of the duct.
rear of the appliance regularly. Dust increases energy consumption.
5-Equipment
5.1 Removable door shelves
5.1
1
1
2
The door shelves can be removed for cleaning:
Place hands on each side of the shelf, lift it upwards (1)
and pull it out (2)(Fig. 5.1).
In order to insert the door shelf, the above steps are
carried out in reverse order.
5.2
5.2 Glass shelves
1.
To take out a shelf, remove it by first uplifting its hind
edge (1) and pulling it out (2) (Fig. 5.2).
2. To reinstall it, put it on the lugs on both sides and
push it to the most rearward position until the rear
.
17
Page 19

6-Care and Cleaning
6.1 General
Clean the appliance when only little or no food is stored and unplug the appliance .
Always keep the door gasket clean.
Clean the inside and housing of the appliance with
a sponge damped in warm water and neutral detergent.
1. Please scrub the interior and exterior of the
freezer, including door gasket, door shelves,
glass shelves, boxes and so on,with a soft
towel or sponge dipped in warm water (you may add neutral detergent into the
warm water).
2. If there is liquid spilled, remove all the contaminated parts, directly rinse with the
flow water, dry and place it back into the freezer.
3. If there is spilled cream (such as the cream, melting ice cream), please remove
all the contaminated parts, put into the warm water with about 40 °C for some
time, then rinse with the flow water, dry and place it back into the frieezer.
4. In case some small part or component gets stucked inside of the freezer (between shelves or storage bins), use small soft brush to release it. If you could not
reach the part, please contact Haier service.
6.1
EN
18
Page 20
EN
8- Care and Cleaning
6.2 Non-use for a longer period
If the appliance is not used for an extended period of time:
Take out the food.
Unplug the power cord.
Clean the appliance as described above.
Keep the door and freezerstorage bins open to prevent the creation of bad odours inside.
Remove the door of the appliance (open the door and hold it before removing the screws)
to avoid children entering into the appliance and getting locked in.
6.3 Moving the appliance
1. Remove all food and unplug the appliance.
2. Secure shelves and other moveable parts in the freezer with adhesive tape.
3. Close the door and secure it with tape.
4. Do not tilt the freezer more than 45° to avoid damaging the refrigerating system.
5.
forcefully.
6-Care and Cleaning
19
Page 21
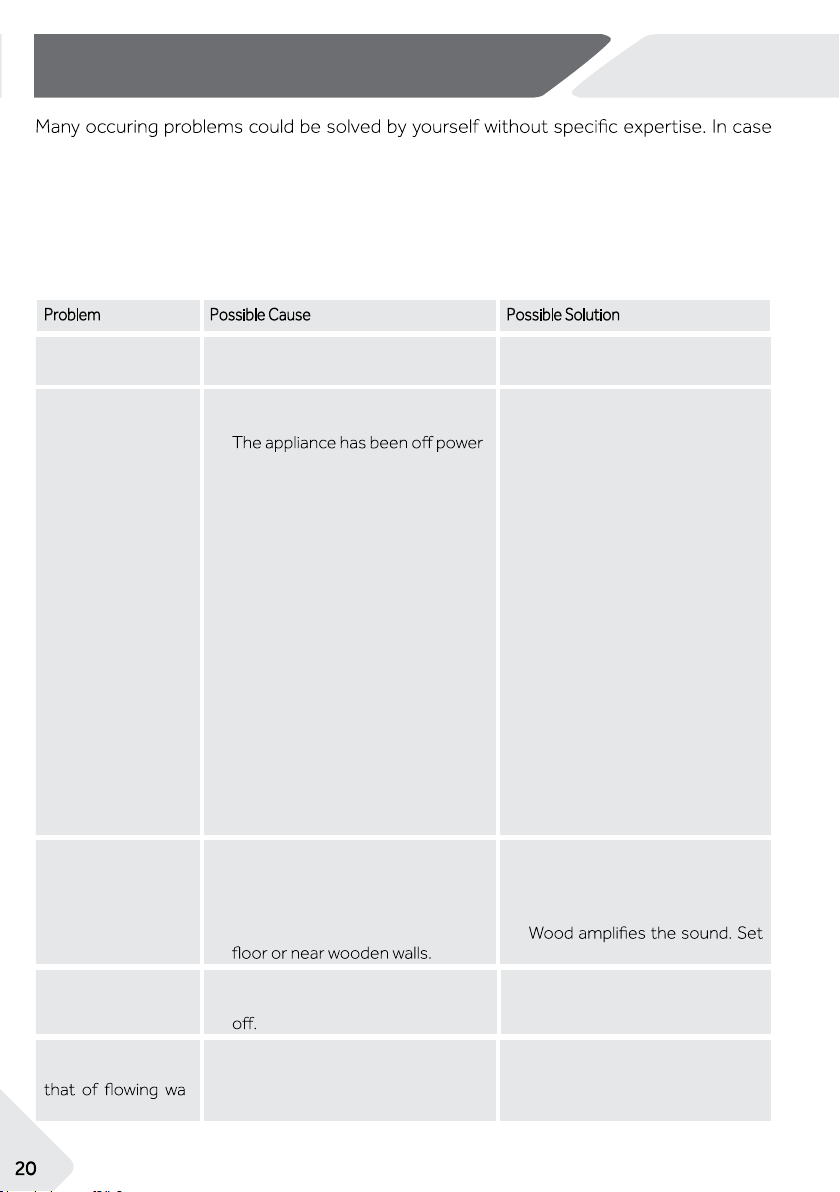
7-Troubleshooting
EN
of a problem please check all shown possibilities and follow below instructions before you
contact an after sales service.
The acoustic alarm can be switched of by pressing any button.
7.1 Troubleshooting
Problem Possible Cause Possible Solution
The compressor
does not work.
The appliance runs
frequently or for a
too long period of
time.
The appliance
makes abnormal
sounds.
The appliance
makes a clicking
sound
A slight sound is to
be heard similar to
ter.
• Mains plug is not connected in the
mains socket.
• The indoor or outdoor temperature is too high.
•
for a period of time.
• The door of the appliance is not
tightly closed.
• The door has been opened too
frequently or for too long.
• The temperature setting is too low.
• The door gasket is dirty, worn,
cracked or mis-matched.
• The required air circulation is not
guaranteed.
• The interior is covered in ice.
• The appliance is not located on
level ground.
• The appliance touches an object
• The appliance stands on a wooden
•
• This is normal. It is caused by the
•
• This is normal. • -
-
o it.
close t
refrigeration unit switching on or
• Connect the mains plug.
• In this case, it is normal for the
appliance to run longer.
• Normally, it takes 8 to 12 hours
for the appliance to cool down
completely.
• Close the door and ensure the
appliance is located on a level
ground and there is no food or
container jarring the door.
• Do not open the door too frequently.
• Set the temperature higher until a satisfactory temperature is
obtained. It takes 24 hours for
the temperature to become
stable.
• Clean the door gasket or replace them by the customer
service.
• Ensure adequate ventilation.
• Defrost the appliance.
• Level the appliance.
• Remove objects around the
appliance.
•
the appliance somewhere else.
• -
20
Page 22
EN
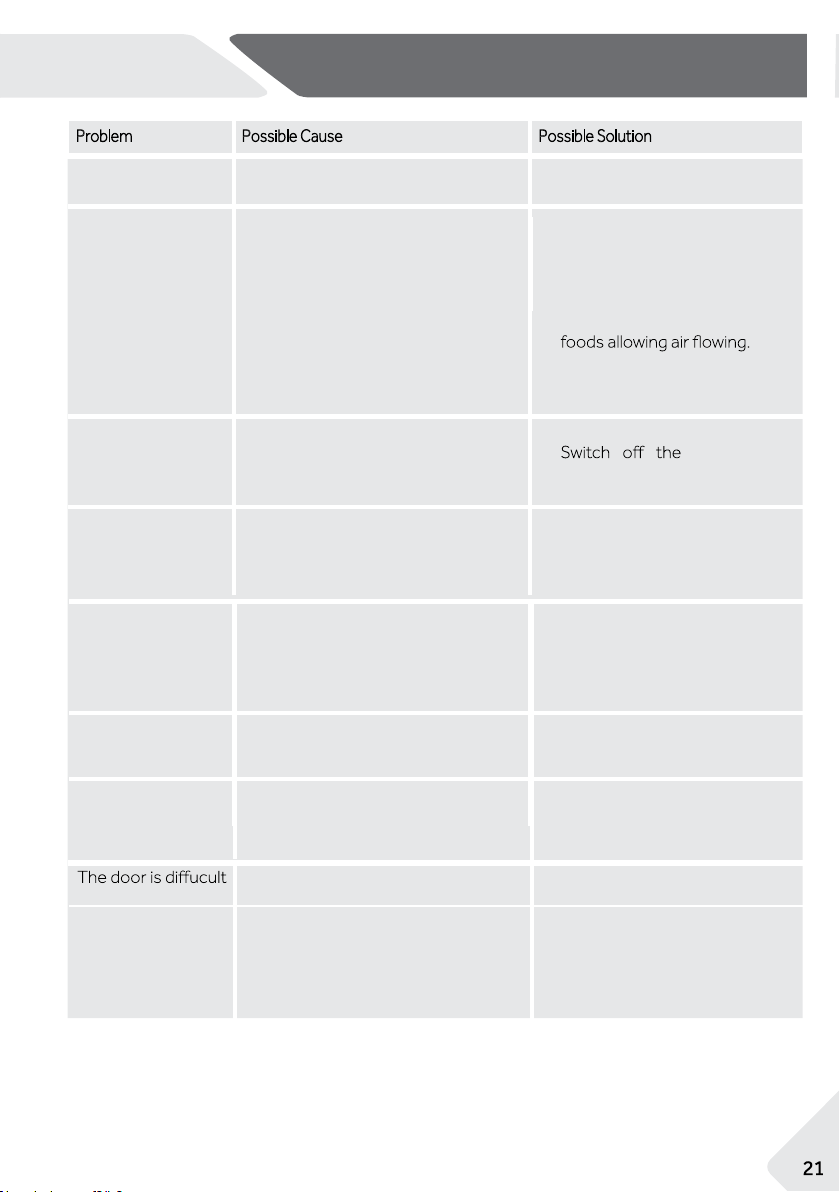
Problem Possible Cause Possible Solution
7 - Troubleshooting
The appliance makes a
motor sound
It is not cold enough
inside the appli-
ance.
It is too cold
inside
the appliance.
Moisture accumu-
lates on the surface
of the appliance
.
The cooling system
does n
ot work.
The sides of the
cabinet and door
strip get warm.
You hear an alarm
signal.
• The refrigeration unit has just
•
turned itself on. This is normal
• The temperature is set too high.
• Goods that are too warm have
been stored.
• Too much food has been stored at
a time.
• The goods are too close to each
other.
• The door is not tightly closed.
• The door has been opened too
frequently or for too long.
• The temperature is set too low.
• The
Super Freeze Super Freeze
tivated or has been running too
long.
• The climate is too warm and too
damp.
• Mains plug is not connected to the
mains socket.
• The power supply is not intact.
• This is normal. • -
• The door is open
• The temperature inside product is
too high
function is
• -
• Reset the temperature.
• Always cool down goods be-
fore storing them.
• Always store small quantities of
food.
• Leave a gap between several
• Close the door.
• Do not open the door too fre-
quently.
• Reset the temperature.
ac-
•
function.
• This is normal in damp climate
and will change when the humidity decreases. Wipe dry with
a cloth.
• Connect the mains plug.
• Check the electrical supply to
the room. Call the local electricity company!
• Close the door or silence the
alarm manually.
to open.
The door can’t be
closed properly. It
always leaves a gap.
• Once the appliance runs, it has an
•
internal vacuum.
• Because of the appliances’s low
temperature, the door seal can
easily get hard and deformed.
• Open the door seal gently to let
air enter the appliacne.
• Use a hair dryer or put a hot
towel on the spot where the
gasket is deformed.
• When the gasket is soft once
again, close the door and compress it tightly.
21
Page 23
7-Troubleshooting
EN
7.2 Power Interruption
In the event of a power cut, food should remain safely cold for about 15 hours. Follow
these tips during a prolonged power interruption, especially in summer:
Open the door as few times as possible.
Do not put additional food into the freezer during a power interruption.
If prior notice of a power interruption is given and the interruption duration is longer
than 15 hours, make some ice and put it in a container in the top of the freezer compartment.
As temperature in the freezer will rise during a power interruption or other failure,
the storage period and edible quality of food will be reduced. Any food that defrosts
should be either consumed, or cooked and refrozen (where suitable) soon afterwards in order to prevent health risks.
Notice: Memory function during power interruption
After restoration of power the appliance continues with the settings that were set before the power failure.
22
Page 24
EN
8 - Installation
8.1 Unpacking
Take the appliance out of the packaging.
Remove all packaging materials.
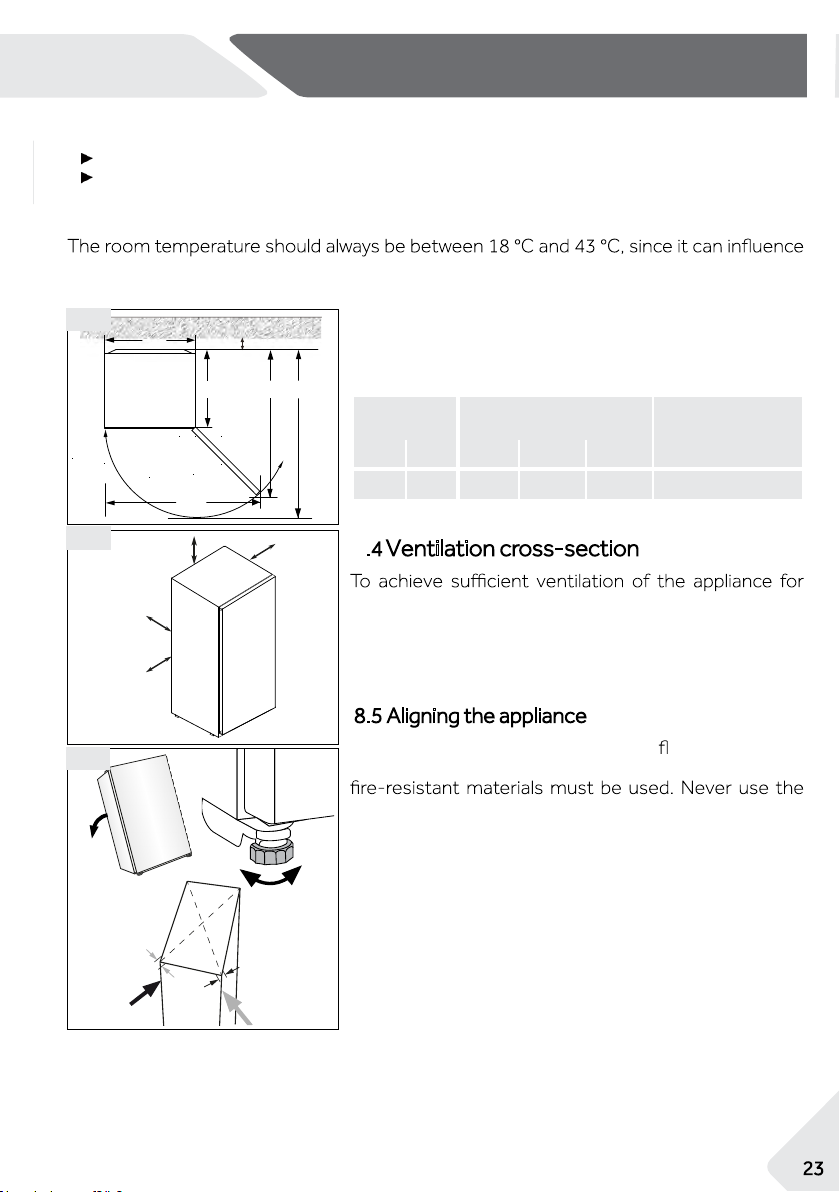
8.2 Environmental conditions
the temperature inside the appliance and its energy consumption. Do not install the appliance near other heat-emitting appliances (ovens, refrigerators) without isolation.
8.1
W1
W2
D1
D4
D2
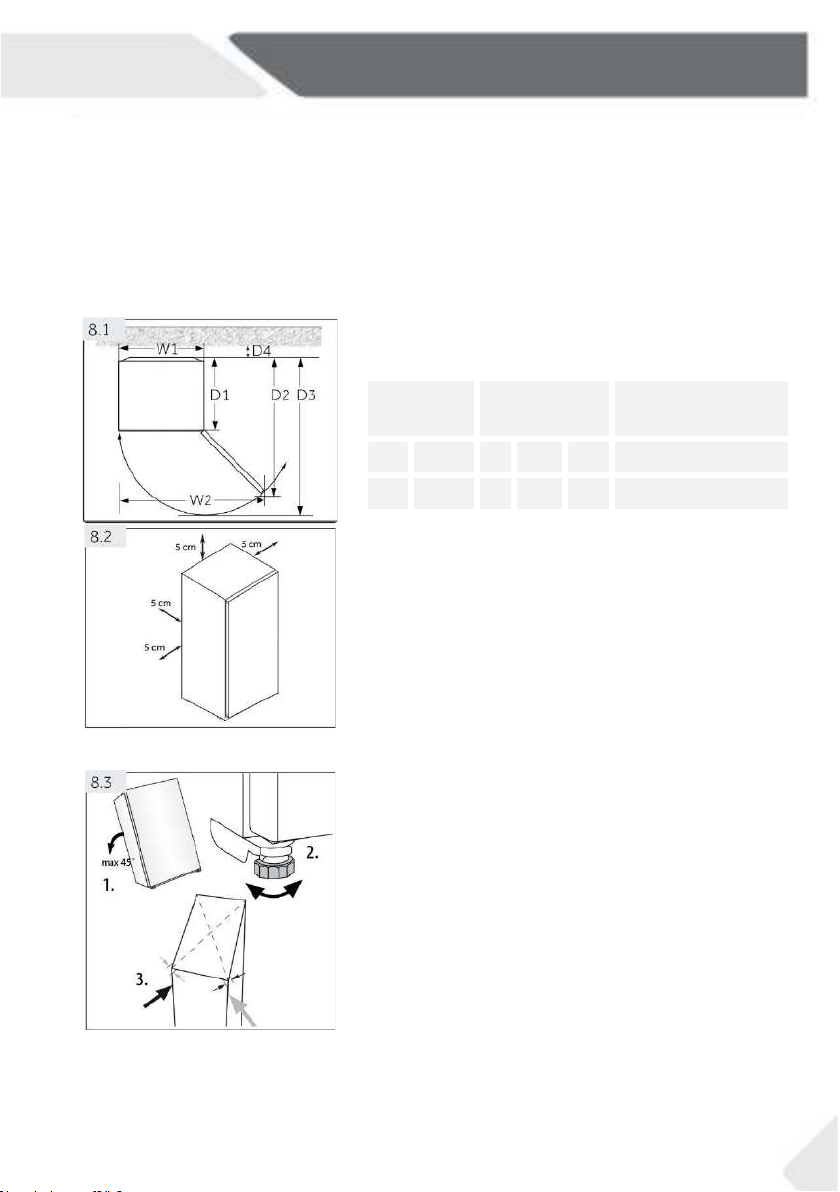
8.3 Space requirements
Required space to open the door (Fig. 8.1):
D3
Width
in mm
Depth
in mm
W1 W2 D1 D2 D3 D4
705 1076 603 1243 1327 50
Distance to wall
in mm
8.2
8.3
max 45°
1.
5 cm
5 cm
5 cm
5 cm
Ventilation cross-section8
safety reasons, the information of the required ventilation cross sections must be observed (Fig. 8.2).
FOR a free standing appliance: this refrigerating appliance is not intended to be used as a built-in appliance.
8.5 Aligning the appliance
The appliance should be placed on a at and solid surface. If the appliance is placed on a pedestal, strong and
foam packing ma
1. Tilt the appliance slightly backwards (Fig. 8.3).
2.
2. Set the feet to the desired level.
3. The stability can be checked by alternately bump-
ing on the diagonals. The slight swaying should be
the same in both directions. Otherwise the frame
can warp; possible leaking door seals are the result.
3.
A low tendency to the rear eases the closing of the
door.
terial as a pedestal.
23
Page 25
8 - Installation
EN
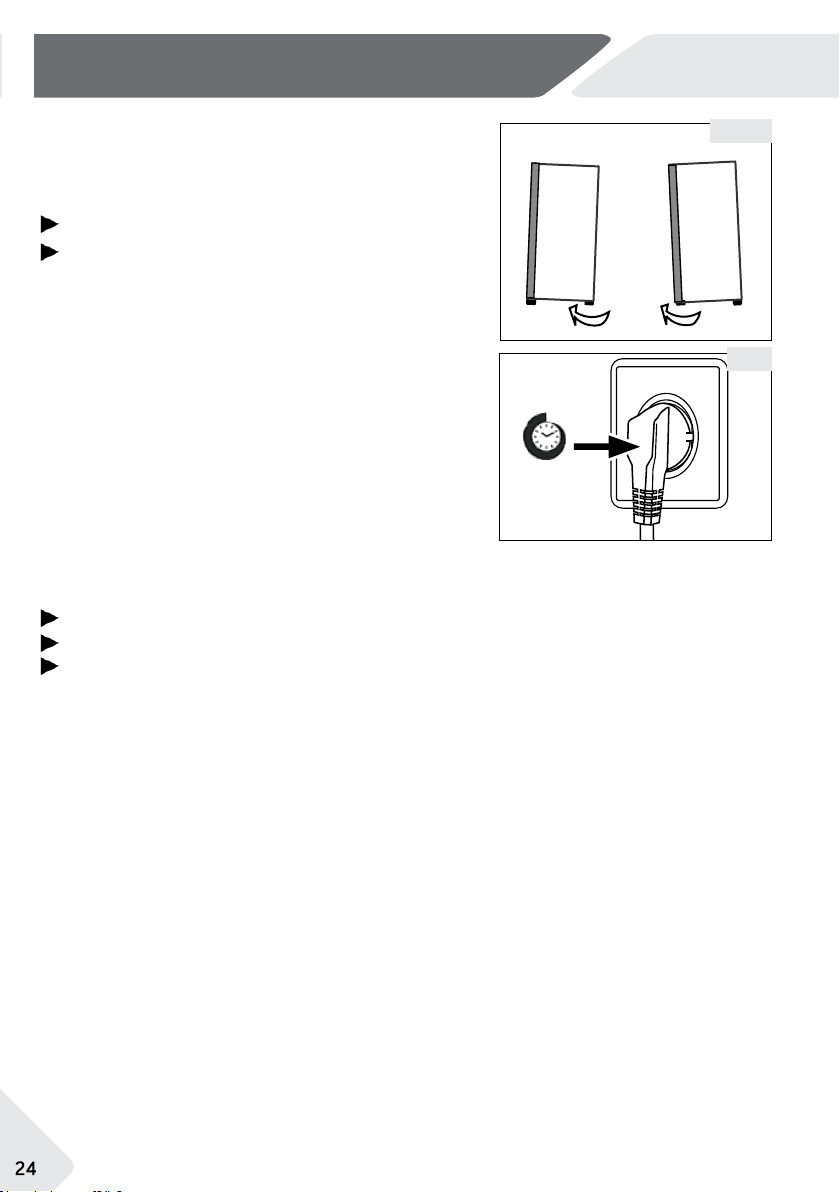
8.6 Using adjustable feet
If the freezer is unstable, the feet can be adjusted: Rotate the adjustable feet according to the direction of
arrow (Fig. 8.4) to turn them up or down:
Turning the feet clockwise raises the appliance.
Turning the feet counterclockwise lowers it.
8.7 Waiting time
To the maintenance-free lubrication oil is located in the
capsule of the compressor. This oil can get through the
closed pipe system during slanting transport. Before
connecting the appliance to the power supply you have
to wait 2 hours (Fig. 8.5) so that the oil runs back into
the capsule.
2 h
8.8 Electrical connection
Before each connection check if:
Power supply, socket and fusing are appropriate to the rating plate.
The power socket is earthed and no multi-plug or extension.
The power plug and socket are strictly according.
Connect the plug to a properly installed household socket.
8.4
8.5
24
Page 26

EN
8 - Installation
8.9 Door Reversibility
Before connecting the appliance to the power supply you should check, whether the door
swing must changed from left (as delivered) to right, if this is required by the installation
location and the usability.
1
3
5
7
9
11
13
2
4
8
10
12
14
Assembly steps (Fig. 8.6):
8.6
1. Provide necessary tool.
2. Unplug the appliance.
3. Open the upper and lower handle covers on the right
side of the door.
4. Pry the white slider slightly.
5. Take out the 2 push rod, and put the handle cover
6
back on.
6. Remove the 2 rubber plugs on the left side of the
door and put it with the removed push rods for step
20.
7. Remove 7 screws and hinge cover. Be careful not
to tear the door cable.
8. Unplug the connection cable.
9. Remove 3 hinge screws and the left upper hinge,
and remove the door carefully.
10.Place a cardboard box or cloth under the door and place
the door horizontally. Remove the
take the left end cover from the accessory bag. Install
it on the top
11. Remove 2 screws on the right bottom of the door. Re
-move 2 screws, door stopper and axe cover on the
left bottom of the door.
12. Take door stopper from last step and the right axe
cover from the accessory bag, fix them with 2screws.
Fix 2 screws also on the other side of the door.
13. Put the back of the cabinet down after placing thicker
pads underground. Remove 4 screws and the lower
hinge.
14. Unscrew the axe cover.
left side of the door.
right door end cover,
25
Page 27

8 - Installation
EN
15
17
19
21
Minimum guarantee is: 2 years for EU Countries, 3 years for Turkey, 1 year for UK, 1 year
for Russia, 3 years for Sweden, 2 years for Serbia, 5 years for Norway, 1 year for Morocco,
6 months for Algeria, Tunisia no legal warranty required.
Thermostats, temperature sensors, printed circuit boards and light sources are available
for a minimum period of seven years after placing the last unit of the model on the market.
Door handles, door hinges, trays and baskets for a minimum period of seven years and door gaskets for a minimum period of 10 year, after placing the last unit of the model on the
market.
18
20
16
15. Take the right axe cover from the accessory bag.
Fix it with screw.
16. Exchange position of caster plate and lower hinge
after replacement.
17. Disassemble the left small hinge cover and hinge
lid from the hinge cover.
18. Change the hinge lid to the other side and take the
right small hinge cover from the accessory bag.
Install it on the hinge cover.
19. Mount the door, install the left hinge, plug the con-
nection cable, and fix the hinge cover with screws.
20. Install the removed push rod on the left side of
the door, and then insert the rubber plugs into the
handle push rod hole on the right side of the door.
21. Finished.
For further information about the product, please consult
https://eprel.ec.europa.eu/ or scan the QR on the energy label supplied with the appliance.
To contact the technical assistance, visit our website:
https://corporate.haier-europe.com/en/
Under the section “website”, choose the brand of your product and your country.
You will be redirected to the specific website where you can find the telephone number and
form to contact the technical assistance.
26
Page 28

EN
9-Technical Data
Trade mark
Category of the model Upright fridge
Annual energy consumption (kWh/ year)
Storage volume cooling (L)
Storage volume freezing (L) ****
Star rating ****
Tempe ratu re of other compartments > 14 °C not applicable
Frostfree system yes
Pow er cut safe (h)
Freezing capacity ( kg/24h)
Clima te class
This appliance is intended to be used at an am-
bient tempe rature be tween 10 °C and 43 °C.
Airborne acoustical noise emissions
(dB(A) )
Construction type freestanding
Regarding specification details, please consult the rating plate and energy label inside the
product.
This appliance is intended to be used at an ambilent temperature indicated below:
1)
Haier
H2R465SF
F
232
463
not applicable
12
62
SN-T
38
27
Page 29

H2F385SF
0070516587A
Page 30

Návod k obsluze
Skříňová chladnička
H2R465SF
CZ
Page 31

Děkujeme
CZ
Děkujeme vám za zakoupení výrobku Haier!
Před použitím spotřebiče si laskavě pečlivě přečtěte tyto pokyny. Pokyny obsahují důležité
informace, které vám pomohou ze spotřebiče vytěžit maximum a zajistí bezpečnou a
správnou instalaci, používání a údržbu.
Tento návod k obsluze uschovejte na vhodném místě, abyste si jej mohli kdykoli
prohlédnout pro bezpečné a správné používání spotřebiče.
Pokud spotřebič prodáváte, darujete nebo ho při stěhování ponecháte na starém místě,
zajistěte se, abyste také zanechali tento návod k obsluze, aby se nový majitel mohl seznámit
se spotřebičem a bezpečnostními upozorněními.
VAROVÁNÍ! Nebezpečí požáru/hořlavý materiál. Symbol označuje nebezpečí požáru,
protože se používají hořlavé materiály. Dbejte na to, aby nedošlo k zapálení hořlavého
materiálu.
Výrobce: Qingdao Haier Special Icebox Co., Ltd.
Adresa: Haier Garden, Qianwangang Road,Economic
Development Zone, Qingdao 266555, Shandong, P.R.China
(Čínská lidová republika)
www.haier.com.au
www.haier.co.nz
2
Page 32

CZ
Obsah
1 – Bezpečnost ....................................................................................................................... 4
2 – Určené použití ................................................................................................................ 11
3 – Popis produktu ............................................................................................................... 12
4 – Použití ............................................................................................................................ 13
5 – Vybavení ........................................................................................................................ 17
6 – Péče a čištění ................................................................................................................. 18
7 – Řešení problémů ............................................................................................................ 20
8 – Instalace ......................................................................................................................... 23
9 – Technické údaje ............................................................................................................. 27
3
Page 33

1 – Bezpečnost
Před prvním zapnutím spotřebiče si přečtěte následující bezpečnostní pokyny!
VAROVÁNÍ!
Před prvním použitím
Ujistěte se, že při přepravě nevznikla žádná poškození.
Odstraňte všechny obaly a uchovávejte je mimo dosah dětí.
Před instalací spotřebiče počkejte alespoň 2 hodiny, aby byl chladicí okruh plně
účinný.
Se spotřebičem manipulujte vždy s nejméně dvěma osobami, protože je těžký.
Instalace
Spotřebič by měl být umístěn na dobře větraném místě. Nad spotřebičem a kolem
něj zajistěte prostor nejméně 5 cm.
VAROVÁNÍ! Udržujte větrací otvory na spotřebiči nebo vestavěné konstrukci bez
překážek.
Nikdy neumisťujte spotřebič do vlhkého prostředí nebo na místo, kde by mohl být
postříkán vodou. Vyčistěte a osušte postřiky vody a skvrny měkkým čistým
hadříkem.
Spotřebič neinstalujte na přímé sluneční světlo nebo v blízkosti zdrojů tepla (např.
kamna, topná tělesa).
Spotřebič nainstalujte a vyrovnejte v prostoru vhodném pro jeho velikost a použití.
Ujistěte se, že elektrické informace na jmenovitém štítku odpovídají zdroji
napájení. Pokud tomu tak není, obraťte se na elektrikáře.
Spotřebič je napájen napájecím zdrojem 220–240 V střídavého proudu/50 Hz.
Abnormální kolísání napětí může způsobit spuštění spotřebiče, poškození
regulátoru teploty nebo kompresoru, nebo může dojít k abnormálnímu hluku při
provozu. V takovém případě musí být namontován automatický regulátor.
Nepoužívejte adaptéry a prodlužovací kabely s více zásuvkami.
VAROVÁNÍ! V zadní části spotřebiče neumisťujte vícenásobné přenosné
prodlužovací zásuvky ani přenosné napájecí zdroje.
VAROVÁNÍ! Při umístění spotřebiče se ujistěte, že napájecí kabel není zachycen
nebo poškozen.
Nešlapejte na napájecí kabel.
Ujistěte se, že napájecí kabel není zachycen v mrazničce.
Nezakrývejte větrací otvory.
Pro snadný přístup ke zdroji napájení použijte samostatnou uzemněnou zásuvku.
Spotřebič musí být uzemněn.
CZ
4
Page 34
CZ
1 – Bezpečnost
VAROVÁNÍ!
VAROVÁNÍ! Nesmí dojít k poškození chladicího okruhu.
Denní používání
Tento spotřebič smějí používat děti starší 8 let a osoby se sníženými
fyzickými, smyslovými nebo duševními schopnostmi nebo bez patřičných
zkušeností a znalostí, pokud jsou pod dohledem osoby odpovědné za jejich
bezpečnost, případně byly poučeny o bezpečném používání spotřebiče a
rozumějí možným nebezpečím.
Děti si se spotřebičem nesmějí hrát.
Vkládat potraviny do chladicího spotřebiče a vyjímat je ven mohou děti ve
věku od 3 do 8 let, ale nesmí čistit a instalovat chladicí spotřebiče.
Udržujte spotřebič mimo dosah dětí do 3 let, pokud nejsou pod neustálým
dohledem.
Děti nesmějí bez dozoru dospělých spotřebič čistit, ani provádět činnosti
údržby.
Spotřebič musí být umístěn tak, aby zástrčka byla přístupná. Pokud do
blízkosti spotřebiče uniká svítiplyn nebo jiný hořlavý plyn, vypněte ventil
unikajícího plynu, otevřete dvířka a okna a neodpojujte napájecí kabel
mrazničky ani jiného spotřebiče.
Všimněte si, že spotřebič je nastaven pro provoz ve specifickém rozsahu
okolního prostředí mezi 10 a 43 °C. Spotřebič nemusí správně fungovat,
pokud byl delší dobu ponechán při teplotě vyšší nebo nižší, než je uvedený
rozsah.
Na mrazničku neukládejte nestabilní předměty (těžké předměty, nádoby
naplněné vodou), aby nedošlo ke zranění osob způsobenému jejich pádem
nebo úrazem elektrickým proudem po kontaktu s vodou.
Neskladujte ani nepoužívejte hořlavé, výbušné nebo korozivní materiály ve
spotřebiči nebo v jeho blízkosti.
Nezvedejte spotřebič za madla.
Při stěhování nikdy neumisťujte spotřebič vodorovně na zem. Před každou
operací nejprve odpojte spotřebič od sítě.
Nenaklánějte spotřebič o více než 45°, abyste zabránili poškození chladicího
systému při stěhování spotřebiče.
V případě výpadku napájení nebo před čištěním spotřebič odpojte. Před
opětovným spuštěním spotřebiče počkejte nejméně 7 minut, protože časté
spouštění může poškodit kompresor.
Zkontrolujte stav potravin, pokud došlo ke zvýšení teploty v mrazničce.
5
Page 35

1 – Bezpečnost
CZ
VAROVÁNÍ!
Netahejte za poličky dvířek. Dvířka mohou být vytaženy šikmo, poličky dvířek
mohou být vytaženy, nebo se spotřebič může převrátit.
Dvířka otevírejte a zavírejte pouze pomocí madel. Mezera mezi dvířky a skříní
je velmi úzká. Nevkládejte ruce do těchto oblastí, aby nedošlo k sevření prstů.
Dvířka spotřebiče otevírejte nebo zavírejte pouze tehdy, pokud v dosahu
pohybu dvířek nejsou žádné děti.
VAROVÁNÍ! Nepoužívejte elektrická zařízení v odkládacích prostorách
spotřebiče, pokud nejsou typu doporučeného výrobcem.
VAROVÁNÍ! Lampy může vyměnit pouze výrobce společně s částí
spotřebiče.
VAROVÁNÍ! Pokud si nejste jisti typem chladiva, zkontrolujte štítek v
jednotce. Údržba tohoto spotřebiče je nebezpečná pro jakoukoliv jinou
osobu než autorizovaného servisního technika. V Queenslandu musí být
autorizovaný servisní technik držitelem povolení k práci s plynem pro
uhlovodíková chladiva, aby mohl provádět servis nebo opravy, které zahrnují
odstranění krytů.
6
Page 36

CZ
1 – Bezpečnost
VAROVÁNÍ!
Údržba/čištění
Pokud čištění a údržbu provádějí děti, ujistěte se, že jsou pod dozorem.
Před prováděním jakékoli běžné údržby odpojte spotřebič od elektrické sítě.
Před opětovným spuštěním spotřebiče počkejte nejméně 7 minut, protože
časté spouštění může poškodit kompresor.
Při odpojování spotřebiče držte zástrčku, nikoli kabel.
Nečistěte spotřebič tvrdými kartáči, drátěnými kartáči, čisticími prášky,
organickými roztoky jako například benzínem, amylacetátem, acetonem a
podobně, kyselými nebo alkalickými roztoky. Čištění provádějte pomocí
speciálního mycího prostředku na mrazničky, aby se předešlo poškození.
Neseškrabávejte námrazu a led ostrými předměty. Nepoužívejte spreje,
elektrické ohřívače, jako je topení, vysoušeč vlasů, parní čističe ani jiné zdroje
tepla, aby nedošlo k poškození plastových dílů.
VAROVÁNÍ! Nepoužívejte mechanické nástroje nebo jiné prostředky k
urychlení procesu odmrazování, pokud nejsou doporučeny výrobcem.
Jestliže je poškozený napájecí kabel, smí ho vyměnit pouze výrobce, servisní
technik nebo osoba s podobnou příslušnou kvalifikací, jinak by mohlo dojít k
úrazu.
Nepokoušejte se spotřebič opravovat, rozebírat ani upravovat sami. V
případě, že je nutná oprava, obraťte se na náš zákaznický servis.
Alespoň jednou za rok odstraňte prach na zadní straně jednotky, aby se
předešlo nebezpečí požáru a zvýšené spotřebě energie.
Spotřebič během čištění nepostřikujte ani nevyplachujte.
Při čištění spotřebiče nepoužívejte vodní sprej ani páru.
Studené skleněné police ani skleněné dvířka nečistěte horkou vodou. Náhlá
změna teploty může způsobit rozbití skla.
Před čištěním spotřebič odpojte od napájecího zdroje.
V případě zahřívání zkontrolujte stav zmrazeného zboží.
Před údržbou spotřebič deaktivujte a odpojte síťovou zástrčku od síťové
zásuvky.
Elektrická zařízení by měla být servisována pouze kvalifikovanými
elektrotechnickými odborníky, protože nesprávné opravy mohou způsobit
značné následné škody.
7
Page 37

1 – Bezpečnost
Informace o chladicím plynu
VAROVÁNÍ!
Údržba/čištění
Spotřebič obsahuje hořlavé chladivo ISOBUTAN (R600a). Ujistěte se, že během
přepravy nebo instalace nedošlo k poškození chladicího okruhu. Únik chladiva
může způsobit poranění očí nebo vznícení. Pokud dojde k poškození, držte se
dále od otevřeného ohně, důkladně větrejte místnost, nezapojujte ani
neodpojujte napájecí kabely spotřebiče nebo jiného spotřebiče. Informujte
zákaznický servis.
V případě kontaktu očí s chladivem jej okamžitě vypláchněte pod tekoucí vodou
a zavolejte očního lékaře.
VAROVÁNÍ! Chladicí systém je pod vysokým tlakem. Do spotřebiče nikdy
nezasahujte. Vzhledem k tomu, že spotřebič používá hořlavá chladiva,
provádějte instalaci, manipulaci a servis přísně v souladu s návodem a v případě
likvidace spotřebiče se obraťte na odborníka nebo na náš poprodejní servis.
CZ
VAROVÁNÍ!
Dbejte opatrnosti, aby zapálením hořlavého materiálu nedošlo k požáru.
VAROVÁNÍ! Při umisťování spotřebiče se ujistěte, že nedošlo k zachycení
ani poškození napájecího kabelu.
VAROVÁNÍ! V zadní části spotřebiče neumisťujte vícenásobné přenosné
prodlužovací zásuvky ani přenosné napájecí zdroje.
V tomto spotřebiči neskladujte výbušné látky, jako jsou aerosolové nádoby s
hořlavou podpůrnou látkou.
Pokud se v mrazničce používají hořlavá chladiva, buďte při instalaci,
manipulaci, podávání a recyklaci spotřebiče opatrní.
Pro likvidaci spotřebiče kontaktujte servisního zástupce, protože byl použit
hořlavý ventilační plyn.
8
Page 38

Zamýšlené použití
CZ
Spotřebič je určen k použití v domácnosti a v podobných prostředích, například
v kuchyňských prostorách pro zaměstnance v obchodech, kancelářích a
jiných pracovních prostředích;
v zemědělských domech a místnostech klientů v hotelech, motelech a
jiných obytných prostředích;
v prostředích pro nocleh se snídaní;
ve stravovacích a podobných zařízeních mimo maloobchod.
Pokud spotřebič není používán delší dobu.
Vyndejte jídlo.
Odpojte napájecí kabel.
Vyčistěte spotřebič, jak je popsáno výše.
Ponechejte dvířka otevřená, abyste zabránili vytváření nepříjemných
pachů uvnitř.
Dodržujte prosím tento návod k použití, aby se zajistilo bezpečné uchování
potravin.
V následující části jsou uvedeny podrobnosti o nejvhodnějším oddílu v
prostoru spotřebiče, kde by se měly skladovat určité druhy potravin, s
přihlédnutím k možnému rozložení teplot v různých oddílech spotřebiče, jsou
uvedeny v další části návodu k obsluze.
Dodržujte prosím následující pokyny, aby se zabránilo kontaminaci potravin:
Otevírání dvířek na dlouhou dobu může v oddílech spotřebiče způsobit
výrazné zvýšení teploty.
Pravidelně čistěte povrchy, které mohou přijít do styku s potravinami, a
přístupné odvodňovací systémy.
1 – Bezpečnost
9
Page 39
1 – Bezpečnost
Pokud je skříňová chladnička po delší dobu ponechán prázdný, vypněte jej,
odmrazte, vyčistěte, vysušte a nechte dvířka otevřená, aby se zabránilo
tvorbě plísní uvnitř spotřebiče.
CZ
Likvidace
Symbol na obalu a jeho balení udává, že tento výrobek nepatří do domácího
odpadu. Místo toho je nutné jej odvézt do příslušného sběrného místa pro
recyklaci elektrického a elektronického zařízení. Zajištěním správné likvidace
tohoto výrobku pomůžete zabránit případným negativním důsledkům na životní
prostředí a lidské zdraví, k nimž by jinak došlo nevhodnou likvidací tohoto
výrobku. Podrobnější informace o recyklaci tohoto výrobku získáte na místním
obecním úřadu, středisku pro likvidaci domovního odpadu nebo v obchodě, kde
jste tento výrobek zakoupili.
Vzhledem k tomu, že spotřebič používá hořlavé izolační ventilační plyny, v
případě likvidace spotřebiče se obraťte na odborníka nebo na náš poprodejní
servis.
VAROVÁNÍ!
Nebezpečí udušení!
Chladiva a plyny musí být odborně zlikvidovány. Před řádnou likvidací se ujistěte,
že hadička chladicího okruhu není poškozena. Odpojte spotřebič od elektrické
sítě. Odřízněte síťový kabel a zlikvidujte jej. Vyjměte zásobníky a zásuvky, jakož i
západku dvířek a těsnění, abyste zabránili zavření dětí a domácích zvířat ve
spotřebiči.
10
Page 40
CZ
2.2
2 – Určené použití
2.1 Určené použití
Spotřebič je určen k použití v domácnosti a v podobných prostředích, například
v kuchyňských prostorách pro zaměstnance v obchodech, kancelářích a jiných
pracovních prostředích;
v zemědělských domech a místnostech klientů v hotelech, motelech a jiných obytných
prostředích;
v prostředích pro nocleh se snídaní;
ve stravovacích a podobných zařízeních mimo maloobchod.
Tento spotřebič je určen pro skladování čerstvých potravin. Byl navržen výhradně pro použití
v suchých vnitřních domácnostech. Není určen pro komerční nebo průmyslové použití.
Změna nebo úprava zařízení není povolena. Nezamýšlené použití může způsobit nebezpečí a
ztrátu práv na reklamace ze záruky.
2.2 Příslušenství
Zkontrolujte příslušenství a literaturu podle tohoto seznamu:
Záruční list Návod k obsluze
Horní levý koncový kryt
lišty
Horní pravý pant pro
obrácení dvířek
Kryt horního pravého
pantu
Kryty os
11
Page 41

3 – Popis produktu
CZ
Poznámka: Rozdíl
Kvůli technickým změnám a různým modelům se některé ilustrace v tomto
návodu mohou lišit od vašeho modelu.
1
2
3
4
5
1 LED kontrolka 6 Nastavitelné police dvířek
2 Kryt vzduchového potrubí 7 Výkonový štítek
3 Skleněné police 8 Klika
4 Mrazicí úložné zásobníky
5 Seřiditelné nožičky
6
7
8
12
Page 42

CZ
4 – Použití
4.1 Před prvním použitím
Odstraňte všechny obalové materiály, uchovávejte je mimo dosah dětí a zlikvidujte je
způsobem šetrným k životnímu prostředí.
Před vložením potravin do spotřebiče vyčistěte vnitřek i vnějšek spotřebiče vodou a
jemným čisticím prostředkem.
Po vyrovnání a vyčištění spotřebiče počkejte nejméně 2 hodiny, než jej připojíte ke
zdroji napájení. Viz pokyny v části INSTALACE.
Před vložením potravin předchlaďte oddíl 2 hodiny při vysokém nastavení. Funkce
Super chlazení pomáhá rychle ochladit oddíl.
Rů zné potraviny by měly být umístěny v
různých oblastech podle jejich vlastností (obr.
2
1
4.1).
1 Nakládané potraviny, konzervované
potraviny, ovoce, zelenina, salát atd.
2 Vejce, konzervy, koření, nápoje a balené
potraviny atd.
3 Masné výrobky, občerstvení atd.
3
4.2 Zapnutí/vypnutí spotřebiče
Spotřebič je v provozu ihned po připojení ke zdroji napájení.
Teplota chladničky se automaticky nastaví na 4 °C. Jedná se o doporučené nastavení
a ideální teplotu pro skladování čerstvého zboží. V případě potřeby můžete teplotu
ručně změnit. Viz NASTAVENÍ TEPLOTY
Poznámka: Předvolená nastavení
1. Spotřebič je nastaven na doporučenou teplotu 4 °C. Za normálních okolních
podmínek nemusíte měnit teplotu.
2. Pokud je spotřebič po odpojení od hlavního napájecího zdroje zapnut, může trvat až
12 hodin, než bude dosažena správná teplota.
Před vypnutím spotřebiče jej vyprázdněte. Chcete-li spotřebič vypnout, vytáhněte
napájecí kabel ze zásuvky.
4.3 Pohotovostní režim displeje
Po zavření dvířek se obrazovka displeje automaticky vypne po 30 vteřinách bez provedení
akce. Displej se automaticky uzamkne. Automaticky se rozsvítí při stisknutí libovolného
tlačítka nebo otevření dvířek.
13
Page 43

4 – Použití
CZ
4.4 Ovládací panel (obr. 4)
Popis ikon
a: Symbol zobrazení teploty
Ikona Super chlazení
b:
c: Ikona denní funkce
d: Ikona Dovolená
e: Ikona Automatické nastavení
f: Ikona zámku
Popis tlačítek
A: Tlačítko nastavení snížení teploty: Stiskněte pro snížení teploty
B: Tlačítko Super mrazení: Stisknutím aktivujete funkci Super chlazení
C: Tlačítko denní funkce: Stisknutím aktivujete denní funkce
D: Tlačítko Dovolená: Stiskněte pro aktivace funkce Dovolená
E: Tlačítko Au tomatické nastavení: Stisknutím aktivujete funkci Automatické nastavení
F: Tlačítko Zámek: Stisknutím a podržením na 3 sekundy uzamknete nebo odemknete
G: Tlačítko nastavení zvýšení teploty: Stiskněte pro zvýšení teploty
4.5 Uza mčení a odemknutí displeje
Automati cké uzamknutí
Ovládací panel může automaticky vstoupit do funkce uzamčení. Displej se automaticky
uzamkne po 30 sekundách bez provedení akce.
Ruční uzam knutí
Po odemčení displeje stiskněte tlačítko „Zámek“ (F) a podržte jej 3 sekundy po pípnutí,
ikona „Zámek“ (f) svítí, displej je uzamčen. Je-li displej uzamčen, stiskněte tlačítko „Zámek“
(F)a podržte jej 3 sekundy, po pípnutí se ikona „Zámek“ (f) vypne a displej se odemkne.
Poznámka: Uzamčení displeje
Je-li displej uzamčen, funkce, jako je nastavení teploty nebo nastavení funkce, jsou
zakázány. Při pokusu o výše uvedenou operaci ikona „Zámek“ (f) 3krát blikne, aby
připomněla, že displej je uzamčený.
14
Page 44

CZ
4 – Použití
4.6 Nastavení teploty
Rozsah teplot této chladničky lze nastavit v rozmezí 2 °C ~ 8 °C.
Je-li displej odemčen, stiskněte při denní funkci tlačítko „Snižování nastavení teploty“ (A),
po pípnutí začne blikat symbol „Zobrazení teploty“ (a) a displej přejde do režimu
nastavení teploty. Pokaždé, když stisknete tlačítko „Snižování teploty“ (A), zazní bzučák a
teplota se sníží o 1 °C a minimální teplota je 2 °C. Je-li teplota nastavena, symbol
„Zobrazení teploty” (a) přestane blikat po 5 sekundách bez provedení akce. Je-li displej
odemčen, stiskněte při denní funkci tlačítko „Zvýšení nastavení teploty“ (G), po pípnutí
začne blikat symbol „Zobrazení teploty“ (a) a displej přejde do režimu nastavení teploty a
pokaždé, když stisknete tlačítko „Zvýšení nastavení teploty“ (G), zazní bzučák, teplota se
zvýší o 1 °C a maximální teplota je 8 °C. Je-li nastavena teplota, symbol „Zobrazení
teploty“ (a) přestane blikat po 5 sekundách bez provedení akce.
4.7 Denní funkce (C)
Jakmile je spotřebič poprvé připojen k napájecímu zdroji, je v denní funkci a rozsvítí se
ikona „Denní“ (c). Teplotu lze nastavit pouze za této funkce.
4.8 Funkce Super mrazení (B)
Když je displej odemčen, stisknutím tlačítka „Super chlazení“ (B) se rozsvítí ikona Super
chlazení (b), chladnička pracuje v režimu Super chlazení. Chcete-li funkci Super chlazení
ručně ukončit, opakujte výše uvedené kroky. Pokud tuto funkci neukončíte ručně, funkce
se automaticky ukončí po 3 hodinách.
V režimu Super chlazení pracuje chladnička s nastavenou teplotou 2 °C, dokud nedokončí
cyklus Super chlazení (3 hodiny).
V rámci funkce Automatické nastavení pracuje chladnička při nastavení 4 °C.
Poznámka: Super chlazení
1. V režimu Super chlazení nelze nastavit teplotu. Pokud tak učiníte, ikona Super
chlazení 3krát blikne, aby vám připomněla, že chladnička je v režimu Super chlazení.
2. V režimu Super chlazení, je-li nastavena funkce Automatické nastavení nebo
Dovolená, se ikona Super chlazení (b) vypne, funkce Super chlazení se automaticky
ukončí a zapne se funkce Automatické nastavení nebo Dovolená.
4.9 Funkce Dovolená (D)
Je-li displej odemčen, stisknutím tlačítka „Dovolená“ (D) se rozsvítí ikona Dovolená (d),
chladnička pracuje ve funkci Dovolená. V režimu Dovolená stisknutím tlačítka „Dovolená“
(D) se ikona Dovolená (d) vypne a chladnička ukončí funkci Dovolená. V režimu Dovolená
se teplota automaticky nastaví na 17 °C, takže vaše chladnička nebude generovat zápach
a bude také šetřit energii.
15
Page 45

4 – Použití
Poznámka: Funkce Dovolená
1. V režimu Dovolená nelze upravit teplotu. Pokud tak učiníte, ikona Dovolená 3krát blikne,
aby vám připomněla, že mraznička je v režimu Dovolená.
2. V režimu Dovolená, pokud je nastavena funkce Automatické nastavení, Denní nebo Super
mrazení, se ikona Dovolená (d) vypne, funkce Dovolená se automaticky ukončí a přejde do
funkce Automatické nastavení, Denní nebo Super mrazení.
CZ
4.10 Funkce Automatické nastavení (E)
Je-li displej odemčen, stisknutím tlačítka „Automatické nastavení“ (E) se rozsvítí ikona
„Automatické nastavení“ (e), mraznička pracuje ve funkci Automatické nastavení. V režimu
automatického nastavení se stisknutím tlačítka „Automatické nastavení“ (E) ikona (e) vypne a
mraznička opustí funkci Automatického nastavení.
V rámci funkce Automatické nastavení pracuje mraznička při teplotě -18 °C.
Poznámka: Funkce Automatické nastavení
1. V režimu Automatické nastavení nelze upravit teplotu. Pokud tak učiníte, ikona
Automatické nastavení 3krát blikne, aby připomněla, že mraznička je v režimu Automatické
nastavení.
2. Je-li v režimu Automatické nastavení nastavena funkce Dovolená, Denní nebo Super
mrazení, ikona Automatické nastavení (e) se vypne a funkce Automatické nastavení se
automaticky ukončí a přejde do funkce Dovolená, Denní nebo Super mrazení.
4.11 Funkce ovládání displeje
Po zavření dvířek se obrazovka displeje automaticky vypne po 30 vteřinách bez provedení akce.
Displej se automaticky uzamkne. Automaticky se rozsvítí, když se dotknete jakéhokoli tlačítka
nebo otevřete dvířka.
4.12 Paměť pro výpadek napájení
Tato mraznička má paměť pro výpadek napájení, nastavení před vypnutím se uloží v paměti.
Když se napájení obnoví, mraznička se vrátí do nastavení před vypnutím a bude nadále fungovat.
Zámek není uložen v paměti, po opětovném zapnutí napájení je displej odemčen.
4.13 Alarm otevřených dvířek
Pokud zůstane mraznička otevřená déle než 1 minutu, bzučák vydá 3 pípnutí v intervalu
0,5 sekundy. Pípnutí se opakuje každých 30 sekund, pokud zůstanou dvířka otevřená. Pípnutí
přestane po zavření dvířek nebo po 7 minutách od otevření dvířek. Bzučák přestane pípat a
osvětlení mrazničky zhasne.
4.14 Indikace chyby
Když symbol displeje zobrazuje E1, E2 a další kódy a bliká, znamená to, že mraznička má
poruchu. V této situaci by mraznička stále mohla zmrazit potraviny, ale uživatel by měl co
nejdříve kontaktovat servis pro optimální ovládání mrazničky.
16
Page 46

CZ
4 – Použití
4.16 Tipy na úsporu energie
Ujistěte se, že je spotřebič řádně větrán (viz INSTALACE).
Spotřebič neinstalujte na přímé sluneční světlo nebo v blízkosti zdrojů tepla
(např. kamna, topná tělesa).
Vyvarujte se zbytečně nízké teplotě ve spotřebiči. Spotřeba energie se zvyšuje,
čím nižší je ve spotřebiči teplota nastavena.
Před vložením do spotřebiče nechte teplé potraviny vychladnout.
Dvířka spotřebiče otevřete co nejméně a co nejkratší.
Ujistěte se, že se dvířka vždy zavírají správně a bez ovlivnění polohou potravin.
Těsnění dvířek udržujte v čistotě.
Zmrazené potraviny rozmrazujte v chladnici.
Pravidelně čistěte zadní část spotřebiče. Prach zvyšuje spotřebu energie.
Energeticky nejúspornější konfigurace vyžaduje, aby byly zásuvky, boxy na
potraviny a police spotřebiče v bezchybném stavu. Potraviny by měly být co
nejdále, aniž by byl zablokován výstup vzduchu z potrubí.
5 – Vybavení
5.1 Vyjímatelné police dvířek
Police dvířek lze vyjmout za účelem čištění.
Položte ruce na každou stranu police, zvedněte ji nahoru (1) a
vytáhněte (2) (obr. 5.1).
Pro zasunutí police dvířek se výše uvedené kroky provádějí v
opačném pořadí.
5.2 Skleněné police
1. Chcete-li polici vybrat, vyjměte ji nejprve zvednutím zadního
okraje (1) a vytažením (2) (obr. 5.2).
2. Chcete-li ji znovu nainstalovat, položte ji na výstupky na
obou stranách a zatlačte ji do nejzadnější polohy, dokud
nebude zadní část police upevněna v otvorech po stranách.
17
Page 47

6 – Péče a čištění
CZ
6.1 Obecné informace
Spotřebič vyčistěte, pokud skladujete jen málo potravin nebo žádné potraviny, a poté jej
odpojte.
Vždy udržujte těsnění dvířek čisté.
Vnitřní část a plášť spotřebiče očistěte houbou
navlhčenou v teplé vodě s neutrálním čisticím
prostředkem.
1. Vnitřní i vnější část mrazničky, včetně těsnění
dvířek, stojanu na dvířka, skleněných polic,
přihrádek atd., otřete měkkou utěrkou nebo
houbou namočenou v teplé vodě (do teplé
vody můžete přidat neutrální čisticí prostředek).
2. Pokud dojde k rozlití kapaliny, odstraňte všechny kontaminované části, přímo je
opláchněte tekoucí vodou, osušte a vložte je zpět do mrazničky.
3. Pokud dojde k rozlití smetany (jako je smetana, tající zmrzlina), vyjměte všechny
kontaminované části, vložte je na nějakou dobu do teplé vody o teplotě přibližně
40 °C, poté je opláchněte tekoucí vodou, osušte a vložte zpět do mrazničky.
4. V případě, že se uvnitř mrazničky zasekne nějaká malá část nebo komponent (mezi
policemi nebo úložnými zásobníky), použijte malý měkký kartáček, abyste ji
uvolnili. Pokud jste se k součásti nedostali, obraťte se prosím na servis Haier.
18
Page 48
6.2 Vypnutí na delší dobu
6.3 Přesun spotřebiče
CZ
Pokud spotřebič není používán delší dobu:
Vyndejte jídlo.
Odpojte napájecí kabel.
Vyčistěte spotřebič, jak je popsáno výše.
Ponechejte dvířka a úložné zásobníky mrazničky otevřené, abyste zabránili vytváření
nepříjemných pachů uvnitř.
Demontujte dvířka spotřebiče (otevřete dvířka a podržte je před vyjmutím šroubů), aby se
zabránilo vstupu dětí do spotřebiče a jejich uzamčení.
Poznámka: Vypnutí
Aby byla zajištěna životnost spotřebiče, vypínejte jej, pouze pokud je to nezbytně nutné.
1. Vyjměte ze spotřebiče veškeré potraviny a odpojte jej.
2. Zajistěte poličky a další pohyblivé části v mrazničce lepicí páskou.
3. Zavřete dvířka a zajistěte je páskou.
4. Nenakloňte mrazničku o více než 45°, aby nedošlo k poškození chladicího systému.
5. Obalte nožičky mrazničky, aby nedošlo k poškrábání podlahy. Nikdy nepřesouvejte
mrazničku násilně.
6 – Péče a čištění
19
Page 49

7 – Řešení problémů
Kompresor nefunguje.
V síťové zásuvce není připojena
Spotřebič běží často
nebo příliš dlouhou
Vnitřní nebo venkovní teplota je
V tomto případě je běžné, aby
Spotřebič je po určitou dobu
Obvykle trvá 8 až 12 hodin, než se
Dvířka spotřebiče nejsou těsně
Zavřete dvířka a ujistěte se, že je
spotřebič umístěn na rovné zemi a
že na dvířkách nejsou žádné
Dvířka byla otevírána příliš často
Nastavte vyšší teplotu, dokud
hnete uspokojivé teploty.
Trvá 24 hodin, než se teplota
Těsnění dvířek je špinavé,
opotřebované, prasklé nebo
Vyčistěte těsnění dvířek nebo jej
nechte vyměnit u zákaznického
Požadovaná cirkulace vzduchu
Spotřebič vydává
Spotřebič není položen na rovném
Spotřebič se dotýká předmětu v
Odstraňte předměty kolem
Spotřebič stojí na dřevěné podlaze
Dřevo zesiluje zvuk. Postavte
Spotřebič vydává zvuk
To je běžné. Je způsobeno
zapínáním nebo vypínáním
Je třeba slyšet slabý
zvuk podobný zvuku
CZ
Mnoho vyskytujících se problémů můžete vyřešit sami bez konkrétních odborných znalostí.
V případě problému zkontrolujte prosím všechny zobrazené možnosti a před kontaktováním
poprodejního servisu postupujte podle níže uvedených pokynů.
Akustický alarm lze vypnout stisknutím libovolného tlačítka.
7.1 Řešení problémů
Problém Možná příčina Možné řešení
dobu.
síťová zástrčka.
příliš vysoká.
vypnutý.
uzavřena.
nebo na příliš dlouhou dobu.
Nastavení teploty je příliš nízké.
Připojte síťovou zástrčku.
spotřebič pracoval déle.
spotřebič zcela zchladí.
potraviny ani nádoby.
Neotvírejte dvířka příliš často.
nedosá
ustálí.
mimo polohy.
není zaručena.
Interiér je pokryt ledem.
abnormální zvuky.
cvakání
tekoucí vody.
povrchu.
jeho blízkosti.
nebo v blízkosti dřevěných stěn.
chladicí jednotky.
To je běžné.
20
servisu.
Zajistěte dostatečnou ventilací.
Rozmrazte spotřebič.
Vyrovnejte spotřebič.
spotřebiče.
spotřebič na jiné místo.
Page 50

Spotřebič vydává zvuk
Chlazení se právě samo zapnulo.
V
spotřebiči není
Teplota je nastavena příliš
Bylo uloženo příliš mnoho
Před uskladněním zboží vždy
Bylo uskladněno zboží, které je
množství
Ponechte mezeru mezi několika
potravinami umožňující proudění
Dvířka byla otevírána příliš často
V spotřebiči je příliš
Funkce Super mrazení je
aktivována nebo běží příliš
Na povrchu spotřebiče
To je běžné ve vlhkém podnebí a
změní se to, když vlhkost klesne.
CZ
7 – Řešení problémů
Problém Možná příčina Možné řešení
motoru.
dostatečný chlad.
To je normální.
vysoko.
Resetujte teplotu.
chladno.
se hromadí vlhkost.
Chladicí systém
nefunguje.
Boky skříně a lišty dvířek
se zahřívají.
Slyšíte signál alarmu.
potravin najednou.
příliš teplé.
Zboží je příliš blízko sebe.
Dvířka nejsou těsně zavřená.
nebo na příliš dlouhou dobu.
Teplota je nastavena příliš nízko.
dlouho.
Klima je příliš teplé a vlhké.
Síťová zástrčka není připojena k
síťové zásuvce.
Napájení je poškozené. Zkontrolujte napájení místnosti.
To je běžné.
Dvířka jsou otevřená.
Teplota uvnitř spotřebiče je
příliš vysoká.
ochlaďte.
Vždy skladujte malé
potravin.
vzduchu.
Zavřete dvířka.
Neotvírejte dvířka příliš často.
Resetujte teplotu.
Funkce Super mrazení.
Utřete ji hadříkem.
Připojte síťovou zástrčku.
Zavolejte místnímu dodavateli
elektrické energie!
Zavřete dvířka nebo ručně ztište
alarm.
Problém Možná příčina Možné řešení
Dvířka se těžko otevírají.
Dvířka nemohou být
správně zavřená. Vždy
po tom zůstane mezera.
Jakmile spotřebič běží, uvnitř se
vytvoří podtlak.
Vzhledem k nízké teplotě
spotřebičů může těsnění dvířek
snadno ztvrdnout a
zdeformovat.
Opatrně odchylte těsnění dvířek,
aby se do spotřebiče dostal
vzduch.
Použijte fén na vlasy nebo položte
horký ručník na místo, kde je
těsnění zdeformované.
Jakmile je těsnění opět měkké,
zavřete dvířka a pevně je přitlačte.
21
Page 51
7 – Řešení problémů
CZ
7.2 Přerušení napájení
V případě výpadku proudu by potraviny měly zůstat bezpečně studené po dobu přibližně
15 hodin. Při dlouhodobém výpadku proudu postupujte podle těchto rad, zejména v létě:
Otevírejte dvířka co nejméně.
Během přerušení napájení nedávejte do mrazničky další potraviny.
Pokud je předem oznámeno přerušení napájení a doba trvání přerušení je delší než 15
hodin, vytvořte led a vložte jej do nádoby v horním oddílu mrazničky.
Vzhledem k tomu, že teplota v mrazničce při přerušení napájení nebo jiném výpadku
vzroste, zkrátí se doba skladování a jedlá kvalita potravin. Veškeré potraviny, které
rozmrazujete, by měly být buď zkonzumovány, nebo uvařeny a brzy poté znovu
zmrazeny (je-li to vhodné), aby se předešlo zdravotním rizikům.
Poznámka: Funkce paměti při výpadku napájení
Po obnovení napájení spotřebič pokračuje s nastaveními, která byla nastavena před
výpadkem napájení.
22
Page 52
8.3 Požadavky na prostor
8.4 Průřezové míry
pro větrání
8.5 Nastavení spotřebiče do roviny
CZ
8 – Instalace
8.1 Vybalení
Vyjměte spotřebič z obalu.
Odstraňte všechny obalové materiály.
8.2 Okolní podmínky
Teplota v místnosti by měla být vždy mezi 18 °C a 43 °C, protože může ovlivnit teplotu uvnitř
spotřebiče a jeho spotřebu energie. Spotřebič neinstalujte bez izolace v blízkosti jiných
spotřebičů vyzařujících teplo (trouby, chladničky).
Požadovaný prostor pro otevření dvířek (obr. 8.1):
Šířka v mm Hloubka v mm
W1 W2 D1 D2 D3
705 1076 603 1243 1327 50
Aby bylo z bezpečnostních důvodů dosaženo
dostatečné větrání spotřebiče, musí být dodrženy
informace o požadovaných průřezových mírách pro
větrání (obr. 8.2).
PRO volně stojící spotřebič: tento chladicí spotřebič
není určen k použití jako vestavěný spotřebič.
Spotřebič by měl být umístěn na rovném a pevném
povrchu. Pokud je spotřebič umístěn na podstavci,
musí být použity silné a ohnivzdorné materiály. Nikdy
nepoužívejte jako podstavec pěnový obalový
materiál.
1. Spotřebič mírně nakloňte dozadu (obr. 8.3).
2. Nastavte nožičky na požadovanou úroveň.
3. Stabilitu lze kontrolovat střídavým nárazem na
úhlopříčky. Mírné kývání by mělo být stejné v
obou směrech. V opačném případě se rám může
deformovat; výsledkem může být případný únik
přes těsnění dvířek. Mírné naklonění k zadní
straně usnadňuje zavírání dvířek.
Vzdálenost od stěny
v mm
D4
23
Page 53

8 – Instalace
8.6 Použití seřiditelných nožiček
8.7 Čekací doba
8.8 Elektrické připojení
Pokud je mraznička nestabilní, lze nastavit nožičky.
Seřiditelné nožičky otáčejte podle směru šipky (obr.
8.4), abyste je otočili nahoru nebo dolů:
Otáčením nožiček ve směru hodinových ručiček
spotřebič zvednete.
Otáčením nožiček proti směru hodinových
ručiček jej snížíte.
Bezúdržbový mazací olej je umístěn v kapsli
kompresoru. Tento olej může vytéct do uzavřeného
potrubního systému během přepravy v šikmé poloze.
Před připojením spotřebiče k napájecímu zdroji
musíte počkat 2 hodiny (obr. 8.5), aby olej stékal zpět
do kapsle.
Před každým připojením zkontrolujte, zda:
zásuvka napájení a pojistky odpovídají jmenovitému štítku,
napájecí zásuvka je uzemněna a není v ní žádný adaptér a prodlužovací kabel s více
zásuvkami,
zástrčka a zásuvka jsou přesně podle standardů.
Připojte zástrčku do správně nainstalované zásuvky pro domácnost.
CZ
24
Page 54
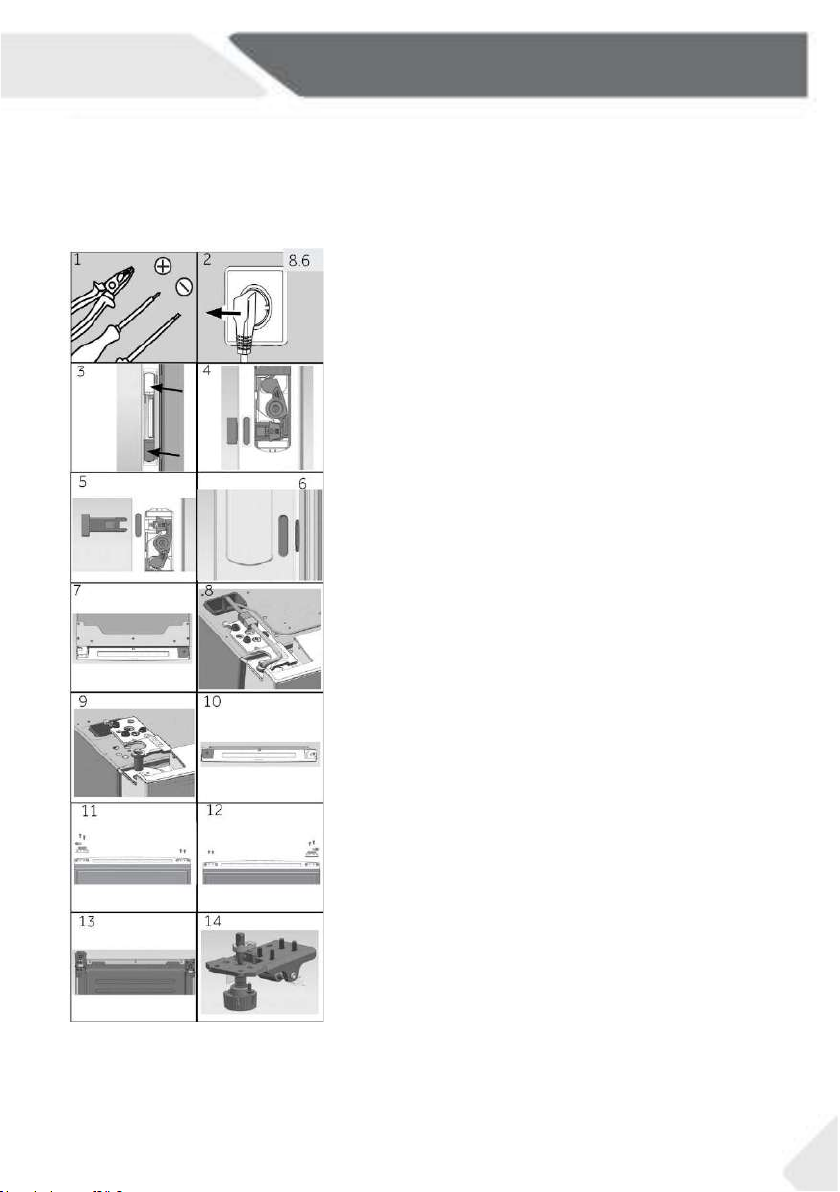
Kroky montáže
CZ
8 – Instalace
8.9 Obrácení dvířek
Před připojením spotřebiče k napájecímu zdroji byste měli zkontrolovat, zda se směr
otevírání dvířek musí měnit zleva (jak je dodáván) doprava, pokud to vyžaduje místo
instalace a použitelnost.
(obr. 8.6)
1. Připravte si potřebné nástroje.
2. Odpojte spotřebič.
3. Otevřete horní a spodní kryt rukojeti na pravé straně
dvířek.
4. Bílý unášeč mírně vypačte.
5. Vyjměte 2 tlačné tyče a nasaďte zpět kryt rukojeti.
6. Odstraňte 2 gumové zátky na levé straně dvířek a
vložte je k odstraněným tlačným tyčím pro krok 20.
7. Odstraňte 7 šroubů a kryt závěsu. Dávejte pozor,
abyste neroztrhli kabel dvířek.
8. Odpojte připojovací kabel.
9. Odstraňte 3 šrouby závěsu a levý horní závěs a
opatrně vyjměte dvířka.
10. Vložte kartonovou krabici nebo látku pod dvířka a
umístěte dvířka ve vodorovné poloze. Demontujte
pravý koncový kryt dvířek, vyjměte levý koncový kryt
z tašky s příslušenstvím. Namontujte jej na levou
horní stranu dvířek.
11. Demontujte 2 šrouby na pravé spodní straně dvířek.
Demontujte 2 šrouby. Uzávěr dvířek a kryt osy na
levé spodní straně dvířek.
12. Vezměte uzávěr dvířek z posledního kroku a pravý
kryt osy z tašky s příslušenstvím, upevněte je pomocí
2 šroubů. Upevněte 2 šrouby i na druhé straně
dvířek.
13. Po umístění hrubších podložek zespodu položte
zadní část skříně dolů. Demontujte 4 šrouby a spodní
závěs.
14. Odšroubujte kryt osy.
25
Page 55

8 – Instalace
15. Vezměte pravý kryt osy z tašky s příslušenstvím.
Upevněte jej šroubem.
16. Po výměně zaměňte polohu náklonové destičky a
spodního závěsu.
17. Demontujte levý malý kryt závěsu a víko závěsu z
krytu závěsu.
18. Zaměňte víko závěsu na druhou stranu a z tašky s
příslušenstvím vyberte pravý malý kryt závěsu.
Nainstalujte jej na kryt závěsu.
19. Namontujte dvířka, nainstalujte levý závěs, zapojte
připojovací kabel a upevněte kryt závěsu pomocí
šroubů.
20. 20. Namontujte demontovanou paličku na levou
stranu dvířek a vložte gumové zátky do otvoru tlačné
tyče rukojeti na pravé straně dvířek.
21. Hotovo.
Minimální záruka je: 2 roky pro země EU, 3 roky pro Turecko, 1 rok pro Spojené království,
1 rok pro Rusko, 3 roky pro Švédsko, 2 roky pro Srbsko, 5 let pro Norsko, 1 rok pro Maroko,
6 měsíců pro Alžírsko, v Tunisku není vyžadována žádná právní záruka.
Termostaty, teplotní senzory, desky plošných spojů a světelné zdroje jsou k dispozici
minimálně po dobu sedmi let od uvedení poslední jednotky modelu na trh. Rukojeti dvířek,
závěsy dvířek, zásobníky a koše po dobu nejméně sedmi let a těsnění dvířek po dobu
nejméně 10 let po uvedení poslední jednotky modelu na trh.
Další informace o výrobku naleznete na
https://eprel.ec.europa.eu/ nebo naskenujte QR kód na energetickém štítku dodaném se
spotřebičem.
Chcete-li kontaktovat technickou podporu, navštivte naše webové stránky:
https://corporate.haier-europe.com/cs/
V sekci „webové stránky“ vyberte značku svého produktu a svou zemi.
Budete přesměrováni na konkrétní webové stránky, kde najdete telefonní číslo a formulář
pro kontaktování technické podpory.
CZ
26
Page 56
CZ
Ochranná známka Haier
Identifikátor modelu H2R465SF
Kategorie modelu skříňová chladnička
Třída energetické účinnosti F
Roční spotřeba energie (kWh/rok)1) 232
9 – Technické údaje
Chlazení skladovacího objemu (L)
Zmrazení skladovacího objemu (L) ****
Hodnocení hvězdičkami ****
Teplota ostatních oddílů > 14 °C nepoužívá se
Systém bez námrazy ano
Bezpečný vápadek proudu (h) 12
Zmrazovací kapacita (kg/24h) 62
Klimatická třída Tento spotřebič je určen k použití při
okolní teplotě mezi 10 °C a 43 °C.
Emise hluku šířeného vzduchem (dB(A)) 38
Typ konstrukce volně stojící
Podrobné specifikace naleznete na štítku a energetickém štítku uvnitř výrobku.
Tento spotřebič je určen k použití při okolní teplotě uvedené níže:
SN +10 °C ~ +32 °C
N +16 °C ~ +32 °C
ST +16 °C ~ +38 °C
T +16 °C ~ +43 °C
463
nepoužívá se
SN-T
27
Page 57

28
H2F385SF
0070516587A
Page 58

Bedienungsanleitung
Kühlschrank
H2R465SF
DE
Page 59

Vielen Dank
DE
Vielen Dank für den Kauf eines Haier-Produktes.
Bitte lesen Sie diese Anleitung sorgfältig durch, bevor Sie dieses Gerät benutzen. Die
Anleitung enthält wichtige Informationen, die Ihnen helfen, das Gerät optimal zu nutzen
und eine sichere und ordnungsgemäße Installation, Nutzung und Wartung zu
gewährleisten.
Bewahren Sie dieses Handbuch an einem geeigneten Ort auf, damit Sie für den sicheren und
ordnungsgemäßen Gebrauch des Geräts immer darin nachschlagen können.
Wenn Sie das Gerät verkaufen, verschenken oder bei einem Umzug zurücklassen, geben Sie
unbedingt auch dieses Handbuch mit, damit sich der neue Besitzer mit dem Gerät und den
Sicherheitshinweisen vertraut machen kann.
WARNUNG: Brandgefahr/brennbare Stoffe. Das Symbol weist darauf hin, dass aufgrund der
Verwendung von brennbaren Materialien eine Brandgefahr besteht. Achten Sie darauf, dass
Sie kein Feuer verursachen, indem Sie brennbare Materialien entzünden.
Hersteller: Qingdao Haier Special Icebox Co., Ltd.
Adresse: Haier Garden, Qianwangang Road,Economic
Entwicklungszone, Qingdao 266555, Shandong, VR China
www.haier.com.au
www.haier.co.nz
2
Page 60

DE
1 - Sicherheit .......................................................................................................................... 4
Inhalt
2 - Bestimmungsgemäße Benutzung
3-Produktbeschreibung ....................................................................................................... 12
4 - Benutzung ....................................................................................................................... 13
5 - Ausstattung ..................................................................................................................... 17
6 - Pflege und Reinigung ...................................................................................................... 18
7 - Fehlerbehebung .............................................................................................................. 20
8-Installation ........................................................................................................................ 23
9 - Technische Daten ........................................................................................................... 27
............................................................................................... 11
3
Page 61

1 - Sicherheit
Schutzkontaktsteckdose. Das Gerät muss geerdet werden.
DE
Lesen Sie vor dem ersten Einschalten des Gerätes die folgenden
Sicherheitshinweise:
WARNUNG!
Vor dem erstmaligen Gebrauch
Stellen Sie sicher, dass keine Transportschäden vorliegen.
Entfernen Sie alle Verpackungen und bewahren Sie sie außerhalb der Reichweite
von Kindern auf.
Warten Sie mindestens 2 Stunden, bevor Sie das Gerät installieren, um
sicherzustellen, dass der Kältemittelkreislauf vollständig effizient ist.
Bewegen Sie das Gerät immer mit mindestens zwei Personen, da es schwer ist.
Montage
Das Gerät sollte an einem gut belüfteten Ort aufgestellt werden. Achten Sie auf einen
Abstand von mindestens 5 cm über und um das Gerät herum.
WARNUNG: Halten Sie Lüftungsöffnungen im Gerät oder in der eingebauten Struktur
frei von Hindernissen.
Stellen Sie das Gerät niemals in einem feuchten Raum oder an einem Ort auf, wo es
Wasserspritzern ausgesetzt sein könnte. Beseitigen und trocknen Sie Wasserspritzer
und Flecken mit einem weichen, sauberen Tuch.
Stellen Sie das Gerät nicht in direktem Sonnenlicht oder in der Nähe von Wärmequellen
auf (z. B. Öfen, Heizungen).
Installieren und nivellieren Sie das Gerät in einem Bereich, der für seine Größe und
Verwendung geeignet ist.
Stellen Sie sicher, dass die elektrischen Angaben auf dem Typenschild mit der
Stromversorgung übereinstimmen. Wenn dies nicht der Fall ist, wenden Sie sich an
einen Elektriker. Das Gerät wird mit einer Stromversorgung von 220-240 VAC/50 Hz
betrieben.
Eine anormale Spannungsschwankung kann dazu führen, dass das Gerät nicht
anspringt, die Temperaturregelung oder der Kompressor beschädigt werden oder ein
ungewöhnliches Betriebsgeräusch auftritt. In diesem Fall ist ein automatischer Regler zu
montieren.
Verwenden Sie keine Multistecker-Adapter und Verlängerungskabel.
WARNUNG: Es dürfen sich keine Mehrfachsteckdosen oder tragbare Netzteile auf der
Rückseite des Geräts befinden.
WARNUNG Achten Sie beim Aufstellen des Gerätes darauf, dass das Netzkabel nicht
eingeklemmt oder beschädigt wird.
Treten Sie nicht auf das Netzkabel.
Vergewissern Sie sich, dass das Netzkabel nicht vom Gefrierschrank eingeklemmt wird.
Belüftungsöffnungen nicht abdecken.
Verwenden Sie für die Stromversorgung eine separate, leicht zugängliche
4
Page 62

Gefrierfach stattgefunden hat.
DE
1 - Sicherheit
WARNUNG!
WARNUNG: Beschädigen Sie keinesfalls den Kühlkreislauf.
Täglicher Gebrauch
Dieses Gerät darf von Kindern ab 8 Jahren und Personen mit eingeschränkten
körperlichen, sensorischen oder geistigen Fähigkeiten oder ohne Erfahrung und
Wissen nur benutzt werden, wenn sie beaufsichtigt werden oder Anweisungen
für den sicheren Gebrauch des Geräts erhalten und die damit verbundenen
Gefahren verstanden haben.
Kinder dürfen keinesfalls mit dem Gerät spielen.
Kinder im Alter von 3 bis 8 Jahren dürfen Kühlgeräte be- und entladen, nicht aber
die Kühlgeräte reinigen und installieren.
Halten Sie Kinder unter 3 Jahren von dem Gerät fern, wenn sie nicht ständig
beaufsichtigt werden.
Kinder dürfen das Gerät nur unter Beaufsichtigung reinigen und instand halten.
Das Gerät muss so aufgestellt werden, dass der Stecker zugänglich ist. Wenn
Kohlegas oder anderes brennbares Gas in die Nähe des Geräts austritt, schalten
Sie das Ventil des austretenden Gases aus, öffnen Sie die Türen und Fenster.
Weder das Netzkabel des Gefrierschranks noch das eines anderen Geräts dürfen
abgetrennt oder angeschlossen werden.
Beachten Sie, dass das Gerät für den Betrieb im spezifischen Umgebungsbereich
zwischen 10 °C und 43 °C eingestellt ist. Das Gerät funktioniert möglicherweise
nicht richtig, wenn es für einen längeren Zeitraum bei einer Temperatur über
oder unter dem angegebenen Bereich belassen wird.
Stellen Sie keine instabilen Gegenstände (schwere Gegenstände, mit Wasser
gefüllte Behälter) auf den Kühl-/Gefrierschrank. So vermeiden Sie Verletzungen
durch Herunterfallen oder elektrische Schläge infolge von Wasserkontakt.
Lagern oder verwenden Sie keine brennbaren, explosiven oder korrosiven
Materialien im Gerät oder in dessen Nähe.
Heben Sie das Gerät nicht an den Griffen an.
Stellen Sie das Gerät niemals waagerecht auf den Boden, wenn Sie es bewegen.
Ziehen Sie vor jeder Inbetriebnahme zuerst den Netzstecker.
Neigen Sie das Gerät nicht um mehr als 45 °, um Schäden am Kühlsystem beim
Bewegen des Gerätes zu vermeiden.
Ziehen Sie bei einem Stromausfall oder vor dem Reinigen den Netzstecker.
Warten Sie vor der Wiederinbetriebnahme des Geräts mindestens 7 Minuten,
da ein zu häufiges Starten den Kompressor beschädigen kann.
Überprüfen Sie den Zustand der Lebensmittel, wenn eine Erwärmung im
5
Page 63

1 - Sicherheit
D
WARNUNG!
Ziehen Sie nicht an den Türfächern. Die Tür könnte schräg gezogen werden, die
Türböden können weggezogen werden, oder das Gerät könnte umkippen.
Öffnen und schließen Sie die Türen nur mit den Griffen. Der Spalt zwischen Tür
und Schrank ist sehr schmal. Halten Sie Ihre Hände nicht in diese Bereiche, um
zu verhindern, dass Ihre Finger eingeklemmt werden. Öffnen oder schließen Sie
die Gerätetüren nur, wenn keine Kinder im Türbewegungsbereich stehen.
WARNUNG: Verwenden Sie – abgesehen von der herstellerseitigen
Empfehlung – keine elektrischen Geräte in den LebensmittelAufbewahrungsfächern des Geräts.
WARNUNG: Die Lampen können nur vom Hersteller zusammen mit einem Teil
des Gerätes ausgetauscht werden.
WARNUNG: Wenn Sie sich bezüglich des Kältemitteltyps nicht sicher sind,
überprüfen Sie das Typenschild im Gerät. Aus Sicherheitsgründen darf dieses
Gerät nur von einem autorisierten Wartungstechniker gewartet werden. In
Queensland – der autorisierte Wartungstechniker MUSS eine
Gasarbeitsgenehmigung für kohlenwasserstoffhaltige Kältemittel besitzen, um
Wartungen oder Reparaturen durchzuführen, die das Entfernen von
Abdeckungen beinhalten.
E
6
Page 64

können.
DE
1 - Sicherheit
WARNUNG!
Wartung / Reinigung
Stellen Sie sicher, dass Kinder bei der Reinigung und Wartung beaufsichtigt
werden.
Trennen Sie das Gerät von der Stromversorgung ab, bevor Sie routinemäßige
Wartungsarbeiten durchführen. Warten Sie vor der Wiederinbetriebnahme des
Geräts mindestens 7 Minuten, da ein zu häufiges Starten den Kompressor
beschädigen kann.
Fassen Sie zum Abtrennen des Netzkabels immer am Stecker an; ziehen Sie nie
am Kabel..
Reinigen Sie das Gerät nicht mit harten Bürsten, Drahtbürsten,
Reinigungsmittelpulver, Benzin, Amylacetat, Aceton und ähnlichen organischen
Lösungen, Säuren oder Laugen. Bitte benutzen Sie einen speziellem Reiniger, um
Beschädigungen zu vermeiden.
Kratzen Sie Frost und Eis nicht mit scharfen Gegenständen ab. Verwenden Sie
keine Sprays, Elektroheizungen, Haartrockner, Dampfreiniger oder andere
Wärmequellen, um Schäden an den Kunststoffteilen zu vermeiden.
WARNUNG: Es dürfen keine anderen als die vom Hersteller empfohlenen Mittel
zur Beschleunigung des Abtauvorgangs verwendet werden.
Ein beschädigtes Netzkabel muss vom Hersteller, dem zugelassenen
Kundendienst oder ähnlichem Fachpersonal ausgewechselt werden, um
Gefahren vorzubeugen.
Versuchen Sie nicht, das Gerät selbst zu reparieren, zu demontieren oder zu
modifizieren. Im Falle einer Reparatur wenden Sie sich bitte an unseren
Kundendienst.
Beseitigen Sie mindestens einmal im Jahr Staubansammlungen auf der Rückseite
des Gerätes, um Brandgefahren und einen erhöhten Energieverbrauch zu
vermeiden.
Besprühen oder spülen Sie das Gerät während des Reinigens nicht.
Verwenden Sie zum Reinigen des Geräts weder Wassersprühstrahl noch Dampf.
Reinigen Sie die kalten Glasböden oder -türen nicht mit heißem Wasser.
Plötzliche Temperaturänderungen können zum Bruch des Glases führen.
Trennen Sie das Gerät vor dem Reinigen von der Stromversorgung ab.
Im Falle einer Erwärmung ist der Zustand tiefgefrorener Waren zu überprüfen.
Schalten Sie das Gerät vor der Wartung aus und ziehen Sie den Netzstecker aus
der Steckdose.
Elektrische Geräte sollten nur von qualifizierten Elektrofachleuten gewartet
werden, da unsachgemäße Reparaturen erhebliche Folgeschäden verursachen
7
Page 65

1 - Sicherheit
Informationen zum Kältemittelgas
WARNUNG!
Wartung / Reinigung
Das Gerät enthält das brennbare Kältemittel ISOBUTAN (R600a). Achten Sie
darauf, dass der Kältemittelkreislauf während des Transports oder der
Installation nicht beschädigt wird. Auslaufendes Kältemittel kann zu
Augenverletzungen oder zur Entzündung führen. Wenn ein Schaden aufgetreten
ist, halten Sie offene Feuerquellen fern, lüften Sie den Raum gründlich, stecken
Sie weder das Netzkabel dieses noch eines anderen Geräts ein oder aus.
Informieren Sie den Kundendienst.
Falls die Augen mit dem Kältemittel in Kontakt kommen, spülen Sie sie sofort
unter fließendem Wasser aus und kontaktieren den Augenarzt.
WARNUNG: Das Kühlsystem steht unter hohem Druck. Nehmen Sie keine
Veränderungen daran vor. Da brennbare Kältemittel verwendet werden,
installieren, behandeln und warten Sie das Gerät bitte strikt nach den
Anweisungen. Wenden Sie sich an den Fachhändler oder unseren Kundendienst,
um das Gerät zu entsorgen.
DE
WARNUNG!
Achten Sie darauf, dass Sie kein Feuer verursachen, indem Sie brennbare
Materialien entzünden.
WARNUNG: Achten Sie bei der Positionierung des Gerätes darauf, dass das
Netzkabel nicht eingeklemmt oder beschädigt ist.
WARNUNG: Es dürfen keine Mehrfachsteckdosen oder tragbare Netzteile
auf der Rückseite des Geräts positioniert werden.
Lagern Sie in diesem Gerät keine explosiven Stoffe wie Spraydosen mit einem
brennbaren Treibmittel.
Da im Gefrierschrank brennbare Kältemittel eingesetzt werden, ist bei der
Montage, Handhabung, Bedienung und Weiterverwertung des Gerätes
Vorsicht geboten.
Bitte wenden Sie sich an den Kundendienst, um das Gerät zu entsorgen, da
brennbares Treibgas verwendet wurde.
8
Page 66

Bestimmungsgemäße Benutzung
DE
Dieses Gerät ist für den Einsatz im Haushalt und ähnliche Anwendungen
vorgesehen, z. B.:
Personalküche in Geschäften, Büros und anderen Arbeitsumgebungen;
Bauernhäuser und von Kunden in Hotels, Motels sowie anderen
Wohnräumen;
Bed & Breakfast;
Catering und ähnliche Anwendungen außerhalb des Einzelhandels.
Wenn das Gerät längere Zeit nicht benutzt wird:
Nehmen Sie die Lebensmittel heraus.
Ziehen Sie den Netzstecker.
Reinigen Sie das Gerät wie oben beschrieben.
Lassen Sie die Türen offen, um die Entstehung von schlechten Gerüchen
im Inneren zu verhindern.
Halten Sie sich bitte an diese Anweisung, um die sichere Aufbewahrung von
Lebensmitteln sicherzustellen.
Die Einzelheiten zu dem am besten geeigneten Abteil im Gerät, in dem
bestimmte Arten von Lebensmitteln gelagert werden sollen, unter
Berücksichtigung der Temperaturverteilung, die in den verschiedenen
Abteilen des Geräts vorhanden sein kann, sind in der Bedienungsanleitung
separat aufgeführt.
Um eine Kontamination von Lebensmitteln zu vermeiden, beachten Sie bitte
die folgenden Anweisungen:
Ein längeres Öffnen der Tür kann zu einem deutlichen
Temperaturanstieg in den Fächern des Gerätes führen.
Reinigen Sie regelmäßig Oberflächen, die mit Lebensmitteln in
Berührung kommen können, sowie zugängliche Drainagesysteme.
1 - Sicherheit
9
Page 67

1 - Sicherheit
Falls das Kühlgerät über einen längeren Zeitraum leer bleibt, schalten Sie
es aus, tauen es ab, reinigen und trocknen es, und lassen dann die Tür
offen, um Schimmelbildung im Gerät zu vermeiden.
DE
Entsorgung
Das Symbol auf dem Produkt oder seiner Verpackung weist darauf hin, dass
dieses Produkt nicht als Haushaltsabfall behandelt werden darf. Bringen Sie es
stattdessen zu einer dafür vorgesehenen Sammelstelle für die
Wiederaufbereitung von Elektro- und Elektronikartikeln. Indem Sie sicherstellen,
dass dieses Produkt korrekt entsorgt wird, tragen Sie dazu bei, potenzielle
negative Folgen für die Umwelt und die menschliche Gesundheit zu vermeiden.
Weitergehende Informationen zur Behandlung, Rückgewinnung und
Wiederaufbereitung erhalten Sie bei den zuständigen Behörden, dem
Abfallbeseitigungsdienstleister oder der Verkaufsstelle.
Da brennbare Treibmittel zur Isolierung verwendet werden, wenden Sie sich
bitte an den Fachhändler oder unseren Kundendienst, um das Gerät zu
entsorgen.
WARNUNG!
Verletzungsgefahr durch Ersticken!
Kältemittel und Gase müssen fachgerecht entsorgt werden. Achten Sie darauf,
dass die Leitungen des Kältemittelkreislaufs unbeschädigt sind, bevor sie
ordnungsgemäß entsorgt werden. Trennen Sie das Gerät vom Netz ab. Trennen
Sie das Netzkabel ab und entsorgen Sie es. Entfernen Sie sowohl die Fächer und
Schubladen als auch die Türverriegelung und die Dichtungen, um zu verhindern,
dass Kinder und Haustiere im Gerät eingeschlossen werden.
10
Page 68
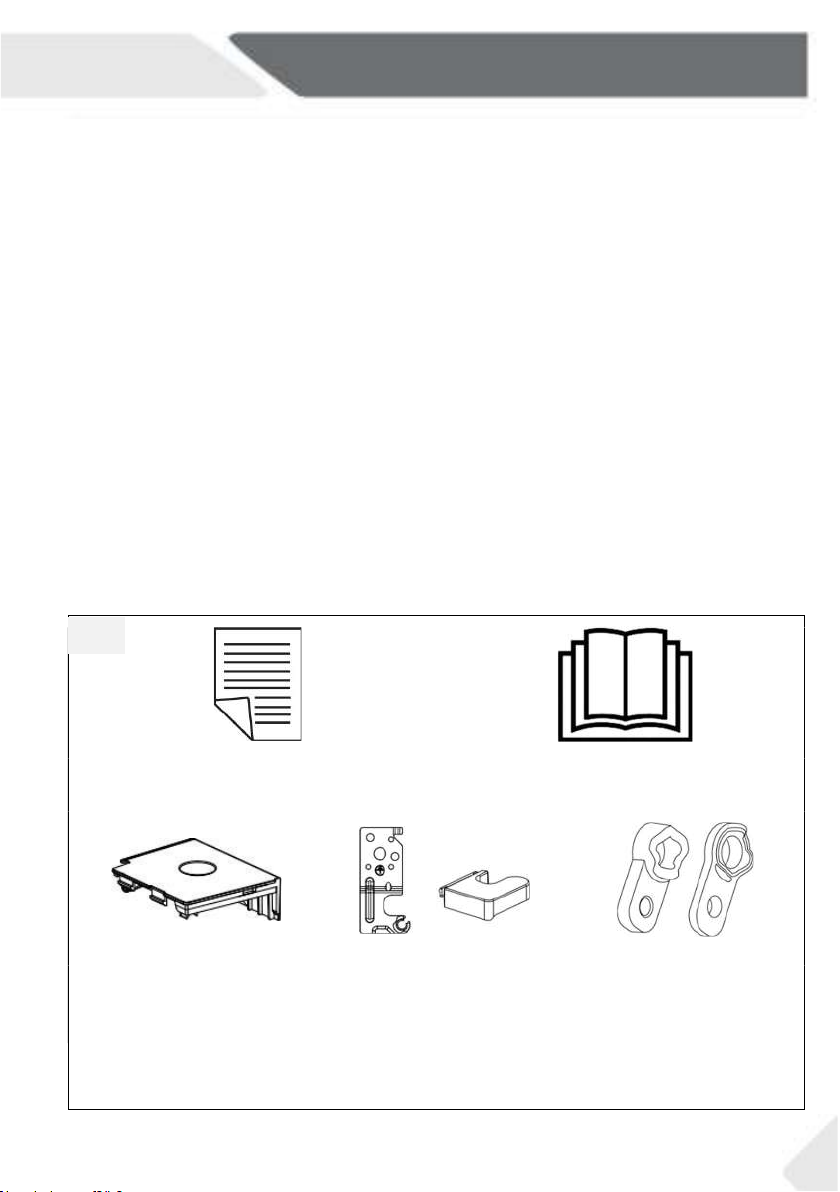
DE
2.2
2 - Bestimmungsgemäße Benutzung
2.1 Bestimmungsgemäße Benutzung
Dieses Gerät ist für den Einsatz im Haushalt und ähnliche Anwendungen vorgesehen, z. B.:
Personalküche in Geschäften, Büros und anderen Arbeitsumgebungen;
Bauernhäuser und von Kunden in Hotels, Motels sowie anderen Wohnräumen;
Bed & Breakfast;
Catering und ähnliche Anwendungen außerhalb des Einzelhandels.
Dieses Gerät dient zur Aufbewahrung von frischen Lebensmitteln. Es ist ausschließlich für
den Einsatz in Trockenräumen konzipiert. Es ist nicht für den gewerblichen oder
industriellen Gebrauch bestimmt.
Änderungen oder Modifikationen am Gerät sind nicht zulässig. Die nicht
bestimmungsgemäße Benutzung kann zu Gefahren sowie zum Verlust von
Garantieansprüchen führen.
2.2 Zubehör
Überprüfen Sie das Zubehör und die Literatur gemäß dieser Liste:
Garantiekarte Bedienungsanleitung
Obere linke
Verkleidungsendeabdeckung
Scharnier oben rechts für
die Umkehrbarkeit der Tür
Obere rechte
Scharnierabdeckung
Achsabdeckungen
11
Page 69
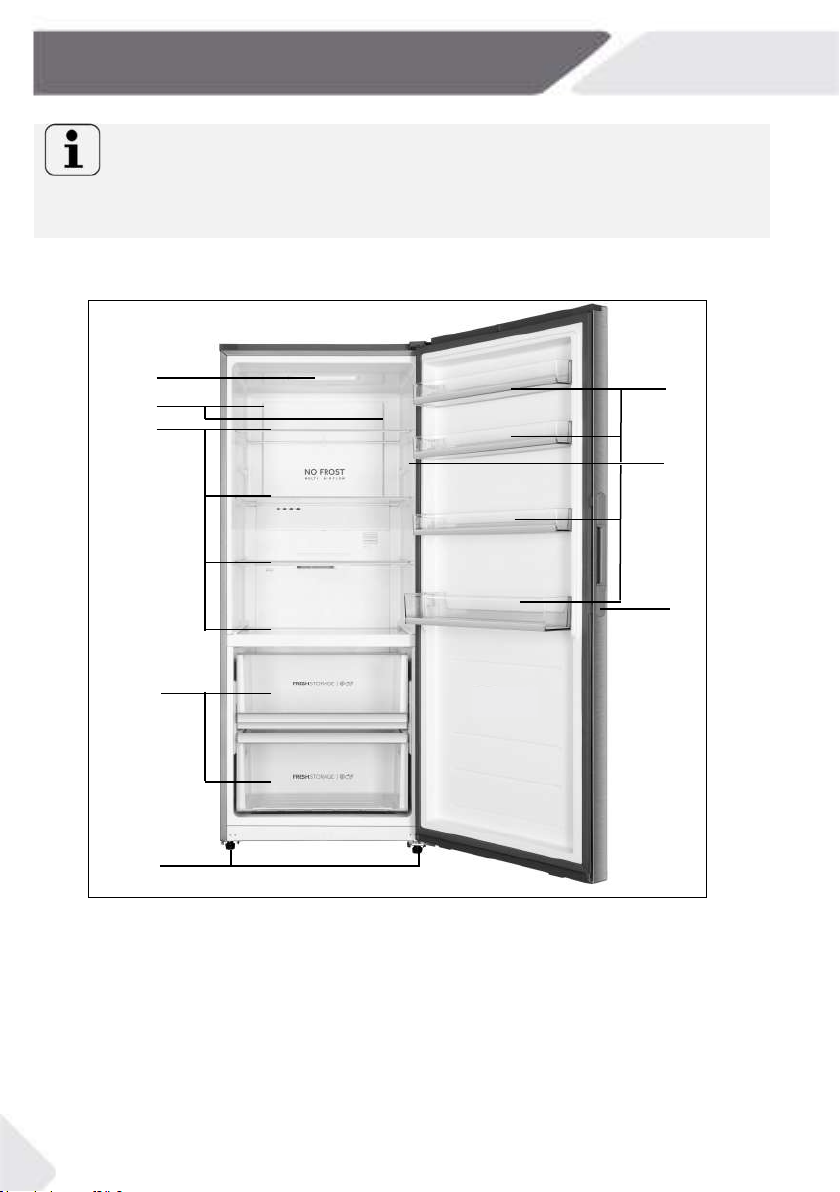
3-Produktbeschreibung
DE
Hinweis: Abweichungen
Aufgrund technischer Änderungen und unterschiedlicher Modelle können einige
der Abbildungen in diesem Handbuch von Ihrem Modell abweichen.
1
2
3
4
5
1 LED-Licht 6 Verstellbare Türablagen
2 Luftkanalabdeckung 7 Leistungsschild
3 Glasetagen 8 Türgriff
4 Lagerbehälter einfrieren
5 Verstellbare Füße
6
7
8
12
Page 70
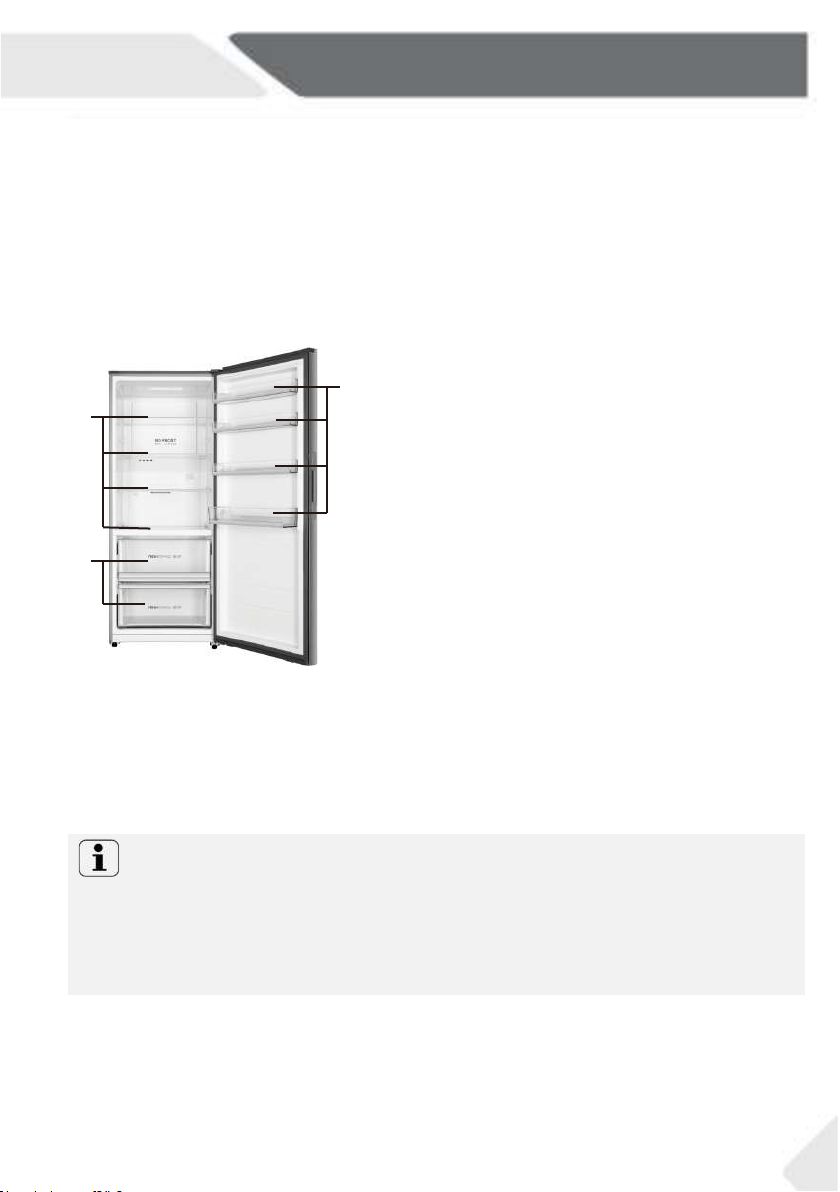
DE
4 - Benutzung
4.1 Vor der ersten Benutzung
Entfernen Sie alle Verpackungsmaterialien und bewahren Sie sie außerhalb der Reichweite von
Kindern auf. Entsorgen Sie sie auf umweltfreundliche Weise.
Reinigen Sie das Gerät innen und außen mit Wasser und einem milden Reinigungsmittel, bevor
Sie Lebensmittel hineingeben.
Warten Sie nach dem Nivellieren und Reinigen des Gerätes mindestens 2 Stunden, bevor Sie es
an das Netzkabel anschließen. Siehe Abschnitt INSTALLATION.
Kühlen Sie das Fach 2 Stunden lang bei hohen Einstellungen vor dem Beladen mit Lebensmitteln
vor. Die Funktion Super Cool hilft, das Fach schnell abzukühlen.
Verschiedene Lebensmittel sollten entsprechend ihrer
Eigenschaften in verschiedenen Bereichen platziert
2
1
werden (Abb.: 4.1).
1 Eingelegte Lebensmittel, Konserven, Obst,
Gemüse, Salat usw.
2 Eier, Konserven, Gewürze, Getränke und
abgefüllte Lebensmittel usw.
3 Fleischprodukte, Snacks usw.
3
4.2 Gerät ein-/ausschalten
Das Gerät ist in Betrieb, sobald es an die Stromversorgung angeschlossen ist.
Die Kühlschranktemperatur wird automatisch auf 4 °C eingestellt. Dies ist die
empfohlene Einstellung und die ideale Temperatur für die Lagerung von Frischwaren.
Falls gewünscht, können Sie die Temperatur manuell ändern. Siehe
TEMPERATUREINSTELLUNG
Hinweis: Voreinstellungen
1. Das Gerät ist auf die empfohlene Temperatur von 4 °C voreingestellt. Unter
normalen Umgebungsbedingungen müssen Sie die Temperatur nicht ändern.
2. Wenn das Gerät nach dem Trennen von der Hauptstromversorgung eingeschaltet wird,
kann es bis zu 12 Stunden dauern, bis die richtige Temperatur erreicht ist.
Leeren Sie das Gerät, bevor Sie es ausschalten. Um das Gerät auszuschalten, ziehen Sie den
Netzstecker aus der Steckdose.
4.3 Standby-Modus der Anzeige
Wenn die Tür geschlossen ist, schaltet sich der Anzeigebildschirm 30 Sekunden nach dem
Schließen automatisch aus. Das Display wird automatisch gesperrt. Es leuchtet automatisch auf,
wenn eine beliebige Taste gedrückt oder die Tür geöffnet wird.
13
Page 71

4 - Benutzung
DE
4.4 Bedienfeld (Abb. 4)
Beschreibung der Symbole
a: Temperaturanzeigesymbol
b: Super Cool-Symbol
c: Daily-Funktionssymbol
d: Holiday-Symbol
e: Auto Set-Symbol
f: Sperrsymbol
Beschreibung der Tasten
A: Temperatureinstellung verringern: Drücken, um die Temperatur zu senken
B: Super Cool: Drücken, um die Super Freeze-Funktion zu aktivieren
C: Daily-Funktion: Drücken, um die Daily-Funktionen zu aktivieren
D: Holiday: Drücken, um die Holiday-Funktion zu aktivieren
E: Auto Set: Drücken, um die Auto-Set-Funktion zu aktivieren
F: Sperre: Halten Sie die Taste 3 Sekunden lang gedrückt, um die Sperre zu aktivieren
oder zu deaktivieren
G: Temperatureinstellung erhöhen: Drücken, um die Temperatur zu erhöhen
4.5 Display sperren und entsperren
Automatische Sperre
Das Bedienfeld kann automatisch die Sperrfunktion aktivieren. Die Anzeige wird nach 30
Sekunden ohne Bedienung automatisch gesperrt.
Manuelle Sperrungen
Wenn das Display entsperrt ist, drücken Sie "Sperren" (F) und halten 3 Sekunden lang gedrückt.
Nach einem Piepton leuchtet das Symbol "Sperren" (f) und das Display ist gesperrt. Wenn das
Display gesperrt ist, drücken Sie "Sperren“ (F) und halten 3 Sekunden lang gedrückt; nach einem
Piepton erlischt das Symbol „Sperren“ (f) und das Display ist entsperrt.
Hinweis: Displaysperre
Bei gesperrter Anzeige sind Funktionen wie Temperatureinstellung oder
Funktionseinstellung deaktiviert. Wenn der obige Vorgang versucht wird, blinkt das
Symbol "Sperren" (f) 3 Mal, um daran zu erinnern, dass die Anzeige gesperrt ist.
14
Page 72
DE
4 - Benutzung
4.6 Temperatureinstellung
Der Temperaturbereich dieses Kühlschranks kann zwischen 2℃ ~ 8℃ eingestellt werden.
Wenn die Anzeige entsperrt ist, drücken Sie unter der täglichen Funktion
"Temperatureinstellung verringern" (A), nach einem Piepton beginnt das
"Temperaturanzeigesymbol" (a) zu blinken und die Anzeige wechselt in den
Temperatureinstellungsmodus. Und jedes Mal, wenn Sie "Temperatureinstellung
verringern" (A) drücken, piept der Summer und die Temperatur sinkt um 1°C, und die
Mindesttemperatur beträgt 2°C. Wenn die Temperatur eingestellt ist, hört das
"Temperaturanzeigesymbol” (a) nach 5 Sekunden ohne Betrieb auf zu blinken.
Wenn die Anzeige entsperrt ist, drücken Sie unter der täglichen Funktion
"Temperatureinstellung erhöhen" (G), nach einem Piepton beginnt das
"Temperaturanzeigesymbol" (a) zu blinken und die Anzeige wechselt in den
Temperatureinstellungsmodus, und jedes Mal, wenn Sie "Temperatureinstellung
erhöhen" (G) drücken, piept der Summer, die Temperatur steigt um 1°C, und die
maximale Temperatur beträgt 8°C. Wenn die Temperatur eingestellt ist, hört das Symbol
"Temperaturanzeige” (a) nach 5 Sekunden ohne Betrieb auf zu blinken.
4.7 Daily-Funktion (C)
Sobald das Gerät das erste Mal an das Netzkabel angeschlossen ist, befindet sich das
Gerät in der Funktion "Täglich" und das Symbol "Täglich" (c) leuchtet auf. Nur unter
dieser Funktion kann die Temperatur eingestellt werden.
4.8 Super Cool-Funktion (B)
Wenn das Display entsperrt ist, wird durch Berühren von "Super Cool " (B) das Super CoolSymbol (b) hell, der Kühlschrank arbeitet im Super Cool-Modus. Um die Super CoolFunktion manuell zu beenden, wiederholen Sie die Schritte oben. Wenn die Funktion nicht
manuell beendet wird, wird sie nach 3 Stunden automatisch beendet.
Im Super Cool-Modus arbeitet der Kühlschrank mit dem Temperatursollwert von 2 °C, bis
der Super Cool-Zyklus abgeschlossen ist (3 Stunden).
Unter der Auto Set-Funktion arbeitet der Kühlschrank mit der Einstellung 4 ℃.
Hinweis: Super Cool
1. Im Super Cool-Modus konnte die Temperatur nicht eingestellt werden. Wenn Sie
dies tun, blinkt das Super Cool-Symbol 3 Mal, um daran zu erinnern, dass sich der
Kühlschrank im Super Cool-Modus befindet.
2. Wenn im Super Cool-Modus die Auto Set-Funktion oder Holiday eingestellt ist, ist
das Super Cool-Symbol (b) ausgeschaltet, die Super Cool-Funktion wird automatisch
beendet und die Auto Set- oder Holiday-Funktion wird eingegeben.
4.9 Holiday-Funktion (D)
Wenn die Anzeige entsperrt ist, leuchtet durch Berühren von "Holiday" (D) das HolidaySymbol (d) auf, der Kühlschrank funktioniert in der Holiday-Funktion. Wenn Sie im
Holiday-Modus auf "Holiday" (D) tippen, geht das Holiday-Symbol (d) aus und der
Kühlschrank beendet die Holiday-Funktion. Im Holiday-Modus wird die Temperatur
automatisch auf 17 ° C eingestellt, so dass Ihr Kühlschrank keinen Geruch erzeugt und
zudem Energie spart.
15
Page 73

4 - Benutzung
Hinweis: Holiday-Funktion
1. Im Holiday-Modus kann die Temperatur nicht eingestellt werden. Bei dem Versuch blinkt
das Holiday-Symbol dreimal als Hinweis darauf, dass sich der Gefrierschrank im HolidayModus befindet.
2. Wenn im Holiday-Modus die Funktion Auto Set, Daily oder Super Freeze eingestellt wird,
wird das Holiday-Symbol (d) ausgeschaltet, die Holiday-Funktion wird automatisch
beendet und die Funktion Auto Set, Daily oder Super Freeze wird aktiviert.
4.10 Auto-Set-Funktion (E)
Wenn die Anzeige entsperrt ist, leuchtet durch Berühren von "Auto Set" (E) das Symbol "Auto
Set" (e), und der Gefrierschrank arbeitet in der Funktion „Auto Set“. Im Auto-Set-Modus wird
das Symbol (e) durch Berühren von "Auto-Set" (E) ausgeschaltet und der Gefrierschrank
beendet die Auto-Set-Funktion.
In der Auto-Set-Funktion läuft der Gefrierschrank bei -18 °C.
Hinweis: Auto Set Funktion
1. Im Auto-Set-Modus kann die Temperatur nicht eingestellt werden. Bei dem Versuch
blinkt das Auto-Set-Symbol dreimal als Hinweis darauf, dass sich der Gefrierschrank im
Auto-Set-Modus befindet.
2. Wenn im Auto-Set-Modus die Holiday-, Daily- oder Super Freeze-Funktion eingestellt
wird, wird "Auto Set" (e) ausgeschaltet, die Auto Set-Funktion automatisch beendet und
zur Holiday-, Daily- oder Super Freeze-Funktion gewechselt.
4.11 Anzeigesteuerfunktion
Wenn die Tür geschlossen ist, schaltet sich der Anzeigebildschirm nach 30 Sekunden ohne
Bedienung automatisch aus. Das Display wird automatisch gesperrt. Es leuchtet automatisch,
wenn Sie eine Taste berühren oder die Tür öffnen.
4.12 Ausschaltspeicher
Dieser Gefrierschrank verfügt über einen Ausschaltspeicher, d. h. die Einstellungen vor dem
Ausschalten werden gespeichert. Wenn die Stromversorgung wieder eingeschaltet wird, läuft das
Gerät mit den zuletzt vorgenommenen Einstellungen weiter. Die Sperre wird nicht gespeichert, d. h.
nachdem die Stromversorgung wieder eingeschaltet ist, wird das Display entsperrt.
4.13 Tür-offen-Alarm
Wenn der Gefrierschrank länger als 1 Minute geöffnet bleibt, gibt das Gerät 3 Pieptöne mit
einem Intervall von 0,5 Sekunden ab. Die Signaltöne werden alle 30 Sekunden wiederholt,
falls die Tür geöffnet bleibt. Der Piepton hört auf, wenn die Tür wieder geschlossen ist bzw.
nach 7 Minuten Türöffnung. Der Piepton hört auf und die Gefrierschrankbeleuchtung erlischt.
4.14 Fehleranzeige
Wenn das Display E1, E2 und andere Codes anzeigt und blinkt, bedeutet dies, dass der
Gefrierschrank defekt ist. In diesem Fall kann der Gefrierschrank zwar immer noch
Lebensmittel einfrieren, aber der Benutzer sollte sich möglichst schnell an den Kundendienst
wenden, um den normalen Gefrierschrankbetrieb wiederherzustellen.
DE
16
Page 74

DE
4 - Benutzung
4.16 Energiespartipps
Stellen Sie sicher, dass das Gerät richtig belüftet wird (siehe INSTALLATION).
Stellen Sie das Gerät nicht in direktem Sonnenlicht oder in der Nähe von Wärmequellen auf
(z. B. Öfen, Heizungen).
Vermeiden Sie unnötig niedrige Temperaturen im Gerät. Der Energieverbrauch steigt, je
niedriger die Temperatur im Gerät eingestellt wird.
Lassen Sie warme Speisen vor dem Einlegen in das Gerät abkühlen.
Öffnen Sie die Gerätetür so wenig und so kurz wie möglich.
Vergewissern Sie sich, dass die Tür immer richtig und von Lebensmitteln unbeeinträchtigt
schließt. Türdichtung sauber halten.
Tiefkühlkost im Kühlschrank auftauen.
Rückseite des Gerätes regelmäßig reinigen. Staub erhöht den Energieverbrauch.
Werksseitig befinden sich Schublade, Lebensmittelbox und Regale in der
energiesparendsten Konfiguration. Lebensmittel sollten so platziert werden, dass sie den
Luftauslass nicht blockieren.
5 - Ausstattung
5.1 Abnehmbare Türablagen
Die Türablagen können zum Reinigen entnommen werden:
Heben Sie die Ablage an beiden Seiten an (1) und ziehen Sie sie dann
heraus (2) (Abb. 5.1).
Um die Türablage wieder einzusetzen, führen Sie die Schritte oben in
umgekehrter Reihenfolge durch.
5.2 Glasböden
1. Um einen Einlegeboden herauszunehmen, heben Sie ihn zuerst
an der Hinterkante (1) an und ziehen ihn dann heraus (2) (Abb.
5.2).
2. Um ihn wieder einzusetzen, legen Sie ihn auf den beidseitigen
Vorsprüngen ab und schieben ihn dann in die hinterste Position,
bis die Rückseite des Einlegebodens in den seitlichen Schlitzen
einrastet.
17
Page 75

6 - Pflege und Reinigung
DE
6.1 Allgemeines
Reinigen Sie das Gerät, wenn nur wenig oder keine Lebensmittel aufbewahrt werden;
trennen Sie dazu den Gerätestecker ab.
Halten Sie die Türdichtung immer sauber.
Reinigen Sie die Innenseite und das Gehäuse des
Gerätes mit einem Schwamm, der mit warmem
Wasser und neutralem Reinigungsmittel
angefeuchtet ist.
1. Reiben Sie das Innere und Äußere des
Gefrierschranks – einschließlich Türdichtung,
Türablagen, Glasablagen, Boxen usw. – mit
einem weichen Handtuch oder Schwamm ab, das in warmes Wasser getaucht ist
(Sie können neutrales Reinigungsmittel in das warme Wasser geben).
2. Bei verschütteter Flüssigkeit alle betroffenen Teile entfernen, direkt unter
laufendem Wasser abspülen, trocknen und wieder in den Gefrierschrank
einsetzen.
3. Bei verschütteter Sahne oder geschmolzener Eiscreme entfernen Sie alle
betroffenen Teile, legen Sie sie für einige Zeit in ca. 40 °C warmes Wasser, spülen
Sie sie dann ab, trocknen sie und setzen sie wieder in den Gefrierschrank ein.
4. Falls kleine Teile oder Gegenstände im Gefrierschrank (zwischen Böden oder
Lagerbehältern) stecken bleiben, nehmen Sie eine kleine weiche Bürste, um sie zu
lösen. Falls Sie das Teil nicht erreichen konnten, wenden Sie sich bitte an den HaierKundendienst.
18
Page 76

6.2 Längerfristige Außerbetriebnahme
6.3 Transport des Geräts
DE
Wenn das Gerät längere Zeit nicht benutzt wird:
Nehmen Sie die Lebensmittel heraus.
Ziehen Sie den Netzstecker.
Reinigen Sie das Gerät wie oben beschrieben.
Halten Sie die Tür- und Gefrierlagerbehälter offen, um die Entstehung von schlechten
Gerüchen im Inneren zu verhindern.
Entfernen Sie die Tür des Gerätes (öffnen Sie die Tür und halten Sie sie fest, bevor Sie die
Schrauben entfernen), um zu vermeiden, dass Kinder in das Gerät eindringen und darin
gesperrt werden.
Hinweis: Ausschalten
Für eine optimale Lebensdauer des Gerätes sollten Sie es nur ausschalten, wenn dies
unbedingt erforderlich ist.
1. Entfernen Sie alle Lebensmittel und ziehen Sie den Netzstecker.
2. Sichern Sie Ablagen und andere bewegliche Teile im Gefrierfach mit Klebeband.
3. Schließen Sie die Tür und sichern Sie sie mit Klebeband.
4. Neigen Sie den Gefrierschrank nicht mehr als 45 °, um eine Beschädigung des
Kühlsystems zu vermeiden.
5. Umwickeln Sie die Füße des Gefrierschranks, um Kratzer am Boden zu vermeiden.
Bewegen Sie den Gefrierschrank niemals gewaltsam.
6 - Pflege und Reinigung
19
Page 77

7 - Fehlerbehebung
Der Kompressor
Der Netzstecker ist nicht an der
Das Gerät läuft häufig
oder Außentemperatur
In diesem Fall ist es normal, dass das
Das Gerät war eine Zeit lang
Normalerweise dauert es 8 bis 12
Stunden, bis das Gerät vollständig
Die Tür des Gerätes ist nicht richtig
Schließen Sie die Tür und
vergewissern Sie sich, dass das
Gerät auf einem ebenen Boden
keine Lebensmittel oder
Die Tür wurde zu oft oder zu lange
Die Temperatureinstellung ist zu
Stellen Sie die Temperatur höher
ein, bis eine zufriedenstellende
erreicht ist. Es dauert
24 Stunden, bis die Temperatur
Die Türdichtung ist verschmutzt,
verschlissen, rissig oder sitzt nicht
Reinigen Sie die Türdichtung oder
lassen Sie sie vom Kundendienst
erforderliche Luftzirkulation ist
Sorgen Sie für eine ausreichende
Das Gerät macht
Das Gerät wurde auf einer
Das Gerät berührt ein Objekt in der
Entfernen Sie Gegenstände um das
Das Gerät steht auf einem
Holzboden oder in der Nähe von
Holz verstärkt das Geräusch. Stellen
Das Gerät macht ein
oder Ausschalten des Kältegeräts
Es ist ein leises
Geräusch wie von
fließendem Wasser zu
DE
Viele auftretende Probleme können ohne spezielle Fachkenntnisse selbst behoben werden. Im
Falle eines Problems prüfen Sie bitte alle aufgezeigten Möglichkeiten und befolgen die
nachstehenden Anweisungen, bevor Sie sich an einen Kundendienst wenden.
Der akustische Alarm kann durch Drücken einer beliebigen Taste ausgeschaltet werden.
7.1 Fehlerbehebung
Problem Mögliche Ursache Mögliche Lösung
funktioniert nicht.
oder zu lange.
Steckdose angeschlossen.
Die Innen-
ist zu hoch.
ausgeschaltet.
geschlossen.
geöffnet.
niedrig.
Schließen Sie den Netzstecker an.
Gerät länger läuft.
abgekühlt ist.
steht und
Behälter gegen die Tür stoßen.
Öffnen Sie die Tür nicht zu oft.
Temperatur
Die
Der Innenraum ist mit Eis bedeckt. Tauen Sie das Gerät ab.
ungewöhnliche
Geräusche.
Klickgeräusch
hören.
20
Das ist normal. Es wird durch Ein-
Das ist normal.
richtig.
nicht gewährleistet.
unebenen Fläche aufgestellt.
Nähe.
Holzwänden.
verursacht.
stabil wird.
ersetzen.
Belüftung.
Nivellieren Sie das Gerät.
Gerät herum.
Sie das Gerät woanders auf.
Page 78

Das Gerät macht ein
Das Kühlaggregat hat sich gerade
Es ist nicht kalt genug im
Die Temperatur ist zu hoch
Zu viele Lebensmittel wurden
Kühlen Sie die Waren vor der Lagerung
Zu warme Speisen wurden
Lagern Sie immer kleine Mengen von
Die Waren liegen zu nahe
Sie Platz zwischen den
Lebensmitteln, damit Luft zirkulieren
Die Tür wurde zu oft oder zu lange
Es ist zu kalt im Inneren des
Temperatur ist zu niedrig
Die Funktion Super Freeze ist aktiviert
Feuchtigkeit sammelt sich
auf der Oberfläche des
Dies ist in feuchtem Klima normal und
ändert sich, wenn die Luftfeuchtigkeit
abnimmt. Mit einem trockenen Tuch
DE
7 - Fehlerbehebung
Problem Mögliche Ursache Mögliche Lösung
Motorgeräusch
Inneren des Geräts.
Geräts.
Gerätes an.
Das Kühlsystem läuft nicht.
Die Seiten des Schrankes
und der Türleiste werden
warm.
Sie hören ein Alarmsignal.
Die Tür lässt sich nur
schwer öffnen
eingeschaltet. Das ist normal.
eingestellt.
gleichzeitig hineingelegt.
hineingelegt.
beieinander.
Die Tür ist nicht richtig geschlossen. Schließen Sie die Tür.
geöffnet.
Die
eingestellt.
oder läuft zu lange.
Das Klima ist zu warm und zu feucht.
Der Netzstecker ist nicht an der
Steckdose angeschlossen.
Die Stromversorgung ist nicht intakt. Überprüfen Sie die elektrische
Das ist normal.
Die Tür ist auf.
Die Temperatur im Produkt ist zu
hoch.
Sobald das Gerät läuft, gibt es
innen ein Vakuum.
Setzen Sie die Temperatur zurück.
immer ab.
Lebensmitteln.
Lassen
kann.
Öffnen Sie die Tür nicht zu oft.
Passen Sie die Temperatur an.
Super Freeze-Funktion.
abwischen.
Schließen Sie den Netzstecker an.
Stromversorgung des Raumes.
Wenden Sie sich an den zuständigen
Energieversorger!
Schließen Sie die Tür oder schalten Sie
den Alarm manuell stumm.
Öffnen Sie die Türdichtung
behutsam, um Luft in das Gerät
eintreten zu lassen.
Die Tür kann nicht richtig
geschlossen werden. Es
bleibt immer ein Spalt.
Aufgrund der niedrigen
Gerätetemperatur kann die
Türdichtung leicht hart und
verformt werden.
Nehmen Sie einen Fön oder legen
Sie ein heißes Handtuch auf die
Stelle, an der die Dichtung
verformt ist.
Wenn die Dichtung wieder weich
ist, schließen Sie die Tür und
drücken sie fest an.
21
Page 79

7 - Fehlerbehebung
DE
7.2 Stromausfall
Bei einem Stromausfall sollten die Lebensmittel etwa 15 Stunden lang sicher kalt bleiben.
Befolgen Sie diese Tipps bei einer längeren Stromunterbrechung, insbesondere im
Sommer:
Öffnen Sie die Tür so wenig wie möglich.
Legen Sie während einer Stromunterbrechung keine zusätzlichen Lebensmittel in den
Gefrierschrank.
Bei einer angekündigten Stromunterbrechung von mehr als 15 Stunden füllen Sie
etwas Eis in einen Behälter und stellen ihn oben in das Gefrierfach.
Da die Temperatur im Gefrierschrank während einer Stromunterbrechung oder eines
anderen Ausfalls steigt, werden Lagerzeit und Qualität der Lebensmittel reduziert.
Alle aufgetauten Lebensmittel sollten entweder verzehrt oder gegart und
anschließend (sofern möglich) wieder eingefroren werden, um Gesundheitsrisiken zu
vermeiden.
Hinweis: Speicherfunktion bei Stromunterbrechung
Nach Wiederherstellung der Stromversorgung fährt das Gerät mit den Einstellungen fort,
die vor dem Stromausfall eingestellt wurden.
22
Page 80
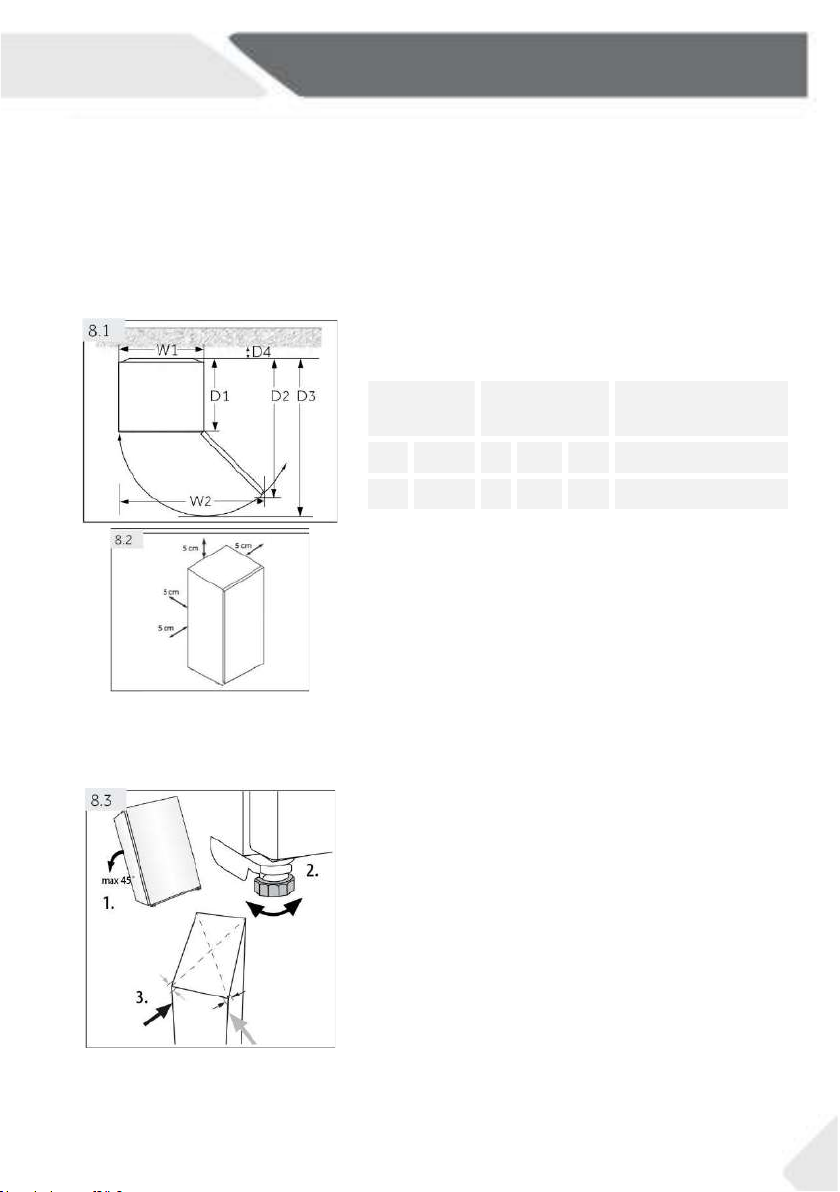
8.3 Platzbedarf
Abstand zur Wand in
8.4 Lüftungsquerschnitt
8.5 Ausrichten des Geräts
DE
8-Installation
8.1 Auspacken
Nehmen Sie das Gerät aus der Verpackung.
Entfernen Sie alle Verpackungsmaterialien.
8.2 Umgebungsbedingungen
Die Raumtemperatur sollte immer zwischen 18 °C und 43 °C liegen, da sie die Temperatur
im Inneren des Geräts und dessen Energieverbrauch beeinflussen kann. Stellen Sie das
Gerät nicht ohne Isolierung in der Nähe wärmeabgebender Geräte (Backöfen,
Kühlschränke) auf.
Benötigter Platz zum Öffnen der Tür (Abb. 8.1):
Breite in mm Tiefe in mm
W1 W2 D1 D2 D3
705 1076 603 1243 1327
Aus Sicherheitsgründen ist eine ausreichende
Belüftung des Gerätes zu gewährleisten. Daher sind
die Angaben zu den erforderlichen
Lüftungsquerschnitte zu beachten (Abb. 8.2).
Freistehendes Gerät: Dieses Kühlgerät ist nicht für die
Verwendung als Einbaugerät vorgesehen.
Das Gerät sollte auf einer flachen und robusten
Fläche aufgestellt werden. Wenn das Gerät auf einen
Sockel gestellt wird, müssen feste und feuerfeste
Materialien verwendet werden. Verwenden Sie
keinesfalls das Schaumstoffverpackungsmaterial als
Sockel.
1. Kippen Sie das Gerät leicht nach hinten (Abb.
8.3).
2. Stellen Sie die Füße auf die gewünschte Höhe ein.
3. Die Stabilität kann durch abwechselndes
Anstoßen an den Diagonalen überprüft werden.
Das leichte Schwanken sollte in beiden
Richtungen gleich sein. Andernfalls kann sich der
Rahmen verziehen und die Funktionsfähigkeit
der Türdichtungen beeinträchtigt werden. Eine
geringe Neigung nach hinten erleichtert das
Schließen der Tür.
mm
D4
50
23
Page 81
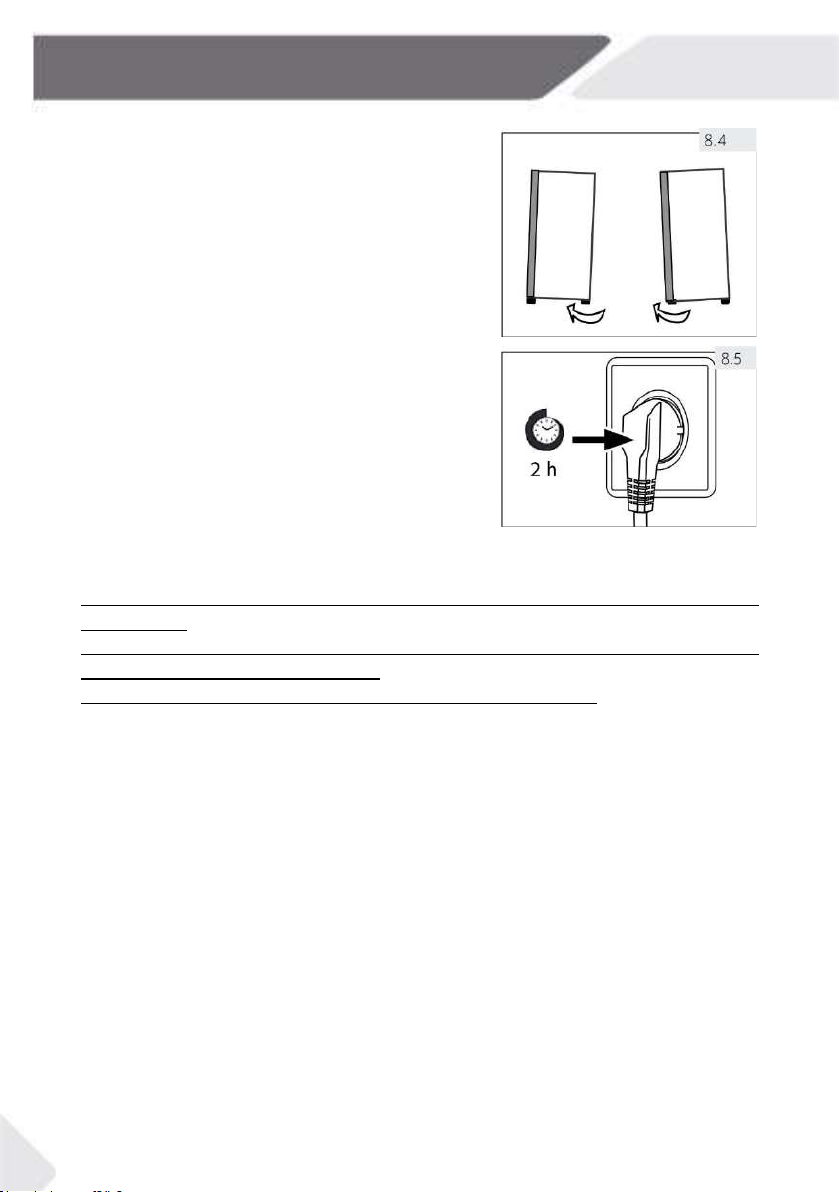
8 - Installation
8.6 Verstellbare Füßen
8.7 Wartezeit
8.8 Elektrischer Anschluss
Wenn der Gefrierschrank instabil ist, können die Füße
eingestellt werden: Drehen Sie die verstellbaren Füße
gemäß Pfeilrichtung (Abb. 8.4), um sie nach oben
oder unten zu drehen:
Durch Drehen der Füße im Uhrzeigersinn wird
das Gerät angehoben.
Durch Drehen gegen den Uhrzeigersinn wird es
abgesenkt.
Zur wartungsfreien Schmierung befindet sich Öl in der
Kapsel des Kompressors. Dieses Öl kann bei einem
Schrägtransport in das geschlossene Leitungssystem
gelangen. Bevor Sie das Gerät an die
Stromversorgung anschließen, müssen Sie 2 Stunden
warten (Abb. 8.5), damit das Öl zurückfließen kann.
Prüfen Sie vor jedem Anschluss, dass:
Stromquelle, Steckdose und Sicherung müssen den Angaben auf dem Typenschild
entsprechen.
Die Steckdose muss geerdet sein. Es darf keine Mehrfachsteckdose oder ein
Verlängerungskabel verwendet wird.
Netzstecker und Steckdose müssen den Vorgaben entsprechen.
Schließen Sie den Stecker an eine ordnungsgemäß installierte Haushaltssteckdose an.
DE
24
Page 82

Montageschritte
DE
8.9 Türumkehrbarkeit
Bevor Sie das Gerät an die Stromversorgung anschließen, sollten Sie prüfen, ob die
Türschaukel von links (wie mitgeliefert) nach rechts gewechselt werden muss, falls dies
aufgrund des Einbauortes und der Verwendbarkeit erforderlich ist.
8 - Installation
(Bild 8.6):
1. Erforderliches Werkzeug bereithalten.
2. Gerät abtrennen.
3. Öffnen Sie die obere und untere Griffabdeckung auf
der rechten Seite der Tür.
4. Drücken Sie leicht gegen den weißen Gleiter.
5. Nehmen Sie die 2 Betätigungsstangen heraus und
setzen Sie die Griffabdeckung wieder auf.
6. Entfernen Sie die 2 Gummistopfen auf der linken
Seite der Tür und setzen Sie sie mit den entfernten
Betätigungsstangen für Schritt 20 ein.
7. Entfernen Sie 7 Schrauben und die
Scharnierabdeckung. Achten Sie darauf, das
Türkabel nicht abzureißen.
8. Trennen Sie das Anschlusskabel ab.
9. Entfernen Sie 3 Scharnierschrauben sowie das linke
obere Scharnier und entfernen Sie die Tür vorsichtig.
10. Legen Sie die Tür auf Karton oder einem Tuch
horizontal ab. Entfernen Sie die rechte
Türendabdeckung und nehmen Sie die linke
Endabdeckung aus dem Zubehörbeutel. Bringen Sie
sie oben links an der Tür an.
11. Entfernen Sie 2 Schrauben an der rechten Unterseite
der Tür. Entfernen Sie 2 Schrauben. Türstopper und
Abdeckung an der linken Unterseite der Tür.
12. Nehmen Sie den Türstopper aus dem letzten Schritt
und die rechte Abdeckung aus dem Zubehörbeutel
und befestigen Sie sie mit 2 Schrauben. Bringen Sie
2 Schrauben auch auf der anderen Seite der Tür an.
13. Legen Sie die Rückseite des Schranks ab, nachdem
Sie dickere Polster darunter platziert haben.
Entfernen Sie 4 Schrauben und das untere Scharnier.
14. Schrauben Sie die Abdeckung ab.
25
Page 83
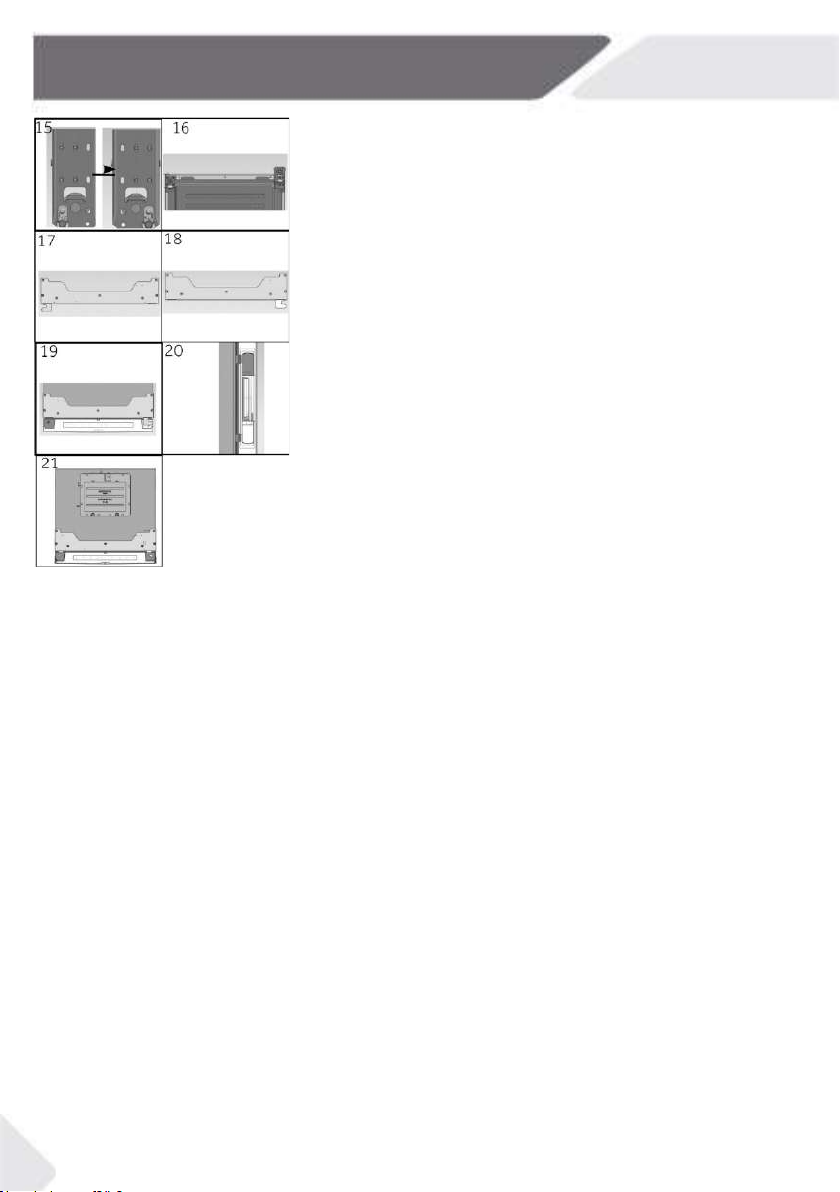
8 - Installation
DE
15. Nehmen Sie die rechte Abdeckung aus dem
Zubehörbeutel. Befestigen Sie sie mit der Schraube.
16. Tauschen Sie die Positionen der Platte und des
unteren Scharniers aus.
17. Entfernen Sie die linke kleine Scharnierabdeckung
und den Scharnierdeckel von der
Scharnierabdeckung.
18. Wechseln Sie den Scharnierdeckel auf die andere
Seite und nehmen Sie den rechten kleinen
Scharnierdeckel aus dem Zubehörbeutel. Montieren
Sie ihn an der Scharnierabdeckung.
19. Montieren Sie die Tür sowie das linke Scharnier,
schließen Sie das Anschlusskabel an, und befestigen
Sie die Scharnierabdeckung mit Schrauben.
20. 20. Installieren Sie die entfernte Betätigungsstange
auf der linken Seite der Tür und stecken Sie dann die
Gummistopfen in die Öffnung für die
Betätigungsstange auf der rechten Seite der Tür.
21. Fertig.
Mindestgarantie ist: 2 Jahre für EU-Länder, 3 Jahre für die Türkei, 1 Jahr für Großbritannien,
1 Jahr für Russland, 3 Jahre für Schweden, 2 Jahre für Serbien, 5 Jahre für Norwegen, 1 Jahr
für Marokko, 6 Monate für Algerien, für Tunesien keine gesetzliche Garantie erforderlich.
Thermostate, Temperatursensoren, Leiterplatten und Lichtquellen sind für einen Zeitraum
von mindestens sieben Jahren nach dem Inverkehrbringen des letzten Geräts des Modells
erhältlich. Türgriffe, Türscharniere, Schalen und Körbe für eine Mindestdauer von sieben
Jahren und Türdichtungen für eine Mindestdauer von zehn Jahren nach dem
Inverkehrbringen der letzten Einheit des Modells.
Weitere Informationen zum Produkt finden Sie unter
https://eprel.ec.europa.eu/ oder scannen Sie den QR-Code auf dem Energieetikett am
Gerät.
Um den technischen Kundendienst zu kontaktieren, besuchen Sie unsere Website:
https://corporate.haier-europe.com/de/
Wählen Sie im Abschnitt "Website" die Marke Ihres Produkts und Ihr Land.
Sie werden auf die entsprechende Website weitergeleitet, wo Sie die Telefonnummer und
das Formular zur Kontaktaufnahme mit dem technischen Kundendienst finden.
26
Page 84
DE
Markenzeichen Haier
Modellbezeichnung H2R465SF
Modellkategorie Kühlschrank
Energieeffizienzklasse F
Jährlicher Energieverbrauch (kWh/Jahr)1) 232
9 - Technische Daten
Kühllagervolumen (L)
Gefrierlagervolumen (L) ****
Sterne-Standard ****
Temperatur anderer Fächer >14 °C nicht zutreffend
Anti-Frost-System ja
Stromausfallsicher (h) 12
Gefrierkapazität (kg/24 h) 62
Klimaklasse: Dieses Gerät ist für den Einsatz bei einer
Umgebungstemperatur zwischen 10 °C und 43 °C
vorgesehen.
Geräuschemission (dB(A)) 38
Bauweise freistehend
Spezifikationsdetails entnehmen Sie bitte dem Typenschild und dem Energieetikett im
Inneren des Produkts.
Dieses Gerät ist für eine Verwendung unter den unten angegebenen
Umgebungstemperaturen vorgesehen:
463
nicht zutreffend
SN-T
SN + 10 °C~+32 °C
N + 16 °C~+32 °C
ST + 16 °C~+38 °C
T + 16 °C~+43 °C
27
Page 85

28
H2F385SF
0070516587A
Page 86
Manual del usuario
Frigorífico vertical
H2R465SF
ES
Page 87

Gracias
ES
Gracias por comprar un producto Haier.
Lea estas instrucciones atentamente antes utilizar el electrodoméstico. Las instrucciones
contienen información importante que le ayudará a sacar el máximo provecho del
electrodoméstico y a garantizar una instalación, uso y mantenimiento seguros y adecuados.
Guarde este manual en un lugar conveniente para poder consultarlo en todo momento para
el uso seguro y adecuado del electrodoméstico.
Si vende el electrodoméstico, lo regala o lo deja cuando se muda, asegúrese de pasar
también este manual para que el nuevo propietario se familiarice con el electrodoméstico
y las advertencias de seguridad.
ADVERTENCIA: Riesgo de incendio/material inflamable. El símbolo indica que existe un
riesgo de incendio ya que se utilizan materiales inflamables. Proceda con cuidado para
evitar encender material inflamable y causar un incendio.
Fabricante: Qingdao Haier Special Icebox Co., Ltd.
Dirección: Haier Garden, Qianwangang Road, Economic
Zona de Desarrollo, Qingdao 266555, Shandong, R.P. de
China
www.haier.com.au
www.haier.co.nz
2
Page 88

ES
1 - Seguridad .......................................................................................................................... 4
2 - Uso previsto .................................................................................................................... 11
3 - Descripción del producto ................................................................................................ 12
4 - Uso .................................................................................................................................. 13
5 - Equipamiento ................................................................................................................. 17
6 - Cuidado y limpieza .......................................................................................................... 18
7 - Resolución de problemas ............................................................................................... 20
8 - Instalación ....................................................................................................................... 23
9 - Datos técnicos................................................................................................................. 27
Índice
3
Page 89

1 - Seguridad
¡Antes de encender el electrodoméstico por primera vez, lea las siguientes indicaciones
de seguridad!
ES
ADVERTENCIA:
Antes del primer uso
Asegúrese de que no se hayan ocasionado daños durante el transporte.
Retire todo el embalaje y manténgalo fuera del alcance de los niños.
Espere por lo menos dos horas antes de instalar el electrodoméstico para asegurarse
de que el circuito de refrigerante este totalmente operativo.
Manipule el electrodoméstico siempre con al menos dos personas porque es pesado.
Instalación
El electrodoméstico debe colocarse en un lugar bien ventilado. Asegúrese de
tener un espacio de al menos 5 cm por encima y alrededor del electrodoméstico.
ADVERTENCIA: Mantenga despejadas las ranuras de ventilación del
electrodoméstico o de la estructura integrada.
Nunca coloque el electrodoméstico en un área húmeda o en un lugar donde pueda
salpicar agua. Limpie y seque el agua que salpique y las mancha con un paño suave y
limpio.
No instale el electrodoméstico bajo la luz directa del sol o cerca de fuentes de calor
(por ejemplo, estufas, calentadores).
Instale y nivele el electrodoméstico en un área adecuada para su tamaño y uso.
Asegúrese de que la información eléctrica de la placa de características concuerde con
la fuente de alimentación. Si no es así, contacte con un electricista.
El electrodoméstico funciona con una fuente de alimentación de 220-240 V CA/50 Hz.
Una fluctuación anormal del voltaje puede hacer que el electrodoméstico no se ponga
en marcha, que se dañe el control de temperatura o el compresor, o que haya un ruido
anormal al funcionar. En tal caso, se montará un regulador automático.
No utilice adaptadores multienchufe y cables de extensión.
ADVERTENCIA: No coloque tomas de corriente múltiples portátiles o fuentes
de alimentación portátiles en la parte posterior del electrodoméstico.
ADVERTENCIA Al colocar el electrodoméstico en su sitio, asegúrese de que el
cable de alimentación no esté pinzado ni dañado.
No pise el cable de alimentación.
Asegúrese de que el cable de alimentación no quede atrapado por el congelador.
No cubra las aberturas de ventilación.
Utilice un enchufe con toma de tierra separado para el suministro de electricidad
que sea de fácil acceso. El electrodoméstico debe tener conexión a tierra.
4
Page 90

congelador.
ES
1 - Seguridad
¡ADVERTENCIA!
ADVERTENCIA: No dañe el circuito de refrigerante.
Uso diario
Pueden utilizarlo niños a partir de 8 años de edad y personas con facultades físicas,
sensoriales o mentales reducidas, o con falta de experiencia y conocimiento, si lo
emplean bajo supervisión o se les instruye acerca de la seguridad del producto y
entienden los riesgos que comporta.
Los niños no deben jugar con el electrodoméstico.
Los niños de 3 a 8 años de edad solo pueden ayudar a cargar y descargar los productos
del aparato frigorífico, pero no se les permite limpiar e instalar el electrodoméstico.
Mantenga alejados a los niños menores de 3 años del electrodoméstico, a menos que
sean supervisados constantemente.
Los niños no deben limpiar ni mantener el producto sin supervisión.
El electrodoméstico debe estar colocado de forma que el enchufe quede accesible. Si
el gas ciudad u otro gas inflamable se está filtrando en las inmediaciones del
electrodoméstico, apague la válvula del gas en la que hay la fuga, abra las puertas y
ventanas y no desenchufe el cable de alimentación del congelador o cualquier otro
electrodoméstico.
Tenga en cuenta que el electrodoméstico está configurado para funcionar en el rango
ambiental específico entre 10°C y 43°C. Es posible que el electrodoméstico no funcione
correctamente si se deja durante demasiado tiempo a una temperatura por encima o
por debajo del rango indicado.
No coloque artículos inestables (objetos pesados, recipientes llenos de agua) encima
del congelador, para evitar lesiones personales causadas por caídas o descargas
eléctricas causadas por el contacto con el agua.
No guarde ni utilice materiales inflamables, explosivos o corrosivos en el
electrodoméstico o en sus alrededores.
No levante el electrodoméstico por las asas.
Nunca coloque el electrodoméstico horizontalmente en el suelo cuando lo muevas.
Antes de cualquier operación, desenchufe primero el electrodoméstico de la red
eléctrica.
No incline el electrodoméstico más de 45º para evitar que se dañe el sistema de
refrigeración al moverlo.
Desenchufe el electrodoméstico en caso de interrupción de la electricidad o antes de
limpiarlo. Espere al menos 7 minutos antes de reiniciarlo, ya que un arranque
frecuente podría dañar el compresor.
Comprueba el estado de la comida si se ha producido un calentamiento en el
5
Page 91

1 - Seguridad
ES
¡ADVERTENCIA!
No tire de los estantes de la puerta. La puerta se puede inclinar, los estantes de
la puerta se pueden salir o el electrodoméstico se puede caer.
Abra y cierre las puertas solo con los tiradores. El espacio entre la puerta y el
armario es muy estrecho. No ponga las manos en estas áreas para evitar
pellizcarse los dedos. Abra o cierre las puertas del electrodoméstico solo cuando
no haya niños en el rango de movimiento de la puerta.
ADVERTENCIA: No utilice aparatos eléctricos dentro de los compartimentos
para la conservación de alimentos del electrodoméstico, a menos que sean del
tipo que recomienda el fabricante.
ADVERTENCIA: El fabricante puede reemplazar las bombillas junto con una
parte del electrodoméstico.
ADVERTENCIA: Si no está seguro del tipo de refrigerante, compruebe la placa de
datos de la unidad. Es peligroso que cualquier persona que no sea una persona de
servicio autorizada realice el mantenimiento de este electrodoméstico. En
Queensland - la persona de servicio autorizada DEBE tener una autorización de trabajo
con gas para refrigerantes de hidrocarburos, para llevar a cabo el servicio o las
reparaciones que impliquen la retirada de las protecciones.
6
Page 92

ES
1 - Seguridad
¡ADVERTENCIA!
Mantenimiento/limpieza
Asegúrese de que los niños estén supervisados cuando se llevan a cabo
operaciones de limpieza y mantenimiento.
Desconecte el electrodoméstico del suministro eléctrico antes de realizar
cualquier mantenimiento de rutina. Espere al menos 7 minutos antes de
reiniciarlo, ya que un arranque frecuente podría dañar el compresor.
Sujete el conector en lugar del cable para desenchufar el electrodoméstico.
No limpie el electrodoméstico con cepillos duros, cepillos de alambre,
detergente en polvo, gasolina, acetato de pentilo, acetona u otras soluciones
orgánicas similares, soluciones ácidas o alcalinas. Limpie con detergente
especial para congelador para evitar daños.
No quite el hielo o la escarcha con objetos afilados. No utilice aerosoles ni
calentadores eléctricos, como calefactores, secadores de pelo, limpiadores
de vapor u otras fuentes de calor para evitar dañar las piezas de plástico.
ADVERTENCIA: No utilice electrodomésticos mecánicos ni otros medios
para acelerar el proceso de descongelación y siga las recomendaciones del
fabricante.
Para evitar riesgos, el fabricante, su representante de servicio o cualquier
otra persona cualificada deben cambiar los cables de alimentación que estén
dañados.
No intente reparar, desmontar o modificar el electrodoméstico usted
mismo. En caso de necesitar una reparación, póngase en contacto con
nuestro servicio de atención al cliente.
Elimine el polvo en la parte posterior de la unidad al menos una vez al año
para evitar el riesgo de incendio, así como un mayor consumo de energía.
No rocíe ni lave el electrodoméstico durante las operaciones de limpieza.
No utilice agua pulverizada o vapor para limpiar el electrodoméstico.
No limpie los estantes de vidrio que estén fríos con agua caliente. Un cambio
repentino de temperatura puede hacer que el vidrio se rompa.
Desconecte el electrodoméstico de la red eléctrica antes de limpiarlo.
En caso de calefacción, compruebe el estado de los productos congelados.
Antes del mantenimiento, desactive el electrodoméstico y desconecte el
enchufe de la toma de corriente.
El equipo eléctrico solo debe ser reparado por electricistas cualificados, ya
que las reparaciones inadecuadas pueden causar daños considerables.
7
Page 93

1 - Seguridad
Información sobre el gas refrigerante
¡ADVERTENCIA!
Mantenimiento/limpieza
El electrodoméstico contiene el refrigerante inflamable ISOBUTANO (R600a).
Asegúrese de que el circuito de refrigerante no se dañe durante el transporte o
la instalación. La fuga de refrigerante puede causar lesiones en los ojos o
incendios. Si se ha producido un daño, mantenga alejadas las llamas vivas, ventile
completamente la habitación y no enchufe ni desenchufe los cables de
alimentación del electrodoméstico o de cualquier otro aparato. Informe al
servicio de atención al cliente.
En caso de que los ojos entren en contacto con el refrigerante, lávelos
inmediatamente con agua corriente y póngase en contacto inmediatamente con
un oftalmólogo.
ADVERTENCIA: El sistema de refrigeración está sometido a alta presión. No lo
manipule. Dado que se utilizan líquidos de refrigeración inflamables, instale,
manipule y realice el mantenimiento del electrodoméstico de acuerdo con las
instrucciones; póngase en contacto con un profesional o con nuestro servicio de
posventa para proceder a su retirada.
ES
¡ADVERTENCIA!
Proceder con cuidado para evitar encender el material inflamable y provocar
un incendio.
ADVERTENCIA: Al colocar el electrodoméstico en su sitio, asegúrese de
que el cable de alimentación no esté pinzado ni dañado.
ADVERTENCIA: No coloque tomas de corriente múltiples portátiles o
fuentes de alimentación portátiles en la parte posterior del
electrodoméstico.
No almacene en este electrodoméstico sustancias explosivas como latas de
aerosol con un propelente inflamable.
Si se utilizan refrigerantes inflamables en el congelador, tenga cuidado al
instalar, manipular, servir y reciclar el electrodoméstico.
Por favor, póngase en contacto con el agente de servicio para deshacerse del
electrodoméstico porque se utilizó el gas de soplado inflamable.
8
Page 94

Uso previsto
ES
Este electrodoméstico está diseñado para su uso en el hogar y en aplicaciones
parecidas, como
zonas de cocina para empleados en negocios, oficinas y otros entornos
laborales;
granjas y por clientes de hoteles, moteles y otros establecimientos de
tipo residencial;
otros establecimientos de hospedaje;
cáterings y otras aplicaciones similares no minoristas.
Si el electrodoméstico no se utiliza durante un largo periodo de tiempo.
Saque los alimentos.
Desenchufe el cable de corriente.
Limpie el electrodoméstico como se describe arriba.
Mantenga las puertas abiertas para evitar la formación de malos olores
en el interior.
Para garantizar una conservación segura de los alimentos, siga estas
instrucciones de uso.
Para más información sobre qué partes del electrodoméstico son las
adecuadas para cada tipo de alimento, en función de la distribución de
temperatura en los diferentes compartimentos del electrodoméstico,
consulte la otra parte del manual.
Para evitar la contaminación de los alimentos, siga las siguientes
instrucciones:
Abrir la puerta durante un tiempo prolongado puede provocar un
aumento significativo de la temperatura en los compartimentos del
electrodoméstico.
Limpie regularmente las superficies que puedan entrar en contacto con
alimentos y sistemas de vaciado accesibles.
1 - Seguridad
9
Page 95

1 - Seguridad
Para evitar la aparición de moho, el electrodoméstico se debe apagar,
descongelar, limpiar y secar, además de dejar la puerta abierta, cuando vaya
a permanecer vacío durante largos periodos de tiempo.
ES
Eliminación
La aparición del símbolo en el producto o en su envase indica que no puede
tratarse como residuo doméstico. Debe llevarse a un punto de recogida de
residuos adecuado para reciclaje de aparatos eléctricos y electrónicos. Al
asegurarse de desechar este electrodoméstico de forma correcta, estará
contribuyendo a evitar las posibles consecuencias negativas para el medio
ambiente y la salud humana que ocasionaría el tratamiento inadecuado de los
residuos de este producto. Para obtener información detallada sobre el reciclaje
de este producto, póngase en contacto con el servicio de recogida de basuras
municipal o el establecimiento donde lo adquirió.
Dado que se utilizan gases de aislamiento inflamables, póngase en contacto con
un profesional o con nuestro servicio de posventa para deshacerse del
electrodoméstico.
¡ADVERTENCIA!
¡Peligro de lesiones por asfixia!
Los refrigerantes y los gases deben ser eliminados profesionalmente. Asegúrese
de que los tubos del circuito de refrigerante no estén dañados antes de
desecharlos correctamente. Desconecte el electrodoméstico de la red eléctrica.
Corte el cable eléctrico y deséchelo. Quite las bandejas y los cajones, así como el
pestillo de la puerta y los burletes, para evitar que los niños y los animales
domésticos queden encerrados en el electrodoméstico.
10
Page 96

ES
2.2
2 - Uso previsto
2.1 Uso previsto
Este electrodoméstico está diseñado para su uso en el hogar y en aplicaciones parecidas,
como
zonas de cocina para empleados en negocios, oficinas y otros entornos laborales;
granjas y por clientes de hoteles, moteles y otros establecimientos de tipo residencial;
otros establecimientos de hospedaje;
cáterings y otras aplicaciones similares no minoristas.
Este aparato está diseñado para almacenar alimentos frescos. Ha sido diseñado
exclusivamente para su uso en viviendas de interior seco. No está diseñado para uso
comercial o industrial.
No se permiten cambios o modificaciones en el dispositivo. El uso no intencionado puede
causar peligros y la pérdida de reclamaciones de garantía.
2.2 Accesorios
Revise los accesorios y los documentos de acuerdo con esta lista:
Certificado de garantía Manual del usuario
Tapa del extremo superior
izquierdo de la moldura
Bisagra superior derecha
para la reversibilidad de la
puerta
Tapa de la bisagra superior
derecha
Cubre-pernos
11
Page 97

3 - Descripción del producto
ES
Nota: Diferencia
Debido a los cambios técnicos y a los diferentes modelos, algunas de las
ilustraciones de este manual pueden diferir de su modelo.
1
2
3
4
5
1 Luz LED 6 Estantes regulables de la
puerta
2 Protección de conducto de aire 7 Placa de datos
3 Estantes de cristal 8 Manija de la puerta
4 Contenedores de
almacenamiento de
congelación
5 Patas de apoyo ajustables
6
7
8
12
Page 98
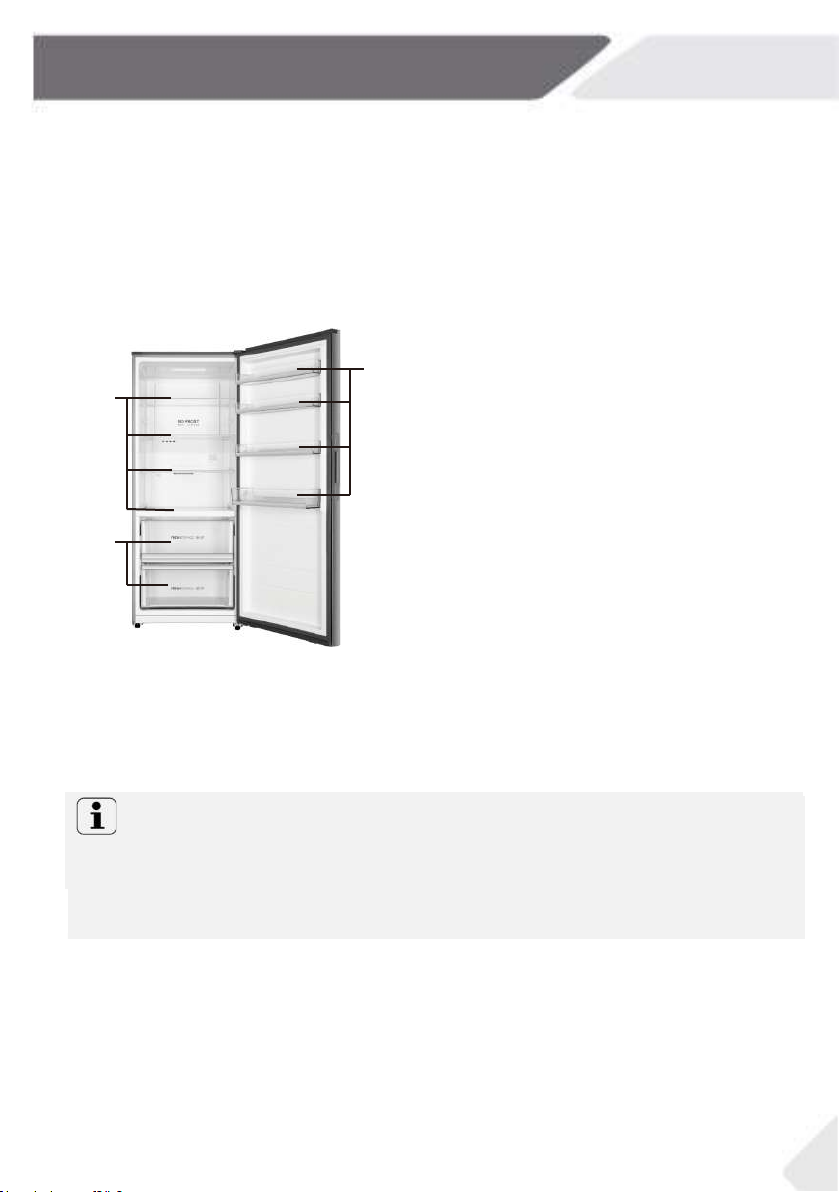
ES
ES
4 - Uso
4.1 Antes del primer uso
Retire todos los materiales de embalaje, manténgalos fuera del alcance de los niños y deséchelos
de una manera respetuosa con el medio ambiente.
Limpie el interior y el exterior del electrodoméstico con agua y un detergente suave antes de
introducir cualquier alimento.
Una vez nivelado y limpiado el electrodoméstico, espere al menos 2 horas antes de conectarlo a
la fuente de alimentación. Consulte la sección INSTALACIÓN.
Enfríe el compartimento 2 horas en configuraciones altas antes de introducir los alimentos. La
función Super Cool ayuda a enfriar los compartimentos rápidamente.
Los diferentes alimentos deben colocarse en
diferentes zonas según sus propiedades (Fig. 4.1).
2
1 Alimentos en escabeche, conservas, frutas,
1
verduras, ensaladas, etc.
2 Huevos, conservas, especias, bebidas y alimentos
embotellados, etc.
3 Productos cárnicos, snacks, etc.
3
4.2 Encendido/apagado del electrodoméstico
El electrodoméstico se pone en funcionamiento cuando se conecta a la fuente de
alimentación.
La temperatura del frigorífico se ajusta automáticamente a 4°C. Este es el ajuste
recomendado y la temperatura ideal para los alimentos frescos. Si lo desea, puede
cambiar la temperatura manualmente. Véase AJUSTE DE LA TEMPERATURA
Nota: Preajustes
1. El electrodoméstico está preajustado a la temperatura recomendada de 4°C. En
condiciones ambientales normales no es necesario cambiar la temperatura.
2. Cuando el electrodoméstico se enciende después de desconectarlo de la fuente de
alimentación principal, puede tardar hasta 12 horas en alcanzar la temperatura correcta.
Vacíe el electrodoméstico antes de apagarlo. Para apagar el electrodoméstico, retire el cable
de alimentación de la toma de corriente.
4.3 Modo de espera de la pantalla
Cuando se cierra la puerta, la pantalla se apaga automáticamente 30 segundos después de no
haber sido utilizada. La pantalla se bloquea automáticamente. Se enciende automáticamente
al pulsar cualquier interruptor o al abrir la puerta.
4 - Uso
13
Page 99
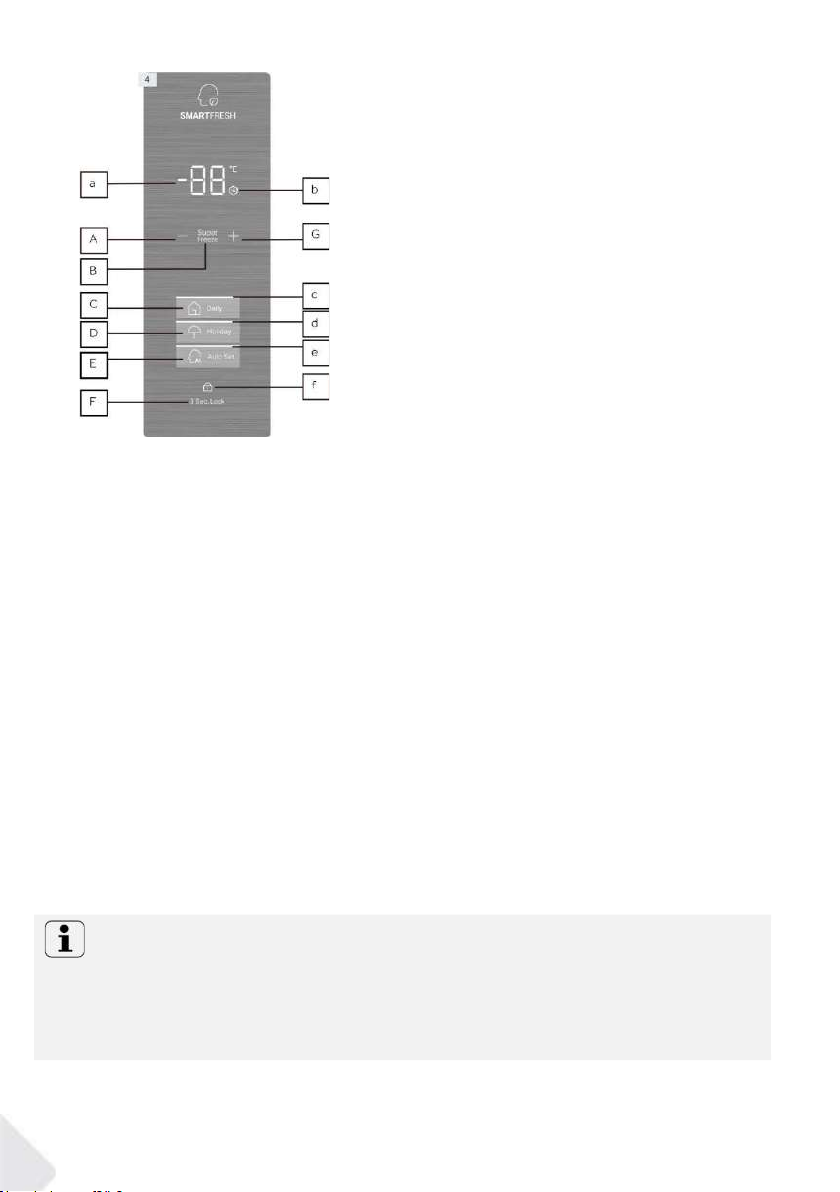
4.4 Panel de control (Fig. 4)
Descripción de los iconos
a: Icono de visualización de la
temperatura
b: Icono Super Cool (congelación
rápida)
c: Icono de función Daily (diaria)
d: Icono Holiday (vacaciones)
e: Icono Auto Set (ajuste
automático)
f: Icono Lock (bloqueo)
Descripción de las teclas
A: Tecla de ajuste de disminución de la temperatura: Pulse para disminuir la
temperatura
B: Tecla Super Cool: Pulse para activar la función Super Cool
C: Tecla de función Daily: Pulse para activar las funciones Daily
D: Tecla Holiday: Pulse para activar la función Holiday
E: Tecla Auto Set: Pulse para activar la función Auto Set
F: Tecla Lock: Pulse y mantenga durante 3 segundos para bloquear o desbloquear
G: Tecla de ajuste de aumento de la temperatura: Pulse para aumentar la temperatura
4.5 Bloqueo y desbloqueo de la pantalla
Bloqueo automático
El panel de control puede entrar automáticamente en la función Lock. La pantalla se
bloquea automáticamente después de 30 segundos sin operación.
Bloqueo manual
Cuando la pantalla está desbloqueada, pulse "Lock" (F) y manténgalo pulsado durante 3
segundos, después de un pitido, el icono "Lock" (f) se enciende, la pantalla está bloqueada.
Cuando la pantalla está bloqueada, pulse "Lock" (F) y manténgalo pulsado durante 3
segundos; tras un pitido, el icono "Lock" (f) se apaga y la pantalla se desbloquea.
Nota: Bloqueo de la pantalla
Cuando la pantalla está bloqueada, las funciones como el ajuste de la temperatura o la
configuración de las funciones están desactivadas. Cuando se intenta la operación
anterior, el icono "Lock" (f) parpadeará durante 3 veces para recordar que la pantalla
está bloqueada.
14
Page 100
ES
4 - Uso
4.6 Ajuste de la temperatura
El rango de temperatura de este frigorífico puede ajustarse entre 2°C y 8°C.
Cuando la pantalla está desbloqueada, en la función Daily, pulse "Ajuste de disminución de la
temperatura" (A), después de un pitido, el icono de la "Pantalla de la temperatura" (a)
comienza a parpadear y entra en el modo de ajuste de la temperatura. Y luego, cada vez que
se pulsa el "Ajuste de disminución de la temperatura" (A), el zumbador emite un pitido, la
temperatura se reduce en 1°C, y la temperatura mínima es 2°C. Una vez ajustada la
temperatura, el icono de la "Pantalla de la temperatura" (a) deja de parpadear después de 5
segundos sin operación.
Cuando la pantalla está desbloqueada, en la función Daily, pulse "Ajuste de aumento de la
temperatura" (G), después de un pitido, el icono "Pantalla de la temperatura" (a) comienza a
parpadear y la pantalla entra en el modo de ajuste de temperatura, y luego cada vez que
pulse "Ajuste de aumento de la temperatura" (G), el zumbador emite un pitido, la
temperatura aumenta en 1°C, y la temperatura máxima es 8°C. Una vez ajustada la
temperatura, el icono de la "Pantalla de la temperatura" (a) deja de parpadear después de 5
segundos sin operación.
4.7 Función Daily (C)
El electrodoméstico está en función Daily desde que se conecta por primera vez a la red
eléctrica y se enciende el icono "Daily" (c). Sólo en esta función se puede ajustar la
temperatura.
4.8 Función Super Cool (B) (superenfriamiento)
Cuando la pantalla está desbloqueada, al tocar "Super Cool" (B), el icono Super Cool (b)
se enciende, el frigorífico funciona en modo Super Cool. Para salir de la función Super
Cool manualmente repita los pasos anteriores. Si no se sale manualmente, la función se
desactivará automáticamente después de 3 horas.
En el modo Super Cool, el frigorífico funciona con el punto de ajuste de temperatura de
2°C, hasta que el ciclo Super Cool se completa (3 horas).
Con la función Auto Set, el frigorífico funciona a 4°C.
Nota: Super Cool
1. En el modo Super Cool, la temperatura no se podía ajustar. Si lo hace, el icono Super
Cool parpadeará durante 3 veces para recordar que el congelador está en modo
Super Cool.
2. En el modo Super Cool, si se ajusta la función de Auto Set o Holiday, el icono Super
Cool (b) está desactivado, la función Super Cool sale automáticamente y se activa la
función Auto Set o Holiday.
4.9 Función Holiday (D)
Cuando la pantalla está desbloqueada, al tocar "Holiday" (D), el icono Holiday (d) se
enciende, el frigorífico funciona en modo Holiday. En el modo Holiday, al tocar "Holiday"
(D) el icono Holiday (d) se apaga y el frigorífico sale de la función Holiday. En el modo
Holiday, la temperatura se ajusta automáticamente a 17°C, para que su frigorífico no
genere olores, y también para ahorrar energía.
15
 Loading...