

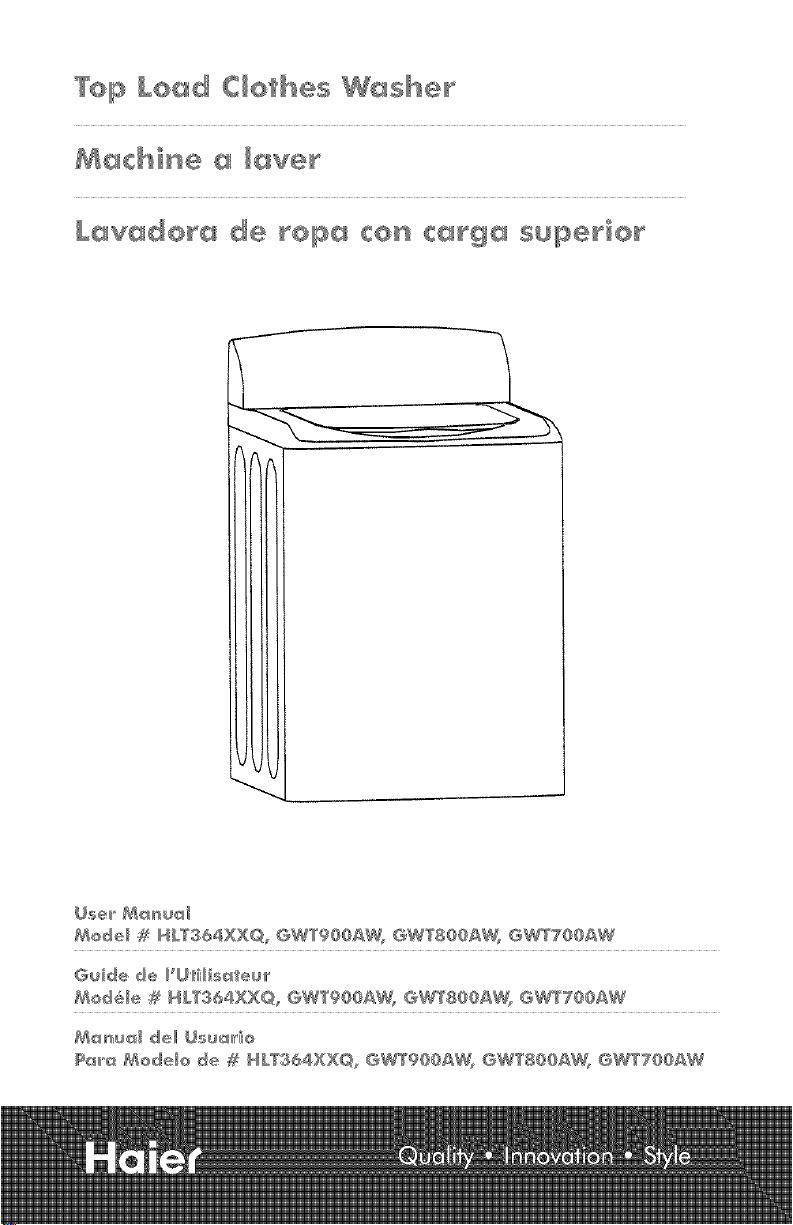
To_ Leed CIo/hes W_she_
k_vedo_e de _o_ con ce_ge s_perio_
_@edel _ MkT@G4XX©, GWT@OOAW_ OWTIOOAW, GW?TOO_W
Guide de _'Ol'_lis_teur
f@ed61e # HkTg64RX©, Gwwg@@_W_ GWWIQQ_W_ GWWTQQ_W
I@_mu_d dell Osu_r'ie
_I_Q _@edeIe de # HkWI64XX©, eWWOOOAW, ewwBooAw, GWWTQOAW
WARNmNG - To reduce the risk of fire, eJectri¢ shock, or iniury
_o persons when using your appJiance_ foJJow _he basic
pre¢au_Jons_ iricJudJng _he follow,rig:
1_ Read aft of the instructions before using this appJiance.
2. Use this appliance only for its intended purpose as described in this
use and care guide_
3_ Use only detergents or softeners recommended for use in a clothes
washer and keep them out of the reach of children_
4_ This washer must be properly installed in accordance with the
installation instructions before it is used_
5_ Never unplug your washer by pulling on the power cord. Always
grasp the plug firmly and pull straight out from the outlet_
6_ Replace immediately worn power cords, loose plugs/power outlets_
7_ Unplug your washer before deanin%
8_ If your old washer is not being used, we recommend that you remove
the doon This will reduce the possibility of danger to children_
9_ Do not operate your washer in the presence of explosive flames_
10_ Do not use washer to wash clothes soaked, spotted or washed in
gasoline, dry cleaning solvents or any other explosive or flammable
substances that could ignite and explode_
11_ Clothes or rags used to clean flammable or explosive materials
should not be washed in the washer till all traces of this material has
been removed, to avoid an accident_
12_ Do not add or mix any flammable or explosive substances to the
wash_
13_ Do not try to remove clothes while the tub or the agitator is movin%
Letit come to a complete stop before use_
14_ Washer loading door must be closed when agitator and tub is
spinning_
15_ Do not operate your washer when parts are missing or parts are
bro!<en_
16_ Do not use the washer for commercial clothes washin%
17_ Do not operate washer unless all enclosure panels are properly in
place_
18_ Do not tamper with contrds_
1
19.
Toreduceriskofinjurydonotallowchildrentoplayinoronthe
washer,
20.
Washer must be connected to proper electrical outlet with the correct
electrical supply.
21.
Proper grounding must be ensured to reduce the risk of shock or fire.
DO NOT CUT OR REMOVE THE GROUNDHNG PLUG. Hfyou do not
have a 3-prong electric receptacle outlet in the wall, have a certified
electrician install the proper receptade_ The wall receptacle MUST be
properly grounded,
22_
Hydrogen gas may be produced if the water heater has not been
used in more than 2 weeks. This could be explosive and can explode
under certain circumstances. Hfthis is the case, before using the
washer, turn on all the hot water faucet's and let the hot water run
for a few minutes. This will let the trapped hydrogen escape. During
this process do not turn on an electric appliance, stool<e, light a
match/lighter or use a flame to avoid an accident, as hydrogen gas
is flammable and can explode.
Risk of d_JJd entroprttent, Before you throw owoy yoor oJd
wosher, tore oJJ the door so thor
chiJdren _oy not eosiJy get tropped inside°
Thank you for using our Haier
product. This easy-to-use manual
Model number
will guide you in getting the best
use of your washer.
Remernber to record the model and
Serial number
serial numben They are on a label
in back of the washer.
StapJe your receipt to your rnanuak
Yoo will need it to obloJn worronty service,
Date of purchase
2
PAGE
SAFETY mNSTRUCTmON$ .................................................................... I
OPERA'rJNG mNSTRUCTION$ ........................................................ 4=8
Parts and Features ................................................................................ 4
Operations .......................................................................................... 5
NormaJ Operating Sounds .................................................................. 7
Lint Filter .............................................................................................. 8
Safety Lid Switch .................................................................................. 8
CARE AND CLEANING GUIDE ............................................................ 9
Cleaning and Maintenance .................................................................. 9
Moving and Vacationing ...................................................................... 9
Storage of your Wasiqer ........................................................................ 9
TROUBLESHOOTING ...................................................................... 1O
INSTALLATION _NSTRUCTmONS ...................................................
Tools and Materials Required .............................................................. 12
Un pacld ng you r Washer .................................................................... 13
Leveling your Washer ........................................................................ 13
Steps for Installation .......................................................................... 18
ELECTRICAL CONNECTmONS .......................................................... 16
Grounding Instructions ...................................................................... 16
Power Interruptions ............................................................................ 16
WARRANTY ...................................................................................... 17
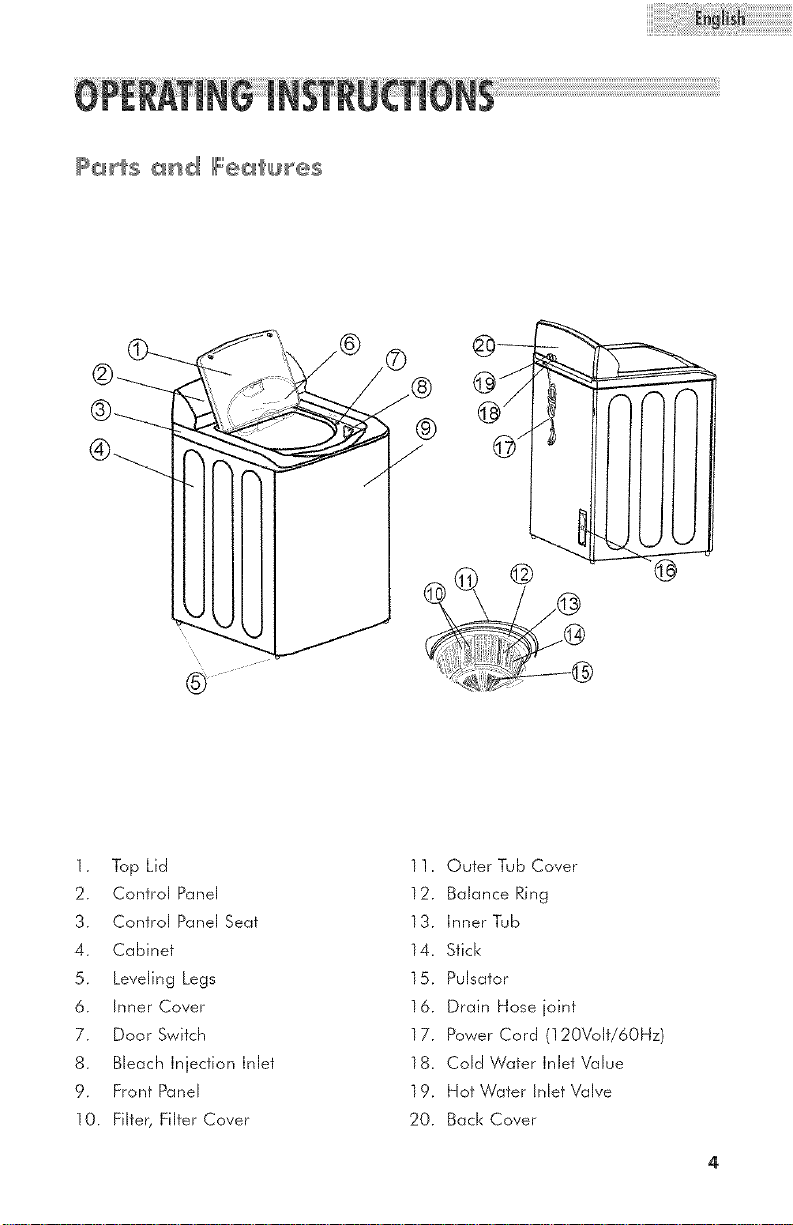
P_ts _Hd Features
1. Top Lid
2. Control Panel
3. Control Panel Seat
4. Cabinet
5. Leveling Legs
6. Inner Cover
7. Door Switch
8. Bleach Injection Inlet
9. Front Panel
10. Filter, Filter Cover
I 1. Outer Tub Cover
12. Balance Ring
13. Inner Tub
14. Stick
15. Pulsator
16, Drain Hose joint
17, Power Cord (120Vdf/60Hz
18, Cold Water Inlet Value
19, Hot Wafer inlet Valve
20, Back Cover
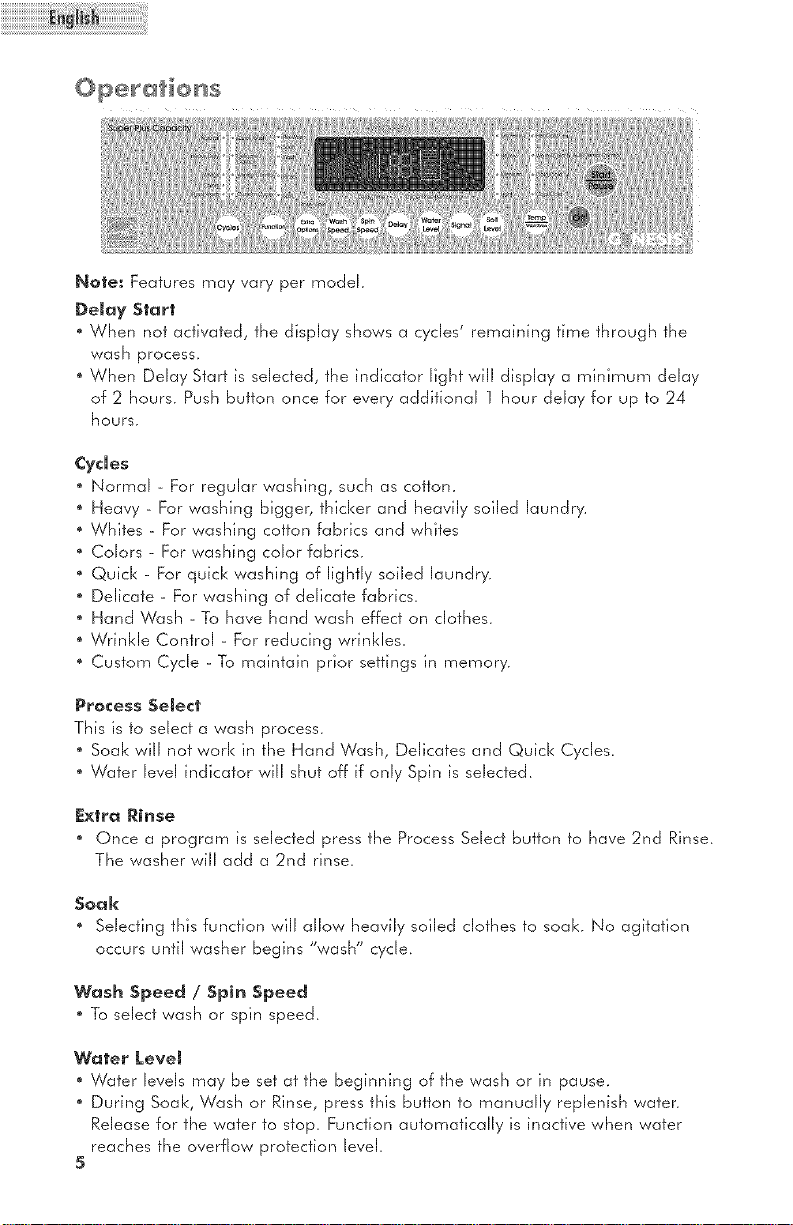
NQte: Features may vary per model.
Delay Start
When not activated, the display shows a cycles' remaining time through the
wash process.
When Delay Start is selected, the indicator light will display a minimum delay
of 2 hours. Push button once for every additional 1 hour delay for up to 24
hours,
Cycles
Normal - For regular washing, such as cotton.
Heavy - For washing bigger, thicker and heavily soiled laundry.
Whites - For washing cotton fabrics and whites
Colors - For washing color fabrics.
Quick - For quick washing of lightly soiled laundry.
Delicate - For washing of delicate fabrics.
Hand Wash - To have hand wash effect on clothes.
Wrinkle Control - For reducing wrinkles.
Custom Cycle - To maintain prior settings in memory.
Precess Select
This is to select a wash process.
Soak will not work in the Hand Wash, Delicates and Quick Cycles.
Water level indicator will shut off if only Spin is selected.
Extra Rinse
Once a program is selected press the Process Select button to have 2nd Rinse.
The washer will add a 2nd rinse.
Soak
Selecting this function will allow heavily soiled clothes to soak. No agitation
occurs until washer begins "wash" cycle.
Wash Speed / Spin Speed
To select wash or spin speed.
Water J.eveJ
Water levels may be set at the beginning of the wash or in pause.
During Soak, Wash or Rinse, press this button to manually replenish water.
Release for the water to stop. Function automatically is inactive when water
reaches the overflow protection level.
5
¢ycmeSignal
Signal volume can be adiusted soft-loud or off,
Soil Level
Select clothes soil level.
Wash cycle increases 2 minutes for each level increased.
Temperature Wash / Rinse
. To select inlet water temperature for wash and rinse.
Auto Temp Control
" Models with this feature will automatically adiust water to the proper
temperature.
Power Off
" If washer is ON push button once to shut off the power.
Start / Pause
. Once washer is powered and selections are chosen, push this button once to
start the wash.
" While unit is working, push this button once to pause it.
" If unit is in pause mode, push this button once to resume operation.
Delay Start indicator
. Indicates remaining minutes when cycle is in progress.
" Indicates remaining hours during delay process.
" Indicates faults codes or conditions that are not normal.
Tkne List of Each Program (minute)
PROGRAM
Whites
TOTAL TiME (rain}
including Soak Not Including Seal<
About 75-81 About 45-51
Heavy About 77-83
Normal About 59-69
Quick Wash S
Delicate
Hand Wash _
About 47-53
About 39-49
About 25
About 36-42
About 38-44
Note: Total time may be affected by water inlet and drain time. It may also be
affected by the water pressure. Normal, Heavy and Cotton programs
could combine the process of soak during which the washing machine
first soaks for about 20-30 minutes with slight agitation after water filling
and then begins to wash.
Loading the Washer
Load each item loosely.
Separate the white and colored clothes. Separate heavy clothes from light
clothes.
Carefully check all pockets and cuffs for small items. They can easily slide into
the tub and may damage the tub.
Pre-freaf all stains and heavily soiled areas for best results.
Do not overload your washer.
When loading wet items, keep wafer level high enough so items can float
easily in the wafer.
Close the door properly after loading the clothes. If you keep the lid up, the
agitation will not start.
Proper Use of Detergent
If is good washing practice to add the detergent fo the water before you add
the clothes so fhaf the detergent can work effectively on you clothes.
If is recommended to use HE (High Efficiency Detergent). This washer needs
less suds fo give good wash performance.
Note: You can use less or more detergent depending on the size of the load,
wafer type in your living area whether it is soft or hard and whether the
clothes are heavily soiled or lightly soiled.
Bleach Dispenser
Bleach dispenser is located on front corner under the
loading door.
Pour in recon-lmended amount of bleach into dispenser
during the first wash fill.
Note: Use only liquid bleach in dispenser.
Warning: * Be careful not to spill undiluted bleach on the washer cabinet or
your clothes. As if is a strong chemical, if n-lay damage some of you
clothes or the finish of the washer if not properly diluted.
Use the manufacturer's chart, on product container for
recommended use of liquid or powder bleach.
The following sounds are normally heard during the operation of the washer:
, Tumbling sounds: This is normal as the heavy wet clothes in the washer are
continuously being tossed around.
" Air rushing noise: This happens when the washer tub spins af very high RPM.
" Wash and Rinse cycles going on and off will also make clicking sounds.
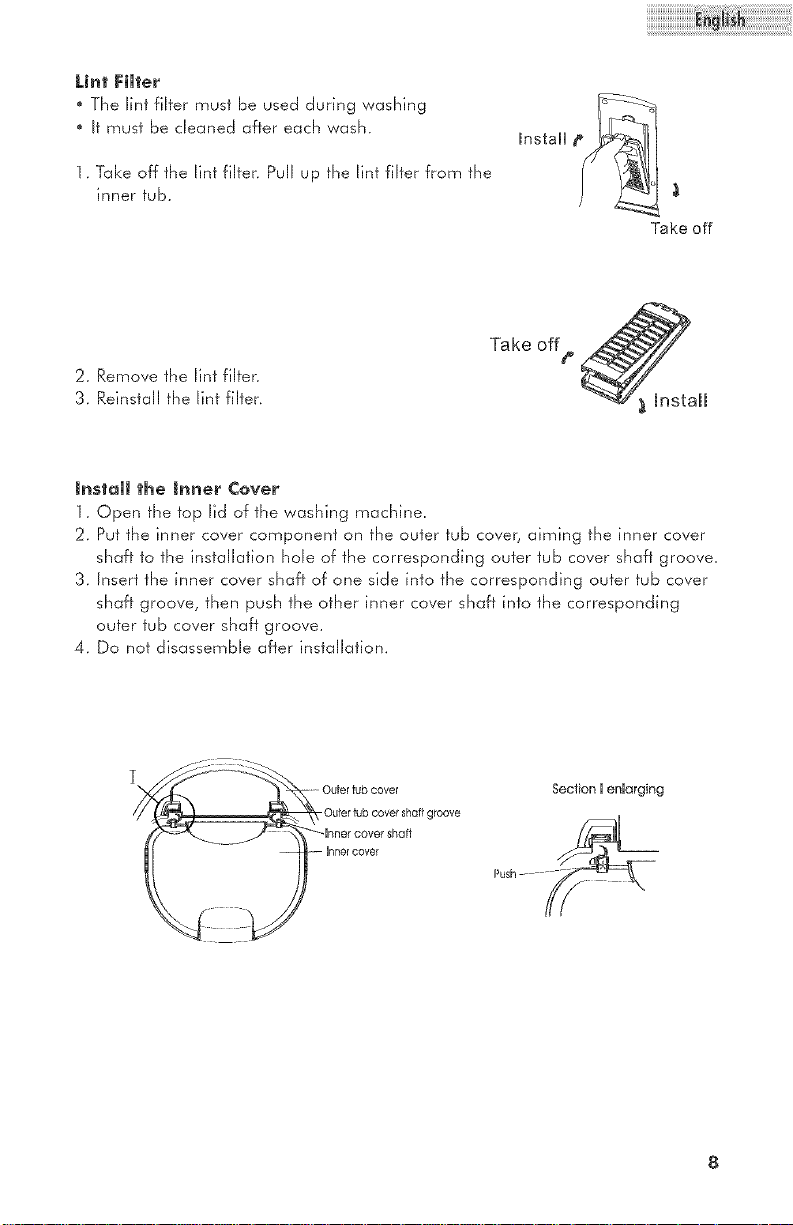
Mnt Fimter
The lint filter must be used during washing
It must be cleaned after each wash.
1. Take off the lint filten Pull up the lint filter from the
inner tub.
Take off
2. Remove the lint fiJfen
3. Reinstall the lint filter.
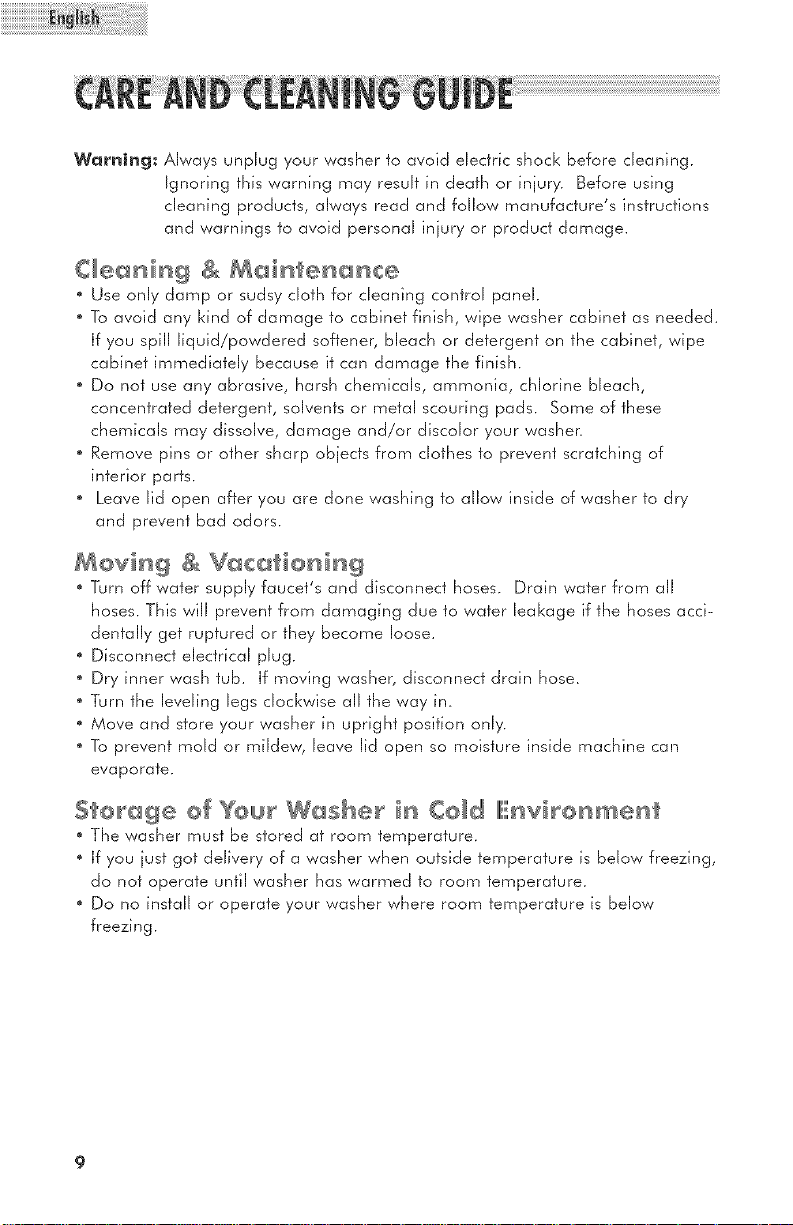
install the inner Cover
1. Open the top lid of the washing machine,
2. Put the inner cover component on the outer tub cover, aiming the inner cover
shaft to the installation hole of the corresponding outer tub cover shaft groove,
3. insert the inner cover shaft of one side into the corresponding outer tub cover
shaft groove, then push the other inner cover shaft into the corresponding
outer tub cover shaft groove.
4. Do not disassemble after installation.
-Outer tub covey shaft gloove
Section I enlarging
Warning_ Always unplug your washer to avoid electric shock before cleaning,
Ignoring this warning may result in death or iniury. Before using
cleaning products, always read and follow manufacfure's instructions
and warnings to avoid personal injury or product damage.
C_e_H_ng & M_inten_nce
" Use only damp or sudsy cloth for cleaning control panel.
" To avoid any kind of damage to cabinet finish, wipe washer cabinet as needed.
if you spill liquid/powdered softener, bleach or detergent on the cabinet, wipe
cabinet immediately because it can darnage the finish.
" Do not use any abrasive, harsh chen-licals, ammonia, chlorine bleach,
concentrated detergent, sdvenfs or metal scouring pads. Some of these
chemicals n-lay dissolve, damage and/or discolor your washer.
" Remove pins or other sharp obiects from clothes to prevent scratching of
interior parts.
Leave lid open after you are done washing to allow inside of washer to dry
and prevent bad odors.
Moving & V ¢ tien ng
" Turn off water supply faucet's and disconnect hoses. Drain water from all
hoses. This will prevent from damaging due to water leakage if the hoses acci-
dentally get ruptured or they become loose.
" Disconnect electrical plug.
" Dry inner wash tub. If moving washer, disconnect drain hose.
" Turn the leveling legs clockwise all the way in.
" Move and store your washer in upright position only.
" To prevent mold or mildew, leave lid open so moisture inside machine can
evaporate.
S_'@_ge 0@You_ W_sBe_ in C@_d IIIl!!!!:nvi_onment
" The washer must be stored af room ternperafure.
" if you iust got delivery of a washer when outside temperature is below freezing,
do not operate until washer has warmed to room temperature.
" Do no install or operate your washer where room temperature is below
freezing.
Washer does not operate:
Check if unit is plugged in.
Check if the electrical wall receptacle is of proper voltage.
Check if the circuit breaker needs to be reset or if the fuse needs to be
replaced.
Check if the washer is overloaded: load may need to be re-balanced and
clothes may need to be redistributed.
Check if the lid is open. You may have to close the lid properly.
The washer pauses in some cycles. This is normal in delicate of hand-washable
cycle, which has short soak period where your clothes are being soaked for
very short period of time. You will not hear washer operation for a short peri-
od of time. When the soak time is over, it will start automatically.
Problems with water:
Not enough water coming out: Water faucet may need to be turned on fully.
Water hoses may be tangled up . Straighten up hoses. Check water level
selection, it may need to be readiusted.
Water temperature is incorrect: Check your water heater temperature. Hot
water needs to be at a temperature at least 120°F - 140°F (49°C - 60°C).
Check to make sure the inlet hoses are properly connected. (e.g. hot to hot
and cold to cold.)
Water leaks'. This is due to not properly installing drain hose or fill hoses. Your
home drain may be clogged or having constant waster pressure. You may
need to tighten hoses, check the plumbing or call a plumben
Water will not drain: This is due to not installing your drain hose properly. You
may need to connect the drain hose properly. Check the position of the drain
hose. Jnorder to drain properly, make sure that top of drain outlet is less then
4 ft. (1.2m) above the floor.
10
Washer is making noise:
Washer may need to be reinstalled. (Check washer installation section.)
Washer load may need to be re-balanced, as the load may be uneven.
Coins, loose change, buttons or other heavy obiects could make noise (read
Operation Guide - Normal Operating Sounds.)
Squealing Sounds'. Due to overloaded wash tub.
Vibration Noises: Due to not leveling washer properly on the floor and uneven
distribution of clothes in the tub.
Problems with clothes:
Clothes are too wrinkled: this is due to improper sorting, overloading and
washing in too hot water repeatedly. Avoid overloading and resort your load.
Do not mix heavy clothes such as work clothes with light clothes such as blous-
es, light shirts and delicate items. You may need to wash in warm or cold
water.
Have soap residue', detergent may not be dissolving in water. Check water
temperature or you need to add detergent as wash tub is being filled with
water before you load your clothes to avoid soap residue on clothes.
Spots or stains on your clothes', this is due to incorrect use of fabric softener.
You many need to read proper instructions on the container and follow proper
directions for using the soflenen
Clothes are grayed or yellowed: this is due to not pouring enough detergent
for large loads, you may have to add more detergent to the load.
Clothes are ripped and have holes/excessive wear and tear: this is due to
sharp objects such as pins and belt buckles left in pockets. You will need to
remove small loose sharp objects. Fasten belts, zippers, metal snaps etc.
Check if you are using undiluted bleach, never add undiluted bleach to wash.
Trouble Codes
E0
E!
E2
E3
E4
E5
E7
11
Reason
Top lid not closed during delay start sequence
Blockage of drain hose.
Top lid not closed during wash operation
The washer is out of balance
Water inlet valve closed
The water pressure is too low
The water level sensor fault - Call service
The communication fault - Call service
,[ _
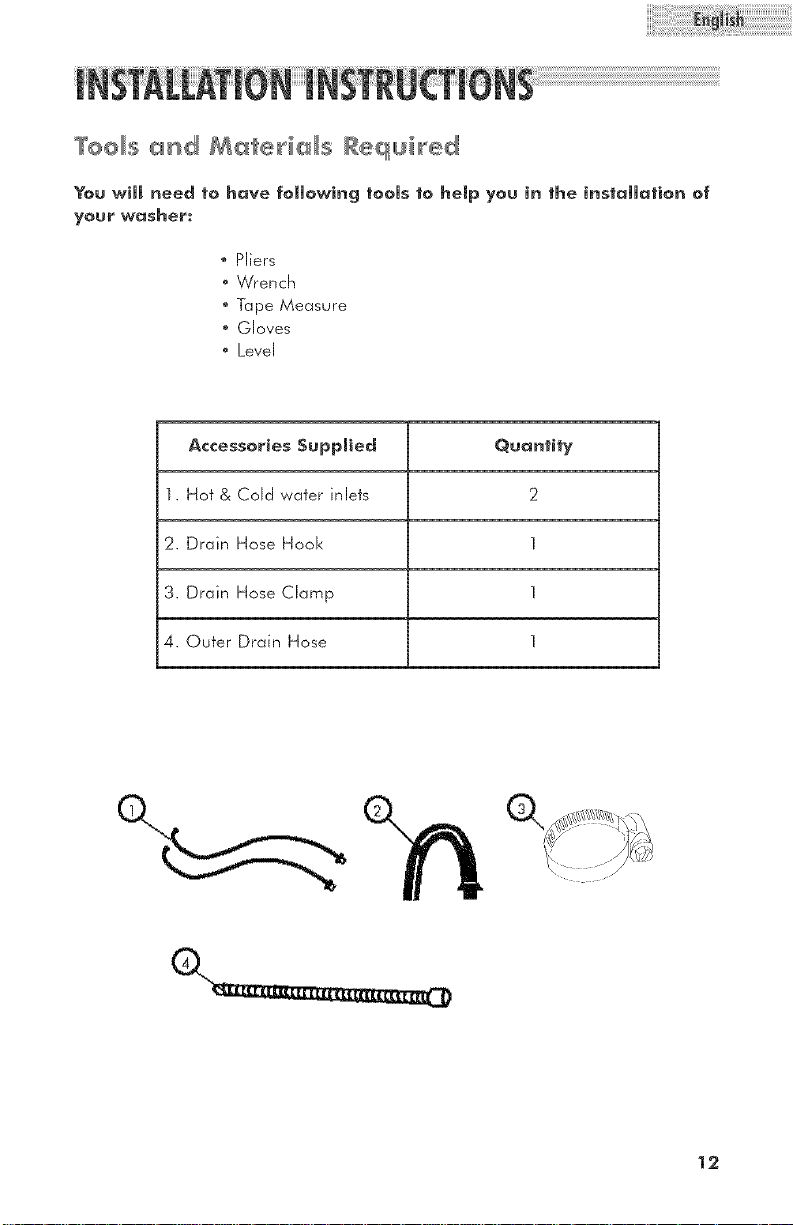
You will need to have foUowing tools to heJp you in the installation of
your washer:
Pliers
Wrench
Tape Measure
Gloves
Level
Accessories Supplied Quantity
1. Hot & Cold water inlets 2
2. Drain Hose Hod< 1
3. Drain Hose Clamp 1
4. Outer Drain Hose 1
12
" RemoveaJJ pad<ing materials. This includes fhe foam base and aJJadhesive
tape holding the washer accessories inside and outside.
Open the top lid to remove the styrofoam drum brace. Pull to remove.
Note: Save drum brace. Reinstall when moving the washen
Inspect and remove any remains of packing, tape or printed materials before
using the washer.
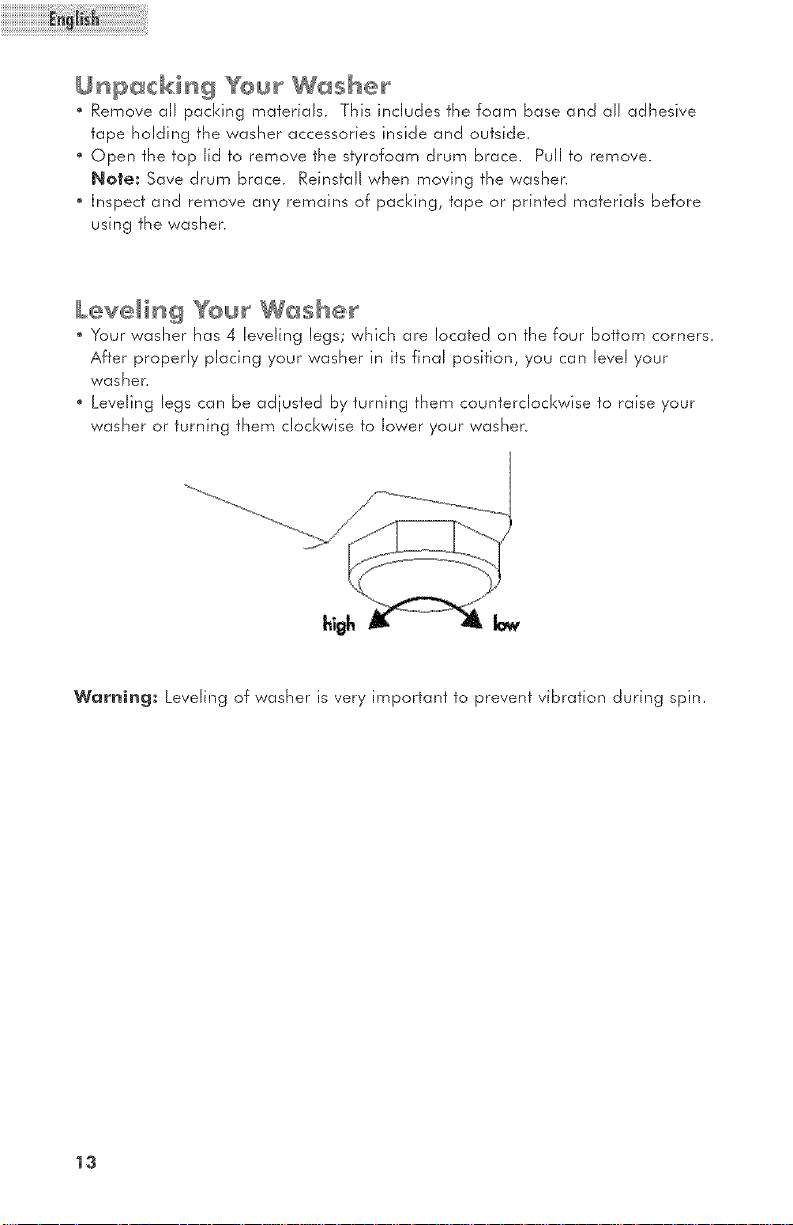
BeveH_g Yoo_ W_she_
Your washer has 4 leveling legs; which are located on the four bottom corners.
After properly placing your washer in its final position, you can level your
washer.
Leveling legs can be adiusted by turning them counterclockwise to raise your
washer or turning them clockwise to lower your washen
high _ _ low
Warning: Leveling of washer is very important to prevent vibration durhqg spin.
18
Select a suitable location for the washer on a hard even surface away from
direct sunlight or heat source e.g. radiators, baseboard heaters, cooking
appliances etc. Any floor unevenness should be corrected with the leveling
legs located on the bottom corners of the washer. The washer must be placed
at room temperature. You must not place washer where the temperature is at
below freezing.
®nstamJingYour Washer
Read installation instructions carefully before installation.
Cc_ution:
If, after completing these steps, you are unsure that unit is properly
installed, contact a qualified installer. To ensure that your washer is
properly installed it is recommended that it be installed by a certified
instalJen
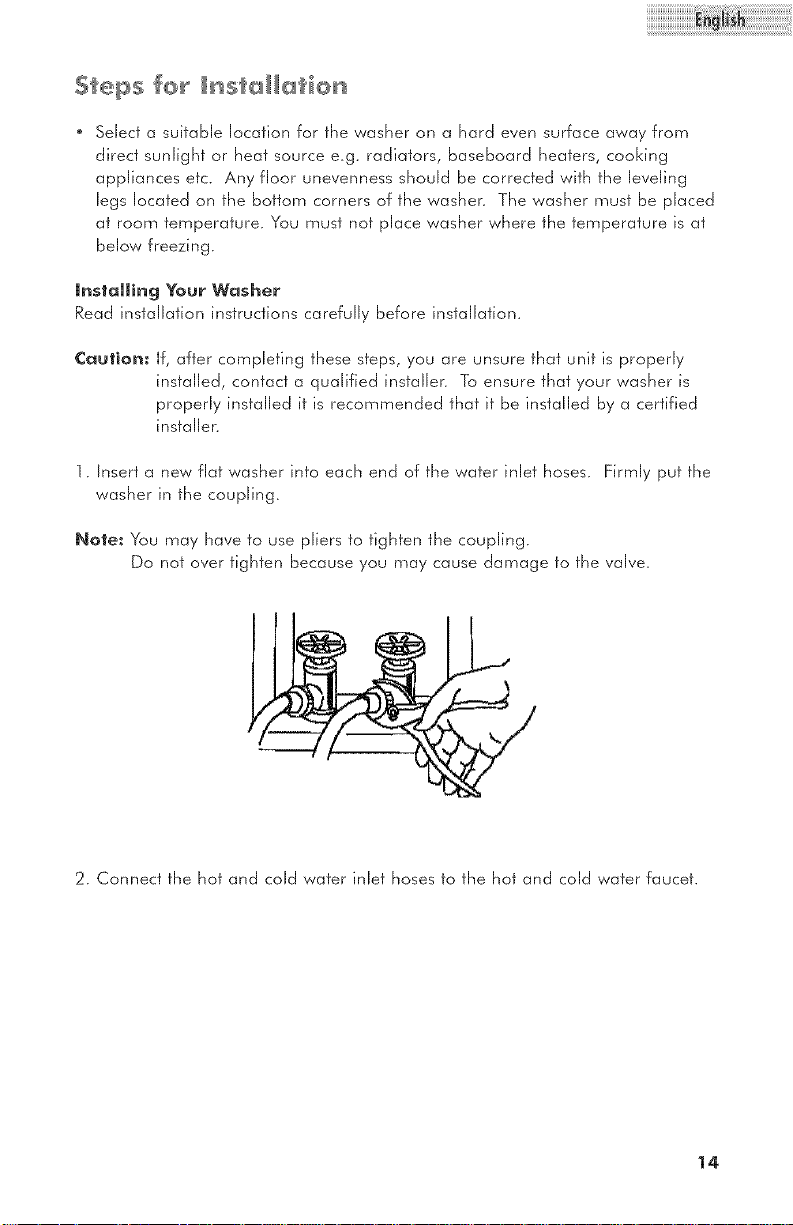
1. Insert a new flat washer into each end of the water inlet hoses. Firmly put the
washer in the coupling.
Note: You may have to use pliers to tighten the coupling.
Do not over tighten because you may cause damage to the valve.
2. Connect the hot and cold water inlet hoses to the hot and cold water faucet.
14
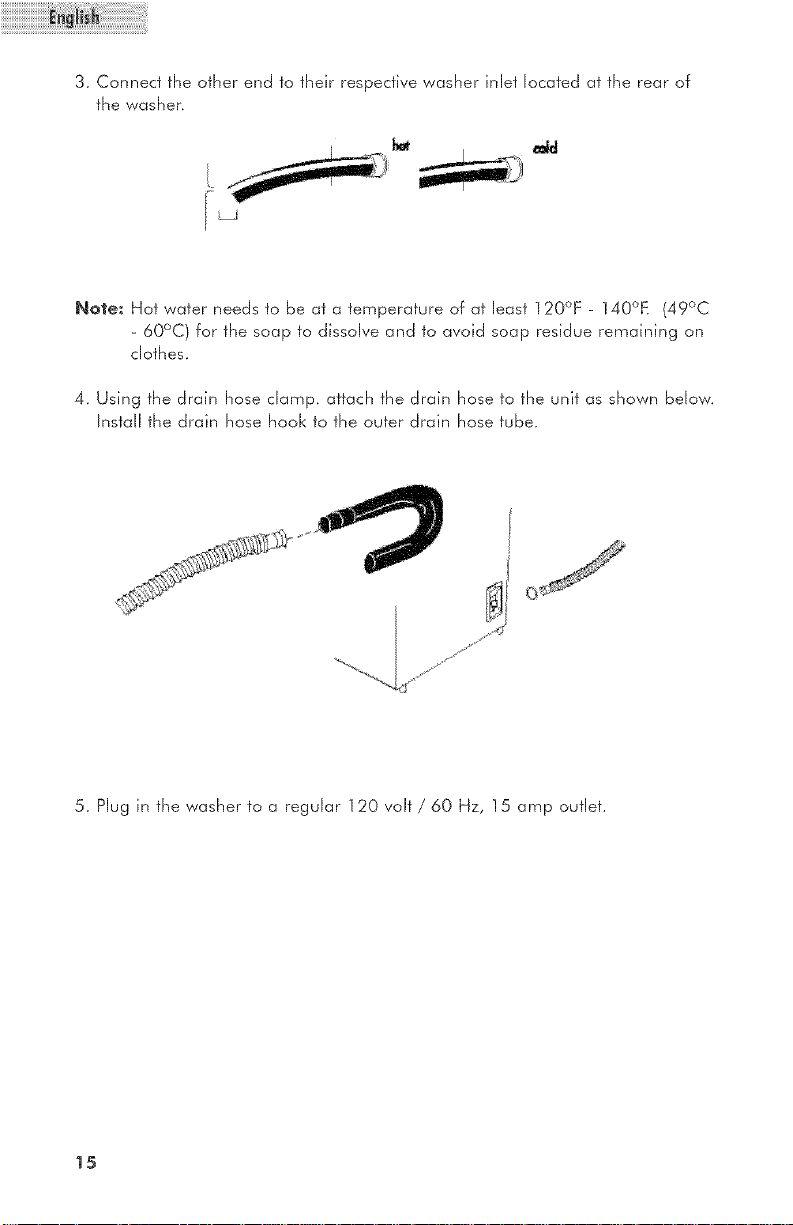
3. Connect the other end to their respective washer inlet located at the rear of
the washer,
Note: Hot water needs to be at a temperature of at least 120°F - 140°E (49°C
- 60°C) for the soap to dissolve and to avoid soap residue remdning on
clothes.
4. Using the drain hose clamp, attach the drain hose to the unit as shown below.
Install the drain hose hook to the outer drain hose tube.
S
5. Plug in the washer to a regular 120 volt / 60 Hz, 15 amp outlet.
15

HSt eCtiOHS
This appliance must be grounded. In the event of an decfricd short circuit,
grounding reduces the risk of electric shock by providing an escape wire for
the electrical current. This appliance is equipped with a cord having a grounding
wire with a grounded plug. The plug must be hqserfed into an outlet that is
properly hqsfalled and grounded.
" improper use of the plug can result in a risk of electric shock.
" Consult a qualified electrician or service person if the grounding
instructions are not completely understood or if in doubt as to
whether the appliance is properly grounded.
Wiring Requirements
This appliance must be plugged into at least a
15 AMP ] 10-120 VOLT,
60 HZ GROUNDED OUTLET.
Nole: Where a standard two-prong outlet is
encountered, it is the personal
responsibility and obligation of the
consumer to have it replaced with a
properly grounded three-prong outlet.
Extension Cords::
Vv'edo not recommend that you use an extension cord.
Power _te_upt_eHs
Occasionally, there may be power interruptions due to thunderstorms or other
causes. Remove the power cord from the AC outlet when a power outage occurs.
When power has been restored, re-plug the power cord to AC outlet. If the out-
age lasts for a prolonged period of time, clean the washer before using it again.
16

In Home Service
FuffONEY0arWarr0nty
For ] 2 months from the date of original
retail purchase, Haier will repair or replace
any part free of charge including labor that
fails due to a defect in materials or work_
manship_
LimitedWarra01y
After one year from the original retail
purchase date, Haler will provide a part at
no cost, as indicated below, to replace said
part as a result of a defect in materials or
workmanship. Haler is solely responsible
for the cost of the part. All other costs such
as labor, trip charge, etc are the responsi-
bility of the owner.
SecondthroughFihhYour
Haier wi!l provide the outer washtub and
related outer tub assembly parts should the
part fail to hold waten
SecondthroughSevoothYoor
Haier will provide the inner stainless steel
wash tub if defective in material or work-
manship.
N0te: This warranty commences on the date
the item was purchased and the original
purchase receipt must be presented to the
authorized service representative before
warranty repairs are rendered.
Excepti0ns:CommerdaJ or Rental Use
'Warranty
90d0ysIoborfrom dote0f originoi porchose
90dogsportsfromdoteof originol pnrchose
Hootherworrontyopplies
ForW0rr00tyService
Contact your nearest authorized service
centen All service must be performed by a
Haier authorized service centen For the
name and telephone number of the nearest
authorized service center please call 1_877-
337_3639.
BeJ0rocnHJngplonsohnveovoiinblothe fdl0wing
inforrnotion:
Model number and serial number of your
appliance_ The name and address of the
dealer you purchased the unit from and the
date of purchase.
A clear description of the problem.
A proof of purchase {sales receipt).
Thiswncr0ntyc0vors0ppli0nceswithinthe ¢00tinent01
UnitedStores,PuertoRicoond (onodo.Whntis not
coveredb_/thinworrooty:
Replacement or repair of household fuses,
circuit breakers, wiring or plumbing.
A product whose original serial number has
been removed or altered.
Any service charges not spedfically identi-
fied as normal such as normal service area
or hours.
Damage to clothing_
Damage incurred in shipping.
Damage caused by improper installation or
maintenance,
Darnage from misuse, abuse accident, fire,
flood, or acts of nature.
Damage from service other than an
authorized Haier dealer or service centen
Damage from incorrect electrical current,
voltage or supply.
Damage resulting from any product
modification, alteration or adiustment not
authorized by Haien
Adjustment of consumer operated controls
as identified in the owner's manual
Hoses, knobs, lint trays and all attachments,
accessories and disposable parts.
Labor, service transportation, and shipping
charges for the removal and replacernent of
defective parts beyond the initial 12_month
period.
Damage from other than normal household
use,
Any transportation and shipping charges_
THISLIMITEDWARRJ_HTYISGIVENIH LIEUOFALL
OTHERWARRAHTIES,EXPRESSEDOk,IHCWDIHGTHE
WARRAHTIESOFMERCHANTAEILITYAHDFITHESSFOR
APARTICUD_RPURPOSE
The remedy provided in this warranty is
exclusive and is granted in lieu of all other
remedies.
This warranty does not cover incidental or
consequential damages, so the above
limitations may not apply to you. Some
states do not allow limitations on how long
an implied warranty lasts, so the above
limitations may not apply to you.
This warranty gives you specific legal rights,
and you may have other rights, which vary,
from state to state.
Haler Arnerica
New York, NY 10018
17

1_ Lisez routes Jes instructions avarmt d'utiJiser votre appareiJ.
2_ Utilisez cet appareil pour le but proiete cornme decrit dans ce guide
d'usage et d'entretiens_
3_ Utilisez seulernent le savon ou adoucissant recornmendes pour les
veternents et gardez les hors de la portee des enfants_
4_ Cette machine a laver doit etre installee proprernent en accordance
avec les instructions d'installation avant d'etre utilisee_
5_ Ne debranchez iamais votre machine a laver en tirant sur la corde
d'alirnentation_ Saisissez toujours la fiche et retirez la de la sortie
murale_
6_ Replacez irnrnediaternent les cordons du secteur uses, les prises lach
es, et prises du courant electrique_
7_ Debranchez votre machine avant de la nettoyer_
8_ Si vous n'utilisez plus votre andenne machine a laveb nous vous rec-
ornrnendons de retirer la porte_ Ceci reduira le risque d'un danger
aux enfants_
% N'operez pas votre machine dans la presence des flarnrnes explosives_
10_ N'utilise,z pas vo,tre machine pour nettoyer des veternents irnb,ibes ou
laves a I aide d essence, dans un solvant de nettoyage ou n irnporte
quelles autres substances qui pourront s'enflammer et exploser_
11_Tousles tissues utilises pour nettoyer des materiels enflamrnables ou
explosifs ne doivent pas etre laves iusqu'a ce que route trace de ces
materiels a ere dirninee pour eviter un accident_
12_ N'aioutez et ne mdangez aucunes substances enflammables ou
explosives au lavage_
13_ N'essayez pas de retirer des vetements quand letambour et agiteur
sont en marcbe_ Attendez pour qu'dle sarrete completement avant de
Vutiliser.
14_ Quand I'agiteur et tambour sont en plein fonctionnement, la porte de
la machine doit etre fermee_
15_ N'utilisez pas votre machine s'il ya des parties qui manquent ou sont
endornrnagees_
16_ N'utilisez pas la machine pour laver des veternents cornrnercials_
17_ N'operez pas la machine afin que tousles panneaux de cloture sont
proprement en place. 1

18_N'dterezpasaveclescornrnandesdecontrde_
19_Afindereduirelerisqued'undangernepermettezpasauxenfantsde
jouerdansousurlamachinea lavec
20_Lamachinealaverdoitetrerdieepropremeneta lasortiedectrique
avecunealirnentationdectriquecorrecte_
21_Cettemachinedoitetreraisea terreproprementpourreduirelerisque
d'unchocelectriqueoud'uneincendie_Necoupezpasetn'enlevez
paslaprisedernisea terreSivousn'avezpasunesortiedectriquea
3broches,assurezvousqu'unelectricienqualifieinstalleunesortie
appropriee_LasortiemuraleDOHTetreprorprernentraisea terre_
22_Ungazd'hydrogenepeutetreproduitsilechauffeeaun'apasere
utilisependant2 sernainesouplus.Cecipeutetreexplosifetpeuts'd-
lurnerdanscertainescirconstances.Sic'estlecas,avantd'utiliserla
machinea laver,ouvreztouslesrobinetsd'eauchaudeetlaissezI'eau
ecoulerpourqudquesminutes_Cecipermettraaugasd'hydrogene
des'echapper.Durantceproces,n'allurnezaucunappareildec-
trique,nefumezpas,n'allurnezpasdesallurnettesetn'utilisezaucune
flamrnepoureviterunaccident,commelegazd'hydrogeneest
enflamrnableetpeutexploder_
Nousvousrernerdonsd'avoirutilis-
erunproduitHaier_Cemanuel
facileasuivrevousguiderapour
obtenirunemeilleurutilisationde
Numero du model
votremachinea laver_
N'oubliezpasd'enregistrerle
Numero de serie
numerodeserieetdumodelde
votremachine,,IIssontsituessur
Date d'achat
uneetiquettesurledosdela
machine_
Agraffez votre recu d'achat au manuel.
Veus en aurez besoin pour obtenir Je service de Ja garantie.

PAGE
iNSTRUCTIONS DE SECURJTE ........................................................ I
JNS'rRUC'r_ON$ D'OPERATmON .................................................. 4-9
Pieces ef Caraderistiques ...................................................................... 4
Operations ...................................................................................... 5-7
Les sonds d'operafion normaux ............................................................ 7
Le filfre de fibre .................................................................................... 8
Commufafeur de securife .................................................................... 8
GUmDE DE NETTOYAGE ET DE SOJNS .............................................. 9
Neffoyage ef Enfrefiens ........................................................................ 9
Demenage ef Vacances ........................................................................ 9
Emmagasinage de la machine a laver .................................................. 9
DEPAN NAGE ............................................................................ 10-1 1
iNSTRUCTIONS D'JNSTALLATmON ...............................................
Les oufils ef manferiaux necessaires .................................................... 12,
Deballage de vofre machine a laver .................................................. 13
Nivelez la machine a laver ................................................................ 13
Les efapes d'insfa!lafion ................................................................ 13-14
LE CONNECTIONS ELEC'rR|QUES .................................................. 15
Instructions de raise a terre ................................................................ 15
Panne decfrique ................................................................................ 15
GARANTJE ...................................................................................... 16

P_eces et C_¢_e_s_qees
1. Couverde superieur
2. Panneau de Comn-lande
3. Siege du panneau de Commande
4. Cabinet
5. Les pieds pour niveJer
6. Couverde inferieur
7. Comn-I@ateur de Ja porte
8. Admission d'iniection d'agent de
blanchissemenf
9. Panneau de devant
10. Filfre, Couvercle du filtre
I 1. CouveHure exferne du baquet
12. Anneau d'equilibre
13. Baquet interieur
14. Baton
15. Pulsateur
16. Joint de tuyauterie souple de
vidange
17. Corde d'alimenfafion
(120Volt/60Hz )
18. Valve d'admission d'eau froide
19. Valve d'admission d'eau chaude
20. Couverde du dos

Note:LescaracterisfiquespeuvenfvariersdonJesmodels.
Debutretarde
Quand la machine n'est pas active, le panneau vous montrera Jes cycles et Je
temps a travers le proces du lavage.
" Quand le Debut ddaye est choisi, la lumiere de I'indicateur affichera un delai
de 2 heures . Appuyez sur le bouton une fds pour chaque heure addifionelle
iusqu'a 24 heures.
cycmes
NormaJe- Pour un lavage regulier - Comme Je coton.
Lourd- Pour un Iplus grand lavage, plus Iourd et trop sale.
Blancs- Pour un lavage de vetements en cotton et blancs.
Couleurs - Pour un lavage de vetements en couleur.
Rapide- Pour un lavage rapide des vetements qui ne sonf pas trop sales.
Delicat - Pour un lavage de vetemenfs qui sont delicats_
Laver a la main - Pour un effet d'un lavage a la main.
Confrole des rides - Pour reduire les rides des vetemenfs.
Cyclefaitsurcommande- Pour maintenirlesarrangementsanterieursdansla
nqemoire.
Choi× du Proces
Ceci est pour choisir un proces du lavage.
Trernper, ne foncfionnera pas sur les cycles Laver a la main, Ddicats, et
Rapide_
L'indicateur du niveau d'eau s'eteingnera seulement si vous chdsissez la rota-
tion.
Rincage de plus
Une lois un programme est chdsi, appuyez le boufon de ce proces pour avolr
un second rincage. La machine a laver ajoutera un second rincage.
Tremper
En choisissant ce cycle , vous permetferez aux vetements trop sales d'etre
trempes . Aucune agitation n'occurera jusqu'a ce que la machine a laver com-
mence le cycle de lavage.
Vitess÷ du lavage/VJtesse de la rotation
. Pour choidr la vitesse du lavage e rotation.
_JVe_U _e_U
Le niveau d'eau peut etre choisi au debut du lavage ou durant la pause
Durantlelavage, rincage, ettremper, appuyezsurceboufon pourajouter
d'eau manuellemenf. Relachez pour que I'eau s'arrette. La fonction est
automafiquement inactive quand I'eau atteint le niveau de protection de
debordement.

Signal du cycle
Le volume du signal peut etre aiuste ou sur doux, fort, ou eteint.
Niveau de la salet÷
. Choisissez le niveau des vetements flop sales.
" Le cycle du lavage augmentera de 2 minutes pour chaque niveau augmente.
Temperature du BavageiRJncage
Pour chddr la temperature d'eau pour le lavage et Jerincage.
Control de temperature Automatique
. Le models avec les caracterisifques, ajusteront automatiquement la tempera-
ture d'eau.
Couran_' Eteint
Si Ja machine a laver est sur le ON, appuyez le bouton une lois pour I'etein-
dre.
Debut/Pause
. Une lois la machine esf en marche et les choix sont choisis, appuyez Je boufon
une fob pour debuter le lavage.
" Durant la fonction de la machine, appuyez Je bouton une lois pour une pause.
" Si I'unite est sur la mode Pause, appuyez le bouton pour resumer I'operation.
Jndicateur d'un debut deJaye
Indique les minutes restanfes quand le cycle est en progres .
Indique les heures restantes durant le proces de delay
Jndique les codes fausses ou con@ions qui ne sont pas normales
Liste de temps de cheque programme (minute)
PROGRAM
BJancs
Lourd
Normal
Lavage
rapide
TEMP TOTAL (mini
Jnclus le lrempqge Sans ]ndus du lrempage
A peu pres A peu pres
75-81 45-51
A peu pres A peu pres
77-83 47-53
A peu pres A peu pres
59-69 39-49
A peu pres
25
Delicat
Lave a la
main
Hote: Le temps total peut etre affecte par le temps d'admission ef le temps d'e-
gout. II peut etre affecte aussi par la pression de I'eau. Les programmes
du Cotton, Normal, Lourd peuvent combiner le proces de tremper quand
la machine a laver trempe les vetements pour 20-30 minutes avec une
agitation legere apres que I'eau salt remplie et le lavage commence.
6
A peu pres
36-42
A peu pres
38-44

Chargement de machineamayer
" Chargez chaque piece separetement
" Separez le blanc des couJeurs. Separez Jes veternents Iourds des vetements leg-
ers.
" Exarninez les poches ef rnanchette pour des objets petits . iis peuvent giisser
facilement dans le baquet et I'endomrnagen
" Traitez en avances routes les taches et les endrdts qui sont trap sales pour un
meilleur result@.
" Ne surchargez pas Ja machine a laver.
" Quand vous chargez des vetements mouiJles, gardez le niveau d'eau haut
pour que les vetements fiottent facilernent dans I'eau.
" Ferrnez la porte proprernent apres avoir charge les veternents. Si vous gardez
le couvert ouvert, I'agitation ne cornrnencera pas.
Usage prapre du detergent
, C'est une bonne idle d'aiouter le detergent a I'eau avant d'y mettre les vete-
ments, comrne ca Je detergent travaiilera efficacernent.
" On recornrnande que vous utilisiez un detergent HE (Haute efficacite) . Cette
machine a laver a besom d'avoir rndns de mousse de savon pour un ban
lavage.
Note: Vous pouvez utiiiser plus ou mains le detergent dependant de la faille de
votre chargement, de la qualite d'eau dans votre aientours , si I'eau est
douce ou forte et si les veternents sont trap ou mains sales.
Le distrJbuteur de m'eau de javem
, Le distributeur de I'eau de iavel est situe dans le coin de
devant sous la porte dechargement.
" Versez le rnontant d'eau de iavel recornrnande dans le
distributeur en merne temps que I'eau.
Note: Utilisez seulement de I'eau de iavel dans le distributeun
Avertissements: , Assurez vous de ne pas renverser de I'eau de javeJ sur le
cabinet ou sur vos veternents. Comrne c'est un chernique
ires fort, ca pourra endornmager vos veternents et le cabinet
si I'eau de javel n'est pas diiutee proprernent.
" Utilisez le diagramrne du fabricant, pour la quantitee d'eau de javel liquide
ou en poudre.
Les sands suivants sont generdement entendus durant I'operation du lavage:
, Bruit croulant: Ceci est normal comrne Jesveternenets rnouilJes Iourds sont
continueliernent jetes en I'air.
" Bruit de precipitation d'air: Ceci arrive quand Je baquet de Ja machine a
laver tourne aun une haute RPM.
" Les cycles du Javage et sechage font du bruit de dignoternent chaque fois
qu'iis se mettent en marche ou s'eteingnent.

FJJtredefib_'e
Lefiltredefibredoitetreutilisependantlelavage.
II doif etre neftoye apres chaque lavage.
1. Enlevez le fiJtre de fibre. Retirez le filtre de fibre du
baquet inferieun
Take off
2. Enlevez le filtre de fibre.
3. Reinstallez le filtre de fibre.
Ins_miezJe ¢ouvert intet'ieur
1. Ouvrez le couvercle superieur de la machine a laver.
2. Mettez le composanf du couved interieur sur le couvert exferne du baquet
en visant I'axe du couvert inferieur au trou d'installafion du baquet exterieur
de la cannelure d'axe correspondenfe.
3. Jnserrez I'axe du couveH interieur sur un cote dans la canndure du couvert
d'axe correspondenfe, puis poussez I'aufre axe du couvert interieur dans la
cannelure du couvert d'axe correspondente.
4. Ne demontez pas apres I'installafion.
Take off
- Outer tub covet shaft groove
Section UenUarging

Avertisse_en_s: Debranchez touiours vofre machine a laver avant de la net-
foyer. En ignorant cef averfissernent peut resulfer d'un deces ou des blessures.
Avant d'ufiJiser un produit pour nettoyer, Jisez ef suivez Jes instructions du fabri-
cant pour eviter des blessures personndles ou des dornrnages au praduit.
" Utilisez seulernenf un tissu hurnide ou savoneux pour nettoyer les panneaux de
comrnande.
" Pour eviter des dornrnages aux cabinets, essuyez les comrne necessaire. Si vous
renversez unadoucissanfliquideouen poudre, del'eaudejavel, dudeter-
gent sur le cabinet, essuyez le tout de suite.
" N'ufilisez pas un abrasif, des produits chirniques rauques, de I'arnn-loniaque,
de I'eau de javel, du detergent concentre, des dissdvanfs ou des tan-lpons de
recurage en metal. Une partie de ces parties chimiques peuvenf dissoudre,
endornrnager et/ou decdorer votre machine.
" Enlevez les epingles ou autres objets pdnfus des veternents pour eviter I'er-
aflure des parties interieures.
" Laissez le couvert ouvert apres avoir terrnine votre Jessive pour perrnettre a I'in-
terieur de la machine de secher proprernent et evitez des odeurs.
Ferrnez I'eau des robinets et deconnectez les tuyaux. Egautez I'eau de fous les
tuyaux. Ceci evitera un dornrnage du a une fuife d'eau si par hasard les tuyaux
ant ere rornpus ou se sont laches.
Debranchez la machine.
Sechez le baquet interieun Si vous deplacez la machine a laver, deconnectez le
tuyau d'egout.
Tournez les pieds nivelants dans le sens des aiguilles d'une montre .
DepJacez et ernn-lagasinez votre machine dans une position verticale.
Pour eviter le rnoule et hurnidite, gardez le couvert ouvert pour que I'hurnidite
puisse s'evaporen
La machine doit etre emrnagasinee dans une temperature ambianfe.
Si vous recevez la livraison de votre machine quand la temperature est au
dessous de zero, n'aperez pas vatre machine , attendez qu'dle s'dapte a la
temperature arnbiante.
N'installez pas et n'operez jarnais votre machine a laver dans une salle ou la
temperature est au dessous de zero.

La machine a mayer ne fonctJonne pas:
Assurez vous que Ja machine esf branchee_
Assurez vous que la sortie elecfrique est d'un voltage approprie.
Assurez vous que Je disioncteur n'a pas trebuchet ou le fusible a besoin d'etre
replace.
Assurez vous que Ja machine n'est pas surchargee. Le chargement ddt etre
rebaJance et Jes vefements distributes egaJement.
Assurez vous que le couvert est ferme, fl se peut quill taut le fermer soJidement
La machine pause pendant ceHdns cycles. Ced esf normal dans le cycle
Ddicat laver a la main, celui ci a des periodes courtes ou les vetements sont
trempes pour une courte periode de temps. Vous n'enfendrez pas pour une
courte periode de temps Ja machine operer. Quand Je temps de tremper est
termine, la machine se meffra en marche automafiquement.
_Pob_e_es _ve¢ _e_U:
II n'y a pas assez d'eau qui sorte. La force du robinet doif etre ouverte totale-
ment. Les tuyaux d'eau sont embrouilles. Redressez les tuyaux et verifies le
choix du niveau d'eau , il se peut qu'il dolt efre reajsute.
La temperature d'eau est incorrecte: Verifiez la temperature de votre chauffe
eau. L'eau chaude doif etre d'une temperature de 120degresF -140degres
(40C-60C) minimum. Assurez vous que les tuyaux d'admissions sont relies
proprement.( Par exemple, chaud sur chaud et froid sur froid )
Fuites d'eau; Ceci esf due a une installation des fuyaux impropre. L'egout de
votre maison peut efre obstrue ou a des pressions d'eau confinuellement. II
taut serrez les tuyaux, examinez la plomberie ef appeler un plombier .
L'eau ne s'egoutte pas. Ceci est due a une installation de tuyaux impropre. II
taut relier les tuyaux correctement. Examinez la position du tuyau d'eau. Pour
ce qu'il egoutte propremenf, assurez vous que le sornmet de I'egout est moins
que 4fl(l.2m) au dessus du plancher.
J.a _c_cbine a laver fair des bruits:
La machine doit etre reinstallee. ( Examinez la section d'insfallafion de la
machine a laver).
Le chargement des vetemenfs doit etre redistribue si le chargement n'est pas
balance.
Les pieces de monaies, des boutons, ou autre Iourds obiets peuvenf faire du
bruit (Lisez le guide d'operation- Sons d'operafion normaux)
Bruits de couinemenf: Ceci est due a un surchargemenf de vetements dans le
baquet
Bruits de vibration: Ceci est due a ne pas niveler la machine correctement sur
le plancher eta une distribution de vetement qui n'est pas egde.
10

ProbJemes ave¢ les vetemen_s:
Les vefemenfs sonf frop rides: Ceci est clue a un assorfissement incorrect, a un
surchargemenf ef a un lavage dans une eau frop chaude confinuellemenf.
Evitez le surchargemenf ef clivisez votre lessive. Ne melangez pas les vefernents
Iourds cornme les vefernenfs de travail avec des vefements legers corame des
blouses, des chemises ef des vefemenfs delicats. II taut les laver dans I'eau
fiede ou frdde.
Vous avez des residus de savon: Le detergent ne dissolve pas clans I'eau.
Verifiez la temperature d'eau , ou assurez vous d'ajouter le savon en meme
temps que I'eau avanf de charger vofre machine a laven
II ya des laches sur vos vefements. Ceci est due a I'usage d'un adoudssanf
hqcorrecf. LIfaudraif suivre les instructions inscrifes sur le paquef d'adoucissanf
avant de I'utiliser.
Les vefemenfs deviennenf gris ou iaunes: Jl n'y a pas assez de savon . Assurez
vous d'aiouter une plus grande quanfifee de savon pour un chargemenf Iourd.
Les vetements sont dechires et onf des frous / ils sonf excessivement uses: Ced
est clue aux objets pointus comrae des epingJes et des boucles de ceinture qui
sont en generde dans les poches. II taut refirer fous Jes perils objets pointus.
Attachez les fermefures, les ceintures les tireftes en metal etc... Verifiez si vous
utilisez un eau de iavel qui n'est pas dilue. II ne taut jamais aiouter ce genre
de iavek
Codes des problernes
EO
E1
E2
de
E3
E4
E5
vice
E7
Reason
Le couvert superieur n'est pas ferme durant la
sequence du Debut Retarde
Un blockage du tuyau d'egout
Le couvert superieur n'est pas ferme durant I'operafion
lavage
La machine a laver n'est pas nivelee
La soupage d'adrnission d'eau est fermee
La pression d'eau esf frop basse
Un defaut de sonde du niveau d'eau- Contactez le set-
pour reparer
Un defaut de communication - Contactez Jeservice
pour reparer
11

Bes o_tHs et m_te_ie_s e×iges
Vous aurez b÷soin de queJques outiJs pour J'JnstaJJatJon de votre
machine a laver:
. Pinces
" Cle plate
" Bande de rnesure
" Gants
" Qbiet pour niveler
A¢¢essoJres founis QuantJtee
1. Admissions d'eau chaude
et frdde
2. Crochef de tuyauterie sou- 1
pie de vidange
3. Bride de tuyauterie souple 1
de vidange
4. Tuyauterie souple de
vidange externe
2
1
12

Deb ll g÷ de votr÷ m chiH÷ I ver
* Refirez tous Jes mater[aux d'embaHage, ains[ que Je sode en mousse ef tout Je
ruban adhesif retenant les accessoires de la machine a laver a Iqnferieur et
I'exferieur_
Ouvrez le couvert superieur pour refirer le crdsillon de tambour en mousse de
styrol. Saisissez leet refirez le vers Je dehors.
Note: Gardez Je croisilJolq de tambour . Reinstallez si vous devez deplacer Ja
machine a laver
lnspecfez et refirez le resfe d'emballage, le ruban adhesif, efla documentation
avant d'ufiliser votre machine a laver.
hlgh AI_ _ law
Avertissements: La rruse a niveau de votre machine est tres importante pour
eviler des vibrations durant Ja rotation.
IIIEt_pes p@ur _i_st_NN_t_@_
Choisissez un endroif convenabJe pour vofre machine a laver , sur une surface
ferme et plane loin des rayons directs du soJeil ou des sources de chaleur
comme les radiateurs, les radiateurs de plinthes, les appareils de cuisine etc...
N'importe qudle inegdite au pJancher doit etre corrigee a I'aide des pieds de
niveau situes dans les 4 coins inferieurs de la machine .La machine a laver
doif etre pJacee dans une temperature ambiante. Vous ne devez pas placer la
machine dans une salle ou la temperature esf au dessous de zero.
Jnstamlez votre machine a laver
L[sez les instructions d'instdlation solgneusement avant d'instdler votre machine.
Precc_utions: Si apres avdr term[he ces efapes , vous n'etes pas totdement sure
que ceffe machine est installee proprement, contactez une person-
ne qualifiee. Pour assurer une bonne installation, on recommande
une personne qualifiee et certifiee.
1. Inserez une nouvelle rondelle plate a chaque extremite des tuyaux d'admission
d'eau. Mettez la rondelle fermement dans I'accouplement.
Note:Ilsepeutquevousaurezbesoin des pinces I j It_ __ L_
pour serrer I'accouplement. Attention de ser-
rer trop fort, vous pourrez endornmager la
soupage.
II1__ II
2. Reliez les tuyaux d'adrnission d'eau chaude et froide aux faucets d'eau
chaude et fro[de .
13

3. Reliez I'autre extremite a leur admission respective situee au fond de la
machine a laver.
Note_ La temperature d'eau chaude doit etre de 120degres F- 140degres F .
(49C- 60C) pour que le savon dissolve ef pour eviter des residus de savon
sur Jes vetemenfs.
4. En ufilisanf la bride de fuyauterie souple de vidange , affachez le tuyau d'e-
gout a I'unif comme montre ci dessous. Installez le crochet de tuyauterie sou-
pie de vidange au tube du tuyau d'egout exterieur.
5. Branchez la machine a un voltage regulier de 120vdf/60Hz, 15 amp sortie
electrique.
14

_st_uct_@_ de M_se _ te_e
Cette machine doit etre rnise a terre. En cas d'un court circuit dectrique la rnise
a terre reduif Je risque d'un choc electrique en fournissant une fuife pour le
courant electrique. Cet appareil est equipe d'une corde ayant unfil d'evasion
pour Je couranf eJecfrique. La prise doif etre inseree dans une sortie qu[ est cor-
recternent instdlee ef fondue .
" Une utilisafion impropre de la prise peut resulfer d'un choc electrique.
" Si vous ne cornprenez pas les instructions de rnise a ferre, ou si vous
doufez si la machine a ere fondue correcternent, contactez un electricien
qualifie.
" Cette machine doif efre branchee sur une
Conditions de cabJage _
sortie electrique d'au rnoins 15AMP 110-
Note: La ou une sortie de 2 fourches esf produife,
120VOLT, 60HZ. 4_
c'est vofre responsbilife personnelernent et
votre obligation de la replacer avec une
sortie a 3 fourches.
kes raJJonges:
On ne recornrnande pas I'usage des rallonges, a
P_H_e IIIE_ect_que
Occasionndlernent, il se peut qu'il y air des ternpefes, des orages, qui
causeront un depannage . Ace moment debranchez la machine a laver. Une
lois le courant est refabli, branchez de nouveau votre machine. Si le depannage
dure pour une Iongue periode de temps, lavez vofre machine avanf de I'ufiliser
de nouveau.
15

$_rvi_ed_nsvolredoBnuine
UnegarunJiepourunan _ompUei
Haler reparera ou replacela nqmporte quelle
piece , gratuU, et couvrera Jesflalx de mah_
d'oeuvre , Jesfralx des defauts du fabrication ou
des materlaux pour une perlode de 12 tools de la
date d'achat orlginaJe.
GaranJieUirniJee
Un an apre Ja date d'achat orlgMde, Haler vous
fournira n'importe queHe piece gratuit, comme
indlque cl dessous, et repJacera Jes pieces qul
sont e_dommagees. Haler est unlquemeJ_t respon
sane pour Jesflalx de ces pieces .Tous Jesautre
falx, comme mah_ d'oeuvre, fralx d'dJer et _etour,
etc,, sont Ja responsabiIUe du proprletalre.
Secondejusqu'aJacinquierneannee
Haier vous fourr/ira Jebaquet exterleur et toutes
Jespieces d'assembJement du baquet sl ces
pieces ne retlel_nent pas I'eau.
Deuxiernejusqu'ala seplienneannee
Haler vous fournha [e baquet Mterleure de [avage
d'ader inoxydabie sl [es materlaux ou executions
sont deffeclueux.
UeJe: Cette garal_fie commence le iour ou ]'unite a
ere achete et [e recu d'achat orlgMd dolt
etre presente au personnd autorlse avant de
commencer n'importe queiles reparations.
Exceptions:Garallfie pour une utillsatloll commer-
clale ou pour une utillsafion a ]ouen
qO]ourspourla main d'oeuvredeladated'achatorginab
gOioorspourbs piecesde la dated'achatoriginab
Aucune autre garanfie ne $'appl[qee
Pourb servicedegarantie
VeuiHez contacter votre plus proche centre de ser-
vice agree. Tous Jes services dolvent etre assures
par ]e ceJ_tre comJnerclaJ autorise Halen Pour
obtenir Jenora et Je numero de votr centre de set
vices ]e plus proche veulJJez colltacleB
1877-337-3639
Want d'appebr veuilbz awir les suivantes [nbrrnation$
d[sponibles:
Le numero du model et [e numero de serle de
votre ulfite. Le nora et addresse du detalJJant ou
vous avez achete votre unite et ]a date d'achat.
Une description claire du probJeme.
Une preuve d'achat ( recu d'achat orlglnd).
(ette garantie _oovrelesappareilssurle contientdes[tats
LJnis,de Puerto_R[_oetdo_anada_[Ib ne _ouvrepasbs
SUiVa_t_
Replacemelfl ou reparation des fuslbles domldles,
du disioncteur, du cabJage et tuyauterle.
Ull apparel[ dollt [e ilumero de serle original a ere
enleve ou altere.
Tous les frals admlnlstratlfs pas specifiquemel_t
identifies en tant que normale teJle que I'alre ou
[es heures de service i_ormale.
Dommages aux veterT_ents.
Dor_mages durant ]e transport.
Dommages dus a une mauvalse insldJation ou
entrefiens.
Dommages dus a une utiJlsafion excessive, ul_
accident, une incel_die, une h_ondafion ou aux
actes de ilature.
Dommages dus a une reparation effeduee par ul_
sepzice autre que le centre de service de Haler.
Dommages dus a un courant electrlque , un volt
age ou approvlslonemel_t incorrects.
Domr','_ages resultant d'ul_e modlflcatlol_ du pro-
duU, d'ul_e alteration ou aiustemellt qul ne sont
pas autorlses par Haien
Aiustement du col_somateur operant [es cor*r_man
des comme idel_tifiees dans [e manuel du proprl
etaire.
Tuyaux, poignees, flJtre du fibre et tous [es allache-
ments, ]es accessdres et les pieces disponlbJes.
Les malns-d'oeuvre, [e servi_ de transportation,
et ]es fralx d'expeditlons pour [e deplacement et
replacement des pieces deffedueuses apres la
periode MUide de 12 rods.
Dommages autre que ]'utillsatlol_ llormaJe de
m6nage.
Frdx de transport et expedition.
(ETTEGARAUTIEL_TEE ESTDOUUEEEULIEUD'AUTRES
G_.RAUTIE$,EUPR_EE$OU,_UCLUAUTLE$G_AUT_[$DE
_U/_LITE_/I_(U,_UDE OU D'_PT_TUDED_USUU BUTP,_RTb
(ULIE_
Les reparations fournies par ]a presellte sollt
exdusslves et sont el_lieu de toute autre repara
tlon
Celle garantle ne couvre pas [e dommages h_dl
rects ou secondalres. Les llmitatlol_s ci dessus peu
vent ne pas etre appJicaHes a vous. CertaMs Etats
ne permellent pas Jes limitation de Ja duree d'ul_e
garantle impJlcUe Les limitations cl dessus peuvent
ne pas etre appllcabJes a vous.
Celle garantle vous donne certalns droUs
iurldlques, iJse peut que vous dlsposlez d'autres
drolts qui varle_t d'u_ etat a ]'autre.
Haler Amerida
New York, NY 10018
16

1_ Lea todas Jas instru¢cion÷s ant÷s de usar ÷J art÷facto0
2_
Use este artefacto s61o con los usos para los que fue diseBado,
seg0n se describe en esta guia de uso y cuidados_
3_
Use s61odetergentes o suavizantes recornendados para el uso en
una lavadora de ropa y mant@ngalos fuera dd alcance de los nir_os_
4_
Esta lavadora debe set instalada correctarnente conforme alas
instrucciones de instalaci6n antes de utilizarla_
5_ Nunca desenchufe su lavadora jalando dd cable de corriente.
Siernpre agarre con firmeza el enchufe y jale directamente dd toma-
corriente_
6_
Reernplace inrnediatarnente los cables de energia deteriorados o los
enchufes y tomacorrientes floios_
7_
Desenchufe la lavadora antes de limpiarla_
8_
Si su lavadora vieja no est6 en uso, le recornendamos quitarle la
puerta_ Esto reducir6 la posibilidad de pdigro para los nir_os_
9_
No accione la lavadora en presencia de humos explosivos_
10_
No use esta lavadora para lavar prendas que se ban moiado, man-
chado o lavado con gasolina, solventes para limpieza en seco o
cualquier otra sustancia explosiva o inflamable que pueda prenderse
fuego o explotac
Lasvestirnentas o trapos usados para lirnpiar materiales inflarnables
o explosivos no deben lavarse en esta lavadora basra que se hayan
removido todos los restos de estos materiales_
12_ No agregue o mezde sustancias inflamables o explosivas al lavado_
13_ No intente sacar la ropa mientras la tina o el agitador est6n en
movimiento_ Espere a que pare totahnente antes dd uso_
14_ La puerta de carga dd artefacto debe estar cerrada cuando la tina o
el agitador est@ncentrifugando_
15_ No accione la lavadora cuando tenga piezas faltantes o rotas_
16_ No use esta lavadora con fines comerciales_

17_
Noaccioneestalavadorahastaquetodoslospantiesdecerrado
est@nubicadoscorrectamenteensulugan
18_
Nomanipuleindebidamenteloscontrdes_
1%
Pararedudrelriesgodelesiones,nopermitaquelosnitrosjueguen
dentroosobrelalavadora_
20_
Estalavadoradebeconectarsea untomacorrienteadecuadoconel
suministrod_ctricocorrecto_
21_
Debeasegurarseunaconexi6natierraadecuadaparareducirel
riesgodedescargasel6ctricaso incendios.NOCORTEOQUITEEL
ENCHUFEDECONEXI6NATIERRA.Sinocuentaconuntornacorri-
entedetresentradasenlapared,pidalea unelectridstarnatricula-
doqueinstaleeltornacorrienteadecuado_Eltomacorrientedepared
DEBEtenetunaadecuadaconexi6natierra_
22_
Sepuedeproducirhidr6genosielcalentadordeaguanohasido
utilizadodurantern@sdedossernanas.Estopuedesetexplosivoen
ciertascircunstancias_Enestecaso,abratodoslosgrifosdeagua
calientey deie correr el agua caliente durante unos minutos. De esta
manera, el hidr6geno atrapado se liberarc_. Durante este proceso no
prenda ning0n artefacto el6ctrico; no fume ni prenda una cerilla ni
encendedor; ni use una llama, Estoevitar6 accidentes ya que el gas
hidr6geno es inflamable y puede explotan
Gracias por cornprar nuestro pro-
ducto Haier. Estemanual fd_cilde
usar le guiar@ para obtener el
mejor uso posible de su lavadora_
Recuerde anotar los nOrneros de
moddo y de serie. Se encuentran
en una etiqueta en la parte posteri-
or de la lavadora_
Abroche su recibo al manual.
Lo necesitclra para obtener servicios de gclrantia0
NOmero de moddo
NOmero de serie
Fecha de compra

PAG NA
JNSTRUCCJONE$ DE SEGUR|DAD JMPORTANTE$ .......................... I
JNSTRUCC_ONE$ DE FUNCJONAMJENTO$ .................................. 4-8
Piezasy caradeffsficas.......................................................................... 4
Fundonamienfo .................................................................................. 5
Sonidos norrndes dd funcionarnienfos ................................................ 7
Filfro de pelusas .................................................................................. 8
Tapa de seguridad .............................................................................. 8
GUJA DE CUJDADO Y LJMPJEZA ........................................................ 9
Lirnpieza y manfenimienfo .................................................................... 9
Mudanzas y vacaciones ........................................................................ 9
D6nde guardar la lavadora .................................................................. 9
DETECCJ6N Y $OLUCJ6N DE PROBLEMAS .................................. 10
JNSTRUCCJONE$ DE HNSTALAC_6N .............................................
Herrarnienfas y maferiales necesarios ..................................................
Desembalaje de su lavadora .............................................................. 13
C6mo nivelar la lavadora .................................................................. 13
Pasos para la insfdad6n .................................................................... "J4
CONEXJONE$ ELECTRJCA$ ............................................................ 16
Insfrucciones para la conexi6n a fierra ................................................ 16
Codes de energla .............................................................................. 16
GARANTiA ......................................................................................17

]. Tapa superior
2. Pane[ de control
3. Base del panel de control
4. Gabinete
5. Paras nivdadoras
6. Tapa interior
7. Jnterruptar de la puerta
8. Entrada par inyecci6n del
blanqueador
9. Panel frontal
]0. Fi[tro, tapa del filtro
11. Tapa exferna de la fina
12. Aro para el equilibria
] 3. Thqa interior
14. Varilla
15. Pulsador
16. Junta de la manguera de
desag0e
] 7. Cable de energia (120V/6OHz)
18, VaJvuJa de entrada de agua frfa
19. V61vula de entrada de agua
calienfe
20. Cubierta posterior

Nora: Las fundones pueden variar seggn el rnodelo.
¢omienzo dernorado
Cuando no est6 activado, el visor rnuesfra el fiernpo restante del ciclo durante
el proceso de lavado.
Cuando se selecciona Cornienza demarado (Delay Start), la luz indicadora
rnuestra una dernora minima de 2 horas_ Presione el bof6n una vez por cada
hora adicional de dernora, se puede Ilegar basra las 24 horas.
¢icios
Norrnah Para el lavado usual, tal corno el de algod6n.
Profundo (Heavy): Para prendas rn6s grandes, gruesas y rnucha suciedad.
Blancos (Whites)'. Para lavar telas de algod6n y blancas.
Colores (Colors)'. Para lavar telas de color.
R6pido (Quick): Para el lavado rapido de prendas con poca suciedad.
Delicado (Delicate): Para lavar telas delicadas.
Lavado a rnano (Hand wash): Para obtener el efecto de lavado a rnano.
Control de arrugas (Wrinkle Control): Para reducir las arrugas.
Ciclo personalizado (Custom Cycle): Para las anteriores en la rnernoria.
Selec¢i6n deJ proceso
Se utiliza para seleccionar un proceso de lavado.
El rernoio no funciona con el Lavado a rnano (Hand Wash), Delicado
(Delicate) o con los ciclos Rapidos (Quick).
El indicador del nivel del agua se apaga si s61o se selecciona Centrifugado
(Spin).
Enjuague extra
Cuando selecciona un pragrama, presione el bot6n Selecci6n del proceso
(Process Select) para realizar un. La lavadora agrega un segundo eniuague.
Remoio
Seleccionar esta funci6n le perrnitir6 rernoiar las prendas rnuy sucias. No se
producen rnovirnientos basra que la lavadora cornienza el ciclo de "lavado".
VeJocidad deE Javado / VelocJd_d deJ ¢entrifugado
" Para seleccionar la velocidad de lavado o centrifugado.
Nivel de agua
. Se pueden fijar los niveles de agua al comienzo del lavado o en pausa.
" Durante el Rernoio (Soak), Lavado (Wash) o Eniuague (Rinse), presione este
bot6n para volver a Ilenar de agua rnanudrnente. Suelte para que se detenga
el agua. La funci6n se desactiva autorn6ticarnente cuando el agua Ilega al
nivd de protecci6n contra desbordes.

iiiiiiiiiiiiiiiiiiiiiiiiiiiiiiiiiiiiiiiiiiiiiiiiiiiii i!ii! ! i! i i i i i i i i i i ii ii ii ii ii ii ii ii ii ii ii iiiiiii illiili
SePal (Signal) deJ cicJo
, El volumen de [a seBal se puede regular como bajo, alto o apagado.
Nive[ de su¢iedad
Selecdone el nivel de suciedad de las prendas.
" El cido de lavado aumenta 2 minutos por cada nivel que se aumenta.
Temperatur_ de Javado y eniuague
Para seleccionar la temperatura de entrada de agua para el lavado y el
eniuague.
Control automat|co de femperatura
Los modelos con esta funci6n regulan autom6ticamente [a temperatura
apropiada del agua.
Apagado
Si la lavadora esta encendida, presione el bot6n una vez para apagarla.
Co_enzar / Pausa
Una vez que la lavadora est@ encendida y se ban realizado las selecciones,
presione esfe bof6n una vez para comenzar el lavado.
Cuando la unidad est@ funcionando, presione esfe bot6n una vez para hacer
una pausa.
Si la unidad est@ en pausa, presione este bof6n para reanudar el fun-
cionamiento.
Jndicador de ¢o_ienzo de_or_do
" [ndica los minutos restantes cuando el ciclo esf@en progreso.
[ndica las horas restanfes duranfe el proceso de demora.
Indica los c6digos de faJlas o las condiciones que no son normales.
Duraci6n de cada programa (minutos)
PROGRAMA
Blancos
Profundo
Normal
Lavado Rapido
Delicado
Lavado a mano
BJ@t_: La duraci6n total puede verse afectada por el tiempo que Ileva la entrada
y el desagOe del agua. Tambi@n puede verse afectada por la presi6n del
agua. Los programas Normal, Profundo y Algod6n pueden combinar el
proceso de remojo durante el cud [a m6quina lavadora primero reaJiza
el remoio durante aproximadamente 20 6 30 minutos con un leve
movim[ento despu@s de que se IJena de agua, y com[enza el lavado.
6
DURACJON TOTAL (rain)
Incluyendo el r_moio
About 75-81
About 77-83
About 59-69
J
J
f
i f
Si_ incluir el lemoio
About 45-51
About 47-53
About 39-49
About 25
About 36-42
About 38-44

¢argar Ja Javadora
Cargue cada prenda sin apretan
Separe las prendas blancas de las de colon Separe las pesadas de las livianas.
Revise con cuidado todos los bolsillos y dobladillos en busca de dementos
pequer_os. Estos pueden deslizarse fc%cilmente dentro de la fina y dar_arla
Trate con anterioridad las n-lanchas y las @reas con mayor suciedad para
Iograr mejores resultados_
" No sobrecargue su Javadora.
" Cuando coloque prendas moiadas, mantenga el nivel de agua Io suficienfe-
mente alto coma para que puedan flofar f6cilmenfe.
" Cierre la puerta correcfamenfe despu6s de cargar Jas prendas. Si deia Ja tapa
subida, el agifador no funcionara.
Usa adecuado deJ detergente
Es conveniente agregar el defergente al agua antes de introducir la ropa para
que el n-lismo pueda funcionar con eficacia en las prendas.
Se recomienda el usa de detergente de alta eficiencia para el lavado de la
ropa. Esta lavadora necesita menos espuma para que el rendimiento del lava-
do sea buena.
Nora: Puede usar mas o menos detergenfe segOn el tamaF_o de la carga, el tipo
de agua de la zona en la que vive, que puede ser blanda o dura, y la
suciedad de las prendas.
¢omlartJmiento lara el blanqueador
El compartimienfo para el bJanqueador est6 ubicado en
el extremo ddanfero debaio de la puerta de carga.
Vierfa la cantidad recomendada de blanqueador en el
cornpartimiento durante el primer cido de lavado.
Nora: Use s61o blanqueador Jlquido en el compartimiento.
Advertenda: _ Tenga cuidado de no derramar blanqueador sin diluir en el
gabinete de la lavadora o sabre las prendas. Coma es un
qufl_-Iico fuerte, puede arruinar sus prendas o la terminaci6n de
la lavadora si no est6 diluido corredamente.
Consulte el cuadro del fabricante en el envase del produc_o
para conocer el usa recomendado del llquido o pdvo blan-
queador.
Se_ides De [lll,',',',';us¢ieHsmieHt@ IIl_o_m_les
Los siguientes sonidos se escuchan normaJmente durante el funcionamiento
de la Javadora:
, Sonidos de gripes: Esto es normal cuando se sacudan de manera continua las
prendas completamenfe moiadas dentro de la lavadora.
" Ruido similar a una rafaga de aire: Esto sucede cuando la tina gira a muchas
RPM (revduciones par rninuto).
" Cuando se encienden y se apagan los cidos de Lavado y Eniuague tambi6n se
oyen sonidos similares a un clic.
7

iiiiiiiiiiiiiiiiiiiiiiiiiiiiiiiiiiiiiiiiiiiiiiiiiiiii i!ii! ! i! i i i i i i i i i i ii ii ii ii ii ii ii ii ii ii ii iiiiiii illiili
Fimtro de pelusas
El filfro de pelusas debe usarse durante el lavado
Debe limpiarse despu_s de cada lavado.
1. Retire el filffo de pelusas. Jale el filtro de pdusas de
la fina interion
2. Quite el filffo de pelusas.
3. Vuelva a instalar el filfro de pelusas.
JnstaJe la tapa interior
1. Abra la tapa superior de la mdJquina lavadora.
2. Ponga el componente de la tapa interior sabre la tapa exterior de la fina, con
el eje de la tapa interior dirigido al aguiero de insfalaci6n de la ranura para
el eie de la tapa exterior de la tina correspondienfe.
3. Insede el eje de la tapa interior de un lado en la ranura para el eie de la
tapa exterior de la tina correspondienfe, luego presione el afro eie de la tapa
interior en la ranura para el eie de la tapa exterior de la fina correspondiente.
4. No Io desarme despu6s de la instalaci6n.
Take off
Take off
- Outer tub covey shaft gloove
Section I enlarging

Adverten¢ia: Desenchufe dempre la lavadora antes de limpiarla para evitar
descargas el_ctricas. Ignorar esfa adverfencia puede ocasionar
Jesiones personaleso Ja muerfe. Anfesde ufiJizar productosde
Jimpieza, lea y siga siempre las insfrucciones del fabricanfe as[
como tambi&n Jas advertencias para evitar lesiones personales y
daF_os d producfo.
" Use sdamenfe on patio h0medo o enjabonado para Jimpiar el panel de con-
trol.
Para evifar cuaJquier daF_o aJ acabado dd gabinete, Jlmpido con un paFio
segOn sea necesario. Si se derrama suavizanfe llquido o en polvo, blan-
queador o detergente sobre el gabinete, Ifl'npielo con un paBo inmediatamente
ya que se podrla daBar el acabado.
No use abrasivos, productos qulmicos fuerfes, amonlaco, blanqueador con
doro, defergente concentrado, solvenfes o esponias de metal texfurizado.
Algunos de esfos productos qulmicos pueden disdver, da_ar o deste_ir la
lavadora.
Quite alfileres y demas objetos puntiagudos de la ropa para evitar que las
piezas internas se rayen.
Deie la tapa abieda despu6s de que termine de lavar para permitir que la
pade interior de la lavadora se seque y as[ evifar los malos dores.
Cierre los grifos de agua y desconecte las mangueras. Elimine el agua de
todas las mangueras. De esta manera evifara el daF_o ocasionado par las
p6rdidas de agua si las mangueras se rompen o se afloian accidentalmente.
Desconecte el enchufe.
Sequela tina interior de lavado. Si va a cambiar la lavadora de lugar,
desconecte la manguera de desag0e.
Gire completamenfe las paras niveladoras hacia la derecha.
$61o mueva y guarde la lavadora en posici6n vertical.
Para evifar el moho y la humedad, deje la tapa abierta para que la humedad
del interior del artefacto se evapore.
Gu d÷ su I v d@ Q ÷H mbieHtes
La lavadora debe esfar a temperatura ambiente.
Si recibe esta lavadora cuando la temperatura exterior est@ bajo el punfo de
congelaci6n, no la accione hasta que se haya cdentado a temperatura ambi-
ente.
No instale la lavadora ni la ponga en funcionamiento en lugares donde la
temperatura ambiente est@ por debaio del punto de congelaci6n.

La Javadora no fun¢iona::
Compruebe que el aparato est6 conectado.
Contrde que el fomacorrienfe de la pared tenga el vdtaje adecuado.
Controle si es necesario reiniciar el interrupfor automafico o si es necesario
cambiar el fusible.
Contrde que la lavadora no est6 sobrecargada_ Es probable que tenga que
vdver a Ilenar la lavadora y vdver a distribuir la ropa.
Contrdequelatapa noest6abierfa. Esprobablequedebacerrarlatapa
corredamenfe.
La lavadora se detiene en dgunos cidos. Es normal en los cidos Ddicado de
Lavado a mano, que tiene un perfodo corto de rernoio, en el que las prendas
seremojan duranfeun lapsocorto_ Nooir@elfuncionamientodela lavadora
duranfeun per_odocorto. Cuandoseterminaelfiempode remojo, comienza
autom@ficamenfe.
ProbJemas con eJ agua:
No sale suficiente agua: Puede ser que necesite abrir pot completo el grifo del
agua. La manguera delagua puedeestarenredada odoblada_Estirela
rnanguera. Verifique el nivel de agua seleccionado, es probable que deba
reaiustarlo.
La temperatura del agua no es la correcta: Controle la temperatura del dis-
positivoparacdentarelagua. Elagua calientedebeestaraunatemperatura
deal menos 120 °F- 140 °F (49°C-60°C). AsegOresedequelas
mangueras de entrada est6n conectadas correctamenfe. (la caliente con la
cdienfe y la fr_a con la fr[a).
P@didas de agua: Esfo se debe a la insfalaci6n incorrecfa de la manguera de
desag0eola mangueradellenado. EIdesag0edesu hogar puedeesfar
tapadootenerpresi6n deagua consfanfe. Es probablequetengaqueajustar
las mangueras, revisar las tuberlas o Ilamar al fonfanero.
No se produce el desagOe: Esfo se debe a la insfdaci6n incorrecta de la
rnangueradedesagOe. Esprobablequedeba conectarla manguerade
desag0e correcfamenfe. Revise la posici6n de la n-languera de desag0e. Para
que el desag0e sea correcto, asegOrese de que la parte superior de la salida
del desagOe est@ a menos de 4 pies (1,2 m) por sobre el piso.
7@

L_Javadoraest@hadendoruJdos:
Esprobablequeseanecesariovolvera instalarla lavadora. (Consulte la sec-
ci6n de instalaci6n de la lavadora).
Es probable que tenga que volver a acomodar la cargo de lavado, ya que
puede estar distribuida en forma despareja.
Es posible que el ruido sea ocasionado per menedas, botones u otros obietos
pesados. {Lea la Gu_a de Funcionamiento - Sonidos de Operaci6n Normales.)
Senidos de chirridos: Debido a la sobrecarga de la tina de lavado.
Ruidos de vibraci6n: Debido a la nivelaci6n incorrecta de la lavadora en el
piso y a la distribuci6n despareja de la ropa en la tina.
Problem.s con I_s pt'endas:
Los prendas estan demasiado arrugadas: Se debe a la clasificaci6n incorreda
de la ropa, la sobrecarga y el lavado con agua demasiado caliente repetidas
veces. Evite las sobrecargas y vuelva a clasificar la carga. No mezcle prendas
pesadas come ropa de trabaio con prendas livianas come blusas, camisas
livianas y otras prendas delicadas. Puede ser necesario lavar con agua tibia o
frfa.
Quedan restos de jab6n: Es probable que el detergente no se est_ disolviendo
en el agua. Revise la temperatura del agua o agregue detergente mientras la
tina se Ilena de agua antes de cargar las prendas para evitar los restos de
jab6n en los prendas.
Manchas en sus prendas: Se deben al use incorrecto de suavizante para la
ropa. Esprobablequedebaleerlasinstruccionesapropiadasdelenvasey
cumplir las indicaciones correctas para el use del suavizante.
Las prendas quedan gris@ceas o arnarillentas: Esto se debe a que no se usa
suficiente cantidad de detergente para las cargas grandes. Es probable que
deba agregar mas detergente a la cargo.
Los prendas resultan rasgadas o tienen aguieros; el desgaste es excesivo: Esto
se debe a los objetos puntiagudos, tales come alfileres y hebillas de cintur6n,
que se deian en los balsillos. Debe sacar los obietos pequeF_os y puntiagudos
que est_n sueltos. Aiuste cinturones, cierres, broches de metal, etc. Controle s[
se est6 utilizando blanqueador no dilu[do. Nunca agregue blanqueador no
diluido al lavado.
C6digo dd problema
E0
E!
E2
E3
E4
E5
E7
Motive
La fapa superior no esta cerrada durante la secuen-
cia de comienzo demorado
Obstrucci6n de la manguera de desag0e.
La fapa superior no esfa cerrada durante el fun-
cionamiento del lavado
La lavadora no esf@ equilibrada
La valvula de entrada de agua esta cerrada
La presi6n de agua es demasiado baja
Fdla el sensor del nivel deJ agua. Llame al servicio
de reparaciones
Folio la comunicaci6n. Llame al servic[o de repara-
ciones
11

Necesi_ar_ las siguientes herra_ientas coco ayuda para mainsta-
_aci6n de su k_vc_cJora.
" Pinzas
" Uave inglesa
Cinta m_trica
" Guanfes
" Nivel
Accesorios que se incluyen Cc_nfdc_d
1. Entradas de calienfe y frfa 2
2. Codo para la manguera de
desag0e 1
3. Ab_azadera para la
manguera de desag0e
4. Manguera exterior de
desag0e 1
1
12

Quite todos los rnateriales de empaque. Esto induye la base de espuma y
toda Ja cinta adhesiva que sostiene los accesorios de Ja lavadora por dentro y
por fuera.
Abra la tapa superior para quitar la abrazadera del tambor de espuma de
pdiestireno Jale para quifarla.
Nota:Conservelaabrazaderadeltambon Vuelvaainstalarla cuandodeba
mover la lavadora,
Revise y quite los restos de embalaje, cinta o materiales impresos antes de
usar la lavadora.
La lavadora tiene 4 paras niveladoras ubicadas en las cuatro esquinas inferi-
ores. Despu_s de colocar correctamente la lavadora en su lugar definitivo,
puede nivelarla,
Las paras niveladoras pueden aiustarse girandolas hacia la izquierda para
subir la lavadora y hacia la derecha para baiarla,
AdvertencJa: La nivelaci6n de la lavadora es muy importante para ev[tar las
vibraciones durante el centrifugado.
13

iiiiiiiiiiiiiiiiiiiiiiiiiiiiiiiiiiiiiiiiiiiiiiiiiiiii i!ii! ! i! i i i i i i i i i i ii ii ii ii ii ii ii ii ii ii ii iiiiiii illiili
Seleccione una ubicaci6n adecuada para la lavadora en una superficie dura y
pareja, leios de la luz direda dd sol y de las fuentes de calor, per eiemplo,
radiadores, z6calos radiantes, artefactos de cocina, etc. Cualquier desnivel
en el piso debe ser corregido con las paras niveladoras ubicadas en las
esquinasinferioresdela lavadora. LaJavadoradebeestarubicadaatemper-
atura ambienfe. No debe colocar la lavadora en lugares donde la ternperatu-
ra est@ por debajo del punto de congelaci6n.
¢6mo instaJar Ja Javadora
Lea afentamente las instrucciones para la instalaci6n antes de la instdaci6n.
Precaution: Si despu@s de completar esfos pasos aOn no estdl seguro de que el
1. Jnserte una arandela plana nueva en cada extremo de la manguera de entra-
da deagua. Pongalaarandelafirmemenfeen laconexi6n.
Biota: Es probable que deba usar pinzas para ajustar la conexi6n.
No aiuste demasiado, ya que se puede dar_ar la vdJlvula.
artefacfo haya sido instalado corredamente, p6ngase en contacto
con un instalador calificado. Se recomienda que un t6cnico cerfifi-
cado instale la lavadora para asegurarse de que la misma est6
instalada correctamente.
2. Conecte las mangueras de entrada de agua cdiente y fr[a al grifo de agua
caliente y fr_a.
14

3. Conecte el otto extren-lo a la enfrada respectiva de la lavadora ubicada en la
parle posterior de la misn-la_
Nora: El agua calienfe debe esfar a una temperatura de al menos 120 °F - 140
°F (49 °C - 60 °C) para que el jab6n se disuelva y para evifar que que-
den restos de jab6n en las prendas.
4. Con la abrazadera de la manguera de desag0e, una Ja manguera de
desag0ealaunidad comosemuestraacontinuaci6n. Instaleelcododela
manguera de desag0e en la tuberfa de la manguera exterior de desag0e.
5. Enchufe Ja lavadora en un tomacorriente normal de 120 voltios / 60 Hz, 15
amperes.
15

Este artefacto debe tener conexi6n a fierra. En el caso de un corfocircuifo el6ctri-
co, la conexi6n a tierra reduce el riesgo de descarga el_ctrica al proporcionar un
cable de escape para la corriente el6drica. Esfe arfefacfo esfa equipado con un
cable que cuenta con conexi6n a fierra con un enchufe a fierra. El enchufe debe
inserfarse en un fornacorrienfe que se encuentre deb[damenfe insfalado y con
conexi6n a fierra.
el_ctrica.
_ El usa indebido del enchufe puede representar un riesgo de descarga
Consulte a un elecfricisfa o personal de reparaciones calificado si no
comprende complefamente las instrucciones de puesfa a fierra o si no
esfa segura de si el adefacto cuenfa con la conexi6n a fierra apropiada.
Requisitos para Ja instaJa¢i6n eJ@¢trica
Este aparafo debe enchufarse en un TOMA-
CORRJENTE DE AL MENOS 15 AMPERES110-
120 VOLTJOS, 60 HZ CON CONEXI@N A
TIERRA.
Nolu: Cuando se cuenta con un tomacorriente
est@ndar de pared de dos aguieros, es
responsabilidad y obligaci6n personal del
usuario reemplazado par un fomacorriente de pared con fres agu[eros con
la adecuada conexi6n a tierra.
Cables de proJ@nga¢i6n:
No se recom[enda el usa de cables de prdongaci6n.
j
Ocasionalmente puede haber inferrupciones de corriente debido a formentas u
arras causas. Desenchufe la unidad cuando esfo ocurra. Cuando la corrienfe
haya sido reesfablecida enchufe nuevamente. En caso de que el carte haya sido
par un perlodo de fiempo muy prolongado limpie a vacle el lavarropas antes de
ponerlo en funcionamiento.
16

_ervJcJG eft ¢_$_
Ga_nnfiucempJetu de un o_o.
Por 12 rneses a partir de la fecha original
de cornpra, HALER se hard_ cargo de las
reparadones o reernplazo de partes (sin
cargo alguno) induyendo la labor en caso
de materides defectuosos o funcionarnien-
GarnntiuJJmJtndn
Pasado el aBo de la fecha original de com-
pra de! producto, HALERsuministrar6 la
partes a ningOn costo, como se indica rnd_s
abajo, en reemplazo de aquellas defectu-
osas en materiales o funcionamiento. HALER
ser6 s6Jo respondable por el costo de Ins
partes. Los dem6s costos y gastos como
labor, translado, etc. ser6n responsabiFdad
deJ propietado.
Dnntr0de10s5 n_os
HALERle facilitard_ el tubo externo del
lavarropas y accesorios rdafivos aJ ensarno
ble dd mismo siendo que @stefallara en su
funci6n.
Dnntrode10s7 n]0s
HALER le facilitard_ el tubo de acero inoxid_
able interno si presentara defectos en el
material o funcionarniento.
NOTA: Esta garanfia comienza desde la
fecha en que el producto fue adquiddo pot
el cliente. La factura de compra debe pre-
sentarse para dar autorizad6n a! service
antes de rendir el servicio.
Excep¢i0nes:Garanfia de uso comerdal o
renta.
90dinspotIn InbnrdesdeInfechnoriginnlde¢om-
prn.
90d_n_porInspnrtes_esdeIn_eChnoriginalde_om-
pru.
No nplicnningnnn0trngnruntin.
Para hacer uso de los servicios de esta
Garanfia contacte al Centro de servicio
autorizado m6s cercano. Todas Ins repara-
clones deberd_n realizarse por un Service
autorizado pot Haien Para obtener el nom-
bre y nOmero de tel@fono del Centro de ser-
vicio m6s cercano pot favor Jlarne d
1-877-337-3639.
AntesdeIJnr_nr,p0rJnvnr,tengnnsndispnsJ¢i6nIn
siguienteinformnci6n:
NOmero de moddo y nOmero de serie de
su unidad. El nornbre y direcci6n del dis_
tribuidor en donde realiz6 la compra y
fecha de cornpra.
Una clara descripd6n del problema que
tiene su equipo.
La prueba de compra de Ja unidad (In fac-
turn)
Esta garantia aplica dentro de los Estados
Unidos, Puerto Rico y Canad6.
Esta garantia no alcanza:
Reemplazo o reparaci6n de los fusibtes de
uso diario, cableado o plorneria.
Un producto cuyo n6rnero de serie haya
sido alterado o quitado.
Cualquier cargo pot servicios que no sean
identificados como norrnales de acuerdo a
los horarios y d_reasde servicio.
DaF_osalas prendas.
Dafios ocurridos en el translado.
DaF_oscausados pot una instalaci6n inade-
cuada o pot real mantenirniento.
Dafios por desuso, abuso accidental, fuego,
inundaci6n u otro desastre natural.
Daflos por reparaciones efectuadas por
personal no autorizado por HALER.
Da_os por utilizaci6n de corriente el_ctrica
o voltaje inadecuado.
Da_los resultante por alteraciones_ rnodifi-
caciones o ajustes de algOn elemento no
autorizados por HALER.
Aiustes al control de operaciones corno le
indica el manual de uso.
Mangueras, periNas, filtros y dem6s acceso-
rios y partes desechables.
Labor, translado dd service, cargos de
embarque de Ins partes a reemplazar,
todo luego de transcurrido e! periodo inicial
de 12 rneses.
Dafios que no sean atribuibJes al uso
dom@stico normal
Cualquier cargo de translado.
ESTAGARAN'flALJMITADAESTADADAENW6ARDE
(UALQUIEROTRAGA_NTIA, IECWYEEDO_ GARAN=
_IA_E CO_ER_AUZACIO_O PAPA_ PROPOSITO
E_ PArTICULAr.
Las soludones provistas en esta garanfia
son exdusivas y concedidas en lugar de
cualquier otra garantia.
Esta garantia no cubre daBos incidentales o
consiguientes, de modo que Ins Jirnitaciones
anteriores pueden no alcanzarlo. AIgunos
Estados no perrniten limitadones en cuanto
la durad6n de una garantia implidta, de
rnodo que los limitaciones anteriores
pueden no alcanzarlo.
Esta garantia le da derechos legales especi-
ficos, y usted gozar6 de otros derechos los
curies varian de Estado a Estado.
Haier America
New'Fork, NY 10018
16

IMPORTANT
Ne pas R_exp@dier ce Produi$ ¢_u Mc_gc_sin
Pour tout probm_rne ¢ortcern_=nt ¢e produi_ veuiHez con_acter mese_ice des
_onso_ateurs _Haler Customer Satisfaction Center _ au 1 =877=337=3639.
UNE PREUVE D'ACHAT DATEE EST REQUISE POUR BENIERCIER DE LA GA_NTIEo
IMPORTANTE
No r÷grese esle prod_cto _ _ _iend_
_ECESITA Ul\lA PRUEBA DE COMPRA FECHADA PARA ELSERV_C_O DE LA GAPANT_A
Cons_or de H_er" _ 1 =877=337=3639 (V6_i_o solo e_ E.U.A)°
M_de _ Chln_
Fab_iq_b en Chi_
H_cho _n Chln_
[]
H_ier Americ_
New York, NY 10_18
HLT364XXQ
Issued: JUNE 2006
Part # WD_8888_90
 Loading...