

Page 1

Top-Load Clothes Washer
Laveuse à chargement par le haut
Lavadora de ropa con carga superior
User Manual
Guide de lutilisateur
Manual del usuario
GWT460BW
Designed for
High-E! ciency;
use HE detergent.
Conçue pour
haute e! cacité;
utiliser un
détergent HE.
Diseñada para un
alta eÞ ciencia; use
detergente HE
(Alta eÞ ciencia).
Page 2

1
TABLE OF CONTENTS
IMPORTANT SAFETY INSTRUCTIONS .................................................................2
Installation Safety Precautions .....................................................................................2
General Safety Precautions .......................................................................................... 3
PARTS AND FEATURES .......................................................................................4
INSTALLATION INSTRUCTIONS ..........................................................................5
Tools Needed ................................................................................................................. 5
Parts Supplied ................................................................................................................5
Location Requirements .................................................................................................5
Drain System Requirements .........................................................................................6
Electrical Requirements ................................................................................................7
STEP BY STEP INSTRUCTIONS ............................................................................ 8
Step 1 - Unpack the Washer .......................................................................................... 8
Step 2 - Connect and Secure the Drain Hose .............................................................. 9
Step 3 - Connect the Water Hoses ............................................................................... 9
Step 4 - Level the Washer ...........................................................................................11
Step 5 - Complete Installation ....................................................................................11
CONTROL PANEL AND FEATURES .................................................................... "2
OPERATING INSTRUCTIONS ............................................................................. "5
Step 1 - Prepare and Sort Laundry .............................................................................. 15
Step 2 - Add Fabric Care Products ..............................................................................15
Step 3 - Load the Washer ............................................................................................16
Step 4 - Start the Washer ............................................................................................16
CARE AND CLEANING GUIDE ............................................................................ "7
Cleaning and Maintenance .......................................................................................... 17
Vacationing Precautions .............................................................................................17
Moving or Storage Preparation ................................................................................... 17
TROUBLESHOOTING ........................................................................................ "8
LIMITED WARRANTY ........................................................................................ 20
RECORD KEEPING
Thank you for purchasing this Haier
product. This user manual will help you
get the best performance from your
new washer.
For future reference, record the model
and serial number located on back of
the washer, and the date of purchase.
Staple your proof of purchase to this
manual to aid in obtaining warranty
service if needed.
___________________________________
Model number
___________________________________
Serial number
___________________________________
Date of purchase
Page 3
2
IMPORTANT SAFETY INSTRUCTIONS
WARNING
To reduce the risk of fire, electric shock, or injury to persons when using
your appliance, follow the basic precautions, including the following:
Read all of the instructions before using this appliance.
Use this appliance only for its intended purpose as described in this user
manual.
Do not use the washer for commercial clothes washing.
Under certain conditions, hydrogen gas may be produced in a hot-water
system that has not been used for 2 weeks or more. HYDROGEN GAS
IS EXPLOSIVE. If the hot water system has not been used for such a
period, before using a washing machine, turn on all hot-water faucets
and let the water ß ow from each for several minutes. This will release
any accumulated hydrogen gas. As the gas is ß ammable, do not smoke
or use an open ß ame during this time.
INSTALLATION SAFETY PRECAUTIONS
DANGER
Before you throw away your old appliance, remove the door or lid so
that children cannot hide or get trapped inside your old appliance.
This appliance must be properly installed and located in accordance with
the installation instructions before it is used.
Do not store or install this appliance where it will be exposed to
temperatures below freezing or exposed to weather, which can cause
damage to the appliance.
The appliance must be properly grounded to conform with all electrical
codes and ordinances. See Electrical Requirements section.
Page 4

3
GENERAL SAFETY PRECAUTIONS
Keep the area around your appliance free from combustible materials
such as lint, paper, rags or chemicals.
Close supervision is necessary if this appliance is used by or near
children. Do not allow children to play on, with, or inside this appliance.
Do not place articles that have been previously cleaned in, washed in,
soaked in, or spotted with gasoline, dry-cleaning solvents or other
ß ammable or explosive substances in the wash water. These substances
give o! vapors that could ignite or explode.
Do not add gasoline, dry-cleaning solvents, or other ß ammable or
explosive substances to the wash water. These substances give o!
vapors that could ignite or explode.
Do not reach into the appliance if the wash basket, tub or agitator is
moving.
Do not tamper with the controls.
Never unplug your washer by pulling on the power cord. Always grasp
the plug Þ rmly and pull straight out from the outlet.
To minimize the possibility of electric shock, unplug this appliance from
the power supply before attempting any maintenance or cleaning.
NOTE: Turning the cycle selector knob to the O! position does NOT
disconnect the appliance from the power supply.
Do not attempt to service, repair or replace any part of the appliance
unless speciÞ cally recommended in this user manual or in published
repair instructions that you understand and have the skills to carry out.
Before discarding or removing from service, remove the washer door or
lid.
SAVE THESE INSTRUCTIONS
HOUSEHOLD USE ONLY
Page 5
4
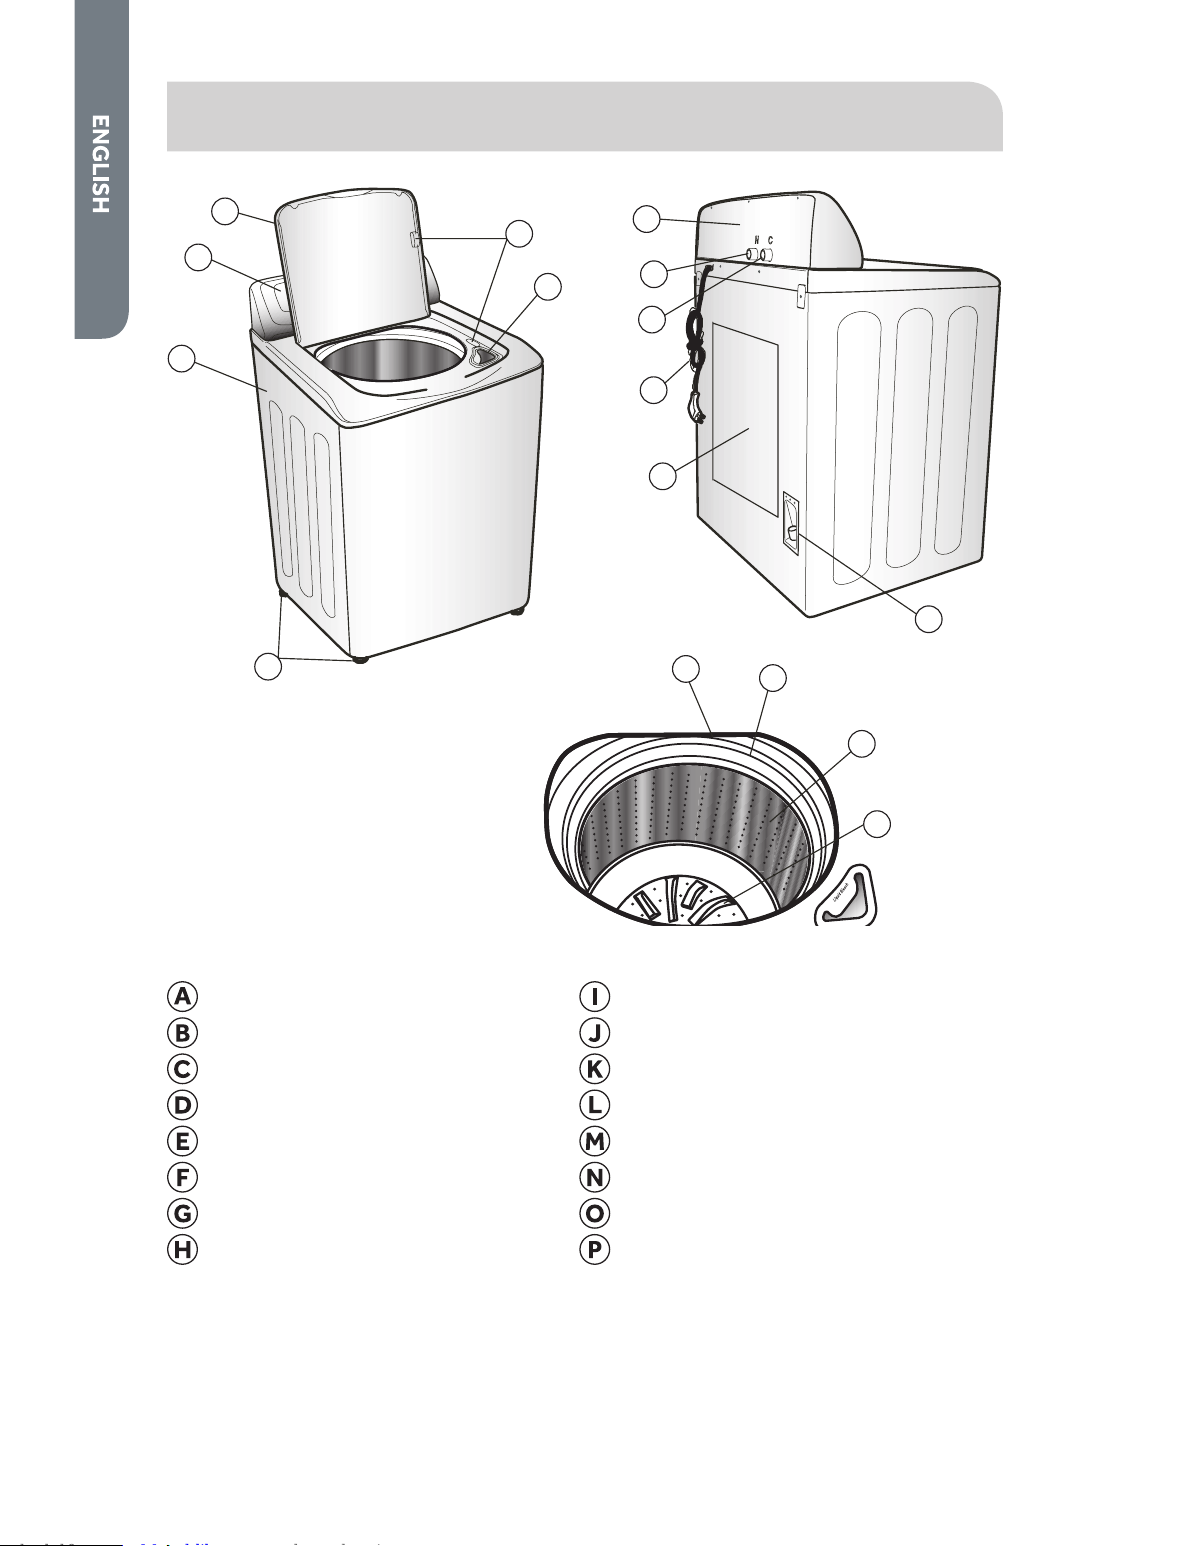
PARTS AND FEATURES
A
B
C
D
E
F
P
O
N
M
G
L
I
J
K
H
Top Lid
Control Panel
Cabinet
Leveling Feet (4)
Door Safety Switch
Liquid Beach Dispenser
Access Panel
Pulsator
Outer Tub Cover
Balance Ring
Wash Basket
Drain Port
Power Cord (120 Volt/ 60 Hz)
Cold Water Inlet Value
Hot Water Inlet Valve
Back Cover
Page 6

5
INSTALLATION INSTRUCTIONS
TOOLS NEEDED
Pliers
Wrench
Flat-blade Screwdriver
Measuring Tape
Carpenters Level
PARTS SUPPLIED
Drain Hose Clamp
Drain Hose Hook
Drain Hose
Water Hoses (2)
(ß at washers pre-installed)
User Manual
LOCATION REQUIREMENTS
The washer must be installed on a solid ß oor to minimize vibration during the
spin cycle. A concrete ß oor is the best.
The ß oor should be level with maximum slope of 1 (25 mm) under entire washer.
A suitable location is protected from direct sunlight and heat sources such as
radiators, baseboard heaters, or cooking appliances.
Do not install on carpeting.
The location must have a grounded electrical outlet located within 4 ft. (1.2 m) of
power cord on the back of the washer.
Hot and cold water faucets must be present within 3 ft. (0.9 m) of the hot and
cold connections on the washer.
A water heater must supply hot water with a temperature of at least 120°F
(49°C).
The water pressure should be between 20 and 100 psi (138 and 690 kPa).
WARNING
Do not install or operate the washer where it will be exposed to
temperatures below 32°F (0°C). Water remaining in the washer will
freeze and cause damage to the washer.
Page 7

6
WASHER DIMENSIONS
27"
(68.6 cm)
27
"
(68.6 cm)
43.5"
(110.5 cm)
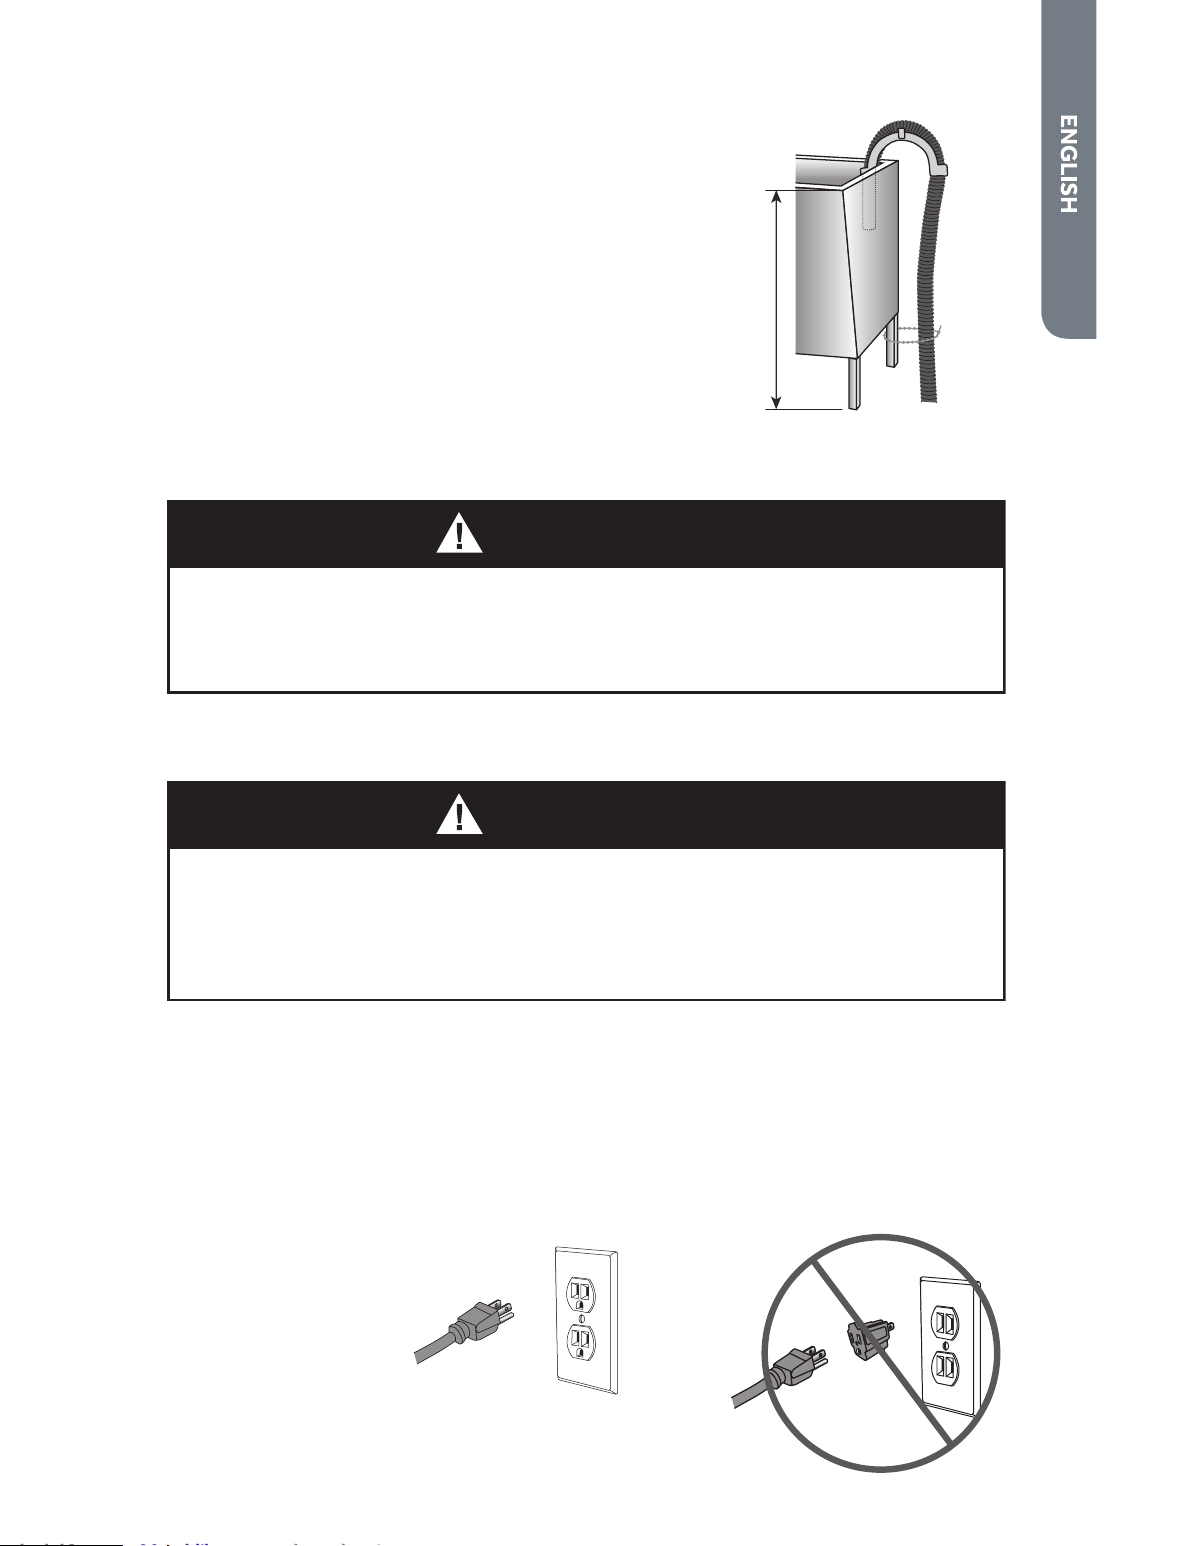
DRAIN SYSTEM REQUIREMENTS
WALL OR FLOOR STANDPIPE
The height of the standpipe must be between 39 (99 cm) and 60 (153 cm) from the
bottom of the washer. The minimum diameter of the standpipe must be 2 ( 5 cm).
Wall Floor
39" – 60"
(99 cm – 153<cm)
Page 8
7
LAUNDRY TUB
The laundry tub must have a minimum
capacity of 20 gal. (76 L). The height of the
laundry tub must be at least 39 (99 cm)
and no more than 48 (122 cm).
39" – 48"
(99 cm – 122<cm)
ELECTRICAL REQUIREMENTS
WARNING
The washer must be connected to a properly grounded 120 volt, 60 Hz.,
AC only, 15- or 20-amp, fused electrical supply. A time-delay fuse or
circuit breaker is recommended.
If the electric supply provided does not meet the above requirements, contact a
licensed electrician.
WARNING
Improper connection of the equipment-grounding conductor can result
in a risk of electric shock. Check with a qualified electrician or
serviceman if you are in doubt as to whether the appliance is properly
grounded.
This appliance must be grounded. In the event of malfunction or breakdown,
grounding will reduce the risk of electric shock by providing a path of least
resistance for electric current.
This appliance is equipped with a cord having an equipment-grounding
conductor and a grounding plug. The plug must be plugged into an appropriate
outlet that is properly installed and grounded in accordance with all local codes
and ordinances.
Do not use a 3 prong plug adapter.
Do not use an extension cord.
Page 9
8
STEP BY STEP INSTRUCTIONS
INSTALLING YOUR WASHER
We recommend that your new washer be installed by a qualiÞ ed appliance
technician. If you feel that you have the skills to install the washer, please read the
installation instructions carefully before installing.
CAUTION: If, after completing these steps, you are unsure that the washer is
properly installed, contact a qualiÞ ed appliance technician.
WARNING
If your washer was just delivered and the outside temperature was
below freezing, do not operate until the washer warms up to room
temperature.
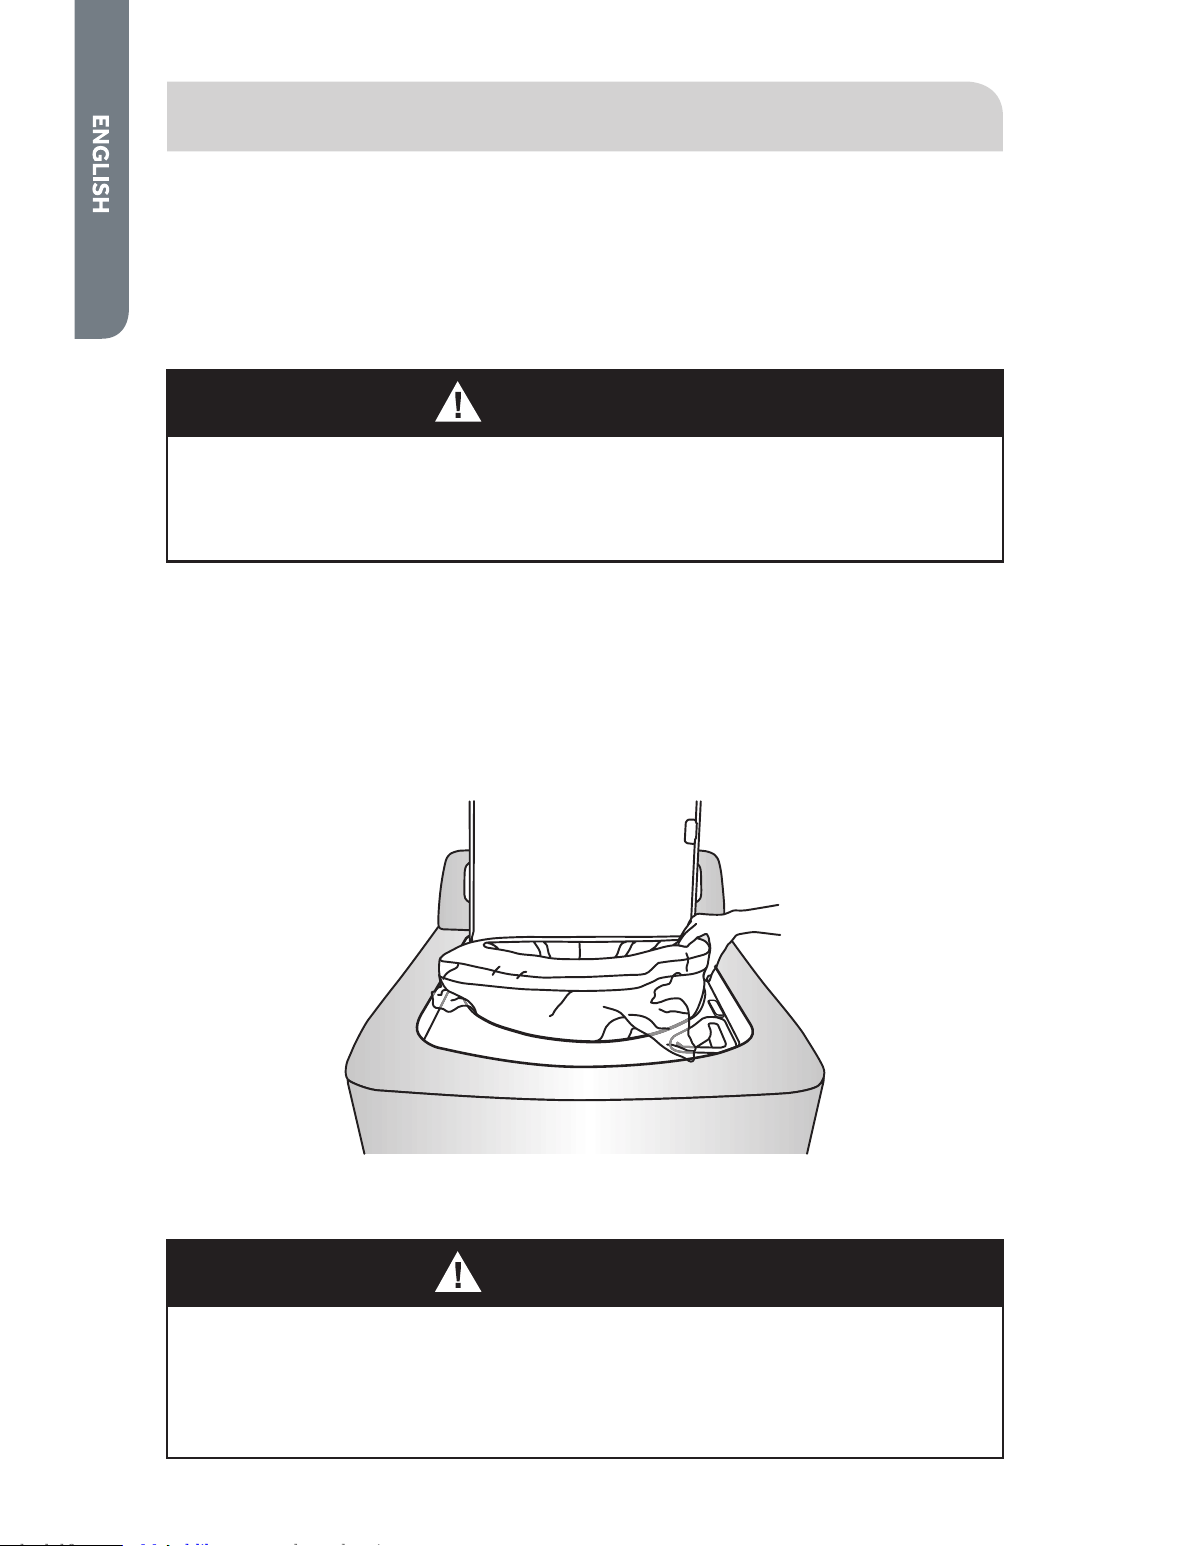
STEP " - UNPACK THE WASHER
". Remove all packing materials. This includes the foam base and all adhesive tape
holding the washer accessories inside and outside.
2. Open the top lid to remove the wash basket brace. Pull to remove.
NOTE: Save the wash basket brace to use when moving the washer in the future.
3. Inspect and remove any remains of packing, tape or printed materials before
using the washer.
WARNING
To avoid danger of suffocation, keep plastic bag and other packing
material away from babies and children. Do not use this bag in cribs,
carriages and playpens. The plastic bag could block nose and mouth
and prevent breathing. This bag is not a toy.
Page 10
9
STEP 2 - CONNECT AND SECURE THE DRAIN HOSE
". Loosen the drain hose clamp with a ß at-
blade screwdriver. Slide the clamp up the
drain hose, o! the hose rubber end.
2. Fit the drain hose rubber end over the
plastic drain port on the washer.
3. Slide the drain hose clamp over the drain
hose rubber end and drain port.
4. Tighten the drain hose clamp to secure the
connection.
5. Put the the drain hose hook end in a drain
pipe or laundry tub.
6. Secure the drain hose in place by fastening it to a water hose, the standpipe, or a
leg on the laundry tub. See Drain System Requirements for illustrations.
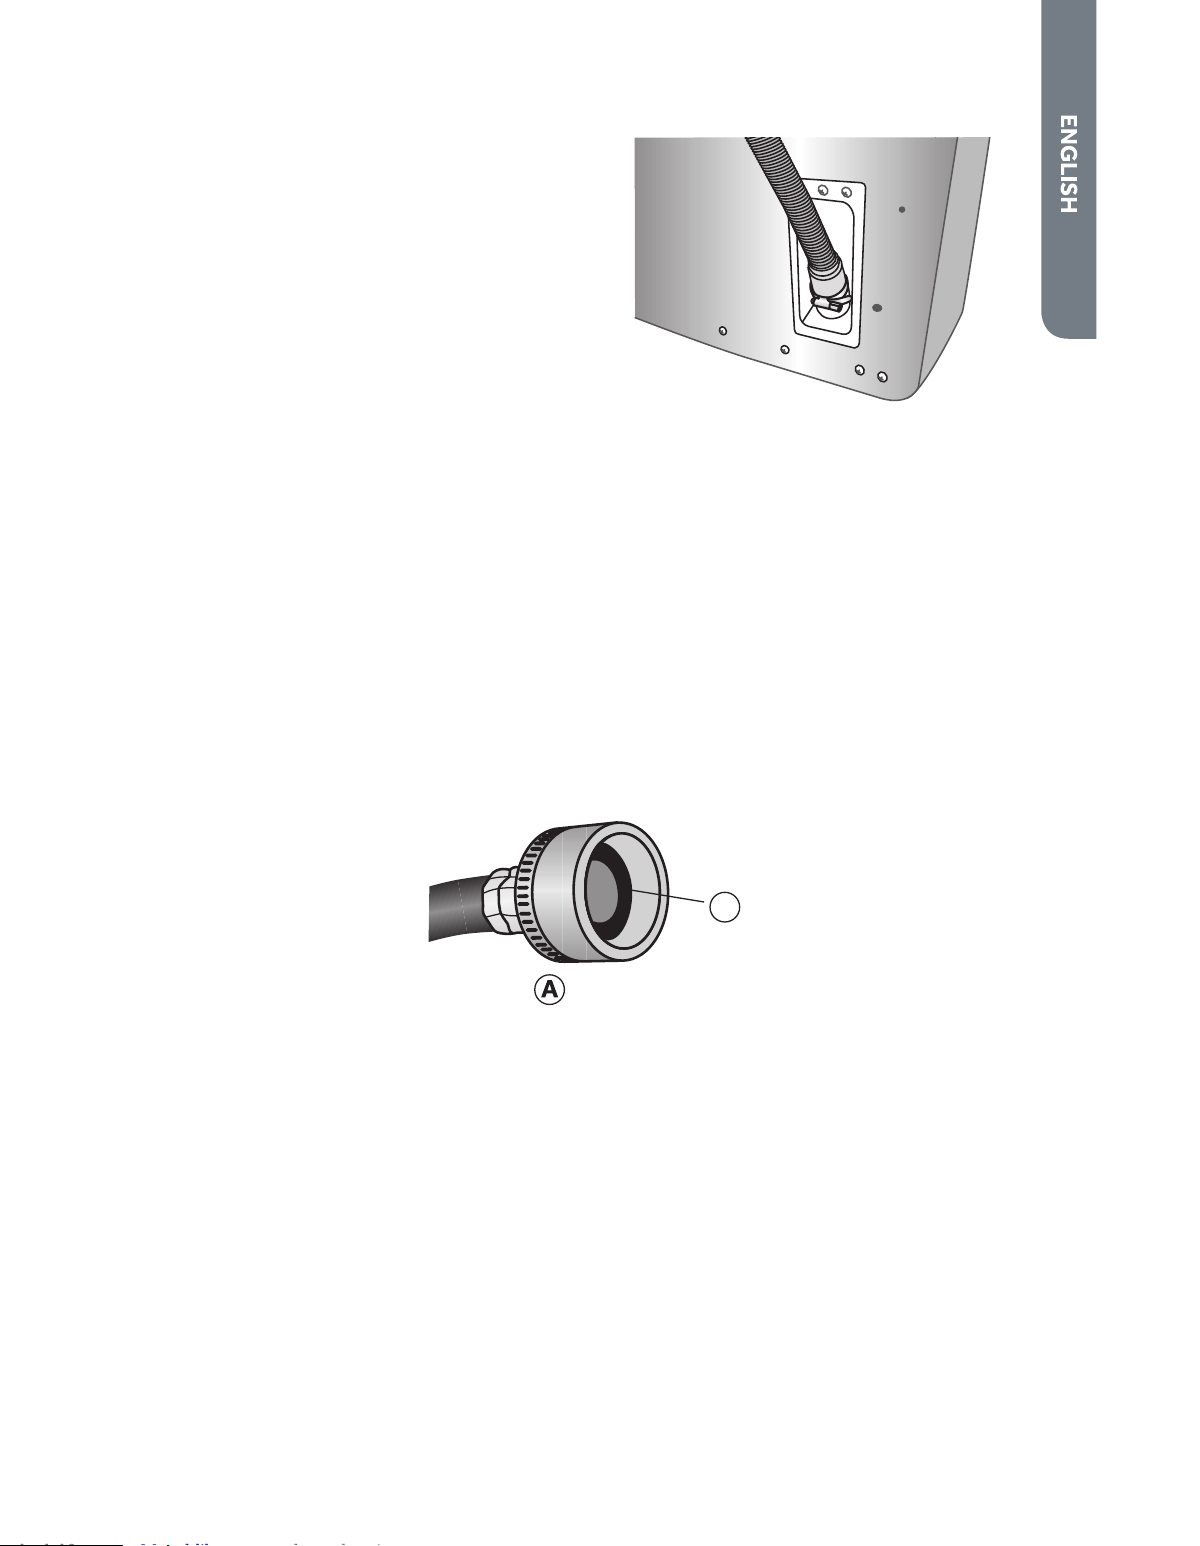
STEP 3 - CONNECT THE WATER HOSES
IMPORTANT: Only use new hoses when installing the washer.
NOTE: Periodically inspect hoses for cracks, cuts, leaks or wear. Replace with new
hoses every 5 years.
NOTE: Hot water needs to be set at a temperature of at least 120ºF - 140ºF. (49ºC-
60ºC) for the soap to dissolve and to avoid soap residue remaining on clothes.
". Check that a ß at washer is present and Þ rmly in place in each end of the water
inlet hoses. Flat washers are pre-installed at the factory.
A
Washer
Page 11

10
2. The hose couplers are color coded to assist you in making the proper
connections. You may want to use gray for cold and red for hot. Thread the inlet
hoses onto the water faucets by hand until snug. Then using pliers, tighten an
additional two-thirds turn.
IMPORTANT: To avoid damage to the hose couplings, do not overtighten.
NOTE: To avoid damage to the faucets do not use plumbers tape or sealants on
the valve threads.
3. Thread the other end of the inlet hoses by hand onto the inlet valves marked
H (hot) and C (cold) on the back of the washer until snug. Then using pliers,
tighten an additional two-thirds turn.
IMPORTANT: To avoid damage to the hose couplings, do not overtighten.
NOTE: To avoid damage to the washer inlet valves, do not use plumbers tape or
sealants on the valve threads.
4. Turn on the hot and cold water faucets and check for leaks. If there is any leaking,
check steps 1 through 3 again.
Page 12
11
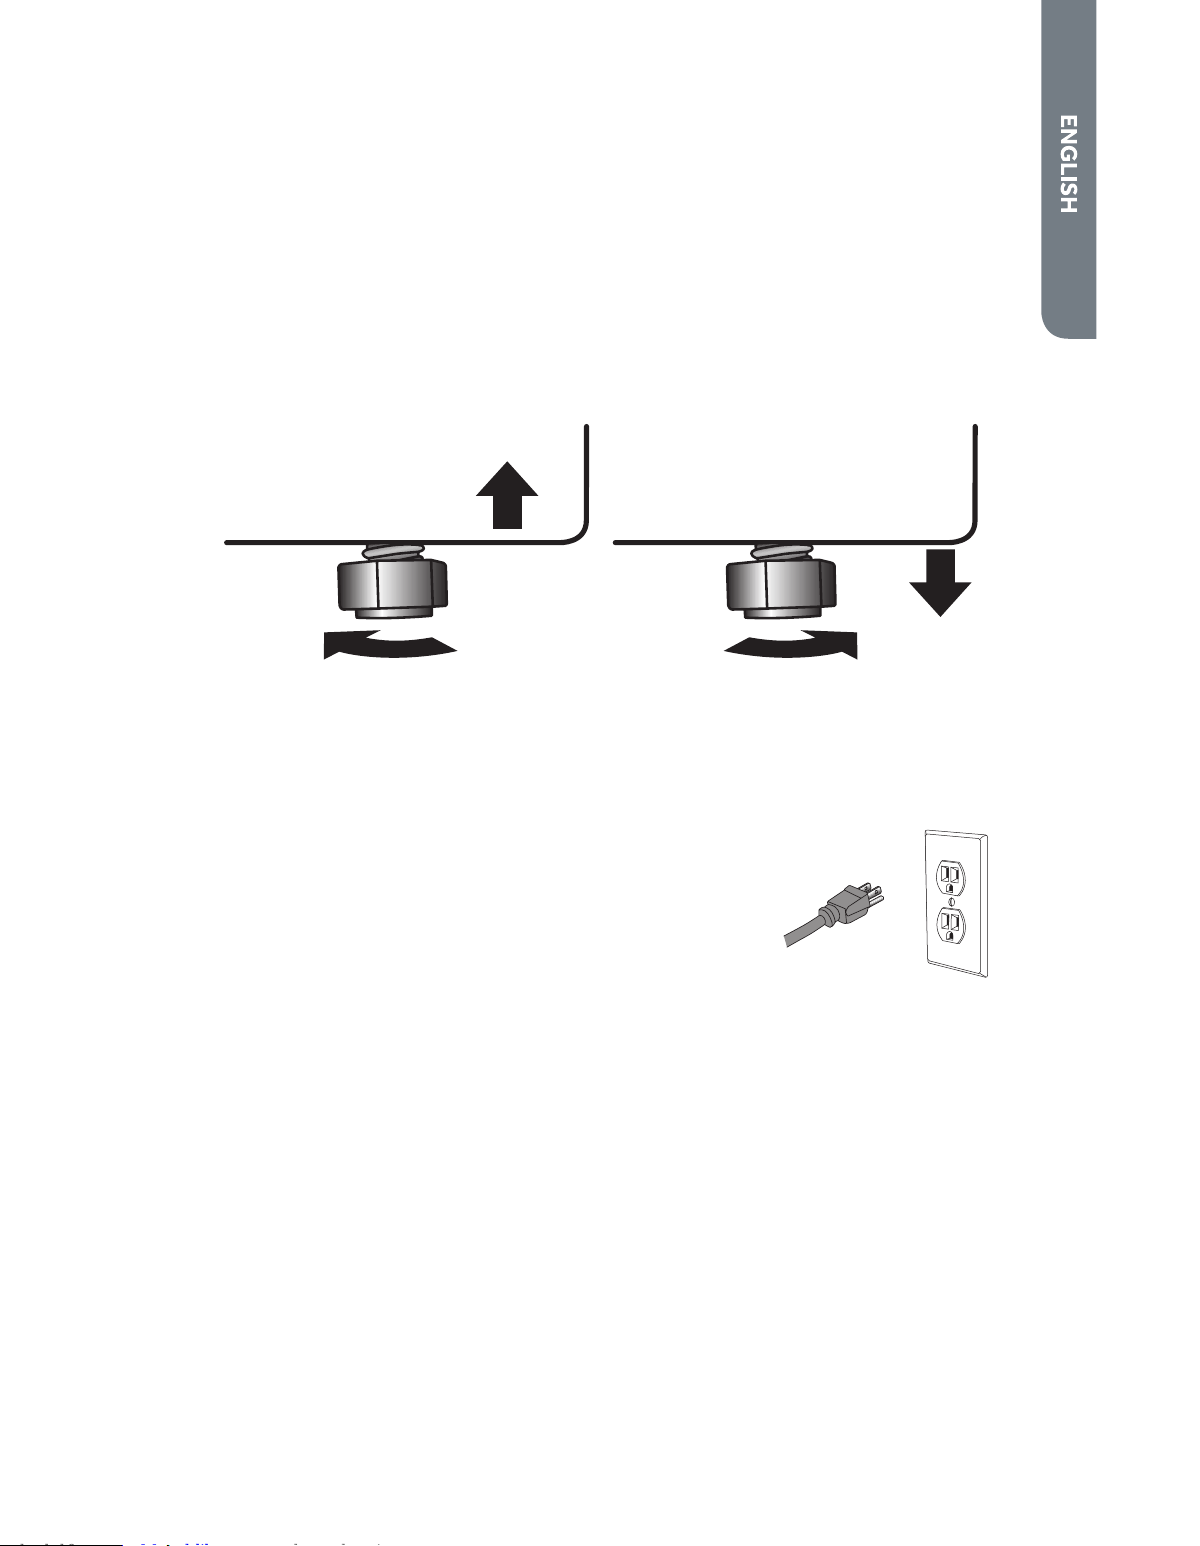
STEP 4 - LEVEL THE WASHER
IMPORTANT: Proper leveling of the washer will help reduce noise and vibration.
". Place washer in its Þ nal location. Check that the water and drain lines are not
strained or pinched. Make sure that all four feet are Þ rmly in contact with the
ß oor and that the washer rests solidly in position.
2. Using a carpenters level, check to make sure the the washer is level from side to
side and from front to back.
3. If the washer is not level, adjust the leveling feet. Turn clockwise to extend (raise
the washer) or counterclockwise to retract (lower the washer).
Raise Lower
STEP 5 - COMPLETE INSTALLATION
". Plug the washer into a grounded 3 prong outlet.
2. Check that water faucets are turned on.
3. Dispose of/recycle all packaging materials.
4. Run a normal wash cycle using detergent to test and
clean the washer. See the Operating Instructions
section.
Page 13

12
CONTROL PANEL AND FEATURES
CONTROL PANEL
C
A
E
B
Temp
D
F
TEMP BUTTON
Use this button to select a wash/rinse temperature combination. For best
results follow your garment label instructions and use the warmest water
temperature that is safe for your fabric.
Not all selections are available for all cycles.
CYCLE PROGRESS INDICATORS
When the washer is Þ rst powered on, the Cycle Progress lights indicate the
stages of the selected cycle.
As a stage is completed, the light will turn o! indicating that the next stage is
operating.
When the cycle is complete the End LED will light.
Page 14

13
SELECT BUTTON
Use this button to modify the default wash process for the selected cycle.
Each press of the button will step you through the available options.
Not all options are available for all cycles. See the Cycle Guide for details.
PRE-WASH WASH RINSE SPIN CYCLE DESCRIPTION
Complete wash cycle plus a pre-wash.
Complete wash cycle.
Wash only. Wash water remains in the
wash basket.
Wash and rinse only. Rinse water
remains in the wash basket.
Rinse & Spin Cycle
Spin Only Cycle
CYCLE SELECTION KNOB
Turn the washer on by rotating the Cycle Selection Knob.
NOTE: If the washer is not started, it will automatically turn o! after about
5 minutes.
There are 7 cycles to choose from:
Whites - Use this cycle for white and light colored clothing such as cotton
that are susceptible to transfer of dye.
Heavy Duty - Use this cycle for heavily soiled durable garments. This cycle
can also be used for towels, sports gear, childrens clothes, etc.
Normal - Use this cycle for normally soiled cottons and mixed fabric loads.
Colors - Use this cycle for lightly soiled, dark, or highly dyed natural fabrics.
Bulky - Use this cycle to wash large items such as comforters, sleeping bags,
and blankets.
Delicate - Use this cycle to wash lightly soiled garments and delicate clothes
that need gentle washing.
Quick - Use this cycle to wash small, lightly soiled loads that are needed in a
hurry.
START/PAUSE BUTTON
Press this button to start a selected cycle or to pause an operating cycle.
NOTE: After starting the wash cycle, you must pause the operating cycle to
change the Wash/Rinse Temp and Load Size settings.
LOAD SIZE BUTTON
Use this button to select an appropriate water level for your load. Small is
the lowest water level and Super is the highest.
Page 15

14
CYCLE GUIDE
NOTE: To protect your wash load, all options and settings are not available for all
cycles. The shaded boxes indicate the default settings for each cycle.
CYCLE FABRIC TYPE
WASH
PROCESS
EST
TIME
TEMP
PRE-
WASH
WASH
ONLY
WASH &
RINSE
RINSE
& SPIN
SPIN
ONLY
Whites
White
garments
20 min Wash
Rinse
Spin
:45*
Hot/Cold
Warm/Cold
Cold/Cold
Heavy
Duty
Heavily
soiled,
durable
colorfast
fabrics
30 min Wash
Rinse
Extra Spin
1:03*
Warm/Cold
Hot/Cold
Cold/Cold
Normal
Cottons,
linens and
mixed
garments
20 min Wash
Spray Rinse
Extra Spin
:44
Warm/Cold
Hot/Cold
Cold/Cold
Colors
Dark and
color dyed
fabric
18 min Wash
Spray Rinse
Spin
:40
Cold/Cold
Hot/Cold
Warm/Cold
Bulky
Comforters,
blankets,
sleeping
bags
8 min Wash
Long Rinse
Short Spin
:33
Warm/Cold
Hot/Cold
Cold/Cold
Delicate
Lingerie,
sheer
fabrics with
lace trim
10 min Wash
Long Rinse
Short Spin
:35
Warm/Cold
Hot/Cold
Cold/Cold
Quick
Cottons,
linens and
mixed
garments
6 min Wash
Rinse
Short Spin
:25
Warm/Cold
* Estimated time does not include the automatically selected Pre-wash option. A
Pre-wash will add approximately 20 minutes.
Page 16

15
OPERATING INSTRUCTIONS
STEP " - PREPARE AND SORT LAUNDRY
PREPARE LAUNDRY
Check garment labels for manufacturers washing instructions.
Empty pockets and turn them inside out.
Turn down cu! s and remove any lint or dirt.
Tie strings and sashes so they dont tangle.
Close zippers, snaps and hooks to avoid snagging.
Remove pins or other sharp objects from clothes to prevent scratching of the
wash basket.
Pretreat all stains and heavily soiled areas.
Turn synthetic and wool knits inside out to avoid pilling.
SORT LAUNDRY
Sort laundry by the type of wash cycle required (water temperature and wash
action).
Separate light colors from dark colors and colorfast items from non-colorfast
items.
Separate heavy duty fabrics from light weight fabrics.
Separate fabrics that attract lint from fabrics that give o! lint.
STEP 2 - ADD FABRIC CARE PRODUCTS
ADD DETERGENT
Use only High E" ciency detergent. HE detergents are speciÞ cally
formulated with ingredients to avoid problems caused by too
many soap suds. Excess suds will prevent the complete rinsing of
detergent residue from clothes.
Pour liquid or powder detergent and color safe bleach directly into the wash
basket.
NOTE: The proper amount of detergent depends on the size of the load, the soil
level of the clothes, and the softness of the water being supplied to the washer.
Page 17

16
ADD BLEACH (IF DESIRED)
Pour measured liquid chlorine bleach into the
liquid chlorine bleach dispenser.
NOTE: Use only liquid bleach in this dispenser.
IMPORTANT: Be careful not to spill undiluted
bleach onto the washer cabinet or your
clothes. Since it is a strong chemical, it may
damage clothes or the Þ nish of the washer.
Follow manufacturers directions on garment
label for recommended use of liquid or powder
bleach.
STEP 3 - LOAD THE WASHER
". Load garments loosely and evenly around the wash basket.
2. Do not place clothes directly over the center of the pulsator.
3. Close the washer lid.
NOTES:
Do not overload or stu! items into the wash basket.
The washer will not pulsate or spin with the lid open.
STEP 4 - START THE WASHER
". Turn the washer on by rotating the CYCLE SELECTION KNOB.
2. Select a wash cycle.
3. Modify the default settings and options if desired.
4. Press the START/PAUSE BUTTON on the face of the knob to start the wash
cycle.
Page 18

17
CARE AND CLEANING GUIDE
WARNING
Always unplug your washer to avoid electric shock before cleaning.
Ignoring this warning may result in death or injury.
Before using cleaning products, always read and follow manufacturer’s
instructions and warnings to avoid personal injury or product damage.
CLEANING AND MAINTENANCE
Only use a damp or sudsy cloth for cleaning the control panel.
If you spill liquid/powdered softener, bleach or detergent on the cabinet, wipe
the cabinet immediately to avoid damage to the Þ nish.
Do not use abrasive cleansers, harsh chemicals, ammonia, chlorine bleach,
concentrated detergent, or solvents to clean the washer. These chemicals may
dissolve, damage, or discolor the washer.
After washing clothes, leave the lid open so that moisture inside the machine
can evaporate and to prevent the growth of mold or mildew.
VACATIONING PRECAUTIONS
Turn o! water supply faucets. This will eliminate the potential for damage to
your home if a water hose ruptures or leaks.
Unplug the washer from the electrical outlet.
Dry the wash basket.
Leave the lid open so that moisture inside the machine can evaporate and to
prevent the growth of mold or mildew.
MOVING OR STORAGE PREPARATION
In addition to performing the Vacationing Precautions, complete the following
additional steps.
Disconnect the water hoses and the drain hose and place them into the wash
basket.
Turn the leveling feet so that they are fully retracted into the washer cabinet.
If moving the washer, place the wash basket brace from the original packing
materials back into the top of the washer opening. Use masking tape to secure
the washer lid.
Move and store your washer in an upright position only.
Do not store your washer in a cold environment where temperatures fall below
freezing; store at room temperature.
Page 19

18
TROUBLESHOOTING
WASHER DOES NOT OPERATE
Check that the power cord is plugged into a grounded 3 prong outlet.
Check that the electrical wall receptacle is of proper voltage.
Check if the circuit breaker needs to be reset or if the fuse needs to be replaced.
Check that the washer is not overloaded. Laundry may need to be redistributed
to re-balance the load.
Check that the washer lid is properly closed.
The washer pauses in some cycles. This is normal in the Delicate cycle, which
has short periods for laundry to soak. You will not hear the washer operating
during that period of time. When the soak time ends, the washer will restart
automatically.
PROBLEMS WITH WATER
Water ß ow is slow or Þ lling takes a long time:
Check to make sure that the water faucets are fully turned on.
Check the water hoses to make sure that they are not tangled, kinked, or
pinched.
Water temperature is incorrect:
Check your water heater temperature. Hot water needs to be at a temperature
of at least 120ºF -140ºF (49ºC - 60ºC).
Check that the inlet hoses are properly connected (hot to hot and cold to cold).
Water leaks:
Check that the inlet hoses connections at the faucets and washer are tight.
Check that the drain hose connection at the washer is secure and that the drain
hose is properly positioned at the drain location.
Check the plumbing or call a plumber.
Water will not drain:
Check that the drain hose is properly connected to the washer.
Check the position of the drain hose. In order to drain properly, the top of drain
outlet must be at least 39 (99 cm) above the ß oor.
Check that the sink or drainpipe is not clogged.
Page 20

19
WASHER IS MAKING NOISE
Thumping Sound:
The wash load may be unbalanced. Pause the washer and redistribute items in
the wash basket.
Rattling or clanking noises:
Foreign objects may be in the washtub. Stop the washer and check for foreign
objects such as keys or loose change.
Squealing Sounds:
Wash basket may be overloaded. Stop the washer and remove part of the wash
load.
Vibration Noises:
Washer may not be level. Check that all 4 leveling feet are resting Þ rmly on the
ß oor and that the washer is level.
PROBLEMS WITH CLOTHING
Wrinkling:
Wrinkling can occur because of improper sorting, overloading or washing at the
wrong water temperature.
Avoid overloading and re-sort your load. Do not mix heavy clothes such as work
clothes with light clothes such as blouses, light shirts and delicate items. You
may need to wash them in warm or cold water.
Detergent Residue:
Detergent may not completely dissolve in extremely cold water. Select a warm
water wash temperature and check to make sure your hot water heater is
providing hot water; at least 120F (49ºC ).
Add detergent before loading clothes. Do not pour detergent directly on
garments.
Clothes Are Grayed or Yellowed:
Separate darks from lights and whites to avoid the transfer of dyes.
Large and heavily soiled laundry may need more detergent. Refer to detergent
manufacturers directions for recommended usage.
Garment Damage:
Tearing and snagging - Tie strings and sashes. Empty pockets, fasten belts, and
close zippers, metal snaps or hook fasteners before loading.
Bleach stains - Do not pour or splash bleach directly on clothes. If you are using
the dispenser and still notice stains, try using diluted bleach.
Excessive wear and tear - Follow manufacturers instructions for garment care.
Page 21

20
This warranty covers appliances within
the continental United States, Puerto Rico
and Canada. What is not covered by this
warranty:
Replacement or repair of household fuses,
circuit breakers, wiring or plumbing.
A product whose original serial number has
been removed or altered.
Any service charges not speciÞ cally identiÞ ed
as normal such as normal service area or
hours.
Damage to clothing.
Damage incurred in shipping.
Damage caused by improper installation or
maintenance.
Damage from misuse, abuse accident, Þ re,
ß ood, or acts of nature.
Damage from service other than an
authorized Haier dealer or service center.
Damage from incorrect electrical current,
voltage or supply.
Damage resulting from any product
modiÞ cation, alteration or adjustment not
authorized by Haier.
Adjustment of consumer operated controls
as identiÞ ed in the owners manual.
Hoses, knobs, lint trays and all attachments,
accessories and disposable parts.
Labor, service transportation, and shipping
charges for the removal and replacement of
defective parts beyond the initial 12-month
period.
Damage from other than normal household
use.
Any transportation and shipping charges.
THIS LIMITED WARRANTY IS GIVEN
IN LIEU OF ALL OTHER WARRANTIES,
EXPRESSED OR, INCLUDING THE
WARRANTIES OF MERCHANTABILITY AND
FITNESS FOR A PARTICULAR PURPOSE
The remedy provided in this warranty is
exclusive and is granted in lieu of all other
remedies.
This warranty does not cover incidental
or consequential damages, so the above
limitations may not apply to you. Some
states do not allow limitations on how long
an implied warranty lasts, so the above
limitations may not apply to you.
This warranty gives you speciÞ c legal rights,
and you may have other rights, which vary
from state to state.
Haier America
New York, NY 10018
LIMITED WARRANTY
IN HOME SERVICE
FULL ONE YEAR WARRANTY
For 12 months from the date of original retail
purchase, Haier will repair or replace any part
free of charge including labor that fails due to
a defect in materials or workmanship.
LIMITED WARRANTY
After one year from the original retail
purchase date, Haier will provide a part at
no cost, as indicated below, to replace said
part as a result of a defect in materials or
workmanship. Haier is solely responsible for
the cost of the part. All other costs such as
labor, trip charge, etc are the responsibility of
the owner.
Second through Fifth Year
Haier will provide the outer washtub and
related outer tub assembly parts should the
part fail to hold water.
Second through Seventh Year
Haier will provide the inner stainless steel
wash basket if defective in material or
workmanship.
NOTE: This warranty commences on the
date the item was purchased, and the original
purchase receipt must be presented to the
authorized service representative before
warranty repairs are rendered.
Exceptions: Commercial or Rental Use
Warranty
90 days labor from date of original purchase
90 days parts from date of original
purchase
No other warranty applies.
FOR WARRANTY SERVICE
Contact your nearest authorized service
center. All service must be performed by
a Haier authorized service center. For the
name and telephone number of the nearest
authorized service center, please call
1-877-337-3639.
Before calling please have available the
following information:
Model number and serial number of your
appliance. The name and address of the
dealer you purchased the unit from and the
date of purchase.
A clear description of the problem.
A proof of purchase (sales receipt).
Page 22

42
ÍNDICE
INSTRUCCIONES IMPORTANTES DE SEGURIDAD .............................................43
Precauciones de seguridad para la instalación ...........................................................43
Precauciones generales relativas a la seguridad ........................................................44
PIEZAS Y CARACTERÍSTICAS ........................................................................... 45
INSTRUCCIONES DE INSTALACIÓN .................................................................. 46
Herramientas necesarias ............................................................................................46
Piezas suministradas ................................................................................................... 46
Requisitos de ubicación ...............................................................................................46
Requisitos del sistema de desagüe ............................................................................. 47
Requisitos eléctricos ................................................................................................... 48
INSTRUCCIONES PASO A PASO ........................................................................ 49
Paso 1 Desempaque de la lavadora ..........................................................................49
Paso 2 Conecte y asegure la manguera de desagüe ...............................................50
Paso 3 - Conecte las mangueras de agua ..................................................................50
Paso 4 Nivele la lavadora ........................................................................................... 52
Paso 5 Complete la instalación ................................................................................. 52
PANEL DE CONTROL Y CARACTERÍSTICAS ......................................................53
INSTRUCCIONES DE FUNCIONAMIENTO .......................................................... 56
Paso 1 Prepare y separe las prendas ........................................................................56
Paso 2 Agregue los productos para el cuidado de las telas ..................................... 56
Paso 3 Cargue la lavadora .........................................................................................57
Paso 4 Ponga la lavadora en marcha ........................................................................57
GUÍA PARA EL CUIDADO Y LA LIMPIEZA ........................................................... 58
Limpieza y mantenimiento .......................................................................................... 58
Precauciones al irse de vacaciones ............................................................................. 58
Preparación para la mudanza o el almacenaje ............................................................58
SOLUCIÓN DE PROBLEMAS .............................................................................. 59
GARANTÍA LIMITADA ........................................................................................ 61
INFORMACIÓN A TENER EN CUENTA
Le agradecemos la compra de este
producto de marca Haier. Este manual
para el usuario le ayudará a obtener
el mejor funcionamiento de su nueva
lavadora.
Para referencia futura, anote el número
de modelo y de serie, que están
situados en la parte posterior de la
lavadora, y la fecha de compra.
Engrape la prueba de compra de este
manual para asistirle cuando necesite
obtener servicio bajo la garantía.
___________________________________
Número de modelo
___________________________________
Número de serie
___________________________________
Fecha de compra
Page 23

43
INSTRUCCIONES IMPORTANTES DE SEGURIDAD
ADVERTENCIA
A fin de reducir el riesgo de incendio, choque eléctrico o de daño a las
personas cuando usen el aparato, deben seguirse las precauciones
básicas, incluidas las siguientes:
Lea todas las instrucciones antes de usar este aparato.
Use este aparato solamente para el propósito que fue diseñado, como
se describe en este manual para el usuario.
No use la lavadora con propósitos de lavandería comercial.
Bajo ciertas condiciones, puede generarse gas hidrógeno en un sistema
de agua caliente que no se haya usado por dos semanas o un período
mayor. EL GAS HIDRÓGENO ES EXPLOSIVO. Si no se ha usado el
sistema de agua caliente durante dicho período, antes de usar una
máquina de lavar, abra todos los grifos de agua caliente y deje que
corra el agua de cada uno por varios minutos. Esto liberará todo el gas
hidrógeno que se haya acumulado. Debido a la inß amabilidad de dicho
gas, no fume ni use una llama abierta durante este lapso.
PRECAUCIONES DE SEGURIDAD PARA
LA INSTALACIÓN
PELIGRO
Antes de deshacerse de su viejo aparato, quítele la puerta o la tapa,
para que los niños no puedan esconderse ni quedar atrapados dentro
del mismo.
Antes de usarse este aparato, deberá ser debidamente instalado y
ubicado de acuerdo a las instrucciones de instalación.
No guarde este aparato ni lo instale en donde se verá expuesto a
temperaturas por debajo del punto de congelación ni expuesto a las
inclemencias del tiempo, ya que esto puede ocasionar daños al mismo.
El aparato deberá ser conectado a tierra como es debido, para que
cumpla con todos los códigos y ordenanzas eléctricos. Vea la sección
Requisitos eléctricos.
Page 24

44
PRECAUCIONES GENERALES RELATIVAS A
LA SEGURIDAD
Mantenga el área alrededor del aparato libre de materiales combustibles,
tales como pelusa, papel, trapos o productos químicos.
Es necesario supervisar cuidadosamente a los niños si los mismos usan
el aparato o cuando éste se use cerca de ellos. No permita que los niños
jueguen con o sobre este aparato ni en el interior del mismo.
No coloque artículos que hayan sido previamente limpiados, lavados,
puestos en remojo o manchados con gasolina, disolventes de limpieza
en seco u otras sustancias inß amables o explosivas en el agua de lavado.
Estas sustancias despiden vapores que pueden encenderse o causar
una explosión.
No agregue gasolina, solventes para limpiar en seco u otras sustancias
inß amables o explosivas al agua de lavado. Estas sustancias despiden
vapores que pueden encenderse o causar una explosión.
No introduzca las manos en el aparato si la canasta de lavado, la tina o el
agitador se está moviendo.
No trate de forzar los controles.
Nunca desenchufe la lavadora jalándola del cable eléctrico. Siempre
sujete el enchufe con Þ rmeza y jálelo directamente fuera del contacto.
Para reducir al mínimo la posibilidad de un choque eléctrico, desenchufe
este aparato del suministro de energía antes de intentar realizar el
mantenimiento o la limpieza.
NOTA: El girar la perilla selectora de ciclos hacia la posición de O!
(Apagado), NO desconectará el aparato del suministro de energía.
No intente proveer servicio, reparación ni reemplazar ninguna parte
del aparato a menos que esto se recomiende especíÞ camente en este
manual o en instrucciones de reparación publicadas para el usuario que
usted comprenda y si cuenta con la experiencia necesaria para llevar a
cabo dicha reparación.
Antes de desechar la lavadora o de retirarla del servicio, quítele la puerta
o la tapa.
GUARDE ESTAS INSTRUCCIONES
SOLAMENTE PARA USO DOMÉSTICO
Page 25

45
PIEZAS Y CARACTERÍSTICAS
A
B
C
D
E
F
P
O
N
M
G
L
I
J
K
H
Tapa superior
Panel de control
Carcasa
Patas niveladoras (4)
Interruptor de seguridad de
la puerta
Depósito del blanqueador líquido
Panel de acceso
Pulsador
Cubierta exterior de la tina
Aro de balance
Canasta de lavado
Conducto de desagüe
Cable eléctrico (120 voltios / 60 Hz)
Válvula de entrada de agua fría
Válvula de entrada de agua caliente
Cubierta posterior
Page 26

46
INSTRUCCIONES DE INSTALACIÓN
HERRAMIENTAS NECESARIAS
Alicates
Llave de tuercas
Destornillador de hoja plana
Cinta de medir
Nivel de carpintero
PIEZAS SUMINISTRADAS
Abrazadera de la manguera de
desagüe
Gancho de la manguera de
desagüe
Manguera de desagüe
Mangueras de agua (2) (con arandelas
planas instaladas previamente)
Manual para el usuario
REQUISITOS DE UBICACIÓN
La lavadora deberá ser instalada sobre un piso sólido, para reducir al mínimo la
vibración durante el ciclo de exprimido. El piso de hormigón es el mejor.
El piso deberá estar nivelado y con un declive máximo de 1 (25 mm) debajo de
toda la lavadora.
Un lugar apropiado, protegido de la luz directa del sol y de fuentes de calor, tales
como radiadores, zócalos radiantes o aparatos de cocción.
No la instale sobre una alfombra.
El lugar deberá tener un contacto eléctrico conectado a tierra, ubicado a menos
de 4 pies (1,2 m) del cable eléctrico, en la parte posterior de la lavadora.
Los grifos de agua fría y caliente deberán estar a menos de 3 pies (0,9 m) de las
conexiones de agua fría y caliente en la lavadora.
Un calentador de agua deberá proveer agua caliente a una temperatura de por lo
menos 120 °F (49 °C).
La presión de agua deberá estar entre 20 y 100 lb/pulg² (138 y 690 kPa).
ADVERTENCIA
No instale ni ponga a funcionar esta lavadora donde estará expuesta a
temperaturas por debajo de 32 °F (0 °C). El agua que quede en la
lavadora se congelará y ocasionará daños a la misma.
Page 27

47
DIMENSIONES DE LA LAVADORA
27"
(68,6 cm)
27
"
(68,6 cm)
43,5
"
(110,5 cm)
REQUISITOS DEL SISTEMA DE DESAGÜE
TUBO VERTICAL DE PARED O POR EL PISO
La altura del tubo vertical deberá ser entre 39 (99 cm) y 60 (153 cm) desde la base
de la lavadora. El tubo vertical deberá tener un diámetro mínimo de 2 (5 cm).
Pared Piso
39" – 60"
(99 cm – 153=cm)
Page 28

48
TINA DE LAVADERO
La tina de lavadero necesita una capacidad
mínima de 20 gal (76 L). La tina de lavadero
deberá tener una altura de por lo menos
39 (99 cm) y no más de 48 (122 cm).
39" – 48"
(99 cm – 122=cm)
REQUISITOS ELÉCTRICOS
ADVERTENCIA
La lavadora deberá ser enchufada en un contacto eléctrico
debidamente puesto a tierra, de 120 voltios, 60 Hz, CA solamente, de
15 ó 20 amperios, con fusibles. Se recomienda un fusible retardador o
un cortacircuitos.
Si el suministro eléctrico provisto no satisface los requisitos mencionados
anteriormente, póngase en contacto con un electricista competente autorizado.
ADVERTENCIA
La conexión inadecuada del conductor a tierra para el equipo puede
resultar en un riesgo de choque eléctrico. Si no está seguro de que la
conexión a tierra del aparato sea la adecuada, verifíquela con un
electricista o técnico de servicio competente.
Este aparato debe estar conectado a tierra. En el caso de funcionamiento
defectuoso o avería, la conexión a tierra reducirá el riesgo de choque eléctrico al
proporcionar una vía de menor resistencia para la corriente eléctrica.
Este aparato está equipado con un cable que cuenta con un conductor para
la conexión a tierra del equipo y un enchufe de conexión a tierra. El enchufe
debe conectarse en un contacto apropiado, que esté debidamente instalado y
conectado a tierra de acuerdo con todos los códigos y ordenanzas locales.
No use un adaptador para cable de 3 terminales.
No use un cable eléctrico de extensión.
Page 29

49
INSTRUCCIONES PASO A PASO
INSTALACIÓN DE LA LAVADORA
Se recomienda que un técnico de aparatos competente instale su nueva lavadora.
Si le parece que tiene la habilidad para instalar la lavadora, lea las instrucciones de
instalación cuidadosamente antes de hacerlo.
CUIDADO: Si después de seguir estos pasos no está seguro de haber instalado
la lavadora adecuadamente, póngase en contacto con un técnico de aparatos
competente.
ADVERTENCIA
Si recién le han entregado la lavadora y la temperatura del exterior
estaba por debajo del punto de congelación, no ponga a funcionar la
lavadora hasta que alcance la temperatura ambiente.
PASO 1 DESEMPAQUE DE LA LAVADORA
1. Quite todos los materiales de empaque. Esto incluye la base de espuma y toda la
cinta adhesiva que mantiene sujetos los accesorios del interior y el exterior de la
lavadora.
2. Abra la tapa superior para quitar el soporte de la canasta de lavado. Jálelo para
quitarlo.
NOTA: Guarde el soporte de la canasta de lavado para usarlo cuando mueva la
lavadora en el futuro.
3. Inspeccione y quite los restos de materiales de envío, cinta o material impreso
antes de usar la lavadora.
Page 30

50
ADVERTENCIA
Para evitar el peligro de asfixia, mantenga la bolsa de plástico y otros
materiales de envío lejos del alcance de los bebés y los niños. No use
esta bolsa en cunas, cochecitos ni corrales. La bolsa de plástico podría
bloquear la nariz y la boca, impidiendo la respiración. Esta bolsa no es
un juguete.
PASO 2 CONECTE Y ASEGURE LA MANGUERA DE
DESAGÜE
1. Aß oje la abrazadera de la manguera de
desagüe con un destornillador de hoja
plana. Deslice la abrazadera hacia arriba
sobre la manguera de desagüe, y sáquela
del extremo de goma de la misma.
2. Haga encajar el extremo de goma de la
manguera de desagüe sobre el conducto
de desagüe plástico en la lavadora.
3. Deslice la abrazadera de la manguera de
desagüe sobre el extremo de la manguera
de desagüe y el conducto de desagüe.
4. Apriete la abrazadera de la manguera de desagüe para asegurar la conexión.
5. Coloque el extremo del gancho de la manguera de desagüe en un tubo o tina de
lavadero.
6. Asegure la manguera de desagüe en su lugar sujetándola a una manguera de
agua, al tubo vertical o a la pata de la tina de lavadero. Consulte Requisitos para
el sistema de desagüe para ver las imágenes.
PASO 3 - CONECTE LAS MANGUERAS DE AGUA
IMPORTANTE: Utilice solamente mangueras nuevas cuando instale la lavadora.
NOTA: Inspeccione periódicamente las mangueras para ver si tienen rajaduras,
cortes, fugas o desgaste. Reemplácelas con mangueras nuevas cada 5 años.
NOTA: El agua caliente deberá Þ jarse a una temperatura de por lo menos 120 °F a
140 °F (49 °C a 60 °C) para que el jabón se disuelva y para evitar que queden restos
del mismo en las prendas.
1. Cerciórese de que cada extremo de las mangueras de entrada de agua tenga una
arandela plana colocada Þ rmemente en su lugar. Las arandelas planas han sido
instaladas previamente de fábrica.
A
Arandela
Page 31

51
2. Los acopladores de la manguera están codiÞ cados por colores, para asistirle al
hacer las conexiones apropiadas. Se aconseja usar el color gris para el agua fría
y rojo para el agua caliente. Enrosque a mano las mangueras de entrada sobre
los grifos de agua hasta que queden apretadas. Luego apriete con pinzas dos
tercios de vuelta adicional.
IMPORTANTE: Para evitar daños en los acoplamientos de las mangueras, no los
apriete en exceso.
NOTA: Para evitar daños en los grifos, no use cinta de plomero ni ningún tipo de
sellador en las roscas de las válvulas.
3. Enrosque a mano el otro extremo de las mangueras de entrada sobre las válvulas
de entrada marcadas con una H (para agua caliente) y una C (para agua fría)
en la parte posterior de la lavadora, hasta que queden apretadas. Luego apriete
con pinzas dos tercios de vuelta adicional.
IMPORTANTE: Para evitar daños en los acoplamientos de las mangueras, no los
apriete en exceso.
NOTA: Para evitar daños en las válvulas de entrada de la lavadora, no use cinta de
plomero ni sellador en las roscas de las válvulas.
4. Abra los grifos de agua fría y caliente y revise si hay fugas. Si hay alguna fuga,
revise nuevamente los pasos 1 al 3.
Page 32

52
PASO 4 NIVELE LA LAVADORA
IMPORTANTE: La nivelación apropiada de su lavadora ayudará a reducir el ruido y la
vibración.
1. Coloque la lavadora en su ubicación Þ nal. Cerciórese de que las líneas de agua y
de desagüe no estén tirantes ni pinchadas. Cerciórese de que las cuatro patas
estén en contacto Þ rme con el piso y que la lavadora descanse Þ rmemente en su
posición.
2. Con un nivel de carpintero, cerciórese de que la lavadora esté nivelada de lado a
lado y de frente hacia atrás.
3. Si la lavadora no está nivelada, regule las patas niveladoras. Gírelas hacia la
derecha para extender (levantar la lavadora) o hacia la izquierda para retraer
(bajar la lavadora).
Levantar Bajar
PASO 5 COMPLETE LA INSTALACIÓN
1. Enchufe la lavadora en un contacto de pared de conexión a
tierra de 3 terminales.
2. VeriÞ que que los grifos de agua estén abiertos.
3. Deshágase de todos los materiales de embalaje o
recíclelos.
4. Ponga a funcionar un ciclo de lavado normal con
detergente, para probar y limpiar la lavadora. Consulte la
sección Instrucciones para el funcionamiento.
Page 33

53
PANEL DE CONTROL Y CARACTERÍSTICAS
PANEL DE CONTROL
C
A
E
B
Temp
D
F
BOTÓN DE TEMPERATURA
Utilice este botón para seleccionar una combinación de temperatura de
lavado/enjuague. Para obtener mejores resultados, siga las instrucciones de
la etiqueta de las prendas y use la temperatura de agua más caliente que la
tela pueda resistir.
No todas las selecciones están disponibles con todos los ciclos.
INDICADORES DEL PROGRESO DEL CICLO
Cuando se haya puesto en marcha la lavadora por primera vez, las luces
de Cycle Progress (Progreso del ciclo) indicarán las etapas del ciclo
seleccionado.
A medida que se completa cada etapa, la luz se apagará, indicando que está
en marcha la próxima etapa.
Cuando se haya terminado el ciclo, se encenderá la luz LED de End (Fin).
BOTÓN DE SELECT (SELECCIONAR)
se este botón para modiÞ car el proceso de lavado preÞ jado para el ciclo
seleccionado. Cada vez que presione el botón, aparecerán las opciones
disponibles.
No todas las opciones están disponibles para todos los ciclos. Consulte la
Guía de ciclos para obtener detalles.
Page 34

54
PRE-WASH
(Prelavado)
WASH
(Lavado)
RINSE
(Enjuague)
SPIN
(Exprimido)
DESCRIPCIÓN DEL CICLO
Ciclo de lavado completo con un
prelavado.
Ciclo de lavado completo.
Lavado solamente. Queda agua
del lavado en la canasta de lavado.
Lavado y enjuague solamente.
Queda agua del enjuague en la
canasta de lavado.
Ciclo de enjuague y exprimido
Ciclo de exprimido solamente
PERILLA DE SELECCIÓN DE CICLOS
Encienda la lavadora girando la perilla de selección de ciclos.
NOTA: Si no se ha puesto en marcha la lavadora, se apagará
automáticamente después de 5 minutos.
Hay 7 ciclos para elegir:
Whites (Ropa blanca) - Use este ciclo para las prendas de color blanco y
claro, como las prendas de algodón, las cuales pueden desteñirse.
Heavy Duty (Intenso) - Use este ciclo para las prendas durables con
suciedad profunda. Este ciclo también puede usarse para toallas, artículos
deportivos, ropa de niños, etc.
Normal - Use este ciclo para las prendas de algodón y cargas de telas mixtas
con suciedad normal.
Colors (Ropa de colores) - Use este ciclo para las telas naturales de color
oscuro o con tintes fuertes, con suciedad ligera.
Bulky (Artículos voluminosos) - Use este ciclo para lavar artículos grandes
como pueden ser edredones, bolsas de dormir y frazadas.
Delicate (Ropa delicada) - Use este ciclo para lavar prendas con suciedad
ligera y ropa delicada que necesite un lavado delicado.
Quick (Rápido) - Use este ciclo para lavar cargas pequeñas de prendas con
suciedad ligera que necesite de prisa.
BOTÓN DE INICIO/PAUSA
Presione este botón para poner en marcha un ciclo seleccionado o hacer una
pausa en un ciclo que esté en marcha.
NOTA: Luego de iniciar el ciclo de lavado, deberá hacer una pausa en el
ciclo que esté en marcha para cambiar los ajustes de Wash/Rinse Temp
(Temperatura de lavado/enjuague) y Load Size (Tamaño de la carga).
BOTÓN LOAD SIZE (TAMAÑO DE CARGA)
Use este botón para seleccionar un nivel de agua adecuado para la carga. El
ajuste Small (Pequeño) es el nivel más bajo de agua; el ajuste Super es el más
alto.
Page 35

55
GUÍA DE CICLOS
NOTA: Para proteger su carga de lavado, no todas las opciones y ajustes estarán
disponibles para todos los ciclos. Las cajas sombreadas indican los ajustes por
defecto para cada ciclo.
CICLO
TIPO DE
TELA
PROCESO
DE
LAVADO
TIEMPO
EST.
TEMP
PRELAVADO
LAVADO
SOLA-
MENTE
LAVADO
Y ENJU-
AGUE
ENJU-
AGUE Y
EXPRI-
MIDO
SÓLO
EXPRI-
MIDO
Whites
(Ropa
blanca)
Prendas
blancas
Lavado de
20 minutos
Enjuague
Exprimido
:45*
Hot/Cold
(Caliente/Fría)
Warm/Cold
(Tibia/Fría)
Cold/Cold
(Fría/Fría)
Heavy
Duty
(Intenso)
Telas
durables
que no
destiñen
con
suciedad
profunda
Lavado de
30 minutos
Enjuague
Exprimido
adicional
1:03*
Warm/Cold
(Tibia/Fría)
Hot/Cold
(Caliente/Fría)
Cold/Cold
(Fría/Fría)
Normal
Telas de
algodón,
lino y
prendas
mezcladas
Lavado de
20 minutos
Enjuague
por rociado
Exprimido
adicional
:44
Warm/Cold
(Tibia/Fría)
Hot/Cold
(Caliente/Fría)
Cold/Cold
(Fría/Fría)
Colors
(Ropa de
colores)
Telas
oscuras y
teñidas
Lavado de
18 minutos
Enjuague
por rociado
Exprimido
:40
Cold/Cold
(Fría/Fría)
Hot/Cold
(Caliente/Fría)
Warm/Cold
(Tibia/Fría)
Bulky
(Artículos
volumin-
osos)
Edre-
dones,
frazadas,
bolsas de
dormir
Lavado de
8 minutos
Enjuague
prolongado
Exprimido
breve
:33
Warm/Cold
(Tibia/Fría)
Hot/Cold
(Caliente/Fría)
Cold/Cold
(Fría/Fría)
Delicate
(Ropa
delicada)
Prendas de
lencería,
telas Þ nas
con encaje
Lavado de
10 minutos
Enjuague
prolongado
Exprimido
breve
:35
Warm/Cold
(Tibia/Fría)
Hot/Cold
(Caliente/Fría)
Cold/Cold
(Fría/Fría)
Quick
(Rápido)
Telas de
algodón,
lino y
prendas
mezcladas
Lavado de
6 minutos
Enjuague
Exprimido
breve
:25
Warm/Cold
(Tibia/Fría)
* El tiempo estimado no incluye la opción Pre-wash (Prelavado), seleccionada
automáticamente. Un prelavado agregará aproximadamente 20 minutos.
Page 36

56
INSTRUCCIONES DE FUNCIONAMIENTO
PASO 1 PREPARE Y SEPARE LAS PRENDAS
PREPARE LAS PRENDAS
Revise las etiquetas de las prendas para ver las instrucciones de lavado.
Vacíe los bolsillos y vuélvalos al revés.
Dé vuelta los puños y quite la pelusa o la suciedad.
Ate los cordones y fajas de modo que no se enreden.
Cierre los zípers, broches de presión y corchetes para evitar que se enganchen.
Quite los alÞ leres u otros objetos puntiagudos de las prendas, para evitar que
rayen la canasta de la lavadora.
Trate previamente todas las manchas y las áreas con suciedad profunda.
Vuelva al revés las prendas sintéticas y los tejidos de lana para evitar que se
llenen de motitas.
SEPARE LAS PRENDAS
Separe la ropa según el ciclo de lavado necesario (temperatura del agua y acción
de lavado).
Separe los colores claros de los colores oscuros, los artículos que no destiñen de
los que sí destiñen.
Separe las telas pesadas de las telas ligeras.
Separe las telas que atraen pelusa de las telas que sueltan pelusa.
PASO 2 AGREGUE LOS PRODUCTOS PARA EL
CUIDADO DE LAS TELAS
AGREGUE DETERGENTE
Use solamente un detergente de alta eÞ ciencia. Los detergentes
HE (Alta eÞ ciencia) han sido especialmente formulados con
ingredientes que evitan los problemas ocasionados por el exceso
de espuma del jabón. El exceso de espuma impedirá el enjuague
completo de los restos de detergente de las prendas.
Vierta detergente líquido o en polvo y blanqueador no decolorante directamente
en la canasta de lavado.
NOTA: La cantidad adecuada de detergente depende del tamaño de la carga, el nivel
de suciedad de las prendas y el grado de agua blanda que se suministre a la lavadora.
Page 37

57
AGREGUE BLANQUEADOR (SI LO DESEA)
Vierta una medida de blanqueador líquido con
cloro en el depósito de blanqueador líquido
con cloro.
NOTA: Use solamente blanqueador líquido en
este depósito.
IMPORTANTE: Tenga cuidado de no derramar
el blanqueador sobre la carcasa de la lavadora
ni sobre la ropa. Debido a que es un producto
químico poderoso, puede dañar la ropa o el
acabado de la lavadora.
Siga las instrucciones del fabricante en la etiqueta de las prendas sobre el uso
recomendado de blanqueador líquido o en polvo.
PASO 3 CARGUE LA LAVADORA
1. Cargue las prendas de modo ß ojo y uniforme alrededor de la canasta de lavado.
2. No cargue las prendas directamente sobre el centro del pulsador.
3. Cierre la tapa de la lavadora.
NOTAS:
No cargue en exceso ni apriete los artículos para que quepan en la canasta de
lavado.
La lavadora no agitará ni exprimirá con la tapa abierta.
PASO 4 PONGA LA LAVADORA EN MARCHA
1. Encienda la lavadora girando la PERILLA DE SELECCIÓN DE CICLOS.
2. Seleccione un ciclo de lavado.
3. ModiÞ que los ajustes y las opciones por defecto, si lo desea.
4. Presione el BOTÓN DE INICIO/PAUSA que sobresale en la perilla para comenzar
con el ciclo de lavado.
Page 38

58
GUÍA PARA EL CUIDADO Y LA LIMPIEZA
ADVERTENCIA
Siempre desenchufe la lavadora para evitar un choque eléctrico antes
de la limpieza.
El ignorar esta advertencia puede ocasionar la muerte o heridas.
Antes de usar productos de limpieza, siempre lea y siga las
instrucciones del fabricante y las advertencias, para evitar daños
personales o al producto.
LIMPIEZA Y MANTENIMIENTO
Utilice solamente un paño húmedo o jabonoso para limpiar el panel de control.
Si derrama suavizante, blanqueador o detergente líquido o en polvo sobre la
carcasa, límpiela inmediatamente con un paño húmedo para evitar daños en el
acabado.
No use productos de limpieza abrasivos, productos químicos irritantes,
amoníaco, blanqueador con cloro, detergente concentrado o solventes para
limpiar la lavadora. Estos productos químicos pueden disolver, dañar o decolorar
la lavadora.
Luego de lavar la ropa, deje la puerta abierta para que se evapore la humedad del
interior de la máquina y así evitar que se forme moho.
PRECAUCIONES AL IRSE DE VACACIONES
Cierre los grifos de suministro de agua. Esto eliminará la posibilidad de daños a
su hogar si hay una ruptura o fugas en la manguera.
Desenchufe la lavadora del contacto eléctrico.
Seque la canasta de lavado.
Deje la puerta abierta para que se evapore la humedad del interior de la máquina
y así evitar que se forme moho.
PREPARACIÓN PARA LA MUDANZA O EL ALMACENAJE
Aparte de seguir las Precauciones al irse de vacaciones, complete los pasos
adicionales indicados a continuación.
Desconecte las mangueras de agua y la manguera de desagüe; colóquelas en la
canasta de lavado.
Gire las patas niveladoras para que queden replegadas completamente dentro
de la carcasa de la lavadora.
Si va a mover la lavadora, coloque el soporte de la canasta de lavado de los
materiales originales de envío nuevamente en el interior de la parte superior
de la abertura de la lavadora. Asegure la tapa de la lavadora con cinta adhesiva
protectora.
Mueva la lavadora y guárdela solamente en la posición vertical.
No guarde la lavadora en un ambiente frío en donde las temperaturas estarán
por debajo del punto de congelación; guárdela a temperatura ambiente.
Page 39

59
SOLUCIÓN DE PROBLEMAS
LA LAVADORA NO FUNCIONA
VeriÞ que que el cable eléctrico esté enchufado en un contacto de pared de
conexión a tierra de 3 terminales.
VeriÞ que que el receptáculo eléctrico de pared tenga el voltaje correcto.
Fíjese si el cortacircuitos necesita volver a Þ jarse o si debe reemplazarse el
fusible.
VeriÞ que que no se haya llenado en exceso la lavadora. Es posible que haya que
redistribuir la carga para volver a balancearla.
Cerciórese de que la tapa de la lavadora esté debidamente cerrada.
La lavadora hace pausas en algunos ciclos. Esto es normal en el ciclo Delicate
(Ropa delicada), que tiene períodos cortos para que la ropa quede en remojo.
Durante ese período, no escuchará a la lavadora en funcionamiento. La lavadora
volverá a comenzar automáticamente cuando se termine el tiempo de remojo.
PROBLEMAS CON EL AGUA
El ß ujo de agua está lento o el llenado demora mucho tiempo:
VeriÞ que que los grifos de agua estén abiertos por completo.
Revise las mangueras de agua para cerciorarse de que no estén enredadas,
torcidas ni pellizcadas.
La temperatura del agua es incorrecta:
VeriÞ que la temperatura del calentador de agua. El agua caliente deberá estar a
una temperatura de por lo menos 120 °F a 140 °F (49 °C a 60 °C).
VeriÞ que que las mangueras de entrada estén conectadas debidamente
(caliente a agua caliente y fría a agua fría).
Fugas de agua:
Revise que estén ajustadas las conexiones de las mangueras de entrada en los
grifos y la lavadora.
VeriÞ que que la conexión de la manguera de desagüe en la lavadora esté segura
y que la manguera de desagüe esté colocada como es debido en la ubicación del
desagüe.
Revise la plomería o llame a un plomero.
No drena el agua:
VeriÞ que que la manguera de desagüe esté conectada correctamente a la
lavadora.
VeriÞ que la posición de la manguera de desagüe. Para que funcione como es
debido, la parte superior de la salida de desagüe deberá estar por lo menos 39
(99 cm) por encima del piso.
VeriÞ que que no esté obstruido el fregadero o el tubo de desagüe.
Page 40

60
LA LAVADORA HACE RUIDO
Sonido de golpeteo:
Es posible que la carga de lavado esté desequilibrada. Haga una pausa en la
lavadora y vuelva a distribuir los artículos en la canasta de lavado.
Ruidos de traqueteo o metálicos:
Es posible que hayan objetos extraños en la tina de lavado. Detenga la lavadora y
fíjese si hay objetos extraños, tales como llaves o monedas sueltas.
Sonidos de chirrido:
La canasta de lavado puede estar sobrecargada. Detenga la lavadora y saque
una parte de la carga a lavar.
Ruidos de vibraciones:
Es posible que la lavadora no esté nivelada. VeriÞ que que las 4 patas niveladoras
estén Þ rmemente en el piso y que la lavadora esté nivelada.
PROBLEMAS CON LA ROPA
Arrugas:
Es posible que se formen arrugas por separar la ropa de un modo inadecuado,
cargar en exceso o lavar con la temperatura equivocada.
Evite cargar en exceso y vuelva a separar la ropa. No mezcle prendas pesadas
tales como ropa de trabajo con prendas livianas, tales como blusas, camisas
ligeras y artículos delicados. Tal vez necesite lavarlos en agua tibia o fría.
Restos de detergente:
Es posible que el detergente no se disuelva por completo en climas
extremadamente fríos. Seleccione una temperatura tibia de lavado y cerciórese
de que el calentador de agua esté suministrando agua caliente de por lo menos
120 °F (49 °C).
Agregue el detergente antes de colocar las prendas. No vierta el detergente
directamente sobre las prendas.
Las prendas se han puesto grisáceas o amarillentas:
Separe los colores oscuros de los claros y blancos, para evitar la transferencia de
tintes.
Es posible que las cargas grandes y con suciedad profunda necesiten más
detergente. Consulte las instrucciones del fabricante de detergente para ver el
uso recomendado.
Prendas dañadas:
Desgarres y enganches Ate los cordones y las fajas. Vacíe los bolsillos, sujete
las correas y cierre los zípers, los ganchos de metal o sujetadores con gancho
antes de cargar.
Manchas de blanqueador No vierta ni salpique el blanqueador directamente
sobre las prendas. Si usa el depósito y todavía ve manchas, pruebe usar
blanqueador diluido.
Desgaste excesivo y desgarres Siga las instrucciones del fabricante para el
cuidado de la prenda.
Page 41

61
Reemplazo o reparación de fusibles
domésticos, cortacircuitos, cableado o
plomería.
Un producto cuyo número de serie original
haya sido removido o alterado.
Cualquier cargo por servicio que no haya sido
identiÞ cado especíÞ camente como servicio
normal, como puede ser el área o las horas de
servicio.
Daños a la ropa.
Daños ocurridos durante el transporte.
Daños ocasionados por la instalación o el
mantenimiento inadecuados.
Daños por el uso incorrecto, abuso,
accidente, incendio, inundación o fenómenos
de la naturaleza.
Daños debidos al servicio efectuado por
un distribuidor o centro de servicio que sea
diferente del autorizado por Haier.
Daños ocasionados por la corriente, el voltaje
o el suministro eléctrico incorrectos.
Daños que resulten de cualquier modiÞ cación
hecha en el producto, alteración o ajustes no
autorizados por Haier.
Ajuste de los controles manejados por el
cliente según han sido identiÞ cados en el
manual del propietario.
Mangueras, perillas, bandejas de pelusa y
todos los otros aditamentos, accesorios y
piezas desechables.
Cargos por mano de obra, transporte para
el servicio y envío para la remoción y el
reemplazo de las piezas defectuosas que se
efectúen después del período inicial de 12
meses.
Daños ocasionados por un uso diferente al
doméstico normal.
Cualquier gasto de transporte y de envío.
ESTA GARANTÍA LIMITADA REEMPLAZA
TODAS LAS OTRAS GARANTÍAS,
EXPRESAS O QUE INCLUYAN LAS
GARANTÍAS DE COMERCIABILIDAD O DE
CAPACIDAD PARA UN PROPÓSITO EN
PARTICULAR
El recurso provisto en esta garantía es
exclusivo y está otorgado en lugar de
cualquier otro recurso.
Esta garantía no cubre daños incidentales o
consecuentes, de modo que las limitaciones
indicadas anteriormente pueden no aplicarse
en su caso. Algunos estados no permiten
las limitaciones acerca de cuánto tiempo
dura una garantía implícita, de modo que
las limitaciones arriba indicadas quizás no le
correspondan.
Esta garantía le otorga derechos legales
especíÞ cos, y es posible que usted tenga
otros derechos, los cuales varían de un
estado a otro.
Haier America
New York, NY 10018
GARANTÍA LIMITADA
SERVICIO EN EL HOGAR
GARANTÍA COMPLETA POR UN AÑO
Durante 12 meses a partir de la fecha de
compra original en la tienda, Haier reparará o
reemplazará cualquier pieza del aparato sin
costo, incluyendo la mano de obra, si la misma
falla debido a defectos en los materiales o en
la mano de obra.
GARANTÍA LIMITADA
Después de un año a partir de la fecha de
compra original en la tienda, Haier proveerá
una pieza sin costo, como se indica a
continuación, para reemplazar la pieza
mencionada como resultado de defectos en
los materiales o en la mano de obra. Haier se
hará responsable solamente por el costo de
la pieza. Cualquier otro costo tales como la
mano de obra, los cargos por viaje, etc., serán
responsabilidad del propietario.
Del segundo al quinto año
Haier proveerá la tina exterior de lavado y
las piezas de ensamblaje relacionadas con la
misma si ésta no logra contener el agua.
Del segundo al séptimo año
Haier proveerá la canasta interior de lavado
de acero inoxidable si presentara defectos en
los materiales o en la mano de obra.
NOTA: Esta garantía comienza en la fecha
de compra de este producto, y el recibo
original deberá presentarse al representante
autorizado de servicio antes de hacerse las
reparaciones bajo la garantía.
Excepciones: Garantía bajo uso comercial o
de alquiler
90 días en la mano de obra a partir de la
fecha de compra original
90 días en las piezas a partir de la fecha de
compra original
No es aplicable ninguna otra garantía.
PARA OBTENER SERVICIO BAJO
LA GARANTÍA
Póngase en contacto con el centro de
servicio autorizado más cercano a su
localidad. Todo servicio deberá ser realizado
por un centro de servicio autorizado por
Haier. Para obtener el nombre y el número
de teléfono del centro de servicio autorizado
más cercano, llame al 1-877-337-3639.
Antes de llamar, tenga a mano la siguiente
información:
Número de modelo y de serie del aparato.
El nombre y la dirección del distribuidor en
donde compró la unidad y la fecha de compra.
Una descripción clara del problema.
Un comprobante de compra (recibo de
compra).
Esta garantía cubre las unidades
comprendidas dentro de la parte
continental de Estados Unidos, Puerto Rico
y Canadá. Lo que no está cubierto bajo esta
garantía:
Page 42

IMPORTANT
Do Not Return This Product To The Store
If you have a problem with this product, please contact the
“Haier Customer Satisfaction Center” at
1-877-337-3639.
DATED PROOF OF PURCHASE, MODEL #, AND SERIAL #
REQUIRED FOR WARRANTY SERVICE
IMPORTANT
Ne pas Réexpédier ce Produit au Magasin
Pour tout problème concernant ce produit, veuillez contacter
le service des consommateurs ‘Haier Customer Satisfaction Center’ au
1-877-337-3639.
UNE PREUVE D’ACHAT DATEE EST REQUISE POUR BENEFICIER DE LA GARANTIE.
IMPORTANTE
No regrese este producto a la tienda
Si tiene algún problema con este producto, por favor contacte el
“Centro de Servicio al Consumidor de Haier” al
1-877-337-3639 (Válido solo en E.U.A).
NECESITA UNA PRUEBA DE COMPRA FECHADA PARA
EL SERVICIO DE LA GARANTIA
Made in China
Fabriqué en Chine
Hecho en China
Haier America
New York, NY 10018
GWT460BW
Issued: July 2012 Printed in U.S.A. Part # 0030509609A
 Loading...