

Haier GDZ22-1 Owner’s Manual
Haier
What The World Comes Home To '_
J
UserManual-
GuidedeI'Utitisateur° Mode_
Manual del Usuario° p_ Modulode
Mo_l#
IMPORTANTSAFETYINSTRUCTIONS
Warning - To reduce the risk of fire, electric shock, or injury
to persons when using your appliance, follow basic
precautions, including the following:
1. Read all instructions before using the appliance.
2. Do not dry articles that have been previously cleaned in, washed in,
soaked in, or spotted with gasoline, dry-cleaning solvents, or other
flammable or explosive substances, as they give off vapors that
could ignite or explode.
3. Do not allow children to play on or in the appliance. Close supervision
of children is necessary when the appliance is used near children.
4. Before the appliance is removed from service or discarded, remove the
door to the drying compartment.
5. Do not reach into the appliance if the drum is moving.
6. Do not install or store this appliance where it will be exposed to water
and/or to the weather.
7. Do not tamper with controls.
8. Do not repair or replace any part of the appliance or attempt any
servicing unless specifically recommended in the user-maintenance
instructions or in published user-repair instructions that you understand
and have skills to carry out.
9. Do not use fabric softeners or products to eliminate static unless
recommended by the manufacturer of the fabric softener or product.
10. Do not use heat to dry articles containing foam rubber or similarly
textured rubber-like materials.
11. Clean lint screen before or after each load.
12. Keep area around the exhaust opening and adjacent surrounding
areas free from the accumulation of lint, dust and dirt.
13. The interior of the appliance and the exhaust duct should be cleaned
periodically by qualified service personnel.
14. Do not place items exposed to cooking oils in your dryer. Items
contaminated with cooking oils may contribute to a chemical
reaction that could cause a load to catch fire.
15. If material has been used with any flammable liquids or solids it should
not be used in the dryer until all traces of the flammable liquids and its
fumes have been removed.
16.Thisdryermustbeproperlyinstalledinaccordancewiththe
installationinstructionsbeforeit isused.Seegroundinginstructions
intheinstallationsection.
17.Propergroundingmustbeensuredtoreducetheriskofelectricshock
andfire.Checkwithaqualifiedelectricianorservicepersonnelifyou
areindoubtastowhetherthedryerisproperlygrounded.
18.Usethedryeronlyforitsintendedpurpose,dryingclothes.
19.Alwaysdisconnectdryerfromelectricalsupplybeforeattemptingany
service.Disconnectpowercordbygraspingtheplug,notthecord.
20.Replacewornpowercordsand/orlooseplugs.
21. To reduce the risk of electric shock or fire, do not use extension cords or
adapters to connect dryer to electrical power source.
SAVETHESEINSTRUCTIONS
ForFutureUse
DANGER
Risk of child entrapment. Before you throw away your old
dryer, take off the door so that children may
not easily get trapped inside.
Thank you for using our Haler
product. This easy-to-use manual will
guide you in getting the best use of
your dryer.
Remember to record the model and
serial number. They are on a label in
back of the dryer.
Staple your receipt to your manual. You will need it to obtain
warranty service.
Model number
Serial number
Date of purchase
As dry cleaning solvents, gasoline, vegetable and cooking oils are highly
hazardous materials, items soaked in or spotted with such should not be used in
the dryer, items may still contain a substantial amount of the hazardous material
after being washed. When such items are exposed to heat they could ignite. As
clothes are stacked and piled up in the dryer the heat cannot escape. Due to this,
items become hot enough to possibly ignite, Washing in hot water with extra
detergent would reduce but not eliminate the risk of fire,
PAGE
Safety Instructions ............................................................................ 1
OPERATING INSTRUCTIONS ............................................................ 5
Features ................................................................................................ 5
Other Features ...................................................................................... 7
Operations ............................................................................................ 8
Normal Operating Sounds ...................................................................... 9
Tips ...................................................................................................... 9
Care and Cleaning Guide ............................................................ 10
Troubleshooting .............................................................................. 11
INSTALLATION INSTRUCTIONS .................................................... 12
Tools and Materials Required ................................................................ 12
Electrical Requirements ........................................................................ 12
Unpacking Your Dryer .......................................................................... 12
Exhaust System Connections ...................................................... 13
Requirements and Instructions .............................................................. 13
Materials ............................................................................................ 14
Location of Your Dryer .......................................................................... 16
Installation in Mobile Home .................................................................. 17
Electrical Connections .................................................................... 18
Requirements and Instructions .............................................................. 18
3-Wire Cord Connections .................................................................... 19
4-Wire Cord Connections .................................................................... 20
Warranty ........................................................................................ 22
WARNING: To reduce the risk of of fire, electric shock or injury to persons, read
the IMPORTANT SAFETY INSTRUCTIONS before operating this dryer,
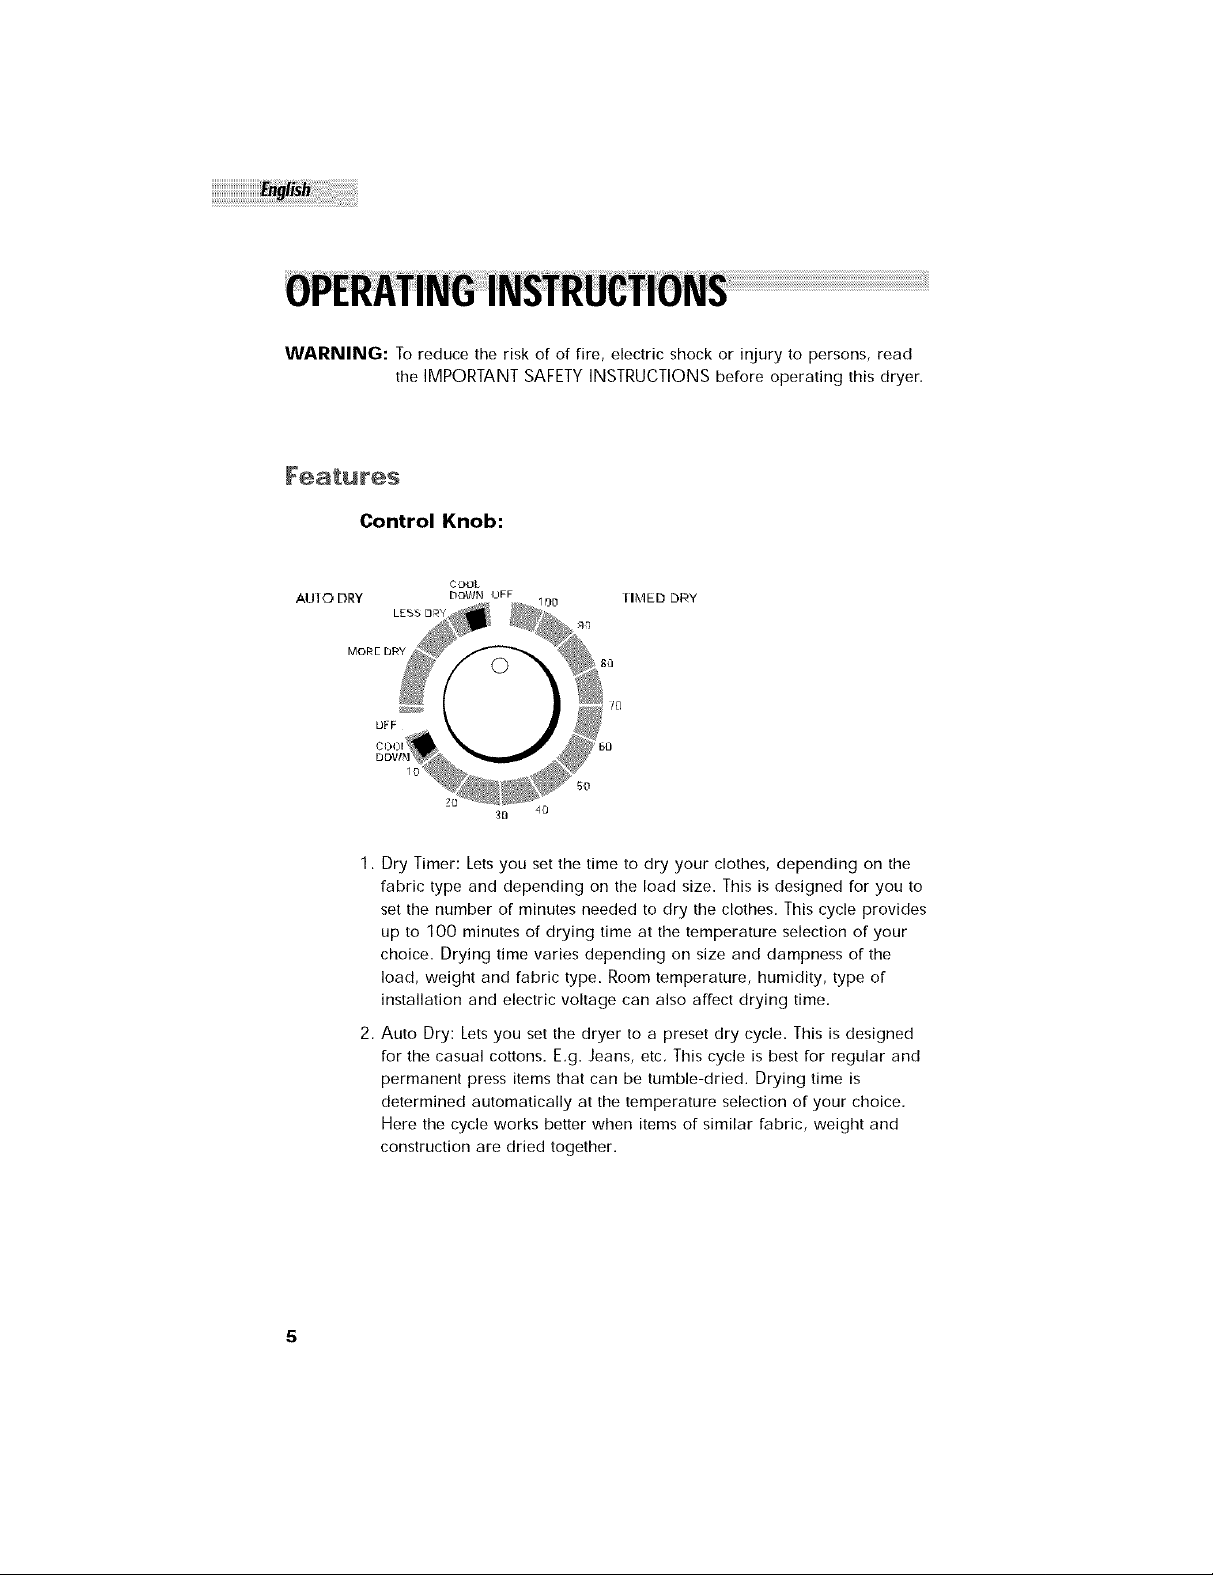
Control Knob:
CDOL
3D 40
1. Dry Timer: Lets you set the time to dry your clothes, depending on the
fabric type and depending on the load size. This is designed for you to
set the number of minutes needed to dry the clothes. This cycle provides
up to 1OO minutes of drying time at the temperature selection of your
choice. Drying time varies depending on size and dampness of the
load, weight and fabric type. Room temperature, humidity, type of
installation and electric voltage can also affect drying time,
2, Auto Dry: Lets you set the dryer to a preset dry cycle. This is designed
for the casual cottons. E.g. Jeans, etc, This cycle is best for regular and
permanent press items that can be tumble-dried. Drying time is
determined automatically at the temperature selection of your choice,
Here the cycle works better when items of similar fabric, weight and
construction are dried together.

Temperature Knob:
I FMI-:'FRAI IJI._F
PERM F_RESS
MEDIUM HEA'f
Temperature Setting Control: To set the heat drying temperature, of the
dryer load, depending on the fabric type.
• low Heat: for knitted and delicate clothes.
• Med, Heat: for permanent press, synthetic clothes,
• High Heat: for regular clothes.
Always follow directions on fabric care labels.To avoid fire do not use
heat to dry items containing feathers, foam rubber or similar textured
rubber-like material,
Start Knob:
START
©
Start Button / Power On: Push Start button for 2 seconds to power on the
Dryer alter loading. Unit will automatically stop once the dryer door is
opened. The start button must be once again pushed to resume operation
once the door is closed.
Other Seatures
Your dryer also has the following features for your convenience:
Dry Sensor: (feature only active in auto dry cycle)
• This senses the dampness in the clothes, The dryer will automatically
shut itself off once it senses that the clothes are dry.
End of Cycle Signal:
• Your dryer is equipped with an audible signal that will alert you every
time the dryer load is finished drying,
Lint Filter:
• All dryers come with a lint filter that needs to be cleaned before or after
every use (read "Care and Cleaning Guide" Section),
Leveling Legs:
• Your dryer has four leveling legs which are located in the front and rear
corners of your dryer. After properly placing your dryer in its final
position, you can level your dryer,
• Leveling legs can be adjusted by turning them clockwise to raise your
dryer or by turning them counterclockwise to lower your dryer.
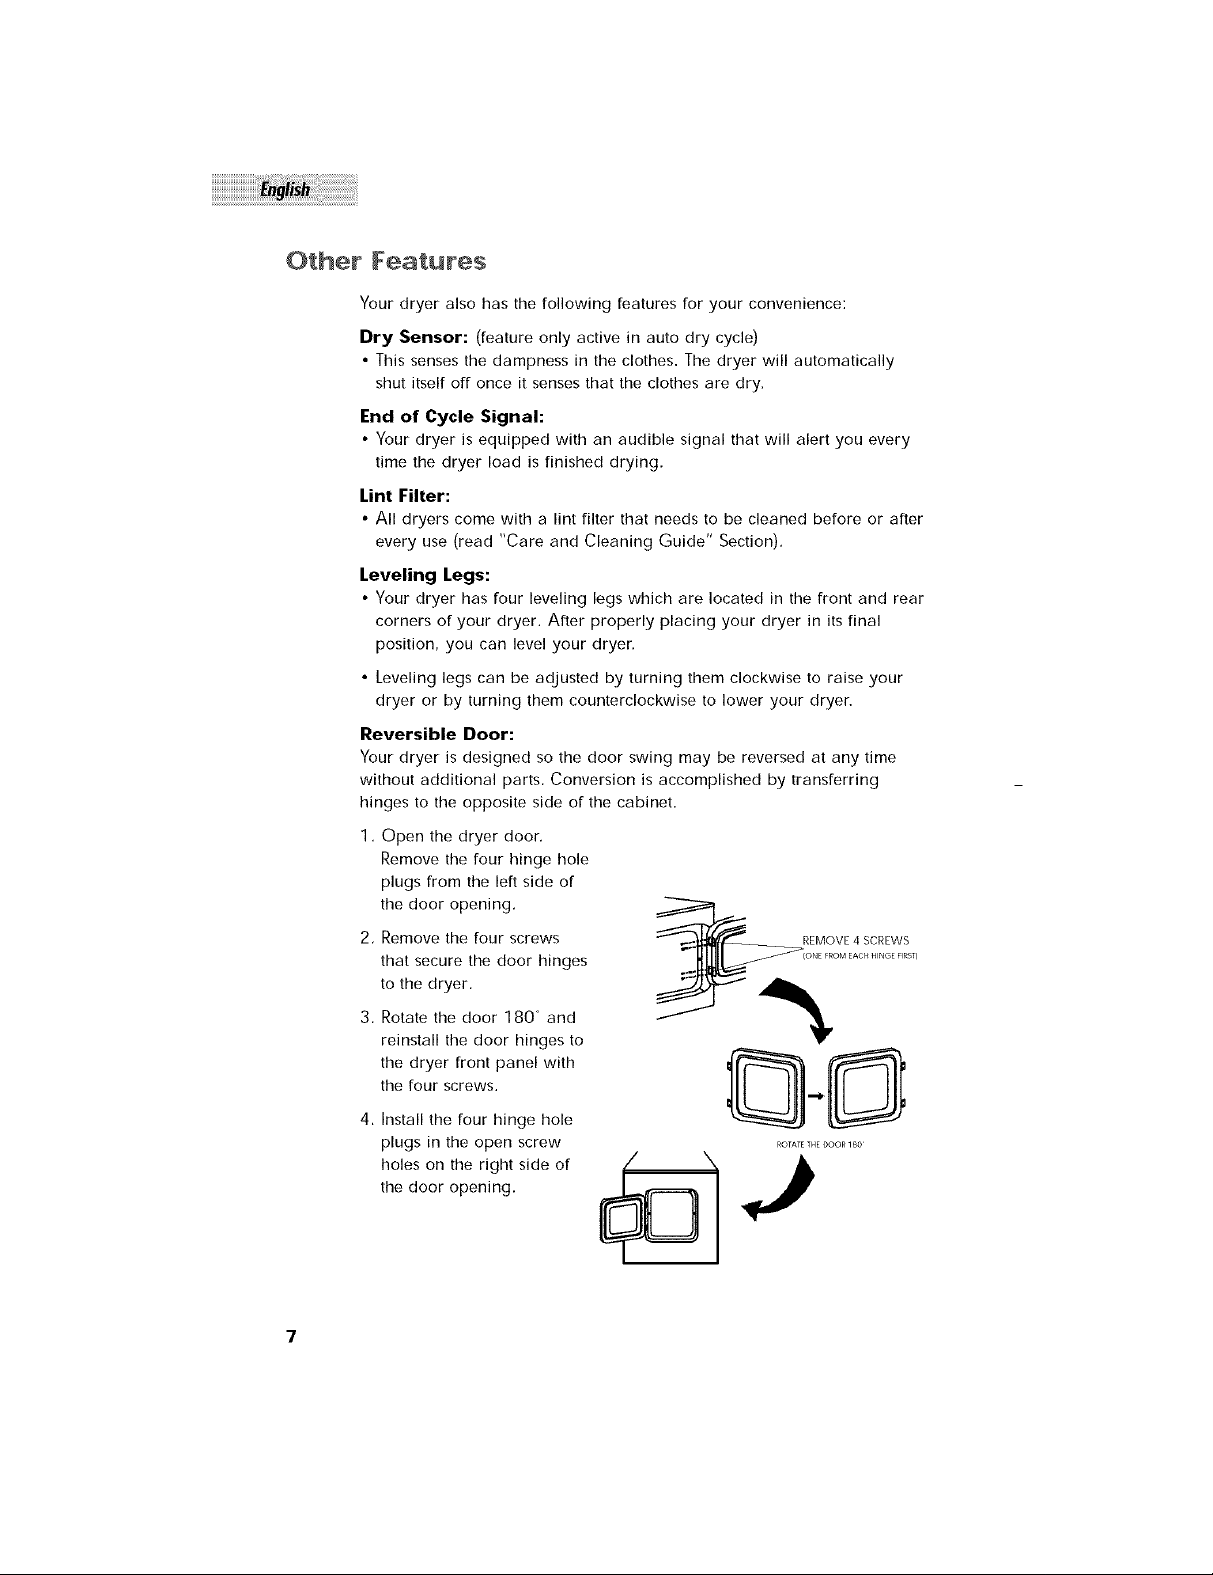
Reversible Door:
Your dryer is designed so the door swing may be reversed at any time
without additional parts, Conversion is accomplished by transferring
hinges to the opposite side of the cabinet.
1, Open the dryer door.
Remove the four hinge hole
plugs from the left side of
the door opening.
2, Remove the four screws REMOVE 4 SCREWS
that secure the door hinges
to the dryer.
3, Rotate the door 180 ° and
reinstall the door hinges to
the dryer front panel with
the four screws.
4. Install the four hinge hole
plugs in the open screw
holes on the right side of
the door opening,
ROTATETHEDOORq8O_
1, Sort clothes for drying. Separate dark and light colored items, like you
do for washing, Check for stains that may not have been removed in
washing. Dryer heat may permanently set some stains. Properly dried
clothes will need minimum of care when removed from dryer.
2. Load up dryer with washed clothes, For optimum results, use dryer load
of similar fabric, weight and construction. Place small items in a mesh
bag to prevent from tangling. Do not overload the dryer. An average
load will fill up half the drum, Add fabric softener sheet if desired.
3, Select the drying temperature depending on the fabric type. Refer to
fabric care label directions before selecting the temperature,
4. Select the drying time depending on the fabric type and the load size,
5. Push the start button to start the drying cycle,
6. Wait for drying cycle to finish before opening the dryer door,
A buzzer will ring when the cycle is complete.
7, Clean the lint filter after every load and before each use, A clean filter
ensures sufficient drying. A layer of lint on the filter reduces airflow
through the clothes and prolongs drying time.
Note: Do not over dry clothes, Over drying can cause shrinkage,
harshness and wrinkling of the fabric,
Norma Operating Sounds
Followingsounds are normally heard during the operationof the dryer.
• Tumbling sounds: This isnormal as the heavy wet clothesinthe dryer
are continuouslybeing tossed around,
• Air rushing noise:Thishappens as the dryer drum spinsat very high
RPM and theair isrushing through the dryer drum.
• Timer clicksmay be heard.
Tips
• For best drying results, clean the lint filter before and after every use,
• Do not overload the dryer,
• Balance the dryer load, evenly throughout the dryer for the best results,
• Drying time depends on many variables: load size, type of fabric and
moisture in it, heat and moisture in the room, electric voltage, length of
the exhaust duct, etc.
• To eliminate guessing and conserve energy, we recommend for certain
clothes to choose an Auto Drying setting,
• Always follow the fabric care instructions supplied by the garment man-
ufacturer.
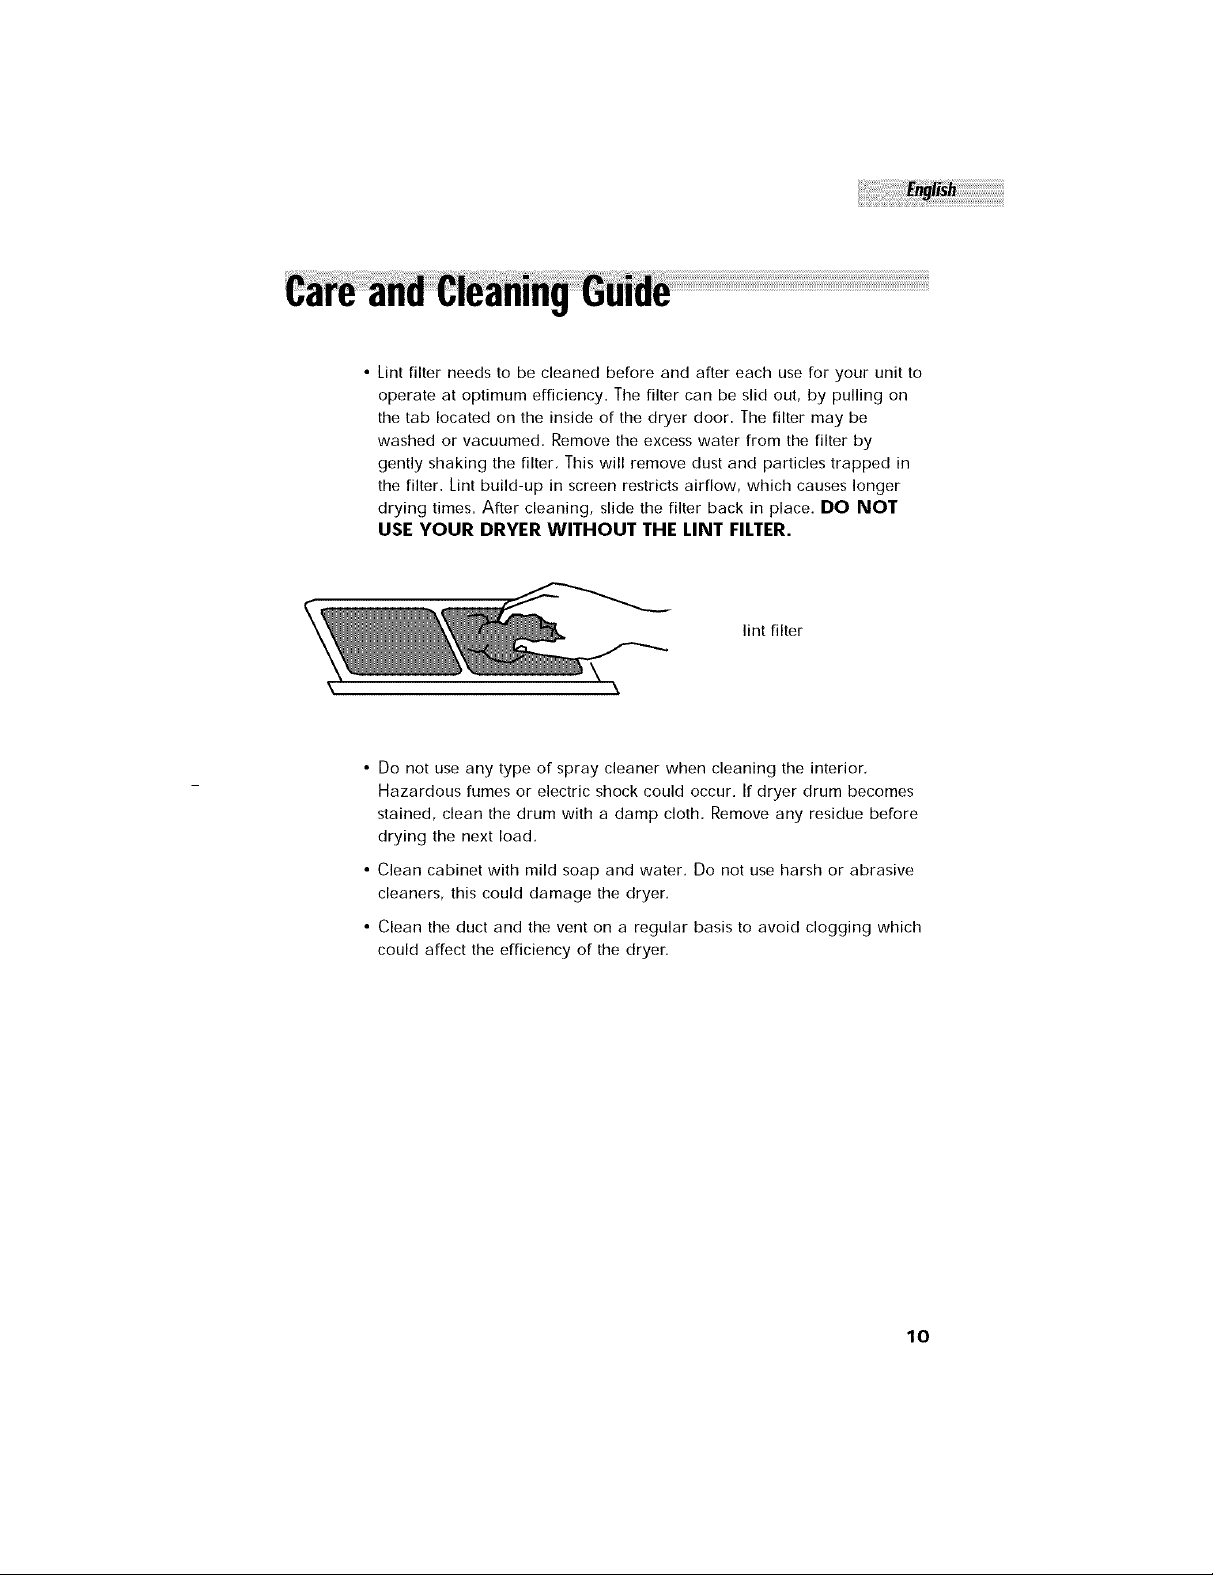
•Lintfilterneedstobecleanedbeforeandaftereachuseforyourunitto
operateatoptimumefficiency.Thefiltercanbeslidout,bypullingon
thetablocatedontheinsideofthedryerdoor.Thefiltermaybe
washedorvacuumed.Removetheexcesswaterfromthefilterby
gentlyshakingthefilter,Thiswillremovedustandparticlestrappedin
thefilter.Lintbuild-upinscreenrestrictsairflow,whichcauseslonger
dryingtimes.Aftercleaning,slidethefilterbackinplace.DONOT
USE YOUR DRYER WITHOUT THE LINT FILTER.
lint filter
• Do not use any type of spray cleaner when cleaning the interior.
Hazardous fumes or electric shock could occur. If dryer drum becomes
stained, clean the drum with a damp cloth, Remove any residue before
drying the next load,
• Clean cabinet with mild soap and water, Do not use harsh or abrasive
cleaners, this could damage the dryer,
• Clean the duct and the vent on a regular basis to avoid clogging which
could affect the efficiency of the dryer.
lO
Dryer does not operate:
• Check if unit is plugged in. The plug may have come loose,
• Check if the electrical wall receptacle is of proper voltage.
• Check if the circuit breaker needs to be reset or if the fuse
needs to be replaced,
• Check if the unit is in "Off" mode, Press Start button again,
• Check if door is open,
Dryer is working but not drying the clothes:
• Unit may be over loaded, The dryer drum should only be half full.
• Check exhaust ducts and vent. Vent should be free of all obstructions,
• Duct should be lint and dust free. Ducts should be cleaned regularly,
• Dryer load needs to be resorted. Heavy clothes may need to
be separated from regular clothes.
• Bulky clothes may require repositioning.
• If clothes dry unevenly a higher dry setting may be required or
clothes in the dryer may need to be resorted,
Dryer making noise when drying:
• Coins, loose change, buttons and other heavy objects could make noise.
• Dryer may need to be leveled evenly.
Read Operating Guide - Normal Operating Sounds,
Static:
• Caused by over drying. Adjust for shorter drying time.
• Mixed with synthetic fabric, Sort and separate different fabrics,
• Use a fabric softener,
11
Select a suitable location for the dryer on a hard even surface away from direct
sunlight or heat source e,g. radiators, baseboard heaters, cooking appliances etc,
Any floor unevenness should be corrected with the leveling legs located on the
bottom of the dryer.
TooMs and MateriaMs Required
Phillips head and flathead screwdrivers
Channel-lock adjustable pliers
1/2 inch open end wrench
Carpenter's level
Measuring tape (12ft, min,)
Duct tape
Rigid or flexible metal 4 inch (10,2 cm) duct
Vent hood
EMectriea_ Requirements
Power Supply:
3 or 4 wire, 240 Volt, 30 Amp, 60Hz, I Phase
Power Supply Cord Kit: (not supplied when sold in the United States)
The dryer MUST employ a 3-conductor power supply cord NEMA 10-30
type SRDT rated at 240 Volt AC minimum, 30 Amp., with 3 open end
spade lug connectors with upturned ends or closed loop connectors and
marked for use with clothes dryers. If being installed in a manufactured
(mobile) home, the dryer MUST employ a 4-conductor power supply cord
NEMA 14-30 type SRDT or ST (as required) rated at 240 Volt AC
minimum, 30 Amp., with 4 open end spade lug connectors with
upturned ends or closed loop connectors and marked for use with clothes
dryers. See Electrical Connections for A 4-Wire System.
Unpaekin 9 Your Dryer
1, Remove all packaging material. This includes the foam base and all
adhesive tape holding the dryer accessories inside and outside.
2. Inspect and remove any remains of packaging, tape or printed
materials before using the dryer.
12
Requirements and _nstructions
The following are specific requirements for proper and safe
operation of your dryer. Failure to follow these instructions
can create excessive drying times and fire hazards.
1. Do not use plastic flexible duct to exhaust the dryer. Excessive lint can build up
inside exhaust system and create a fire hazard and restrict air flow. Restricted air
flow will increase dryer times. If your present system is made up of plastic duct or
metal foil duct, replace it with a rigid or flexible metal duct, Ensure present duct
is free of any lint prior to installing dryer duct.
2, if the dryer is not exhausted out doors, some fine lint will be expelled
into the laundry area. An accumulation of lint in any area of the home can
create a health and fire hazard, To reduce risk of fire, dryer MUST BE
EXHAUSTED OUTDOORS.
3. Do not allow combustible material (for example: clothing,
draperies/curtains, paper) to come in contact with exhaust system. The dryer
must not be exhausted into a chimney, a wall, a ceiling, or any concealed space
of a building which can accumulate lint, resulting in a fire hazard.
4, Exceeding the length of duct pipe or number of elbows allowed in
the "Maximum Length" charts can cause an accumulation of lint in
the exhaust system. Plugging the system could create a fire hazard,
as well as increase drying times,
5, Do not screen the exhaust ends of the vent system, nor use any screws
or rivets to assemble the exhaust system, Lint can become caught in the screen,
on the screws or rivets, clogging the duct work and creating a fire hazard as well
as increasing drying times. Use an approved vent hood to terminate the duct out-
doors, and seal alIgoints with duct tape. All male duct pipe fittings must be
installed downstream with the flow of air.
_ xplosion hazard:
Do not install the dryer where gasoline or other flammables are kept or stored.
If the dryer is installed in a garage, it must be minimum of 18 inches (45,7 cm)
above the floor, Failure to do so can result in death, explosion, fire or burns.
13
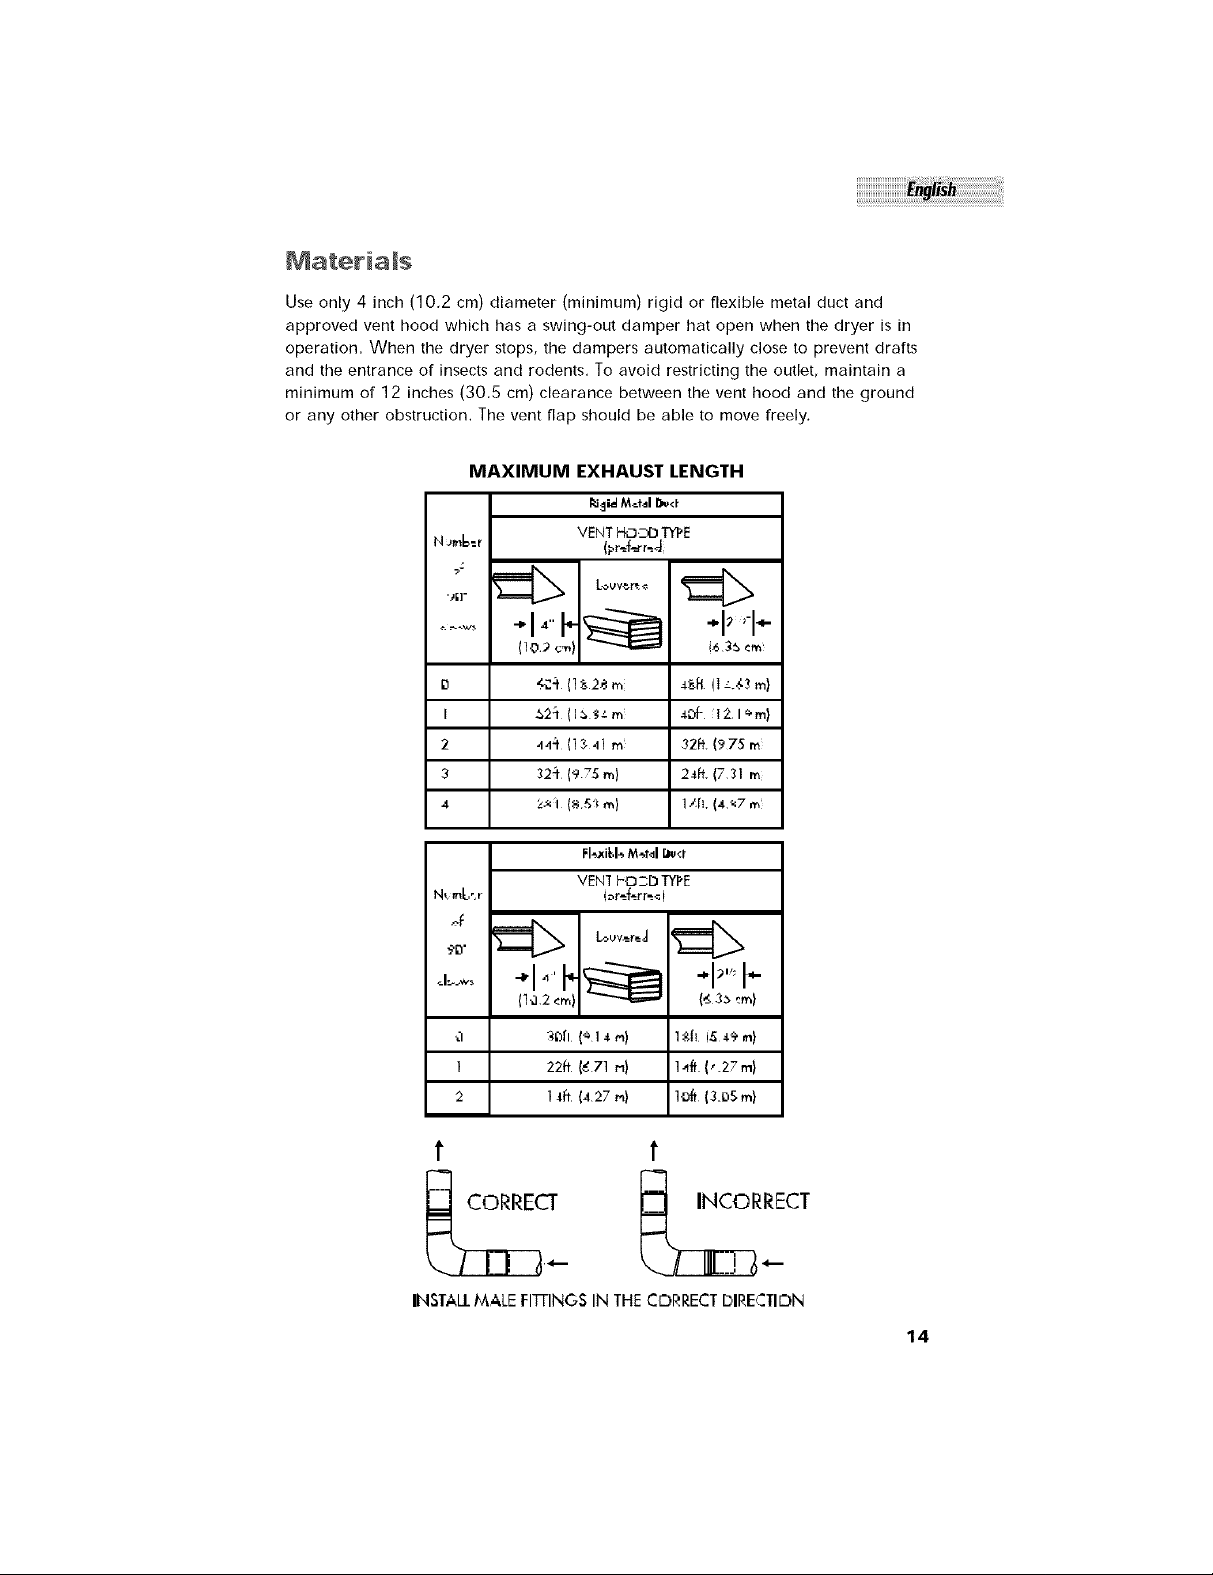
Use only 4 inch (10,2 cm) diameter (minimum) rigid or flexible metal duct and
approved vent hood which has a swing-out damper hat open when the dryer is in
operation. When the dryer stops, the dampers automatically close to prevent drafts
and the entrance of insects and rodents, To avoid restricting the outlet, maintain a
minimum of 12 inches (30,5 cm) clearance between the vent hood and the ground
or any other obstruction, The vent flap should be able to move freely,
MAXIMUM EXHAUST LENGTH
Ridi_M_I B_<_
N Jt, t16=_ "
VENTHO_D TYPE
(_r_.f_r-.d
D
I
2
3
4
'_E]"
_f
-2D"
1
2
L_vv_
--I*h
{10,) c'Y_)
ta2:t (I s_-' m
44:t(lS41m
32:t (97._ m)
2*i (sg'_m)
i=r-f-rr-_t
11",.12,cm 1_3_ _m}
_Dl*l ('_ I 4 m) 1_I'I i_ €9 rn)
22ff 1971 m) 1,1{f(,_27 m)
I aft (427 m) loft (3_g5m)
14.35 <m
cgR.il _:.4_m)
4.D[-IZ I _'m}
32ff (_'75 m
24ff. (731 m
l X[L (4._7 m
INSTAll MALE I:ITFINGS IN THE CORRECT DIRECTION
14
After installation is completed, the following method must be used to
determine if the exhaust system is acceptable:
1, Connect an inclined or digital manometer between the dryer and the
point the exhaust connects to the dryer,
2, Set the dryer timer and temperature to air fluff (cool down)
and start the dryer,
3, Read the measurement on the manometer,
The system back pressure must not be higher than 0,75 inches
of water column. If the system back pressure is less than 0.75
inches of water column, the system is acceptable, If the manometer
reading is higher than 0,75 inches of water column, the system is too
restrictive and the installation is unacceptable,
Although vertical orientation of the exhaust system is acceptable, certain
extenuating circumstances could affect the performance of the dryer:
1, Only the rigid metal duct work should be used.
2, Venting vertically through a roof may expose the exhaust system to
down drafts causing an increase in vent restriction,
3, Running the exhaust system through an area not insulated may cause
condensation and faster accumulation of lint,
15
4, Compression or crimping of the exhaust system will cause an increase
in vent restriction.
The exhaust system should be inspected and cleaned a minimum of every
18 months with normal usage, The more the dryer is used, the more often
you should check the exhaust system and vent hood for proper operation,
Location of Your Dryer
Do Not Install Your Dryer:
• In an area exposed to dripping water or outside weather conditions,
• in an area where it will come in contact with curtains, drapes, or
anything that will obstruct the flow of combustion and ventilation air.
• On carpet. Floor must be solid with a maximum slope of
1inch (2.54 cm).
Installation in Recess or Closet:
• A dryer installed in a bedroom, bathroom, recess or closet, must be
exhausted outdoors.
• Your dryer needs the space around it for proper ventilation.
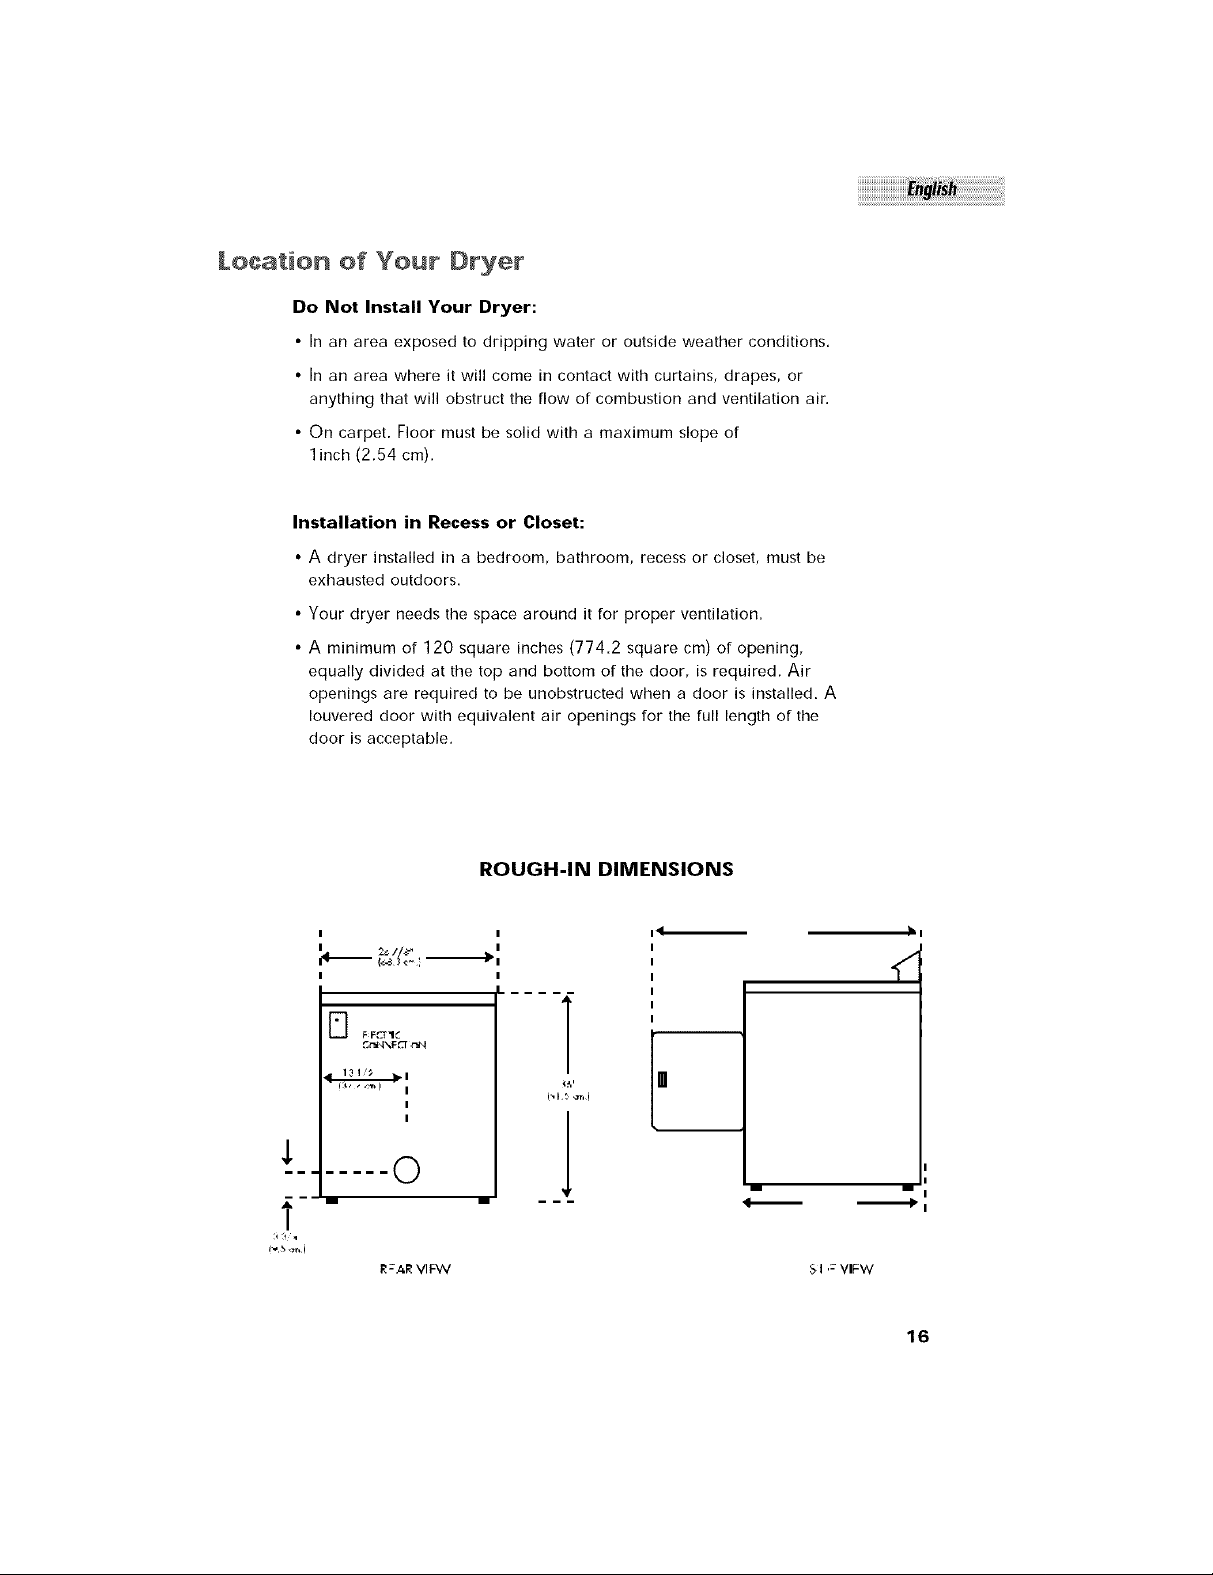
• A minimum of 120 square inches (774.2 square cm) of opening,
equally divided at the top and bottom of the door, is required, Air
openings are required to be unobstructed when a door is installed. A
Iouvered door with equivalent air openings for the full length of the
door is acceptable,
I
2
r_ F FC_'ld
131/_ I
....... 0
I_:ARVlFW
ROUGH-IN DIMENSIONS
Y
]
!
!
1
|
m m
m_
SI ': VIFW
16
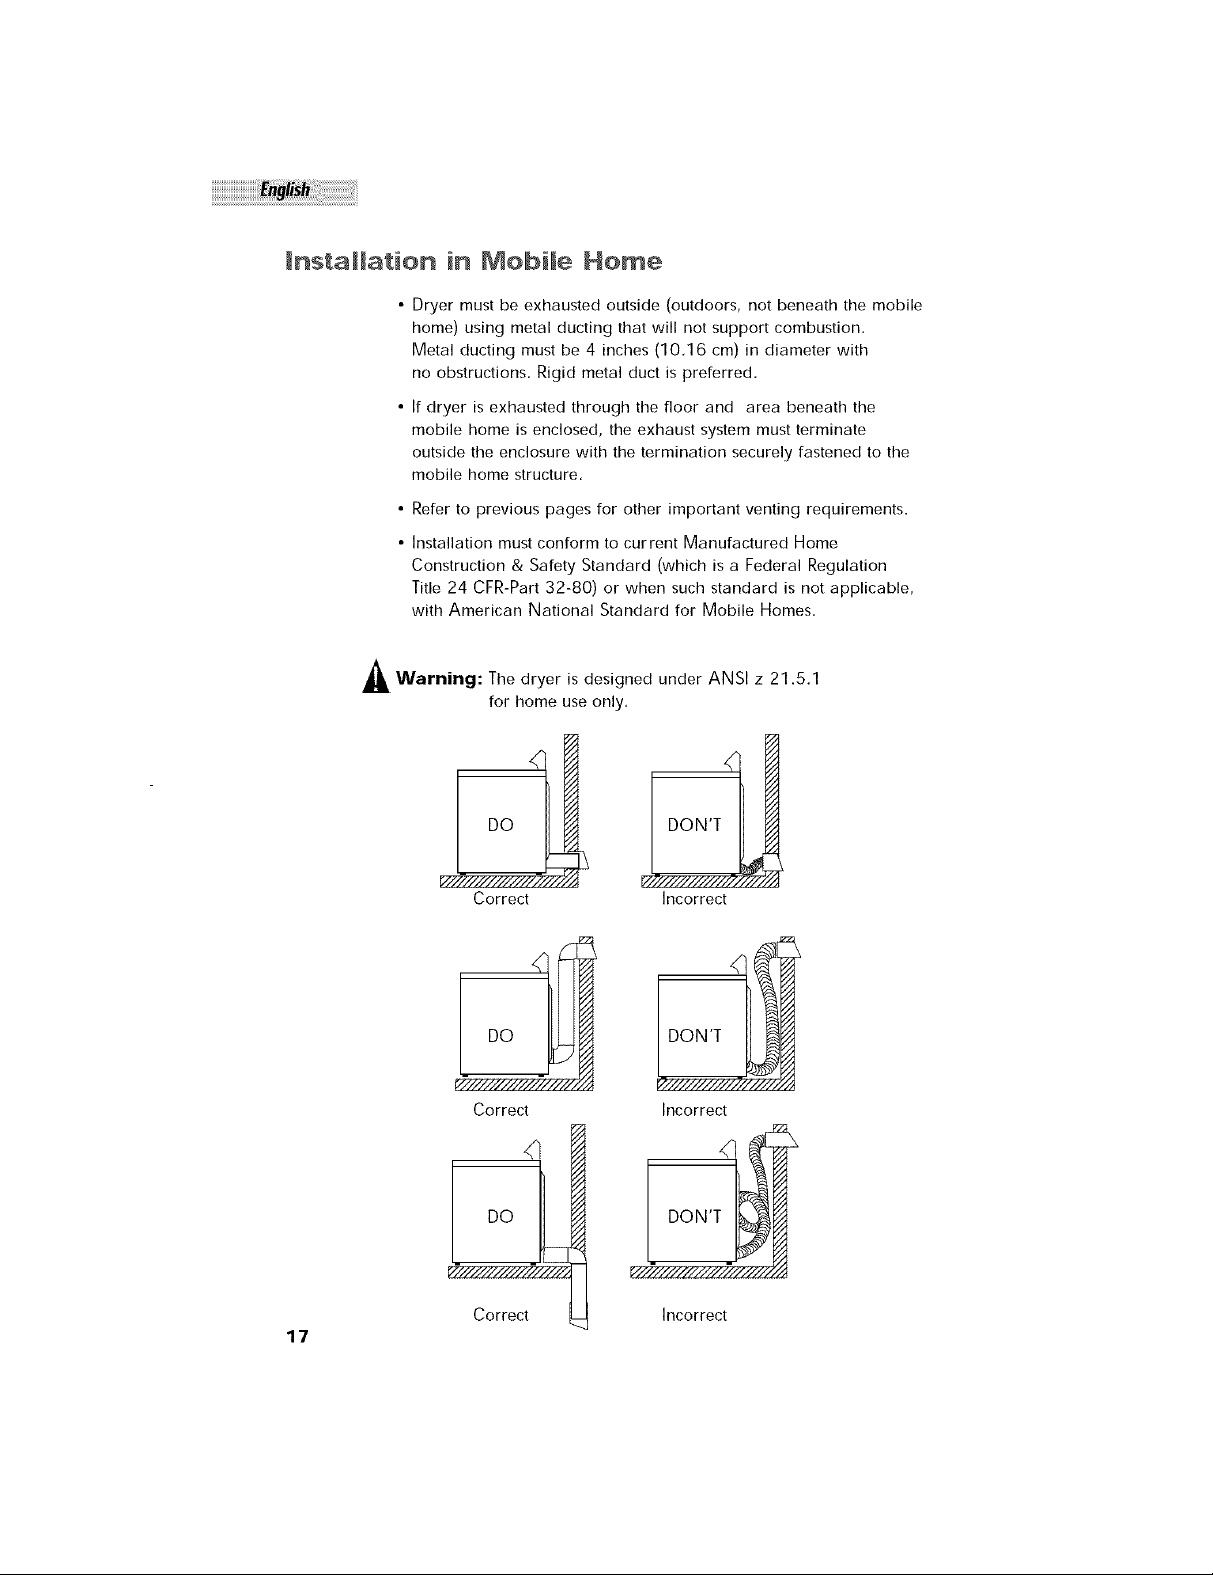
_nstaHation in Mobile Home
• Dryer must be exhausted outside (outdoors, not beneath the mobile
home) using metal ducting that will not support combustion.
Metal ducting must be 4 inches (10.16 cm) in diameter with
no obstructions. Rigid metal duct is preferred.
• If dryer is exhausted through the floor and area beneath the
mobile home is enclosed, the exhaust system must terminate
outside the enclosure with the termination securely fastened to the
mobile home structure.
Refer to previous pages for other important venting requirements.
Installation must conform to current Manufactured Home
Construction & Safety Standard (which is a Federal Regulation
Title 24 CFR-Part 32-80) or when such standard is not applicable,
with American National Standard for Mobile Homes.
_ Warning: The dryer is designed under ANSI z 21.5.1
for home use only.
17
Correct Incorrect
Correct
Incorrect
<q
Correct incorrect

Requirements and instructions
The following are specific requirements for proper and safe
electrical installation of your dryer. Failure to follow these
instructions can create electrical shock and/or fire hazard.
1, This appliance must be properly grounded. Electrical shock can result if the
dryer is not properly grounded, Follow the instructions in this manual
for proper grounding,
2. Do not use an extension cord with this dryer, Some extension cords are not
designed to withstand the amounts of electrical current this dryer utilizes and
can melt, creating electric shock and/or fire hazard. Locate the dryer within
reach of the receptacle for the length power cord to be purchased,
allowing some slack in the cord. Refer to the electrical requirements
in this manual for the proper power cord to be purchased.
3, A U.L approved strain relief must be installed onto power cord. If the strain
relief is not attached, the cord can be pulled out of the dryer and can be cut
by any movement of the cord, resulting in electrical shock.
4. Do not use an aluminum wire receptacle with copper wired power
cord and plug (or vice versa). A chemical reaction occurs between
copper and aluminum and can cause electrical shorts, The proper wiring
and receptacle is a copper wired power cord with a copper wired receptacle.
Note: Dryers operating on 208 Volt power supply will have longer
drying times than operating on 240 Volt power supply.
Danger: Improper connection of the equipment grounding conductor
can result in a risk of electrical shock. Check with a licensed
electrician if you are in doubt as to whether the appliance is
properly grounded, The dryer must be connected to a grounded metal,
permanent wiring system, or an equipment grounding
conductor must be run with the circuit conductors and connected
to the equipment-grounding terminal or lead on the appliance,
18
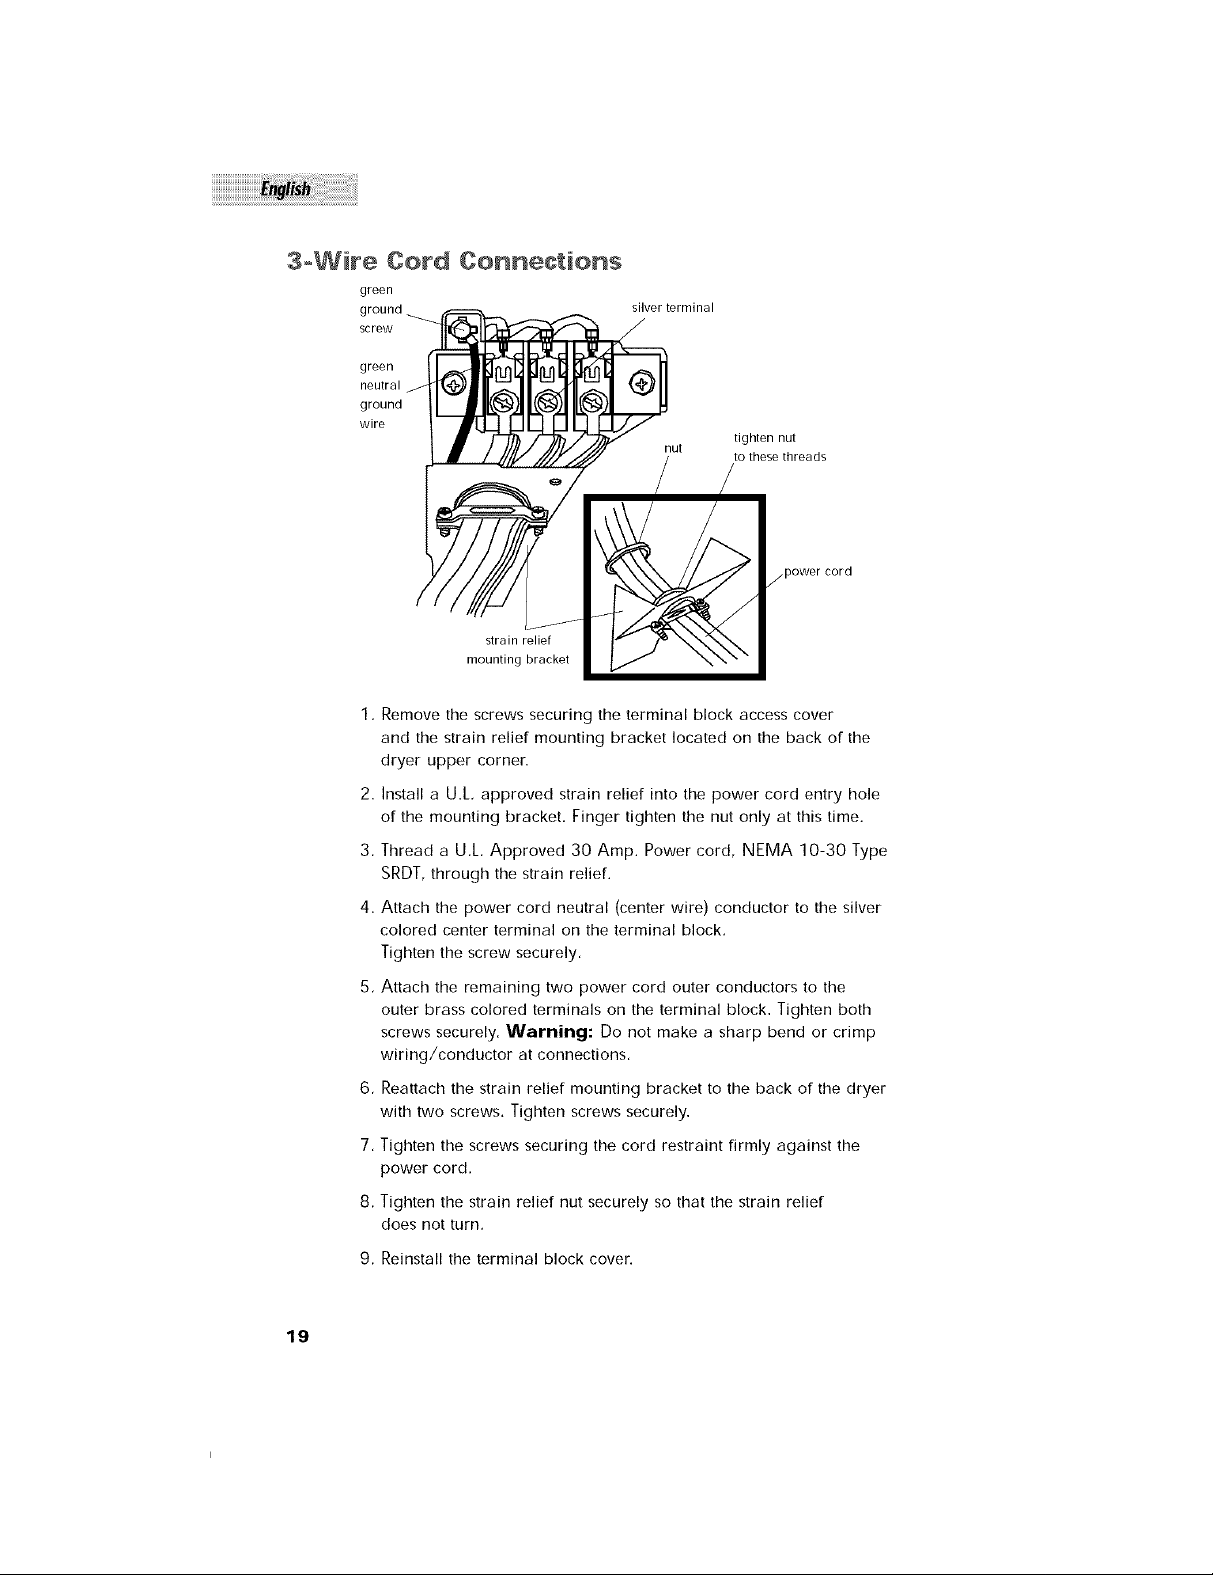
3oWir÷ Cord ¢onn÷¢tions
green
ground
screw
green
neutral
ground
wire
strain relief
mounting bracket
1, Remove the screws securing the terminal block access cover
and the strain relief mounting bracket located on the back of the
dryer upper corner.
2. Install a U.L, approved strain relief into the power cord entry hole
of the mounting bracket, Finger tighten the nut only at this time.
3, Thread a U,L, Approved 30 Amp. Power cord, NEMA 10-30 Type
SRDT, through the strain relief.
4. Attach the power cord neutral (center wire) conductor to the silver
colored center terminal on the terminal block,
Tighten the screw securely,
5, Attach the remaining two power cord outer conductors to the
outer brass colored terminals on the terminal block. Tighten both
screws securely. Warning: Do not make a sharp bend or crimp
wiring/conductor at connections,
6, Reattach the strain relief mounting bracket to the back of the dryer
with two screws. Tighten screws securely.
7, Tighten the screws securing the cord restraint firmly against the
power cord,
8, Tighten the strain relief nut securely so that the strain relief
does not turn,
silver terminal
nut
tighten nut
to these threads
cord
19
9, Reinstall the terminal block cover.
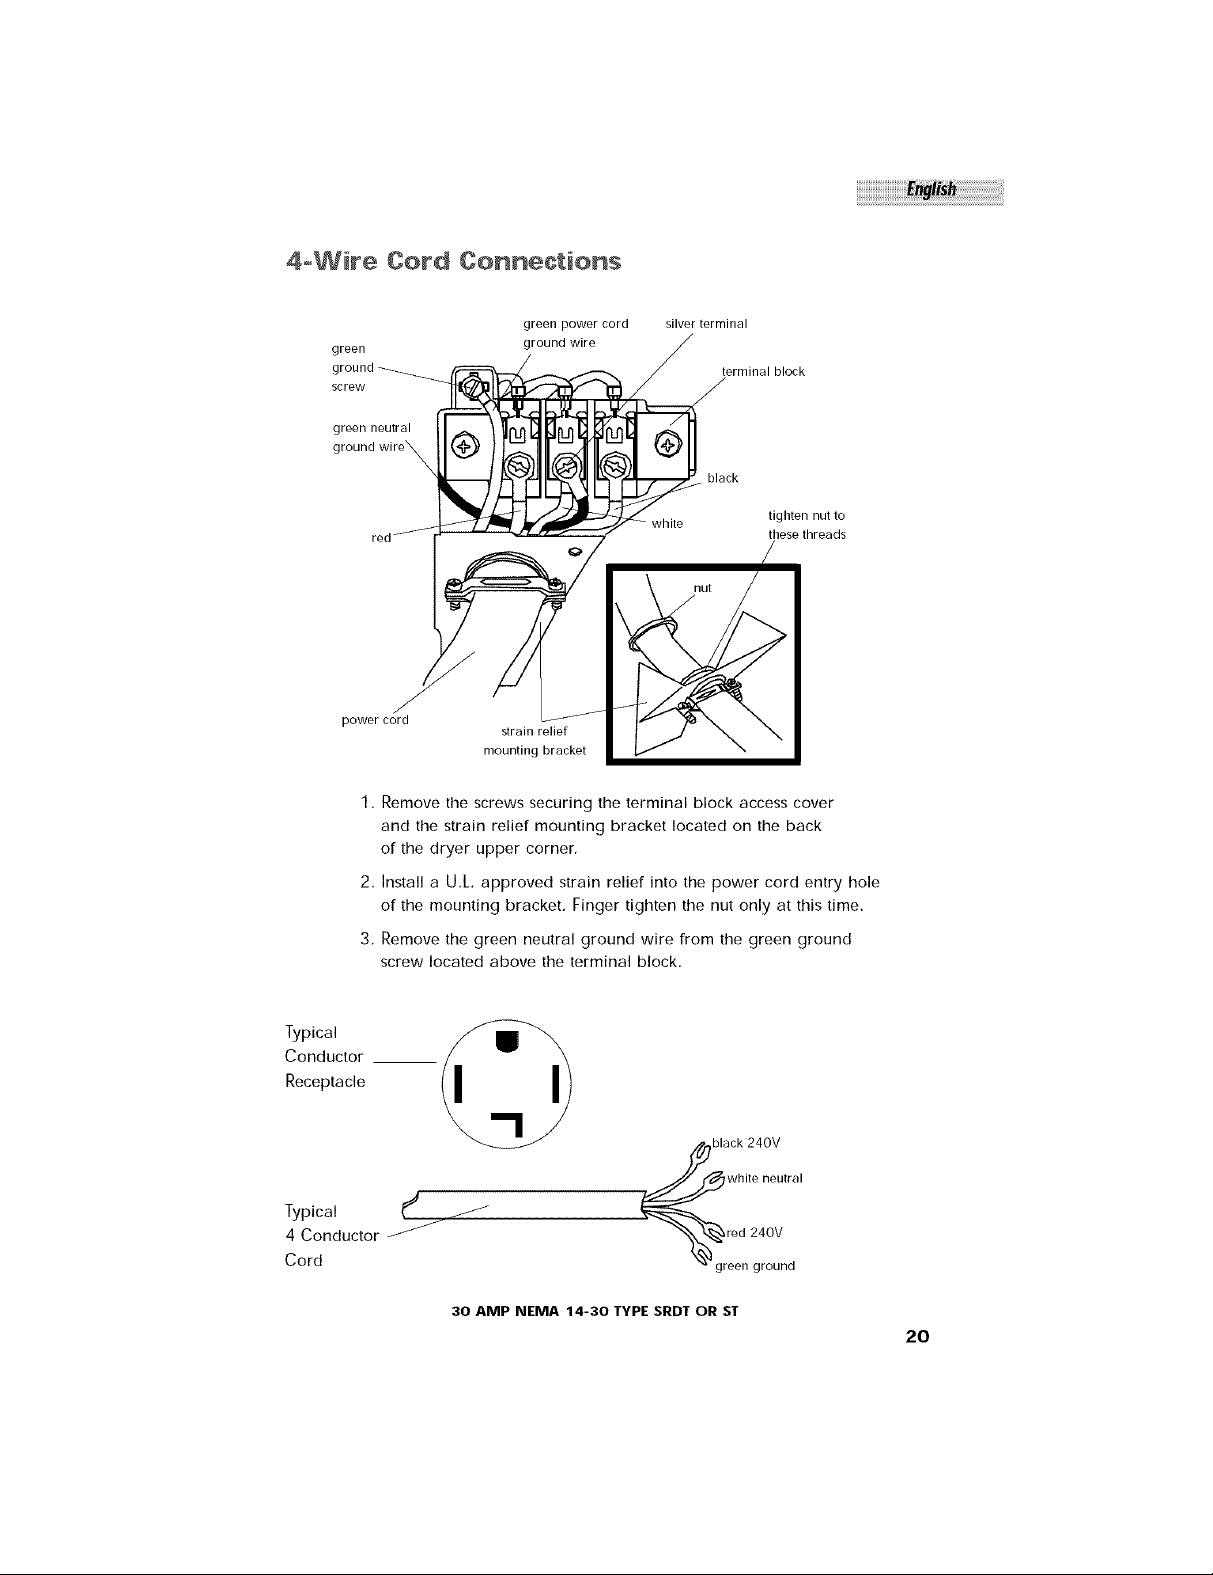
4oWir÷ Cord Connections
green power cord silver terminal
green
green neutral
ground wire
terminal block
black
tighten nut to
these threads
power cord
1. Remove the screws securing the terminal block access cover
and the strain relief mounting bracket located on the back
of the dryer upper corner,
2. Install a U,L approved strain relief into the power cord entry hole
of the mounting bracket. Finger tighten the nut only at this time.
3, Remove the green neutral ground wire from the green ground
screw located above the terminal block,
Typical
Conductor
Receptacle
Typical ¢
4 Conductor
Cord
mounting bracket
f
strain relief
black 240V
red 240V
white neutral
"_ green ground
30 AMP NEMA 14-30 TYPE SRDT OR ST
20
 Loading...