

Haier FCD-HTHMG50-III-E, FCD-HTHMG60-III-E, FCD-HTHMG80-III-E, FCD-HTHMG100-III-E User Manual
Page 1

Silver Sea-ox
Haier Household Electric Water Heater
User's Manual
Qingdao Economic and Technological Development District
Group
Haier Water Heater Co., Ltd.
Add:
Haier Garden, Qianwangang Road, Economic Development Zone, Qingdao, P. R. China
Website:http:// www.haier.com
Rev. 01
Specific Number 0040501638
Please read this manual before usage
Retain it for future regerence
Page 2
Pre-safe Expert
Mark of
Haier Safe Water Heaters
This mark is the designation for Pre-Safe Expert of
Haier Water Heater Company, which indicates use of
the company's patented technology inside the
product. It ensures you a safe bath while monitoring
whether your house ground wire is live or not all the
time. If this mark is lighted on, it indicates your house
ground wire has come live (poor grounding and live).
In this case, please immediately stop use and unplug
from the power supply, and remember not to touch
any electric appliance shell in your house. At the
same time, immediately contact after-sales service
and your property management company for
professional repair until the mark goes off.
Pre-Safe Expert will become the electric safeguard
for your family.
Cleaning and Maintenance
Statement:
Note:
External Cleaning: Disconnect power supply before cleaning. Gently wipe with wet
cloth dipped with a little of mild detergent. Do not use gasoline or other solvents. Finally
dry with dry cloth. Keep water heater dry. Do not use cleansers containing grinding
agent (e.g. toothpaste), acids, chemical solvents (e.g. alcohol) or polishers to clean.
Internal Cleaning: To ensure high working efficiency, heating elements and tank liner of
water heater shall be cleaned once in three years. Take care not to damage protection
layer on heating elements and tank liner inner surface. According to different local
water qualities and use habits, magnesium anode rod shall be periodically replaced. If
maintenance is needed, please contact local service station.
This water heater shall only be repaired and maintained by qualified
servicemen. Improper maintenance may cause severe injury or damage.
Before opening or repairing water heater, please do pull out the power plug.
Before asking for service, please refer to troubleshooting section to resolve easy
problems.
FAQ
Contents
Before USage
Special reminding
Features
Views and parts
Safety precautions
Setting environment
Parameters
Dimensions
Installation
Attentions in Installation
Installation
Operation
Correct Disposal of this product:
This marking indicates that this product should not be disposed with other
household wastes throughout the EU. To prevent possible harm to the
environment or human health from uncontrolled waste disposal, recycle it
responsibly to promote the sustainable reuse of material resources. To return
your used device, please use the return and collection systems or contact the
retailer where the product was purchased. They can take this product for
environmental safe recycling.
2-3
Problems
Control panel illustration
2
Remote controller panel illustration
Operation instructions
3
4
5
5
6
Operation diagram
Attentions in operation
Use of remote controller
Electric Circuit Diagram
Electric Circuit Diagram
6
7
FAQ*After service
Cleaning and maintenance
FAQ
Packing list
8
8
8-12
12
13
13
14
14
14
No outlet water
Outlet water is cold
Outlet water flow and
temperature is not steady
Unable to start machine
Error display of E1
Error display of E2
Error display of E3
Possible Causes to be Confirmed
If water supply is stopped or water
pressure is too low
If use point is blocked or if hot water
valve is open
If water temperature is properly adjusted
If thermostat is out of control
Heating time is too short
If city water pressure is steady
If components are damaged
Circuit fault
If tank is full of water or if components
are damaged
If sensor is damaged
Corrective Measures
Check
Check and clean
Re-adjust
Contact service station
Continue heating
Check
Contact service station
Contact service station
Fill water full or contact
service station
Contact service station
Packing List
Name
Quantity
Water Heater
(set)
Safety Valve
(pcs)
11
Expansion
bolt
(pcs)
2
Expansion
hook
(pcs)
2
User manual
(copy)
1
Battery
(pcs)
2
Remote
controller
(pcs)
1
Drain hose
(ply)
1
See to the physical product for the appearance,color or pattern.
Page 3
Use of Remote Controller
button: Power on / off the machine. In off status, clock time is displayed and can be
1.
adjusted by pressing Set button, and or button.
2.
Mode button: With machined powered on, you can lightly press Mode button to shift
between Real-time Heat / Warm, Medium Warm, Night Power, Time 1,Time 2,Time
1+Time 2 and Intelligent operation modes. In Medium Warm mode, default highest
temperature is 40 and can't be adjusted. In Time 1 and Time 2 modes, default heating
power is 2150W and can't be adjusted.
3.
Ppwer button: With machine powered on, press this button to shift heating power level
between 850 W, 1300 W and 2150 W.
or button: Same as Adjust button on control panel. If not in clock or delay time
4.
adjusting status, you can use or button to increase or decrease temperature setting
value between 35 - 75 with an increment 1 . If in clock or delay time adjusting status,
these buttons can be used to increase or decrease time.
Set button: Press it to set clock time, and press or button to adjust the value. Press
5.
Confirm button after adjusting. In Real-time Heat / Warm mode, press Set button to
adjust clock hour and minute together with Confirm button. In Time 1 mode, press Set
button to set Time 1 hour and minute. In Time 2 mode, press Set button to set Time 2 hour
and minute. In Time 1 + Time 2 mode, press Set button to set Time 1 hour and minute,
and Time 2 hour and minute. In addition, in Medium Warm mode and Intelligent mode,
Set button is inactive.
Notes:
1. Remote controller buttons (except Set button) are used in the same way as buttons with
same name on control panel. After adjustment is made with Set button, press Confirm
button to confirm.
2. Remote controller has a memory function. Upon re-starting after powering off, original
settings keep unchanged.
3. As an optimum, remote controller shall be used in short distance pointing to the machine
vertically. Water immersion shall be avoided. If battery is used up, to prevent battery liquid
pollution, please open battery cover in indicated direction, remove used batteries and
replace with new batteries installed as original. To avoid explosion, used batteries shall
not be kept in hot places or put in fire, but shall be treated in accordance with related local
regulations.
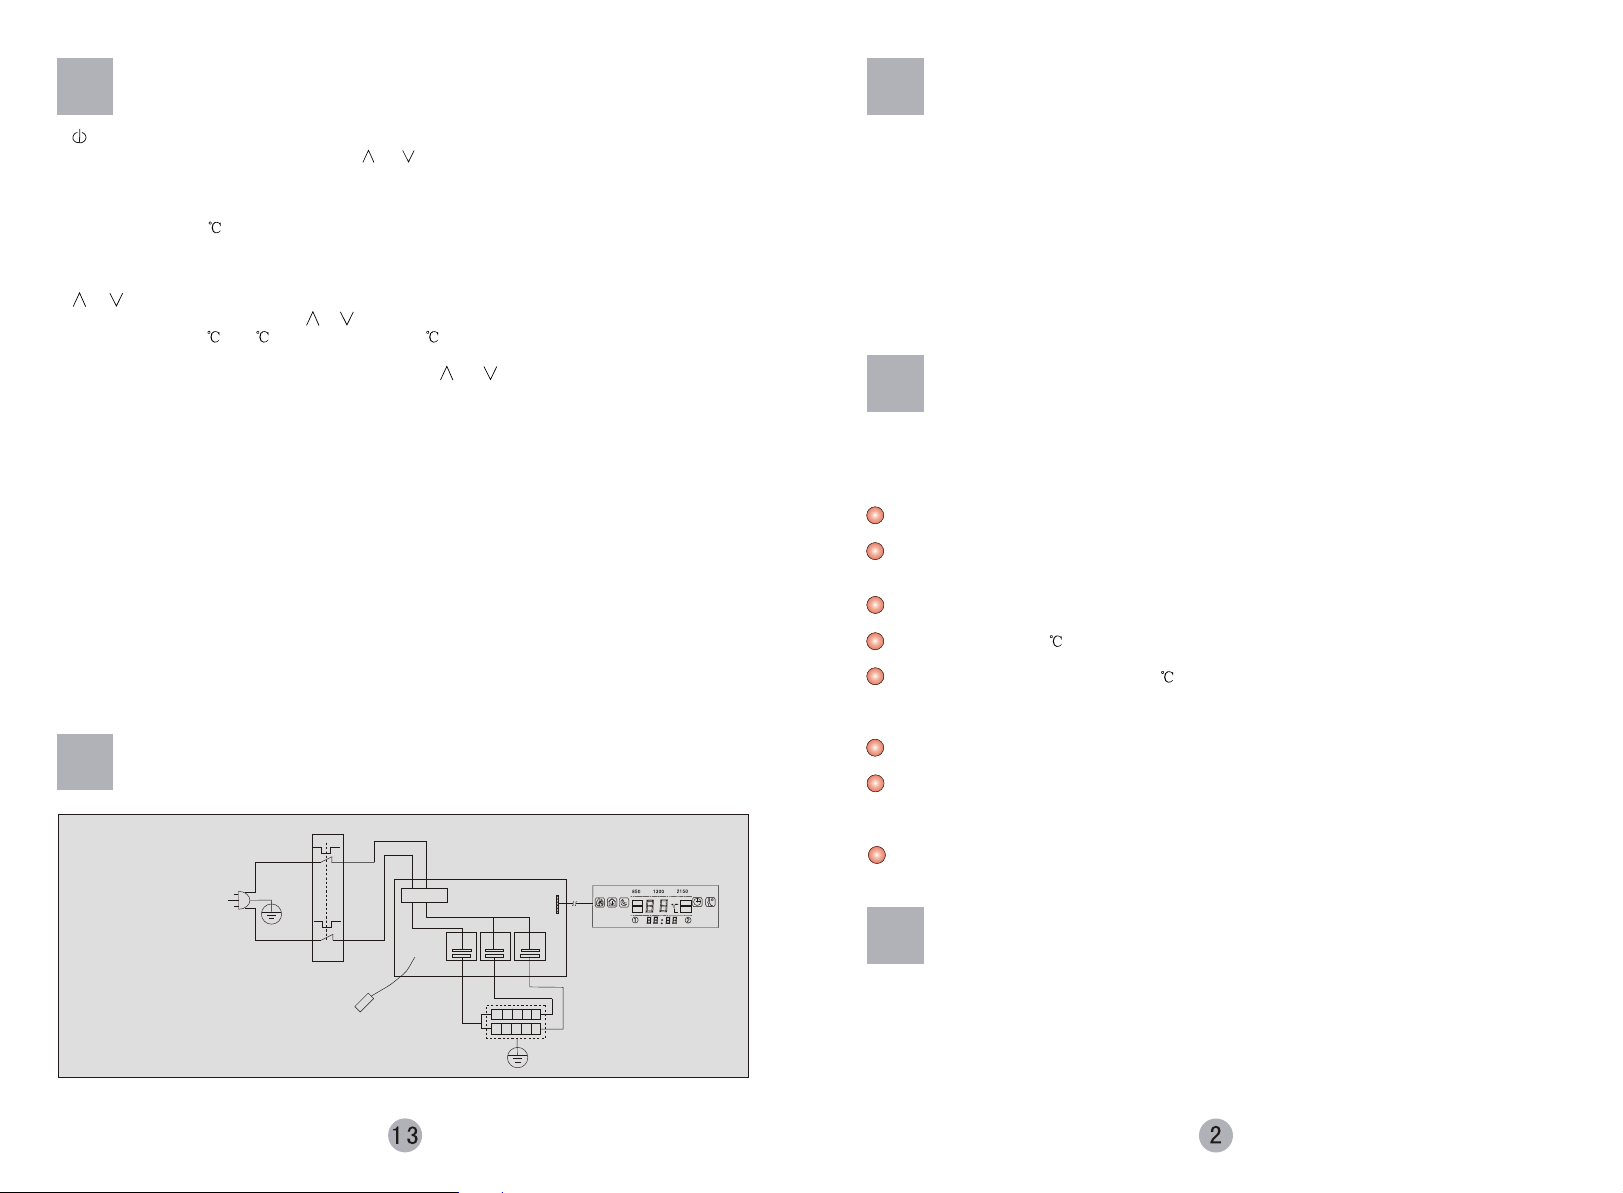
Electric Circuit Diagram
MT
L
N
E
L: Brown wire
N: Blue wire
MT: High temperature limiter
EH: Heating element
RT: Sensor
E:Yellow/green wire
RT
Leakage Coil
Relay
EH
Relay
Relay
E
SET
ACTUAL
W W
W
HEATING
KEEPING
Before Usage
Dear users,
Thanks for choosing Haier water heater product.
Haier
products have good quality and excellent performance. To facilitate you to use the
product, please read the manual and operate accordingly. Please retain it for future
reference.
The international star service of Haier Group will always accompany you. No matter
what kind of problems you meet in usage, please contact with the local after -sales service
agent. We are at your service all the time. Thanks again for choosing Product.
Haier
The water heater you purchased may not full comply with the manual due to the
improvement of product. We apologize for the inconvenience occurred therefrom.
Special Reminding
To ensure proper and safe use of the water heater, we hereby sincerely declare that users
shall contact our designated professional service providers for installation and service.
For inappropriate installation, Haier would not undertake any liability.
Do disconnect the power supply before any maintenance and repair on the water heater.
Unprofessional persons shall not adjust or repair the water heater.
Make sure the machine is full of water before powering it on, otherwise heating element
may be damaged. Do ensure power socket complies with local standard and is reliably
grounded. Ungrounded use is forbidden.
This electric water heater is provided with a safety valve, which shall not be randomly
relocated or blocked.
Hot water above 50 may burn your skin. Do mix hot water and cold water before
showering or washing.
At an ambient temperature below 0 , possible ice formation within pipes may break the
pipes and cause the machine inoperable. Protection shall be made by emptying water in
the tank. In case the water heater will not be used for more than 1 month, please empty
the water and unplug the power plug.
If the electric water heater is heavily wetted by water, it should be checked by our
authorized technicians before next use.
Hot water inside the water heater is not drinkable. Due to long time use, sediments will
form inside the tank, and water quality may also deteriorate due to pipe aging. After
washing rice and vegetables with water from the tank, please flush again with clean
water.
Please do not place flammable matters like gasoline nearby the water heater, otherwise
accidents like fire may occur.
Features
1. High Technology:
Full PC controlled. Display indicates the actual water temperature, temperature setting,
clock and working state. Upon faults, power supply is automatically cut off and the
display indicates fault code.
The intelligent heating feature reflects a more humanized design.
Page 4

Features
2. Safe:
High-quality imported heat-resistant stainless steel heating element, corrosion
resistant and more reliable. Fuzzy control with over-temperature protection, tank liner
over-pressure protection and current leakage protection. Safe Care patented design
together with the function of monitoring and displaying of live ground wire has become
a real safeguard for family safety.
3. Durable:
Specially treated shell. Elegant and durable.
Tank liner produced with 3-layer liner enameling technology. More reliable quality.
4. Energy Saving:
One-piece PU foaming technology, thermal insulative and power saving. Two delayed
water use times manually set, easy and energy saving.
Three power levels. Upper and lower heating elements. Save energy in both winter and
summer.
Night power feature and Medium temperature warming feature, free selection as you
desire.
5. Easy to use:
Water heating temperature adjustable between 35 - 75 in an increment of 1 .
Outlet water temperature adjustable between inlet temperature and 75 .
6. Power Failure Memory:
Patented PC board design. Machine automatically memorizes setting information
before power failure, and directly goes to previous working status upon power
resumption.
7. Multi-purpose:
Closed structure suitable to connect several outlets for water use in locations like
washroom and kitchen. (outlet water is not suitable to drink)
8. Horizontal installation,space saving.
Options of local control or remote control.
Operation Instructions
D.
In non-heating intelligent mode, machine stays in standby status. You can activate
interface by pressing any button on the control panel (buttons on remote controller are
inactive).
Operation Diagram
On/Off
button
Set highest heat temperature
Real-time
Heat / Warm
Medium Warm
Power
on
Power off
Mode
(Function)
button
Time 1
Time 2
Time 1+Time 2
Intelligent
Power button-Select heating power (850W / 1300W / 2150W)
Press Set button
Night Power
Press Set button
Press Set button
Press Set button
Press Set button
Clock hour setting
Clock minute setting
Clock hour setting
Clock minute setting
Time 1 hour setting
Time 1 minute setting
Time 2 hour setting
Time 2 minute setting
Repeat steps for Time 1 and Time 2
Press or
Press or
Press or
Press or
Calibrate Time 1 hour digits
Calibrate Time 1 minute digits
Calibrate Time 2 hour digits
Calibrate Time 2 minute digits
Your water heater is an improved product of this series. Please use it as instructed in
this manual.
Views and parts
Front View
A Hot water outlet B Cold water inlet C Heating element D Enamel tank
E Water inlet tube F Water outlet tube G
H Wall-mounting bracket
Cutaway View
G
Magnesium anode rod
Side View
H
Attentions in Operation
1.
To avoid causing machine troubles, do not connect power before tank is full of water.
Adjust a suitable temperature before use, for water temperature above 50 may burn
2.
your skin.
3.
This product is closed water heater, which can supply hot water through pipe connection
to several points like bathroom (bathtub, washbasin, showerhead) and kitchen.
4.
Heating adjustment can be made flexibly all year round adapting to climate changes. In
long-term out-of-use or maintenance, you can close city water pipe valve, open mixing
valve, and move up safety valve handle to drain the tank. To avoid injury, before next use,
it is suggested to first open hot water valve before switching on the water heater,
exhausting gas possibly retained in the pipeline. In this case, no smoke or fire is
permitted near the open valve. carefully check and confirm all parts are in good condition.
5.
Provided hot water quantity can meet use demand, temperature setting shall be possibly
low. It can minimize heat dissipation, high-temperature corrosion and sedimentation,
ensuring a longer service life.
Regularly ask servicemen to make safety inspection, remove sediment on heating
6.
elements, and check consumption of anode bar. Too much consumed anode bar shall be
replaced.
Page 5

Operation Instructions
9. Delay Time Setting
Delay function means that, system automatically calculates the time needed to reach
temperature setting value with a defaulted 2150 W power, then determines the time to
start heating, and automatically heats to the set temperature before the preset delayed
time to use hot water. Two Delay Times (Time 1 + Time 2) means machine as needed can
heat water in two delayed use times. This machine can be manually set two delayed water
use times. Setting will take PC clock time as reference. Defaulted Time 1 use time is 17:00
and Time 2 use time is 06:00. In Delay mode, system default heating power 2150 W can't
be adjusted.
Example: as shown in Fig. 12, set delayed use Time 1 at 10:30.
With machine powered on, consecutively press Mode button until it enters Time 1
operation status with delay indication and symbol lighted. Press Set button to enter
Time 1 hour setting status with Time 1 hour digits flashing. Press or button to get
10:00. While hour digits are flashing, you can press Set button to confirm and enter Time 1
minute setting. Adjust the value to 10:30 with or button.
Then you may press Set button to confirm current settings or wait 6 s after which
machine automatically confirms and quits. Time 2 time setting is similar to Time 1, i.e.
press Mode button to enter Time 2 operation mode and set Time 2 time with Set button.
Note: If large quantity hot water is used after delay mode is started and water heaters
starts heating, resulting in water heater still hasn't reached temperature setting at delayed
use time, machine will automatically extend heating for half an hour and stops. If actual
temperature has reached setting value before delayed use time, and it decreases by 5
before reaching delayed use time, machine will calculate heating time again and
determines if re-heating is needed or not. Likewise, if water heater hasn't reached set
temperature at delayed use time due to too low supply voltage, machine also
automatically extends for half an hour and stops.
10. Operation Mode Selection
After powering on, by consecutively pressing Mode button, system will shift between
Real-time Heat / Warm (with Real-time indication), Medium Warm (with Medium Warm
indication), Night Power (with Night Power indication), Time 1 (with Delay and
indication), Time 2 (with Delay and indication) ,Time 1 + Time 2 (with Delay and ,
indication) and Intelligent (with Intelligent indication) modes. User can select any mode as
current operation mode. Only after being selected as current operation mode,
corresponding settings can be executed.
Example: clock at 7:00, heating power of 2150 W, temperature setting of 75 (temperature
setting and actual temperature flash alternatively), delayed useTime 1 being set at 10:00.
If you want to use water at 10:00, after settings are made, you must press Mode button to
adjust current mode as Time 1 mode. Machine will automatically heats water to set
temperature at 10:00. Otherwise (e.g. in Night Power mode as shown in Fig. 13), it doesn't
execute Time 1 function. You need to select Delay and symbol with Mode button, and
then Time 1 function can be executed.
11. Powering Off
After taking shower, you can lightly press On/Off button to power off the machine.
Hints:
A.
With machine powered on, you can press Set button to set On/Off time for various
modes, and adjust time with or button. In Real-time Heat mode, you can press Set
button to adjust clock hour and minute values. In Delay mode, you can press Set button
to set delayed use time. In Medium Warm and Intelligent mode, Set button is inactive.
The machine has multiple safety means like current leakage protection, over-
B.
temperature protection, sensor short-circuit and open-circuit protection, which can
realize full disconnection and display fault code. All fault protections are unrecoverable
protection which needs local after-sales service.
C.
This water heater has power failure memory function. You needn't re-set heating power
level, heating temperature ,clock and operation mode. Machine will directly go to
previous working status after powering on again.
Safety Precautions
The water heater shall use 230 V~ / 50 Hz
Check if power meter and wire size are consistent
with water heater rated current. If necessary, ask
experienced qualified electricians to check.
Do not use damaged wire, socket or appliances
with loose plug, otherwise accidents like
electric shock, short circuit and fire may occur.
Make sure power plug closely fits with power
socket.
For first use after installation, the tank must be
full of water before connecting the power.
Otherwise, heating element overheat may
cause troubles.Children taking shower must be
attended by adults.
C
Haier
In winter in cold regions, for long-term out-ofuse, please lift the safety valve handle to empty
the water, avoiding ice formation damaging the
water heater.
Temperature value indicated on the display is for water around the detection point. Outlet water
temperature is generally higher. Before use, please first turn on cold water and then adjust water
temperature as you need. During use, the displayed value is still water temperature at detection point
instead of outlet temperature. Please do not directly turn on hot water.
The product adopts Haier Safe Care patented technology. In normal installation, even in severe
case that ground wire is live due to wrong connection, the product Safe Care technology can filter
and efficiently ensure your safety. However, whenever your feel a sensory current, please pull out the
power plug and notify local after-service men in time. Do not dismantle by yourself.
Description of the Symbols
Never do that
Be sure to act as per instructions
power supply from a separate socket (no
multi-purpose socket) and be reliably
grounded. Power plug pins shall be cleaned
in time to avoid any contamination causing
accidents like fire.
£¡
ÐÐ
²»ÐÐ
²»
Power socket for water heater shall be
located in a dry place free of water spray. Do
not insert or pull the power plug with wet
hands, for accidents like electric shock or
injury may happen.
Ô¡
Ô¡
Ï´
ÓÚÏ´
ÓÃ
ÓÚ
¼´
ÓÃ
Á¢
Á¢¼´
Please do not point the showerhead towards
human body when turning on or off the faucet,
avoiding to be scalded by a small stream of
hot water.
Damaged power cord must be replaced by
after-service technicians with special cable
(factory provided). Other persons shall not
dismantle or repair. In addition, do not place
flammable matters nearby the water heater.
²»
¿ÉÒÔ
²»
¿É
ÒÔ
Page 6

Setting Environment
Do not locate in freezing places. If ice
forms, tank and pipes will break, causing
scalding and leakage.
Do not install it outdoors.
Operation Instructions
Water heater automatically sets an energy saving temperature between 35 - 40
according to the difference between water temperature and ambient temperature
(normally this medium temperature can ensure small demand but not shower. For shower,
you need to quit Medium Warm mode, and press Mode button to enter Real-time Heating /
Keeping mode.Then the water can be heated to the setting temperature in a short time.).
When water temperature decreases to 34 , machine automatically restarts heating.
Heating power level can be manually set with Power button.
Example: Fig. 10 shows Medium Warm mode. Press Power button to set power level
2150 W with corresponding indication lighted. The actual temperature then is 52 . When
it decreases to 34 , machine will automatically re-heats to 40 and keeps warm. It cycles
in this way. In this mode, the machine defaulted highest heating temperature 40 can't be
adjusted.
ACTUAL
KEEPING
ACTUAL
HEATING
Do not install it as stand-alone.
It shall be hung on firm and solid wall.
²»Òª°²×°ÓÚÎÞ·¨ÅÅË®µÄµØ·½
Do not install it in places unable to drain
water.
The tubes and pipes fitted on the product are inseparable parts of the Safe Care
technology, and shall not be removed by yourself. Otherwise, Haier shall not be liable for
any damages or injuries caused due to resulted potential risks.
If a drain hose is connected, it shall be
connected to sewage drain, avoiding
spilling the room.
Description of the Symbols
Never do that
Be sure to act as per instructions
Parameters
Rated voltage: 230V~ , 50Hz Dimensions: (see to Fig. 1)
Power: W Weight: (see to Fig. 1)850 W /1300 W /2150
Rated pressure: 0.75 Mpa Volume :(see to Fig. 1)
Waterproof grade: IPX 4 ( ) Tap water pressure: not less than 0.05 MPa
(Fig.10)
(Fig.11)
7. Night Power Setting
With machine powered on, as described in Item 10, consecutively press Mode button
until it enters Night Power operation mode (with Night Power indication on the display). If
you would use hot water in early morning, you may adjust operation mode to Night Power
mode. Machine will heat / warm in default period (0:00 on and 6:00 off). Heating power
level and highest temperature can be manually set. In this mode, you can press Set button
to calibrate clock time.
In addition, in regional power consumption regulations, night power price rate is lower
than in day, so Night Power mode will be easier and more economic.
Note: In selecting Night Power function, water heater clock shall be adjusted to local
time. Inaccurate clock will cause night period partly charged as day use. (Only for
regions with Peak and Valley Electricity Rates)
Example: With machine powered on, press Mode button to select Night Power mode.
When PC clock displays 00:00, machine automatically starts heating. It enters warm
status after reaching setting value and has thermostat control during 0:00 6:00. (see
Fig.11)
8. Intelligent Heating Function
Intelligent heating function means that the system can analyze, process and memorize
user's water use habits in one week, and accordingly heat water in advance automatically.
With machine powered on, consecutively press Mode button until it enters Intelligent
operation mode with intelligent indication lighted on. System automatically starts heating
in the first memorized heating time since then. Heating power and highest temperature
can be manually set.
In non-heating period, system remains standby with clock and intelligent indications
lighted on. After it reaches the heating temperature, the machine will start to heat
aotomatically. If you'd like to quit Intelligent Heating mode and enter another mode, you
can press any button on control panel to activate the interface (buttons on remote
controller inactive), and then press Mode button to shift modes.
Notes: 1. In any mode after powering on, Intelligent Heating function can memorize your
water use habits. If you bathe in a fixed period everyday several times a week (4 times or
more than 4 times), system will analyze and memorize your this habit and automatically
start heating in advance.
2. Only in Intelligent mode can Intelligent function be executed.
SET
HEATING
SET
KEEPING
(Fig.12)
(Fig.13)
Page 7

Operation Instructions
2. Temperature Setting
With the machine powered on (with no any digits flashing on the display), press or
button to enter temperature setting status with the temperature digits rapidly flashing.
Temperature can be changed between 35 - 75 with an increment 1 . In real-time
heating mode, you can directly press or button to adjust temperature setting value. In
medium warm status, machine defaulted highest temperature is 40 and can't be
adjusted. If actual water temperature is lower than setting value and the machine is in
medium warm mode, you need to change operation mode to real-time heating mode, and
then the machine can heat water to the set temperature.
3. Clock Calibration
Clock goes in 24-hour and 60-min system in a second flashing way.
Example: calibrate the clock to 11:29
After powering on, in real-time heating and night power modes, you can press Set button
to enter clock calibration status with hour digits flashing. Press or button to set 11.
Press Set button again and minute digits flash. Press or button to set 29. You can
press Set button to confirm current setting, or wait 6 s after which the system will
automatically confirms and quits setting status (as shown in Fig. 7, machine is in real-time
heat / warm mode).
ACTUAL
Fig.6
Fig.7
4. Power Level Selection
With the machine powered on, press Power button to directly go to power level selection
status. You can select a power level 850 W, 1300 W or 2150 W. If 850 W is selected, 850 W
digits are lighted and only the upper heating element works. If 1300 W is selected, 1300 W
digits are lighted and only the lower heating element works. If 2150 W is selected, 2150 W
digits are lighted and both the upper and lower heating elements work. In Delay mode,
machine defaulted heating power is 2150 W and can't be adjusted. Fig. 8 shows a heating
power level 2150 W, the present clock time 12:10, and the real-time heating mode.
5. Real-time Heat / Warm Setting
With machine powered on, as described in Item 10, press Mode button to enter Real-time
Heat / Warm mode with real-time heat indication lighted on. According to settings, machine
will automatically starts to heat or keep warm. The machine has a thermostat function, by
which, the machine goes into warm keeping status when it reaches the temperature setting
value. In warm keeping status, machine automatically starts heating when actual water
temperature is 5 (for setting value lower than 55 ) or 10 (for setting value equal to or
above 55 ) lower than the setting value, until reaching setting temperature again. It
repeats in this way.
Example: Fig. 9 shows real-time heat / warm status with heating power 1300W and
temperature setting 75 .
ACTUAL
Fig.8
HEATING
SET
Fig.9
6. Medium Warm Setting
With machine powered on, as described in Item 10, press Mode button until it enters
Medium Warm operation mode (with Medium Warm indication on the display).
HEATING
HEATING
Dimensions
(Fig.1)
Front View
a1
C1
Model
FCD-JTHMG50- E
FCD-JTHMG60- E
FCD-JTHMG80- E
FCD-JTHMG100- E
Volume
50L
60L
80L
100L
1
b
Net
Weight
22kg
25kg
29kg
34kg
Bottom View
I
a1
671mm
765mm
876mm
1052mm
A
B
b1
442mm
442mm
479mm
479mm
d1
c1
100mm
100mm
100mm
100mm
I: Drain
d1
410mm
410mm
450mm
450mm
Remarks:the permitted error limit of above parameters is 10%.
Attentions in installation
During installation, adequate space must be reserved for future maintenance and
repair. If the water heater is installed within decoration boards, the right board shall be
removable to facilitate removing the plastic cover during maintenance.
City water inlet pressure shall not be less than 0.05 Mpa.
Electric water heater shall be installed indoors with ambient temperature above 0 .
The pipes shall be collectively laid. Hot water outlet shall not be too far from use points.
In case farer than 8 m, hot water pipe shall have a thermal insulation to minimize heat
loss.
The mounting wall shall be firm and reliable to support twice the weight of water heater
full of water. Non-load bearing walls or air brick walls must have corresponding
protective measures like additional support, wall-through screws or back boards.
Electric water heater shall be located in a place easy for use, maintenance and with a
floor drainer. In case the tank or pipes leak, nearby or lower facilities shall not be
damaged. The installation location shall avoid being above toilet bowl, bathtub,
washbasin or doorframe, where will cause a suppressed or unsafe feeling to users.
Power socket for water heater shall be in a dry place free of water splash to avoid
nonnormal work of the water heater. (splash-proof box is preferred)
Do not confuse inlet and outlet water pipes. Safety valve shall be installed at
designated position with no random modification. The safety valve pressure relief vent
shall keep open to the air. Do not block it.
To ensure safety, water heater shall use a separate socket (not multi-purpose socket)
and be reliably grounded. Socket quality shall comply with local standard. Check with a
neo-electroscope the line and neutral are not wrongly connected. Only after confirming
the tank is full of water, no water leakage at various connections and power supply
meets requirements, power can be turned on to start heating.
Page 8

Installation
Installation must be made by installers of or designated by our company after-service
department. The water heatershall be wall-mounted.
Before installation, make sure water heater rear wires are fit firmly. Determine an
installation location. Make four holes 12mm, 65 mm deep in the wall with an impact
drill as shown in Fig. 2. Insert and fixexpansion hooks and expansion bolts in
corresponding wall holes. Lift the water heater. Insert wall rack onto the hooks and bolts.
Fit flat washers, rear wires and nuts in turn onto the bolts (see Fig. 3). Tighten the nuts
and check them firm. Install accessories such as safety valve, drain hose as shown in
Fig. 4. Use sealing compound to prevent water leakage.
L1
Capacity
L2
L1
L2
(Fig.2)
To facilitate installation and removal, it is suggested a G 1/2" movable nut is fitted at
appropriate locations on inlet and outlet pipes respectively. Find water supply location.
Connect inlet pipe, outlet pipe and city water pipe respectively to the use point. Fill the
tank full of water and check if water circuit shows any leakage. For any leakage, reconnection shall be made.
Safety valve
Cold water inlet
Showerhead
Hot
water
outlet
Mixing valve
(Fig.4)
Note: Make sure the wall rack is reliably hung on the hooks before releasing your hands.
Otherwise, the water heater may fall and cause human injury or property loss.
Connection and Use of Safety Valve:
The safety valve should be connected to the cold water inlet pipe. Please check
carefully if the direction is correct after installation. The correct direction of installation
is that the arrowhead on the safety valve should be pointed to the water heater.
Please connect the drain hose to the safety valve. Connect one end of the hose to the
safety valve vent and the other end to the sewage drain. The hose can be cut short or
extended as necessary. The hose shall be installed as inclined downward.
The water may drip from the discharge pipe of the pressure relied device and that this
pipe must be installed in a continuously downward direction and in a frost-free
environment. Check safety valve once a month as follow: move the small handle of
safety valve, if there's water flowing out, safety valve is normal; if there's no water flow,
please contact local after-sales service station.
The pressure relief device is to be operated regularly to remove lime deposits and to
verify that it is not blocked.
50L
200mm
320mm
60L
300mm
320mm
80L
282mm
320mm
100L
370mm
320mm
(Fig.3)
Connect to drain hose
(Fig.5)
Control Panel Illustration
SET
ACTUAL
1. Set Button
2. Temperature and Clock Time Increase Button
3. Temperature and Clock Time Decrease Button
4. Real-time Heating Indication
5. Medium Warm Indication
6. Night Power Indication
7. Heating Power Indication Area
8. Heating Indication
9. Delay Indication
HEATING
KEEPING
Mode
Power
On/Off
10. Intelligent Indication
11. Mode Button
12. Power Level Selection Button
13. On/Off Button
14. Warm Keeping Indication
Time
15. 2 Indication
16. Clock Time Display
17. Temp.Setting / Actual Temp Display
18. 1 Indication
Time
Remote Controller Panel Illustration
Mode
Signaling Indication
850 W
2150 W
1300 W
TIME 1
TIME 2
Power
Set
Confirm
Real-time Heating Indication
Medium Warm Indication
Night Power Indication
Intelligent Indication
Delay Indication
1. Indication Area
2. Mode selection Button
Temperature and Clock Time
3.
Increase Button
4. Set Button
Temperature and Clock Time
5.
Decrease Button
6. On/Off Button
7. Confirmation Button
Power Level Selection Button
8.
Operation Instructions
For the first use after installation, due to there's no water within the tank, first the city water
inlet valve and mixing valve must be opened. Close the mixing valve when water flows out
continuously from the showerhead or other outlets (the tank is full). Check connections
are free of water leakage, and insert the power plug.
1. Powering On
This product has a power failure memory function, i.e. it remembers temperature setting,
power level, clock and current working status. Upon connecting power, all indications on
the display are displayed for 2 s before the system goes into standby status (with only
clock display and all buttons except On/Off button inactive) or previous working status
before power failure with corresponding indicators lighted on. For example, machine as
shown in Fig. 6 is in standby status with only On/Off button active.
 Loading...