

Page 1
Top Load
Clothes Washer
User Manual-
Guide de l’Utilisateur-
Manual del Usuario-
Model #
Modèle
Para Modelo de
ESL-T21
Chargement
superieure Lave-linge
Lavarropas
Máxima Carga
Page 2

IMPORTANT SAFETY INSTRUCTIONS
Warning – To reduce the risk of fire, electric shock, or injury
to persons when using your appliance, follow basic
precautions, including the following:
1. Read all instructions before using the appliance.
2. Use this appliance only for its intended purpose as described
in this use and care guide.
3. Use only detergents or softeners recommended for use in a clothes
washer and keep them out of the reach of children.
4. This washer must be properly installed in accordance with the
installation instructions before it is used.
5. Never unplug your washer by pulling on the power cord. Always
grasp the plug firmly and pull straight out from the outlet.
6. Replace immediately worn power cords, loose plugs/power outlets.
7. Unplug your washer before cleaning or before making any repairs.
8. If your old washer is not being used, we recommend that you
remove the door. This will reduce the possibility of danger to children.
9. Do not operate your washer in the presence of explosive fumes.
10. Do not use washer to wash clothes soaked, spotted or washed in
gasoline, dry cleaning solvents or any other explosive or flammable
substances that could ignite and explode.
11. Clothes or rags used to clean flammable or explosive materials should
not be washed in the washer till all traces of this material has been
removed, to avoid an accident.
12. Do not add or mix any flammable or explosive substances to the wash.
13. Do not try to remove clothes while the tub or the agitator is moving. Let it
come to a complete stop before use.
14. Washer loading door must be closed when agitator and tub is spinning.
15. Do not operate your washer when parts are missing or parts are broken.
16. Do not use the washer for commercial clothes washing.
17. Do not operate washer unless all enclosure panels are properly in place.
18. Do not tamper with controls.
19. To reduce risk of injury do not allow children to play in or on the washer.
20. Washer must be connected to proper electrical outlet with the correct
electrical supply.
1
English
Page 3

2
21. Proper grounding must be ensured to reduce the risk of shock and fire.
DO NOT CUT OR REMOVE THE GROUNDING PLUG. If you do not
have a three-prong electric receptacle outlet in the wall, have a certified
electrician install the proper receptacle. The wall receptacle MUST be
properly grounded.
22. Hydrogen gas may be produced if the water heater has not been used in
more then 2 weeks. This could be explosive and can explode under
certain circumstances. If this is the case, before using the washer turn on
all the hot faucet's and let the hot water run for a few minutes. This will
let the trapped hydrogen escape. During this process do not turn on an
electric appliance, smoke, light a match/lighter or use a flame to avoid
an accident, as hydrogen gas is flammable and can explode.
SAVE THESE INSTRUCTIONS
For Future Use
English
Thank you for using our Haier
product. This easy-to-use manual will
guide you in getting the best use of
your washer.
Remember to record the model and
serial number. They are on a label in
back of the washer.
Model number
Serial number
Date of purchase
Staple your receipt to your manual. You will need it to obtain
warranty service.
DANGER
Risk of child entrapment. Before you throw away your old
washer, take off the door so that children may
not easily get trapped inside.
Page 4

Table Of Contents
PAGE
SAFETY INSTRUCTIONS ....................................................................1
OPERATING INSTRUCTIONS............................................................4
Parts and Features ..................................................................................4
Operations ........................................................................................5-6
Normal Operating Sounds....................................................................12
Lint Filter..............................................................................................13
Safety Lid Switch ..................................................................................13
Care and Cleaning Guide ............................................................14
Cleaning and Maintenance ..................................................................14
Moving and Vacationing ......................................................................15
Storage of Your Washer ......................................................................15
Troubleshooting..............................................................................16
INSTALLATION INSTRUCTIONS ....................................................18
Tools and Materials Required ................................................................18
Unpacking Your Washer ......................................................................19
Leveling Your Washer ..........................................................................19
Steps for Installation ............................................................................20
Electrical Connections ....................................................................22
Grounding Instructions..........................................................................22
Power Interruptions ..............................................................................22
Warranty ........................................................................................23
3
English
Page 5
4
English
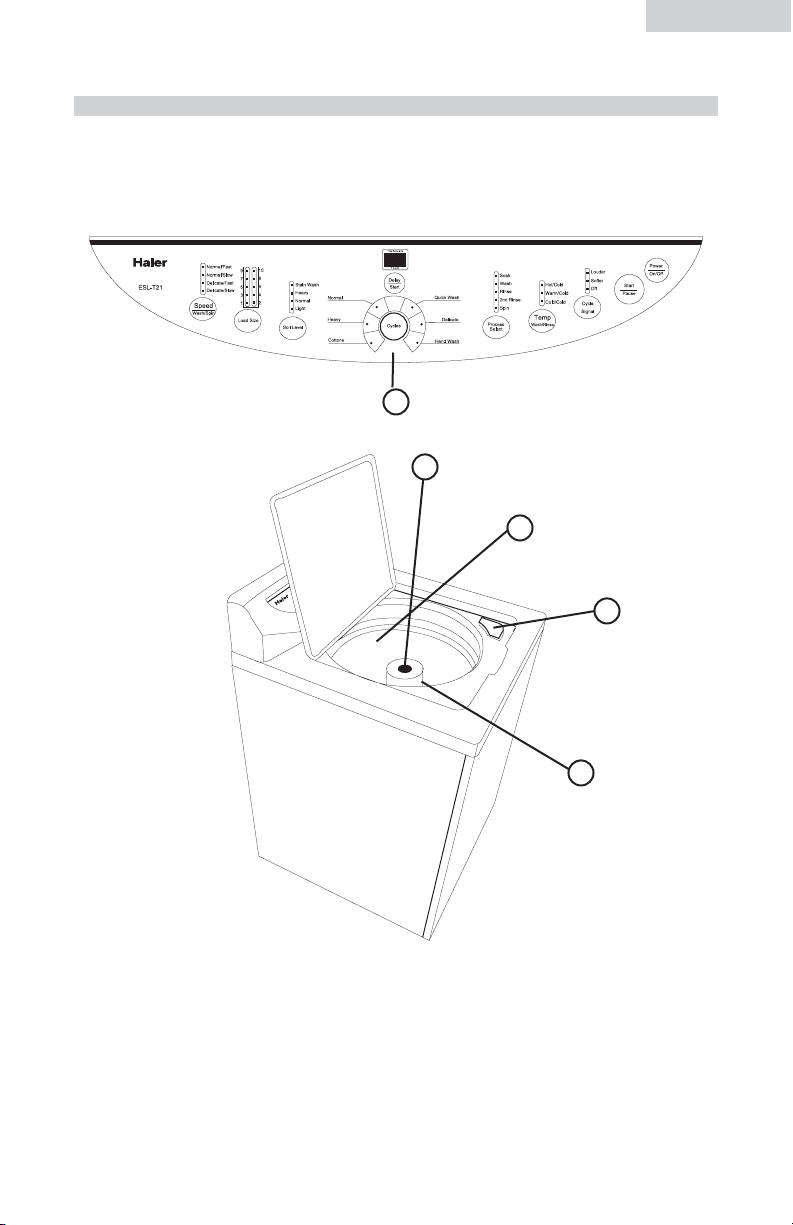
Control Panel
1. Liquid Fabric Softener Dispenser
2. Inner Wash Tub
3. Liquid Bleach Dispenser
4. Agitator
5. Control Panel
5
1
2
3
4
OPERATING INSTRUCTIONS
Parts and Features
Page 6

5
English
Operations
Delay Start
• When not activated the display shows cycle remaining time through the wash
process.
• When Delay Start is selected the indicator light will display a minimum delay of 2
hours. Push button once for every additional 1 hour delay for up to 24 hours.
Cycles
• Normal - For regular washing.
• Heavy – For washing bigger, thicker and heavier dirty laundries.
• Cotton – For washing cotton fabrics.
• Quick – For quick washing of light dirty laundries.
• Delicate – For washing of delicate fabrics.
• Hand Wash – To have hand wash effect on clothes.
Soil Level
• Select clothes soil level.
• Wash cycle increases 2 minutes for every soil level increased.
Load Size
• Water levels may be set at the beginning of the wash or at pause.
• During Soak, Wash or Rinse press this button to manually replenish water. Release
to stop. Function automatically is inactive when water reaches the overflow protection level.
Speed Wash/Spin
• Select spin speed when program is in normal or delicate cycle.
Note: • Flashing light indicates the program is running.
• Steady light indicates the program is the selected mode or is
about to operate.
Page 7

6
English
Power On/Off
• Push button once to power on the washer.
• If washer is On push button once to shut off the power.
Start/Pause
• Once washer is powered and selections are chosen push this button once to Start
the wash.
• While unit is working push this button once to pause it.
• If unit is in Pause mode, push this button once to resume operation.
Cycle Signal
• Signal volume can be adjusted soft – loud or off.
Temperature Wash/Rinse
• To select inlet water temperature for wash and rinse.
Process Select
This is to select washing process.
• Soak will not work in the Hand Wash, Delicates and Quick cycles.
• Water level indicator will shut off if only Spin is selected.
• Once a program is selected press the Process Select button to have 2nd Rinse. The
washer will add a 2nd rinse.
Delay Start Indicator
• Indicates remaining minutes when cycle is in progress.
• Indicates remaining hours during delay process.
• Indicates faults codes or conditions that are not normal.
Page 8

7
English
Operating Procedure
1. Press power on button.
• The washer will now be in the working status in the Normal cycle.
• If the Start/Pause button is not pressed within 5 minutes after powering on the unit
it will automatically switch off and return to the stand by mode.
• The washer will also return to the stand by mode immediately after completion of
the wash process.
• Regardless of the settings by pressing the power on/off button all programs will
stop and return to the stand by mode.
• The washer has intelligent wash resumption. If the power was interrupted at the
power source and then when the power is resumed the washer will resume
working at the stopped position.
2. Selection of Cycles
• When the washer is powered on the Normal cycle is the default cycle. If other
cycle is required press the cycle button for desired program.
3. Process Select
• Once the power is switched on the washing machine will automatically set the
Normal cycle which will Wash, Rinse and Spin. If other selection combinations
are desired, press the Process Select button to choose.
Note: Spin shall begin after some time even if there is no water in the tub. Do not
use soak process for woolen clothes. Clothes prone to fading should be
washed separately.
Page 9

4. Load Size
• After Wash Cycle selection press the Load Size button to select the proper water
level for wash.
Note: See chart below for Load Size selection.
5. Speed Wash/Spin
• Once the power is switched on the machine will automatically set to Normal/Fast.
Press button to change selection. (See page 5)
8
English
Process Selecting
Note: Follow chart below for selection of wash process.
Selected Processes Applications Operation (the on indicator
represent the processes to run)
0 Wash,Rinse, Common clothes needing
Spin wash,rinse & spin
1 Wash (Wash water Repeatedly use the
remains in the tub) wash water
2 Wash,rinse(Rinse Water Repeatedly use the
remains in the tub) rinse water
3 Rinse, Spin When rinse and spin
are needed after hand wash
4 2nd rinse When the clothes
need
5 Wash, Rinse second
2nd Rinse/Spin rinse
6 Spin When only spin is needed
(to spin after drain) after hand wash
(first drain and then spin)
7 Soak, Wash, For heavily soiled clothes
Rinse, Spin shirt cuffs and collars,
first soak and then wash
0
1
2
3
/
4
5
/
Times of pressing
Process(Normal,
Heavy and Cotton
Times of pressing
Process(Quick Wash,
Delicate Casual or
Hand Wash
Water level water quantity
The Capacity of Water Water
Washing(lbs.) Level Quantity
17.6~22 10 About 23.6g
9 About 21.7g
13.2~17.6 8 About 19.3g
7 About 17.6g
8.8~13.2 6 About 16.0g
5 About 14.2g
4.4~8.8 4 About 12.5g
3 About 11.0g
Below 4.4 2 About 9g
1 About 7.3g
Page 10

9
English
6. Soil Level
• When the washer is powered the machine will automatically set at Normal. Select
different soil levels by pressing button.
7. Temperature Wash/Rinse
• Initial setting is Warm/Cold when washer is powered on. Press button to change
selection based on clothes put in the washer.
8. Cycle Signal
• This is set at Low when washer is started. Press button to adjust.
9. Delay Start
• To start the washer at a later lime press the Delay Start button and set the time.
• When activated the indicator displays 2. Push button once for every 1 hour delay
for up to 24 hours
• Press Start button to activate Delay Start.
• When the delay timer starts the program select indicator turns off. The indicator
will display the remaining time to turn on the unit. In the lower right corner of the
display, a blinking light will indicate that Delay Start has been activated.
• By pressing the Delay/Start button the selected Process programs will be
displayed.
• By altering the running program, the washer will have to be reset.
10. Start/Pause
• Press this button when you want the machine to start.
• During operation press this button to pause and press it again to resume operation.
Note: By opening the top lid will stop the machine except for water filling or
draining.
Page 11

10
English
Note: Total time may be affected by water inlet and drain time. It may also be
affected by the water pressure. Normal, Heavy and Cotton programs could
combine the process of soak during which the washing machine first soak
for about 20-30 minutes with slight agitation after water filling and then
begins to wash.
Loading the Washer:
• Load each item loosely.
• Separate the white and colored clothes. Separate heavy clothes from light clothes.
• Carefully check all pockets and cuffs for small items.
They can easily slide in to the tub and may damage the tub.
• Pre-treat all stains and heavily soiled areas for best results.
• Do not overload your washer.
• When loading wet items, keep water level high enough so items
can float easily in the water.
• Avoid wrapping large items such as bed sheets around the agitator.
• Close the door properly after loading the clothes. If you keep the lid
up, the agitation will not start.
Proper Use of Detergent:
• It is good washing practice to add the detergent to the water
before you add the clothes so that the detergent can work
effectively on your clothes.
Note: You can use less or more detergent depending on the size of the load, water
type in your living area, whether it is soft or hard and whether the clothes
are heavily soiled or lightly soiled.
Time list of each program (minute)
Program Total Time (min)
Including soak Not including soak
Cottons About 75-81 About 45-51
Heavy About 77-83 About 47-53
Normal About 59-69 About 39-49
Quick Wash About 25
Delicate About 36-42
Hand wash About 38-44
Page 12
11
English
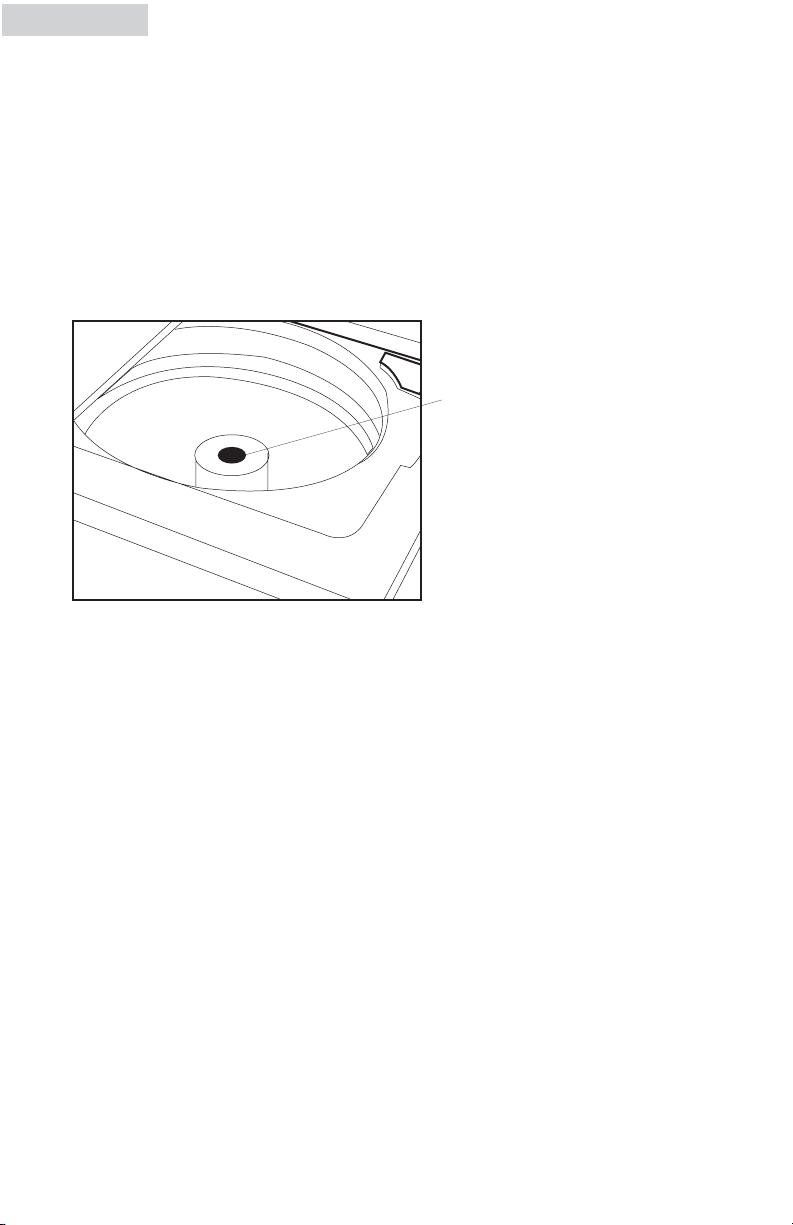
Fabric Softener Dispenser:
• The fabric softener dispenser is located on the top of the agitator.
Dispenser will automatically release liquid fabric softener at proper time during
rinse cycle.
Steps to use the dispenser:
1. Pour in liquid fabric softener into dispenser as recommended
by the manufacturer.
2. Add water up to its fill level, but do not exceed the level.
Warning: • Never pour fabric softener directly onto clothes because it will stain
your clothes or you may get spots on your clothes.
• Do not stop washer during its first spin or dispenser will automatically
release the softener in to the wash load.
• Do not use powder form of softener into dispenser otherwise it will
clog up the dispenser. This dispenser is only designed for liquid form.
fabric softener dispenser
Page 13

12
English
Bleach Dispenser:
• Bleach dispenser is located on front corner under the loading door.
• Pour in recommended amount of bleach into dispenser
during the first wash fill.
Note: Use only liquid bleach in dispenser.
Warning: • Be careful not to spill undiluted bleach on the washer cabinet or your
clothes. As it is a strong chemical, it may damage some of your
clothes or the finish of the washer if not properly diluted.
• Use the manufacturer’s chart, on product container for recommended
use of liquid or powder bleach.
Normal Operating Sounds
The following sounds are normally heard during the
operation of the washer:
• Tumbling sounds: This is normal as the heavy wet clothes in the Washer
are continuously being tossed around.
• Air rushing noise: This happens when the Washer tub spins at
very high RPM.
• Wash and Rinse cycles going on and off will also make clicking sounds.
Page 14
13
English
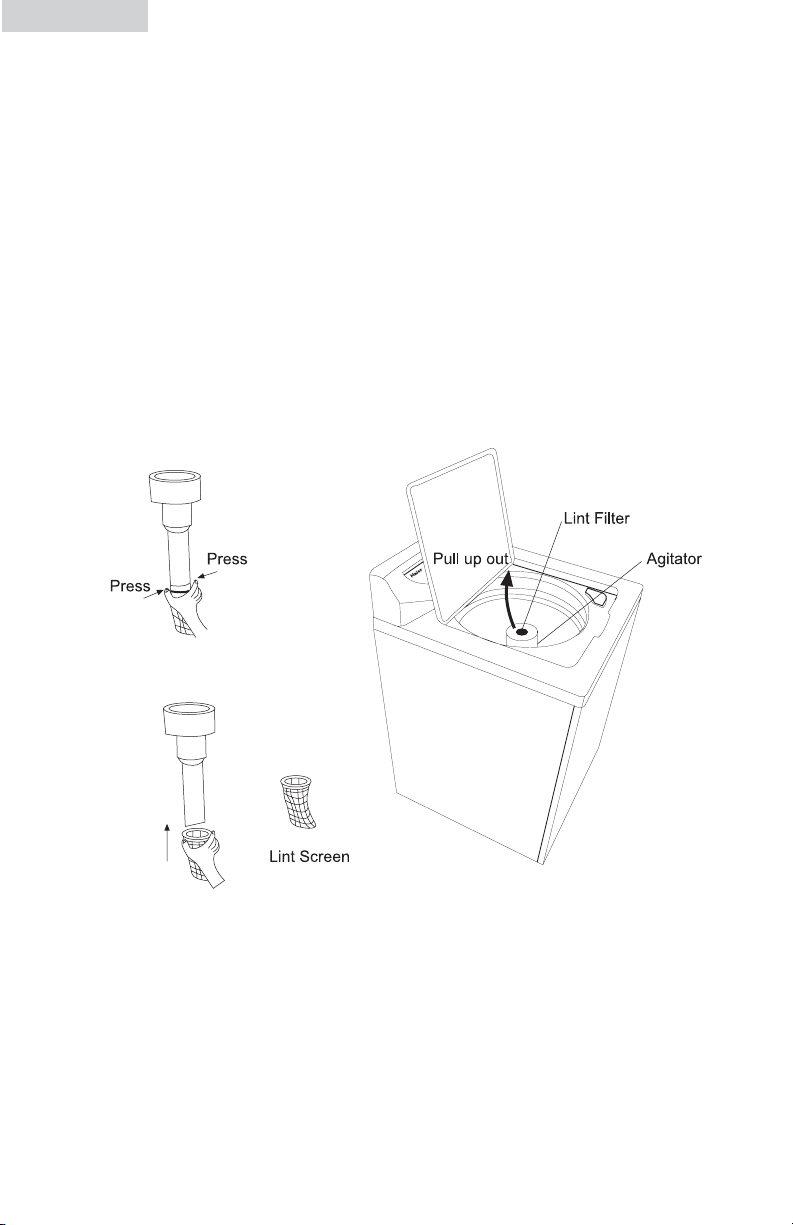
Lint Filter
• The lint filter must be used during washing.
• It must be cleaned in time after each using.
1. Take off the lint filter.
Pull up the lint filter from the agitator.
2. Remove lint
Press the lint screen clip with your thumb and index finger, and get the screen
downward as shown in figure below. While wet, remove the lint from the screen.
3. Install the lint filter
After cleaning, install the screen back onto the lint filter. Then put the lint filter
back in the agitator barrel.
Safety Lid Switch
• If for any reason you open the lid in the middle of the wash cycle, the
washer will not spin and will shut off automatically. Once the lid is
closed, the washer will start back on.
Page 15

14
English
Warning: Always unplug your washer to avoid electric shock before cleaning.
Ignoring this warning may result in death or injury. Before using
cleaning products, always read and follow manufacturer’s instructions
and warnings to avoid personal injury or product damage.
Cleaning and Maintenance
• Use only damp or sudsy cloth for cleaning control panel.
• To avoid any kind of damage to cabinet finish, wipe washer cabinet as
needed. If you spill liquid/powdered softener, bleach or detergent on the
cabinet, wipe cabinet immediately because it can damage the finish.
• Do not use any abrasive, harsh chemicals, ammonia, chlorine bleach,
concentrated detergent, solvents or metal scouring pads. Some of these
chemicals may dissolve, damage and/or discolor your washer.
• Remove pins or other sharp objects from clothes to prevent scratching of
interior parts.
• Leave lid open after you are done washing to allow inside of washer to
dry and prevent bad odors.
Care and Cleaning Guide
Page 16

English
15
Moving & Vacationing
•Turn off water supply faucet's and disconnect hoses. Drain water from all hoses.
This will prevent from damaging due to water leakage if the hoses accidentally
get ruptured or they become loose.
• Disconnect electrical plug.
• Dry inner wash tub. If moving washer, disconnect drain hose.
• Turn the leveling legs clockwise all the way in.
• Move and store your washer in upright position only.
• To prevent mold or mildew, leave lid open so moisture inside
machine can evaporate.
Storage of Your Washer in Cold Environment
• The Washer must be stored at room temperature.
• If you just got delivery of a washer when outside temperature is below freezing,
do not operate until washer has warmed to room temperature.
• Do not install or operate your washer where room temperature is below freezing.
Page 17

16
English
Washer does not operate:
• Check if unit is plugged in. The plug may have come loose.
• Check if the electrical wall receptacle is of proper voltage.
• Check if the circuit breaker needs to be reset or if the fuse
needs to be replaced.
• Check if the washer is overloaded: load may need to be
re-balanced and clothes may need to be redistributed.
• Check if the lid is open. You may have to close the lid properly.
• The washer pauses in some cycles. This is normal in delicate or
hand-washable cycle, which has short soak period where your clothes
are being soaked for very short period of time. You will not hear washer
operation for a short period of time. When the soak time is over,
it will start automatically.
Problems with water:
• Not enough water coming out: Water faucet may need to be turned on
fully. Water hoses may be tangled up or wrinkled up. Straighten up
hoses. Check water level selection, it may need to be readjusted.
• Water Temperature is incorrect: Check your water heater temperature.
Hot water needs to be at a temperature at least 120˚F. -140˚F
(49˚C – 60˚C.). Check to make sure the inlet hoses are properly
connected. (e.g. hot to hot & cold to cold)
• Water leaks: This is due to not properly installing drain hose or fill
hoses. Your home drain may be clogged or having constant
water pressure. You may need to tighten hoses, check the
plumbing or call a plumber.
• Water will not drain: This is due to not installing your drain hose
properly. You may need to connect the drain hose properly. Check the
position of the drain hose. In order to drain properly, make sure that top
of drain outlet is less than 4 ft. (1.2 m) above the floor.
Troubleshooting
Page 18

17
English
Washer is making noise:
• Washer may need to be reinstalled. (Check washer installation section)
• Washer load may need to be re-balanced, as the load may be uneven.
• Coins, loose change, buttons or other heavy objects could make noise
(read Operating Guide – Normal Operating Sounds).
• Squealing Sound: Due to overloaded wash tub.
• Vibration Noise: Due to not leveling washer properly on the floor and
uneven distribution of clothes in the tub.
Problems with clothes:
• Clothes are too wrinkled: this is due to improper sorting, overloading
and washing in too hot water repeatedly. Avoid overloading and resort
your load. Do not mix heavy clothes such as work clothes with light
clothes such as blouses, light shirts and delicate items. You may need to
wash in warm or cold water.
• Have soap residue: detergent may not be dissolving in water.
Check water temperature or you need to add detergent as wash
tub is being filled with water before you load your clothes to avoid
soap residue on clothes.
• Spots or stains on your clothes: this is due to incorrect use of fabric
softener. You may need to read proper instructions on the container
and follow proper directions for using the softener.
• Clothes are grayed or yellowed: this is due to not pouring
enough detergent for large loads. You may have to add more
detergent to the load.
• Clothes are ripped & have holes/excessive wear & tear: this is due to
sharp objects such as pins and belt buckles left in pockets. You will need
to remove small loose sharp objects. Fasten belts, zippers, metal snaps
etc. Check if you are using undiluted bleach. Never add undiluted
bleach to wash.
Note:
T
rouble Codes Reason
E0 Top lid not closed during delay start sequence
E1 Blockage of drain hose
E2 Top lid not closed during wash operation
Page 19
18
English
INSTALLATION INSTRUCTIONS
Tools and Materials Required
You will need to have following tools to help
you in the installation of your Washer:
• Pliers
• Wrench
• Tape Measure
• Gloves
• Level
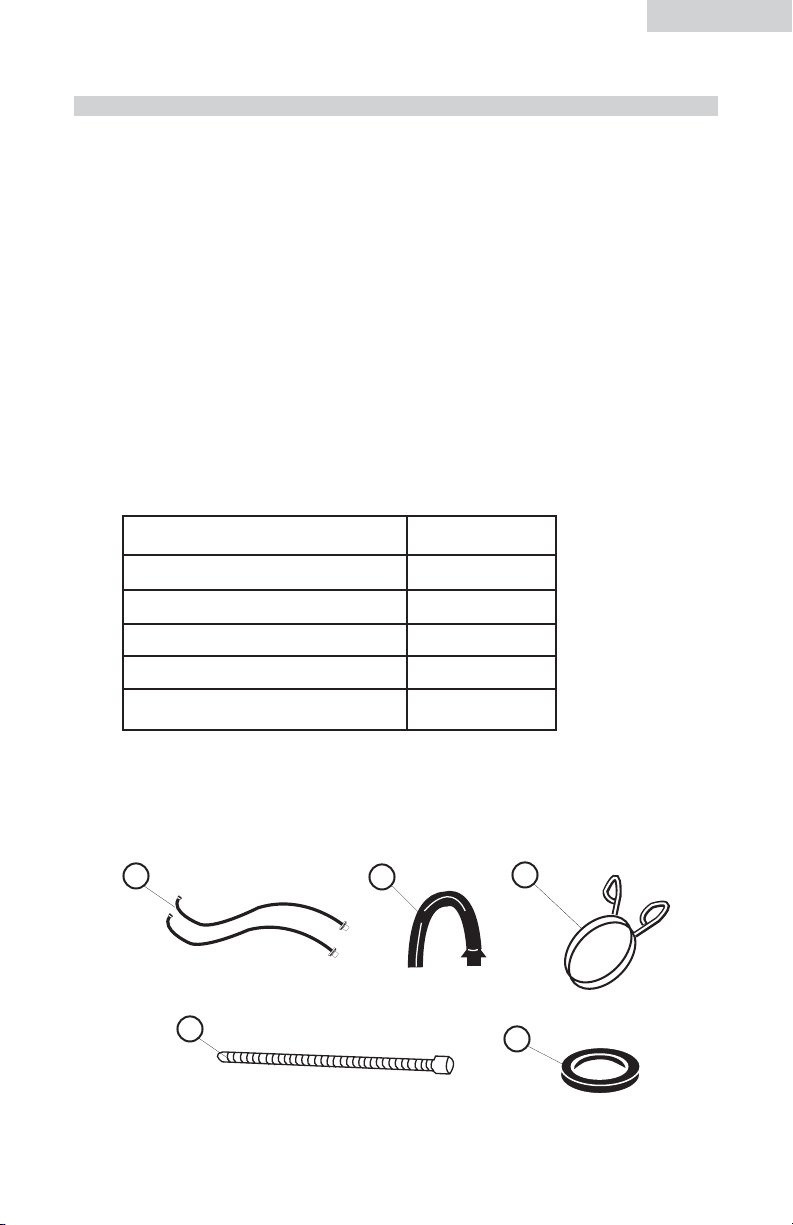
Accessories Supplied Quantity
1. Hot & Cold water inlet hoses 2
2. Drain Hose Hook 1
3. Drain Hose Clamp 1
4. Outer Drain Hose 1
5. Flat Water Inlet Hose Washers 4
1
2
3
4
5
Page 20
19
English
Unpacking Your Washer
• Remove all packing materials. This includes the foam base and all
adhesive tape holding the washer accessories inside and outside.
• Open the top lid to remove the styrofoam drum brace. Pull to remove.
Note: Save drum brace. Reinstall when moving the washer.
• Inspect and remove any remains of packing, tape or printed
materials before using the washer.
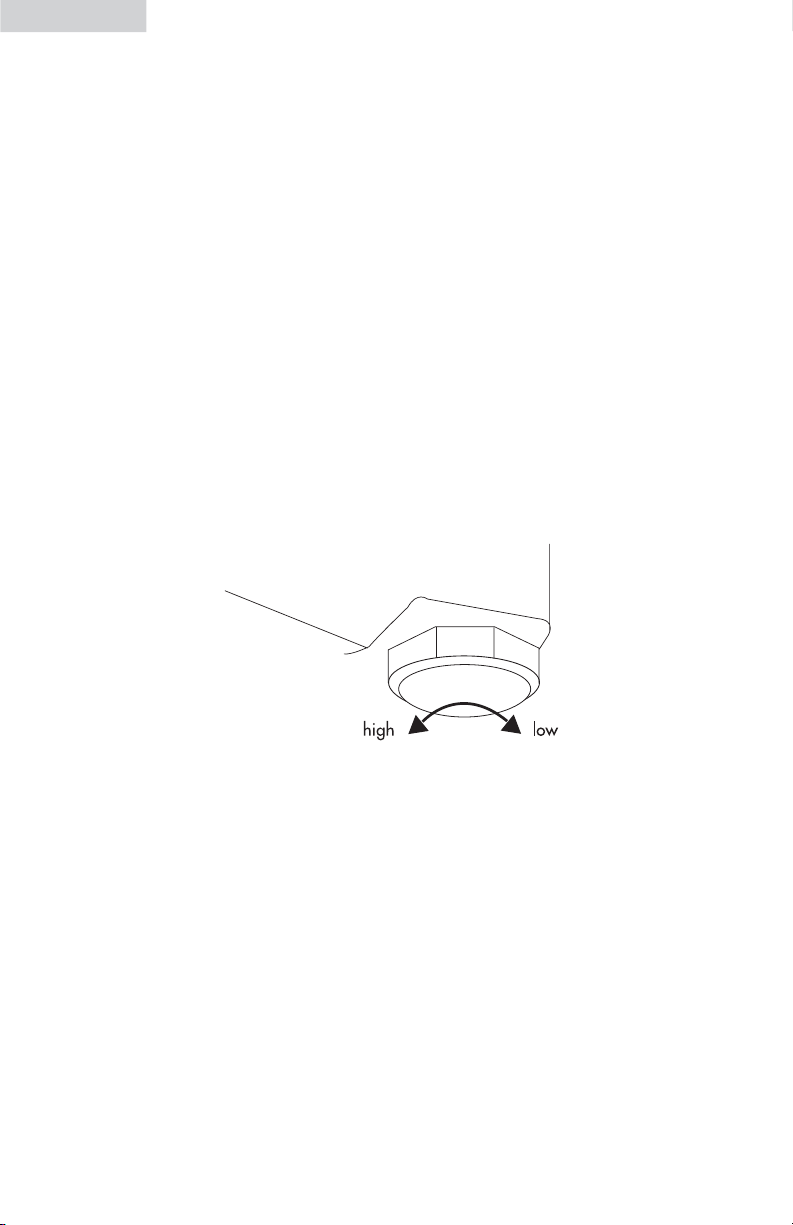
Leveling Your Washer
• Your washer has 4 leveling legs; which are located on the four bottom
corners. After properly placing your washer in its final position, you can
level your washer.
• Leveling legs can be adjusted by turning them counterclockwise to raise
your washer or turning them clockwise to lower your washer.
Warning: Leveling of washer is very important to prevent vibration
during spin.
Page 21
20
English
Steps for Installation
• Select a suitable location for the washer on a hard even surface away from direct
sunlight or heat source e.g. radiators, baseboard heaters, cooking appliances etc.
Any floor unevenness should be corrected with the leveling legs located on the
bottom corners of the washer. The washer must be placed at room temperature.
You must not place washer where the temperature is at below freezing.
Installing Your Washer:
Read installation instructions carefully before installation.
Caution: If, after completing these steps, you are unsure that unit is properly
installed, contact a qualified installer. To ensure that your Washer is
properly installed it is recommended that it be installed by a certified
installer.
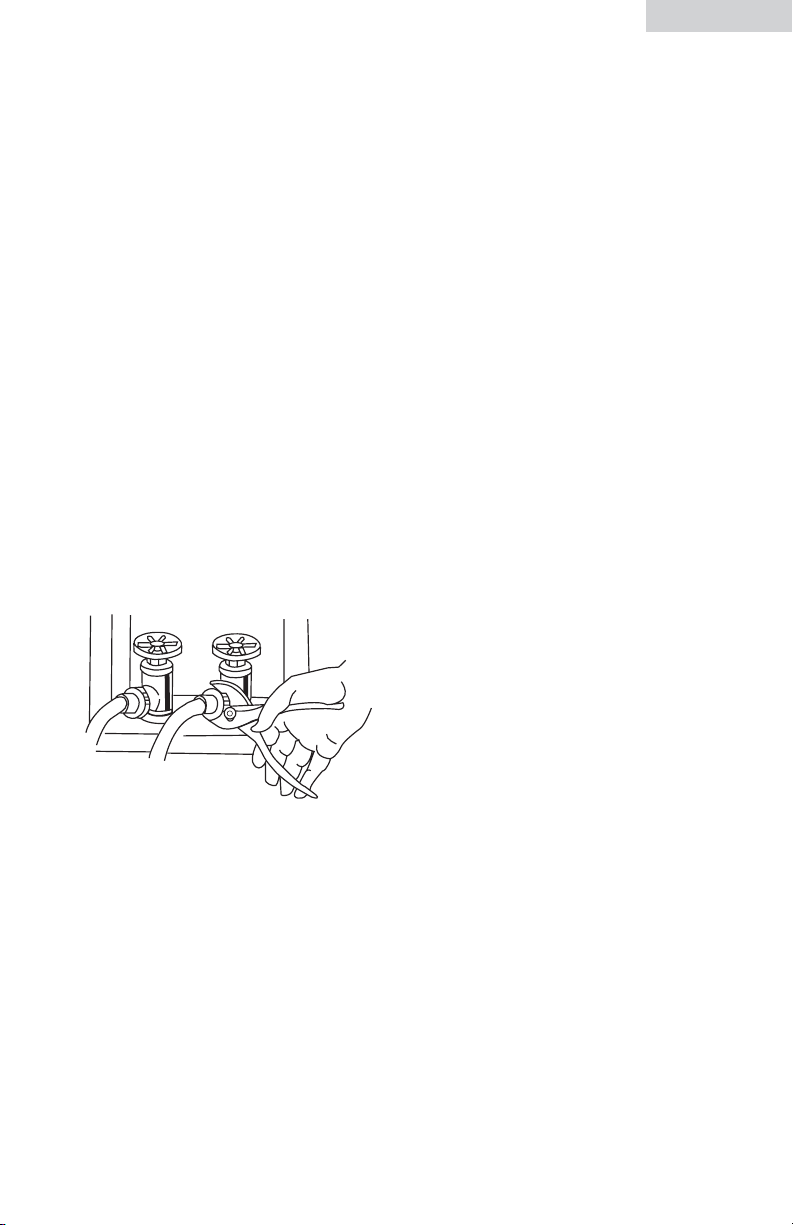
1. Insert a new flat washer into each end of the water inlet hoses.
Firmly put the washers in the coupling.
Note: You may have to use pliers to tighten the coupling.
Do not over tighten because you may cause damage to the valve.
2. Connect the hot and cold water inlet hoses to the hot and
cold water faucet.
Page 22
English
21
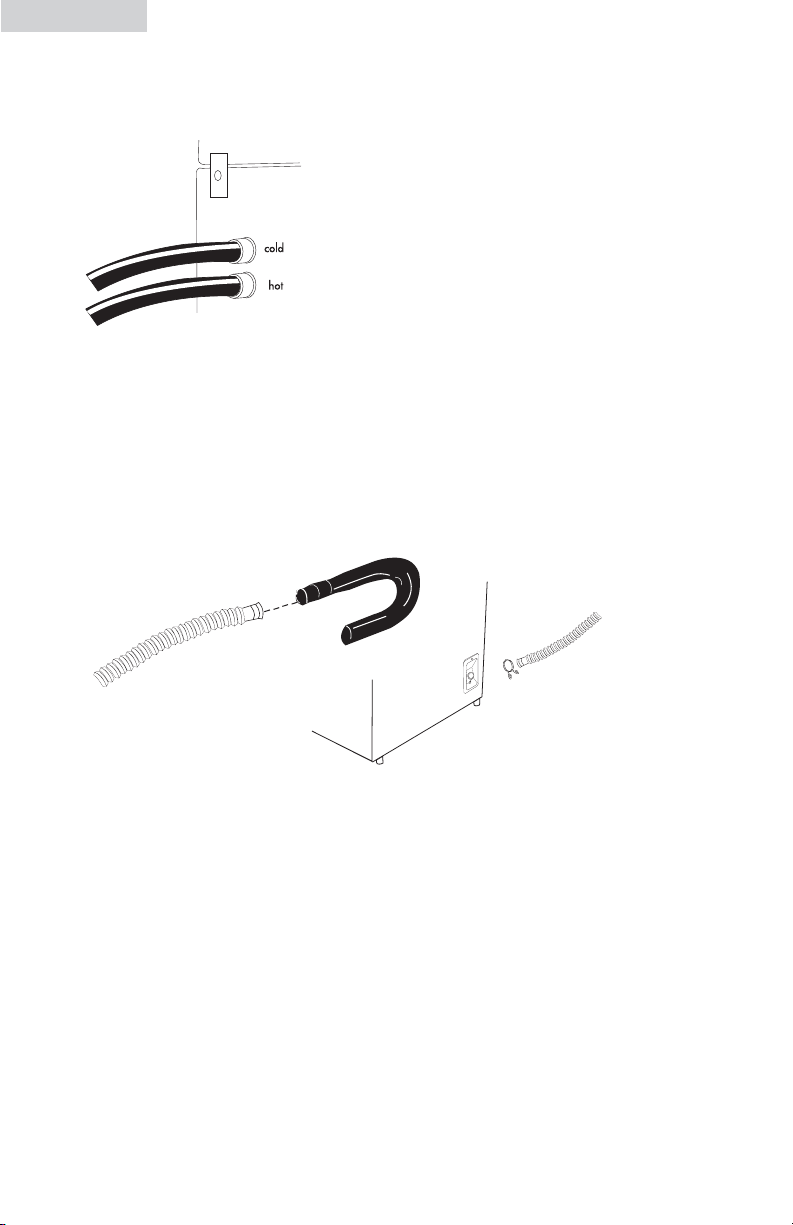
3. Connect the other end to their respective washer inlet located
at the rear of the washer.
Note: Hot water needs to be at a temperature of at least 120˚F – 140˚F.
(49˚C- 60˚C) for the soap to dissolve and to avoid soap residue
remaining on clothes.
4. Using the drain hose clamp, attach the drain hose to the unit as shown
below. Install the drain hose hook to the outer drain hose tube.
5. Plug in the Washer to a regular 115 volt / 60 Hz, 15 amp outlet.
Page 23

Grounding Instructions
This appliance must be grounded. In the event of an electrical short circuit,
grounding reduces the risk of electric shock by providing an escape wire for
the electric current. This appliance is equipped with a cord having a grounding
wire with a grounded plug. The plug must be inserted into an outlet that is
properly installed and grounded.
• Improper use of the plug can result in a risk of electric shock.
• Consult a qualified electrician or service person if the grounding
instructions are not completely understood or if doubt exists as to
whether the appliance is properly grounded.
Wiring Requirements:
• The washer must be plugged into at least 15 AMP 115-120 VOLT,
60 HZ GROUNDED OUTLET.
Note: Where a standard two-prong
outlet is encountered,
it is the personal responsibility
and obligation of the
consumer to have it replaced
with a properly grounded
three-prong outlet.
Extension Cords:
We do not recommend that you use an extension cord.
Power Interruptions
Occasionally there may be power interruptions due to thunderstorms or other
causes. Remove the power cord from AC outlet when a power outage occurs.
When power has been restored re-plug power cord to AC outlet. If outage is
for a prolonged period, clean washer before using it again.
Electrical Connections
X
English
22
Page 24

Limited Warranty
Full ONE Year Warranty
For 12 months from the date of original retail
purchase, Haier will repair or replace any
part free of charge including labor that fails
due to a defect in materials or workmanship.
Limited Warranty
After one year from the original retail
purchase date, Haier will provide a part at
no cost, as indicated below, to replace said
part as a result of a defect in materials or
workmanship. Haier is solely responsible for
the cost of the part. All other costs such as
labor, trip charge, etc are the responsibility
of the owner.
Second Year
Haier will provide All Parts.
Third through Fifth Year
Haier will provide the transmission assembly.
Haier will provide the cabinet assembly
should the cabinet rust through
Third through Tenth Year
Haier will provide the outer wash tub and
related outer tub assembly parts should the
part fail to hold water.
Lifetime
Haier will provide the inner stainless steel
wash tub.
NOTE: This warranty commences on the
date the item was purchased and the original
purchase receipt must be presented to the
authorized service representative before warranty repairs are rendered.
Exceptions: Commercial or Rental
Use Warranty
90 days labor from date of original purchase
90 days parts from date of original purchase
No other warranty applies
For Warranty Service
Contact your nearest authorized service center. All service must be performed by a Haier
authorized service center. For the name and
telephone number of the nearest authorized
service center please call 1-877-337-3639.
Before calling please have available
the following information:
Model number and serial number of your
appliance (found on the rear of the unit on
the upper left hand side).
The name and address of the dealer you
purchased the unit from and the date
of purchase.
A clear description of the problem.
A proof of purchase (sales receipt).
This warranty covers appliances
within the continental United States,
Puerto Rico and Canada. What is
not covered by this warranty:
Replacement or repair of household fuses,
circuit breakers, wiring or plumbing.
A product whose original serial number has
been removed or altered.
Any service charges not specifically
identified as normal such as normal
service area or hours.
Damage to clothing.
Damage incurred in shipping.
Damage caused by improper installation
or maintenance.
Damage from misuse, abuse accident, fire,
flood, or acts of nature.
Damage from service other than an
authorized Haier dealer or service center.
Damage from incorrect electrical current,
voltage or supply.
Damage resulting from any product
modification, alteration or adjustment
not authorized by Haier.
Adjustment of consumer operated controls as
identified in the owners manual.
Hoses, knobs, lint trays and all attachments,
accessories and disposable parts.
Labor, service transportation, and shipping
charges for the removal and replacement
of defective parts beyond the initial
12-month period.
Damage from other than normal
household use.
Any transportation and shipping charges.
THIS LIMITED WARRANTY IS GIVEN IN LIEU
OF ALL OTHER WARRANTIES, EXPRESSED
OR, INCLUDING THE WARRANTIES OF
MERCHANTABILITY AND FITNESS FOR A
PARTICULAR PURPOSE
The remedy provided in this warranty is
exclusive and is granted in lieu of all
other remedies.
This warranty does not cover incidental or
consequential damages, so the above
limitations may not apply to you. Some states
do not allow limitations on how long an
implied warranty lasts, so the above
limitations may not apply to you.
This warranty gives you specific legal rights,
and you may have other rights, which vary,
from state to state.
Haier America
New York, NY 10018
English
23
Page 25

INSTRUCTIONS IMPORTANTES DE
SECURITE
Avertissement – Pour reduire le risqué d’incendie , des
choques electriques, ou blessure , suivez les precautions de
base, y compris les suivants:
1. Lisez toutes les instructions avant d’utiliser cet appareil.
2. Utilisez cet appareil uniquement pour l’usage auquel il est destine comme
indique dans ce guide d’utilisation et d’entretien
3. Utilisez les detergents et adoucissants recommandes pour laver le vetements et gardez les hors de la portee des enfants.
4. Cet appareil doit etre convenablement installe conformement aux instructions d’installation avant d’etre utilise.
5. Ne debranchez jamais votre appareil en tirant sur la corde d’alimentation. Saisissez fermement la prise et tirez directement hors de la sortie.
6. Replacez immediatement les cordons d’alimentations endommages, et les
fiches ou connecteurs detaches.
7. Debranchez votre appareil avant de le nettoyer ou de faire n’importe
quelle reparation.
8. Si vous n’utilisez plus votre lave-linge, nous recommandons que vous
enlevez les portes . Ceci reduira la possibilite de danger aux enfants.
9. N’operez pas votre appareil dans la presence des fumees explosives.
10.N’utilisez pas votre lave-linge pour laver des vetements qui etaient laves
ou imbibes dans l’essence , dans le dissolvant de nettoyage a sec ou
d’autres substances inflammables qui pourraient etre mets a feu ou
exploteront.
11.Les tissues ou chiffons utilises a nettoyer des materiels inflammable ou
explosifs ne doivent pas etre laves dans cette machine jusqu’a ce que
toutes traces de ces materiels doivent etre eliminees pour eviter n’importe
quel accident.
12.N’ajoutez pas ou ne melangez pas des substances inflammables ou
explosifs au lavage.
13.N’essayez pas d’enlever les vetements pendant que le baquet ou l’agitateur est en marche. Attendez jusqu’a ce qu’il s’arrette completement.
14.La porte du chargement doit etre fermee quand l’agitateur et le baquet
tournent.
15.N’operez pas votre machine si des parties de cet appareil sont cassees
ou manquent.
24
Français
Page 26

16.N’utilisez pas ce lave-linge pour des vetements commerciaux.
17.N’operez pas votre machine a moins que tous les panneaux de cloture
sont convenablement en place.
18.N’alterez pas les controles.
19.Pour reduire les risques de blessures ne permettez pas aux enfants de
jouer dans ou avec cet appareil.
20.Ce lave-linge doit etre connecte proprement a une sorite electrique avec
la provision electrique exacte.
21.Propre mise a terre doit etre assuree afin d’eviter des risques de feu . NE
PAS ENLEVER OU COUPER LE BOUCHON DE MISE A TERRE. Si vous
n’avez pas un adapteur a 3 broches dans le mur, veuillez avoir un electricien certifie installer un adapteur correcte. L’adapteur mural doit etre
proprement mis a terre.
22.Le gaz d’hydrogene peut etre produit si l’appareil de chauffage d’eau n’a
pas ete utilise dans plus de 2 semaines.Ceci peut etre explosif et peut
explose sous certaines circonstances. Dans ce cas, avant d’utiliser votre
lave-linge, ouvrez tous les robinets d’eau chaude et laissez l’eau ecouler
pour quelque minutes. Ceci aidera au gaz d’hydrogene pris en piege de
s’echapper.Pendant ce process, n’allumez pas des alumettes, ne fumez
pas ne tournez pas un appareil elctrique pour eviter un accident comme
le gaz d’hydrogene est inflammable et peut exploser.
Gardez ces instructions
Pour le Future
Merci d’avoir utilise un produit
Haier. Ce manuel facile a utiliser ,
vous guidera pour obtenir le meilleur
resultat de votre machine.
N’oubliez pas d’enregistrer votre
numero de serie et model. Ils sont sur
une etiquette au dos du lave-linge
Numero du model
Numero de serie
Date d’achat
Agrafez votre recu d’achat a votre manuel. Vous en aurez besoin pour
obtenir le service de garantie.
DANGER
Le risque d’entrappement des enfants. Avant de disposer de
votre ancien lave-linge , enlevez les portes , comme ca les
enfants ne seront pas mis au piege a l’interieur.
25
Français
Page 27

Table de Matieres
PAGE
INSTRUCTIONS DE SECURITE ..................................................24-25
INSTRUCTIONS D’OPERATION......................................................27
Parties et Characteristiques ..................................................................27
Operations ....................................................................................28-29
Sons d’operation normaux....................................................................35
Filtre du fibre ......................................................................................36
Commutateur de couvercle de Surete ....................................................36
Guide de soin et de nettoyage ..................................................37
Entretien et nettoyage ..........................................................................37
Deplacement et vacances......................................................................38
Stockage de votre lave-linge ................................................................38
Depannage ....................................................................................39
INSTRUCTIONS D’INSTALLATION ................................................41
Outils et materiels exiges ......................................................................41
Deballage du lave-linge........................................................................42
Mise a niveau le lave-linge ..................................................................42
Etapes pour l’installation ......................................................................43
Connections Electriques ................................................................45
Instruction de mise a terre ....................................................................45
Interruption electrique ..........................................................................45
Garantie ..........................................................................................46
26
Français
Page 28

Les panneaux de control
1. Distribiteur d’adoucissant liquide
2. Baquet interieur
3. Distribiteur d’agent de blanchement
liquide
4. Agitateur
5. Panneaux de control
5
1
2
3
4
INSTRUCTIONS D’OPERATION
Parties et Caracteristiques
27
Français
Page 29

Operations
Debut Retarde
• Une fois non active, l’affichage monte le temps du cycle qui reste durant le proces
de lavage.
• Quand vous choisissez le cycle Debut Retarde, un signe de lumiere affichera un
minimum delai de 2 heures. Appuyez une fois sur le bouton pour chaque delai
d’heure desire jusqu’a les 24 heures.
Cycles
• Normal - Pour lavage normal.
• Lourd – Pour un lavage plus lourd et plus souille.
• Cotton – Pour laver les vetements en cotton.
• Vite – Pour un lavage vite aux vetements moins souilles .
• Delicat – Pour un lavage aux vetements delicats.
• Laver a main – Pour avoir l’effet d’un lavage a la main.
Les Niveaux
• Choisissez le niveau des vetements souilles.
• Le cycle de lavage augmentera de 2 minutes pour chaque niveau de vetements
souilles.Chargement des vetements
• Choisissez le niveau des vetements souilles.
• Pendant l’immersement, le lavage ou le rincage, appuyez sur ce bouton pour
ajouter de l’eau desiree. Relachez pour arreter l’eau. Cette fonction automatique
est inactive quand le niveau d’eau atteint le niveau de protection du debordant.
Vitesse/Rotation
• Select spin speed when program is in normal or delicate cycle.
Note: • Une lumiere clignotante indiquera que le est en fonction.
• Une lumiere stable indiquera que le programe choisi est sur le
point d’operer.
28
Français
Page 30

ON/ Off Boutons de Puissance
• Appuyez le bouton une fois pour commencer le lave-linge
• Si le lave-linge est en pleine operation, appuyez le bouton une fois pour l’arreter.
Debut/Arret
• Une fois le lave-linge est prêt et les selections sont choisies, appuiyez sur ce bouton pour commencer le lavage.
• Durant l’operation appuyez sur ce bouton une fois pour l’arreter
• Si l’unite est sur le mode Arret, appuyez sur ce bouton une fois pour reprendre
l’operation.
Le signal de cycle
• Le volume du signal peut etre ajuste Doux - Bruillant ou peut etre Ferme.
Temperature du Lavage/Rincage
• Pour choisir la temperature d’eau d’arrivee pour le lavage et rincage.
Les process choisis
Ceci est pour choisir les process du lavage.
• Trempe, ne travaillera pas dans les cycles lave-a-main, delicat et vite.
• L’indicateur du niveau d’eau s’eteindra seulement si seulement Rotation est choisie.
• Une fois un programe est choisi, appuyez sur le bouton Proces Choisis pour avoir
un second rincage. Le lave-linge ajoutera un second rincage.
Indicateur pour delai le commencement
• Indiquera les minutes qui restent quand le cycle est en progres
• Indiquera les heures qu restent pendant un proces de delai.
• Indiquera les codes fautes ou conditions qui ne sont pas normales.
29
Français
Page 31

Proces d’operation
1. Appuyez sur le bouton de puissance.
• Le lave-linge fonctionnera sous le cycle normal.
• Si le Debut/ Arret bouton n’est pas appuye dans les 5 minutes après la puissance
de l’unite il se coupera automatiquement et retournera au stand by mode.
• Le lave-linge retournera automatiquement au stand by mode immediatement
après l’achevement du proces du lavage.
• En appuyant sur le ON/ Off bouton tous les programes s’arreteront et
retourneront sur le stand by mode sans tenir compte des reglages choisis.
• Le lave-linge a une reprise intelligente de lavage. Si après une panne electrique ,
tout est resume, le lave-linge resumera le fonctionnement a la position arretee.
2. Selections des cycles
• Quand le lave-linge est sur le cycle Normal en defaut, si un autre cycle est
desire, appuyez sur le cycle du programe desire.
3. Proces choisis
• Une fois la puissance est tournee , le lave-linge automatiquement reglera sur le
cycle normal qui lavera, rincera et rotera . Si d’autres selections combinees sont
desirees , appuyez sur le bouton Proces choisi bouton.
Note: La rotation commencera après peu de temps meme s’il n’y a pas d’eau dans
le baquet. Ne choisissez pas le process pour tremper les vetements en laine.
Les vetements enclins a faner doivent etre laves separement.
30
Français
Page 32

4. La taille du chargement
• Apres le cycle du lavage, appuyez le bouton du taille du chargement pour choisir
le niveau d’eau propre pour laver.
Note: Voir le graphique au dessous pour la selection du chargement.
5. Vitesse du lavage/Essorer
• Une fois le lave-linge est en courant, la machine reglera automatiquement au
Normal/Vite. Appuyez sur le bouton pour changer votre selection (voir page 5)
Proces choisis
Note: Suivez le graphique au dessous pour choisir le process du lavage.
Proces choisis Applications Operation (L’indicateur ON,
(representera le proces marche)
0 Laver, Rincer Vetements qui ont besoin
Essorer d’etre laves, rinces essores
1 Laver (L’eau du lavage A maintes reprises utilisez
reste dans le baquet) l’eau de lavage
2 Laver,Rincer(L’eau du A maintes reprises utilisez
rincage reste dans le) l’eau de rincage
3 Rincer, Essorer Rincer et essorer necessaries
aprés le lavage a la main
4 Deuxieme Rincage Vetements
ont besoin
5 Laver, Rincer d’un second
2me Rincage/Essorer rincage
6 Essorer When only spin is needed
(Essorer aprés after hand wash
l’epuisement) (first drain and then spin)
7 Soak, Wash, For heavily soiled clothes
Rinse, Spin shirt cuffs and collars,
first soak and then wash
0
1
2
3
/
4
5
/
Times of pressing
Process(Normal,
Heavy and Cotton
Times of pressing
Process(Quick Wash,
Delicate Casual or
Hand Wash
Niveau d’eau ,quantitee d’eau
Capacite du Niveau Quantitee
Lavage(lbs.) d’eau d’eau
17.6~22 10 Plus ou 23.6g
9 Plus ou 21.7g
13.2~17.6 8 Plus ou 19.3g
7 Plus ou 17.6g
8.8~13.2 6 Plus ou 16.0g
5 Plus ou 14.2g
4.4~8.8 4 Plus ou 12.5g
3 Plus ou 11.0g
Below 4.4 2 Plus ou 9g
1 Plus ou 7.3g
31
Français
Page 33

6. Niveau du souille
• Une fois le lave-linge est en courant, la machine reglera automatiquement au
Normal. Choisissez le niveau du souilles en appuyant sur le bouton.
7. Temperature Laver/Rincer
• Le reglage initial est sur Tiede/Froid quand la machine est en courant. Appuyez
sur le bouton pour changer la selection basee sur les vetements mis le lave-linge
8. Le signal du cycle
• Ceci est regle sur Bas quand la machine est en courant. Appuyez sur le bouton
pour ajuster.
9. Debut retarde
• Pour mettre en marche le lave-linge a une heure plus tard, appuyez sur le bouton
Delai Debut et reglez l’horraire.
• Quand active, l’indicateur affichera 2 . Appuyez one fois pour chaque heure de
retard jusqu’a 24 heures.
• Appuyez sur le bouton Debut pour activer un debut delai.
• Quand le minuteur du delai mettra en marche le programe choisi, l’indicateur
choisi s’etteindra. L’indicateur affichera le temps qui reste pour mettre la machine
en marche. Sur le coin droit de dessous de l’exposition, une lumiere clignotee,
indiquera que le Debut Delai a ete active.
• En appuyant sur le bouton Delai/Debut le proces des programmes choisis sera
affiche.
• En alterant le programme courant, le lave-linge doit etre regle de nouveau.
10. Debut/Arret
• Appuyez sur ce bouton quand vous voulez mettre en marche la machine.
• Durant l’operation appuyez sur ce bouton pour Arret et appuyez de nouveau
pour reprendre l’operation.
Note: En ouvrant le couvercle superieur, la machinera arretera de fonctioner sauf
quand l’eau est en train d’ecouler ou de s’accumuler.
32
Français
Page 34

Note: Le temps total peut etre affecte par la rentree d’eau et le time d’ecoulement.
Il peut aussi etre affecte par la pressure d’eau. Les programmes pour
Normal, Lourd et. Cotton peuvent combiner le proces du trempement
pendant lequel le lave-linge trempe pour 20-30 minutes après que l’eau soit
remplie et que le lavage commence.
Charger le lave-linge:
• Charger chaque piece separemment.
• Separer les vetements blancs et colores. Separer les vetements lourds et legers.
• Soigneusement verifiez toutes les poches et manchettes pour petits articles.
• Ils peuvent tres facilement glisser dans le baquet et l’endommager.
• Traitez en avance toutes les taches et les parties souillees pour un meilleur resultat.
• Ne pas surcharger votre lave-linge.
• En chargeant des articles mouilles, gardez le niveau d’eau assez haut pour que
les articles flottent facilement dedans.
• Evitez d’emballer des articles grands comme les draps de lit autour de l’agitateur.
• Fermez la porte proprement après avoir mis les vetements. Si vous laissez la porte
ouverte, l’agitateur ne fonctionnera pas.
Usage propre du detergent:
• C’est une bonne pratique de lavage d’ajouter le detergent a l’eau avant d’ajouter
les vetements, comme ca le detergent travaillera efficacement sur vos vetements
Note: Vous pouvez utiliser plus ou moins du detergent dependant la taille de votre
chargement, de la qualite d’eau dans votre domaine, si l’eau est douce ou
dure et si les vetements sont souilles legerement ou lourdement.
Le temps pour chaque programme (minute)
Programme Temps total (min)
Trempez y compris Trempez pas compris
Cottons Peu pres 75-81 Peu pres 45-51
Lourd Peu pres 77-83 Peu pres 47-53
Normal Peu pres 59-69 Peu pres 39-49
Lavage rapide Peu pres 25
Delicat Peu pres 36-42
Laver-a-la-main Peu pres 38-44
33
Français
Page 35

Distributeur de l’adoucissant:
• Le distributeur de l’adoucissant de tissue liquide est situe au sommet de
l’agitateur. Le distributeur relachera automatiquement l’adoucissant au moment
propre pendant le cycle du rincage.
Etapes pour utiliser le distributeur:
1. Verser le liquide adoucissant dans le distributeur comme recommande par le
fabricant.
2. Ajouter de l’eau jusqu’au niveau rempli, mais ne pas depasser le niveau.
Avertissement: • Ne versez jamais l’adoucissant liquide directement sur les
vetements car ca vous les tachera.
• N’arretez pas le lave-linge pendant la premiere rotation si non
le distributeur relachera automatiquement l’adoucissant dans le
chargement.
• N’utilisez pas un adoucissant en forme de poudre dans le
distributeur, autrement il l’obstruera. Le distributeur est concu
pour les formes liquides seulement.
Distributeur de l’adoucissant
34
Français
Page 36

Distributeur de l’agent de blanchement liquide:
• Le distributeur de l’agent de blanchement est situe dans le coin de
devant sous la porte du chargement.
• Versez la quantitee recommandee dans le distributeur pendant que le
lave linge se remplisse.
Note: Faites attention de ne pas renverser le blanchement non dilue sur les
vetements ou sur le lave-linge.
Avertissement: • Comme c’est un chimique fort, ca peut endommager les vete-
ments ou le lave-linge s’il n’est pas dilue proprement.
• Utilisez le graphique du fabricant sur le recipient du produit
pour l’usage recommande du blanchement liquide ou en
forme de poudre.
Les Sons d’operation Normals
Les sons suivant sont souvent entendus pendant l’operation
du lave-linge:
• Les sons de lavage: Ceci est normal comme les vetements lourds sont
continuellement lances dans le lave-linge.
• Bruit d’air courant: Ceci arrive quand le baquet du lave-linge tourney a
un RPM tres haut.
• Les cycles du lavage et rincage feront des cliquetis chaque fois qu’ils
sont ouverts ou etteints.
35
Français
Page 37

Le filtre de fibre
• Le filtre de fibre doit etre utilise pendant le lavage.
• Il doit etre nettoye a temps après chaque usage.
1. Enlevez le filtre de fibre.
Retirez le filtre de fibre de l’agitateur
2. Retirez le fibre
Serrez l’agrafe d’ecran du fibre avec votre pouce et doigt d’index et mettez l’ecran de haut en bas comme montre dans la figure ci dessous. Tandisqu’humide,
releverz le fibre de l’ecran.
3. Installez le filtre de fibre.
Apres l’ avoir nettoye , installez l’ecran dans le filtre de fibre. Puis mettez le filtre
en place dans le baril d’agitateur
Le Couvercle du Commutateur de Surete
• Si pour n’importe quelle raison vous ouvrez le couvercle au milieu du
cycle de lavage, le lave-linge ne fonctionnera pas et s’eteindre
automatiquement. Une fois le couvercle est ferme, le lave-linge
commencera de nouveau.
36
Français
Page 38

Avertissement: Debranchez toujours votre lave-linge avant de le nettoyer pour
eviter des choques electriques. En ignorant cet avertissement,
vous pouvez resulter d’une blessure grave ou un deces. Avant
d’utiliser des produits pour nettoyage , lisez et suivez les
instructions et avertissements du fabrican pour eviter des
blessures personnelles.
Nettoyage et Entretien
• Utilisez seulement des tissues humides savoneux pour nettoyer les
paneaux de controle.
• Pour eviter quel dommage au placard, essuyer le placard du lave-linge
comme necessaire. Si vous renversez des adoucissants liquides ou en
forme de poudre, des decolorants ou detergents, essuyez le placard
immediatement car ceci peut l’ endommager .
• N’utilisez pas des abrasives , produits chimiques rauques, ammoniaque,
detergent concentre, solvent ou des tampons a recurer.Une partie de ces
produits peut dissolver, endommager et ou discolorer votre lave-linge.
• Enlevez les epingles ou autres objets aigus des vetements pour eviter les
rayures des parties interieures
Guide de Soin et Nettoyage
37
Français
Page 39

Demenagement et Vacations
• Virez les robinets de provision d’eau et debranchez le tuyaux. Egoutez l’eau de
tous les tuyaux. Ceci empechera des dommages dus a la fuite d’eau si les tuyaux
sont accidentellement rompus ou detaches.
• Debrachez votre corde d’alimentation.
• Sechez le baquet interieur du lave-linge. Si vous deplacez le lave-linge,
debranchez votre tuyau d’egout.
• Tournez les pieds qui nivelent dans le sens des aiguilles d’une montre completement a l’interieure.
• Deplacez et emmagasinez vote lave-linge dans une position debout seulement.
• Pour evitez des moisisseurs laissez le couvercle ouvert , comme ca l’humidite
interieure de la machine peut s’evaporer.
Emmagasinez votre lave-linge endroit froid
• Le lave-linge doit etre emmagasine dans un endroit a temperature normale.
• Si vous venez de recevoir votre lave-linge quand la temperature exterieure est
moins que gelee.
• N’operez pas votre machine jusqu’a ce que cette derniere atteint la temperature
de la salle.
38
Français
Page 40

Lave-linge n’opere pas:
• Verifiez si l’unite est branchee. Le cordon pourait etre detache.
• Verifiez si la prise murale est de propre voltage.
• Verifiez si le disjoncteur n’a pas besoin d’etre remet a l’etat initial et si
le fusible doit etre replace.
• Verifiez si le lave-linge est surcharge.
• Le lave-linge s’arrete pendant quelques cycles. Ceci est normal dans le
cycle delicat et laver a main, qui a des courtes periodes pour tremper les
vetements.
• Vous n’entendrez pas le fonctionement du lave-linge pour une courte
periode de temps. Quand le temps de tremper est termine, le lave-linge
fonctionnera automatiquement.
Problemes avec l’eau:
• Pas assez de sortie d’eau: Les robinets d’eau peuvent avoir besoin d’etre
tournes sur completement. Les tuyaux d’eau peuvent etre enchevetres ou
embrouilles. Mettez les en ordre. Verifiez le niveau d’eau choisi, it se
peut qu’il doit etre reajuste.
• La temperature d’eau est incorrecte. Verifiez la temperature de votre
appareil de chauffage d’eau. Eau chaude doit etre a une temperature
minimum de 120˚F-140˚F (49˚ C-60˚C) Assurez que les tuyaux d’arrivee d’eau sont convenablement connectes. (par example, chaud sur
chaud et froid sur froid).
• Les fuites d’eau: Ceci est du grace au tuyau d’egout qui n’est pas installe
convenablement. L’egout de votre maison peut etre obstrue ou peut avoir
des pressures d’eau constemment. Vous avez besoin de resserer les
tuyaux et verifiez la plomberie. L’eau ne s’egoutte pas: Ceci est du grace
a l’installation impropre de votre tuyau d’egout.
• Vous avez besoin de le connecter correctement. Assurez la position de
votre tuyau d’egout. Afin d’egouter proprement , assurez que le sommet
du sortie d’egout est moins de 4pieds (1.2m) au dessus du plancher.
Depannage
39
Français
Page 41

Lave-linge fait du bruit:
• Lave-linge a besoin d’etre reinstallee. (Verifiez la section d’installation )
• Le chargement du lave-vaisselle doit etre equilibre, comme le chargement peut etre inegal.
• Pieces de monaie, des boutons ou autres objets lourds peuvent faire du
bruit (Lisez le guide d’operation – Operation des sons normaux)
• Des bruits percants: Due au surchargement du lave-linge
• Bruit de vibration: due a une mise a niveau incorrecte et distribution
inegale des vetements dans le baquet.
Probeme avec les vetements:
• Vetements sont trop rides: Ceci est du au triage impropre, au
surchargement et lavage des vetements dans l’eau tres chaude a maintes
reprises. Evitez le surchargement et triez vos vetements. Ne melangez
pas les vetements lourds , comme vetements de travail avec les vetements
legers tels que les chemisiers, les jupes legeres et les articles delicats.
Vous avez besoin de les laver avec l’eau tiede ou froide.
• Residus de savon: Detergent ne dissout pas dans l’eau. Verifiez la
temperature d’eau . Il se peut que vous avez besoin d’ajouter le
detergent quand le baquet est en train de se remplir d’eau avant
d’ajouter les vetements pour eviter les residus de savon.
• Des taches sur vos vetements: C’est du a l’incorrect usage de
radoucissant . Il faudra lire les propres instructions sur le recipient et
suivez les instructions du radoucissant. Les vetements deviennent gris ou
jaunes. Ceci est du au detergent qui n’est pas suffisant. Il faudra en
ajouter de plus.
• Les vetements sont dechires et ont des trous/ usure excessive . Ceci est
du aux objets aigus comme epingles, et les boucles de ceinture laisses
dans les poches. Il faudra enlever tous les objets aigus: ceintures,
zippers, les couverts en metal etc.. Verifiez si vous utilisez un decolorant
undilute. N’ajoutez jamais un decolorant undilute au lavage.
Note:
Code d’ennui
Raison
E0 Couvercle n’est pas ferme pendant le Debut/Delai
E1 Obstruction du tuyau d’egout
E2 Le couvercle superieur n’est pas durant l’operation
40
Français
Page 42

INSTRUCTIONS D’INSTALLATION
Les outils et materiels exiges
Vous avez besoin d’avoir les outils suivants
pour vous aider a installer votre lave-linge:
• Epinces
• Cle plate
• Mesure de bande
• Gants
• Nivel
Quantite d’accessoires Quantity
1. Tuyaux d’arrivee d’eau froide 2
2. Crochet pour le tuyau d’egout 1
3. Serre-joint pour le d’egout 1
4. Tuyau d’egout exterieur 1
5. Les rondelles plates du tuyau 4
1
2
3
4
5
41
Français
Page 43

Deballage du lave-linge
• Retirez tout le materiel d’emballage ainsi que la base en mousse et le
ruban adhesif retenant les accessoires du lave-linge a l’interieur et l’exterieur.
• Ouvrez le couvercle superieur pour retirer le croisillon du tambour en
styrol. Retirez pour enlever. Note: Gardez le croisillon du tambour.
Reinstallez quand vous deplacez le lave-linge.
• Inspectez et retirez le reste de l’emballage, le ruban adhesif et les documents avant d’utiliser votre lave-linge.
Mettre a niveau votre lave-linge
• Votre lave-linge a 4 pieds de mise a niveau situes dans les 4 coins du
bas. Apres avoir place votre lave-linge dans sa position finale, vous
pouvez mettre a niveau votre lave-linge.
• Les pieds de mise a niveau peuvent etre regles en les tournant dans le
sens des aiguilles d’une montre pour les relever et dans les sens inverse
pour rabaisser votre lave-linge.
Avertissement: Mettre a niveau votre lave-linge est tres important
pour eviter des vibrations pendant la rotation.
42
Français
Page 44

Etapes pour l’installation
• Choisissez une location convenable pour votre lave-linge, sur une surface ferme et
loin de la lumiere des rayons de soleil ou des sources de chauffage comme les
radiateurs, les plyntes et les appareils pour cuisiner etc. N’importe quelle surface
inegale doit etre rectifiee avec les pieds de mise a niveau situes dans les coins
inferieurs du lave-linge. Le lave-linge doit etre place dans une salle appropriee.
Ne placez pas le lave-linge ou la temperature est moins que gelant.
Installez votre lave-linge:
Lisez toutes les instructions d’installation soigneusement.
Caution: Si après avoir completes ces etapes , vous n’etes pas sure si l’unite est
proprement installee, contactez un installateur qualifie. Pour assurer que
votre lave-linge est installe proprement, nous recommandons que vous
l’installez a l’aide d’une personne certifiee.
1. Inserrer une nouvelle rondelle plate aux fins des tuyaux d’arrivee d’eau
Fermement mettez les rondelles dans l’accouplement.
Note: Vous aurez peut etre besoin des pinces pour resserer l’accouplement.
Ne serrez pas tres fort de peur de causer des dommage a la soupape.
2. Connectez les tuyaux d’eau d’arrivee froide et chaude aux robinets
d’eau chaude et froide.
43
Français
Page 45

3. Connectez l’autre fin des tuyaux a leur respective arrive d’eau situee
au derriere du lave-linge
Note: Eau chaude doit etre a une temperature au moins de 120˚F -140˚F. (49˚C-
60˚C) pour que le detergent dissolve et eviter des residus de detergent sur
les vetements.
4. En utilisant le serre-joint du tuyau d’egout, attachez le tuyau d’egout
a l’unite comme vu ci dessous. Installez le crochet du tuyau d’egout au
tube du tuyau d’egout exterieur.
5. Branchez lave-linge a voltage regulier 115volt/60Hz, 15amp de sortie.
44
Français
Page 46

Instructions de mise a terre
Cet appareil doit etre mis a terre. En le mettant a terre vous reduissez les risques
des choques electriques au cas d’un circuit court electrique en fournissant une
evasion pour l’electrique courant. Cet appareil est equipe d’une corde avec un fil et
une prise pour la mise en terre. La fiche doit etre inserre dans une sortie
convenablement installee et mise a terre.
• L’usage impropre de la fiche peut resulter dans un risqué de choque
electrique.
• Consultez un electricien ou une personne qualifiee si les instructions ne
sont pas completement comprises ou si vous avez des doutes si l’appareil
est convennablement mis a terre.
Les cables exiges:
• Le lave-linge doit etre branchee sur un minimum 15AMP 115-120
VOLT, 60HZ sortie de mise a terre.
Note: Si vous avez une sortie a 2
broches, c’est la responsabilite
et l’obligation du consumateur
de la replacer proprement
avec une sortie a 3 broches.
Rallonges:
Nous ne recommandons pas des rallonges.
Pannes Electriques
Occasionnellement vous pouvez avoir des pannes electriques dues aux orages ou
autres causes. Debranchez votre corde d’alimentation de la sortie AC durant ces
pannes. Quand le courant est restaure, rebranchez votre corde d’alimentation a la
sortie AC . Si la panne est pour une longue periode de temps, nettoyez votre lavelinge avant de l’utiliser.
Connections Electriques
X
45
Français
Page 47

Garantie Limitee
Une garantie pour une annee entire
Pour 12 mois de la date d’achat, Haier
reparera ou remplacera n’importe quelle partie gratuitement y compris les couts de maind’oeuvre dus a un defaut des materiaus ou
execution.
Garantie limitee
Apres un an de la date originale d’achat,
Haier fournira gratuitement et replacera
comme indique ci dessous, la partie , due a
un defaut dans le materiel ou execution.
Haier est uniquement responsable pour les
couts de cette partie. Tous les autres couts
tels que main-d’oeuvre,tarif de voyage, etc..
sont la responsabilite du proprietaire.
Seconde annee
Haier fournira toutes les parties.
Troisieme jusqu’a la cinquieme
annee
Haier fournira l’assemblement du transmiteur.
Haier fournira l’assemblement du placard
rouille.
Troisieme jusqu’a la dixieme annee
Haier fournira l’exterieur du baquet et
l’assemblement des parties exterieures si ces
dernieres echouent de tenir l’eau en place.
Lifetime
Haier fournira le baquet en acier interieur.
NOTE: Cette garantie commence le jour ou
ce produit a ete achete. Le recut d’achat
original doit etre presente au representant
authorise du service avant de commencer
n’importe quelle reparation.
Exceptions: Garantie commerciale
ou de louage.
90 jours pour main-d’oeuvre de la date originale d’achat.
90 jours pour parties de la date originale
d’achat.
Aucune autre garantie est appliquee.
Pour le service de garantie
Contactez le plus proche service authorise.
Tous les services doivent etre executes par un
Haier service authorise. Pour le nom et
numero de telephone du service le plus
proche de vous, contactez, 1-877-337-3639
Avant d’appeler, veuillez avoir les
informations suivantes:
Le numero du model et de serie de votre
appareil (situes au dos de l’unite sur la cote
gauche superieure)
Le nom et addresse du fournisseur dont vous
avez achete l’appareil et la date d’achat.
Une description claire du probleme.
Une preuve d’achat (Recut d’achat)
Cette garantie couvre tous les
appareils dans le continent des Etats
Unis, Puerto Rico et Canada. Ce qui
n’est pas sous cette garantie:
Reparation our emplacement des disjoncteurs
des fusibles, l’installation electrique et
plomberie.
Un produit dont le numero de serie a ete
enleve ou altere.
N’importe quels couts de service qui ne sont
pas identifies comme service d’un endroit
normal ou horraires.
Dommages de vetements.
Dommages causes a une installation ou
entretiens malpropres
Dommages dus aux abus d’un accident ,
d’une incendie, inondation, ou actes de
nature.
Dommages dus a un service autre qu’un service authorise de Haier
Dommages dus a un courant el
Dommages resultant d’une modification,
alteration, ou ajustement executes par un non
authorise de Haier
Ajustements du consomateur pour operer les
controles comme identifies dans le manuel du
prorietaire.
Tuyaux, poignees, plateau de fibre et tous les
attachements, accessoires et parties
disponibles.
Main-d’oeuvre, service de transportation et
les frais de transportation pour enlever et
replacer les parties deffectueuses après les 12
mois initials.
Dommages autres que l’usage d’un ménage
normal.
N’importes quels frais de transport et d’expedition.
CETTE GARANTIE LIMITEE EST DONNEE AU
LIEU ET EN PLACE DE TOUTES AUTRES
GARANTIES, EXPRIMEE OU Y COMPRIS LES
GARANTIES DE MERCHANTABILITE ET SANTEE POUR UN BUT PARTICULIER.
Le remede fourni dans cette garantie est
excluse et accordee en lieu de tout autre
remedes. Cette garantie ne couvre pas les
dommages accidentals ou consequents, alors
la limitation ci dessus n’est pas appliquee
pour vous. Quelques Etats ne permettent pas
les limitations de la longueur de la garantie.
Ces limitations ne seront peut etre pas pour
vous.
Cette garantie vous donne des droits legals
specifiques et vous pouvez avoir d’autres
droits qui varient d’un Etat a l’autre.
Haier America
New York, NY 10018
46
Français
Page 48

Español
IMPORTANTES INSTRUCCIONES DE
SEGURIDAD
Advertencia – Para reducir el riesgo de fuego, shock eléctrico,
o dabos físicos siga las precauciones básicas de seguridad
incluyendo las siguientes:
1. Lea todas las instrucciones antes de utilizar esta unidad.
2. Utilice esta unidad sólo para su uso entendido como lo describe este
manual.
3. Utilice sólo detergentes, jabones o suavizantes como recomendamos en
este manual, mantenga los mismos fuera del alcanze de los niños.
4. Esta unidad deberá instalarse correctamente de acuerdo a las instruc-
ciones de este manual antes de utilizar.
5. Nunca desenchufe tirando del cable de corriente. Siempre sostenga
firmemente el enchufe y tire hacia atrás.
6. Reemplace inmediatamente los cables dañados y tomas de corriente o
enchufes flojos.
7. Desenchufe la unidad antes de limpiar o de hacer alguna reparación.
8. Si su lavarropas viejo estuviese en desuso recomendamos que retire la
puerta del mismo de modo de evitar peligro a los chicos.
9. No opere la unidad en presencia de gases explosivos.
10. No uitilce esta unidad para lavar ropa que haya sido sumergida, salpic-
ada o lavada con gasolina, solventes o cualquier otra sustancia inflamable que pueda reaccionar y explotar.
11. Ropas o trapos utilizados en la limpieza de materiales inflamables o
explosivos no podrán lavarse en esta unidad a menos que no queden
restos de dichas sustancias.
12. No agregue ni mezcle ninguna sustancia inflamable al lavado.
13. No quiera remover la ropa mientras el tambor del lavarropa esté giran-
do. Permita uns segundos para que se detenga completamente.
14. La puerta de carga del lavarropa debe estar cerrada cuando el tambor
esté centrifugando.
15. No opere la unidad en caso de que falte o esté rota una pieza.
16. No utilice esta unidad con fines comerciales.
17. No utilice esta unidad a menos que todos los paneles e instrumentos se
encuentren en su lugar.
47
Page 49

Español
18. No forcejee los controles.
19. Para reducir riesgos impida que los niños jueguen sobre o cerca de la
unidad. Es necesario mantener una estricta supervisión cuando estén
chicos cerca.
20. Esta unidad debe ser conectada debidamente a la toma de energía cor-
respondiente.
21. La unidad debe conectarse correctamente a tierra de modo de evitar
shocks eléctricos. No corte o retire el cable de conexión a tierra, en caso
de no tener la toma adecuada para una enchufe de tres patas llame a
un técnico calificado para que realice la conexión apropiada.
22. Gas hidrógeno puede producirse en el caso de que el calentador de
agua no haya sido utilizado por más de dos semanas. Esto puede ser
explosivo sólo bajo ciertas circunstancias. Preferible, abra todas las
canillas de agua caliente y deje correr el agua por unos minutos antes
de utlizar la unidad. Esto permitirá que el gas atrapado escape. Evite
accidentes durante este proceso absteniéndose a encender cualquier
electrodoméstico, fósforos, encendedores y llamas.
GUARDE ESTAS INSTRUCCIONES
para futuro uso
Gracias por comprar nuestro
producto HAIER. Este manual
práctico le facilitará utilizar el
lavarropas al máximo de eficiencia.
Recuerde grabar el modelo y
número de serie que se encuentran
en la etiqueta en la parte trasera de
la unidad.
Número de modelo
Número de serie
Fecha de compra
Guarde la factura de compra junto con el manual. Será necesaria para
hacer uso de la garantía.
PELIGRO
Antes de deshacerse de su lavarropas anterior retire la
puerta del mismo de modo de no correr el riesgo de que
algun niño quede atrapado dentro.
48
Page 50

Indice
PAGINA
Instrucciones De Seguridad....................................................47-48
INSTRUCCIONES DE OPERACION ................................................50
Partes Y Características ........................................................................50
Operacion ....................................................................................51-52
Sonidos Normales de la Operación ......................................................59
Filtro ..................................................................................................60
Traba de seguridad ..............................................................................60
Guía de cuidados y mantenimiento ..........................................61
Limpieza y mantenimiento ....................................................................61
Vacaciones y translados ......................................................................62
Guarda de el lavarropas ......................................................................62
Guía De Problemas........................................................................63
INSTRUCCIONES DE INSTALCION ................................................65
Herramientas y materiales necesarios ....................................................65
Desempacando el lavarropas................................................................66
Nivelando la unidad ............................................................................66
Pasos para la instalación......................................................................67
Conexiones eléctricas....................................................................69
Instrucciones de conexión a tierra ........................................................69
Interrupciones de energía ....................................................................69
Garantía ..........................................................................................70
Español
49
Page 51

Panel de control
1. Dispenser de Suavizante líquido
2. Tubo interno
3. Dispenser de blanqueador líquido
4. Agitador
5. Panel de control
5
1
2
3
4
INSTRUCCIONES DE OPERACIÓN
Partes y Características
Español
50
Page 52

Operaciones
Comienzo diferido
• Cuando la unidad no está activada se ve en la pantalla el tiempo restante del
ciclo de lavado.
• Cuando se selecciona la opción de comienzo diferido la luz indicadorá mostrará
un tiempo mínimo de 2 horas de espera. Presione el botón una vez más por cada
hora adicional que usted desee agregar hasta 24hs.
Ciclos
• Normal - Para lavados regulares
• Pesado - Para cargas más pesadas, gruesas o con mayor suciedad
• Algodón - Para laver prendas de algodón
• Rápido - Para lavado rápido de prendas poco sucias
• Delicado - Para el lavado de fibras delicadas
• Maual - Para tener el efecto de lavado a mano en las prendas.
Nivel de manchas
• Para lavado rápido.
• El ciclo de lavado se incrementa en 2 minutos a medida que aumenta el nivel de
manchas
Tamaño de carga
• Los niveles de agua deben establecerse al comienzo del lavado o durante una
pausa del ciclo
• Durante el remojo, lavado o enjuague presione este botón para llenar de agua
manulmente la unidad. Suelte el botón para que la carga de agua se detenga. La
carga automáticamente se detiene cuando se llega al nivel máximo de agua.
Velocidad lavado/ centrigugado
• Eliga la velocidad de centrifugado cuando programado el Normal o delicado.
Nota: • Luz intermitente indica que el programa esta corriendo.
• A luz quieta indica el programa seleccionado o que el mismo
está por comenzar.
Español
51
Page 53

Encendido/ apagado
• Presione el botón una sola vez para encender la unidad.
• Si el lavarropas está en ON presione y una vez para apagar (OFF).
Comienzo/ Pausa
• Una vez encendida la unidad y seleccionado el ciclo presione este botón para
comenzar el lavado
• Mientras la unidad esté en funcionamiento presione para una pausa
• Si la unidad está en pausa presione nuevamente para continuar el lavado.
Señal de ciclo
• El volúmen de la señal puede ser ajustado: bajo- Alto- Off
Temperatura lavado/ enjuague
• Para elegir la temperatura del agua para el lavado y el enjuague
Selección del proceso
Para seleccionar el programa de lavado:
• La función de Remojo no se realiza para los ciclos de Lavado a Mano, Delicados
y Ciclo rapido.
• El indicador de nivel de agua sólo se apagará si sólo elige la función de
centrifugado.
• Una vez que elige el programa presione el botón de Selección de proceso par
atener un segundo enjuague. El lavado incluirá un segundo tiempo de enjuague.
Indicador de comienzo diferido
• Indica los minutos restante cuando el ciclo está en progreso
• Indica las horas restantes cuando el ciclo fue demorado
• Indica faltas y condiciones anormales durante el ciclo.
Español
52
Page 54

Pasos de operación
1. Presione el botón de encendido
• El lavarropas estará ahora en el ciclo normal.
• Si el botón de ´comienzo/pausa´ no es presionado en los primeron 5 minutos, la
unidad se apagará automáticamente y quedara en ´stand-by’
• El lavarropas también retornará al modo stand-by cuando el proceso haya concluído.
• Sin importar las selecciones que usted realizó cuando presiona el botón on/off la
programación se detendrá.
• Este lavarropas posee un sistema de resolución inteligente. Si la corriente fue
interrumpida desde la fuente de energía y luego la corriente reanuda, la unidad
se enciende y continúa con el ciclo de lavado.
2. Selección de ciclos
• Cuando el lavarropas es encendido se está automáticamente en el ciclo Normal.
Si usted opta por otra programación utilice la tecla de ‘selección de ciclos’ para
ajustar.
3. Seleccion de procesos
• Una vez que la unidad está encendida la misma seleccionará automáticamente el
ciclo normal, el cual inckuye: lavado, enjuague y centrifugado. Si desea otra
combinación de procesos utilice el botón de ´selección de procesos´
Nota: El centrifugado deberá realizarse luego de cierto tiempo incluso aunque no
haya agua en el tubo del lavarropas. No utilice el proceso de remojo para
ropas de lana. Las prendas que tienden a desteñir deben lavarse por
separado.
Español
53
Page 55

4. Tamaño de carga
• Luego de la selección del ciclo de lavado presione el botón de ‘tamaño de carga’
para seleccionar el nivel de carga de agua.
Nota: Vea el cuadro de abajo para la selección
5. Velocidad de lavado/ centrifugado
• Una vez encendida la unidad automáticamente se establecerá la velocidad:
Normal/rápida. Presione el botón para cambiar la selección (ver pag 5)
Selección de procesos
Nota: Siga le cuadro más abajo para seleccionar el proceso de lavado.
Proceso elegido Aplicaciones Operacion (el indicador
representa el proceso a correr)
0 Lavado, enjuague, Prendas comunes necesitan
centrifuigado lavado enjuague centrifugado
1 Lavado (el agua del Uso repetido del
lavado se en el tubo) agua del lavado
2 Lavado enjuague(agua Se utilice reiteradas veces
proceso se en el tubo) el agua del enjuague
3 Enjuague, centrifugado Cuando el enjuague y mano
centrigado necesarios lavado
4 2nd enjuague Cuando las prendas
necesitan
5 Lavado, enjuague, un segundo
2nd enjuague/centrifdo enjuague
6 Centrifugado Cuando sólo se
(luegodel drenaje) necesita centrifugar
luego (luego del drenaje)
7 Remojo, lavado, Para prendas con severa
enjuague, centrifugado suciedad o manchas,
primero quedan en remojo
0
1
2
3
/
4
5
/
Times of pressing
Process(Normal,
Heavy and Cotton
Times of pressing
Process(Quick Wash,
Delicate Casual or
Hand Wash
Nivel de agua cantidad de agua
La capacidad Nivel Cantidad de
del lavado(lbs.) de Agua Agua
17.6~22 10 About 23.6g
9 About 21.7g
13.2~17.6 8 About 19.3g
7 About 17.6g
8.8~13.2 6 About 16.0g
5 About 14.2g
4.4~8.8 4 About 12.5g
3 About 11.0g
Below 4.4 2 About 9g
1 About 7.3g
Español
54
Page 56

6. Nivel de suciedad
• Una vez encendida la unidad automáticamente se establecerá el nivel: Normal.
Presione el botón para cambiar la selección.
7. Temperatura lavado/ enjuague.
• La selección inicial es calido/frío. Presione el botón para cambiar la selección de
acuerdo a las prendas que van a lavarse.
8. Señal de ciclo
• Es baja cuando el lavarropas se enciende. Presione para ajustar.
9. Comienzo diferido
• Para que la unidad comience a operar en una hora establecida presione el botón
comienzo diferido´ y elija la hora de comienzo.
• Cuando la función está activada la pantalla indica “2”. Presione le botón tantas
veces como horas quiera demorar el comienzo del lavado, hasta 24 horas.
• Presione Comenzar para activar la función.
• Cuando se activa este programa los indicadores se apagan. Solo se indicará el
tiempo restante para que la unidad comience a funcionar. En la parte derecha
una luz indica que el proceso esta corriendo.
• Presionando la tecla ´comienzo diferido´ se podrán observar las selecciones
realizadas
• Si usted altera el programa corriente la unidad debe ser reestablecida.
10. Comiezo/pausa
• Presione este botón para que el lavarropas comience a funcionar.
• Durante la operación presione para realizar una pausa y presione nuevamente
para terminar con el proceso.
Nota: Cuando usted abrá la tapa del lavarropas durante el funcionamiento este
también se detendrá, excepto durante la carga o descarga de agua.
Español
55
Page 57

Nota: El tiempo total puede ser alterado por el tiempo de entrada o drenaje de
agua, como tambien de la presión del agua. Los programas Normal,
Pesado, Algodón pueden combinarse con el proceso de remojo, durante el
cual el lavarropas primero remoja la ropa por 20-30 minutos con una
agitación suave y luego comienza el lavado.
Cargando el Lavarropas:
• Cargue cada prenda sueltamente
• Separe las prendas blancas de las de colores. Separe las pendas pesadas de las
delicadas.
• Cuidadosamente controle todos los bolsillos para evitar que haya objetos
pequeños que puedan dañar el tubo.
• Pre-trate todas las manchas y las prendas con alta suciedad para obtener
mejores resultados.
• No sobrecargue el lavarropas
• Cuando cargue las prendas mantenga el nivel de agua lo suficientemente alto de
manera que las prendas puedas flotar fácilmente.
• Evite enrollar las prendas largas,como sábanas, alrededor del agitador.
• Cierre la tapa o puerta correctamente luego de realizada la carga. Si usted
mantiene la tapa abierta el proceso no comenzará.
Uso Adecuado del Detergente:
• Es una buena práctica de lavado agregar el detergente al agua antes de colocar
las prendas de manera de que este pueda actuar efectivamente sobre la ropa.
Nota: Usted puede usar más o menos cantidad de detergente de acuerdo al
tamaño de la carga, tipo de agua suave o pesada, si las prendas están
demasiado sucias o poco sucias.
Lista de tiempo de cada programa (minutos)
Programa Tiempo Total (min)
Remojo incluído No incluye remojo
Algodón About 75-81 About 45-51
Pesado About 77-83 About 47-53
Normal About 59-69 About 39-49
Lavado rápido About 25
Delicado About 36-42
Lavado a mano About 38-44
Español
56
Page 58

Dispenser de Suavizante:
• El dispenser de suavizante se encuentra en la parte superior del agitador.
El lavarropas expenderá autómaticamente el suavizante líquido durante el ciclo
de enjuague.
Paso para utilizar el dispenser:
1. Coloque el liquido suavizante en el dispenser de la manera recomendada por el
fabricante.
2. Agregue agua hasta el máximo nivel, pero no exceda el mismo.
Cuidado: • Nuca coloque el suavizante directamente sobre la ropa ya que puede
manchar las prendas.
• No para el lavarropas durante el primer centrifugado para evitar que
se suelte el liquido suavizante en la carga de lavado.
• No utilice otros productos como jabón en polvo en el dispenser, este
fue diseñado para ser utilizado on suavizantes líquidos.
Dispenser de suavizante
Español
57
Page 59

Blanqueador:
• El dispenser de liquido blanqueador esta ubicado en la esquina debajo
de la puerta de carga.
• Coloque la cantidad de blanqueador recomendada durante el primer
llenado.
Nota: Utilice solo blanqueadores líquidos.
Advertencia: • Tenga cuidado de no derramar blanquedor sin diluir sobre el
gabinete del lavarropas.
• Este es un químico fuerte que puede dañar el acabado de la
unidad o las prendas si no esta bien diluído.
Español
58
Page 60

Español
Sonidos de la Operación Normal
Los siguientes sonidos son normales al
funcionamiento del lavarropas:
• Temblores: esto es normal ya que las prendas pesadas son contínuamente revultas dentro del tubo del lavarropas
• Corriente de aire: cuando el tubo centrifuga a alta velocidad.
• Lavado y secado que se enciende y detiene pueden generar “clicks”.
59
Page 61

Filtro
• El filtro de suciedad debe ser utilizado durante el lavado
• Este debe ser lavado luego de cada utilización.
1. Retire el filtro, levante el filtro del agitaador
2. Remueva las pelusas del filtro: presione el clip con el pulgar y presione hacia
abajo como se muestra en la figura debajo. Retire los restos del filtro.
3. Instale el filtro nuevamente: luego de la limpieza coloque nuevamente el filtro en
su lugar.
Traba de Seguridad
• Si por alguna razón usted abre la tapa del lavarropas durante el ciclo
de lavado el lavarropas se detendrá automaticamente. Una vez que
cierra la tapa se reanuda el proceso.
Español
60
Page 62

Español
Cuidado: Siempre desenchufe la unidad antes de la limpieza. Ignorar esta adver-
tencia puede generar daños o lesiones físicas. Antes de utilizar productos de limpieza siempre lea als instrucciones dadas por el fabricante
para evitar daños a la unidad o lesiones físicas.
Limpieza y Mantenimiento
• Utilice solo un paño suave y húmedo para limpiar el panel de control
• Para evitar cualquier daño al acabado del gabinete limpie o repase el
mismo lo necesario. Si se derrama liquido suavizante o blanqueador
sobre el gabinete repase y limpie de inmediato.
• No utilice químicos, limpiadores abrasivos, amoníaco, cloro, detergentes
concentrados, solventes o esponjas de metal. Algunos de estos químicos
pueden ser corrosivos y decolorar la unidad.
• Retire los objetos u otros elementos puntudos para prevenir rayaduras
en el interior.
• Deje la tapa del lavarropas abierta luego del lavado para que el interior seque y asi prevenir olores fuertes.
Guía de Cuidado y Limpieza
61
Page 63

Vacaciones y Traslados
• Cierre las conexiones de agua y desconecte las mangueras. Drene el agua de
todas las mangueras, para prevenir que goteen o que se hechen a perder.
• Desconecte el enchufe eléctrico.
• Seque el tubo interno del lavarropas, si va a mover la unidad desconecte la
manguera de desagüe.
• Gire los pies niveladores
• Mueva y guarde la unidad siempre en forma vertical.
• Para prevenir humedad deje la tapa del lavarropas abierta.
Guardado del lavarropas en ambientes fríos
• El lavarropas debe guardarse en un lugar a temperatura ambiente
• Si usted recibe el lavarropas cuando la temperatura exterior esta por debajo de
los 0 grados C permita que la unidad llegue a temperatura ambiente antes de
operar.
• No opere cuando la temperatura sea menor a 0 grados c
Español
62
Page 64

Español
El lavarropas no funciona:
• Verifique que la unidad esté enchufada. El enchufe puede haberse aflojado.
• Controle si la toma de corriente es del voltage apropiado
• Controle que haya corriente eléctrica
• Verifique que el lavarropas no este sobrecargado. De ese modo cargue
nuevamente y distribuya las prendas más equilibradamente.
• Controle que la tapa esté cerrada correctamente.
• El proceso de lavado esta en pausa. Esto es normal para los ciclos de
lavado delicado y lavado a mano los cuales tiene un tiempo muy
reducido de remojo. Usted no escuchara la operatoria por un período
corto de tiempo hasta que el remojo se acabe.
Problemas con el agua:
• No carga la suficiente agua: Controle que la canilla de agua este
abierta del todo. La manguera de agua puede estar inclinada o
enroscada, enderécela. Controle el nivel de agua seleccionado, usted
puede reajustarlo. Esto causará una pequeña demora en el programa
antes de cargar el agua.
• La temperatura del agua es incorrecta controle el calentador del agua,.
El agua caliente debe estar a una temperatura de por lo menos 120140 F (49-60C). Controle que las mangueras de entrada de agua esten
conectadas correctamente.
• Goteo de agua: Este puede ser resultado de la inadecuada instalación
de la manguera de desagüe o la de llenado. El desagüe de su casa
puede estar atascado. Necesitará ajustar la manguera, controlar la
plomería o llamar a un plomero. También pueden presentarse goteras si
el lavarropas estuviese muy lleno o si se ha utilizado mucho detergente
o jabón.
• El agua no drena: Es el resultado de la inadecuada instalación de la
manguera de desagüe. Ajuste la conexión dela manguera, controle la
posición de la misma.
Problemas Frecuentes
63
Page 65

El lavarropas hace ruidos:
• La unidad puede requerir una nueva instalación y nivelación. Lea la sección de instalación.
• La carga del lavarropas necesita balancearse.
• Monedas, botones u otros objetos pesados puedan estar ocasionando
ruido. Lea la sección de sonidos comunes de la operatoria.
• Un chirrido puede generarse debido a una sobrecarga en el tambor.
• Las vibraciones se atribuyen a una nivelación impropia o a una mala
distribución de las prendas en el interior.
Problemas con las ropa:
• Las prendas han sido mal acomodadas o la máquina ha estado sobrecargada. No mezcle prendas pesadas como ropa de trabajo con prendas livianas como blusas, remeras y demás ropa delicada. Las prendas
tienen residuos de detergente o jabón:
• El jabón puede no estar disolviéndose en el agua. Controle la temperatura del agua o agregue el detergente o jabón a medida que el lavarropas se esté llenando (antes de acomodar la ropa). Recomendamos
detergentes líquidos.
• Las prendas tienen manchas: es debido al uso incorrecto del
suavizante. Lea las instrucciones dadas por el fabricante.
• Las prendas estan amarillentas: es necesario utilizar mas cantidad de
detergente en las cargas. La prendas están rasgadas o con agujeros:
• Se debe a que objetos pequeños como clips o hebillas han entrado con
la ropa. Debe asegurarse de retirar todos los elementos pequeños
filosos, puntudos como hebillas de cinturones, cierres, etc. Acuérdese
también de no utilizar blanqueadores no diluídos.
Nota:
Códigos de er
ror Razón
E0 Tapa superior no cerrada durante el comienzo
E1 Obstrucción en la manguiera de salida de agua
E2 Tapa no cerrada durante la operatoria
Español
64
Page 66

Español
INSTRUCCIONES DE INSTALACIÓN
Herramientas y materiales necesarios
Usted necesita las siguientes herramientas
para la instalación del lavarropas:
• Pinzas
• Llave
• Cinta de medición
• Guantes
• Nivelador
Accesorios Quantity
1. Manguera de fría/caliente 2
2. Soportes de manguera 1
3. Ganchos de manguerap 1
4. Manguera de drenaje 1
5. Arandelas manguera entrada 4
1
2
3
4
5
65
Page 67

Desempacando el Lavarropas
• Retire todos los elementos del packaging. Incluyendo la base de telgopory todas las cintas adhesivas que sujetan los accesorios dentro y fuera
de la unidad.
• Abra la tapa superior y retire el protector plástico del tambor. Nota:
guarde el brazo del tambor para posterior utilización cuando translade
la unidad
• Inspeccione y retire todos los elementos del embalaje, incluyendo cintas
o materiales impresos.
Nivelando el Lavarropas
• Su lavarropas posee 4 pies niveladores los cuales se encuentran en las
cuatro esquinas inferiores de la unidad. Luego de instalado el lavarropas usted puede nivelarlo.
• Los pies niveladores pueden ajustarse girando en dirección a las agujas
del reloj para bajas la unidad o en dirección contraria para levantar.
Cuidado: Es importante nivel el lavarropas para evitar vibraciones.
Español
66
Page 68

Español
Pasos Para la Instalación
• Eliga el lugar adecuado para instalar el lavarropas, en una superficie resistente,
lejos de la luz directa del sol o cualquier fuente de calor, como radiadores, artefactos de cocina, etc.. Cualquier desnivel del piso debe ser corregido utilizando
los pies niveladores ubicados en las esquinas inferiores de la unidad. Usted no
debe colocar la unidad en ambientes con temperatura menor a 0 grados C.
Instalando el lavarropas:
Lea las instrucciones de instalación previamente.
Precaucion: Si luego de completados estos pasos usted tiene dudas de si la
unidad ha quedado instalada correctamente contáctese con un técnico especializado. Para asegurarse de una adecuada instalación es
conveniente que un técnico realice la misma.
1. Inserte una arandela nueva en cada extremo de la manguera de
entrada de agua . Firmemente inserte coloque las arandelas en el
acople.
Nota: Usted puede utilizar las pinzas para ajustar las conexiones de la manguera.
No ajuste demasiada ya que puede dañar las conexiones.
2. Conecte las mangueras de entrada de agua fría y caliente a las
canillas correspondientes.
67
Page 69

3. Conecte el otro extremo de la manguera a la unidad.
Nota: El agua caliente debe estar a una temperatura mínima de 120 F-140F. (49
C- 60 c) para que el jabón disuelva y evitar que queden residuos en las
prendas.
4. Utilizando el grancho para la manguera de drenaje ajuste la misma a
la unidad como se muestra en la figura. Instale el sopore de la
manguera de drenaje al tubo de salida.
5. Enchufe la unidad a una toma de 115 volt/ 60 hz 15 amp.
Español
68
Page 70

Español
Instrucciones de Cableado a Tierra
Este artefacto debe ser conectado a tierra, en el caso de un cortocircuito la conexión a tierra reduce el riesgo de shock eléctrico proveyendo un cable de escape de
la energía. Esta unidad está equipada con un cable con conexión a tierra y debe
ser conectado a una toma de corriente adecuada.
• El uso inadecuado del cable puede resultar en shock eléctrico.
• Consulte a un técnico calificado o persona de servicio si las instrucciones
de conexion a tierra no son entendidas por completo.
Requerimientos de la Instalación Eléctrica:
• Este electrodoméstico debe estar conectado a un tomacorriente
CONECTADO A TIERRA de al menos 15 A, 115-120 V y 60 Hz.
Nota: Donde se encuentra un
tomacorriente bifásico, es
responsabilidad y obligación
del consumidor reemplazarlo
por un tomacorriente trifásico,
con una conexión apropiada
a tierra.
Cables de Extensión:
No se recomienda el uso de cables de extensión.
Interrupciones de energía
ß Ocasionalmente pueden ocurrir cortes de energía debido a tormentas u otras
causas. Desenchufe cuando esto ocurra. Cuando la corriente se reestablezca
enchufe el cable nuevamente. Si el corte de corriente fuese por un período de tiempo prolongado limpie la unidad antes de volver a enchufar.
Conexiones Electricas
X
69
Page 71

Garantia Limitada
Garantía de 1 año completa
Por 12 meses desde el día en que el producto
fue comprado, Haier reparará o reemplazará
cualquier de las partes, libre de cargos
incluyendo la labor, que estuviese defectuosa
en el material o funcionamiento
Garantía limitada
Luego de un año de la fecha original de
compra, Haier reemplazará cualquier parte
sin costo alguno, como se indica más abajo,
que estuviera defectuosa en el material o funcionamiento. Haier se hará responsable solamente del costo de la parte. Costos por labor,
translado, etc. Serán responsabilidad del
dueño de la unidad.
Segundo año
Haier proveerá todas las partes.
Tercer a quinto año
Haier proveera el ensamblaje de transmisión
Haier proveerá el gabinete de ensamble.
Tercer a décimo año
Haier proveerá el tubo externo y accesorios
externos relativos al tubo que no funcionen.
En adelante
Haier proveera el tubo de acero inoxidable
NOTA: Reemplazaremos cualquier parte
mecánica o eléctrica que se compruebe como
defectuosa en el funcionamiento normal
Excepciones: Garantía de uso
comercial
90 días labor desde la fecha original de
compra
90 días partes desde la fecha original de
compra
no aplica ninguna otra garantía.
Para el uso de los servicios de la
garantía
Contacte su service autorizado más cercano.
Para averiguar el nombre del service mas
cercano llame al 1-877-337-3639
Antes de llamar, por favor, disponga
de la siguiente información:
Número de modelo y número de serie de la
unidad (ubicado en la esquina izquierda de
la parte trasera de la unidad)
Nombre y dirección del local donde adquirió
la unidad y la fecha de compra.
Descripción del problema
Prueba de compra de la unidad (factura)
ESTA GARANTI A CUBRE EN LOS
EEUU, PUERTO RICO Y CANADA. NO
CUBRE LO SIGUIENTE:
Reparaciones en el circuito de electricidad,
fusibles, cableado o plomería.
Producto cuyo numero de serie fue modificado o alterado
Cualquier cargo no identificados como normales por causa horario o area de servicio
Daño a prendas
Daños causados por el tranlado
Daños por instalación impropia
Daños por desuso, abuso, accidente,
alteración o falta de cuidado y mantenimiento adecuado.
Daños ocasionados por reparaciones de personal no perteneciente a algún service autorizado.
Daños resultante por modificaciones,
alteración del producto u otro ajuste no
autorizado por Haier
Mangueras, perillas, bandejas y accesorios
desechables.
Labor, cargos de translado, envio de partes
luego de los 12 meses iniciales
Daños por otro uso que no sea el doméstico.
Transporte y embarque
Labor (luego de los primeros 12 meses)
ESTA GARANTIA LIMITADA ESTA DADA EN
LUGAR DE CUALQUIER OTRA GARANTIA.
Las soluciones dadas por esta garantía son
exclusivas y otorgadas en lugar de cualquier
otra solución. Esta garantía no cubre daños
incidentales o secundarios, de modo que las
limitaciones precendentes no lo alcanzan a
usted. Algunos Estados no permiten las limitaciones de tiempo de una garantía implícita, de modo que las limitaciones anteriores
pueden no aplicarse en su caso.
Haier America
New York, NY 10018
Español
70
Page 72

ESL-T21-02
Issued: April-04
IMPORTANT
Do Not Return This Product To The Store
If you have a problem with this product, please contact the "Haier Customer
Satisfaction Center" at 1-877-337-3639.
DATED PROOF OF PURCHASE REQUIRED FOR WARRANTY SERVICE
IMPORTANT
Ne pas Réexpédier ce Produit au Magasin
Pour tout problème concernant ce produit, veuillez contacter le service des
consommateurs ‘Haier Customer Satisfaction Center’ au 1-877-337-3639.
UNE PREUVE D’ACHAT DATEE EST REQUISE POUR BENEFICIER DE LA GARANTIE.
IMPORTANTE
No regrese este producto a la tienda
Si tiene algún problema con este producto, por favor contacte el "Centro de Servicio al
Consumidor de Haier" al 1-877-337-3639 (Válido solo en E.U.A).
NECESITA UNA PRUEBA DE COMPRA FECHADA PARA EL SERVICIO DE LA GARANTIA
115 V, 60 Hz
Made in China
Fabriqué en Chine
Hecho en China
Haier America
New York, NY 10018
Printed in China
Part #WD-9999-17
 Loading...