


What The World Comes Home To
TM
ESD200-MANUAL 1/10/03 11:29 AM Page 2
®
Built-in Dishwasher
Lave-Vaisselle
User Manual-
Guide de l'Utilisateur-
Manual del Usuario-
Encastrable
Lavaplatos
Empotrable
Model #
Modèle #
ESD200
Modelo #

ESD200-MANUAL 1/10/03 11:29 AM Page 3
English
IMPORTANT SAFETY INSTRUCTIONS
Warning – To reduce the risk of fire, electric shock, or injury
to persons when using your appliance, follow basic
precautions, including the following:
1. Read all instructions before using the appliance.
2. Use this appliance only for its intended purpose as described in this use and
care guide.
3. Use only automatic dishwashing detergent and rinse agent recommended for
use in this appliance and keep them out of the reach of children because they
are corrosive and can be harmful.
4. This appliance must be properly installed in accordance with the installation
instructions before it is used.
5. Never unplug your appliance by pulling on the power cord. Always grasp the
plug firmly and pull straight out from the outlet.
6. Replace immediately worn power cords, loose plugs/power outlets.
7. Unplug your appliance before cleaning or before making any repairs.
8. Do not open the dishwasher door immediately after completion of wash process
or during the operation as hot air/steam may cause personal injury. Press the
door latch, wait few seconds by allowing cold air to go in and then open the
door.
9. Do not operate your appliance in the presence of explosive fumes.
10. Do not add or mix any flammable or explosive substances to the wash.
11. Appliance loading door must be closed during the operation of the machine.
12. Do not operate your appliance when parts are missing or broken.
13. Do not use this appliance for commercial dishwashing purpose.
14. Do not operate this appliance unless all enclosure panels are properly in place.
15. Do not tamper with controls.
16. To reduce risk of injury do not allow children to play in or on the appliance.
Close supervision of children is necessary when the appliance is used
near children.
17. This appliance must be connected to proper electrical outlet with the correct
electrical supply.
18. Proper grounding must be ensured to reduce the risk of shock and fire. DO
NOT CUT OR REMOVE THE GROUNDING PLUG. If you do not have a
three-prong electric receptacle outlet in the wall, have a certified electrician
install the proper receptacle. The wall receptacle MUST be properly grounded.
1

ESD200-MANUAL 1/10/03 11:29 AM Page 4
19. Hydrogen gas may be produced if the water heater has not been used in more
then 2 weeks. This could be explosive and can explode under certain
circumstances. If this is the case, turn on all the hot faucets and let the hot water
run for a few minutes before using this appliance. This will let the trapped
hydrogen escape. To avoid an accident, as hydrogen gas is flammable and can
explode, do not turn on an electric appliance, smoke, light a match/lighter or
use a flame.
20. Do not repair or replace any part of the appliance or attempt any servicing
unless specifically recommended in the user-repair instructions that you
understand and have skills to carry out.
21. To reduce the risk of electric shock or fire, do not use extension cords or
adapters to connect the unit to electrical power source.
22. Do not wash any heat sensitive or any other items that are not designed for
automatic dishwasher. Items not dishwasher safe could become deformed or melt
and create a potential fire hazard.
23. Do not use this dishwasher outdoors.
24. Do not leave the dishwasher door open to dry dishware while children are
around the counter top. Close supervision and observation needed when
children are around the dishwasher.
25. Do not abuse, sit on or stand on the door or dish rack of the dishwasher.
English
26. Do not touch the heating element during or immediately after use, as it may be
very hot.
27. Load sharp objects such as knives and forks upside down to reduce the risk of
cut type injuries.
28. Do not wash plastic items unless they are marked dishwasher safe. Check the
manufacturer’s recommendations for items not marked.
29. Do not load sharp items near the door; you could damage the door seal.
30. When removing an old dishwasher from service or discarding it, remove the
front door.
31. Disconnect electrical power and water inlet hose to dishwasher before servicing.
SAVE THESE INSTRUCTIONS
2

ESD200-MANUAL 1/10/03 11:29 AM Page 5
English
Table Of Contents
SAFETY INSTRUCTIONS ....................................................................1-2
Knowing Your Dishwasher ............................................................4-6
Using Your Dishwasher ................................................................7-20
Understanding The Filtration System ............................................21
Dishwasher Safe or Hand Wash ..............................................22-24
Care & Cleaning Of Your Dishwasher............................................25
Troubleshooting............................................................................26-29
Warranty..............................................................................................30
PAGE
Thank you for purchasing our Haier
product. This easy-to-use manual will
guide you in getting the best use of
your dishwasher.
Remember to record the model and
serial number. They are labeled on
the back of the dishwasher.
Staple your receipt to your manual. You will need it to obtain
warranty service.
All figures in this use & care manual are for illustration purposes only. The
illustrated parts shown in figures may be different on the actual unit.
Specifications and features are subject to change without prior notice.
3
Model number
Serial number
Date of purchase

ESD200-MANUAL 1/10/03 11:29 AM Page 6
Knowing Your Dishwasher
Parts and Features
(Front View with Open Door)
English
13
12
11
10
1
2
3
4
5
6
7
9
8
1. Upper Sprayer
2. Deluxe 2 Position Adjustable Upper
Rack with Stemware Holders
3. Middle Spray Arm
4. Pressure Relief Valves (One located
at the upper left corner) (not shown)
5. Lower Rack
6. Removable Split Silverware Basket
7. Convection Fan Intake
8. Rinse Aid Compartment
9. Pre-Wash Detergent Compartment
10. Main Wash Detergent Compartment
11. Triple Filtration System (Located at
the bottom under Lower Rack)
12. Heating Element (Located at rear
and under lower rack)
13. Lower Spray Arm
4
ESD200-MANUAL 1/10/03 11:29 AM Page 7
English
(Front View with Door Closed)
3
2
1
4
5
6
8
7
10
11
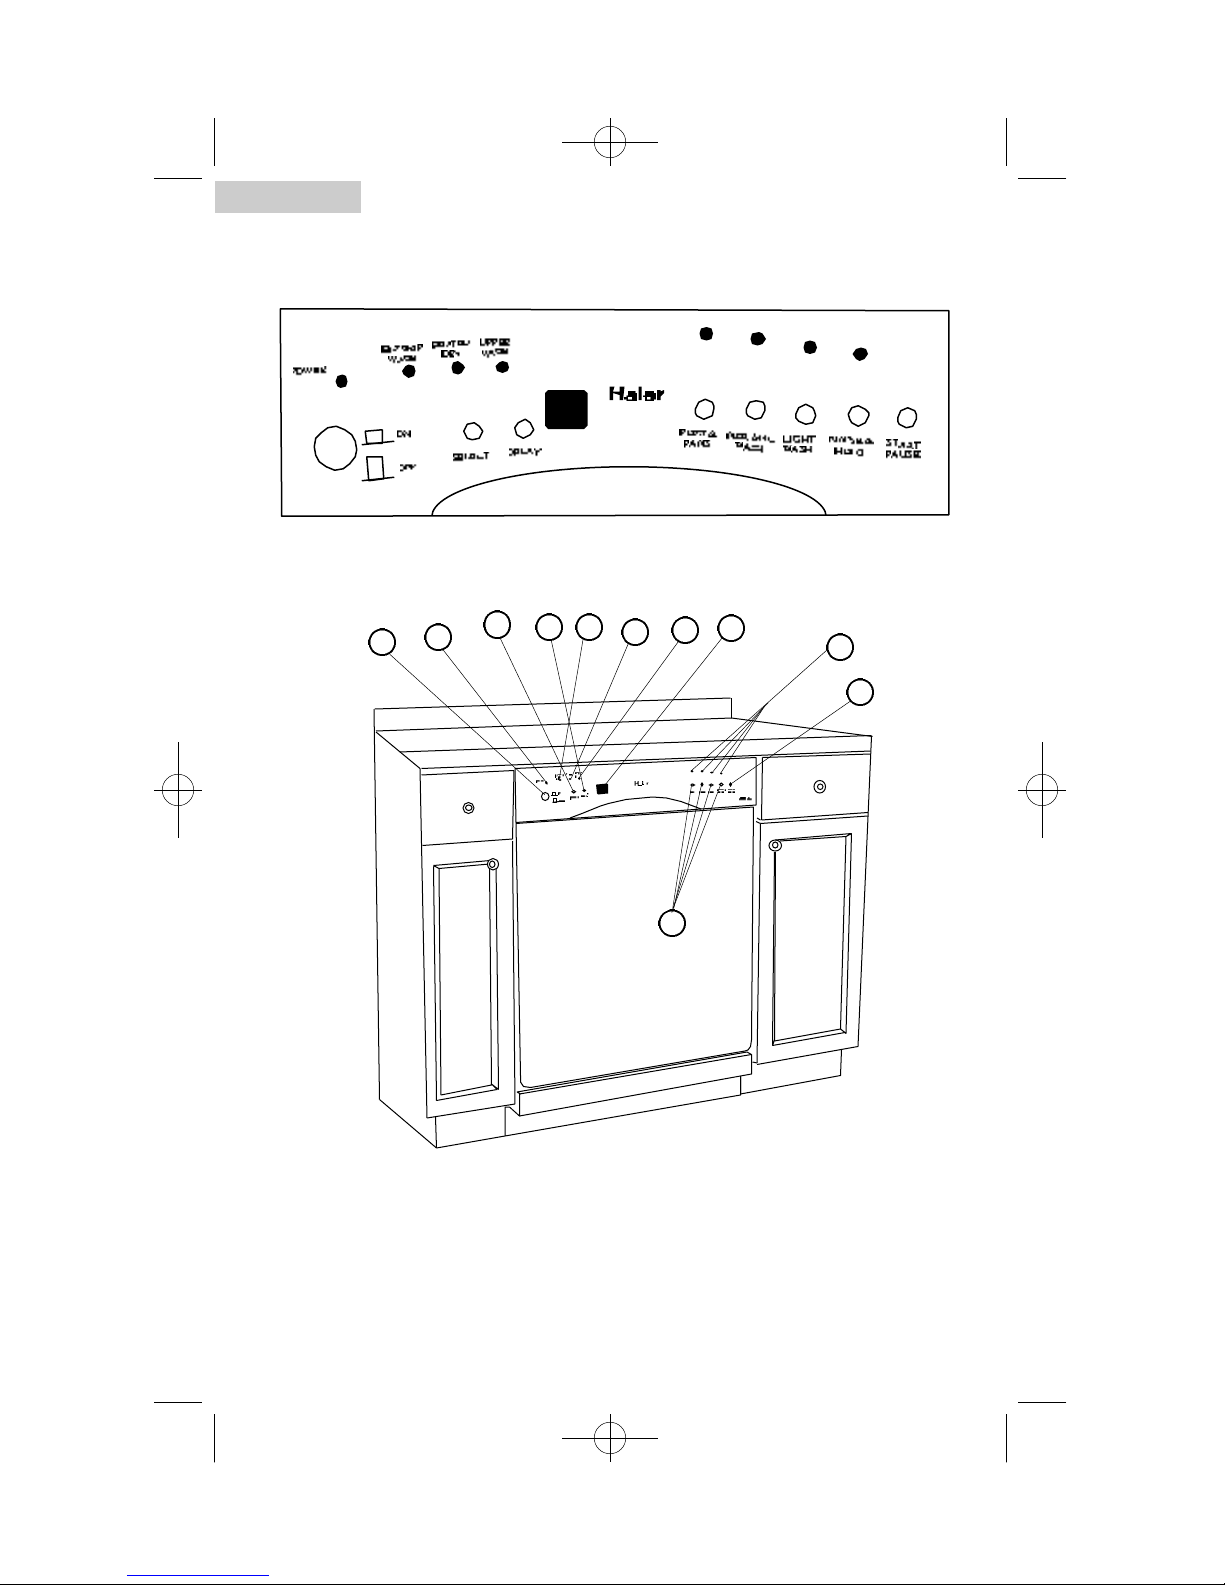
1. Power Button
2. Power Indicator Light
3. Select Button
4. Delay Button
5. High-Temp Wash Indicator Light
6. Heated Dry Indicator Light
5
9
7. Upper Wash Indicator Light
8. Time Delay Display
9. Wash Programs Button
10.Wash Programs Indicator Lights
11.Start/Pause Button

ESD200-MANUAL 1/10/03 11:29 AM Page 8
(Rear View)
English
5
4
1
2
3
1. Drain Hose (Factory Attached)
2. Electrical Connection Junction Box
(120v/60Hz - Plug not Included)
3. Rear Leveling Legs
4. Water Inlet
5. Rear Insulation Panel
6

ESD200-MANUAL 1/10/03 11:29 AM Page 9
English
Using Your Dishwasher
Understanding the Dishwasher Control Panel:
Power Button:
• Press "POWER" button "In" to turn the power "ON".
• Press this button again to turn the power "OFF".
Note: You will see the "Power On Indicator Light" lit when the unit is on.
Select Button:
• Press "SELECT" button to select your desired option: Hi-Temp
Wash, Heated Dry or Upper Wash. Selected option(s) indicator
light(s) will be blinking at the start of the wash program.
Delay Button:
• Press "DELAY" button if you want to delay the starting time for a
wash program. You can delay the starting time for a wash
program from 1-9 hours.
Time Delay Display (LCD):
• The timer display which is located next to the delay button shows the number of
hours the starting time for a wash program is delayed. Once the delay timer is
set, the set time will start blinking in the LCD.
Door Latch:
• To lock the door, push the door with light
force until you hear the “Click.”
• To unlock the door, squeeze the door latch
and pull towards you.
Note: DO NOT open the dishwasher door right away because the moist hot air
still may be present inside the tub and cause harm.
Wash Program Buttons:
• There are four wash programs that you can
select from: Pots & Pans, Normal Wash, Light
Wash, and Rinse & Hold. Simply press wash program button based on the load
and soil type. The selected wash program indicator light will be blinking at the
start of the wash program.
7

ESD200-MANUAL 1/10/03 11:29 AM Page 10
Start/Pause Button:
• After selecting your desired wash program and its option, press
this button once to start the wash process. Pressing this button
once more during the wash process will “Pause” the activity.
Note: At the start of the wash program, the selected wash program and option(s)
indicator light(s) will start blinking. When the wash process is paused, the
selected wash program and option(s) indicator light(s) will remain
unblinking.
Selecting Wash Program:
• Select the appropriate program based on the load and soil level. For your
convenience, the dishwasher has Pots & Pans, Normal, Light and Rinse & Hold
wash programs that you can select from.
Pots & Pans Wash:
English
• This program is used for heavily soiled pots & pans, cookware, dishware, silverware and glassware items with dried-on or baked-on soils.
Note: This program will not remove burned-on foods.
Normal Wash:
• This program is used for medium or heavily soiled dishware, glassware and
silverware.
Light Wash:
• This program is used for lightly soiled glassware, chinaware, pre-rinsed dishes
and silverware.
Rinse & Hold:
• This program is used for rinsing partial loads that will be washed later.
Note: DO NOT use detergent with this program.
8

ESD200-MANUAL 1/10/03 11:29 AM Page 11
English
Selecting Wash Options:
For your convenience, there are three wash options available for
the wash programs: Hi-Temp Wash, Heated Dry and Upper Wash.
“SELECT” button allows you to select your desire options.
Hi-Temp Wash Option:
• This option is used only with the “POTS & PANS” wash cycle.
Note: This option is not available with “NORMAL, LIGHT and RINSE & HOLD wash
programs.
Note: When this option is selected, water temperature boosts up between
161˚F – 167˚F. “HI-TEMP WASH” temperature helps to kill bacteria, dissolve
detergents, remove sticky and greasy substances off the dishware.
Note: Due to any interruption during the wash and rinse program or low incoming
water temperature, proper water heating temperature can not be achieved
and therefore the “HI-TEMP WASH” (heating temperature) conditions may be
affected.
Heated Dry Option:
• When this option is selected, both the heater and convection fan turn on
automatically for fast drying purposes.This option can be used with
“POTS & PANS, NORMAL and LIGHT” wash programs.
Note: This option is not available with the “RINSE & HOLD” program.
Using Delay Start Option:
Follow the steps below to delay start a wash program.
1) Press the "POWER" button to turn the unit "ON".
2) Press the "DELAY" button to select the amount of time that the wash program is
delayed. For your convenience, you can select between 1 to 9 hours to delay the
wash process.
3) Select your desired wash program and option(s).
Note: Some restrictions may apply when selecting wash option(s) with wash
programs. Read "Wash Option Selecting Procedure" section on page
numbers 10-11 for more details.
Note: If you are not satisfied with the wash program and wash option(s) that you
have selected, simply press the "POWER" button to turn off the unit. To
reselect new wash program and option(s), press "POWER" button again to
turn the unit "ON". Reselect the new wash program and wash option(s).
9

ESD200-MANUAL 1/10/03 11:29 AM Page 12
4) Press the "START/PAUSE" button to start the timer. At this time, all the selected:
Wash Program, Wash Option(s) and Delay Time Display with selected "Hours"
lights will blink. The wash process will begin automatically after an hourly delay
countdown.
Note: At the end of the wash program the machine will beep for few times to
indicate that the wash process has been completed. All the lights except for
the power indicator light will turn off
5) Remove all washed items and reload if you would like to start a new wash process
or press the "POWER" button to turn the unit "OFF" at the end of wash process.
Once the unit is in the "OFF" position, the power indicator light shuts off.
Understanding the Convection Fan Dry Process:
• The convection fan activates automatically after each wash program to start the
drying cycle. During the drying process the fan removes hot moist air to
condensation chamber. The condensed hot moist air cools down ito form water and
is exhausted through the drainpipe.
• With this type of exhaust design in your dishwasher, there is no need to worry
about your cabinets getting damaged, unlike other conventional dishwashers with a
front vent opening to exhaust hot moist air which may easily spread around the
cabinets and cause damage.
English
Upper Wash Option:
This option can be used with ALL wash programs.
Note: You can select this option when you want to wash small load of dishware
and glassware. You must load items in the “UPPER RACK ONLY.” The lower
rack must be completely empty when using this option. During the wash
process, the water flow from the upper sprayer is concentrated only on the
wash load in the upper rack.
Note: You must use “ONE HALF” the amount of detergent that you would normally
use for full a load. This option saves detergent, water and energy. Follow the
steps below to select the wash option for each program.
WASH OPTION SELECTING PROCEDURE
Pots & Pan Wash
Selected Wash Option(s) Type Procedure
Hi-Temp Wash Press SELECT button 1 time
Heated Dry Press SELECT button 2 times
Upper Wash Press SELECT button 3 times
Hi-Temp Wash & Heated Dry Press SELECT button 4 times
Hi-Temp Wash &Upper Wash Press SELECT button 5 times
Heated Dry & Upper Wash Press SELECT button 6 times
Hi-Temp Wash, Heated Dry & Upper Wash Press SELECT button 7 times
10

ESD200-MANUAL 1/10/03 11:29 AM Page 13
English
Normal Wash
Selected wash Option(s) Type Procedure
Heated dry Press SELECT button 1 time
Upper Wash Press SELECT button 2 times
Heated Dry & Upper Wash Press SELECT button 3 times
Note: Hi-Temp Wash option is not available under Normal Wash.
Light Wash
Selected Wash Option(s) Type Procedure
Heated Dry Press SELECT button 1 time
Upper Wash Press SELECT button 2 times
Heated Dry & Upper Wash Press SELECT button 3 times
Note: Hi-Temp Wash option is not available under Light Wash.
Rinse & Hold
Selected Wash Option(s) Type Procedure
Upper Wash Press SELECT button 1 Time
Note: Hi-Temp Wash &Heated Dry options are not available under Rinse & Hold.
Check List for Wash Process:
1) Make sure all items are loaded in the racks and silverware basket properly.
Note: Do not load tall dishware or cookware items near the middle spray arm
because it may block the spray arm from rotating.
2) Pour the proper detergent into the detergent dispenser.
Note: If rinse aid compartment is empty, add “Rinse Aid” agent at this time.
3) Close the door and latch properly.
4) Turn on the power button.
5) Select your desired wash program and option(s) based on the load and soil type.
6) Press the “START/PAUSE” button once to start the wash process. Press this button
once again if you want to “Pause” the activity during the wash process in order
to add or remove items.
Note: Selected wash program and option(s) blinking light(s) will indicate that the
wash process has begun and is running. When paused, the selected wash
program and option(s) light(s) will be still. This indicates that wash
process is paused.
11

ESD200-MANUAL 1/10/03 11:29 AM Page 14
7) At the end of the wash program, the machine will beep a few times to indicate
that the wash process has finished. Simply shut off the unit by pressing the
“POWER” button.
Note: DO NOT open the dishwasher door immediately because the moist hot
air remaining inside the tub may cause harm.
Warning: Keep children away from the machine when the door is
left to dry the dishware because the moist hot air is
exiting out of the door may cause harm.
Canceling or Resetting Wash Cycle
Note: The dishwasher will automatically release detergent within a few minutes
after the start of the wash program. To avoid the “release of detergent”
before you cancel or reset the wash program, you must press the
“START/PAUSE” button right away.
English
• Once you have reset to a new wash cycle, you must refill the detergent
compartment if it is open and empty because the detergent from previous wash
cycle may have already been released.
Follow the steps below to cancel or reset a wash program:
1) Press “START/PAUSE” button to pause the wash program.
2) Turn “OFF” the dishwasher power by pressing the “POWER” button to cancel the
program.
3) Turn the dishwasher back “ON” again by pressing the “POWER” button.
4) Reset by reselecting the porper wash program.
5) Reselect the proper wash option(s) with the selected wash program.
6) Press the “START/PAUSE” button to begin the wash process.
12

ESD200-MANUAL 1/10/03 11:29 AM Page 15
English
Pausing a Wash Program:
If you need to pause in the middle of the cycle to add or remove any items, follow
the steps below:
1) Press the “START/PAUSE” button to pause the wash process during the program.
When the wash process is paused, the selected wash program and option(s)
indicator light(s) will stay still.
2) Open the door by squeezing the door latch slowly.
Note: DO NOT open the door until the water spray action has stopped. Be
careful of moist hot air that may rise out of the dishwasher.
3) Add or remove items. Once you are finished adding or removing, simply close
the door properly.
4) Press “START/PAUSE” to resume the program. You will notice that the power
indicator display light turns on.
Understanding The Open Door Protection:
Your dishwasher will stop and beep automatically if the door is opened during the
operation. The dishwasher will not start and the beep will not shut off until the door
is closed again. Once the door is closed, the program will resume automatically.
Warning: The dishwasher door must be closed at all times during
the operation.
13

ESD200-MANUAL 1/10/03 11:29 AM Page 16
Preparing to wash dishes:
For best results, practice the following
before you put dishware in the dishwasher:
• Discard big chunks of food from the plate
before loading.
• Remove sticky foods and loosen
burned-on foods before loading.
• Empty liquids such as juice, soup, soda,
coffee or tea from glasses and cups
before loading.
• Rinse off acid based liquid, such as vinegar or lemon juice right a way. This may
cause discoloration over time to your plates, food containers or internal cabinet.
• Always check manufacturer’s recommendations before you start washing items.
Tips to avoid stains and films:
The following suggestions are recommended to prevent stains and films
from dishware and utensils items:
English
• You must rinse all dishware, silverware, glassware and food containers right a
way after use. Some citric based food products, coffee, tea and iron deposits in
water can cause yellow or brown film on inside surface when left on for a long
time and not rinsed immediately.
• You must check your water hardness to see whether you need to use more or less
detergent to wash. If water is extremely hard then it may be causing stains on
items. You may need to use water softener.
• Do not over load the dishwasher.
• Avoid improper loading.
• Make sure there is a proper water temperature that is recommended to
wash dishware.
• Do not use too little detergent.
• Do not use old or damp powder detergent.
• Do not load aluminum utensils improperly. Aluminum utensils can cause gray or
black marks to porcelain utensils if touching during wash cycle.
14

ESD200-MANUAL 1/10/03 11:29 AM Page 17
English
Loading the Lower & Upper Rack:
To get maximum cleaning results, follow the
recommendations below before you start
the dishwasher:
Note: Do not wash any heat sensitive or any other
items that are not designed for automatic
dishwashers.
• Keep all tall dishware and food containers away from the spray arm rotation.
• Place food containers such as cups, glasses, bowls, saucepans and casserole
dishes with soiled surface facing in the downward position.
• To avoid any type of damage to glassware such as
coffee/tea cups, beverage, wine and champagne
glasses, do not load them on the bottom rack. Place
these items on the upper rack.
• Put cups upside down on the top of the
cup/stemware rack and put wine or
champagne glasses upside down between the divided segments of the
cup/stemware rack to secure them properly.
(upper rack)
(lower rack)
• Do not load dishware or food containers that are made of wood or iron. These
items are not considered dishwasher safe.(See chart on p.22 for details.)
• Do not jam the glassware items together when loading.
• Place delicate items on the upper rack.
• Do not load tall dishware or cookware items near the middle spray arm.
• Move racks slowly in and out to avoid slamming the dishware items together.
• Make sure all dishware and glassware items are securely in place when loading
to avoid falling over or striking against each other.
15

ESD200-MANUAL 1/10/03 11:29 AM Page 18
Adjustable Upper Rack System:
The upper rack has two positions, which allows you to modify the rack system
according to your current space needs. The flexibility of the upper rack is ideal for
washing tall dishware and glassware items.
For Example: Adjusting the Rack to the Lower Position:
Allows you the flexibility to load taller wine or champagne glasses in the upper
rack. Simply remove the rack and bring it to the lower position.
For Example: Adjusting the Rack to Upper Position:
Allows you the flexibility to load tall dishes on the lower rack.
Steps to Remove the Rack
1) Open both sides of the rail guards from the upper rack.
2) Slide the rack out.
3) Place the rack to your desired position.
4) Close both sides of the rail guards so rack will not slide out.
English
16

ESD200-MANUAL 1/10/03 11:29 AM Page 19
English
Loading Split Silverware Basket:
Your dishwasher has a removable split basket with two compartments that can be
separated to give you loading flexibility in order to accommodate flatware and
lower rack capacity needs. This option saves space when only half the unit is
needed. Simply remove the basket from the
dishwasher to load silverware and place it
back once you finish loading.
Steps to Split the Silverware Basket
1) Put your right hand in right side of the
basket and your left hand in the left side
of the basket.
2) Simply slide the basket with light force to
unlock/split by pushing it forward and
pulling it towards you until you see that
both hooks come out of the elongated holes in the middle.
Note: Do not use heavy force to split the basket because this may cause
damage to plastic hooks to break off.
3) To put both halves together again, use both hands to level the split baskets and
sliding each hook into each elongated hole on both sides. Now, slide with light
force to attach/lock by pushing it forward and pulling it towards you until both
baskets snaps in easily.
• To avoid any type of injury, load knives and forks face down.
• Try to mix spoons, knives and forks for better cleaning and drying and to prevent
nesting.
• Do not mix stainless steel and silver items because you may damage the silver
finish on silver items.
• Do not load tall items next to the upper spray arm because it
may block the rotation.
• Do not load tin, pewter and non-dishware filters. These items
are not considered dishwasher safe.
17

ESD200-MANUAL 1/10/03 11:29 AM Page 20
Proper Use of Detergent:
• The amount of detergent to use depends on the type of water in your living area
whether it is hard or soft and whether items are lightly or heavily soiled.
• Water softness or hardness is measured in grains content per gallon (gpg). You
can find out the gpg level by calling your local Environmental Protection Agency
(EPA) in your county.
• If you find that the gpg level is higher in the water, then the water will be harder
in your living area. You will need more detergent to clean. If gpg level is lower,
then the water will be softer in your living area so you will need less
detergent to clean.
See the following table to understand the "water hardness type" and gpg level.
Water Hardness Type gpg
Hard 10+
Medium 4-9
Soft 0-3
English
Note: If gpg level is over 12, then water is very hard. You may need water
softener to improve the water quality and the performance of
your dishwashing.
Note: The quality of the detergent will make a big difference in the cleaning of
dishes. Detergent that is damp or too old will not be as effective to clean
because the active ingredients will be phased off. Detergent will not work
properly.
Note: Use only "Automatic Dishwasher Detergent" for your
dishwasher. Other types of detergents that are not for dishwasher use may
cause oversudsing and foaming. Do not use detergents that are dried, caked
or moist. These types of detergents will not dissolve properly and and will
clean effectively.
18

ESD200-MANUAL 1/10/03 11:29 AM Page 21
English
Pouring Dishwasher Detergent:
Use the recommended amount of detergent for your wash loads. Measure and pour
the detergent into the large compartment for the main wash. The detergent for the
pre-wash goes into the small compartment next to the main wash compartment.
Note: For the pre-wash you should use one-half the amount of detergent that you
use for the main wash.
• We recommend that you use a Rinse Agent to help remove spots and prevent
new film build-up on your dishes, glasses, flatware, cookware and plastic.
compartment door lever
main wash
prewash detergent compartment
detergent compartment
detergent compartment lid
Note: Use only a liquid form of rinse agent in the dispenser.
Pouring Liquid Rinse Agent into the Dispenser:
Use the recommended amount of rinse agent for your wash loads. The rinse agent
dispenser is located next to the detergent dispenser. During the wash cycle, it
automatically releases a preset amount of rinse agent during the last rinse cycle.
When the dispenser is full, the see through rinse agent level indicator will be dark.
When it is empty, it will be clear which means you need to pour in more.
rinse agent
level indicator
(at this time you
should refill to
eliminate spotting)
rinse agent compartment
Full
3/4 Full
1/2 Full
1/4 Full
Empty
Note: A full dispenser should last approximately one month.
If you want to adjust the amount of rinse agent dispensed, the
dispenser has 1 to 6 levels that you can adjust to. Simply rotate
the dial to your desire settings.
19

ESD200-MANUAL 1/10/03 11:29 AM Page 22
Checking Water Temperature:
• Your incoming water must be between at least 120˚F / 49˚C and at most
150˚F / 66˚C in order to clean effectively and prevent damage to your dishware.
Note: The minimum incoming temperature must be at 120˚F/49˚C in order for the
detergent to dissolve properly.
If you are unsure of the temperature of your hot water:
1. Simply open the hot water faucet and let it run for a minute and fill a glass.
2. Take a thermometer and check the temperature of the water.
3. If the temperature is below 120˚F / 49˚C, then you need to adjust the water
temperature on your water heater in order to maintain that temperature level.
Overflowing Protection:
• In case water level is rising above the highest acceptable point, the security
pressure switch will activate the drain pump automatically.
English
20

ESD200-MANUAL 1/10/03 11:29 AM Page 23
English
Understanding Filtration System
For your convenience, the three level filtration system is conveniently located inside
the dishwasher tub beneath the lower rack and consists of a Main Filter, Coarse
Filter and Fine Filter.
Main Filter
Coarse Filter
Fine Filter
Main Filter: The purpose of this filter is to trap food and soil particles.
Coarse Filter: The purpose of this filter is to trap large items such as pieces of
bone or glass that might clog the drain. (attached to main filter)
Fine Filter: The purpose of this filter is to trap and hold tiny soil and food residue
and prevent it from being re-deposited on the dishes during a cycle.
Warning: Never run your dishwasher without the filters in place.
Failure to do so may cause drain blockage and pump
damage.
21

ESD200-MANUAL 1/10/03 11:29 AM Page 24
Dishwasher Safe or Hand Wash
English
Materials Type
Aluminum
Cast Iron
Chinaware
Copper
Dishwasher Safe
Yes No
X
X
X
X
Comments
Some restrictions apply.
Read manufacturer's washing
instructions before loading.
Not recommended - Hand
Wash Only, dry immediately
after washing.
Some restrictions apply.
Read manufacturer's washing
instructions before loading.
Note: Only if stated
"Dishwasher Safe"
(Some restrictions apply.)
Read manufacturer's washing
instructions before loading.
Explanations
Materials such as anodized
aluminum may fade or
become dark in hot water
temperature. Some discoloration may also appear.
Load aluminum items away
from other type of materials
items because they can cause
gray or black marks.
Iron will rust in water and the
seasoning will be lost due to
the hot water temperature.
You can wash "Chinaware"
items that are without
decoration. You can wash
"Chinaware" items with
decoration protected by
special type of "Glaze". Any
type of "Pattern" on top of
glaze with gold or silver
lining or design may fade in
hot water temperature. Load
these type of items away from
each other to avoid scratches
and damage.
Load cooper items away from
stainless steel items. Do not
mix cooper and silver items in
the same basket. They can
easily discolor.
Crystal
Not recommended - Hand
X
Wash Only.
Read manufacturer's washing
instructions before loading.
Certain type of "Lead Crystal"
may etch in high hot water
temperature. Do not wash
"Antiques" and "Very
Delicate" items in the
dishwasher. Crystal Items are
recommended to be washed
in low temperature
setting. When loading, make
sure they are securely in
place to avoid falling over
and knocking against other
dishware items during the
wash process.
22

ESD200-MANUAL 1/10/03 11:29 AM Page 25
English
Dishwasher Safe or Hand Wash (continued)
Materials Type
Dirilyte (Gold
Colored Flat
Ware)
Disposable
Plastic
Glassware
Knives
Lead Crystal
Dishwasher Safe
Yes No
X
X
X
X
X
Comments
Not recommended - Hand
Wash Only.
Read manufacturer's washing
instructions before loading.
Not recommended - Hand
Wash Only.
Read manufacturer's washing
instructions before loading.
Some exceptions and
restriction apply. Read
manufacturer's washing
instructions before loading.
Not recommended - Hand
Wash Only in cold water.
Note: Sharp knives can
become dull in hot water
temperature.
Read manufacturer's washing
instructions before loading.
Not recommended - Hand
Wash Only.
Read manufacturer's washing
instructions before loading.
Explanations
These items may become
discolored.
These items are not made for
machine wash.
You may wash some
glassware items to avoid
stains. Empty liquids such as
juice,soup, soda, coffee or tea
from glasses and cups before
loading.
Sometimes the knife "Handle"
(wood or other type of
materials) may crack, loosen
or wear out in hot water
temperature.
These items may "Etch" if
machine washed.
Non-Dishware
Non-Stick
Coatings
Pewter
23
Not recommended - Hand
X
Wash Only.
Read manufacturer's washing
instructions before loading.
Some exceptions and
X
restriction apply.
Read manufacturer's washing
instructions before loading.
Note: Only if stated
"Dishwasher Safe".
Not recommended - Hand
X
Wash Only.
Read manufacturer's washing
instructions before loading.
Never machine wash items
such as electronic
"air cleaners/filters"
of any kind of small
electronics/appliances.
After wash, it is
recommended that you wipe
off the non-stick surface
area with vegetable oil to
maintain its non-stick quality.
This will stain or discolor if
machine washed.

ESD200-MANUAL 1/10/03 11:29 AM Page 26
Dishwasher Safe or Hand Wash (continued)
English
Materials Type
Plastic
Silver & Silver
Plated
Stainless Steel
Metal
Wood
Dishwasher Safe
Yes No
X
X
X
X
X
Comments
Only if stated "Dishwasher
Safe".
Read manufacturer's washing
instructions before loading.
Note: Rinse these items immediately. If you are going to
wash them later because
acidic or salty foods may
stain if left on for long time.
Note: Rinse these items immediately if you are going to
wash them later because
acidic or salty foods may
stain if left on for a long time.
Note: Do not mix stainless
and silverware items.Read
manufacturer's washing
instructions before loading.
Not recommended.
Note: It will rust.
Read manufacturer's washing
instructions before loading.
Not recommended.
Note: Only if stated
"Dishwasher Safe"
Read manufacturer's washing
instructions before loading.
Explanations
Place plastic items away from
sharp items to avoid damage.
It is recommended to place
plastic items on the top rack.
Do not heat dry. Do not wash
"Disposable" plastic items.
Do not place silverware and
stainless steel items in the
same basket. Silverware items
may get damaged if they
come in contact with stainless
steel items.
Do not place silverware and
stainless steel items in the
same basket. Silverware items
may become damaged if they
come in contact with stainless
steel items. Do not load
different types of "Stainless"
items in the same
load/basket.
Do not wash "Metal Tin" in
the dishwasher.
Wood may crack or lose its
shape in machine wash due
to the hot water
temperature condition.
24

ESD200-MANUAL 1/10/03 11:29 AM Page 27
English
Care & Cleaning of your Dishwasher
General Cleaning and Maintenance:
• Do not use abrasive, harsh cleaners, solvents, concentrated detergents or metal
scouring pads to clean the inside of dishwasher.
• Use warm soapy water with a soft brush or a piece of cloth to clean the interior
of a tub.
• Clean around the tub gasket with a damp cloth.
• When cleaning the control panel, use a slightly dampened cloth to wipe. Then dry
thoroughly.
• When cleaning the exterior cabinet, use slightly soapy water with a soft piece of
cloth.
• Do not use any sharp objects that can scratch the cabinet surface.
Cleaning Dishwasher Filters:
• We recommend that you wash and clean all three filters gently in hot, soapy
water and rinse them thoroughly periodically to clean soil and chemical build up
on the filters.
• The filters are located inside the dishwasher at the bottom in the front below
the lower rack.
• After a wash and dry cycle is finished, you must wait few minutes until the
dishwasher is completely cooled off in order to remove the filters to clean.
• Remove the lower rack first in order to take the filter out.
• Remove and clean any residue off the filters with soap and water; then wipe them
off with a soft piece of cloth.
• After you finish cleaning the filters, place them back to their original position in
the dishwasher.
Preventing Your Dishwasher from Freezing:
You must protect your dishwasher if it is left in an unheated place during the winter.
• You must cut off electrical power to the dishwasher.
• You must turn off the water supply and disconnect the water inlet line from the
water valve.
• You must drain water from the water inlet into the sink or pan.
• Do not install or operate your dishwasher where the temperature
is below freezing.
• If you receive a delivery of a dishwasher when the outside temperature is below
freezing, do not operate it until the dishwasher has warmed to room temperature.
Storage of Your Dishwasher in a Cold Environment:
• You must store the dishwasher at room temperature.
25

ESD200-MANUAL 1/10/03 11:29 AM Page 28
Troubleshooting
Dishwasher does not work:
• Check if the circuit breaker needs to be reset or if the fuse needs to be replaced.
• Check if the unit is in "OFF" mode.
• Check if the door is open. You may need to close the door properly.
• Check that you have pressed "POWER" button after proper selection.
Dishware and glassware/flatware are cloudy
and not properly cleaned:
• Use of old or poor detergent.
You need to make sure that detergent is fresh.
• The water may be hard in your area.
You may need to install a water softener.
• Spray arms may be blocked.
You may need to rearrange dishware and utensils.
• Water pressure may be low.
You may need to adjust the water pressure.
Make sure it is between 20 to 120 (PSI).
• Water temperature may be lower than what is recommended.
(120 Degree F / 49 Degree C) You may need to adjust the water temperature on
your water heater.
English
• Overloading of dishware.
You may need to rearrange or remove some dishware from the load.
• (May have selected wrong cycle.) Inappropraite cycle selection.
You may need to select the proper cycle.
Dishes are not dry:
• Low water temperature.
You may need to regulate the water temperature to 120 Degree F / 49 Degree C
or select Hi-Temp Wash option.
• Make sure the rinse agent dispenser is filled and the proper amount is used.
• Avoid nesting and do not overload.
• Load items in a tilted position if possible so the water will run off easily.
• Dishware washed in higher temperatures will dry faster.
• Some plastic materials may need to be towel dried.
26

ESD200-MANUAL 1/10/03 11:29 AM Page 29
English
Dishware is chipped:
• This is due to poor loading or overloading. You need to be careful when loading.
Do not overload. You need to place the glassware securely against the pins. Make
sure delicate items are on the side rack. We recommend that fine chinaware or
crystal items be hand washed.
• Do not jam the glassware items together when loading.
• Place delicate items on the upper rack.
• Do not load tall dishware items near the middle spray arm.
• Move racks slowly in and out to avoid slamming the dishware items together.
• Make sure all dishware and glassware items are securely in place when loading
to avoid falling over or striking against each other.
Noise:
Some of the sounds you will hear are normal.
• You will hear the sound of the water fill and rinse.
• You will hear the drain pump motor operation to pump water out.
• You will hear the motor stopping at the end of the cycle.
• If some utensils are not secure in the rack, you will hear that they are being tossed
around the tub.
Oversudsing:
This is due to the use of regular hand washing detergent.
Detergent should be for "Automatic Dishwasher Use". You must use the proper
detergent for best dishwashing results.
Dishware Odor:
• This is due to an incomplete cycle.
You need to allow the cycle to be fully completed.
• New scented detergent used.
This is normal because different types of detergents may have different
fragrances.
27

ESD200-MANUAL 1/10/03 11:29 AM Page 30
Etching:
• Too much detergent used.
Use the appropriate amount of detergent. Reduce the amount of detergent
used per load.
• The water temperature is too hot.
You need to lower the water temperature.
• Use of old detergent.
Read the expiration date. Avoid using old detergent. Use only fresh detergent.
• Do not pre-rinse the dishes.
Simply scrape off large food particles
Stained interior tub:
• Some detergents contain colorants known as "pigments" or "dyes" that will
discolor the tub with extended use. You need to change the detergent to one
without a colorant. Read the container label carefully before using the detergent.
• Some acid based and/or paste based foods may discolor the tub. Use of the rinse
cycle may help to decrease the level of staining.
English
Spots & filming found on flatware/glassware:
This is due to:
• Use of too little detergent.
• Low incoming water temperature and pressure.
• Improper loading.
• Use of old, moist and damp powder detergent.
• Hard water in your area.
Dishwasher is leaking:
• Dishwasher is not properly leveled.
You need to place the dishwasher on a flat hard surface. Avoid an uneven
surface.
• Make sure the dishwasher is properly leveled . (See the installation instructions)
• Do not overfill the detergent or the rinse agent dispenser because it will cause
oversudsing and overflowing.
• Do not use regular type hand or dish washing detergent in the detergent
dispenser. These types of detergents are not recommended for dishwasher use.
28

ESD200-MANUAL 1/10/03 11:29 AM Page 31
English
Dishwasher will not fill:
• Check the water supply.
Make sure that the water supply is in "ON" position.
• Check water pressure.
Make sure the water pressure is at the proper level. (Between 20 – 120 PSI)
Water found under the filter:
• A small amount of water found under the filter area after completion of the cycle
is normal.
Detergent found in the compartment:
• Do not load items too close to the detergent compartment. This may block the
automatic release of the detergent.
• Do not use old or caked/dried detergent in the compartment because it will not
dissolve properly and will leave a sandy residue on dishware.
Dishwasher is running for too long:
• The temperature of incoming water is below 120˚F. Raising your water heater
setting will help to shorten the time of operation.
• Call the Haier Customer Satisfaction Center if this does not resolve the problem.
Beeping Sound and Flashing Light(s):
• The dishwasher door is not closed properly.
After pressing the “START/PAUSE” button to start the wash process and if the
door is not closed properly or the door is opened in the middle of the wash
process, you will notice the following,
- The 1st light from the left of “Wash Programs Indicator Lights” will flash.
- The machine will continue to beep every few seconds.
• Close the door properly. The machine will stop beeping. The selected wash
program light will flash and the wash process begins automatically.
• If the dishwasher malfunctions in the middle of the wash operation, the “Wash
Programs Indicator Lights” will flash and the machine will beep.
29

ESD200-MANUAL 1/10/03 11:29 AM Page 32
Limited Warranty
In-Home Service
1 Year Warranty
For 12 months from the date of original retail
purchase, Haier will repair or replace any
part free of charge that fails due to a defect
in materials or workmanship, including labor.
2 Years Limited Warranty
Water Distribution System
(Parts Only)
For 24 months from the date of original retail
purchase, Haier will replace any parts in the
water distribution system which fail due to
manufacturing defect. This includes the pump,
motor, lower wash arm, middle wash arm
and the wash tower upper sprayer with associated supply tube and filters.
NOTE: Associated outside inlet and drain
plumbing parts are not covered by this
warranty.
Vinyl Coated Racks (Parts Only)
For 24 months from the date of original retail
purchase, Haier will replace vinyl-coated
upper or lower rack that peels or rusts due to
a manufacturing defect.
Rotary or Electromechanical Control
(Parts Only)
For 24 months from the date of original retail
purchase, Haier will replace rotary/electromechanical control that fails due to a manufacturing defect.
Lifetime (Parts Only)
Stainless Steel Tub and Door Liner
Provide a replacement tub or door liner if the
original tub or door liner fails to contain
water because of a manufacturing defect.
NOTE: This warranty commences on the
date the item was purchased and the original
purchase receipt must be presented to the
authorized service representative before warranty repairs are rendered.
Exceptions: Commercial or Rental
Use Warranty
90 days labor from date of original purchase
90 days parts from date of original purchase
No other warranty applies
For Warranty Service
Contact your nearest authorized service
center. All service must be performed by a
Haier authorized service center. For the name
and telephone number of the nearest
authorized service center please call
1-877-337-3639.
Before calling, please have the
following information available:
Model number and serial number of your
English
appliance (found on the rear of the unit on
the upper left hand side).
The name and address of the dealer you
purchased the unit from and the date
of purchase.
A clear description of the problem.
A proof of purchase (sales receipt).
This warranty covers appliances
within the continental United States,
Puerto Rico and Canada. What is
not covered by this warranty:
Replacement or repair of household fuses,
circuit breakers, wiring or plumbing.
A product whose original serial number has
been removed or altered.
Any service charges not specifically
identified as normal such as normal
service area or hours.
Damage to dishware.
Damage incurred in shipping.
Damage caused by improper installation
or maintenance.
Damage from misuse, abuse accident, fire,
flood, or acts of nature.
Damage from service other than an
authorized Haier dealer or service center.
Damage from incorrect electrical current,
voltage or supply.
Damage resulting from any product
modification, alteration or adjustment
not authorized by Haier.
Adjustment of consumer operated controls as
identified in the owners manual.
Hoses, knobs and all attachments, accessories
and disposable parts.
Labor, service transportation, and shipping
charges for the removal and replacement
of defective parts beyond the initial
12-month period.
Damage from anything other than normal
household use.
Any transportation and shipping charges.
THIS LIMITED WARRANTY IS GIVEN IN LIEU
OF ALL OTHER WARRANTIES, EXPRESSED
OR, INCLUDING THE WARRANTIES OF
MERCHANTABILITY AND FITNESS FOR A
PARTICULAR PURPOSE
The remedy provided in this warranty is
exclusive and is granted in lieu of all
other remedies.
This warranty does not cover incidental or
consequential damages, so the above
limitations may not apply to you. Some states
do not allow limitations on how long an
implied warranty lasts, so the above
limitations may not apply to you.
This warranty gives you specific legal rights,
and you may have other rights, which vary,
from state to state.
Haier America
New York, NY 10018
30

ESD200-MANUAL 1/10/03 11:29 AM Page 1
IMPORTANT
Do Not Return This Product To The Store
If you have a problem with this product, please contact the "Haier Customer Satisfaction
Center" at 1-877-337-3639.
DATED PROOF OF PURCHASE, MODEL # AND SERIAL # REQUIRED FOR WARRANTY SERVICE
IMPORTANT
Ne pas renvoyer cet appareil au magasin.
Si vous avez un problème avec cet appareil, veuillez contacter le service à la clientèle de
Haier au 1-877-337-3639.
IL EST OBLIGATOIRE DE FOURNIR UNE PREUVE D'ACHAT DATÉE, LE NUMÉRO DU MODÈLE ET
SON NUMÉRO DE SÉRIE AFIN DE BÉNÉFICIER DE LA COUVERTURE DE LA GARANTIE.
IMPORTANTE
No Devuelva Este Producto al Establecimiento Compra.
Si tiene problemas con este producto, por favor póngase en contacto con el "Centro Haier
de Atención al Cliente" en el 1-877-337-3639.
PARA EL SERVICIO DE GARANTÍA SE REQUIERE PRUEBA DE COMPRA, FECHADA, No. DE
MODELO Y No. DE SERIE
ESD200
Issued: September 02
As an ENERGY STAR
®
Partner, Haier America has
determined that this product meets the ENERGY
®
STAR
En tant que partenaire ENERGY STAR
guidelines for energy efficiency.
®
, Haier America a
déterminé que cet appareil répond aux normes ENERGY
®
STAR
sur le rendement et l'efficacité énergétique.
Como Socio de ENERGY STAR
®
Partner, Haier
America ha determinado que este producto cumple con
los lineamientos de ENERGY STAR
®
en lo referente a
eficiencia energética.
®
What The World Comes Home To
TM
Haier America
New York, NY 10018
Printed in China
part # DW-9999-01
 Loading...