

®
What The World Comes Home To
Built-In Dishwasher
Lave-Vaisselle
TM
Encastrable
Lavaplatos
Empotrable
User Manual-
Guide de l'Utilisateur-
Manual del Usuario-
Model #
Modèle #
ESD100
Modelo #

English
IMPORTANT SAFETY INSTRUCTIONS
Warning – To reduce the risk of fire, electric shock, or injury
to persons when using your appliance, follow basic
precautions, including the following:
1. Read all instructions before using the appliance.
2. Use this appliance only for its intended purpose as described in this use and
care guide.
3. Use only automatic dishwashing detergent and rinse agent recommended for
use in this appliance and keep them out of the reach of children because they
are corrosive and can be harmful.
4. This appliance must be properly installed in accordance with the installation
instructions before it is used.
5. Never unplug your appliance by pulling on the power cord. Always grasp the
plug firmly and pull straight out from the outlet.
6. Replace immediately worn power cords, loose plugs/power outlets.
7. Unplug your appliance before cleaning or before making any repairs.
8. Do not open the dishwasher door immediately after completion of wash process
or during the operation as hot air/steam may cause personal injury. Press the
door latch, wait few seconds by allowing cold air to go in and then open the
door.
9. Do not operate your appliance in the presence of explosive fumes.
10. Do not add or mix any flammable or explosive substances to the wash.
11. Appliance loading door must be closed during the operation of the machine.
12. Do not operate your appliance when parts are missing or broken.
13. Do not use this appliance for commercial dishwashing purpose.
14. Do not operate this appliance unless all enclosure panels are properly in place.
15. Do not tamper with controls.
16. To reduce risk of injury do not allow children to play in or on the appliance.
Close supervision of children is necessary when the appliance is used
near children.
17. This appliance must be connected to proper electrical outlet with the correct
electrical supply.
18. Proper grounding must be ensured to reduce the risk of shock and fire. DO
NOT CUT OR REMOVE THE GROUNDING PLUG. If you do not have a
three-prong electric receptacle outlet in the wall, have a certified electrician
install the proper receptacle. The wall receptacle MUST be properly grounded.
1

English
19. Hydrogen gas may be produced if the water heater has not been used in more
then 2 weeks. This could be explosive and can explode under certain
circumstances. If this is the case, turn on all the hot faucets and let the hot water
run for a few minutes before using this appliance. This will let the trapped
hydrogen escape. To avoid an accident, as hydrogen gas is flammable and can
explode, do not turn on an electric appliance, smoke, light a match/lighter or
use a flame.
20. Do not repair or replace any part of the appliance or attempt any servicing
unless specifically recommended in the user-repair instructions that you
understand and have skills to carry out.
21. To reduce the risk of electric shock or fire, do not use extension cords or
adapters to connect the unit to electrical power source.
22. Do not wash any heat sensitive or any other items that are not designed for
automatic dishwasher. Items not dishwasher safe could become deformed or melt
and create a potential fire hazard.
23. Do not use this dishwasher outdoors.
24. Do not leave the dishwasher door open to dry dishware while children are
around the counter top. Close supervision and observation needed when
children are around the dishwasher.
25. Do not abuse, sit on or stand on the door or dish rack of the dishwasher.
26. Do not touch the heating element during or immediately after use, as it may be
very hot.
27. Load sharp objects such as knives and forks upside down to reduce the risk of
cut type injuries.
28. Do not wash plastic items unless they are marked dishwasher safe. Check the
manufacturer’s recommendations for items not marked.
29. Do not load sharp items near the door; you could damage the door seal.
30. When removing an old dishwasher from service or discarding it, remove the
front door.
31. Disconnect electrical power and water inlet hose to dishwasher before servicing.
SAVE THESE INSTRUCTIONS
2

English
Table Of Contents
SAFETY INSTRUCTIONS ................................................................1-2
Knowing Your Dishwasher ........................................................4-6
Using Your Dishwasher ............................................................7-16
Understanding The Filtration System ........................................17
Dishwasher Safe or Hand Wash ..........................................18-20
Care & Cleaning Of Your Dishwasher ......................................21
Troubleshooting........................................................................22-26
Warranty ........................................................................................27
PAGE
Thank you for purchasing our Haier
product. This easy-to-use manual will
guide you in getting the best use of
your dishwasher.
Remember to record the model and
serial number. They are on a label in
back of the dishwasher.
Staple your receipt to your manual. You will need it to obtain
warranty service.
All figures in this use & care manual are for illustration purposes only. The
illustrated parts shown in figures may be different on the actual unit.
Specifications and features are subject to change without prior notice.
3
Model number
Serial number
Date of purchase
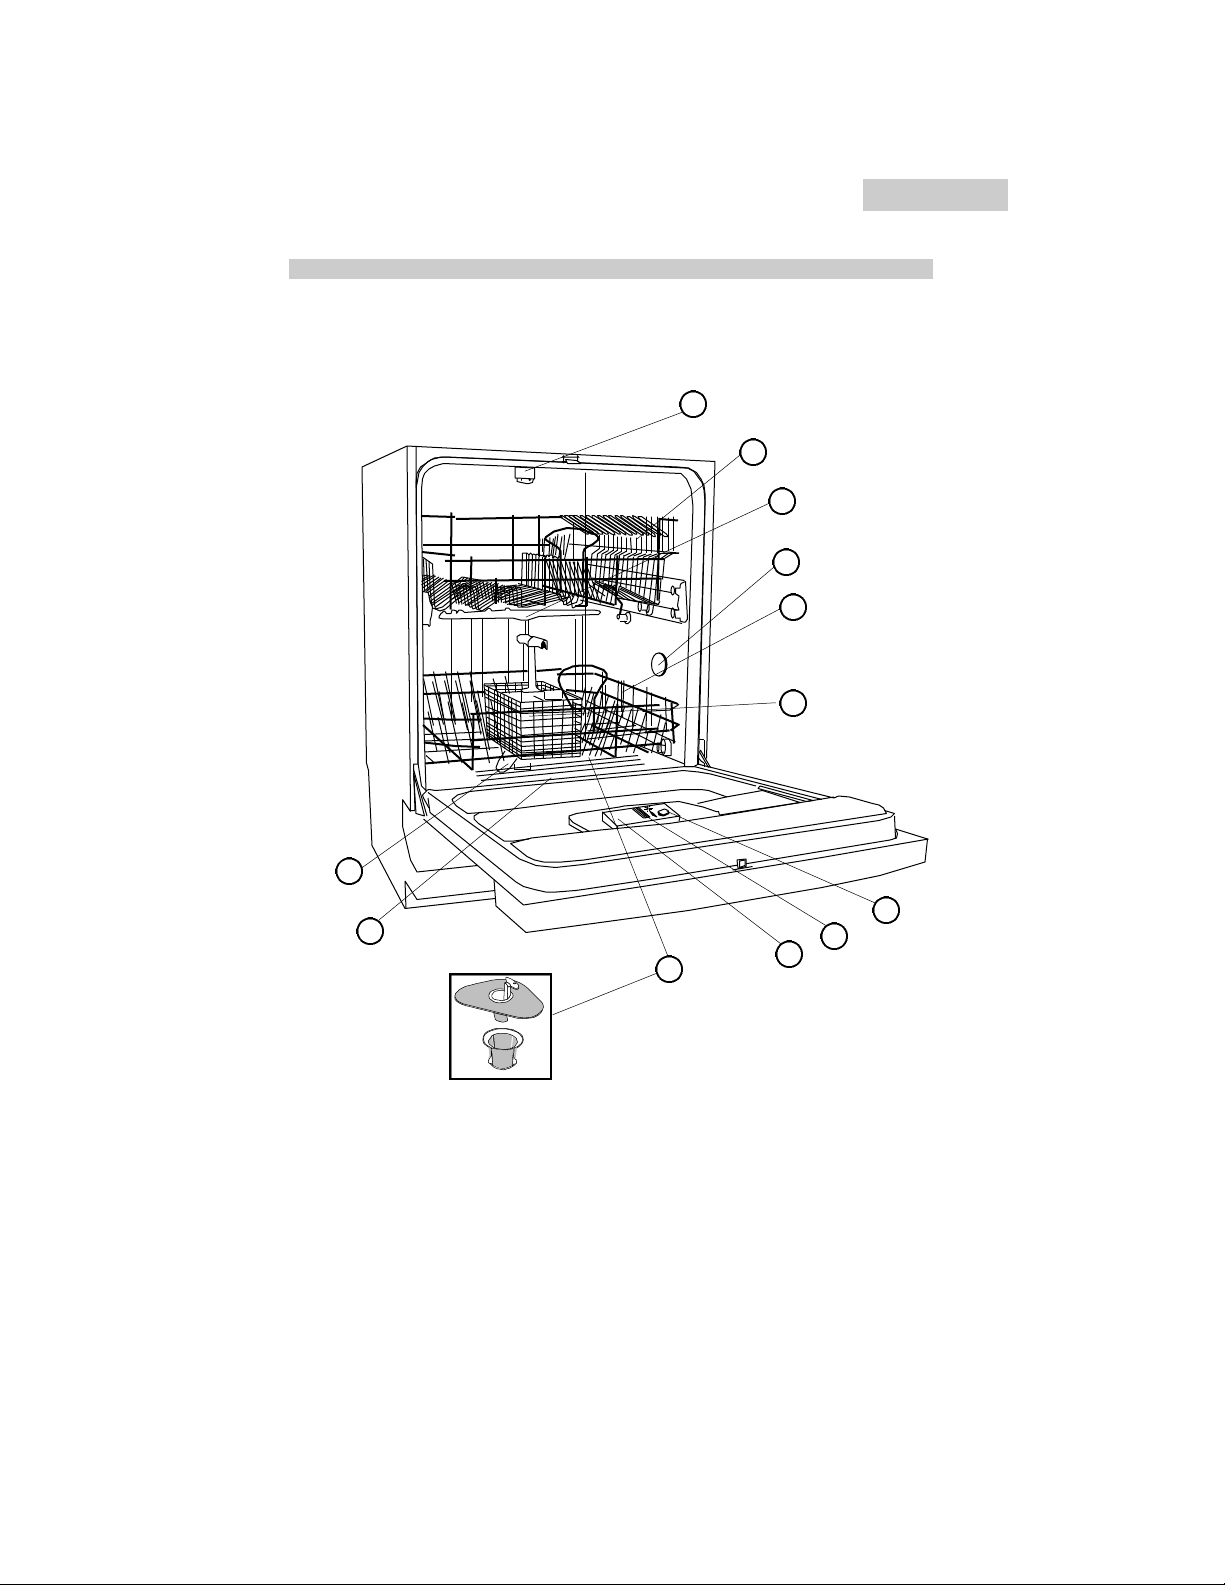
Knowing Your Dishwasher
Parts and Features
(Front View with Open Door)
1
English
2
3
4
5
6
12
11
1. Upper Sprayer
2. Deluxe 2 Position Adjustable Upper
Rack with Stemware Holders
3. Middle Spray Arm
4. Pressure Relief Valves (One located at
the upper left corner (not shown)
5. Lower Rack
6. Removable Split Silverware Basket
7
8
10
9
7. Rinse Aid Compartment
8. Pre-Wash Detergent Compartment
9. Main Wash Detergent Compartment
10. Triple Filtration System (Located at
the bottom under Lower Rack)
11.Heating Element (Located at rear and
under lower rack)
12. Lower Spray Arm
4
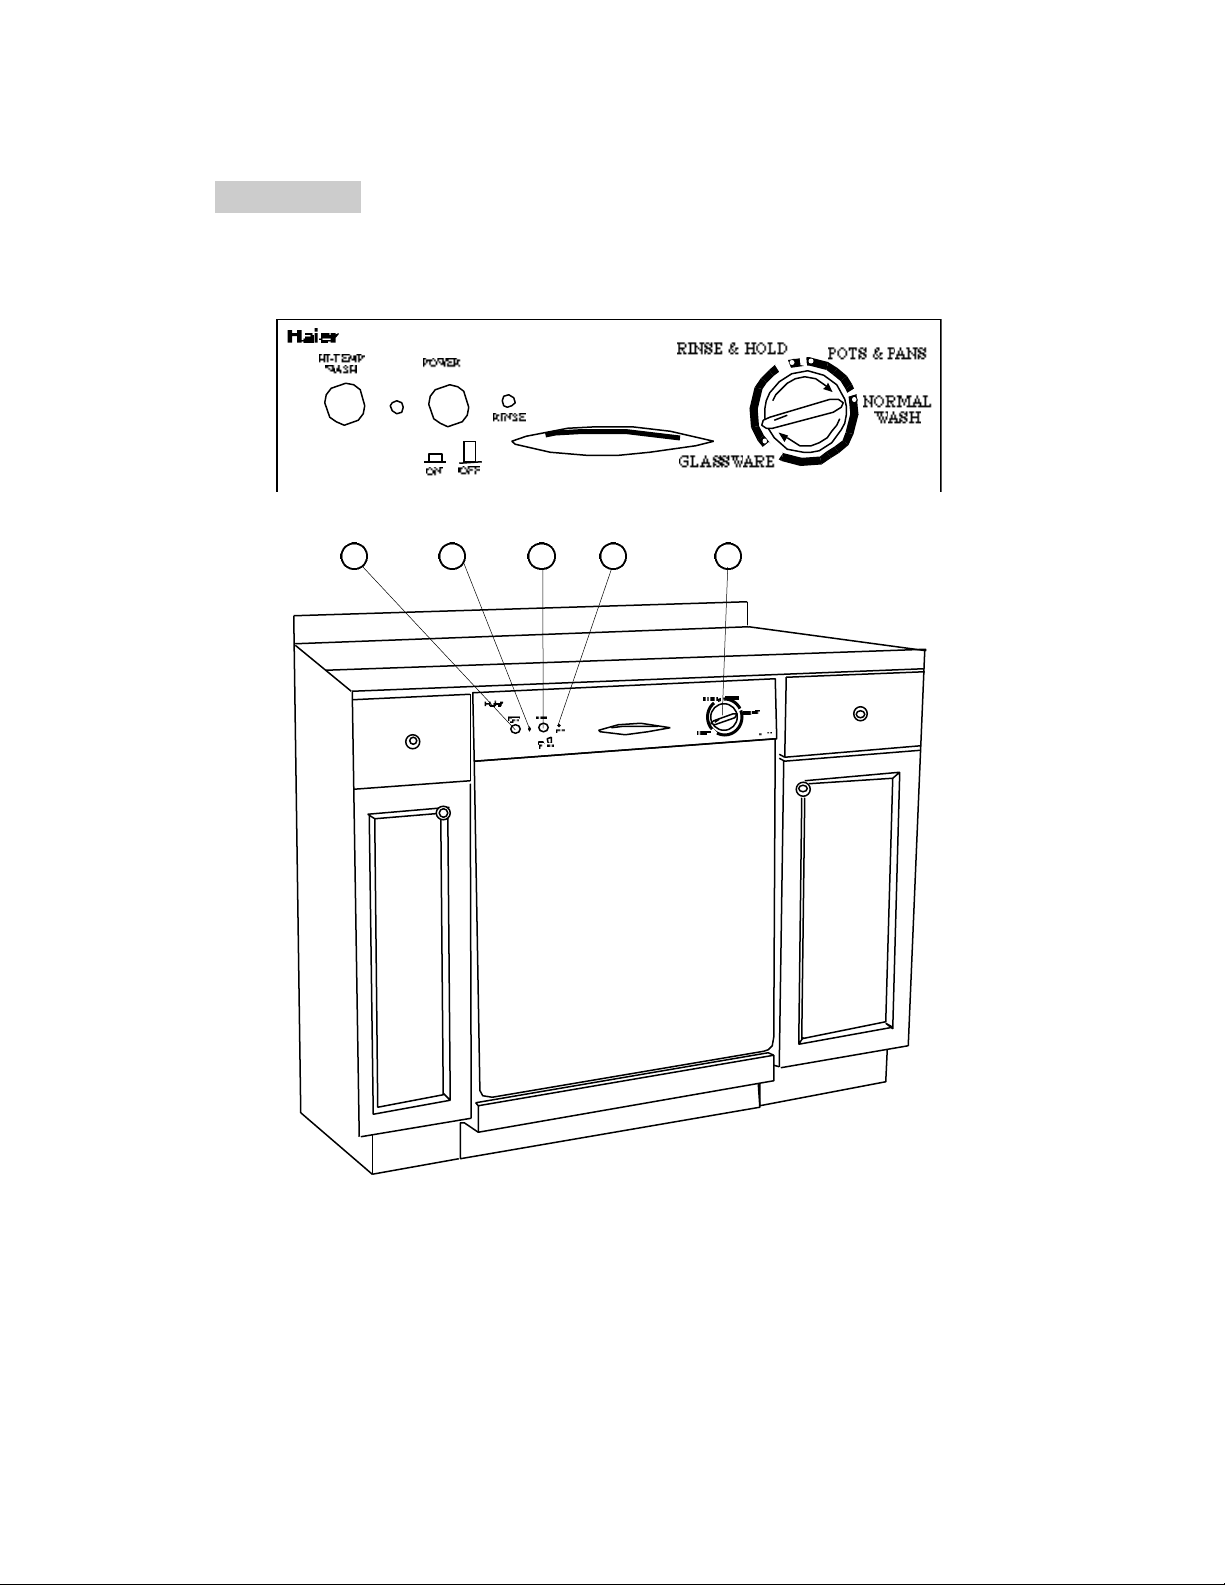
English
√
(Front View with Door Closed)
1
2 3 4
5
1. Hi-Temp Wash Button (On/Off)
2. Power On Indicator Light
3. Power Button (On/Off)
5
4. Rinse Check Indicator Light
5. Wash Selector Knob
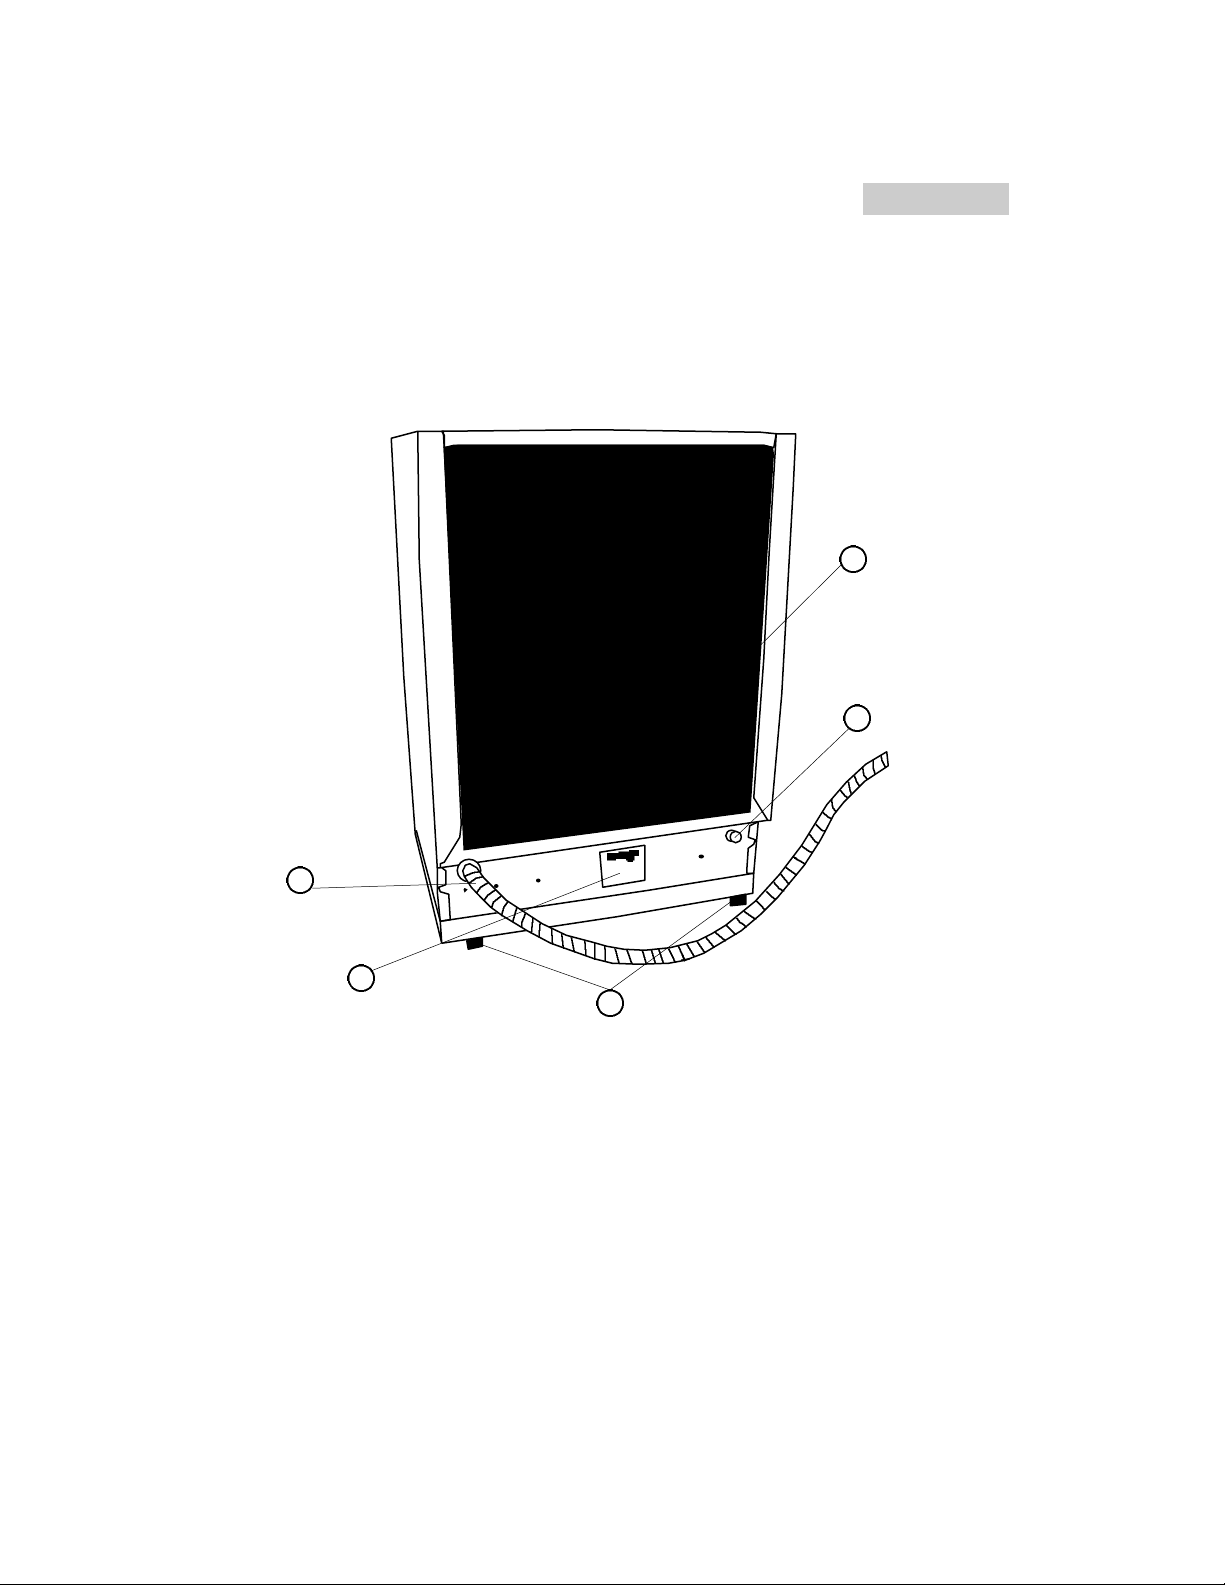
(Rear View)
English
5
4
1
2
3
1. Drain Hose (Factory Attached)
2. Electrical Connection Junction Box
(120v/60Hz - Plug not Included)
3. Rear Leveling Legs
4. Water Inlet
5. Rear Insulation Panel
6
English
√
Using Your Dishwasher
Understanding the Dishwasher Control Panel:
Power Button:
• Press "POWER" button in to turn the power "ON".
• Press this button again to turn the power "OFF".
Note: You will see the "Power On Indicator Light" lit when the unit is on.
Hi-Temp Wash Button:
• Press "HI-TEMP WASH" button in to turn the "HI-TEMP WASH"
option "ON".
• Press this button again to turn the "HI-TEMP WASH" option "OFF".
“Rinse √“ Indicator Light:
• When “RINSE √” indicator light is lit, this means the rinse aid
detergent is empty in the rinse aid compartment. You need to
refill rinse aid at this time.
√
Door Latch:
• To lock the door, push the door with
light force until you hear the “Click.”
• To unlock the door, squeeze the door
latch and pull towards you.
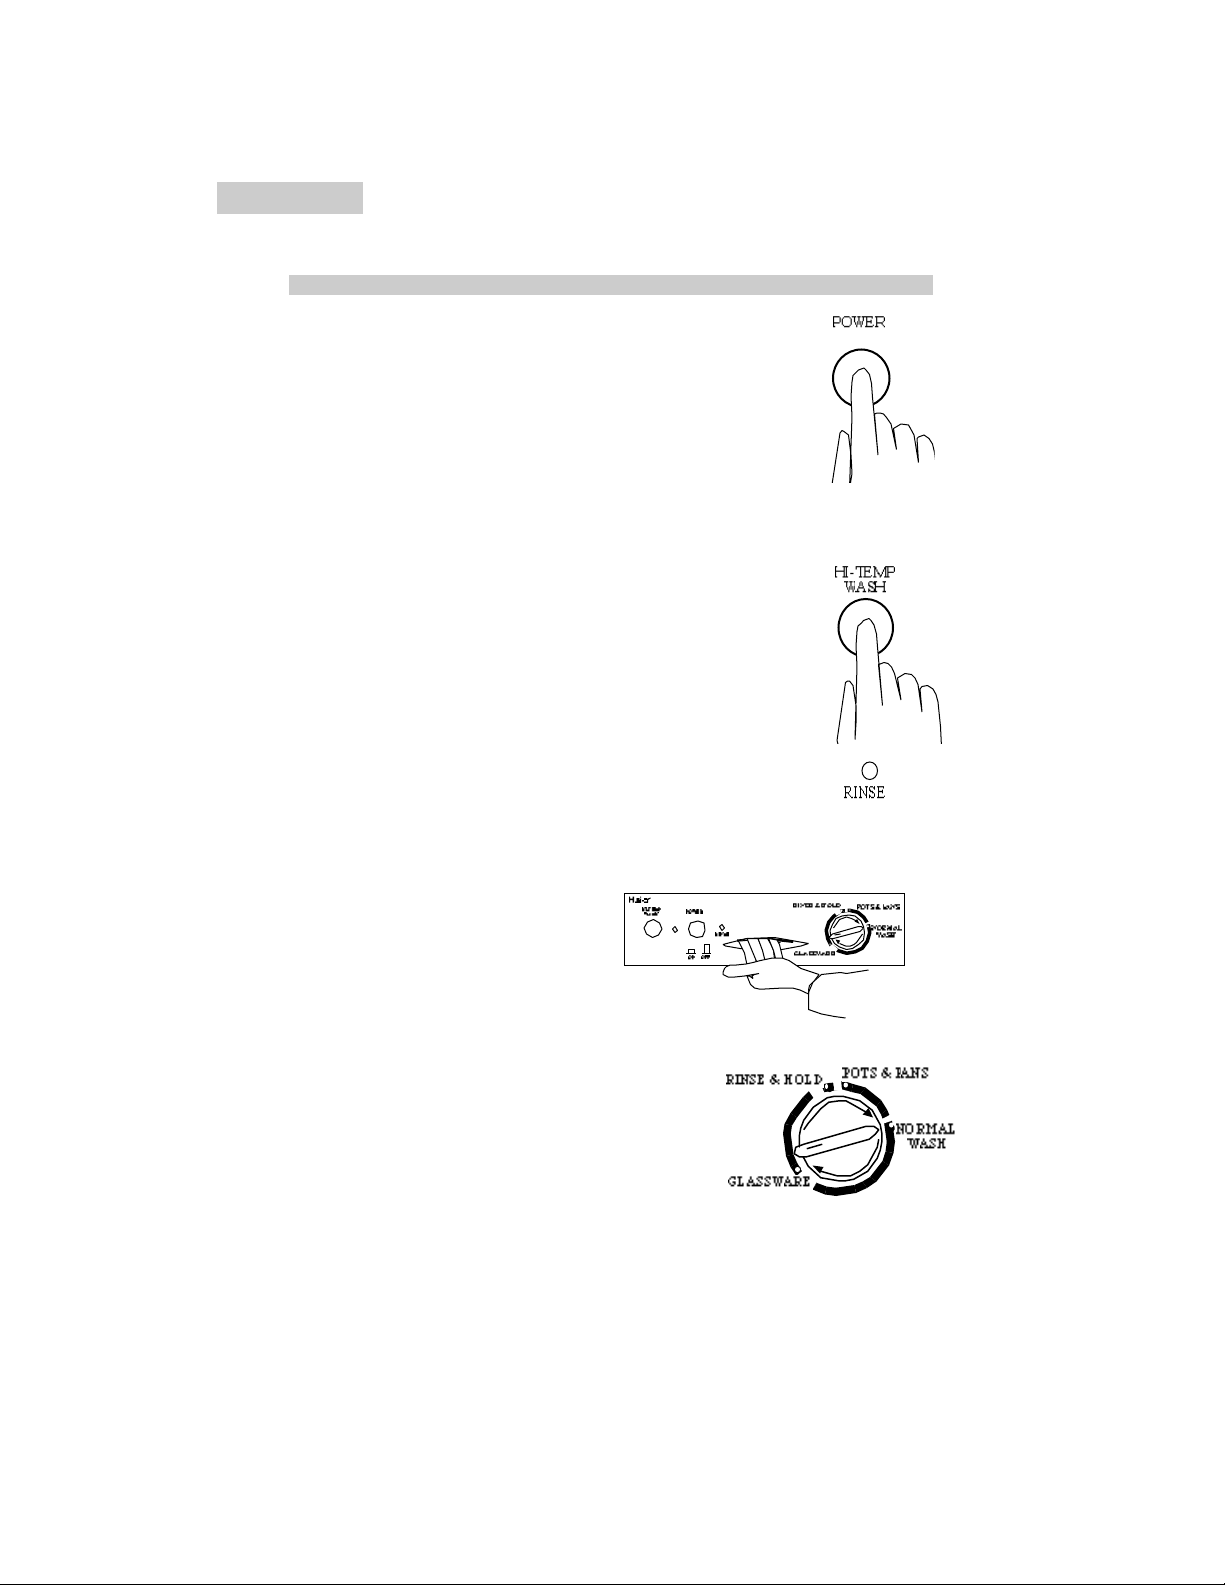
Wash Selector Knob:
• When selecting a wash cycle, turn the knob
"CLOCKWISE" to your desired setting by matching
the knob "Pointer" symbol to the cycle "dot" symbol.
Once both are lined up, press "Power" button to
begin the wash process. (You will hear "Click" and
the wash cycle will start automatically.) A “Click” will
signify the automatic start at the wash cycle.
Warning: The wash selector knob is designed to work only in a
clockwise direction. DO NOT turn the knob "COUNTER
CLOCKWISE." Turning in a counter clockwise direction
7
may cause damage to the wash selector.
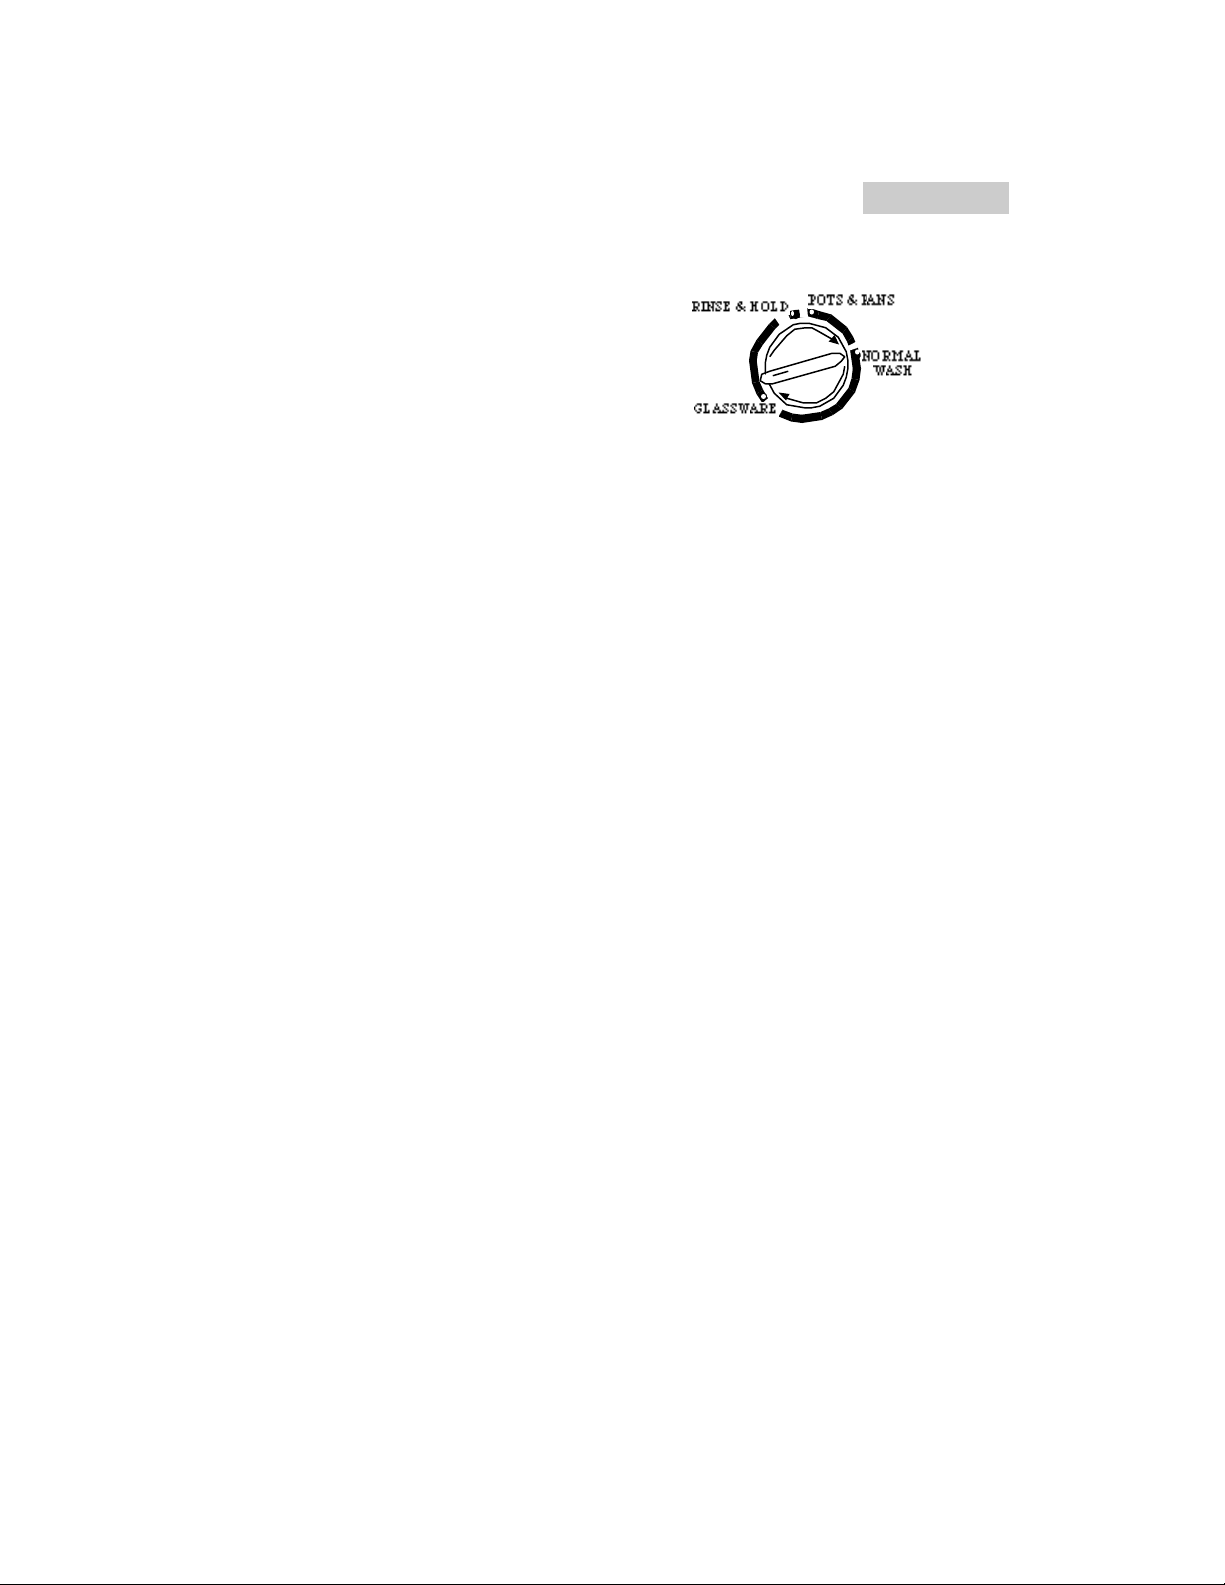
Selecting Wash Cycles
• Select the appropriate cycle based on the load
and soil level. For your convenience, the
dishwasher has Pots & Pans, Normal,
Glassware and Rinse & Hold wash cycles that
you can select from.
Pots & Pans Wash Cycle:
• This cycle is used for heavily soiled pots & pans,
cookware, dishware, silverware and glassware items with dried-on or baked-on
soils.
Note: This cycle may not remove burned-on foods.
Normal Wash Cycle:
• This cycle is used for medium or heavily soiled dishware, glassware and
silverware.
Glassware Wash Cycle:
• This cycle is used for lightly soiled glassware, chinaware, pre-rinsed dishes and
silverware.
Rinse & Hold Cycle:
• This cycle is used for rinsing partial loads that will be washed later.
Note: Do not use detergent with this cycle.
English
Selecting Wash Option
Hi-Temp Wash:
• You can select this option with Pots & Pans, Normal or Glassware wash cycles.
Note: Do not use this option with Rinse & Hold Cycle.
Note: When this option is selected, water temperature boosts up between
161˚ F – 167˚ F. "HI-TEMP WASH" helps: kill bacteria, dissolve detergents,
remove sticky and greasy substances off the dishware and as well as
effective cleaning.
Note: Any interruption during wash and rinse cycles or if the incoming water
temperature is too low, proper water heating temperature cannot be
achieved and the Hi-Temp Wash heating temperature conditions may be
affected.
8
 Loading...