


User & Care Guide
Guide d'utilisation et d'entretien
Guía de uso y cuidado
Room Air Conditioner
Climatiseur individuel
Aire acondicionado
de uso doméstico
ESA405P
ESA406P
ESA406N
ESA408N
ESA410N
ESA412N
Design may vary by model number. La conguration peut varier selon le
numéro de modèle.
This user manual is to be only use for
electronic control 5,100 BTU, 6,000
BTU, 8,000 BTU 10,000 BTU and 12,000
BTU Models. - Some models may have
an additional letter after the model
number.
Ce guide d'utilisation doit être utilisé
strictement avec les modèles à
commande électronique de 5,100 BTU,
6,000 BTU, 8,000 BTU, 10,000 BTU et
12,000 BTU. - Sur certains modèles, le
numéro de modèle peut être suivi d'une
lettre.
El diseño puede variar conforme al
número de modelo
Este manual del usuario es únicamente
para utilizar los controles electrónicos
modelos 5,100 BTU, 6,000BTU,
8,000 BTU, 10,000 BTU y12,000 BTU.
Algunos de los modelos pueden tener
una letra adicional después del número
de modelo.


TABLE OF CONTENTS
SAFETY INFORMATION............................................................................................................. 2
Important Safety Precautions ................................................................................................ 2-3
Operational Safety & Warnings .................................................................................................. 4
INSTALLATION REQUIREMENTS .............................................................................................5
Tools and Parts ............................................................................................................................ 5
Location Requirements .............................................................................................................. 6
Electrical Requirements .........................................................................................................7-9
HOW TO INSTALL ....................................................................................................................10
Unpacking the Air Conditioner ................................................................................................. 10
Preparing the Air Conditioner ............................................................................................10-11
Preparing the Window ..............................................................................................................12
Completing the Installation ...................................................................................................... 13
USING YOUR AIR CONDITIONER ........................................................................................... 14
Starting the Air Conditioner ............................................................................................... 14-18
Using the Remote Control ..................................................................................................18-19
Changing the Air Direction ....................................................................................................... 20
CARING FOR YOUR AIR CONDITIONER ................................................................................ 21
Cleaning the Air Filter ...............................................................................................................21
Cleaning the Front Panel ..........................................................................................................22
Annual Maintenance .................................................................................................................22
Customer Service .....................................................................................................................22
Normal Sounds of an Air Conditioner ...................................................................................... 23
TROUBLESHOOTING ..............................................................................................................24
LIMITED WARRANTY ...............................................................................................................25
PRODUCT REGISTRATION
Thank you for purchasing our Haier
product. This easy-to-use manual will guide
you in getting the best use of your product.
Remember to record the model and serial
numbers. They are on a label on the side of
your unit.
Model number
Serial number
Date of purchase
Staple your receipt to your manual. You will need it to obtain warranty service.

ENGLISH
1. Use this air conditioner only for its intended application as described in this
2. This air conditioner must be properly installed and use the correct wall
IMPORTANT SAFETY PRECAUTIONS
WARNING
THE INFORMATION IN THIS USE & CARE GUIDE MUST BE
FOLLOWED TO MINIMIZE THE RISK OF PERSONAL INJURY, FIRE,
ELECTRIC SHOCK OR OTHER UNSAFE CONDITIONS.
THE INSTRUCTIONS IN THIS USE & CARE GUIDE ARE NOT MEANT
TO INCLUDE EVERY POSSIBLE CONDITION OR SITUATION THAT
MAY OCCUR. USE CAUTION AND CARE WHEN INSTALLING, OPERATING
AND CLEANING THE AIR CONDITIONER.
Use & Care Guide.
outlet that matches with the air conditioner’s power supply cord in
accordance with the Installation Section of this Use & Care Guide before
it is operated.
3. Never unplug the air conditioner by pulling on the power supply cord.
Always grip the plug firmly and pull straight out from the wall outlet.
4. Replace the power supply cord immediately if it becomes damaged in any
way. A new power supply cord must be purchased from the air conditioner
manufacturer and installed by a qualified technician. DO NOT use a power
supply cord that is cracked, split, cut, or damaged anywhere along its
length or either at the plug end or connector end.
5. Turn off the air conditioner and unplug it from the wall outlet before
performing any cleaning or maintenance.
6. Do not store or use combustible or flammable materials or liquids on
or near the air conditioner.
7. If the wall outlet configuration does not match the plug configuration
on the air conditioner, the wall outlet must be changed by a qualified
electrician.
PAGE 2 SAFETY INFORMATION

IMPORTANT SAFETY PRECAUTIONS
8. This air conditioner contains R410a refrigerant and requires certified
technicians to use the proper equipment, tools and safety standards that
are approved for this refrigerant. Use only equipment certified for R410a
refrigerant. In addition, under federal law, all refrigerant must be properly
removed from the air conditioner prior to its disposal.
For responsible disposal of the product, please contact your local
municipality for additional recycling options in your area.
READ AND FOLLOW THE
SAFETY INSTRUCTIONS CAREFULLY.
SAVE THESE INSTRUCTIONS
SAFETY INFORMATION PAGE 3

OPERATIONAL SAFETY & WARNINGS
ENGLISH
1. This air conditioner contains no consumer serviceable parts. If you have
2. Be sure that the air conditioner is properly and securely installed in
3. DO NOT drill any holes in the base or sides of the air conditioner.
4. DO NOT place fingers or objects in the air discharge or air intake in the
5. DO NOT operate the air conditioner with a protective cover on the
6. DO NOT block the air discharge or air intake areas on the front panel.
7. DO NOT block the side louvers on the outside of the air conditioner.
8. DO NOT place any objects either on the indoor or outdoor sections of
problems or questions regarding the operation of your air conditioner
always call Haier Customer Service: 1-877-337-3639.
the window according to the installation instructions included in this
Use & Care Guide.
front of the air conditioner.
outside section.
the air conditioner
9. Operate the air conditioner with the air filter installed.
10. Keep this Use & Care Guide, carton and packing material for future use
in removing, storing and reinstalling the air conditioner.
PAGE 4 SAFETY INFORMATION

TOOLS AND PARTS
Read and follow the instructions provided with any tools listed here.
TOOLS NEEDED
Phillips head screwdriver
Scissors
Level
Tape measure
Drill and 1/8” bit
Pencil
PARTS SUPPLIED:
Check that all parts for your specific air conditioner are included in the parts package.
NOTE: If parts are missing, call Haier Customer Service: 1-877-337-3639.
ESA405P,
ESA408N, ESA410N,
IMAGE PART
ESA406P,
ESA412N
ESA406N
Top channel
Foam seal
Side bracket
1 1
1 1
2 2
Window lock
1 1
bracket
3/8" self-
3 4
tapping screws
1" wood screws
Side curtains
Side curtain
9 9
2 2
2 2
frames
ON/OFF
MODE
SPEED
TIMER
TEMP/TIME
TEMP/TIME
Remote control 1
INSTALLATION REQUIREMENTS PAGE 5
1

LOCATION REQUIREMENTS
HEIGHT
WIDTH
ENGLISH
IMPORTANT: Observe all governing codes and ordinances. Check the location where the air
THE LOCATION SHOULD PROVIDE:
• A grounded electrical outlet within 6 ft. (183 cm) of where the power supply cord exits the air
•
NOTE: Do not use an extension cord, plug adapter, surge protector or multi-outlet adapter.
•
•
•
NOTE: The outside cabinet louvers and air discharge must not be obstructed by bushes, trees,
conditioner will be installed. Make sure you have everything necessary for correct
installation.
conditioner, for models: ESA405P, ESA406P, ESA406N, ESA408N
A grounded electrical outlet within 4 ft. (122 cm) of where the power supply cord exits the air
conditioner, for models: ESA410N, ESA412N
Free movement of air in the room to be cooled.
A large enough window opening for the air conditioner. (See Fig.2)
The air conditioner must not be installed in a through-the-wall sleeve or in a wall. It can only be
installed in a double-hung window.
etc. Air must be able to pass freely through the cabinet louvers. (See Fig.1)
Fig. 1
CABINET LOUVERS
WINDOW INSTALLATION
Window opening measurements:
ESA405P ESA406P, ESA406N ESA408N / ESA410N ESA412N
A. Width
B. Height
21-7/8" - 36" 24-1/2" - 36" 25" - 36-21/32" 26-1/8" - 37-25/32"
13-3/8" 13-3/8" 14-9/16" 14-9/16"
Fig. 2
AIR DISCHARGE
B-HEIGHT
A-WIDTH
PAGE 6 INSTALLATION REQUIREMENTS

ELECTRICAL REQUIREMENTS
WARNING
ELECTRICAL SAFETY and WARNINGS
1. DO NOT cut or remove the grounding prong on the attached power supply cord. Doing so may
cause sparks or fire, and voids all warranties. For safety purposes the air conditioner must be
properly grounded.
2. To avoid a fire hazard or possible electric shock, DO NOT use an adapter plug, extension cord,
surge protectors, or multi-outlet adapters with the air conditioner.
3. The power supply cord is equipped with a 3-prong plug which mates with a standard 115 volt
wall outlet to minimize the possibility of electrical shock from this air conditioner.
4. The power supply cord includes a leakage current detection interrupter device (LCDI). A
RESET and TEST button are on the plug case. The device should be tested on a periodic
basis by pressing the TEST button and then the RESET button while it is plugged into the wall
outlet. If the TEST button does not trip or the RESET will not stay engaged, do not use the air
conditioner and contact a qualified service technician.
5. Have the wall outlet and circuit inspected by a qualified electrician to ensure that the wall outlet
is properly grounded.
6. If there is a 2-prong wall outlet present and not a 3-prong wall outlet, it is the responsibility of
the user to have it replaced with a properly grounded 3-prong outlet.
7. The air conditioner should always be plugged into a dedicated electrical outlet which has a
voltage rating that matches the serial label on the side of the air conditioner.
8. The electrical ratings for your air conditioner are listed on the Model/Serial Number label. The
Model/Serial Number label is located on the side of the air conditioner cabinet.
9. Specific electrical requirements are listed in the chart below. Follow the requirements for the
type of plug on the power supply cord.
POWER SUPPLY CORD
Wiring Requirements
115-Volt (103.5 min. to 126.5 max.)
•
15-Amp time-delay grounded fuse or circuit breaker
•
Use on single outlet circuit only.
•
INSTALLATION REQUIREMENTS PAGE 7

ELECTRICAL REQUIREMENTS cont.
RESET
TEST
ENGLISH
REQUIRED GROUNDING METHOD (See Fig.3)
This air conditioner must be grounded. This air conditioner is equipped with
a power supply cord that has a 3 prong grounding plug. The power supply
cord must be plugged into a mating, grounded 3 prong outlet, and grounded
in accordance with all local codes and ordinances. If a mating outlet is not
available, it is the customer’s responsibility to contact a qualified electrician
and ensure that a properly grounded 3 prong outlet is installed.
POWER SUPPLY CORD (See Fig.4)
NOTE: Your air conditioner's plug may differ slightly in appearance from the one shown.
A. Reset button
B. Test button
Fig. 3
A
B
Fig. 4
This room air conditioner is equipped with an a leakage current detection interrupter (LCDI)
power supply cord required by UL. This power supply cord contains a current detection device.
If the power supply cord is crushed, this device will detect current leakage and power will be
disconnected from the air conditioner. If this power supply cord is damaged, it cannot be
repaired and must be replaced with a cord from the product manufacturer. If the power supply
cord is damaged call Haier Customer Service: 1-877-337-3639.
PAGE 8 INSTALLATION REQUIREMENTS

ELECTRICAL REQUIREMENTS cont.
WARNING
• Electrical shock hazard
• Plug into a mating, grounded 3 prong
outlet.
• Do not remove the ground prong from the
power supply cord.
TO TEST YOUR POWER SUPPLY CORD:
• Do not use a plug adapter, extension cord,
surge protector, or multi-outlet adapter
• Failure to follow these instructions can
result in injury, fire, or electrical shock.
1. Plug power supply cord into a mating, grounded 3 prong outlet.
(See Fig.5)
2. Press RESET (on some devices, a green light will turn on).
3. Press TEST (listen for click; Reset button will trip, and on some devices,
a green light will turn off).
4. Press and release RESET (listen for click; Reset button will latch, and on
some devices, a green light will turn on). The power supply cord is ready
for operation.
NOTE:
The RESET button must be pushed in completely for proper operation.
•
(See Fig.6)
The power supply cord must be replaced if it fails to trip when the test
•
button is pressed or fails to reset.
DO NOT turn the air conditioner on or off by unplugging the power
•
supply cord from the outlet. Always turn the air conditioner on or off at
the control panel or by using the remote control.
A damaged power supply cord must be replaced with a new power
•
supply cord obtained from the product manufacturer and installed my
a qualified service professional. It cannot be purchased at a retail store
and must not be repaired by the user.
Fig. 5
RESET
Fig. 6
TEST
If the power supply cord is damaged please call Haier Customer Service:
1-877-337-3639.
The power supply cord contains no user-serviceable parts.
•
• Opening the tamper-resistant case voids all manufacturer warranties.
INSTALLATION REQUIREMENTS PAGE 9

ENGLISH
REMOVE PACKAGING MATERIALS
•
NOTE: There are NO internal packing materials inside the air conditioner to remove—Do Not
•
•
UNPACKING THE AIR CONDITIONER
WARNING
EXCESSIVE WEIGHT HAZARD
When moving or lifting the air conditioner, use two or more people.
Wear gloves when handling the air conditioner to protect against
possible sharp edges and metal fins.
Remove packaging materials. Save the carton and the foam packaging for storing the unit when
not in use.
open the cabinet.
Handle the air conditioner gently.
Keep the air conditioner upright and level. Do not set the air conditioner on its side, front, back
or upside down.
The air conditioner must be standing upright for 2 hours prior to installation and operation.
•
PREPARING THE AIR CONDITIONER
INSTALL TOP CHANNEL
Front
3/8" Screw
(Actual Size)
1. Place the top channel on the top of the air conditioner, lining up
the holes in the top channel with the holes in the top of the unit.
Make sure the channel is facing forward as indicated by the
illustrations. (See Fig.7 & 8)
2. Using 3/8" self-tapping screws, attach the top channel to the top
of the air conditioner. (See Fig.8)
Use three (3) 3/8" self-tapping screws for models:
ESA405P, ESA406P, ESA406N
Top Channel
Fig. 7
Fig. 8
Use four (4) 3/8" self-tapping screws for models:
ESA408N, ESA410N & ESA412N
PAGE 10 HOW TO INSTALL

PREPARING THE AIR CONDITIONER cont.
INSTALL SIDE CURTAINS
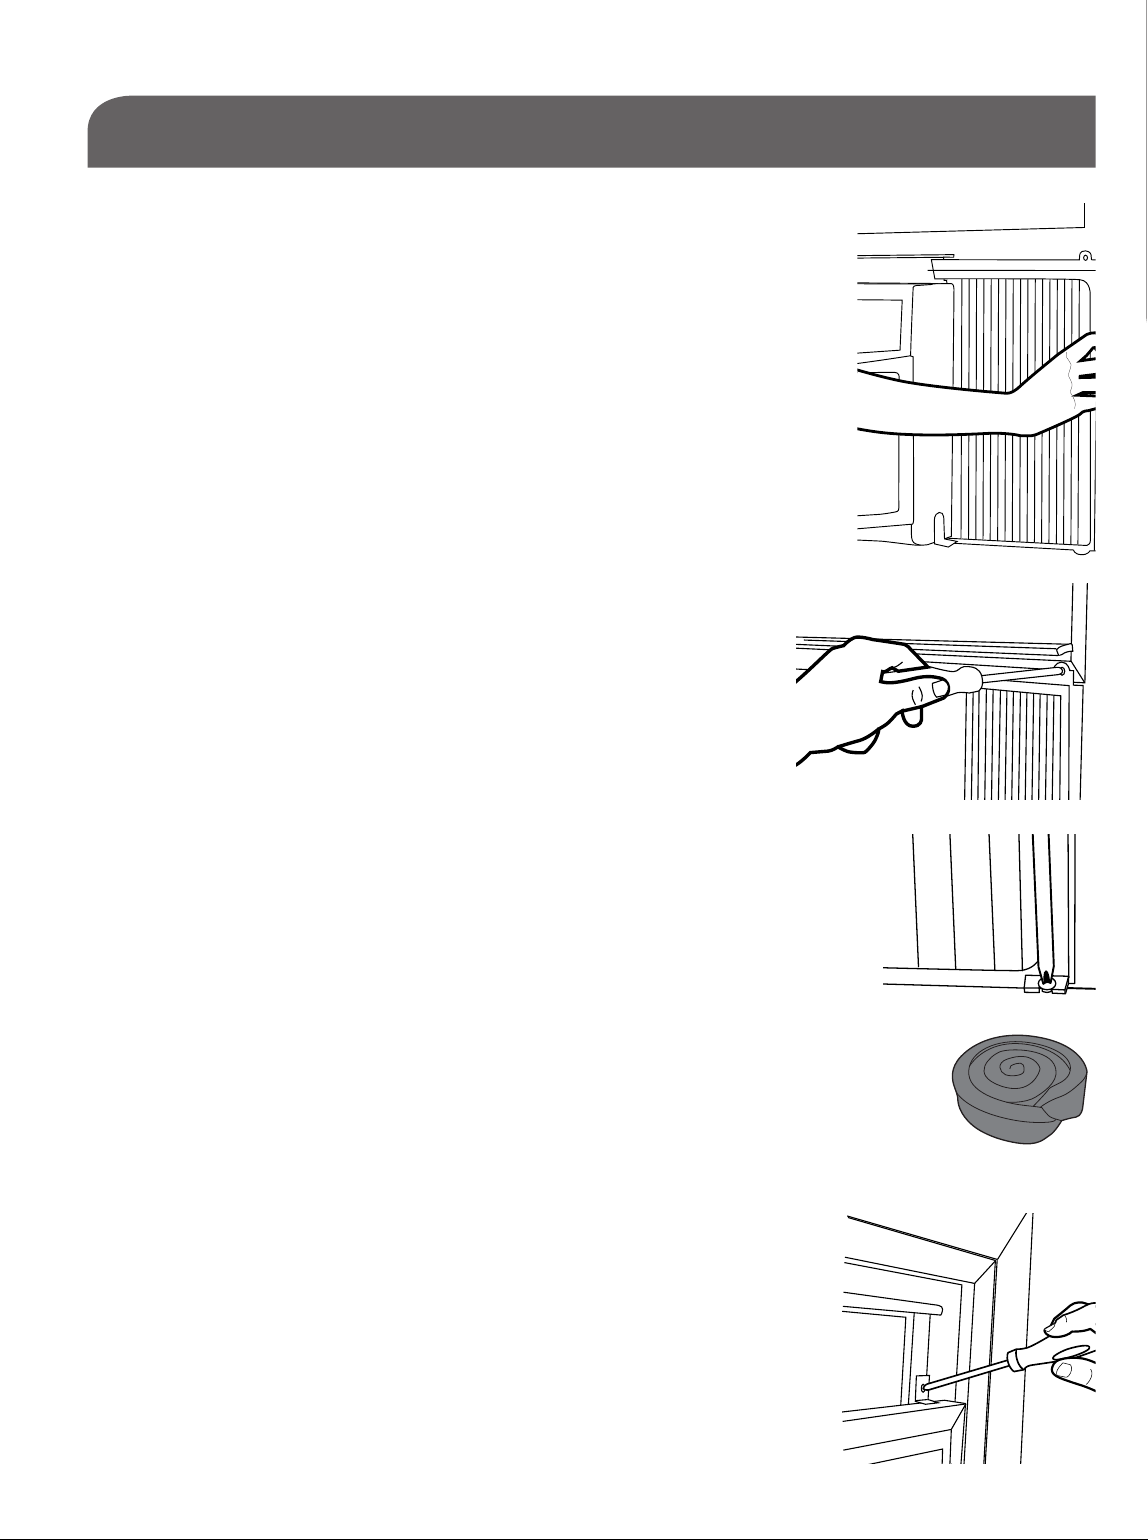
NOTE: Attach side curtains to the air conditioner before placing the unit in the window.
1. Place the tabbed side of the side curtain in
the track on the right-hand side of the air conditioner cabinet. (See Fig.9)
Fig. 9 Fig. 10
TABBED SIDE OF
SIDE CURTAIN
2. Slide the tabbed side of the side curtain down over
all 3 tracks until the curtain is aligned with the top and bottom
of the air conditioner cabinet. (See Fig.11)
3. Slide the side curtain frame over the top of the side curtain, then
into the channel on the top of the air conditioner and
into the track on the bottom of the air conditioner. (See Fig.12)
4. Slide the side curtain frame as close to the air
conditioner cabinet as necessary to lock the side
curtain to the frame. Gently press the frame until
it clicks. (See Fig.10 & Fig.12)
5. Repeat above steps for the left-hand side curtain
and frame. Make sure no gaps are left to ensure that
air does not escape into or out of the room.
LOCK EDGE SIDE
OF SIDE CURTAIN
Fig. 11
Fig. 12
CLICK
HOW TO INSTALL PAGE 11

PREPARING THE WINDOW
HEIGHT
WIDTH
ENGLISH
1. Measure the width of the window opening. (See Fig.13)
2. Mark the center line on the inside of the windowsill
•
•
with a pencil. (See Fig.14)
WIDTH OF
CENTER LINE
WINDOW OPENING
Fig. 13
WIDTH
Fig. 14
CENTER
NOTES AND WARNINGS:
Be sure your air conditioner does not fall out of the window opening during installation
•
or removal.
Do not block the air discharge or air intake areas on the front panel.
Do not block the louvers on the outside of the air conditioner.
3. Center the air conditioner in the window sill.
Fig. 15
Make sure to place the unit so that it is resting on the windowsill
with a ¼" to ½" downward tilt towards the outside. Lower the
Top Channel
window sash behind the top channel to hold the unit in place.
(See Fig.15)
NOTE: The appearance of your model may differ from the one
shown.
4. Loosen the screw located on the lower-right hand corner of the
air conditioner.
5. Slide the side bracket over the screw. The side bracket should be
resting on the window sill. (See Fig.16)
6. Partially tighten the screw. Secure the unit before tightening completely.
7. Use 1/8" drill bit to drill a starter hole through the holes in the side
bracket.
8. Using two (2) 1" wood screws, attach the side bracket to the
window sill.
9. Repeat for side bracket installation on the left-hand side of the air
conditioner.
Lower Window Sash
PAGE 12 HOW TO INSTALL
Fig. 16
COMPLETING THE INSTALLATION
ATTACH SIDE CURTAINS TO WINDOW
1. Pull the right-hand curtain and frame out until it fits flush to the side
of the window frame. (See Fig.17)
2. Use a 1/8” drill bit to drill a starter hole through the top hole in the
side curtain and into the window sash.
3. Insert one (1) 1" wood screws through the top hole of the right-
hand curtain and into the window sash. (See Fig.18)
4. Repeat for the left-hand curtain.
5. Use a 1/8" drill bit to drill a starter hole into the window sill using the
bottom hole in the side curtain as a guide.
6. Insert one (1) 1" wood screws through the bottom hole of
the right-hand curtain and into the window sill. (See Fig.19)
Fig. 18
7. Repeat for the left-hand curtain.
FINAL INSTALLATION
1. Uncoil the included foam seal. (See Fig.20)
2. Insert the foam seal behind the top of the lower window sash
and against the glass of the upper window.
Fig. 17
3. Place the window lock bracket as shown in the diagram using
a screwdriver. Use a 1/8" drill bit to drill a starter hole through the
hole in the window lock bracket and into the upper window. (See
Fig.21)
4. Attach the window lock bracket to the upper window with one (1)
1" wood screw to secure the unit in place.
5. Plug unit into a grounded 3 prong outlet.
6. Press RESET on the power supply cord on some devices.
A green light will come on. See “Electrical Requirements"
for full detail.
Fig. 19
Fig. 20
Fig. 21
HOW TO INSTALL PAGE 13

ENGLISH
STARTING THE AIR CONDITIONER
˚F/˚C
86
MODE SPEED TIMER
hr
MODE SPEED
FAN
ENERGY
SAVE
COOL
FILTER RESET
HIGH
MED
LOW SLEEP
AUTO COOLDEHUM
TEMP/TIME
FILTER
RESET
CLEAN FILTER
ON
OFF
TEMPERATURE / TIME
CLEAN FILTER
INDICATOR
TIMER
POWER
POWER
AUTO RESTART
Operating your air conditioner properly helps you to obtain the best possible results.
This section explains how to operate this air conditioner.
IMPORTANT:
• When you turn off the air conditioner , either at the control panel or with the remote control,
wait at least 3 minutes before turning it back on. This prevents the compressor from
overloading. This 3 minute delay also applies when switching from cool mode to fan and
back.
Note: There is a built in 3 minute delay. You may notice the compressor might not start right
away. This was designed to protect the unit.
• Do not operate your air conditioner in the Cool mode when the outside temperature is below
61°F (16° C). The inside evaporator coil will freeze up, and the air conditioner will not operate
properly.
PAGE 14 USING YOUR AIR CONDITIONER

STARTING THE AIR CONDITIONER cont.
1. Carefully remove the clear plastic film from the control panel.
2. Press POWER once to turn on the air conditioner.
NOTE: When the air conditioner is first plugged in, the LED display will show “88” for 3 seconds.
After the air conditioner is turned on for the first time, the display will show the
temperature 72 F and the fan is automatically set to Low speed and the Mode indicator will
show ENERGY SAVE.
NOTE: To switch the temperature display between Fahrenheit (F) and Celsius(C), the air
conditioner must be plugged in and turned on. On the control panel on the front of the
AC, press the UP and DOWN button at the same time and hold for 3 seconds. The change
cannot be done using the remote control.
3. Select Mode. Refer to “Mode.”
4. Select Speed. Refer to “Speed.”
5. Set Timer. Refer to “Temp/Time”
6. Reset the filter. Refer to “Filter Reset”
MODE
1. Press mode until you see the indicator light come on next to the desired setting.
2. Choose Fan, Cool, Energy Save, or Dehum.
FAN— Only the fan runs. Press SPEED to select High, Med or Low fan speed. The display shows
the current room temperature.
NOTE: In fan mode, the temperature cannot be set.
ENERGY SAVE— In this mode the fan runs only when cooling is needed. The fan will run for 3
minute after the compressor shuts off. The fan then cycles on for 2 minutes
at 10 minute intervals until the temperature in the room is above the set
temperature. The compressor then turns back on.
COOL— Cools the room. Press SPEED to select High,Med , Low or Auto Cool fan speed. Press
the TEMP/TIME up or down arrow button to adjust the temperature. The fan will run
continuously in cool mode.
DEHUM— Aids in removing humidity from the room. Dehum mode cannot be used to cool room.
NOTE: In Dehum mode, when the set temperature is close to ambient temperature, the
compressor may stop and the fan will run in low speed only.
USING YOUR AIR CONDITIONER PAGE 15

STARTING THE AIR CONDITIONER cont.
ENGLISH
SPEED
1. Press FAN SPEED until; you see the indicator light come on next to the
2. Choose High, Med, Low or Auto Cool
HIGH—For maximum cooling
MED—For normal cooling
LOW—For minimum cooling
AUTO COOL – Adjusts the fan speed automatically to provide ideal cooling
TIMER OFF
To set the air conditioner to turn off between 1 hour and 24 hours (The air
conditioner must be ON to set):
1. Press TIMER button until Timer Off indicator light illuminates. The display
2. Press the TEMP/TIME up or down arrow button to change the delay time
desired setting.
based on the room temperature.
will show the remaining hours before the air conditioner will turn off.
from 1 hour to 24 hours.
˚F/˚C
86
hr
MODE SPEED TIMER
FAN
HIGH
ON
ENERGY
MED
SAVE
COOL
TEMP/TIME
FILTER
RESET
CLEAN FILTER
POWER
AUTO RESTART
OFF
LOW SLEEP
AUTO COOLDEHUM
3. Timer Off indicator light will remain on. The display will show the left time to Timer Off.
TIMER ON
To set the air conditioner to turn on bwtween 1 and 24 hours:
1. Press TIMER until Timer On indicator light illuminates. The display will show the remaining
hours before the air conditioner will turn on.
2. Press the TEMP/TIME up or down arrow button to change the delay time from 1 hour to 24
hours.
3. Timer On indicator light will remain on. Unit will shut off and restart.
PAGE 16 USING YOUR AIR CONDITIONER

STARTING THE AIR CONDITIONER cont.
TO CLEAR TIMER PROGRAM:
NOTE: Air conditioner can be either on or off.
Press TIMER until Timer indicator light turns off.
TO VIEW OR CHANGE THE REMAINING TIME (IN HOURS):
TIMER OFF
1. Press the TEMP/TIME up or down arrow button to increase or decrease the time.
2. After 5 seconds, the display will show the remaining time to Timer OFF.
TIMER ON
1. Press the TEMP/TIME up or down arrow button to increase or decrease the time.
2. The display will show the remaining time to Timer ON.
NOTE: In TIMER and SLEEP mode, temperature cannot be adjusted.
SLEEP
1. Press the TIMER button to choose Sleep mode. The indicator light will turn on.
2. The temperature will increase by 2˚F 1 hour after the mode is chosen. The temperature then
increases another 2˚F after 1 hour. The unit will hold this temperature for 6 hours then stops.
3. To turn off Sleep mode, press the TIMER button until the indicator light is off.
TEMP/TIME
1. Press the TEMP/TIME up arrow button to raise the temperature. Each time you press the
TEMP/TIME up arrow button, the temperature will go up 1°F until it reaches 86°F (30°C).
2. Press the TEMP/TIME down arrow button to lower the temperature. Each time you press the
TEMP/TIME down arrow button, the temperature will go down 1°F until it reaches 61°F (16°C).
NOTE: After 5 seconds, under Fan mode, the display will show the current temperature. Under
Energy Save,Cool or Dehum mode, the display will show the set temperature.
USING YOUR AIR CONDITIONER PAGE 17

STARTING THE AIR CONDITIONER cont.
ENGLISH
FILTER RESET
This feature automatically notifies you that the air filter must be cleaned. The indicator light will
come on after 240 hours of operation. Clean the air filter (refer to Care and Cleaning), place it back
in the front panel, and press the Filter Reset button. The light will turn off.
NOTE: The raised dots are Braille for the visually impaired. (See Fig.22)
Remote control may differ in appearance from the image shown.
NOTE: Remove and discard protective film prior to use. The remote control runs
POWER
Press ON/OFF to turn on the air conditioner.When you first press the ON/OFF
button, the air conditioner will operate in Energy Save mode, low fan speed and
temperature of 72°F. You can select any other mode to satisfy your needs.
USING THE REMOTE CONTROL
on one CR2025 battery (included). Replace battery after 6 months of use,
or when the remote control starts to lose power. To change battery, first
remove screw on back panel of remote.
ON/OFF
MODE
SPEED
TIMER
TEMP/TIME
TEMP/TIME
Mode
Fig. 22
Press MODE to choose Fan, Energy Save, Cool or Dehum.
Speed
Press SPEED to choose High, Med, Low or Auto Cool.
TIMER
To set the air conditioner to turn off after a set amount between 1 hour and 24 hours (unit must
be ON):
1. Press TIMER. Timer OFF indicator light on the air conditioner control panel will illuminate.
2. Press the TEMP/TIME up or down arrow button to change the delay time from 1 hour to 24
hours.
3. Timer OFF indicator light on the air conditioner control panel will remain on.
To set the air conditioner to turn on between 1 hour and 24 hours:
1. Press TIMER. Timer On indicator light on the air conditioner control panel will illuminate.
2. Press the TEMP/TIME up or down arrow button to change the delay time from 1 hour to 24
hours.
3. Timer On indicator light on the air conditioner control panel will remain on.
PAGE 18 USING YOUR AIR CONDITIONER

USING THE REMOTE CONTROL cont.
TO CLEAR TIMER DELAY PROGRAM:
NOTE: Air conditioner can be either on or off.
Press TIMER until Timer indicator light turns off.
TO SEE OR CHANGE THE REMAINING TIME (IN HOURS):
TIMER OFF:
1. Press the TEMP/TIME up or down arrow button to increase or decrease the time.
2. The display on the air conditioner control panel will show the remaining time to Timer Off.
TIMER ON:
1. Display on the air conditioner control panel will show remaining time.
2. Press the TEMP/TIME up or down arrow button to increase or decrease the time.
SLEEP
1. Press the TIMER button to choose Sleep mode. The indicator light will turn on.
2. The temperature will increase by 2F˚ 1 hour after the mode is chosen. The temperature then
increases another 2F after 1 hour. The unit will hold this temperature for 6 hours then stops.
3. To turn off Sleep mode, press the TIMER button until the indicator light is off.
TEMP/TIME
• Press the TEMP/TIME up arrow button to raise the temperature. Each time you press the TEMP/
TIME up arrow button, the temperature will go up 1°F until it reaches 86°F (30°C).
• Press the TEMP/TIME down arrow button to lower the temperature. Each time you press the
TEMP/TIME down arrow button, the temperature will go down 1°F until it reaches 61°F (16°C).
Note: In TIMER and SLEEP mode, temperature cannot be adjusted.
USING YOUR AIR CONDITIONER PAGE 19

ENGLISH
ESA405P
2-Way Air Flow: The air directional louvers let you control the direction of the airflow. The airflow
can be directed left to right.(See Fig.23)
ESA406P, ESA408N, ESA410N, ESA412N
4-Way Air Flow: The air directional louvers let you control the direction of the airflow. The airflow
can be directed up-down and left to right. (See Fig.24)
CHANGING THE AIR DIRECTION
Fig. 23
Fig. 24
o
p
e
n
PAGE 20 USING YOUR AIR CONDITIONER

CLEANING THE AIR FILTER
The air filter is removable for easy cleaning. A clean air filter helps remove dust, lint, and particles
from the air for optimal cooling and operating efficiency. The Filter Reset light will turn on to
notify you that the air filter must be cleaned. The light goes on after the air conditioner has been
operating for 240 hours.
1. Turn off the air conditioner and unplug the power supply cord from the outlet.
2. Remove the air filter by opening the front panel and removing the air filter. Some models may
have a filter that slides out instead and does not require opening of the front panel. (See Fig.25
& Fig.26)
Fig. 25
3. Use a vacuum cleaner with the hose attachment to clean the air filter. If the air filter is very
dirty, wash it in warm water with a mild detergent. Do not wash the air filter in a dishwasher or
clothes washer, or use any chemical cleaners. Do not use a clothes dryer or microwave oven to
dry it. Air-dry the air filter completely before placing it back in the unit.
4. Place the air filter back in the air conditioner.
5. Close the front panel.
6. Plug the power supply cord into the outlet, turn on the air conditioner and press the filter reset
button to turn off the indicator light.
NOTE: Do not operate the air conditioner without the filter in place.
Fig. 26
USING YOUR AIR CONDITIONER PAGE 21

CLEANING THE FRONT PANEL
ENGLISH
1. Turn off the air conditioner and unplug the power supply cord from the outlet.
2. Clean the front panel with a soft cloth. Do not use chemical cleaners, especially spray cleaners,
3. Air-dry the front panel completely.
4. Plug the power supply cord in the outlet and turn on the air conditioner.
In the event that the filter is damaged and needs replacing, call Haier Customer Service:
1-877-337-3639
sharp instruments, or flammable fluids. These products can damage the surface of your air
conditioner.
CUSTOMER SERVICE
IMPORTANT
DO NOT RETURN THIS PRODUCT TO THE STORE
If you have a problem with this product, please contact the
Haier Customer Satisfaction Center at 1-877-337-3639.
DATED PROOF OF PURCHASE, MODEL # AND SERIAL #
REQUIRED FOR WARRANTY SERVICE
CUSTOMER
SERVICE
1-877-337-3639
PAGE 22 CARING FOR YOUR AIR CONDITIONER

NORMAL SOUNDS OF AN AIR CONDITIONER
NORMAL SOUNDS
Your new air conditioner is designed to give you many years of dependable service. This section
tells you how to clean and care for your air conditioner properly.
While your air conditioner is operating, it is normal to hear the following sounds:
SOUNDS REASON
Air movement Air rotating around the fan.
Window vibration Installation not correct. Refer to Install section
Water droplets being thrown against the outside coil. This helps cool the
condenser coil.
Pinging
High pitched hum The compressor turning on and off.
Clicking The thermostat turning on and off.
Gurgling Refrigerant moving through the inside coil.
You can reduce this noise by removing the subbase water plug. (See
Fig.27) Removing this plug will lower the Energy Efficiency of your unit.
NOTE: Do not drill hole in base pan.
Fig. 27
CARING FOR YOUR AIR CONDITIONER PAGE 23

TROUBLESHOOTING
POSSIBLE
PROBLEM
Air Conditioner
does not start or
operate
Remote control is
not working
Room does not
feel cold enough
POSSIBLE CAUSE REMEDY
Power supply cord is not plugged
into an outlet.
Power supply cord has tripped. Press and release RESET button on the power
Unit is turned off. Turn on unit using remote control or on
A household fuse or circuit breaker
has blown.
Batteries are dead. Replace the batteries.
Batteries inserted wrong. Make sure batteries are inserted in the
The room is too hot. Allow time for the room to cool down when
The temperature control may not
be set correctly.
Air flow is restricted. Make sure the air discharge area is not
Plug unit into a mating grounded outlet.
supply cord.
control panel.
Replace the fuse or reset the circuit breaker.
correct position.
you turn on the unit.
Adjust the temperature control on the
control panel or remote control.
blocked.
Room feels too
cold
Air conditioner
cycles on and off
too often
Water drips into
your house
Water drips
outside your
house
Water collects in
cabinet base
Air conditioner is
freezing up; ice
forming on coil
Temperature set too low. Raise the set temperature.
Air filter is dirty or restricted. Clean the air filter.
Air flow is restricted. Make sure the air discharge area is not
blocked.
Outside air temperature is below
61˚F.
Outside temperature is very hot. Raise the FAN speed to the highest setting.
Air conditioner is not properly
leveled.
Hot, humid weather. This is normal during days with high humidity.
Humidity drains into cabinet base. This is normal during days with high humidity.
Temperature outside is too low,
below 61˚F.
Do not operate the unit when the outside
temperature is below 61˚F.
Tilt unit slightly from the front to the back.
Refer to Installation section. DO NOT drill a
hole in the cabinet base.
DO NOT drill a hole in the cabinet base.
To defrost coil, set to FAN ONLY setting.
PAGE 24 TROUBLESHOOTING

LIMITED WARRANTY
ONE YEAR LIMITED WARRANTY
This warranty covers all defects in workmanship
or material for the mechanical and electrical parts
(including labor costs) contained in this product for
a period of 12 months from the date of purchase.
For commercial or rental application, the warranty
is 90 days. You must keep and be able to provide
your original sales receipt as proof of the date of
purchase.
The sealed system and compressor (hermetic
compressor, condenser and evaporator) contained
in this product is for a period of 1 year from the
date of purchase. You must keep and be able to
provide your original sales receipt as proof of the
date of purchase.
WHO IS COVERED
The original retail purchaser of this product.
WHAT WILL BE DONE
Haier America will repair or replace any mechanical,
electrical part or the compressor, which proves
defective in normal household use for a period of
12 months.
HOW CAN YOU GET SERVICE
Contact your nearest manufacturer-authorized
Service Depot. For the name of the Service Depot
nearest you, contact Haier America at 1-877-337-
3639.
All service must be performed by a manufacturer-
authorized Service Depot.
THIS WARRANTY DOES NOT COVER
1. Damages from improper installation.
2. Damages in shipping.
3. Defects other than manufacturing.
5. Damage from other than household use.
6. Damages from service by other than an
authorized dealer or service center.
7. Decorative trims.
8. Labor, service, transportation and shipping
charges for the removal of defective parts and
installation of replacement parts beyond the
initial 12-month period.
9. Credit or refund for products over 30 days
past date of purchase, or for any loss or injury
caused by the product or defects to the product
including but not limited to incidental or
consequential damages.
10. Refurbished product purchased as/like new or
second-hand.
THIS LIMITED WARRANTY IS GIVEN IN LIEU
OF ALL OTHER WARRANTIES, EXPRESS OR
IMPLIED, INCLUDING THE WARRANTIES OF
MERCHANTABILITY AND FITNESS FOR A
PARTICULAR PURPOSE.
The remedy provided in this warranty is exclusive
and is granted in lieu of all other remedies.
This warranty does not cover incidental or
consequential damages. Some states do not
allow the exclusion of incidental or consequential
damages, so this limitation may not apply to you.
Some states do not allow limitations on how long
an implied warranty lasts, so this limitation may not
apply to you. This warranty gives you specic legal
rights and you may aldo have other rights which
vary from state to state.
This warranty covers units within the continental
United States, Canada and Puerto Rico.
4. Damages from misuse, abuse, accident,
alteration, lack of proper care and maintenance
or incorrect current or voltage.
Haier America,
Wayne, NJ 07470
LIMITED WARRANTY PAGE 25


ÍNDICE
INFORMACIÓN DE SEGURIDAD ............................................................................................... 2
Precauciones importantes de seguridad ..............................................................................2-3
Seguridad en el funcionamiento y advertencias ....................................................................... 4
REQUISITOS DE INSTALACIÓN ............................................................................................... 5
Herramientas y partes ................................................................................................................ 5
Requisitos de ubicación .............................................................................................................. 6
Requisitos eléctricos............................................................................................................... 7-9
CÓMO INSTALAR ..................................................................................................................... 10
Cómo desempacar el aire acondicionado ...............................................................................10
Cómo preparar el aire acondicionado ................................................................................10-11
Cómo preparar la ventana ........................................................................................................ 12
Cómo finalizar la instalación .....................................................................................................13
CÓMO UTILIZAR EL AIRE ACONDICIONADO .....................................................................14
Cómo encender el aire acondicionado ..............................................................................14-18
Uso del control remoto ....................................................................................................... 18-19
Cómo cambiar la dirección del aire .........................................................................................20
CÓMO CUIDAR EL AIRE ACONDICIONADO ......................................................................... 21
Limpieza del filtro de aire .......................................................................................................... 21
Limpieza del panel frontal .........................................................................................................22
Mantenimiento anual ................................................................................................................22
Servicio al cliente ......................................................................................................................22
Sonidos normales de un aire acondicionado ........................................................................... 23
SOLUCIÓN DE PROBLEMAS ................................................................................................... 24
GARANTÍA LIMITADA .............................................................................................................. 25
REGISTRO DEL PRODUCTO
Gracias por adquirir nuestro producto Haier.
Este manual de fácil uso lo guiará para que
aproveche al máximo su producto.
Recuerde registrar el modelo y números
deserie que se encuentran en la parte lateral
de la unidad.
Número de modelo
Número de serie
Fecha de compra
Engrape el recibo al manual, lo necesitará para recibir el servicio de garantía.

PRECAUCIONES IMPORTANTES
DESEGURIDAD
ADVERTENCIA
SE DEBE SEGUIR LA INFORMACIÓN DE ESTA GUÍA DE USO Y CUIDADO
PARAREDUCIR AL MÍNIMO EL RIESGO DE LESIONES PERSONALES, INCENDIO,
DESCARGA ELÉCTRICA U OTRAS CONDICIONES PELIGROSAS.
LAS INSTRUCCIONES EN ESTA GUÍA DE USO Y CUIDADO NO PRETENDEN
ABARCAR TODAS LAS POSIBLES CONDICIONES O SITUACIONES QUE PUDIERAN
OCURRIR. TENGA PRECAUCIÓN Y CUIDADO CUANDO INSTALE, PONGA
ENFUNCIONAMIENTO Y LIMPIE EL AIRE ACONDICIONADO.
1. Utilice este aire acondicionado solamente para lo que fue diseñado, según
se describe en esta guía de uso y cuidado.
2. Antes de poner en funcionamiento, este aire acondicionado debe instalarse
correctamente y estar conectado al tomacorriente apropiado que
corresponda al cable de suministro eléctrico del aire acondicionado según
la sección de instalación de esta guía de uso y cuidado.
3. Nunca jale el cable de suministro eléctrico para desconectar el aire
acondicionado. Tome siempre la clavija con firmeza y jálela en línea recta
deltomacorriente en la pared.
4. Reemplace de inmediato el cable de suministro eléctrico si se daña de
alguna manera. Se debe comprar el cable de suministro eléctrico con el
fabricante del aire acondicionado y lo debe instalar un técnico calificado.
NO utilice un cable de suministro eléctrico que tenga fisuras, grietas, cortes
o que tenga daños en algún lugar a lo largo del cable mismo o bien enel
extremo de la clavija o en el extremo conector.
5. Apague el aire acondicionado y desconéctelo del tomacorriente en la pared
antes de limpiarlo o de darle mantenimiento.
6. No almacene ni utilice materiales ni líquidos combustibles ni inflamables
enel aire acondicionado o cerca de este.
7. Si la configuración del tomacorriente en la pared no corresponde con la
configuración de la clavija del aire acondicionado, un electricista calificado
ESPAÑOL
PÁGINA 2 INFORMACIÓN DE SEGURIDAD
debe cambiar el tomacorriente en la pared.

PRECAUCIONES IMPORTANTES
DESEGURIDAD
8. Este aire acondicionado contiene refrigerante R410a y requiere que
técnicos certificados utilicen el equipo, herramientas y estándares de
seguridad adecuados aprobados para este refrigerante. Utilice únicamente
equipo certificado para el refrigerante R410a. Además, según las leyes
federales, todo refrigerante debe retirarse del aire acondicionado de manera
adecuada antes de que se le deseche.
Para descartar el producto de manera responsable, consulte earth911.com
o póngase en contacto con la municipalidad local para obtener opciones de
reciclado adicionales en su zona.
LEA Y SIGA CUIDADOSAMENTE
LAS INSTRUCCIONES DE SEGURIDAD.
GUARDE ESTAS INSTRUCCIONES
INFORMACIÓN DE SEGURIDAD PÁGINA 3

SEGURIDAD EN EL FUNCIONAMIENTO
Y ADVERTENCIAS
1. Este aire acondicionado no contiene partes a las que el cliente pueda dar
mantenimiento. Si tiene problemas o dudas sobre el funcionamiento del
aire acondicionado llame siempre al centro de servicio al cliente de Haier:
1-877-337-3639.
2. Asegúrese de que el aire acondicionado está instalado correctamente y
demanera segura en la ventana, según las instrucciones de instalación que
se incluyen en esta guía de uso y cuidado.
3. NO haga perforaciones en la base ni en los lados del aire acondicionado.
4. NO meta los dedos u objetos donde se descarga el aire o donde entra
elaire en la parte delantera del aire acondicionado.
5. NO ponga en funcionamiento el aire acondicionado con una cubierta
protectora en la sección exterior.
6. NO obstruya las partes por donde se descarga el aire o por donde entra
elaire en el panel frontal.
7. No obstruya las rejillas laterales del exterior del aire acondicionado.
8. NO coloque ningún objeto en las secciones de entrada ni en las de salida
delaire acondicionado.
9. Ponga en funcionamiento el aire acondicionado con el filtro de aire instalado.
10. Guarde esta guía de uso y cuidado, la caja y el material de empaque
para utilizarlos en el futuro cuando quite, guarde y vuelva a instalar
elaireacondicionado.
ESPAÑOL
PÁGINA 4 INFORMACIÓN DE SEGURIDAD

HERRAMIENTAS Y PARTES
Lea y siga las instrucciones incluidas y utilice las herramientas que se enumeran a continuación.
HERRAMIENTAS NECESARIAS
Destornillador Phillips
Tijeras
Nivel
Cinta métrica
Taladro y broca
de 1/8 de pulg.
Lápiz
PARTES INCLUIDAS:
Revise que el paquete incluya todas las partes mencionadas para su aire acondicionado específico.
NOTA: Si faltan partes, llame al centro de servicio al cliente de Haier: 1-877-337-3639.
ESA405P,
ESA408N, ESA410N,
IMAGEN PARTE
ESA406P,
ESA412N
ESA406N
Canaleta superior
Cinta de espuma
Soporte lateral
1 1
1 1
2 2
Soporte del seguro
1 1
de la ventana
Tornillos
autorroscantes
3 4
de3/8 de pulgada
Tornillos para madera
9 9
de 1pulgada
Cortinas laterales
Marcos de
2 2
2 2
la cortina lateral
ON/OFF
MODE
SPEED
TIMER
TEMP/TIME
TEMP/TIME
Control remoto 1
REQUISITOS DE INSTALACIÓN PÁGINA 5
1

REQUISITOS DE UBICACIÓN
HEIGHT
WIDTH
IMPORTANTE: Respete todos los códigos y normativas correspondientes. Revise la ubicación
donde se instalará el aire acondicionado. Asegúrese de tener todo lo necesario
para realizar la instalación correctamente.
LA UBICACIÓN DEBE CONTAR CON LO SIGUIENTE:
• Tomacorriente eléctrico con conexión a tierra a una distancia de 6 pies (183 cm) a partir del lugar
de donde sale el cable de suministro eléctrico del aire acondicionado para modelos: ESA405P,
ESA406P, ESA408N
Tomacorriente eléctrico con conexión a tierra a una distancia de 4 pies (122 cm) a partir del lugar
•
de donde sale el cable de suministro eléctrico del aire acondicionado para modelos:
ESA410N, ESA412N
NOTA: No use un cable de extensión, adaptador para enchufe, protector contra sobrecargas
oadaptador de varias salidas.
Circulación libre de aire en la habitación que va a enfriarse.
•
Una abertura lo suficientemente grande para el acondicionador de aire. (véase la Figura 2).
•
El aire acondicionado no debe instalarse en una carcasa para instalación en pared ni en una
•
pared. Únicamente puede instalarse enuna ventana de guillotina.
NOTA: Las rejillas del gabinete externo y la salida del aire no deben estar obstruidas por arbustos,
Fig. 1
REJILLAS DEL
GABINETE
INSTALACIÓN EN UNA VENTANA
árboles, etc. El aire tiene que poder pasar libremente a través de las rejillas del gabinete.
(véase la Figura 1).
Fig. 2
B. ALTURA
SALIDA DE AIRE
A. ANCHO
Medidas de la abertura de la ventana:
ESA405P ESA406P, ESA406N ESA408N / ESA410N ESA412N
556 -914 mm 622 -914 mm 635 -931 mm 664 -960 mm
340 mm 340 mm 370 mm 370 mm
ESPAÑOL
A. Ancho
B. Altura
PÁGINA 6 REQUISITOS DE INSTALACIÓN

REQUISITOS ELÉCTRICOS
ADVERTENCIA
SEGURIDAD ELÉCTRICA y ADVERTENCIAS
1. NO corte ni quite la clavija de conexión a tierra en el cable de suministro eléctrico colocado.
Si lo hace pueden salir chispas o fuego y se invalidarían todas las garantías. Por motivos
deseguridad, el aire acondicionado debe conectarse a tierra de manera apropiada.
2. Para evitar el riesgo de incendio o descarga eléctrica, NO utilice un adaptador para enchufe,
cable de extensión, protector contra sobrecargas o adaptadores de varias salidas con el
aireacondicionado.
3. El cable de suministro eléctrico tiene un enchufe de 3 clavijas que se acopla a un tomacorriente
en la pared estándar de 115 voltios para reducir al mínimo la posibilidad de descarga eléctrica
debido al aire acondicionado.
4. El cable de suministro eléctrico incluye un dispositivo interruptor en caso de detección de fuga
de corriente (LCDI). La caja de enchufe cuenta con un botón RESET (RESTABLECER) y TEST
(PROBAR). El dispositivo se debe probar periódicamente oprimiendo el botón TEST y después
el botón RESET mientras esté enchufado al tomacorriente en la pared. Si el botón TEST no se
activa o el botón RESET no se acopla, no utilice el aire acondicionado y póngase en contacto
con un técnico de servicio calificado.
5. Pida a un electricista calificado que inspeccione el tomacorriente en la pared y el circuito para
asegurarse de que aquel esté conectado a tierra de manera apropiada.
6. Si tiene un tomacorriente en la pared de 2 clavijas y no de 3, es responsabilidad del
usuario reemplazarlo por un tomacorriente en la pared de 3 clavijas conectado a tierra
demaneraapropiada.
7. El aire acondicionado debe estar siempre conectado a un tomacorriente eléctrico dedicado
quetenga un valor de voltaje que corresponda con la etiqueta del número de serie en el
costado del aire acondicionado.
8. Los valores nominales eléctricos del aire acondicionado se incluyen en la etiqueta del modelo
ynúmero de serie. Esta se encuentra en el costado del gabinete del aire acondicionado
odetrásde la rejilla frontal.
9. La siguiente tabla muestra los requisitos eléctricos específicos. Debe cumplir con los requisitos
para el tipo de enchufe que tiene el cable de suministro eléctrico.
CABLE DE SUMINISTRO ELÉCTRICO
Requisitos de cableado
115 voltios (103.5 mínimo a 126.5 máximo).
•
Fusible de retardo de 15 amperios conectado a tierra o interruptor de carga.
•
Utilícelo en un circuito con un solo tomacorriente.
•
REQUISITOS DE INSTALACIÓN PÁGINA 7

REQUISITOS ELÉCTRICOS, continuación
RESET
TEST
MÉTODO DE PUESTA A TIERRA REQUERIDO (véase la Figura 3).
Fig. 3
Este aire acondicionado debe conectarse a tierra y está equipado con uncable
de suministro eléctrico que tiene un enchufe con conexión a tierra de 3clavijas.
El cable de suministro eléctrico debe enchufarse en un tomacorriente
apropiado de 3 clavijas con conexión a tierra de acuerdo con todos los códigos
y normativas locales. Si no cuenta con un tomacorriente apropiado, el cliente
tiene la responsabilidad de comunicarse con un electricista calificado y
asegurarse de que se instale un tomacorriente de 3 clavijas con conexión
atierra adecuado.
CABLE DE SUMINISTRO ELÉCTRICO (véase la Figura 4).
NOTA: El enchufe del aire acondicionado puede ser ligeramente diferente en apariencia al que
semuestra.
A. Botón Reset.
B. Botón Test.
A
B
Fig. 4
Este aire acondicionado de uso doméstico está equipado con un interruptor en caso de
detección de fuga de corriente (LCDI) y un cable de suministro eléctrico exigido por UL.
Este cable de suministro eléctrico contiene un dispositivo de detección de corriente. Si el
cable de suministro eléctrico está aplastado, este dispositivo detectará fuga de corriente
yse desconectará el suministro eléctrico del aire acondicionado. Si este cable de suministro
eléctrico está dañado, no se puede reparar y debe reemplazarse por un cable que se obtenga
con el fabricante del producto. Si el cable de suministro eléctrico está dañado, llame al centro
deservicio al cliente de Haier: 1-877-337-3639.
ESPAÑOL
PÁGINA 8 REQUISITOS DE INSTALACIÓN

REQUISITOS ELÉCTRICOS, continuación
ADVERTENCIA
• Riesgo de descarga eléctrica.
• No use un adaptador para enchufe, cable
de extensión, protector contra sobrecargas
• Enchufe en un tomacorriente apropiado
ni adaptador de varias salidas.
de 3 clavijas con conexión a tierra.
• No seguir estas instrucciones puede
• No quite la clavija de conexión a tierra
delcable de suministro eléctrico.
producir una lesión, un incendio
o una descarga eléctrica.
PARA PROBAR EL CABLE DE SUMINISTRO ELÉCTRICO:
1. Enchufe el cable de suministro eléctrico en un tomacorriente
apropiadode 3 clavijas con conexión a tierra (véase la Figura 5).
2. Oprima RESET (restablecer) (en algunos dispositivos se encenderá
unaluz verde).
3. Oprima TEST (probar) (espere escuchar un clic; el botón Reset
seactivará y en algunos dispositivos se apagará una luz verde).
4. Oprima y suelte RESET (espere escuchar un clic; el botón Reset
se bloqueará y en algunos dispositivos se encenderá una luz verde).
El cable de suministro eléctrico está listo para usarse.
NOTA:
Fig. 5
• El botón Reset debe estar oprimido por completo para un correcto
funcionamiento (véase la Figura 6).
• El cable de suministro eléctrico debe sustituirse si no se dispara cuando
se oprime el botón de prueba o si no se restablece.
• NO encienda ni apague el aire acondicionado desenchufando el cable
de suministro eléctrico del tomacorriente. Encienda o apague el aire
acondicionado siempre en el panel control o con el control remoto.
• Si el cable de suministro eléctrico está dañado, debe sustituirse por
unonuevo que se obtenga del fabricante del producto y debe instalarlo
un profesional deservicio calificado. No debe comprarse en una tienda
ni debe repararlo el usuario.
Si el cable de suministro eléctrico está dañado, llame al centro de servicio al cliente de Haier:
1-877-337-3639.
• El cable de suministro eléctrico no contiene partes que el usuario pueda reparar.
• Abrir el revestimiento resistente a alteraciones anula todas las garantías del fabricante.
Fig. 6
RESET
TEST
REQUISITOS DE INSTALACIÓN PÁGINA 9

CÓMO DESEMPACAR EL AIRE ACONDICIONADO
ADVERTENCIA
RIESGO DE EXCESO DE PESO
Cuando mueva o levante el aire acondicionado, hágalo entre dos o más personas.
Cuando manipule el aire acondicionado, utilice guantes
para protegerse de bordes filosos y de aletas de metal.
CÓMO QUITAR LOS MATERIALES DE EMPAQUE
Cómo quitar los materiales de empaque. Guarde la caja y la espuma de empaque para almacenar
•
la unidad cuando no la esté utilizando.
NOTA: NO hay ningún material embalado dentro del acondicionador de aire para quitar - No abra
el gabinete.
Manipule el aire acondicionado con cuidado.
•
Mantenga el aire acondicionado en posición vertical y nivelado. No coloque el aire acondicionado
•
de lado, de frente, de espaldas ni al revés.
El aire acondicionado debe dejarse en posición vertical durante 2 horas antes de su instalación
•
ypuesta en funcionamiento.
CÓMO PREPARAR EL AIRE ACONDICIONADO
INSTALACIÓN DE LA CANALETA SUPERIOR
Parte frontal
Tornillos de
3/8 de pulgada
(tamaño real)
1. Coloque la canaleta superior en la parte superior del aire
acondicionado, alineando los orificios de la canaleta superior
conlos orificios de la parte superior de la unidad.
Asegúrese de que la canaleta quede viendo de frente
comoloindicalaetiqueta (véase la Figura 7 & 8).
2. Utilice tornillos autorroscantes de 3/8 de pulgada para fijar la canaleta
superior a la parte superior del aire acondicionado (véase la Figura 8).
Utilice tres (3) tornillos autorroscantes de 3/8 de pulgada para los modelos:
ESA405P, ESA406P, ESA406N
Canaleta superior
Fig. 7
Fig. 8
ESPAÑOL
Utilice cuatro (4) tornillos autorroscantes de 3/8 de pulgada para los modelos:
ESA408N, ESA410N & ESA412N
PÁGINA 10 CÓMO INSTALAR

CÓMO PREPARAR EL AIRE ACONDICIONADO, continuación
INSTALACIÓN DE LOS SEGUROS PARA CORTINA
NOTA: Fije las cortinas laterales al aire acondicionado antes de colocar la unidad en la ventana.
1. Coloque el lado con aleta de la cortina lateral en la guía del lado derecho del gabinete del aire
acondicionado (véase la Figura 9).
Fig. 9 Fig. 10
LADO CON ALETA DE
LA CORTINA LATERAL
2. Deslice hacia abajo el lado con aleta de la cortina lateral
sobre las 3 guías hasta que la cortina se alinee con
la parte superior e inferior del gabinete del aire acondicionado
(véase la Figura 11).
3. Deslice el marco de la cortina lateral sobre la parte superior
de la cortina lateral, y posteriormente en la canaleta
de la parte superior del aire acondicionado y dentro
de la guía de la parte inferior del aire acondicionado
(véase la Figura 12).
4. Deslice el marco de la cortina lateral lo más cerca posible
al gabinete del aire acondicionado, lo suficiente para
poder asegurar la cortina lateral en el marco. Presione
con cuidado el marco hasta que se escuche un clic
(véase las Figuras 10 y 12).
5. Repita los pasos anteriores para la cortina lateral
y el marco izquierdos. Asegúrese de que no queden
espacios para garantizar que no se escape el aire dentro
o fuera de la habitación.
CIERRE EL LADO
DEL BORDE DE LA
CORTINA LATERAL
Fig. 11
Fig. 12
CLIC
CÓMO INSTALAR PÁGINA 11

CÓMO PREPARAR LA VENTANA
HEIGHT
WIDTH
1. Mida el ancho de la abertura de la ventana (véase la Figura 13).
2. Marque con un lápiz una línea central en la parte interior de la base de la ventana
(véase la Figura 14).
ANCHO DE
LAABERTURA
DELAVENTANA
LÍNEA CENTRAL
Fig. 13
WIDTH
Fig. 14
CENTER
NOTAS Y ADVERTENCIAS:
Asegúrese de que el aire acondicionado no se caiga de la abertura de la ventana mientras
•
loinstala o lo quita.
NO obstruya las partes por donde se descarga el aire o por donde entra el aire en el panel frontal.
•
No obstruya las rejillas del exterior del aire acondicionado.
•
3. Centre el aire acondicionado en la base de la ventana.
Asegúrese de colocar la unidad de manera que descanse en la
base de la ventana con una inclinación hacia abajo de ¼ a ½
pulgada hacia el exterior. Baje el bastidor delaventana detrás
Fig. 15
Lower Window Sash
Top Channel
de la canaleta superior para sujetar la unidad en su lugar (véase la
Figura 15).
NOTA: La apariencia del modelo que usted tiene puede ser diferente
a la que se muestra.
4. Afloje el tornillo que se encuentra en la esquina inferior derecha
del aire acondicionado.
5. Deslice el soporte lateral sobre el tornillo. El soporte lateral debe
descansar en la base de la ventana (véase la Figura 16).
6. Apriete parcialmente el tornillo. Asegure la unidad antes
deapretarlo completamente.
7. Utilice una broca de taladro de 1/8 de pulgada para hacer
unorificio inicial a través de los orificios del soporte lateral.
8. Con dos (2) tornillos de madera de 1 pulgada fije el soporte lateral
a la base de la ventana.
9. Repita lo mismo al instalar el soporte lateral del lado izquierdo
ESPAÑOL
delaire acondicionado.
PÁGINA 12 CÓMO INSTALAR
Fig. 16

CÓMO FINALIZAR LA INSTALACIÓN
CÓMO FIJAR LAS CORTINAS LATERALES A LA VENTANA
1. Jale hacia afuera la cortina derecha y el marco hasta que
encajen al ras de la parte lateral del marco de la ventana
(véase la Figura 17).
2. Con una broca de taladro de ⅛ de pulgada, haga un orificio
inicial a través del orificio superior de la cortina lateral
ydentro del bastidor de la ventana.
3. Inserte uno (1) de los tornillos para madera de 1 pulgada
através del orificio superior de la cortina derecha y dentro
del bastidor de la ventana (véase la Figura 18).
4. Haga lo mismo para la cortina izquierda.
5. Con una broca de taladro de ⅛ de pulgada, haga un orificio
inicial en el bastidor de la ventana utilizando el orificio
superior de la cortina lateral como guía.
6. Inserte uno (1) de los tornillos para madera de 1 pulgada
através del orificio inferior de la cortina derecha y dentro del
marco de la ventana (véase la Figura 19).
7. Haga lo mismo para la cortina izquierda.
Fig. 17
Fig. 18
INSTALACIÓN FINAL
1. Desenrolle la cinta de espuma que se incluye (véase la Figura 20).
2. Introduzca la cinta de espuma detrás de la parte superior
delbastidor inferior de la ventana y contra el vidrio de
laventanasuperior.
3. Coloque el soporte del seguro de la ventana como se muestra
enel diagrama utilizando un destornillador. Con una broca
detaladro de ⅛ de pulgada, haga un orificio inicial a través
delorificio del soporte del seguro de la ventana y dentro
delaventana superior (véase la Figura 21).
4. Fije el soporte del seguro de la ventana a la ventana superior
conun (1) tornillo para madera de 1 pulgada para sujetar la
unidaden su lugar.
5. Enchufe la unidad en un tomacorriente de 3 clavijas
conconexiónatierra.
6. Oprima RESET en el cable de suministro eléctrico. Se encenderá
una luz verde. Para conocer los detalles completos, véase
“Requisitos eléctricos”.
Fig. 19
Fig. 20
Fig. 21
CÓMO INSTALAR PÁGINA 13

CÓMO ENCENDER EL AIRE ACONDICIONADO
˚F/˚C
86
MODE SPEED TIMER
hr
TIMER (temporizador)
MODE (modo) SPEED (velocidad)
FAN
ENERGY
SAVE
COOL
RESTABLECIMIENTO
DEL FILTRO
HIGH
MED
LOW SLEEP
AUTO COOLDEHUM
TEMP/TIME
FILTER
RESET
CLEAN FILTER
ON
OFF
TEMPERATURE/TIME
(temperatura/tiempo)
INDICADOR DE
LIMPIEZA DEL FILTRO
POWER (encendido)
POWER
AUTO RESTART
Poner en funcionamiento de manera correcta el aire acondicionado le permite obtener losmejores
resultados posibles.
Esta sección le explica cómo poner en funcionamiento este aire acondicionado.
IMPORTANTE:
Cuando apague el aire acondicionado, ya sea en el panel de control o con el control remoto,
•
espere por lo menos 3 minutos antes de encenderlo de nuevo. Esto evita que el compresor
se sobrecargue. Esta demora de 3 minutos también aplica cuando se cambia de modo frío
aventilador y viceversa.
Nota: Hay una demora incorporada de 3 minutos. Puede notar que el compresor no se
enciende de inmediato. Esto se diseñó para proteger la unidad.
No ponga en funcionamiento el aire acondicionado en el modo Cool (enfriar) cuando
ESPAÑOL
•
latemperatura exterior sea menor a los 61 °F (16 °C). La bobina evaporadora interior
secongelará y el aire acondicionado no funcionará correctamente.
PÁGINA 14 USO DEL AIRE ACONDICIONADO

CÓMO ENCENDER EL AIRE ACONDICIONADO, continuación
1. Quite con cuidado la película de plástico transparente del panel de control.
2. Oprima POWER (encendido) una vez para encender el aire acondicionado. Se encenderá la luz
indicadora POWER.
NOTA: Cuando el aire acondicionado se conecte por primera vez, la pantalla LED mostrará “88” durante
3 segundos. Después de encender el aire acondicionado por primera vez, la pantalla mostrará la
temperatura de 72 °F y el ventilador se establecerá automáticamente en Low speed (Velocidad
baja) y el indicador de modo mostrará ENERGY SAVE (AHORRO DE ENERGÍA).
NOTA: Para cambiar la temperatura entre Fahrenheit (F) y Celsius(C) en la pantalla, debe conectar el
aire acondicionado, y encendido. En el panel de control al frente del AC, mantenga presionado
los botones HACIA ARRIBA y HACIA ABAJO a la vez durante tres segundos.. El cambio no se
puede hacer con el control remoto.
3. Seleccione un modo. Consulte “Mode”.
4. Seleccione una velocidad. Consulte “Speed”.
5. Oprima el botón de temporizador. Consulte “Temp/Time (temperatura/tiempo)”.
6. Restablezca el filtro. Consulte “Filter Reset” (restablecimiento del filtro).
MODO
1. Oprima MODE hasta que vea que la luz indicadora se enciende para la configuración deseada.
2. Elija Fan (ventilador), Cool (enfriar), Energy Save (ahorro de energía) o Dehum (deshumidificar).
FAN: Sólo hace funcionar el ventilador. Oprima SPEED para seleccionar la velocidad del ventilador:
High, Med o Low. La pantalla muestra la temperatura actual de la habitación.
COOL: Enfría la habitación. Oprima SPEED para seleccionar la velocidad del ventilador: High, Med, Low
o Auto (alta, media, baja o automática). Oprima el botón con la flecha hacia arriba o hacia abajo
TEMP/TIME (TEMPERATURA/TIEMPO) para ajustar la temperatura.
ENERGY SAVE: En este modo el ventilador sólo se activa cuando es necesario enfriar. Elventilador
se activará durante 3 minuto después de que el compresor se apague. Entonces el
ventilador inicia el ciclo durante 2 minutos, a intervalos de10 minutos, hasta que la
temperatura de la habitación sea mayor a la temperatura establecida. Después el
compresor se enciende de nuevo.
DEHUM: Ayuda a eliminar la humedad de la habitación. El aire acondicionado selecciona
automáticamente la temperatura. Esta configuración NO enfriará la habitación.
NOTA:
El modo Dehum no puede utilizarse para enfriar la habitación.
•
USO DEL AIRE ACONDICIONADO PÁGINA 15

CÓMO ENCENDER EL AIRE ACONDICIONADO, continuación
SPEED
1. Oprima FAN SPEED hasta que vea que la luz indicadora se enciende
paralaconfiguración deseada.
2. Elija High, Med, Low o Auto Cool.l
HIGH: Para enfriar al máximo.
86
˚F/˚C
hr
MED: Para enfriamiento normal.
MODE SPEED TIMER
LOW: Para enfriar al mínimo.
FAN
AUTO COOL (ENFRIAMIENTO AUTOMÁTICO): Ajusta automáticamente
la velocidad del ventilador para proporcionar el enfriamiento ideal según
latemperatura de la habitación.
TIMER OFF (TEMPORIZADOR APAGADO)
ENERGY
SAVE
COOL
HIGH
MED
LOW SLEEP
AUTO COOLDEHUM
TEMP/TIME
FILTER
RESET
Para configurar el aire acondicionado para que se apague en un lapso entre 1 y 24
horas (el aire acondicionado debe estar en ON [encendido] para configurarse):
1. Presione TIMER (TEMPORIZADOR) hasta que se ilumine el indicador Timer Off
(Temporizador apagado). La pantalla mostrará las horas restantes antes de que
CLEAN FILTER
POWER
AUTO RESTART
el aire acondicionado se apague.
2. Oprima el botón con la flecha hacia arriba o hacia abajo TEMP/TIME para
cambiar el tiempo de demora de 1 hasta 24 horas.
3. Después de 5 segundos, la luz indicadora Timer Off (Temporizador apagado) permanecerá
encendida. La pantalla mostrará el tiempo restante para que se apague el temporizador.
TIMER ON (TEMPORIZADOR ENCENDIDO)
Para configurar el temporizador para que encienda el aire acondicionado con los ajustes previos:
1. Encienda la unidad.
2. Presione TIMER (TEMPORIZADOR) hasta que se ilumine el indicador Timer On (Temporizador
encendido). La pantalla mostrará las horas restantes antes de que el aire acondicionado se
encienda.
3. Oprima el botón con la flecha hacia arriba o hacia abajo TEMP/TIME para cambiar el tiempo
de demora de 1 hasta 24 horas.
4. La unidad se apaga y se reinicia.
ON
OFF
ESPAÑOL
PÁGINA 16 USO DEL AIRE ACONDICIONADO

CÓMO ENCENDER EL AIRE ACONDICIONADO, continuación
PARA BORRAR LA PROGRAMACIÓN DEL TEMPORIZADOR:
NOTA: El aire acondicionado puede estar encendido o apagado.
Presione TIMER (TEMPORIZADOR) hasta que la luz del indicador de temporizador se apague.
PARA VER O CAMBIAR EL TIEMPO RESTANTE (EN HORAS):
TIMER OFF
1. Oprima el botón con la flecha hacia arriba ohacia abajo TEMP/TIME para aumentar o disminuir el
tiempo.
2. Después de 5 segundos, la pantalla mostrará la temperatura actual de la habitación.
TIMER ON
1. La pantalla mostrará el tiempo restante.
2. Mientras la pantalla muestra el tiempo restante, oprima el botón con la flecha hacia arriba o hacia
abajo TEMP/TIME para aumentar o disminuir el tiempo.
3. Después de 5 segundos, la pantalla mostrará la temperatura actual de la habitación.
Nota: En los modos TIMER (TEMPORIZADOR) y SLEEP (DESCONEXIÓN AUTOMÁTICA), no puede
regularse la temperatura.
SLEEP (DORMIR)
1. Oprima el botón TIMER para elegir el modo Sleep. Se encenderá la luz indicadora.
2. La temperatura aumentará 2 °F, 1 hora después de haber seleccionado el modo. Posteriormente
la temperatura aumentará otros 2 °F después de 1 hora. La unidad mantendrá esta temperatura
durante 6 horas y después se detendrá.
3. Para apagar el modo Sleep, oprima el botón TIMER hasta que la luz indicadora se apague.
TEMP/TIME
1. Oprima el botón con la flecha hacia arriba TEMP/TIME para aumentar la temperatura. Cada vez que
oprima el botón con la flecha hacia arriba TEMP/TIME, la temperatura aumentará 1 °F hasta que llegue
a los 86 °F (30 °C).
2. Oprima el botón con la flecha hacia abajo TEMP/TIME para disminuir la temperatura. Cada vez que
oprima el botón con la flecha hacia abajo TEMP/TIME, la temperatura disminuirá 1 °F hasta que llegue
a los 61 °F (16 °C).
NOTA: Después de 5 segundos, en el modo Ventilador, el visor mostrará la temperatura actual.
En los modos Enfriamiento, Ahorro de energía o Deshumidificador, el visor mostrará la
temperatura configurada.
USO DEL AIRE ACONDICIONADO PÁGINA 17

CÓMO ENCENDER EL AIRE ACONDICIONADO, continuación
RESTABLECIMIENTO DEL FILTRO
Esta función notifica automáticamente que se debe limpiar el filtro de aire. La luz indicadora
seencenderá después de 240 horas de funcionamiento. Limpie el filtro de aire (consulte Cuidado
USO DEL CONTROL REMOTO
ylimpieza), vuelva a colocarlo en el panel frontal y oprima el botón Filter Reset. Se apagará la luz.
NOTA: Los puntos en relieve son sistema Braille para las personas con discapacidades
ON/OFF
visuales
(véase la Figura 22).
El control remoto puede tener una apariencia diferente de la imagen que
MODE
SPEED
semuestra.
NOTA: Quite y deseche la película protectora antes del uso. El control remoto utiliza
una pila CR2025 (incluida). Reemplace la pila después de 6 meses de uso o
cuando el control remoto comience a perder energía. Para cambiar la pila,
primero quite el tornillo del panel trasero del control remoto.
TIMER
TEMP/TIME
TEMP/TIME
POWER
Presione ON/OFF (ENCENDIDO/APAGADO) para encender el acondicionador
de aire. Cuando presiona por primera vez ON/OFF (ENCENDIDO/APAGADO), el
acondicionador de aire funcionará en el modo de ahorro de energía, con velocidad de
ventilador baja y una temperatura de 72°F. Puede seleccionar cualquier otro modo para satisfacer sus
necesidades.
Fig. 22
MODO
Oprima MODE para elegir Fan, Energy Save, Cool o Dehum.
SPEED
Oprima SPEED para elegir High, Med, Low o Auto Cool.
TIMER
Para configurar el aire acondicionado para que se apague después de 1 a 24 horas seleccionadas
(launidad debe estar en ON):
1. Oprima TIMER. La luz indicadora Timer Off del panel de control del aire acondicionado destellará.
2. Oprima el botón con la flecha hacia arriba o hacia abajo TEMP/TIME para cambiar el tiempo de
demora de 1 hasta 24 horas.
3. Después de 5 segundos, la luz indicadora Timer OFF del panel de control del aire acondicionado
permanecerá encendida.
ESPAÑOL
PÁGINA 18 USO DEL AIRE ACONDICIONADO

USO DEL CONTROL REMOTO, continuación
PARA BORRAR LA PROGRAMACIÓN DE DEMORA DEL TEMPORIZADOR:
NOTA: El aire acondicionado puede estar encendido o apagado.
Oprima TIMER hasta que la luz indicadora del temporizador se apague.
PARA VER O CAMBIAR EL TIEMPO RESTANTE (EN HORAS):
TIMER OFF:
1. Oprima el botón con la flecha hacia arriba o hacia abajo TEMP/TIME para aumentar o disminuir el
tiempo.
2. Después de 5 segundos, la pantalla del panel de control del aire acondicionado mostrará el tiempo
restante para que se apague el temporizador.
TIMER ON:
1. La pantalla del panel de control del aire acondicionado mostrará el tiempo restante.
2. Mientras la pantalla muestra el tiempo restante, oprima el botón con la flecha hacia arriba o hacia
abajo TEMP/TIME para aumentar o disminuir el tiempo.
SLEEP
1. Oprima el botón TIMER para elegir el modo Sleep. Se encenderá la luz indicadora.
2. La temperatura aumentará 2 °F 1 hora después de haber seleccionado el modo. Posteriormente
la temperatura aumentará otros 2 °F después de 1 hora. La unidad mantendrá esta temperatura
durante 6 horas y después se detendrá.
3. Para apagar el modo Sleep, oprima el botón TIMER hasta que la luz indicadora se apague.
TEMP/TIME
• Oprima el botón con la flecha hacia arriba TEMP/TIME para aumentar la temperatura. Cada vez que
oprima el botón con la flecha hacia arriba TEMP/TIME, la temperatura aumentará 1 °F hasta que llegue
a los 86 °F (30 °C).
• Oprima el botón con la flecha hacia abajo TEMP/TIME para disminuir la temperatura. Cada vez que
oprima o mantenga oprimido el botón con la flecha hacia abajo TEMP/TIME, la temperatura disminuirá
1 °F hasta que llegue a los 61 °F (16 °C).
USO DEL AIRE ACONDICIONADO PÁGINA 19

CAMBIO DE LA DIRECCIÓN DEL AIRE
ESA405P
Flujo de Aire en 2 Direcciones: Les pales orientables de circulation d'air vous permettent de
contrôler le sens de la circulation de l'air. La circulation de l'air peut être dirigée latéralement
(gauche/droite) . (voir la figure 23)
ESA406P, ESA408N, ESA410N, ESA412N
Flujo de Aire en 4 Direcciones: Las rejillas direccionales de aire permiten controlar la dirección
del flujo de aire. El flujo de aire puede dirigirse hacia arriba o abajo y a la izquierda o a la derecha.
(véase la Figura 24).
Fig. 23
Fig. 24
o
p
e
n
ESPAÑOL
PÁGINA 20 USO DEL AIRE ACONDICIONADO

LIMPIEZA DEL FILTRO DE AIRE
1. Apague el aire acondicionado y desenchufe el cable de suministro eléctrico del tomacorriente.
2. Para quitar el filtro de aire, abra el panel frontal y saque el filtro de aire. Algunos modelos pueden
tener un filtro que en cambio se desliza y no requiere que se abra el panel frontal (véase las Figuras 25
y 26).
3. Utilice una aspiradora con el accesorio de manguera para limpiar el filtro de aire. Si el filtro de aire
está muy sucio, lávelo con agua tibia y un detergente suave. No lave el filtro de aire en un lavavajillas
ni lavadora ni utilice limpiadores químicos. No utilice una secadora de ropa ni horno de microondas
para secarlo. Déjelo secar al aire completamente antes de volver a colocarlo en la unidad.
4. Vuelva a colocar el filtro de aire en el aire acondicionado.
Fig. 25
5. Cierre el panel frontal.
6. Enchufe el cable de energía en el tomacorriente, encienda el acondicionador de aire y presione el
botón de restablecimiento de filtro para apagar la luz indicadora.
NOTA: No ponga en funcionamiento el aire acondicionado sin colocar el filtro en su lugar.
Fig. 26
USO DEL AIRE ACONDICIONADO PÁGINA 21

LIMPIEZA DEL PANEL FRONTAL
1. Apague el aire acondicionado y desenchufe el cable de suministro eléctrico del tomacorriente.
2. Limpie el panel frontal con un paño suave. No utilice limpiadores químicos, en especial limpiadores
en aerosol, utensilios filosos ni líquidos inflamables. Estos productos pueden dañar la superficie
delaire acondicionado.
3. Déjelo secar al aire completamente.
4. Conecte el cable de suministro eléctrico en el tomacorriente y encienda el aire acondicionado.
En caso de que el filtro esté dañado y sea necesario remplazarlo, llame al centro de servicio al cliente
de Haier: 1-877-337-3639
SERVICIO AL CLIENTE
IMPORTANTE
NO DEVUELVA ESTE PRODUCTO A LA TIENDA
Si tiene algún problema con este producto, comuníquese
conel Centro de satisfacción del cliente al 1-877-337-3639.
ES NECESARIO TENER EL COMPROBANTE DE COMPRA
FECHADO, EL NÚMERO DE MODELO Y EL NÚMERO DE SERIE
PARA RECIBIR EL SERVICIO DE GARANTÍA.
SERVICIO
AL CLIENTE
1-877-337-3639
ESPAÑOL
PÁGINA 22 CÓMO CUIDAR EL AIRE ACONDICIONADO

SONIDOS NORMALES DE UN AIRE ACONDICIONADO
El filtro de aire se puede quitar para facilitar la limpieza. Un filtro de aire limpio contribuye a eliminar
elpolvo, las pelusas y partículas del aire para optimizar el enfriamiento y para que el aparato funcione
eficazmente. La luz de restablecimiento del filtro se encenderá para notificarle que se debe limpiar
elfiltro de aire. La luz se enciende después de que el aire acondicionado ha estado en funcionamiento
durante 240 horas.
SONIDOS MOTIVO
Movimiento
deaire
Vibración
enlaventana
Sonido metálico
Zumbido agudo Encendido y apagado del compresor.
Chasquido Encendido y apagado del termostato.
Gorgoteo Refrigerante que se mueve a través de la bobina (interna) del evaporador.
Fig. 27
Aire que gira alrededor del ventilador.
Instalación incorrecta. Consulte la sección Instalación.
Gotas de agua arrojadas contra la bobina (externa) del condensador.
Esto ayuda a enfriar la bobina del condensador.
Puede reducir el sonido quitando el tapón de agua de la sub-base.(véase
las Figuras 27)
Nota: No perfore agujero en la placa de base. Quitar este tapón disminuirá
la eficiencia energética de su unidad.
CÓMO CUIDAR EL AIRE ACONDICIONADO PÁGINA 23

SOLUCIÓN DE PROBLEMAS
ESPAÑOL
POSIBLE
PROBLEMA
El aire
acondicionado
no enciende
nifunciona
El control remoto
no funciona
La habitación
no se siente lo
suficientemente
fría
La habitación
sesiente
demasiado fría
El aire
acondicionado
inicia y finaliza
el ciclo con
demasiada
frecuencia
Escurre agua
enlacasa
Escurre agua fuera
de la casa
El agua se
acumula en la base
delgabinete
El aire
acondicionado se
está congelando;
se forma hielo
enlabobina
POSIBLE CAUSA SOLUCIÓN
El cable de suministro
eléctrico no está conectado
enuntomacorriente.
El cable de suministro eléctrico
seactivó.
La unidad está apagada. Encienda la unidad con el control remoto
Se fundió un fusible doméstico o
se quemó el interruptor de carga.
Las baterías están descargadas. Reemplace las baterías.
Las baterías están mal colocadas. Asegúrese de que las baterías estén
La habitación está
demasiadocaliente.
El control de temperatura no se
puede configurar correctamente.
El flujo de aire está bloqueado. Asegúrese de que la zona por donde
La configuración de la temperatura
está demasiado baja.
El filtro de aire está sucio
obloqueado.
El flujo de aire está bloqueado. Asegúrese de que la zona por donde
La temperatura del aire en el
exterior es menor a 61 °F (16 °C).
La temperatura en el exterior
esmuy alta.
El aire acondicionado no está
nivelado correctamente.
Clima caliente, húmedo. Esto es normal durante días de
La humedad drena en la base
delgabinete.
La temperatura en el exterior es
demasiado baja, es menor a 61 °F
(16 °C).
Enchufe la unidad en un tomacorriente
apropiado con conexión a tierra.
Oprima y suelte el botón RESET en el cable
desuministro eléctrico.
oenel panel de control.
Reemplace el fusible o restablezca
elinterruptor de carga.
colocadas en la posición correcta.
Deje pasar un tiempo cuando encienda
launidad para que la habitación se enfríe.
Ajuste el control de temperatura en el panel
de control o con el control remoto.
sedescarga el aire no esté obstruida.
Aumente la temperatura establecida.
Limpie el filtro de aire.
sedescarga el aire no esté obstruida.
No ponga en funcionamiento la unidad
cuando la temperatura exterior esté por
debajo de los 61 ˚F.
Aumente la velocidad del VENTILADOR
alvalor más alto.
Incline ligeramente la unidad desde el frente
hacia atrás. Consulte la sección Instalación.
NO haga un orificio en la base del gabinete.
muchahumedad.
Esto es normal durante días de mucha
humedad. NO haga un orificio en la base
delgabinete.
Para descongelar la bobina ajuste el
modo FAN ONLY (SOLO VENTILADOR)
yestablezca la temperatura más alta.
PÁGINA 24 SOLUCIÓN DE PROBLEMAS

GARANTÍA LIMITADA
UN AÑO DE GARANTÍA LIMITADA
Esta garantía cubre todos los defectos de fabricación
o de material para las partes mecánicas y eléctricas
(incluidos los costos de mano de obra) de este
producto, durante un período de 12 meses a partir
de la fecha de compra. Para usos comerciales o
de renta, la garantía es de 90 días. Debe guardar
y entregar el recibo de venta original como
comprobante de la fecha de compra.
El sistema sellado y el compresor (compresor,
condensador y evaporador herméticos) que
contiene este producto tienen un período de
garantía de 1 año a partir de la fecha de compra.
Debe conservar el recibo de venta original y
proporcionarlo como prueba de la fecha de compra.
QUIÉN RECIBE COBERTURA
La persona que compró originalmente este producto
en la tienda.
QUÉ SE HARÁ
Haier America reparará o reemplazará cualquier parte
mecánica, eléctrica o del compresor que resulté
defectuosa por uso doméstico normal, durante un
período de 12 meses.
CÓMO PUEDO SOLICITAR SERVICIO
Comuníquese con el almacén de servicio más
cercano autorizado por el fabricante. Para obtener
el nombre del almacén de servicio más cercano,
comuníquese con Haier America al 1-877-337-3639.
Todo servicio debe ser realizado por un almacén
deservicio autorizado por el fabricante.
ESTA GARANTÍA NO CUBRE
1. Daños por instalación inadecuada.
2. Daños producidos en el envío.
3. Defectos distintos a los de fabricación.
4. Daños por uso incorrecto, maltrato, accidente,
alteración, falta de cuidado y mantenimiento
adecuados, o corriente o voltaje incorrectos.
5. Daño por uso distinto al doméstico.
6. Daños por un servicio brindado por alguien
distinto a un distribuidor o centro de
servicioautorizado.
7. Acabados decorativos.
8. Cargos por mano de obra, servicio, viáticos y
transporte para el retiro de partes defectuosas
einstalación de las refacciones, después
delperíodo inicial de 12 meses.
9. Crédito o reembolso por productos después de
30días o más de la fecha de compra, o por pérdida
o lesión provocada por el producto o por defectos
del producto que incluyen, entre otros, daños
incidentales o derivados.
10. Producto reconstruido adquirido como nuevo
ode segunda mano.
ESTA GARANTÍA LIMITADA SE OTORGA
ENLUGAR DE CUALQUIER OTRA GARANTÍA,
EXPRESA O IMPLÍCITA, INCLUSO LAS GARANTÍAS
DE COMERCIALIZACIÓN E IDONEIDAD PARA
UNFIN EN PARTICULAR.
La solución ofrecida en esta garantía es exclusiva
yse otorga en lugar de cualquier otra solución. Esta
garantía no cubre daños incidentales o derivados.
Algunos estados no permiten la exclusión por daños
incidentales o derivados, de modo que es posible
que estas limitaciones no se apliquen en su caso.
Algunos estados no permiten limitaciones sobre la
duración de una garantía implícita, de modo que es
posible que esta limitación no aplique en su caso.
Esta garantía le otorga derechos legales especícos,
y usted puede tener también otros derechos que
varían en cada estado.
Esta garantía cubre unidades dentro de los
EstadosUnidos continental, Canadá y Puerto Rico.
Haier America,
Wayne, NJ 07470
GARANTÍA LIMITADA PÁGINA 25

www.Haier.com
Model # ESA405P, ESA406P, ESA406N,
ESA408N, ESA410N, ESA412N
Issued Date: October 2014
Haier America
Wayne, NJ 07470
©2015 Haier America Trading, LLC.
 Loading...