


m
What The World Comes Home To
a
................................._ @,@_¢_@©
..................... _ @ r_ ®/
..................................................................................................................................................._ @ @ ®J
il
Call 1-877-337-3639 for questions on parts and services
Pour _ovtesqves_bnsconcernant les pi_ceset I'en_retle_,composez te _-877-337-3639.
t_dmenos al 1-877-337-3639 sl t;ene pregun_s sobre rep_es_os o servidos
0010546311
A
Life les instruction_ avant de pro_er d Pinstallation,
Lealos tnstrucdo_es anie_ de ins_alar elapara_o
Read ;nstruct;onsbJare installing.

Thank YouForbuying a dependable, energy saving and easy to operate
HAJERroom air conditioner This manuaJcontains usefulinformation for
you to maintain, operate, install and safely useyour room air condifianer_
Your air conditioner deans, coals and dehumidifies theair in your room to
provide you with the ultimate bvel of comfort.
Pleaseread instructions carefully before using the producL Also, do not
forget to fiHout and mail the Product Registration Card.
Record Your ModeUand SeHaUNumber°
For all your service calls during the warranty period the bHowing
information will be needed. Affach the sales receipt to this guide and keep
for future reference. This information can be obtained from the serial pJate,
which is on your air conditioner: This is either on the cabinet (side or back)
or you may have to remove the front grille to Jocateit.
1) Air conditioner mustbe connectedto proper electrical outlet with the
correct electrical supply. (seetabJe)
_. 2) Proper grounding must be ensuredto reducethe risk of shockand fire.
DO NOT CUTOR REMOVETHEGROUNDING PRONG. Ifyou do
not have a three-prong electricreceptacle outlet in thewall, have a certified
electrician install the proper receptacle. The wall receptacleMUSTbe
properly grounded.
3) Do not use if power cord isfrayed or otherwise damaged. Also avoid
using it ifthere are cracks or abrasion damage along the length, plug or
connector.
4) DO NOT USEAN ADAPTEROR AN EXTENSIONCORD.
5) When installing your air conditioner in a window, make surethe window
is strong enough to hold the weight of the air conditioner. Youalso want to
secureand correctly install your air conditioner properly to prevent it from
falling. Extra brackets and or support may be required depending
on your window.
6) Do not block airflow inside or outside the air conditioner with blinds,
drapes, protective covers,shrubs or bushes.
7) Becareful of sharp edges on thefront and rear fins of the unit that could
cut and cause seriousinjury.
8) Becareful when lifting the air conditioner to install or removethe unit.
Always usetwo or more people for this.
9) Always unplug theair conditioner before servicing it or moving it.
PAGE
A Word From Haler 1
P_duct Registration 1
Safely/Precautions 2
Warnings 4
ElectricaJSafely/ 4
Tips 5
Energy Saving Guide 5
FeQtures G-7
@peratlng Gulde 8-14
Normal Operating Sounds 8
Operating instructions 8-14
JnstaJJatians 15- 24
Parts ] 6
Tools ] 7
Installing Unit into A Window ]8-25
Clean and Care Gulde 2G-27
TroubUeshaoting 27 _28
Warran_ Jnfarmatian 2g
3
Following the safety messagesis very important.
Thesemessagescan save you from being injured or killed.
Warning symboRsalert you to be carefuRand means Danger. AJways
follow instructions to be safeand reduce chancesof injury or deatk
Warning and Danger signswill precede safety messages.
Grounding: This room air conditioner must be grounded.
Grounding reduces the risk oFenectricshock by
providing an escape wire for the electric current.
The power cord has a grounding wire with a
grounding pJug. PJugif into an outlet that is
properly installed and grounded.
WARNHNG: mmproperuseof the grounding
pJugcan resuJtin a risk of electric shock.
Coil a qualified electrician if you don't understand
the grounding instructions or if you are not
sureif theair conditioner is properly grounded.
mfthe wall eJectricaJoutlet is not grounded, please contact an
eJectricianto have if repJacedwith a properly
grounded outJet.
DO nOtr Under Qny ¢_rcu_st_n¢esr CUt or re_ove t_e
thlrd (ground) prong from the power ¢or_.
Adapter PUug: We strongly advise against using an adapter plug.
4
®Air Conditioners are designed for use in a douHe hung window or
through the wall installation only (As appJicable in your model)
®While installing unit be sureto tilt air conditioner _/4inch ouhvard to
havethe water drip outside the house.
s_k o mnstanlthe unit on the north side as normanlythat is the shaded side This
winJenhance the operation of your unit.
Window has to be strong for installation. Extra brackets and or support
may be required depending on your window.
• Measure thewindow before installing, if the window is too big Forthe
unit you may require professional installation.
_'_ Usecorrect electric voJfageand proper ampere for the unit to run
effectively.
,_® Only let a certified eledrician do any modifications fo your eledricol
outlet,
o When installing your air conditioner make sure to seaJaHareas where
there is a possibiJify of air Jeakage.
Airflow should not be bJocked inside either by curtains, drapes or
furniture or outside by shrubs or bushes
Do not needJessJyuse an eJectricaJJightor other appliances that
produce heat
Keep the vent dosed on the air conditioner when in the cooling function.
Keep the bJinds and the drapes drawn on all the other windows.
o While cooking usean exhaust fan in the kitchen to remove the excess
heat produced.
Always usethe correct BTUsize air conditioner to cool the room to
attain optimum efficiency.
5
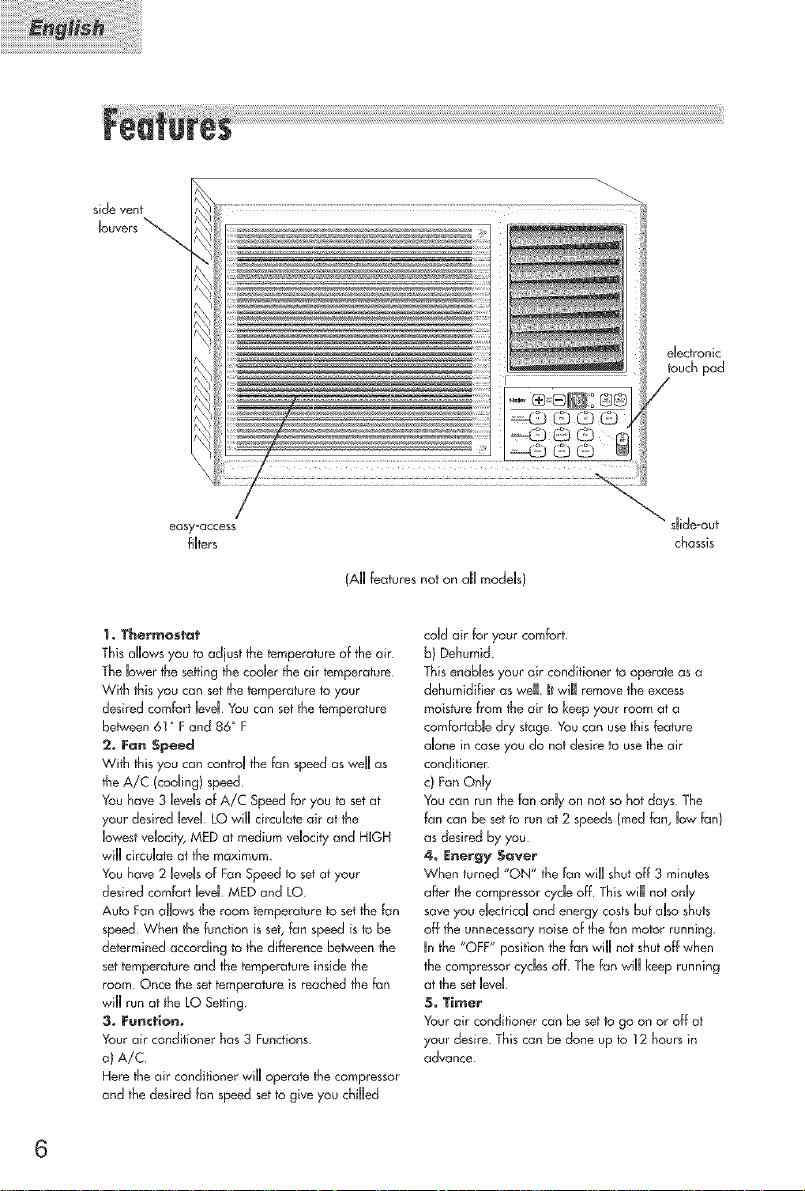
side vent
louvers
easy=access
fluters
chassis
(AH features not on alUmodds)
'J° Thermostat
This allows you to adjust the temperature of the ain
The lower the sobbingthe coder the air temperature
with this you can set the temperature to your
desired comfort levd You can setthe temperature
behueen 61 _ F and 86 ° F
2. Fan Speed
With this you can contrd the fan speed as ",veil as
the A/C (coding) speed
You have 3 levels of A/C Speed for you to set at
your desired levd LO will chdate air at the
lowest vdoci_y, MED at medium vdocity and HUGH
will cirdate at the maximum
You have 2 lords of Fan Speed to set at your
desired comfort levd MED and LO
Auto Fan allows the room temperature to set the fan
speed When the function is set, fan speed is to be
determined according to the difterence belween the
s_ttemperature and the temperature inside the
room Once the set temperature is reached the fan
will run at the LQ Setting
3. Function.
Your air conditioner has 3 Functions
a)A/C,
Here the air conditioner will operate the compressor
and the desired fan speed set to give you chilled
cold air for your comfort
b) Dehumid
This enables your air conditioner to operate as a
dehumidifier as we[[ Jtwi[[ remove the excess
moisture from the air to keep your room at a
comfortabJe dry stage Youcan use this feature
alone in case you do not desire to use the air
conditioner
c) Fan Only
You can run the fan only on not so hot days The
fan can be set to run at 2 speeds (rned fan, low fan)
as desired by you
4° Energy Saver
\_Vhenturned "ON" the fan "will shut off 3 rnlnutes
after the compressor cycle off. This will not only
save you electrical and energy costs but also shuts
off the unnecessary noise of the fan motor running
In the "OFF" position the fan will not shut off when
the compressor cycles off The fan will keep running
at the setlevel
5o Timer
Your air conditioner can Be setto go on or off at
your deske This can be done up to 12 hours in
advance
6
6. Vent (not hi aH modds)
This feature hdps you to exhaust any stole
unwanted air from the room and draw fresh outside
air in the room To cirdate the air, bring the lever
to the open position ( right ) 1o r_toin the cooJ it is best
to keep this in the dosed mode ( left )
7° Air Sweep (not in aH modds}
When left on "ON" this automatically d stributes the
air through out the room This will ensure an even
airflow through out the room
8_ 4 Way Air Flow
These air directional Jouverslet you control the
directio__of the airflow in your required direction
The airflow can Bedirected
up - down - right side - left side
9o Sllde Out Chassis (,lot on aH modeJs}
Your Air Conditioner becomes more versatile with
this fuature You have the option to instoll the unit in
a window or the wall
10. Wir_dow mnstaJJKit
Enables you to install the air conditioner in a
double hung window Extra brackets or support
may be needed depending on your window
1'J° Re_ote ¢oe_rom
This full functional wireless remote allows you to
operate your air conditlor_er from a d_stoace You
need not have to get up to change the se#ings, the
functions or to turn the unit on or off
12. LED DispJay EJectroel¢ Coeds| PaeeJ
The 4 function LEDdisplays Room]emperature,
Temperature Setting, Timer Setting and Time
Remaining to Stop / Start the unit Electronic
Control Panel letsyou set the temperature to the
Exact Temperature you desire
13° EJect_st_ti¢ FiJter
Being constructed of high efficiency purifying
substance, active carbon fabric, electrostatic fabric,
electrostatic active carbon net and other materials
it purifies the air effectively ffswavy structure
increases the capability to hirer dust and smoke
effectively Due to the retention of the acti,,e carbon,
it has a high purifying speed capable of
strong aid{ow
14. SJeep
When activated, this feature automatically sets an 8
hour shut off timer The unit will shut off in 8 hours
lllerm l @le tlHg Se ds
The folowing sounds are normally heard during the operation of an air conditioner,
o Cod airflow movement as didated by the set fan speed.
Water sounds. This is normaJas your air conditioner acts as a
dehumidifier aJso.Thus you wil hear water sounds from water drops
faling on the condenser.
As the refrigerant tows through the inner sealed tubing a rushing noise
may be heard.
Railing or vibrating noises may be heard due to poor wal
or window instalafion.
* High pitch compressor sound may be heard.
@pe ethsg Ins tru¢lieHs
Folowing are the operating instructions of your electronic air conditioner.
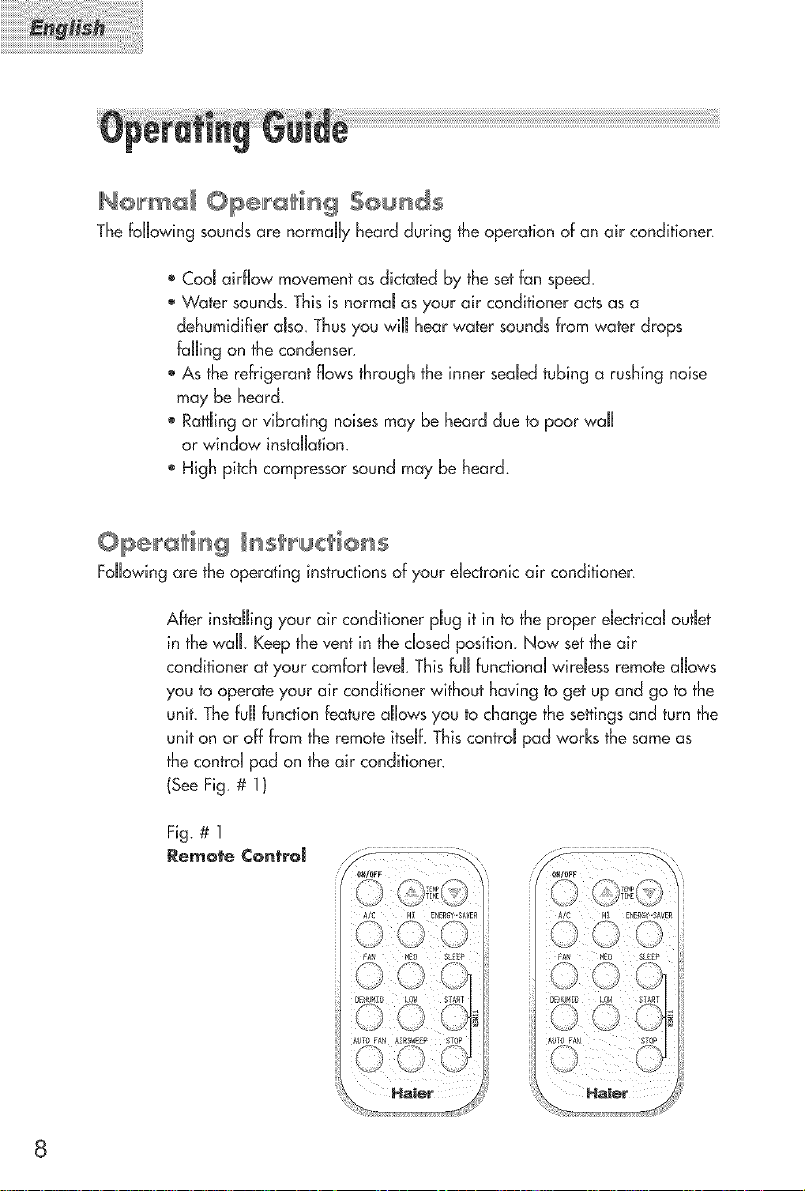
After instaling your air conditioner pJug it in to the proper dectricaJ outJet
in the wal Keepthe vent in the closed position. Now set the air
conditioner at your comfort bye[ This ful functional wireJessremote alows
you to operate your air conditioner without having to get up and go to the
unit. The ful function feature alows you to change the settings and turn the
unit on or off from the remote itseJf.This controJpad works the same as
the control pad on the air conditioner.
(See Fig # ])
Fig. # 1
Remote ¢@ntr@J
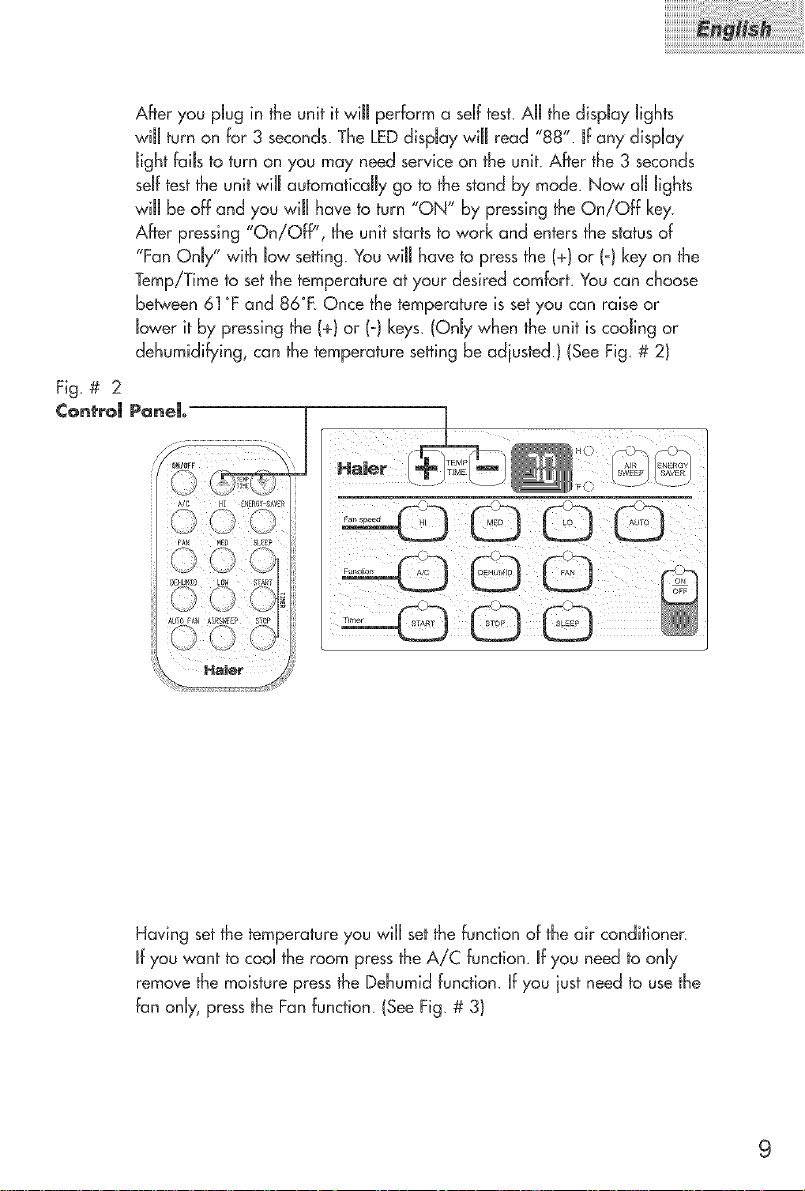
After you plug in the unit it wi[[ perform a self test. A[[ the displaytights
will turn on for 3 seconds. The LED display will read "88". If any dispnay
light fails to turn on you may need service on the unit. After the 3 seconds
self test the unit will automatically go to the stand by mode. Now all lights
will be off and you wilt have to turn "ON" by pressing the On/Off key
After pressing "On/Off", the unit starts to work and enters the status of
"Fan Only" with low seffing. You will haveto press the (+) or (o} key on the
TempiTime to set the temperature af your desired comfort. You can choose
bebNeen 61 °F and 86°R Once the temperature is set you can raise or
lower it by pressing the (+) or (o) keys. (Only when the unit is cooling or
dehumidi_ing, can the temperature seffing be adiusted.} (See Fig, # 2)
PaneH_
FA_ MEO _L_EP
Having set the temperature you will set the function of the air conditioner.
mfyou want to cool the room press the AiC function, mfyou need to onJy
remove the moisture press the Dehumid function. Ifyou iust need to use the
fan only, press the Fan function. (See Fig. # 3)
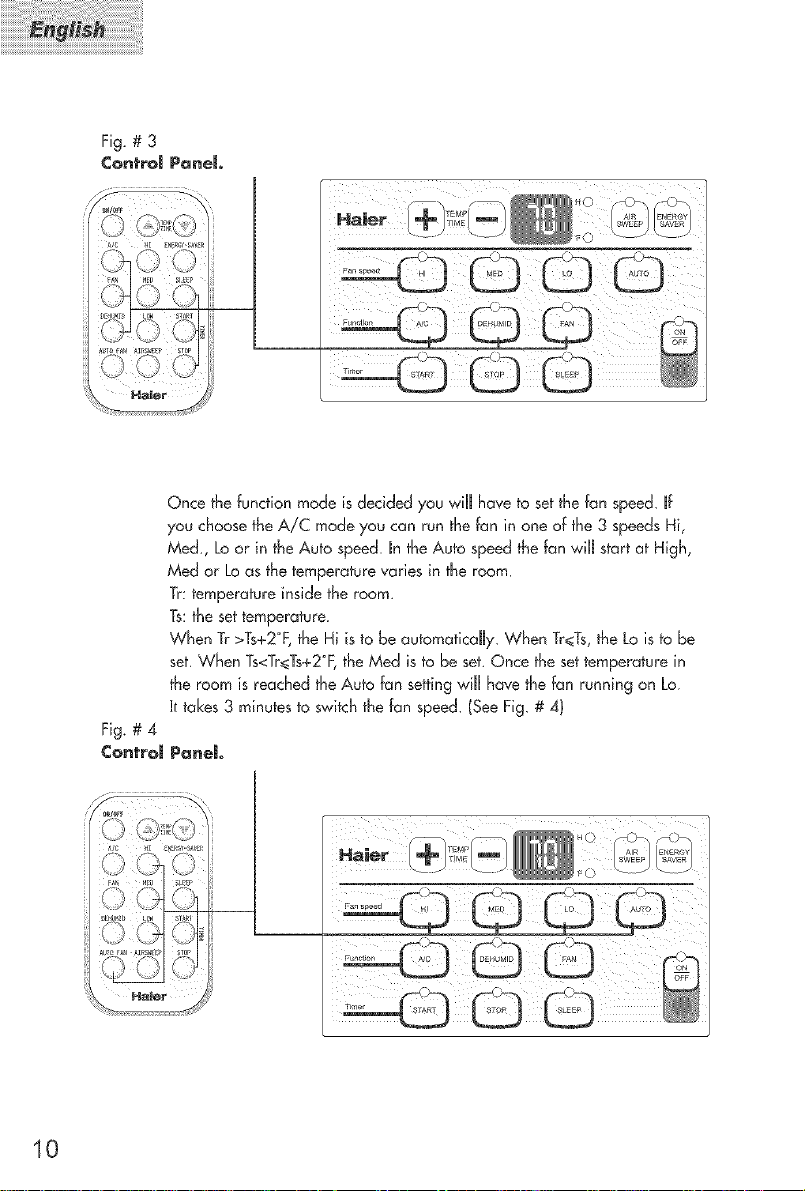
Fig.#3
¢ontrom Panel
Once the function mode is decided you wiHIhave to set the fan speed_ If
you choose the A/C mode you can run the fan in one of the 3 speeds Hi,
Med., Lo or in the Aub speed, mnthe Auto speed the fan wiHIstart at High,
Med or Lo as the temperature varies in the room.
Tr: temperature inside the room.
Ts:the settemperature.
When Tr >Ts+2°F, the Hi is to be automatically. When Tr<Ts, the Lo is to be
set. When Ts<Tr_<Ts+2°F,the Med is to be set. Once the set temperature in
the room is reached the Auto fan setting wilH have the fan running on Lo.
]_takes 3 minutes to switch the fan speed, (See Fig # 4)
Fig. # 4
¢ontrom
Panel
10
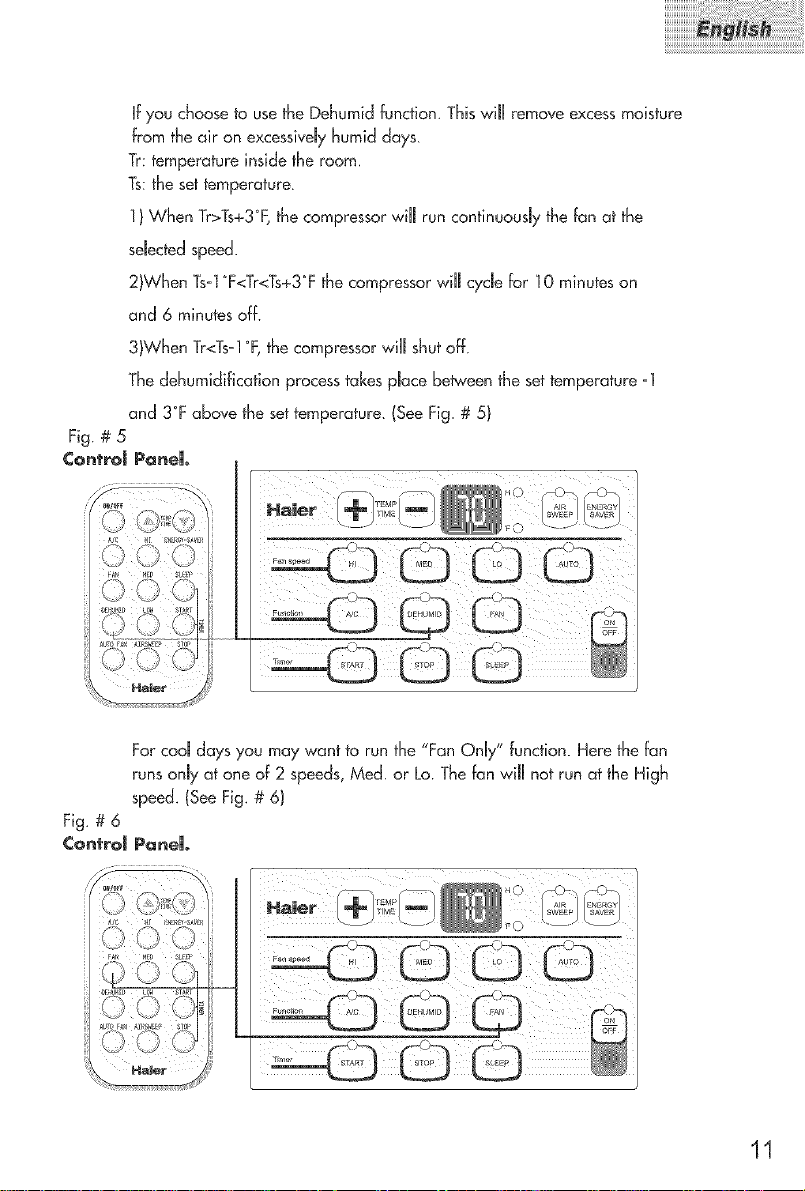
HFyou choose b use the Dehumid function, Thiswill remove excessmoisture
from the air on excessivelyhumid days.
Tr temperature inside _heroom,
Ts: _hese_femperature.
] ) When Tr>Ts+3°F,the compressor wilJ run confinuousJythe fan at the
selectedspeed.
2)When Ts°l°F<Tr<Ts+3°Fthe compressor wilJcycle for 10 minutes on
and 6 minutesoff.
3)When Tr<Tsol°F,the compressor wilJshut off,
The dehumidification process takes pJace between the settemperature _1
and 3°Fabove the settemperature. (See Fig # 5)
Fig. # 5
Control Panel.
For cooJdays you may want to run the "Fan Only" function. Here the fan
runsonJyaf one of 2 speeds,Meal or Lo. Thefan will not run at fhe High
speed. ISee Fig. # 6)
Fig # 6
¢ontrom Panel
11
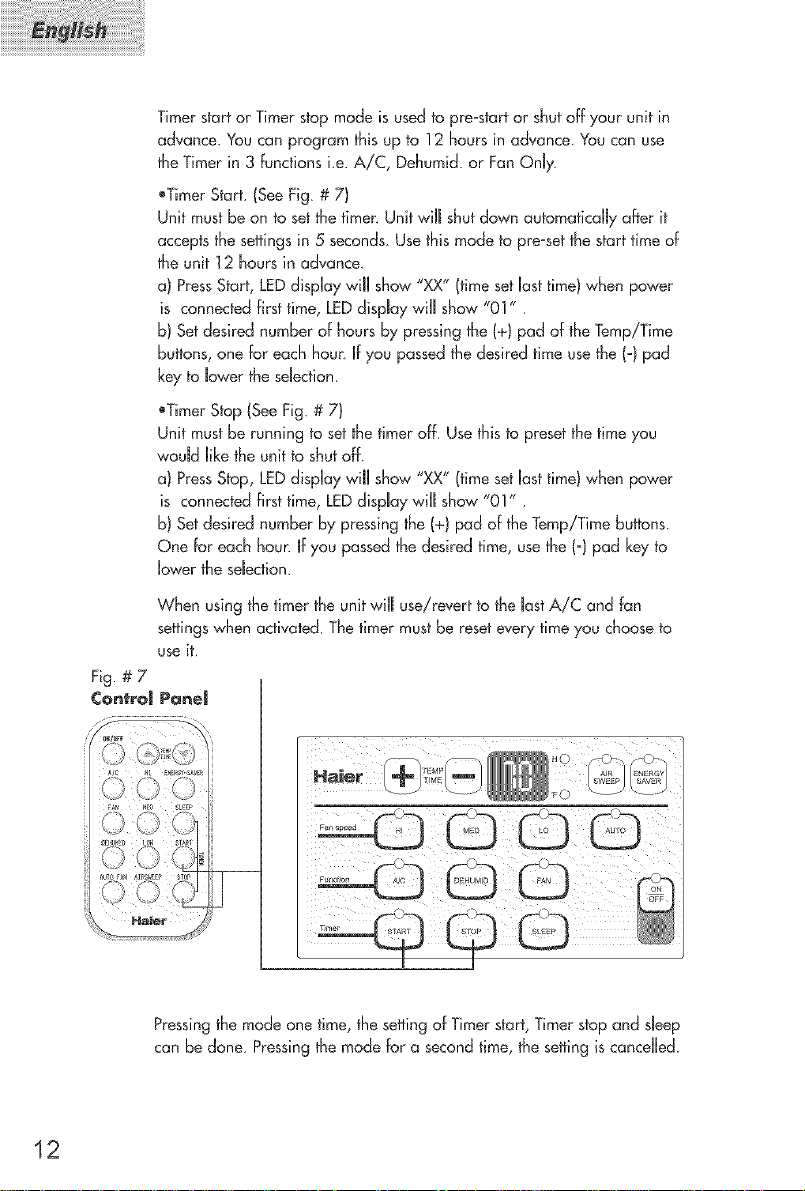
Fig. # 7
Control
Timer start or Timer stop mode is used to pre-start or shut off your unit in
advance. You can program this up to ! 2 hours in advance. You can use
the Timer in 3 Functions i.e. A/C, Dehumid. or Fan Only
eTimer Start. (See Fig. # 7)
Unit must be on to set the timer. Unit will shut down automatically after it
accepts the settings in 5 seconds Use this mode to pre-sef the start time of
the unit 12 hours in advance.
a) Press Start, LED dispUay wilU show "XX" (time set Uasttime) when power
is connected first time, LED display wiUl show "01" .
b) Set desired number of hours by pressing the (+) pad of the Temp/Time
buHons, one for each hour. If you passed the desired time use the 1-1pad
key to lower the selection.
oTimer Stop (See Fig # 7)
Unit must be running to set the timer off. Use this to preset the time you
would like the unit to shut off.
a) Press Stop, LED display will show "XX" (time set last time) when power
is connected first time, LED display will show "01"
b) Set desired number by pressing the (+) pad of the Temp/Time buttons.
One for each hour. If you passed the desired time, use the (o) pad key to
lower the selection.
When using the timer the unit wilJ use!revert to the last A/C and fan
settings when activated. The timer must be reset every time you choose to
use it.
PQ_e_
12
Ha Jet
O©O
Pressingthe mode one time, the settingof Timer start,Timer stopand sleep
can be done. Pressingthe mode Fora second time,the setting iscancelled.
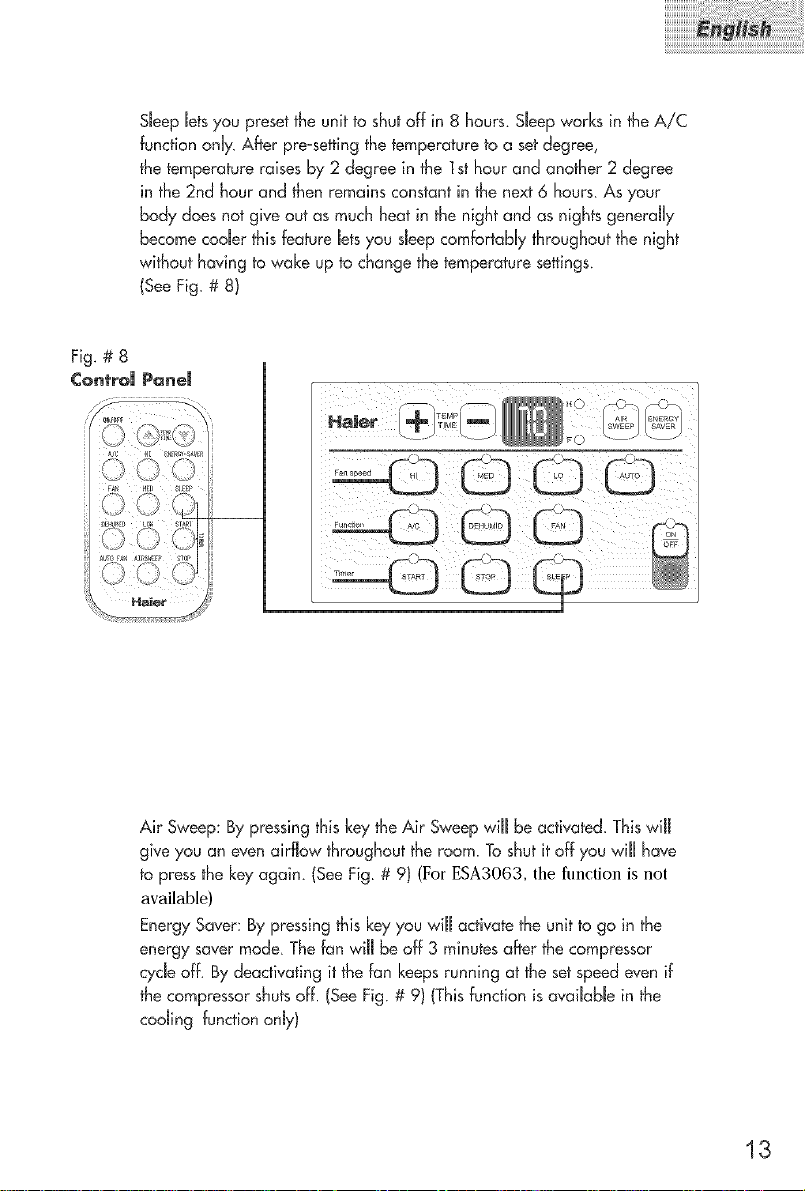
SJeepJetsyou presetthe unit to shutoff in 8 hours. SJeepworks in the AiC
function only. After preoseffingthe temperature to a set degree,
the temperature raises by 2 degree in the I st hour and another 2 degree
in the 2nd hour and then remains constant in the next 6 hours As your
body doesnot give out as much heat in the night and as nights generally
become cooler this feature Jetsyou sJeepcomfortably throughout the night
without having to wake up to change the temperature settings.
(See Fig. # 8}
Fig. # 8
¢ontroU Panem
HaJ_r
Air Sweep: By pressing this key theAir Sweep will be activated. Thiswill
give you an even airflow throughout the room. Toshut it of]:you will have
to press the key again (See Fig # 9) (For ESA3063, the flmction is not
available)
EnergySaver: By pressing this keyyou will activate the unit to go in the
energy saver mode. The fan wiJJbe off 3 minutes after the compressor
cycle off. By deactivating it the fan keepsrunning at the set speed even if
the compressor shutsoff. (SeeFig. # 9) (Thisfunction isavaiJable in the
cooJing functiononly)
FC
13
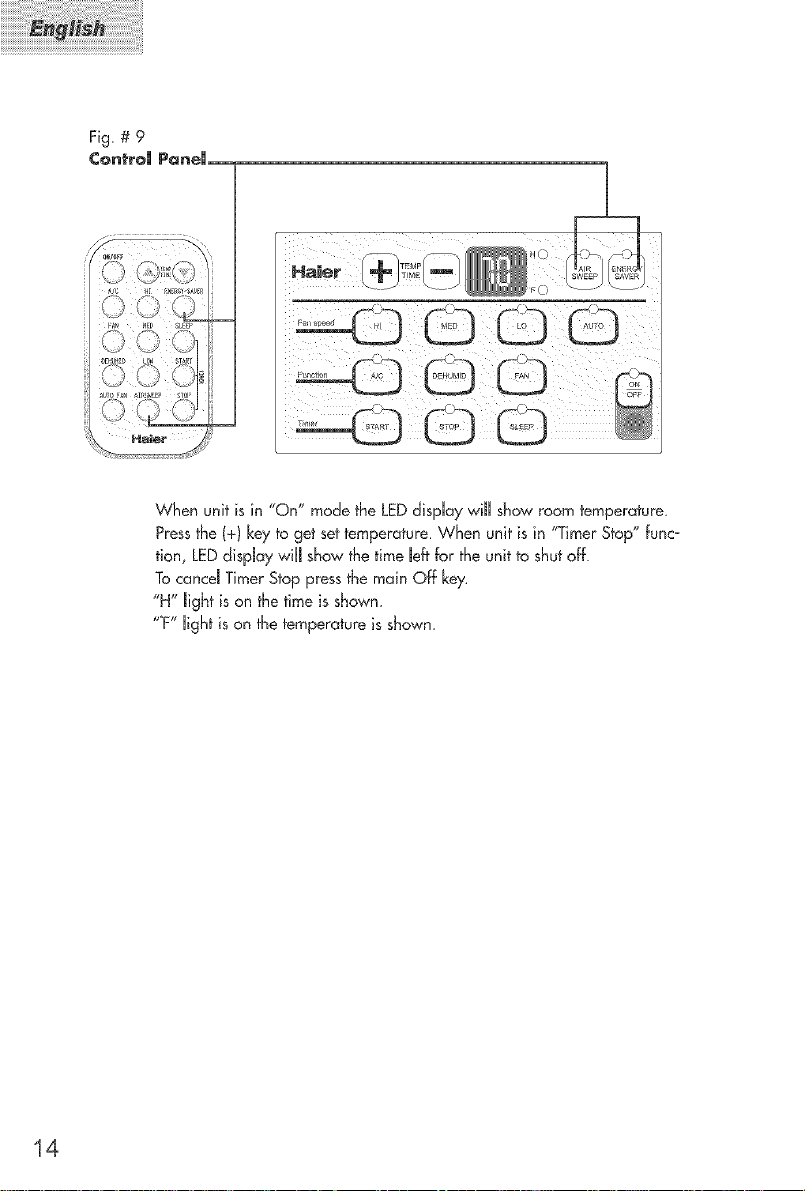
Fig. # 9
¢ontroJ PQneJ_
kS ',_
When unit is in "On" mode the LEDdisplay wil showroom temperature.
Pressthe (+) keyto get settemperature. When unit is in "Timer Stop" funco
tion, LEDdispJaywil show the timeJefffor the unit to shut off.
Tocancd Timer Stop pressthe main Off key.
"H" Jightis on the time is shown.
"°F"light is on the temperatureis shown
14
Before you install your air conditioner check the foJ[owing:
1) The unit is free of a[[ obstructions inside and outside the room eg. drapes,
curtains, furniture, pJants,shrubs, bushes, trees, other structures[ike building,
garage etc Air conditioner must have dear unobstructed airflow through the
condenser to remove the heat
2) Thewindow is strong enough to hold the weight of the air conditioner.
Extra brackets or supports may be needed depending on your windows.
3) Thewindow si[[ and track are strong enough to hold the weight of the
air conditionen
4) Thewail is strong enough to hold the unit. Extra brackets or supports may be
needed depending on the wail
5) There is adequate and proper power supply near the air conditioner.
_6) DO NOT useadapter plugs.
_7) DO NOT useextension cords.
_8) DO NOT cut or remove the ground prong.
9) DO NOT modify the plug or the eJectrica[waJ[ outlet in any way.
mfpJug does not fit the dectricd outlet have a certified electrician do the
necessarychange.
_10) DO NOT connect electrical power to the unit before installation.
_1 !) DO NOT use if power cord is worn out, frayed or otherwise damaged
Avoid using if there are cracks or abrasion damage along thelength,
plug or connection.
15
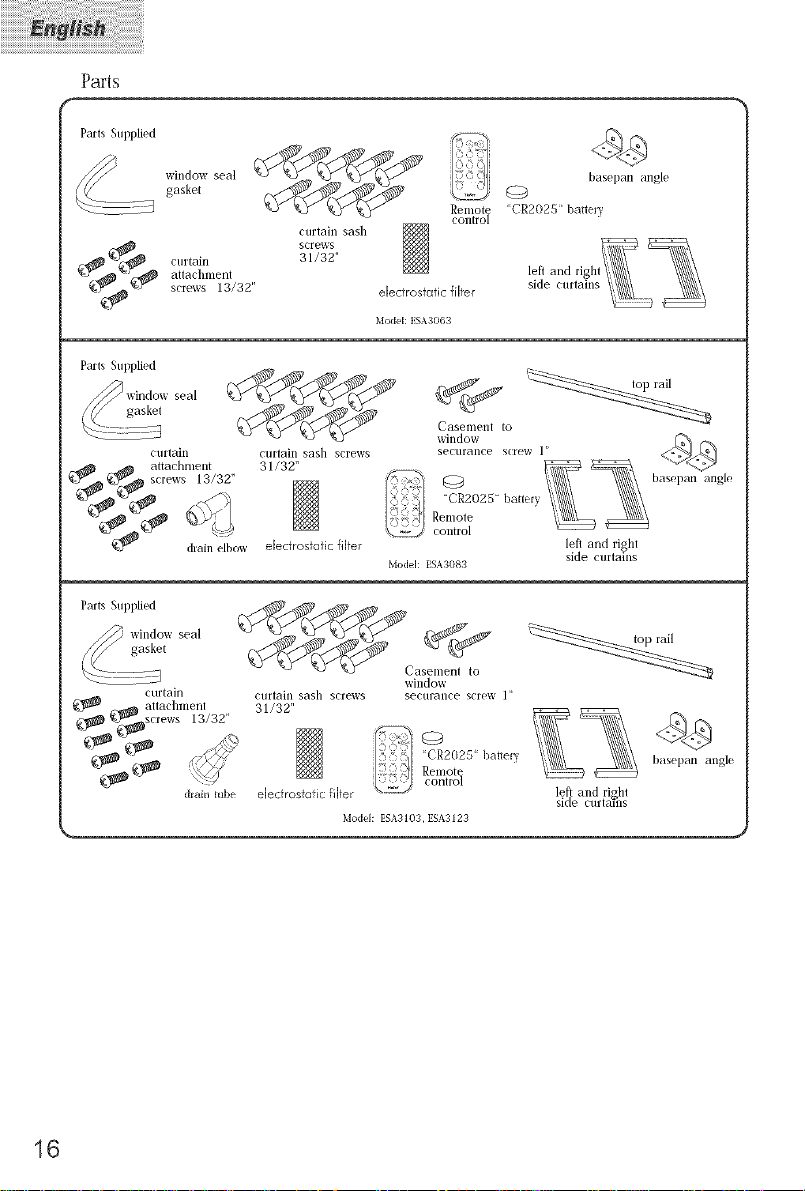
Parts
Parts Suppli{ d
window seal
gasket
_ attachnlenl
_¢_ curtain
Parts Suppli{ d
_ window seal
r,//M/ gasket
_2- Z_73
_;_ attachment 31/32"
Parts Suppli{ d
/_// window seal
,(_// gasket
"_7- £ZTJ
{g_ £_ altachnlent
{;_ _screws 13/32"
screws 13/32"
curtain Cllrlain sash screws
¢_,{_ screws _5_13/32"
curtain
dlah_ robe
curtain sash screws
31/32"
e[ec ros'iofic fiJter
curtain sash
screws
31/32"
Model: ESA3103, ESA3123
electrostatic filter
blodel: ESA3063
Casenlent to
window
securance screw 1"
'+(R2025" hatte U
control
Model: t SA3083
Casement to
window
securance screw ]
0
"(R2025' batmry
Remot_
control
Remote 'CR2025" batte*v
control
_ _ basepan angle
%&Remole
left and right
side curtains
left and right
side curtanls
basepan angle
hasei}an angl{
16
You will need to have the fallowing tods to help yau in the installation of
your air condifianen
®Sdssars
_PhiHipsScrewdriver
oStandard Screwdriver
oPliers
eWrench
•DriJJand DriH Bits
oTapeMeasure
eGJaves
®Level
oSackets
17
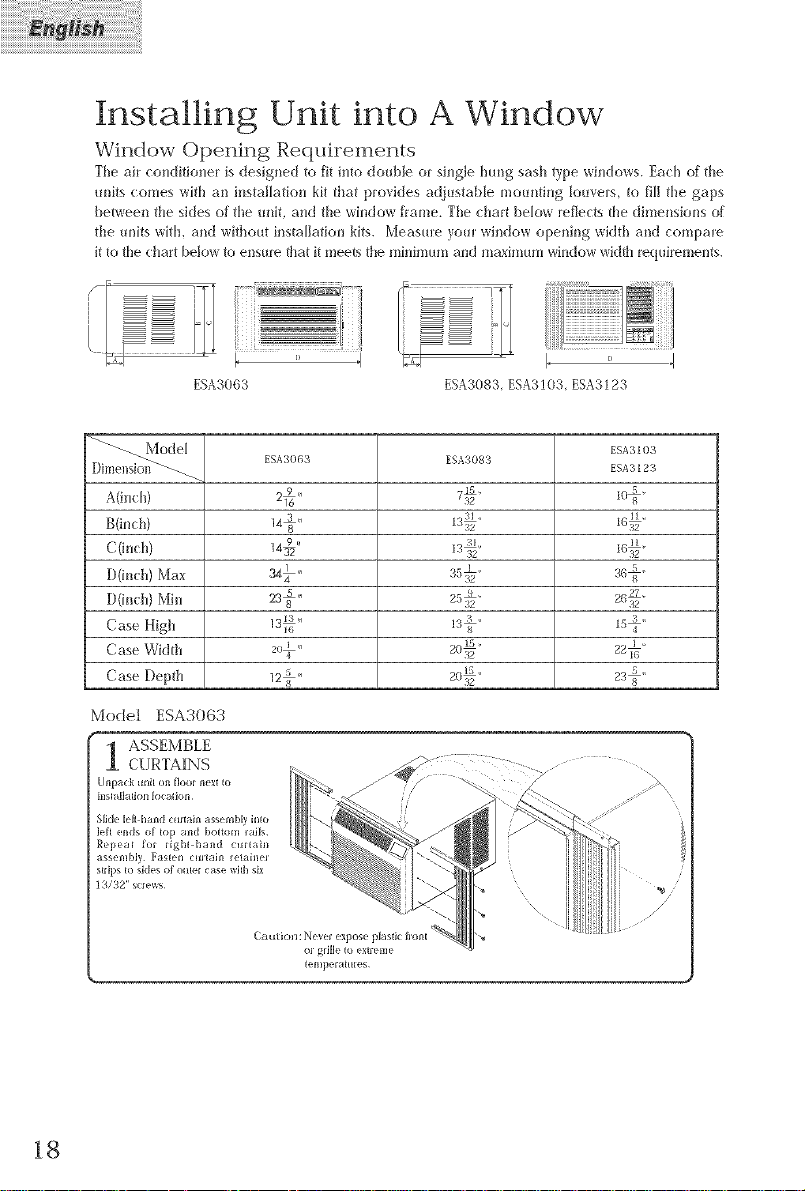
Installing Unit into A Window
Window Opening Requirements
The aiI conditioner is designed to fit into double or single hung sash type windows. Each of the
units comes wifl_ an ins_'aHation kit that provides adjus_'aMe mounting _ouvers, to fiH_'he gaps
between _'he sides of _'heunit, and _'hewindow flame. The chart below reflects the dimensions of
_'heunits with, and without installation kits. Measure your window opening widflJ and compare
itto file chart below to ensure {ha_it mee{s the minimum and maximum window wi&h requkements.
' i
i
ESA3063 ESA3083, ESA3103, ESA3123
_ ESA3 [ 03
ESA3063 ESA3083 ESA3123
A(indl)
g(indl) _:@
C(h_ch)
DOnch) Max 2a_,,
D(inch) Min 235"
Case High I3ll_;' I5@
Case Wklfl_ 2(_1:'
Case Depth _-_@
Model ESA2_O(_3
ASSEMBLE
CURTAINS
insl llh6oli 1o(alion
Slkle leJl hand (uimin assembly inlo
left ends of _op and bottom la_ls
Repea_ for i_ghl hand curlain
assembly Fas{en _ur_a_n rela_ner
s_ips _o skies of outer case w_lh six
13/32" screws¸
18
m
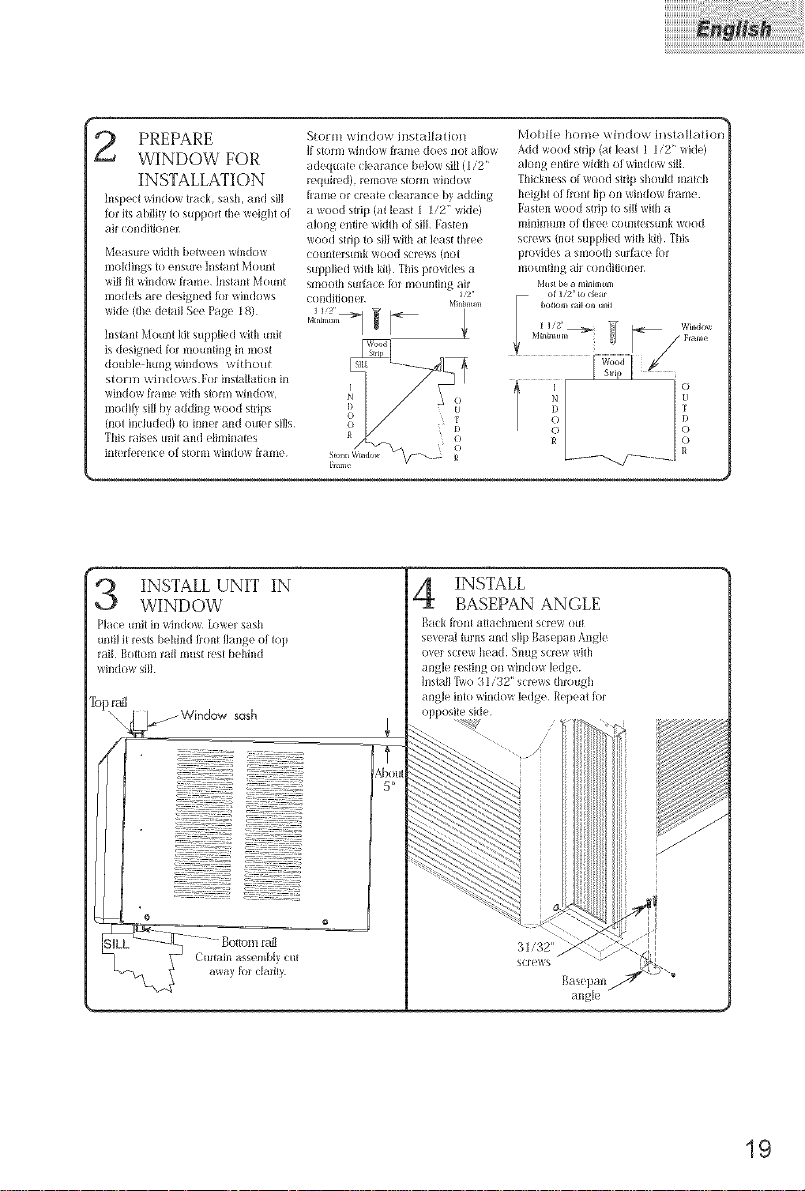
PREPARE
WINDOW FOR
INSTALLATION
]nspe/i window ira/k, sash. md sill
for i_stbililv lo sllppor_ _he weight of
_Jil/ ondiii/luei
Measuw width b(,iweell window
mok[iIlgS kl eiIs[ffe hlsial]_ Mouili
will lit will(tow hame Illsianl Moun_
ii]o([els are deslgIled _(11¸ whldows
wide (_he deiail See Page 18)
]llsia11I Mouni kil supplied wlih Llnil
is d esigned [(11¸ illO[[llii_lg ill I11(ISi
double huIlgwil]dows wi[hou_
st()]-m wil K[o_,\ s For iIiS_allaiion ill
willdow h'allle wi_ll siolm window¸
modi_ sill by adding wood slrips
(lloi included) Io illller and outer sills
This raises unil and ellminales
inierlerence of sIorlll wi[K[OW [Iame
SIorm window illsial[a/iotl
]f Slol Ill Will(tOW l} [lIl( _ does 11o[ allow
idequat(/learan(e below sill (I/2'
requiwd), r( ItK)Ve S[OI'III WIII([OW
l_a_le ol creaR, clearanc( by adding
a wood strip (ai leas{ I 1/2" wide)
dolls enike widlh of sill }'aaen
wood sIrip lo sill with a_ lt,as_ [hi {_P
cotlltiers{[llk wood sol'( _,:_ (noi
supplied with ki0 _[hispro/kk,s a
f:ondi_iogl( r
M[t/[it/ll]t
.....
MmEm,n,,
Mobile home wi]ldow hlstallation
Add wood sirip (ai leasi 1 12' wlde)
akmg enii*_ _qdih ol wi_KIow sill
Thickn( ss of wood slrip shouk[ mtich
h( ight ol ff(ini lip ou windm_ h'ame
Fasten wood strip to sill wiih a
l/llltll]lUtti of lhree (O[[llierS[[llk _oo([
screws (noi supplied wiih ki0 This
provkles a smooih surface lbl
l/KK[llii_lg ail ( oudiik_n( 1
Mustbea minimum
of 1/2' to detr
.....g;;Zi a!
o D
[_/.../ ....... i'
INSTALL UNIT IN
WINDOW
P]ale [[nil ill winding, l_o_/_r sash
tmli! it resis behind lronl lkmge ol it,ll
rai_ Bottom lail must It'si behind
tt il]dow sill
INSTALL
BASEPAN ANGLE
[{[(k lion{ aiiachnl( lit s(rew ot[t
several ruins and slip gasepan Angle
ovel screw head _iltlg sclew w]{]l
angle *esling on wil]d ov_ ledge
]nsiall "f_o 31 32" s(rews _hrough
angle into window ledge R{pea_ fi_r
opposite si(k
5 o
31/32"
screws
angle
19
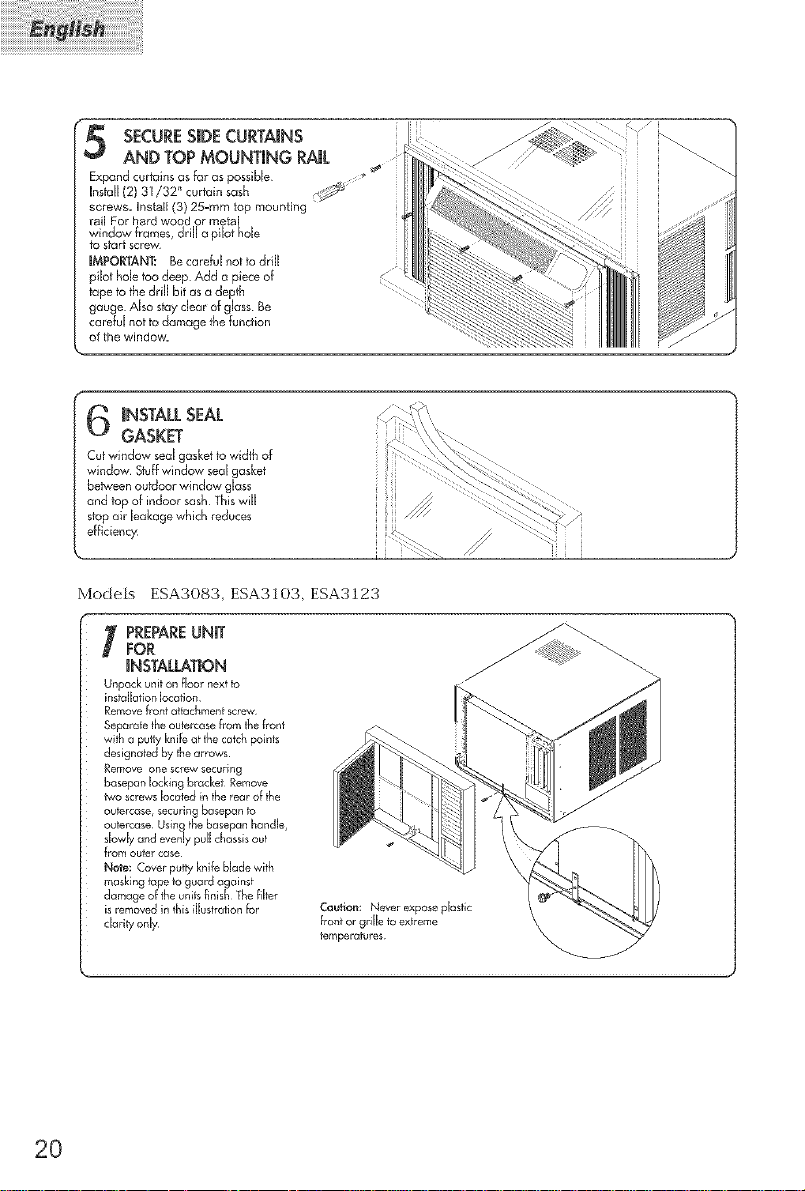
SECURESmDECURTAINS
AND TOPMOUNTING RAiL
Expand curtains as far as possible \\"
Instal[ (2) 31/32 '_ curtain sash
screws. Unstal[ (3) 25_mm top mounting
rail For hard wood or metal
window frames, drill a pilot hole
fo starJ screw
JMPORTA't',JT: Be careful not to ddJJ
pilot hole too deep Add a piece of
tape to the drill bit as a depth
gauge Also stay dear of glass Be
careful not ta damage the function
of the window.
INSTALLSEAL
GASKET
Cut window seal gasket to width of
window Stuff window seal gasket
between outdoor window glass
and tap of indoor sash This wiJJ
stop air leakage which reduces
eft ciency
Models ESA3083, ESA3]03, ESA3123
I REPAREUNIT
FOR
[NSTALLATJON
Unpack unit on fJoor next te
installation location
Remove h'ont ottechment screw
Separate the outercase from the front
with a putty knife af the catch points
designated by the arrows
Remove one screw securing
bosepan Jacking bracket Remove
f,uo screws located in the rear of the
outercase, securing basepan to
outercase Using the basepan handle,
slowly and evenly pu[[ chassis out
from outer case
Note: Cover" putty knife Blade _vi[h
masking tape to guard against
damage of the units finish The filter
is removed in this illustration for
clarity only
Caution: Never expose plastic
front or grille to extreme
temperatures
2O
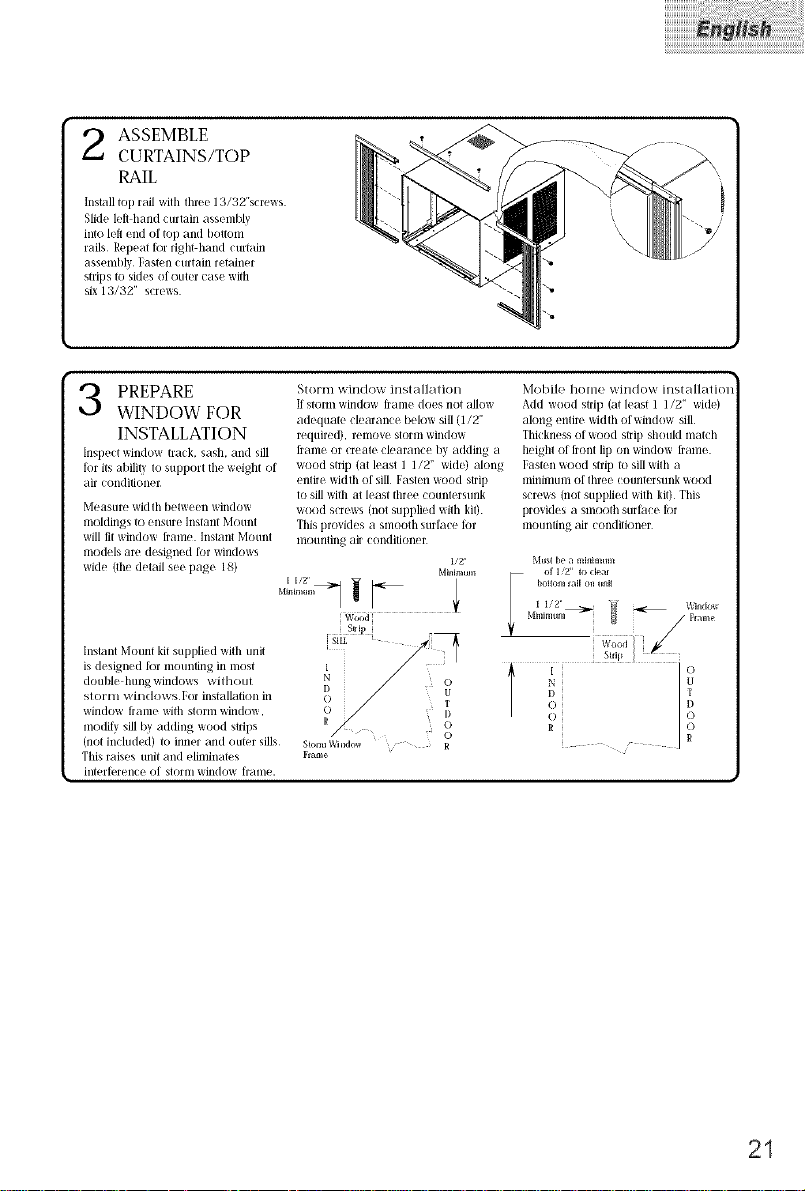
ASSEMBLE
CURTAINS/TOP
RAIL
Inslall toll rail with three 13/32"screws
Slid_ leIl hand curlain assen/blv
into left end of top and t!ottom
rails Repeat R_r right hand curtain
assembly Fasten curtain retainer
strips to sides of outer case with
six 13/32" screws
Storm window installalion
PREPARE
WINDOW FOR
INSTALLATION
Inspect window trail sash. and sill
Mr its ability to supporl th_ weight of
air condilionet
Measure width belween window
moldings to ensure Instant Mount
will lit window hame Instam Mount
models are designed Mr windows
wide (lh_ delail see page l 8)
hls{anl Mount kit stlppli{ d Wifll tlnit S!_ _
is d_ sign_ d R31' nlounling in most
dotlbl_ hungwindows vv'ilhout N 0
slornl windows I,or installatk)n in o
window flam_ with storm window, o T
nlodify sill by adding wood strips R o
(not includ(d) tO inn{r and out(H' sills Stoun Window R
This raises unit and ( linlinates Flame
intel'f(_ren(e of storm window h'anle.
If storm window hame does not allow
adequate clearance below sill (1/2"
required), remove storm window
hame or create clearance by adding a
wood strip (al leas_ 1 1/2" wMe) along
_n{ire widlh of sill Fasten wood strip
1o sill with at least three counlersunk
wood screws (not supplied wRh kil)
This provides a smooth surlace lor
moun{ing air condilion_ r
D e
Mobile home window installalioi
Add wood strip (at least 1 1/2" with)
along _n{ire width of window sill
Thickness of wood strip should match
heigh{ of honl lip on window hame
Fasten wood strip to sill wifli a
minimum of three ( otlnterstlnk wood
screws (not supplied with kit) This
provides a smooth surface for
mounling air condition_ r
I/2'
Musl be a mlnhnum
21
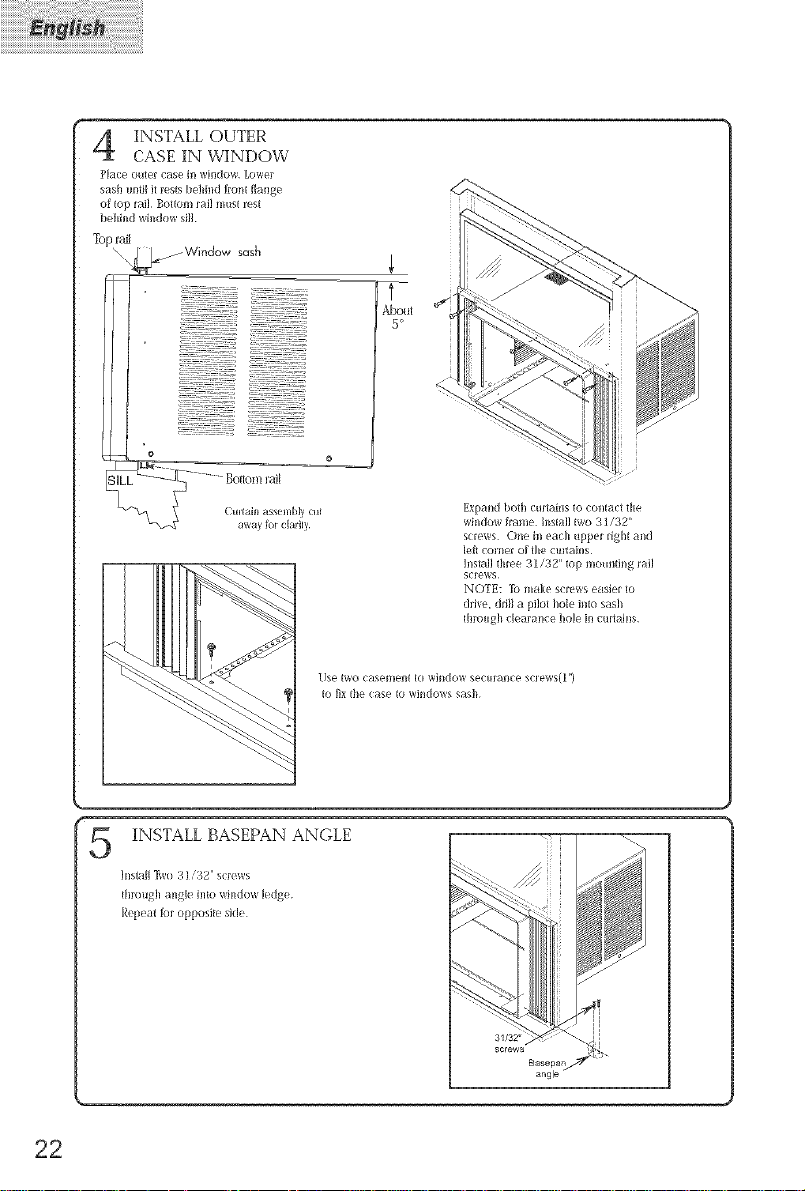
INSTALL OUTER
CASE IN WINDOW
Place oilier case _t]window Lower
sash I/n_i]J{ resls bellfnd l]o_+tflange
of top lail Bottom rail ll/lls{ rest
behind/_h_clov., sill
_ Window sash
Expalld bo{h ctlr[ains to coil{a(:{ {lie
wi+_dow fi'ame hls_all _wo 31/32 +'
screws¸ One hi each _tpper righ[ and
lefl comer of file clmains
Ills{all _llree 31/32 ++_op mo_nl_ing rail
screw_
NOTE; To make screws easier [o
drive, dl_ll a pilo_ hole in[o sash
[hrol@+ clearance hole i_ c_lr[ai+ls
l.Jse iwo casenle_i io wJlldow secttlal}ce sclews(l')
_o l_x Ihe case [o wil]dow_ _asll
INSTALL BASEPAN ANGLE
5
Install _fv,o 31/_2" s(r{,ws
_hrough angl_, into wh]dow k,dg_,
R_,p_,a_ fur opposite si/l_
angle
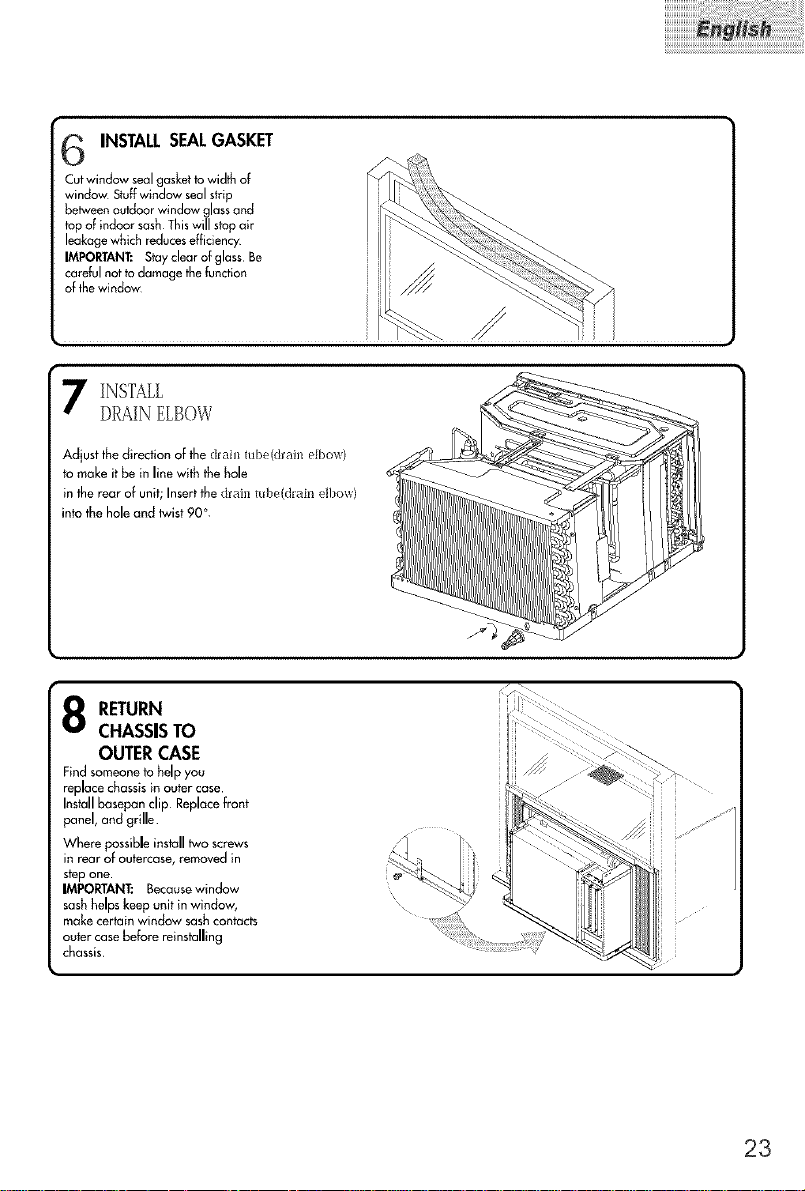
INSTALLSEALGASKET
Cutwindow seal gasket towidth of
window Stuffwindow sealstrip
between outdoor window glassand
top oFindoor sash Thiswill stop air
leakage which reducesefficiency
IMPORTANT: Stayclear of glass Be
careful not to damage the function
of thewindow
, S
INSTALL
DRAINELBOW
Adjust the direction of the dlail_ robe(drain elbow)
to make it be in line with the hole
in the rear of unit; Insertthe dJ'ailt tt_be(dlata dbow)
into the hole and twist 90°.
RETURN
CHASSISTO
OUTERCASE
Find someone to help you
replace chassis in outer case.
Install basepon clip Replace front
panel, and grille
Where possible install two screws
in rear of outercase, removed in
step one.
IMPORTANT: Becausewindow
sash helps keep unit in window,
make certain window sash contacts
outer case before reinstalling
chassis,
\
23
Wall Hns_aHations: sJideooutchassisonly
Note: Removethe ] or 2 shipping screws on the rear of the air conditioner
that hold the chassisto the outer sheJlcasing. Once removed,
thesedo not have to be reoinstalled. To ensure that your air
cendifioner is properJy instalbd in the walJ,it is recommended
that it be installed by a certified technician who is famiJiar with
through the wall instaHafions_
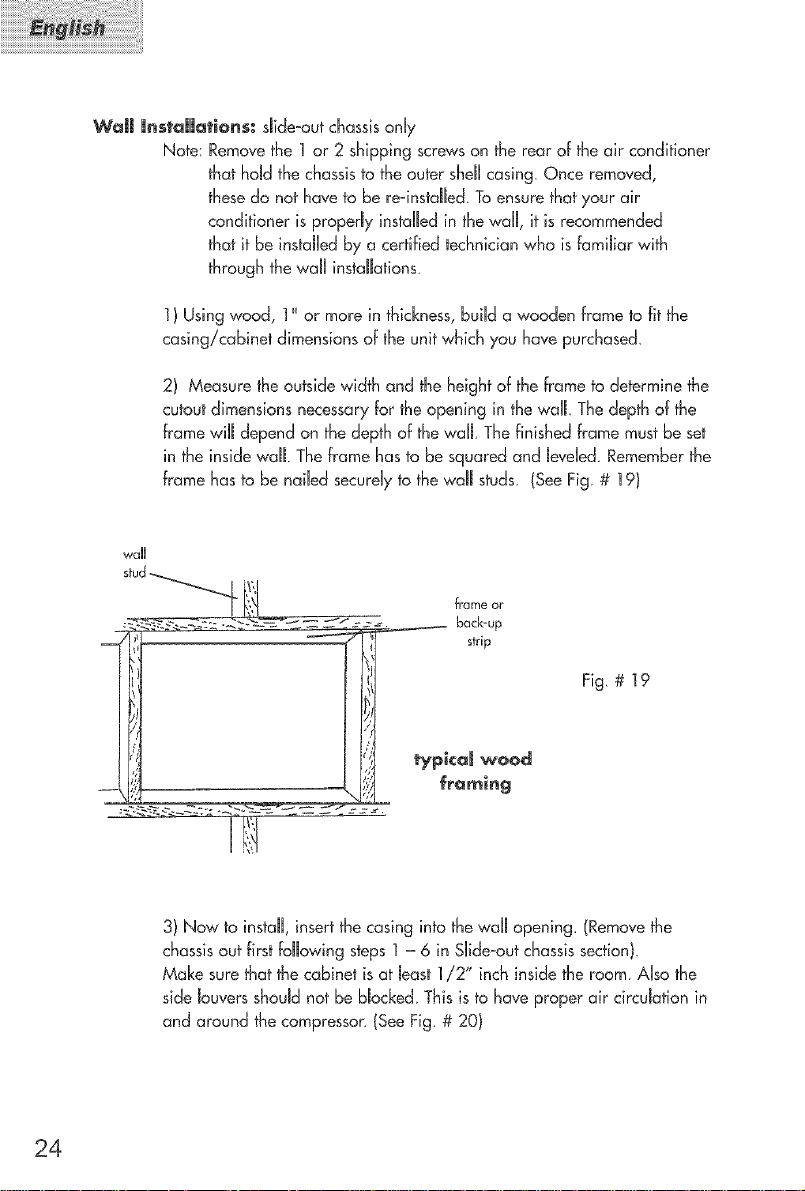
1) Using wood, 1" or more in thicknessr build a wooden frame to fit the
casing!cabinet dimensions of the unit which you have purchased.
2) Measure the outside width and the height of the frame to determine the
cutout dimensions necessary for the opening in the wall The depth of the
frame will depend on the depth of the wall. The finished frame must be set
in the inside wall. Theframe has to be squared and leveled Remember the
frame has to be nailed securelyto the wall studs (SeeFig # ] 9)
wall
Fig. # 19
24
3) Now to instaH,insert the casing into the walJ opening. (Removethe
chassisout first following steps 1 - 6 in Slide-out chassissectionI.
Make sure that the cabinet is at bast ]/2" inch inside the room. Also the
side buvers shouJd not be bbcked This is to have proper air circuJation in
and around the compressor. (See Fig. # 20)
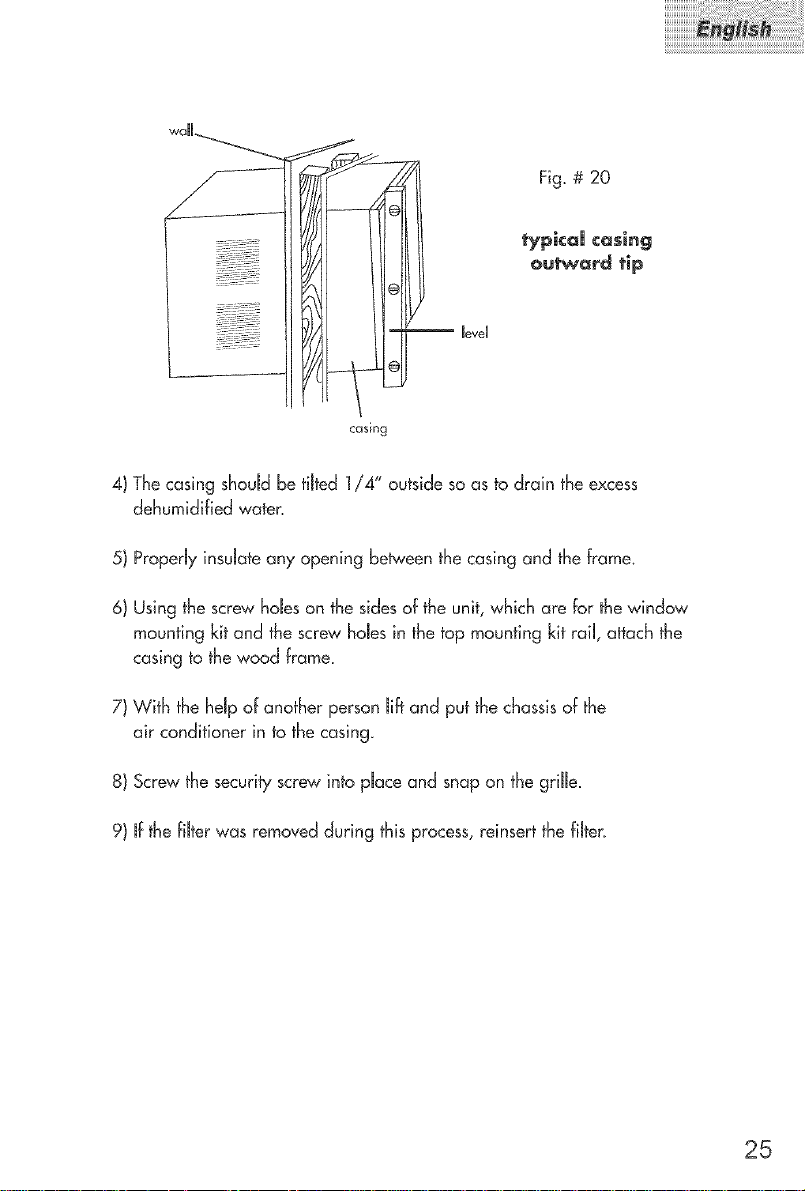
Fig. # 20
€
typicaJ casing
@utward tip
meveU
casMg
4) Thecasing shouJdbetilted 1/4" outsideso asto drain the excess
dehumidified water.
5) ProperlyinsuJateany opening be_een thecasingand the frame.
6) Usingthescrew haleson the sidesof the unit,which are for thewindow
mountingkit and thescrew halesin the top mountingkit rain,attachthe
casing to the wood frame_
7) With thehdp of another personJiltand put thechassisof the
air conditioner in to the casing.
8) Screwthe securityscrew into pJaceand snapon thegrille.
9) mfthefiJterwas removedduring this process,rdnsert the fiJter.
25
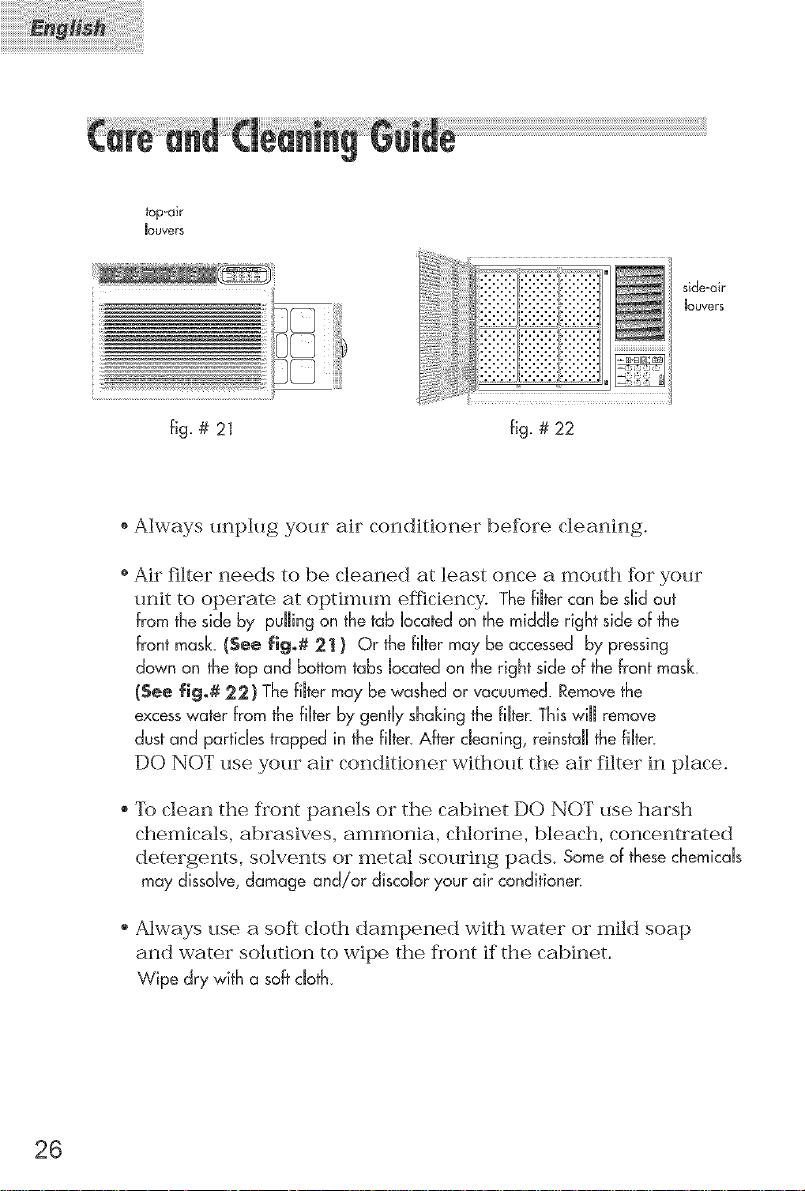
fop-air
_ouvers
i;i! _iI
i_i i/
fig_ # 21 fig_ # 22
o
Always unplug your air conditioner before cleaning.
@
Air filter needs to be cleaned at least once a mouth for your
unit to operate at optimum efllciency, The filter can be did out
from the side by pulling on the tab located on the middle right side of the
front mask {gee fig.# 21 } Or the filter may be accessed by pressing
down on the top and bottom tabs located on theright side of the front mask.
(See fig.# 2.2) The filter may be washed or vacuumed. Removethe
excesswater from the tinterby gentnyshaking the filten This will remove
dust and particles trapped in the filten After cleaning, rdnstdn the filter.
DO NOT use yam" oh" conditioner without tile oh" filter in place.
To clean the fl'ont panels or the cabinet DO NOT use harsh
chemicals, abrasives, ammonia, chlorine, bleach, concentrated
detergents, solvents or metal scouring pads. Some of these chemicals
may dissolve, damage and/or discolor ?,,ourair conditioner.
side=air
_ouvers
26
Always use a soft cloth dampened wRh water or mild soap
and water solution to wipe the fk'ont if tile cabinet.
Wipe dry with a soft cloth,

Tostore your air conditioner, after the season, remove the unit from the
window as per the installation guide. Repack the unit in its original box
and store away_ff your unit is instdbd in a wall or you do not intend to
remove it from the window then cover the outside with a winter coven
This can be purchased from the retaibr where you purchased your
air conditioner or from your local hardware store.
Before putting away your unit make sure any water Jeffin the pan is
removed and drained away. Water bff in the pan could bad to Rusting
or damage to the dectricd connections.
Hfa_r ¢ondltloner does not operate:
Check if unit is pJuggedin. The plug may have come loose.
o Check if the unit is in "Off" mode.
Air frora a_r ¢andlt_oner is war_:
• The A/C setting may need to be raised.
ke farmatlan an ¢aaUlng calJs:
Outside temperature too coJd Set the unit on fan only
setting to defrost ice.
o bwer temperature setting Temperature setting may Be too cold
Unit BTUmay be too high far the room.

A_r ¢ondltior_er working but room not ¢ooJing:
Room may have appliances that produce heat, Use an exhaust Fanto
remove excessheat.
Redirect the airflow. Removeany obstacles.
AHdoors and windows need to be dosed so cooJair does
not escape the room.
o Air filter may need cleaning.
o Unit BTUmay be too Jowfor the required coding area.
On extreme hot & humid days air conditioners may take
a JittJelonger to cooJ.
Vent may be in the open position. Vent has to be dosed far
optimum cooJing_
Air condltloner is maklng noise when cooJirlg:
Youmay hear soundsof air movement, water, compressor clicking on and
off or window vibrations Read Operating Guide = Normal Operating
Sounds. (See page 8)
Woter in the air condJtloner c_blnet:
This is normaJas your air conditioner not onJycools but also dehumidifies
the ain If there is water dripping inside the room, check the installation of
the unit. The unit may need to be reinstaJJed.(See page ]g, 22)
28

This worron_/covers oH defects
in workmanship or materla|s
for:
]. ThemechanicaHand ebctricaHparts (including
Haborcosts)contained in this Haler product, for a
period of ] 2 months,from the date of purchase,
(cornrnerc]aHor rentamappHication,thewarranty is
90 days),
2, The seabd systemand compressor contained
in this Haier product is for a period of 5 years,
from the date of purchase (excluding labor costs
after the initial 12 month period)_ _ncommercial
or rentaJuse, the additional limited compressor
warranty is for 1 year and 9 months, (excluding
hbor costsar_erthe initial 90 days period).
You must keep aed be able to provide
your orlglna| sales receipt" as proof of
the date of purchase.
Who is covered?
Theoriginal retaimpurchaser of this Haier product.
What w_|| be dace?
Haier wimJrepair or replace, inyour home, any
mechanical,ebctrical part or the compressor,
which proves defective in normal household,
use for a period of 12 months. Haier will repair
or replace (excluding labor costs! thesealed
systemand compressor (parts only) for an
additianam4 year period.
Hew can you get se_ice?
1. Contact your nearest Haier authorized Service
Depot. For the name of the Service Depot nearest
you, contact Haier at (877) 337_3639
2. All service must be performed, by an
authorized Haier Service Depot
?HHSWARE_J_NTY COVERS UN|TS
W|THUN THE ¢ONT|NENTAL
UN|TED STATES, CANADA
AND PUERTO R|¢O AND
DOES NOT COVER:
Damages from improper installation
_'Damages in shipping
Damages from misuse,abuse, accident,
alteration, lack of proper care and
maintenance
Damages from service, by other than
an authorized dealer or service center
Labofi service, transportation and
shipping charges for the rernoval of
defective parts and instamlationof a
replacement part, beyond the initial
12 month period.
THISLIMITEDWARRANTY ISGIVEN
IN LmEUOF ALLOTHER WARRANTmES,EXPRESSOR
IMPLJED,mNCLUDINGTHEWARRANTIESOF
MERCHANTABHTTAND F_TNESSFORA
PARTICULARPURPOSE.
Theremedy provided in this warranty is
exclusiveand is granted in mieuof all other
remedies Thiswarranty does not cover
incidental or consequential damages Some
statesdo not allow the exclusion of incidental
or consequential damages, so this limitation
may not apply to you. Some states do not
allow limitations on how long an implied
warranty lasts, so this limitation maTnot
appmyto you. This warranty gives you specific
legal rights, and you may also have other
rights, which vary from state to state.
2g

Fe[ici_a{ions[Vousvenez de faire I'acquisi_iond'un dima_iseur
d'appar_emen_facile _ u_i_isere_d'une grande fiabi_i_e_qui vous
perme_ra de faire des _conomies d'_nergie. Ce manue_ con_ien_des
in[ormations importances quivous perme_ron_ d'insmllerle clima_iseure_
de procOder _ sa maintenance e{de I'u{i[iseren {ou{esecm'i_6.Vo_re
dima{isem'ne{_oie,refroidi{e{ ass_che fair de vo{repiece a[in d'offrir un
confor{op{imaL
Veuillezlifeles ins_ruOionsat_en_ivemen{avan_ d'u{iliserce_appareil. De
ph_s,ffouNiez pas de remp_ire{de renvoyer la carte
d'enregistrement de I'appareil.
Notez le num_ro du module et son num_ro de s_rie
Vous aurez besoin des in[orma{ionssuivan{espore {oulesr_para{ions ou
opOm_ionsd'en_re_iene_de maintenance lots de la p_riode co_ver_epar la
garan{ie. Fixezle requ de ven{e_ ce{_eno{icee{conse_ez la a_n de
pouvoit la consu_mtul{_riememen{.Vous{ro_verezces in[orma{ionsau
niveau de _a p_aque signa_0{iquede vo{reappareiL Si_ap_aque ne se
{rouvepas sur I'habiHage(sin'_ec6{4ou au dos), re{irez_agrille
a[_nde la {rouver.
Nmn_m du module: ..................................................................
Nmn_ro de serie: ..................................................................................
Da{e d'acha{: ........................................................................................
Nora du revendem': ..............................................................................
Adresse du revendem': ..........................................................................
Nmnero de {_qephone du revendem': ......................................................
TABLEAU
PRISES ET FUSIBLES
I1 NSION N( )M]NAtl 125/_fl _50/60
_P_RE$ _5 2_ _5 20 a_
PRIS] ML RAil
CAHBRE DL ] L SIB] E _5 _0 _ 15 _* 30
FUS_LI_ _ F_S|ON F_:_i_le _ C_l_ Fusible h C_|_ _;_s_bl__ Cul_
3O

AVERTISSEMENT:
A
1)Le chma{isem' doi{ 5{re branche au niveau d'm-m prise dec{rique d'une
{eHsioHadOqua{e. (cor_suhez _etableau)
2) L'apparei_doi{ 5{re mis _ _a {erre (masse) afin de reduile {ou{risque
d'6_ec_locmion e{ d'incendie. NE PAS COUPER NI RETIRERLABROCHE
DE MASSE. Sivo{le prise mma_e ne peu{ acc_eiHil une fiche _ {rois
bloches, veufllez faire en sor_e qu'un _iec_ricien qua_ifi_ en insmHe une.
La prise mma_e DOlT _H'e raise _ _amasse.
3) Ne pas u{fliser I'apparefl si le cordo*_ d'a_imenmlioHes{ efffloche ou issm%,
ou si _a fiche e{_e com-_ec{em"soil{ eHdommagSs.
4) NE PAS UT[LISER UN ADAPTATEUR OU UNE RALLONGE.
5) Lorsque vous ins{a[[ez vo{re chma{isem" sin" une fen_{re, v_rifiez que ce{{e
demi_re es_ suffisammen_ robus_e afin de souvenir _e poids de PappareiL
Vous dew'ez _ga_emem fixer i'apparei_ afin qu'i_ ne puisse _omber e_
installer des supports e_ fixations supp_emenmires en fonc_ion
du Upe de fem'_re.
Veuillez suivre ces pr0cautions de base
Iorsque vous utilisez I'appareil afin de
r0duire tout risque d'incendie,
d'01ectrocution, de blessure, voire de mort.
G) Ne pas g_ner *_iobs{ruer le fh_x d'air _ Pin_erieur e_ 5 Pex{Oriem" de
Pappareil avec des s_ores, des rideaux, des caches de pro_ec_ions,
e_ des buissons.
7) Ptenez gatde _ *re pas vous b[esser sm[es bords coupan_s des ai[e_es
Pavan_ et _ PaH'i_re de PappareiL
8) Fai_es al_eH_ioH[orsque vous iHs_aHezou re{irez PappareiL Vefllez 5
_ou]om's soulever Papparefl eH vous faisa*_ aider par uHe ou
deux au{res personnes.
9) D_btanchez _oujoms [e chma_isem avan_ de [e d_p[acer ou d'effecmer
_ou_e op_a_ioH de main_eHance.
31

PAGE
Message de Haler 30
hmnatriculation du Produit 30
Consignes 31
Avertissements 33
Mesures de S_curit_ Electriques 33
Conseils 34
Guide d'Economies d'Energie 34
Caract_ristiqu es 3 5- 3 6
Guide d'Utllisatlon 37- 43
Bruits de Fonctionnement Lots d'Une Exploitation Normale 37
Instructions d'Exploitation 37-43
Installations 44- 54
Pi_ces Fournies 45
Outils 46
Etapes de I'lnstallation 46-54
Guide de Nettoyage et d'Entretien 55-56
Guide de D6pannage 56-57
Ga_'antie Limit_e 58
32

II es_ imporlan_ de suivre [es consignes de s_,cmil6,.
Ces consignes peuven_ vous _vi_erdes blessures yoke la mor_.
Les Avert_ssements vous me_en_ en galde e_ indiquen_ un Danger.
Veui[lez suMe [es ins{mc{ions pour vo{re s_curi{_ e{ r_duire [es risques de
blessme, voim de morL ]Lesindications " Avertissement " e{ "Danger"
pr4ceden{ [es consignes de s6cmi{e.
Mise a la masse:
Ce dima{isem doi{4{remis _ _amasse La raise a _a{erre
l_dui_les lisques de chocs _eOriques grS_e _ une broche
perme{mn{que _ecoman{ s'edhappe_Le cordon _4_ec_rique
compor_e m_N de masse avec une brodhe de masse.
Branchez la _[_clhedans une prise ad_quam ayan_ (_eraise
la masse.
AVERTISSEMENT : Tou{ u{i[isa{ion incorrec{e de [a broche de {erre risque
d'en_rNner her une _eOrocu_ion. Con_aOez un (qeOricien
qua_ilie si vous ne comprenez pas _es insmm_ions de raise
_amasse ou si vous ne savez pas si _e dima_iseur a _
correc_emen_ mis _ _a {erre. Si _a prise mm'a_e n'es_ pas
raise _ _a _erre, veuiHez con_ac_er un _Dc_ricien a_[inde _a
remplacer par une prise ayan_ _4, raise _ la masse.
Ne jamais retirer ou couper la troisi6me
broche (masse) du cordon d'alimentation.
Fiche d'adaptation: II es{ vivemen{ dOconseiH(4d'u_i[iser une prise d'adap_a_ion.
33

Les chma{isem's on{ _{_ consq:us afin d'_{re insmH_s sin une fen_{re
gui_lo{ine ou darts une ouvermre pra{iqu_e darts un ram"uniquemen{
(se_on _emod}_e en question).
* Lorsque vous insmHez I'appareiL penchez Fapparei_ 1/4 de degre vers
I'ex_riem' afin que ['eau puisse d'_gou_er _ i'ex_riem" de _a maison.
InsmHez I'apparei_ sin' _e c6_0.nord de _a maison,
savoir _e c6{_ ombrag&
Ceci vous perme_ra d'am6horer _e rendemen_ de I'appareiL
_, - La fel-_re doi_ _l'e robus_e. Vous devrez peu_ _l'e il_smHerdes supports
e_des fixations supp_menmi_es en fonc_ion du _ypede fen_H'e.
(S_ppor_s e_ fixations non inch_s darts _ous _es modules)
° Mesm'ez _a fen_re avan_ d'insmHe_ I'appareiL Si _afen_H'e es_ _rop
_arge, fai_es vous aider par un ptofessionneL
_, - Assmez vous que I'appa_ei_ puisse _re branche sin"mm prise mm'a_e
ad(_qua{e correspondan{ _ _a{ension e{ I'in{ensi{_.de ce detniet afin
qu'i_puisse fonc{ionner _ p_ein fendemen{.
_ Tou{e modifica_io*_au niveau de vo_re prise _ec_rique doi_ _re effecm_4e
uniquemem par un _]lec_ricienagree.
* Lorsque vous insmHez vo{re chma_isem', veui_ez fake en sor{e
q_e _a piece ne compor_e aucune ouve_me perme_an_ _ Fair
h'oid de s'_c]happer.
* VeuiHez ne pas g&ner _efh_xd'air 5 _'in_riem"avec des rideauo ou
des meub_es e_ avec des buissons _ i'ex_OA'iem'.
N'u_ihsez pas inu_i_emen_de _ampe ou _ou_mm'e apparei_
risquan_de g6n_rer de _a c/l_a[em'.
, Vei_ez _ ce que Feven_demem'e ferm_ Iorsque i'apparei_ fonc_ionne.
- Vei_lez5 ce que _es rideaux e_ s_ores de _ou_es_es mm'es
fen_res soien_ refines.
. Lorsque vous cuisinez, u{ihsez une ho_{ed'a_ra{ion e{ d'ex{rac_ion
darts la cuisine afin d'aspirer {ou{e cha_em"produi{e.
* U_'ilisez_'ouiom'sun chmalisem" d'une puissance en BTUadOquale
afin de reh'oidir la piece de fagon efficace.
34

Votersd'a@atiotl
coulissattts\
\
\
FiJtressimpJes/ \Ch6ssis
d'ac@s CSulissanf
(L'el_semblede ces caraci41isikl_ms sont ptGsentes sin cerlairls mo@les mliquemen0
1. Thermostat
Permet de re2gJer[a temp(qraittre de lair. Plus oct
r?_glestir ff_rtetplus [atemp@aturede Iair
r@'oidit.Permetder6g[er]a temp@atuteaul_iveau
qui vous corn,tern[e mieux. La tempe'ratm'e
pettt@'ere_gle'eentre18,3° et 30°C
2. Vitesse du VentiJateur
Permetdecontr6ler la vitesseduve_ttilaieuraiiisi
que ]a vitesse de ['A/C (reffoidissal_t).L'apparei]
comprettd 3 vitesses d'A/C qtte vous pouve7 r4gler
au niveau qui vous crmvietttie mieux.'LO (gas)[lilt
circuler Fair a basse vitesse, MED' (Moyen)
_tvitesse moyemm et HIGH (Elev@)a la vitesse
maximum. LeVentilateur comprettd 2 vitesses de
cotffort. MED' (Moyemte)etLO' (Basse). ga
fbnOi<m'AtttoFan'(VemilatettrAutomatique}permet
de rOgIeria vitesse du ventilateur ett ffmction de [a
temp@ature de [a pi?_ce.(_-)uattd[a [kmctirmde ia
temp@ature est plac0e, ia vitesse de ventilateur est
d(4terntitt@sekm ia difference el_treia
tempe'rature de positionttemettt etla temp@ature
_tFit@tern"de ia sa[le. Lorsque [a temp@ature
r(4gl_eest atteint, ie vetttiIateur fbnctiomm
sur 'L(3'(Bas)R0glage.
3. Fot_ction.
ge climatiseur poss_de 3 [kmctions.
a)A/C.
Sin"retie positiom [a climatisation active [e
compresseur etla vitesse de ventiJation
souhait@ a[il_de raffaichir Fairpour voice
plus grartd con[k_rt.
b) D_hmttidificaieur.
Cette hmctiort permet au dimatiseur de kmction
_galement eit tattt que dOhumidi[icateur. 1[permet
de @barrasser Iair d'mm hmnidit6 excessive de
mani_re h ce que [a pi?_cereste seche etagr_abJe
a viwe. Cette [kmctirmpeu_ @'e utilise_esettle sivous
l_esouhaitez pas uti[iserla dimatisatiom
c)Vel_tiIateurSetti
Vous pom,ez faire hmctiomter le vel_ti[aiemseu[ pat"
[esjoum@s moitts chaudes. Le ventiIateur peut ?_tre
re'gD sur 2 positions en hmcti(m de vos pre_J>rel_ces.
(_MED'(Moyelme)ventilateur et L(Y (gasse)
vemilatem0
4. Economie d'Energie
Une fbis sur la position Z)N' (Marche), le
vetttilateur s'atTOteapres [es intervalles de 3
miHutesd'arr_t du compressem: Cettefbnction
permet d'Oconomiser [es fiats dkqectricite et
d'@mrgie et Ogalemettt d'elimlner ies bruits imltiles
du moteur de ventilation. Sur la positiott 'OFF'
(Arr0t),le vettti[atettr crmtimte _t[bttctiommr at*
l_iveaus(qectirmn_.
35

5. Miimterie
La eIimatisation peut 6ire rt4gI_ede maniere t_
ce qu'elIe @marre ou s'arr_te en ffmctionde vos
pr(4Drences.Vouspouvez ia programmer j_lsq_l'a
12 heures a Iavance.
(;.Ot,vet'tt,re de ve*_tilation
(sur cerl'ains mo@les uniquement)
Cette fl_mcttonpermet d'etvacuer Fair vicietet de
remp[tr la piece d'air flais venam' de i'exteirieur.
Pour [hire circuler ['air, placer ie ievier sur ia
position ouverte. Pour conseJver [a flaicheut;
iaisser de prOf>rence[e [evier sur [a posiiion
fk_rmele.
7. Balayage el%it
(sur certains mo@les uniquement)
Sur la position 'ON' (ouver0, cette fbnction
distribue automatiquement ['air dans ia piece.
Ceci penuet s'assumrune @culation d'airr0guliem a
Iim'etrieurde [a piece.
8. 4 Balayage d'Air
(sur cer_'ainsmo@les uniquement)
Lesvotersd'a_ration directiomte!spermettent
dorienteria direction deia circulaiion d'air en
fl_mciionde sespr_fFrences.Lacirculation dair
peut _tre dirig_e ve[.'s]ehaut 'up', [e has 'dowff,
ia droite right side ou [a gauche I@ side'.
9. Chassis Coulissant
(sur certains modules uniquement)
Cette fbnction permet d'augmenter les possibiliteis
du Climaiisem: D)us pouvez installer ['appareil
soit _-_une DnOtre, soit sur un tour.
10. Kit d'h_stallatior_ pore Fen6tre
Permet dinstal[er ie c[imatiseur sur une f_nf_tre
double _lguillotine. Hpeut s'av_4rern_cessaire
d'uti[iser divers_ypes de supporl's suppDmentaires
en fimctirmdug,pe de [bnOtre.
11. TOlOcommande
La t_q_commande flmctions inteigralespermet de
faire [imctionner la dimatisation a distance, hmtile
de se lever pour changer [e r0giage, les flmctions
ou encore a[lumer ou 0teindre ['appareiL
12. Panneal_ de Contr61e Electroniql*e _
Erran _ cristaux liquides
L'_4cran,_cristaux [iquides ,_4 flmctions permet
d'affldler[a Tempcqratumde ]a Piece. ie Relglagede
[a TempOrature, [e Relglage de [a Mim_tetieainsi
que le TempsRestaniavant d'Am_teffde Metireen
route Iappareil. ge Panneau de Contr6]e
E[eOroniquepermet de rOg[er[atemp_@aturefixade
souhaiteLe
13. Filtre Electrostatiqtle
(sur retrains modules tmiquement)
Lefiltre a 0i_ congu a partir de subsiances
eminemment purifiantes, de mat0riau de carbone
actif, de mat0riau _qectrostatique, d'un fileide
carl)one acti[ 01ectrostatiqueet dautres mateiriaux
r@ui_s pour [eurptx)ptieltOspurlflcagicesde ['air.
Sa smmture onduleleaugmente ia capaciteia flitter
[a poussiere et [a Imnelede mani_re eflicace. GrSce
a ia rOientiondu carbone actifl ia vitesse de
purification ei ia circulation d'air sont _qe%'es.
14. Mode sous tensio_-t
Lorsque ce mode est ac@4, Iappareil d&[enche
automatiquement une minutetie d'an_t de 8 hem'es.
L'appareil g_ieint 8 heures apr_s.
36

Bruits de tbnctionneH en ]ors d'une
exploha ion normale
Ees @mob, s sonores suivan_s se fon_ norma[emen_ en_endre &n'an_ _e fonc_ionnemen_
de _a dimatisa_ion:
° Des mouvemen_s d'ail froids r_gis par ]a vi_esse du r_g]age
du vendia_eur.
*Des bruits d'eau. Ces bruits son_normaux darts ]a mesm'e oi_]e
dima{isem"set{_,gaiemen_de d6lhmnkiiiicateur.IIes{donc normal
d'en{endledes brui{sd'eau qui proviennen{des gou{_eie{_esqui
{ombemsur le condensateur .
. Lorsque_e_iqnider@ig6ran_ circ@e_ I'imeiem du sys_6me
de con&@s internes, un bn@ d'6co@emen{peu_se faire en_endre.
*Des bn@s de daquemen_ ou des vibrations peuven_ se faim en_endre
Iorsd'une mauvaise installation au tour ou _ une Dn@re.
° Le compressem"@_e_parl[bisdes bruits@s aigus.
InstKH:t k)r s d'exp/oitatbn
Vous _rouverezci dessous [es directivesde foncdonnemen_du
Apr_savoir ins@_ _edimadseur, brancher I'apparei_darts
une prise O_eOriquemutate adap@e. L'ouvermrede ventilation doi{@e
@ac_e sur _aposNon fem_@. Vouspouvez a_orsn4gDr_a
dimadsadon au niveau quivous convien_.La _4,k%ommandeintegrate sans
I[iipem_e{de faim foncdonnet la dimadsadon sans avoit _ se @,placer
jusqu'5 I'appareik Tom_emen_ibncdonneHe, ceasecarac_risdque vous
perme_de change_ _esr6g_agesainsi qne d'aHumerau d'0mindre
]['appareildirec_emen__ pardr de la _61ecommande.La_ouc]hede
commande foncdonne de la m@_e maniee que celle se _rouvan_sm le
dimadseur. (Voirling.# 1)
fig.# 1
T616commande
AUTO FAh MRS_E_Y STOP
37

Une lois ]['apparei[branc]hO,un _es_au_omatique s'effecme.L1n_egra[i{ddes
hmli_msde ]['af'fMlages'aHmnen_pendan{ 3 secondes. L'af'f]chage_
cdsmux _iquidesaf'fMlea_ors"88'. Si I'une des hm_i_resde Paf'fic]hagene
fonoionnai_ pas, i_fau&'ai_a_orsfaire rdpat'er I'appareiL A_afin du _es_
de 3 secondes, ]Papparei_passe au_oma_iquemen{en mode sous _ension.
L'ensemNe des lumi_mss'_ein_ e_i_fau_abrs aHmnerI'apparei_en
appuyan_ sin"_a_ouche'On/Off (Marche/Arr_0.Apr0.savoirappuyd sin"
_atouche d'On/Of'f', f'uni_dcommence _ fonOionner e__cri__emode du
'Fan Only'avec une basse configm'ation. Appwer sm _a_ouche (+) ou (-)
sim_e sin"'Temp/Time'(Temp/Hem'e)afin de regret _ammp_ramre en
fonOion de vos p_'dDrences.Vouspouvez sdleOionner une _emp0a'amre
comprise entre 16 °C e_30°C. Une fois la _emp_ramre regDe, vous pouvez
_amongerou _abaisser en appuyan_ sm _es_ouches(+) ol/(-).
Laconfigm'a_ionde _a_empdramrepeu_ _re ajus_eeseu_emen_quand
I'uni_des_se refroidissanm ou de]hmnidifying.(Vokfig.# 2)
fig.#2
Panneau de
38
kpr_s avoir rdg_d_ammperamre,vous devezrdg_er_e{ypede
fonOionnemen_du c[ima_iseur.Pourde ['air h'ais,appuyersur [a
fonOion _A/C' .Sivous souhai{ezuniquemen{ O_iminerP]mmedi{&
appwer sm _afondion 'Dehumid'(Ddhmnidificateur).Pom"n'u_i_iser
que _even_i_a_em",appwer sm _a fonOion 'Fan'(Ven_i_a_em)
(Vokffg,# 3)

fig. #3
Pannea_l de Contr61e
Apr_savoh s_[eOionnel le mode, r_g[er [a vi_essede venetia{ion Sivous
s_ec{ionnez _emode A/C, _even_i_a_em"pe._ fonc{ionnelsm 3 vi_esses:
'Hi'(Rapide),'Med' (Moyenne),e_'Lo'(Basse);o. en mode 'A._o speed'
(Vfiesseau_oma_ique).En mode de vi_esseau_oma_ique,_even_i_a_em"
d_mane sin"'High'(Rapide) puis se rOglesin"'Lo'(Bas)enfonc{ion des
fluctuationsde _a_empel'amrede la piece, Une lois que _a_emp_ramre
souhai{Oede _api}ce es{a{min{e,_eleg_age de ven{i_a{ionau{oma{iquefai{
d_maner _even_fla_emsm %0'(cda prend 3 rain.ms pore comm._er _a
vi{essede ven{fla{em').(W_i_"fig. # 4)
fig. #4
Pannea_ de Contr61e
39

sivous choisissezd'u{fliseria tbndion de deshumidifica{ion,puis erie
perme_ d'_iminer sm'phlsdlnmMi_ de ¿'ak pal"_esjoins de grandes
chMem'shumides Une lois ce mode s61edionn6, le compressem"fondionne
en permanence e{leven{ilammmarche sin"lavi{esseseledionn_e. Une
lois q_e la {emp6ramre de la pibce esl a{{ein{e,le compressem se me{en
marc:hependan{ 10 minu{esputs s'an%{e6minu{es.Sm ce{{eposNon, le
ven{i_a{emfondionne sin"_avi{esse'Lo'(Basse).Sila {emp_ramre descend
au dessous du l_g_age, le compressem s'e{ein{e{le ven{fla{em"con{inuede
fondionnel a basse vi{esse.Leprocessus de delmmidifica{ioninmrvien{
en{reler_glage de la {emp_ramre e{3 ° au dessus de ce r_glage
(W_ilfig. # 5).
fig.#5
Panneau de ContrOle
_,.t_j,) t, /
Par des jom'n(_es ph_s finches, i[ peu{ s'av4rer u_i[e d'u_fliser [a tbndion
'Fan OMy' (Ven_i_a_eurseu_). Ce_te [ondion perme_ au ven_i_a_eur de ne
[ondionner que sur 2 vi_esses: 'Med' (Moyenne) ou 'Lo' (Basse).
Le ven_i_a_em'ne peu_ Mors pas fondionner sur _a vi_esse 'High' (Hev_e).
(Voir fig. # (_)
fig.#6
Pannea_ de Contr&le
4O

'Timermode' {Modeminu_erie)ser{h pre d6marrer ou 5 _eindre
I'apparei__ai'avance: Vouspouvez programmer jusqu'_ 12 hem'es
I'avance. LaMinu_erieposs_de 3 fonOions: 'A/C', 'Dehumid'
(D_shmnidifica_eur)e_ 'Fan Only' (Ven_i_a_em"seu_).
D_marrage de _aMinu_erie(Voirfi&# 7)
Pore"l_g_ella minu_erie,I'apparefl doi__re a_hm_. L'apparei_s'_ein_
aummatiquemen_ apr_s I'accepm_iondu reg_age dans _es5 secondes.
U_fliserce mode pore prel4g_erIqheuredu d_marrage de I'apparefl
jusqu'_ 12 hem'es _ I'avance.
a) Appwer sin"'Stuff (Marc]he),i'affichage _ crismuxliquides
indique 'XX'(p_acezI'hem'e, _alois passOeLSi la puissance es_rdi_e pour
_apremiere I[bis,I'affichage _ crismux_iquidesindiquera '01 '.
b)R_g_elle hombre d']hemessouhai_ a i'aide de _atouche (+) des
bou_ons'Temp/Timer',(Temp/Minumrie)un pal"heure. Sivous d_passez
I']hem'esouhai_e, servezvous de la _ouche ( ) pore revenir en alli_re.
An'_ de [a Minu_erie(Voilfig # 7)
Pore'arr_._er[a minu_erie,I'apparefl doi__re aHum_.Se servir de ce_te
fonOion pore prel_g_er r]hem'e.q_aq_e_e vous souhai_ezarr_mr I'appareiL
a) Appwer sin''Stop' (Arr_0,I'affic]hage5 crismuxliquides
indique 'XX'(placez i']heme,_afoispass_e) Si la puissance es_rdi_e pore"
_apremiere I[bis,I'affichage _ crismux_iquidesindiquera '01 '.
b)R_g[el [e hombre dqhemessouhai_ h ['aide de [a _ouche (+) des bou
_ons%mp/Timer',un pal"heure. Sivous d_passez I']heuresouhai_e,
servezvous de _a_ouclhe(-)pore"revenil en artiste.
Lorsque I'on se ser_ de _a miim_erie, I'apparei_ reprend _es rOg_ages
pr_cc4den_s d'Ail condNonn4 e_ de ventilation iorsqu'i_ se me_ en marche.
La minu_erie doi_ _re r_g_ee _ nouveau _ dhaque nouvd_e u_flisa_ion.
Jig, # 7
Pannea_ de ContrOle
Suppor{ez _a configma{ion du mode m_e lois pour _ancel
En _e suppormn{ d'une seconde de romps, _a cont_gura{ion sera anmfl_
41

ge Mode 'Sleep' (Sommei[)permet de pr_rOg[erI'apparei[ de mani_re _ ce
qu'i_s%teigne8 hem'es ph_stard. ge mode 'S_eep'(Sommei_)ne fonOionne
que sm la position 'A/C. Apr_savoil"pr_reglel la temperature, elle monte
de 2 degres au corn'sde _apremibre hem< p_is _ nouveau de 2 degr_s
pendant I'heme suivanm E_le_'esteensuite constante pendant les C,
prochaines hem'es Darts [a mesme o_'_[e corps humain ne produit pas
autant de cha_em pendant _anuit, et q_e _esnuits sont g_n_ra_ementph_s
fia_ches, cette fonction pelmet de dormil"con['ortablement din'ant to_te la
nuit sons avoil a se r_veillel"pore changer le l%glagede temp_lamm.
(Voi_fig # 8)
fig. #8
Panneau de Contr61e
TtMp
/:_ f\ (FN
42
Ba[ayage d'Air:ga fonction 'AirSweep' (Ba[ayage d'Air)se met en route
Iorsque I'onappuie sin"[atouche con'espondante. EHepermet d'obtenir
une circulation d'air constante darts [a piSce. Pore"I'an'_ter,appuyer t_
nouveau sin"_atouche (fonctionnon indus darts taus _esmodules).
(Voi_fig # 9)
Economie d'gnergie: Cette touche pe_met d'active_[e mode 'EnergySaver'
(gconomie d'Enetgie) de I'appareiL ge ventflatem"s'aH_teapr_s 3 minutes
oh [ecompressem s'an'_te. En[e d_saOivant, _eventi_atem"continue _
fonctionnet sm la vitesse s_[ectionn_e, et ce m_me darts [e (:as oh le
compressem"s'ar_'_te(la fonOion est seulement disponible dans le mode
d'cA/C}.(Void"_[]g.# 9)

fig. # 9
Panne_u de Contr6]e
Lorsque Fappareil es_ en mode 'On' (Marche}, I'affichage _ cris_aux
liquides indique ]a lemp6ramre de ]a piece,Appuyer sur ]a _ouche (+)
pour r6g[er [a _empSra_ure. Lorsque ]['apparei[ fonc_ionne en mode 'Timer
S_op' (Arr_ Minu_erie), l'affichage _ cris_aux liquides indique le _emps
msmn_ avan_ que ]'appareil s'_eigne. Pore" annulet i'An'_ de _a Minum_'ie,
appwer sin"_a _ouche d'an_ 'Off principa_e Si 'H' es_ s'a_lumaiL i_
indique le _emps. Si 'F' es_ s'aHm_aiL i_indique _a _emperamre darts
Fa]l_renhei_.
43

VOrifiez_espoints suivants avant d'instaHervotre dhnatiseur:
1)V0rifiezque rien ne g_ne l'appd et _efluxd'ah _ I'_t_rimHet_ _'exl_rie_H"
de _apiece (par ex: lideaux, tenmres, meub_es, p_antes, buissons, arbres ou
route autle type de construction comme un immeuMe, un garage, etc). IIest
important que rien ne g_ne _e flux d'ah' a_lant au condensem" ahn que
Fapparefl puisse evacuer I'ah' c]haud.
2) Verifiezque _aDn_treest su_fisammentrobusteafinde supporter_epoids du
c[imatisem. Vous dewez peut _tte instMler des supports et fixations
supp_Omentaires en fonction du type de fen_tte. (Supports et fixations non
indus dans tousles modules).
3) V_tifiez que _e tebord de _a fen_tre est suffisamment tobuste afin de
supporter le poids du chmatisem"
4) V_rifiez que le ram"est suffisamment robuste afin d'accueiHh"
[e chmatisem'. Vous dew'ez peut _tre installer des supports et fixations
supp[_mentaires en fonction du type de ram'. (Supports et fixations non
indus darts tous les mode[es).
5) Verifiez qu'i[ existe une somce de comant _[ectrique ad(_quate
_ proximit_ de I'apparefl.
_) NE PAS utfliser de fic]hes d'adaptation.
7) NE PAS uti_iser de raHonges.
8) NE PAS couper ni retirer _a broc]he de masse de la tic]he.
9) NE PAS modifier, _a fiche ni la prise _ectfique mma_e. Si _a fiche ne
correspond pas _ la prise mmMe, contactez un _lectficien agr_ afin de
proc_d_ _ _a modification.
_k 10) NE PASbrancher le cordon _ectfique avant d'instaHer Fapparei_
11) NE PAS utfliser I'appareil si le cordon d'Mimentatio*_ est effilochO ou
fissure, ou si la fiche et le connecteur sont endommages.
44

Pi ces fournies (Voir fig, # 10)
ROf. Description de la piece Modi_le
ESA3063 FSA3083
1 Persiem_e droi_e 1 t 1
2 Persiem_e gauche ] t 1
3 Joht{en mousse de [a fen_{re _ guillotine[ l t 1
4 2 2 2
5 Vis de 31/32 po. 9 9 9
6 Vis de 13/32 po. 6 9 9
7 Rai_ de montage supeliem mon_ 1 1
8 Videz [e _ube de Fea_ 1
9 Raccord coud_ pore" sortie d'eau 1
10 Rail de montage in['_tiem mont_ mont_ mont_
11 1 t 1
12 T_commande e{ ba{{erie 1 1 1
13 Vis de secm'it_ de trame de feH_re 2 2
FSA3103
ESA3[23
45

Outils
Vo_s a_lrez besoin des o_i_s s_ivaJ_s pore' I_h_s_aHa_ion _1_ dima_ise_r:
Cisea_/x
° Tom'J_evis cmciforme
* Tomnevis ordinaile
eiH(es
" C_ _ moselle
Perce_se e{ fore{s
® M_{re (mban grad_e)
Nivea_*
46

Installation du climatiseur sur une fen6tre
Le dima_isem" a _6, con_'u afin d'etre ins_aH_ sin"une lend,re _ guillotine simpD ou double.
Chaque dima_iseu_'es_ibm'hiavec un ki_d'insmHa_ionavec des persiennes q_i perme_en_ de
fermer les ouvermres des deux c6_s, enh'e le clima_isem" e_ la lend,re. Le _ableau ci dessous
indique les dimensions de chaque appareil avec ou sans ki_d'insmlla_ion.Mesm'ezla largem"
de l'ouvemn'e de la fe,n_re e_ comparez la au tableau ci dessous afin de vous assm'er qu'elle
correspond aux cri{_a'esminimmn e{maximum.
ESA3083, ESA3103, ESA3123
Dimension_ __ ESA3063 ESA3083 ESA3123
A(po.)
B (po.) 143" 131_
D (po) max.
D (po.}mi*_. _3}"
Haulem"de bohe _3_"
Latgem de bo_{e a_/,.
Pro_bitdem"de boh_
Mod_ele ESA,3 0 (;,'-3
FIXATION DES
RIDEAUX
Refilel l'ap )al{il de soil emballage
et le d(• _oser sm¸ le _lancher a c6t_
de I en_roit o i il sela install_
Faim glissel le lideau gauche dans
les extlt!mit_s gauches des cr_mail
leres sup&ieure et in_rieme R_ _ter
la ploc_dme pour le l_deau droit Fixer
les bandes de lelenue des lkleaux
alex c6t_s _hJ boitiel ¸ ext_liem ¸ aw_c six
vis de 10 mm
Attention : Ne jamais ex _oser la grille
on le devant en plastique g_des temp_ratmes
extl_mes,
47

PRI_PARERLA
FENETREPOUR
L'INSTALLATION
hlspectel le lebold, la gllillotine el
la cldmaillel{ de la fen{'tle pore
s'assulel que le pokls du
clhllaliselll pelll {'lie SOlllenll
M_ slllez la lalg_ ul _ }1_1_Ies ltlonlHles
de la [e_e_r_ afill de volts _sgnlel _I1_
Motl_t ptlisse s')n( lstrel"
inst m[anSmenL Les mod{les _ kil
d'i_ls_aJla[ion inmtelliale "]nsl mE
col {spond_n_ d_lXC_lg_(l_'ris_iqH_S _]e
h p_g_ 28
te llecessahe de montage
hlslantand foulni avec Pap )al_il est
congl )oln la )lupalt des fen{qles _1
dollble Sllspellsion sans {ontle fen6tl_
Poul mm installation dans
ii11le]lold de fen_ql_ avec COlllle
fen{'tle, modifiel le l_bold en
ajol_tant des bandes de bois (ce nest
pas h/chlsallx lebolds ]ntelne el e×telne
CecJpellne{ de SOlllevel l'a )p_lleJl et
dlilnhle l'obstlllCtlon causg, e pal la
conlle [en{,tl e,
Installation de la contre f_n'_,tre
Si le cadre de la conlre fen6tre ne
procure pas l'espace de d_gagement
addqnat so.s le rebord (½ po
[1,27 cm] ndcessaire), retirer le
cadre de la contre _n_tre oll crier
un espace de ddgagement en
_mtant m/e bande de bois (d'au
moins 1_/_ po [3,81 cml de Imge) le
long du _ebo_d. Fixe_ la bande de
bois all rebo_d h I'aide d'au moins
trois vis h bois h l_'te tiaisde (lion
comprises dans le ndcessaire) Ceci
procl/re line surface pills Iisse pony
installer le climatismm 12cm
lalle
de bo;s
R_4,o,d] /_
hlstallation dans ulle feng'tre
de maison mobile
Ajouter nne bande de bois (d'au
moins1'/, po 13,gl_mlde large)
le long du mbold de la fen{'tle,
Udpaisseur de la bande de bois doit
conespon&e h la hamem de la liw_e
avant dll mbold de fend,tie Fixei la
bande de bois au rebord h l'akle d'al_
moins trois vis a bois a t_te tiaisde
(non comprises dans le ndcessaire)
(eci plocme une slnta_e plus lisse
poul installel le climaflseul
dh_aliseut
& bo;s
N i X
E i E
INSTALLATION DE L'APPAREIL
DANS LA FENETRE
Place_ I'appaleil dans la fen{,tle Abaissel la gl_illofln{
jusqu'h ce qu'elle lepose deni_le le _ebold awmt de la
cl_maill_e slq)dJieule, ha cJdmailMe inl_:lieule doit
leposel deniele la guilloline de la tbn6tle
G
48
INSTALLATION DU
COUDE DE BASE
Ddvissel la vis de la paltie avant et gliss_l 1{ col]de de
base pal ¸ dessus la t{'te de la vis Serrer la vis en
faisant reposer le _l_le sur le rebord de la fen{'tre
Poser deux vis de 25 mm h _raw_rs le coMe dans le
rebord de fen_tre Rdpdter la procddlue pour I'au_re
c6td
V_sde 25 mm

POSE DES RIDEAUX
LATI_RAUX
Rallong_l les lkh aux aussi loin
que possible Posel 2 visa
guillotine de lid_ mix de 25 mm
Intloduisez tlois vis(25mm) dans le lail de montage
Ponl les bois dins el les cadles m61alliques, u_ilisez
lille }elellSe at]n de }elC(l iii1 [1Oll
ce gllk age pOlll comlll( nr:el a vissel
IMPORTANT : Plendle galde de ne pas pel_el
II1111Oll tlop plofond AjOlllel IIn inolceau de
llll)an goll/in{; Sill In nl_che de la pelcellse poul
mesm_l la plofondem Se lenil loin de la Vitle
Plendle grade de ne pas endommagel le
m_canisme de la fen{'ne.
INSTALLATION DU
JOINT D'I_TANCHI_ITI_
( o,pel le johll d'_tanch6it_ de la fen_tle
selon la kugem de la tbn_.tm Ins_lei le
joint d'6tanch6ilt} de la fen_tle entle la
vitl_ de la fen&tie ext_l{eule el le dessus
de la gldllotine intt}l{elll_ Ceci emp_'.che
loule fuile d'ail sllsceptible de lOdllile
l'eftlcacitO de l'appaleiL
ModUles
ESA3083, ESA3103, ESA3123
PRI_PARER
L'APPAREIL POUR
L'INSTALLATION
Retirer l'appareil de son emballage el
le d(.poser sur le plancher a cOt(. d_
l'endroit ou il sera install_
Relirer la vis de la partie avanl
Sdparer Ie boilier ext0rieur de
l'avanl a l'aide d'un COU_EaU a
mastic aUX endroits d0signOs par
les fli.ches
Retirer une ViS retenant Ie support de
ff'_ation de la base Relirer deux vis
siltldes a l'arriere du boner exldrieur
el retenan{ la base au boilier ext(.rieur
A I' _hte des poign0es de la basE. tirer
lentement et de lagon unilormE 1_
chilssis hors du boNEr t.xl(.rieur
Remarque :Recouvrir la lame du
cotHeatl _1mastic de rtlban cach_
pour ne pas endommager le fini de
l'appareil te filtre n'apparail pas sur
l'illustralion a des lins de clart0.
Attention : Ne jamais exposer
la grille ou le devant en
plastklUE a des temp0ratures
extff,mes.
49

MONTEZ LES
RIDEAUXET LE
RAILSUPERIEUR
FENETRE POUR
L'INSTALLATION
his }{_({{Z [{_ (/dI{ f[ [f_ lf_l}{Hd d{ [El
f{ ll(_{lf a_[n ([_ vous assui'f F fItl _s
pourront supp(llIe_ le poids ([I1
(:[illla[iselll
Mesmez la laiR{ m ell{le [es ltlou[tlre8
d{ [a _(_110_1{ al]ll d{ _ot_s Issur{ 1 ( u{
Mo{_lli" ptlisse S'ell( asIle_
ilisIartlaIl(q_t{nl Les modiles a kit
d'iI_slalI t_k)tt imm(;dia_e '_]nsta_t{
MoronS" ont (,l(, con_,u pot_l ([{s
_( I1611{ s (ori'ospoitdall{ _tllX
cala(lOris[iques de [a page 44
Motlll{" qtfi e_;{ foulni a_,e( [e l_l_nlmm]
C[[IIIat[sOUF {t f{{ (OIIgU afin (If
pouvoil installel le climatis{ m stir la c,{i_
)hi )11t d{s [(!110{I'{_S / guJlkl[ine Sails de b°_s
con{lo felI{}tres ] otF l!ls_llksl [{5 i le fen/_Ir{
C[_Ina[_sOUI S{H Ull cadr{ d{ _{ n(?{l(
s_lns coiI{r{ [e11_}_re. Illodi_iez 1{ T E
lebord d{ la _H]_}[I{ fll _t ou[atl[ dfs E x
[a[_{ S (1{5 bOiS(C{5 II'{ S{ p/s i11(21113) 111 R T
lilY{ 8U ([11 bOP([ in{{}r]{ Ul (I (tU bold ! _
ex_(ri{ur d{ la f{mtl{ Vous _
palvi{ ndi{z aiIls[ t sur( kvel k! ( _d_{l_de t_
([_ma{is{ {ff {)I _l i)o[B'oil n{ !.{f){i{_l {on{re _en{4_e i{
IOUIe obs[ruc[iotl {]t_{ lis{[tle {[e
}I('S{HI[{_I 1{_CIdFO do [gl { oll[l{_
{ IlO[r{
[ns_ !lIa{iotl stir [_ ll(;_re a
Si le cadre de la c{}i_Ire _n_tre _e
laisse )as stlfl_sal_lill{?Ill (]'es)ace eIl[ie
e Pebol(] {[{_a_emel_{ o ) i_aklire { e
] ,2 cm), retirez le cadre de la conlre
l_!n_re ou _iles e_ sorle {l'{)bleilir le
d{}gaoenlei_{ (1{!sir{! en _t ot_{a1iI tlne
ladle _ I){lis {illesllrant all l_lfl_ns _.8
ci_l {[e lal_etli ¸) _oul au IO_l_ {[e la
largeur {hi bord de la li!i_tre _xez
la lathe de bois au rebord de la _t_a e
avec atl _loiil8 II{li_ v]s _l bois _t _{e
liais_e (non _ui_e_ ave(: le ki_) %us
o[)_iendlez aillsi tlile stlllace I]sse al_1]
de placer le climaflseur
i 2 cm
Mh_m_m_
[t3stallaliot] stir lenOtre de
car_vsIleS et iI_iso_ls i_lob]les
Placez la la_e de [){)is O_l{_sl_rail_au
mo]ns _,8 cm {[e [a_etlr) {otl{ a(l [on_
L'_pai_seur de la latle de bois devrai_
collesp{}i]dre _t la laPgeur de [a Ji!_e
awmt du cadre de la _i_tr{_ Fixez la
ladle de bois au rel}ord de la li!u_tre
avec till _lOi!]s tPois _s _tbois a I_Ie
lrais_e (non _umies avec le kil) Vous
ob{ielldlez aillsi tlIle s[li[ace l]sse _t_
de placer le cllmaflseul_
le tail in_,de_lroh1
cl_ma{_seur
5O

INSTALLERL'HABILLAGE
EXTERNEDANS LA FENETRE
Placez l'habillage _xtem{ du clima{iseul dam la
fen0tre Abaissez la vi{re [llsq_f_ ce qu'elle repose
de*Tii!re le rebord avant du lai[ sllp_rieur Le rail
iI_lielil ¸doi_ reposer derriere le rebord de la _I_{re
Wtilisez till IJVeatl al]I] {[e colrec{ei_lent iI]S_a[[el¸ [e
c[i_llati_;eili_
........ Guktei11_g'rieur
Utilisez deux _is d{ s((llFi{( d( [H_III( d( feB(![fe afill
de fixer Je boi{i_!r atl c_d_e d(! la v_[Ie
<
INSTALLATION DU
COUDE DE BASE
Pose_ d{nx vis d{ 25 mm h tlaw_s le cond{ dans 1{
rebord de fen_tre R_p_iter la proc&hne pour I'alme
c6t(<
I;_tirerles rid_aux de la_on h
ce qtl'ils entrent en contact ave(:
le cadre de la len0tre Poser cinq de
25 mm h trawrs les rideaux et la cr(,mailli,re
sup0rieure
REMARQUE: Afinde f;_cili_ell'inltoductloll {ks
vis. ave( title pelceus;, pelcez tin {FOIld(
guidage dans le cadr_ d; celte {enf;lreeI_
pas aIl_pal le _rou de d(,gagemem situ(, darts
ks rk]eaux
V_sde25 mfn
Coude debase"
51

INSTALLATION DU
JOINT D'ETANCH]EIT]E
( oupez le joiu_ d't,_ancht,ill,/k la Dn(stl_ al]I] qll'il coP:espond;
_1 la la*gem ¸ de la Dl]Otre Enlbf]cez le ioil]_/l'Otanch_i_O eJ]_e
le velle de la vi_re ex_elne e_ le desslls dr1 cadre de la vi{re
i11(_ie[lie Vous eil]pOcherez _insi {'ail¸ extOrieur de passel ¸
pot/r ull i_le_llet[l ¸ leIK[eiileiR
N olo i[llf)Ol {_l[l{( : V( ilk z _ dell1( tli'(_F l()_fl dt[ _,( 11( ASSK[F( Z
vot[s qt[e celte op_!la_iotl I]e tlL[ise pas _L[ foi]ctk_I]l]emel]{
de la fen(_r_
INSTALLER LE TUYAU
D'ECOULEMENT/LE
COUDE DE DRAINAGE
Aligner les attaches du
luyau d'6coulemenl ave(; la cl_} situ6e
darts la base¸ InsUrer le luyau el le _ire
tourner a 9(I degr_s pour le verrouiller
Pousser l'exlr_mil_ du coude darts le
trou jusqu'a ce qu'il soit verrouill_
REMETTRELECHASSIS
DANS LEBOITIER
EXTt_RIEUR
Paire appel _1quelqu'un pour remel_re le
chflssis dans le boitier e_:t0ri(ur Poser
l'at_ach_ de la base Remet_re le panneau
avant el la grille en place Si possible,
poser deux vis a l'arriere du boilier _'_t_ri_ tlr
retir6es a I'd;tape un
IMPORTANT :Comme la guillotine de la
lenOlre aide a garder l'appareil dans la
len{,_re, s'assurer que la guillotine de la
[enetre entre en (onta([ ave( le boitier
ext_;ri_ ur avan/ de reme_/re le chhssis
en plale
i/
52

Installation dans un tour: pour bS{i amovible
Remarque Reeker [es 2 vis d'exp_dNon sN_es _ ['arri_re du c[hna_iseur
qui main{iennen{ _e chSssis sin"I'envdoppe ex_riem'e. Une fois
m_ir_es, i_es_ inu_i_ede les mme_tre e place. Afin de vous
assm'et q_e le dima{isem" a _{_ corredemen{ mon_
dans le mm par un {echnicien agr_46,s'e{an{
famt_tariset ace {ype de montage.
1)U{i_isezm_ep_anche de bois d'au moins 1 po. (2,54 cm) d'Opaisseur
afin de consm*ire un cadre en bois afin de correspondre aux
dimensions de I'habiHagede vo{reappareiL
2) Mesm'ez[a [argeur de I'exld,riem'e_ [a haumur du cadre afin de
d_erminer _esdimensions de I'ouvermre _ pra_iquer dans le tour. La
profondem"du cadre d6,pendra de _aprofondem"du ram'.Apres avoir
_ermim4de consmfire _e cadre, p_acez _edans _etour.Le cadre
doi{_{recarre e{_ nivemL N'ouMiezpas que _ecadre doi{_{re
so_idemen_fix0aux mon_an_sen bois de _a doison avec des dous.
{Voirfig. # 21)
monmn{
en bois
cadre ou bande
de renforcemen{
fig, # 21
cadre ou
bande de
renforcement
3) Pore ins{a[ler, p[acez I'habi[lage dans I'ouvem_re pra{iqu_e dans le ram:
(Re{irez mu{ d'abord le bS{i en suivan{ les empes 1 _ (_de _asection
"Installation sm Fen_re: B_i_iamovibD"). Verifiez que I']habi_lage
d_passe d'au moins 1/2 po (1,2 cm) dans la I'appaHemen_. De plus,
veiHez 5 ce que _ien ne g_ne les pe_siennes _a_,_a_es afin que I'ai_
puisse ci_cule_ libremen_ 5 I'in_riem" du compressem" (Voi_fig. # 22).
53

fig. # 22
Indinaison typiqtle
de Fhabi]]age vers
]'exte?rie_lr
5) [so[eze{_{anchSisez{ou{eouvermre en{reI'habiHage e{
le cadre en bois.
G) U{i[isez [es {rous de vis sur [es c6{5s de ]'apparei[ des{inSs au ki{de
montage pore" fen6_re ainsi que les _rous de vis du ki_de rai_
de montage sup_liem afin de fixer I'habi_lage au cadre en bois,
u{i_isez_es vis de 31/32 pouce.
7) Ins{aHez [e robe ou [e coude de drain sur [e chg_ssis(pas dans {ous [es
modules). Ajus{ez_a direction du robe de drain (coude de drain) po_r
_efake _re en conformi_ avec _e _rou dans I'arribre de i'uni_. Ins_rez
le robe de drain (coude de drain) dans le {rou e{ {ordez. (Voit fig# 15)
54
8) En vous faisan{ aider par une deuxibme personne, sou[evez [e
bS_i du dima{iseur e{g_issez _e dans HmbiHage.
9) Vissez [avis de s6curi{Oe{rep[acez [a grille en appwan{.
10) Si vous avez re{ir_ le fi[{re, reme{tez [e en place.
11) Vissez [es deux vis [a_4ra[es qui _iennen{ [e gri[ sur I'envdoppe.
12) U{i[isez [es mon{ages ex{_rieurs de tour si n_cessaire.
CAUTION: Si I'apparei[ parai{ r 5{re mai insmHe aprbs avok suivi les
e_apes precedences, conmcmz un insmHa_eur qua_ifi_.

persiennes persiennes
sup_rieures [at(_ra[es
!iii! iilii
fig. # 23 fig. # 24
* D6branchez to_jours le cordon 51ectrique avant de nettoyer le
climatiseur.
° Le filtre _ air doit 6tre nettoy5 au moins une lois par mois afin que
I'appareil fonctionne & son rendement optimal. Reth'ez [e filtre en tirant
sur _a _anguette situSe sur _a moiti5 du c6t5 droit du cache de protection avant
(Voir fig. # 23). Vous pouvez 5ga_ement accSder au fi_tre en pressant sur les
languettes sup_rieures et inI'_rieures situ_es sur _e c6t6 droit du cache de
protection avant (Voir tig. #24). Le Ntre pent _tre _av_,ou nettoy6, _
I'aspirateur. Retirez I'eau du Ntre en _e secouant i_,g_,rement. Ced vous permettra
de retirer _a poussi_re et _es particu_es _ I'int_,rieur du Ntre. Apr_s avoir nettoyO
_eNtre, rep_acez D. NE PAS utiliser le climatiseur sans filtre.
° Pour nettoyer les panneaux avant ou I'habillage, NE PAS utiliser
les produits suivants: produits rhimiques puissants, agents abrasif\s,
chlore, ammoniac dStergents conrentr_!s, solvants, tampons _
r_rm'er ou tampons en laine au paille de fer. Certains de ces produits
chimiques risquent de dissoudre, d'endommager et de d_cdorer _a sm'face du
c_imatiseuL
* Veillez & tot0om's utiliser un chiffon hmnide avec de I'eau ou une
soh_tion savonneuse _ base d'eau et de savon pen puissant afin
d'essuyer I'avant de I'habillage. S_chez en essuyant ave(: un chiffon sec.
55

Pour ranger e_ remiser vo_re dhna_iseur apr_s la saison chaud< re_imz
I'apparei_ de la lend,re en suivan_ _es insmm_ions du guide d'insmHa_ion_
l%p_acez le dima_iseur darts son car_on d'origine e_ rangez _e. Sivo_re
apparefl a e_6,monad dans un tour ou une doison ou si vous ne comp_ez
pas _ereciter de _a lend,re, p_acez une housse de pro_eOion pour i'hiver
sur _a pattie exldfiem. Vous pouvez vous procurez ces housses aupres
du revendeur qui vous a vendu le dima{isem ou aupr_s de vo{re
quincai_lier _eph_s prodhe
Avan_de mmiser fappareiL assurez vous qu'flne res_epas dbau dans
le bac e_que mu_eI'eau a 6_ pmg_e, Tou_eeau demem_e dans _ebac
lisque d'en_rgdnella forma{ionde rouiHee_d'endommager _es
Si le climatiseur ne fonctionne it)as:
Assurezvous que le cordon e_ec{riq.e es{branc/h6.La fiche
• Assurez vous que I'apparei_ se {rouve sur "Off' (mode d'arr_0.
L'air sortant du dirnatiseur est chaud:
Le r_g[age de fair r'ondNonnO, doi_ probab[emen_
_re augmentS.
56
Du givre se forme sur Ires bobines de refroidissement:
* La _emp_ra_ure ex_rieure es_ _rop ffoide. R_g_ez I'apparei_ sur
_emode de ven{fla{ion afitn de dOgivrer bs bobines.
Abaissez _a {empdramre. Le r_g_age de _a {empOramre es{
probaNemen{ {top has.
o La puissance en BTU de I'apparefl es_probaNemen_ _rop
elevde pour _apiece.

Le c]imatisem" forictionne mais la piece ne se re_]'oidit pas:
* La [fi&ce compor{e saus dou{e des appamils g_,u(_rau{de _achalem'.
U{i[isezuu veu{i[a{em"ex{raOem"d'air a_iude m{irer [a cha[em'.
® L'_veJt{estprobab_emeH{ ouver{. Fel'mezI'_veH{pore' re[roidir
la pi_,ceau maximum.
" Tou_es [es por_es e_ feu_res doiveu_ &_refemales afin que I'ail froid ue
puisse s'_dhappel" de la piece.
" I! es_possiHe que les figuressoien_ sa_es e_ doiven_ _re ne_oy_s
" La puissance en BTU de ['appal'ei_ es_insuff_sanm afin de
_efroidir _a piece.
* If fau_ _oujoms m_peu ph_s de _emps pour mfroidir une piece lots d'une
c]ha_em extreme e_ &me for_e humidi_
Le dimatiseur far du brui_ Iorsqu'i1 tbnctionne:
%us en_eudrez saus douse des bruits de dep_aceme_s d'air, d'eau, des
dedics e_ _esvibrations de la Dn_re. Lisez a_en_ivemen_ la seOion "Bruits
de fonc_ionnemen_ Iors d'une exploitation norma_e" du guide d'u_i_isa_ion.
(Voyez la page 37)
Presence d'eau dans I'habillage du climatiseur:
Ceci es_normal ('a_"[e c[ima_iseu_ uou seulemen_ refroidi_ mais ass{ec]he
fair. Si de I'eau s'egou_e dans _a piece, ve_'ifiezI'ins_a_lation. Vous devrez
peu_ _re recommencer ['installation. (Voyez_a page 48,51)
57

Cette garantie colwre les pieces
suivantes du climatiseur centre
tous vices de fi._brication et de
mate!riaux:
1. Les pieces meicaniques e( e[edriques
¢ compris [es flais de main d'oeuvre)
de ce produit Haier pour mm periode de
12 mois _ parch" de la da_e dacha_
(pour mflisation commerdale et [ocaiion,
ia garaniie est de 90 join's).
2. Le sys_eme sce[le e( [e compresseur
contenu 5 Iinterieur de ce produit Haier
pour rote peMode de 5 ans gl partir de
ia date d'achat (fi'ais de main d'oeuvre
non compris apres [es 12 premiers mois
de com,erture) Si ['apparei[ est utilisg:
comnmrcia[enmnt ou en iocation, [a
garamie suppDmentaire du compresseur
est de i _l 9 mois (fi'ais de main
d'oeuvre non compris apres
ies 90 premiers jours).
Ve_tlillez conseFvef vo{re
re,'It de vente datd_ comme
preuve d'achat.
Qui est couvert?
L'achetem" d'origine ayant [_lit
I'acquis_ion de ce_ apparefl Haiet:
Quelles sent les
r_4]parations couvertes?
Haler s'engage g_reparer ou 5
remp[acer 5 ye,re domicile et pour mm
durete de 12 mois. tome piece
mecanktue ou e_ecMque du compressem"
ayan_ e_ de{ermin_e d_fbctueuse suite _-_
rote uhlisation jugee norma[e. Haler
s'engage ,q reparer ou _lremplacer
(flais cIe main d'oeuvre non comptis) ]e
systeme scelD e_ ie compresseur (p_ces
untquemen0 pour une petiode
suppiementatre de 4 arts.
D_4ma_c!-tes _ suivre pore"
routes rg_parations
1. Contactez re{re centre de
repara{ion agree Haier ie plus proche.
Pour com_a_{re ie nora du ceutre agree
Haier [e plus proche, composez ie
(877) 337 3(;'_59.
2. Toute reparation do_t 6ire.
eflectuOe par un centre de
reparation agree Haler.
58
LA GARANTIE COUVRE LES
APPAREILS SUR LE TERRITOIRE
CONTINENTAL DES ETATS UNIS,
AU CANADA ET&. PUERTO RICO.
ELLENE COUVRE PAS:
Lesdommages survenant suite amm
installation incorrecte.
Lesdommages survenan{ [ors du
{ransporL
. Les dommages et degSts suite _ _oute
utfl_sa_'ionincorrede ou abusive,
negligence ou modification.
" Lesdommages suite _tdes r@arat_ons
ayant eree[][i_c{ueespar m_
concessionnaire ou revendeur au{re
que par tm cen{re de
repara{km agreO Hater .
- Lespieces de garn_{ureen verre.
* Lesfla_sde ma_n d'oeuvre, de
repara_kms, de _ransport et tous
flais d'expeditton couvrant [e
dehnontage de pieces etie montage
des pieces de rechange at* de[5 des
12 premiers triers.
LAPRESENTEGARANT[EREMPLACE
TOUTEAUTREGARANT[EEXPRESSE
OU [MPL[C[TE Y COMPRIS TOUTE
GARANTIEDE COMMERC[ABIL[TEOU
DE QUAL[TEMARCHANDEET
D'APTITUDEA UNEUT[LISAT[ON
PART[CUL[t_RE.
Le recours o[_er_ par ia garantie est un
recours exchtsff et tient lieu de recours
unique. Cette garantie ne couvre pas ies
dommages accessoires ou indtrec{s.
Cer_ains e_ats ou provinces ne
perme_em ni [a [im_ia_km de [a duree
d'une garamte impl_die ni ['exclusion de
dommages indtrects. Les [imties ou
exchls[otts _lletttkinnees ci dessus
peuvent ne pas s'app[iquer darts votre
cas. Cet{e garan{ie vous conDre des
drot{s jurtdtques par{iculters et fl es{
possible que vous ayez d'amres droi{s
qui peuvent varier se!on Iem{ e{ ia
province.

Leagradecernos que haya comprado e] acondicionador de aire de HALER
para habitad6n, un aparato confiabJe,que ahorra energia y de operaci6n
f6ciL Estemanua] confiene informaci6n (*ill para el mantenimiento, ]a
operad6n, la instaJad6n y d usa seguro de su acondidonador de aire
para habitad6m El acondidonador de aim limpia, enfria y reduce la
humedad dd aim de ]a habitad6n para propordonade eJm6s alto nivd
de conforL
Par favor, ]ca cuidadosamenfe estas instrucciones antes de usar el aparafo.
Adem6s, no oJvide Henary enviarnos por correo Ja
Yarieta de Reg_s_ro demProduc_o°
Registre el Modemo y N_mero de Serie de su Aparato
Para todos Jospedidos de servicio durante el perlodo de garanfia es
necesario _ener Jasiguiente informaci6n. Adjunte su recibo de
compra a esta gu_a y gu6rdeIos para rderencia fufura
La informaci6n que aqul se pide se encuenfra en ]a pJaca de serie de]
acondidonador de aire. La placa est6 cdocada en el gabinete
(en e] costado latera] o en e] respaldo) o puede ser necesario
remover la rejilla del frente para encontrarJa.
ModeIo NOmero:
NOmero de Serie:
Fecha de Compra:
Nambre dd Distribuidor:
Dkecd6n de[ Distribuidor:.
TeJ_fonode] Distribuidor:.
TABLA
TIPO DE RECEPTACULO Y FUSIBLES
VOH]OS INDICAD( )S ] f15/60 250/60
AMP] RES 15 2.0 15 20 _0
RE(EPI;\CL tO
DE PARED
CAPAC]DAD DE[ ] L SIBH _ 5 20" 15 20" 30
]L SIBtE 11 \%DOR O ]IPC) ];)_ ]]PO D] I]PO D]
]N] ERRL HfOR ] NC]{L]] ] NC]]L]E EN(HL FE
59

1) El acondicionador de aire debe conectarse a un recept6culo el6ctrico
adecuado, energizado con la corriente apropiada. (verJa tabb)
La conexi6n el6drica debe proporcionar una conexi6n segura a fierra
para redudr los riesgos de choque d6drico o incendio. NO CORTEO
REMUB/A LA CLAVUA DELENCHUFE QUE PROPORCEONALA
CONEXEON A TEERRA.Si no fiene en la pared un recept6culo d6drico
para tres claviias, pida a un dedricista cerfificado que le instale el
recept6culo adecuado. El recepf6culo DEBEestar conedado
a fierra correcfamente¢
3) No use un cable de alimentaci6n que seencuentre gastado o en malas
condidones. Evite usarlo si mue4ra grietas o da_os por desgaste en el
cable mismo o en d enchufe o conedor.
NO USE ADAPTADORES O CABLESDE EXTENSION.
Cuando insfde el acondicionador de aire en una venfana, asegOrese que
la ventana es sufidentemente fuerte para sostener el peso dd
acondidonador de aire_ Tambi6n verifique que el aparato queda seguro y
corredamente instalado para evitar que pueda caerse. Seg0n suventana,
puede set necesario ins_dar apoyos o soportes adicionales para que el
aparato quede apropiadamen_e instdado.
6) No obstruya la corriente de aire dd acondidonador dentro de la
habitad6n, o fuera de ella, con persianas, corfinas, cubiertas de proteco
d6n, arbustos o matas,
6O

7) Tenga cuidado con los bordes agudos de hasaletas en el frente y en
respaldo de na unidad, que pueden cortarle y causarle nesiones graves.
8) Tenga cuidado cuando levanta el acondicionador de aire para
instalarlo o remover la unidad_ Siempre realice esta operaci6n con
dos personas por Io menos.
9) Siempre recuerde desconectar el acondicionador de aire antes de
darb servicio o moverlo.
61

PAGJNA
Un Mens_e De Haler ................................................................... 59
Registro Del Producto ................................................................... 59
Precau¢_ones De Segur]dad .................................................... 60-61
Adverten¢ias .................................................................................... 63
La $÷gurldad en los Aparatos E[_ctrkos .................................. 63
Sugerenclas ..................................................................................... 64
Go_a de Ahorro de Energ[a .......................................................... 64
Caracter[sticas ......................................................................... 65-66
Guia De Opera¢i_n ................................................................. 67-73
Sonidos De Operad6n Normal ............................................................ 67
[nstrucciones De Operaci6n ........................................................... 67- 73
Unsta[acJones ............................................................................ 74- 84
Piezas Que Se Suministran .................................................................. 75
Herramientas ...................................................................................... 76
Procedimiento De Instalaci6n .......................................................... 77- 84
Guia para e[ Cuidado y Limpieza de[ Aparat@ ................ 85-86
ResoJu¢i6n De Prob[emas ...................................................... 86-87
Oarant_a Umitada ........................................................................ 88
62

El observar cuidadosamente los mensaies de seguridad es muy
importante_ Esfosmensajes pueden evi_arque usted pueda suFrir lesiones
graves y aOn de muerte_ Loss_mbolosde Advertencla Redan Ja abrfa,
le urgen a que sea cuidadoso y siempre significan PeUigro.
Siga siempre estas instrucciones para obrar con seguridad y reducir los
riesgos de lesiones o muerte. Lasse_aResde Advertencia o
PeJigro preceden los mensajes de seguridad_
¢onexi6n a T_erra:
ADVERTENCHA:
Esfeacondicionador de aire debe contar con cone×i6n a fierra.
La conexi6n a fierra reduce el riesgo de choque el6ctrico
proporcionando un cable de escape para Jacorriente eJ6drica.
El cable de alimentaci6n de corriente cuenta con un cable de
conexi6n a fierra y con un enchufe que permite es_aconexi6n.
Conecte el enchufe en un recept6culo o tomacorrien_e apropi o
adamente insfalado y con conexi6n a fierra.
El uso inapropiado deJ enchufe con conexi6n a fierra puede
crear eJriesgo de choque eJ6drico. LJamea un ebctricista
calificado si usted no enfiende Jasinstrucciones de conexi6n a
fierra o si usted no est6 seguro de que eJacondicionador de aire
ha quedado conedado a tierra en forma apropiada. Si eJ
recepf6culo de pared no est6 conectado a tierra, por favor
Hamea un eJectricista para que Jo reempJace pot uno
debidamente conectado a fierra.
De nlr_ggrla mcmera, y baio rllnguna clrcur, s_ancla,
cc_rte o remueva dei enchufe ks tercera ck_viia
(de ¢orlexi6n a tlerra)o
Encarecidamente Jeaconseiamos que no use enchufes
o accesorios de adaptaci6n.
63

o Losacondidonadores de aire est6n dise_ados Onicamente para set
usados en ventanas de dos hojas, fipo guiHofina, o a trav6s de napared.
(Seggn eJ moddo dd aparato)
AJ instdar Ja unidad, asegOresede que eJacondicionador de aire
queda indinado en un ]/4 ° hada d exterior de manera que eJ
agua pueda escurrir hacia d exterior de Jacasa.
• mnstaJenaunidad en eJcostado norte de Jaedificaci6n que es
normdmente enlado sombreado En esta forma meiorar6 Ja
operaci6n de Jaunidad.
_o Laventana debe set suficientemente fuerte para nainstdad6n den
aparato. Puede ser necesario usar soporfes o apoyos compJementarios
segOnJa configuraci6n de su ventana. (Los soportes a apoyos
compJementarios no viene induidos en todos Josmoddos.)
Mida la ventana antes de proceder con Ja instdaci6n Si Javentana es
demasiado grande para Jaunldad, puede ser necesario que un
profesiond redice JainstaJad6n.
• Use corriente en_ctrica de los vdtajes y amperaies requeridos para que
la unidad fundone en forma efidente
_ Llame Onicamente a dectridstas certificados para cudquier mdificaci6n
que se necesaria en sus recept6culos o tomacorrientes d6dricos.
64
®AJ instdar eJacondicionador de aire, aseggrase de seJJartoda
6tea que presente la posibilidad de fiJtraci6n de aire.
La corriente de aire dd acondicionador no debe bJoquearse
dentro de la habitaci6n con cortinas, persianas o muebles,
ni en eJexterior con arbustos o matas_
No use innecesariamente JuceseJ6ctricaso aparatos que generen cdon
• Mantenga eJ escape de aire cerrado cuando eJacondicionador
de aire est6 en su funci6n de enfriamiento_
®Mantenga Jaspersianas o cortinas cerradas en todas Jas
dem6s ventanas.
Si esf6 cocinando, use un ventiJador de extracd6n en Jacocina
para remover eJexceso de cdor producido.
Use siempre un acondicionador de tire de capacidad (BTU)
apropiada para enfriar Ja habitaci6n y obtener su efidencia m6xima

RejiHasde ventiHaci6n
HateraHes
Tdado
eHectr6nico
Basfldor
dd_zabHe
(No se induyen todas Jasfunciones en cada modeb}
1° Terrvtostato
Esta funci6n mepermite aiustar Hatemperatura dell
aire Entre m6s aHtosea eHajuste m6s frla ser6 Ha
temperatura dell aire E4o Heperrnlte aiustar Ra
temperatura aJ niveHde comodidad deseado
Pude aiustar Hatemperatura entre 18 ° y 30°C
20 vemoddad de| Ven_mador
Puede controHar Havdocidad dd venfiHador aHiguam
que Havdoddad dell acondiciandor de alre
T_eneHaopci6n de 3 nlvdes de veHoddad dell
acondicionador de aire La veHoddad _LO"
cirdar6 emaire a HaveHocidad m6s baja, _'MED'_a
vebcidad media y '_HHGH"a HaveHocidad m6xima
Tiene Haopd6n de 2 niveHesde vebcidad dell
venflHador para ajustarHo aRniveHde comodidad
deseado, "MED"y "LO". La funci6n "Auto Fan_
permite que Hatemperatura de mahabitaci6n aiuste
HaveHocidad deJventiHador. Cuando se ilia Ha
fund6n de Hatemperatura, HaveHoddad dd
venflHdor se determ_na segOnHadiferencia
entre Hatemperatura del coniunto y Hafemperatura
dentro dell cuarto Cuando se aHcance Ha
temperatura ajustada, eHvenfiHador fundonar6 en
eHajuste *_LO"(Bajo)
3. I:unci6n
Su tire acondiclonado tiene 3 funciones
a) Acondicionador de aire
En esta funci6n eHacondicionador de aire operar6
eJcompresor y Ja veJocidad ajustada dell ventiHador
para proveerHe con un aire frlo para sucomodldad.
B) Deshumidificadon
Esta funci6n Hepermite a su acondicionadar de aire
operar como un deshumidificadon EHiminar6 Ha
humedad excesiva dell aire para mantener su
habltaci6n a un niveHde aire c6modo Puede usar
sob esta funci6n en caso que no desee usar aH
acondicionador de aire
c) VentiHador SoJarnente
Sob puede utiHizar eJventiHador en Hosdlas no muy
cdientes EHventiHador puede fundonar
en 2 veHocidades segOn Jo desee (_MED'_ventiHador
y _LQ'_venfiJador)
4° Ahorrador de Energ_a
Cuando eHvenfiHador est_ en "ON" (Encendido),
_ste se apagar6 3 minutos despu6s de que eH
compresor se apague Esta fund6n no sob He
ahorrar6 costos em6ctricasy de energla sino que
tambi6n eHiminar6 eHruido innecesario dell motor
dell ventiHador en marcha. En Ja posici6n de _'OFF_
(Apagado) eJventiHador seguir6 funcionando aH
nivei ajustado
65

5. Te_porlzador
Su acondidonador de oire puede ser aiustado para
encenderse o apagarse segOn Hedesee. Puede
programarse basra 12 horas por addantado
6. Rejlmma de ven_imad6n
(no en todos los rnodelos)
Esia funci6n Heayuda a eHiminar cuaHquier aire
vidado de Hahabitaci6n y a joHar d oire fresco del
exterior a Hahabitaci6n Pare cirdar eHaire,
cobque Hapdanca en maposici6n abierta
Para conservar la frescura, es mejor mantenerHa
en Haposid6n cerrada
7_ Distrlbu]dor de Aire
(no en fodos los modelos)
Cuando se coRoca en "ON" (Encendido),
autom6ticamente distribuye eHaire a trav@sde Ha
habitad6n, Esfo asegurar6 un fHujo de alre
uniforme en toda Hahabitaci6n.
8o Fmuio de Aire en 4 Direcdones
(no en todos Hosmodelos)
Estas reiiHHasde ventiHaci6n direcdonales He
permiten controlar Had_recci6n dell fHujode aire en
Hadirecci6n requerida, EHfHujo de aire puede
dirigirse hacia arriba, abajo, a Ha
derecha o a Haizquierda
9. Bas_idor Des|izabJe
(no en todos Hosmoddos)
Su acondicionador de aire es mucho m6s vers6tiJ
con esta funci6n, Usted tiene Haopci6n de instaHar
Haunidad en una ventana o en Hapared.
10o Equipo de lns_aJaci6n en Ja Pared
Le permite instdar eHacondidonador de aire en
una ventana de guiHbtina. Puede que necesite
soportes extra dependiendo de su ventana
11o¢ontro| Remoto
Estepr6ctico control remoto inaH6mbricoHe
permite operar su acondicionador de aire desde
una distancia. No necesitabvantarse pare
cambiar Hosajustes.
12. Panem de ¢ontro| EJectr6nlc@ con
PantaJJa de Crlsta| Liq_,sido
LapantoHHade crlstaJHiquidode 4 funclones
muestraJoTemperaturede JaHabltaci6n, eHAjuste
de Temperature,eJAjustedellTemporizador yeH
Tiempo Restantepare Parer / EncenderJaunidad.
EHPaneHde Control EHectr6nicoHepermiteajustar ma
temperaturea HaTemperaturaExactaque desee
13_ FihIro EJec_ros_&t_¢o
(noen todos JosmodeUos)
EHfiJtro,construidode un substanciapurificadora
de gran eficiencia, con tejida de carbono activo,
tejido ebctrost6tlco, red de carbone y otros
materiaHes,purifica eHaire eficientemente.Su
estructuraonduJanteaumenta Hacapacidad de
fiHtrareJpoJvoyeHhumo eficientemente.
Debido a Jorotaci6n dellcarbono acfivo, 6stetiene
unaveHocidadpurificadora capaz de producir
un fJujode aire fuerte
14. Apagado Auto,rico
Cuando est6 activado, esto funci6n
autom6ficamenteajusta un temporizador de
apagado durante 8 horas Launidad seapagar6
dentro de 8 horas
66

Sell" ides de @Ier ¢i6 He m l
Lossiguientessonidos normdmente seoyen durante Jaoperaci6n de
un acondicionador de aire:
o Sonido dd movimiento de tire seg0n Javdoddad
generada pot eJven@adon
o Sonidos de agua. Estees un sonido normal en d acondicionador de
aire, a medida que act0a tambi6n como extractor de humeda&
PorJo tanto, se oye eJruido de gotas de agua cuando escurren
sobre eJcondensadon
A medida que eJ refrigerante fluye a trav@sde la tuberia seHada,
sepuede olr el ruido de este fJuio.
o Ruidoso vibraciones pueden en ocasiones drse debido a una
instdaci6n defectuosa en la pared o en Javentana.
o Un sonido de aJtafrecuenda puede oirse como producto dd
fundonamiento de compreson
llllr strucdelllr es de @llll er d@
A continuaci6n se induyen Jasinstrucciones de funcionamiento de su
acondidonador de aire dectr6nico:
Despu6sde instdar su aire acondicionado, con6ctdo a un tomacorriente
d@trico correcto en la pared. Mantenga la reiiJJade ventiJaci6n cerrada.
Ahora aiuste el acondicionador de aire d nivd deseado. Estepr6ctico
control remoto ind6mbrico Jepermite operar suacondicionador de aire
sin tenerque Jevantarsee ir hasta Jaunidad Estafunci6n Jepermite
cambiar Josaiustes 7 encender o apagar Jaunidad desde eJcontrol
remora Estetdado de control fundona de la misma manera que el
tedado de control en eJacondicionador de aire. (Vea fig. #1}
Rein@t@
AIC HI E_RGY-SAVER
AN _EO _LEEP
B_PU_!O LQW _TAR1
A/C HI _N_CY-SAVER
FAN _#J£ SLE£P
DEHUR{O t_ START
AUTO FAN STOP
67

Despu_sque conede Ja unidad, 6sta eFeduar6 una verificaci6n
aufom6fica. En Ja panfaHa )(quida aparecer6 un "88". Todas Ja Jucesen Ja
pantaJJase encender6n duran)e 3 segundos_Si a(guna de )as )ucesde (a
pantaJJano se enciende, puede que necesite reparar Ja unidad_ Despu6s
de la verificaci6n au_om6fica de 3 segundos, la unidad pasar6 a Ja
modaJidad de espera. Ahora todas Jas(uces esfar6n apagadas y tendr6
que encender(o presionando Jatec)a de "On/Off _ (EncendidoiApagado).
Despu6sde presionar e) clave de On/Off, Jaunidad comienza a
trabaiar e incorpora e( estatus de( _FAN ONLY" con una configuraci6n
baja. Tendr6 que presionar la tec(a (+! o (°! en e) ajuste "Temp/Time'
(TemperaturaiHoral para aiustar la temperafura segOn Io desee.
Usfed puede escoger entre femperafuras de 61 °F (16'_C)y 86°F (30°C).
Una vez que aiusfe la temperatura, puede aumentar(a o disminuirla
presionando )as fec(asde (+! o H. La con%uraci6n de )a femperatura
puede ser aiusfada so(amenfe cuando la unidad es que se refresca o
dehumidifying (Vea fig. # 2)
fig, # 2
Pane) de Con_ro(
68
Habiendo aiustado (a temperafura, ahora ajus)ar6 (a funci6n de( aire
acondicionado. Si quiere )a habitaci6n fresca presione (a funci6n _AiC"
(aire acondicionado). Si so(o necesifa e(iminar )a humedad presione (a
funci6n "Dehumid" (deshumidificaci6n) Si soJonecesifa usar e( venfi(ador,
presione (a funci6n '_Fan"(venfi)ador). (Vea fig. #3)

fig. # 3
Panel de Control
Ha_er
Una vez que eJiia Jamoddidad de funci6n, tendr6 que aiustar la
vdocidad dd venfiJador. Si dige Ja modaJidad "AiC" puede operar eJ
venfiJador en una de Jastres vdocidades "HF_(dta), "Med" (media),
"Lo_ (baia} o en Javdocidad "AUTO" (autom6fica)_ En JaveJocidad
autom6fica eJvenfiJador comenzar6 en Javdocidad y despu6s se aiustar6
a navdoddad baia como Ja temperatura de Ja habitaci6n.
Una vez que Ja habitaci6n akance la temperatura aiustada , eJaiuste
autom6tico deJvenfilador har6 funcionar aJvenfiJador en Javdocidad
baia, (Vea fig. # 4}
fig # 4
PaneJ de ¢ontr@j
6g

Si decide usar Jafunci6n de Deshumidificaci6n Esta funci6n diminar6 eJ
exceso de humedad deJ aire en Josd]as e×cesivamenfe hOmedos.
Una vez que presione esta modalidad, eJcompresor funaonar6
confinuamenfe y eJvenfiJador fundonar6 a Ja vdocidad sdeccionada,
Despu_s que se alcance Jatemperafura aiustada , el compresor se
encender6 duranfe cidos de 10 minutos y se apagar6 durante cidos
de 6 minutos EJvenfilador funcionar6 a vdocidad baja en este a[usfe.
Si Jatemperafura disminuye m6s de Jo aiustado, Juego eJcompresor se
apagar6 y eJvenfinador confinuar6 funcionando a vdocidad baja
EJproceso de deshumidificad6n toma lugar entre Ja temperatura ajusfada
y 3°F arriba de Ja temperatura ajustada. (Vea fig_ # 5)
fig # 5
PaneJ de ¢ontroJ
_ ME_ _EEP
fig. # 6
PaneJ de ¢ontroJ
;Q C
,)0
7O
En dias frescos puede usar la funci6n "Fan Only" (venfiJador sdamente).
En esta funci6n eJventiJador funciona solo en una de 2 vebcidades,
Media o Baia. EJventiJador no funcionar6 a Javdoddad aJta
(Yea fig. # 6)
0 Q

La moddidad de[ femporizador se usa para encender o apagar
Jaunidad pot addan_ado, Puedeprogramarlo haste 12 horas pot
addantado, Puedeusar el temporizador en 3 funciones, "A/C" (aire
acondicionado), "Dehumid'_(deshumidificad6n} o "Fan"
(venfiJador)soJamente,
JnidaJizad6n dd Temporizador. (Veafig. # 7)
La unidad debe estar encendida para ajustar el temporizadon Launidad
seapagar6 autom6ticamente dentro de 5 segundos despu6sde aceptar
Josajustes.Useesta moddidad para preaiustar d tiempo de encendido
de Jaunidad 12 horas por addantado.
a) Presione_Starf_(iniciaJizar), en JapantaHade cristaJ
Jiquidoaparecer6 '_XX'' (actual tiempo, vez tiempo). Si Japotencia est6
conectada para Ja primera vez, d indicador de cristd
Jiquidoaparecer6 "01".
b) Ajuste eJnOmerodeseado de horas presionando Jatecla (+) en los
botones '_Temp!Time"(temperatura!horario), uno por cada hora. Si se
pas6 dd fiempo deseado use Jatda (_) para disminuir Uasdecci6n.
JnterruptordeJTemporizador (Vea fig. # 7)
La unidad debe estar encendida para apagar eJtemporizadon Use esta
funci6n para preaiustar eUtiempo deseado para eJapagado de la unidad
a) Presione"Stop'_(parar), en JapantaHade cristd
Jiquidoaparecer6 '_XX'_(actual tiempo, vez tiempo)_Si Japotenda est6
conectada para Ja primera vez, eJ indicador de cristd
Jiquidoaparecer6 "01_.
b) Aiuste eJnOmerodeseado presionando la tda (+) en los botones
_Temp/Time" (temperatura/horario). Uno por cada hora Si se pas6 deJ
fiempo deseado useJatecJa(_)para bajar JaseJecd6n.
Cuando useel temporizador la unidad usar6/revertir6 losOJtimosajustes
de aire acondicionado y ventiJadorcuando se active. Eltemporizador
debe reaiustarsecada vez que quiera usarJo.
fig. # 7
PaneJ de ¢ontroJ
Paraadivar, presioneJaconfiguraci6n una vez,
PresionarJauna segundavez cancdar6 Jaconfiguraci6n.
71

La funci6n "Sbep" (apagado aufom6fico) Uepermite preaiustar la unidad
para que seapague dentro de 8 horas_Estafunci6n solo puede ufiJizarse
con la fund6n de aire acondicionado_Despu6sde preaiustarJa
temperaturaa cieHo grado, Jatemperatura aumenta por 2°Fen na
primera hora y otros 2°F en la segunda hora y bego permanece
constantedurante Jaspr6ximas 6 horas.Ya que su cuerpo no despide
mucho cdor durante la nochey ya que las nochesgenerdmente se
refrescanun poco, esta fund6n Jepermitedormir c6modamentetoda Ja
nochesin fenerque bvantarse a cambiar los aiustesde temperatura_
(Yeala fig. # 8)
fig. # 8
PaneJ de ¢on_roJ
Distribuidor de Aire: PresionandoJateda "Air Sweep" el distribuidor de
aire seacfivar6. Estafunci6n ledar6 un fJuiode aire uniforme a trav6s de
la habitaci6n. Para apagarb tendr6 que presionar Jateda de nuevo
(funcionno disponibJeentodosoJsmoddos).(Veafig. # 9}
Ah6rrador de Energia:AJpresionar estateda Jaunidad seactivar6 a Ja
moddidad de ahorrador de energla. Enesta funci6n eJventiJadorse
apaga despu6sde 3 minutoscuando eJcompresorseapaga, AJ
desactivarb, eJventiJadorsigue fundonando a la vdocidad ajustada aOn
cuando eJcompresorseapaga (Jafunci6nest6 sdamente disponibJeen
modo de A/C}. (Veafig, # 9)

fig. # 9
Pane[ de Control
0., __
AI_ _k SLIP
O D O
Haler ;
Cuando la unidad est6 en la modalidad "On" (encendido) la pantalla de
cristal Iiquido mostrar6 la temperatura de la habitaci6n_ Presione la teda
(+) para olotener la temperatura aiustada. Cuando la unidad est6 en la
funci6n "Timer Stop" finterruptor del temporizador), la pantalla de cristal
llquido mostrar6 el tiempo que falta para que la unidad seapague.
Para cancelar el Interruptor del Temporizador presione la tecla "OFF"
(apagado) Si es "H" se encendi6, 61 indica el tiempo. Si es "F" se
encendi6, 61indica la temperatura en Fahrenheit.
Haler
73

Antes de instdar d acondicionador de aire, cerd6rese de que:
1) La unidad queda Jibre de obstrucaones, tanto end interior de Ja
habitad6n como afuera, taJescomo cortinas, muebJes,pJan_as,
arbustos, 6rbdes y otras estructuras como construcdones, garajes, etc.
EJacondicionador de aire debe ener una corriente de ake,
nibre de obstrucciones, que pase a tray,s dd condensador
para remover eJcanon
2) La ventana es sufidentemente fuerte para resistir eJpeso deJ
acondicionador de aire. Seg0n Ja configuraci6n de su ventana, puede
ser necesario instdar apoyos o soportes compJementarios. (Estos
apoyos o soportes no disponibJe en todos nosmoddos)
3) EJumbrd o repisadeJaventanay Jascandetas Jaterdesson
suficientementefuertespara resisfird pesodd acondicionadorde ake.
4) La pared essuficientemente fuer_e para sostener Jaunidad. Seg0n Jas
condiciones de Ja pared, puede ser necesario instaJar apoyos o
soportes compJementarios. (Estos apoyos o soportes
compJementarios no disponibJe en todos nosmoddos)
5) Hay un suministro adecuado de corriente eJ_ctrica de Jas
especificaciones requeridas cerca dd acondicionador de aire
74
_6) NO use adaptadores de enchufe
7) NO use cabJesde extensi6n.
_8) NO corte o remueva Jadavija de conexi6n de tierra deJenchufe.
_9) NO modifique en ninguna forma eJenchufe o eJrecept6cuJo
en_ctricode Japared. Sid enchufe no concuerda con eJrecept6do
en6ctrico, pide a un dectricista que haga Joscambios necesarios.
_10) NO conecte Ja unidad a Jacorriente eJ6ctrica antes de instdarJa
_11 ) NO use eJcabJede aJimentaci6n si se nora gastado o daBado
en dguna forma. Evite usarJo si tiene grietas o muestra daBos
de desgaste a Jonargo deJcabJe, en eJenchufe o en Jaconexi6n.

P_ez_s q_e s÷ $_m_His'_°r_ (Veofb, # Io1
No. De_¢dpci6n de maPleza Modemo
ESA3OG3 ESA3083
1 EnsambUede Uapersiana de montaje derecha 1 1 1
2 Ensamble de la persiana de mantoje izquierda' t 1 1
3 Sdlo de espuma de caucho de la hoia de la ventana 1 1 1
4 Ayuda dd bloqueo de la ventona 2 2 2
5 TorniJUosde 31/32 po 9 9 9
6 TorniHosde 13/32 po 6 9 9
7 Rid de montaie superior instaHado 1 1
8 Tap6n de cauchodeJdrenaie l
9 Accesorio de drenaje de agua 1
l O Rid de montaje inferior insfdlado instaHado insldlado
11 Fi[tro e[ectrost6tlco 1 1 1
12 Mando a clistancia y bater_a 1 1 1
13 Tornillo de Jasegurictad dd bastidor de Javentana 2 2
ESA3103
ESA3123
fig # 10
75

Para la insfalaci6n dd acondicionador de aire
nece@ar6 las siguientes herramienfas.
Tiieras
®DestorniJJador PhiJips
® DestorniJJadorEst6ndar
®AJicates
® LJavede Tuercas
Tdadro y Juego de Brocas
Cinta para Medir
®Guantes
o NiveJ
® CasquiHos
76

InstalaciOn del Acondicionar en la ventana
Requerimientos para realizar la instalaci6n
H Acondidonador de aim es_ disefiado para la ins_a_ad6n en _ipos venlanas de dob_e marco
o simple. Cada m_idad viene con un ki_ de ins_a_aci6n que cons_a de sopor_es ai_s_ab_es para
ocl[par completamente k_s espacios enlre los [atera[es de la m_idad y e[ borde de la ventana.
g[ c_adro a con{inuacidn mues{ra [as dimensiones de k_s Acondicionadores con o sin e[ kit de
ins_a_acidn Mida _aamp_imd de s_ venmna y compa'e con bs va_ores dd cuadro pa'a asegmarse
de es_ar entre la m_xima y minima amplimd de ven_ana requelida
/
D
ESA3063
ESA3083, ESA3103, ESA3123
_ moddo
Dimensidn _
A (pu_gadas)
B {pulgadas)
C (pulgadas)
D (pu[gadas) Max
D (pu_gadas) Min
Mmra
Pmflmdidad
Mode!os ESA3OG3
ENSAMBLE LAS
CORTINAS
Desempaque la unidad en el piso junlo
a la utlicacion donde se instalara
Deslice el ensamt!le de la corlina del
lado izquierdo denim de los exlremos
izquierdos de los rieles superior e
inlerior Repiia con el lado derecho el
ensamble de la corlina Sujete las liras
de relenci6n de la cogina a los lados
de la caja exterior con seis lomillos d(
lO inln
Pr( cau(i6ii: Nunca (xponga (1 [i(ilI(
d( pl_istico ni la rejilla a
I_inpel'aturas exlr( nlosas.
ESA3063
14@"
14,_"
3atla ,,
2o@" 22llt_'
[SA3083
I3_"
35_ '_
ESA3103
ESA3123

PREPARE LA
VENTANA PARA
LA INSTALACION
Iltspe{ CiOIH III_tFCO. tlltIblJl/' [a
vett{ tn_J paint asegurals_ d_ (]t_e esR,
en condk:[oltes ([_ sopol_ar el peso
de la unktod
Mida el a_tdlo etttre las itlOk[Ulas de
la veii_atia pala colroborar qL[e la
ullktad }ueda sel ¸i_[_ll_t(t_t de
i_]ille( [aK_ en a ven_atia Los i]lo_ e[os
de insialaci0tt inmedia{a _ si,ltl
dis{h tdos pala VelliaIlaS ([( aIiCho
espec@co (ver de{alle en pagiIla 47)
El kit de insiaJad0_t que vie*]( con
la tmktad es_a disehado para el
mo_]I@e en las venial]as de doble
hQia. sin coIl[ravel]ta_ia Para [a
itlsta[a(:kin en armazoIleS de Vetl_a_ta
(tie)oseel] coIl_ravel_[al]a l_]o([[fk ue
e[ ill_] )la a( ler[e_l( o [a }as de
madera (no i_]chfida)e_] el interio y
a[ extelk)l ¸ del L[mbra[
]IlS[_la(](Stl {I1 @S{rtl(RIIaS
(O11 (O1 l[rav{ i It _ltla
Siel monbJi{/k la ventaIla _topelmfle
o_ s )_1([o {tde(tlado [)of (teb{_ o (t([
iilal(o d( [a ven{alla o cl(e (spado
agr_gaMo tma ttbla d_ made*a (pol
10 lIlelK}S (te [ _') "fie andKi } a lo
hrgo de todo el acho dd umb*al
&ills{ela IaNa de nladera al umblal
pol 1o meIlos ((in [l(s k)rilillos (rio
/i{*_en co_ el ki0 es{o propo*ckmara
t_la st_p{ rllcie kka[ pair coloc{u It
unk[ad
{9 "
{1,27 cm} mJnimo
mademJ
]tlst_lla(:iOtl Itl0bJl para SU (asa
A,Ri'e_e tlt]_ _ab[a de l_ladera ( )(it kl
ill_!I]OS I !/}"de _ll]/:_l_)} _ [o larRo de[
t_mblaL E[ es ]es(_r de [a Illadela debe
coJIlck[ir coil [a a[_t[ra de[ bolde del
he1i_e de [_ es[ructt[ra de la veIltana
,%Isle la {abla de nl _dem al umb*al
])Of [O IIHHIOS COIl ties tornillos 01o
viellen (Oil el kit}_s{o plopol(:iollala
t_Ila su HY_iCie idea[ )ala COkX al la
(lll_( a(I
I)el_- a_r ({_mdo menos
de I/2¸'0,2?cm} para
I_brar e_ rie_ h_ fervor de
Ti T
oi [,1
3 NSTALELAUNIDAD EN LA
VENTANA
(Ok)( tl( [a (_t a _i1 l_t Veil[a1H'c [la i la [IQ a (l_ [a
v(nI/lla ]Eis[_t ([u _lpoy( ( _l_ls ( ( pliIIH_f _f }oil (
del rail El lail iufqk_r/[(bl ml)osar d( _]'dS dd ulnbral
d_ [a V(H{alla
{ ortiua para dlr IIllS ([{IF]dad
78
INSTALEELANGULO DELA
BANDEJA INFERIOR
Aflojevarias vueltas eltornillo delantero iI_ sujeci6n y
deslice el angulo de la bandeja inDfior sobre la cabeza
del tomillo Acomode el tomillo con el fingulo
descansando _n el descanso de la wmtana Instal_ dos
lornillos II_ 25 mm a traw!s del finRulo denlro dd
descanso de la ventana Repita el procedflniento en el
lado opuesto
Tornillos de 25
&_gm
bandeja inferior

SUJETE LAS CORTINAS
LATERALES
Expanda las cortinas Ianlo colno
sea posible Inslale (2) tomillos de
25 rain en la hoja de la venlana
htsla_ los _res t/_rnilli_s(25mm) de[ e_tsamble de[ rail
Para _ell{alla8 de malco de mad(la dula o me_al
taladle los orJfi( i(_s ])ala (olo( tl ](is [oi'iliHos
IMPORTANTE: Tenga cuidado de no taladrar el
orificio pilolo demasiado prohmdo Aflada un
pedazo de cinta a la broca dd taladro como
calibrador de prolundidad Ademas mant(,ngase
alejada d(l vidrio lenga cuidado de no dafiar el
Iuncionamiento de la vmltana
INSTALE EL EMPAQUE DE
SELLO
Modelos ESA3()83, ESA3103 ESA3123
I PREPARE LA
UNIDAD PARA LA
INSTALAClON
I)_sempaqu_ la unidad _n _1 piso
_r(a (1_ dond_ s_ ills_alara
Quite el lornillo d( sUj_(ion
S(par_ la parte (xl(rior de
la (aja dd h(nl( con una (spfitula (n
lOS ptln_OS d( tl'abado designados (on
las ll(ctlas
Quite tin lornillo qu( asegura (1 sopol'l(
d( trabado de la bande a inferior Quit(
dos tomillos qu( se ubican (n la parte
posl{rior de la caja _xkrior, los cuales
aseguran la bandQa inf_rk3r a la caja
Usando las asas ll_ la bandeja inferior,
l(nta v unifornl(nl(nl( saque el
13aslidor 11_ la caja _xkrior
Nota: (ubra la hoja d_ la _spalula con
cinla proRclora para cuidar qu( no s(
dafl_ d acabado de la unidad No s_
incluy_ d filtro _n _s{a ilustracion para
oh{c{r mas claridad
[ i(}(atlci6ii: Ntlnca (xponga (1
frente d( plastico ni la rejilla a
{elnp{ i a{Ul as { X{l'( l/lOSaS,
ii
79

ENSAMBLE DE LAS
CORTINAS Y EL RAIL
SUPERIOR
PREPARE LA
VENTANA PARA
LA INSTALACION
]I]specciol]e toni(o, L[llll)r_ y [21
ven_afia pala as{ gBua_se de qm, _sR,
ell (oIl([i(loIl_s ([(, yff)por_r ol peso
de la unidad
Mida el aucho eutre [as moIdula:_ d{
[a ve_Iai_a [}ara corlobola_ ql/e [a
unidad pu{da sel insta[ada de
illl]lod[a[o _,I1 [a volltana l_os [II(KIO]OS
{[e itlsI tla([On iulll{ dlata t,sI_ill
dis_hados part veu{ tllaS de ail(:ho
t'speIifl( o {let d{la[ll, eu pagina 72)
El kit de instaladon qu_ viene/on
la unidad esIa dise_ado para el
_lOl]I_e en [as Vel]tanas de dob[e
[]Q[a. s[_] (xn]tPavel]taila Para ]a
_llst a[acion eli al iIlaT{_Ile8 de vei]la[la
{ L_e }oseel] (:on_Favenial]a I]K}{]ilk tie
e L_11])Pa _{[ Iellei_do ta ) as { e
madera(no il]cMdo) en el inlel_o y
al exterior del umblal
[llSDfl_!CiOll etl osttudufzls
coil colltrav_ ,tl[a!lla
Si el mon{aje de la veniana no pemlit{
el espacio adecuado pol d{ bajo d{l
uulblal (1/2" l(qu fido), ldil( el
mal(o d{ la ventdua o (le{ esp_K:io
ag!_epando una tabla de madela (p{ll
Io ulellos de I "de du(ho ) a 10
largo de todo el a(ho del uml}ral
,_;jusmla tabla {1{ madela aI uml)ral
pop I{}ulellos (ou _les tolnilIos (no
vienen {(m el kit} esRi p*oporcior_ara
una superfi{ie kleal papa colo(ar la
uukiad
] !/ ,'
iT_ra dei
imaderai
(127 {m} mhl_mo
[tlS[_IISCiOll ll]()bi[ D_ID! Ski (XIS_I
,\g_ege L[]_t _al}]a ([{! madela ( ){ll ¸ ]o
i]]eiios ] !,_"de allc[]o) a ]o Jalgo {[eJ
umbral H e5 ]esol de [a m tdera delx
coincklil con la tltura del bolde de[
l}{,llI( d{, 1_ OS[ILl([tlPJ {1(' ]_t VLqI[HIKt
,\jugte la labia d{ m tdera al Lm]l}_dl
p{ll 10 Ill{ I]OS (Oil _F{'S K}IUII[OS (llO
ViOl]{ 1] {on {q kil} {,s_(} propo_{iona_d
1/i]8 Sllp{_lfid{ idoa] [}{_P8 (2olo(2zti' [_I
Imidad
!,z"
Debe se] { uando menos
Ni X
Ti :1
8O

INSTALACION DE LA CAJA
EXTERIOR EN LA VENTANA
(okxl[_{ la _ia {f] la _mana: I>_i_ la hoja d{ la
Vf_II_ll_LahasKi f U a }oy{ d{_l_s d{[ )lJHlf l l{bold{_
Ho]a de la venlvma
U_ilk dos/k los tomilMs (1 ') s_i_ta_ la/_ia a la hoia
de [a v{ II{ana
Expanda an/has cortinas para
que loquen el i/larco de la ven(ana
Instale cinco tornillos de 25 mln a trav(,s
d{ las cortinas y del riel superior
NO{_I: } ala h}t({_l ([tl{ los lolllilIos Seall
nKis f_(:i[ de cokl(2ar _a[a{[le ul_ olilic_o ell
eJ nlsP(x}
INSTALEELANGULO DE LA
BANDEJA INFERIOR
Instal{ dos tomillos de 2,} mm a tray{ s
dd angulo d{ ntro d{l d{ s{anso d{ la venlana
R{I}iIa {1 I}rO{{dinlk_nIo {n {1 lado oI}u{ sIo
t_ngulo d{ la
I}and{ ja lift{ fior
81

INSTALEELEMPAQUE
DE SELLO
(OIt( [_ {il_i p_ila [a i{[llta (If! Jl I_1_([i([a (If[ alRho ([_
Ja venta_a CoJoqLle I_ Iira _!n Ja jlli_{a i!nlre 6!1 vi(_lio
de la _1( a f!xIl!l ii_/y el boldl! _;LI/l!l Jol¸ dr! I_ _f i_ il_ellla
hil])Ol-{_iIl{( : (_uld ldo df IlO ([aiiaF J{_[([]l(:io]l_I]li_ ii{o
de Ja v_I_ta1ia
INSTALE EL TUBO Y EL
CODO DE DRENAJE
Alinee las lengtietas del tubo de drenaje con la
ranura de la tlandeja inlerior, inserte el lubo y glrelo
!_0° para tratlarlo en su posicion Instale el codo
empujando el extremo dentro del orilicio hasta que
se lrabe en su posicion
COLOQUE DE NUEVO
EL BASTIDOR EN LA
CAJA EXTERIOR
Pida a una persona que le ayude a colocar de
nuevo el bastidor en la caja exterior Ins{ale el
sujetador de la bandqa inDrior ( oloque el
panel delantero de nuevo y la parrilla Cuando
sea posible ins{ale (los tornillos en la parle
posterior de la caja exterior, que se hayan
quitado ell el paso uno
IMPORTANTE: Debido a que la hoja de la ventana
ayuda a mantener la unidat] en la ventana.
asegtirese de que la hoja de la ventana toque la
caja exterior antes de wllver a insialar el bastidor
J
82

Jnstaiaciones de Pared: de chasis ddizante
Nota: Quite los 2 torniHos de transportoci6n de la porte posterior dd
acondidonador de aire que sosfienen d bastidor a la cubierta
exterior. Uno vez que Josquite, no tendr6 que instalarnosde nuevo.
Para asegurar que d acondicionador de aire queda
apropiadamente instolado en no pored, se recomienda que la
instdad6n sea hecha por un t6cnico cerfificado con experienda en
instaJadones a trav6s de Ja pored.
Usando madera de l" (2,54 cm) por Jomenos de espesor, construya un
marco de Jasdimensiones deJgabinete de Ja unidad que ha comprado.
2)
Mida Jasdimensiones exteriores deJancho y dtura deJmarco para
determinor hasdimensiones necesarias para Ja abertura en Ja pared. La
profundidad deJ marco depender6 dd grueso de la pared. El marco
terminado deber6 ahora coJocarsedentro de Japared. EJmarco
deber6 quedar cuadrado y niveJado. Recuerde que eJ marco debe
fiiarse en forma segura por media de puntiJJasa Josmontantes de Ja
pared (Vea fig. # 21)
montanfe
de Uapared
fig # 21
3) Ahora, para instdar Jaunidad, introduzca eJgabinete en Jaabertura
de Ja pared. (Pero, remueva antes el chasis siguiendo los pasos 1 a 6
descritos en la secci6n hstdaciones de Ventana: Chasis Dedizante)
Verifique que eJgabinete queda pot Jomenos !/2" (1,2 cm) dentro de
Jahabitaci6n. Tambi_n vedfique que Jaspersianas laterdes no quedan
bloqueodas. Esto, para que exista drdaci6n de aire apropiada a
trav6s y drededor dd compreson (Vea fig. # 22)
83

pared_
fig # 22
incJinaci6n
_iplca deU
gablne_e
hacla afuera
gabinete
4) Elgabinete debe indinarse hada afuera 1/4" (6ram) de manera que haya
drenaie haaa abera para Jacondensad6n de Jahumedad que se
extrae dd aire.
5) mnstaJeaisJad6n en farina apropiada en cuaJquier rendija que pueda
quedar entre eJgabinete y eJ marco.
6) UtiliceJasperForadonespara tornillos en loscostadosde la unidad, que
ban sido dise_adospara eJiuego de montaje, y las perForacionesen el
juego de montaje dd rid superior,fije d gabineted marco de madera,
usando JosforniHosde 31/32 puJgada.
7) mnstaJed tubo o eJcododd dren end bastidor (no en todos bs
modebs). Aiuste Jadirecci6n dd bbo dd dren (codo dd dren) para hacer
queest6 en linea con d agujero en la parte _sferior de la unidad Inserte
eJtubo dd dren (codo dd dren) en el agujero y tuerza. (Veafig. # ]L5)
84
8) Con Jaayuda de otra persona bvante y ponga el chasis dd
acondicionador de aire en el gabinete.
9) Cdoque eJtorniHode seguridad donde correspondey presione
JareiiJJaen suJugar.
10) Si durante eJprocesotuvo que removereJfiltro, vudva a cobcarlo.
11)AtorniJJeJosdos torniJJosJaterdesque sostienenJaparriJJaa la cubierta.
12) UtiJiceJasbasesde Japared externa en casode necesidad.
_j_ PRECAUaON: Si una vez terminadas estasoperacionesla unidad parece
quedar fbja o si usted duda que la unidad ha quedado
apropiadamente instdada, p6ngase encontacto con un
instdador caJificado.

persiana de
arrlba para
aire
fig. # 23 fig. # 24
Siempre desenchufe el acondicionador de aire antes
de limpiarlo.
* E1 filtro de aire se debe limpiar par lo menos una vez
par rues para que la unidad opere con maxima eficiencia.
E[libra puede sacarsedes[k6ndda par d lada tkanda de [a [engOeta
uNcada en Hemitad dd Hadaderecho de Hacubier_add frente.C_leafig.#23)
0 1ambi6n, se puede JJegard fintro presionando Jas JengiJetasde arriba
y abaio que se encuentran en eJ Jado derecho de nacubierta deJfrente.
(Vea fig. #24) EJfintro puede Javarseo Jimpiarse con una aspiradora de
aire. Remueva, despu_s de JavarJo,eJacceso de agua que quede en eJ
fintro, sacudi6ndoJo suavemente. En esfa farina se podr6n remover Jas
partldas y eJ poJvoque hayan quedado afrapados en eJfintro
Una vez nimpio rdnstde el fiJtro. NO USE el acondicionador
de aire sin el filtro colocado en su lugar.
persiana
Uaterampara
aire
* Para limpiar los paneles de frente o el gabinete NO USE
substanciasquimicas fllertes, abrasivos, amoniaco, clara,
blanqueadores, detergentes corncentrados, solventes o
almohadillas metF_licas para refregar. Algunas de estas
substancias quimicas pueden afectar, daBar o descdorar eJ
acondidonador de aire
o Use siempre tin patio suave, humedecido en una soluci6n
de jabdn suave mezclado con agua para limpiar el frente
del gabinete. S6qudo con un pa_o suave.
85

oPara guardar d acondidonador de aire, despu6sde la temporada,
saqueRaunidad de Raventana como se indica en RaGula de Jnstdaci6n_
Vudva a empacar Jaunidad en sucaja original y aJmac6nda, Si su
unidad e46 instdada en Japared y usted no deseaquitda de la
ventana, cubra d exterior de la unidad con una cubierta de invierno.
Estacubierta puede comprarse dd distribuidor donde compr6 eJ
acondidonador de aire o puede obtenerseen una fienda
[oca[de ferreter_a.
• Antes de guardar la unidad, cerci6resede que no ha quedado agua en
Rabandeja_EJagua que pueda quedar en Rabandeja puede producir
oxidad6n o dai_osen Jasconexionesd6ctricas.
Si eUacondiclonador de aire no funciona:
®Verifique que Jaunidad est6enchufada. EJenchufe puede estar sueJto.
Verifique si Jaunidad est_ en modaJidad "OfP_oapagada.
EUalre que saUedeU_¢ondicionader de aire est6 ¢aUienteo
* Lagraduaci6n A/C puede estar baja y esnecesario aumentarla.
Se forma h]eJo en eJ serpentln de enfrlamlento°
* Latemperatura exterior est6demasiado baia_ Pongaa fundonar
Onicamenteel ventilador para derretir el hieJo.
Baje Jagraduad6n de temperatura. La graduaci6n de temperatura
seha puestoa un nivd demasiadofrlo_
o Lacapacidad de la unidad (BTU)puede serdemasiadodta para
lascondicionesde la habitaci6n.
86

EUacondlcionador de alre funclona pe_ ia habi_aci6n no se enfrla°
Puedehaberartdactos en la habitaci6n que producen cdor. Useun
venfilador de extracd6n para remover el excesode cdor.
Elescape deaire puedeestar abier_o.Esfeescapedebe cerrarse para
ob_enerel enfriamiento6primo.
e Cambie la direcd6n dd flujo de aire y remuevaobst6culosqueest6nen
sutrayectoria.
®Todaslos puertasy ventanasdebenestorcerradasde manera que d
aire frlo no seescapede Jahabitad6n.
LosfiJtrosde aire puedennecesitarlimpieza.
Lacapaddad de la unidad en BTUpuede sermuy baja para Jascondio
clones de la habitoci6n.
e Endias ex_remnadamentec6Jidosy hOmedos,los acondidonadores de
tire pueden demorar un poco para prindpiar a enfriar_
EUacondlclonador de alre hace ruldo cuando enfria:
Us_edpuede olr ruidos de movimientode aire, agua, el
arranque y parada dd compresory vibraciones en Javenfona_
LeaJaGula de Operad6n, o RuidosdeOperaci6n Normal
(Vet pagina 67)
Hay agua en el gablnete del accmdlclonador de alre:
Estoesnormal, pues eJacondicionador de aire no sdamente
enfria sino que tambi6n extrae Jahumedad dd aire. Si encuentra
que hay agua escurriendo dentro de Jahabitaci6n, reviseJainstdaci6n
de la unidad Launidad puede requerir una reinstdaci6n.
(Vet pagina 78, 81)
87

Esta garantla ¢ubre todos Uos
defectos en rnano de obra o
rnaterlaUes para:
1_Laspartesmec6nicasy d6ctricas que
integran esteproducto Haier finduyendo
loscostasde mano de abra), pot un
per_odode ] 2 mesesaparfir de Jafecha
de campra de la unidad. (Encasosde
usacomerdd a de dquiler, la garanfia
es par 90 d_as).
2. EJsistemaselladoy el compresor
induido en esfeproducto Haier est6n
garantizados par un per_odode 5 ar_os
a partir de JaFechadecompra dela
unidad costosde mano
de un pedodo inicid
de ] 2 Encasasde usa
comerciaJo Jagaranfia
compresores por
un a_o y nuevemeses(exc]uyendolos
costosde mano de obra despu6sde un
pedoda inicid de 90 d_as.
Usted debe guardar y deber6
presentar su redbo originaJ de
¢ompra como prueba de JcJ
fecNa de c_dq#_sici6n°
&Quienes est6n cubierfos?
Loscompradoresorigindes, aJpor
menor,de esteproductoHaier.
m6s cercano,JJamea Haier d (877)
337°3639.
2. Todoserviciodebe ser redizado par
un Centro de Servicio de Haler,
debidamenteautorizado.
ESTAGA_NT|A CUBRE
UNJDADES EN ELCONTUNENTE
DE LOS ESTADOS UNUDO$
CANADA Y EN P_E_YO _CO Y
_O CU_E:
* Da_os pot instdaci6n inapropiada_
®Da_os en transporte
DaRosdebido a md usa abuso,
acddente, a terad6n, fata de cuidado o
mantenimientoaproplados
DaBospor trabajos redizados por
personasqueno seanun distribuidor o
centro de servicioautorizados
Adornos de vidrio a bombiJJos
o Mano de obra, servicio, transporte y
costosde transporte para Jaremoci6n de
partes defectuosasei'nstdaci6n dd
reemplazo, despu6sde transcurrido eJ
per_odoinitial de 12 meses
ESTAGARANTIA LIMITADASEDA EN
LUGARDECUALQUIEROTRA
GARANTIA EXPRESAO IMPUCITA,
INCLUYENDOLASGARANTIASDE
COMERCIALIZACIONY APTITUDPARA
UN PROPOSITOEN PARTICULAR.
&Gu_ deber6 hacerse?
Haier reparar6 o reemplazar6, en su
domiciJio, cudquier porte d6ctrica
mec6nica o eJcompresar .clueresuJten
defectuosos en uso normal dom6stico,
por un perlodo de 12 meses. Haier
reparar6 o reempJazar6 (exduyendo Jos
costos de mana de obra) eJ sistema
seJJadoy eJcompresor (Jaspartes
6nicamente) por un pedoda adicionaJ de
4 aBos.
&C6mo puede usted obtener
servicio?
1_P6ngaseencontactocon eJCentrode
ServicioAutorizado de Haien Para
obtener eJnombre dd Centrode 8ervido
88
EJremedioque resuJtadeestagaranfia
esexdusivo y seotorga en Jugarde rode
otro remedio. Estagaranfia no cubre
daFiosincidentdes o con
secuendaJesAlgunos estadosno
permiten Jaexdusi6n de daBos
incidentdes o consecuencides,de
manera que estalimitaci6n puede serno
apJicabJeen sucaso_AJgunosestados
no permiten limitacionesen cuanto a Ja
duraci6n de una gyanfia impJlcita,de
manera que estalimitaci6n puede ser no
apJicabJeen sucaso. Estagaranfia Je
otorqa derechosJegdesespedficosy
uste_puedetenerotrosderechos,Jos
que varian de estadoa estado.

C_s_mi_or de Hc_er" c_| _-_77-337-3639 IV_ s_ e_ EJJoA)o
_ECES|TA _J_A P_UEBA DE ¢OMP_A _:ECHA_A PAPA E_ $E_V|C|O DE LA GA_A_T|A
_EFE_ TO ELECY_|CAL _AY|HG HAMEPLAYE O_ YO_ UH|Y
_EPORTEZ-VOUS A LA PLAQUE $|G_ALET|QUE DE L'APPA_E|L
_L EEG|ME_ ELECTS|CO ESPEC|F|_O DEL APARATO SE E_CUE_T_ E_ LA
FOE SPEC|F|¢ ELECT_|CAL _J_T|HG,
P_¢A DE _EG|ME_ ELECTR|¢O _E _ _|DA_.
Haier
W_t _ Wor_ _om_ _o_ To _
H_ier Ameri¢_
New Y_r_, NY _00_
 Loading...