

Page 1
English
11
Page 2
English
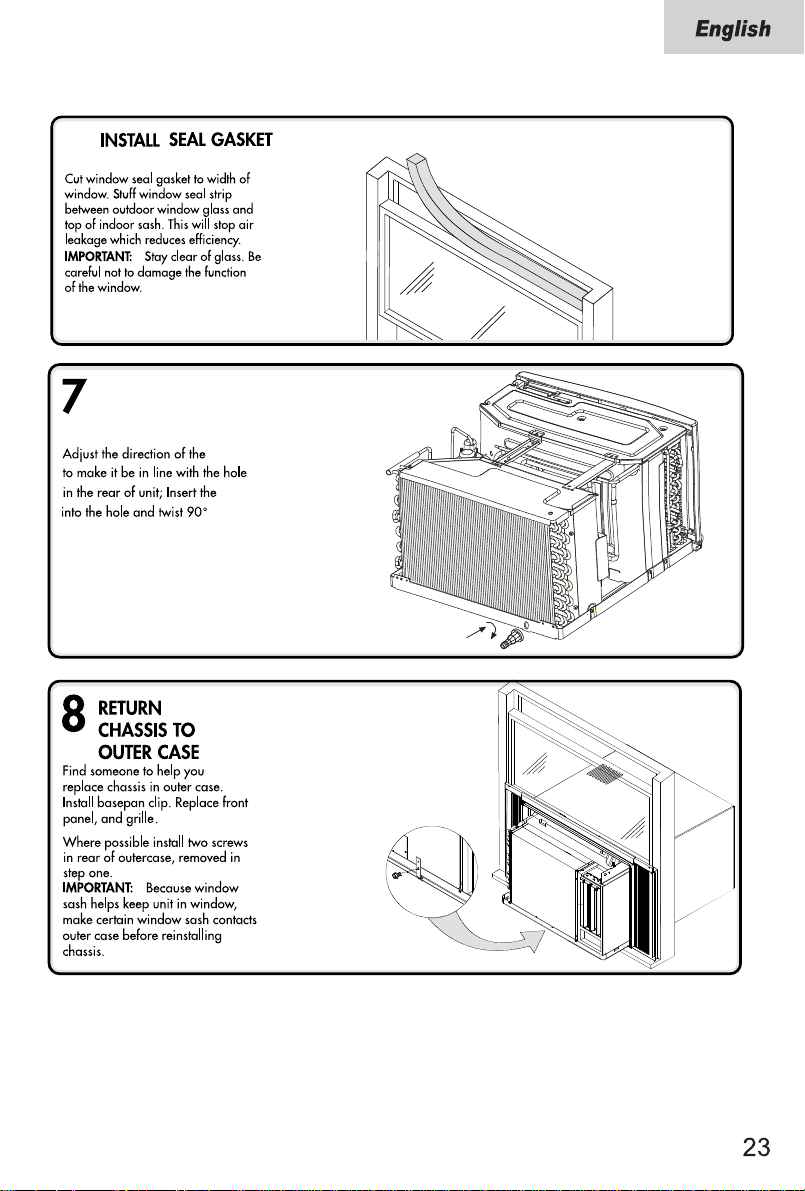
PREPARE
2
WINDOW FOR
INSTALLATION
Inspect window track, sash, and sill
for its ability to support the weight of
air conditioner .
Measure width between window
moldings to ensure Instant Mount
will fit window frame. Inst ant Mount
models are designed for windows
wide (the detail See Page 18).
Instant Mount kit supplied with unit
is designed for mounting in most
double-hung windows without
storm windows. For installation in
window frame with storm window ,
modify sill by adding wood strips
(not included) to inner and outer sills.
This raises unit and eliminates
interference of storm window frame.
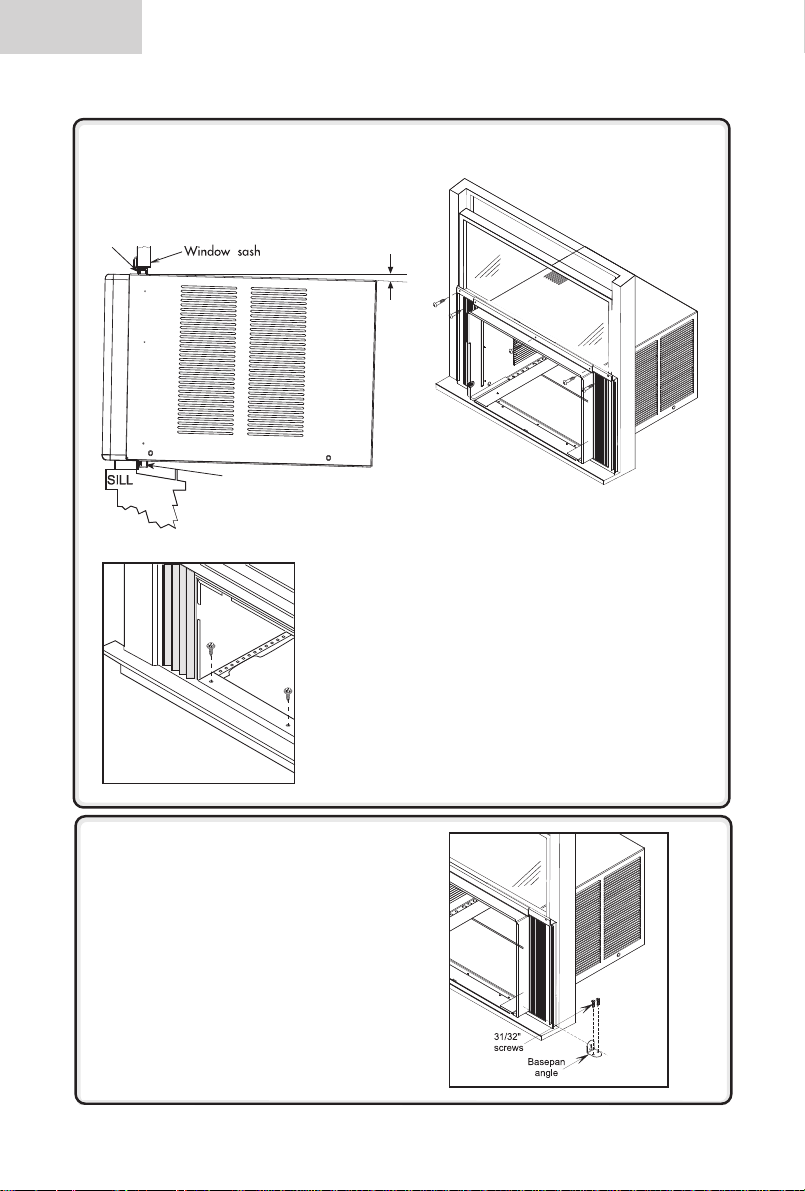
INSTALL UNIT IN
3
WINDOW
Place unit in window . Lower sash
until it rests behind front flange of top
rail. Bottom rail must rest behind
window sill.
Top rail
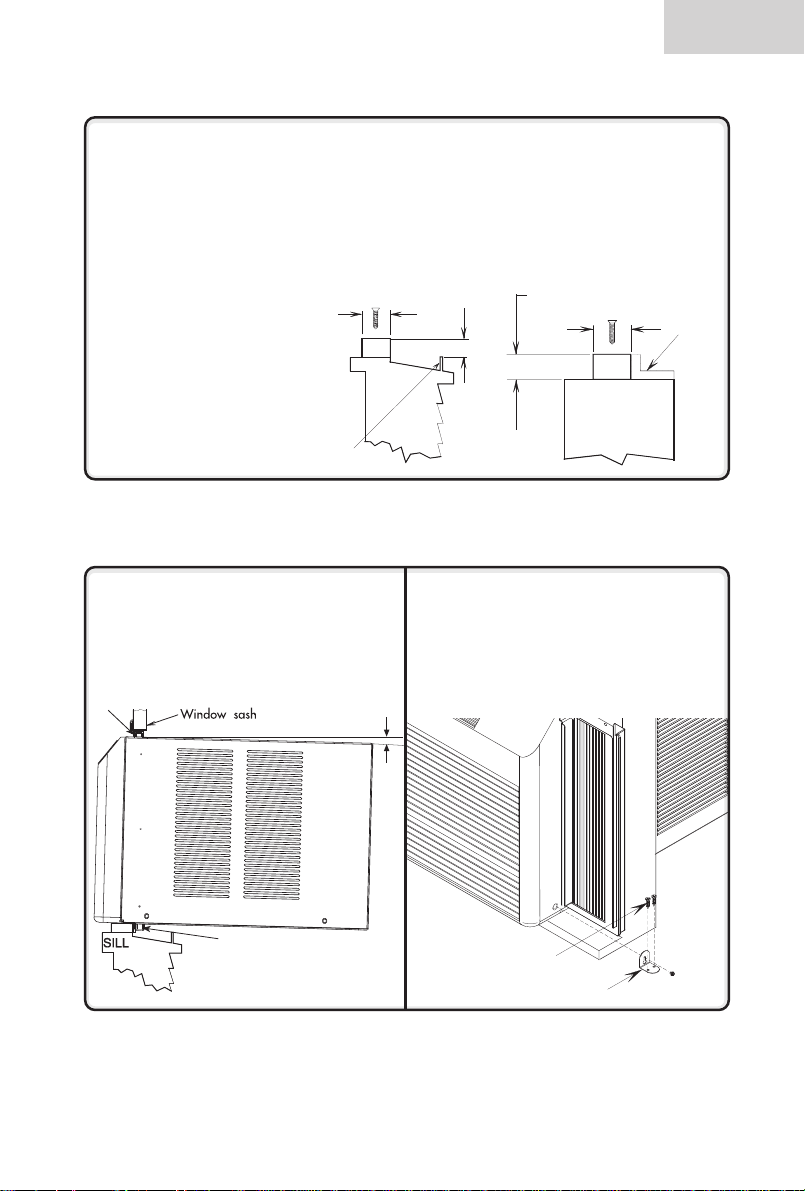
Storm window installation
If storm window frame does not allow
adequate clearance below sill (1/2î
required), remove storm window
frame or create clearance by adding
a wood strip (at least 1 1/2î wide)
along entire width of sill. Fasten
wood strip to sill with at least three
countersunk wood screws (not
supplied with kit). This provides a
smooth surface for mounting air
conditioner.
1 1/2"
Minimum
Wood
Strip
SILL
I
N
D
O
O
R
Storm Window
Frame
1/2"
Minimum
O
U
T
D
O
O
R
INSTALL
4
BASEP AN ANGLE
Back front attachment screw out
several turns and slip Basepan Angle
over screw head. Snug screw with
angle resting on window ledge.
Install T wo 31/32" screws through
angle into window ledge. Repeat for
opposite side.
Mobile home window installation
Add wood strip (at least 1 1/2î wide)
along entire width of window sill.
Thickness of wood strip should match
height of front lip on window frame.
Fasten wood strip to sill with a
minimum of three countersunk wood
screws (not supplied with kit). This
provides a smooth surface for
mounting air conditioner .
Must be a minimum
of 1/2" to clear
bottom rail on unit
1 1/2"
Minimum
Wood
Strip
I
N
D
O
O
R
Window
Frame
O
U
T
D
O
O
R
Bottom rail
Curtain assembly cut
away for clarity.
About
5∞
31/32"
screws
Basepan
angle
19
Page 3
English
6
Models ESA3083, ESA3103, ESA3123
20
Page 4
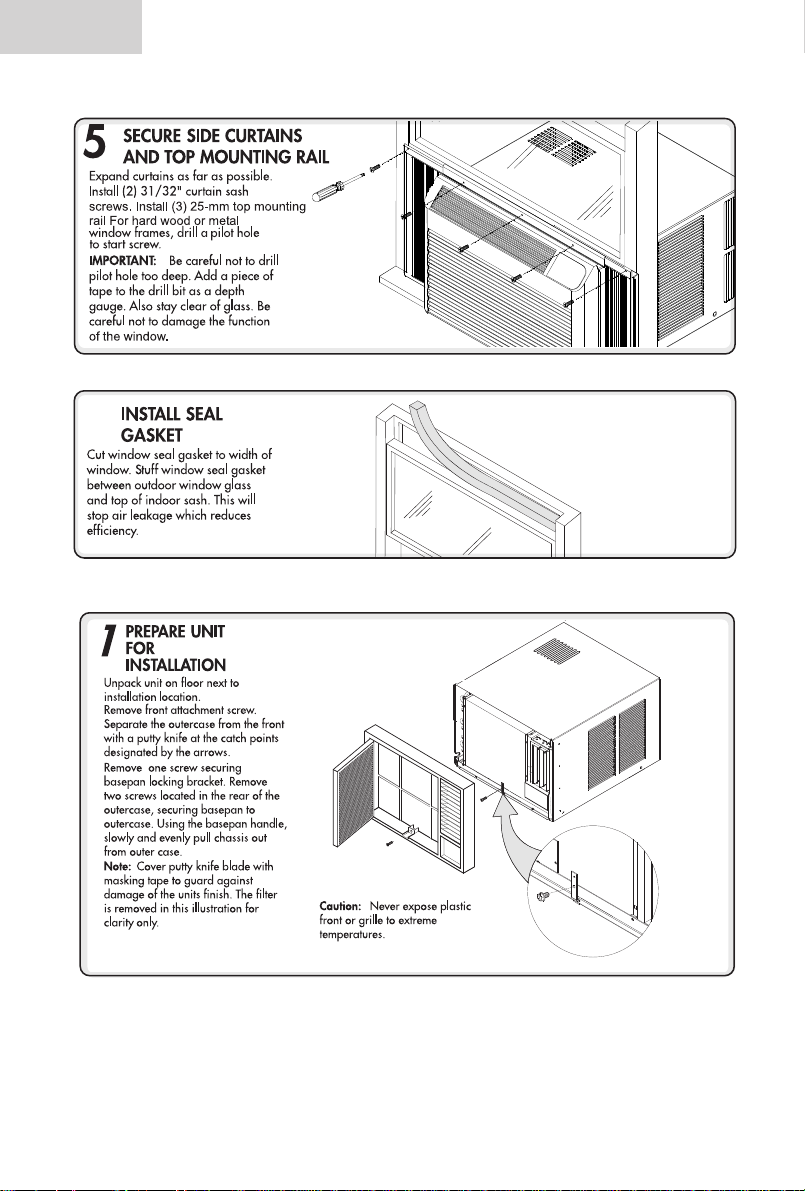
ASSEMBLE
2
CURTAINS/TOP
RAIL
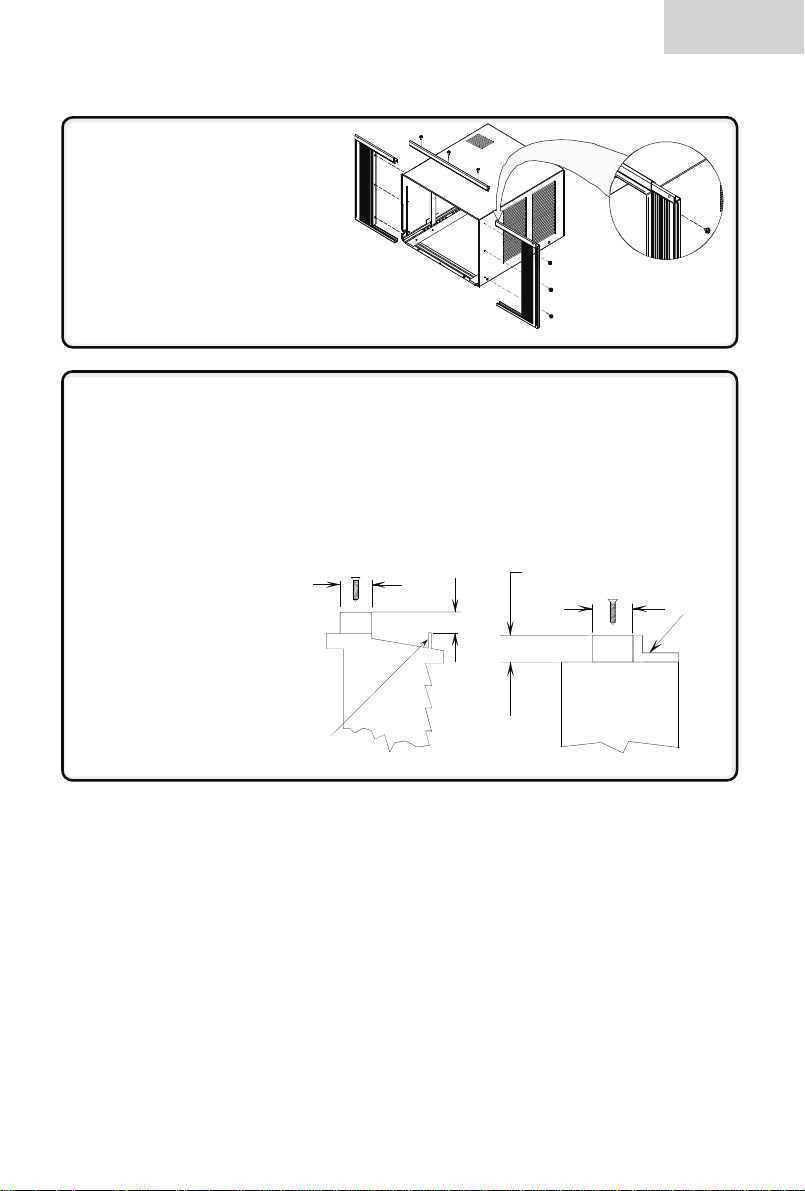
Install top rail with three 13/32"screws.
Slide lef t-hand curtain assembly
into left end of top and bottom
rails. Repeatfor right-hand curtain
assembly. Fastencurtain retainer
strips to sidesof outer case with
six13/32" screws.
English
PREPARE
3
WINDOW FOR
INSTALLATION
Inspectwindow track, sash, and sill
for it sability to supportthe weight of
air conditioner.
Measure width between window
moldings to ensureInstant Mount
will fit window frame. Instant Mount
models are designed for windows
wide (the detail seepage 18)
Instant Mount kit supplied with unit
is designedfor mounting in most
double-hung windows without
storm windows. For installation in
window frame with stormwindow ,
modify sill by adding wood strip
(not included)
Thisraises unit and eliminates
to
inner and outersills.
stormwindow frame.interference of
Storm window installation
If stormwindow frame does not allow
adequateclearance below sill (1/2"
required), remove storm window
frame or createclearance by adding a
wood strip (at least 1 1/2" wide) along
entire width of sill. Fastenwood strip
to sill with at least three countersunk
wood screws(not supplied with kit).
Thisprovides a smooth surface for
mountingair conditioner.
1 1/2"
Min imum
W ood
Str ip
SI LL
I
N
D
O
O
s
R
St orm Wi ndo w
Fram e
1/2"
Min i mum
O
U
T
D
O
O
R
Mobile home window installation
Add wood strip (at least1 1/2" wide)
along entire width of window sill.
Thickness of wood strip should match
height of front lip on window frame.
Fastenwood strip to sill with a
minimum of three countersunkwood
screws(not supplied with kit). This
provides a smooth surface for
mountingair conditioner.
Mus t be a mini mum
of 1/2" to cl ear
botto m rail on unit
1 1/ 2"
Minimum
W ood
St rip
I
N
D
O
O
R
Window
Frame
O
U
T
D
O
O
R
21
Page 5
English
4
T op rail
INSTALL OUTER
CASE IN WINDOW
Place outer case in window. Lower
sash until it rests behind front flange
of top rail. Bottom rail must rest
behind window sill.
About
5∞
Bottom rail
Curtain assembly cut
away for clarity.
Expand both curtains to contact the
window frame. Install two 31/32"
screws. One in each upper right and
left corner of the curtains.
Install three 31/32" top mounting rail
screws.
NOTE: To make screws easier to
drive, drill a pilot hole into sash
through clearance hole in curtains.
22
Use two casement to window securance screws(1")
to fix the case to windows sash.
INSTALL BASEPAN ANGLE
5
Install Two 31/32" screws
through angle into window ledge.
Repeat for opposite side.
Page 6
6
INSTALL
DRAIN ELBOW
drain tube(drain elbow)
drain tube(drain elbow)
.
Page 7

English
12
Page 8

English
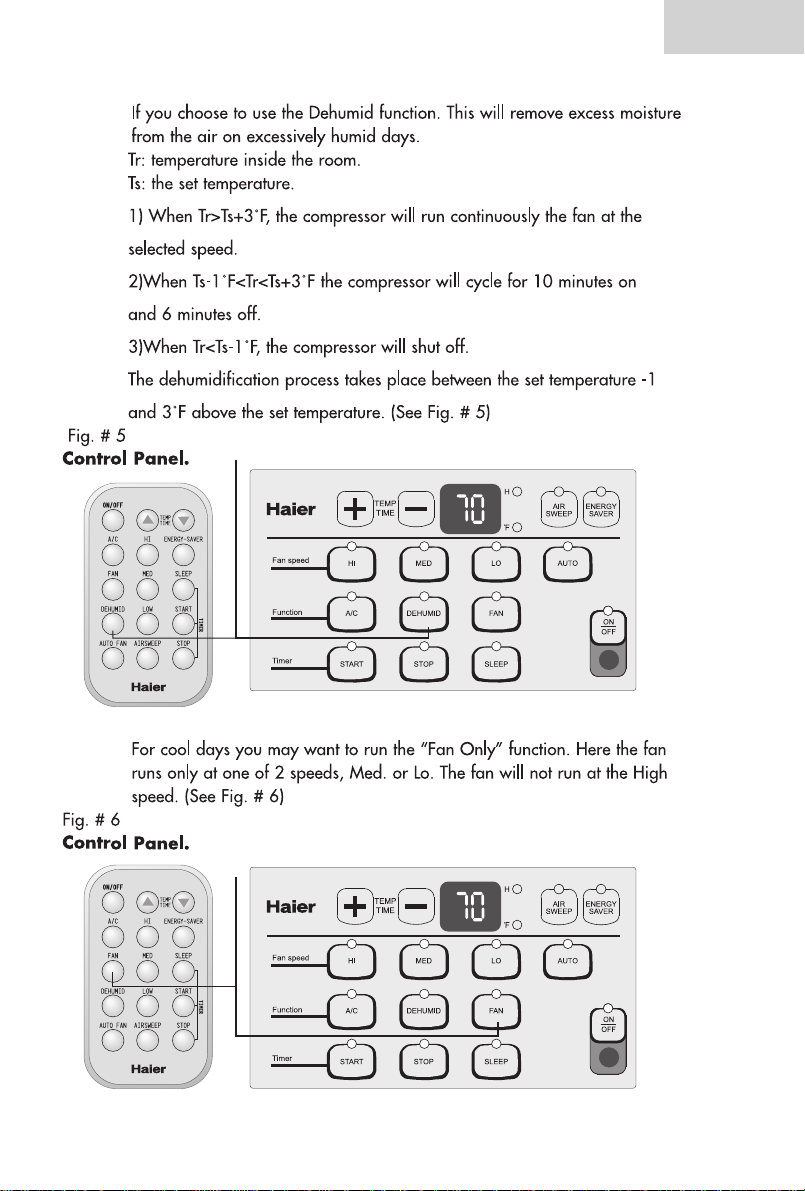
available)
(For ESA3063, the function is not
13
Page 9

English
14
Page 10

English
15
Page 11

English
Parts
PartsSupplied
PartsSupplied
window seal
gasket
PartsSupplied
window seal
gasket
window seal
gasket
curtain
attachment
screws 13/32"
curtain
attachment
screws 13/32"
drainelbow
curtain
attachment
screws 13/32"
draintube
curtainsash
screws
31/32"
curtainsash screws
31/32"
curtainsash screws
31/32"
Model: ESA3103, ESA3123
Model: ESA3063
Model: ESA3083
Casement to
window
securance
ìCR2025ì battery
Remote
control
Remote
control
Casement to
window
securance
ìCR2025ì battery
Remote
control
screw1"
ìCR2025ì battery
left and right
sidecurtains
screw 1"
basepan angle
left and right
sidecurtains
left and right
sidecurtains
toprail
basepan angle
toprail
basepan angle
16
Page 12

English
17
Page 13

Installing Unit into A Window
Window Opening Requirements
The air conditioner is designed to fit into double or single hung sash type windows. Each of the
units comes with an installation kit that provides adjustable mounting louvers, to fill the gaps
between the sides of the unit, and the window frame. The chart below reflects the dimensions of
the units with, and without installation kits. Measure your window opening width and compare
it to the chart below to ensure that it meets the minimum and maximum window width requirements.
B
C
A
D
A
ESA3063
B
C
ESA3083, ESA3103, ESA3123
D
Model
Dimension
ESA3063
A(inch)
B(inch)
C(inch)
D(inch) Max
D(inch) Min
Case High
Case Width
Case Depth
Model ESA3063
ASSEMBLE
CURTAINS
1
Unpack unit on floor next to
installation location.
Slide left-hand curtain assembly into
left ends of top and bottom rails.
Repeat for right-hand curtain
assembly. Fasten curtain retainer
strips to sides of outer case with six
13/32" screws.
Caution: Never expose plastic front
ESA3083
15
7
"
32
31
13
"
32
31
13
"
32
1
35
"
32
9
25
"
13
16
1
20
4
5
8
or grille to extreme
temperatures.
32
3
"
13
8
15
"
20
32
15
20
"
32
ESA3103
ESA3123
5
10
8
11
16
32
11
16
32
5
36
8
27
26
32
3
15
4
1
22
16
5
23
8
"
"
"
"
"
"
"
"
18
Page 14

English
24
Page 15

English
25
Page 16

English
PUSH
PUSH
PUSH
PUSH
Always unplug your air conditioner before cleaning.
Air filter needs to be cleaned at least once a mouth for your
unit to operate at optimum efficiency .
26
DO NOT use your air conditioner without the air filter in place.
To clean the front panels or the cabinet DO NO T use harsh
chemicals, abrasives, ammonia, chlorine, bleach, concentrated
detergents, solvents or metal scouring pads.
Always use a soft cloth dampened with water or mild soap
and water solution to wipe the front if the cabinet.
Page 17

English
27
Page 18

English
(See page 8)
28
(See page 19, 22)
Page 19

 Loading...