

Page 1

Page 2

Page 3

Page 4

Page 5

Page 6

Time functions
Clock setting and timer on/off functions
TIME
1
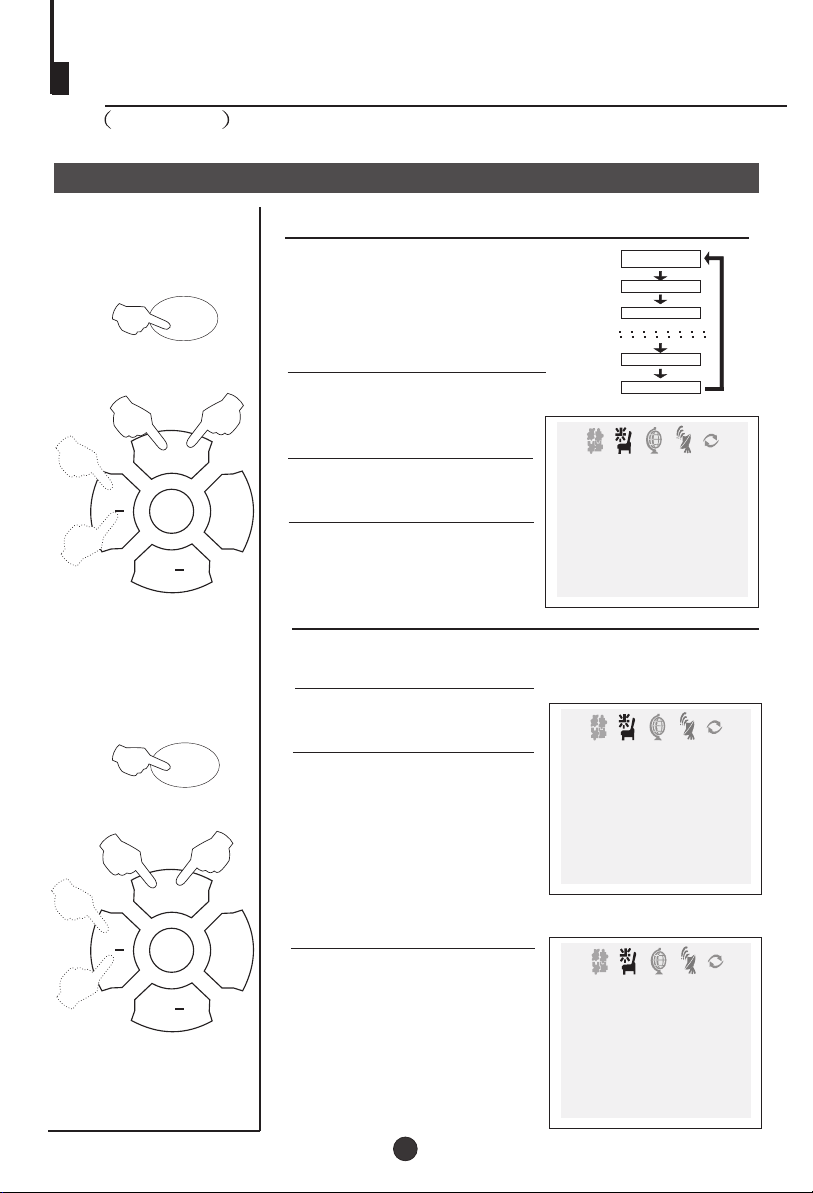
Clock setting
The clock will only work if the TV set if left turned on
or in standby. When the set is disconnect from the
power supply or is turned off by the main power on
the front panel, the clock loses power and will need to
be reset when the power is reconnected.
2
1 Press the TIME button, and
the TIME menu display on the
2
P+
MENU
VV
V+
PP
screen.
2Press the P .+/- buttons select
"CLOCK", then press the V-/+
buttons to adjust the time in
hour position; press again the
P+/- buttons to select the time
TIME
CLOCK 17:18
ON TIME 18:00
ON PROG 1
OFF TIME --:-SLEEP TIMER 0
REMIND TIME --:-REMIND PROG 1
in minute position, then press
the V-/ +buttons to adjust the
value of minutes
On/off timer
Using on/off timer function, the TV set can automatically
turn on to a preset program or shut down in a preset time.
TIME
1
P+
MENU
3
V+
2
2
VV
3
PP
1 Press the TIME button to call
up the TIME menu on the
screen.
2 Press the P+/- buttons to
select "ON TIME", then press
the V-/+ buttons to set the value
in hour position; press again the
P+/- buttons to select the minute
position and set the value of the
minute.(take 18:00 as an
example)
3 Press the P+/- buttons to
select "ON PROG", then press
the V-/+ or program direct
number buttons to select your
desired channel (take 8 as an
example).
4 Repeat step 1-2 to set OFF
TIME.(take 23:00 as an example)
TIME
CLOCK 17:18
ON TIME 18:00
ON PROG 1
OFF TIME --:-SLEEP TIMER 0
REMIND TIME --:-REMIND PROG 1
TIME
CLOCK 17:18
ON TIME 18:00
ON PROG 8
OFF TIME 23:00
SLEEP TIMER 0
REMIND TIME --:-REMIND PROG 1
18
Page 7
Time functions
Continued
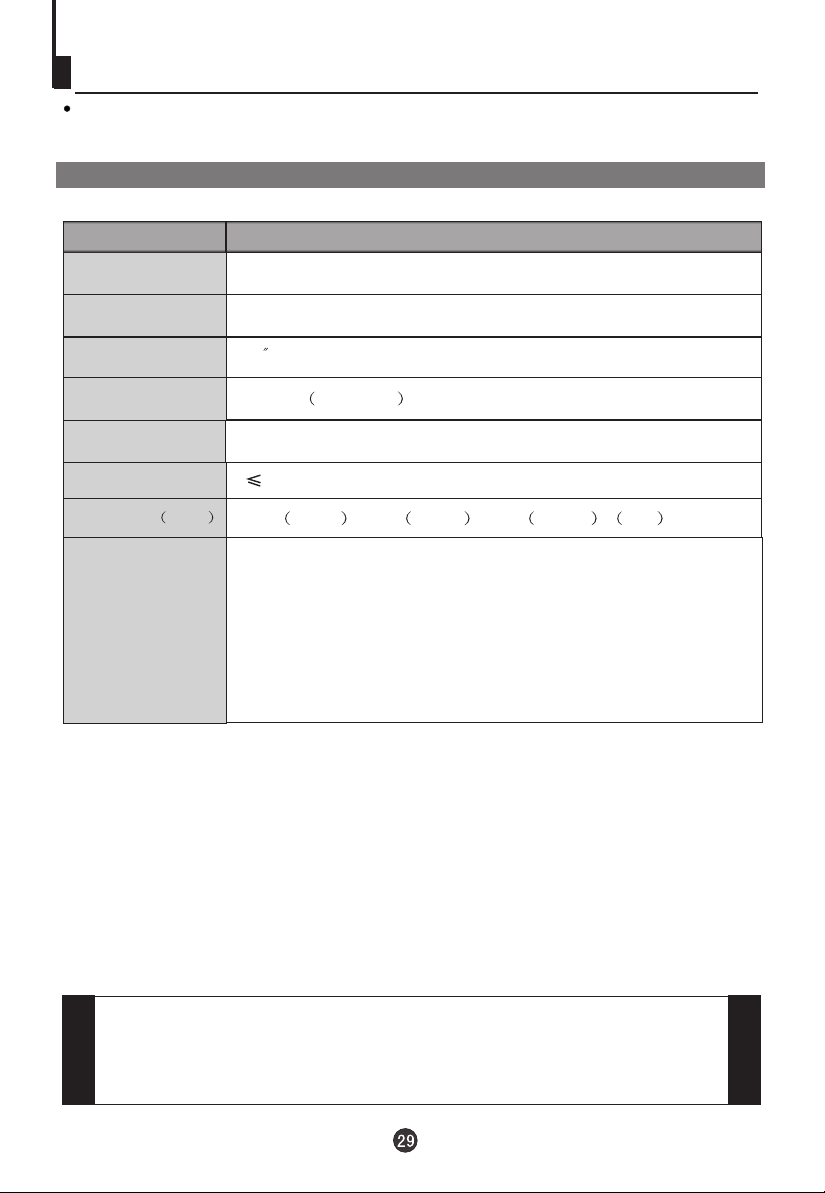
Sleep timer and program preset
Sleep timer
The TV has 18 option settings for
TIME
1
2
2
MENU
VV
3
P+
V+
3
PP
"Sleep timer ", each setting has
a time value of 10 minutes.
1 Press the TIME button, and
the TIME menu display on the
screen.
2 Press the P +/- buttons to
select "SLEEP TIMER ".
3 press the V -/+ buttons to set
the value of the SLEEP TIMER.
REMIND PROG function
Program remind timer , that displays an on-screen reminder
prompt, when a program on a different channel is due to start.
0
10
20
17 0
TIME
CLOCK 17:18
ON TIME 18:00
ON PROG 8
OFF TIME 23:00
SLEEP TIMER 120
REMIND TIME --:-REMIND PROG 1
18 0
1 Press the TIME button to call
TIME
1
2
2
3
P+
up the TIME menu on the
screen.
2 Press the P+/- buttons to
select "REMIND TIME", then
press the V-/+ buttons to set
the value in hour position;
press again the P+/- buttons to
select the minute position, and
then set the value of the
minute.(take 19:00 as an
TIME
CLOCK 17:18
ON TIME 18:00
ON PROG 8
OFF TIME 23:00
SLEEP TIMER 120
REMIND TIME 19:00
REMIND PROG 1
example)
MENU
VV
3
PP
V+
3.Press the P+/- buttons to
select "REMIND PROG", then
press the V -/+ buttons or the
program direct number buttons
to set the desired channel
(take 18 as an example).
NOTE: For
operate
turned off.
REMIND PROG to
CHILD LOCK must be
19
TIME
CLOCK 17:18
ON TIME 18:00
ON PROG 8
OFF TIME 23:00
SLEEP TIMER 120
REMIND TIME 19:00
REMIND PROG 18
Page 8

Teletext
Teletext is an inform ation sys tem, broa dcast by certain ch annels, w hich can be read li ke
a newspa per . It al so provid es subtitl es for peo ple with h earing dif ficulties o r those w ho
are unfam iliar with t he langua ge in whi ch a parti cular prog ram is be ing broad cast (cab le
networks , satellite channels , etc.).T eletext bu tton on re mote can be used in TV
mode onl y. W hen using DVD or s electing AV1 /AV 2,please do not pre ss the tex t
button.
Teletext
Teletext functions
To select "Teletext " press the Teletext button on the
handset. T o switch of f Teletext, press the button again.
"Note all menu functions are not available in Teletext
mode ". Only a few direct button control functions are
available in TELETEXT mode, they are:
V olume adju stment, but w ithout OSD d isplay .
Mute fun ction, but with out OSD disp lay.
Page up/down
Use the P+/- buttons to browse next or previous page.
Page number entering
4
8
To select a T eletext page, enter the page number using
the numeric key pad on the remote control, or use the
P+ or P- buttons, or the coloured Fast text buttons.
VV
1 2
5
6
P+
MENU
PP
V+
3
7
9
0
Mix mode
To view the TV picture while in T ext mode press the
button, this will superimpose the T eletext data on top
of the Tv picture. Press this button again to return to
Full text.
23
Page 9

Teletext
Continued
Teletext
Cancel mode
This feature allows the TV picture to be displayed while next
page to be searched is entered and found. Only the top
teletext line is displayed until the page is found. Press the
button to hide the teletext information. Either press the
button or the T ext button to exit the cancel display mode.
Language change
Pressing the button will change the T eletext characters
between Eastern and Western.
Hold
Pressing the button will stop the teletext page automatically updating. This feature is very useful where there are
several teletext pages or data on the same page number.
Size
Pressing the button changes between full screen top
half bottom half full screen. This feature is very useful as it
magnifies the image making the characters easier to read.
Reveal
Pressing the button will reveal hidden text. This feature
is used to reveal information such as answers to T eletext
on-line interactive puzzles.
Subcode / Time
By entering its 4-digit number to enter a secondary page;
in normal TV mode only, pressing the button will display the
teletext time in the top right hand corner for a few seconds.
Switch teletext on/off
Press the button on the remote control to turn teletext
On/Off.
Fast text coloured buttons
Fast text automatically displays the four most commonly
used pages that the broadcaster thinks that you may want
to choose next. Press the same coloured button on the
remote control as the coloured link at the bottom of the
teletext page to go directly to that page.
24
While
Page 10

Basic Playback
Basic Playback
Preparations
Press the TV/DVD button on the remote control
or the TV to enter the DVD status.
Stop playback
1. Press STOP button to stop the disc
playing. With some discs the player will
memorize the stop position, such as DVD's
and audio CD's.
Basic playback
1. Press OPEN/CLOSE to open the disc tray,
place a disc on the disc tray.
There are two different disc sizes. Place the
disc in the correct guide on the disc tray. If the
disc is out of the guide, it may damage the disc
and cause the DVD player to malfunction.
Do not place a disc which is unplayable in this
DVD player.
2. Press OPEN/CLOSE to close the disc tray, the
playback will automatically start.
Some discs do not start automatically . Press
PLAY/ENTER to start playback.
3. Some discs may start playback with a menu. Use
the cursor buttons on the remote control to select
menu options and press PLAY/ENTER to start. Y ou
may also press the digit buttons to select a menu
option directly. Many DVDs will not allow this during
start-up.
Pause playback
1. Press PAUSE/STEP to pause playback (still mode).
The sound will be muted during still mode.
2. Press PLAY/ENTER to resume normal playback.
2. Press PLAY/ENTER to playback to resume play-
back from the location where playback is stopped
or from the beginning of the disc.
3. Press STOP twice to stop completely.
Previous and Next
During Playing, pressing the PREV key will
restart the current chapter and skip chapters
backwards with each subsequent press until the
start of the disc is reached.
Each press of NEXT key during playing will
skip the current chapter and play the next one.
Fast forward and Fast reverse
1. Press FWD to fast forward through the disc.
Each time the FWD button is pressed, the
fast forward motion speed changes.
2. Press PLAY/ENTER to resume normal playback.
3. Press REV to fast reverse through the disc.
Each time the REV button is pressed, the
fast reverse motion speed changes.
4. Press PLAY/ENTER to resume normal playback.
Single step playback
To "single step" press the "Pause" button,
then press "Pause/Step" in continuous steps
to view the next frame.
25
Page 11

Advanced Playback
Advanced Playback
IMPORTANT NOTE:
ALL DESCRIBED FUNCTIONS ARE FOR DVD DISCS. IF YOU PLAY OTHER FORMA TS, THE
OPERATION AND DISPLA Y ON SCREEN MAY V ARY .
C A PT IO N
P re ss " C AP T ION " , th e s cre en w ill d isp lay "S UB TITLE 0 1/X X X XX XX ", "0 1 " ind ica tes th e ord ina l
num be r of th is l an gua g e ; "XX " ind ica tes to tal nu m be r
of la ng u a g e; "X XX X XX " i ndic ate s t h e lang u a g e o f
co un try. (th e n um be r o f la ng u age d ep end s o n d isc).
This fu n c ti o n c an se lec t u p to 3 2 l a ngu a g e s d isp lay ed o n s cre en .
R E PE AT
P re ss " R EP EAT " a nd C ha pte r r ep ea t w ill be
dis p lay ed o n s cre en , the se co nd p ress w ill d isp lay
Tit le r ep ea t, t he t h ir d pre ss w ill d isp lay All re pe at,
th e f o u rt h p ress w ill c a n cel th is f un c ti o n .
A -B
Press A-B to select the Start point. Press
again to select the End point. A third press
will cancel the function.
A N GLE
W he n e njo yin g s po rts , con c e rt or thea tr e, p ress th is
key to w atc h s a me actions in d iffe rent a n gle s. (V a lid
fo r d is cs p os sessin g t h is fu nctio n . U sin g a d is c
re co rd ed in m ulti- a n g le y ou ca n v iew th e s ce ne f ro m
diffe re nt a ng le s,f o r ex a m ple ,fro nt, s ide , w ho le v ie w
and e xte rio r s c e ne).
D .M E N U
P re ss th is ke y t o dis pla y r oo t m en u,s ele ct item
accord ing to y ou r pre fere nc e. (T his fu nc ti o n w ill w ork
w it h a D VD havin g a m ulti- la ye r me nu .)
D .C A L L
P re ss in g this k e y w ill cycle th ro ug h " title e lap se d ",
"title re ma in", "c ha p ter ela ps ed", " ch a p te r re m ain "
and " d isp lay off ".
P R OG R AM
W he n p la yin g dis cs,p res s "P R O GR AM " t o
ente r p rog ram m od e. P re ss the d igit button s t o
sele ct th e p rog ra m n um be r th at yo u w ant. W hen
finis h ed m ove th e c urs or to s ele ct "S TA R T" . Th is
w ill sta rt t he p rogra m p lay ba c k .
SEARCH
P ress " SE AR CH " on ce to d isp la y the s ea rch
m en u . P re ss t h e b u tt on a gain to s ele ct. A nd
th en p re ss t he d ig it ( 0-9 ) b utt on s to s ele ct t he
num be r. Pre ss P LAY /E N TE R to c onfirm .
S L O W
P re ss SL OW to pla y a d isc i n slo w fo rw ard . E ac h
tim e th e SL OW bu tt o n is p re ss ed, th e slo w
m otio n s pe ed c ha ng e s .
P re ss P L AY/E N TE R t o r esum e n orm a l pla yb a c k ;
Note: T his fu n c ti o n is invalid f o r CD and M P 3 .
TIT LE /P B C
W ith s om e D V D d isc s pre ss in g this k ey w ill d ispla y
th e tit le m en u. You c an t h e n use t he d ig it b utton s
to s ele ct the i tem yo u p refe r.
A U DIO
P re ss this ke y c an ch an g e th e m od e o f a ud io .
such a s: A ud io 1 /2: A C 3 2 C H E n g lish
A u dio 2 /2 : A C 3 5.1 C H E nglish
P re ss this bu tto n t o c yc le betw ee n M o n o L eft , M on o
R ig ht, M ix -M on o a nd Ste reo.
Note: Do not press this button continuously.
Each press must have a 3 second delay .
26
Page 12

Special Function Playback
JPEG DISC PLAYBACK
When a disc containing standard JPEG picture files is inserted into the player, a
navigation menu will be dis played automatically . Use the UP and DOWN cursor
buttons to select a file then press PLA Y/ENTER. The slide show will commence.
Press PREVIOUS or NEXT to move between pictures. Press pause to stop on the
current picture. Press PLA Y/ENTER to resume normal playing.
MP3 PLAYBACK
When playing an MP3 disc, a navigation menu will be dis played automatically . In the
menu, use UP or DOWN cursor buttons to choose the folder, then press
PLAY/ENTER to enter the folder. Use the UP and DOWN cursor buttons to select
the file and press PLA Y/ENTER. Pressing the LEFT cursor button will take you to
the previous screen/menu.
SCREEN SAVER FUNCTION
This unit employs a screen saver mode to help protect the tube during static video
pictures. This can be turned off on the GENERAL SETUP PAGE (see Pg. 28)
27
Page 13

Connecting the TV set to the other video and audio equipment
Connection of AV input /output terminal
The figure below shows how to connect external equipment using AV signals.
DVD Player
VCR
output
output
input
input
input
Audio right
Audio left
Video
Audio right
Audio left
output
Video
There is also an AV input on the front of your television. Use the Left Audio input
(white terminal on the TV), if you are connecting equipment with mono sound. The
MONO sound will be delivered by both left and right speakers.
DVD player
ideo output
V
Audio left output
Audio right output
VCR
Page 14

Troubleshooting guide
To assist in location possible faults use help guide below.
BREAKDOWN PHENOMENON
PICTURE
Picture with snow
Double or Triple Image
Disturb
No Picture No sound
No colour Normal volume
SOUND
Noise
Normal
Noise
No soundNormal
CHECKING
The aerial direction and connection
This is called "ghosting" and can be minimized with
an outside aerial, and good quality cable and
terminations. Altering the aerial direction can also
minimize this effect.
Electrical interference which can be caused by cars,
motorbikes etc, Fluorescent lamps and dirty
insulators on overhead power cables.
Volume Sound mute
Ensure that the power supply is connected to
the TV set and turned on. Also ensure that the
TV set is not in "Listen Mode" or that the
brightness and contrast are not turned down.
Adjust colour control
Adjust channel again
Scramble
Colour Spot
Note:
1.If the fault can not be corrected using the above guide consult with your local authorized service
center.
2.The TV set must only be repaired by a qualified registered service person. Never attempt to
remove the back cover as TV set has dangerous voltages inside that may cause a fatality or fire.
3. The cabinet may produce the occasional "snapping sound" This is normal and caused by the
materials in the cabinet expanding with room temperature changes.
Normal or Weak Volume
Normal volume
Colour Purity is a fault that can be caused by moving the
TV set, placing magnets near the TV screen or turning
on/off house hold appliances such as vacuum cleaners
near the TV set. Turn the TV off with the main power
switch for 15 minutes. When the power is turned on
again the TV set will automatically degauss the picture.
In severe cases leave the TV set turned off over night.
Page 15
Specifications
The specifications offered you here are for reference only. With product improvement
there may be some differences between the description and the final product.
Specifications
Model
Colour system
Sound system
Picture tube
Sound output power
Power requirements
Power consumption
Dimension WDH
Accessories
C20D201F
NTSC
M
20 colour picture tube
2X2W 10% THD
AC 120V~ 60Hz
80W
500 Width x480 Depth x485 Height mm
Remote control X1
Owner's manual X1
Battery(AAA) X2
NOTE
Design and specifications are subject to change without notice.
Dimensions quoted in this manual are approximate.
Page 16

CITIZEN WARRANTY
Consumer Electronics Products
Thank you for choosing Citizen!
Citizen Electronics gives the following express warranty to the original consumer purchaser or gift recipient
for this Citizen brand product, when shipped in its original container and sold or distributed in Canada by
Citizen Electronics or by an Authorized Citizen Dealer:
Citizen Electronics warrants that this product is free, under normal use and maintenance, from any defects
in material and workmanship. If any such defects should be found in this product within the applicable
warranty period, Citizen Electronics shall, at its option, repair or replace the product as specified herein.
Replacement parts furnished in connection with this warranty shall be warranted for a period equal to the
unexpired portion of the original equipment warranty.
This warranty shall not apply to:
a.Any defects caused or repairs required as a result of abusive operation, negligence, accident,
improper installation or inappropriate use as outlined in the owner's manual.
b.Any Citizen product tampered with, modified, adjusted or repaired by any party other than Citizen
Electronics or Citizen's Authorized Service Centres.
c.Damage caused or repairs required as a result of the use with items not specified or approved by
Citizen Electronics, including but not limited to head cleaning tapes and chemical cleaning agents.
d.Any replacement of accessories, glassware, consumable or peripheral items required through
normal use of the product including but not limited to earphones, remote controls, AC adapters, batteries,
temperature probe, stylus, trays, filters, cables and paper.
e.Any cosmetic damage to the surface or exterior that has been defaced or caused by normal wear
and tear.
f.Any damage caused by external or environmental conditions, including but not limited to
transmission line/power line voltage or liquid spillage.
g.Any product received without appropriate model, serial number and CSA/cUL markings.
h.Any products used for rental or commercial purposes.
i.Any installation, setup and/or programming charges.
Should this Citizen product fail to operate during the warranty period, warranty service may be obtained
upon delivery of the Citizen product together with proof of purchase and a copy of this LIMITED WARRANTY
statement to an Authorized Citizen Service Centre. In-home warranty service may be provided at Citizen
Electronics' discretion on any Citizen television with the screen size of 27” or larger. This warranty
constitutes the entire express warranty granted by Citizen Electronics and no other dealer, service centre or
their agent or employee is authorized to extend, enlarge or transfer this warranty on behalf of Citizen
Electronics. To the extent the law permits, Citizen Electronics disclaims any and all liability for direct or
indirect damages or losses or for any incidental, special or consequential damages or loss of profits
resulting from a defect in material or workmanship relating to the product, including damages for the loss of
time or use of this Citizen product or the loss of information. The purchaser will be responsible for any
removal, reinstallation, transportation and insurance costs incurred. Correction of defects, in the manner
and period of time described herein, constitute complete fulfillment of all obligations and responsibilities of
Citizen Electronics to the purchaser with respect to the product and shall constitute full satisfaction of all
claims, whether based on contract, negligence, strict liability or otherwise.
WARRANTY PERIODS: Parts & Labour (exceptions noted)
Audio Products: 1 Year (Remote Control, if applicable 90 Days)
DVD Products: 1 Year (Remote Control 90 Days)
LCD & Plasma Display TV: 1 Year (Remote Control 90 Days)
Microwave Ovens: 1 Year
Television Products: 1 Year (Remote Control 90 Days)
VCR Products: 1 Year (Remote Control 90 Days, Video Heads 6 Months)
To obtain the name and address of the nearest Authorized Citizen Service Centre or Dealer, please contact:
Citizen Electronics, 455 Gordon Baker Road, Toronto, Ontario M2H 4H2 or visit our web site:
www.citizen-electronics.com
For more information on this Warranty or Service Locations, please call (416) 499-5611 or toll free 1-800663-5954, Monday to Friday 9:00am 5:00pm Eastern Standard Time.
 Loading...