

Page 1

Compact Refrigerator
Réfrigeratuer Compact
Refigerador Compacto
User Manual
Model # HSE04WNC
Guide de l’Utilisateur
Modéle # HSE04WNC
Manual del Usuario
Para Modelo de # HSE04WNC
Quality Innovation Style
Page 2

English
IMPORTANT SAFETY
INSTRUCTIONS
Read all of the instructions before using this appliance. When using
this appliance, always exercise basic safety precautions, including the
following:
1. Use this appliance only for its intended purpose as described in this
use and care guide.
2. This must be properly installed in accordance with the installation
instructions before it is used. See grounding instructions in the
installation section.
3. Never unplug your convertible freezer / refrigerator by pulling on the
power cord. Always grasp the plug firmly and pull straight out from
the outlet.
4. Repair or replace immediately, all electric service cords that have
become frayed or otherwise damaged. Do not use a cord that shows
cracks or abrasion damage along its length, the plug or the
connector end.
5. Unplug your refrigerator before cleaning or before making any
repairs. Note: If for any reason this product requires service, we
strongly recommend that a certified technician performs the service.
6. Do not use any electrical device or any sharp instrument in
defrosting your refrigerator.
7. If your old refrigerator is not being used, we recommend that you
remove the doors. This will reduce the possibility of danger to
children.
8. After your refrigerator is in operation, do not touch the cold surfaces
in the convertible freezer / refrigerator compartment, particularly
when hands are damp or wet. Skin may adhere to these extremely
cold surfaces.
9. Do not refreeze foods, which have been thawed completely. The
United States Department of Agriculture in Home and Garden
Bulletin No. 69 reads: "…You may safely refreeze frozen foods that
have thawed if they still contain ice crystals or if they are still
cold-below 40˚F".
"…Thawed ground meats, poultry
off-color should not be refrozen and should not be eaten. Thawed ice
cream should be discarded. If the odor or color of any food is poor
or questionable, discard it. The food may be dangerous to eat."
1
, or fish that have any off-
odor or
Page 3

"…Even partial thawing and re-freezing reduce the eating quality of
foods, particularly fruits, vegetables, and prepared foods. The
eating quality of red meats is affected less than that of many other
foods. Use refrozen foods as soon as possible, to save as much of its
eating quality as you can.
10. This refrigerator should not be recessed or built-in an enclosed
cabinet. It is designed for freestanding installation only.
11. Do not operate your unit in the presence of explosive fumes.
SAVE THESE INSTRUCTIONS
DANGER
Risk of child entrapment. Before you throw
away your old appliance, take off the doors.
Leave the shelves in place so that children
English
may not easily climb inside.
Thank you for using our Haier
product. This easy-to-use manual will
guide you in getting the best use of
your refrigerator.
Remember to record the model and
serial number. They are on a label in
back of the refrigerator.
Staple your receipt to your manual.
ou will need it to obtain warranty service.
Y
Model number
Serial number
Date of purchase
2
Page 4

English
TABLE OF CONTENTS P
MPORTANT SAFETY INSTRUCTIONS
I
ARTS AND FEATURES........................................................................................................4
P
INSTALLING YOUR REFRIGERATOR ....................................................................................5
Unpacking your refrigerator......................................................................................................5
eveling your refrigerator ..........................................................................................................5
L
roper air circulation ................................................................................................................5
P
Electrical requirements ..............................................................................................................5
nstall Limitations......................................................................................................................5
I
Use of extension cords..............................................................................................................5
Door alignment........................................................................................................................5
Reversing the door hinge ..........................................................................................................6
REFRIGERATOR FEATURES AND USE..................................................................................6
General Features......................................................................................................................6
Refrigerator Interior Shelves ......................................................................................................7
Using the Dispense-A-Can
Using the lock ..........................................................................................................................7
Defrosting ................................................................................................................................7
Food Storage Information ........................................................................................................8
Normal operating sounds ........................................................................................................8
PROPER REFRIGERATOR CARE AND CLEANING ..............................................................8
Cleaning and maintenance ......................................................................................................8
Power interruptions ..................................................................................................................9
Vacation & moving care............................................................................................................9
TROUBLESHOOTING ............................................................................................................9
LIMITED WARRANTY ..........................................................................................................10
TM
....................................................................................................7
.............................................................................1-2
.
AGE
3
Page 5

PARTS AND FEATURES
1
3
4
5
6
English
2
8
9
1. Freezer Compartment
2. Ice Cube Tray
ray
3. Drip T
4. Adjustable T
5. Slide-Out Shelves
emperature Control
7
10
10
6. Retainer Bar
7. Adjustable Front Leveling Leg (not shown)
TM
Can
8. “Dispenser
9. F
10. Lock With Key
-A-
ixed Door Shelf
Storage
4
Page 6

English
INSTALLING YOUR REFRIGERATOR
Unpacking Your Refrigerator
. Remove all packaging material. This includes the foam base and all adhesive tape holding the
1
accessories inside and outside.
2. Inspect and remove any remains of packing, tape or printed materials before powering on.
Leveling Your Refrigerator
• Your refrigerator has two leveling legs which are located in the front corners of your refrigerator. After
roperly placing your refrigerator in its final position, you can level your refrigerator.
p
Leveling legs can be adjusted by turning them clockwise to raise your refrigerator or by turning them
•
counterclockwise to lower your refrigerator. The refrigerator door will close easier when the leveling
legs are extended.
Proper Air Circulation
• To assure your unit works at the maximum efficiency it was designed for, you should install it in a
location where there is proper air circulation, plumbing and electrical connections.
• The following are recommended clearances around the refrigerator:
Sides ..................................3/4" (19mm)
Top......................................2" (50mm)
Back....................................2" (50mm)
Electrical Requirement
• Make sure there is a suitable power Outlet (115 volts, 15 amps outlet) with proper grounding to
power the unit.
• Avoid the use of three plug adapters or cutting off the third grounding in order to accommodate a two
plug outlet. This is a dangerous practice since it provides no effective grounding for the unit and may
result in shock hazard.
Install Limitations
• Do not install your refrigerator in any location not properly insulated or heated e.g. garage etc. Your
refrigerator was not designed to operate in temperature settings below 55° Fahrenheit.
• Select a suitable location for the refrigerator on a hard even surface away from direct sunlight or heat
source e.g. radiators, baseboard heaters, cooking appliances etc. Any floor unevenness should be
corrected with the leveling legs located on the front bottom corners of the refrigerator.
Use of Extension Cord
• Avoid the use of an extension cord because of potential safety hazards under certain conditions. If it is
necessary to use an extension cord, use only a 3-wire extension cord that has a 3-blade
grounding plug and a 3-slot outlet that will accept the plug. The marked rating of the extension cord
must be equal to or greater than the electrical rating of the
appliance.
. 1)
Door Alignment (see F
1. Remove hinge cover screw.
2. Remove the top hinge cover
3. Loosen the top hinge screws using a phillips head screwdriver.
4. Adjust the door or put a spacer in between and then tighten the
screws.
5. Replace the top hinge cover.
5
ig
.
Fig. # 1
Page 7
English
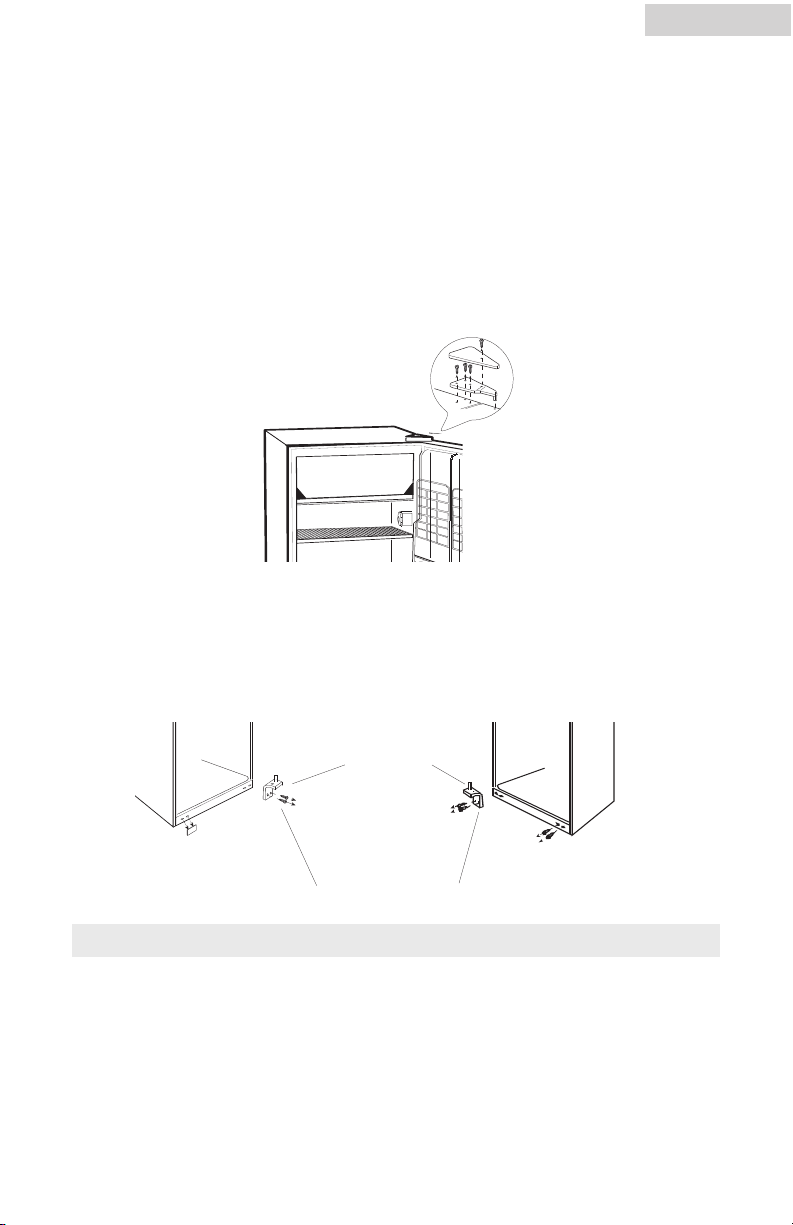
Reversing the Door Hinge
1. Removing the top hinge cover screw and then remove the top hinge cover.
. Using a Philips Head Screwdriver, loosen and remove the screws holding the top hinge in place.
2
. Remove the top hinge and carefully lift off the door.
3
4. Carefully remove the top screw hole plug from the opposite side and insert the plug in the screw
ole openings of the just removed screws.
h
. Remove the door pin from the bracket of the lower hinge by turning counter clockwise. Move the
5
pin to the opposite hole and tighten.
. Loosen the screws holding the lower hinge bracket and remove the hinge. Remove the two
6
screws from the non-hinge side.
. Align the holes in the lower hinge bracket to the corresponding holes in the opposite side of the
7
abinet. Insert and tighten the screws. Insert the two remaining screws into the holes of the side
c
opposite the current hinge location.
8. Align the bottom hole on the left side of the door with the pin of the lower hinge and slide into place.
9. Align the pin of the top hinge with top hole on the left side of the door and push into place.
Replace the screws in the upper hinge bracket but do not tighten all the way.
10. Make sure the door closes easily but forms a tight seal. Adjust the door as needed. (See Door
Alignment Section) Once you are satisfied with the door alignment, completely tighten the upper
door hinge screws.
11. Replace the hinge cover, insert the screw and tighten completely.
12. If the door does not close properly, refer to the section titled “Door Alignment.”
door pin
fig. # 2
lower hinge bracket
fig. # 3
FEATURES AND USE
General Featur
Adjustable temperature dial:
Your refrigerator will automatically maintain the temperature level you select. The temperature control
dial has 7 settings plus off. 1 is the warmest. 7 is the coldest. Turning the dial to OFF stops cooling in
both the refrigeration and freezer sections. At first, set the dial to 4 and allow 24 hours to pass before
adjusting the temperature to your needs.
If the refrigerator has been placed in a horizontal or tilted position for any period of time
Note:
wait 24 hours before plugging the unit in.
es
6
Page 8

English
Refrigerator Interior Shelves
o remove or replace a full-width slide-out shelf: (see Fig. # 4)
T
1. Gently tilt the shelf up and slide forward until the shelf has been
completely removed.
2. To replace the shelf, gently slide the shelf back.
Using the Dispense-A-Can™
• Your refrigerator may be equipped with the convenient “Dispense-A-Can™”
compartment. Each compartment will hold up to four cans. Simply load the cans
from the top. To dispense a can, simply draw one out from the bottom. It is that
easy. (see Fig #5)
Using the Lock
• Your refrigerator may be equipped with a lock and key
(located at the bottom center of the door) for optional
security, should you choose. Simply close the refrigerator
door, insert the key and turn. To open, insert the key and
turn in the opposite direction. (see Fig #6)
Fig. # 4
Fig. # 5
Fig. # 6
lock and key
Defrosting Your Refrigerator
Note: If you have purchased a model with no freezer section,
you do not need to defrost.
• For maximum energy efficiency, defrost freezer section
whenever frost accumulates to a thickness of 1/4" or more
on freezer walls. Note that frost tends to accumulate more
during the summer months
• To defrost freezer, remove food and ice cube tray from the
freezer section. Place drip tray under freezer section and
turn temperature control dial to OFF position. Defrosting
may take a few hours. To speed up defrost time, keep the
door open and place a bowl of warm water in the
refrigerator.
During the defrost cycle, water will accumulate in the drip tray
•
may also need to be emptied during the defrost process. Do not leave
unattended. (see Fig. 7)
After defrosting
•
the refrigerator. You may now reset your refrigerator to the desired
temperature and return food.
, empty and wipe down the drip tray, as well as the interior of
7
. The drip tray
Fig. # 7
drip tray
Page 9

English
FOOD STORAGE INFORMATION
Fresh Food:
• When storing fresh food, which is not prepackaged, be sure to wrap or store food in airtight and
oisture proof material unless otherwise noted. This will ensure proper shelf life and prevent the
m
ransfer of odors and tastes.
t
• Whip containers before storing to avoid needless spills.
Eggs should be stored in an upright position in their original carton to maximize shelf life.
•
Fruit should be washed and dried then stored in sealed plastic bags before storing in the refrigerator.
•
• Vegetables with skins should be stored in plastic bags or containers.
Leafy vegetables should be washed and drained and then stored in plastic bags or containers.
•
• Hot food should be allowed to cool before storing in the refrigeration. This will prevent unnecessary
energy use.
• Fresh seafood should be used the same day as purchased.
• When storing meats in the fresh food section, keep in the original packaging or rewrap as necessary.
Follow the suggestions below for safe storage:
• Chicken 1-2 Days
• Ground Beef 1-2 Days
• Cold Cuts 3-5 Days
• Steaks/Roasts 3-5 Days
• Smoked/Cured Meats 7-10 Days
• All others 1-2 Days
Normal Operating Sounds You May Hear
• Boiling water, gurgling sounds or slight vibrations that are the result of the refrigerant circulating
through the cooling coils.
• The thermostat control will click when it cycles on and off.
PROPER REFRIGERATOR CARE AND CLEANING
Cleaning and Maintenance
Warning: To avoid electric shock always unplug your refrigerator before cleaning. Ignoring this
Caution: Before using cleaning products, always read and follow manufacturer’s instructions and
General: Prepare a cleaning solution of 3-4 tablespoons of baking soda mixed with warm water.
Door Gaskets
warning may result in death or injury.
warnings to avoid personal injury or product damage.
Use sponge or soft cloth, dampened with the cleaning solution, to wipe down your
refrigerator.
• Rinse with clean warm water and dry with a soft cloth.
Do not use harsh chemicals, abrasives, ammonia, chlorine bleach,concentrated
•
detergents, solvents or metal scouring pads. SOME of these chemicals may
dissolve, damage and/or discolor your refrigerator.
Clean door gaskets every three months according to general instructions. Gaskets
•
must be kept clean and pliable to assure a proper seal.
• Petroleum jelly applied lightly on the hinge side of gaskets will keep the gasket pliable
and assure a good seal.
8
Page 10

English
Power Interruptions
• Occasionally there may be power interruptions due to thunderstorms or other causes. Remove the
power cord from AC outlet when a power outage occurs. When power has been restored, replug
ower cord to AC outlet. If outage is for a prolonged period, inspect and discard spoiled or thawed
p
ood in freezer and refrigerator. Clean refrigerator before reusing.
f
Vacation and Moving Care
• For long vacations or absences, empty food from refrigerator and freezer, move the temperature DIAL
to the OFF position and clean the refrigerator and door gaskets according to "General cleaning"
ection. Prop doors open, so air can circulate inside.When moving always move the refrigerator
s
vertically. Do not move with the unit lying down. Possible damage to the sealed system could occur.
TROUBLE SHOOTING
Refrigerator Does Not Operate
• Check if thermostat control is not in the “OFF” position.
• Check if refrigerator is plugged in.
• Check if there is power at the ac outlet, by checking the circuit breaker.
Food temperature appears too warm
• Frequent door openings.
• Allow time for recently added warm food to reach fresh food or freezer temperature.
• Check gaskets for proper seal.
• Adjust temperature control to colder setting.
Food temperature is too cold
• If temperature control setting is too cold, adjust to a warmer setting and allow several hours for
temperature to adjust.
Refrigerator runs too frequently
• This may be normal to maintain constant temperature during high temperature and humid days.
• Doors may have been opened frequently or for an extended period of time.
• Check gasket for proper seal.
• Check to see if doors are completely closed.
Moisture build up on interior or exterior of the refrigerator
• This is normal during high humidity periods.
• Prolonged or frequent door openings.
• Check door gaskets for proper seal.
Refrigerator has an odor
• Interior needs cleaning.
• Foods improperly wrapped or sealed are giving off odors.
Refrigerator door does not shut properly
• Re-align refrigerator door.
Check for blockages e.g. food containers, crisper cover, shelves, bins etc.
•
9
Page 11

What is covered and for how long?
This warranty covers all defects in
workmanship or materials for a period
of:
12 months labor (Carry In)
12 months parts
5 years sealed system
The warranty commences on the date
the item was purchased and the original purchase receipt must be presented to the authorized service center
before warranty repairs are rendered.
EXCEPTIONS: Commercial or Rental
Use warranty
90 days labor (carry-in only)
90 days parts
No other warranty applies
What is covered.
1. The mechanical and electrical parts,
which serve as a functional, purpose
of this appliance for a
period of 12 months. This includes
all parts except finish, and trim.
2. The components of the sealed
system e.g. hermetic compressor,
condenser and evaporator from
manufacturing defects for a period
of 5 years from the date of
purchase. Any damages to such
components caused by mechanical
abuse or improper handling or
shipping will not be covered.
What will be done?
1. We will repair or replace, at our
discretion any mechanical or
electrical part which proves to be
defective in normal usage during
the warranty period so specified.
English
10
Page 12

Français
INSTRUCTIONS DE SECURITE
IMPORTANTES
Lisez toutes les instructions avant d’utiliser cet appareil. Lorsque vous
utilisez cet appareil, respectez les consignes de securite de base y
compris les suivantes:
Utilisez cet appareil uniquement pour l’usage auquel il est destine
1.
comme indique dans ce manuel d’utilisation et d’entretien
2. Cet appareil doit etre installe proprement et conformement aux instruc-
tions d’installation avant d’etre utilise . Consultez les instructions de
mise a terre dans la section d’installation.
3. Ne debranchez jamais votre congelateur / refrigerateur convertible en
tirant sur le cordon d’alimentation . Saisissez la fiche fermement et tirez
tout droit de la prise murale.
4. Reparez ou remplacez immediatement , toutes les cordes electriques qui
sont devenues frangees ou autrement endommagees .N’utilisez pas un
cable representant des craquelures ou des abrasions a la longueur du
cordon, de la fiche ou de l’extremite du connecteur.
5. Debranchez votre congelateur / refrigerateur avant de le nettoyer ou
avant de le reparer
exige un service de reparation, nous recommandons avec force qu’un
technicien certifie execute le service.
6. N’utilisez aucun dispositif electrique ou aucun instrument aigu pour
degriver votre congelateur / refrigerateur convertible.
7. Si vous n’utilisez plus votre congelateur /refrigerateur convertible, nous
vous recommandons de retirer les portes. Cela reduira les risques d’accident aux enfants.
8. Apres avoir mis en marche votre congelateur / refrigerateur , ne
touchez pas aux surfaces froides specialement si vos mains sont
mouillees ou humides. La peau peut adherer aux surfaces extremement froides.
9. Ne congelez pas de nouveau la nourritue qui a ete degelee complete-
ment . Le service des Etats Unis d’Agriculture dans le bulletin de
Maison et Jardin N0 69 lisent “……Vous pouvez sans risque congeler
de nouveau la nourriture degelee si elle contient des cristaux de glace
ou si la temperature est restee froide au dessous de 40degres F
“La viande hachee, le volaille,ou le poisson degeles, qui ont n’importe
quelle odeur ou couleur ne doivent pas etre congeles de nouveau ou
manges. La glace degelee doit etre jetee . Si l’odeur ou la couleur de
1
. Note: Si pour n’importe quelle raison cet appareil
.
Page 13

Français
n’importe quelle nourriture est incertaine, jetez la. Il peut etre dan
geureux de manger cette nourriture.
“Meme une decongelation partiale et recongelation peuvent reduire la
qualitee de la nourriture, particulierement, les fuits, les vegetables et
les plats prepares en avance. La qualitee de la viande rouge est
moins affectee que celle que d’autres nourritures. Utilisez la nourriture
qui a ete recongelee au plus tot possible pour garder sa qualite.
10. Ce refrigerateur ne doit pas etre encastre ou incorpore dans un
placard enclos . Il est concu pour une installation sans encastrement.
11. N’operez pas votre unite en presence des fumees explosives.
VEUILLEZ CONSERVER CES
INSTRUCTIONS
DANGER
Risque d'occlusion d'enfant. Avant que vous
jetiez votre vieux réfrigérateur ou
congélateur, enlevez les portes. Laissez les
étagères en place de sorte que les enfants
ne puissent pas facilement s'élever à
l'intérieur.
Nous vous remercions d’avoir
choisi ce produit Haier. Ce guide
d’utilisation facile d’emploi permet
une utilisation optimum du
réfrigérateur.
Ne pas oublier de prendre note du
numéro de modèle et de série. Ils
sont inscrits sur une plaquette
apposée sur l’arrière du
réfrigérateur.
Agrafer le ticket de caisse au guide.
Il devra être présenté pour tout service après-vente sous garantie.
Numéro de modèle
Numéro de série
Date d’achat
2
Page 14

Français
TABLE DES MATIERES
Instructions de Securitre Importantes ............................................................................1-2
PAGE
Parties et Caracteristiques
Installation
Deballage ............................................................................................................................5
Leveling Your Refrigerator ......................................................................................................5
irculation d’air ....................................................................................................................5
C
nstallation electrique ............................................................................................................5
I
Restrictions a l’installation ......................................................................................................5
Utilisation des rallonges ........................................................................................................5
Alignement de la porte ..........................................................................................................5
Reversez les gonds de la porte................................................................................................6
Caracterisiques et utilisation ..............................................................................................7
Caracteristiques generales......................................................................................................7
Les etageres interieures du refrigerateur..................................................................................7
using the Dispense-A-Can ......................................................................................................7
Using the Lock ......................................................................................................................8
Degrivage de votre refrigerateur ............................................................................................8
Information pour l’emmagasinsge de la nourriture ..................................................................9
Les sons normaux du fonctionnement que vous entendez ........................................................9
Proper soin et nettoyage du refrigerateur ........................................................................10
Nettoyage et soin ................................................................................................................10
Panne de courant electrique ................................................................................................10
Entretien lors des vancaces ou demenagement......................................................................10
Depannage ........................................................................................................................11
Garantie Limitee
..........................................................................................................................5
.............................................................................................................. 12
..................................................................................................4
3
Page 15

PARTIES ET CARACTERISTIQUES
2
1
3
4
5
6
Français
8
9
1. Compartiment De Congélateur
2. Plateau De Cube En Glace
3.Plateau D'Égouttement
4. Commande De T
5. Glissez-Dehors Les Étagères
6. Barre D'Arrêtoir
empérature Réglable
7
10
Jambe de mise à niveau avant réglable (non
7.
montrée)
8."Stockage De Distributeur-Un-CanTM
9. Étagère Fixe De Porte
10. Fermez à clef Avec La Clef
4
Page 16

rançais
F
INSTALLATION
Deballage
. Retirez tous les materiaux d’emballage. Ceci inclus le socle en mousse et tout le ruban adhesif qui
1
retient les accessoires a l’interieur et exterieur.
2. Inspectez et retirez le reste de l’emballage, le ruban adhesif et la documentation avant de mettre en
arche votre refrigerateur.
m
Mise à niveau De Votre Réfrigérateur
Votre réfrigérateur a deux jambes de mise à niveau qui sont plac dans les coins avant de votre
•
réfrigérateur. Après avoir correctement placé votre réfrigérateur dans sa position finale, vous pouvez
iveler votre réfrigérateur.
n
• La mise à niveau des jambes peut être ajustée en les tournant dans le sens des aiguilles d'une montre
pour soulever votre réfrigérateur ou en les tournant dans le sens contraire des aiguilles d'une montre
pour abaisser votre réfrigérateur. La porte de réfrigérateur clôturera plus facile quand les jambes de
mise à niveau sont prolongées.
Circulation d’Air
• Pour vous assurez que votre refrigerateur fonctionne a plein rendement , installez le dans un endroit
ou la circulation d’air est propre et ou il existe des prises electriques et pour la connection et la
plomberie.
• Les alentours suivants sont recommendes autour du refrigerateur
Cotes 3/4" (19mm)
Au Dessue 2" (50mm)
Derriere 2" (50mm)
Installation Electrique
• Assurez vous qu’il existe une prise electrique adequate ( 115 volts, 15amps) avec une mise a la
masse appropriee pour brancher l’unite
• N’utilisez pas des adapteurs a 3 broches et ne coupez pas la troisime broche afin d’accomoder
une prise murale de 2 broches . Ceci est une pratique dangereuse car elle n’offre pas une mise a
terre effective pour l’unite et ceci peut resulter d’un choc electrique.
Restrictions a l’installation
• N’installez pas ce refrigerateur dans un endroit qui n’est pas isole ou chauffe proprement comme
par example, le garage etc.. Votre unite n’est pas concu pour operer dans une temperature
inferieure a 55degres F.
• Choisissez un endroit approprie sur une surface ferme et plane loin des rayons de soleil ou des
sources de chaleurs comme les radiateurs, les radiateurs de plinthes, les appareils de cuisines,
etc…. Si le sol est inegal, il doit etre repare.
Utilisation des rallonges
• Evitez l’usage d’une rallonge car dans certains cas, cela peut entrainer des risques de sante. Si c’est
necessaire d’utiliser une rallonge, utilisez une a 3 conducteurs disposant d’une fiche
male a 3 broches avec mise a la masse et branchez la sur une prise susceptible
d’accepter la fiche. Le calibre de la rallonge doit etre egal ou superieur a celui de
l’equipement.
Alignement de la porte. ( voir figure 1)
1. Enlevez le vis du couvert du gond
2. Enlevez le couvert du gond superieur
3. Desserez le vis du gond superieur a l’aide d’un tounevis Phillips
4. Ajustez la porte ou mettez une entretoise dans l’intervalle puis
serrez les vis.
5. Replacez le couvert du gond superieur.
5
ig. # 1
F
Page 17

Reversez les gonds de la porte
1. Enlevez le vis du couvert du gond superieur puis enlevez le couvert.
. En utilisant un tournevis Phillips, desserez et enlevez les vis qui retiennent le gond superieur en
2
place.
. Enlevez le gond superieur et retirez la porte soigneusement.
3
. Enlevez soigneusement le trou des vis superieur de la prise du cote oppose et inserrez la prise
4
dans l’ouverture du trou des vis juste enleves.
. Enlevez la goupille de la porte de l’equerre du gond inferieur en la tournant dans le sens des
5
aiguilles d’une montre. Deplacez la goupille au trou oppose et serrez la.
6. Desserez les vis retenant le gond inferieur de l’equerre et deplacez le gond. Enlevez les 2 vis du
ote sans gond.
c
7. Alignez les trous dans le gond inferieur de l’equerre correspondant aux trous du cote oppose du
placard. Inserrez et serrez les vis. Inserrez les 2 vis restant dans les trous du cote oppose de la
place du gong.
8. Alignez le trou inferieur sur le cote gauche de la porte avec la goupille du gond inferieure and glis
sez le en place.
Français
9. Alignez la goupille du gond superieur avec le trou superieur du cote gauche de la porte et mettez le
en place. Replacez les vis dans le gond superieur , ne serrez pas totalement.
10. Assurez vous que la porte se ferme facilement et forme une etancheite ferme.Ajustez la porte
comme necessaire. (Voir la section de l’alignement de la porte ) Une fois satisfait avec l’alignement
de la porte, serrez completement les vis du gond superieur.
11. Replacez le couvert du gond, inserrez les vis et serrez completement.
12. Si la porte ne se ferme pas correctement, référez-vous à la section intitulée "alignement de porte."
goupille de
porte
abaissez la parenthèse de
charnière
6
Page 18

Français
CARACTERISTIQUES ET UTILISATION
Caracteristiques Generales
Ajustez le cadre de Temperature:
Votre refrigerateur maintiendra automatiquement la temperature que vous avec choisie. Le cadre de
emperature a 7 niveaux plus la fermeture OFF. 1 est le plus chaud, 7 est le plus froid. Quand le cadre
t
est sur le OFF , les sections de refrigerateur et congelateur arretent de refroidir. Au debut reglez le cadre
sur le No 4 , attendez 24 heures puis ajustez votre temperature a votre choix.
Note: Si le refrigerateur a ete place dans une position horizontale ou a ete incline pour une periode de
(
temps, attendez 24 heures avant de le brancher. )
Les etageres interieures du refrigerateur
Pour enlever ou replacer une étagère glissante au dehors:( voir fig#4)
1. Gentiment inclinez l’etagere vers le haut et glissez la totalement
vers le dehors.
2. Pour replacez l’etagere, glissez la soigneusement vers l’interieur.
3. Votre refrigerateur a une etagerere interieure de chiquenaude,
simplement soulevez le cote de chiquenaude pour utiliser.
Employer la Distribution-Un-Can™
• Votre réfrigérateur peut être équipé du commode "Distribuent-Un-Can™" le com-
partiment. Chaque compartiment supportera dans quatre bidons. Chargez simplement les bidons du dessus. Pour distribuer le bidon de a, tirez simplement un
dehors du fond. C'est que facile (voir fig# 5).
Fig. # 4
Fig. # 5
7
Page 19

Français
Utilisation de la Serrure
• Votre réfrigérateur peut être équipé d'une serrure et d'une
clef (situées au centre inférieur de la porte) pour la sécurité
acultative, si vous choisissez. Fermez simplement la porte
f
de réfrigérateur, insérez la clef et tournez. Pour ouvrir,
insérer la clef et le tour dans la direction opposée
voir fig# 6).
(
Degrivage de votre refrigerateur
• Pour “efficacite energetique maximum, degrivez votre con-
gelateur chaque fois que le gel s’accumule a une epaisseur
de” ou plus dans le congelateur.. Notez que le gel tend a
s’accumuler plus pendant les mois d’ete.
• Pour degrivez le congelateur, enlevez toute la nourriture et
les plateaux de glace du congelateur. Placez le plateau d’egout sous la section du congelateur et tournez le cadre de temperature sur le
OFF . Degrivage peut durer quelques
heures. Pour accelerer le temps de degrivage, gardez la porte
ouverte et placez un bol d’eau chaude dans le refrigerateur.
Fig. # 6
lock and key
Fig. # 7
drip tray
• Pendant le cycle de degrivage , de l’eau s’accumulera dans le plateau d’egout . Ce dernier doit etre
vide pendant le proces. Ne le laissez pas sans su veillance. (Voir figure #7 )
• Apres le degrivage, videz et essuyez le plateau d’egout et l’interieur du refrigerateur. A ce moment
vous pouvez regler de nouveau votre refrigerateur a la temperature desiree, et remettre la nourriture
dedans
8
Page 20

Français
INFORMATION POUR L’EMMAGASINAGE DE LA
NOURRITURE
ourriture fraiche:
N
• Quand vous emmagasiner de la nourriture fraiche, qui n’est pas preemballee, assurez vous de l’em
aller correctement ou de la mettre dans des recipients hermetiques et etanche a l’humidite a moins
b
u’indique autrement. Ceci assurera une duree de conservation appropriee et empechera le
q
transfert des odeurs et gouts.
Essuyez les recipients avant de les emmagasiner pour eviter des flaques inutiles.
•
Les oeufs doivent etre emmagasines dans une position verticale dans leur carton original pour
•
maximiser la duree de conservation.
• Les fruits doivent etre laves et seches puis emmagasines dans des sacs en plastique scelles.
• Legumes a peaux doivent etre emmagasines dans des sacs en plastiques ou des recipients.
• Legumes feuillus doivent etre laves et vidanges, puis emmagasines dans des sacs en plastique ou
des recipients.
• Permettez a la nourriture chaude de refroidir avant de l’entreposer dans le refrigerateur. Ceci evitera
une utilisation inutile d’energie.
• Poissons et fruits de mer frais doivent etre cuisines le meme jour d’achat.
• Quand vous emmagasiner de la viande dans la section de la nourriture fraiche, gardez les dans leur
emballage original ou emballez si necessaire. Suivez les suggestions ci-dessous pour un
emmagasinage plus sur.
• Volaille 1-2 Jours
• Viande Hachee 1-2 Jours
• Viande Froide 3-5 Jours
• Biftecks/Rôtis 3-5 Jours
• Viande Fumee 7-10 Jours
• Autres 1-2 Jours
Les sons normaux du fonctionnement que vous entendez
• Les bruits d’eau bouillante et du gargouillement ou des vibrations legeres sont le resultat de la
refrigeration circulant a travers les tubes refroidissants.
• Le thermostat cliquetera quand il cycle sur le OFF et ON.
9
Page 21

Français
PROPRE SOIN ET NETTOYAGE DU REFRIGERATEUR
Nettoyage et Soin
vertissement: Debranchez votre refrigerateur avant de le nettoyer afin d’eviter des chocs
A
elec triques . En ignorant cet avertissement , un deces ou une blessure grave
ourront resulter.
p
Prudence: Avant d’utiliser de produits de nettoyage , lisez et suivez les instructions et
vertissements du fabricant afin d’eviter des dommages personnelles et des
a
dommages au produit.
General: Preparez une solution de nettoyage de 3-4 cuilleres de bicarbonate de soude
mélange avec de l’eau tiede. Utilisez une eponge ou un tissu doux , trempe
dans la solution de nettoyage pour nettoyer votre refrigerateur.
• Rinsez a l’aide d’eau tiede et sechez a l’aide d’un tissu doux
• N’utilisez pas des produits chimiques rauques, abrasives, l’ammoniaque, le
javel, les detergents concentres, les dissolvants, les tampons a recurer. Un
par tie de ces produits peut dissolver , endommager et /ou decolorer votre
refrigerateur.
Les joints de la porte • Nettoyez les joints de la porte chaque 3 mois selon les instructions generales.
Les joints doivent etre propres et pliables pour assure rune fermeture scellante.
• Une application legere de gelee de petrole sur les gonds des joints gardera les
j oints pliables et assurera une bonne fermeture.
Panne du Courant Electrique
• Occasionellement on peut avoir des pannes du courant electrique dues aux orages ou autres causes.
Debranchez la corde d’alimentation de la prise AC quand une panne occure. Quand le courant est
remis en marche , branchez votre refrigerateur de nouveau. Si la panne est allongee pour une longue
periode de temps, inspectez la nourriture du refrigerateur et congelateur et disposez de celle qui es
gatee. Nettoyez votre refrigerateur avant de l’utiliser de nouveau.
Entretiens Lors des Vacances et Demenagement
• Durant les longues vancances ou absences, videz votre refrigerateur et congelateur de toute nourriture, tournez le cadre de temperature au OFF , nettoyez votre refrigerateur et les joints de la porte
selon “ Le nettoyage general”. Gardez les portes ouvertes, pour que l’air puisse circuler au dedans.
Quand vous demenagez , soutenez toujours le refrigerateur dans le sens vertical. Ne le deplacez pas
dans le sens horizontal. Ceci peut endommager le systeme scelle.
10
Page 22

Français
DEPANNAGE
e refrigerateur ne fonctionne pas
L
• Assurez vous que le thermostat n’est pas sur la position OFF.
Assurez vous que le refrigerateur est branche.
•
• Assurez vous que le courant est en marche en inspectant le disjoncteur.
a temperature de la nourriture est tiede
L
•
Les portes sont ouvertes tres souvent
• Accordez le temps necessaire a la nourriture tiede pour se refroidir
Assurez vous de la fermeture scellee des joints de la porte
•
• Ajustez la temperature a un montage plus froid
La temperature de la nourriture est trop froide
Si le montage de la temperature est trop froid, ajuster a une temperature plus tiede et attendez
•
quelques heures pour que la temperature s’ajuste.
Le refrigerateur fonctionne excessivement
• Ceci peut etre normal pour maintenir constemment une temperature ambiante pendant la haute
temperature et les jours humides.
• Les portes sont ouvertes frequemment ou pour une longue periode de temps
• Assurez vous que les joints sont proprement scelles.
• Assurez vous que les portes sont completement fermees
Humidite s’accumule a l’interieur ou exterieur du refrigerateur
• Ceci est normal pendant les periodes d’humidite haute
• Les portes sont ouvertes frequemment ou pur une longue periode de temps.
• Assurez vous que les joints de la porte sont scelles proprement.
Refrigerateur a une mauvaise odeur
L’interieur doit etre nettoye
•
• La nourriture emballee ou scellee improprement donne une mauvaise odeur.
La porte du refrigerateur ne se ferme pas proprement
Alignez de nouveau la porte du refrigerateur.
•
• Assurez vous qu’il n’y a pas des obstructions , comme les recipients, le couvercle du tirroir a
legume, les etageres, les huches etc…
11
Page 23

GARANTIE LIMITEE
ue recouvre cette garantie et pour
Q
ombien de temps?
c
ette garantie couvre tous les defauts de fabrica-
C
tion de materiaux pour une periode de:
12 mois pour la main d’oeuvre
12 mois pour les parties (Parties fonctinelles
eulement )
s
ans pour le systeme scelle.
5
Cette garantie commence le jour de la date
’achat . Le client doit fournir a Haier la preuve
d
de la date d’achat , de la marque , du modele et
du numero de serie pour
verification avant d’effectuer n’importe quel service de reparation.
Exceptions: Garantie pour une utilisation
commerciale ou en cas de location
90 jours pour la main d’oeuvre
90 jours pour les parties
Aucune autre garantie ne s’applique
Qu’est-ce qui couvert/ et qu’est-ce pas.?
1. Les parties mecaniques et electriques qui
atteignent l’objectif fonctionel de cet appareil
sont garanties pour 12 mois. Cela inclus toutes
les parties sauf la finition et l’habillage.
2. Les defauts de fabrication aux composants du
systeme scelle ( par exemple le compresseur
hermetique, le condenseur et l’evaporateur
sont garantis pour une duree de 5 ans de la
date d’achat. N’importe quel dommage aux
composants causes par un mauvais traitement
,par une utilisation excessive ou par le transport de l’equipement ne seront pas couverts.
3. Cette garantie ne couvre aucun degre de solv-
abilite ou remboursement pour aucune perte
ou dommage provoques par le produit ou les
defauts au produit incluant mais non limite aux
dommages incidentals ou consecutifs
Quelles mesures seront prises?
1. Nous reparerons ou remplaceront les parties
electriques ou mecaniques deffectueuses
durant l’usage normale pendant la periode
specifiee de la garantie .
Le service de A&E est le fournisseur de service
authorise pour Haier Si c’est determine qu’une
reparation est inappropriee ou le remplacement d’une partie n
echangera le produit avec un produit refourbi
ou un nouveau produit valable ou similaire a
l’original .
2. Il n’y aura aucune charge pour l’acheteur pour
les remplacements des parties fonctionelles ou
les mains-d’oeuvre durant l’initial 12 mois de
’est pas valuable, Haier
Français
a garantie. Au dela de cette periode, seule-
l
ment les composants du systeme scelle sont
sous garantie. La main d’oeuvre est au frais du
client
3. Pour faire entretenir votre produit, veuillez contacter le service a la clientele, Haier
1-877-377-3639
CETTE GARANITE COUVRE LES APPAREILS
SUR LE CONTINENT DES ETATS UNIS, PUERTO RICO ET CANADA. ELLE NE COUVRE PAS
LES SUIVANTS:|
Les dommages dus a mauvaise installation
Les dommages survenus pendant transport
Les defauts autres que du fabricant
Les dommages dus a une utilisation
excessive, a un abus, a une alteration
impropre,manque de soin et d’entretien ou a une
tension ou voltage incorrects
Les dommages d’une utilisation autre que domestique
Les dommages dus a une reparation effectuee
par un service autre que le le
service autorise ou centre de service.
Remplacement des ampoules et l’habillage Le
transport et l’expedition
La main d’oeuvre ( après les 12 mois initiaux) Un
credit ou remboursement pour des
produits plus de 30 jours après la date
d’achat.Une perte ou corrompre de nourriture
comme resultat direct de l’echec mecanique du
produit , ou retardement en fournissant un service, une reparation our emplacement. Cette
garantie limitee ne s’applique pas aux produits
renoves ou des produits achetes comme nouveaux
ou d’une personne.
CETTE GARANTIE LIMITEE EST DONNEE EN LIEU
D’AUTRES GARANTIES, EXPRIMEE OU INCLUANT
LES GARANTIES DE LA VALEUR MARCHANDE OU
D’APTITUDE DANS UN BUT PARTICULIER
Les reparations fournies dans la presente garantie
sont exclusives et remplacent toutes autres reparations.
Cette garantie ne couvre pas les dommages indirects ou secondaires. Dans ce cas, les limitations
ci-dessus peuvent ne pas etre applicables.
Certains etats n
la duree d’une garantie implicite. Dans ce cas, les
limitations ci-dessus peuvent ne pas etre applicables.
Cette garantie vous reconnait certain droits
juridiques, et il se peut que vous avez d’autres
droits, qui varient d’un etat a l’autre.
Haier America
New Y
’autorisent pas les limitations sur
ork, NY 10018
12
Page 24

Español
INSTRUCCIONES
PRECAUTORIAS
Lea todas las instrucciones antes de utilizar este aparato. Cuando
utilice este aparato, siempre ejerza las precauciones de seguridad
básicas, incluyendo las siguientes:
1) Utilice este aparato exclusivamente para su uso especificado, según se
describe en esta guía de uso y cuidados.
2) Este refrigerador debe ser instalado adecuadamente siguiendo las
instrucciones de instalación antes de utilizarse. Observe las instrucciones para conectarlo a tierra en la sección de instalación.
3) Nunca desconecte su refrigerador tirando del cordón eléctrico. Sujete
siempre la clavija firmemente y retírela del contacto evitando torcerla.
4) Repare o reemplace inmediatamente cualquier cordón eléctrico que
muestre raspaduras o daños. No utilice ningún cordón que muestre
señales de abrasión o grietas en su extensión, clavija o terminal
de conexión.
5) Desconecte su congelador antes de limpiarlo o antes de hacer
cualquier reparación. Nota: Si por alguna razón este producto necesita
ser reparado, recomendamos fuertemente que la reparación se lleve a
cabo por un técnico calificado.
No emplee ningún aparato eléctrico o instrumento punzocortante para
6)
descongelar su refrigerador.
7) Si su antiguo refrigerador no está siendo utilizado, recomendamos
quitarle las puertas. Esto reducirá los riesgos de accidentes infantiles.
8) Una vez que su refrigerador se encuentre operando, no toque las
superficies frías en el compartimento del congelador, especialmente
si sus manos se encuentran húmedas o mojadas. Su piel puede
adherirse a estas superficies extremadamente frías.
9) No congele alimentos que hayan sido previamente descongelados en
su totalidad. El Departamento de Agricultura de los Estados Unidos, en
su Boletín de Casa y Jardín No. 69 indica que: "…Usted puede volver a
congelar
hayan sido descongelados y que aún contengan cristales de hielo o
que aún se encuentren fríos con una temperatura por
debajo de los 4,5°C (40°F)".
1
, sin correr ningún riesgo, aquellos alimentos congelados que
Page 25

Español
"…Carnes molidas, aves, o pescados descongelados que despidan olor
extraño o muestren decoloración no deben volver a congelarse y no
deben consumirse. El helado descongelado debe desecharse. Si el olor o
color de cierto alimento es deficiente o cuestionable, deséchelo. Tal alimento podría resultar peligroso si lo ingiriese."
"…Incluso el descongelar parcialmente y volver a congelar los alimentos
disminuye su calidad de consumo, especialmente si se trata de frutas, verduras y alimentos preparados. La calidad de consumo de las carnes rojas
es menormente afectada en comparación a la de muchos otros alimentos.
Utilice los alimentos que hayan vuelto a congelarse lo más pronto posible
para evitar que sufran mayor deterioro en su
calidad de consumo."
Este refrigerador no debe de ser empotrado o colocado dentro
10)
de un gabinete de cocina. Ha sido diseñado exclusivamente
para ser instalado por separado.
No opere su congelador en la presencia de gases explosivos.
11)
POR FAVOR GUARDE ESTAS
INSTRUCCIONES para referencia
futura.
PELIGRO
Existe el riesgo de que los niños puedan quedar atrapados
dentro. Antes de tirar su refrigerador o congelador, quite las puer-
tas. Deje los anaqueles en su lugar para que los niños no puedan
entrar fácilmente en el interior."
Gracias por utilizar nuestro
producto Haier. Este sencillo
manual le orientará con respecto al
mejor uso que puede darle a
su refrigerador.
Recuerde tomar nota del modelo y
número de serie. Ambos se
encuentran impresos en una
etiqueta en la parte posterior del
refrigerador.
Agrafer le ticket de caisse au guide. Il devra être présenté pour tout service
-vente sous garantie.
après
Número de Modelo
Número de Serie
Fecha de Compra
2
Page 26

Español
INDICE
Instrucciones Precautorias ..........................................................................................................1
Partes y Funciones........................................................................................................................4
Instalando de su Refrigerador ......................................................................................................5
Desempaque ..................................................................................................................................5
Nivelación de su Refrigerador .
Circulación de Aire Adecuada ..........................................................................................................5
Requerimientos Eléctricos. ................................................................................................................5
Limitaciones de Instalación ..............................................................................................................5
Uso de Alargues ..............................................................................................................................5
Alineación de la Puerta ....................................................................................................................5
Revirtiendo el Eje de la Puerta ..........................................................................................................6
Caracteristicas y Uso del Refrigerador ........................................................................................7
Caracteristicas Generales ................................................................................................................7
Estantes Interiores del Refrigerador ..................................................................................................7
Usar el Dispensar-Uno-Can
Usar la Cerradura ..........................................................................................................................8
Descongelando el refrigerador ........................................................................................................8
Información sobre Alimentos ............................................................................................................9
Ruidos de Operación Normales........................................................................................................9
.........................................................................................................5
TM
..........................................................................................................7
PAGINA
Cuidados y Mantenimiento Apropiado del Refrigerador de Bibidas..........................................10
Limpieza y Mantenimiento..............................................................................................................10
Interrupciones de Energía ..............................................................................................................10
Vacaciones y Cuidados en el Traslado de la Unidad........................................................................10
Problemas Generales ..................................................................................................................11
Información de la Garantía..........................................................................................................12
3
Page 27

PARTES Y FUNCIONES
2
1
3
4
5
6
Español
8
9
1. Compartimiento Del Congelador
2. Bandeja Del Cubo Del Hielo
3. Bandeja Del Goteo
4. Control De la T
5. Resbale -Hacia fuera L
emperatura Ajustable
os Estantes
7
10
6. Barra Del Detenedor
Pierna de nivelación delantera ajustable (no
7.
demostrada)
8. "Almacenaje Del Dispensador-Uno-CanTM
9. Estante Fijo De la Puerta
10. Trábese Con Llave
4
Page 28

Español
INSTALANDO SU REFRIGERADOR
Desempaque
. Retire todos los elementos del packaging. Esto incluye la base de telgopor y todas las cintas
1
dhesivas que sostienen los accesorios dentro y fuera del refrigerador.
a
2. Inspeccione y asegúrese de retirar todos los materiales del embalaje como cintas o materiales impresos antes de poner en funcionamiento la unidad.
Nivelación De Su Refrigerador
• Su refrigerador tiene dos piernas de nivelación que estén situadas en las esquinas delanteras de su
efrigerador. Después correctamente de colocar su refrigerador en su posición final, usted puede nive-
r
lar su refrigerator.
• La nivelación de las piernas puede ser ajustada dándoles vuelta a la derecha para levantar su refrig-
erador o dándoles vuelta a la izquierda para bajar su refrigerador. La puerta del refrigerador cerrará
más fácil cuando las piernas de nivelación son extendidas.
Circulación de Aire Adecuada
• Para asegurarse que su refrigerador trabaje al máximo de eficiencia para el que fue diseñado usted
debe instalarlo en un lugar donde exista una circulación de aire suficiente e instalaciones eléctricas
adecuadas.
• Los siguientes son los espacios recomendados alrededor del refrigerador:
Laterales..............................4" (102mm)
Parte superior ......................4" (102mm)
Parte trasera........................4" (102mm)
Requerimientos Eléctricos
• Asegúrese de que haya una toma de corriente adecuada (115 vol., 15 amp) con la conexión a tierra
adecuada.
• Evite el uso de adaptadores de tres patas. Nunca corte el tercer cable o la pata del enchufe de modo
de poder insertar el enchufe en una toma de dos patas. Esta práctica puede ser peligrosa y resultar
en shock eléctrico.
Limitaciones de Instalación
• No instale su refrigerador en un lugar sin el espacio suficiente o en lugares de calor como por
ejemplo un garaje, etc. Su refrigerador no fue diseñado para operar temperaturas menores a 55° F.
• Seleccione una superficie plana y resistente para colocar el refrigerador. Asegúrese de estar lejos de
la luz directa del sol y de radiadores u otros artefactos eléctricos que irradien calor. Cualquier desnivel del suelo debe ser corregido.
Uso de Alargues
• Evite el uso de alargues para evitar riesgos bajo ciertas condiciones. En caso de ser necesario
utilizar un alargue, use solo uno de tres cables que posee enchufe y recepción para
enchufes de 3 patas.
Alineación de la Puerta (ver figura #1)
1. Retire el cobertor superior
2. Afloje los tornillos de la bisagra utilizando un destornillador
phillips.
3. Ajuste la puerta o coloque un espaciador entre medio y luego
ajuste los tornillos.
4. Coloque en su lugar el cobertor de la bisagra.
5. Substituya la cubierta superior de la bisagra.
5
Fig. # 1
Page 29

Español
Revirtiendo el Eje de la Puerta
1. Retire el cobertor del eje superior de la puerta.
. Utilizando un destornillador Phillips afloje y retire los tornillos que sujetan el eje superior
2
3. Retire el eje superior y cuidadosamente levante la puerta
. Cuidadosamente retire los tapones de los orificios al otro lado e insertelos del lado donde usted
4
caba de retirar el eje.
a
5. Retire el pestillo del soporte en el eje inferior girando en dirección contraria a las agujas del reloj.
oloque el pestillo en el orificio opuesto y ajuste.
C
floje los tornillos que sujetan el eje inferior y retire el mismo. Retir e los 2 tornillos del lado
6. A
opuesto.
. Alinee los orificios del soporte del eje inferior a los orificios correspondientes del lado opuesto del
7
gabinete. Inserte y ajuste los tornillos. Insete los 2 tornillos restantes del otro lado del gabinete.
8. Alinee el orificio inferior en el lado izquierdo de la puerta con el pestillo del eje y deslice al interior.
9. Alinee el eje superior con el lado superior de la puerta y coloque el pestillo. Coloque los tornillos
sin ajustarlos por completo.
10. Asegúrese de que la puerta cierre facilmente y que selle correctamente. Ajuste como sea
necesario. (ver sección de alineación de la puerta) Una vez que esté satiusfecho con la alineación
ajuste por completo los tornillos.
11.Coloque el cobertor nuevamente, ajuste los tornillos.
12. Si la puerta no se cierra correctamente, refiera a la sección titulada "alineación de la puerta."
perno de
la puerta
fig. # 2
baje el soporte de bisagra
fig. # 3
6
Page 30

Español
CARACTERISTICAS Y USO DEL REFRIGERADOR
Características Generales
Control de Temperatura:
• Una vez que la unidad está en el lugar adecuado enchufe a una toma de 115 v y 15 amp. Encienda
ON. La luz verde indicará que la unidad está funcionando.
Seleccione entre Freezer o refrigerador.
•
• Seleccione la temperatura. 1 es la es la opción más cálida, 4 es la opción más fría. Inicialmente
seleccione la posición 2. Coloque los alimentos en el interior. Luego de pasadas 24 horas alija el
ivel de temperatura deseado
n
En caso de apagar la unidad o de haber un corte de energía siempre espere unos 5 minutos antes
•
de volver a encender.
(Nota: Si el refrigerador ha estado en posición horizontal o inclinado por cualquier período de
tiempo espere 24 horas antes de enchufar la unidad)
Estantes Interiores del Refrigerador
Para retirar o ajustar los estantes deslizables (ver figura 4)
1. Gentilmente agarre el estante, levantelo y deslice el
mismo hasta retirarlo completamente.
2. Para colocar nuevamente, seleccione el nievel deseado y
gentilemente deslice hacia adentro.
Usar el Dispensar-Uno-Can™
• Su refrigerador se puede equipar del conveniente "Dispensa -Uno-Can™" el com-
partimiento. Cada compartimiento soportará a cuatro latas. Cargue simplemente
las latas de la tapa. Para dispensar la lata de a, dibuje simplemente uno hacia
fuera del fondo. Es que fácil (ver figura 5)
Fig. # 4
Fig. # 5
7
Page 31

Español
Usar la cerradura
• Su refrigerador se puede equipar de una cerradura y de
una llave (situadas en el centro inferior de la puerta) para
a seguridad opcional, si usted elige. Cierre simplemente
l
la puerta del refrigerador, inserte la llave y dé vuelta.
Para abrir, insertar la llave y la vuelta en la dirección
puesta (ver figura 6).
o
Descongelando el Refrigerador
• Para mayor eficiencia descongele el freezer cuando el
hielo acumulado en las paredes del compartimiento sea de
un espesor de 1/4” o mayor. Note que el hielo tiende a
formarse con mayor frecuencia en los meses de verano.
• Para descongelar el freezer retire todos los alimentos y las
cubeteras del interior. Asegúrese de que la bandeja de
goteo convertible esté en el lugar correspon diente y gire el
control de temperatura a off. El descongela do puede tomar unas horas. Para
acelerar el proceso man tenga la puerta
abierta y coloque un recipiente con agua tibia dentro del efrigerador.
• Durante el ciclo de descongelado se acumulará agua en la bandeja de
goteo. Puede que sea necesario vaciar el agua de la bandeja durante el
descongelado. No deje desatendido el proceso. (ver figura 7)
Fig. # 6
lock and key
Fig. # 7
drip tray
• Luego del descongelado vacíe y limpie la bandeja de goteo como también el interior del refrigerador.
Ahora puede programar el nivel de temperatura deseado nuevamente.
8
Page 32

Español
INFORMACIÓN SOBRE ALIMENTOS
Alimentos Frescos:
Cuando guarde alimentos frescos asegúrese de envolver los mismos con un film adherente u otro
•
material a prueba de humedad, a menos que se indique de otra manera. Esto garantizará la calidad
y vida de los alimentos y previene la transferencia de olores y sabores.
Limpie cualquier recipiente antes de almacenar en el refrigerador para evitar derrames.
•
• Los huevos deben almacenarse en los cartones originales de modo de economizar espacio.
• Las frutas deben lavarse y secarse, luego guardadas en los compartimientos o cajones con baja
umedad. Si usted no posee control de humedad coloque primero estos alimentos en bolsitas plás
h
ticas y luego guarde en el refrigerador.
• Los vegetales con piel deben guardarse en bolsas o recipientes.
• Otros vegetales deben lavarse y secarse antes de guardarse en bolsas o recipientes dentro del
freezer.
• Los alimentos o comidas calientes deben dejarse enfriar a temperatura ambiente antes de guardar
dentro del refrigerador. Evita el uso de energía innecesario.
• Pescados y carnes similares deben utilizarse el mismo día en que se compró.
• Cuando guarde carnes déjelas en el envase original o envuélvalas nuevamente si es necesario. Siga
las sugerencias siguientes para un almacenamiento seguro:
• Pollo ........................................1-2 Días
• Carnes rojas ............................1-2 Días
• Cortes fríos ..............................3-5 Días
• Bifes / asados ..........................3-5 Días
• Carnes ahumadas ................7-10 Días
• Otros ......................................1-2 Días
Sonidos de la Operación Normal
• Burbujeo, sonido de agua hirviendo, o pequeñas vibraciones que son el resultado de la circulación
del líquido refrigerante.
• El termostato hara un “click” cuando se encienda y apague.
9
Page 33

Español
CUIDADO Y MANTENIMIENTO APROPIADO DE
REFRIGERADOR DE BIBIDAS
Limpieza y Mantenimiento
Cuidado: • Para evitar riesgos de un shock eléctrico desenchufe siempre la unidad
antes de limpiar. No ignore nunca esta advertencia.
Precaución: • Antes de utilizar productos de limpieza siempre lea y siga las instruc
ciones dadas por le fabricante para evitar lesiones y daños a la unidad.
eneral:
G
Juntas de la Puerta: • Limpie las juntas cada tres meses mínimo de acuerdo a las instruc
Prepare una solución de 3 o 4 cucharadas de bicarbonato de sosa
•
mezclado con agua tibia. Utilice una esponja o paño suave humedeci
da con la solución anterior para repasar el refrigerador.
• Lave com agua tibia y limpia y seque con un paño suave.
• No utilice químicos, abrasivos, amoníaco, cloro, detergentes concen
trados, solventes o esponjas de metal. Algunos de estos materiales
pueden dañar, corromper o decolorar se unidad.
ciones generales de limpieza. Las juntas deben mantenerse limpias
para permitir un correcto sellado de la puerta mientras esté cerrada.
• Puede pasarse en la junta un poco de vaselina para mantener las jun
tas flexibles y asegurar el sellado completo.
Interrupciones de Energía
• Ocasionalmente pueden ocurrir cortes de energía debido a tormentas u otras causas. Desenchufe
cuando esto ocurra. Cuando la corriente se reestablezca enchufe el cable nuevamente. Si el corte de
corriente fuese por un período de tiempo prolongado inspeccione y descarte los alimentos que se
hayan descongelado en el freezer o refrigerador. Limpie por dentro del refrigerador antes de volver a
enchufar.
Vacaciones y Cuidados en el Traslado de la Unidad
• En caso de que usted tome vacaciones o se ausente, vacíe el refrigerador y freezer, mueva el dial de
temperatura a Off y limpie la unidad de acuerdo a las instrucciones generales de limpieza. Deje la
puerta abierta de modo que el aire pueda circular. Cuando necesite trasladar la unidad siempre
mueva verticalmente. No la mueva en forma horizontal, puede causar daños al sistema..
10
Page 34

Español
PROBLEMAS GENERALES
l Refrigerador no Funciona
E
•
Controle que la perilla de la temperatura no esté en OFF
• Controle que la unidad esté enchufada
ontrole que haya corriente en la toma.
• C
La Temperatura de los Alimentos Parece Cálida
a puerta es abierta frecuentemente
•
L
ermita tiempo a los alimentos colocados recientemente a alcanzar la temperatura establecida.
• P
• Controle que la puerta cierre correctamente
• Ajuste el control de temperatura a mayor nivel de frío.
La Temperatura de los Alimentos es Demasiado Fría
Ajuste el nivel de temperatura a una posición más cálida y permita un tiempo para que la misma se
•
ajuste.
El Motor Trabaja muy Seguido
Puede ser normal para mantener la temperatura en días cálidos y de humedad
•
• La puerta es abierta frecuentemente por un largo tiempo.
• Controle las juntas de la puerta para que cierre correctamente.
• Controle si la puerta cierra completamente
• Controle que no haya objetos bloqueando la puerta
Formación de Vapor en el Interior o Exterior del Refrigerador
Es normal en días de mucha humedad
•
• La puerta es abierta con mucha frecuencia
• Controle las juntas de la puerta
El Refrigerador Tiene Olor
El interior del mismo necesita limpieza
•
• Comidas envueltas o tapadas incorrectamente estan provocando olores.
La Puerta no Cierra Correctamente
Re-alinee la puerta de la unidad
•
• Controle que no haya recipientes o botellas bloqueando la puerta.
11
Page 35

GARANTIA LIMITADA
Servicio en su casa
Qué cubre y por cuanto tiempo?
Esta garantía cubre todos los defectos
en el funcionamiento y los materiales
por un período de tiempo de:
12 meses
12 meses parts
5 años (partes unicamente)
La garantía comienza a partir de la
fecha en que el producto fue comprado, la factura original de compra debe
presentarse ante el Centro de servicios.
EXCEPTIONES: Garantías comercial o
de uso rentado
90 días labor (part unicamente)
90 días partes
No oteres warrantiés appliés
Lo que cubre la garantía.
1. Las partes mecánicas y eléctricas en
un período de 12 meses. Esto
incluye todas las partes menos el
acabado y otros arreglos.
2. Los componentes del sistema por
ejemplo compresor, condensador y
evaporador, que posean defectos de
manufactura por un período de 5
años desde la fecha de compra.
Cualquier daño a dichas partes
provenientes de translado
inadecuado o abuso no son
alcanzados por la garantía.
Qué se hará?
1. Nosotros repararemos o reem-
plazaremos cualquier parte mecánica o eléctrica que se compruebe
esté defectuosa en el funcionamiento
normal y mientras se esté en el
período de garantía antes especificado.
No habra cargos al comprador por
2.
la reparación de las partes especifi
cadas y por el período inicial de 12
meses. Luego de este período la
labor deberá abonarse.
3. Contacte el Centro de servico
autorizado más cercano. Para
conocer el centro más cercano visite
website www.HaierAmerica.com.
lame al
1-877-337-3639 para mayor
información.
ESTA GARANTIA CUBRE A LOS PRODUCTOS DENTRO DE LOS ESTADOS
UNIDOS, PUERTO RICO Y CANADA.
NO SIGUIENTE:
Dañor por instalación inadecuada.
Daños en el translado.
Defectos que no sean de manufactura.
Daños por desuso, abuso, accidente,
alteración, falta de cuidado y
mantenimiento o uso del incorrecto.
Daños causados por otro uso que no
sea el doméstico.
Daños causados por reparaciones que
no hayan sido realizadas por un service
autorizado o fuera entro de servcio.
Decoración o arreglos.
Embarque y transporte.
Labor (luego de los 12 meses iniciales).
ESTA GARANTIA LIMITADA ESTA DADA
EN LUGAR DE TODA OTRA GARANTIA, INCLUYENDO LA
GARANTIA DE COMERCIALIZACION
POR PROPOSITOS PARTICULARES.
La solución provista en esta garantía
es exclusiva y está otorgada en lugar
de toda otra garantía.
Esta garantía no cubre daños
ocacionales o incidentales, es por ello
que las limitaciones anteriores pueden
no ser aplicables en su caso.
Esta garantía le da derechos específi
cos y usted tendrá otros derechos que
pueden variar de Estado a Estado.
Haier America
New York, NY 10018
-
Español
-
12
Page 36

IMPORTANT
Do Not Return This Product To The Store
If you have a problem with this product, please contact the
Haier Customer Satisfaction Center" at 1-877-337-3639.
"
DATED PROOF OF PURCHASE REQUIRED FOR WARRANTY SERVICE
IMPORTANT
Ne pas Réexpédier ce Produit au Magasin
Pour tout problème concernant ce produit, veuillez contacter le service des
consommateurs ‘Haier Customer Satisfaction Center’ au 1-877-337-3639.
UNE PREUVE D’ACHAT DATEE EST REQUISE POUR BENEFICIER DE LA GARANTIE.
IMPORTANTE
No regrese este producto a la tienda
Si tiene algún problema con este producto, por favor contacte el "Centro de Servicio al
NECESITA UNA PRUEBA DE COMPRA FECHADA PARA EL SERVICIO DE LA GARANTIA
Consumidor de Haier" al 1-877-337-3639 (Válido solo en E.U.A).
115V, 60 Hz
Made in China
Fabriqué en Chine
Hecho en China
Haier America
ork, NY 10018
New Y
HSE04WNC
Issued: March 05 P
art # RF
-9999-246
 Loading...