

Page 1

Contents
Page 2

Page 3

1 Introduction
Thank you for using CM200 Data Modem. To guarantee the CM200 always in its
best condition, please read this manual carefully and keep it for further use.
The pictures, symbols and contents in this manual are just for your reference.
They might not be completely identical with your CM200.
With the CM200, you can easily:
Make and answer calls
Technical Standard: CDMA2000 1X
USB Interface Standard: USB 2.0 Full Speed
Maximum Transmit Power: 24dBm
Access the Internet
View the statistics
Use the call logs service
Send and receive message
Use the phonebook
Features
Page 4
Data Rate: 153.6kpbs
Frequency Band: 800 MHz
Dimensions: 89 28 10.5mm
Weight: 22g
Operating Temperature:0 to 55
Storage Temperature:-20 to 65
Operating Humidity:5 to 95
Storage Humidity:5 to 95
To use the CM200, the following requirements are recommended for your
computer:
CPU: Pentium4 1GHz or above
Memory: 256MB or above
Hard Disk: 50MB free disk space
OS: Windows 2000/XP/Vista or Macintosh Operating System
Interface: USB1.1 or above
System requirements
Page 5

Note: If the configuration of your computer is inferior to the recommended
configuration, the running performance of the data modem may be affected.
The installation process is subject to different operating systems, such as
Windows 2000, Windows XP, Windows Vista, Macintosh .During the actual
installation, if any step differs from what is described here, follow the specific
installation instructions.
1.Put the CM200 into the USB interface;
2.The setup program starts automatically, and the CM200 installation interface is
displayed later.
3.Follow the instructions of the program;
4.Once the installation completes, the shortcut icon for CM200 Manager appears
on the desktop;
2 Management Software
Installation & Uninstalling
Installation
Page 6

5.When the system prompts you that the installation is finished, click Finish to
finish the installation of the CM200 Manager.
Uninstalling the CM200 Manager through the Add / Remove in the Windows.
1. To start program, double-click the shortcut icon of the CM200 Manager on the
desktop;
2. If you are prompted to enter PIN code, enter the correct one and click OK;
You can try 3 times to enter your PIN code. If you failed to do that after 3 times,
your R-UIM card would be locked, if this happens, use the PUK code to unlock it.
You can try 10 times to enter your PUK code. If you failed to do that after 10 times,
your R-UIM card cannot be used, if this happens, contact your network operator.
If you failed to enter PIN or PUK code, you can click Cancel to skip over the
authentication of the PIN code. Then, the functions related to the R-UIM card are
Uninstalling
Accessing & Exiting
Accessing the CM200 Manager GUI
Page 7
not available for you. However, you can still make emergency calls.
Click the button on the right corner on the interface
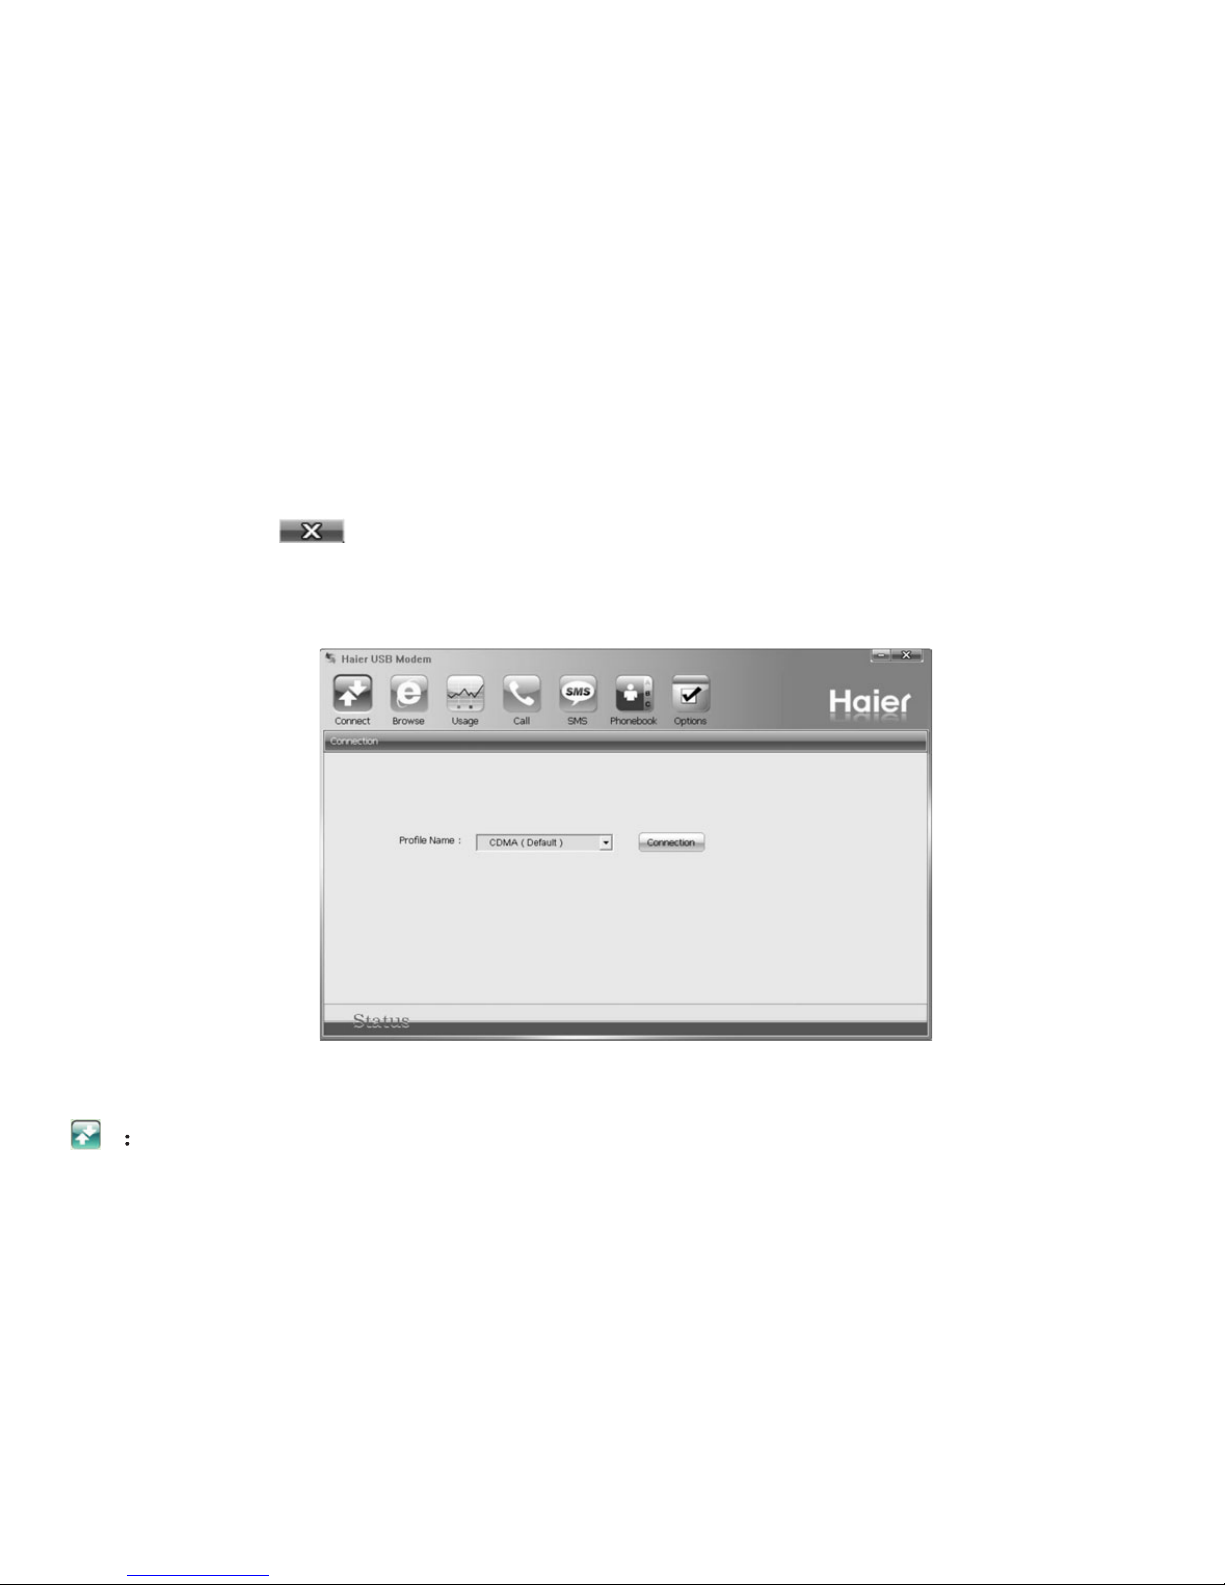
The initial interface after the CM200 Manager starts is as follows.
Access the Connect interface
Exiting the CM200 Manager
Instruction to the main interface
Shortcut Icon
.
Page 8

Start the default internet browser in your operating system
Access the Usage interface
Access the Call and Call log interface
Access the SMS interface
Access the Phonebook interface
Access the Options interface
1.Choose a profile and click to set up a connection;
2.When the connection is set up, click or start the browser on your computer,
and then you can access the internet;
3.Click to disconnect from the network.
Click and access the Usage interface. You can view the content of the statistics,
including sent and received statistic values and the duration of the connection.
You can select the operation you need. The operation options are: Reset statistics,
3 Main Function
Internet Service
Usage Service
Connect
Disconnect
Page 9

Expand all, Collapse all.
Reset statistics-Clear the statistic information
Expand all-Start all of the data
Collapse all-Close all of the data
The above data of the statistic is for your reference only.
When you use the call service, you need to insert the earphone to the earphone
jack on the CM200.
Click to display the Voice Call and History interface.
The CM200 provides many easy and quick ways to make a call.
You can make a call by entering a telephone number directly.
1.Click the telephone keypad on the call interface;
2.Click to make a call;
3.Click to hang up.
Note:
Make a call
Entering a telephone number directly
Dial
End
Call Service
Page 10

Note: Clear
Contacts
Dial
OK
End
Dialed/Received/Missed Dial
You can press to delete number on the call interface digit by digit.
You can make a call by selecting a telephone number in the phonebook.
1.Click and the phonebook interface is displayed. Double-click a contact
or select a contact and then click .
If two or more number(s) in the selected contact, double-click the selected
number in the pop-up Select interface or click after selecting the number. The
selected number is displayed on the call interface and dial out.
2.Click to hang up.
You can make a call by selecting a number from the recently dialed number.
1.Click , and click after selecting the number. Then
ClearYou can press and hold to clear the whole number.
If only one number in the selected contact, then the number is displayed on call
interface and dial out.
Selecting a telephone number in the phonebook
Selecting a recently dialed number
Page 11

the number is dialed out.
2.Click to hang up.
Answering a call
An alert window is displayed when there is an incoming call. You can choose the
options in the follow.
1.Click to answer the call
2.Click to reject the call
Volume Adjustment
You can adjust volume during the call.
The call history contains information about dialed, received and missed calls.
Each kind of call supports up to 100 items.
Dialed/Received/Missed calls
Click , and the Dialed/Received/Missed calls interface is
displayed.
End
Answer
Reject
Dialed/Received/Missed
Saving a number
Call History
Page 12

1.Select an item and click ;
2.The Select Position interface is displayed, and select the position you want to
save;
3.Click ;
4.The New Contact interface is displayed. Enter required relevant information for
this contact.
5.Click to save the contact.
You can delete one or more item(s) from the call history.
1.Select one or more item(s), click ;
2. Click to confirm.
You can dial the number of the call history.
1.Select an item and click ;
2.The Dial interface is displayed, and the selected number appears automatically
on the interface, and dialed out at the same time.
Sending a message
Save
OK
OK
Deleting a call
Delete
OK
Making a call
Dial
Page 13

You can send a message to the number of the call history.
1.Select one or more item(s) and click ;
2.The CM200 automatically retrieves the number in the selected items, and the
Writ SMS interface is displayed.
3.The retrieved numbers are automatically displayed in the blank field behind the
Contacts. Input the content for the message and click .
Click to display the SMS interface.
The inbox stores messages you have received. It supports up to 300 messages.
When the inbox is full and a new message is coming, the earliest message in the
inbox is deleted automatically.
The messages you have sent out are saved in the Outbox. Up to 300 messages
can be stored in the Outbox. When the Outbox is full and an additional message is
coming, the earliest message in the Outbox is deleted automatically.
SMS
Send
Inbox
Outbox
SMS
Page 14

Draft
Archive
View
Cancel
Writing a new message
The messages that you write on the Write SMS window, if having been saved, can
be stored in the draft. Up to 300 messages can be stored in the draft. When you
save a message, only the message content can be saved in the draft. The
designated number cannot be saved.
The message you have copied from the inbox can be stored in the archive. Up to
300 messages can be stored in the Archive. The designate number cannot be
saved.
You can view a message in the Inbox/Outbox/Draft directly.
1.Click Inbox/Outbox/Draft/Archive to open and browser the
Inbox/Outbox/Draft/Archive.
2 When there is a new message, you can see the alert window. Click to
view the message, Click to close the window.
Viewing a message
.
Page 15

1.Click and the Write SMS interface is displayed;
2.Enter the telephone number(s) by one of the following ways:
3.Input the message. The maximum length of each message is 160 characters.
4.Click to send message.
After the message is sent successfully, it is automatically saved to the Outbox. If
the message is sent unsuccessfully, you are prompted whether to send it again. If
you cancel the sending, the message is saved to Outbox.
Click to save message to the Draft.
Click to clear the message content.
Click to insert template.
The CM200 supports to send a message to a group of up to 20 numbers.
New
Send
Save
Clear
Template
Note:
To enter one or more number directly: In the Contacts textbox, enter the
numbers separated by semicolons
To select a number from the Contacts: Click . Select one or more
contact(s) and click . Select the number to send a message in the pop-up
dialog box and click .
When your message contains no more than 160 characters, it is sent as
Contacts
OK
OK
Page 16

one message. If this limit is exceeded, the message is divided to several
messages and sent one by one.
Replying a message
Reply
Send
Forwarding a message
Forward
Contacts
Send
You can reply to a message directly in the inbox.
1. Select a message and click ;
2. The telephone number of the original sender appears automatically in the blank
filed behind Contacts and you can change it;
3. Input the content for the message to reply;
4. Click to reply a message.
In Inbox/Outbox/Draft, you can forward a message to other contacts.
1.Select a message and click ;
2.Input the telephone number to forward to, or click to select the
number;
3.The content of the message to forward displays automatically in the text box.
You can edit it.
4.Click to forward a message.
Page 17

Deleting a message
Delete
OK
Extracting a number
Extract
OK
OK
OK
Searching a message
Search
Making a call
In inbox/outbox/draft, you can delete a message.
1.Select one or more message(s) and click ;
2.Click to confirm.
You can save the number of a message to the phonebook.
1.Select a message and click ;
2.The Select Number interface is displayed, select the number and click ;
3.The Select Position interface is displayed, select the position and click ;
4.Input the required information of this number;
5.Click .
The CM200 provides the function of search a message in the SMS.
1.Click ;
2.Input the content in text box to search.
You can call back the number of a message sender.
Page 18

1.Select a message and click ;
2.The Dial interface is displayed. The number of the message sender is displayed
and dialed out automatically at the same time.
In Outbox/Draft, you can edit a message.
1.Select a message and click ;
2.Change the information and click or .
The CM200 can store up to 500 contacts.
You can New, Edit and Delete the contacts. You can also send message, make
calls to the contacts.
Click to display the phonebook interface.
1.Click ;
2.Fill in the name, mobile number, home number, company number, group, E-mail
and remarks.
3.Click to save a new contact to the phonebook.
Dial
Editing a message
Edit
Send Save
Phonebook Service
Creating a contact
New
OK
Page 19

Modifying a contact
Edit
OK
Deleting a contact
Delete
OK
Grouping in the phonebook
Group
OK
Searching a contact
Search
Making a call
1.Select a contact and click ;
2.Modify the contact;
3.Click to save.
1.Select one or more contact(s) from the phonebook and click ;
2.Click to confirm.
1.Click ;
2.Create or edit group;
3.Input the requited information of this group;
4.Click to save.
The CM200 provides the function of searching a contact in the phonebook.
1.Click ;
2.Enter relevant searching terms in the value text box to search.
Page 20

You can dial out the number you have selected from the phonebook.
1.Select the contact that contains the number to dial from the phonebook, and
click .
If the selected contact contains only one telephone number, the dial interface is
displayed automatically.
If two or more telephone numbers are contained in the selected contact, the
Select number interface is displayed and you are prompted select one number.
After doing that, click and the dial interface is displayed.
2.The selected number is appears on the dial interface automatically and dialed
out automatically at the same time.
The CM200 allow you to select a number from the phonebook and send a
message.
1.Select a contact from the phonebook;
2.Click and the Write SMS interface is displayed;
3.The Name or number appears in the blank field behind the Contacts. Input the
Dial
OK
SMS
Sending a message
Page 21

content for the message and Click .
PIN Code Management
The PIN code is used to prevent your R-UIM card from the invalid use. The PIN
code is provided along with the R-UIM card. You can change your PIN code, and
you can also enable/disable the PIN feature. If you enable the PIN feature, you
need to enter the PIN code when the CM200 starts up.
You can enable / disable PIN feature. If the feature is enabled, you need to enter a
PIN code when the CM200 is started.
Enable PIN-You need to enter the PIN code when the CM200 is started.
Disable PIN-You need to not enter the PIN code when the CM200 is started.
Enter the current PIN code and the new PIN code. Enter the new PIN code again
to confirm it.
Click OK to modify it.
Send
Security and settings
Enable/Disable PIN
Modify PIN
Unlock PIN
Page 22

If your R-UIM card locks, you can use the PUK code to unlock it. You can try 10
times to enter your PUK code. If you failed to do that after 10 times, you R-UIM
card cannot be used. If this happens, contact your network operator.
Text Message Setting
Select the priority level for sending a message.
In the period of validity, the message center will repeat to deliver a
message till it is received.
Select the time for sending a message.
You can enable or disable this function. If the function is enabled,
after you send a message, the network can send a message to inform you that the
receiver has got the message you have sent.
Check the box, and an alert window is displayed whenever a new
message comes.
Click to see the message
Click to close the window
If a sound file is selected, it plays on the earphone of CM200 whenever
a new message comes.
Priority :
Validity Period:
Defer Delivery:
Delivery Report:
Alert Window:
View
Cancel
Alert tone:
Page 23

Click to select a sound file
Network Setting
You can choose no roaming or auto roaming in the window.
1.Click ;
2.Enter a new profile name in the Profile Name field
3.Enter required relevant information for the settings
4.Click to finish
1.In the Profile Name field, select a profile to delete
2.Click .
1.In the Profile Name field, select a profile to modify
2.Click
Browse
CDMA Roaming
Creating a profile
New
Save
Deleting a profile
Delete
Modifying a profile
Edit
Profile Setting
Page 24

3.Modify the profile
4.Click .
Start Up Setting
You can set the CM200 Manager to connect internet when program starts up and
Start main window minimized.
Standby / Hibernate Setting
You can set CM200 Manager to prevent or allow standby / hibernate.
You need to enter the password when the feature of usage limit is used. The
default password is blank.
1.Enter required relevant information for the settings.
2.Click .
The CM200 allows you to query information for the CM200 and the R-UIM card.
Save
Preference Setting
Usage Limit
Save
Diagnostics
Page 25

ISI
Page 26

Page 27

1 Introduction
Nous vous remercions d'utiliser le CM200 Data Modem. Afin de vous assurer que
le CM200 soit toujours dans sa condition optimale, nous vous invitons à lire
soigneusement le manuel d'utilisateur et le conserver pour tout usage ultérieur.
Les images, symboles et contenus dans ce manuel sont juste pour votre
référence. Ils peuvent ne pas être entièrement identiques à votre CM200.
Avec le CM200, vous pouvez facilement :
-Accéder à Internet,
-Voir les statistiques,
-Emettre et recevoir des appels,
-Utiliser le service de journal d'appels,
-Envoyer et recevoir des messages,
-Utiliser le répertoire.
Norme technique : CDMA2000 1X
Norme d'Interface USB : USB 2.0 Full Speed
Maximum Transmit Power:>24dBm
Débit:153.6 kbps
Caractéristiques
Page 28

Bande fréquence: 800 MHz
Dimensions: 89×28×10.5mm
Poids: 22g
Température en usage: 0 to 55
Température de stockage :-20 to 65
Humidité en usage:5 to 95
Humidité de stockage:5 to 95
Pour utiliser le CM200, les pré-requis suivants sont recommandés pour votre
ordinateur :
Système d'exploitation: Windows 2000/XP/Vista ou Macintosh Operating
Si la configuration de votre ordinateur a une version antérieure à la
Pré-requis
Processeur: Pentium4 1GHz ou version supérieure
Mémoire: 256MB ou version supérieure
Disque dur: 50MB d'espace disque libre
Interface: USB1.1 ou version supérieure
System
N.B.:
Page 29

configuration recommandée, la performance du modem peut être affectée.
La procédure d'installation est sujette à différents systèmes d'exploitation, comme
le Windows 2000, Windows XP, Windows Vista, Macintosh. Pendant l'installation,
si une étape diffère de ce qui est décrite dans ce manuel, suivez les instructions
spécifiques d'installation.
1.Branchez le CM200 dans l'interface USB ;
2.Le programme de lancement commence automatiquement, et l'interface
d'installation de CM200 est affichée plus tard ;
3.Suivez les instructions du programme ;
4.Une fois l'installation effectuée, l'icône relative au raccourci du « CM200
Manager » apparaît sur votre bureau ;
5.Lorsque le système vous signale que l'installation est effectuée, cliquez sur «
2 Logiciel de gestion
Installation & Désinstallation
Installation
Page 30

Terminer » pour terminer l'installation du CM200 Manager.
Désinstallez le CM200 Manager en vous accédant à « Ajouter/Supprimer des
programmes».
1.Pour commencer le programme, double-cliquez l'icône relative au raccourci
du CM200 Manager sur votre bureau ;
2.Si vous êtes invité à taper votre code PIN, entrez-le et cliquez sur « OK » ;
Vous avez droit à 3 essais. Si vous entrez 3 codes erronés, votre carte R-UIM
sera bloquée ; si cela arrive, entrez le code PUK afin de le débloquer.
Vous avez droit à 10 essais pour entrer votre code PUK. Après la dixième erreur,
votre carte R-UIM ne pourra pas être utilisée. Si le cas se produit, contactez votre
opérateur.
Si votre carte est bloquée, vous pouvez encore sauter l'étape d'authentification,
Désinstallation
Accès & déconnexion
Accès à CM200 Manager
Page 31

ce qui ne vous donne pas accès aux fonctions de votre carte R-UIM mais vous
permet d'effectuer des appels d'urgence si besoin.
Cliquez tout simplement sur le bouton situé à l'angle à droite de l'interface.
L'interface initiale après le lancement du CM200 Manager est comme suit :
Déconnexion du CM200 Manager
Instruction relative à l'interface principale
Page 32

Icones raccourcies :
Service Internet
Connexion
:Accéder à l'interface de connexion
:Démarrer le navigateur Internet par défaut dans votre système d'exploitation
:Accéder à l'interface d'utilisation
:Accéder à l'interface d'appels et du journal d'appels
:Accéder à l'interface SMS
:Accéder à l'interface Répertoire
:Accéder à l'interface Options
1.Choisissez un profil et cliquez sur pour installer ;
2.Quand la connexion est effectuée, cliquez sur ou lancer le navigateur sur
votre ordinateur, et vous pouvez accéder à Internet ;
3.Cliquez “Déconnecter” pour déconnecter.
Cliquez sur pour accéder à l'interface d'utilisation. Vous pouvez voir le contenu
3 Fonction principale
Service d'utilisation
Page 33

des statistiques, incluant les statistiques des données envoyées et reçues, ainsi
que la durée de la connexion.
Vous pouvez sélectionner l'opération que vous voulez. Les options de l'opération
sont : Mettre les statistiques à zéro, développer tout, réduire tout.
Mettre à zéro les statistiques : Effacer les informations relatives aux statistiques
Développer tout : Démarrer tout
Réduire tout : Réduire tout
Quand vous utilisez le service d'appel, vous devez insérer le casque dans la fente
réservée à cela sur le CM200.
Cliquez sur pour montrer l'interface d'appel et l'historique.
Le CM200 offre plusieurs moyens faciles et rapides pour émettre un appel.
N.B. Les données relatives aux statistiques ci-dessus sont uniquement pour
référence.
Service d'appel
Emettre un appel
Page 34

Tapez directement un numéro de téléphone
Sélectionner un numéro dans le répertoire
Vous pouvez effectuer un appel en entrant directement un numéro de téléphone.
1.Cliquez sur l'icône téléphone sur l'interface d'appel ;
2.Cliquez sur pour émettre un appel ;
3.Cliquez sur pour raccrocher.
Vous pouvez cliquer sur pour effacer chaque numéro sur l'interface
d'appel.
Vous pouvez effectuer un appel en sélectionnant un numéro de téléphone dans le
répertoire.
1.Cliquez sur et l'interface relative au répertoire est affichée. Doublecliquez un contact ou sélectionnez un contact et cliquez sur .
Si appel vers un seul numéro de téléphone, le numéro est affiché sur l'interface
d'appel ; pour terminer, cliquez sur « Composer ».
Si appel vers deux ou plusieurs numéros dans le répertoire, double-cliquez les
numéros ou cliquez sur OK après la sélection des numéros. Les numéros sont
Composez
Terminer
N.B. Effacer
Contacts
Composer
Page 35

affichés sur l'interface d'appel ; pour terminer, cliquez sur « Composer ».
2.Cliquez sur pour terminer l'appel.
Vous pouvez effectuer un appel en sélectionnant un numéro parmi les numéros
composés récemment.
Cliquez sur , et cliquez sur Composer après
sélection du numéro. Ainsi, le numéro est rappelé.
Une fenêtre alerte apparaît lorsqu'il y a un appel entrant. Vous pouvez choisir des
options parmi les suivantes.
1.Cliquez sur pour prendre l'appel
2.Cliquez sur pour rejeter l'appel
Vous pouvez régler le volume d'écoute pendant un appel.
Fin
Composé/Reçu/En absence
Répondre un appel
Répondre
Rejeter
Réglage de volume
Sélectionner un numéro composé récemment
Page 36

Journal d'appel
Le journal d'appel contient des informations sur les numéros composés, les
appels reçus et les appels en absence. Chaque catégorie peut mémoriser jusqu'à
100 appels.
Cliquez sur , et l'interface des appels
composés / appels reçus / appels en absence apparaît.
Sélectionnez un numéro et cliquez sur ;
1.L'interface Select Position est affichée, et sélectionnez la position de votre choix;
2.Cliquez sur ;
3.L'interface Nouveau contact est affichée. Entrez après les informations relatives
au contact;
4.Cliquez sur pour sauvegarder le numéro.
Vous pouvez effacer un ou plusieurs éléments dans le journal d'appels.
1. Sélectionner un ou plusieurs éléments et cliquez sur ;
Composés/Reçus/Appels en absence
Composés/Reçus/Appels en absence
Enregistrer un numéro
Sauvegarder
OK
OK
Effacer un appel
Effacer
Page 37

2. Cliquez sur pour confirmer.
Vous pouvez composer un numéro parmi la liste des numéros dans le journal
d'appel.
1.Sélectionnez un élément et cliquez sur ;
2.L'interface est affichée et le numéro sélectionné apparaît
automatiquement sur l'interface, et composé en même temps.
Vous pouvez envoyer un SMS vers un numéro parmi la liste dans le journal
d'appels.
1.Sélectionnez un élément et cliquez sur ;
2.Le CM200 récupère automatiquement le numéro et l'interface Composer un
message est affichée.
Les numéros récupérés sont automatiquement affichées dans la partie vide près
de . Ecrire le message et cliquez sur .
OK
Emettre un appel
Composer
Composer
Envoyer un message
SMS
Contacts Envoyer
SMS
Page 38

Cliquez sur pour afficher l'interface SMS.
La boîte de réception stocke les messages que vous avez reçus. Elle peut
mémoriser jusqu'à 300 messages. Lorsque la boîte est pleine et un nouveau
message entrant est en cours, le plus ancien message dans la boîte de réception
est automatiquement effacé.
Les messages que vous avez envoyés sont sauvegardés dans les éléments
envoyés. Jusqu'à 300 messages peuvent être sauvegardés dans les éléments
envoyés. Lorsque la boîte des éléments envoyés est pleine, et qu'un nouveau
SMS est sur le point d'être envoyé, le plus ancien message dans la boîte des
éléments envoyés est automatiquement effacé.
Les messages que vous composés dans la fenêtre , et qui n'ont
pas pu être envoyés sont enregistrés dans Brouillons. Jusqu'à 300 messages
peuvent être sauvegardés dans les modèles. Le numéro de destination ne peut
pas être enregistré.
Boîte de réception
Eléments envoyés
Brouillons
Ecrire un SMS
Page 39

Archive
Voir Annuler
Nouveau Ecrire un SMS
Le message que vous avez copié depuis la boîte de réception peut être enregistré
dans Archive.
Jusqu'à 300 messages peuvent être sauvegardés dans Archive. Le numéro de
destination ne peut pas être enregistré.
Vous pouvez visualiser directement un message dans Reçus/Envoyés/Modèle.
1.Cliquez sur Reçus/Envoyés/Brouillon pour ouvrir et afficher les messages
reçus/envoyés/ brouillon.
2.Lorsqu'ilyaunnouveau message entrant, vous pouvez voir une fenêtre d'alerte.
Cliquez sur pour afficher le message, cliquez sur pour fermer la
fenêtre.
1.Cliquez sur et l'interface est affichée;
2.Entrez le numéro de téléphone, les options pour cela sont les suivantes:
Visualiser un message
Ecrire un nouveau message
Page 40

Dans la boîte de texte , entrez directement un ou plusieurs numéro(s)
séparée par un point-virgule«;»;
Pour choisir un numéro dans les contacts, cliquez sur . Sélectionnez
un ou plusieurs contact(s) et cliquez sur . Sélectionnez le numéro de
destination du message et cliquez sur .
Ecrivez le message. Un message est limité à 160 caractères chacun.
Après que le message soit envoyé avec succès, il est automatiquement
sauvegardé dans la boîte d'éléments envoyés. Si l'envoi du message a échoué,
vous êtes invité à le renvoyer si vous le désirez. Si vous refusez le renvoi, le
message est automatiquement sauvegardé dans la boîte d'éléments envoyés.
Cliquez sur pour effacer le contenu du message.
Cliquez sur pour insérer un modèle.
Contacts
Contacts
OK
OK
Effacer
Modèle
3.Cliquez sur pour envoyer le message.
Cliquez sur pour sauvegarder le message dans Modèle.
Envoyer
Sauvegarder
N.B.: Le CM200 peut envoyer directement un message vers un groupe allant
jusqu'à 20 numéros.
Quand un message contient moins de 160 caractères, le message est envoyé
Page 41

en une fois. Si le message contient plus de 160 caractères, le message est
envoyé en plusieurs envois.
Répondre à un message
Transférer un message
Vous pouvez répondre directement à un message. Pour cela,
1. Sélectionnez un message et cliquez sur ;
2. Le numéro de téléphone qui vous a envoyé le message initialement apparaît
automatiquement dans la partie vide; toutefois, vous pouvez le changer si besoin ;
3. Ecrire le message;
4. Cliquez sur pour répondre au message.
Depuis Boîte de réception/Eléments envoyés/Brouillon, vous pouvez transférer un
message vers d'autres contacts.
1.Sélectionnez un message et cliquez sur ;
2.Entrez le numéro de téléphone vers qui vous voulez transférer ou cliquez sur
pour sélectionner un numéro ;
Répondre
Envoyer
Transférer
Contacts
Page 42

3.Le contenu du message à transférer apparaît automatiquement dans la boîte
texte. Vous pouvez encore le modifier ;
4.Cliquez sur pour transférer le message.
Dans Boîte de réception/Eléments envoyés/Brouillon, vous pouvez envoyer un
message.
1.Sélectionnez un ou plusieurs messages et cliquez sur ;
2.Cliquez sur pour confirmer.
Vous pouvez enregistrer un numéro attaché à un message. Pour cela,
1.Sélectionnez le message et cliquez sur ;
2.L'interface est affichée, sélectionnez le numéro et
cliquez sur .
3.L'interface est affichée, sélectionnez la position et
cliquez sur .
4.Entrez les informations que vous voulez marquer sur le contact ;
Envoyer
Effacer
OK
Extraire
Sélectionner un numéro
OK
Sélectionner position
OK
Effacer un message
Extraire un numéro
Page 43

5.Cliquez sur
Le CM200 offre la fonction de chercher un message dans les SMS. Pour cela :
1.Cliquez sur ;
2.Entrez le contenu du texte dans la partie réservée pour cela.
Vous pouvez rappeler le numéro qui vous a envoyé un message. Pour cela :
1.Sélectionnez un message et cliquez sur ;
2.L'interface est affichée. Le numéro qui a envoyé le message est
effacé et rappelé automatiquement au même moment.
Dans Eléments envoyés/Brouillon, vous pouvez modifier un message. Pour cela,
1.Sélectionnez un message et cliquez sur Modifier ;
2.Changez le contenu et cliquez sur ou .
OK
Rechercher un message
Rechercher
Composer
Composer
Envoyer Sauvegarder
Emettre un appel
Modifier un message
Répertoire
Page 44

Le CM200 peut enregistrer jusqu'à 500 contacts.
Vous pouvez enregistrer, modifier ou supprimer les contacts. Vous pouvez aussi
envoyer un message, faire un appel vers vos contacts.
Cliquez sur pour afficher l'interface .
1.Cliquez sur ;
2.Complétez le nom, numéro, téléphone maison, téléphone bureau, groupe, email et notes.
3.Cliquez sur pour sauvegarder le nouveau contact dans le répertoire.
1.Sélectionnez un contact et cliquez sur ;
2.Modifiez le contact ;
3.Cliquez sur pour sauvegarder.
répertoire
Nouveau
OK
Modifier
OK
Créer un contact
Modifier un contact
Effacer un contact
Page 45

1.Sélectionnez un ou plusieurs contact(s) depuis le répertoire et cliquez sur
;
2.Cliquez sur pour confirmer.
1.Cliquez sur ;
2.Créer ou modifier un group ;
3.Entrez les informations requises sur le groupe ;
4.Cliquez sur pour sauver.
Le CM200 offre des fonctions de recherche de contact dans le répertoire. Pour
cela :
1.Cliquez sur ;
2.Entrez des informations dans la boîte de texte pour rechercher.
Vous pouvez composer et appeler un numéro dans votre répertoire. Pour cela:
Effacer
OK
Groupe
OK
Rechercher
Groupe dans le répertoire
Rechercher un contact
Emettre un appel
Page 46

1.Sélectionnez le contact qui contient le numéro à appeler et cliquez sur
.
Si vous sélectionnez juste un numéro, l'interface apparaît.
Si plusieurs contacts sont sélectionnés, l'interface apparaît
et vous êtes invité à sélectionner un numéro. Après cette étape, cliquez sur OK et
l'interface apparaît.
2.Le numéro sélectionné apparaît sur l'interface et appelé
automatiquement en même temps.
Le CM200 vous permet de sélectionner un numéro dans votre répertoire et
d'envoyer un message. Pour cela :
1.Sélectionnez un contact depuis votre répertoire ;
2.Cliquez sur et l'interface apparaît.
3.Le nom ou le numéro apparaît dans la partie vide au dessous des contacts.
Entrez le contenu du message et cliquez sue .
Composer
Composer
Sélection de numéro
Composer
Composer
SMS Ecrire un message
Envoyer
Envoyer un message
Page 47

Sécurité et réglages
Activer/Désactiver le PIN
Modifier le PIN
Gestion de code PIN
Le code PIN protège votre carte R-UIM pour des usages frauduleux. Le code PIN
est rattaché à la carte R-UIM. Vous pouvez modifier votre code PIN, et vous
pouvez aussi activer/désactiver votre code PIN. Si vous activez votre PIN, vous
devez d'abord entrer le code PIN quand le CM200 démarre.
Vous pouvez activer/désactiver votre PIN.
Activer le PIN :Vous devez entrer votre code PIN lorsque le CM200 démarre.
Désactiver le PIN:Vous n'êtes pas invité à entrer votre code PIN lorsque le CM200
démarre.
Entrez le code PIN actuel et le nouveau code PIN. Entrez le nouveau code PIN
pour confirmer la modification.
Cliquez sur pour confirmer.OK
Page 48

Débloquer le PIN
Si votre carte R-UIM est bloquée, vous pouvez utiliser le code PUK pour le
débloquer. Vous avez droit à 10 essais. Si vous avez commis 10 erreurs de code
PUK, votre carte R-UIM ne peut pas être utilisée. Si c'est le cas, contactez votre
opérateur.
Sélectionner un niveau de priorité de l'envoi du message
:Dans la période de validité, le système recommence à
renvoyer le message jusqu'à ce qu'il soit envoyé
Sélectionner l'heure d'envoi du message.
Vous pouvez activer ou désactiver cette fonction. Si cette
fonction est activée, après l'envoi d'un message, le réseau peut envoyer un
message pour vous informer que le destinataire a reçu le message que vous avez
envoyé.
A chaque fois qu'un message entre, une fenêtre d'alerte apparaît.
Réglages de message textes
Priorité:
Période de validité
Différer l'envoi:
Rapport d'envoi:
Fenêtre d'alerte:
Cliquez sur pour voir le message
Cliquez sur pour fermer la fenêtre.
Voir
Annuler
Page 49

Son d'alerte:
Roaming CDMA
Créer un profil
Nouveau
Sauvegarder
Effacer un profil
Nom de profil
Effacer
Un son est entendu dans l'écouteur de CM200 lorsqu'un nouveau
message entre.
Réglage réseau
Vous pouvez choisir No Roaming ou Auto roaming dans la fenêtre.
Réglage Profil
1.Cliquez sur ;
2.Entrez un nouveau nom de profil dans la partie réservée à cela ;
3.Entrez des informations relatives aux réglages ;
4.Cliquez sur pour terminer.
1.Dans le champ , sélectionnez un profil ;
2.Cliquez sur .
Cliquez sur pour sélectionner un son.Naviguer
Page 50

Modifier un profil
Nom de profil
Modifier
sauvegarder
1.Dans le champ , sélectionnez un profil ;
2.Cliquez sur ;
3.Modifiez le profil ;
4.Cliquez sur .
Vous pouvez utiliser le CM200 Manager pour se connecter à Internet lorsque le
programme démarre.
Vous pouvez utiliser le CM200 Manager pour permettre le standby / hiberner.
Vous devez entrer le mot de passe lorsque la limitation d'usage est activée. Par
défaut le mot de passe est vide.
1.Entrez des informations sur les réglages;
2.Cliquez sur Sauvegarder.
Réglage de préférence
Réglage Standby / Hiberner
Limitation d'usage
Page 51

Diagnostics
The CM200 vous permet de demander des informations sur le CM200 et sur la
carte R-UIM.
Page 52

 Loading...