

Page 1

Table of Contents
TABLE OF CONTENTS
SAFETY PRECAUTIONS...................................................................................................................1
SAFET Y NOT ES..................................................................................................................................1
NOTICE ................................................................................................................................................1
PERSO NAL..........................................................................................................................................2
MOBIL E PHONE..................................................................................................................................2
BATTERY .............................................................................................................................................3
ON THE ROAD.....................................................................................................................................3
ON AN AIRPL ANE ...............................................................................................................................4
1. GETTING STARTED.......................................................................................................................5
1.1 BATTERY .......................................................................................................................................5
1.1.1 Removing and installing the battery................................................................................6
1.1.2 Charging the battery..........................................................................................................6
1.1.3 U sing the bat tery................................................................................................................7
1.1.4 B attery cha rge level...........................................................................................................7
1.2 CONNECTING TO THE NETWORK ...........................................................................................8
1.2.1 U IM card ..............................................................................................................................8
Page 2

1.2.2 I nserting t he UIM card .......................................................................................................8
1.2.3 Unlocking the UIM..............................................................................................................9
1.2.4 Connecting to the network................................................................................................10
1.3 STANDBY SCRE EN AND CONTEN T .........................................................................................10
1.4 BUTTON FUNCTIONS.................................................................................................................11
1.5 FIG URE AN D CHARACTE R INPUT............................................................................................12
1.6 PHO NE LOCK................................................................................................................................13
1.7 INP UT ME THOD ...........................................................................................................................14
1.7.1 Editing window...................................................................................................................14
1.7.2 Switch between input methods........................................................................................14
1.7.3 Digit input method .............................................................................................................15
1.7.4 ABC input method..............................................................................................................15
1.7.5 abc input method ...............................................................................................................16
1.7.6 Smart ABC input method..................................................................................................16
1.7.7 Smart abc input method....................................................................................................16
2. DIALLING ANDANSWERING ......................................................................................................18
2.1 POWER ON/OFF...........................................................................................................................18
2.2 DIA LLING.......................................................................................................................................18
2.2.1 Dialling directly..................................................................................................................18
Page 3

2.2.2 Dialling from the Contacts.................................................................................................20
2.2.3 Dialling by location.............................................................................................................20
2.3 ANSWERI NG A CALL ...................................................................................................................20
2.4 IN-CALL OPTIONS.......................................................................................................................21
2.4.1 Making a call to a telephone extension...........................................................................21
2.4.2 Adjusting the volume.........................................................................................................21
2.4.3 O ption .................................................................................................................................22
2.4.4 Hanging up.........................................................................................................................22
2.4.5 N ew SMS ............................................................................................................................22
2.4.6 Answering an incoming call while in-call ........................................................................23
2.4.7 Making a new call while in-call.........................................................................................23
3. MENU OPERATION........................................................................................................................24
3.1 MENU STRUCTURE.............................................................................................................24
3.2 MENU OPERATION..............................................................................................................24
3.3 OTHER OPERATION............................................................................................................24
3.4 MENU FUNCTION LIST .......................................................................................................25
4. CONTACTS......................................................................................................................................28
4.1 LIS TS ......................................................................................................................................28
4.2 SEA RCH.................................................................................................................................29
Page 4

4.3 ADD NEW ...............................................................................................................................29
4.4 GRO UPS ................................................................................................................................30
4.5 MULTICO PY...........................................................................................................................31
4.6 SPEED DIAL..........................................................................................................................32
4.7 MEM ORY STATUS ................................................................................................................32
4.8 DEL ETE..................................................................................................................................33
5. MESSAGES .....................................................................................................................................34
5.1 CREATING A NEW MESSAGE............................................................................................34
5.2 SENDING MESSAGES.........................................................................................................35
5.3 RECEIVING MESSAGES.....................................................................................................35
5.4 VIEWING THE MESSAGES.................................................................................................3 6
5.5 VIEWING THE MESSAGES IN DRAFT ..............................................................................37
5.6 TEMPLATES ..........................................................................................................................37
5.7 MEM ORY STATUS ................................................................................................................38
5.8 DELETING MESSAGES.......................................................................................................38
5.9 MESSAGE SETTING............................................................................................................38
6. CALL HISTORY...............................................................................................................................40
6.1 MISSED CALLS.....................................................................................................................40
6.2 REC EIVED CALL S................................................................................................................4 1
Page 5

6.3 DIA LLED CALLS ....................................................................................................................41
6.4 DEL ETE ..................................................................................................................................41
6.5 CAL L TIMERS ........................................................................................................................41
7. SETTINGS .......................................................................................................................................43
7.1 PHONE SETTING..................................................................................................................43
7.2 CALL SETTING......................................................................................................................43
7.3 DIS PLAY.................................................................................................................................45
7.4 SEC URITY..............................................................................................................................46
7.4.1 Calls Restrictions.........................................................................................................46
7.4.2 PIN Management..........................................................................................................47
7.4.3 F actory Res et ...............................................................................................................47
7.4.4 Change Security PWD.................................................................................................48
7.4.5 B lacklist .........................................................................................................................48
7.4.6 Vo ice Privac y ................................................................................................................48
8. TOOLS..............................................................................................................................................49
8.1 INTRODUCTION ...................................................................................................................49
8.2 ALARM....................................................................................................................................49
8.2.1 Ti me ................................................................................................................................49
8.2.2 P eriod .............................................................................................................................50
Page 6

8.2.3 O n or Off .........................................................................................................................50
8.3 CAL ENDAR ............................................................................................................................50
8.4 CALCULATOR.......................................................................................................................51
9. PROFILES .......................................................................................................................................52
9.1 INTRODUCTION ...................................................................................................................52
9.2 INC OMING CALL ALERT .....................................................................................................52
9.3 SMS AL ERT............................................................................................................................52
9.4 RIN G TYP E ............................................................................................................................52
9.5 RIN G VOLUME ......................................................................................................................52
9.6 KEY TO NE ..............................................................................................................................52
9.7 POW ER TONE .......................................................................................................................52
9.8 LOW B ATT. BEE P..................................................................................................................52
10. GAM ES...........................................................................................................................................54
10.1 SN AKE..................................................................................................................................54
10.2 TETRI S .................................................................................................................................54
10.3 GA ME SOUND.....................................................................................................................55
11.SMS S ERV ICES.............................................................................................................................56
12.TROUBLESHOOTING..................................................................................................................57
13.ACCESSORIES.............................................................................................................................59
Page 7

SAFETY PRECAUTIONS
Safety Notes
If your mobile phone is lost or stolen, please immediately notify your service operator to
prevent use of the UIM CARD, thus avoiding the economic loss which caused by unauthorized
calls made under your name.
When contacting your local operator or sales outlet, they will need to know the ESN number of
your mobile phone. This number is printed on the label of the back of the mobile phone (remove
the battery to view the number). Take note of the ESN number and store it in a secure place for
future use.
In order to avoid unauthorized use of your mobile phone, take preventative measures, such
as:
-Configure the Phone Lock function, set the PIN CODE, and change the code if it is disclosed to
another party;
-If leaving your C1000 in an unattended vehicle, do not place the mobile phone in an obvious
place. It is preferable to take it with you, or store it in a secure place.
Notice
In order to use the product safely and correctly, and to prevent accident or injury, please comply
with the cautions outlined in this user guide. After reading the user guide, keep it in a safe place
for easy reference.
1
Page 8

Personal
Using radio-frequency equipment may cause interference with medical equipment, for
example, hearing aids and cardiac pacemakers, etc. Before using the mobile phone, consult the
medical equipment manufacturer or your doctor for advice.
In places which may present blast hazards, such as oil depots, chemical factories, etc., it is
considered best practice to limit the use of radio-frequency equipment. Even when a mobile
phone is in the Standby State, it will still transmit electromagnetic signals. If possible, and if
requested, switch off your mobile phone.
Please pay attention to traffic safety. When driving a car, please do not use your mobile phone.
If it is absolutely necessary to use a mobile phone when driving, park your car in a safe place
before use.
Please keep the mobile phone and all accessories out of the reach of children.
Rubber plugs (used at the earplug jack and at the bottom of mobile phone) pose a choking
hazard if swallowed by children.
Avoid contact between the battery (metal part) and other metal objects (necklaces, coins, etc),
as well as consumption or biting of the battery by the animals or striking sharp material on the
battery.
Mobile Phone
Your mobile phone will generate an electromagnetic field. Please do not place it near storage
2
Page 9

media such as computer disks, or other similar devices.
Using mobile phone near electrical appliances and equipment such as TV set, telephone,
radio and personal computer, etc, might cause the interference on the mobile phone, thereby
affecting its performance.
Please do not expose your mobile phone to strong sunshine and high temperatures as it will
shorten the life of electronic components, damage the battery, and cause the deformation of
plastic parts and components.
Keep the mobile phone dry, away from rain, moisture, and other liquids which can corrupt the
electronic circuits.
Battery
Do not short circuit the battery equipment, as it will damage the battery, generate heat and
may cause fire.
Do not dispose of a battery in fire as it may explode. Waste batteries should be returned to a
designated recycling site. Please do not dispose of the battery into the household garbage.
Warning: If the battery is damaged or broken, avoid contact with exposed skin. In the event of skin
contact, wash the affected area liberally with clean water. If necessary, consult a doctor.
On the Road
Before making or receiving calls, pay attention to the legal regulations concerning the use of mobile
phones, and restrict phone usage to non-driving time.
3
Page 10

Confirm whether the safety airbag, brakes, velocity control system and oil filter system will be
affected by the wireless transmission. If any problems are evident, please contact the distributor of
the automobile.
When refueling your vehicle, please switch off your mobile phone. Similarly, you should also switch
off the mobile phone in places which restrict the use of two-way wireless devices.
Do not put the mobile phone near inflammable or explosive products.
On An Airplane
During takeoff, landing and the duration of the flight, follow the relevant civil aviation regulations
prevent interference with the telecommunication system of the airplane.
4
Page 11

1.GETTING STARTED
Thank you for choosing the HaierC1000. This manual is written to explain the functions of your
new mobile phone. Apart from basic call functions, the C1000 mobile phone and network system
provides numerous functions, applications and services to enrich both work and social use.
The C1000 mobile phone is specially designed for the CDMA1X network. With the increasing
development of CDMA1X network, C1000 users will have freedom to communicate - any time,
anywhere.
We have provided special accessories for your new C1000 including: battery, travel charger.
More details regarding these accessories can be referred to in Section 12 in the user manual.
There may be with risks with using accessories that have not been approved by the
manufacturer, and, the phone damage may be caused by using accessories not covered by the
scope of the guarantee.
The company reserves the right to amend any technical specifications without releasing notice.
Before using the mobile phone, read this section carefully, it will instruct you how to install,
charge and maintain the battery of your mobile phone. In addition, it also provides information
relating to the digital CDMA1X network, and shows how to insert and remove the UIM CARD.
1.1Battery
The C1000 mobile phone comes with one battery. The new battery is not fully charged but can
5
Page 12
support the power on function. Before the initial use of a new battery, charge it for at least 16
hours, and recharge it only when the battery power is fully discharged for the first and second
charge times. These initial three charge times, are essential to the optimization of ongoing
battery performance.
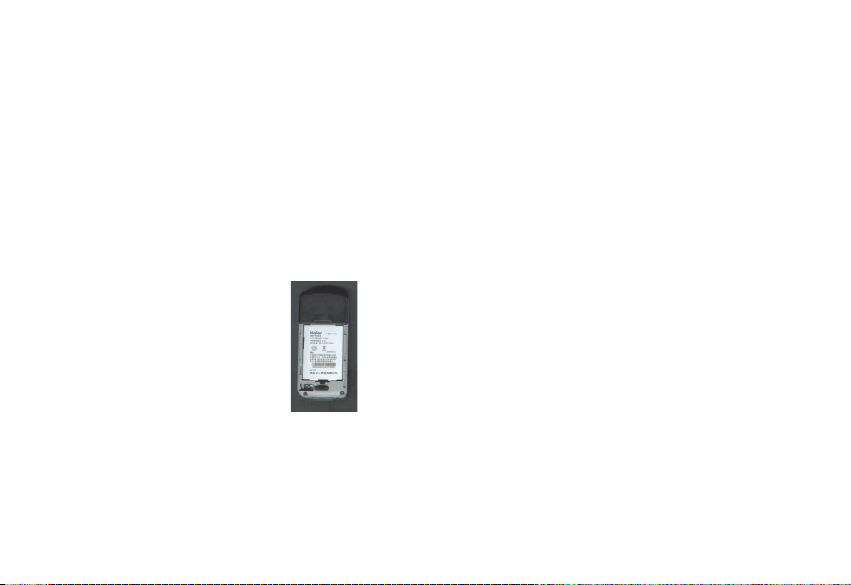
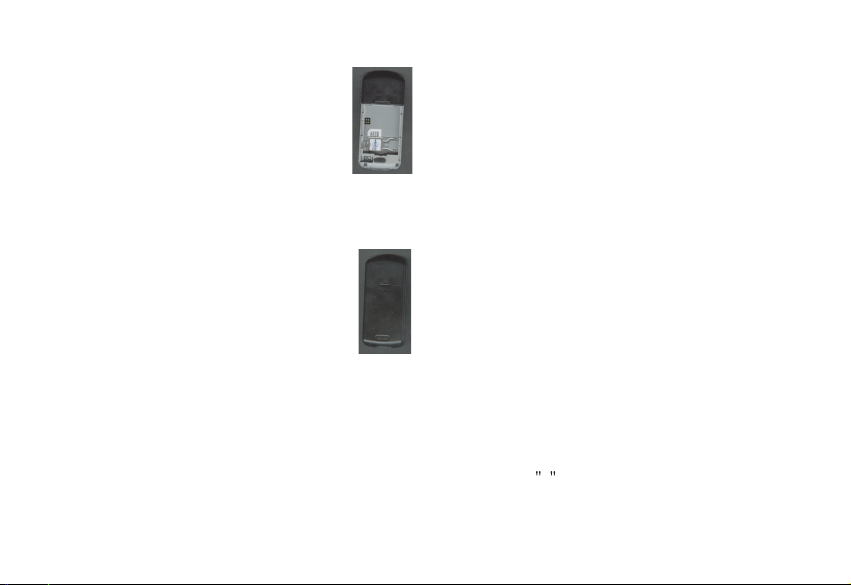
1.1.1 Removing and installing the battery
When removing the battery, carefully open the battery cover, and pull out the battery.
To replace the battery, place the bottom of the battery into the battery store, and press it in until
the battery is securely in place. Replace the battery cover.
1.1.2Charging the battery
Insert the connector of the charger into the bottom of the mobile phone.
When the charger is connected to the power supply, the display of the mobile phone will show a
dynamic charging icon as the battery is charging.
6
Page 13

When the display shows a static charging icon, it means that battery charging is complete.
During charging, the battery, mobile phone and charger will be warm or hot to touch, which is a
normal state for battery charging.
After charging is complete, disconnect the power supply, and remove the charger.
Warning
: The mobile phone must be within a temperature range of +5 ~+40 . Do not use a
charger that has not been provided by vendor. Using unapproved chargers or batteries are a
potential hazard, and void the manufacturer's warranty.
1.1.3 Using the battery
Standby and talk time provided by the manufacturer for this phone are based on optimal
conditions. During actual use, talk time and standby time will change according to the network
status, environment & usage method.
Notice
Standby time will be decreased by playing the phone games for a long period of time.
To minimize battery usage during game play, adjust backlight display time to prolong standby
time.
1.1.4 Battery charge level
The battery charge level is shown at the top right of the LCD screen. The more indicator bars
inside the battery icon - the more power in the battery.
7
Page 14

1.2 Connecting to the network
1.2.1UIM card
The network service provider provides the UIM card. An effective UIM card must be inserted into
The mobile phone before it can be used.
Notice
: Using UIM cards that have been previously used in other mobile phones and contain
saved information (such as the contacts, messages, etc.), may not be compatible with the
C1000 mobile phone due to different mobile phone coding formats.
To prevent lost or destroyed information in UIM cards, avoid touching the metallic area and
keep the UIM card away from electricity and magnetic fields. If the UIM card is destroyed, the
phone can not enter the CDMA network.
Warning
: Before removing the UIM card, you must switch off the mobile phone. It is
prohibited to insert or remove the UIM card when the mobile phone is connected to an external
power source as it will damage the UIM card.
1.2.2Inserting the UIM card
Turn off the mobile phone and remove the battery and the external power source.
8
Page 15
Place the UIM card in the card slot, and ensure that the metal contact area on the card is facing
downward. The position of the card is as shown in the figure above.
After the UIM card is properly inserted, install the battery.
To remove the UIM card, turn off the mobile phone and disconnect the external power source, lift out
the battery, and remove the UIM card.
1.2.3Unlocking the UIM
The PIN code provided by UIM card prevents unauthorized access to your phone. When the PIN code
is activated (refer to Section 7.4.2), input the PIN code (shown as * ) when the phone is switched on.
After the phone is unlocked, you can make receive calls, perform other operations. To disable this
function, refer to Section 7.4.2.
9
Page 16

If the PIN code is deactivated, it cannot prevent your phone from unauthorized use by others.
Press and hold to turn on the phone and input the PIN code. Press to confirm. ( Can be
used to delete erroneous input)
If the correct PIN code is not input within 3 consecutive attempts, the UIM card will be locked. The
phone will prompt for the PUK code. Refer to Section 7.4.2 for further details regarding the PUK code.
Warning: The service provider can provide a standard PIN code (4~8 digits) for your UIM card.
Ensure that it is changed into a personal password as soon as possible. Refer to Section 7.4.2 for
further details regarding PIN code.
1.2.4Connecting to the network
After successfully unlocking the UIM card, the mobile phone will automatically search for the network.
Once the network is obtained, the name of network service provider will appear in the top center of the
LCD display screen.
Your mobile phone is under standby screen and you can send or receive calls now.
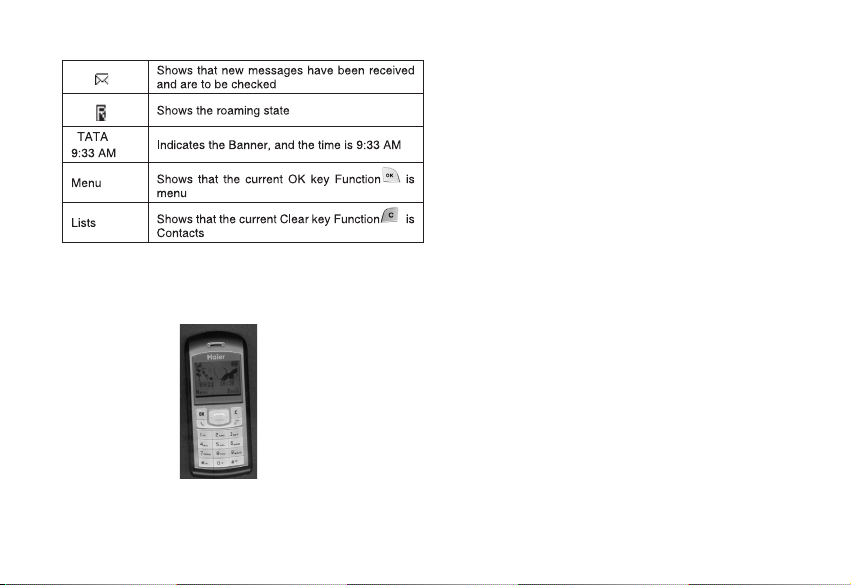
1.3 Standby screen and content
Under standby screen you can get the information that you need by fist note and symbol shown on the
LCD.
When entering the Contacts or Menu from the standby screen, if any key has been pressed the
phone will return to standby screen automatically, after a period of time.
10
Page 17
1.4Button functions
The button functions are described in the chart below:
11
Page 18
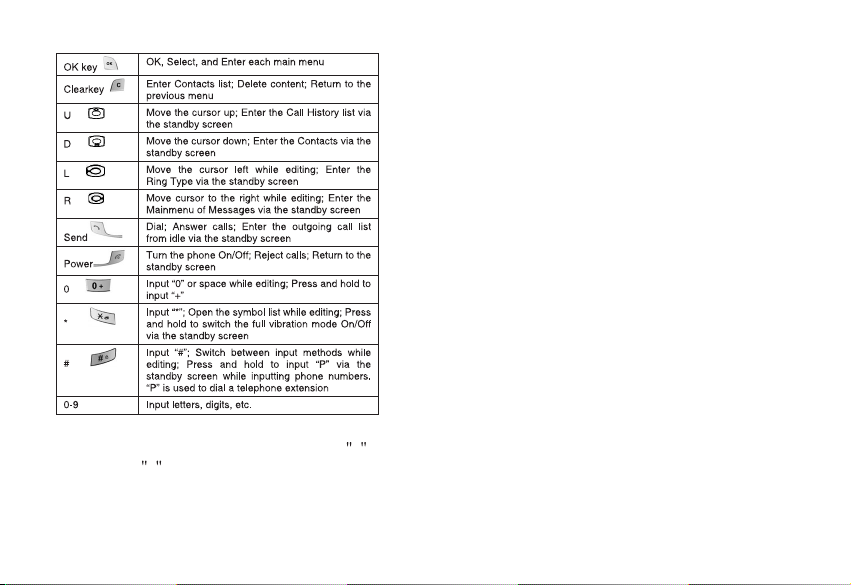
Notice: In this manual, pressing the * means pressing the key for a short time. Pressing and
holding the * key for a long time indicates pressing the key for at least for one second.
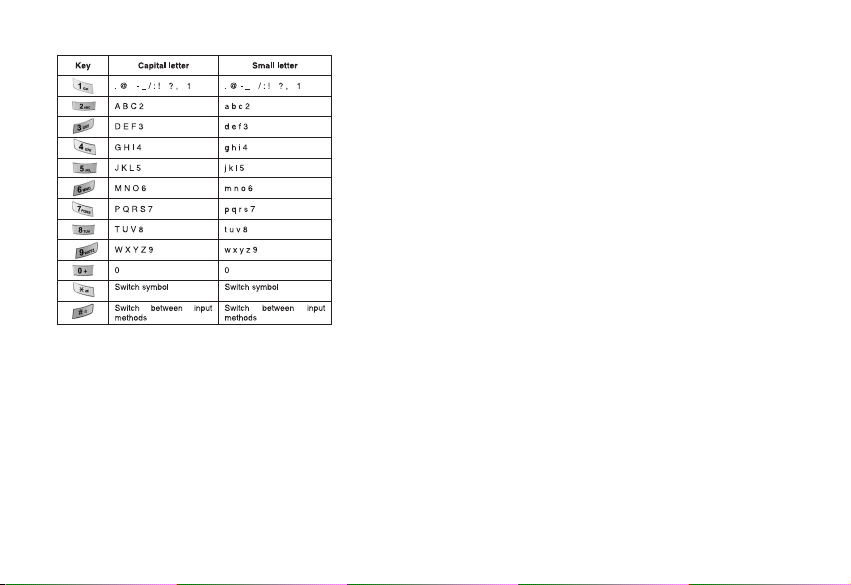
1.5 Figure and character input
12
Page 19
1.6Phone lock
To prevent unauthorized use of your phone; after powering on, go to the security setting to lock
the phone. You must input the correct password when locking and unlocking the phone. This
function prevents others from locking and unlocking your phone.
The default password is 0000; to reset the password, go to: settings->security->Change
Security.
Notice: After buying your phone, reset the 4 digit password to a personal password as soon
13
Page 20

as possible.
1.7 Input method
For the sake of the convenience of inputting English, the C1000 specially sets some input
methods such as ABC and smart abc. You can lookup the correlative words with less keystroke.
You can select the words which you need by pressing U/D/L/R keys.
1.7.1 Editing window
Used to input text; for example: rename, edit name, SMS, etc.
1.7.2 Switch between input methods
To input words, first select an input method.
The mobile phone provides the following input methods:
Digit input method
l
ABC input method
l
abc input method
l
En input method
en input method
The key is used to switch between input methods.
14
Page 21

To input symbols, press the key.
The icon corresponding to the input method is displayed in the left bottom of the screen.
1.7.3 Digit input method
The Digit input method icon is: .
To input numbers you must use the number input method.
Press the keys to to input the ten numbers 0 to 9, with each button representing its
corresponding number. Press to delete input numbers.
1.7.4 ABC input method
The ABC input method icon is:
During ABC input, the first press of the digit button will input the first letter on the button, and
second swift pressing of the digit button will input the second letter on the button. If the letter to
be input is on the same button as the previous input letter, wait until the cursor appears before
attempting to input the next letter.
To input OK , press the key three times in succession to input O first, and then press the
key twice in succession to input K . The word OK will appear in the text zone. Pressing
deletes input text.
15
Page 22

1.7.5 abc input method
The abc input method icon is: .
The operational steps are the same as the ABC input method shown in Section 1.7.4
1.7.6 Smart ABC input method
The Smart ABC input method icon is:
Smart ABC input method is intelligent, and automatically capitalizes the first letter of the word.
Press the digit buttons 2 to 9 to input the relevant English characters, with each letter able to be
input by one press. Candidate words will change accordingly. Make a selection by using the
Left/Rightward Direction Key, and search the pages of candidate words by using the
Up/Downward Direction Key. Press to confirm the word choice and the selected word will
appear in the text input zone.
EXAMPLE: To input OK , press digital button 6 and 5 (the relevant letters will appear on the
keypad), then press and the word OK will appear in the text input zone. Press to delete
input text.
1.7.7 Smart abc input method
The Smart abc input method icon is:
16
Page 23

Details for this method are similar to that of Smart ABC Input Method. The primary difference is
that the first letter of the word will not be capitalized in smart abc input method.
Press to input symbols. When a candidate symbols appears, press Left/Right/Up/Downward
Direction Key to select, and then press the OK key to confirm. The selected symbol will appear
in the text input zone.
17
Page 24

2.DIALLING AND ANSWERING
After setting up your phone, you can dial and answer calls. This Section provides a basic
overview for reference purposes.
2.1Power On/Off
Press and hold to turn on the phone; and a power on display will flash on-screen.
If phone requests PIN code entry, input it to continue. (Refer to Section1.2.3)
Pressing and holding again will turn off the phone.
2.2Dialling
When the logo of the network service provider shows on-screen, your phone is in standby state
and you can dial and answer calls. The icon in the top left corner displays the strength of the
signal received by the phone and current signal strength is indicated by the number of bars on
the screen (5 bars maximum). Call quality may be weakened by obstacles. Changing the
direction of the phone may enhance signal strength.
There are many ways to make a call in standby state, e.g. dialling directly, dialling from your
contacts, speed dialling, or dialling by location.
2.2.1Dialling directly
18
Page 25

Make an internal call
The easiest way to make a call is to input the telephone number directly by pressing the number
keys and pressing to call the desired number. If making a long-distance internal call, ensure
that you have input the telephone number with the appropriate area code. You will see
Dialling... the name or number, on the screen this time. When successfully connected, the
screen will show the call time, and the number and the name of the person you are calling.
After entering the number, press key to save it to contacts, or press the key to call the
number.
Pressing or to hang up a call. The screen will display the time you spent on the call.
Making a call to a telephone extension
A telephone extension usually cannot be called directly; you must first connect to the host
telephone number. Add P between the host telephone number and the extension telephone
number, so that your phone will dial the host telephone number first, and will not dial the
extension telephone number until you have pressed and again; after hearing the prompt
from the host telephone. Press and hold to input P . ( P will display on the screen).
Making an international call
To make an international call, you should input + first. (Press and hold until + appears
on-screen). Input the country code, area code and the number to be dialled.
19
Page 26

For example: to make a call to France, press and hold key 0 to first to input + , then key in 33
(Country code for France), and then dial the desired phone number.
2.2.2 Dialling from the Contacts
Press the key under the standby screen to enter the main menu, and choose contacts by
navigation, and press to enter the contacts. Locate the person, select the corresponding
number, and press to make the call.
2.2.3 Dialling by location
Press the key after inputting a number under the standby screen, and the telephone number
saved in this location will display on-screen, press to dial. Search the save location in the
information of the contact record listed in the contacts.
2.3Answering a call
When there is an incoming call, the screen will display its number and name.
20
Page 27

When the phone informs you that there is an incoming call with vibration, you just need to press
or to answer it and press or to end.
While calling, the phone will notify you of incoming calls by sounding a Du...Du... tone.
Pressing or to answer the new incoming call. The existing call will be placed on hold.
Refer to Section 3.4 for further details.
2.4In-call options
During a call, the following options are available: Contacts, Messages, Mute/Unmute.
2.4.1 Making a call to a telephone extension
Upon hearing the prompt from the host telephone number, enter the extension telephone
number to connect. Another method is to insert a P between the host telephone number and
the extension telephone number, and then press or to connect to the extension telephone
after hearing the host telephone prompt.
21
Page 28

2.4.2 Adjusting the volume
During a call, pressing and to adjust the volume of telephone receiver.
The position of keys refers to the picture in Section 1.4.
2.4.3 Option
Press to activate the option menu. There are five options available: Contacts, Messages,
Mute/Unmute, and New Call.
Contacts: enter the contacts list, look-up telephone numbers while talking.
Messages: enter the message menu to perform specific operations. Press to exit the
message menu and return to the call.
Mute/Unmute: temporarily enable or disable voice transmission. When mute is chosen, your
voice not be transmitted, but you can hear the other party. This feature is used to talk with
people around you while in-call. Choose Unmute to recover voice transmission.
2.4.4 Hanging up
You could press or to end a call. You will see the conversation time on the screen after
hanging up.
2.4.5 New SMS
22
Page 29

When there is a new incoming message while you are in-call, the phone will prompt you with a
New SMS received prompt.
2.4.6 Answering an incoming call while in-call
This operation refers to Section 3.3, with the difference of when you answer a new call, the old
one will be placed on hold, press to switch between the two calls.
2.4.7 Making a new call while in-call
You can make a new call while in-call. While calling, press and choose new call option from
the menu, then enter the number and press or to dial. An easier method is to enter the
telephone number by pressing number keys directly while in-call, and pressing to make a
new call.
23
Page 30

3.MENU OPERATION
This section provides an overview of the C1000 functions and structure.Its details include how
to modify default settings, and how to operate this mobile phone.
3.1 Menu structure
The main menu consists of Contacts, Messages, Call History, Settings, Tools, Profiles, Games
and SMS Services.
3.2 Menu operation
In the standby screen, press the key and the navigation keys to select the main menu, and
then press the key to confirm changes.
3.3 Other operation
In the standby screen, all function keys define specific menu operations. The key functions are
detailed below to facilitate selection of menu operations.
24
Page 31

25
Page 32

26
Page 33

27
Page 34

4.CONTACTS
Under the Contacts menu, there are eight function options, including: Lists , Search , Add
New , Groups , Multicopy , Speed Dial , Memory status and Delete .
In standby screen, press to enter the main menu, press to select contacts, and press
To enter the contacts.
4.1Lists
In contacts menu, choose Lists and press enter; it will show the contacts list and arranged
alphabetically by the first letter of the name, you can press the key corresponding to the first
letter of the name to search.
To Search for a record press , with the available options of Send Message , Edit , Save ,
Delete , Copy and Blacklist .
Choose Send Message , to choose the contact's number enter the Create Message
interface edit and send.
Choose Edit , to modify basic information. Enter the group select feature, if the group is UIM,
you cannot change to phone; if the group is default - it cannot change to UIM.
Choose Save , to save the record;
Choose Delete , to delete the record;
28
Page 35

Choose Copy , if the record is in UIM, it will be copied to the phone; if the record is in another
group, it will be copied to the UIM.
Choose Blacklist , add the contacts to the Blacklist.
4.2Search
In contacts menu, choose Search and press enter; to enter the edit interface input the
name to search.
4.3Add New
In the contacts menu, select Add New . If Full is displayed, it indicates that there are no
space to store the new record and you must delete some of the contacts records to provide
space.
In the Add New screen, you can input name, group, mobile phone number, office number ,
house number, Email, address, URLand location.
To input name, place cursor on Name , then press , from the Edit and Save options,
select Edit , to enter the Edit feature. For the Edit function, refer to Section 1.7.
To select a group, place the cursor on the Group, press , and the options Edit or Save will
appear; choose Edit, and enter the group select function. Press , key, to choosing a group,
29
Page 36

and press to confirm. If choosing from the UIM, you can only store a single name and number,
press the confirm-key to confirm, and the number will be stored.
For mobile phone numbers, office numbers, house numbers, Email, address and URL, enter the
text input feature (refer to Section 4.1).
After all contents have been successfully compiled, press , and from the options Edit or Save,
select Save, and press . The screen will display Saved as confirmation.
4.4 Groups
you can classify a number of contacts into one group in accordance with their social relationship,
for example: UIM, Friend, Family, Colleague, Default and VIP. All groups (except UIM), consist
of several items, including: name, group, mobile phone number, office number, house number
and other relevant information.
When you add a new contacts record, it will be placed in the Default group.
Groups is used to manage your contacts records, and divides the records according to social
relationships.
The phone provides seven groups: UIM, Friend, Family, Colleague, Default and VIP. If you do
not change the group, it will be in Default; UIM only stores one name and one number, other
group can store a name three numbers one Email one address and one URL.
30
Page 37

In the Groups, choose the group to query the phone number or the name wanted.
After you choosing the phone number, press to dial the number. Find the details of dialling
number operations in Section 2.2.2.
In the Groups, press , to choose from List , Rename , Add New and Delete options.
Choose List: lists all the records of this group;
Choose Rename: you can modify the name of this group as desired. (Rename interface is the
same as the Edit interface in Section 1.7).
Choose Add New: you can add new groups what you want.
Choose Delete: you can delete the groups you don't like.
Note: The fixed group can not be renamed.
4.5Multicopy
Enter the contacts interface, choose Multicopy and enter the Copy interface: you can choose
Copy All or Choice Copy .
Choose , enter the next interface and choose Phone To UIM : press , the Copy
Copy All
interface to confirm appears, press , and all records will be copied. Press to cancel this
operation.
The operation of UIM To Phone is the same as Phone To UIM .
31
Page 38

Choose , enter the next interface and choose Phone To UIM : press , and
Choice Copy
the contacts list appears, you can choice Select/Unselect , Select All , Cancel All to select
the records, then choice Copy to confirm copy,
The operation of UIM To Phone is the same as Phone To UIM .
4.6 Speed Dial
Your mobile phone has 9 speed dial entries in which 5 speed dial entries are by default other 4
entries can be set by user.
How to Dial Speed Dial Numbers?
*Speed Dial Keys from 1 to 9 Press and Hold the Key, automatically dial the number.
Defualt Speed Dial Numbers are:
1=Voice mail (*89)
2=12900 Voice Station (12900)
3=Customer care (12524)
4=Customer care (121)
5=Directory Assistance (197)
4.7 Memory Status
32
Page 39

Used to obtain the current total memory use of the mobile phone.
It provides the total number of records and the number of used records in the phone and UIM.
4.8 Delete
Used to delete records in the contacts; you can also delete all records of group list at one time.
Enter the contacts interface, choose Delete and enter the Delete interface: you can choose
Delete Group or Delete All .
Choose , enter the group list and choose UIM : press , the delete interface
Delete Group
to confirm appears, press , and all UIM records will be deleted. Press to cancel this
operation.
The operation of other groups is the same as UIM.
Choose , press , and the Delete interface confirmation appears. Press to
Delete All
confirm deletion, and all records stored in the contacts and in the UIM will be deleted. Press
to cancel this operation.
33
Page 40

5.MESSAGES
This Section introduces the message service provided by CDMA 1X.
If your network carrier provides a message service, you can send or receive messages. These
messages can comprise 160 characters. You can reply or send new messages with your
network carrier's support.
5.1 Creating a new message
Choose the Write Message option in messages menu or pressing under the standby
screen enters the message editing window.
Editing messages is done in a text editing interface. Please refer to Section 1.7.
During editing, press to perform operations such as send, insert templates, save to draft,
insert number, etc.
Send: sends the message you have edited. In the input number window, you can input the
receiver's phone number or pick up a number in the contacts to insert by pressing . You can
send a message to a maximum of persons.
ten
34
Page 41

Insert templates: adds the phrase or sentence from the templates into the message.
Save to draft: the message edited will be saved to drafts.
Insert number: adds the number from the contacts into the message.
5.2 Sending messages
When sending a message, the screen will display the number or the name of the receiver. If
sending has failed, the screen will display Failed to notify you. The message which is sending
failed or has not been sent will be automatically saved to Outbox.
If sending is successful, the screen will display Sent . The sent message will be saved to
Outbox.
5.3 Receiving messages
When your mobile phone has received a message, it will inform you with a prompt sound, (Refer
to sound settings in Section 9.3) and save the message to Inbox. The notice 1 New Msg will
appear on the standby screen. You can press to enter the inbox window to view the message,
or press to cancel reading and to return to the idle screen. An icon which means there are new
messages displays on the screen until you view them (Refer to Section 1.3) and messages will
be saved to the phone or UIM automatically. The total amount of messages which can be saved
35
Page 42

(including the messages to be sent) depends on the available memory of your mobile phone and
the UIM card.
5.4 Viewing the messages
Messages in phone/UIM card
Inbox includes phone, UIM, and voice mail. There are envelopes which show the status of every
message before every message. The opened envelope indicates that the message has been
viewed. The closed envelope means the message hasn't been viewed.
While reading the message, pressing performs operations such as reply, forward, delete,
save number, and copy to phone/UIM.
Reply: replies to the current message;
Forward: sends this message to others;
Delete: deletes the current message, and then returns to the Inbox. (If there is no message in
Inbox, the screen will return to the Inbox menu.) If you choose delete, the mobile phone will
prompt for confirmation and also notify you the action and deletion results;
Save number: picks up the telephone numbers in the message, and saves them to the
contacts;
Copy to phone/UIM: copies this message to the phone/UIM.
Voice Mail
36
Page 43

There will be a prompt when your mobile phone receives a voice message. Enter the voice
message menu and operate the following sound directions to receive it.
Consult your network carrier for more details about voice messages.
5.5 Viewing the messages in Draft
You can scan the details of messages saved in Draft. Press to perform the following
operations:
Send: sends this message;
Edit: edits this message;
Delete: deletes this message.
5.6 Templates
When you are editing the message, you can insert the templates. There are 16 Templates in all.
From one to nine of them are existed, the others can be edited in advance by users. And the
Empty won't be displayed.
You can scan the details of phrase or sentence saved by yourself in templates. Press to
perform the following operations:
Edit: edits the template;
Delete: deletes the saved template;
37
Page 44

Add New:add a new template;
Send: sends the template you have edited.
5.7 Memory status
Check the memory status of the phone and UIM card.
5.8 Deleting messages
Delete messages in Inbox, Outbox, Draft, UIM, Phone or Delete all messages.
5.9 Message Setting
Set parameters for message operation such as auto save, priority, Delivery Reports and
Storage Device.
Auto save
Press to perform the following operations:
Auto save: save the sent messages ;
Do not save: not save the sent messages.
Priority
There are two levels of message priority: normal and urgent.
Storage Device
38
Page 45

Choose to save messages to UIM, Phone, UIM And Phone .
39
Page 46

6.CALL HISTORY
The call history records Missed Calls, Received Calls and Dialled Calls and each kind has 10
numbers. Also it records the time of dialling, and it can delete records.
I
n the standby screen, press to display the list of numbers for the 10 most recently Missed
and Received calls; press , displays the list of numbers of the 10 recent Dialled calls (If you
have locked the mobile phone, you must input the correct password to view this record).
6.1 Missed Calls
In Missed calls interface, press , to show details of the records, and press , to perform the
following operations: Save , Send SMS , Delete and Delete All .
Press to dial this number; press to:
Choose Save , to save the number you need to contacts;
Choose Send SMS , to send a message;
40
Page 47

Choose Delete , to delete this record;
Choose Delete All , you can delete all of the numbers
6.2 Received Calls
The Received Calls operations are the same as Missed Calls .
6.3 Dialled Calls
The Dialled Calls operations are the same as Missed Calls .
6.4 Delete
In the delete interface, press or , to select the record you want to delete, you can choose
and delete Missed Calls , Received Calls , Dialled Calls or Delete All .
Choose the record you want to delete, press to confirm, the phone will provide a prompt, to
confirm or exit.
6.5 Call Timers
In the Call History menu, press or , choose call timers, press to enter the call timers
interface, you can view Last Call , Received Calls , Dialled Calls and Total Airtimes . You
41
Page 48

can press to reset the time, which will begin at 00:00:00.
42
Page 49

7.SETTINGS
7.1Phone Setting
Phone settings are for the phone status. They contain Input Setting , Conversation Volume and
Auto Keylock.
In the Input Setting interface, there are five choices such as: 123, ABC, abc, EN and en.
In Conversation Volume interface, to adjust the voice volume, press or to turn the Volume
down, press or to turn the Volume up.
The Auto Keylock function is to prevent the unauthorized use of the mobile phone. You can set
the Phone lock to Off , 10 Sec , 30 Sec , 1 Min. , 5 Min. . If the cell phone be locked after
your set, before using the mobile phone, you must input the correct the unlock and .
7.2 Call Setting
Call setting contains Answer Call, Auto Answer, Auto Redial, Call Connect Beep, Minute Beep,
Call Waiting, and Call Forward.
43
Page 50

Answer Call:You can set Any key or Send Key . Any Key option allows your phone to
answer an incoming call by pressing any key except PWR.
Auto Answer: You can set Off or After 5 Sec. . This option allows your phone to answer an
incoming call automatically when earphone has attached the phone. If you select the After 5
Sec. Function with the earphone attached, the phone provides a prompt and automatically
answers after 5 sec; it cannot activate the automatic answer function without the earphone
attached.
Auto Redial: To set whether to allow the cell phone to make automatic redial;
Call Connect Beep: this option indicates for the phone to provide a voice prompt when you
answering a call.
Minute Beep: this option is for the phone to provide a voice prompt on every 50th sec of a
minute in a call.
Call Waiting: whether to allow call waiting. When your phone is busy, any third party calling
you will hear a busy sound if you cancel this option.
Call Forward: this option is used to forward a call to the number de
request.
signated according to your
44
Page 51

When this function is Immediate, successful setting depends on the network and UIM; the phone
provides appropriate prompts.
It requires input of the correct number when setting, and connects the designated number
according to request. If case it does not connect to the number to be forwarded to, check the
designated number.
Immediate: after this function is enabled, all incoming calls will be forwarded to the number
-
designated.
When Busy: after this function is enabled, when in-call, the incoming call will be forwarded to the
-
number designated.
No Reply/Not Reachable: when you have not answered an incoming call, it will be forwarded to the
-
number designated.
Every Forward has the options Immediate , When Busy . No Reply/Not Reachable and Disable All .
-
7.3 Display
It contains one option: Backlight and Banner.
45
Page 52

Backlight: contains five options, four options for backlight time and one option for Always On .
If you select Always On , the backlight will remain on all the time.
Banner: you can setup the banner you want.
7.4 Security
You should pass the PWD before entering the Security settings (the default PWD is 0000; you
can modify it after you enter in. Then you can use the new PWD).
In Security setting interface, it contains five options: Calls Restrictions , PIN Management ,
Factory Reset , Change Security PWD , Blacklist and Voice Privacy .
46
Page 53

7.4.1 Calls Restrictions
The Calls Restrictions has two options: Received Calls or Dialled Calls.
Received Calls Reject all incoming calls;
Dialled Calls Restrain your cell phone to call any number other than the Emergency Numbers.
7.4.2 PIN Management
The UIM Code setting contains Enable PIN , Change PIN and Disable PIN .
Enable PIN: enables the UIM PIN. You must enter the right PIN when you inspire the phone.
Change PIN: you can change the PIN code you use frequently under the condition of enabling
the PIN;
Disable PIN: you can access the phone without entering the PIN code.
Attention: PIN Code relates to the UIM Card. It is also the operation password of the UIM
Card.
For example:
When Phone Lock enabled (UIM Card doesn't enable PIN code), the phone is locked. Anybody
wanting to use your phone must enter the PWD, or the phone cannot be used.
Otherwise, if the UIM Card is used in another phone it can be used normally.
If the PIN is enabled and the Phone Lock disabled, you must input the PIN Code or change to
another UIM Card for normal use.
47
Page 54

7.4.3 Factory Reset
Use this function to reset the phone to the default values. When you select this option, it will
prompt Reset? If you confirm, the phone will be reset to default value and prompt Reset OK,
Restart .
It will not clear data stored in the contacts and messages. It only changes the work environment
settings such as the Ring selected, Profiles, etc.
7.4.4 Change Security PWD
Before changing the PWD, you must input the correct password. After doing so, you can input a
new password which will become effective immediately. Be sure to remember the new password
you have set!
7.4.5 Blacklist
All numbers on the blacklist cannot connect the cell phone. The blacklist of the cell phone can
contain 10 numbers. The blacklist is editable, and the user can delete some numbers from the
blacklist.
7.4.6 Voice Privacy
48
Page 55

8. TOOLS
8.1 Introduction
Tools consist of alarm, calendar and calculator.
Alarm clock provides Time , Period and On/Off options.
Calendar: this function facilitates user query of calendar information.
Calculator can perform simple calculations: Add, Subtract, Divide, and Multiply. After entering
the calculator interface, you can input numbers directly and perform calculations. All the
numbers and signs entered will be shown in the editing window.
8.2 Alarm
Enter the Alarm Clock menu, select the alarm clock, and then make settings including Time,
Period and On/Off.
8.2.1 Time
Input alarm times (24-hour time format)
49
Page 56

8.2.2 Period
Four options including Once, Daily, Mon-Fri are available for users to make according to their
needs.
As shown above, the alarm clock is set at 20:00. The period is set only once.
8.2.3 On or Off
Finally, select the choice item of On (Tip: this will only be shown when the alarm clock is off.).
Then it will prompt Alarm On? Press .
Tip: When you select On , this choice item will change into Off , a vice versa. You can view that
the alarm is On or Off from this item option.
8.3 Calendar
View the current calendar. Upon entry, it displays the current date. Press to enter the item
options, from which to select the current calendar or the desired data to look for. The date
50
Page 57

ranges from Jan.1901 to Dec. 2050.
8.4Calculator
This function allows you to use of your phone as a calculator.
This calculator performs basic mathematical functions (addition, subtraction, multiplication,
division). To access the calculator: all the numbers and characters entered will be shown in the
editing window.
For example:
Calculate: 123*2.2
Step1: Input 123 ;
Step2: Press to prefix multiplication sign;
Step3: Input the number 2.2. (To insert a decimal point, press .)
Step4: Press or for the answer.
Press to clear the number input, and hold to clear all numbers input. When there are
errors, messages such as Can't Divided by "0" Result too large will be displayed on screen.
51
Page 58

9. PROFILES
9.1 Introduction
Phone profiles include Incoming Call Alert, SMS Alert, Ring Type, Ring Volume, Key Tone,
Power Tone and Warning Beep.
9.2 Incoming Call Alert
When you are receiving an incoming call, you can be alerted in five ways: Ring , Vibrator ,
Ring & Vib , Ring After Vib and Silence .
9.3 SMS Alert
When you are receiving a message, you can be alerted in four ways: Ring , Vibrator , Ring &
Vib and Silence .
9.4 Ring Type
Ringing tone type involves Phone Ring, SMS Ring, and Alarm Ring. There are 16 general music
options prepared for Phone andAlarm Ring, and 5 for SMS Ring.
9.5 Ring Volume
Six ring volume levels are available, from the minimum level 0 to maximum level 5.
9.6 Key Tone
Select from Key Tone Disable or select Low , Mid , High .
9.7 Power Tone
Decides whether there is tone when power On/Off the handset. You can choose to switch to
Enable/Disable .
52
Page 59

9.8 Low Batt. Beep
you can choose to switch Enable/Disable ,if Low Battery
53
Page 60

10. GAMES
Two classic games are offered: Snake and Tetris.
10.1 Snake
Move the snake to eat the goody and evade walls and self. Note: The snake cannot go
backwards. Use the keys 2, 8, 4 and 6 to move up, down, left and right. Press to pause
game play and press again to continue. When you press , you will be asked whether to
save the game, or quit. If you press during the game, it will save automatically and quit.
The level of the game can be adjusted according to skill level.
10.2 Tetris
The screen is divided into two regions: game region and tip region. The square object is the
standard Tetris object. Each line, when filled, will be erased and gets scored. When the objects
reach the top of the screen, objects cannot fall down and the game will be over. The current
score and the shape of the incoming object will be shown in the tip region. You can select the
game skill level and query the highest game scores.
54
Page 61

10.3 Game Sound
You can set the game sound to enable or disable during game play.
55
Page 62

11.SMS SERVICES
This menu option allows you to access a range of SMS based services that help you do more.
Simply select the desired service from the service menu. Choose from Jokes, Cricket
information, Astrology, Win Prizes and more
To get the list of content available for your handset or for further assistance on this service, dial
12524 for prepaid users and 121 for postpaid users.
56
Page 63

12.TROUBLESHOOTING
The phone cannot power on
If the power of battery is too low, it will automatically power off. Please charge the battery and
then power on.
Other parties are receiving my incoming calls:
The phone have been transferred your incoming calls to another number; check and cancel Call
Forwarding.
Message display
During the operation, the phone may display incorrect operation messages; check the UIM card.
You must insert the UIM card before powering on. If the card has been inserted, please take it
out. Wipe the metal area with dry cloth, and insert the card.
No Service
You may be beyond the network service area (or there is physical barrier between you and a
signal tower); this will prevent successful dialling or answering of incoming calls.
Input PUK code
The wrong password of the PIN code has been input fifteen times, or if the UIM card has been
locked, you must apply for the especial 8 digit PUK code to unlock UIM card from the network
carrier.
If the malfunction symptoms are not listed in the above table, or the corresponding solution is
invalid, please contact your local HaierC1000 Customer Service Center.
:
:
:
:
57
Page 64

For Technical Support and Assistance please visit the HaierC1000 website at:
http://www.Haier.com
Select Support and be directed to the Toll Free number of the HaierC1000 International
Professional Service Regional Center that serves your area.
Or you can call the HaierC1000 North America Professional Service organization at 1-(866)
4006999999.
58
Page 65

13.ACCESSORIES
Standard Accessories
Mobile phone (1)
User guide (1)
Travel Charger (1)
Battery (1): 850mAh lithium battery, providing 130 hours operating time and 180 minutes call
time.*
* The duration varies from the actual situations.
Optional Accessories
Battery
Travel Charger: For travel convenience and can be connected directly to the jack in exterior of
phone during charging
Data cables: The phone can become multifunctional by connecting to a PC, and data can be
transmitted between the PC and mobile phone. You should open the phone before inserting
cables; otherwise the PC CPU may be damaged.
Earphone For receive incoming calls. You can answer a call by pressing the key on the
:
earphone, even if walking. Please handle with it carefully during inserting or removing the
earphone. The earphone volume also depends on the depth that the earphone has been
inserted into the mobile telephone.
59
Page 66

While purchasing accessories for your mobile phone, please consult the agency or service
center to ensure compatibility.
Warning: Only use batteries, chargers and other fittings provided by HaierC1000 as the
phone may be damaged when using non-compliant accessories.
60
 Loading...