

Page 1

MODEL RQ-85
M
REFRIGER
A
TOR
S
O
PER
A
TIN
G
INSTRUCTION
S
The manufacturer keeps on developing various
types of refrigerators, so he has the right to mo
dify
desi
gns, products and technical data without furthe
r
notice
.
No. 0711
6015
Lema
ir
BC-76
Page 2
If the supply cord is damaged, it must be replaced by t
he
manufacturer or its service agent or a similarly qua
lified
perso
n
i
n order to avoid a hazar
d.
W
ARNING:
Page 3
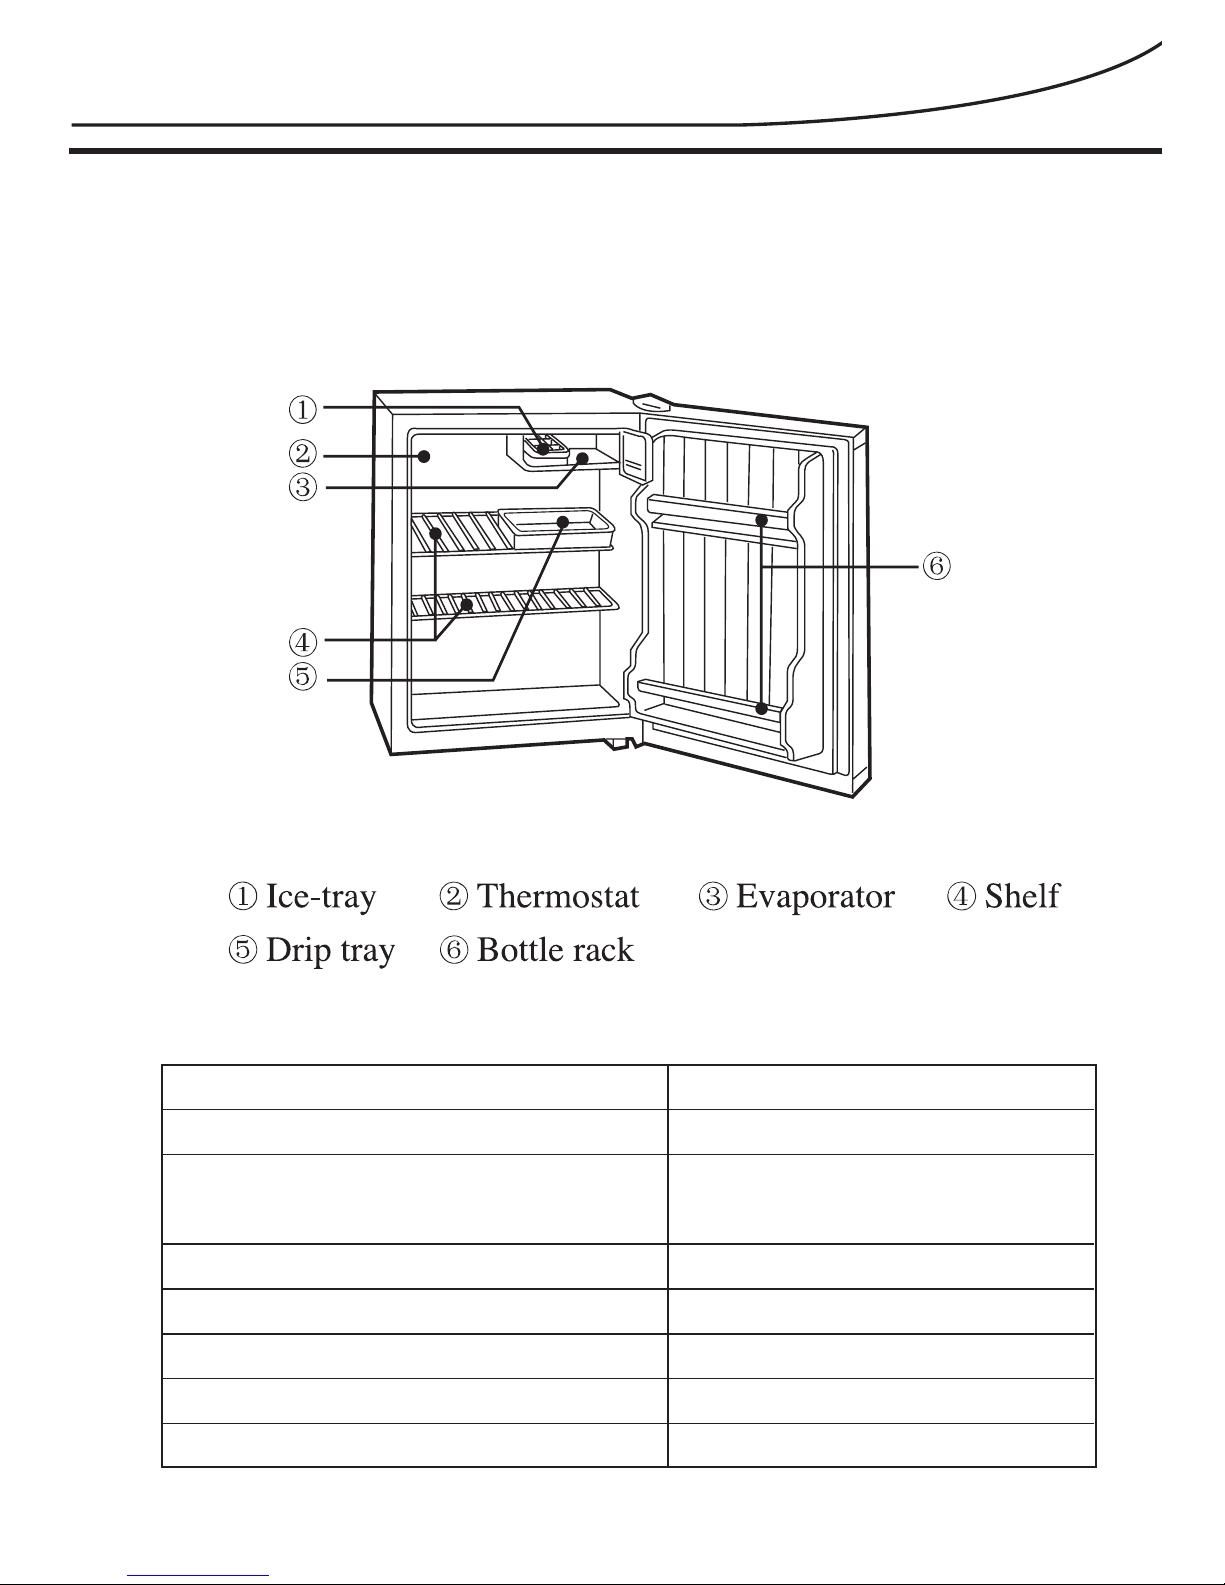
FIGURATION OF THE REFRIGERATOR
1
TECHNOLOGY DATA
Model
Climate class
Anti-shock safety
classification
Net capacity
Gross capacity
Voltage
Watt
Refrigerant
BC-76
T
I
76L
80L
220V,60Hz
85W
46g
BC-76
Page 4

NOTI
CE
The power supp
ly
f
or appliance
is
240V, 50H
z
single phase
.
It is n
ot
recomende
d
t
o use an
y
extension cords
.
Connect the appliance with
a
properly earthed three-wire plu
g
and socket with a special use
.
ETTING U
P
The appliance can be placed with it
s
rear panel directly against the wa
ll.
For a good air circulation, the ven
t
gr
ill
e at the back of the worktop mus
t
not be blocked, It should be placed o
n
at and firm ground lest it gives o
ff
high
er noise than usua
l.
Poorly ventilated room
s
are unsuitable. Avo
id
positioning the applianc
e
n direct sunshine o
r
exposed to simila
r
sources of heat
.
Never store anything dangerou
s
n the appliance, such a
s
combust
ibl
es, exposives
,
strong acid and alkali. etc
.
The appliance is not in
-
tended for use by youn
g
c
hild
ren or infirm person
s
without supervision
.
supervised to ensure tha
t
they do not play with t
he
appliance
.
T
he power supp
ly
f
or appliance is
2
20V, 60Hz
Page 5

THERM
OS
TA
T
The knob graduation 0, 1, 2, 3, 4, 5, 6, 7
,
oes not stand for concrete temperature.The smalle
r
the numbers,the higher the temperature in t
he
compartment and vice versa.Usually,it’s better t
o
put the thermostat in Pos. “1”,Pos. “4”, Pos. “0
”
shows the power is cut o
ff.
TORING F
OOD
The temperatures in
diff
erent positions ins
ide
the refrigerator are
diff
erent due to
diff
eren
t
re
fri
geration distribution.Thus when stor
e
ood, select proper position to meet you
r
needs
.
The coldest position
ë
, Temperatur
e
rom
l
ow to high in order a
s
!
ICE-MAKIN
G
When making ice,add water to the ice tra
y
until 4/5 full with the grid in it and place i
t
on the bottom of the ice chamber. Twist t
he
tray or place it briefly in warm water t
o
remove the ice cubes
.
NOT
E
Do not use a
knif
e and the
lik
e whe
n
remov
i
ng the ice tray
.
Page 6

NOTES ON STORA
GE
Where necessary, food should
be
packed in bags, avo
idi
ng givin
g
off strong odours or getting we
t
or dry
.
Do not store food too full
in
the appliance. Allow space amon
g
t
h
e packages of food for
a
perfect refrigerating
.
Hot food or liquid must be allowe
d
to cool to room temperatur
e
bef
ore placing in it
.
LEANIN
G
The appliance can only be cleaned at drawn network plug. Clean
it
with lukewarm water containing a little detergent. In any case
do
not use hot water,corrosive scouring agent and anything roug
h.
NOT
E
Do not use anything roug
h
or cleaning
.
Pullt
he
plug ou
t
4
Page 7

DEFR
OS
TIN
G
When defrosting, switch o
ff
the appliance. Remove food fro
m
the ice chamber,it w
ill be
efrosted automatically.Whe
n
efrosting process has bee
n
completed, the drip-tray shou
ld
be depl
eted. Replace the foo
d
and switch on the appliance
.
NOTE
S
If the applianc
e
remains out o
f
use for some time
,
pull out the plu
g
to disconnect t
he
app
li
ance fro
m
power supply
.
Clean the interio
r
as describe
d
above to preven
t
odours fro
m
orming inside
.
In the event of powe
r
ailure,try to kee
p
the appliance close
d
to maintain t
he
refrigeration as lon
g
as poss
ible.
The appliance doo
r
should be opened a
s
ttle and brie
fly
as poss
ibl
e to reduc
e
energy consumptio
n
4~6m
m
Page 8

LEFT/RIGHT-OPENED DOO
R
This product is assembled according to the right-opened doo
r
configuration. The right hinge together with its mount is fixed o
n
the right side of the door body. Take out the door handle fro
m
the accessory parts and fix it on the left side of the door body
.
The two holes on the right side of the door body shall be stuffe
d
with the handle hole stoppers, as an item of accessory parts
.
In case the left-opened door configuration is required, this can
be achieved by using accessory parts
.
1) Remove the right hinge, hinge mount and the lower hinge fro
m
the door body
.
2) Put stoppers in the holes that occur
.
3)Install the left hinge and hinge mount (two items of accessor
y
parts) onto the corresponding location at the left upper corner o
f
the refrigerator body with Screws removed from the right hinge
.
4) Dismantle the shaft from the lower hinge, put it into the hole o
n
the left side and fasten it securely
.
) Install the door body with the refitted lower hinge and put th
e
lower hinge adjusting pad in place
.
) Install the door handle on the right side of the door body wit
h
screws through two holes and fasten them securely
.
7) Stuff the two holes on the left side of the door body with han
dle
hole stoppers
.
Page 9

In the event of a fault occurring during operation, check first if t
he
ault is due to an operation error. You can repair the following fault
s
yourself
.
The appliance doe
s
not run
.
1. It
i
s not switched on properly
,
or mains plug properly inserte
d
in the socket
.
2. T
h
e thermostat knob is turned t
o
position “0”
.
3. Su
pply
voltage is too low
.
The temperature ins
ide
the appliance is no
t
ow enoug
h.
1. The appliance is too full of foo
d.
2. The appliance is located too nea
r
a source of heat
.
3. T
he d
oor is not properly closed o
r
is opened too frequently
.
4. The vent gr
ille i
s covered over
.
Excessive nois
e
rom the appliance
.
The appliance is not standin
g
secure
l
y on the groun
d.
If none of these circumstances applies and you are not able t
o
repa
i
r the fault, please Contact the service point
.
Page 10

s`RPOMMT
kçKMMSMRMTMQQ
 Loading...