

Page 1

LED Backlit Flat TV
INSTRUCTION MANUAL
Please read this manual carefully before operating the unit, and keep it for
future reference.
Page 2

Contents
EN-1 LED Bac
klit Flat TV instruction Manual
Contents
Safety Warnings 2
Welcome............................................................... 2
Important Information........................................ 2
About Your LED LCD TV 5
Installing the Stand ............................................ 5
Wall Mounting Installation..................................6
Front Control Panel..............................................7
Rear
Terminal Control..........................................8
Get to Know Your Remote Control...................... 9
Connecting Your TV ...........................................10
Antenna Connection..........................................................10
Improve Your Signal ...........................................................10
Connect Your PC to the TV...............................................10
Connect a DVD Player to Your TV ..................................10
Connect a DVD Player or VCR to Your TV ....................10
SCART Input ..........................................................................10
HDMI
Input ............................................................................10
Preparation of Your Remote Control................11
Battery Installation..............................................................11
Battery Caution ....................................................................11
Setting up........................................................... 11
Location..................................................................................11
Connection............................................................................11
Switching Your TV On ........................................................11
Tuning Your TV...................................................12
Switching to an External Source Other Than TV......12
Channel
Scan ( Cable)........................................................12
Channel
Scan ( Air)..............................................................12
Channel
Scan (Satellite) ...................................................13
Di
gital Manual Search(Cable) .........................................13
Di
gital Manual Search(Air) ...............................................14
Analog Manual Search ......................................................14
Channel
Edit..........................................................................14
Common Interface.............................................15
Software Update Function................................ 15
Operation...............................................................................15
Using Your TV .....................................................16
How to Select the TV Program .......................................16
How to Adjust Volume.......................................................16
Adjusting Picture Settings................................16
Changing the Picture Setting .........................................16
Adjusting Sound Setting................................... 17
Changing the Sound Setting ............................ 17
Function Settings .............................................. 17
Lock Menu Setting............................................. 21
Shortcut Menu Display...................................... 22
Teletext Functions .............................................23
Teletext....................................................................................23
To watch a 3D TV................................................ 24
If the TV is currently in the 2D mode............................25
If the TV is currently in the 3D mode............................25
USB Mode........................................................... 25
To Use the USB Device.......................................................25
Connecting a USB Device.................................................25
USB
Media Menu operation ............................................26
To play pictures ....................................................................26
To play music ........................................................................26
To play movie........................................................................27
DLNA (Digital Living Network Alliance)........... 27
Using External USB Disk For Recording........... 27
Using the APP@TV service ................................28
Reference Sections 29
Troubleshooting................................................29
Specification.......................................................30
Appendix.............................................................31
Figures and illustrations in this User Manual
are provided for reference only and may
differ from actual product appearance.
Product design and specification may be
changed without notice.
The LED light will start flashing when you
turn the TV on. The Haier Logo will appear
for a few seconds, and then disappear. The
LED continues flashing.
Please wait as the TV continues to boot up.
Do NOT press any buttons during the boot up.
After approximately 30 seconds the main
picture will be displayed.
Page 3
Safety warnings
LED Backlit Flat TV Instruction Manual EN-2
En
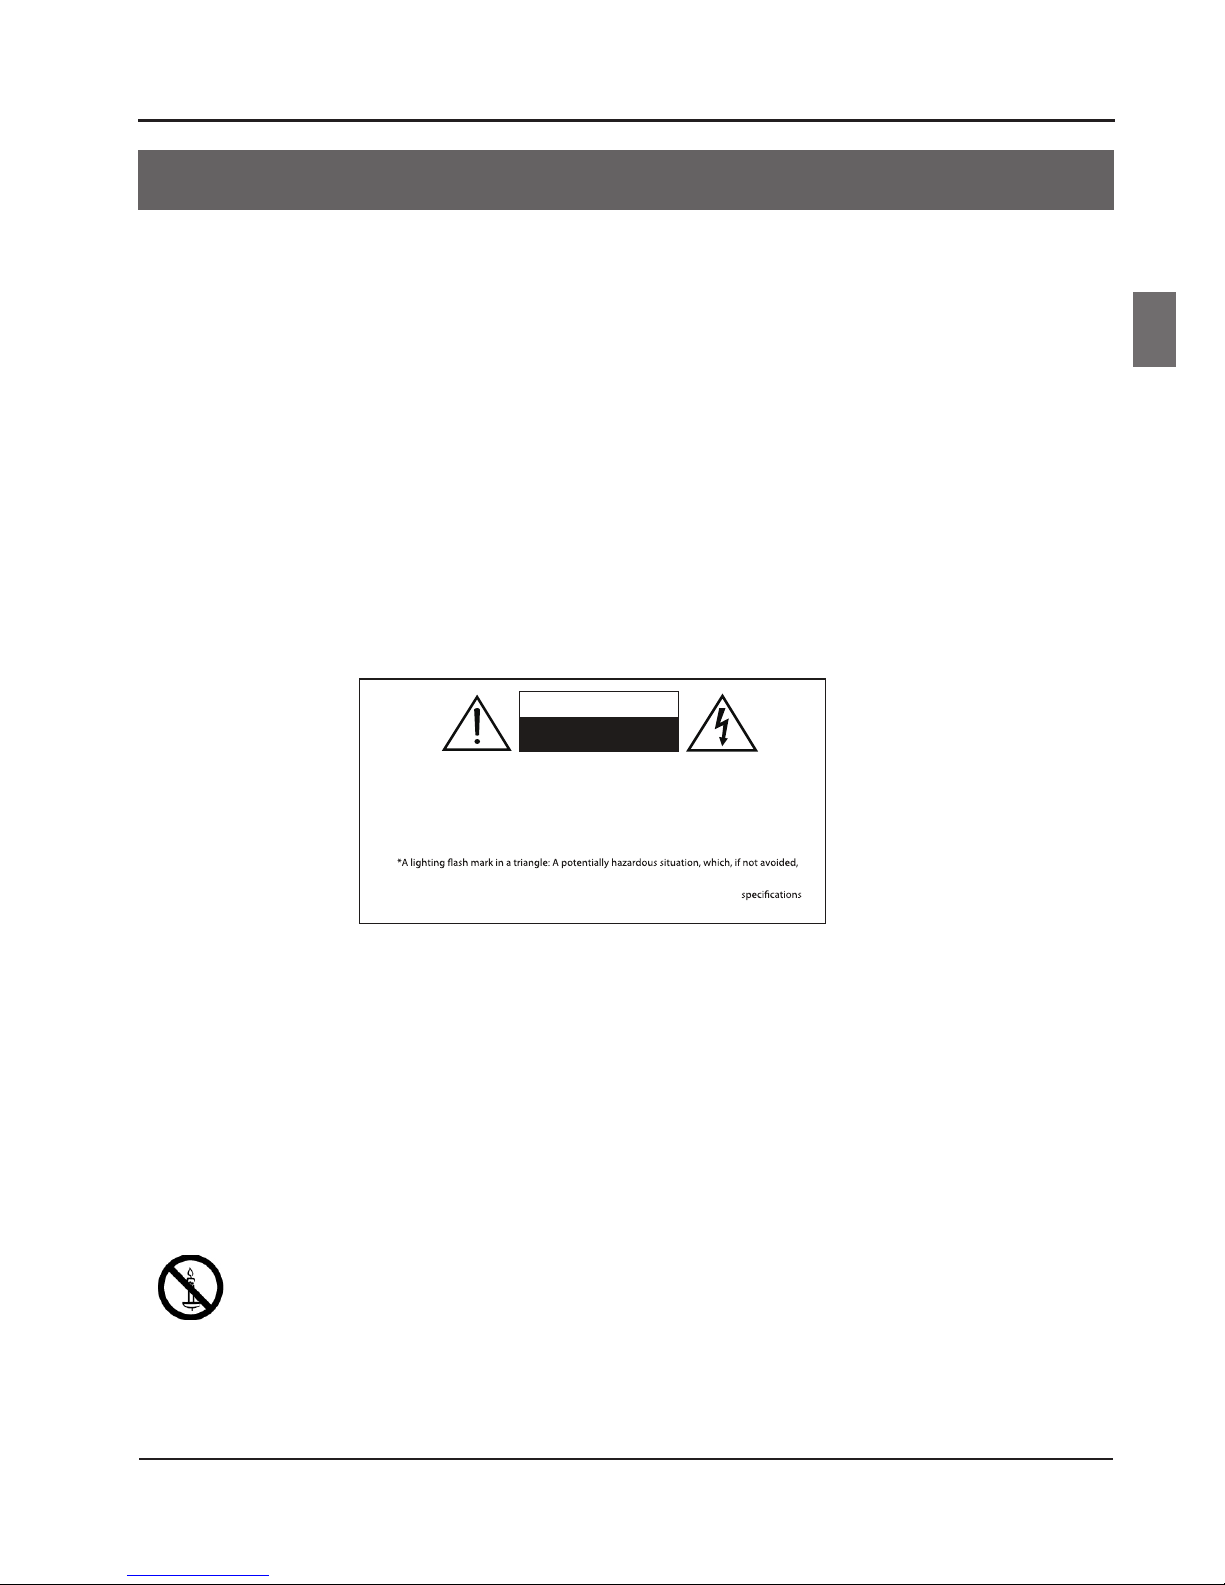
WARNING
*To avoid electric hazards, it is strongly suggested that the back cover not be opened, as
there is no any accessory inside the casing.
*If necessary, please contact authorized after-sales services.
could result in serious injury by high voltage.
*An exclamation mark in a triangle: Major partor accessory of which technical
must be followed i t is to be replaced.
WARNING
RISK OF ELECTRIC SHOCK
DO NOT OPEN
TO REDUCE THE RISK OF ELECTRIC SHOCK DO NOT REMOVE COVER (OR BACK). NO
USER SERVICEABLE PARTS INSIDE. REFER TO QUALIFIED SERVICE PERSONNEL.
f i
Welcome
Thanks for buying this 32"/42" LED Backlit Flat TV. This guide will help you to set up and begin using your TV.
Firstly, check the contents of your box with the parts checklist below:
32"/42" LED Backlit Flat TV •
Remote control •
AAA battery • x2
Instruction manual, warranty•
Quick start guide, TV stand•
7x screws for 32" model; 8x screws for 42" model •
Component video adaptor, SCART adaptor, PC/DVI/component adaptor.•
3D glasses x6 •
Now you can get started!
Important information
READ ALL INSTRUCTIONS BEFORE USE AND KEEP FOR FUTURE REFERENCE.
WARNING: To avoid res and electrical hazards, never place your television receiver in a humid
area. Take care to avoid accidental scratches or impacts on the screen.
Do not cover the ventilation openings with items such as newspaper, table-cloths, curtains etc.
CAUTION: The main plug is used as a disconnection device and must remain readily accessible.
Please read this manual carefully before using your television, and keep this manual to
hand for future reference.
To achieve the best performance from your television, read this User Manual carefully and
keep to hand for future reference.
Information in the User Manual regarding screen displays and gures may vary due to
technical innovations.
Unauthorised disassembly of this product is prohibited.
WARNING To prevent the spread of re, keep candles or other open ames away from this product at all
times.
Safety warnings
Page 4
Safety warnings
EN-3 LED Backlit Flat TV Instruction Manual
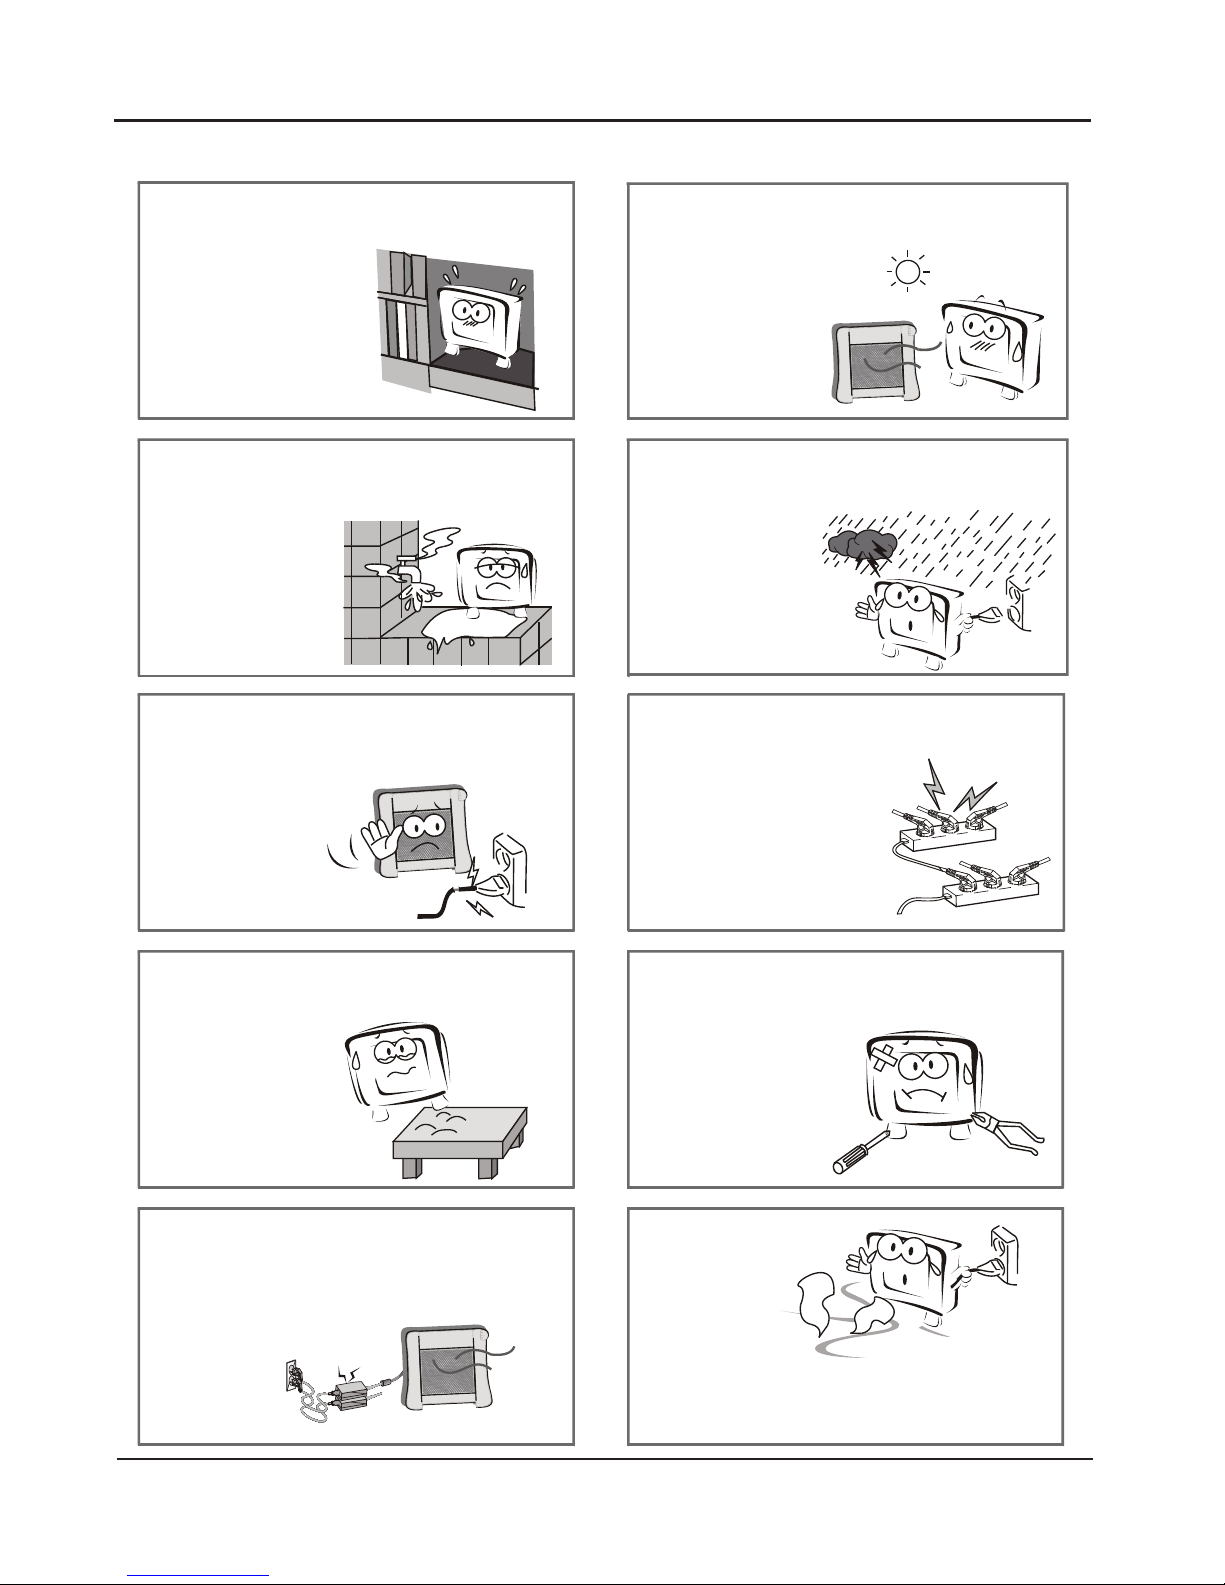
Do not position the product close to water or
oil (e.g. cooking oil or lubricating oil), as this
may cause a fire hazard.
The product should be tightly secured to
avoid fires and damage caused by
dropping.
To avoid fire hazards, do not use this
product in direct sunlight or close to
heat sources.
Unplug the power supply and antenna of
the product during a rainstorm and
particularly during
a thunderstorm.
Do not use damaged or worn electrical plugs
and keep cables away from heat sources to
avoid electric shocks and fire hazards.
To avoid fire hazards, do not connect multiple
sockets in parallel and do not connect multiple
plugs to the same socket.
To avoid it collapsing, the product must be
placed on a solid and stable surface.
To avoid electric shocks or fire hazards,
unauthorised disassembly of the television
is prohibited. Contact
an authorised
after-sales service
provider if technical
servicing is required.
To avoid fire hazards, keep the product
away from transformers or heat sources.
Disconnect the product from the power
supply and contact an authorised after-sales
service provider if the product starts to
make abnormal sounds.
Page 5
Safety warnings
LED Backlit Flat TV Instruction Manual EN-4
En
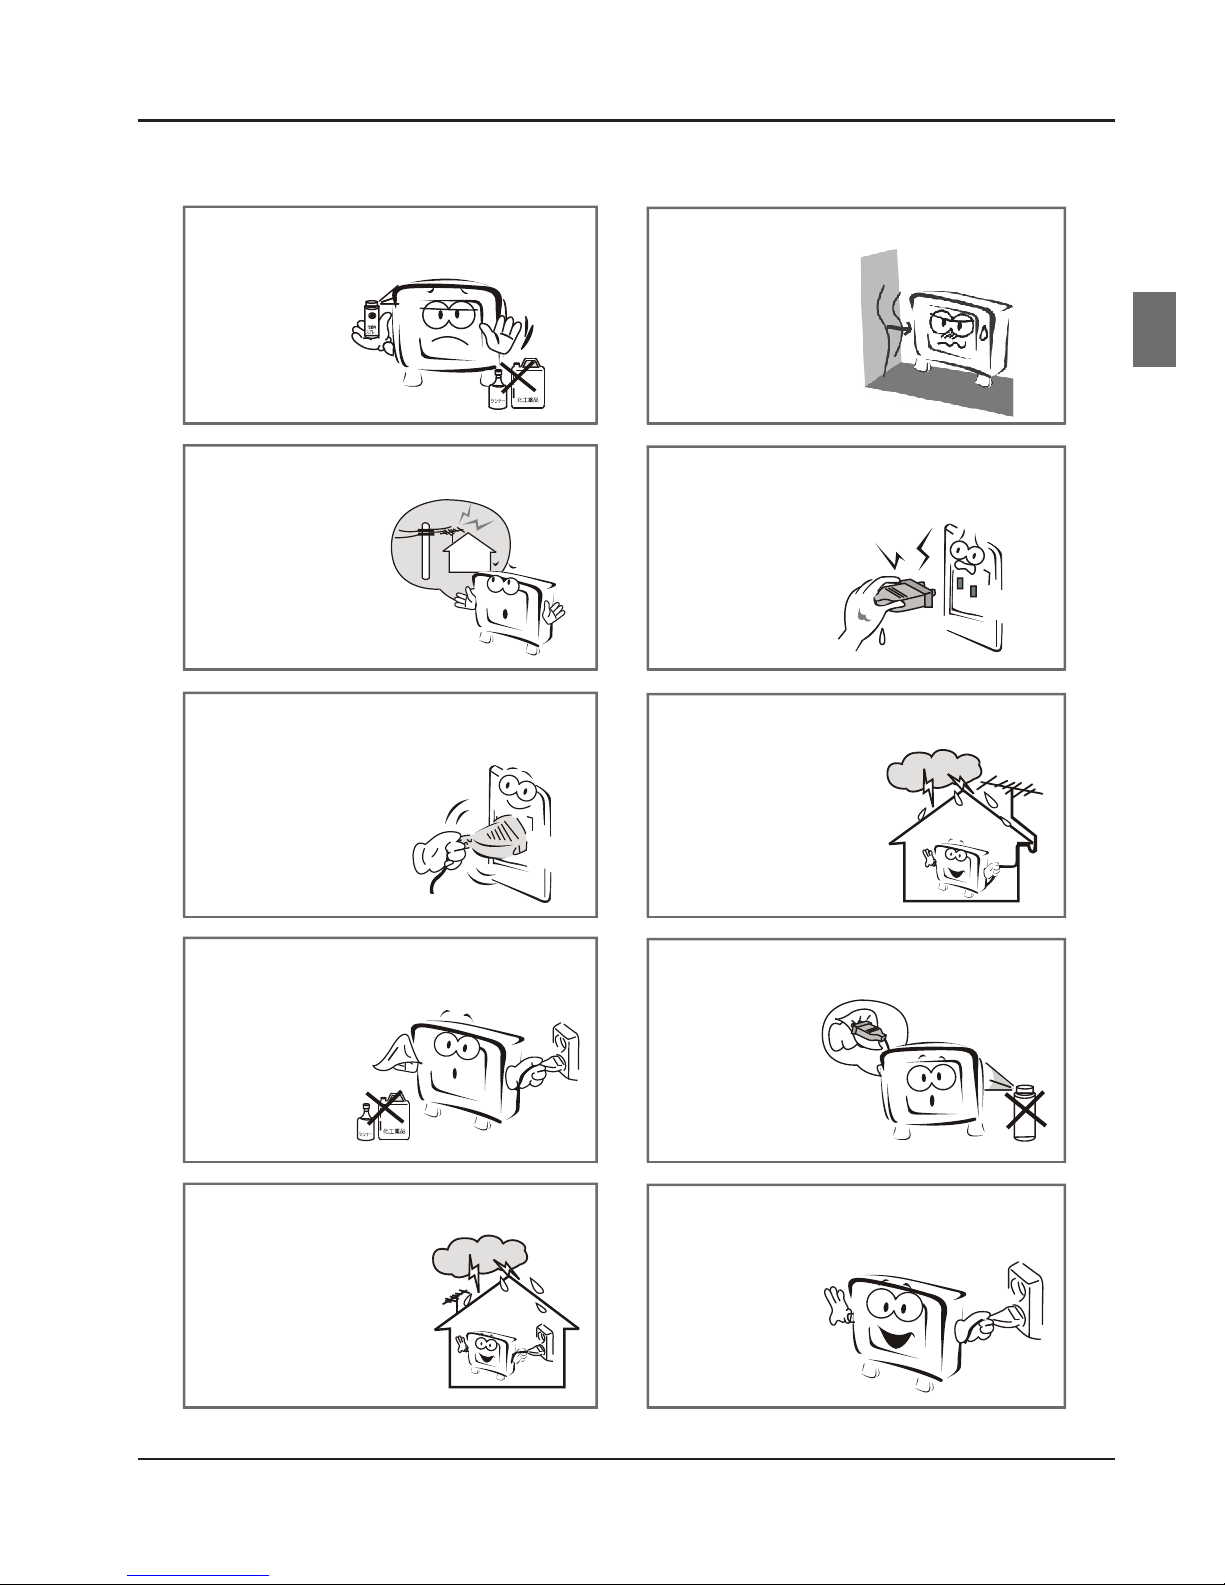
To avoid explosions and fire hazards,
don't use or store inflammable materials
near the product.
To avoid fire hazards, do not place the
product in a humid
area.
To avoid electric shocks, the antenna of
the product should be
away from electrical
cables.
Never touch the plug with wet hands,
as this might cause electric shocks.
Always make sure that the television is
firmly plugged in, as a poor electrical
connection might cause a fire.
When an antenna is used, measures should
be taken to prevent water
from flowing down
through the cable and
into the television.
Before cleaning the product, unplug the
television, and use soft fabric, not chemicals.
Make sure that no water
comes into contact
with the product.
The plug and electric cable must be kept
clean to avoid electric shocks or fire hazards.
To avoid electric shocks or fire hazards,
disconnect the television
from the power supply
and the antenna during
a rainstorm or
thunderstorm.
To avoid electric shocks or fire hazards,
if you are not using the television for long
periods of time, disconnect it from the
power supply.
Page 6
About your LED LCD TV
EN-5 LED Backlit Flat TV Instruction Manual
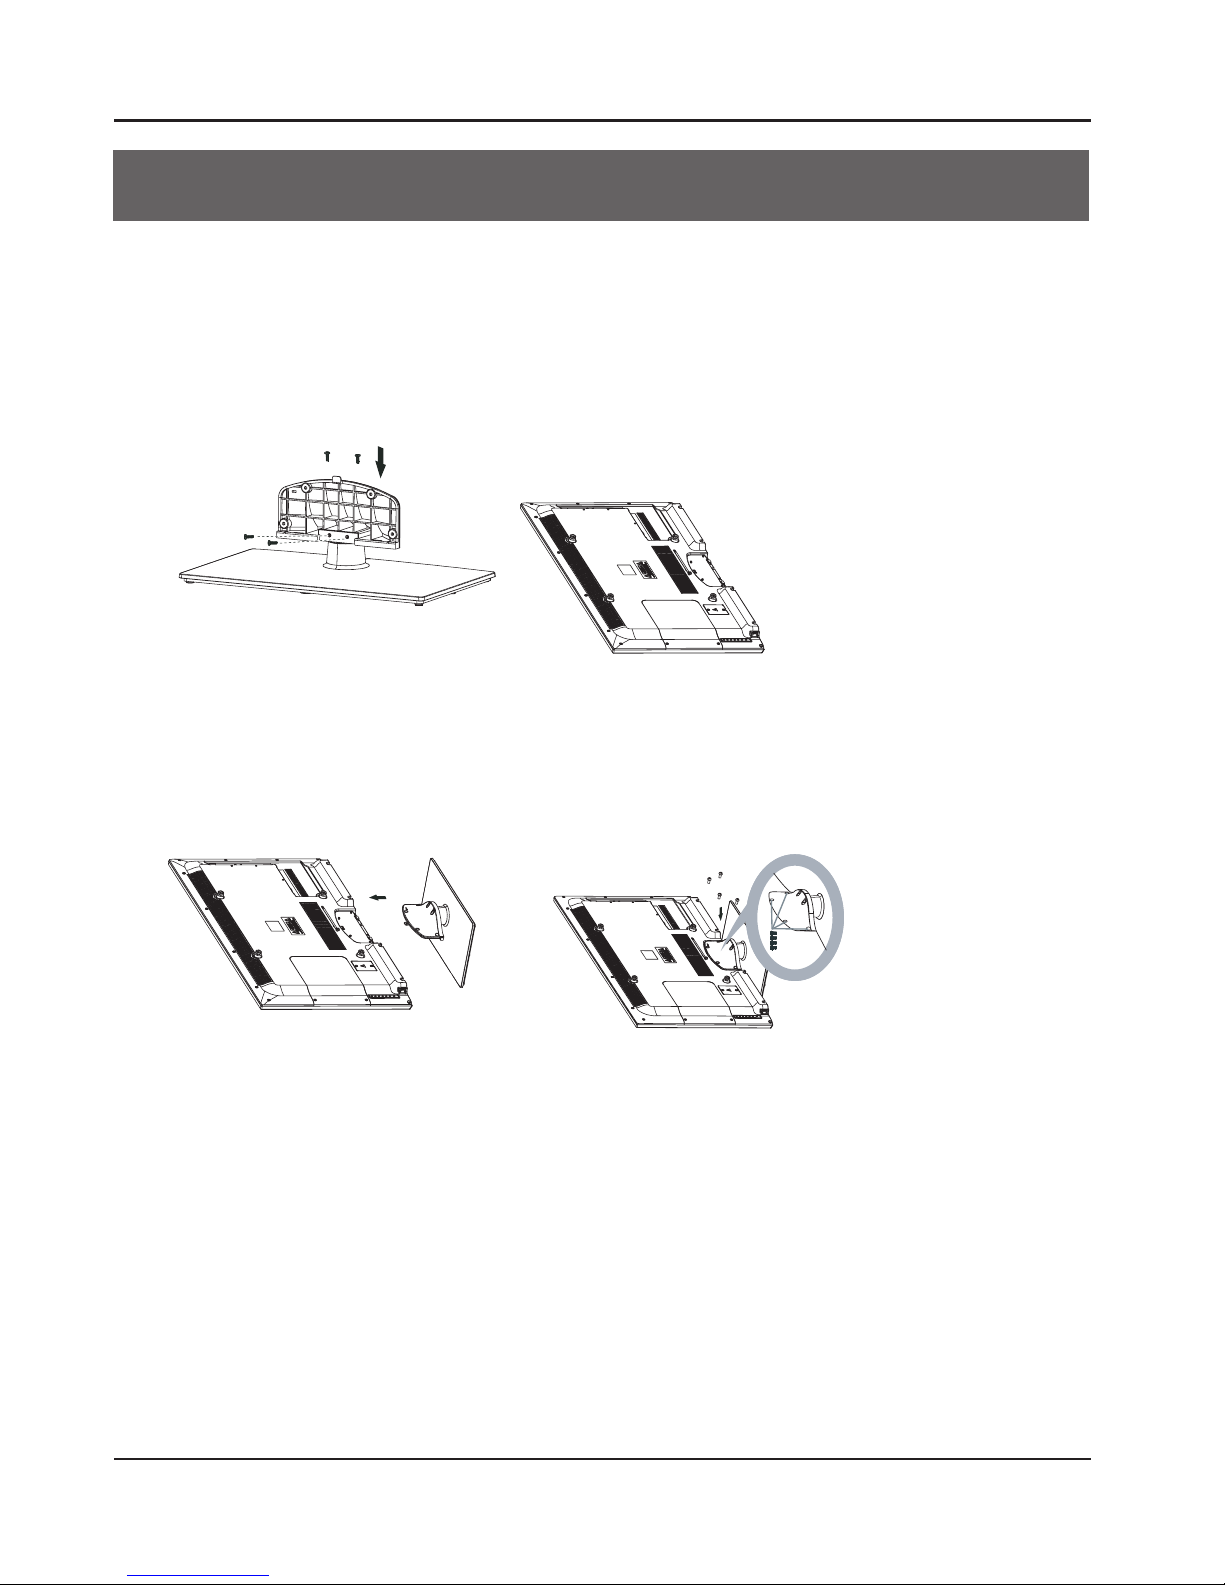
Step 4: Attach the screws through the bottom
of the stand to the TV.
The 32" model needs 5 screws (ST4X12)
in order to x the bottom of the stand
to the TV. This includes 2 screws xed
on the TV.The 42" model needs 4 screws
(M4X12) in order to x the bottom of the
stand to the TV.
Step 3:Push the stand onto the TV.
Step 1: Connect the guide stand to the
stand using four screws (ST4X12) as
shown.
Step 2:
Carefully place the TV screen face down
on a table. To protect the screen from
damage, we suggest that you place the
packaging that the TV was wrapped in
on the table top.
About your LED LCD TV
Installing the stand
Page 7
About your LED LCD TV
LED Backlit Flat TV Instruction Manual EN-6
En
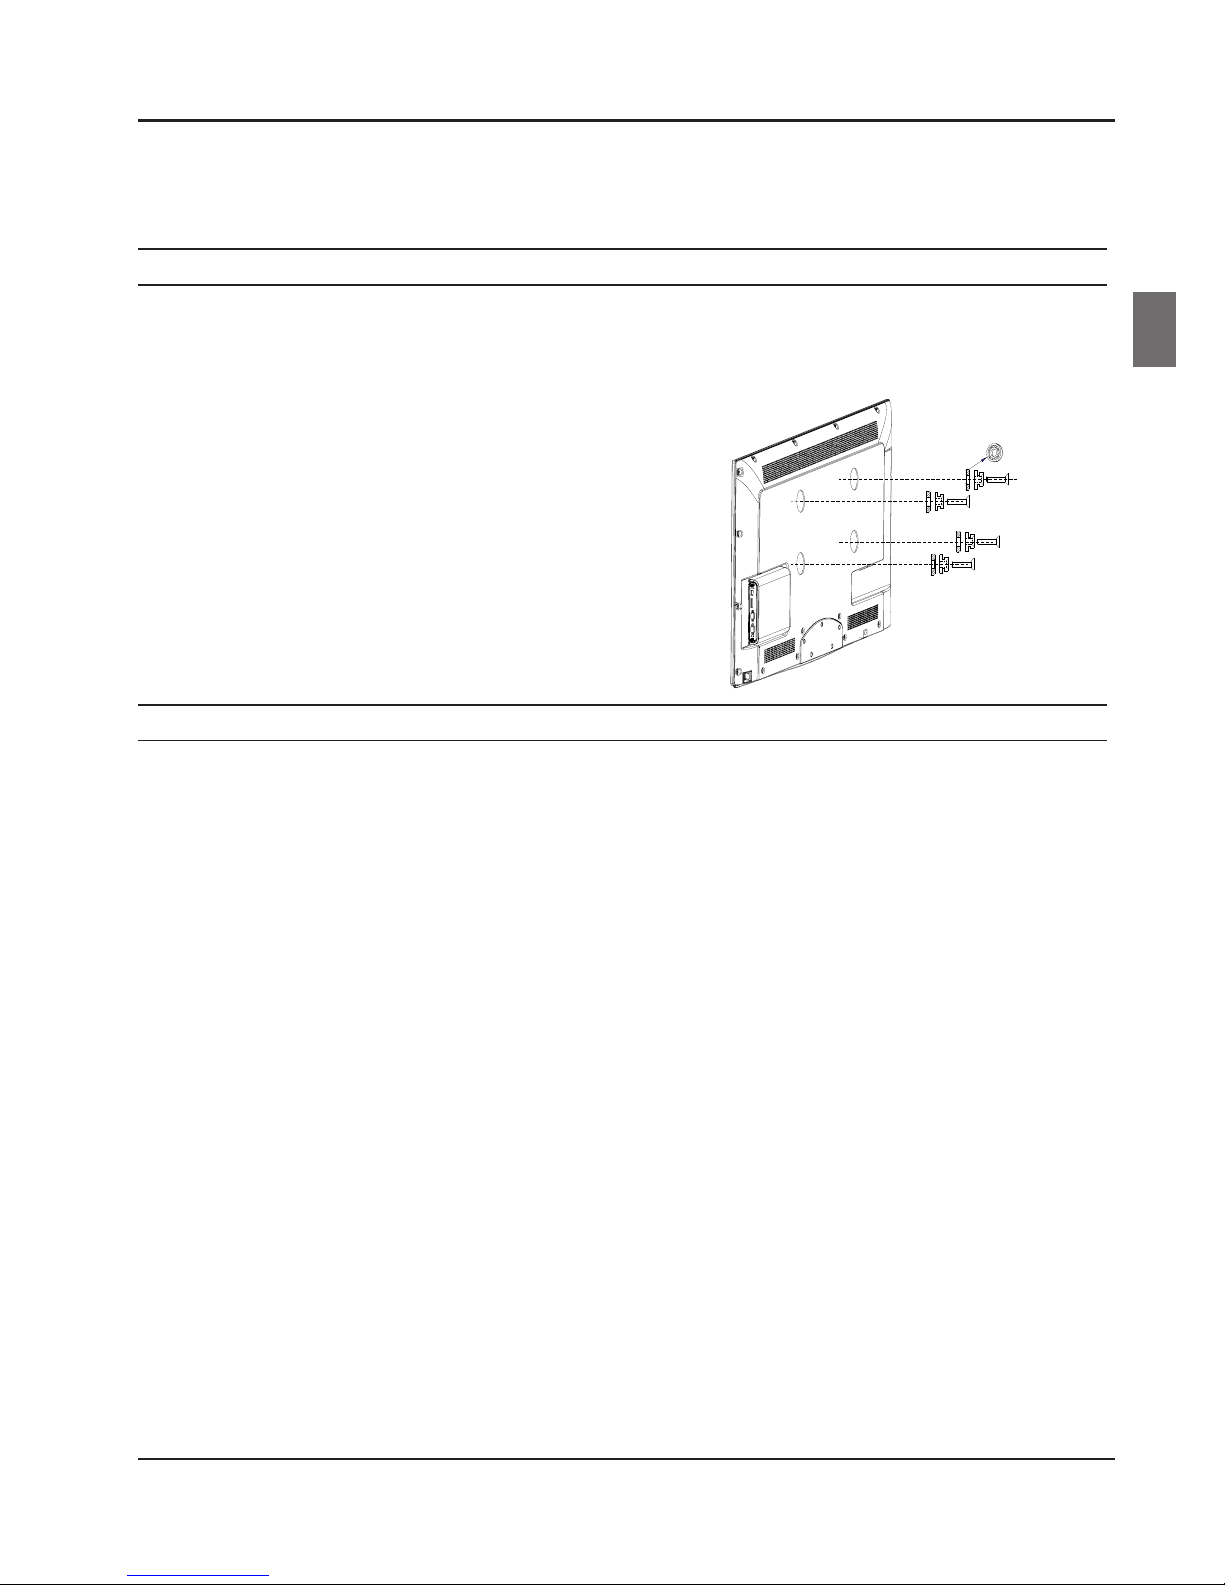
Wall-mount installation
Preparing to install a wall mount.
To install a wall mount from another manufacturer, use the holder ring.
32" model standard screw: M4
42" model standard screw: M6
Wall-mount installation kit
The wall mount kit (sold separately) allows you to attach the TV to the wall.
For detailed information on installing the wall mount, see the instructions provided with the wall mount.
Contact technical assistance when installing the wall mount bracket. Haier Electronics is not responsible for
any damage to the product or injury to yourself or others if you install the TV on your own.
Page 8
About your LED LCD TV
EN-7 LED Backlit Flat TV Instruction Manual
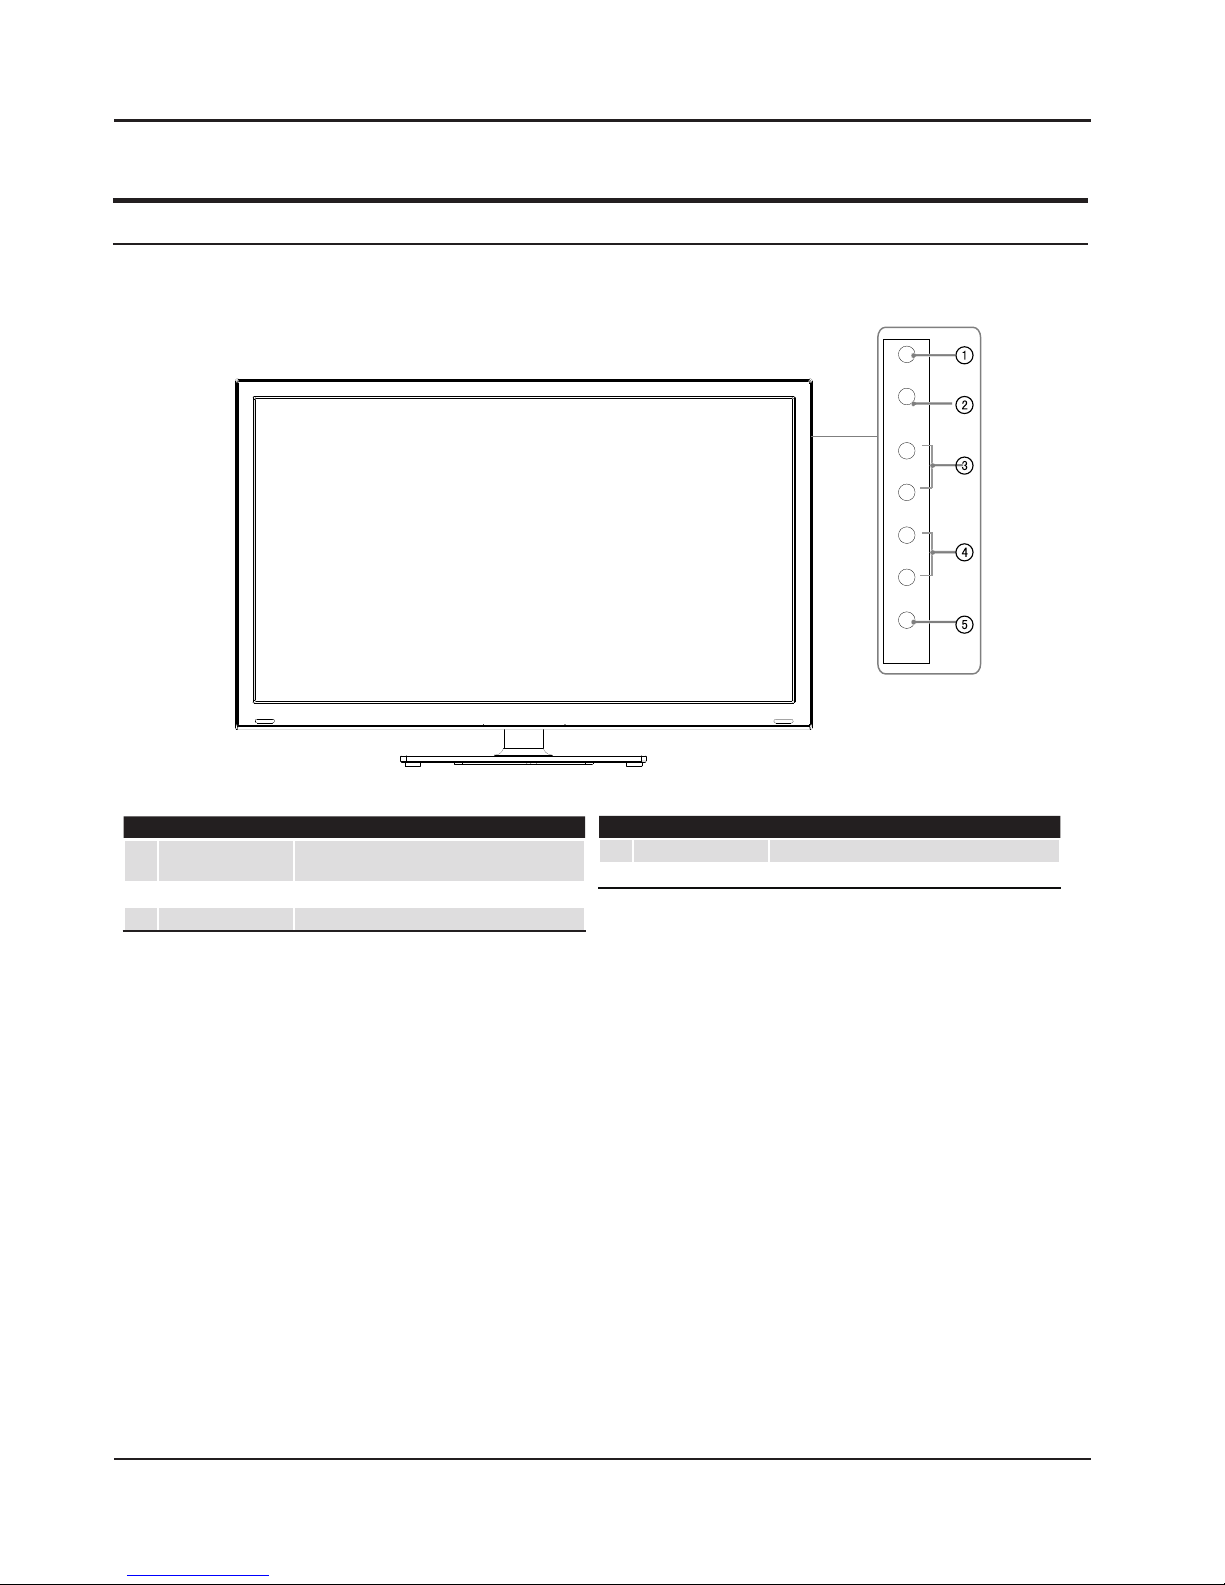
Front control panel
SOURCE
MENU
VOL+
CH+
CH-
POWER
VOL-
1
SOURCE
Toggles between all the available input
sources.
2
MENU
Press to select the main menu.
3
VOL+/- Press to increase and decrease the volume.
4
CH+/-
TV channel up
and
down.
5
POWER Press to turn the TV on and o.
Page 9
About your LED LCD TV
LED Backlit Flat TV Instruction Manual EN-8
En
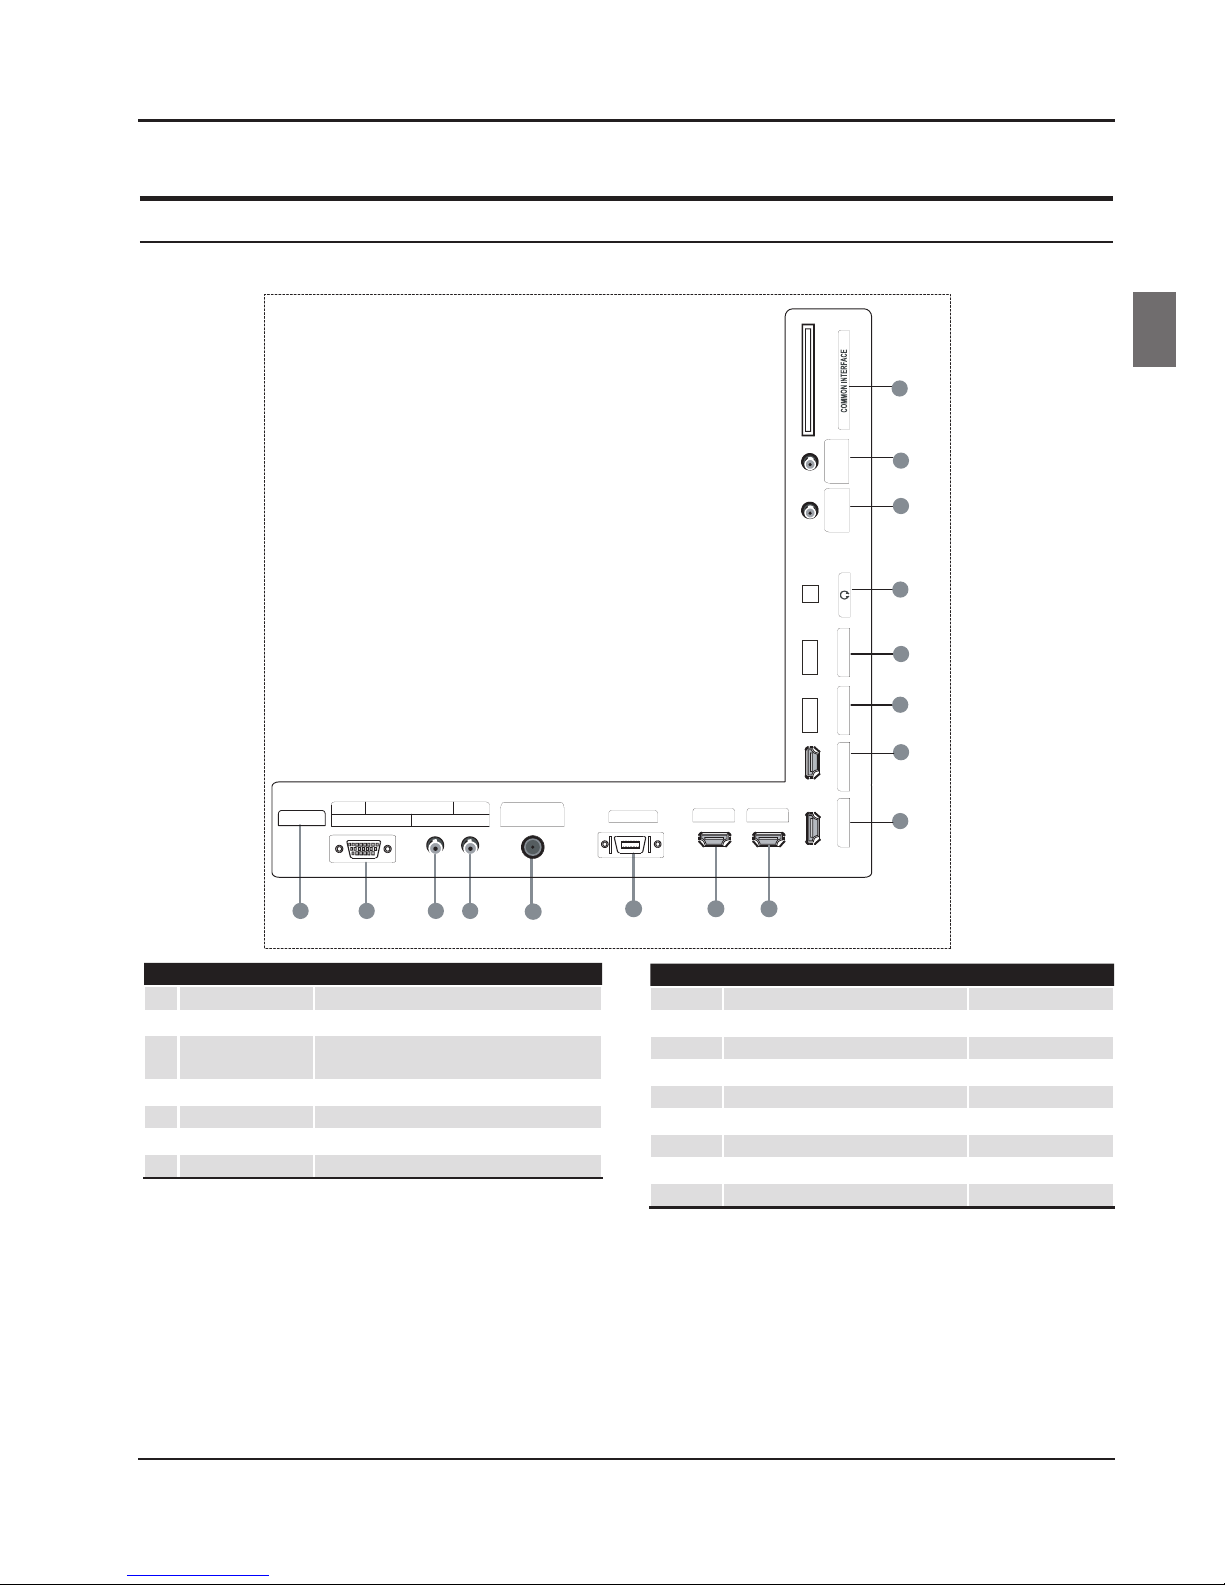
1
LAN input
2
PC IN input
3
PC/DVI/YPbPr
AUDIO
input
4
Component IN input
5
Optical
output
6
SCART input/output
7
HDMI4 IN
input
8
HDMI3 IN input
9
Common interface input
0
ANTENNA satellite input
A
ANTENNA air/cable input
B
Earphones output
C
USB 1
input
D
USB 2 input
E
HDMI1 IN input
F
HDMI2 IN input
Rear terminal control
NI TNENOPMOC
5
CP
NI CP
21 3 4
PC/DVI/YPbPr AUDIO YPbPr
TRACS
876
USB 2
9
12
DIGITAL AUDIO OUT
(OPTICAL )
ANT IN
(SATELLITE)
(AIR/CABLE)
10
USB 1
ANT IN
11
HDMI 1 IN
15
13
16
14
HDMI 2 IN
HDMI 3 INHDMI 4 IN
NAL
Page 10

About your LED LCD TV
EN-9 LED Bac
klit Flat TV Instruction Manual
Get to know your remote control
When using the remote control, aim it towards the remote sensor on the TV.
1
POWER
2
Picture mode
3
Sound mode
4
Programme number/Channel selection
5
Q.VIEW: Change channel.
6
VOL+/VOL-: Volume selection
7
DTV Audio/NICAM
8
Subtitles button
9
Favourites list button
0
APP@
TV (TV-APP homepage)
A
Menu but
ton
B
Cursor button
C
Back button
D
RED but
ton, GREEN button, BLUE button and YELLOW button. These
are fast text buttons used with analogue signals. Function button in
DTV (reference the OSD)
E
Text
F
Pl
ay/pause button (only for USB & timeshift)
G
Fast reverse (only for USB & timeshift)
H
Fast forward (only for USB & timeshift)
I
D/A (digital/analogue signal switch)
J
Source exchange
K
Screen button
L
Sleep but
ton
M
GUIDE but
ton (only for DTV)
N
P∧/P∨: Channel selection
O
Mu
te
P
Call screen display/Help information
Q
3D
world button
R
Channel list button
S
Media player button
T
OK but
ton
U
Exit but
ton
V
Press to start/pause the REC function
W
Stop (only for USB, REC & timeshift)
X
Next (only for USB)
Y
Previous (only for USB)
19
20
21
22
23
24
25
26
27
28
29
30
31
32
33
34
35
1
2
3
4
5
6
7
8
9
11
10
12
13
14
15
16
17
18
SOURCE
P.MODE S.MODE SLEEP SCREEN
Q.VIEW
GUIDE
AUDI
O
SUBTITLE
CH.LIST
MEDIA.
P
BACK
TEXT
OK
3D WORLD
APP@TV
INFO
D/A
?
I/II
.,@
ABC
JKL
TUV
DEF
MNO
WXYZ
GHI
PQRS
Page 11
About your LED LCD TV
LED Backlit Flat TV Instruction Manual EN-10
En
Connecting your TV
Antenna connection
Connect your aerial to the back of the TV through the
ANTENNA IN socket.
Improve your signal
To improve the picture quality in a poor signal area, use
a signal amplier (not supplied).
Connect your PC to the TV
You can use your TV as a monitor for your personal
computer by connecting it using a VGA cable (not
supplied).
Read your computer user guide and check it has a A
VGA connector.
Turn o your TV and PC.B
Connect a D-type 15-pin VGA interface cable to the C
VGA video interface connector on the PC. Connect
the other end of the cable to the PC interface
connector on the TV. Tighten the screws on the
VGA connectors and connect the audio cable (not
supplied) to the audio input socket on the back of
the TV.
First turn on the TV, and then the PC.D
Press the Source button on the TV or TV remote E
control to set the video input mode to PC.
Once the image is displayed, and if sound can be F
heard, change the PC mode to another resolution,
change the refresh rate or adjust the brightness and
contrast on the menu until the picture is clear.
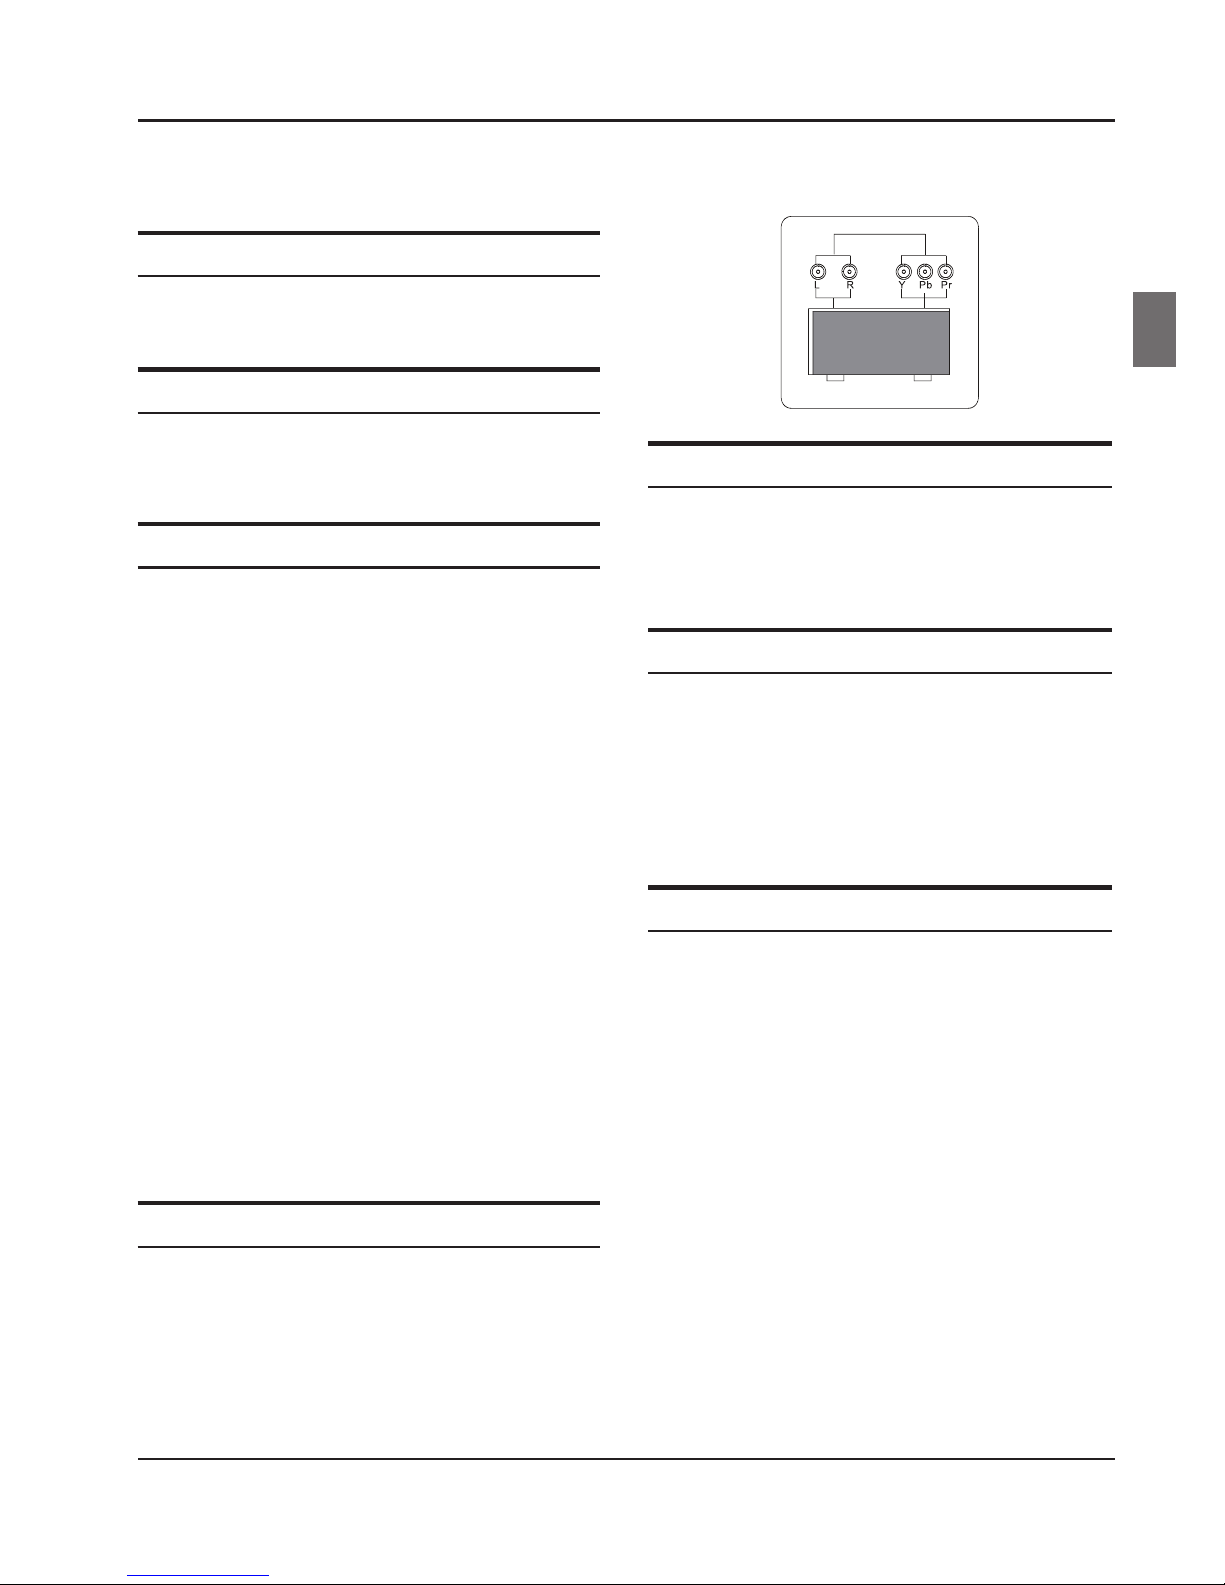
Connect a DVD player to your TV
Connect the DVD video outputs (Y, Pb, Pr) to the
COMPONENT IN (Y, Pb, Pr) socket on your TV.
Turn on the DVD player and insert a DVD disc.A
Press the SOURCE button to select COMPONENT B
mode.
Refer to the DVD player user guide for operating C
instructions.
DVD
Connect a DVD player or VCR to your TV
There are two ways in which you can connect a DVD
player or VCR to your TV. Make sure that both the TV and
DVD player or VCR are switched o before you connect
them.
SCART input
Connect the SCART lead from the external device A
(DVD player, set-top box or games console) to the TV
SCART socket.
Press theB SOURCE button to select SCART mode.
Press theC PLAY button on the external device.
HDMI input
Connect the cable from the HDMI device to the TV A
HDMI socket.
Press theB SOURCE button to select HDMI mode.
Refer to the HDMI device user guide for operating C
instructions.
Page 12

About your LED LCD TV
EN-11 LED Backlit Flat TV Instruction Manual
Preparing your
remote control
Installing the batteries
Place the remote control face down, then open the A
cover of the battery compartment.
1
Install two AAA batteries. (The + and - symbols on B
the batteries must match the marks on the remote).
2
Close the cover of the battery compartment. C
3
Battery caution
Ensure that there is nothing between the remote control
and the remote sensor of the TV set.
Sunlight, or other strong light, will interfere with the
signal from the remote control. Avoid using near
uorescent lights or neon signs.
Do not place the remote control in direct heat or in a
damp place as you may damage the remote.
Please use two AAA 1.5V batteries. Do not mix battery
types. Install the batteries according to the correct
polarities. Do not use rechargeable batteries. If your TV is
going to be stored for a long period of time, remove the
batteries from the remote control.
Do not dispose of the batteries with standard household
waste. Do not throw them in a re. Dispose of the
battery according to local regulations.
Getting started
Setting up
Location
You need to place your TV near to your plug socket (so
the power cable can comfortably reach) and within
reach of your aerial socket or extension lead.
Connection
Insert your TV aerial lead into the Antenna input at A
the side of the TV.
Insert the batteries into the remote control. Make B
sure they are inserted the right way around,
matching the polarity as indicated inside the battery
compartment.
Switching your TV on
Press the A POWER button in the bottom right-hand
corner of the TV once. An indicator light will appear
in the left of the screen.
PreB ss POWER on the remote control. The TV will turn
on. This may take a few moments.
When prompted, select your chosen language C
from the list that will appear on-screen. Use the
button to scroll to the language you want and press
the OK button to conrm.
Select the usage mode; either Shop mode or Home D
mode.
Select your country.E
Set the initial password for your TV. If the country F
you selected is France, the password cannot be set
as 0000.
Page 13

Getting started
LED Backlit Flat TV Instruction Manual EN-12
En
Please select your tuning mode and then press the G
OK button to start scanning for channels.
Tuning your TV
Switching to an external source
other than TV
If you have attached a DVD player or similar external
device to the TV, you need to programme the TV to
display the content from it. Simply press SOURCE, which
will bring up the source menu in the left-hand corner of
the screen, press 5 and the button to highlight the
required source and press the OK button to select.
For details of how to plug in other equipment see
Connecting your TV on page 10.
Channel scan (cable)
Press the A MENU button.
Press the B 5 button to select Tuning. Press the OK
button to select.
Function
Lock
Country UK
Channel Scan >>
Digital Manual Search >>
Analog Manual Search >>
Channel Edit >>
Program Guide >>
CI Information >>
Picture
Sound
Tuner Mode
Tuning
Cable Air Satellite
Back Move Enter
Back
Press the C 5 button to select Tuner mode.
Press the 34 button to set it to Cable.
Press the D 5 button to select Channel scan. Press
the OK button to select.
Function
Lock
Digital Manua l Search >>
Analog Manual Search >>
Channel Edit
>>
Program Guide >>
CI Information >>
Picture
Sound
Tuner Mode C able
Country UK
Tuning
Back Move Enter
Channel Scan
Status Scanning
Search Mode Quick
Modulation Auto
NetworkID Auto
Frequency Auto
Symbol Rate Auto
Press [OK] to search
Back
Press the E 34 button to set the Search mode.
Press the F 5 button to select Press the [OK]
button to Search. Press the OK button to start
searching.
G
Function
Lock
Digital Manua l Search
Analog Manual Search
>>
Channel Edit >>
Program Guide >>
CI Informatio n >>
Picture
Sound
Tuner Mode Cable
Country UK
Tuning
Back Move Enter
Channel Scan
Press [EXIT] to exit
25%
Digital Channels: 5
Analog Channels : 0
Status Scanning
Back
>>
Press the H EXIT button to stop channel scanning
during a search.
Note
It will take a few minutes to complete the channel ❏
scan.
Press the Menu button to exit DTV search. ATV ❏
search will continue.
Channel scan (air)
Press the A MENU button.
Press the B 5 button to select Tuning. Press the
OK button to select.
Function
Lock
Country UK
Channel Scan >>
Digital Manual Search >>
Analog Manual S earch > >
Channel Edit >>
Program Guide >>
CI Information >>
Picture
Sound
Tuner Mode
Tuning
Cable Air S atellite
Back Move Enter
Back
Press the C 5 button to select Tuner mode. Press
the 34 button to set it to Air.
Press the D 5 button to select Channel scan.
Press the OK button to select.
Function
Lock
Digital Manu al Search
Analog Manua l Search
>>
Channel Edit >>
Program Guid e >>
CI Informati on >>
Picture
Sound
Tuner Mode Ai r
Country UK
Tuning
Back Mo ve Enter
Channel Scan
Press [EXIT] to exit
25%
Digital Channels: 5
Analog Channels : 0
Status Scanning
Back
>>
Note
Press the Menu button to exit DTV search. ATV ❏
search will continue.
Page 14

Getting Started
EN-13 LED Backlit Flat TV Instruction Manual
Press the ❏ EXIT button to exit.
Channel Scan (Satellite)
Press the A MENU button.
Press the
B 5 button to select Tuning , press OK
button to select.
Function
Lock
Country UK
Channel Scan >>
Digital Manua l Search >>
Analog Manual Search >>
Channel Edit >>
Program Guide >>
CI Information >>
Picture
Sound
Tuner Mode
Tuning
Cable Air Satellite
Back Move Enter
#BDL
Press the C 5 button to select Tuner Mode , Press
the 34 button to set it to Satellite.
Press the
D 5 button to select Channel Scan, press
the OK button to select.
Function
Lock
Digital Manual Search
Analog Manual Search
>>
Channel Edit
>>
Program Guide >>
CI Information >>
Picture
Sound
Tuner Mode Sa tellite
Country UK
Tuning
Back Move Enter
OK
Channel Sc an
Back
>>
Function
Lock
Digital Manual Search
Analog Manual S earch
>>
Channel Edit
>>
Program Guide >>
CI Information >>
Picture
Sound
Tuner Mode Sa tellite
Country UK
Tuning
Back Move Enter
OK
Channel Scan
Back
>>
Satellite
Satellite list Astra 19.2E
Transponder Auto
LNB frequency Universal
ToneBurst None
Diseqc input
None
Tone 22K Hi/Lo
LNB Power 13-18v
Screamble Type All
Satellite List ❖
Press the5 button to select Satellite List, and press
OK button to select.
Press
the BLUE button , you can follow the prompts
on the OSD to select the satellite or transponder
you want to add. Press the RED button to delete the
satellite you do not need.
Transponder ❖
Press the34button to adjust Transponder as Auto/
Present/User.
LNB Frenquency ❖
To set local frenquency on your LNB.
Tone Burst ❖
Press the34button to adjust Toneburst Input as
None/A/B.
Diseqc input ❖
Press the34button to adjust Diseqc input as
None/
A/B/C/D.
Tone 22K ❖
Press the34button to adjust Tone 22KHZ as O,On
or Hi/Lo.
LNB Power ❖
Press the34button to adjust LNB Power as 13-18v,
14-19v or O.
Note
If the antenna is longer than 60 meters, we suggest ❏
that the LNB power should be set as 14-19V.
Scramble Type ❖
Press the34button to adjust it as Free or All.
Scan ❖
Press the OK button to start the satellite scan.
Function
Lock
Digital Manual Search
Analog Manual Search
>>
Channel Edit
>>
Program Guide >>
CI Information >>
Picture
Sound
Tuner Mode Satellite
Country UK
Tuning
Back Move Enter
OK
Channel Sc an
Back
>>
Satellite Scan
Satellite Astra 19.2E
Transponder scanned 1
Channels scanned 0
Press [EXIT] to exit
Update satellite transponders ❖
Update satellite transponders
1st download satellites.xml from
http://www.satellites.com using your PC
2nd copy satellite.xml to udisc
3rd insert your udisc to TV USB PORT
4th press”Start to update” menu
Start to update
After carrying out 4 steps displayed on the TV ,
select Start to update and press OK button to
start updating.
Note
The update satellite transponder will delete all ❏
channels.
Trident-SXL.indd 13
2012-2-3 10:05:23
Page 15

Getting started
LED Backlit Flat TV Instruction Manual EN-14
En
Digital manual search (cable)
Press the A MENU button.
Press the B 5 button to select Tuning. Press the
OK button to select.
Press the C 5 button to set the Tuner mode. Press
the 34 button to set it to Cable.
Press the D 5 button to select Digital manual
search. Press the OK button to select.
Function
Lock
Analog Manual Search >>
Channel Edit >>
Program Guide >>
CI Informatio n e >>
Picture
Sound
Tuner Mode Cable
Country UK
Channel Scan >>
Tuning
Back Move Enter
Digital Manual Search
Modulation 16QAM
Frequency 0 KHz
Symbol Rate 0 KS/S
Search
Channels scanned 0
Signal Strength:
Poor Fair Good
0%
Manual Cable Search
Back
Press the E OK button to set the Modulation you want.
Press the number buttons on the remote control to
set the frequency (kHz) and symbol rate (ksym/s).
Press the 5 button to select Search. Press the
OK button to start searching.
Digital manual search (air)
Press the A MENU button.
Press the B 5 button to select Tuning. Press the OK
button to select.
Press the C 5 button to select Tuner mode. Press
the 34 button to set it to Air.
Press the D 5 button to select Digital manual
search. Press the OK button to select.
Function
Lock
Digital Man ual Search
Analog Manual Search >>
Channel Edit
>>
Program Guide >>
CI Information >>
Picture
Sound
Tuner Mode A ir
Country UK
Tuning
Back Move Enter
OK
Channel Scan
Back
0%
Channel K21
Frequency 474.00MHz
Search
Found Channels 0
Signal Strength:
Press [OK] to search
Poor Fair Good
Digital Manual Search
Press the E 5 button to select the Channel and
Frequency , follow the cue on the OSD to set them.
Press the F 5 button to select Search. Press the OK
button to start searching.
Analogue manual search
Press the A MENU button, then press the 5 button
to select Tuning and press the OK button to select.
Press tB he 5 button to select Tuner mode. Press
the 34 button to set it to Cable or Air.
Press the C 5 button to select Analogue manual
search. Press the OK button to select.
Function
Lock
Analog Manual Search >>
Channel Edit >>
Program Guide >>
CI Informatio n e >>
Picture
Sound
Tuner Mode Cable
Country UK
Channel Scan >>
Tuning
Back Move Enter
Digital Manual Search
Back
Program No. 1
Color System Auto
Sound System B/G
Frequency ---, --MHz
Store
Press [Left/Right]
Analog Manual Search
Press thD e number buttons on the remote control to
set the Programme number and Frequency.
PrE ess the 34 button to set the Colour system and
Sound system.
Press the F 5 button to select the store, and press
the OK button to start storing.
Press the EXIT button to exit.
Channel edit
Press the A 5 button to select Channel edit. Press
the OK button to enter the sub-menu.
Function
Lock
Digital Manual Search >>
Analog Manual Search
>>
Channel Edit
Program Guide
>>
CI Information >>
Picture
Sound
Tuner mode Air
Country UK
Tuning
Back Move Enter
Channel Scan >>
Analog
Fav Skip
123
Delete Rename Tuner Mode Sort Select
Back
Press the B 5 button to select the channel you want
to edit. Press the 34 button to select Fav or Skip
item, then press the OK button to select or cancel.
Press the coloured buttons to edit the channel.C
Page 16

Getting started
EN-15 LED Backlit Flat TV Instruction Manual
Common interface
The common interface (CI) slot is designed to hold
the conditional access module (CAM) and smart card
in order to access pay-per-view TV programmes and
additional services. Contact your common interface
service provider to get more information about modules
and subscription. Please note that CAMs and smart cards
are neither supplied by nor optional accessories from us.
Insert the CAM correctly, then insert the smart card A
into the CI slot located at the side of the TV.
CI slot
CAM
Smart card
The TV will display a message indicating that the B
CAM has been detected. Wait for a few minutes until
the card is activated.
Press the C MENU button, and then press the 5
button to select Tuning. Press the OK button to select.
Press the D 5 button to select CI information.
Press the OK button to select.
Press the E 5 button to select the option you need
and press the OK button to select.
Function
Lock
Picutre
Sound
Tuning
Main menu
Module Information
Smart card Information
Language
Software Download
Press OK to select,or Exit to qiut。
Back Move Enter
Back
Detailed information about the CI card used is F
displayed. Refer to the module instruction manual
for settings details.
Software update
function
When you receive updates from the TV •
manufacturer's website, you can update the
operating software using the Software update
menu. The data for various units is transferred
consecutively on a special receiving channel or via
the Internet.
You need to search the channel for the updating •
code stream.
Note
You can get further information from the TV shop ❏
or from the Internet.
Do not turn o the TV while it is updating. ❏
Operation
Press the A MENU button.
Press the B 5 button to select Function. Press the
OK button to select.
Function
Lock
Screen Mode Auto
OSD Transparency Off
Teletext Language Auto
Subtitle
>>
Time Setup
>>
>>
Back Move Enter
Sound
Tuning
Picture
Network Setting
MEMC Off
OK
Software Update
Press the C 5 button to select the Software
update and press the OK button to select.
Press theD 5 button to select By channel or
Online. Press the OK button to search for updates.
Software Update
By Channel >>
By Online >>
If the software is updated successfully, the TV will E
restart automatically.
Note
If updates are received, the TV will begin to update.
Page 17

Getting Started
LED Backlit Flat TV Instruction Manual EN-16
En
Using Your TV
How to Select the TV Programme
Using the program number button , enter the A
channel number with the number keypad on the
remote control.
Using
B P∧/P∨ button.
Press the P∧/P∨button to select a channel
number.
How to adjust the volume
Press the VOL+/VOL- button on the remote control or
the bottom of the TV to adjust the volume level.
Adjusting the picture
settings
Changing the picture setting
Press the A MENU button.then press the button
to select Picture , press the OK button to select.
Sound
Tuning
Function
Lock
Picture Mode Standa rd
Brightness 50
Contrast 50
Colour 50
Tint 50
Sharpness 50
Color Temp Stand ard
Backlight 100
Advanced Video 》
Eye Guard On
Reset
Back Move Enter
Picture
#BDL
Press theB button to select the item that needs
adjusting.
Press the
C 34 button to adjust the selected item.
When you are happy with your choice, press the
D
EXIT button to return to normal viewing or press the
MENU button to return to the previous menu.
Picture Mode ❖
This will select the picture mode. Select Standard/
Mild/User/Vivid/Eye Guard/Eco according to the
programme. You can quickly select the desired mode
by P.MODE button on the remote control.
Brightness ❖
This will adjust the light output of the complete
picture, which will mainly aect the darker areas of
the picture.
Contrast ❖
This will adjust the intensity of bright areas of the
picture , but keep the dark parts unchanged.
Colour ❖
This will adjust the saturation level of the colours to
suit your personal preference.
Tint ❖
Allows you to select the colour mix (Tint) of the
picture.
Note
The Tint function is only available in NTSC mode. ❏
Sharpness ❖
This will adjust the sharpness of fine details in the
picture.
Color temp ❖
Press34 button to set the oolour temperature as
Standard, Cool, Warm.
This will increase or decrease Warm (red) and Cool
(blue) colours to suit personal preferences.
Select Cool to give the white colour a blue tint,
Standard to give the white colour a natral tint and
Warm to give the white colour a red tint.
Backlight ❖
To adjust the back light to be brighter or darker:
0 ~ 100.
Advanced Video ❖
DNR •
To adjust the level by which to reduce the
digital noise.Press the34button to set DNR as
O,Low,Medium or High.
MPEG NR •
To adjust the level of MPEG NR. Press the34button
to set MPEG NR as O, Low, Medium or High.
Trident-SXL.indd 16
2012-2-3 10:20:43
Page 18

Getting started
EN-17 LED Backlit Flat TV Instruction Manual
DCR •
Press the 34 button to set DCR to o or on.
Cinema •
Press the 34 button to set cinema to o, low,
medium, high, auto1 or auto2.
Black stretch •
Press the 34 button to set black stretch to o, low,
medium or high.
White stretch •
Press the 34 button to set white stretch to o or on.
Blue stretch •
Press the 34 button to set blue stretch to o or on.
Eye guard ❖
Press the 34 button to set eye guard to o or on.
Reset ❖
To reset to the default value.
Adjusting the sound
settings
Changing the sound settings
Press the A MENU button.
Press theB 5 button to select Sound. Press the OK
button to select.
Tuning
Function
Lock
Mode Standard
Balance 0
meloD AROUND+ >>
Equalizer On
Audio Language >>
SPDIF Output Off
MeloD Advance >>
Reset
Back Move Enter
Picture
Sound
Back
Press theC 5button to select the item that needs
adjusting.
Press the D 34 button to adjust the selected item.
When you are happy with your choice, press theE
EXIT button to return to normal viewing or press
the MENU button to return to the previous menu.
Mode ❖
This sound setting can be adjusted to suit your
personal preference. Select Standard/Music/
Theatre/User according to the programme. You can
quickly select the desired mode using the S.MODE
button.
Balance ❖
This will adjust the output of the right and left
speakers to obtain the best stereo sound for your
listening position.
meloD AROUND+ ❖
Press the 5button to select meloD AROUND+. Press
the 34 button to set meloD AROUND+ to o or on.
Equaliser ❖
120Hz/250Hz/500Hz/1.2kHz/3kHz/7.5kHz/12kHz
(bandwidth adjustment): Adjust the level of specic
bandwidth frequencies.
Audio language ❖
Press the OK button to enter the sub-menu and press
the 34 button to select the default audio language
and AUDIO TYPE according to the cue on the OSD.
This function activates when on a digital channel.
SPDIF output ❖
Press the 34 button to set the type to PCM, Bit
stream, Auto-detect or O.
This will control the digital audio output.
meloD advance ❖
Press the OK button to select. Press the 34button
to set the meloD VOICE+/meloD BASS+/meloD
VOLUME+ to o or on.
Reset ❖
To reset to the default menu settings.
Function settings
Press the A MENU button.
Press the B
5
button to select Function. Press the
OK button to select.
Function
Lock
OSD Language English
DPMS Off
Blue Screen Off
Shop Mode Off
Screen Mode Auto
Overscan Off
OSD Timeout Off
OSD Transparency Off
Teletext Language Auto
Subtitle
>>
Time Setup >>
Back Move Enter
Sound
Tuning
Picture
Back
Page 19

Getting started
LED Bac
klit Flat TV Instruction Manual EN-18
En
Press thebutton to select the item that needs
adjustin
g.
Press the button to adjust the selected item.
When you are happy with your choice, press the
EXIT button to return to normal viewing or press the
MENU but
ton to return to the previous menu.
OSD language❖
To select the menu language.
DPMS❖
In PC mode, the TV will automatically enter standby mode
if no PC input signal is detected after 3 minutes. The
set will tu
rn on and automatically enter PC mode
when the PC input is
connected.
Blue screen❖
This will select the background colour.
Note
The blue screen function is only available in ATV ❏
mode.
Shop mode❖
Press the button to select On/Off.
Screen mode❖
To set the picture proportions, press the button
to select 4:3/16:9/auto/wide/zoom1/zoom2. You can
quic
kly select the desired mode using the SCREEN
but
ton on the remote control.
4:3 mode•
Choose 4:3 when you want to view a picture in an
original 4:3 aspect ratio with grey bars appearing
down both the left and right sides.
16:9 mode•
Choose 16:9 when you want to adjust the picture
ho
rizontally, in a linear proportion, to fill the entire
screen.
Auto•
Choose Auto when you want to view the original
picture aspect ratio.
Wide•
Choose Wide when you want to adjust the picture
in a non-linear p
roportion. That is, larger at the top
sides and with no al
teration on the bottom side.
Zoom1•
Choose Zoom1 when you want to view the picture
without a
ny alteration. Note that the top and
bot
tom portions of the picture will be cropped.
Zoom2•
Choose Zoom2 when you want the picture to be
al
tered by being both vertically extended and
cropped. The picture will be a trade off between
al
teration and screen coverage.
Overscan❖
This function is only active and visible in
the menu when the signal is ELA timing
(480i/480p/720p/1080i/1080
p) in the RGB colour
spa
ce in the HDMI/DVI input.
OSD timeout❖
To set how long you want the menus to appear
on-sc
reen. Press the button repeatedly to select
the number of p
reset seconds. The time will be set in
the
following sequence: off, 10sec, 15sec, 30sec, 45sec
and 60se
c.
Teletext ❖ language
To set the Teletext mode.
Subtitles❖
To show subtitles for the video currently playing on
the
TV
.
Time setup❖
Function
Lock
OSD Language Off
DPMS O
ff
Blue Screen
OFF O
ff
Shop Mode O
ff
Screen Mode Auto
Overscan
>>
OSD Timeout
Subtitle
Back Move Enter
Picture
Sound
Tuning
Time Mode Auto
Clock 02:05
Date 2011/01/01
Off Time Off
On
Time Off
Sleep
Timer Off
Time Zone None
Auto Power Down(4h) On
Time
Back
Time mode•
Press the button to select Auto or Manual.
When Auto is selected, the time cannot be adjusted.
When Manual is selected, you can set the time
manuall
y.
Page 20

Getting started
EN-19 LED Backlit Flat TV Instruction Manual
Clock • : Press the 34 button to select the position
and the digits buttons to set the time.
Date • : Press the 34 button to select the
position and the digits button to set the date.
O time • : Press the OK button to enter the setting.
Press the 5button to select Mode, and then press
the 34 button to select o once or daily.
Press the5button to select Hour or Minute. Press
the 4 button to enter and press the number buttons
to adjust the value.
When the o time that has been selected is reached,
the TV set will enter standby mode.
On time • : Press the OK button to enter the setting.
Press the5button to select Mode, and then press
the 34 button to select on once or daily.
Press the5button to select Hour or Minute. Press
the 4 button to enter and press the number buttons
to adjust the value.
When the on time that has been selected is reached,
the TV set will switch on automatically.
Sleep • timer
Press the 34 button to select the number of
minutes: O, 5min, 10min, 15min, 30min, 45min,
60min, 90min, 120min, 180min or 240min.
Time zone •
Press the 34 button to select the appropriate time
zone.
Auto power-down (4h) •
If after 4 hours of switching on, no changes have been
made to the TV, for example no channel or volume
changes, the TV will start the automatic power-down
sequence. A pop-up window will then appear on the
screen.
XXX’s to automatic powder-down
Please press ang key to cancel
OK Cancel
After 150 seconds, the TV will automatically switch to
standby. To override the automatic shutdown, press
any button on the remote control.
Setting the Auto power-down (4h):
Press the OK button to set Auto power-down (4h) to O.
A pop-up message will appear
Are you sure you want to disable automatic powerdown?
OK Cancel
Press the 34 button to select and press the OK
button to conrm.
Press the OK button to set Auto power-down (4h) to On.
A pop-up message will appear
Are you sure you want to enable automatic powerdown?
OK Cancel
Press the 34 button to select and press the OK
button to conrm.
Network settings ❖
Your TV's wireless Internet network connection can
be established automatically or manually. Follow the
instructions below to establish a network connection.
Connecting to a network
You can set up your TV to access the Internet
through your local area network (LAN) using a wired
or wireless connection.
Connecting to a wired network. You can connect your TV
to your LAN using a cable (not included) in three ways:
•
You can connect your TV to your LAN by connecting
the LAN port on the back of your TV to an external
modem using a cat 5 cable. See the diagram below:
LAN
The modem port on the wall
External modem
(ADSL / VDSL / cable TV)
LAN cable
(not supplied)
Modem cable (not supplied)
Back of TV
You can connect your TV to your LAN by connecting
the LAN port on the back of your TV to a router,
which is connected to an external modem. Use a cat
5 cable for the connection. See the diagram below:
LA N
The modem port on the wall
External modem
(ADSL/VDSL/cable TV)
LAN cable
(not supplied )
LAN cable(not supplied)
Modem cable (not supplied)
Back of TV
Router
Depending on how your network is congured,
you may be able to attach your TV to your LAN by
connecting the LAN port on the back of your TV
directly to a network wall outlet using a cat 5 cable.
Page 21

Getting started
LED Backlit Flat TV Instruction Manual EN-20
En
See the diagram below. Note that the wall outlet is
attached to a modem or router elsewhere in your
house.
LAN
The modem port on the wall
LAN cable (not supplied)
Back of TV
Note
The terminals (the position and type of port) of
the external device may be dierent depending
on the manufacturer.
If the IP address allocation by the DHCP server
has failed, turn the external modem o, wait at
least 10 seconds, turn it back on and try again.
For the connections between the external
modem and the router, refer to the user manual
of the corresponding product.
You can connect the TV to the LAN directly
without using a router.
You cannot use a manual connection-type ADSL
modem because it does not support DHCP. You
have to use an automatic connection-type ADSL
modem.
How to set up automatically
Press the A MENU button and then use the 5
button to select the Function menu. Press the OK
button to select.
Press the B
5
button to select Network setting.
Press the OK button to select.
Press the C 5 button to select Network link. Press
the 34 button to set the Network link to ON.
Press the D 34 button to set the Network type
to Wired.
Function
Lock
OSD Language Off
DPMS Off
Blue Screen Off
OFF Off
Shop Mode
》
Screen Mode >>
Overscan >>
O
Back Move Enter
Picutre
Sound
Tuning
Network Link 〈 On 〉
Network Type 〈 Wired 〉
IP Config
》
Wireless Setting
》
Network Info
》
Network Test
》
Network Setting
Back
Press the E
5
button to select IP cong. Press
the OK button to select.
IP Config
DHCP On
IP Adress 192 168 1 117
Subnet Mask 255 255 255 0
Gateway 192 168 1 1
Auto DNS On
DNS Sever 192 168 1 1
Confirm OK Cancel
Press the F
5
button to select DHCP. Press the
34 button to select ON.
Press the G
5
button to select Auto DNS. Press
the 34 button to select ON.
How to set up manually
For use when connecting your TV to a network that
requires a static IP address and DNS.
Follow the steps below to manually set up your TV
network connection.
Follow steps 1 to 5 in the "How to set up A
automatically" procedure.
Press the B 34 button to set DHCP to O.
IP Config
DHCP On
IP Adress 192 168 1 117
Subnet Mask 255 255 255 0
Gateway 192 168 1 1
Auto DNS On
DNS Sever 192 168 1 1
Confirm OK Cancel
Enter the C IP address, Subnet mask and
Gateway. Use the number buttons on your
remote to enter numbers and the 345
buttons to move from one entry eld to another.
Press the D
5
button to select Auto DNS. Press
the 34 button to set it to O.
Press the E
5
button DNS server. Use the
number buttons on your remote to enter
numbers and the 34 buttons to move from one
entry eld to another.
When you've nished, press the F OK button on the
remote to conrm.
Connecting to a wireless network
Follow steps 1 and 2 in the "How to set up A
automatically" procedure.
Page 22

Getting started
EN-21 LED Backlit Flat TV Instruction Manual
Press the B 34 button to set the Network type
to Wireless.
Function
Lock
OSD Language Off
DPMS Off
Blue Screen Off
OFF Off
Shop Mode
》
Screen Mode >>
Overscan >>
O
Back Move Enter
Picutre
Sound
Tuning
Network Link 〈 On 〉
Network Type 〈
Wireless
〉
IP Config
》
Wireless Setting
》
Network Info
》
Network Test
》
Network Setting
Back
Press the C
5
button to select Wireless setting.
Press the OK button to select.
Wireless Network
SSTD Mode Security Signal Status
TP-LINK-Changkuan Master
TP-LINK-WR740N Master
Tenda_dzrj Master
TP-LINK-zhangxia Master
十
十
十
十
Press the D
5
button to select the network you
need and press the OK button to select.
Press the E
5
button to select the Network
security key and press the OK button to select.
Enter the password if necessary. Press the OK F
button to nish.
To connect your TV to your wireless network,
you need a wireless router or modem.
The LAN port on the walll
Wireless
router
LAN cable
Note
To use a wireless network, your TV must be ❏
connected to a wireless router. If the wireless
router supports DHCP, your TV can use a DHCP
or static IP address to connect to the wireless
network.
If the wireless router allows you to turn the Ping ❏
connection function on/o, turn it on.
Select a channel for the wireless router that ❏
is not currently being used. If the channel set
for the wireless router is currently being used
by another device nearby, this will result in
interference and communications may fail.
�MEMC
Press the 34 button to select O/On/Demo.
�Recorder
Press the OK button to enter the sub-menu.
Press the 5 button to select the Recorder list or
USB setup.
Recorder list •
Press the OK button to scan the recorder list.
USB setup •
Press the OK button to enter the USB setup and
enable the USB for recording.
�Reset
Press the OK button to enter the sub-menu. Press the
34 button to select OK/Cancel.
If OK is selected and conrmed, then the TV settings
will be changed to the factory default settings.
Resetting to the factory default will only aect the
video, audio and function settings. All channel
programming information remains as it was.
Lock menu settings
Using this function can control the tuner, programme,
source volume and so on. After pressing MENU on the
remote control, press the 5 button to select the
Lock menu and then press the 4 button. You will then
be required to enter the password. The initial password
of the television is the same as the code which you
set when you rst turn on the TV. If you forget your
password, you can always input 9443 to regain control.
Change password ❖
Press the A 5 button to select Change password.
Press the OK button to enter the sub-menu.
Back Move Enter
Picture
Sound
Tuning
Function
Child Lock Off
Tuning Lock Off
Source Set >>
Channel No. >>
Source Lock >>
Max Volume 100
Initial Volume Mode Off
OK
Change Password
Back
Input the new digital password and conrm it. B
You have now changed the password.
Page 23

Getting started
LED Backlit Flat TV Instruction Manual EN-22
En
Child lock ❖
Press the 34 button to select O/On.
Tuning lock ❖
Press the 34 button to select O/On. (When
switched on, some operations such as search will
be not available.) When you enter the tuning menu,
tuner lock will be on the screen. If you want to use the
tuning menu, you need to enter the lock menu to set
the tuner lock to o or select Clear lock.
Source set ❖
Source set is used for setting up preset channels.
Press the OK button to enter the sub-menu. Press the
5
button to select o, TV, SCART, component, PC,
HDMI1, HDMI2, HDMI3 and HDMI4 in turn.
C ❖ hannel no.
Channel no. controls the channel number when you
turn on the TV.
Source lock ❖
Source lock will control the source when you turn on
the TV.
Press the OK button to enter the sub-menu. Press the
5 button to set the source lock.
If you press the SOURCE button when the source lock
switched to on, the TV can switch to a corresponding
source and will display that the Source is locked.
Max. volume ❖
Press the 34button to adjust from 0 –100. If a certain
value is set, when the volume is adjusted, the sound
value cannot exceed the maximum volume value. If
the current volume is higher the maximum volume,
when the lock set menu is set, the current volume
will become the set maximum volume. If the current
volume is below the maximum volume, the volume
set by the user will remain unchanged.
Initial volume mode ❖
Press the 34 button to select O/On. The TV will
store this information, and the next time the TV is
switched on, it will be at this volume.
Initial volume ❖
The TV will store the setting, andwill be the volume
when the TV is next turned on.
Parental lock ❖
Press the OK button to enter the sub-menu. Press the
5 button to select OFF or 3 – 18 to limit the age of
children who will watch TV.
Channel lock ❖
Press the 5 button to select the channel you want
to lock.
Clear lock ❖
Press the 5 button to select clear lock mode.
Press the OK button to unlock all set modes This will
set all lock options to o and the maximum volume
will return to 100.
Shortcut menu
display
Subtitle function ❖
Pressing the SUBTITLE button on the remote control
will set the subtitle function to On or O.
Note
Pressing the SUBTITLE button on the remote will ❏
only display the subtitle languages menu in DTV
mode.
CH.LIST function ❖
Pressing the A CH.LIST button on the remote
control will display the channel list menu.
Press the red/green button to select from satellite, B
digital or analogue in tuner mode.
Press the yellow button to select from satellite or C
digital in the select list. You can press the 5
button to select video/radio/data/all.
Press the D 34 button to page up or page down.
Press the blue button to select the satellite list.E
GUIDE function ❖
Press the GUIDE button on the remote control
to display the programme guide menu. Press the
534 button to select the programme.
You can press the EXIT button to cancel the changes
at any time.
Page 24

Using the features
EN-23 LED Backlit Flat TV Instruction Manual
Guide
Sun Mon Tue Wed Thu Fri Sat
001 entertainment 14:33-15:34 The Streets of San Francisco (1)
002 entertainment 15:34-16:34 The Streets of San Francisco (2)
The cases of Detective Mike Stone
and his partner Steve Keller.
14:30
Note
Only av ❏ ailable in DTV/satellite mode.
FAVOURITE Function ❖
Press the FAVOURITE button on the remote control to
display the favourite list menu.
Press the 5 button to select your favourite
channel, and press the OK button to select.
Favorite List
INFO ❖
Press the INFO button on the remote control to
display information about the current channel.
You can press the EXIT button to cancel the changes
at any time.
Digital video 2012-01-01 Sun 03:05
0
AUDIO/I/II ❖
Press the AUDIO button on the remote control and
the audio languages menu will be displayed on the TV
.
Note
Pressing the ❏ AUDIO button on the remote will
only display the audio languages menu when in
DTV mode.
❖ Mute sound
When you need to hear the sounds around you, or if
you answer a phone call or you have guests visiting
you, the sound elimination (mute) function is very
convenient.
Press theA MUTE button on the remote control
and the word “Mute” will be displayed in the lower
part of the screen. This means that the TV sound is
switched o.
If you want to switch the sound back on, press theB
MUTE button again or press the V+ button.
Quick channel view ❖
This function enables you to quickly switch back to
the last watched channel. Press the Q.view button
and the TV will switch back to the last watched
channel.
If you were watching channel number 8, and A
you're now watching channel number 18 (as
shown in the gure)
.
if you want to return to the channel you were B
watching, channel 8, you can simply press the
Q.View button.
If you want to return to channel 18, press the C
button again. By using this function you can easily
switch between the channel you are currently
watching and the channel you last watched.
Teletext functions
Teletext is an information system broadcast by certain
channels, which can be read like a newspaper. It also
provides subtitles for people with hearing diculties
or those who are unfamiliar with the language in which
a particular programme is being broadcast (cable
networks, satellite channels etc.).
Note
The TEXT buttons may work even if there is no ❏
teletext signal, but no teletext will be displayed.
Teletext
Teletext functions ❖
To select “teletext”, press the button on the
handset. To switch o teletext, press the button again.
"Note: no menu functions are available in teletext
Page 25

Using the features
LED Backlit Flat TV Instruction Manual EN-24
En
mode." Only a few direct button control functions are
available in teletext mode. They are:
Volume adjustment •
Mute function •
TEXT
Page up/down ❖
Use the P∧/P∨ buttons to browse the next or
previous page.
P
Page number entering ❖
To select a teletext page, enter the page number using
the numeric keypad on the remote control, or use the
P∧ or P∨ buttons or the coloured fast text buttons
.
Index ❖
Press the
i
button to go to the teletext INDEX page.
MENU
i
Mix mode ❖
To view the TV picture while in text mode, press the
button. This will superimpose the teletext data on
top of the TV picture. Press this button again to return
to full text.
BACK
Hold ❖
Pressing the button will stop the teletext page
automatically updating. This feature is very useful
when there are several teletext pages or lots of data
on the same page number.
FAVORITE
Size ❖
Pressing the button changes between full screen
and top half/bottom half screen. This feature is very
useful as it magnies the image and makes the
characters easier to read.
CH.LIST
Reveal ❖
Pressing the button will reveal hidden text. This
feature is used to reveal information such as answers
to interactive teletext puzzles.
INFO
?
Fast text coloured buttons ❖
Fast text automatically displays the four most
commonly used pages that the broadcaster thinks
that you may want to choose next. Press the same
coloured button on the remote control as the
coloured link at the bottom of the teletext page to go
directly to that page.
R G Y B
Subcode ❖
Press the button and enter the 4-digit number to
enter a secondary page.
MEDIA.P
To watch 3D TV
Ensure you read and understand the following safety
information before using the TV's 3D function.
Note
Some people may experience discomfort, such as ❏
dizziness, nausea and headaches, while viewing
3D TV. If you experience any such symptom, stop
watching 3D TV, remove the 3D glasses and have
a rest.
Page 26

Using the features
EN-25 LED Backlit Flat TV Instruction Manual
USB mode
Note
The diagrams in the following section are ❏
schematic and should only be used for reference.
Please see the actual product if necessary.
The OSD of the USB function may be somewhat ❏
dierent from your product because this is just an
example.
To use the USB device
Supported le formats:A
Photo: *. jpg;•
Music: *. mp3 les;•
Movie: *. avi les;•
Note
Some les may be unreadable due to individual ❏
le settings.
Supported equipment: B
Equipment that supports Mass Storage Protocol
and the le system of which is FAT32, for example
some USB disks, mobile hard disks and MP3 players.
If USB equipment could not be identied due to
an unsupported le system, please format the
equipment to the above-mentioned le system.
To achieve smooth play, ensure the following:C
The le code rate should be lower than 300 kB/s;•
Due to the limited distance of USB signal •
transmission, it is recommended not to use a USB
patch cord. If this cord is used, make sure that it is
no longer than 1 m in length;
Use high-speed USB equipment that conforms •
with USB 2.0 full speed Interface Standard; If USB
equipment does not comply with USB full speed
Interface Standard, play may be unsmooth.
Connecting a USB device
TAurn the TV on.
CB onnect a USB device containing photos, music and/
or movie les to the USB jack on the side of the TV.
WC hen the USB is connected to the TV, select Media
play.
Watching 3D images for an extended period of time ❏
may cause eye strain. If you feel that your eyes are
becoming strained, stop watching 3D TV, remove
your 3D glasses and have a rest.
Do not allow children under 6 years old to view 3D ❏
images. A responsible adult should frequently check
on children who are using the 3D function. If there
are any reports of tired eyes, headaches, dizziness
or nausea, stop the child from watching 3D TV and
have a rest.
Do not use the 3D glasses for other purposes (such as ❏
general spectacles, sunglasses, protective glasses etc.)
Do not use the 3D function or 3D glasses while ❏
walking or moving around. If you use the 3D
function or 3D glasses while walking or moving
around you may run into objects, trip and/or fall and
injure yourself.
Do not drop, exert pressure on or step on the 3D ❏
glasses.
Do not use the 3D glasses if they are cracked or ❏
broken.
If the TV is currently in 2D mode,
press the 3D WORLD switch key on the remote control A
to display the prompt menu.
Press the B
3/4
button
and select OK. You can then
select a corresponding 3D mode.
If the TV is currently in 3D mode,
press the 3D WORLD switch key on the remote control A
to display the prompt menu.
Press the B
3/4
button to select 3D o/2D>3D
setup/cancel mode.
Note
When you watch a 3D TV programme, please wear ❏
3D glasses.
The TV doesn’t store the 3D mode settings, so if you ❏
switch it o, it will return to 2D mode when turned
back on again.
I ❏ n USB mode, there are various modes of 3D video
sources. With USB signals, the 3D switch key only
functions when playing a lm. The TV will exit 3D
mode when the lm nishes or when you manually
exit 3D mode.
Page 27

Using the features
LED Backlit Flat TV Instruction Manual EN-26
En
USB Media Menu operation
Plug-in an external storage device into USB port.A
Press B SOURCE button on the remote and press
5
/6 button to select USB. You can also press
MEDIA.P button to enter quickly.
Press
C OK button on the remote to display the sub
page.
Main B ack Move Play
Pictur
Delete Copy Paste
Back Exit Move Select
Movie
Back
To play pictures
PressA
3/4
button
to select Picture, then press
OK
button
on the remote.
PrB ess
3/4
button to select
the desired picture in
the le list, then press OK button to play pictures
.
1
2
345678
1 Play previous picture 5 Zoom in
2 Play next picture 6 Zoom out
3
Rotating clockwise
by 90 degrees
7
Play
4
Rotating
counterclockwise
by 90 degrees
8
Pause
Press the button on the remote control to select the C
adjusted item, press OK button to confirm.
1. Play or pause
2. Play previous picture
3. Play next picture
Press
D BACK button to return to the previous menu.
Note
You may play the pictures among selected. ❏
To play music
PreA ess
3/4
button
to select Music, then press
OK
button in the control remote
.
PressB
5
/6button to select
the desired music in the
le list, then press OK button to play music
.
Playing
Back Exit
Move Select
Exit
00:03:19
.VTJD
:FTUFSEBZPODFNPSFNQ.#
PresC s the button on the remote control to select the
adjusted item.
1
2
3
TEXT
Trident-SXL.indd 26 2012-2-3 15:27:31
Page 28

Using the features
EN-27 LED Bac
klit Flat TV Instruction Manual
1
2
3
4
TEXT
1. Play or pause
2 Stop
3. Pl
ay previous music
4. Pl
ay next music
Press
BACK button to return to the previous menu.
Note
You may play the music among selected.❏
To play movie
Press the/
button
to select Movie, then press
the
OK button in the control remote.
Press the
/
button to select
the desired movie in
the file lis
t, then press the OK button to play movie
.
Playing
Repeat Info
BACK Exit
MENU
Exit
Press the button on the remote control to select the
selected item.
1
2
5 63 4
TEXT
1. Play or pause
2 Stop
3.
4.
5.
6.
Press the
BACK button to return to the previous
men
u.
Note
Do not remove USB device from the TV until ❏
you have exited the USB mode otherwise you
may damage the USB device.
DLNA (Digital Living
Network Alliance)
Digital Living Network Alliance (DLNA) is a standard
th
at allows various consumer electronic devices to
sha
re content with each other across a standard home
ne
twork. This would allow a device such as a DLNA
compatible television to play music or view videos
or pho
tos stored on a desktop computer or other
compatible device.
Pre
ss the SOURCE
button
to select USB , then press
the
/
button to select DLNA
.
Press the
/
button to select
the desired
computer , press the OK button to enter .
Press the
/
button to select the desired option
in the file list , then p
ress the OK button to play it.
Using external USB
disk
for recording
Note
It is recommended that the minimum device size ❏
used for recording is 1GB. Bit rate:
Device bit-rate>5MB/s REC is safe .•
The system cannot work normally if the USB device ❏
has a
ny problem listed below:
There is a bug in the device .•
There is an error with the device.•
The device reports an inaccurate size.•
IMPORTANT
The USB device should be format as FAT32 •
by your PC before being inserted into the USB
connector.
Trident-SXL.indd 27 2012-2-3 13:16:42
Play previous video
Pl
ay next video
Fast reverse
Fast forward
Page 29

Reference section
LED Backlit Flat TV Instruction Manual EN-28
En
Timeshift
Insert the FAT32 format USB device into the USB A
connector.
Press the B PLAY/PAUSE button to start timeshifting.
Timeshift function is only available in DTV mode.
Press PLAY/PAUSE to pause the programme.
When you press PLAY/PAUSE again, the timeshift
programme will play. If you want to stop the
timeshift function, press the STOP button.
You can stop the timeshift programme from playing
by pressing the STOP button.
Recording
Press the A REC button to record the current
programme, and press the EXIT button to minimise
the recording interface.
TEXT
Press the B STOP button to stop the programme
recording.
To play back the recorded programme. Enter C
MEDIA.P to open the pvr folder.
Select the content you recorded.D
PrE ess the OK button to play the recorded
programme and press the STOP button to stop it.
Using the APP@TV
service
Haier app service
Press the A APP@TV
button
to go to the Haier app
home page.
PrB ess the
5
//3/4 button to select the item
you need. Press the OK button to select.
Internet content: YouTube ❖
USB content: Pictures, Music, Movies ❖
DLNA ❖
Other apps ❖
Note
The content of the Haier app home page may be ❏
somewhat dierent from your product because it
is just an example.
Internet content will increase and be continuously ❏
updated.
Page 30

Reference sections
EN-29 LED Backlit Flat TV Instruction Manual
Reference sections
Troubleshooting
For help locating possible faults, use the
help guide below:
No picture, no
sound
Verify that the television is
correctly plugged in.
Verify that the television is
supplied with the correct power
source. Verify that electricity is
available.
Blank screen
Verify that the correct signal
input is used.
Use the remote to correct the
signal input.
Restart the television if the
power supply is interrupted.
No sound
Press the MUTE button and
verify that Mute mode is active.
Switch to another channel
to check whether the same
problem occurs.
Press the VOL+ button to see if
the problem can be solved.
Poor sound
Verify that the sound system
is correct. Refer to the user
manual for instructions on how
to adjust it.
No picture on
some channels
Verify that the correct channel
has been selected.
Adjust the antenna.
No colour
on some
programmes
(black and
white)
Verify that the same problem
exists on other channels.
Check the picture and sound
systems.
Refer to the relevant instructions
in the manual to adjust the
colour.
Interference
with some or all
pictures
Verify that the antenna is
correctly connected.
Verify that the antenna is in
good condition.
Finely adjust the channel.
Television is not
working
Disconnect the television
from the power supply for
10 seconds, then reconnect
the television. If the problem
persists, contact an authorised
after-sales service provider for
technical assistance.
Note
If the fault cannot be repaired using the above ❏
guide, consult your local authorised service centre.
The TV set must only be repaired by qualied, ❏
registered service personnel. Never attempt to
remove the back cover, as the TV set contains
dangerous voltage that may cause a fatally or a re.
Page 31

Appendix
LED Backlit Flat TV Instruction Manual EN-30
En
Specification
Specifications of the television that you have just purchased may differ from the information in this table due to
technical innovations.
Model 32" 42"
Picture, sound
system
PAL/SECAM-B/G, I, D/K, L
Power 75W 140W
Audio Output 8W+8W 9W+9W
External input port Component input, PC input, PC audio input, SCART, antenna input,
HDMI input, USB
Temperature Working: 5OC–35OC
Storage: 15OC–45OC
Humidity Working: 20%–80%
Storage: 5%–90%
Accessories Remote control, AAA battery x2, instruction manual, warranty, quick
start guide, TV Stand, 7x screws for 32" model, (8x screws for 42"
model), component video adaptor, PC/DVI/component adaptor,
SCART adaptor, 3D glasses x6
Dimensions with
stand (WxDxH)
751x160x505 984x220x650
Weight with stand
(kg)
10.3 16
Weight without stand
and base (kg)
8.7 13.2
Wall mounting 200x100 200x200
Page 32

Appendix
EN-31 LED Backlit Flat TV Instruction Manual
Appendix
Appendix1
VGA timing table
Item 61.08H.Freq.(kHz) Mode Resolution V.Freq.(kHz) 32" 42"
1 31.469 IBMVGA 640x350 70.086
2 31.469 IBMVGA 720x400 70.087
3 31.469 IBMVGA 640x480 59.94 • •
4 35 MACINTOSH 640x480 67
5 37.861 VESA 640x480 72.089 • •
6 37.5 VESA 640 x 480 75 • •
7 35.156 VESA 800x600 56.25 • •
8 37.879 VESA 800x600 60.317 • •
9 48.077 VESA 800x600 72.188 • •
10 46.875 VESA 800x600 75 • •
11 49.7 MACINTOSH 832x624 75
12 48.363 VESA 1024x768 60.004 • •
13 56.476 VESA 1024x768 70.069 • •
14 60.023 VESA 1024x768 75.029 • •
15 61.08 IBM XGA-2 1024x768 75.781
16 44.772 VESA CVT 1280x 720 59.855
17 47.776 VESA 1280x768 59.87 • •
18 60.289 VESA 1280x768 75 • •
49.702 VESA 1280x800 59.81 • •
19 47.72 VESA CVT 1360x768 59.799
20 63.981 VESA 1280x1024 60.02 • •
21 79.976 VESA 1280x1024 75.025 • •
22 65.29 CVT1.76MW 1680x1050 59.954
23 64.674 CVT1.76MW-R 1680x1050 59.883
24 66.587 CVT2.3MA-R 1920x1080 60
Page 33

Appendix
LED Backlit Flat TV Instruction Manual EN-32
En
Appendix 2
HDMI (High Denition Multimedia Interface) support format
1. Only supports 480i/480p, 576i/576p, 720p, 1080i, 1080p, 42" format with HDCP.
2. Digital interface with 4-channel TMDS signal.
SCART input/output description
TV source Screen display
source
SCART out
ATV ATV ATV
DTV DTV DTV
Page 34

This page is
intentionally left blank.
 Loading...