

Page 1
Please read this operation manual before using the air conditioner.
Keep this operation manual for future reference.
SPLIT TYPE ROOM AIR CONDITIONER
OPERATION MANUAL
0010560207
Contents
1
2-4
5
7
6.7
CAUTIONS
PARTS AND FUNCTIONS
OPERATION
MAINTENANCE
TROUBLE SHOOTING
HSU-18LXA03(T3)
AS24ZE1LAA
AS24ZE2LAA
AS24ZE1HAA
HSU-18HXA03(T3)
HST-24LXA13(T3)
HST-24HXA13(T3)
HST-18LXA13(T3)
HST-18HXA13(T3)
HSU-18HXA03
HSU-18LXA03
HSU-12HXA03
HSU-12LXA03
HSU-09HXA03
HSU-09LXA03
HSU-12LZE14
HSU-18LZE14
HSU-09LZE14
AS09ZB1LAA
AS12ZB1HRA
AS09ZB1HRA
AS18ZD3HAA
HSU-18HXAR(R2DB)
HSU-18HZE/R2(DB)-DC inverter
HSU-12HZE/R2(DB)-DC inverter
HSU-09LXA03-Y3HSU-18LXA13(T3)
HSU-18HXA13(T3)
HSU-19CXAG3
HSU-19CXAR5
HSU-19CXAS3
HSU-19CXBW3
HSU-13CXAG3
HSU-13CXAR5
HSU-13CXAS3
HSU-13CXBW3
Page 2
1
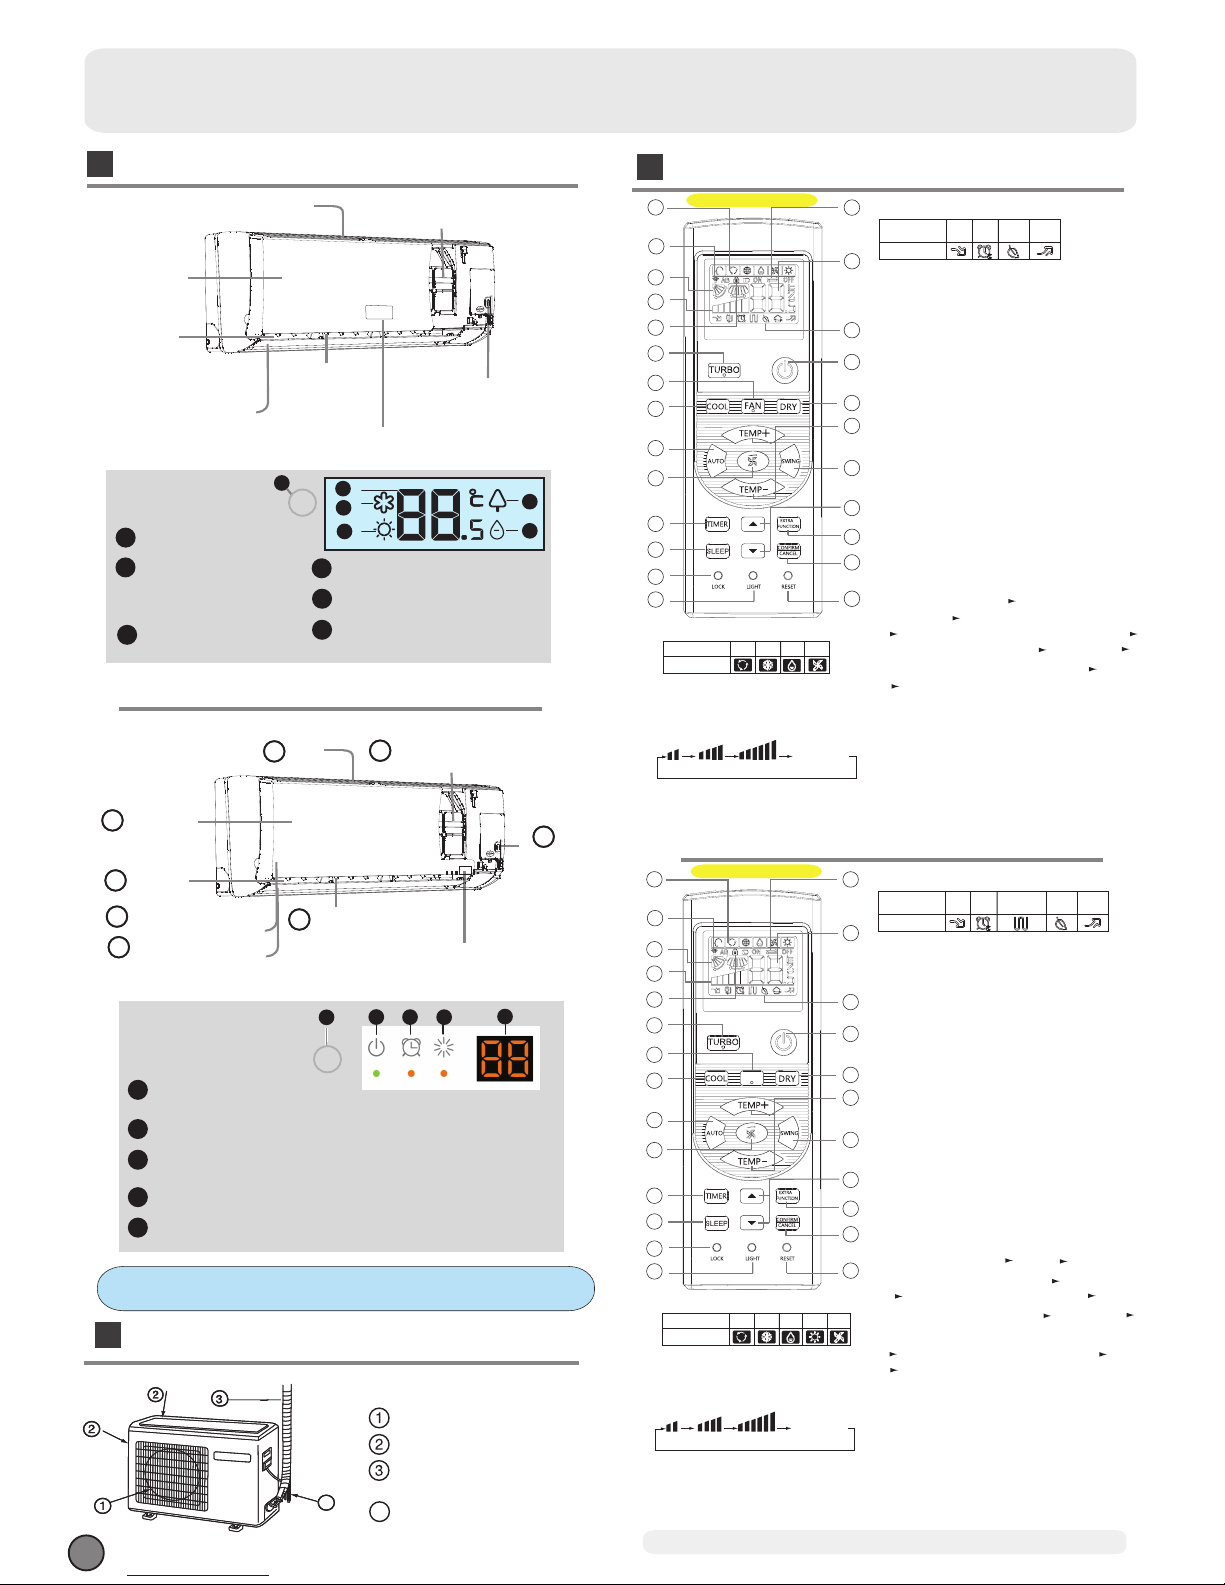
Parts and Functions
Remote controller
Indoor Unit
Outdoor Unit
4
OUTLET
INLET
CONNECTING PIPING
AND ELECTRICAL WIRING
DRAIN HOSE
4
Display board
(adjust left and
ow)
Vertical blade
r
ight air fl
Air Purifying Filter
Inlet
(inside)
Emergency
Switch
Horizontal flap
(adjust up and down air flow
Don't adjust it manually)
Outlet
Inlet grille
Display board
Display board
Signal receiver hole
COOL display
HEALTH display
4
2
3
1
5
DRY display
6
Ambient temp.display
When receiving the remote
control signal, display the set
temperature.
1. Mode display
2. Signal sending display
4. FAN SPEED display
5. LOCK display
6. TIMER OFF display
TIMER ON display
LO MED HI
7.TEMP display
16. LOCK button
Used to lock buttons and LCD display.
25. RESET button
When the remote controller
appears abnormal, use a sharp
pointed article to press this button
to reset the remote
22. HOUR button
Operation mode
AUTO FANCOOL DRY
Remote controller
1
2
3
4
5
9
10
11
12
13
14
15
16
17
22
23
24
25
19
20
21
8
18
7
6
Control the lightening and extinguishing
of the indoor LED display board.
3. SWING display
8
.
9. TURBO button
10. FAN button
11. COOL button
12. AUTO button
13. FAN SPEED button
14. TIMER button
15. SLEEP button
17. LIGHT button
18. POWER ON/OFF button
19. DRY button
20. TEMP button
21. SWING button
23. EXTRA FUNCTION button
24.CANCEL/CONFIRM button
AUTO
Function: Setting and cancel to the
timer and other additional functions.
Display
circulated
Operation mode
Remote controller
QUIET
TURBO
SLEEP
HEALTH
Additional functions display
NOTE: Healthy function is not available for some units.
Function: Health--- Healthy airflow
position1--- Healthy airflow position 2
--- Restore the original flap position--Right & left air airflow--- A-B yard---
Refresh air(
reserved function)--- QUIET
--- Fahrenheit/Celsius mode conversion
Remote controller A
1. Mode display
2. Signal sending display
4. FAN SPEED display
5. LOCK display
6. TIMER OFF display
TIMER ON display
LO MED HI
7.TEMP display
16. LOCK button
Used to lock buttons and LCD display.
25. RESET button
When the remote controller
appears abnormal, use a sharp
pointed article to press this button
to reset the remote
22. HOUR button
Operation mode
AUTO FANCOOL DRY
Remote controller
HEAT
Remote controller B
Remote controller B
1
2
3
4
5
9
10
11
12
13
14
15
16
17
22
23
24
25
19
20
21
8
18
7
6
Control the lightening and extinguishing
of the indoor LED display board.
3. SWING display
8
.
9. TURBO button
10. HEAT button
11. COOL button
12. AUTO button
13. FAN SPEED button
14. TIMER button
15. SLEEP button
17. LIGHT button
18. POWER ON/OFF button
19. DRY button
20. TEMP button
21. SWING button
23. EXTRA FUNCTION button
24.CANCEL/CONFIRM button
AUTO
Function: Setting and cancel to the
timer and other additional functions.
Display
circulated
Operation mode
Remote controller
QUIET
TURBO
SLEEP
Supplemented
electrical
heating
HEALTH
Additional functions display
Function:
Health--- FAN---
Healthy airflow
position1---
--- Healthy airflow position 2--Right & left air airflow--- A-B yard---
function
)-- QUIET--- Refresh air(
reserved
--- Fahrenheit/Celsius mode conversion
HEAT
Low-Temperature Heating Operation Down to 10℃
Actual inlet grille may vary from the one shown in the
manual according to the product purchased
(adjust left and
ow)
Vertical blade
r
ight air fl
Air Purifying Filter
Inlet
(inside)
Emergency
Switch
Horizontal flap
(adjust up and down air flow
Don't adjust it manually)
Outlet
Inlet grille
6
5
2
1
4
3
6
4
2
1
5
3
(inside)
7
8
Anion generator
2
3
5
6
4
HEAT display
Display board
1
4
2
3
1
5
Operation mode indicator
(lights up when the compressor is on.)
Timer mode indicator
(Lights up whenTimer operation is selected.)
Power indicator
(Lights up when unit starts.)
Ambient temp display
When receiving the remote control signal, display the set temperature.
Remote signal receiver
(A beeping sound is generated when a signal from remote controller isreceived.)
1
2
3
4
5
Page 3
2
Operation
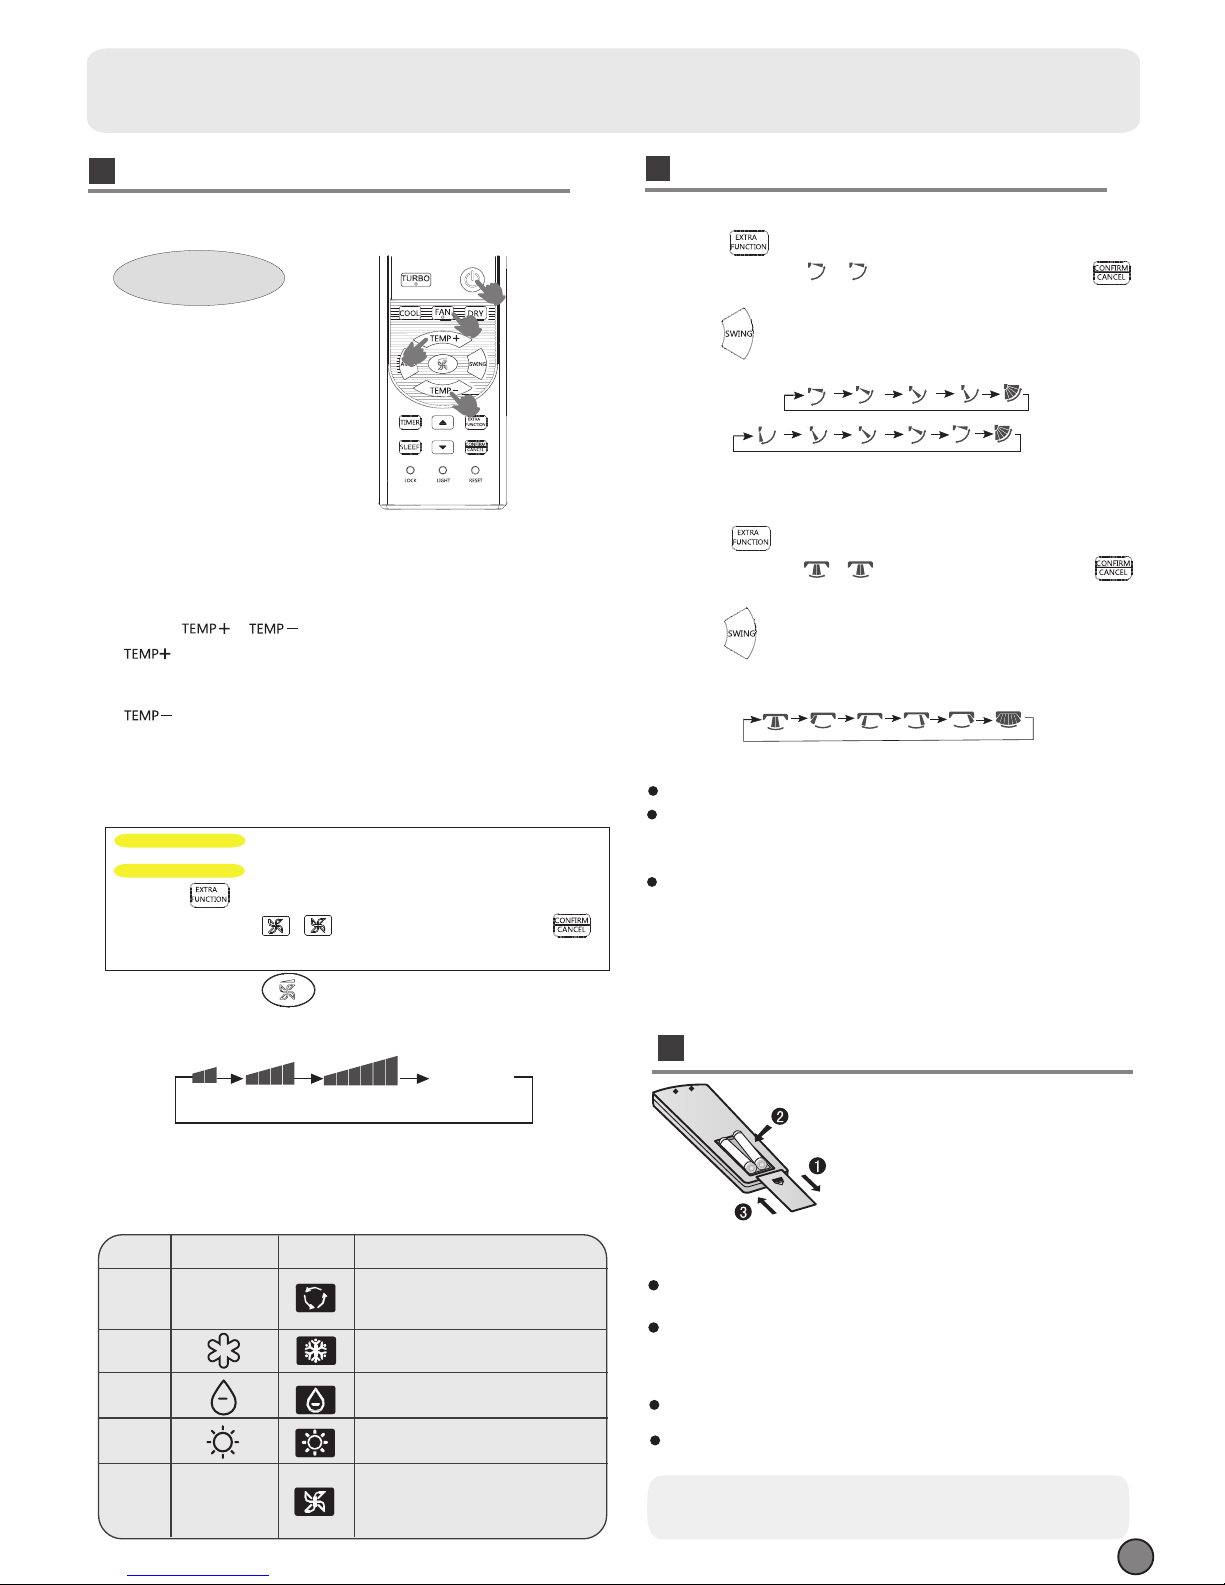
Unit start / stop
1
3
2
2
Press FAN button.
Remote controller:
Press
button
Every time the button is pressed, temp.setting
increase 1
o
C,if kept depressed, it will increase
rapidly
Every time the button is pressed, temp.setting
decrease 1
o
C,if kept depressed, it will
decrease rapidly
Select a desired temperature.
3.Fan function
2.Select temp.setting
Air conditioner is running under displayed fan speed.
When FAN is set to AUTO, the air conditioner
automatically adjusts the fan speed according to room
temperature.
1. Unit start
Press ON/OFF on the remote controller, unit starts.
/
Remote controller
changes as follows:
LOW
MED HI
AUTO
Display
circulated
Air Flow Direction Adjustment
1.Status display of air flow
When restart after remote turning off, the remote
return to the previous
2.Left and right air flow adjustment
Cautions:
When adjusting the flap by hand,turn off the unit.
When humidity is high,condensate water might occur
adjusted to left or
It is advisable not to keep horizontal flap at downward
position for a long time in COOLor DRY
otherwise, condensate water might occur.
at air outlet if all vertical louvers are
right.
mode ,
controller will automatically
Note:
set swing position.
Press button to enter additional options, when
cycle display to , will flash. And then press
enter to Left and right air flow function.
(This function is unavailable on some models.)
COOL/DRY:
HEAT:
Initial state
Press button to enter additional options, when
cycle display to , will flash. And then press
enter to up and down air flow function.
Press button. For each press,changes as follows:
Remote controller:
Press button. For each press,changes as follows:
Remote controller:
COOL/DRY/HEAT:
For each press button fan speed
In HEAT mode,warm air will blow out after a short
periodof the time due to cold-draft prevention function.
When FAN is set to AUTO, the air conditioner automatically
adjusts the fan speed according to room temperature.
Cooling only unit do not have displays and functions
related with heating
Display Board
Remote
Controller
Note
COOL
DRY
HEAT
FAN
nothing
In DRY mode, when room temperature becomes
lower than temp.setting+2
o
C,unit will run intermittently
at LOW speed regardless of FAN setting.
Under the mode of auto operation, air conditioner will
automatically select Cool or Heat operation according
to room temperature.
air conditioner
automatically adjusts the fan speed
temperature.
When FAN is set to AUTO, the
according to room
In FAN operation mode, the unit will not operate in
COOL or HEAT mode but only in FAN mode ,AUTO is
not available in FAN mode.And temp.setting is disabled.
In FAN mode,SLEEP operation is not available.
Operation
Mode
AUTO
nothing
Remote controller A:
Remote controller B:
Press button to enter additional options, when
cycle display to , will flash. And then press
enter to FAN function.
Loading of the battery
1
2
3
4
Remove the battery cover;
Load the batteries as illustrated.
2 R-03 batteries, resetting key
(cylinder);
Be sure that the loading
is in line with the
" + "/"-";
Load the battery,then put on the cover again.
The distance between the signal transmission head and the receiver hole should be within 7m without any obstacle as well.
When electronic-started type fluorescent lamp or change- over
wireless telephone is installed in the
ver is apt to be disturbed in receiving
the signals,
so the distance to the indoor unit should be shorter.
type fluorescent lamp or
room, the recei
Note:
Full display or unclear display during operation indicates the
ries have been used up.
Please change batteries.
If the remote controller can't run normally during operation, please
reload several minutes later.
batte
remove the batteries and
Hint:
Remove the batteries in case won't be in use for a long period. If
there is any display after taking-out, just press reset key.
Page 4
Operation
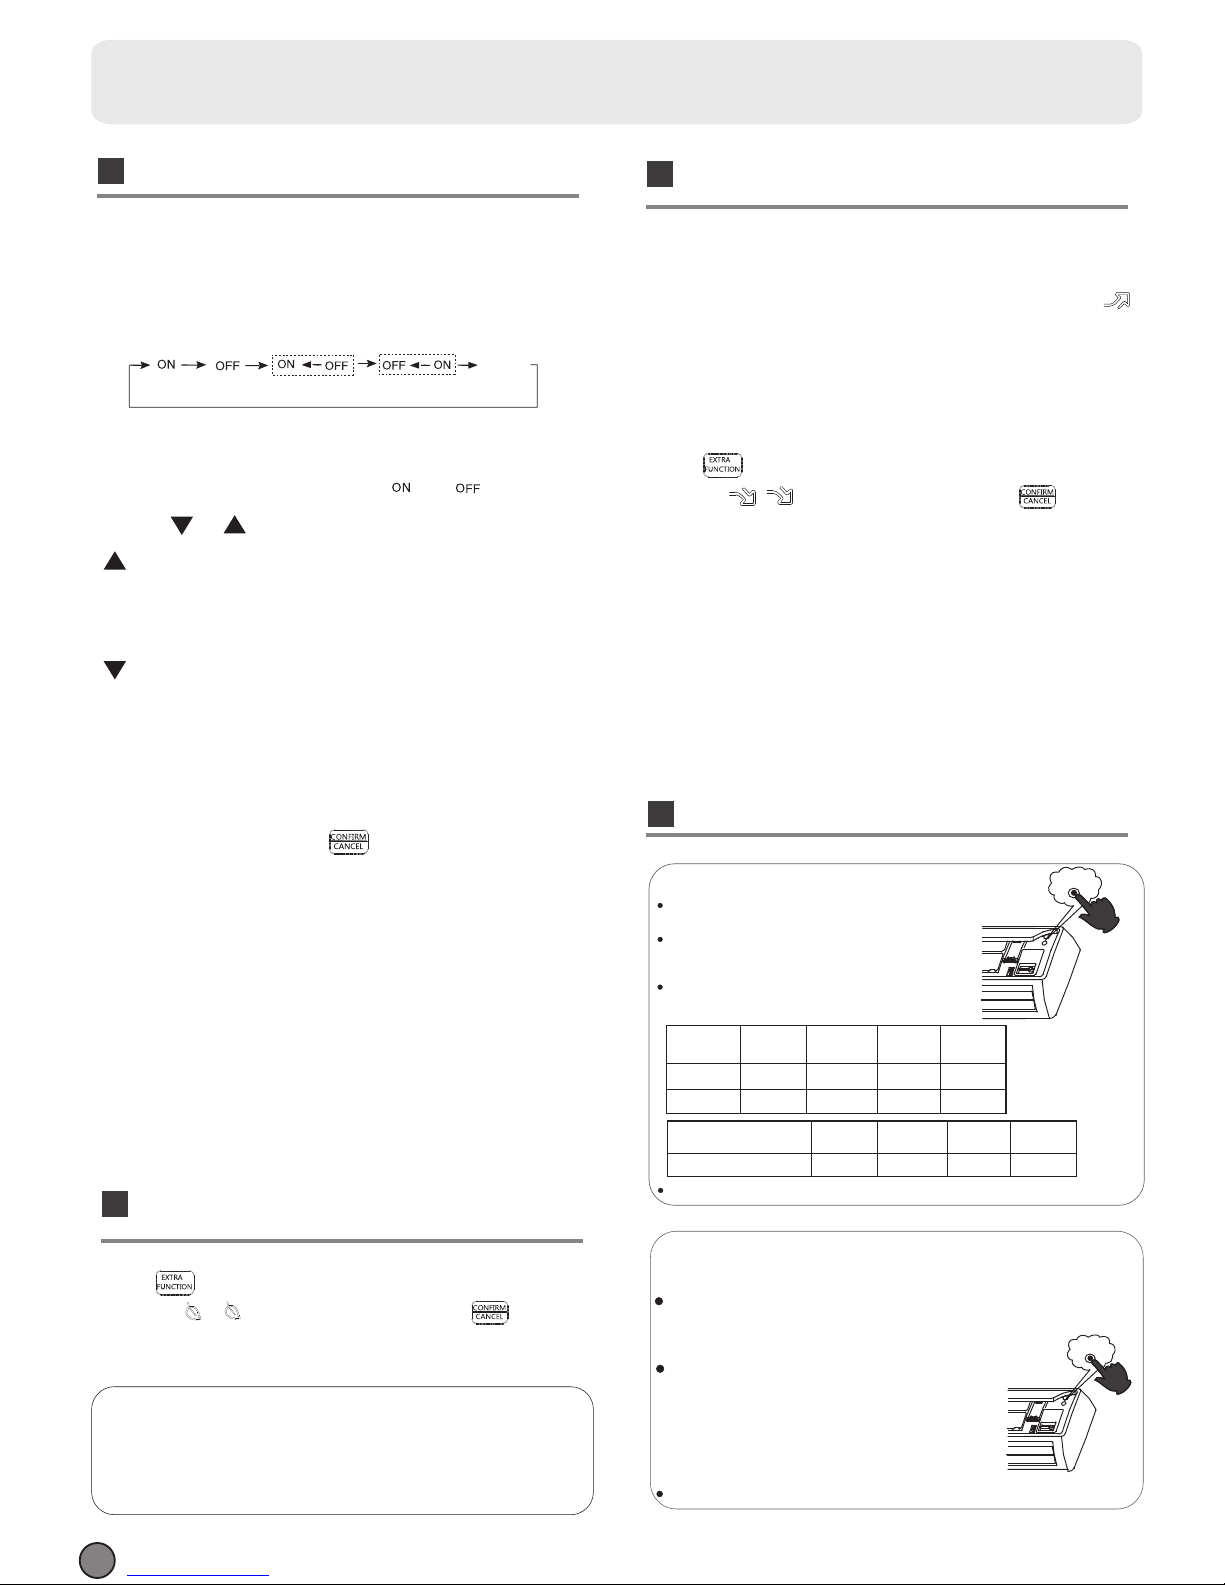
Emergency Operation:
temperature is below 16
o
C, do not use it in the
Test operation:
Use this switch in the test operation when the room
normal operation.
your finger from the switch: the cooling
Continue to press the test operation
switch for more than 5 seconds. After
you hear the "Pi" sound twice,
release
Test operation switch is the same as emergency switch.
operation starts with the air flow speed "Hi".
Emergency operation and test operation
Use this operation only when the remote controller
is defective or lost.
When the emergency operation switch is
pressed,the" Pi "sound is heard once, which means
the start of this operation.
In this operation, the system automatically selects
the operation modes,cooling or fan or heat,according
to the room temperature.
It is not possible to operate in dry mode.
Room
temperature
Operation
mode
Designated
temperature
Timer
mode
Air flow
ABOVE 23
O
C
BELOW 23
O
C
COOLING
HEAT
23
O
C
26
O
C
NO
NO
AUTOMATIC
AUTOMATIC
Pi
(Cooling only uint)
Room temperature
Operation
mode
Designated
temperature
Timer
mode
Air flow
BELOW 23
O
C
FAN
26
O
C
NO
AUTOMATIC
Pi Pi
After 30 minutes, test operation ends automatically(Only for 22K,24K unit).
3
Note :
During TURBO operation, in rapid COOL mode ,
the room
will show inhomogeneous temperature distribution.
Long period QUIET operation will cause effect of not too
cool or not too warm.
1.After unit starts, select your desired operation mode.
2.Press TIMER button to change TIMER mode. Every
time the button is pressed, display changes as follows:
Remote controller:
Then select your desired TIMER mode (TIMER ON or
TIMER OFF or TIMER ON-OFF). " "or " "will flash.
Timer On/Off On-Off Operation
BLANK
TIMER ON TIMER OFF TIMER ON-OFF
3.Press / button to set time.
It can be adjusted within 24 hours.
Hints:
After replacing batteries or a power failure happens, time
setting should be reset.
According to the Time setting sequence of TIMER ON or
TIMER OFF, either Start-Stop or Stop-Start can be achieved.
TIMER OFF-ON
0.5h
0.5h 0.5h
0.5h
Press the button for each time, setting time in the first
12 hours increased by 0.5 hour every time, after 12
hours,increased by 1 hour every time.
Press the button for each time, settiing time in the first
12 hours decreased by 0.5 hour every time, after 12
hours,decreased by 1 hour every time.
After adjust the time,press button and confirm the
time ON or OFF button will not flash any more.
4.Confirm timer setting
5.Cancel timer setting
Press the timer button by times until the time display
eliminated.
TURBO/QUIET Operation
(This function is unavailable on some models.)
(1)
TURBO Operation
(2)
QUIET Operation
When you need rapid heating or cooling, you can use this function.
Press button to enter additional options, when cycle
display to , will flash,and then press ,enter to
quiet function. When cancel the function, please enter
additional options again and to cancel quiet function.
Press TURBO button, the remote controller will show ,
and then achieve to the turbo function. Press again this
TURBO button , the turbo function will be cancelled.
Press button to enter additional options, when cycle
display to , will flash,and then press ,enter to
health function. When cancel the function, please enter
additional options again and to cancel health function.
HEALTH Operation
(This function is unavailable on some models.)
a lot of anion effectivel y ba lance the q ua ntity of position
up the dust sed iment in the roo m and finall y cl ean the
an d anion in the a ir and also to kil l bacteria and sp ee d
ai r in the room.
The anion generator in the aircond itio ner can generate
Page 5
Comfortable SLEEP
Operation
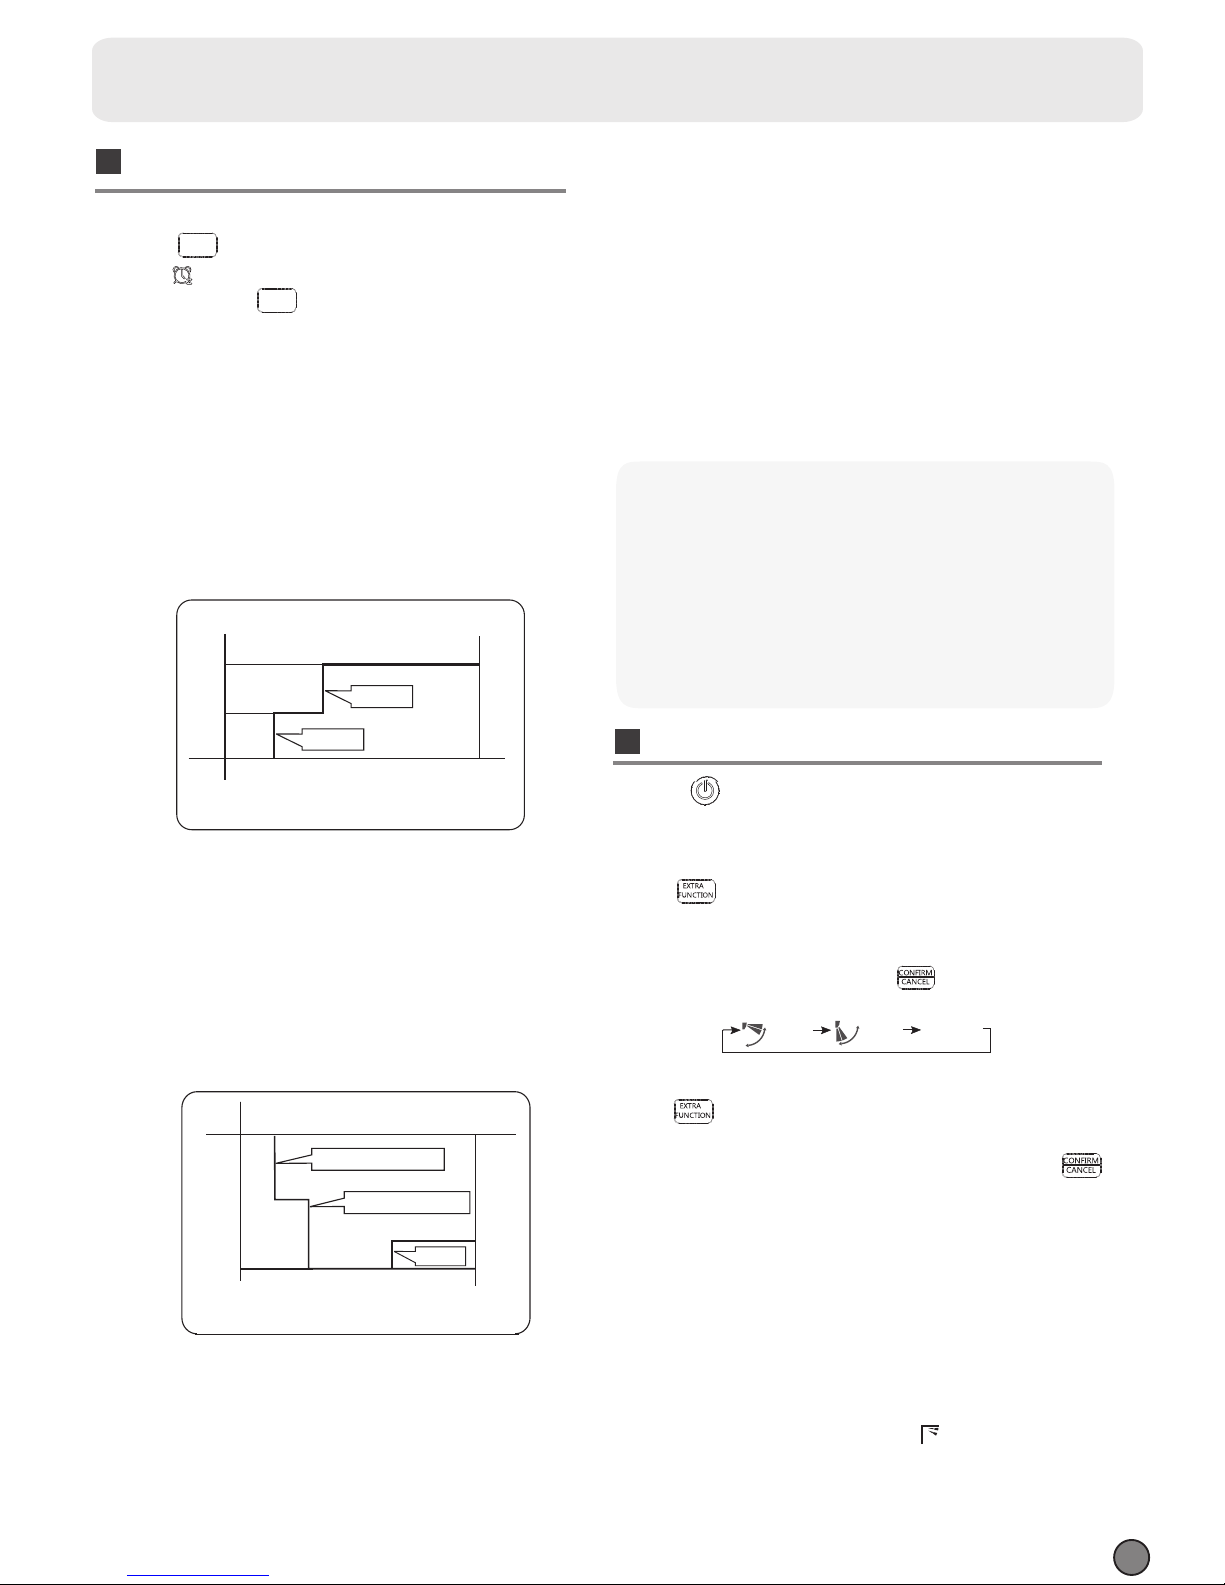
4
3.In AUTO mode
corresponding sleep mode adapted to the
automatically selected operation mode.
4. In FAN mode
It has no SLEEP function.
sleeping function is set up,if user resets TIMER function, the
state of timing-on,if the two
modes are set up at the same
time,
either of their operation time is ended first,the unit will
stop automatically,and the other mode will be cancelled.
5. When quiet sleeping function is set to 8 hours the quiet
Note to the power failure resume:
press the sleep button ten times in five seconds and enter
function after hearing four sounds.And press the sleep button
ten times within five seconds and leave this function after
hearing two sounds.
sleeping time can not be adjusted.When TIMER function is
2.In HEAT mode
1 hours after SLEEP mode starts, temp will become
2 C lower than temp.setting. After another 1 hours,
temp decrease by 2 C further. After more another
3 hours, temp.risesby 1 C further.The unit will run
for further 3 hours then stops.Temp. is lower than
temp. setting so that room temperature won't be too
high foryour sleep.
O
O
SLEEP
operation starts
SLEEP
operation stops
1 hr
1 hr
3 hrs
3 hrs
Rises 1OC
Temp.setting
Unit stop
In HEAT mode
Decreases 2
O
C
Decreases 2
O
C
The unit operates in corresponding sleep mode
set,the quiet sleeping function can't be set up.After the
sleeping function will be cancelled; the machine will be in the
Operation Mode
1. In COOL,DRY mode
SLEEP operation starts SLEEP operation stops
Approx.6hrs
1 hr
Rises 1
O
C
Rises 1
O
C
Temp.setting
Unit stop
In COOL, DRY mode
1 hr
1 hours after SLEEP mode starts,temp.will become
higher than temp.setting.After another 1 hours,
temp.risesby 1 futher .The unit will run for further
6 hours then stops Temp. is higher than temp.setting
so that room temperature won’t be too low for your
sleep.
O
C
1
O
C
Press button , the remote controller will
show , and then achieve to the
sleep function.
Press again this button , the
sleep function will
be cancelled.
O
Note
When TIMER function is set, the sleeping function can’t be
set up .After the sleeping function is set up
,if user resets
TIMER function, the sleeping function will be cancelled; the
machine will be in the state of timing-on.
Power Failure Resume Function
If the unit is started for the first time, the compressor will not
start running unless 3 minutes have elapsed. When the power
resumes after power failure, the unit will run automatically,
and 3 minutes later the compressor starts running.
Healthy airflow Operation
1.Press to starting
Setting the comfort work conditions.
2.The setting of healthy airflow function
Note:
1.After setting the healthy airflow function, the position
grill is fixed.
3.In cooling and dry, using the air conditioner for a long
time under the high air humidity, condensate water may
occur at the grille .
Notice: Do not direct the flap by hand. Otherwise, the
grille will run incorrectly. If the grille is not run correctly, stop
for a minute and then start, adjusting by remote
controller.
2.In cooling, it is better to select the
mode.
3.The cancel of the healthy airflow function
Press button to enter additional options,Press this
button continuously, the louvers location will cycle between
in the following three locations, to choose the swing location
what you needed,and then press button to confirm.
Press button to enter additional options,Press this
button continuously, the louvers location will cycle between
in the following three locations again,and then press
button to cancel.
Healthy
airflow
upwarder
Healthy
airflow
downwarder
Present
position
SLEEP
SLEEP
Page 6
Maintenance
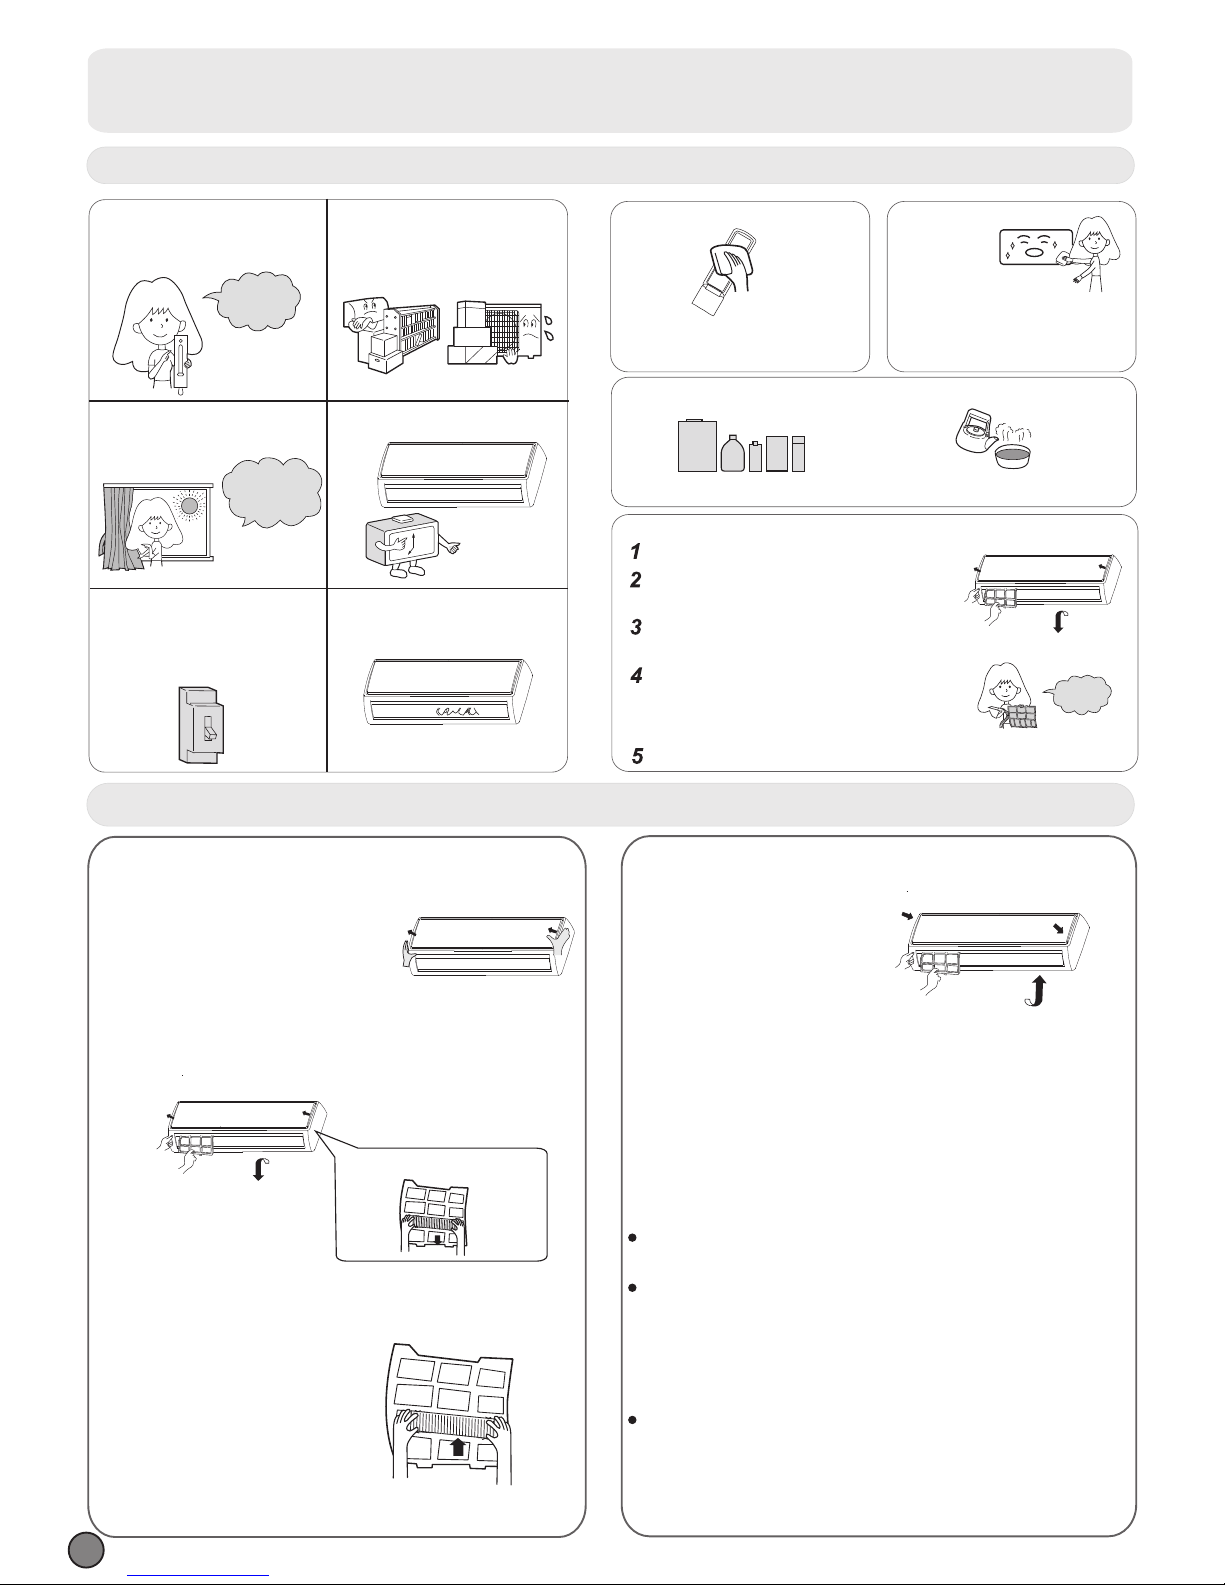
For Smart Use of The Air Conditioner
Setting of proper room
temperature
Close doors and windows
during operation
If the unit is not to be used
for a long time, turn off the
power supply main switch.
Use the timer effectively
Use the louvers effectively
Do not block the air inlet
or outlet
Proper
temperature
During cooling operation
prevent the penetration of
direct sunlight with
curtain or blind
OFF
Air Filter cleaning
Open the inlet grille by pulling it upward.
Remove the filter.
Clean the filter.
Attach the filter.
Close the inlet grille.
Push up the filter's center tab slightly until it is released
from the stopper, and remove the filter downward.
Use a vacuum cleaner to remove dust, or wash the filter with
water.After washing, dry the filter completely in the shade.
Attach the filter correctly so that the "FRONT" indication is
facing to the front.Make sure that the filter is completely
fixed behind the stopper.If the right and left filters are not
attached correctly, that may cause defects.
Remote Controller
Do not use the following for cleaning
Do not use water ,wipe the controller with a
dry cloth.Do not use glass cleaner or chemical
cloth.
Gasoline,benzine, thinner or cleanser may
damage the coating of the unit.
Hot water over 40
O
C(104OF) may cause
discoloring or deformation.
Wipe the air conditioner by using a soft and
dry cloth.For serious stains,use a neutral
detergent diluted with water.Wring the water
out of the cloth before wiping.then wipe off
the detergent completely.
Indoor Body
Once every
two weeks
1.Open the lnlet Grille
2.Detach the standard air filter
3.Attach Air Purifying Filter
4.Attach the standard air filter
(Necessary installation)
5.Close the Inlet Grille
Close the Grille surely
Slide the knob slightly upward to
release the filter, then withdraw it.
Put air purifying filter appliances into the
right and left filter frames.
Detach old Air Purifying Filter
NOTE:
The photocatalyst air purifying filter will be solarized in fixed
time. In normal family,
it will be solarized every 6 months.
Prop up the inlet grille by using a
small device named grille-support
ATTENTION:
The white side of the photocatalyst air purifying
filter face outside,
and the black side face the unit.
The green side of the bacteria-killing medium air
and the white side face the unit.
Please keep the bacteria-killing medium air purifying filter in
avoid long time directly sunshine
when you stop using it,or its ability of sterilization will
be
reduced.
The bacteria-killing medium air purifying filter will be used
for a long time,no need for replacement. But in the period
of using them ,you should remove the dust frequently by
Replacement of Air Purifying Filter
which located in the right side of
the indoor unit.
purifying filter face outside,
using vacuum cleaner or flaping them lightly,otherwise ,
its performance will be affected.
the cool and dry conditions
(NOTE: Air purifying filter is optional part)
5
Page 7
Cautions
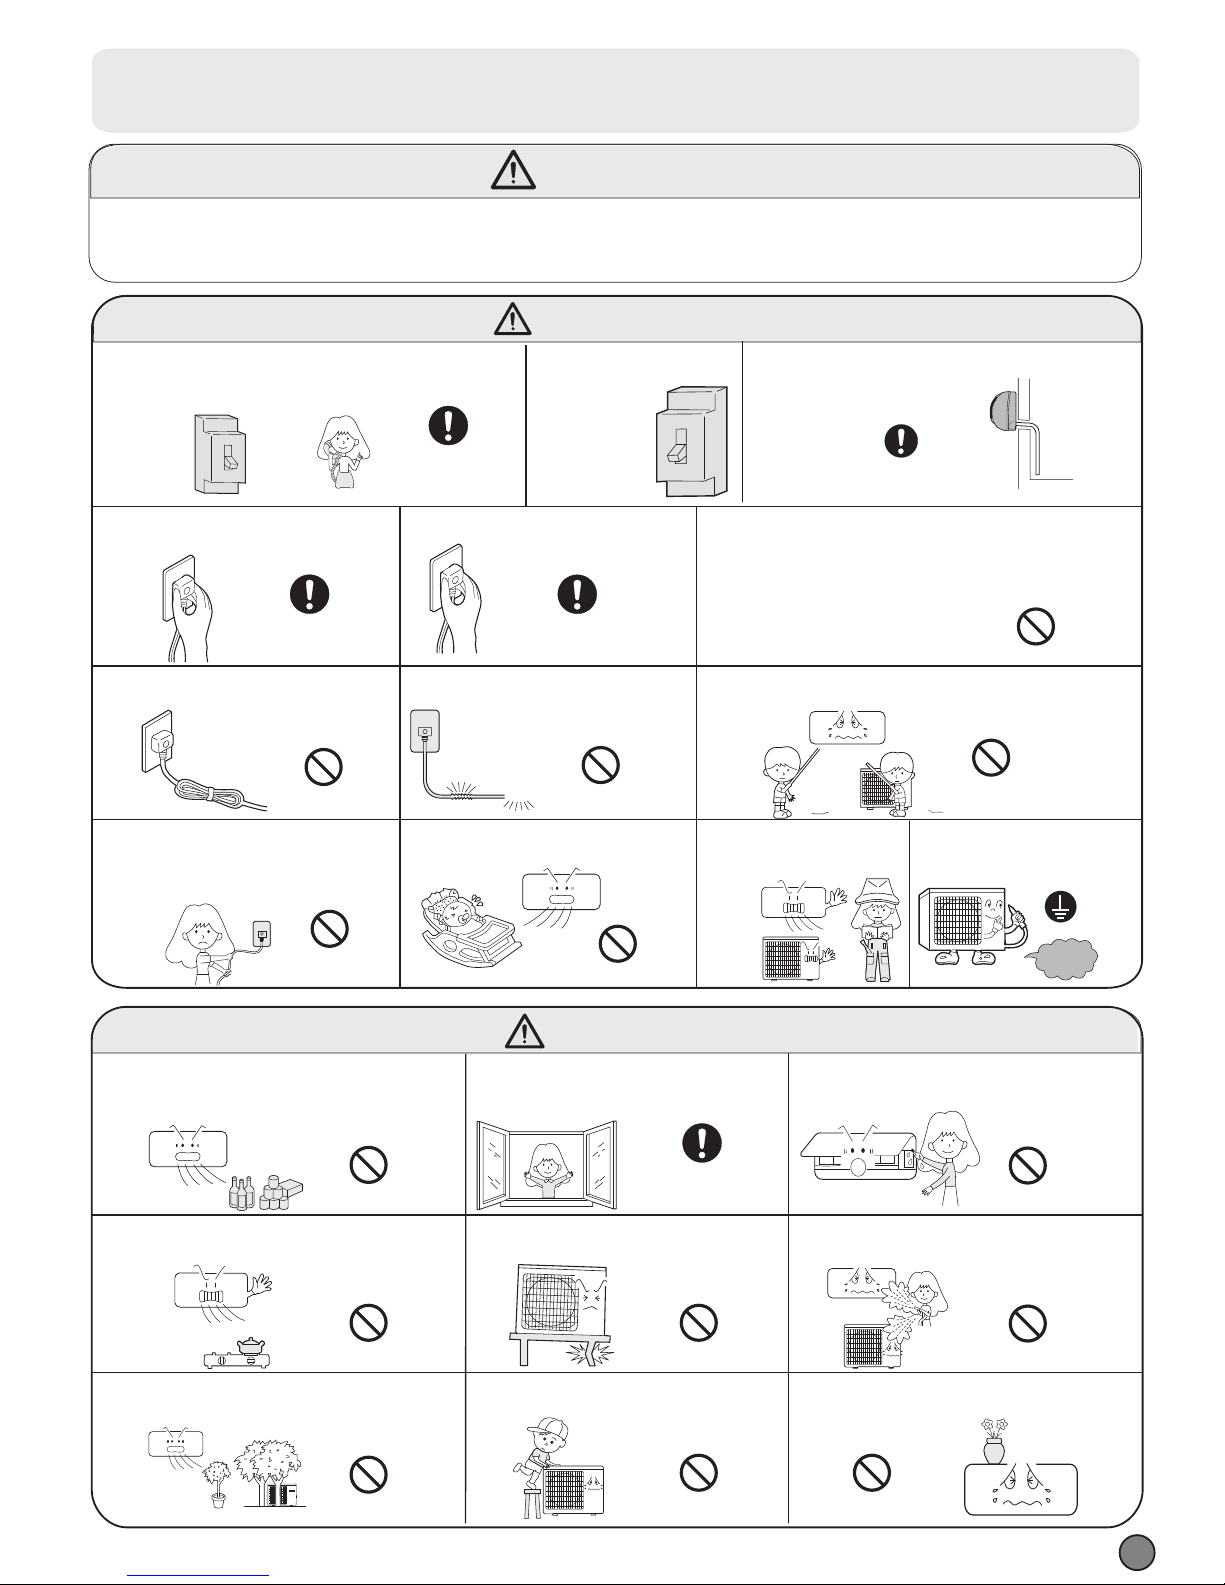
WARNING
Please call Sales/Service Shop for the Installation.
Do not attempt to install the air conditioner by yourself because improper works
may cause electric shock, fire, water leakage.
Connect the earth
cable.
earthing
WARNING
When abnormality such as burnt-small found,
immediately stop the operation button and
contact sales shop.
OFF
Use an exclusive
power source
with a circuit
breaker
ENFORCEMENT
Connect power supply cord
to the outlet completely
Use the proper voltage
Do not use power supply
cord in a bundle.
Take care not to damage
the power supply cord.
1.Do not use power supply cord extended
or connected in halfway
STRICT
ENFORCEMENT
STRICT
STRICT
ENFORCEMENT
PROHIBITION
PROHIBITION
PROHIBITION
PROHIBITION
Do not start or stop the
operation by disconnecting
Do not channel the air flow directly
at people, especially at infants or
the aged.
Do not try to repair or
reconstruct by yourself.
Do not use for the purpose of storage of
food, art work, precise equipment,
breeding, or cultivation.
CAUTION
Take fresh air occasionally especially
when gas appliance is running at the
same time.
PROHIBITION
STRICT
ENFORCEMENT
Do not operate the switch with
wet hand.
PROHIBITION
PROHIBITION
PROHIBITION
PROHIBITION
PROHIBITION
Do not install the unit near a fireplace
or other heating apparatus.
Check good condition of the
installation stand
Do not pour water onto the unit
for cleaning
PROHIBITION
Do not place animals or plants in
the direct path of the air flow
Do not place any objects on or
climb on the unit.
Do not place flower vase or water
containers on the top of the unit.
Do not insert objects into the air
inlet or outlet.
PROHIBITION
PROHIBITION
PROHIBITION
STRICT
ENFORCEMENT
Check proper
installation of the
drainage securely
the power supply cord
and so on.
2.
Do not install in the place where there is any
possibility of inflammable gas leakage around the unit.
3.Do not get the unit exposed
to vapor or oil steam.
6
Page 8
Trouble shooting
7
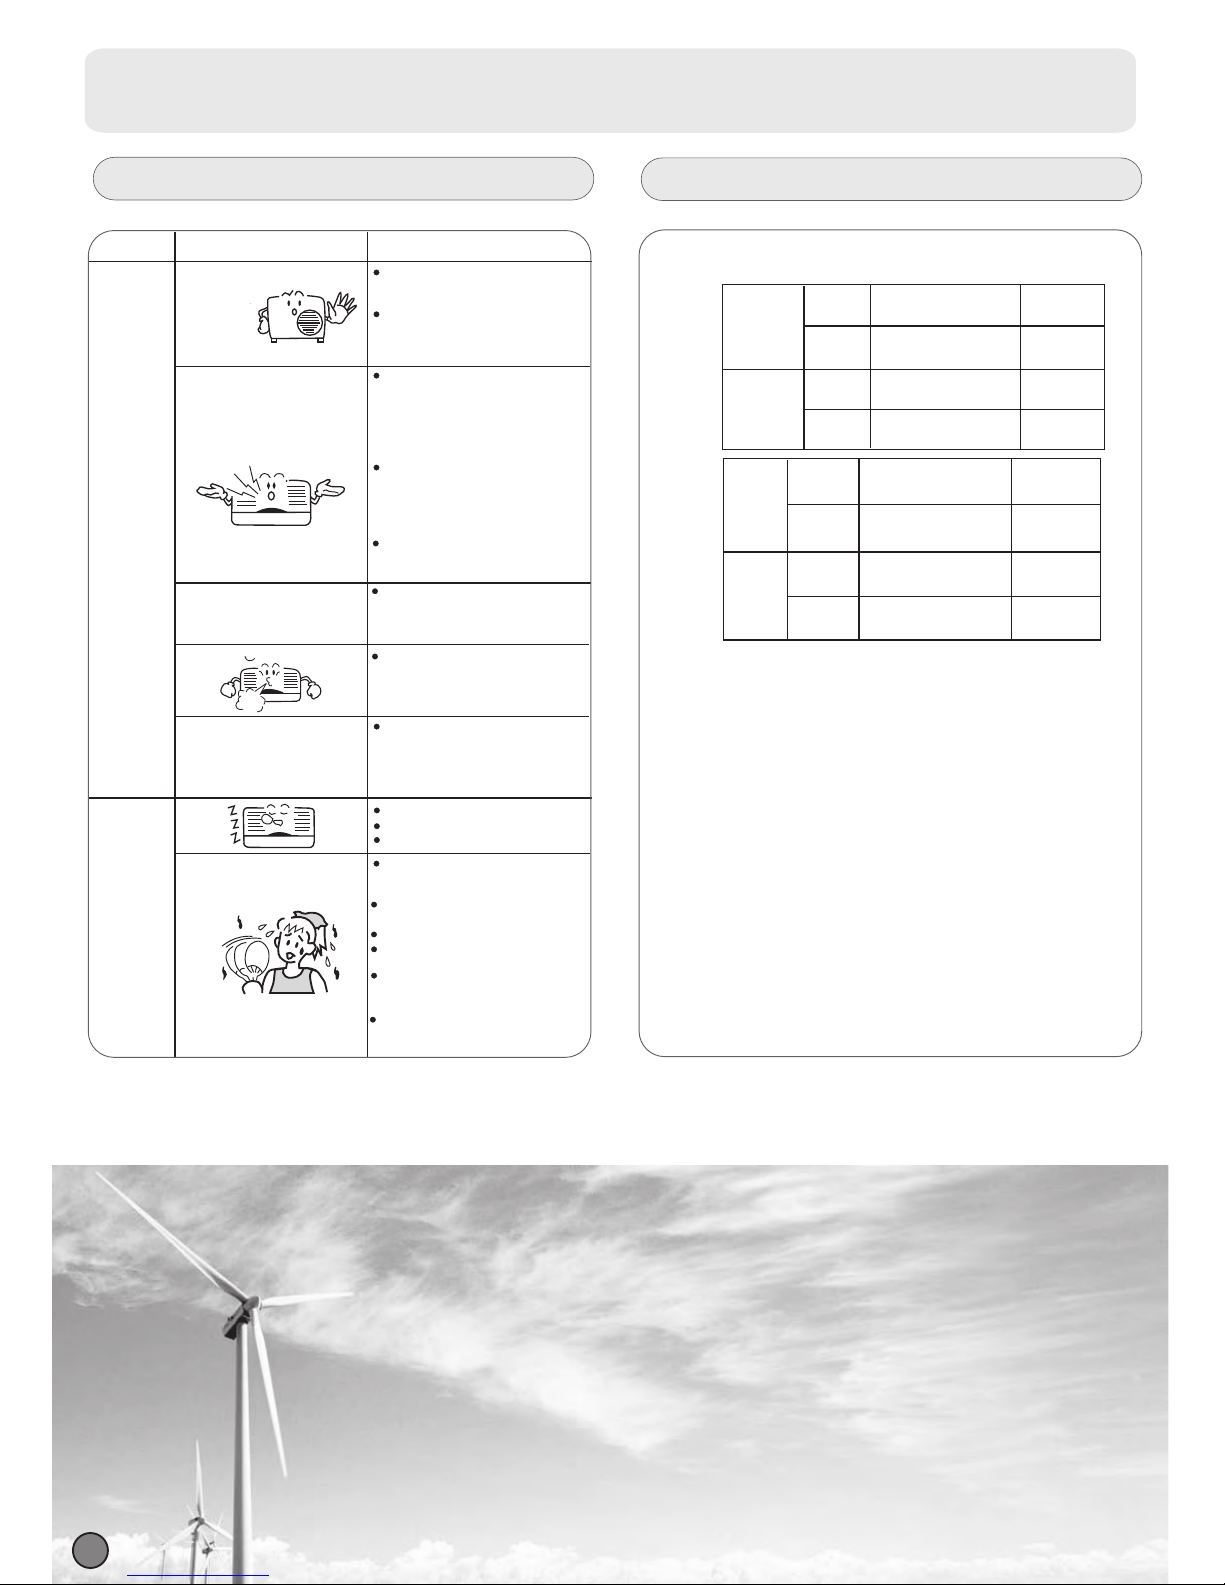
Before asking for service, check the following first.
Normal
Performance
inspection
Noise is heard
Phenomenon
Cause or check points
The system does not restart
immediately.
Smells are generated.
Mist or steam are blown out.
Multiple
check
Poor cooling
Application temp. range of air conditioner -7
o
C~43oC.
When unit is stopped, it won't restart
elapsed to protect the system.
When the electric plug is pulled out
and reinserted, the protection circuit
During unit operation or at stop,
a swishing or gurgling noise may
(This noise is generated by
refrigerant flowing in the system.)
During unit operation, a cracking
noise may be heard.This noise is
temperature changes.
Should there be a big noise from
filter may be too dirty.
This is because the system
circulates smells from the interior
During COOL or DRY operation,
This is due to the sudden cooling
Is power plug inserted?
Is there a power failure?
Is fuse blownout?
Is the air filter dirty?
Are there any obstacles before
Is temperature set correctly?
Are there some doors or
Is there any direct sunlight
through the window during the
Are there too much heat sources
or too many people in the room
In dry mode,
fan
speed can’t be changed.
In DRY mode, when room
than temp.setting+2
o
C,unit will
regardless of FAN setting.
Maximum: D.B
10.The appliance must be installed on a strong enough support.
9.Young children should be supervised ensure that they do not
play with the appliance.
8.The appliance is not intended to use by young children or infirm
persons without supervision.
7.The used batteries should be disposed of properly.
6.
After installation, the power plug should be easily reached..
5.The wiring method should be in line with the local wiring standard.
4.The distance between the indoor unit and the floor should be
more than 2m.
3. If the fuse on PC board is broken please change it with a fuse
type T. 3.15A/250V.
11.The wiring diagram is attached inside the machine.
2. If the supply cord is damaged, it must be replaced by the
manufacturer or its service agent or a similar qualified
person.
The type of connecting wire is H05RN-F or H07RN-F
Cautions
The machine is adaptive in following situation
1.Applicable ambient temperature range:
Cooling
Heating
Indoor
Outdoor
Outdoor
Indoor
Maximum: D.B / W.B 32
o
C/23
o
C
18
o
C/14
o
C
43
o
C/26
o
C
18
o
C
27
o
C
15
o
C
24
o
C/18
o
C
-7
o
C/-8
o
C
Minimum: D.B / W.B
Minimum: D.B
Maximum: D.B
Minimum: D.B
Maximum: D.B / W.B
Minimum: D.B / W.B
For: T1
during cooling operation?
cooling operation?(Use curtain)
windows left open?
inlet and outlet?
Normally it should be cleaned
every 15 days.
run intermittently at LOW speed
temperature becomeslower
indoor unit may blow out mist.
of indoor air.
air such as the smell of furniture,
paint, cigarettes.
air flow in unit operation, air
generated by the casing expanding
or shrinking because of
be heard.At first 2-3 minutes after
unit start, this noise is more noticeable.
will work for 3 minutes to protect the
air conditioner.
immediately until 3 minutes have
If the fuse of outdoor unit on PC board is broken, please change
it with the type of T. 25A/250V.
Application temp. range of air conditioner -7
o
C~52oC.
T1:
T3:
For: T3
Cooling
Heating
Indoor
Outdoor
Indoor
Outdoor
Maximum: D.B / W.B
Minimum: D.B / W.B
Maximum: D.B / W.B
Minimum: D.B
Maximum: D.B
Minimum: D.B
Maximum: D.B / W.B
Minimum: D.B / W.B
32oC/23oC
18
o
C/14oC
52
o
C/31oC
18
o
C
27
o
C
15
o
C
24
o
C/18oC
-7
o
C/-8oC
 Loading...