


SPLIT AIR CONDITIONER
OPERATION
MANUAL
AS102AMARA
AU102ACARA
(HSU-10HA03(DB))
AS102ALARA
AU102ACARA
(HSU-10H03(DB))
AS122AYARA
AU122ACARA
(HSU-12HA03(DB))
AS122AVARA
AU122ACARA
(HSU-12H03(DB))
Digital DC Variable Frequency
Healthy Split Air Conditioner
Please read this manual carefully before use.
Please keep this manual carefully and safely.
No.0010540438
I

Contents
Cautions........................................................................................................1-2
Name of Parts...............................................................................................3-4
Operation Hints............................................................................................5-6
Operation.....................................................................................................7-13
Notes for Safety.........................................................................................14-15
Maintenance............................................................................................. 16-18
Trouble Shooting.......................................................................................19-21
Installation.................................................................................................22-30
Installation Check and Trial Operation...........................................................31

Cautions
Disposal of the old air conditioner
Before disposing an old air conditioner that
goes out of use. please make sure it's
inoperative and safe. Unplug the air
conditioner in order to avoid the risk of child
entrapment.
It must be noticed that air conditioner system
contains refrigerants, which require
specialized waste disposal. The valuable
materials contained in a air conditioner can
be recycled. Contact your local waste
disposal center for proper disposal of an old
air conditioner and contact your local
authority or your dealer if you have any
question. Please ensure that the pipework of
your air conditioner does not get damaged
prior to being picked up by the relevant
waste disposal center, and contribute to
environmental awareness by insisting on an
appropriate, anti-pollution method of
disposal.
All these valuable materials may be taken to
a waste collecting center and used again
after adequate recycling.
Consult your local authorities for the name
and address of the waste materials
collecting centers and waste paper diposal
services nearest to your house.
Safety Instructions and Warnings
Before starting the air conditioner,read the
information given in the User's Guide
carefully. The user's Guide contains very
important observations relating to the
assembly, operation and maintenance of
the air conditioner.
The manufacturer does not accept
responsibility for any damages that may
airse due to non-observation of the
following instruction.
Damaged air conditioners are not to be
put into operation.In case of doubt,consult
your supplier.
Disposal of the packaging of your
new air conditioner
All the packaging materials employed in the
package of your new conditioner may be
disposed without any danger to the
environment.
The cardboard box may be broken or cut into
smaller pieces and given to a waste paper
diposal service. The wrapping bag made of
polyethylene and the polyethylene foam
pads contain no fluorochloric hydrocarbon.
Use of the air conditioner is to be carried
out in strict compliance with the relavtive
instructions set forth in the User's Guide.
Installation shall be done by professional
people,don't install unit by yourself.
1

Cautions
3
For the purpose of safety, the air
conditioner must be properly grounded in
accordance with specifications.
Always remember to unplug air
conditioner before opening inlet grill. Never
unplug your air conditioner by pulling on the
power cord.Always grip plug firmly and pull
straight out from the outlet.
All electrical repairs must be carried out
by qualified electricians. Inadequate repairs
may result in a major source of danger for
the user of the air conditioner.
Do not damage any parts of the air
conditioner that carry refrigerant by piercing
or perforating the air conditioner's tubes with
sharp or pointed items, crushing or twisting
any tubes, or scraping the coatings off the
surfaces. If the refrigerant spurts out and
gets into eyes, it may result in serious eye
injuries.
Do not obstruct or cover the ventilation
grille of the air conditioner.Do not put fingers
or any other things into the inlet/outlet and
swing louver.
Specifications
The refrigerating circuit is leak-proof.
The machine is adaptive in following situation
1.Applicable ambient temperature range:
Cooling
Heating
Indoor
Outdoor
Indoor
Outdoor
Maximum: D.B/W.B
Minimum: D.B/W.B
Maximum: D.B
Minimum: D.B
Maximum: D.B
Minimum: D.B
Maximum: D.B/W.B
Minimum: D.B/W.B
32 /23
18 /14
43
15
27
20
24 /18
-7 /-8
2.If the supply cord is damaged, it must be replaced
by the manufacturer or its service agent or a similar
qualified person. The type of connecting wire is
H05RN-F or H07RN-F:3G1.5mm +1X0.75mm ..
22
3.If the fuse on PC board is broken please change it
with the type of T.3.15A/250V. If the fuse of outdoor
uit is broken please change it with the type
of T.25A.AC250V.
4.The distance between the indoor unit and the floor
should be more than 2m.
5.The wiring method should be in line with the local
wiring standard.
6.After installation ,the power plug should be easily
reached.
7.The waste battery should be disposed properly.
8.The appliance is not intended for use by young
children or infirm persons without supervision.
9.Young children should be supervised to ensure
that they do not play with the appliance.
10. The requirement of power supply cord.
Installation Check and Trial Operation
Please operate the air conditioner in accordance with this Operation Manual
Check items for the Trial Operation(Tick in )
Is the connector leaked?
How is the connector insulated?
Is the electric connection between the indoor and outdoor units firmly inserted into the
terminal plate?
Are the electric wires on the indoor and outdoor units fixed firmly?
Is the drain pipe placed correctly?
Is the earth line connected firmly?
Does the power supply voltage conform to the electric regulations?
Is there any noise?
Is the cooling operation normal?
Is the indoor temperature adjuster working normally?
Power Supply:
L should be connected with the live wire;
N should be connected with the zero wire;
should be connected with the earth wire.
Do not allow children to play with the air
conditioner. In no case should children be
allowed to sit on the outdoor unit.
2
Series
European
region
10 12
H05VV-F
3G 1.5mm
2
H05VV-F
3G 1.5mm
2
1

30
Installation
3
Name of Parts
Wiring for Indoor and Outdoor Units
1. Wiring Method for Ring Terminal
The wiring method is as the drawing below for the ring terminal:
Remove the connection screw and put the screw through the ring on
the connection wire terminal, then connect it to the terminal blocks,
then screw it tightly.
Wiring Method for
2.Wiring Method for Line Terminal
The wiring method is as follows for the non-ring terminal:
Loosen the connection screw and insert the connection wire end into the
terminal block completely, screw it tightly, then slightly pull out the
connection wire to ensure it be clamped tightly.
3. Method for Pressing the Connection Wire
After wiring, the connection wire must be pressed tightly with a wirepressing clip, which should press the outer sleeves of the wire as the
right drawing:
Wiring for Indoor Unit and Outdoor Unit
Lay out the connection wires as the connection drawing (Notes: The two ends of the connection
wires are different, never connect reversely)
1) Open the wire cover, unscrew the pressing clamp(outdoor unit).
2) Connect the connection wires as per the wiring method and the wiring drawing (the wires on
the indoor unit shall be inserted from behind as the attached drawing).
3) Ensure that the terminals are clamped tightly, and press the connection wires(outdoor unit) as
per the pressing method, then install the wire-pressing cover.
Air Inlet Grille
Pressing Cover
Screw
Correct Pressing Wrong Pressing
Terminals
Pressing Clamp
Power Supply Wire
Indoor and Outdoor
Connec ion Wirest
Ring Terminal Block
Terminal
block
Pressing
Clamps
Indoor Unit:
1. Inlet Grill
2. Anion Generator (inside)
3. Air Filter
4. Swing louver
It can be adjusted to upward or downward with the remote controller only (Do not adjust it manually)
5. Power or Healthy Operation Indicator
After the air conditioner is started, this indicator lights up; when the healthy operation is started,this
indicator turns green.
6. Timer Set Indicator
When the air conditioner is at the state of time-set, this indicator lights up.
7. Test
8. Emergency Manual Button
9. Remote Signal Receiving Window
10. Working Method Indicator
11. Power Plug
Manual Button
This button is only used for test refrigerating operation when the room temperature is below 16 , so it
should not be used in normal situation.
When the remote controller is lost or cannot be used, this button can make the air conditioner continue
to operate for the time being.
It receives the remote signal from the remote controller.
When the compressor is working, the indicator lights up .
11
1
Outdoor Unit:
1. Inlet
2. Outlet
Send out hot air when cooling,
and send out cold air when heating .
3. Inlet
4. Connection pipe and electric wiring.
5. Drain Hose
3
2
4
5
6
10
3
1
7
8
9
4
Notes:
When connecting the wires of indoor and outdoor units, check the numbers on the terminals
of the indoor and outdoor units,the same wire shall connect the same number and color
terminal
Wrong connection would damage the air conditioner,s controller,or the unit cannot work.
2
5

Name of Parts
9
Installation
Remote Controller:
Introduction to Display and Function:
1. Mode
Mode selected is displayed
2. Air Volume
Indicating the air speed, when automatic is set, the air speed changes according to the temperature
difference between the indoor temperature and set temperature.
3. Healthy Operation
Indicating healthy operation
4. Timing Mode Display
Indicating time set mode:
Normal for non-time-set;
Timed off for timed turning off;
Timed on for timed turning on;
5. Indicating the Time set
Indicating the time set on and off
6. Mode Selection
Selecting the modes below:
cooling, dehumidifying, and heating
7. Timer
Used to select TIMER ON, TIMER OFF
8. Time Set
1
2
3
4
AUTO
ion
ON OFF
TEMP
ON/OFF
C
H
To set the time on and off
9. Signal Sending Head
To send signal into the signal receiver on the indoor unit
10. Signal Display
It blinks when the signal is being sent
11. Temperature Display
5
6
MODE
TIMER
RESET
POWER
HEALTH
FAN
SWING
To display the temperature set
12. Temperature Set
To set the desired room temperature
13. On/Off Button
7
19
17
To turn on and turn off the air conditioner
14. Air Volume
16
To select the desired air speed
15. Air flow Direction
To adjust the air flow direction
16. Healthy Button
To set the healthy operation
17. Power Button
To set super or soft operation
18. Indication for Power Operation
19. Reset
When the remote controller appears abnormal,
use a sharp pointed item to press this button to
reset the remote controller to normal condition.
Notes: After replacing the batteries in the remote controller, press on/off button, the mode is resumed
as below:
Mode: Refrigerating; Temperature:26
Timer: Normal; Fan Speed: Automatic
4
Piping Connection for Outdoor Unit
Connect the Piping and Inlet and Outlet Liquid Tubes
Gas Drainage Method:
Drain the air in the indoor unit and the pipes as per the drawing:
(1) Remove the valve cap on the two-way valve of the indoor unit with a spanner.
(2) Unscrew by 1/2 cycle the nut on the mouth of the thick pipe connected with the three-way valve
with a spanner.
(3) Unscrew the spool of the two-way valve by 90 with an inner hexagon spanner, and after about 10
o
seconds,close the two-way valve,then air will be drained out from the mouth of the thick pipe. When
the air is drained out, screw tightly the nut on the mouth according to there quired torque.
9
(4) Open the two-way valve and three-way valve with an inner hexagon spanner.
(5) Check the leakage with soap liquid or a leakage checker.
(6) Screw tightly the two valve caps according to the required torque.
10
11
18
Two-way Valve
90
Open
Liquid Side
6.35mm(1/4")
Gas Side
Mouth Nut
Three-way Valve
9.52mm(3/8")
12.7mm(1/2")
Required Torque
12
Torque Tight screw N. M
Specif.
14
Valve Spool
Valve Cap
7-9
20-25
When the connection pipe is more than 5 cm, it shall be filled with refrigerant as per the following
13
15
8
form:
Pipe Length
Refrigerant filled5mnone
7m
32g
10m
80g
15m
160g
Notes: When the pipe is extended, the air in the connection pipe shall be drained out with the
refrigerant(R22) from outside the system, then the excess refrigerant shall be drained out as per the air
drainage method.
Check the Layout of the Drain Pipe and Connection Wires
The drain pipe should be placed underneath, and the connection
wires should be plac upside; and the drain pipe especially the
ed
section inside the machine and indoors must be wound up with
insulating material to preserve heat
The drain pipe shall be sloped and no concave and convex shall
occur along the whole pipe. And the cases as the right drawing
indicates shall not occur.
Prohibited Prohibited Prohibited Prohibited
Correct Up-bent End in the Water Ripple Bad Smell in the Pool
2

8
Installation
5
4.Piping Connection for Indoor Unit:
Insert the auxiliary hoses(liquid hose and gas hose)and the unit connection wires through the wall
hole from outdoor side,and connect the pipes and wires as per the method of piping connection, or
insert the auxiliary hoses(liquid hose and gas hose) and the connection wires as a whole through
the wall hole from indoor side for connecting the outdoor unit after connection of the auxiliary
hoses and unit connection wires.
Operation Hints
Air Conditioner Operation:
When the ambient humidity is too high,
the anion effect would be reduced, so during
the cooling and dehumidifying, water
would drop from the outlet mouth
5.Install and Fix:
Hang the indoor wall unit on the fastener of the mounting plate,
and move the unit left and right to check the firmness.
Hold the two sides of the unit with two hands to press the unit
to the mounting plate until a sound kacha is heard.
Piping Protective Cover
Installation of Outdoor Unit
1.Install and Fix:
Fix the outdoor support on the wall with M10 expansion screws, then screw tightly the outdoor
unit on the support with M10 bolts and nuts, and leveled. If it is installed on wall or roof, the stand
shall be firmly fixed to resist the earthquake or strong wind. A vibration reduction rubber ring
shall be used.
267
105 500
105
2.Install the Drain Elbow
The elbow is only used for the thermal pump type air conditioner.And the cold air type air
conditioner does not need it.The elbow shall be installed as per the drawing.The drain elbow is not
used in a very cold weather(the air temperature is below 0 for long).
3 Minutes Protection:
When the air conditioner is turned on immediately
after being turned off, the compressor will not start
until 3 minutes later to protect the machine.
Air Speed Change:
At the state of cooling, when air is set to automatic ,
the air speed would decrease automatically when the room
temperature is close to the set temperature. In heating
mode, when the room temperature is the set temperature,
compressor will stop and fan will be low speed or stop;
In dehumidifying mode, air speed will change automatically.
Air Direction Adjustment
At the state of cooling or dehumidifying,
it would be better not to let the outlet guide plate
be downward for long, otherwise the outlet mouth
would be dew.
Healthy Operation
Drain Elbow
Only when the air conditioner is at the state of operation
(normal state), can the healthy operation be started.
When the button Health is pressed, the healthy operation
will be indicated.
Drain Hose
Healthy Operation
Indication
Healthy Button
ion
2

6
Operation Hints
7
Installation
Cold Air Prevention
When heating is started, the fan in the indoor unit will
not be started immediately to prevent cold air being blew
out.
Defrost
During the heating, when the heat exchanger in the
outdoor unit is frosted, the air conditioner will defrost
automatically for a few minutes. During the defrost, the
fan in the outdoor unit does not run until the defrost is
completed.
Notes
When heating, the air conditioner takes a lot of heat
from outdoor and release the heat into the room , therefore
the outdoor temperature will affect the heating effect.
Wait a moment
Installation of Indoor Unit
The indoor unit shall be installed as per the indoor unit
installation drawing:
Hanging Wire
Holes forFixing
Find out the LevelPosition
Drop Wire Here
3
Wire
Dropping Weight
A=185mm
Mounting Plate
A145mm
60mm
1.Fix the Mounting Plate and Localize the Wall-through Hole
Fix the mounting plate as per the selected position and the piping layout (see the installation
drawing).
Fix the mounting plate on a smooth wall surface under the beam or beside a column. First fix the
mounting plate with a steel nail,then level it with a level meter or a drop line, then fix it with A4
50 cement nails.If the expansion screws are used,first drill holes into the wall( 4.8mm), then
put the plastic sleeve into the holes,then fix the mounting plate with 4 25 screws. Measure the
position the wall hole with a measuring tape.
2.Drill a Hole through the Wall and Install the Piping Protective Sleeve
Drill a hole 60mm through the wall with the outer side slightly downward,then install the
piping sleeve,then seal it with gypsum powder.
Inter side Outer side
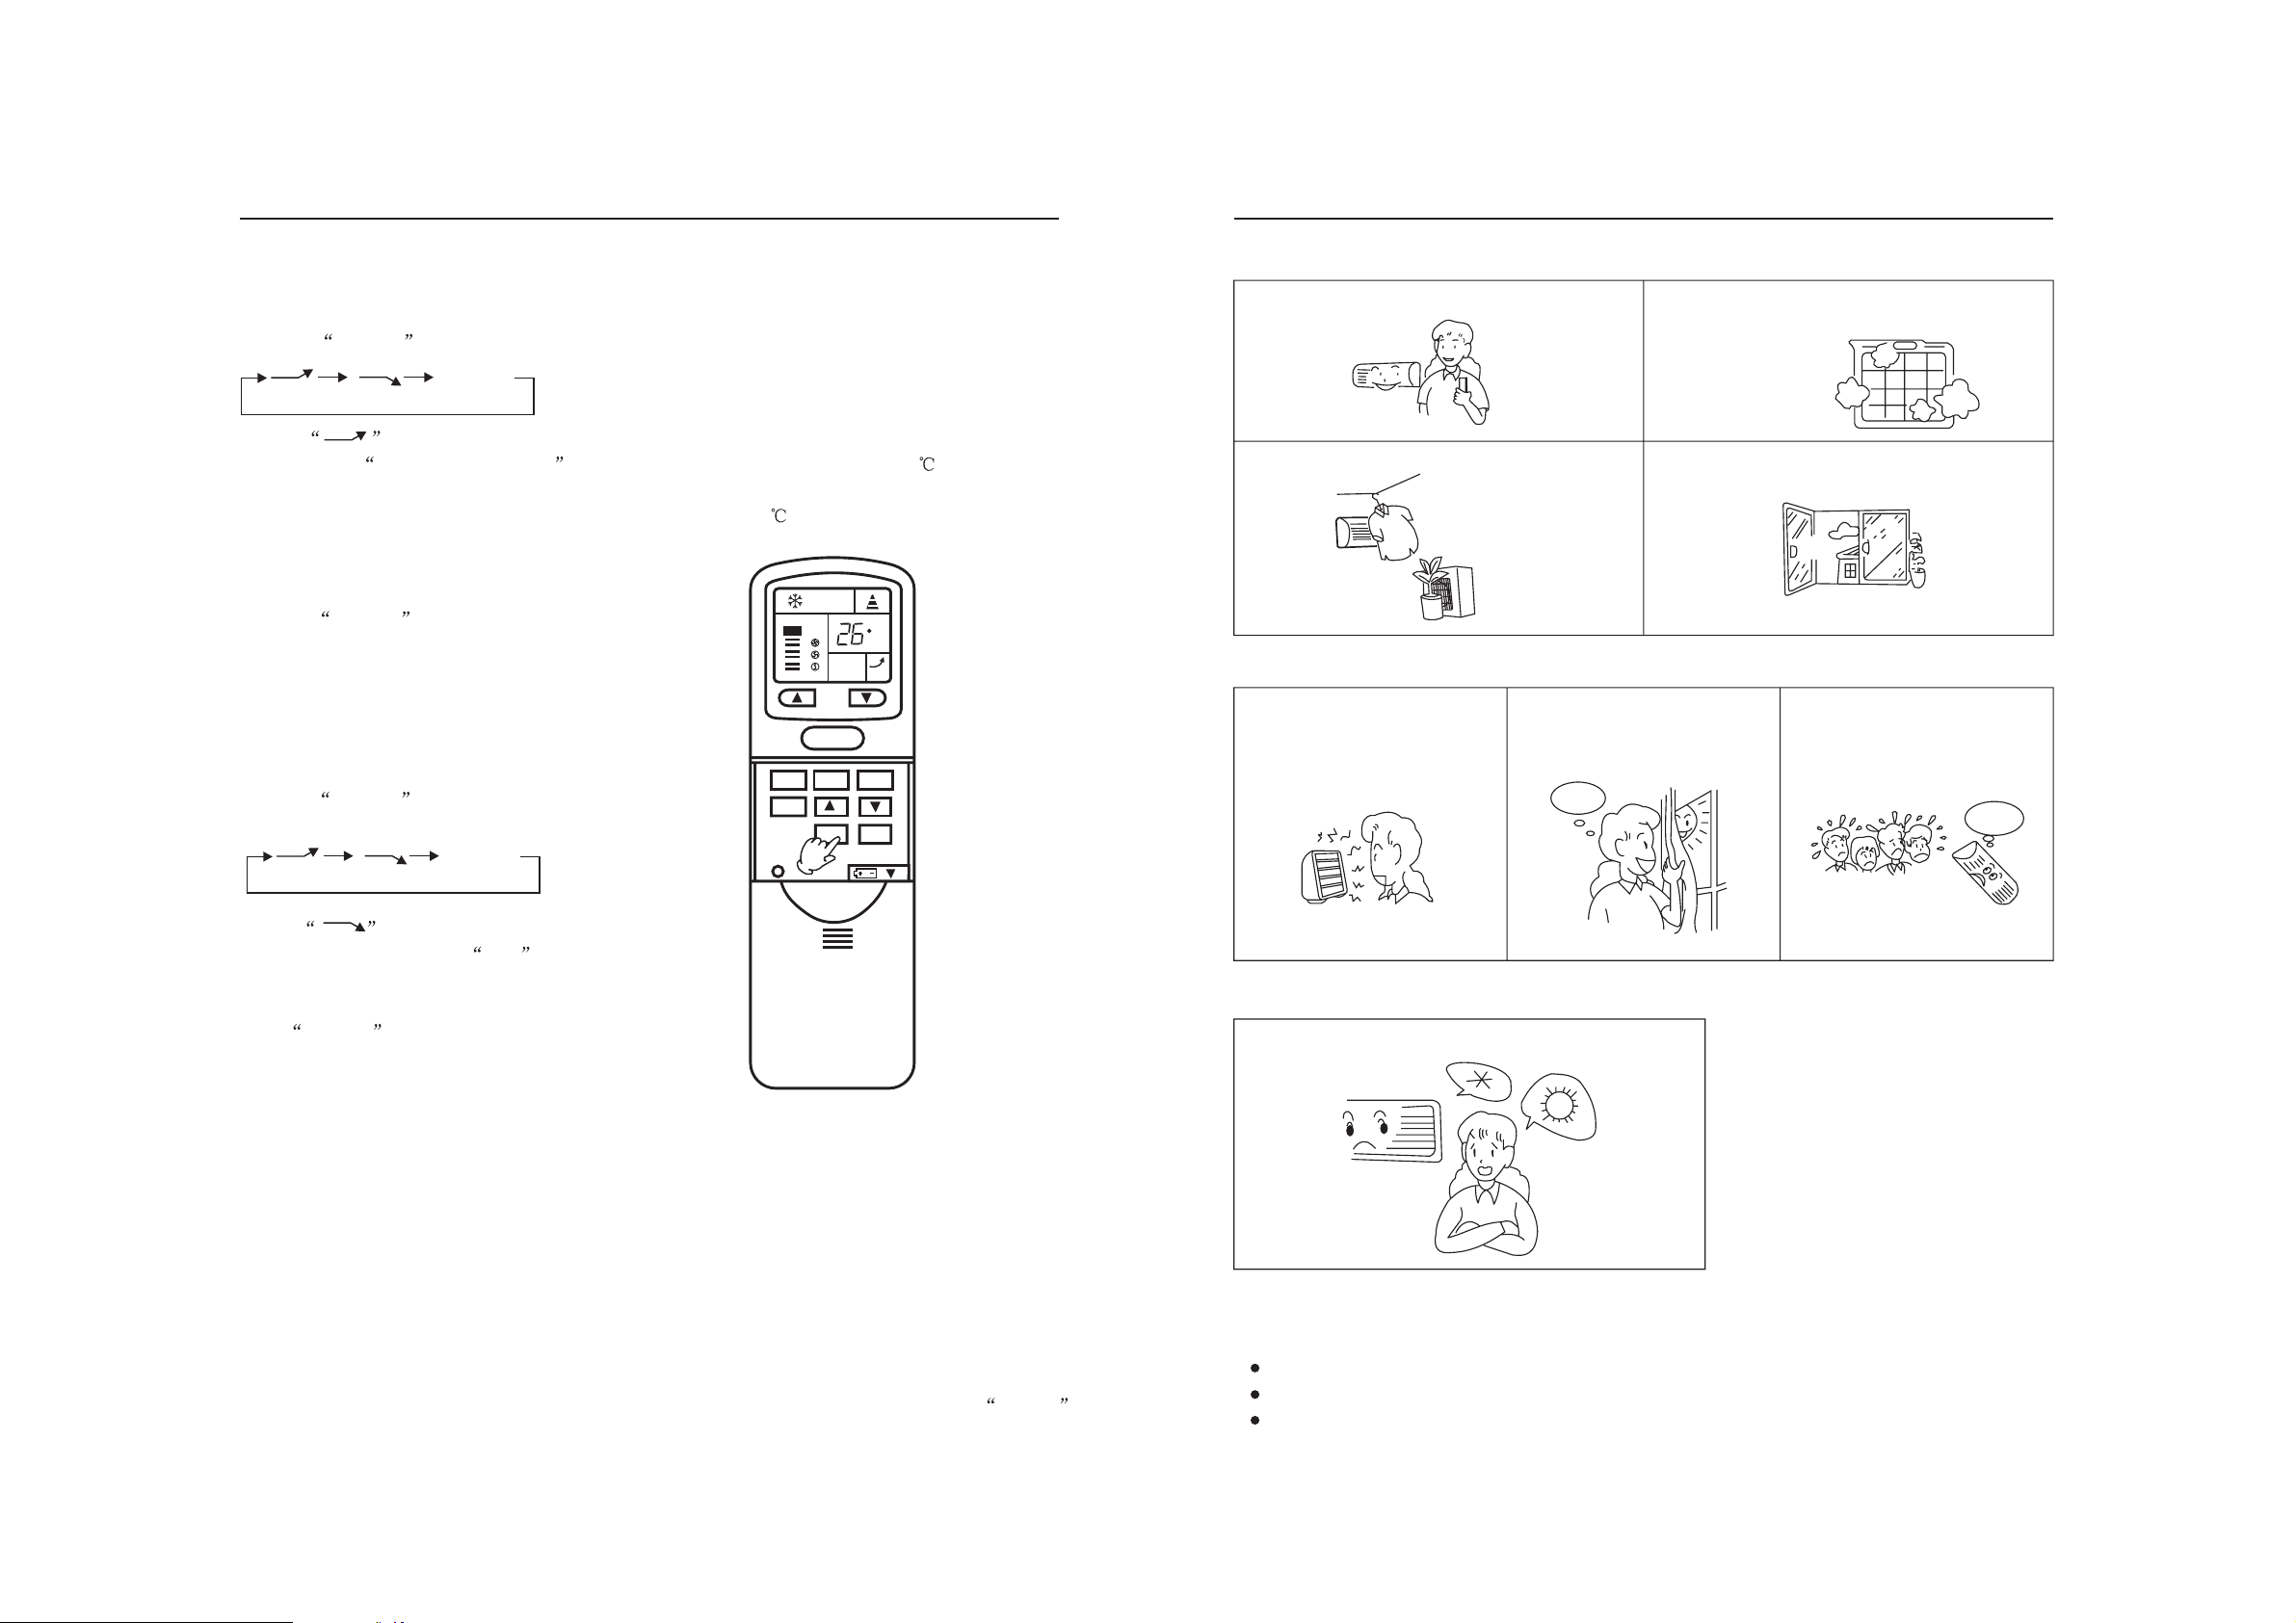
Instructions Operation
Adjust the air flow direction
Set a proper room temperature
Too cold and too hot are not only harmful for
health but also will consume too much electricity.
Best
temperature
Avoid the direct sunlight and hot air flow
Use of Timer
Time set can make your room in a comfortable
temperature when you wake up or come back.
3.Piping Layout for Indoor Unit
Wall hole
60mm
(Section plan of wall hole)
Thickness of wall
Lay out the connection pipe,drain pipe, and the connection wires according to the installation
position of the indoor and outdoor units. During the layout, the drain pipe shall be placed
underneath,and the connection wires shall be placed on the top; the drain pipe(especially indoor
or inside the unit)shall be wound up with the insulating material.
Insulating Material
Right Connection
Low Connect oni
Tape
Drain Pipe
Left Connection
Electrical Connection
between Indoor and
Pipe Clamp
Outdoor Units
Installation of the Connection Pipe Clips(Left or Left-Back Connection):
Insert the pipe clip into the fixing position of the pipe with the upper part inserted first.
Press the bottom of the clip until a sound Ka Ta is heard.
Pipe
Notes: After installation, please confirm that the refrigerant is not leaked.
Pipe Clamp
2

6
Installation
7
Operation
Localize the Installation:
Indoor Unit
Install the indoor unit where the weight of the unit can be supported.
Install the indoor unit where the head source and steam source are not close and the unit inlet and
outlet are not blocked.
Install the indoor unit where the drainage is easy and the outdoor unit can easily connected.
Install the indoor unit where its cold air and hot air can be easily sent to all the corners of the room.
Install the indoor unit where the power socket is near and there is sufficient space around the indoor
unit.
Install the indoor unit where there is no T.V set, radio set, and wireless appliance underneath, and the
sunlight lamp is over one meter away.
If the remote controller is installed on the wall, the indoor unit shall be ensured to receive the signal
while the sunlight lamp is on.
Outdoor Unit
The location shall bear the weight of the unit and will not produce a big vibration and noise.
The location shall be in good ventilation,and the airflow blew out and noise produced shall not affect
the neighbors.
The location shall not be directly drenched in rain,sun,or blew by sea wind.
The location shall not be near anywhere the corrosive gas(SO ),flammable gas(thinner or gasoline),oil
mist,or steam are probably produced(for example in kitchen).
Sufficient space shall be left for air inlet and outlet.
The location shall be easily maintained and repaired.
It cannot be installed on a non-professional metal structure(like anti-burglary net).
2
Remote Controller,s Operation
When in use, point the signal sending head directly to the receiver window on the indoor unit.
The distance between the signal sending head and the receiver window should be within 7 m
without any obstacle as well.
Don't throw the controller, prevent it from being damaged.
When electronic-started type fluorescent lamp or change-over type fluorescent lamp or
wireless telephone is installed in the room, the receiver is apt to be disturbed in receiving the
signals so the distance to the indoor unit should be shorter.
Method for Cutting and Expanding Pipes:
When the pipe is too long or its mouth is damaged,the pipe needs to cut or expand.
1.Cutting hose
3.Put on nut
2.Removing burr
Liquid hose
Gas hose
4.Expand Hose
Expansion Size
Hose dia.
6.35 mm(1/4")
9.52 mm(3/8")
12.7 mm(1/2")
A
Piping Connection
1. Connecting Method
To ensure the efficiency,the pipe should be as short as
possible.
Apply refrigerant oil at half union and flare nut.
To bend a pipe,five the roundness as large as possible
not to crash the pipe.
When connecting pipe,hold the pipe center to center
then screw nut on by hand,refer to the Drawing.
Be careful not to let foreign matters,such as sands enter
the pipe.
Pipe dia.
Liquid pipe 6.35mm(1/4")
Gas Pipe 9.52mm(3/8")
Gas Pipe 12.7mm(1/2")
Recommended
Fastening Torque
18 N.m
42 N.m
50 N.m
Hose Expander
Spanner
Correct
Connector Nut
Spanner
Not Correct
cracks on
expanded
Tilting burr
mouth
Size(mm)
0.8-1.5
1.0-1.8
1.2-2.0
Refrigeration Oil
incomplete too long
Loading of Batteries
Load the batteries as illustrated in the drawing below:
Remove Battery Cover:
Slightly press and push down the cover. Then , as the drawing, hold the upper end of
the remote controller with left hand, and slightly hold the cover with right hand, push slightly in
the arrow direction to remove the battery cover .
Load Batteries:
Be sure that the loading is in line with the + / - as illustrated.
Put back Cover:
Put back the cover in the reverse procedure.
Confirmation Indicator:
If there is no display after pressing the on/off button, reload the batteries.
Notes: Use two same-typed batteries when loading.
If the remote controller cannot run normally or doesn't work at all, use a sharp pointed
item to press the reset button (with the mark ).
2

8
Operation
5
Small Hints:
Remove the batteries in case the unit won't be in use for a long period.
The remote controller will be self-checked after loading the new batteries by displaying
all the symbols and resume working very soon.
Installation
1. Installation Localization 2. Indo r Unit Mounting Plate Localization 3. Drill through Wallo
Health Operation
1. After turning on the air conditioner, set to the desired mode:
The remote controller displays the mode selected, the power
light on the indoor unit lights up.
2. Set Healthy Operation:
Press the Health button once is displayed and
ion
the power or healthy operation indicator turns from orange
color to green.
Now the air conditioner is operating the healthy function,
meanwhile the anion generator in the indoor unit begins to
release anion to clean the air and eliminate dust.
3. Cancel Healthy Operation:
Press the button Health again to stop the health
display, then the healthy operation stops.
Notes:
When the fan in the indoor unit does not work, the health
lamp lights up, but the anion generator does not release
anion.
1
MODE
TIMER
RESET
ion
TEMP
ON/OFF
SWING
POWER
4. Connect Indoor Unit 5. Install Indo r Unit 6. Install Outdoor Unito
C
7. Connect Outdoo Unit 8. Drain Out 9. Check Drainager
FAN
HEALTH
3
2
10. Check Installation 11. Trial Operation 12. Wind up Pipes
Brief Introduction to Health Operation
The anion generator in the air conditioner can generate a lot of
anion to effectively balance the quantity of posion and anion in
the air and also to kill bacteria and speed up the dust sediment
in the room and finally clean the air in the room.
The step 4 and step 5 above can be adjusted according to the practical situation.
This procedure is a reference to the installation person and customer, it can be adjusted according
to the practical situation.
2

Installation
9
To enable the air conditioner to work well, please install it as required by this manual.
When moving the air conditioner, please don't scratch the shell.
The max. length of the connection pipe is 15 meters, and the max. height difference between the
indoor unit and outdoor unit is 7 meters for AS122 AVARA/AU122 ACARA(HSU-12H03(DB))
AS122AYARA/AU122ACARA(HSU-12HA03(DB)) and 5 meters for AS102ALARA/AU102ACARA
(HSU-10H03(DB)) AS102AMARA/AU102ACARA(HSU-10HA03(DB)).
Please keep this manual carefully for maintenance and installation.
After installation, please operate the air conditioner as per this manual.
Electrical Requirements
A specialized power supply wire, which shall be installed by a competent person as per the rules of
the national standard.
Power supply socket must be close to the air conditioner. And the socket must have an earth to
make the air conditioner be grounded through the power supply socket.
If the power supply wire is damaged, it must be replaced by the manufacturer or its service center or
professional person.
Power supply wire parameters:3 1.5mm for AS102AMARA AU102ACARA(HSU-10HA03(DB))
AS102ALARA AU102ACARA(HSU-10H03(DB)), AS122AVARA AU122ACARA(HSU-12H03(DB))
AS122AYARA AU122ACARA(HSU-12HA03(DB)).
Connection wire parameters:3G1.5mm +1 0.75mm .
Hose Selection
description Size
Liquid hose
6.35mm(1/4")
12.7mm(1/2")
Gas hose
9.52mm(3/8")
Notes: After installation, please confirm that the refrigerant is not leaked.
2
22
AS122AVARA
AU122ACARA
(HSU-12H03(DB))
AS102ALARA
AU102ACARA
(HSU-10H03(DB))
AS122AYARA
AU122ACARA
(HSU-12HA03(DB))
AS102AMARA
AU102ACARA
(HSU-10HA03(DB))
Operation
Cooling / Dehumidifying/Heating Operation
Recommended Modes:
Cooling mode for summer;
Heating mode for winter;
Dehumidifying mode for spring and fall.
1. Turn on the Air Conditioner
Press On/Off button to start the air conditioner;
Previous operation status appears on display;
working method indicator lights up.
2. Select Operation Mode
Press mode button, For each press, mode changes as follows:
Cooling
When the compressor operates as the panel displays, working
method indicator on indoor unit lights up. During heating,
if the outdoor unit frosts, the machine will stops heating
automatically to defrost , meanwhile neither of the indoor
unit fan and outdoor unit fan will work.
3. Select Temperature Setting
Press Temp. button
Each press increases by 1 ;
Each press decreases by 1 .
When Unit operation, the room temperature will be the same with
temperature display on LCD.
4. Fan Speed Selection
Press Fan button, each press change the fan speed as follows:
Dehumidifying Heating
C
TEMP
3
ON/OFF
1
SWING
MODE
2
TIMER
POWER
RESET
5
6
FAN
4
HEALTH
Auto Hi Med Lo
AUTO
The fan works at the displayed speed.
Hints:
The remote controller can remember the working status of each time. Each time when you press
the Turn On/Off button, the air conditioner will work at the previous status.
24

0
Operation
3
5. Adjustment of Air Flow Direction
After selecting the mode, swing louver will automatically be opened to the position as the drawing
indicates:
Cooling Mode
Approx.10
o
Up and Down Adjustment (with remote controller)
Press swing button once , the swing louver will swing automatically within the range as
indicated in the drawing; press the button again, the swing louver will stop at the current position.
The remote controller will remember the current swing position, and each time when you turn
on the air conditioner, the swing louver will automatically stop at the position set previously.
Cooling approx.45
Notes:
Heating approx.60
When cooling or dehumidifying, do not let the swing louver be downward for long time,
otherwise the outlet would be dew and leak water. Even if the louver is downward for long
time, after one hour, it will be automatically moved to the position which is 10 to
horizontal position. Don't turn the louver manually, otherwise it would work abnormally. If
the swing louver works abnormally, turn off the unit, then turn on again, adjust it with the
remote controller.
Horizontal
Heating Mode
Approx.60
Approx.
10
o
o
0
0
Installation
Installation Tools
1. Screw Driver (flat head, wabbler, triangle)
2. Steel Saw
3. 60mm Drill
4. Inner Hexagon Spanner
5. Shifting Spanner
6. Spanner (14,17,19, 27 mm)
7. Pipe Cutter
8. Pipe Expander
9. Knives
10. Clippers
11. Leakage Checker or Soap Liquid
12. Measuring Tape
13. Scraper or File
14. Refrigeration Oil
Self-contained Accessories
No. A B C D E F G
Name of
Parts
Accessories Delivered with Your Air Conditioner
Please check if your unit is delivered with the following accessories.
o
No.
Shape
Nonadhesive
Tape
Remote
controller
Adhesive
Tape
1
Connecting
Hose
Heat
Insulation
Gypsum
Powder
Material
2
3
Batteries Mounting plate
Drain Hose Pipe Clip
4
Drain Hose
Left and Right Adjustment(manual)
As the drawing below, turn the vertical louver to adjust the left and right air flow direction.
Notes:
When the humidity is very high, if all the horizontal
louvers are turned left or right, the
outlet would leak water.
6. Turn off
Press ON/OFF button to turn off the unit; all the displays disappear from LCD and all the lamps
on indoor unit go out. And the swing louvers will all be closed automatically.
Notes: After turning off, the unit must not be restarted until 3 minutes later to protect the system.
Hints:
As cold air flows downward in COOL mode, adjusting air flow horizontally will be much more
helpful for a better air circulation.
As warm air flows upward in HEAT mode, adjusting air flow downward will be much more helpful
for a better air circulation.
Be careful not to catch cold when cold air blows downward.
1
Qty
No.
Shape
Qty
No.
Shape
Qty
5
Pipe clip
1
11
Piping Hole
Cover
1
1
Expansion
Screw &
Bushing
Rubber
Cushion
2
6
7813910
Putty Cement Steel
Nail
1
1
Drain Elbow Connection
Pipe
450
181116
12
Connection
Wire
4
2

Installation
Operation
Installation Drawing for Indoo and Outdoor Unitsr
more than10 cm
more than60 cm
Piping Layout
Left
Right Back
Right
Down
more than5 cm
More than10 cm
Insulating Material
more than10 cm
Non-adhesive Tape
more than10 cm
Mounting Plate
Piping Cover
Insulating Material
Connection Wire
Insulating Material
Pipe Clip
Time Set Operation
With the time set function, the air conditioner can be turned on and off automatically at your
set time.
You can let your air conditioner be turned on or off automatically after you wake up in the morning,
before you come back from work in the evening, or after you fall asleep at night.
1. After turning on the air conditioner, select your desired mode.
The operation mode is displayed on the LCD of the remote controller, and the working method
indicator on the indoor unit lights up.
2. Timer Setting
Press TIMER button to change the timer mode, each press makes
the timer mode change in the following sequence:
No Display OFF ON
Timer Off Timer On
The timer mode displays off or on .
The time displayed indicates the time set last time.
The timer mode on the indoor unit lights up.
TEMP
C
ON
H
Notes: Selecting No Display cancels the timer mode.
ON/OFF
1
3. Time Setting
Press TIMER button:
Every time the button is pressed, time increases one hour.
If the button is kept depressed, time will change quickly.
Every time the button is pressed, time decreases one hour.
MODE
TIMER
2
RESET
SWING
POWER
FAN
HEALTH
If the button is kept depressed, time will change quickly.
Time can be adjusted within 12 hours . Time will be shown on
LCD.
The time setting is to automatically turn on or off the air
conditioner a certain number of hours later
3
More than60 cm
22
Drain Hose
more than15 cm
Notes:
After the batteries are replaced, the time set resumes as below:
Time set off for 1 hour;
Time set on for 6 hours.
If necessary, time can be reset; after power goes out, time
should be reset.
Valve Cover
Cancel Timer Mode
Just press TIMER button until TIMER mode disappears on LCD.
11
Operation
Trouble Shooting
Super Mode Operation
When you need to cool or heat your room rapidly, you can use this function.
Set Super Mode Operation :
Press the POWER button each time the display will vary in the following sequence:
No Display
Stop at .
At the state of Super Mode Operation ,when cooling, the temperature will be 4 lower than
the temperature set, and the fan will automatically run at high speed for 15 minutes, then return to
the previously set state;when heating, the temperature will be 6 higher than the temperature set ,
and the fan will automatically run at mid speed for 15 minutes, then return to the previously set state.
Cancel Super Mode Operation:
Press the POWER button twice until the
display disappears.
Soft Mode Operation
When you need silence, you can use this function.
Set the Soft Mode Operation:
Press the POWER button each time the display will
vary in the following sequence:
No Display
MODE
TIMER
RESET
AUTO
TEMP
ON/OFF
SWING
POWER
C
FAN
HEALTH
Insufficient Cold Air or Hot Air
Has the mode been selected correctly?
Has the inlet or outlet been blocked?
Insufficient Cold Air?
Is there any other hot
resources in the room?
Is the dust filter too dirty? (it should be cleaned
once every two weeks)
Is the door or window open?
Is the sun light directly sent
into the room?
Are there many people in the
room?
Stop at .
At this state, the fan speed is Low .
Cancel Soft Mode Operation:
Press POWER button once until the display disappears.
Hints:
When at the state of Super Mode Operation , the room temperature would not be even. And long
time soft mode operation would make the room temperature neither too cold nor too hot.
Power Failure Resume (to be applied for a necessary situation) (only for the models:AS102ALARA
AU102ACARA(HSU-10H03(DB)) AS122AVARA AU122ACARA(HSU-12H03(DB)) AS102AMARA
AU102ACARA(HSU-10HA03(DB)) AS122AYARA AU122ACARA(HSU-12HA03(DB)))
After the power failure compensation is set, if power failure suddenly occurs while the air conditioner is
working, it will resume the previous working state when the power is supplied again .
When a power failure suddenly occurs during the air conditioner is working after the power failure
Notes:
resume is set, if the air conditioner will not be used for a long time, please cut off the power supply to
prevent its operation from being resumed after the power is supplied again, or press the On/Off
button after the power comes again.
12
Cold Air is Blew out (during heating operation)
Is the unit under heating operation?
If, after the above-mentioned checks are made and treated accordingly, the air conditioner still
cannot work normally or one of the following facts are found, please stop the operation and
contact your local service center:
Fuse or circuit breaker often breaks;
Water is leaked during cooling and dehumidifying;
Working abnormally or abnormal sound is heard.
21

0
Trouble Shooting
3
Operation
Emergency Operation & Test Operation
Air does not blow or the fan speed cannot be
changed during the dehumidifying mode.
During the dehumidifying operation, when the
room temperature is less than 2 higher than
the temperature set, the air conditioner will
operate at low fan speed intermittently
regardless to the fan speed set.
Water or steam generates from the outdoor unit
during heating.
This results from removal of the frost
accumulated on the outdoor unit (Defrosting
operation).
During heating, the fan in the indoor unit still
works even after the unit operation stops.
To eliminate the afterheat, the fan in the indoor
unit will still operate for a while after the unit
automatically stops.
There would be sooting around the outlet and a
sound Si Si would be heard.
It is due to the accumulation of anion, which
can be cleaned after the unit is turned off. The
sound "Si Si" is due to generation of anion.
Please check your air conditioner as the procedure below before contacting the local maintenance
center for after sales service:
The air conditioner cannot be started
Is power switch on?
Is power supply normal?
Is the leakage breaker tripped?
When your remote controller is lost or cannot be used, the unit can be operated with a
function of emergency operation.
The test operation can be applied when the cooling test operation is carried out under the
room temperature of 16 .
Emergency Operation
It can only be used when the remote controller is lost or damaged.
Turning on
Press the emergency manual button, you will hear a sound Hua , then the emergency
operation begins. This time the power or healthy operation indicat r lamp on the indoor
unit lights up.
The air conditioner will automatically run as the mode below:
indoor temp
Above 23
Below 23
Temp set Timer
26
23
No
No
Air speed Mode Health
Auto
Auto
During emergency operation, the temperature set and air speed
cannot be changed. Besides, the dehumidifying and timer operation
cannot be operated either.
Turning Off(Cancel Emergency Operation)
Press the Emergency Manual Operation button, you will hear a
sound Hua , then all the indicators will go out .
Cancel Emergency Operation with Remote Controller
Press the On/Off button, you will hear a sound Hua , then
the air conditioner will work as the mode indicated on the remote
controller.
Cooling
Heating
o
Operation
No
No
ON
OFF
The power switch is not on the
position ON .
Power cut?
2
Please switch off the power
supply immediately and
contact the local maintenance
center.
Test Operation
This is for test cooling operation under 16 indoor temperature.
It cannot be used under normal condition.
Turning On
Keep pressing the Test Manual button button for 5 seconds,
you will hear sound Hua Hua", then release the pressing ,
then the test operation begins. Now the unit works under Hi
air speed, and the power or healthy operation indicator on the
indoor unit lights up.The air conditioner will be automatically
turned off after test operation lasts 30 minutes.
Turning Off (Cancel Test Operation)
Press the Test manually button , you will hear a sound Hua ,
then all the indicators on the unit will go out.
Cancel Test Operation with Remote Controller
Press the On/Off button, you will hear a sound Hua , then
the air conditioner will work as displayed on remote controller.
1
Hua!
Hua! Hua!

Notes for Safety
9
Trouble Shooting
The power supply plug must have the earth line
to ensure that the air conditioner may be
grounded effectively through the power supply
socket. Non-grounding or incomplete grounding
would result in electric shock.
Clean the dust filter periodically:
Blockage of the dust filter would reduce the
cooling and heating effect, consume more
power, water would be leaked during cooling,
and other failures would also occur.
After electric wiring , the air conditioner shall
be electrified to check for electric leakage.
Use the fuse of required capacity:
Never use steel wire or copper wire to take
place of the fuse.
The followings are not malfunction:
Water flowing sound is heard.
Hua
Hua
Cracking sound is heard.
It smells.
During operation, white fog comes out of
indoor unit.
When the air conditioner is started, when the
compressor starts or stops during operation or
when the air conditioner is stopped. it
sometimes sounds shuru shuru or gobo
gobo . It is the flowing sound of the refrigerant,
and it is not a trouble.
This is caused by heat expansion or contraction
of plastics.
Air which blows out from the indoor unit
sometimes smells.
The smell results from residents of tobacco
smoke or cosmetics stuck inside of unit.
During the cooling and dehumidifying
operation, a thin white fog would be sprayed
out of the indoor unit. It is a watery fog formed
by a condensed air blew out of the unit.
Never connect the earth with the gas pipe,
water pipe, lightening arrester, or phone line.
Fuse
Steel wire Copper wire
Never install the air conditioner where the
flammable gas is easily leaked.
14
During cooling mode, it is automatically
switched to Fan mode.
The air conditioner cannot be restarted soon
after it stops.
To prevent frost from being accumulated on the
indoor unit heat exchanger, it is sometimes
automatically switched to the Fan Mode but it
will soon be returned to the cooling mode.
This is due to its self-protection function,
therefore the machine cannot work until three
minutes later.
Wait for three minutes
1

8
Maintenance
5
Maintenance after Season of Use
Turn on the machine and let it operate for half a day under the status of sending air in
a sunny day so as to make the inside of the
air conditioner fully dry.
Clean the dust filter, the indoor unit, and outdoor
unit, then cover it.
Notes for Safety
Do not spray any paint or insecticide on the air
Conditioner.
Insecticide
Never pour water on the indoor unit.
Paint
Keep the inlet and outlet of the indoor unit
unblocked.
Maintenance before Season of Use
Check the inlet and outlet of the outdoor unit,
see if they are blocked.
The dust filter must be installed to ensure the
air filter to be clean,otherwise dust would enter
to damage the machine or cause failure.
When the louver is being swung, never touch
the outlet or put anything into the air grille.
The instructions with this warning mark must be carried out strictly, for they are all
concerned with safety of the product or human beings.
The instructions with this prohibiting mark must be completely forbidden, otherwise
the product would be damaged or the human being would be injured.
Operate the unit with the remote controller.
1
1

6
Maintenance
7
Maintenance
Installation and Replacement of Air Filter
1. Open the inlet grill as drawing:
2. Remove the dust filter and slightly push the filter upward then pull downward.
Dust Filter
3. Install the air filter by inserting it into left and right frames with the white side upward.
Air Filter
4. Install back dust filter
Left filter and right filter are different in shape, so never make it wrong.(dust filter must be
installed).
Left Right
Clean the Air Conditioner
Turn off Power
ON
OFF
Open the inlet grill upward
Remove the dust filter:
Slightly push it upward then
Pull it downward
Clean the Dust Filter:
Clean the dust filter with water or vacuum cleaner,
When the filter is too dirty , clean it with detergent
or medium soap liquid. Then flush it with water and
dry it in sunshine. Finally fix it back.
Do not touch the machine with
wet hands
Do not clean it with hot water
or detergent
Remove the Old Air Filter
Install Air Filter
Notes: The air filter is optional. Please approach the nearest local maintenance center to buy
the air filter according to the replacement time in Air Filter Instructions.
Hints:
This model of air conditioner falls into two types: one is with a multiple light catalysis air filter,
the other with an air filter without multiple light catalysis. So the maintenance should be done
accordingly:
The multiple light catalysis air filter shall be put in sunshine once every half a year (8 hours each
time), while the air filter without the light catalysis shall be replaced every half a year, which can
be purchased in the local service center.
Replace Air Filter
1
Notes:
Do not clean the dust filter with water higher than
40 , otherwise it would be damaged. Clean the dust
filter gently and carefully.
Clean the Indoor Unit and Outdoor Unit:
Clean it with wet cloth or medium detergent, then
clean with dry cloth. The water cannot be higher
than 40 , otherwise the unit would be deformed or
discolored. And never clean it with insecticide or
other chemical detergent.
1
>40
>40
 Loading...