

Page 1
AS072AZNBA
AU072ABNCA
(HSU-07CG03/R1)
AS092AMNBA
AU092ABNCA
(HSU-09CG03/R1)
AS122AYNBA
AU122ABNCA
(HSU-12CG03/R1)
AS162ATNBA
AU162AFNBA
(HSU-16CG03/R1)
AS182ASNBA
AU182AFNDA
(HSU-18CG03/R1)
AS222AJNBA
AU222AHNBA
(HSU-22CG03/R1)
Please read this operation manual before using the air conditioner.
No.0010544375
Page 2

Contents
Cautions
Parts and functions
Operation
Maintenance
Trouble shooting
1-2
3-5
6-13
14-16
17
Page 3

Cautions
The cardboard box may be broken or cut into
1
Page 4
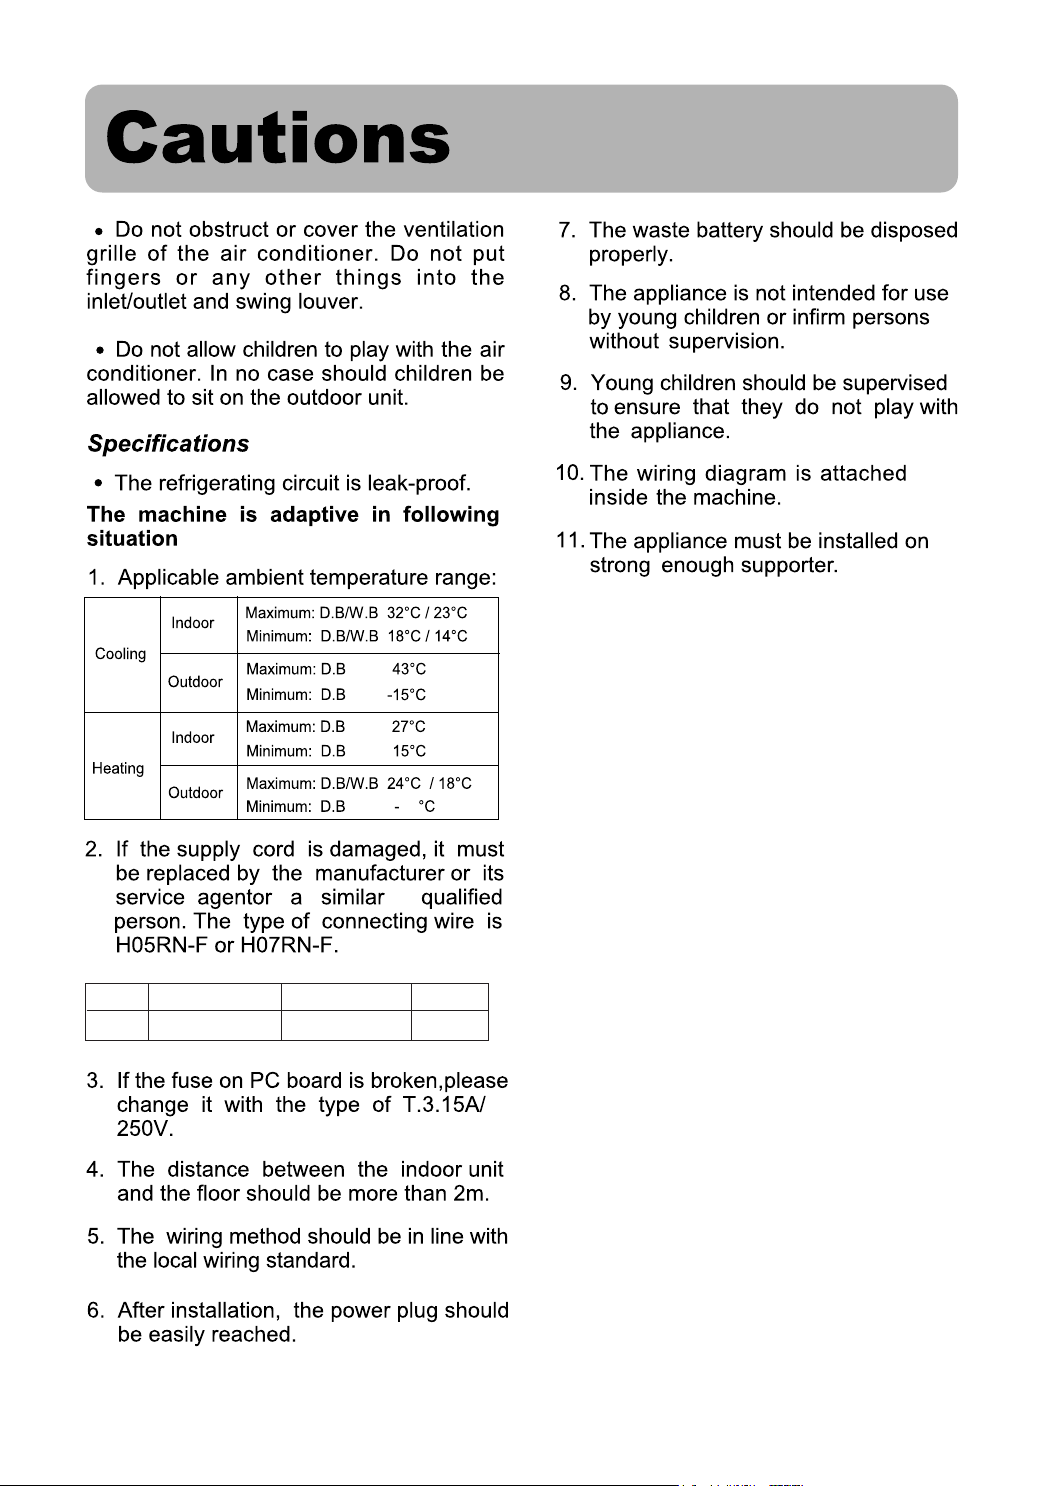
20
Series
Type
07,09,12 16,18 22
2
3G1.5mm2+2x0.75mm
3G2.5mm2+3x0.75mm
2
4G1.5mm
2
2
Page 5
Parts and Functions
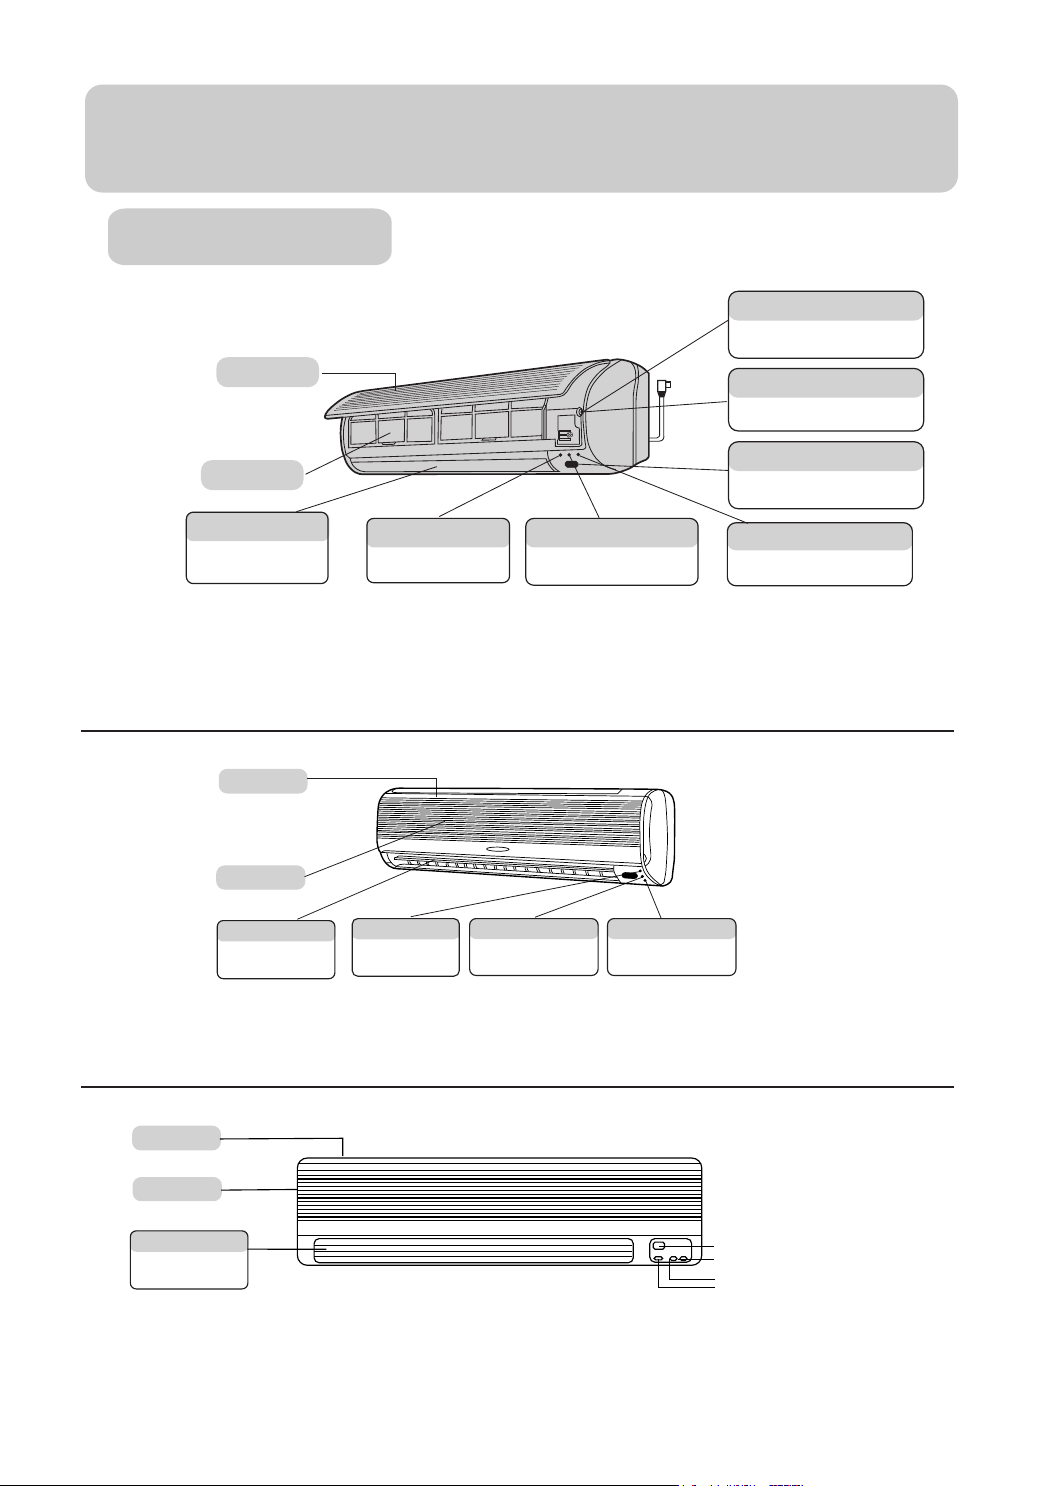
Indoor Unit
Test running switch(manual)
Used only for test running in cooling
when room temp. is below 16oC .
Don't use it in normal operation.
Inlet grille
Emergency switch(manual)
Used when remote controller is lost or
defective. Unit will run temporarily.
For models:
For models:
Air filter
Vertical flap
Use remote controller to
adjust up and down air flow.
(Don't adjust it manually.)
AS072AZNBA
(HSU-07CG03/R1)
Inlet grille
Air filter
Vertical flap
Use remote controller to
adjust up and down air flow.
(Don't adjust it manually.)
AS162ATNBA
(HSU-16CG03/R1)
Power indicator
Lights up when unit starts.
AS092AMNBA
(HSU-09CG03/R1)
Power indicator
Lights up when unit
starts.
AS182ASNBA
(HSU-18CG03/R1)
Timer mode indicator
Lights up when Timer operation
is selected.
AS122AYNBA
(HSU-12CG03/R1)
Timer mode indicator
Lights up when Timer
operation is selected.
Remote signal receiver
A beeping sound is generated when
a signal from remote controller is
received.
Operation mode indicator
Operation mode indicator
Lights up during
compressor running.
Lights up during compressor
running.
Inlet grille
Air filter
Vertical flap
Use remote controller to
adjust up and down air flow.
(Don't adjust it manually.)
For models:
AS222AJNBA
(HSU-22CG03/R1)
Signal Receiving Window
Running Indicator
Timer Mode Indicator
Power Indicator
3
Page 6
Page 7
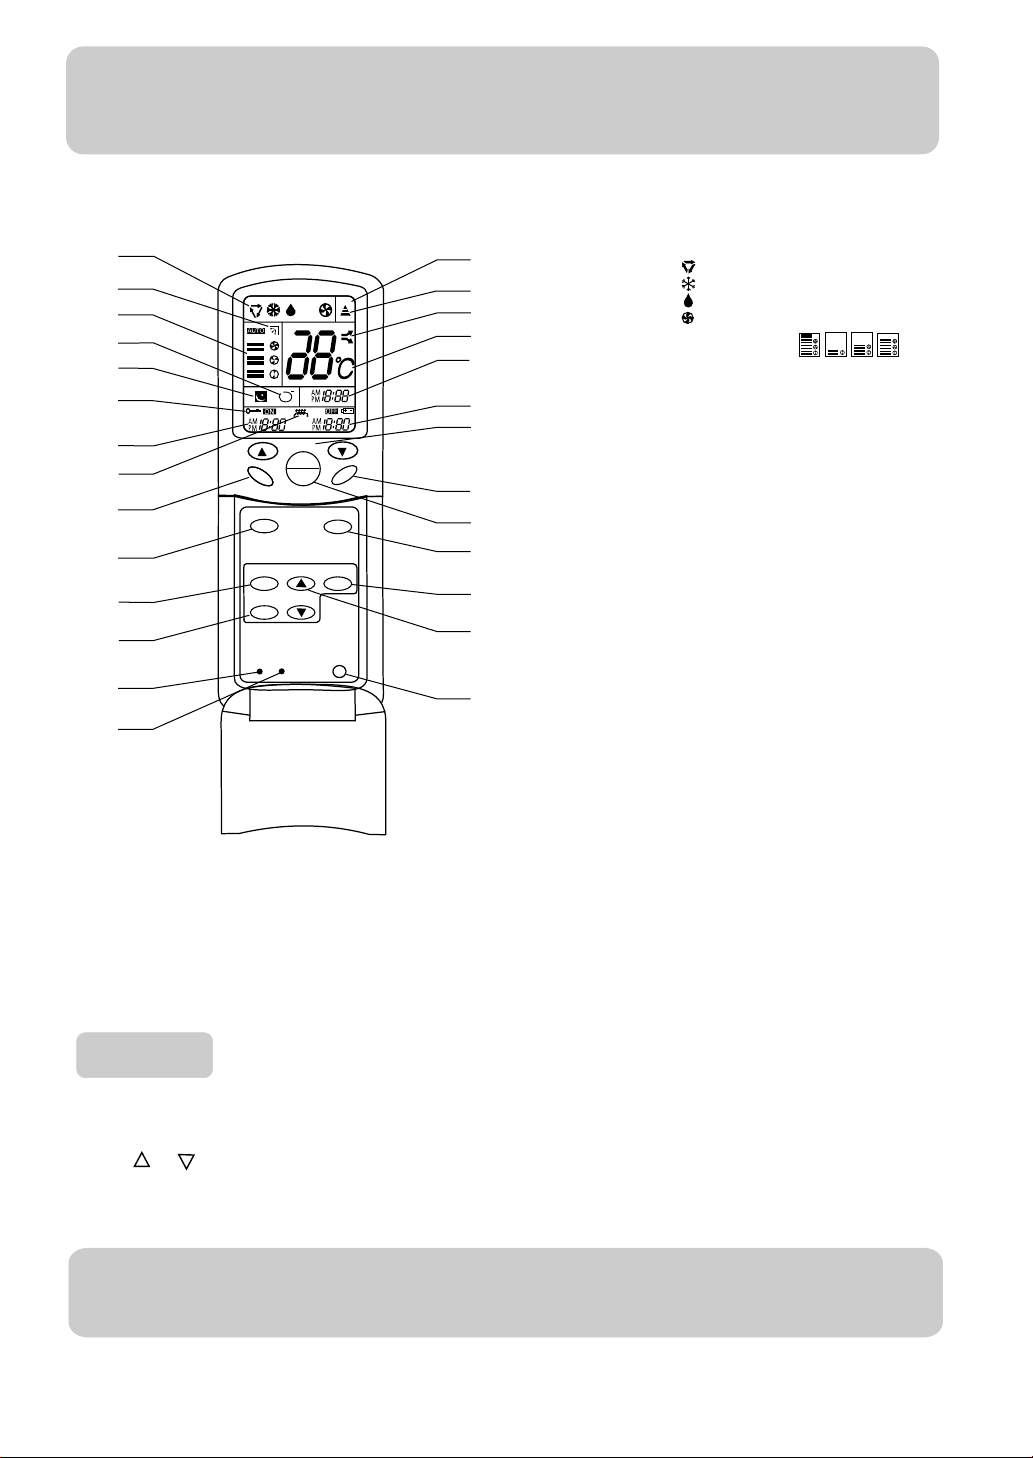
Parts and Functions
Operation
1
2
3
4
5
6
7
8
9
10
11
12
13
14
25. SET
Used to confirm timer and clock settings
26. HOUR
Used to set clock and timer settings
27. LOCK
Used to lock buttons and LCD display
NOTE:(1)The following functions and related displays are not available :HEALTH display,AUXILIARY HEAT display,POWER/SOFT display.
(2)If the Air condition don't have the function,press code B can cause it not available.
(3)Cool only unit do not have functions and displays related with heating.
on
i
SWING FAN
MODE
CLOCK
TIMER
RESET CODE
Buttons and display of the remote controller.
1. Mode display
AUTO
COOL
DRY
FAN
2. SWING display
3. FAN SPEED display
4. HEALTH display
5. SLEEP display
6. LOCK display
7. TIMER ON display
8. AUXILIARY HEAT display
9. SWING
10. MODE
Used to select AUTO,COOL,DRY ,HEAT
and FAN
11. CLOCK
Used to select your desired temp.
12. TIMER
Used to select TIMER ON,TIMER OFF
13. RESET
Used to reset the controller back to
normal condition
14. CODE
Used to select code A or B with a press,A
or B will be displayed on LCD.please
select A without special explanation
15. CODE display
16. SIGNAL SENDING display
17. POWER/SOFT display
18. TEMP display.
19. CLOCK display
20. TIMER OFF display
21. TEMP
Used to select your desired temperature.
22. FAN
Used to select fan speed
23. POWER ON/OFF
Used for unit start or stop
24. SLEEP
Used to select sleep mode
TEMP
ON
OFF
SLEEP
SET
LOCK
15
16
B
A
17
18
19
20
21
22
23
24
25
26
27
AUTO
AUTO
LO
MED
HI
Clock set
When unit is started for the first time and after replacing batteries in remote controller,
clock should be adjusted as follows:
Press CLOCK button, "AM" or "PM" flashes.
Press or to set correct time. Each press will increase or decrease 1min. If the
button is kept depressed, time will change quickly.
After time setting is confirmed, press SET, "AM " and "PM" stop flashing, while clock
starts working.
Hints
After replacing with new batteries, remote controller will conduct self-check, displaying
all information on LCD.Then, it will become normal.
5
Page 8
Operation
1.DO
NO
TMIX
OLD
WITH
NEW
BA
TTERIESAND
DO
NO
TUSE
BA
TTERIES
OF
DIFFERENTTYPES
T
OGETHER
2.INSER
TCORRECTL
Y
2
(TW
O)
R-03
BA
TTERIES
I
N
T
H
E
+
-
P
O
L
A
R
I
T
Y
3.PLEASE
REMO
VETHE
BA
TTERIESWHEN
THE
REMO
TE
CONTRLLER
DISORDER,AND
RELO
AD
NEW
Õ
S
AFTER
SIX
M
I
N
U
T
E
S
REMO
TE
CONTR
OL
UNIT
MODEL:YR-H05
1.DONO
T
MIXOLD
WITH
NEWBA
TTERIES
AND
DONOT
USEBA
TTERIES
OFDIFFERENT
TYPES
T
OGETHER
2.INSER
TCORRECTL
Y
2
(TW
O)R-03
BA
TTERIES
I
N
T
H
E
+
-
P
O
L
A
R
I
T
Y
3.PLEASEREMO
VE
THE
BA
TTERIESWHEN
THE
REMOTECONTRLLER
DISORDER,ANDRELO
AD
N
E
W
Õ
S
A
F
T
E
R
S
I
X
M
I
N
U
T
E
S
R
E
M
O
T
E
C
O
N
T
R
O
L
U
N
I
T
M
O
D
E
L
:
Y
R
-
H
0
5
-
+
-
+
1.DO NOT MIX OLD WITH
NEW BATTERIESAND
DONOT USE BATTERIES
OFDIFFERENT TYPES
TOGETHER
2.INSER TCORRECTL Y 2
(TWO) R-03 BATTERIES
INTHE +- POLARITY
3.PLEASE REMOVE THE
BATTERIESWHEN THE
REMOTE CONTRLLER
DISORDER,AND RELOAD
NEWÕS AFTER SIX
MINUTES
REMOTE CONTROL UNIT
MODEL:YR-H05
-
+
-
+
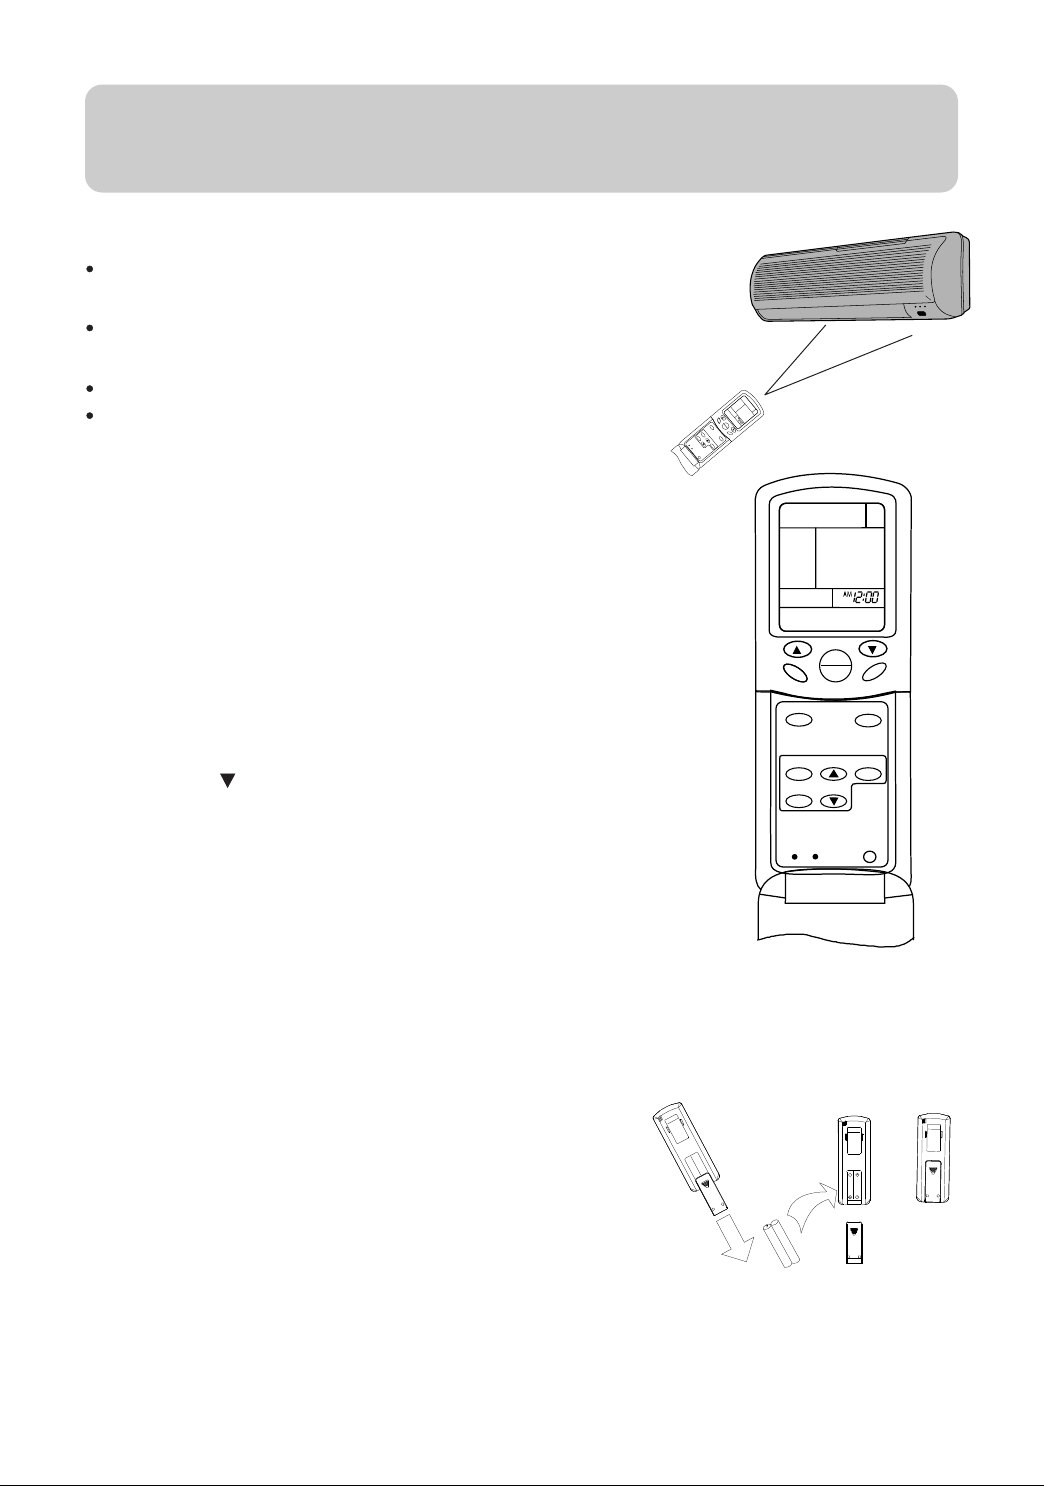
Remote controller's operation
When in use, put the signal transmission head directly to the
receiver hole on the indoor unit.
The distance between the signal transmission head and the
receiver hole should be within 7m without any obstacle as well.
Don't throw the controller, prevent it from being damaged.
When electronic-started type fluorescent lamp or change-over
type fluorescent lamp or wireless telephone is installed in the
room, the receiver is apt to be disturbed in receiving the signals
so the distance to the indoor unit should be shorter.
A
SWING
TEMP
ON
MODE
OFF
CLOCK
F
AN
TIMER
SLEEP
RESET
SET
CODE
LOCK
A
Loading of the battery
Load the batteries as illustrated.
2 R-03 batteries, resetting key (cylinder)
Remove the battery cover :
Slightly press " " and push down the cover.
Load the battery :
Be sure that the loading is in line with the " + " / " - " pole request as
illustrated.
Put on the cover again
Confirmation indicator :
In disorderation, reload the batteries or load the new batteries
after 6 mins.
Note :
Use two new same-typed batteries when loading.
If the remote controller can't run normally or doesn't work at all,
use a sharp pointed item to press the reset key.
TEMP
ON
OFF
SWING FAN
MODE
CLOCK
SLEEP
SET
TIMER
RESET CODE
LOCK
Hint :
Remove the batteries in case unit won't be in usage for a long period.
If there are any display after taking-out just need to press reset key.
6
Page 9
SWING
MODE
A
TEMP
ON
1
OFF
4
SLEEP
FAN
3
2
9
CLOCK
TIMER
RESET CODE
SET
LOCK
7
Page 10
Operation
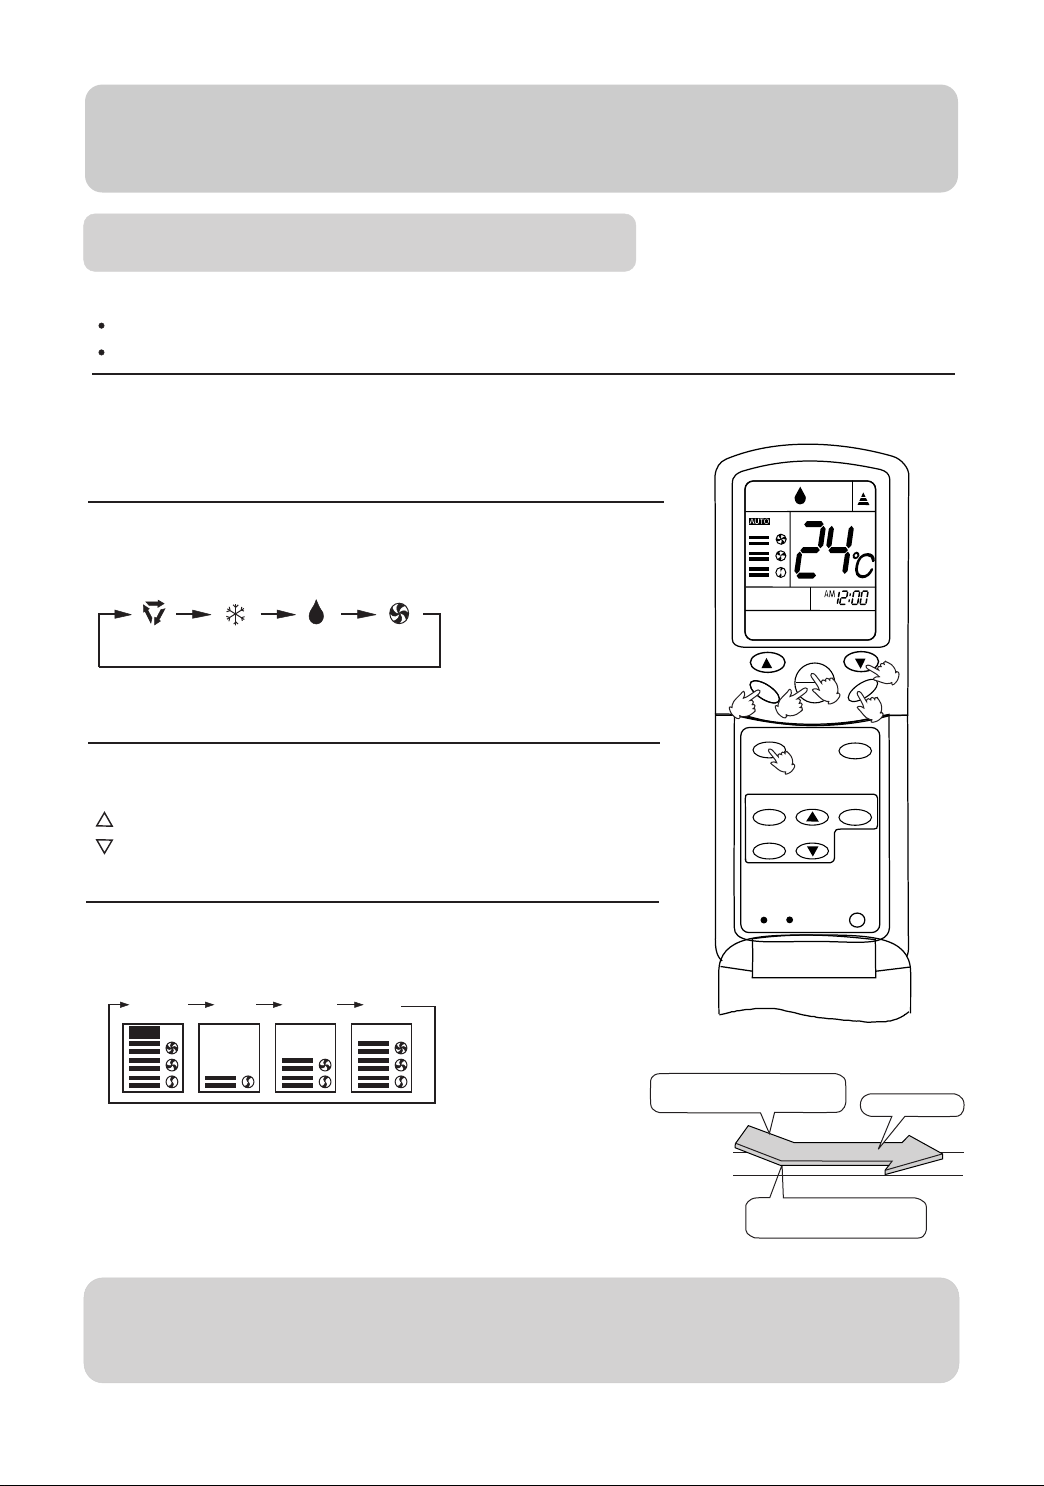
COOL and DRY operation
Recommendations:
Use COOL in summer.
Use DRY in spring, autumn and in damp climate.
(1) Unit start
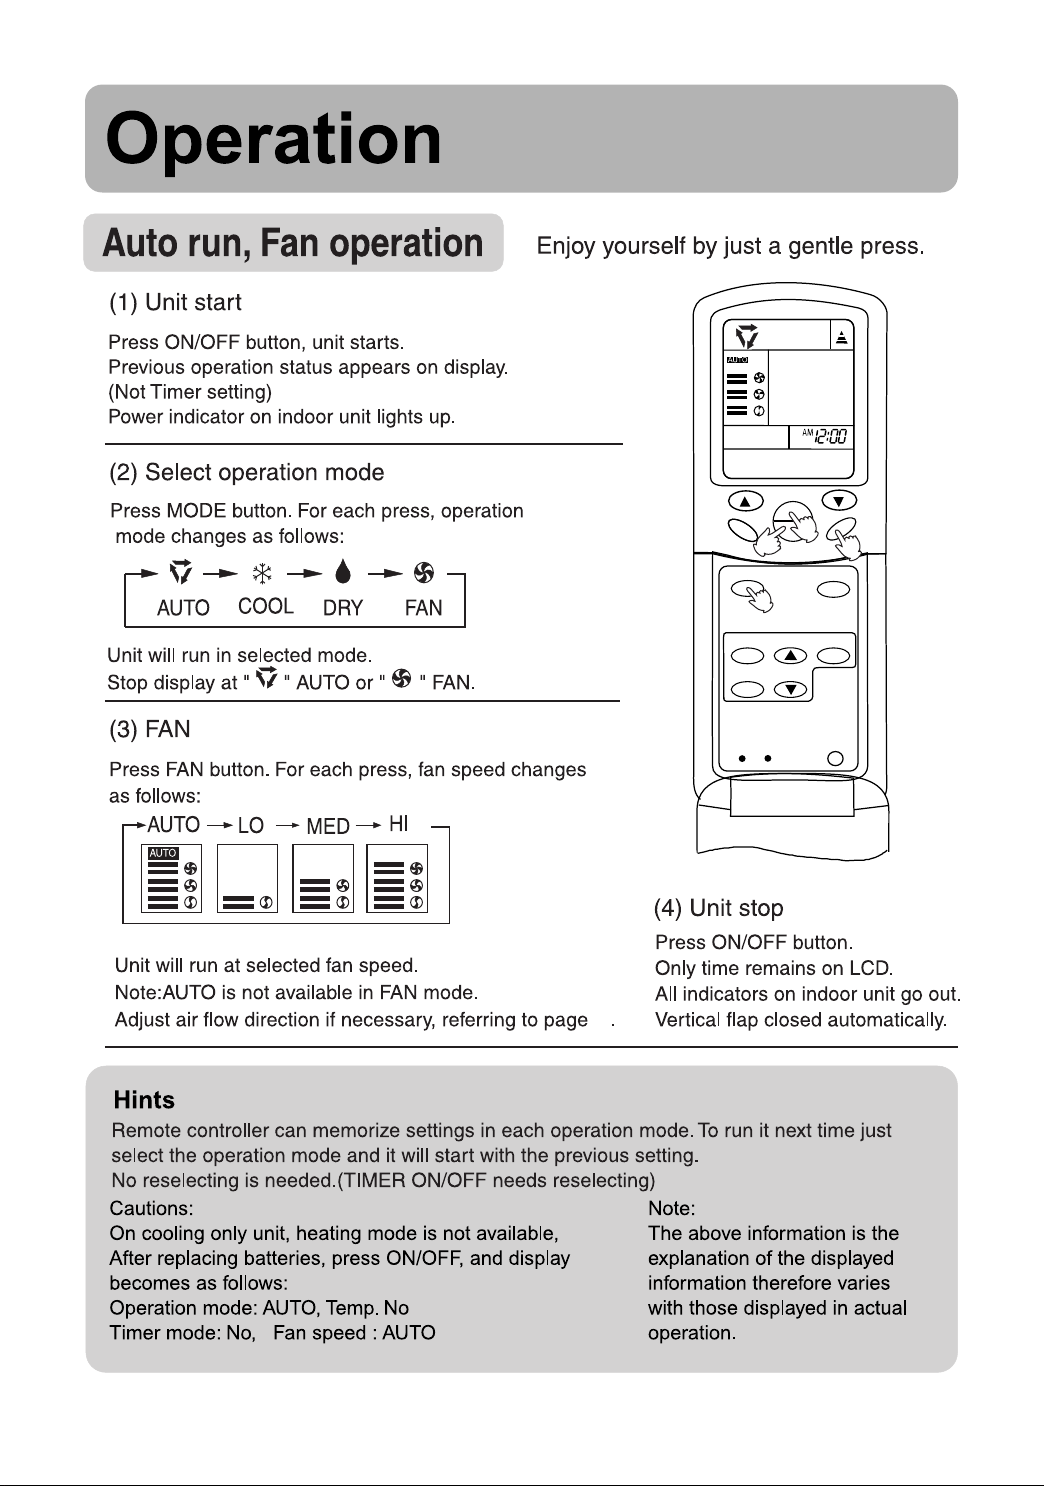
Press ON/OFF button, unit starts.
Previous operation status appears on display. (Not Timer setting)
Power indicator on indoor unit lights up.
(2) Select operation mode
Press MODE button. For each press, operation
mode changes as follows:
A
AUTO DRY FAN
COOL
Unit will run in operation mode displayed on LCD.
Stop display at your desired mode.
(3) Select temp. setting
Press TEMP. button.
Every time the button is pressed, temp. setting increases 1oC
Every time the button is pressed, temp. setting decreases 1oC
Unit will start running to reach the temp. setting on LCD.
(4) Fan speed selection
Press FAN button. For each press, fan speed changes
as follows:
AUTO
AUTO
LO
MED
Unit runs at the speed displayed on LCD.
In DRY mode, when room temp. becomes 2oC higher than
temp. setting, unit will run intermittently at LO speed
regardless of FAN setting.
HI
Temp. setting+2
Temp. setting
TEMP
ON
1
SWING FAN
5
COOL operation starts when room
temp. is higher than temp. setting.
o
C
OFF
6
MODE
2
CLOCK
TIMER
RESET CODE
On reaching temp. setting,unit
will run in mild DRY mode.
3
4
SLEEP
SET
LOCK
Ultra-low air flow
Hints
Remote controller can memorize each operation status. When starting it next time,
just press ON/OFF button and unit will run in previous status.
8
Page 11
Operation
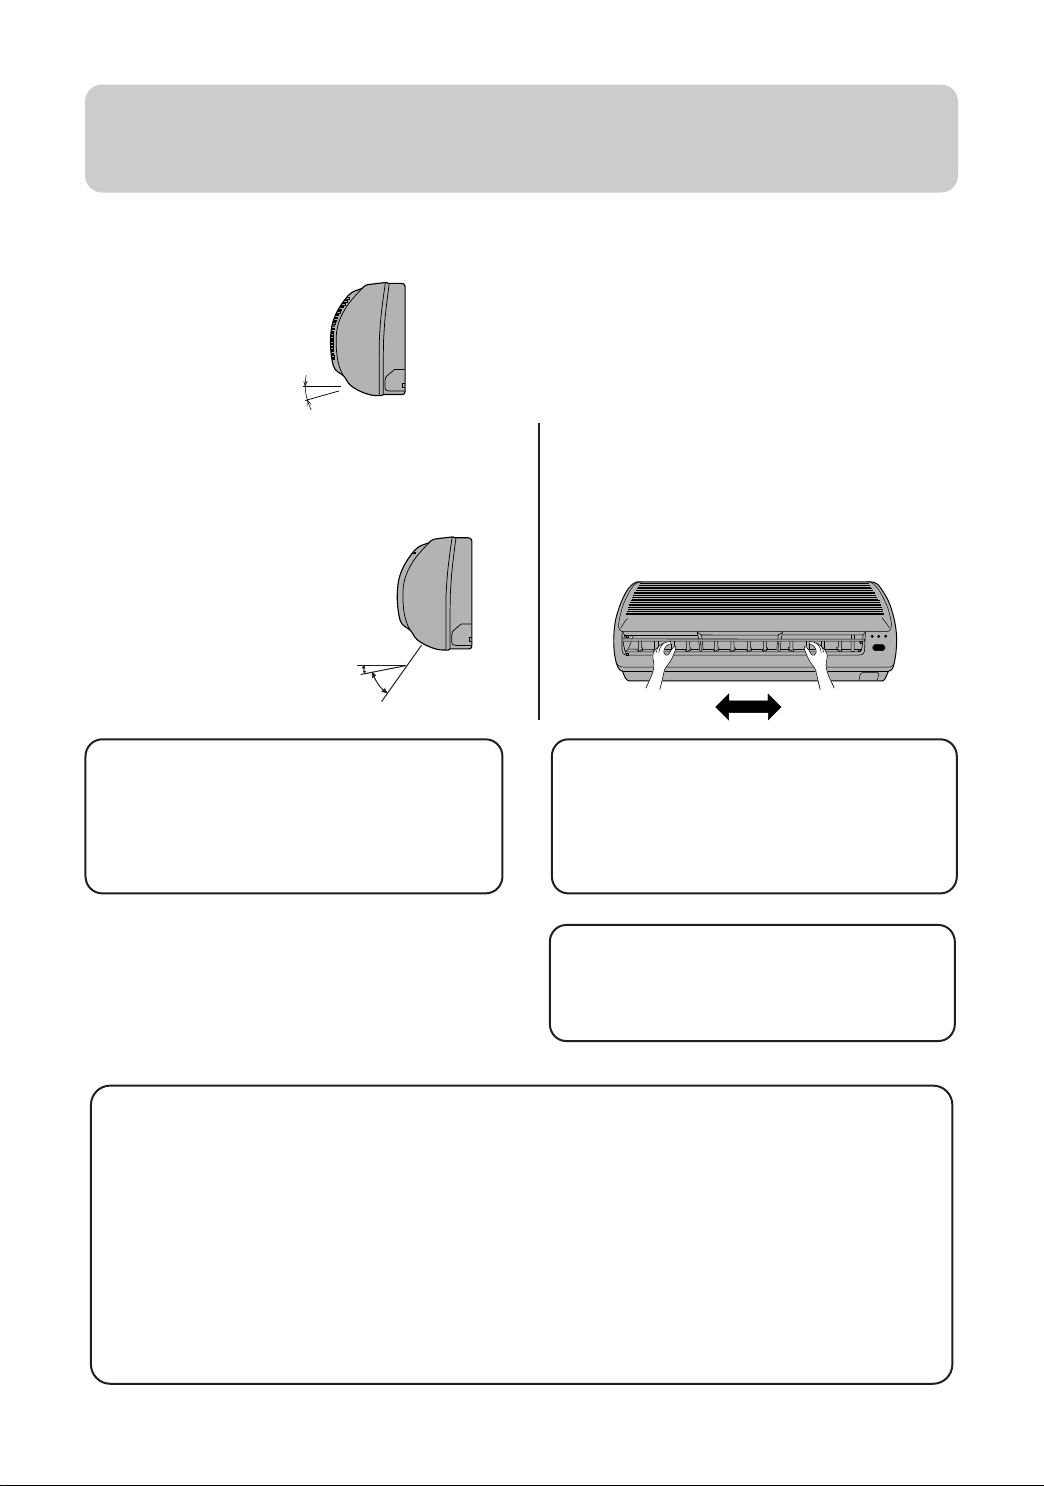
(5) Air flow direction adjustment
After operation mode is selected, vertical flap will open automatically according to the mode.
Referring to the Fig.
COOL
About 10
Level
o
Up and down (Use remote controller)
Press SWING button, vertical flap will move within
the range shown in the Fig. Press SWING button
stop it at a fixed position.
o
o
COOL
About 10
About 45
Cautions:
It is advisable not to keep vertical flap at
downward position for a long time in COOL
or DRY mode, otherwise, condensate
water might occur.
(6) Unit stop
Press ON/OFF button.
Only time remains on LCD.
All indicators on indoor unit go out.
Vertical flap closes automatically.
Left and right air flow adjustment
(manual)
Move the horizontal blade by a knob on air
conditioner to adjust left and right direction
referring to Fig.
Cautions:
When humidity is high, condensate water
might occur at air outlet if all horizontal
louvers are adjusted to left or right.
Cautions:
Unit won't restart until 3 minutes have
elapsed, due to system protection.
Hints
As cold air flows downward in COOL mode, adjusting air flow horizontally will be much more
helpful for a better air circulation.
Be careful not to catch a cold when cold air blows downward.
It is harmful to your health in summer to go frequently in and out of places where temp.
difference is above 7oC. Temp. difference of 3-5oC will remove your fatigue.
More than this, unit's load can be reduced and power consumption cut down as well. So, you'd
better set a temp. diff of 3-5oC between indoor and outdoor temp. in COOL mode.
9
Page 12
Operation
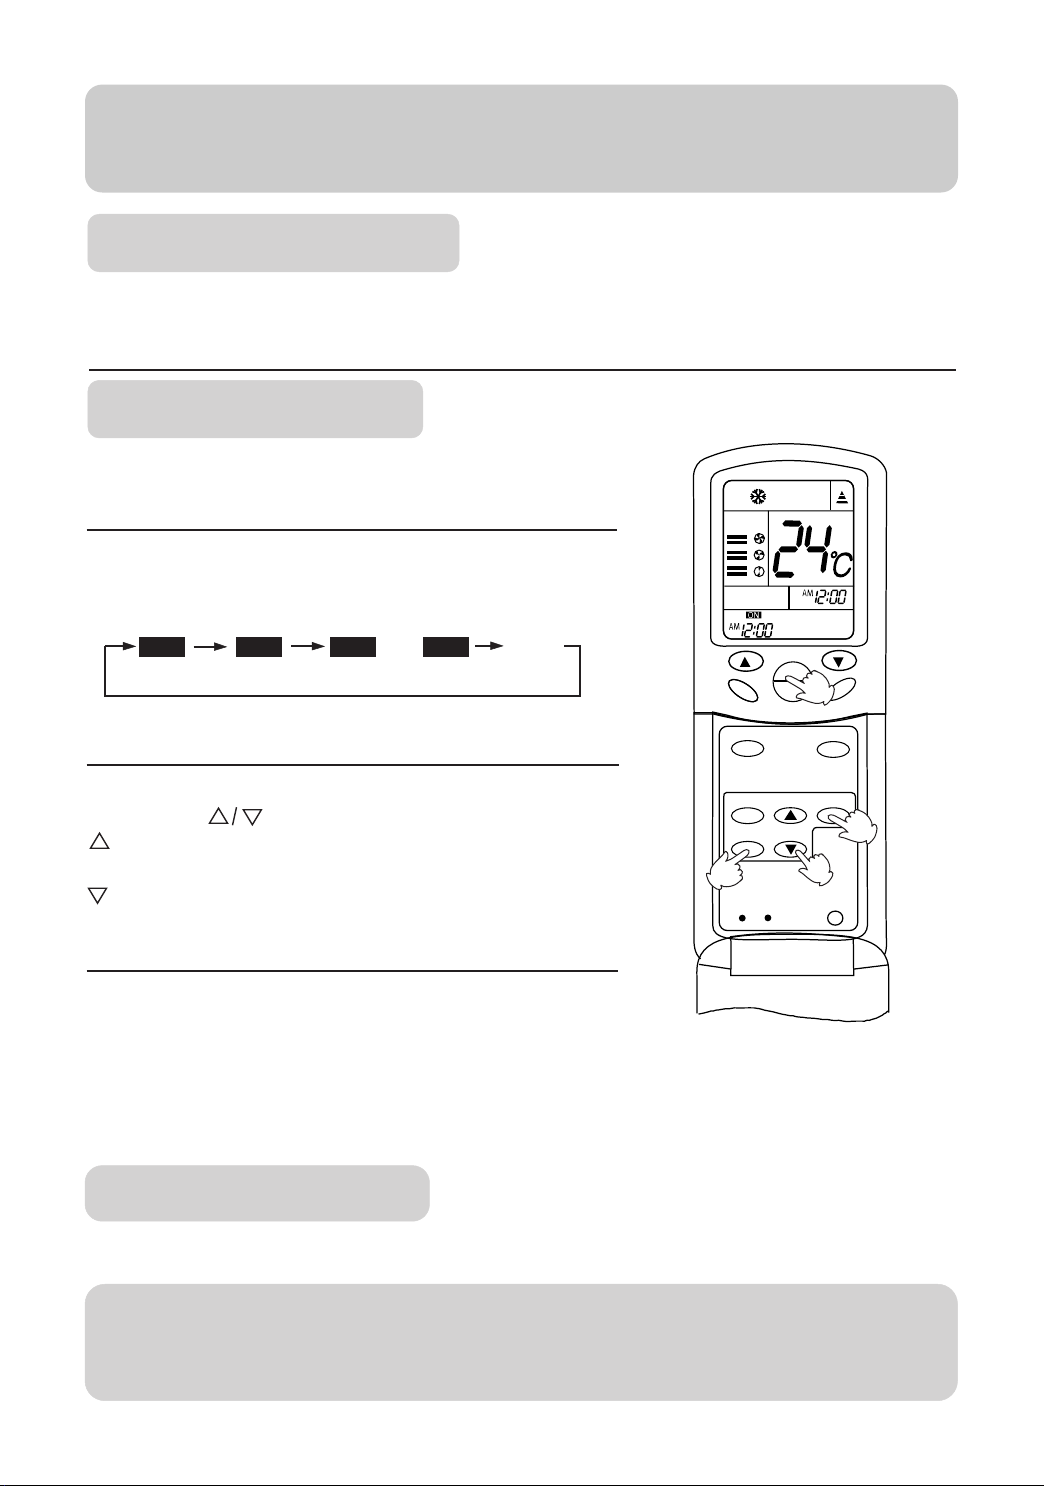
TIMER operation
Set Clock correctly before starting Timer operation(referring to page 5)
You can let unit start or stop automatically at following times: Before you wake up in the
morning, or get back from outside or after you fall asleep at night.
TIMER ON/OFF
(1)After unit start, select your desired operation mode.
Operation mode will be displayed on LCD.
Power indicator on indoor unit lights up.
(2)TIMER mode selection
Press TIMER button to change TIMER mode.
Every time the button is pressed, display changes as follows:
ON
TIMER ON
TIMER OFF
ON
TIMER ON-OFF
OFFOFF
Select your desired TIMER mode (TIMER ON or TIMER
OFF) ON or OFF will flash.
blank
TEMP
ON
OFF
SWING FAN
MODE
1
SLEEP
A
(3)Timer setting
Press HOUR button.
Every time the button is pressed, time increases 10 min.
If button is kept depressed, time will change quickly.
Every time the button is pressed, time decreases 10 min.
If button is kept depressed, time will change quickly. Time
CLOCK
TIMER
2
RESET CODE
will be shown on LCD. It can be adjusted within 24 hours.
(4)Confirming your setting
After setting correct time, press SET button to confirm, "ON"
or "OFF" stops flashing
Time displayed: Unit starts or stops at x hour x min. (TIMER
ON or TIMER OFF).
Timer mode indicator on indoor unit lights up.
To cancel TIMER mode
Just press TIMER button several times until TIMER mode disappears.
Hints
After replacing batteries or a power failure happens, Time setting should be reset.
Remote controller possesses memory function, when use TIMER mode next time, just
press SET button after mode selecting if timer setting is the same as previous one.
SET
4
3
LOCK
10
Page 13
Operation
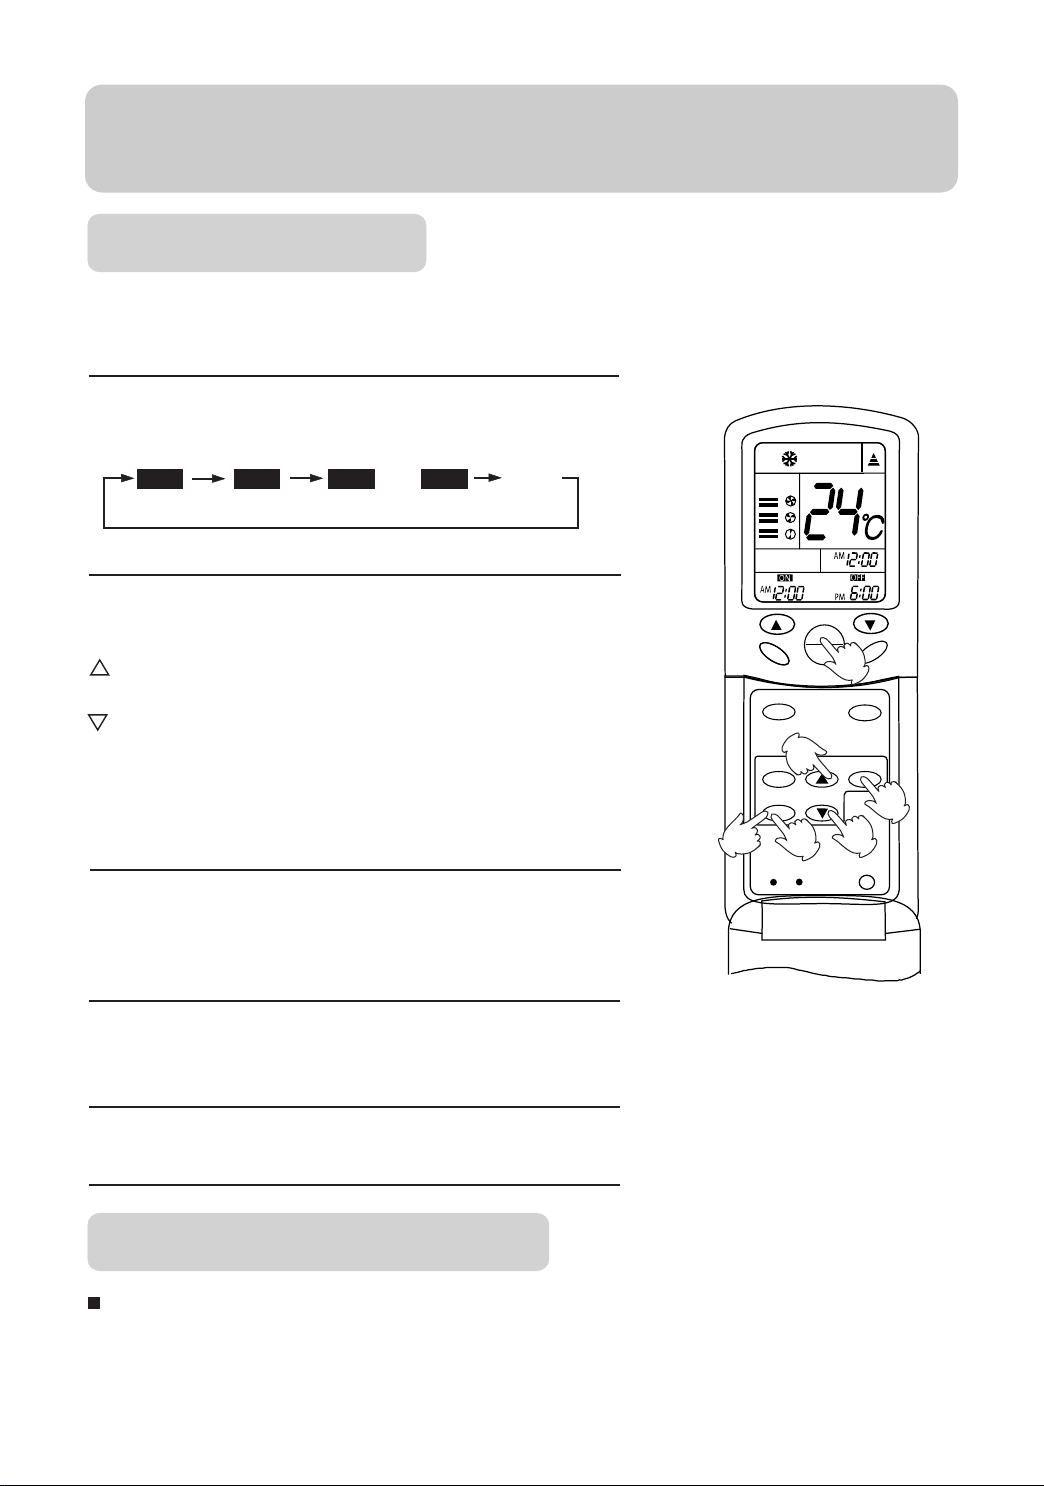
TIMER ON-OFF
(1)After unit start, select your desired operation mode
Operation mode will be displayed on LCD.
Power indicator on indoor unit lights up.
(2) Press TIMER button to change TIMER mode.
Every time the button is pressed, display changes as follows:
ON
TIMER ON TIMER OFF TIMER ON-OFF
OFF
ON
Select TIMER ON-OFF. "ON" will flash.
OFF
blank
A
(3)Time setting for TIMER ON
Press HOUR button.
Every time the button is pressed, time increases 10min.
If button is kept depressed, time will change quickly.
Every time the button is pressed, time decreases 10min.
If button is kept depressed, time will change quickly.
Time will be shown on LCD.
It can be adjusted within 24 hours.
AM refer's to morning and PM to afternoon.
(4) Time confirming for TIMER ON
After time setting, press TIMER button to confirm.
"ON" stops blinking, While "OFF" starts blinking.
Time displayed: Unit starts at x hour x min.
(5)Time setting for TIMER OFF
After time setting, press SET button to confirm, "OFF" stops flashing.
Time displayed: Unit stops at X hour X min.
(6) Time confirming for TIMER OFF
Follow the same procedures in "Time setting for TIMER ON".
TEMP
ON
MODE
CLOCK
TIMER
4
RESET CODE
OFF
1
3
5
SWING FAN
2
SLEEP
SET
6
LOCK
To cancel TIMER mode
Just press TIMER button several times until TIMER mode disappears.
11
Page 14
Operation
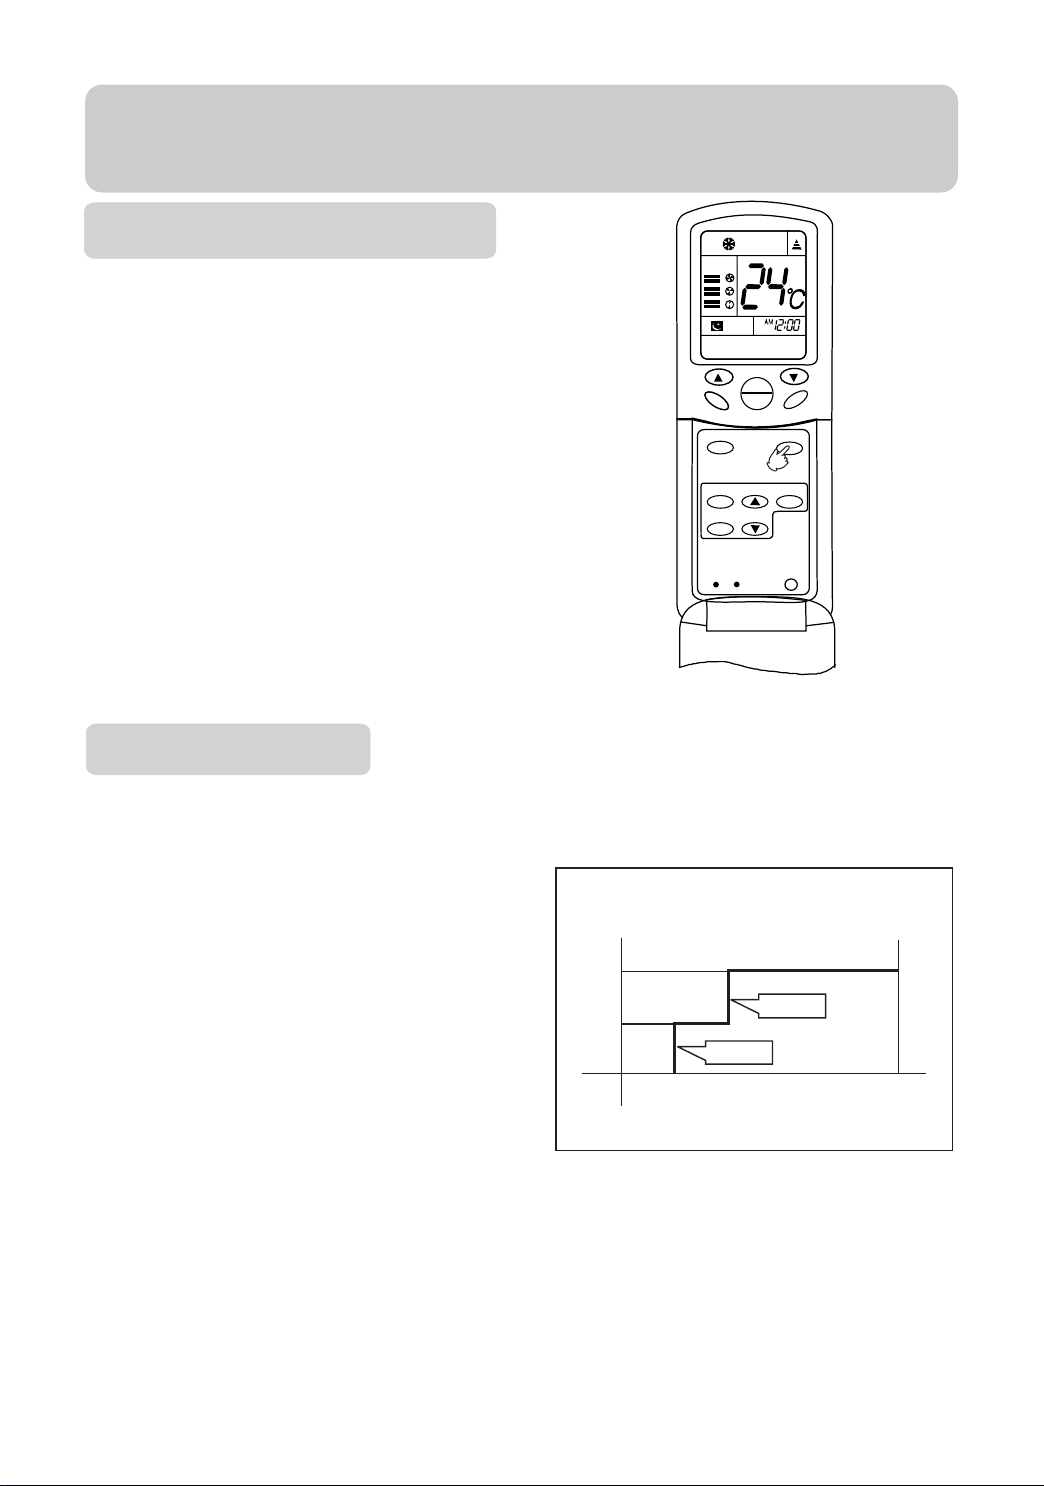
Comfortable SLEEP
Before going to bed at night, you can simply press
the SLEEP button and unit will bring you a sound
sleep in selected mode.
In COOL ,DRY mode
One hour after SLEEP mode starts, temp. will
become 1oC higher than temp. setting. After
running for another 1 hour, temp. rises by 1oC
further. Unit will run for 6 hours then stops
automatically. Temp. is higher than temp.
setting so that room temp. won't be too low
for your sleep.(As shown in Fig.1)
SWING FAN
SLEEP operation starts
MODE
CLOCK
TIMER
RESET CODE
A
TEMP
ON
OFF
SLEEP
SET
LOCK
SLEEP operation stops
Approx. 6 hrs
Note:
In AUTO mode, unit will run in SLEEP
function according to operation mode.
In FAN mode, comfortable sleep is not
available.
12
1 hr
1 hr
Temp. setting Unit stop
Rises 1oC
Rises 1oC
Fig.1
Page 15
Operation
Emergency operation and test operation
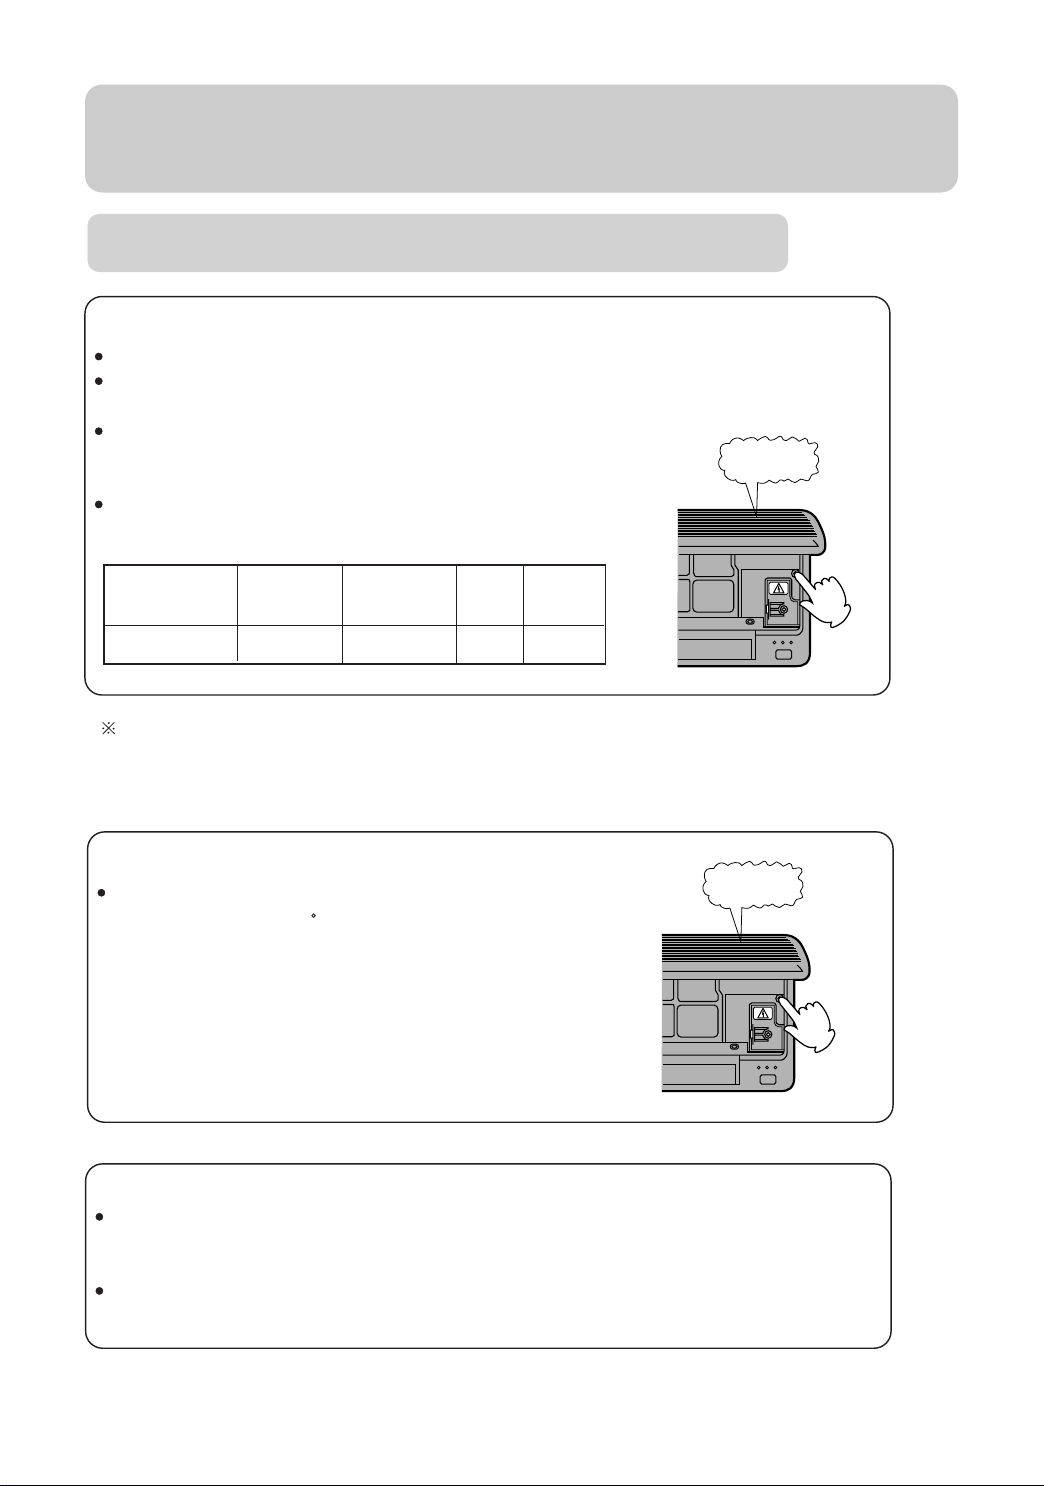
Emergency Operation:
Carry out this operation only when the remote controller is defective or lost.
When the emergency operation switch is pressed, a " Pi " sound starts once, which
means the start of this operation.
In this operation, it is not possible to change the
settings of temperature and air flow speed, it is
also impossible to do an operation by the timer.
Follow the requirements below.
"Pi"!
Room
temperature
More than 23oC
If an air conditioner is a model cooling .
Cooling when the room temperature at the start of operation is above 23oC.
Test operation:
Use this switch in the test operation when the room
temperature is less 16 C, do not use it in the normal
operation.
Continue to press the test operation switch for more
than 5 seconds. After you hear the "Pi" sound twice,
release your finger from the switch, the cooling
operation starts with the air flow speed setting "Hi".
Designated
temperature
26oC
Timer
mode
CONTINUOUS
Air flow
speed
AUTO
Operation
mode
COOL
"Pi"! Pi"!
Removal of the restriction of emergency or test operation:
Press once more the emergency operation switch, or manipulate through the remote
controller, a "Pi" sound causes the restriction of emergency or test operation to be
removed.
When the remote controller is manipulated for the removal, then the selected operation
by the remote controller.
13
Page 16
Maintenance
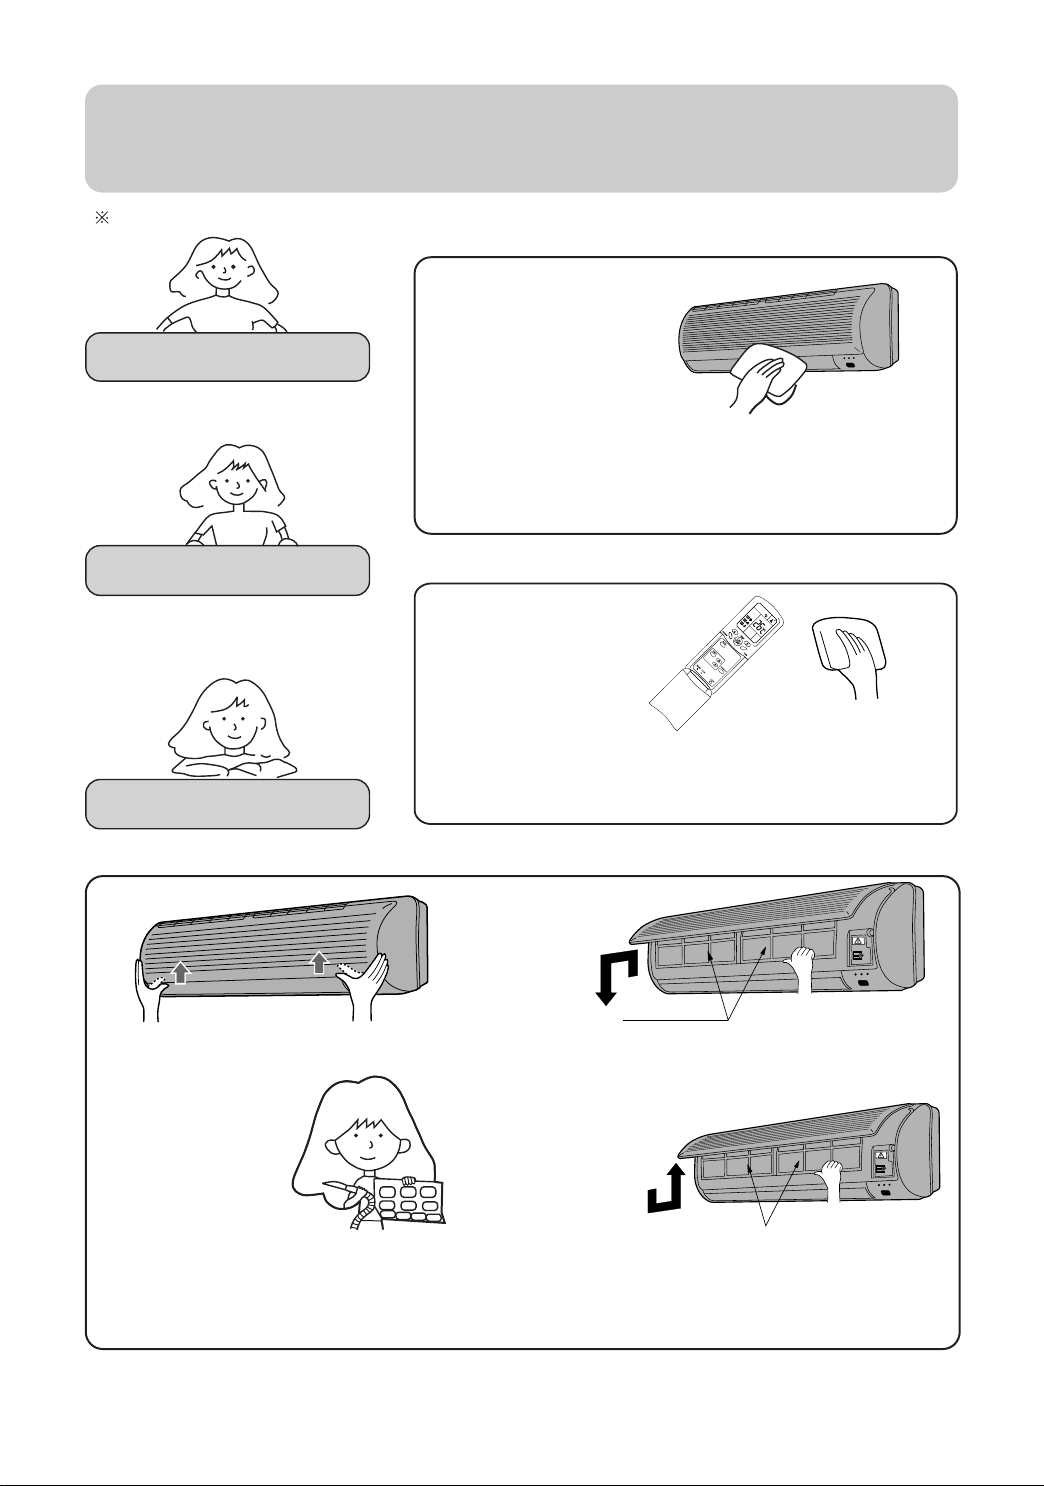
Different models have different appearance.
Cleaning of unit casing
Cut off power supply
before cleaning wipe unit casing with soft cloth.
In case of heavy stain, clean it with neutral detergent.
squeeze water in the cloth, wipe off the detergent on unit
casing completely.
Cleaning of remote controller
Don't use water to wash unit casing, please use dry cloth.
Don't use glass cleanner or cloth soaked with chemicals.
Cleaning of air filter
1.Open inlet grille by pulling it upward.
3.Clean the filter
Use a vacuum
cleaner to remove
dust, or wash the
filter with water.
After washing,
dry the filter
completely in the shade.
5.Close the inlet grille.
Air Filter
2.Remove air filters
Push up the filter's center tab
slightly until it is caesura of
the stopper. Remove it by
pulling down.
4.Attach the filters
Attach filter behind the stopper so that
the " Front " indication is facing to the front. Make sure
that it is completely behind the stopper, otherwise
problems might occur.
Air Filter
14
Page 17
Maintenance
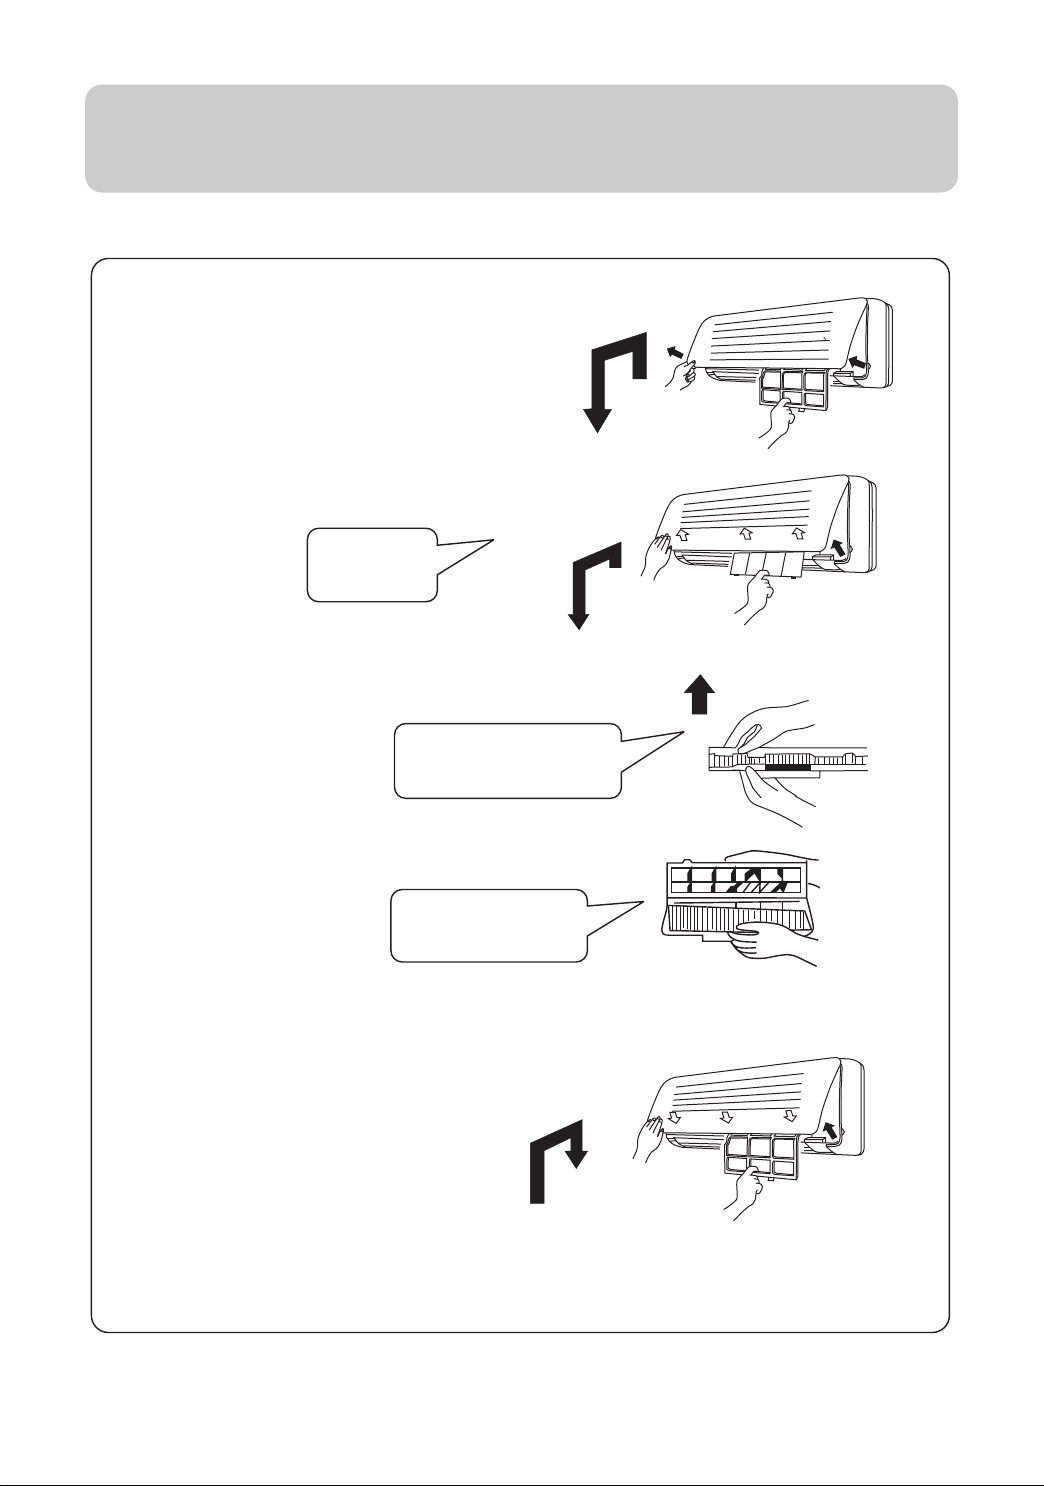
Replacement of Electrostatic Filter
Detach the Air filters.
1
2
Detach the Electrostatic Filters.
Be careful
with fins.
Replace the old filter with
3
new one into the frame.
Pull up the hook to the
designated direction
White side should
be up side.
Open the frame of the filter.
4
Attach the Electrostatic Filters.
5
Attach the Air Filters.
6
Close the inlet grille.
Some of the models may not have the frame of the filter.
If Electrostatic Filter can no longer be used, please buy a new one instead.
15
Page 18
Maintenance
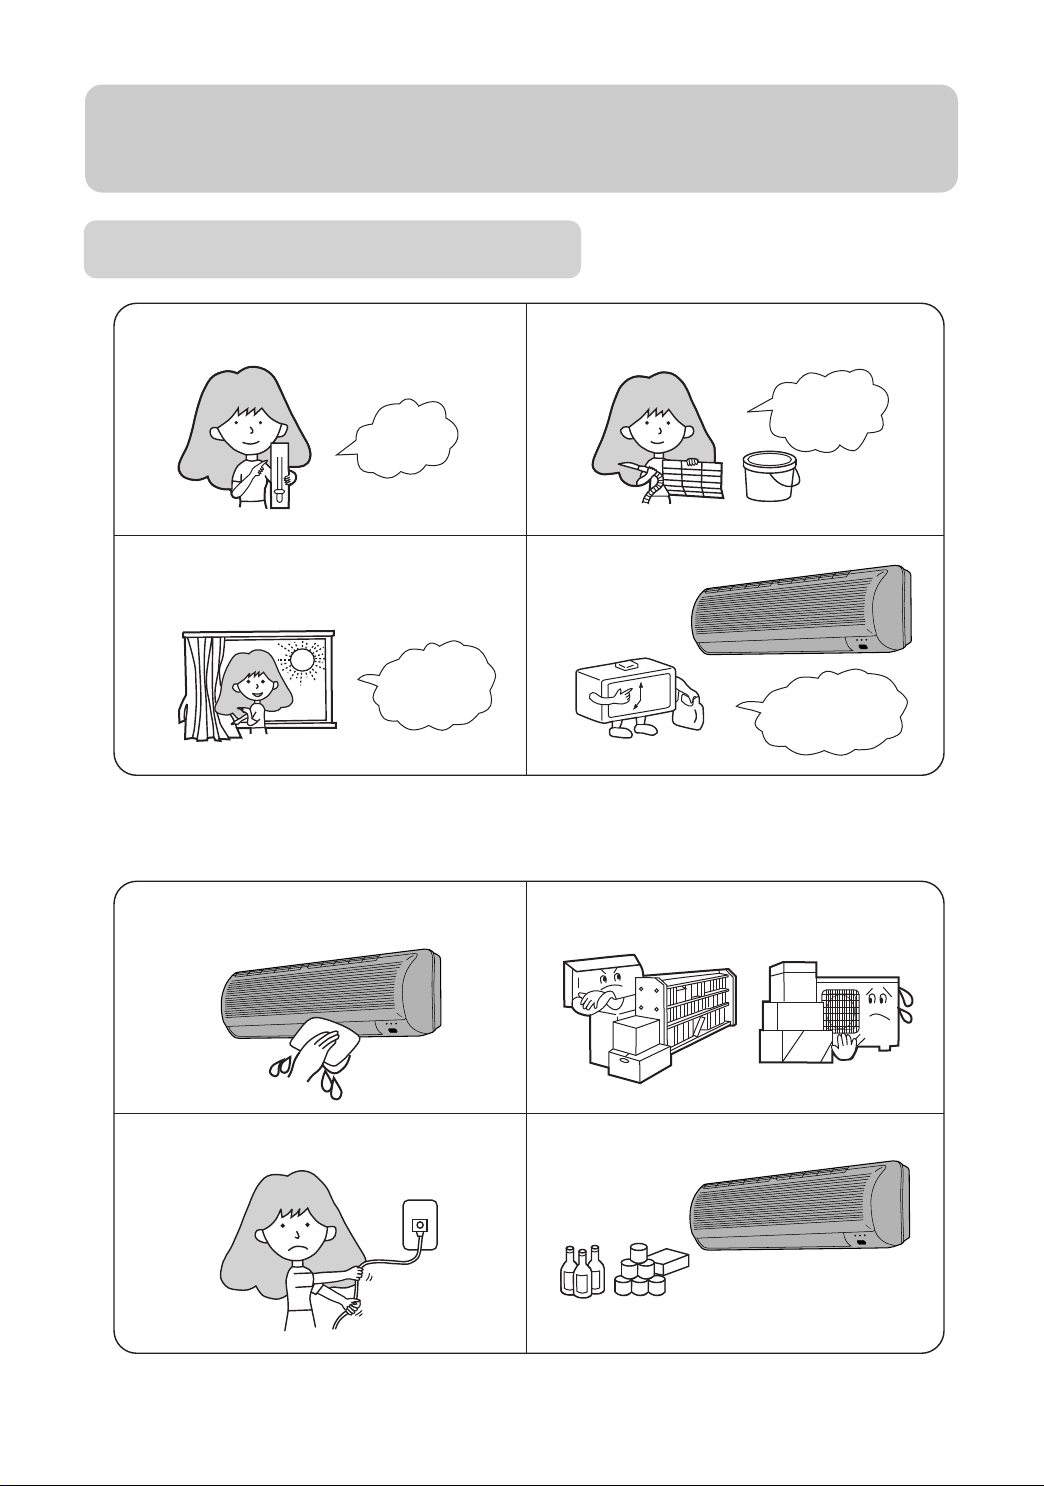
Better use of air conditioner
Proper room temperature.
Proper
temperature
Closing of doors and windows
during operation.
Curtains or blinds
for windows
Never fail to observe the followings
Cleaning of the air filter.
Once every
two weeks
Effective use of the timer.
Avoid time-wasteful
operation
Do not sprinkle water over the
unit..
Do not block the inlet or outlet.
Do not use for other purposes.Do not pull power plug.
Such as food preservation.
plant cultivation.or animl
breeding.
16
Page 19
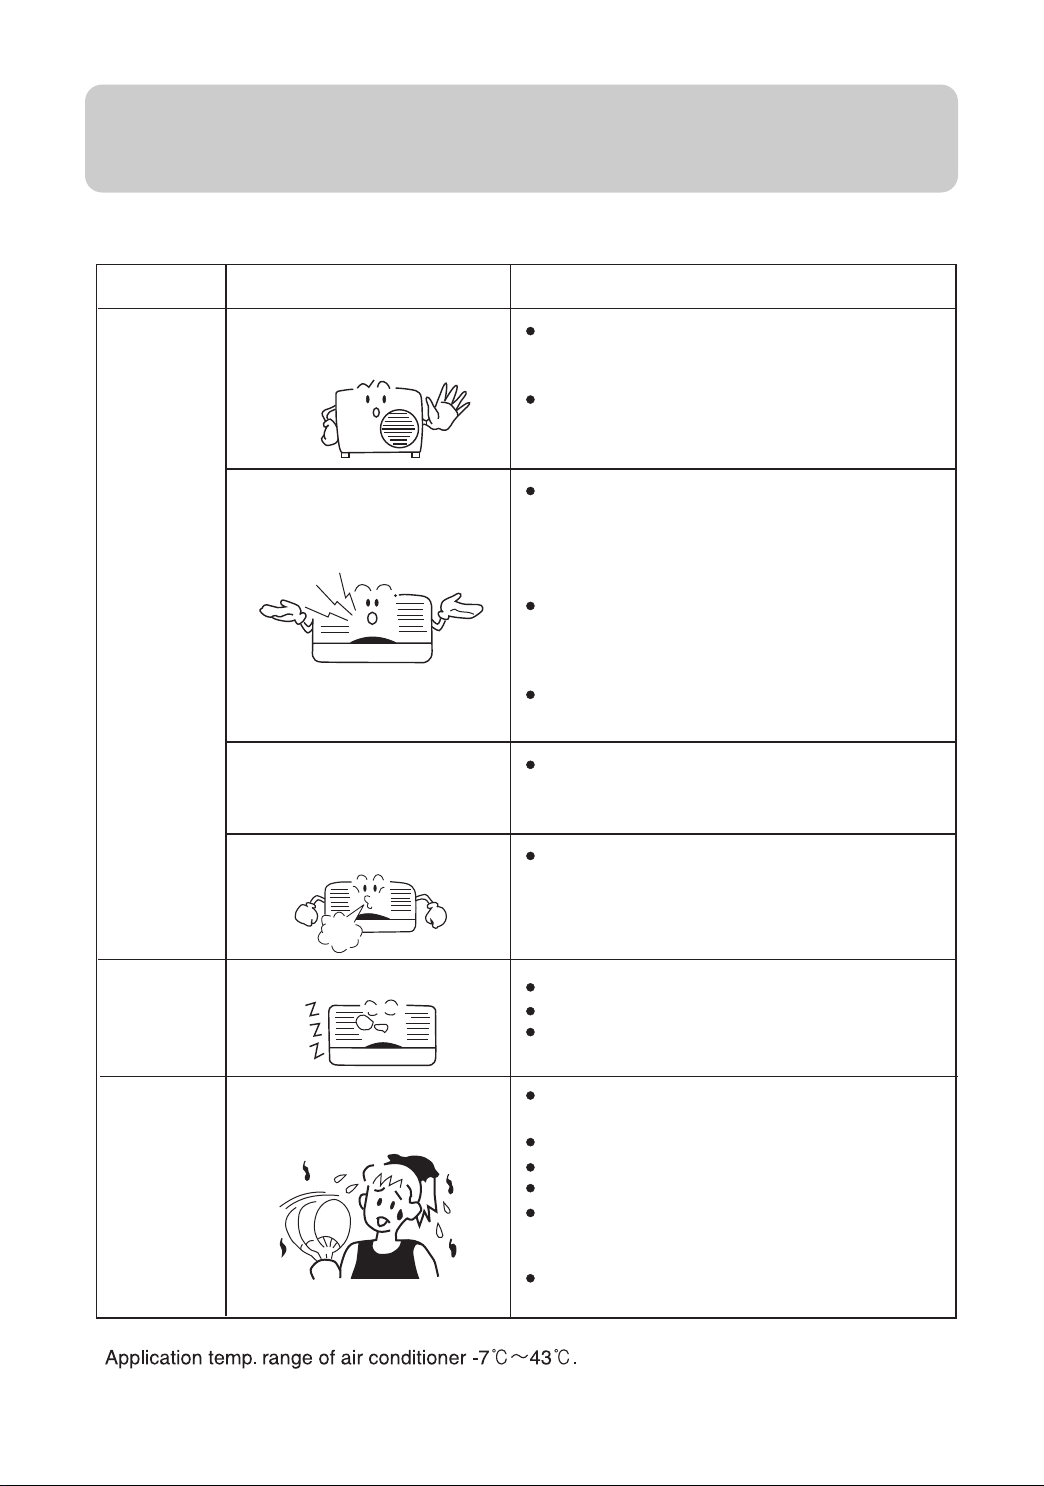
Trouble shooting
Before asking for service, check the following first.
Normal
performance
inspection
Phenomenon
The system does not restart
immediately.
Noise is heard :
Smells are generated.
Mist or steam are blown out.
Cause or check points
When unit is stopped, it won't restart
immediately until 3 minutes have elapsed
to protect the system.
When the electric plug is pulled out and
reinserted, the protection circuit will work
for 3 minutes to protect the air conditioner.
During unit operation or at stop, a swishing
or gurgling noise may be heard. At first 2-3
minutes after unit start, this noise is more
noticeable. (This noise is generated by
refrigerant flowing in the system.)
During unit operation, a cracking noise may
be heard. This noise is generated by the
casing expanding or shrinking because of
temperature changes.
Should there be a big noise from air flow in
unit operation, air filter may be too dirty.
This is because the system circulates smells
from the interior air such as the smell of
furniture, cigarettes.
During COOL or DRY operation, indoor unit
may blow out mist. This is due to the sudden
cooling of indoor air.
Multiple
check
Does not work at all.
Poor cooling
Is power plug inserted?
Is there a power failure?
Is fuse blown out?
Is the air filter dirty? Normally it should be
cleaned every 15 days.
Are there any obstacles before inlet and outlet?
Is temperature set correctly?
Are there some doors or windows left open?
Is there any direct sunlight through the
window during the cooling operation?(Use
curtain)
Are there too much heat sources or too many
people in the room during cooling operation?
17
 Loading...