

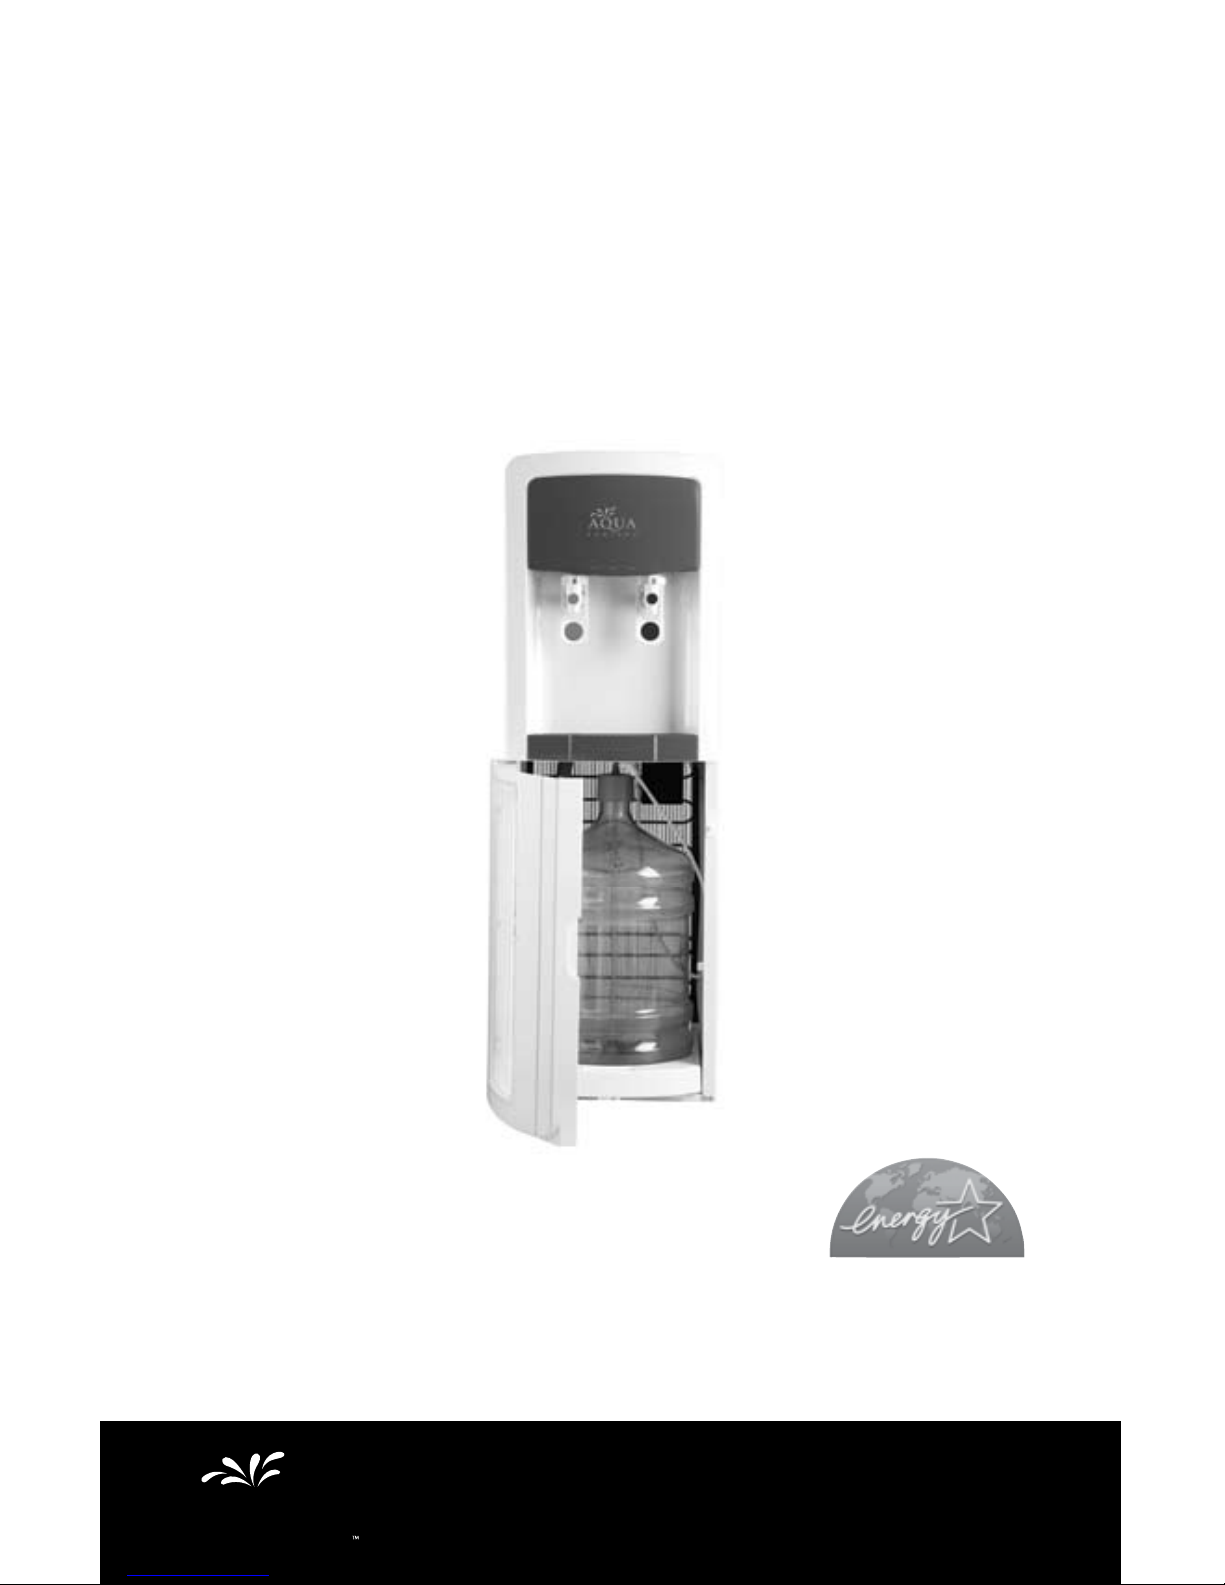
BOTTOM MOUNT WATER DISPENSER
DISTRIBUTEUR D’EAU À OUVERTURE
DE BOUTEILLES PAR LE BAS
SURTIDOR DE AGUA PARA
COLOCACIÓN INFERIOR
User Manual
Manual d’ Utilisateur
Manual de Usuario
WDBF01
aqua
F O N T A N A

1
English
SAFETY PRECAUTIONS
When using this appliance, always exercise basic safety
precautions, including the following:
1. Read all of the instructions before using this appliance.
2. Use this appliance only for its intended purpose as described in this
use and care guide.
3. This water dispenser must be properly installed in accordance with the
installation instructions before it is used. See the grounding instructions in the
installation section on page 5.
4. Never unplug your water dispenser by pulling on the power cord.
Always grasp the plug firmly and pull straight out from the outlet.
5. Repair or replace immediately, all electric service cords that have become
frayed or otherwise damaged. Do not use a cord that shows cracks or
abrasion damage along its length, on the plug or at the connector end.
6. Unplug your water dispenser before cleaning and making any repairs.
Note: If for any reason this product requires service, we strongly
recommend that a certified technician perform the service.
7. This water dispenser should not be recessed or built into an enclosed
cabinet. It is designed for FREESTANDING INSTALLATION ONLY
.
8. This appliance is designed for INDOOR USE ONLY and should not be used
outdoors.
9. Do not operate your water dispenser in the presence of explosive fumes.
10. Close supervision is necessary when any appliance is used by or
near children.
11. To protect against electric shock, do not immerse the cord, plug, or any other
part of the water dispenser in water or other liquids.
SAVE THESE INSTRUCTIONS
For Future Use
Thank you for purchasing our
product. This easy-to-use manual
will guide you in getting the best
use of your water dispenser.
Remember to record the model and
serial number. They are on a label
in back of the unit.
Model number
Serial number
Date of purchase
Staple your receipt to your manual.
You will need it to obtain warranty service.

English
2
TABLE OF CONTENTS
PAGE
SAFETY PRECAUTIONS ......................................................................1
PARTS AND FEATURES ...................................................................... 3
UNPACKING ......................................................................................4
Proper Location ......................................................................................
4
ELECTRICAL CONNECTIONS............................................................... 5
Grounding Instructions ............................................................................
5
Wiring Requirements ..............................................................................
5
Extension Cords .....................................................................................
5
ASSEMBLY INSTRUCTIONS ................................................................
6
Installing Your Water Dispenser ...............................................................
6
Power Interruptions .................................................................................
6
OPERATING YOUR WATER DISPENSER ............................................ 7
Checking Points .....................................................................................
7
Replacing the Bottles ..............................................................................
7
Temperature Control ...............................................................................
8
PROPER CARE AND CLEANING ........................................................8
General ................................................................................................
8
Cleaning the Condenser Coils .................................................................
9
Moving and Storage ..............................................................................
9
TROUBLESHOOTING GUIDE ............................................................10
FREQUENTLY ASKED QUESTIONS ...................................................11
WARRANTY......................................................................................12
3
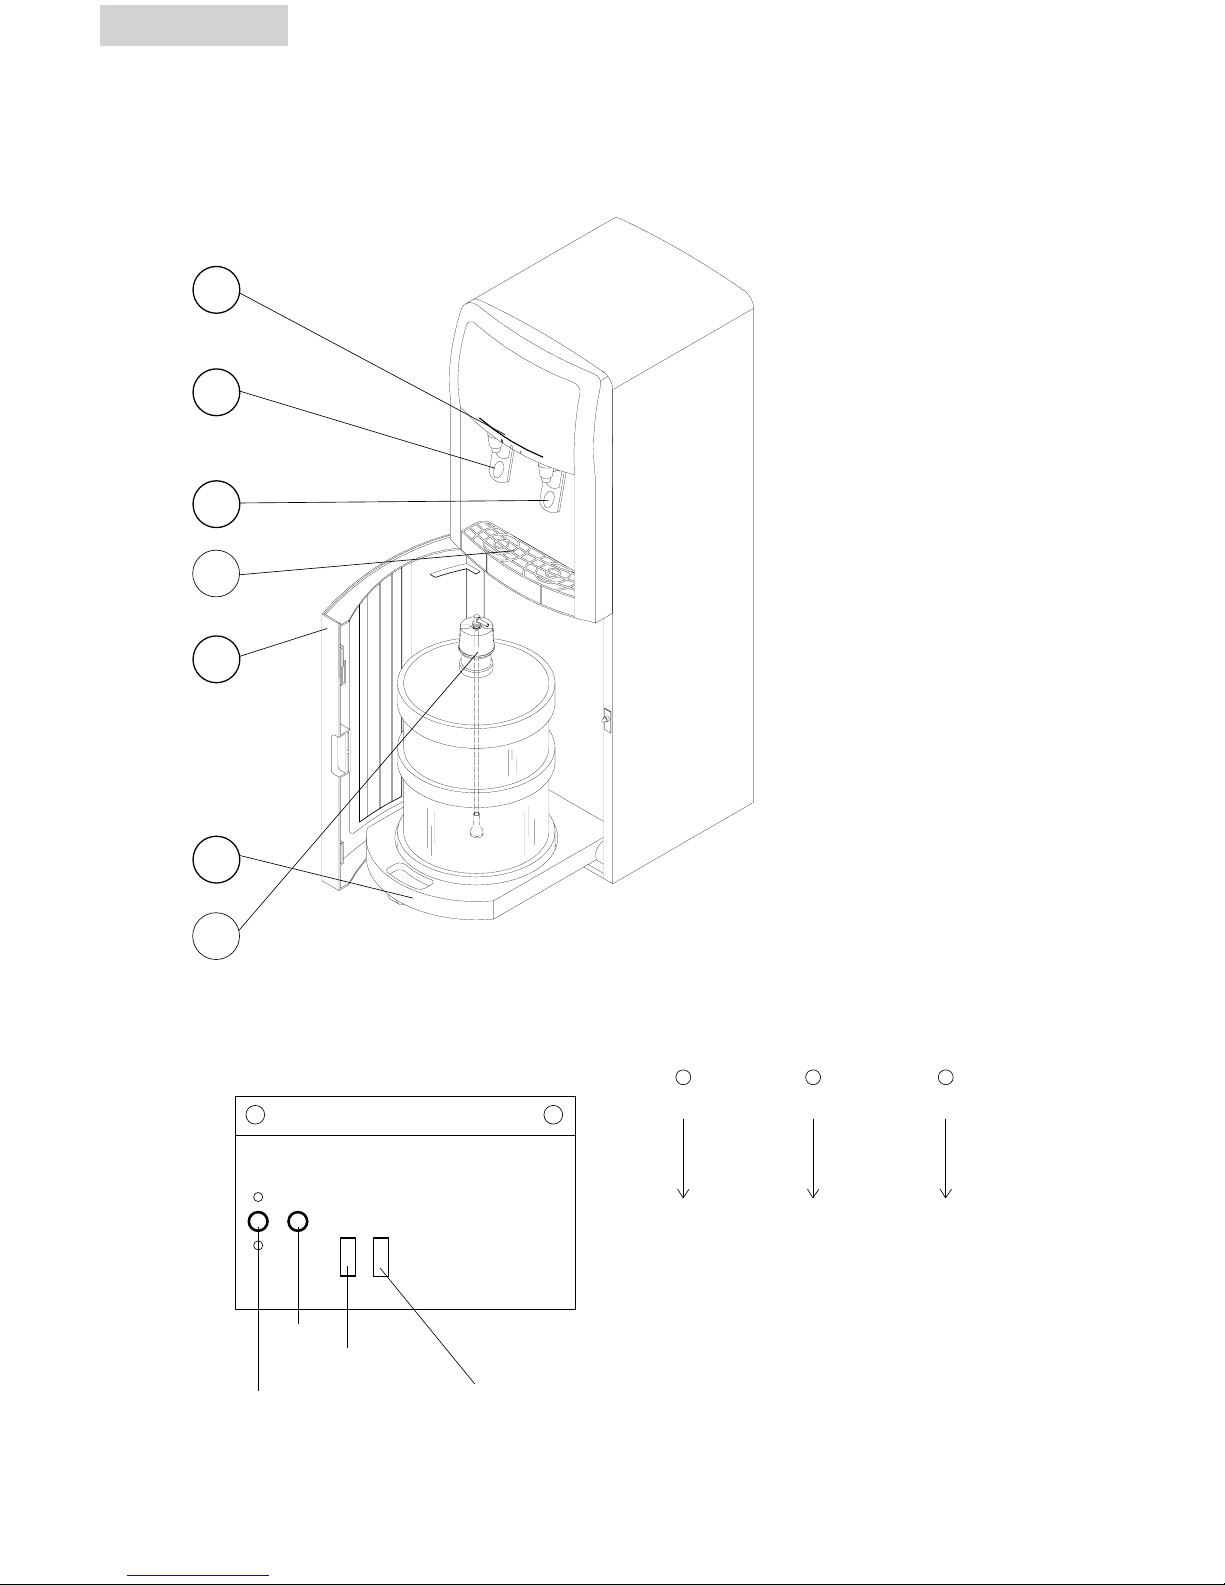
PARTS AND FEATURES
1. Display LED
2. Hot Tap (Red)
3. Cold Tap (Blue)
4. Removable Drip Try
5. Front Door
6. Bottle Guide
(On wheels not shown)
7. Suction Pipe
(Bottle not included)
FRONT VIEW
1
2
3
4
5
6
7
REAR VIEW
English
DISPLAY LED
HOT
RED
EMPTY
YELLOW
COLD
GREEN
Thermostat
(Service Only)
Hot Switch
Cold Switch
* not available on all models
Fuse

UNPACKING
1. Remove all packing materials. This includes the foam and all adhesive tape
holding the accessories inside and outside.
2. Inspect and remove any remaining packaging, tape and printed material
before turning on the water dispenser.
Note: Allow the water dispenser to stand in an upright position for at least
10 hours before turning on the power.
PROPER LOCATION
• To ensure that your water dispenser works at the maximum efficiency it was
designed for, you should install it in a location where there is proper air
circulation and electrical connections.
• Maintain a sufficient distance (about 6-7 inches, 15cm) between the wall and
the back of the unit. Avoid locating the water dispenser in direct contact with
sunlight, water and heating units. Room temperature should not exceed 90˚F
(32˚C) or drop below 32˚F (0˚C) for optimal functioning.
• Select a suitable location for the unit on a hard even surface away from direct
sunlight and heat sources (e.g., radiators, baseboard heaters, cooking
appliances, etc.).
Note: Hot and cold water will not be instantly available as the unit will need
time to heat up and cool down the water.
CAUTION: DO NOT turn on “Hot Water Switch” and the
“Cold Water Switch” (not on all models) in the rear
of the water dispenser until water flows through
both Hot and Cold water faucets.
English
4

5
ELECTRICAL CONNECTIONS
GROUNDING INSTRUCTIONS
This appliance must be grounded. In the event of an electrical short circuit,
grounding reduces the risk of electric shock by providing an escape wire for the
electric current. This appliance is equipped with a cord containing a grounding
wire and a grounded plug. The plug must be inserted into an outlet that is
properly installed and grounded.
• Improper use of the plug may result in the risk of electric shock.
• Consult a qualified electrician or service technician if the grounding
instructions are not completely understood or if in doubt as to whether
the appliance has been properly grounded.
WIRING REQUIREMENTS
This appliance must be plugged into a 15A 115V~60Hz
GROUNDED OUTLET.
Note: Where a standard two-prong outlet is encountered, it is the personal
responsibility and obligation of the consumer to have it replaced with a
properly grounded three-prong outlet.
EXTENSION CORDS
We do not recommend the use of an extension cord with this unit.
English
English
6
ASSEMBLY INSTRUCTIONS
Read carefully and understand all installation instructions before installing the
water dispenser.
Installing Your Water Dispenser
1. Open the front door.
2. Untie the wire that holds the suctions pipe.
3. Remove the protective vinyl bag from the suction pipe.
4. Remove the plastic seal from a 5 gallon water bottle.
- Place the water bottle on the middle of the Bottle Guide.
5. Then insert the suction pipe in the water bottle and make sure the cap is secure
on the bottle.
6. Roll back into the Cabinet. (Please install bottles that are at least half full.)
7. Close the Front Door.
8. After inserting the power plug into a dedicated – 115V~60Hz power source
you should hear a pumping sound. For the first 5 seconds, the pump sound is
quite noticeable. This is normal so do not be alarmed. After 5
seconds, the sound will fade. Pump will start to supply water to tank.
9. After approximately 7 minutes, or when the water can dispense water from the
hot water tap, turn on the hot water switch in the back of the unit. The
cooling system will begin to operate as soon as the power cord is plugged in.
On some models, you need to turn on the cold water switch in the back of the
unit as well.
10. If the water level has not reached full level over a 10-minute period while the
pump is operating, the pump will stop, the “Empty” indicator light will flash,
and the unit will begin beeping.
11. When you open the door, the “Empty” indicator light will turn off and the
beeping will stop.
12. Please replace with a full bottle of water.
NOTE: Careful and proper handling of the tube, suction pipe and
bottle guide will ensure a longer lasting unit.
POWER INTERRUPTIONS
Occasionally, there may be power interruptions due to thunderstorms
or other causes. Remove the power cord from wall outlet when a power
outage occurs. When power has been restored, re-plug the power cord
into wall outlet.

7
English
OPERATING YOUR WATER DISPENSER
This water dispenser maintains instant hot and cold water for your drinking and
cooking needs. It accepts 5 gallon water bottles.
Note: The hot (red) water button is equipped with a child safety lock to
prevent accidental spilling of hot water. To release the hot water flow, the
lever must be pushed along with the child safety button, which is located
right over the water release tap.
Caution! Be careful when carrying hot water in your cup or container to avoid
any injury or harm from spills.
Display Indicator Lights:
HOT - Red COLD - Green EMPTY - Yellow
CHECKING POINTS
1. Check if the correct voltage is supplied to the cooler. (115V~60Hz)
2. Check if the cold indicator light turns “ON” when plugging the electric cord
into the wall outlet.
3. Check if the door is closed or not.
Note: If door is not closed, the pump will not operate.
4. Check if the pump works properly by installing a water bottle and closing the
door.
5. Check if display LED lights up correctly.
Note: When first plugged in (Power On), the Cold indicator light will be ON.
When Hot Switch is turned on, the Hot Indicator light will be ON.
REPLACING THE BOTTLES
1. When water bottle is empty, the empty LED will start blinking and the
unit will alert you with a beep.
2. Open the Front Door.
3. Roll the Bottle Guide out of the Cabinet.
4. Remove the cap with the suction pipe from the empty bottle and remove empty
bottle from the Bottle Guide.
5. Place a new 5 gallon water bottle upright on the Bottle Guide, insert the
suction pipe in the bottle, secure the cap and roll it back into the Cabinet.
6. Close the Front Door.
8
English
TEMPERATURE CONTROL
HOT WATER
The water in the hot tank is heated by a band type heater. A temperature sensor
(Bi-metal) is attached to the hot water tank, which controls the water temperature.
A secondary over-heating prevention sensor (Bi-metal) is attached to the hot water
tank, which will prevent the heater from overheating.
Please turn off the hot water switch on the back panel when not using hot water.
COLD WATER
The water in the cold water tank is cooled by a Compressor Cooling System. The
temperature of cold water is sensed and controlled by a thermostat. The cooling
time depends on the environmental conditions where water dispenser is used.
PROPER CARE AND CLEANING
Caution! Before using any cleaning product, always read and follow the
manufacturer’s instructions and warnings to avoid personal injury
and/or product damage.
Note: It is best to clean the unit and its surrounding area in between
replacing the empty bottle with a new one. This way you can move the
unit easily without the weight of the bottle.
GENERAL
• Prepare a cleaning solution of 3-4 tablespoons of baking soda mixed with
warm water. Use a sponge or a soft cloth dampened with the cleaning solution
to wipe down the unit.
• Wipe with clean warm water and dry with a soft cloth.
• Do not use harsh chemicals, abrasives, ammonia, chlorine bleach,
concentrated detergents, solvents or metal scouring pads. Some of
these chemicals may dissolve, damage and/or discolor the unit.
• The spilled water in the drip tray must be removed regularly and cleaned
properly to avoid any bacteria and residue build-up.
• We recommend that you clean the water dispenser at least twice a year.
When cleaning, you do not need to take anything apart.
WARNING!
Always unplug the unit before cleaning
to avoid electric shock. Failure to do so
may result in death or injury.

English
9
CLEANING THE CONDENSER COILS
• We recommend that you move the dispenser away from the wall and vacuum
or brush the coils on the rear of the unit at least 4 times a year. Some operat
-
ing environments may require more frequent cleaning.
MOVING AND STORAGE
• Turn off the hot switch on the back of the unit and unplug your Water Dispenser
before moving it to another location.
• Remove water bottle from the cabinet prior to relocating the dispenser.
• If you will be storing your Water Dispenser, completely drain all the water from
the tanks via the Hot and Cold Water tap and hot drain valve to prevent the
remaining water from stagnating.
• With a soft cloth, dry the moisture left on each part of the dispenser.
• Pack the dispenser into the corrugated box with the Styrofoam used for
shipping to prevent the dispenser from being damaged and contaminated by
foreign substances.

TROUBLESHOOTING GUIDE
Problems are sometimes caused by simple “faults” that can be easily
corrected with or without the help of a service technician by first checking
a few basic remedies. The following can be helpful for diagnosis of the
problem and solution:
Appliance does not operate
• Is the power supply cut off? Check another electrical appliance at the electrical
outlet, or check fuse on the back of the unit. If needed, replace the fuse with a
250V 8AMP.
Note: Remove power cord from outlet before replacing fuse.
Cooling efficiency is poor
• Check if the unit is placed close to stove or heater. Place the unit away from
these heat sources.
• Check if the unit is placed close to wall. Leave some space between the back
of the unit and the wall.
• Are there any unnecessary objects around the unit? Remove all the objects.
• Check if the ambient temperature is too high. Regulate the ambient
temperature properly.
Heating efficiency is poor
• Check if the heater switch is set to the “OFF” position. Set the switch to “ON.”
• Check if the ambient temperature is too low. Regulate the ambient
temperature properly.
Generates abnormal noises
• Is the appliance placed on an uneven floor? Position the appliance on a firm
and even surface.
• Is there an obstacle at the back of the appliance? Remove the obstacle.
Pump does not work
• If front door is not closed, the pump will not operate. Please make sure
door is closed.
Drinking water does not flow well
• Check if the water tank is empty. Make sure that the pump operates properly
and that the water bottle has enough water.
• Check if the water flow pipe and the lever are clean and unblocked.
Clean the pipe and the lever.
10
English

11
English
FREQUENTLY ASKED QUESTIONS
About Bottle Replacement
Do I have to open the Front Door to see if the Bottle is empty?
No. “Empty Indicator” and “Beep” sound will let you know when it is empty.
When do I replace the bottles?
When there is a beep and the empty LED display starts blinking.
Why do I sometimes hear the Beeping Alarm even though the
Bottle is not empty ?
This happens when you dispense water for more than 5 minutes at a time. The
“Beep” is designed to work when tank is not full after the pump has been
operating for 10 minutes.
How do I stop the Alarm?
Just reset the Dispenser by opening and closing the front door.
Will the Beep sound again after I replace the empty Bottle with a
new one?
No, a microprocessor in the dispenser knows that you’ve replaced the bottles
since you opened and closed the “Front Door.” So you won’t hear the “Beep”
again after replacing the bottles because the pump will work for 10 minutes,
which is enough time for the pump to refill the both hot & cold water tanks.
Could I drink the last drop of the water in the “Bottle”?
No, you couldn’t. A couple of cups of water left in the bottle won’t be drinkable
because the bottom of the bottle is not flat, so it is impossible for the absorption
tube to absorb the last drop of the water in the bottle.
If you need service, please first see the “Troubleshooting” section of
the User Manual. After checking “Troubleshooting,” additional help
is available by calling 1-866-955-AQUA (2782).

12
Limited Warranty
What is covered and for how long?
This warranty covers all defects in
workmanship or materials for a period of:
12 months for labor
12 months for parts
(Functional Parts Only)
5-Year Sealed System
The warranty commences on the date of item
purchase. Customer shall provide proof of the
date of purchase and the original receipt along
with; brand, model and serial number for
verification prior to any warranty service
being provided.
Carry-In Service is available for
selected products at our discretion.
EXCEPTIONS: Commercial or Rental Use
warranty
90 days for labor 90 days for parts
No other warranty applies.
What is covered:
1. The mechanical and electrical parts of the
appliance that serve the functional purpose
of this appliance are covered for a period
of 12 months or as stated above. This
includes all parts except finish, trim and
glass.
2. The limited warranty does not cover any
credit or refund for any loss or injury caused
by the product or defects to the product
including but not limited to incidental or
consequential damages.
3. The components of the sealed system e.g.
hermetic compressor, condenser, and
evaporator from manufacturing defects for
a period of 5 years from date of purchase.
Any damages to such components caused
by mechanical abuse or improper handling
or shipping will not be covered.
What will be done:
1. Any mechanical or electrical part that
proves to be defective in normal usage
during the specified warranty period will be
repaired or replaced at our discretion.
ALL WARRANTY SERVICE MUST BE PROVIDED
BY ONLY OUR FACTORY SERVICE CENTERS,
OR BY AN AUTHORIZED CUSTOMER
TECHNICIAN.
If it is determined that repair is not
appropriate or replacement parts are
unavailable for repair, we will exchange the
product with a refurbished or new product the
same or similar to the original at its discretion.
2. There will be no charge to the purchaser for
functional replacement parts and labor on
any covered items during the initial
12- month period or as stated above.
3. THIS WARRANTY COVERS APPLIANCES
WITHIN THE CONTINENTAL UNITED
STATES, PUERTO RICO AND CANADA. IT
DOES NOT COVER THE FOLLOWING:
Damages from improper installation. Damages
incurred during shipping. Defects other than
manufacturing. Damage from misuse, abuse,
accident, alteration, lack of proper care and
maintenance or incorrect current or voltage
or acts of God. Damage from other than
household use. Damage from service by other
than an authorized dealer or service center.
Decorative trims, glass or replaceable light
bulbs. Transportation and shipping costs. Labor
(after the initial 12 months). Credit or Refund
for products over 30 days past date of
purchase Food loss for food spoiled as a direct
result of mechanical failure of the product
or of any delay in providing service, repair,
replacement. This limited warranty doesn’t
apply to refurbished product or unit purchased
as/like new or second-hand. THIS LIMITED
WARRANTY IS GIVEN IN LIEU OF ALL OTHER
WARRANTIES, EXPRESSED OR INCLUDING
THE WARRANTIES OF MERCHANTABILITY
AND FITNESS FOR A PARTICULAR PURPOSE.
The remedy provided in this warranty is
exclusive and is granted in lieu of all other
remedies. This warranty does not cover
incidental or consequential damages, so the
above limitations may not apply to you. Some
states do not allow limitations on how long an
implied warranty lasts, so the above limitations
may not apply to you. This warranty gives you
specific legal rights, and you may have other
rights, which vary from state to state.
Distributed by Haier America,
New York, NY 10018
To have your product serviced, please
call 1-866-955-AQUA (2782).
English

13 14
Français
CONSIGNES DE SÉCURITÉ
Lorsque vous utilisez cet appareil, veillez à toujours respecter les
consignes de sécurité les plus élémentaires, les suivantes:
1. Lisez toutes les instructions avant d’utiliser cet appareil.
2. Utilisez cet appareil uniquement pour l’usage auquel il est destiné comme
indiqué dans ce manuel.
3. Cette fontaine d’eau réfrigérée doit être montée conformément aux
instructions d’installation avant de l’utiliser. Voir les instructions de la section
d’installation.
4. Ne débranchez jamais votre fontaine d’eau réfrigérée en tirant sur le câble
d’alimentation. Saisissez fermement la fiche et tout droit sur cette dernière.
5. Remplacez immédiatement tout cordon ou câble électrique effiloché ou
endommagé. Veillez à ne pas utiliser un câble présentant des craquelures ou
des abrasions au du cordon, de la fiche ou de l’extrémité du connecteur.
6. Débranchez la fontaine d’eau réfrigérée avant de la nettoyer de la réparer.
Remarque: Si pour une raison ou pour une autre, cet appareil doit être
réparé, il est fortement agréé effectue la réparation.
7. Cette fontaine d’eau réfrigérée ne doit pas être placée en retrait ou encastré
à l’intérieur d’une cavité armoire. Cet être placé tout seul et sans support.
8. Cet appareil doit être utilisé À L’INTÉRIEUR UNIQUEMENT et ne doit en
aucun cas être utilisé à l’extérieur.
9. N’utilisez pas la fontaine d’eau réfrigérée en présence de explosives.
10. Il est nécessaire de surveiller attentivement les enfants lorsque vous utilisez
cet appareil à proximité des enfants.
11. Pour éviter tout risque d’électrocution, ne pas immerger le câble électrique,
la fiche ou toutes autres pièces de la réfrigérée l’eau ou tout autre liquide.
CONSERVEZ CES INSTRUCTIONS
Afin de pouvoir les consulter ultérieurement
Agrafez le reçu de vente sur votre notice. Vous en aurez besoin afin de
bénéficier de la couverture offerte par la garantie.
Nous vous remercions d’avoir fait
l’achat de cet appareil. Cette
notice facile à consulter vous aidera
à utiliser au mieux votre fontaine
d’eau réfrigérée.
N’oubliez pas de noter le modèle
et numéro de série. Ces derniers se
trouvent sur une étiquette au dos de
l’appareil.
Numéro du modèle
Numéro de série
Date d’achat

Français
TABLE DES MATIERES
PAGE
MESURES DE SECURITE ....................................................................13
PARTIES ET CARACTERISTIQUES ......................................................15
DEBALLAGE ......................................................................................16
Location Appropriee .............................................................................
16
CONNECTIONS ELECTRIQUES ..........................................................17
Instructions de Mise a terre ...................................................................
17
Conditions des cables ..........................................................................
17
Les Rallonges .......................................................................................
17
INSTRUCTIONS D’ASSEMBLEE .........................................................18
Insallez votre distributeur d’eau .............................................................
18
Interruptions de Puissance .....................................................................
18
OPEREZ VOTRE DISTRIBUTEUR D’EAU ............................................19
Points a Vérifier ...................................................................................
19
Remplacer les Bouteilles ........................................................................
19
Reglage de la temperature ....................................................................
20
ENTRETIENS ET NETTOYAGE ............................................................20
Generale ............................................................................................
20
Nettoyez les Enroulements de Condensateur ...........................................
21
Déménagement et Entreposage ..............................................................
21
PROBLÉMS ET SOLUTIONS ..............................................................22
QUESTIONS FREQUEMMENT POSEES .............................................23
GARANTIE LIMITÉE ...........................................................................24

Français
15 16
PARTIES ET CARACTERISTIQUES
1. Voyant lumineux
2. Robinet d’eau chaude
(Rouge)
3. Robinet d’eau froide
(Bleu)
4. Bac de récupération
amovible
5. Porte
6. Guide bouteille
(Sur roues, non montré)
7. Conduite d’aspiration
(Bouteille non incluse)
VUE AVANT
1
2
3
4
5
6
7
VUE ARRIÈRE VOYANT LUMINEUX
CHAUD
ROUGE
VIDE FROID
VERTJAUNE
Thermostat
(Service uniquement)
Bouton d’eau chaude
Bouton d’eau froide
*non disponible sur tous les modèles
Fusible

DEBALLAGE
1. Retirez tout le materiel d’emballage. Ceci inclus le socle en mousse et tout le
ruban adhesif retenant les accessoires a l’interieur et l’exterieur .
2. Inspectez et retirez le reste d’emballage, le ruban adhesif et les documents
avant de mettre en marche le distributeur d’eau.
Note: Laissez le distributeur d’eau dans une position debout pour
10 heures avant de le mettre en marche.
LOCATION APPROPRIEE
• Pour assurer que votre distributeur d’eau fonctionne a l’efficacite maximum qu’il
a ete concu pour, vous devriez l’installer dans un endroit ou il y a une
circulation d’air appropriee et des raccordements electriques.
• Maintain a sufficient distance (about 6-7 inches, 15cm) between the wall and
the back of the unit. Avoid locating the water dispenser in direct contact with
sunlight, water and heating units. Room temperature should not exceed 90˚F
(32˚C) or drop below 32˚F (0˚C) for optimal functioning.
• Placez votre distributeur sur une surface plate et egale, loin de la lumiere du
soleil et des sources de chauffage, (par exemple, radiateurs, les appareils de
chauffage, les appareils de cuisine , etc.)
Note: Hot and cold water will not be instantly available as the unit will need
time to heat up and cool down the water.
ATTENTION: Ne branches pas votre distributeur d’eau
jusqu’a ce que l’eau traverse dans les
robinets d’eau chaude et froide.
Français

17 18
Français
CONNEXIONS ELECTRIQUES
INSTRUCTIONS DE MISE-A TERRE
Cet unite doit etre mis a terre. En cas d’un court circuit electrique, la mise en
terre reduira le risque d’un choc electrique en fournissant un fil d’evasion pour
le courant electrique . Cet appareil est equipe avec une corde contenant un fil de
masse et une prise fondee. La prise doit etre inseree dans une sortie qui est
correctement installee et fondue.
• L’usage impropre de la prise peut resulter par un risque de decharge
electrique
• Consultez un electricien qualifie ou un technicien si les instructions
de mise a terre ne sont pas completement comprises ou en cas de
doute si l’appareil a ete correctement fondu.
CONDITIONS DE CABLAGE
Cet unite doit etre branche a une sorte de 15A 115V~60Hz. SORTIE AU SOL.
Note: La ou une sortie a 2 broches de la norme est
produite, c’est la responsabilite et l’engagement
personnels du consomateur de le faire remplacer
avec une sortie correcte a 3 broches.
RALLONGES
Nous ne recommandons pas l’usage des rallonges pour cet unite.

Français
INSTRUCTIONS D’ASSEMBLEE
Lisez attentivement et comprenez toutes les instructions avant d’assembler votre
distributeur d’eau.
Insallez votre distributeur d’eau
1. Ouvrez la porte.
2. Déserrez le fil qui retient la conduite d’aspiration.
3. Retirez le vinyle de protection de la conduite d’aspiration.
4. Retirez le sceau en plastique d’une bouteille d’eau de 20 litres (5 gallons).
Placez la bouteille d’eau au milieu du guide bouteille.
5. Insérez le tuyau d’aspiration dans la bouteille d’eau et assurez-vous que le
bouchon est bien sur la bouteille.
6. Retournez-la sur la carrosserie. (Veuillez installer des bouteilles qui sont au
moins à moitié pleines.)
7. Fermez la porte.
8. Après avoir inséré la fiche dans une prise murale 115V/60 Hz vous
entendrez un bruit de pompe. Pendant les 5 premières secondes, le bruit de
pompe s’entend assez bien. Ceci est normal alors ne vous inquiétez pas.
Après 5 secondes, le bruit diminuera. La pompe commencera à fournir de
l’eau au réservoir.
9. Après environ 7 minutes, si l’eau chaude sort du robinet d’eau chaude,
appuyez sur le bouton rouge et à ce moment là uniquement, appuyez
sur le bouton « Bouton d’eau chaude » à l’arrière de l’appareil. Le système de
refroidissement commencera à fonctionner dès que la fiche sera insérée dans
la prise murale. Pour activer le « Bouton d’eau froide » situé à l’arrière doit
être en marche.
10. Si le niveau d’eau n’a pas atteint son niveau maximum en 10 minutes de
fonctionnement de la pompe, la pompe s’arrêtera, l’indicateur « Vide »
clignotera et l’appareil commencera à émettre un bip.
11. Lorsque vous ouvrez la porte, l’indicateur « Vide » s’éteindra et le bip
s’arrêtera.
12. Veuillez remplacer avec une bouteille d’eau pleine.
REMARQUE: La manipulation soigneuse et appropriée du tube, du
tube d’aspiration et du guide de bouteille assurera une
plus longue unité durable.
INTERRUPTIONS DE PUISSANCE
Occasionellement il se peut qu’il y ait des interruptions de puissance
dues aux orages ou autres causes. Debranchez la corde d’alimentation
de la sortie murale quand ceci occure. Quand la puissance est remise,
rebranchez votre corde d’alimentation a la sortie murale.

Français
19
OPEREZ VOTRE DISTRIBUTEUR D’EAU
Ce distribiteur d’eau contient une eau chaude et froide instantanee pour vos
besoins a cuire et potable. Il accepte des bouteilles d’eau de 5 galons.
Note: Le bouton (rouge) d’eau chaude est equippe d’une securite d’enfants
pour empecher le renversement accidentel de l’eau chaude. Pour
degager l’eau chaude, le bouton chaude doit etre appuye sur en meme
temps que le bouton de securite d’enfant qui est situe au dessus du bouton
de degagement d’eau.
Prudence! Faites attention en transportant l’eau chaude dans vos tasses ou
recipients pour eviter n’importe quelles blessures ou endomagements
resultant du renversement de l’eau chaude.
Les Voyants de Signalisation de l’Eau:
CHAUD - Rouge FROID - Vert VIDE - Jaune
POINTS À VÉRIFIER
1. Vérifiez si le voltage est correct. (115V~60Hz)
2. Vérifiez si l’indicateur d’eau froide est en marche, le voyant lumineux affiche
« ON » en marche, lorsque l’appareil est branché.
3. Vérifiez si la porte est fermée ou non.
Remarque: Si la porte n’est pas fermée la pompe ne fonctionnera pas.
4. Vérifiez que la pompe fonctionne correctement en installant une bouteille
d’eau et en fermant la porte.
5. Vérifiez que les voyants lumineux s’allument bien.
Remarque: Lorsque vous branchez pour la première fois, l’indicateur Froid
sera sur ON (Marche). Lorsque le bouton d’eau chaude est mis en marche, le
voyant de l’eau chaude sera sur ON (Marche).
REMPLACER LES BOUTEILLES
1. Lorsque la bouteille est vide, le voyant « Vide » clignotera et l’appareil
émettra un bip pour vous prévenir.
2. Ouvrez la porte.
3. Faites sortir le guide bouteille de l’appareil.
4. Retirez la bouteille vide du guide bouteille.
5. Placez une nouvelle bouteille de 20 litres à l’endroit au milieu du guide
bouteille, insérez la conduite d’aspiration dans la bouteille, sécurisez le
bouchon et replacez-le dans l’appareil.
6. Fermez la porte.

Français
20
RÉGLAGE DE LA TEMPÉRATURE
EAU CHAUDE
L’eau dans le réservoir d’eau chaude est chauffée par une bande chauffante. Un
senseur de température (bi-métal) est attaché au réservoir d’eau chaude et
contrôle la température de l’eau.
EAU FROIDE
L’eau dans le réservoir d’eau froide est refroidie par un compresseur. La
température de l’eau chaude est détectée et contrôlée par un thermostat. Le temps
de refroidissement dépend des conditions climatiques d’où le distributeur est
utilisé.
ENTRETIENS ET NETTOYAGE
Attention! Avant d’employer n’importe quel produit de nettoyage, lisez et
suivez toujours les instructions et les avertissements du fabricant pour
eviter des blessures personnelles et des domages au produit.
Note: Il est mieux de nettoyer le distributeur et ses abords en meme temps que
vous remplacer la bouteille d’eau vide , comme ca vous pouvez bouger
l’unite plus facilement sans le poids de la bouteille pleine.
GENERAL
• Preparez une solution de nettoyage de 3 a 4 cuilleres a soupe de
bicarbonate de soude mélangee avec de l’eau chaude. Utilisez une
eponge ou un tissu trempe dans la solution pour nettoyer l’unite.
• Essuyez a l’aide d’eau tiede et sechez a l’aide d’un tissu doux.
• N’utilisez pas des produits chimiques rauques, abrasifs , de l’ammoniaque, du
decolorant de chlore, des detergents concentres, des dissolvants ou des
tampons en metal. Certains de ces produits chimiques peuvent dissoudre,
endommager ou decolorer l’unite.
• L’eau renversee dans le plateau d’egout doit etre enlevee regulierement et
nettoyee proprement pour eviter l’accumulation de bacterie et residu.
• Nous recommandons que vous nettoyez le distributeur d’eau au moins 2 fois
par an. Quand vous le nettoyez , vous n’avez pas a le demonter. Simplement
versez la solution d’eau de bicarbonate de soude par la garde d’eau.
AVERTISSEMENT!
Toujours débrancher l’unité avant de
nettoyer pour éviter la décharge
électrique. L’échec pour faire si peut
avoir pour résultat la mort ou blessure.

Français
NETTOYEZ LES ENROULEMENTS DE CONDENSATEUR.
• On recommande que vous eloignez le distributeur d’eau loin du mur et
d’aspirer ou balayer les enroulements sur l’arriere de l’unite au moins 4 fois
par an. Quelques environnements peuvent exiger un nettoyage plus frequent.
DÉMÉNAGEMENT ET ENTREPOSAGE
• Éteignez le bouton d’eau chaude à l’arrière de l’appareil et débranchez le
distributeur d’eau avant de déménager.
• Retirez la bouteille d’eau de l’appareil avant de replacer le distributeur.
• Si vous entreposez le distributeur d’eau, videz complètement toute l’eau du
réservoir via le robinet d’eau froide et d’eau chaude et le robinet de vidange
d’eau chaude pour éviter que l’eau stagne.
• Avec un chiffon doux, essuyez le distributeur de toute humidité.
• Emballez le distributeur dans la boîte de carton ondulé avec le polystyrène
utilisé pour le transport pour éviter que l’appareil soit endommagé et contaminé
par des substances étrangères.
21 22

PROBLÈMES ET SOLUTIONS
Les problèmes sont parfois causés par de simples « erreurs » qui peuvent être
facilement corrigées, avec ou sans l’aide d’un technicien, en vérifiant quelques
solutions de base. La liste suivante peut vous aider à diagnostiquer le problème
et trouver la solution:
L’appareil ne fonctionne pas
• Assurez vous que la corde d’alimentation est branchee. Essayez un autre
produit electrique dans la sortie murale, ou examinez le fusible situe au dos de
l’unite. Si necessaire, replacez le avec un autre de 250V 8AMP.
Note: Debranchez la corde d’alimentation avant de replacer le
fusible.
Le refroidissement n’est pas efficace
• Vérifiez si l’appareil est placé près d’une cuisinière ou d’un chauffage. Placez
l’appareil loin de ces sources de chaleur.
• Vérifiez si l’appareil est placé près d’un mur. Laissez de l’espace entre l’arrière
de l’appareil et le mur.
• Est-ce qu’il y a des appareils qui ne sont pas nécessaires autour de l’appareil?
Retirez tous les objets.
• Vérifiez que la température ambiante n’est pas trop élevée. Réglez-la
correctement.
Le chauffage n’est pas efficace
• Vérifiez si l’interrupteur du chauffage est sur « OFF »/Arrêt. Mettez-le sur
« ON »/Marche.
• Vérifiez si la température ambiante est trop élevée. Réglez-la correctement.
Bruits anormaux
• Est-ce que l’appareil est placé sur une surface non plane ? Posez l’appareil sur
une surface plane et ferme.
• Est-ce qu’il y a un obstacle à l’arrière de l’appareil ? Retirez l’obstacle.
La pompe ne fonctionne pas
• Si la porte n’est pas fermée la pompe ne fonctionnera pas. Assurez-vous que la
porte est fermée.
L’eau ne coule pas bien
• Vérifiez si le réservoir d’eau est vide. Assurez-vous que la pompe fonctionne
correctement et que la bouteille d’eau contient assez d’eau.
• Vérifiez que la conduite d’eau et le levier sont propres et non obstrués.
Nettoyez la conduite d’eau et le levier.
Français

23 24
QUESTIONS FRÉQUEMMENT POSÉES
Remplacement des bouteilles
Est-ce que je dois ouvrir la porte pour voir si la bouteille est vide?
No. The “ Beep When Empty Indicator” will let you know when it is empty.
Quand dois-je remplacer les bouteilles?
Quand vous entendez le bip et que le voyant lumineux commence à clignoter.
Pourquoi est-ce que j’entends parfois le bip de l’alarme même si
la bouteille n’est pas vide?
Cela se produit lorsque le distributeur délivre de l’eau pendant plus de 5 minutes
à la fois. Le bip est conçu pour se mettre en marche lorsque le réservoir n’est pas
plein après que la pompe ait fonctionné pendant 10 minutes.
Comment est-ce que j’arrête l’alarme ?
Réenclenchez le distributeur en ouvrant et fermant la porte.
Est-ce que le bip s’arrêtera une fois que j’aurai remplacé la
bouteille vide par une bouteille pleine ?
Non, un microprocesseur dans le distributeur sait que vous avez remplacé les
bouteilles puisque vous avez ouvert et fermé la porte. Vous n’entendrez donc plus
le bip après avoir remplacé les bouteilles parce que la pompe va marcher
pendant 10 minutes et c’est assez de temps pour que la pompe remplisse le
réservoir d’eau chaude et le réservoir d’eau froide.
Est-ce que je pourrai boire la dernière goutte d’eau de bouteille ?
Non. Le fond de la bouteille n’est pas buvable car le fond n’est pas plat. Il est
donc impossible pour le tube d’absorption d’absorber la dernière goutte d’eau
de la bouteille.
Français
Au cas ou vous avez besoin du service, veuillez voir la section
“Depannage” dans le manuel de l’utilisateur.
Apres avoir examiner la section “Depannage”, une aide
supplementaire est disponible en appellant ce numero.
1-866-955 –AQUA (2782)

Garantie Limitée
Que recouvre la garantie et pour
combien de temps?
Cette garantie couvre tous les defauts de fabrication ou des materiaux pour une periode de:
12 mois pour la main-d’oeuvre
12 mois pour les pieces ( Pieces fonctionnelles
seulement)
5 ans pour le systemer scelle .
Cette garantie prend effet le jour de la date
d’achat de l’article. La facture originale de
l’achat doit etre presentee avec la marque, les
numeros de serie et du model comme
verification avant d’effectuer toute reparation.
Un service de est disponible pour les produits
choisis sous notre discretion.
Exceptions: garantie pour une utilisation
commerciale ou en cas de location
90 jours pour la main-d’oeuvre , 90 jours pour
les pieces
Aucune autre garantie ne s’applique
Qu’est-ce qui est couvert?
Les pieces mecaniques et electriques de cet
appareil quis servent au bon fonctionnement
de cet appareil sont sous garantie pendant
une periode de 12 mois. Ceci inclus toutes les
pieces a l’exception de la finition , la verrerie
et l’habillage .
La garantie ne couvre aucun credit ou
remboursement pour n’importe quelle perte ou
blessures causes par le produit ou defauts au
produit , y compris mais non limitee aux
dommages incidentels ou consecutifs
Les elements du systeme scelle, par ex: le
compresseur hermetique, le condenseur et
l’evaporateur sont garantis contre tout vice de
fabrication pour une periode de 5 ans a partir
de la date d’achat. Tout dommage de ces
pieces cause par une utilisation excessive, une
manutention incorrecte ou durant le transport
ne sera pas couvert.
Qelles mesures seront prises?
1. Nous resevons le droit de reparer ou de
remplacer toute piece mecanique ou
electrique defectueuse lors d’une utilisation
normale pendant la periode de garantie
specifiee.
TOUTE SORTE DE SERVICE DOIT ETRE
FOURNI PAR NOS CENTRES COMMERCIAUX
D’USINE OU PAR UN TECHNICIEN
AUTORISE.
S’il est determine qu une reparation n’est pas
approriee ou les pieces de remplacement sont
indisponibles pour la reparation, nous
echangerons le produit avec un produit
refourbi ou un nouveau produit de meme
valeur ou semblable a l’original sous notre
discretion.
2. Nous ne chargerons pas l’acheteur pour le
replacement des pieces fonctionnelles ou
pour la main-d’oeuvre durant la periode
initiale de 12 mois ou comme declare
ci-dessus. .
3. CETTE GARANTIE COUVRE LES APPAREILS
SUR LE CONTINENT DES ETATS-UNIS ,
PUERTO RICO ET CANADA… ELLE NE
COUVRE PAS LES SUIVANTS:
Les dommages dus a une mauvaise installation,
Les dommages survenus pendant le transport.
Les dommages autre que ceux de fabrication.
Les dommages dus a une mauvaise utilisation,
a une utilisation excessive, a un accident, a
une alteration, au manque d’entretien et soins,
ou une utilisation incorrecte du courant ou
voltage ou a un acte de Dieu.
Les dommages autres que l’usage de ménage.
Les dommages d’un service de reparation
effectues par une personne autre que le
service de centre autorise.
La main –d’oeuvre ( apres les 12 mois initials)
Un credit ou remboursement de l’unite apres
les 30 jours de la date d’achat .
A la nourriture gatee comme resultat direct
d’une faillite mecanique du produit , ou du
delai du centre du service pour une reparation
ou replacement.
Cette garantie n’applique pas aux unites
refourbis achetes comme nouveau ou deuxieme
main.
CETTE GARANTIE EST DONNEE AU LIEU
ET EN PLACE DE TOUTE AUTRE GARANTIE,
EXPRIMEE Y COMPRIS LES GARANTIES DE
MERCHANTABILITE ET D’APTITUDE POUR UN
BUT PARTICULIER.
Le remede fourni dans cette garantie est
exclusif et accorde au lieu et en place de
tout autre remede. Cette garantie ne couvre
pas les dommages indirects ou secondaires.
Dans ce cas les limitations ci-dessus mentionnees peuvent ne pas etre applicables a vous.
Certains Etats n’autorisent pas les limitations
sur la duree d’une garantie implicite. Dans ce
cas les limitations ci-dessus peuvent ne pas etre
applicables . Cette garantie vous reconnait
certains droits juridiques, il est possible que
vous disposiez d’autres droits qui varient d’un
etat a l’autre.
Distribue par Haier America
New York, NY 10018
Pour le service de votre produit, veuillez
contacter 1-866-955-AQUA (2782)
Français

25 26
PRECAUCIONES DE SEGURIDAD
Siempre que opere esta unidad tenga en cuentas las normas
básicas de seguridad incluyendo las siguientes:
1. Lea todas las instrucciones antes de utilizar esta unidad.
2. Utilice esta unidad sólo para su uso entendido, como se describe en este
manual y guía de cuidados.
3. Este Dispenser de agua debe instalarse adecuadamente de acuerdo a las
instrucciones provistas en este manual antes de utilizarse. Vea las
instrucciones de conexión a tierra.
4. Nunca desenchufe esta unidad tirando del cable. Siempre sostenga
firmemente el enchufe y tire hacia atrás.
5. Repare o reemplace inmediatamente los cables de corriente que estén
dañados o presenten abrasiones. No utilice cables que muestren rajaduras
a lo largo del mismo ni enchufes o conectores dañados.
6. Desenchufe la unidad antes de limpiar o antes de hacer alguna reparación.
Nota: Si por alguna razón este producto necesita ser reparado nosotros
recomendamos que la reparación sea realizada por un service
calificado.
7. Este dispenser no debe ubicarse en un gabinete cerrado. Esta diseñado
para la instalación libre únicamente.
8. No opere el dispenser en presencia de gases explosivos.
9. Se necesita una supervisión cercana cuando es operado por chicos.
10. Para protegerse de shocks eléscricos no sumerja el cable, enchufe o alguna
otra parte del dispenser en agua u otros líquidos.
11. Para proteger contra el golpe eléctrico, no sumerge la cuerda, el tapón, ni
cualquier otra parte del abastecedor de agua en el agua ni otros líquidos.
GUARDE ESTAS INSTRUCCIONES
para futura referencia

EspañolEspañol
Gracias por utilizar producto. Este
manual de fácil uso lo guiará para
obtener los mejores resultados de
este producto.
Recuerde de tomar nota del modelo
y número de serie. Estos se encuentran en la etiqueta en la parte
trasera de la unidad.
Número de modelo
Número de serie
Fecha de compra
Adjunte la factura de compra a este manual.
La misma será necesaria para hacer uso de los servicio de garantía.

27 28
INDICE DE MATERIAS
PAGE
MEDIDAS DE SEGURIDAD ................................................................25
PARTES Y CARACTERÍSTICAS ...........................................................
28
DESEMPAQUE ..................................................................................
29
Ubicacion Adecuada ...........................................................................29
CONEXION ELECTRICA ....................................................................
30
Instrucciones de conexión a tierra ..........................................................30
Requerimientos de cableado .................................................................30
Cables alargues ...................................................................................30
INSTRUCCIONES DE ENSAMBLE ......................................................
31
Instalando el Dispenser de aguar ...........................................................31
Interrupciones de energía .....................................................................31
OPERANDO EL DISPENSER ..............................................................
32
Puntos de Control .................................................................................32
Reemplazo de los Botellones .................................................................32
CUIDADO Y LIMPIEZA ADECUADA .................................................
33
General ..............................................................................................33
Limpiando el condensador ....................................................................34
Vacaciones y ausencias largas ..............................................................34
GUIA DE SOLUCIONES DE PROBLEMASE .......................................
35
FREQUENTLY ASKED QUESTIONS ...................................................
37
WARRANTY......................................................................................38

EspañolEspañol
PARTES Y CARACTERÍSTICAS
1. Indicador luminoso
2. Grifo de agua caliente
(rojo)
3. Grifo de agua fría (azul)
4. Bandeja para goteo
extraíble
5. Puerta frontal
6. Guía para la botella (no
se muestran las ruedas)
7. Tubo de succión
(no se incluye la botella)
VISTA FRONTAL
1
2
3
4
5
6
7
VISTA POSTERIOR INDICADOR LUMINOSO
CALIENTE
ROJO
VACÍO
AMARILLO
FRÍO
VERDE
Termostato (sólo para servicio técnico)
Interruptor para agua caliente
Interruptor para agua fría
*no disponible en todos los modelos
Fusible

29 30
DESEMPAQUE
1. Retire todos los elementos del embalaje. Esto incluye plásticos y cintas
adhesivas que sujetan los accesorios.
2. Inspeccione que no haya quedad ningún elemento del embalaje, materiales
impresos o accesorios antes de descartar.
Nota: permita que el dispenser de agua esté en posición vertical por al menos
10 horas antes del encendido.
UBICACIÓN ADECUADA
• Para asegurar que el funcionamiento de la unidad sea óptimo usted debe
instalar el dispenser en un lugar provisto de las conexiones eléctricas
adecuadas y con buena circulación de aire.
• Seleccione una ubicación para la unidad donde la superficie sea resistente y
lejos de la luz directa del sol y fuentes de calor. (por ejemplo radiadores,
calentadores, artefactos de cocina)
Nota: El agua caliente y fría no estará disponible al instante, sino que será
necesario unas horas para que el agua se enfríe o caliente luego del
encendido de la unidad.
PRECAUCION:
No enchufe la unidad hasta que el agua fluya
de ambas canillas, fría y caliente.

EspañolEspañol
CONEXIÓN ELECTRICA
INSTRUCCIONES DE CABLEADO A TIERRA
Este artefacto debe ser conectado a tierra. En el caso de un corte en los circuitos
la conexión a tierra reduce en riesgo de un shock eléctrico a través de un cable
de escape de corriente. Esta unidad posee un cable y enchufe con conexión a
tierra. La toma de corriente debe estar adecuadamente instalada a tierra.
• El uso inadecuado del enchufe puede ser causa de shock eléctrico
• Consulte a un técnico electricista o técnico si las instrucciones de
conexión no son entendidas en su totalidad o si hay dudas de que se
haya realizado una conexión satisfactoria.
REQUERIMIENTO DE CABLEADO
Enchufe la unidad a una toma de 15A 115V~16Hz Y CONEXIÓN A TIERRA.
Nota: Cuando la toma de corriente es para enchufes de 2 patas, es
responsabilidad del consumidor reemplazarla por una nueva
toma adecuada.
ALARGUE
No recomendamos el uso de alargues en esta unidad.

31 32
INSTRUCCIONES DE ENSAMBLE
Lea cuidadosamente y entienda las siguientes instrucciones de la instalación:
Instalando el dispenser de aguar
1. Abra la puerta frontal.
2. Desate el cable que sostiene el tubo de succión.
3. Quite la bolsa protectora de vinilo del tubo de succión.
4. Quite el sello plástico de un botellón de 5 galones de agua. Ubique el
botellón de agua en el medio de la guía para la botella.
5. Luego introduzca el tubo de succión en el botellón de agua y asegúrese de
que la tapa esté segura en la botella.
6. Hágalo rodar hacia dentro del gabinete. (Se deben instalar botellones que
estén al menos llenos hasta la mitad).
7. Cierre la puerta frontal.
8. Después de introducir el enchufe de energía en una fuente de energía
exclusiva de 115V/60Hz, debe oír el sonido del bombeo. Durante los
primeros 5 segundos, el sonido de extracción de agua es muy notorio. Esto es
normal, de modo que no debe alarmarse. Una vez transcurridos 5 segundos,
el sonido desaparecerá. La bomba comenzará a suministrar agua al tanque.
9. Después de aproximadamente 7 minutos, si no sale agua caliente del grifo de
agua caliente, entonces simplemente encienda el interruptor de agua caliente
(“Hot Water Switch”) ubicado en el panel trasero. El sistema de enfriamiento
comenzará a funcionar cuando el enchufe se introduzca en un tomacorriente.
Para que se ponga en funcionamiento, el interruptor negro de agua fría (“Cold
Water Switch”) ubicado en el panel trasero debe estar encendido.
10. Si el nivel de agua no ha alcanzado el nivel lleno después de un período de
10 minutos cuando la bomba está en funcionamiento, la bomba se detendrá,
el indicador “Vacío” (Empty) destellará y la unidad comenzará a un pitido.
11. Cuando abra la puerta, la luz de indicador “Vacío” (Empty) se apagará y el
pitido se detendrá.
12. Vuelva a ubicar un botellón de agua lleno.
NOTA: La dirección cuidadosa y apropiada del tubo, del tubo de
succión y de la guía de la botella asegurará una unidad
duradera más larga.
INTERRUPCIONES DE ENERGÍA
Ocasionalmente pueden ocurrir cortes de energía a causa de
tormentas u otros inconvenientes. Desenchufe la unidad cuando esto
ocurra. Cuando se reestablezcala corriente enchufe nuevamente.

EspañolEspañol
OPERANDO EL DISPENSER
Este dispenser le proporciona agua caliente y fría para beber y para cocinar. Se
puede utilizar con botellones de 5 galones.
Nota: La canilla de agua caliente está equipada con una traba para preve-
nir accidentes a causa del derrame de agua caliente. Para expender
agua caliente la llave de seguridad debe presionarse junto con el botón
expendedor.
Precaución! Tenga cuidado de no derramar cuando cargue agua caliente en
una taza o recipiente para evitar quemaduras.
Luces De Indicador Del Agua
CALIENTE - Rojo FRÍO - Verde VACÍO - Amarillo
PUNTOS DE CONTROL
1. Controle que se suministre el voltaje correcto al enfriador. (115 v ~ 60 Hz)
2. Controle que el indicador de frío del indicador luminoso se encienda cuando
enchufe el cable eléctrico en la fuente de energía.
3. Verifique que la puerta esté cerrada.
Nota: Si la puerta no está cerrada, la bomba no funcionará.
4. Para verificar que la bomba funcione adecuadamente, instale el botellón de
agua y cierre la puerta.
5. Controle que las luces del indicador se enciendan correctamente.
Nota: Cuando se enchufe por primera vez (encendido de la unidad), el
indicador de Frío (Cold) se encenderá. Cuando se enciende el
interruptor de agua caliente (Hot), el indicador de caliente estará
encendido.
REEMPLAZO DE LOS BOTELLONES
1. Cuando el botellón de agua está vacío, el indicador de vacío (empty)
comenzará a destellar y la unidad le avisará con un pitido.
2. Abra la puerta frontal.
3. Deslice la guía para el botellón hacia afuera del gabinete.
4. Quite el botellón vacío de la guía para el botellón.
5. Ubique un botellón de agua de 5 galones erguido en el medio de la
guía para el botellón, introduzca el tubo de succión en el botellón,
asegure la tapa y deslícelo nuevamente dentro del gabinete.
6. Cierre la puerta frontal.

33 34
CUIDADO Y LIMPIEZA ADECUADA
Precaución! Antes de utilizar cualquier producto de limpieza siempre lea las
instrucciones y las advertencias dadas por el fabricante para
evitar cualquier daño.
Nota: Es conveniente limpiar el dispenser y las áreas alrededor cada vez que
se realiza el cambio de un botellón. De esta manera usted puede mover
la unidad fácilmente sin el peso del botellón de agua.
GENERAL
• Prepare una solución de 3 o 4 cucharadas de bicarbonato y mezcle con agua
tibia. Utilice una esponja o un paño suave humedecido con la solución
anterior para repasar la unidad.
• Limpie y seque con un trapo seco
• No utilice químicos abrasivos, amoníaco, cloro, detergentes concentrados,
solventes o esponjas de metal. Estos elementos pueden decolorar o dañar el
acabado del dispenser.
• El agua que se derrama en la bandeja de goteo debe vaciarse y limpiarse
regularmente para evitar que se formen residuos y bacterias.
• Recomendamos que limpie el dispenser por lo menos 2 veces al año. Cuando
limpie no necesitará retirar ninguna pieza.
ADVERTENCIA!
Siempre quite la unidad antes limpiar
para evitar calambre. El fracaso para
hacer así puede tener como resultado la
muerte o la herida.

EspañolEspañol
LIMPIANDO EL CONDENSADOR
• Recomendamos que corra el dispenser de la pared y con un cepillo o
aspiradora limpie el condensador y la parte trasera de la unidad por
lo menos 4 veces al año. Algunos ambientes pueden requerir una
limpieza más frecuente.
MUDANZAS Y ALMACENAMIENTO
• Apague el interruptor de agua caliente en la parte posterior de la unidad y
desenchufe el dispensador de agua antes de cambiarlo de lugar.
• Quite el botellón de agua del gabinete antes de volver a ubicar el
dispensador.
• Si va a almacenar el dispensador de agua, desagüe completamente toda el
agua que pueda haber en los tanques con los grifos de agua fría y caliente y
la válvula de agua caliente para evitar que el agua que quede se estanque.
• Con un paño suave, seque la humedad restante de todas las piezas
del surtidor.
• Embale el dispensador en la caja de cartón corrugado con espuma de
poliestireno utilizada para el envío del producto para evitar que el
dispensador se dañe o se contamine con sustancias extrañas.

35 36
GUÍA PARA LA DETECCIÓN Y
SOLUCIÓN DE PROBLEMAS
Algunas veces, la causa de los problemas son simples “fallas” que pueden
corregirse fácilmente con o sin la ayuda de un técnico de reparaciones si
primero se verifican algunas soluciones básicas. A continuación se describen
ítems útiles para el diagnóstico y la solución de problemas:
El artefacto no funciona
• Se interrumpió el suministro de energía? Pruebe que funcione otro artefacto
eléctrico en el tomacorriente, o verifique si se quemó el fusible en la parte de
atrás de la unidad. Si es necesario, reemplace el fusible por uno de
250V 8AMP.
Nota: Desenchufe la unidad antes de reemplazar el fusible.
La eficacia de enfriamiento es deficiente
• Verifique que la unidad no esté ubicada cerca de una cocina o calefactor.
Ubique la unidad lejos de estas fuentes de calor.
• Verifique que la unidad no esté ubicada cerca de una pared. Deje espacio
suficiente entre la parte posterior de la unidad y la pared.
• ¿Hay objetos innecesarios alrededor de la unidad? Quite todos los objetos.
• Verifique que la temperatura ambiente no sea demasiado alta. Regule la
temperatura ambiente de forma adecuada.
La eficacia de calentamiento es deficiente
• Verifique que el interruptor de calentamiento no esté en la posición “OFF”
(APAGADO). Configure el interruptor en la posición “ON” (ENCENDIDO).
• Verifique que la temperatura ambiente no sea demasiado baja. Regule la
temperatura ambiente de forma adecuada.

EspañolEspañol
Produce ruidos anormales
• ¿El artefacto está ubicado sobre un piso desparejo? Ubique el artefacto sobre
una superficie firme y pareja.
• ¿Hay algún obstáculo en la parte posterior del artefacto? Quite el obstáculo.
La bomba no funciona
• Si la puerta frontal no está cerrada, la bomba no funcionará. Asegúrese de
que la puerta esté cerrada.
El agua potable no fluye bien
• Verifique que el tubo de flujo de agua y la palanca estén limpios y sin
obstrucciones. Limpie el tubo y la palanca.
• Verifique que el depósito de agua no esté vacío. Asegúrese de que la bomba
funcione adecuadamente y que el botellón de agua tenga suficiente agua.

PREGUNTAS FRECUENTES
En relación con el reemplazo del botellón
¿Debo abrir la puerta frontal para ver si el botellón está vacío?
No. El pitido indicador de que el botellón está vacío le avisará cuando está
vacío.
¿Cuándo debo reemplazar los botellones?
Cuando se oye un pitido y el indicador luminoso comienza a destellar.
¿Por qué algunas veces se oye el pitido de alarma aunque el
botellón no esté vacío?
Esto sucede cuando se proporciona agua durante más de 5 minutos de una
vez. El pitido está diseñado para que funcione cuando el tanque no está lleno
después de que la bomba ha estado en funcionamiento durante 10 minutos.
¿Cómo detengo la alarma?
Simplemente reinicie el dispensador abriendo y cerrando la puerta frontal.
¿Sonará nuevamente el pitido cuando haya reemplazado el
botellón vacío con uno nuevo?
No, el microprocesador del dispensador sabe que ha reemplazado los
botellones, dado que abrió y cerró la puerta frontal. De modo que no oirá el
pitido nuevamente después de reemplazar los botellones porque la bomba
funcionará durante 10 minutos, que son suficientes para volver a llenar los
tanques de agua fría y caliente.
¿Puedo beber la última gota de agua del botellón?
No, no se puede. El par de tazas de agua que queda en el botellón no puede
beberse porque la parte de abajo del botellón no es plana, de modo que es
imposible que el tubo de absorción absorba hasta la última gota de agua del
botellón.
37 38
Si necesita reparaciones, primero consulte la sección “Detección y
solución de problemas” del Manual para el Usuario. Luego de
consultar “Detección y solución de problemas”, puede obtener
ayuda adicional llamando a 1-866-955-AQUA (2782).

EspañolEspañol
Garantia Limitada
¿Qué se cubre y por cuánto tiempo?
Esta garantía brinda cobertura por todos los
defectos de mano de obra o en los materiales
por un período de:
12 meses por mano de obra
12 meses por las piezas
(únicamente piezas funcionales)
5 años por el sistema de sellado
La garantía comienza el día de la compra
del producto. Los clientes deben proporcionar
una prueba de la fecha de compra y el recibo
original junto con la marca, el modelo y el
número de serie para la verificación previa a
la provisión de servicios con garantía.
El servicios de reparaciones en el taller está
disponible para determinados productos, a
nuestra discreción.
EXCEPCIONES: Garantía en uso comercial o
de alquiler
90 días para la mano de obra
90 días para las piezas
No se aplica ninguna otra garantía.
Qué cubre.
1. Los repuestos mecánicos y eléctricos, que
sirven para un propósito funcional de este
artefacto, están cubiertos por un período
de 12 meses o como se estableció previamente. Esto incluye todos los repuestos,
excepto terminaciones, acabado y el vidrio.
2. La garantía limitada no cubre créditos o
reintegros por pérdidas o lesiones causados
por el producto o defectos del producto
incluyendo, entre ,consecuentes o fortuitos.
3. Los componentes del sistema de sellado,
(por ejemplo: compresor hermético, condensador y evaporador) por defectos de
fábrica por un período de 5 años desde la
fecha de compra. Cualquier daño a dichos
componentes debido a abuso mecánico, o
manipulación inapropiada durante el envío.
¿Qué se hará?
1. Los repuestos mecánicos o eléctricos que se
pruebe que son defectuosos durante el uso
normal y durante el período de garantía
especificado, se repararán o reemplazarán
según nuestra discreción.
TODOS LOS SERVICIOS DE GARANTÍA
DEBEN SER PROPORCIONADOS
ÚNICAMENTE POR NUESTROS CENTROS
DE REPARACIÓN DE FÁBRICA, O POR
UN TÉCNICO DE ATENCIÓN A CLIENTES
AUTORIZADO.
Si se determina que la reparación no es
adecuada o que los repuestos para el reemplazo no están disponibles para la reparación,
cambiaremos el producto por uno nuevo o
reacondicionado en fábrica que sea el mismo
o similar al original según su discreción.
2. El comprador no incurrirá en ningún gasto
por repuestos funcionales y mano de obra
de los ítems cubiertos durante el período
inicial de 12 meses o como se previamente.
3. ESTA GARANTÍA CUBRE LOS ARTEFACTOS
DENTRO DE LA PORCIÓN CONTINENTAL
DE LOS ESTADOS UNIDOS, CANADÁ Y
PUERTO RICO. NO BRINDA COBERTURA
EN LOS SIGUIENTES CASOS:
Daños por instalación incorrecta. Los daños
ocurridos durante el envío. Los defectos que no
sean defectos de fabricación. Daños causados
por el mal uso, abuso, los accidentes, las alteraciones, la falta de atención y mantenimiento
apropiados, la corriente o el voltaje incorrectos
o los casos de fuerza mayor. Daños causados
por todo aquello que no sea el uso hogareño.
Daños causados por otra reparación que no
sea la brindada por un vendedor autorizado o
centro de reparaciones. Terminaciones
decorativas, vidrio o lámparas de luz. Costos
de transporte y envío. Mano de obra (luego de
los 12 meses iniciales) Crédito o reintegro por
productos después de los 30 días de la fecha
de compra. Pérdidas por los alimentos que se
echan a perder a causa de una falla mecánica
del producto o por cualquier retraso en la provisión de servicios, reparación o reemplazo.
Esta garantía limitada no se aplica a productos reacondicionados en fábrica o a unidades
adquiridas como nuevas o de segunda mano.
ESTA GARANTÍA LIMITADA SE OTORGA EN
LUGAR DE CUALQUIER OTRA GARANTÍA,
EXPRESADA O IMPLÍCITA INCLUYENDO
LAS GARANTÍAS DE COMERCIABILIDAD E
IDONEIDAD PARA UN FIN DETERMINADO. El
recurso provisto en esta garantía es exclusivo
y otorgado en lugar de cualquier otro recurso.
Esta garantía no cubre daños fortuitos o consecuentes, de modo que las limitaciones descritas
anteriormente pueden no aplicarse a su caso.
Algunos estados no permiten limitaciones en
cuanto a la duración de una garantía implícita, de modo que las limitaciones descritas
anteriormente pueden no aplicarse a su caso.
Esta garantía le concede derechos legales
específicos, y usted puede tener otros derechos, que varían de un estado a otro.
Distribuido por Haier America,
Nueva York, NY 10018
Para obtener servicio de reparaciones, por
favor llame a 1-866-955-AQUA (2782).

115V, 60Hz
Made in China
Fabriqué en Chine
Hecho en China
Distributed by
Haier America
New York, NY 10018
IMPORTANT
Do Not Return This Product To The Store
If you have a problem with this product, please contact 1-866-955-AQUA (2782).
DATED PROOF OF PURCHASE REQUIRED FOR WARRANTY SERVICE
IMPORTANT
Ne pas Réexpédier ce Produit au Magasin
Pour tout problème concernant ce produit, veuillez contacter le service des
consommateurs 1-866-955-AQUA (2782).
UNE PREUVE D’ACHAT DATEE EST REQUISE POUR BENEFICIER DE LA GARANTIE.
IMPORTANTE
No regrese este producto a la tienda
Si tiene algún problema con este producto, por favor contacte el
1-866-955-AQUA (2782).
NECESITA UNA PRUEBA DE COMPRA FECHADA PARA EL SERVICIO DE LA GARANTIA
Part # RF-9999-294
Issued: May - 07
©2007 Haier America Trading, LLC. All Rights Reserved. 100074 0507
aqua
F O N T A N A
 Loading...