

Page 1

CABINET TYPE AIR CONDITIONER
OPERATION MANUAL AND INSTALLATION MANUAL
–¨ 1.000
Please read this manual carefully before installation.
Keep this operation manual for future reference.
0150508963 C
Page 2

Page 3

CABINET TYPE AIR CONDITIONER
OPERATION MANUAL AND INSTALLATION MANUAL
Contents
Cautions
Parts and Functions
Operation
Energy Saving
Maintenance
Troubleshooting
Indoor & Outdoor Unit Connection
Installation Procedure
3
5
7
9
10
11
14
15
English
–¨ 1.000
Please read this manual carefully before installation.
Keep this operation manual for future reference.
Page 4

Page 5

Cautions
Disposal of the old air conditioner
Before disposing an old air conditioner that goes out of use, please make sure it's inoperative and safe. Unplug the air
conditioner in order to avoid the risk of child entrapment.
It must be noticed that air conditioner system contains refrigerants, which require specialized waste disposal. The valuable
materials contained in a air conditioner can be recycled. Contact your local waste disposal center for proper disposal of
an old air conditioner and contact your local authority or your dealer if you have any question. Please ensure that the
pipework of your air conditioner does not get damaged prior to being picked up by the relevant waste disposal center, and
contribute to environmental awareness by insisting on an appropriate, anti-pollution method of disposal.
Disposal of the packaging of your new air conditioner
All the packaging materials employed in the package of your new air conditioner may be disposed without any danger to
the environment.
The cardboard box may be broken or cut into smaller pieces and given to a waste paper disposal service. The wrapping
bag made of polyethylene and the polyethylene foam pads contain no fluorochloric hydrocarbon.
All these valuable materials may be taken to a waste collecting center and used again after adequate recycling. Consult
your local authorities for the name and address of the waste materials collecting centers and waste paper disposal services
nearest to your house.
Safety Instructions and Warnings
Before starting the air conditioner, read the information given in the User's Guide carefully. The User's Guide contains very
important observations relating to the assembly, operation and maintenance of the air conditioner.
The manufacturer does not accept responsibility for any damages that may arise due to non-observation of the following
instruction.
Damaged air conditioners are not to be put into operation. In case of doubt, consult your supplier.
Use of the air conditioner is to be carried out in strict compliance with the relative instructions set forth in the User's Guide.
Installation shall be done by professional people, don't install unit by yourself.
For the purpose of safety, the air conditioner must be properly grounded in accordance with specifications.
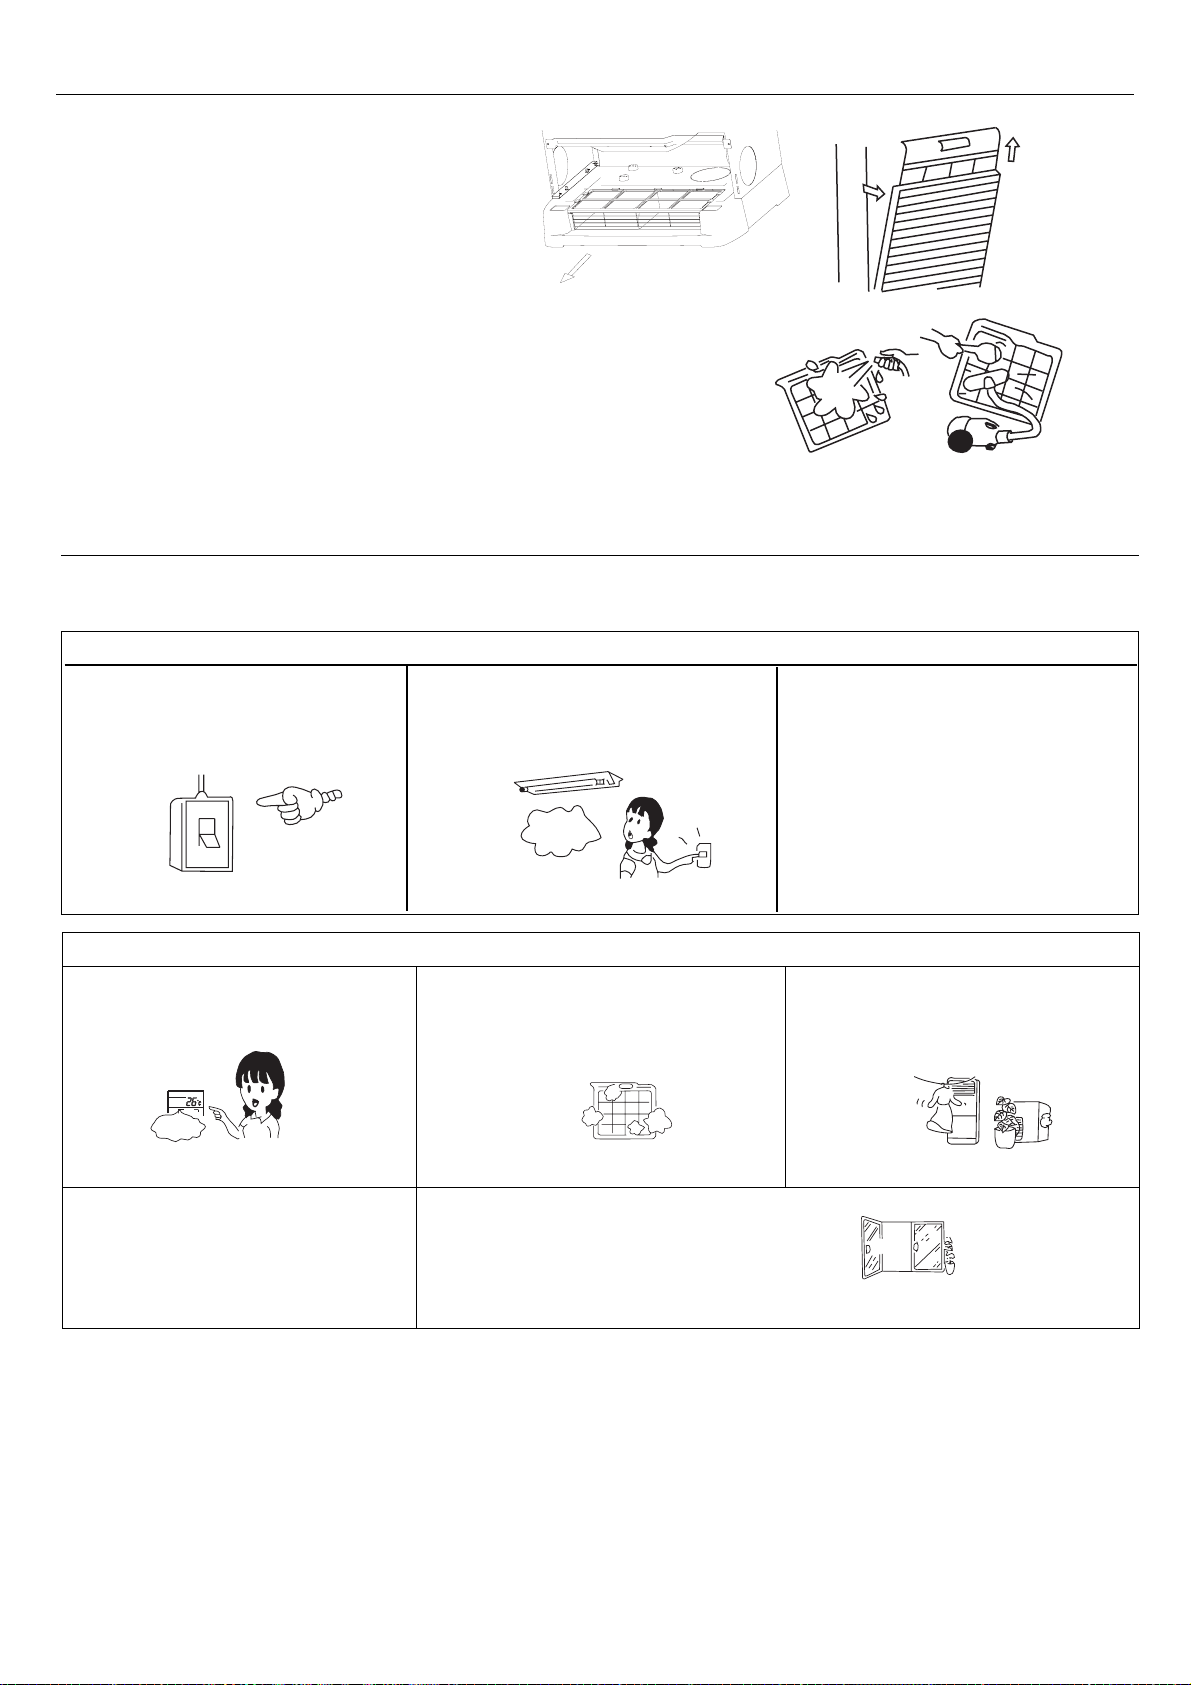
Always remember to unplug the air conditioner before opening inlet grill. Never unplug your air conditioner by pulling on
the power cord. Always grip plug firmly and pull straight out from the outlet.
All electrical repairs must be carried out by qualified electricians. Inadequate repairs may result in a major source of
danger for the user of the air conditioner.
Do not damage any parts of the air conditioner that carry refrigerant by piercing or perforating the air conditioner's tubes
with sharp or pointed items, crushing or twisting any tubes, or scraping the coatings off the surfaces. If the refrigerant
spurts out and gets into eyes, it may result in serious eye injuries.
Do not obstruct or cover the ventilation grille of the air conditioner. Do not put fingers or any other things into the inlet/outlet
and swing louver.
Do not allow children to play with the air conditioner. In no case should children be allowed to sit on the outdoor unit.
This appliance is not intended for use by persons (including children) with reducedphysical, sensory or mental capabilities, or
lack of experience and knowledge, unless they have been given supervision or instruction concerning use of the appliance by
a person responsible for their safety.
Children should be supervised to ensure that they do not play with the appliance.
3
Page 6

Cautions
Specifications
The refrigerating circuit is leak-proof.
The machine is adaptive in following situation
Applicable ambient temperature range:
32/23 C
18/14 C
46/26 C
10/6 C
27 C
15 C
24/18 C
Cooling
Heating
Indoor temperature
Outdoor temperature
Indoor temperature
Outdoor temperature
max. DB/WB
min. DB/WB
max. DB/WB
min. DB/WB
max. DB/WB
min. DB/WB
max. DB/WB
min. DB/WB
If the supply cord is damaged, it must be replaced by the manufacturer or its service agent or a similar qualified person.
If the fuse on PC board is broken please change it with the type of T 3.15A /250VAC. Please check the circuit diagram
about the fuse replaced.
The wiring method should be in line with the local wiring standard.
The power cable and connecting cable are self-provided. All the cables shall have got the local authentication certificate.
The breaker of the air conditioner should be all-pole switch; and the distance between its two contacts should be no less
3mm. Such means for disconnection must be incorporation in the fixed wiring.
The waste battery shall be disposed properly.
4
Page 7

Parts and Functions
–¨ 1.000
5
Page 8

Parts and Functions
Electrical heating is not available.
(This model has not this function.)
(This model has not this function.)
Fan only function
6
Page 9

Operation
7
Page 10
Operation
(This model has not this function.)
8
Page 11
Energy Saving
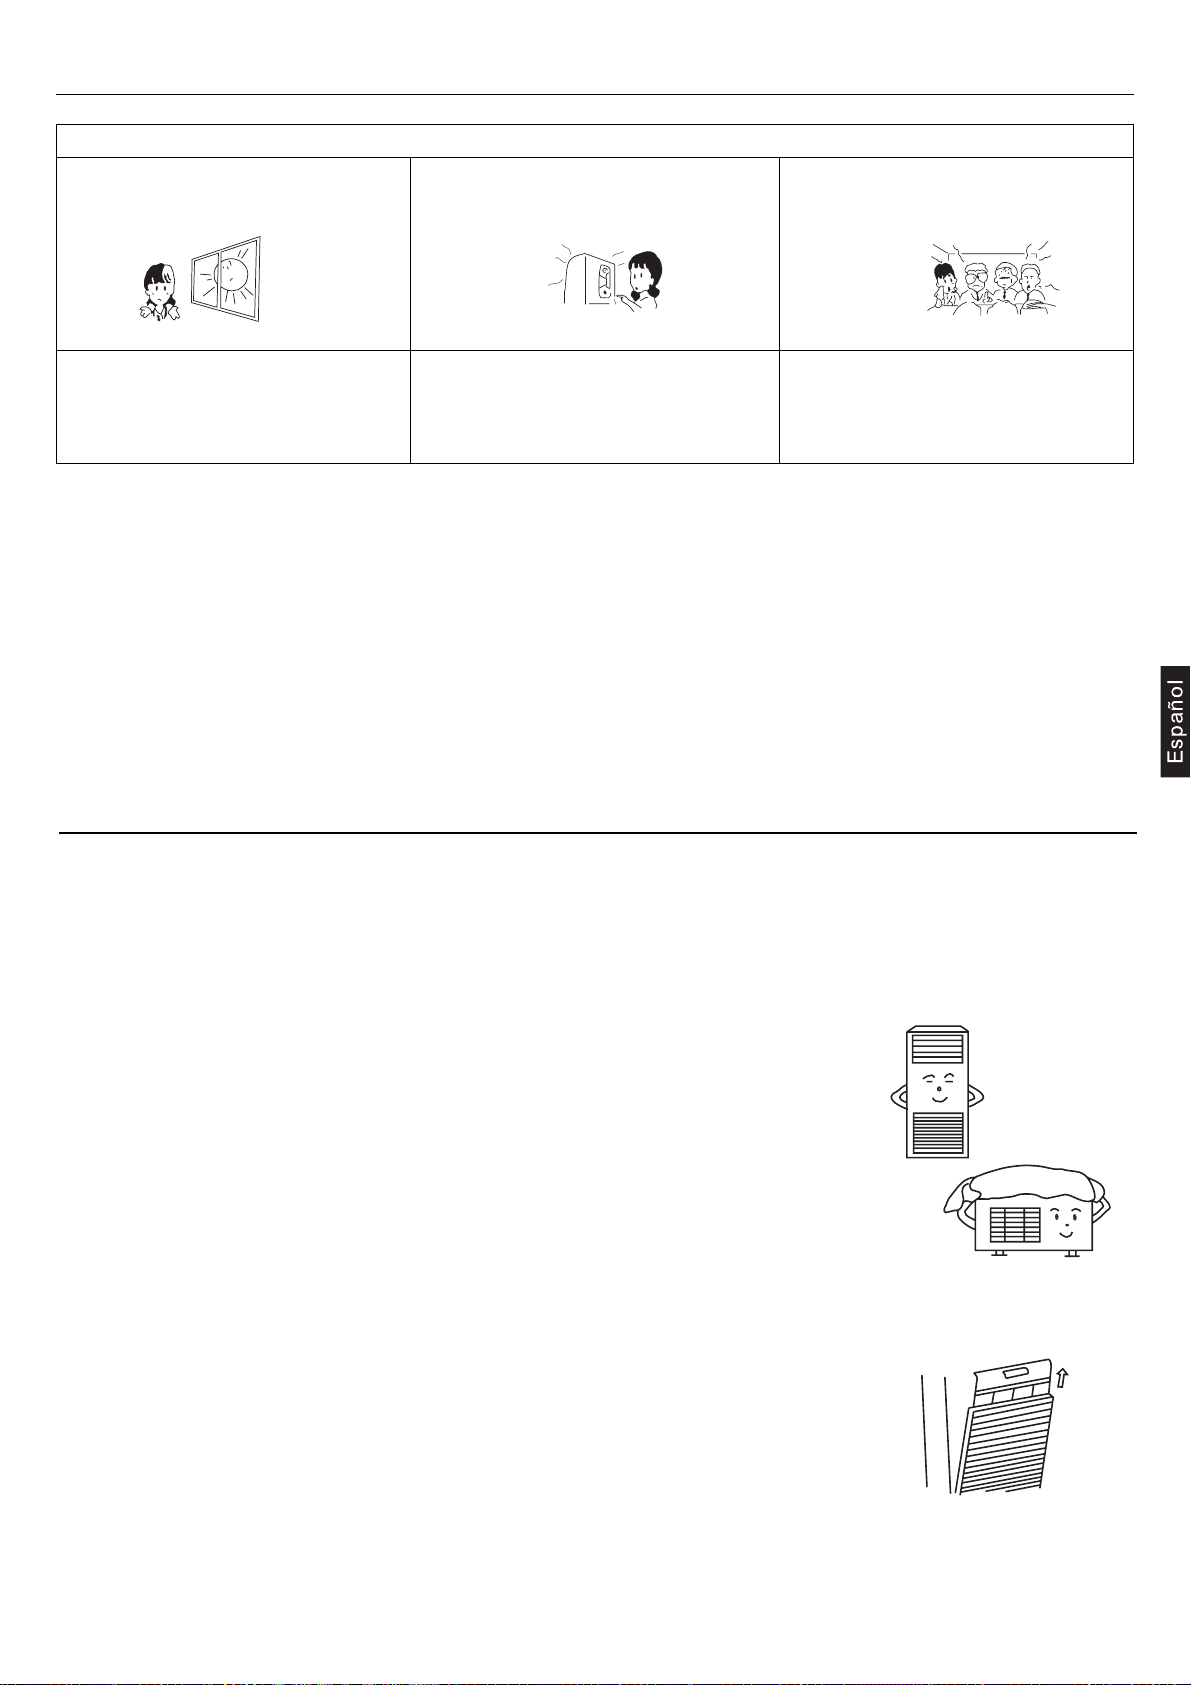
Keep proper room temperature
Too cold or too warm is no good to your health, and power
consumption will be increased as well.
Air filter should be periodically cleaned
If air filter is clogged, it will cause poor cooling and heating
efficiency, higher power consumption and even problem
may occur. In cooling operation, water will flow out.
Proper temp.
Use Timer effectively
You may use Timer mode to keep a comfortable room temp.
when you wake up or come home from outside.
Avoid direct sunlight and air flow Adjust air flow properly
AM
ON
8:00
OFF
PM
5:00
9
Page 12
Maintenance
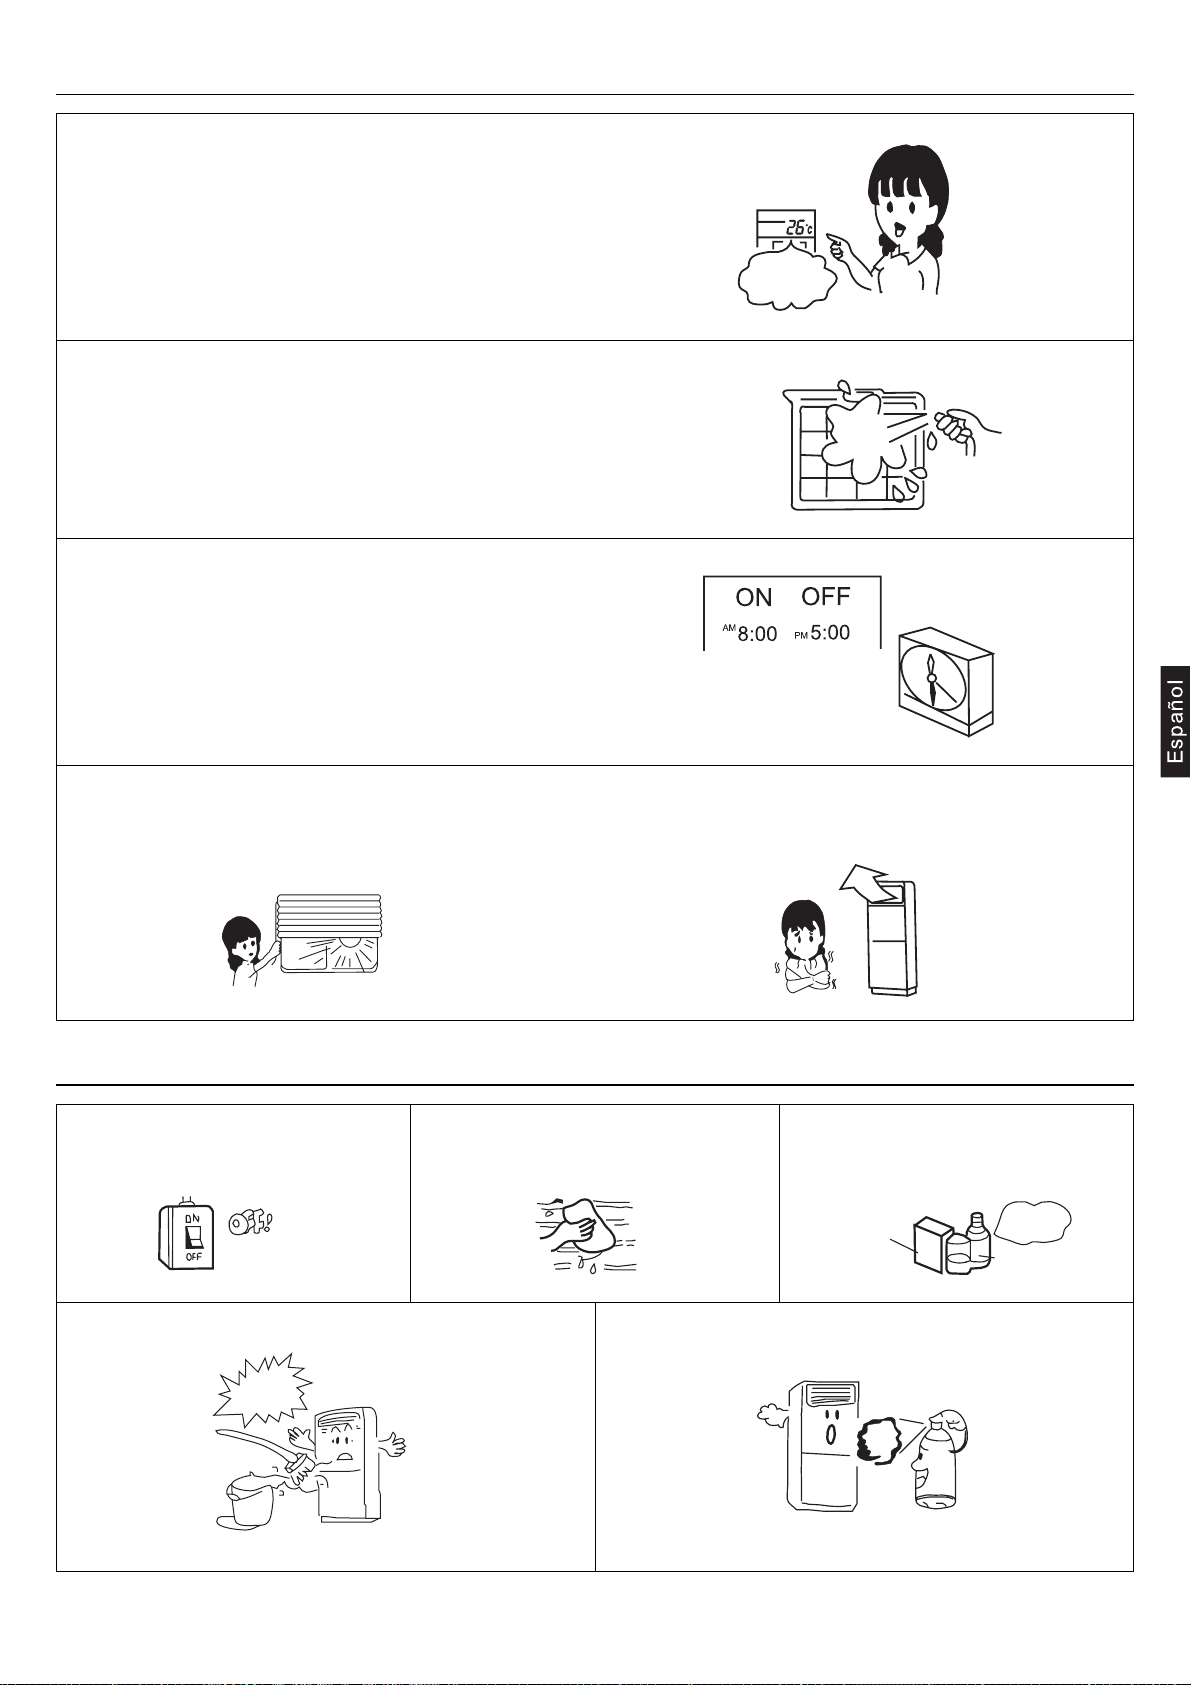
Disconnect power supply Don't touch it with wet hand Don't wash with hot water or solvent to
clean the unit
Don't spray any paint or insecticide on the unit.Don't splash water directly on indoor unit.
This could be
very dangerous
This will cause damage or even fire accident.
Air filter cleaning
Pull it out from top as shown in Fig.
Use water or vacuum cleaner to clean it. If it is extremely dirty,
wash it with neutral detergent or soap water.
Wash it with clean water and install it after complete dry.
Caution:
Don't use hot water over 40 C, as this may cause damage to air filter.
Wipe air filter carefully.
Indoor and outdoor cleaning
Clean it with warm and wet cloth or with neutral detergent, then wipe it dry with clean and soft cloth.
If air conditioner is very dirty, clean it with cloth soaked in neutral detergent, then wipe off the detergent with clean water.
Don't use water higher than 40 C, which will cause discoloring and deformation.
Don't use insecticide or other chemical detergents.
After season maintenance
Let the unit run in Fan mode for half a day in a fine weather to dry completely the unit inside.
Turn off the unit and pull out power plug. Otherwise, there might be certain power consumption
even if the unit is stopped.
Clean air filter and indoor unit, cover outdoor unit after cleaning.
Before season maintenance
Check if there are obstacles at inlet and outlet of indoor and outdoor unit, whick will reduce unit
efficiency.
Don't fail to attach air filter after making sure it is cleaned. Dust will enter into unit causing
damages or faults if it is running without air filter.
To protect compressor at start, please connect external power supply to the unit 12 hrs prior to
starting. Also please keep the power supply switch ON during the whole season.
10
Page 13
Troubleshooting
Followings are not problems
Sound of water flowings are not
problems.
Sound of cracking is heard.
Smells are generated.
During operation, white fog or
steam comes out of indoor unit.
In cooling operation, unit switches to fan
operation.
Unit will not restart after stop.
Won't start?
During unit start and operation or at stop, a swishing or gurgling noise may
be heard. This noise is generated by refrigerant flowing in the system.
During unit operation, a cracking noise may be heard. This noise is generated
by the casing expanding or shrinking because of temperatuer changes.
This is because the system circulates smells from the interior air such as
the smell of cigarettes or the painting on the unit.
When unit is running at places like restaurant where dense edible oil fumeis
always exist, this will happen.
To prevent frost from accumulating on indoor heat exchanger, unit will switch
to fan operation for a while and then resume cooling operation.
Though ON/OFF button is set to ON, the unit won't resume cooling, dry or
heating operation in 3 min after it is stopped, this is because of
3-min-delay protection circuit.
Please wait 3 minutes
No outlet air or fan speed can't be changed
in dry mode.
In heating operation, water or steam are
blown out of indoor unit.
In heating operation, indoor fan won't stop
even if unit is stopped.
Unit will reduce fan speed repeatedly and automatically if room temp. is too
low in dry operation.
This occurs when frost accumulated on the outdoor unit is removed.
(during defrosting operation)
After unit stops, indoor fan will go on running until indoor unit cools down.
11
Page 14
Troubleshooting
Before asking services, please firstly check your unit according to following.
Air conditioner won't start.
Is power supply switch turned on?
Power supply switch
is not set at ON.
Is city power supply normal?
Power
failure?
Poor cooling or heating
Are operation controlls adjusted
Is air filter too dirty?
correctly as specified?
Proper
temp
Are horizontal louvers at up position (in heating mode)?
Is leakage current breaker activated?
This is very dangerous, please
disconnect power supply immediately
and contact your dealer.
Are there any obstacles at inlet or outlet
grill?
Any doors or windows left open?
Poor cooling
Is there any direct sunlight in the room?
If there are unexpected heat sources
Too many people in the room?
in the room?
If your unit still can't work properly after above mentioned checks, or following problems occur, please stop it immediately
and contact your dealer.
Fuses or circuit breakers often blow out.
Water comes out in cooling/dry operation.
Operation is abnormal or sound is heard.
12
Page 15

Troubleshooting
13
Page 16

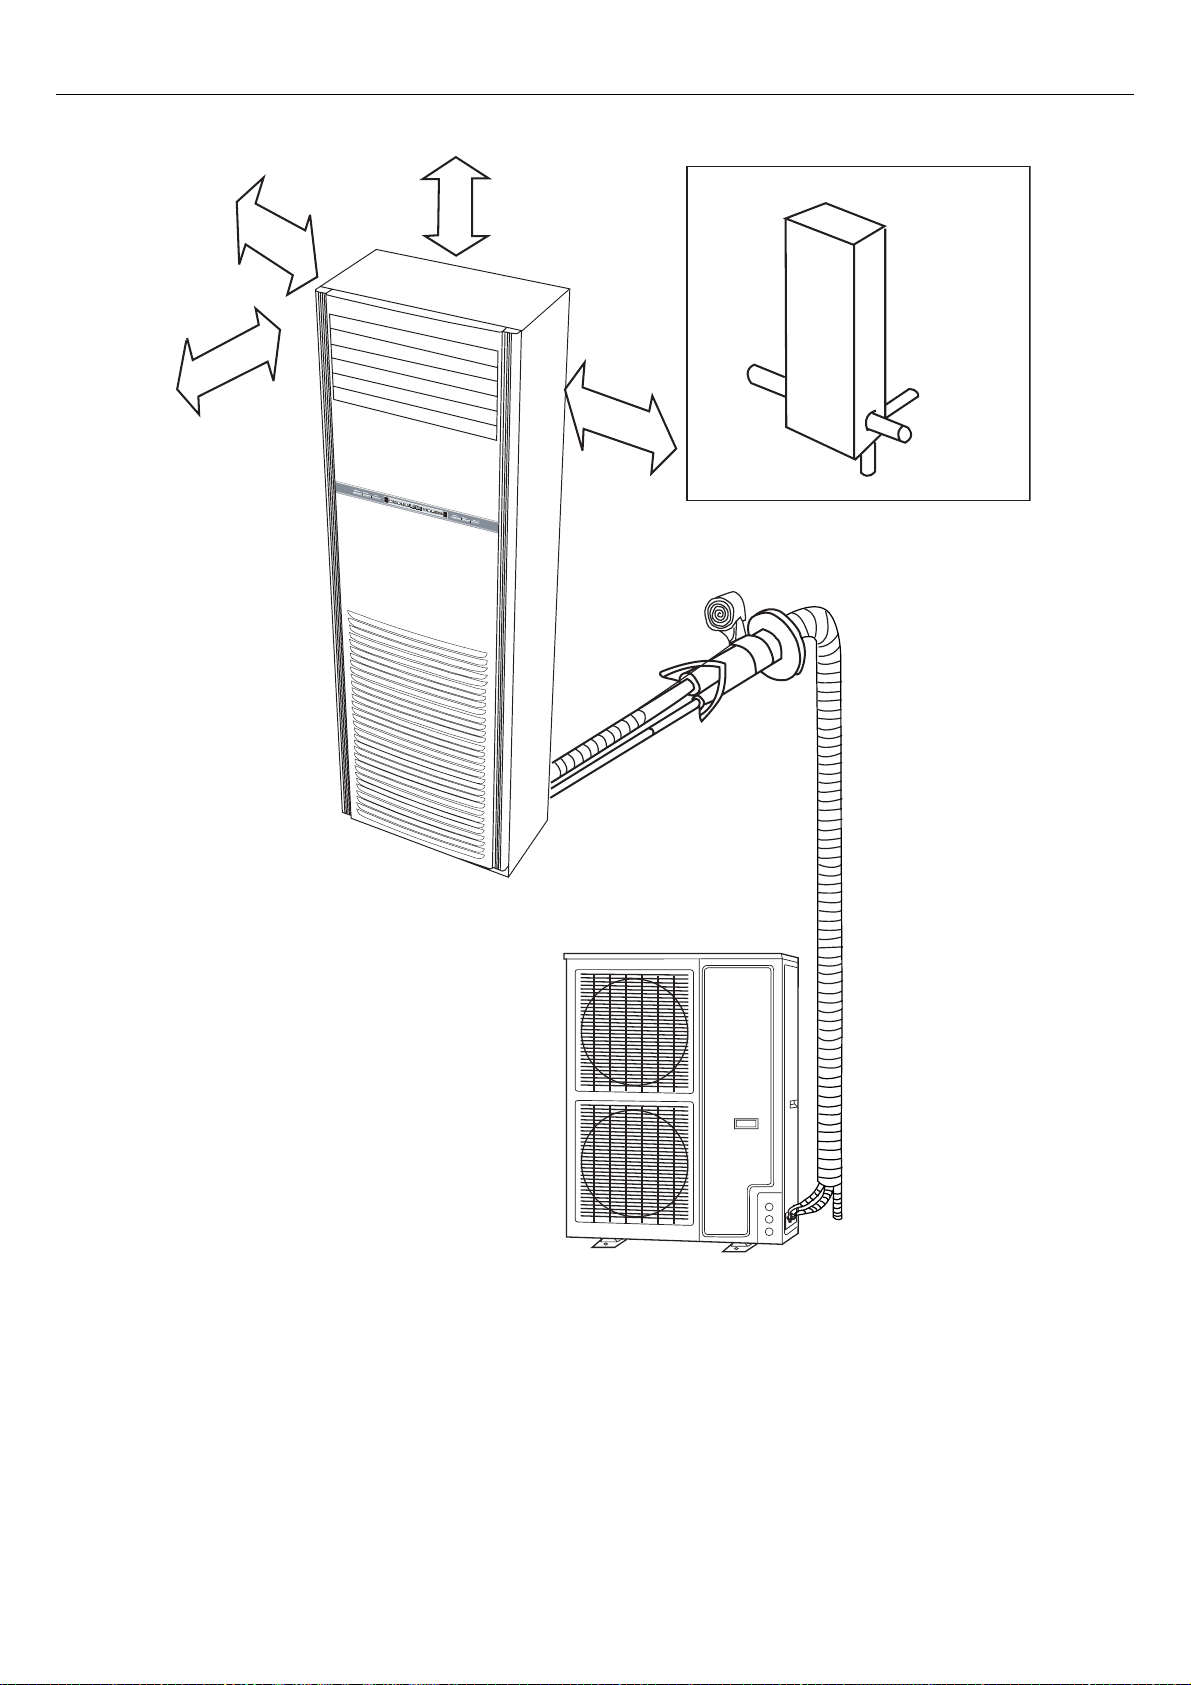
Indoor & Outdoor Unit Connection
E
E
E
E
E
E
E
E
E
E
14
Page 17

Installation Procedure
Installation Preparation
Tools necessary
1. Screw driver
2. Hacksaw
3. 70mm dia. hole core drill
4. Spanner (dia. 22, 36mm)
5. Spanner (16, 18, 22, 36mm)
6. Pipe cutter
7. Flaring tool
8. Knife
9. Nipper
10. Gas leakage detector or soap water
11. Measuring tape
12. Reamer
13. Refrigerant oil
Installation Procedure
Installation accessories
Following parts shall be field supplied
Part name
Adhesive tape
Pipe clip
Connecting hose
Insulation material
Putty
Drain hose
Outdoor Unit
Before installation
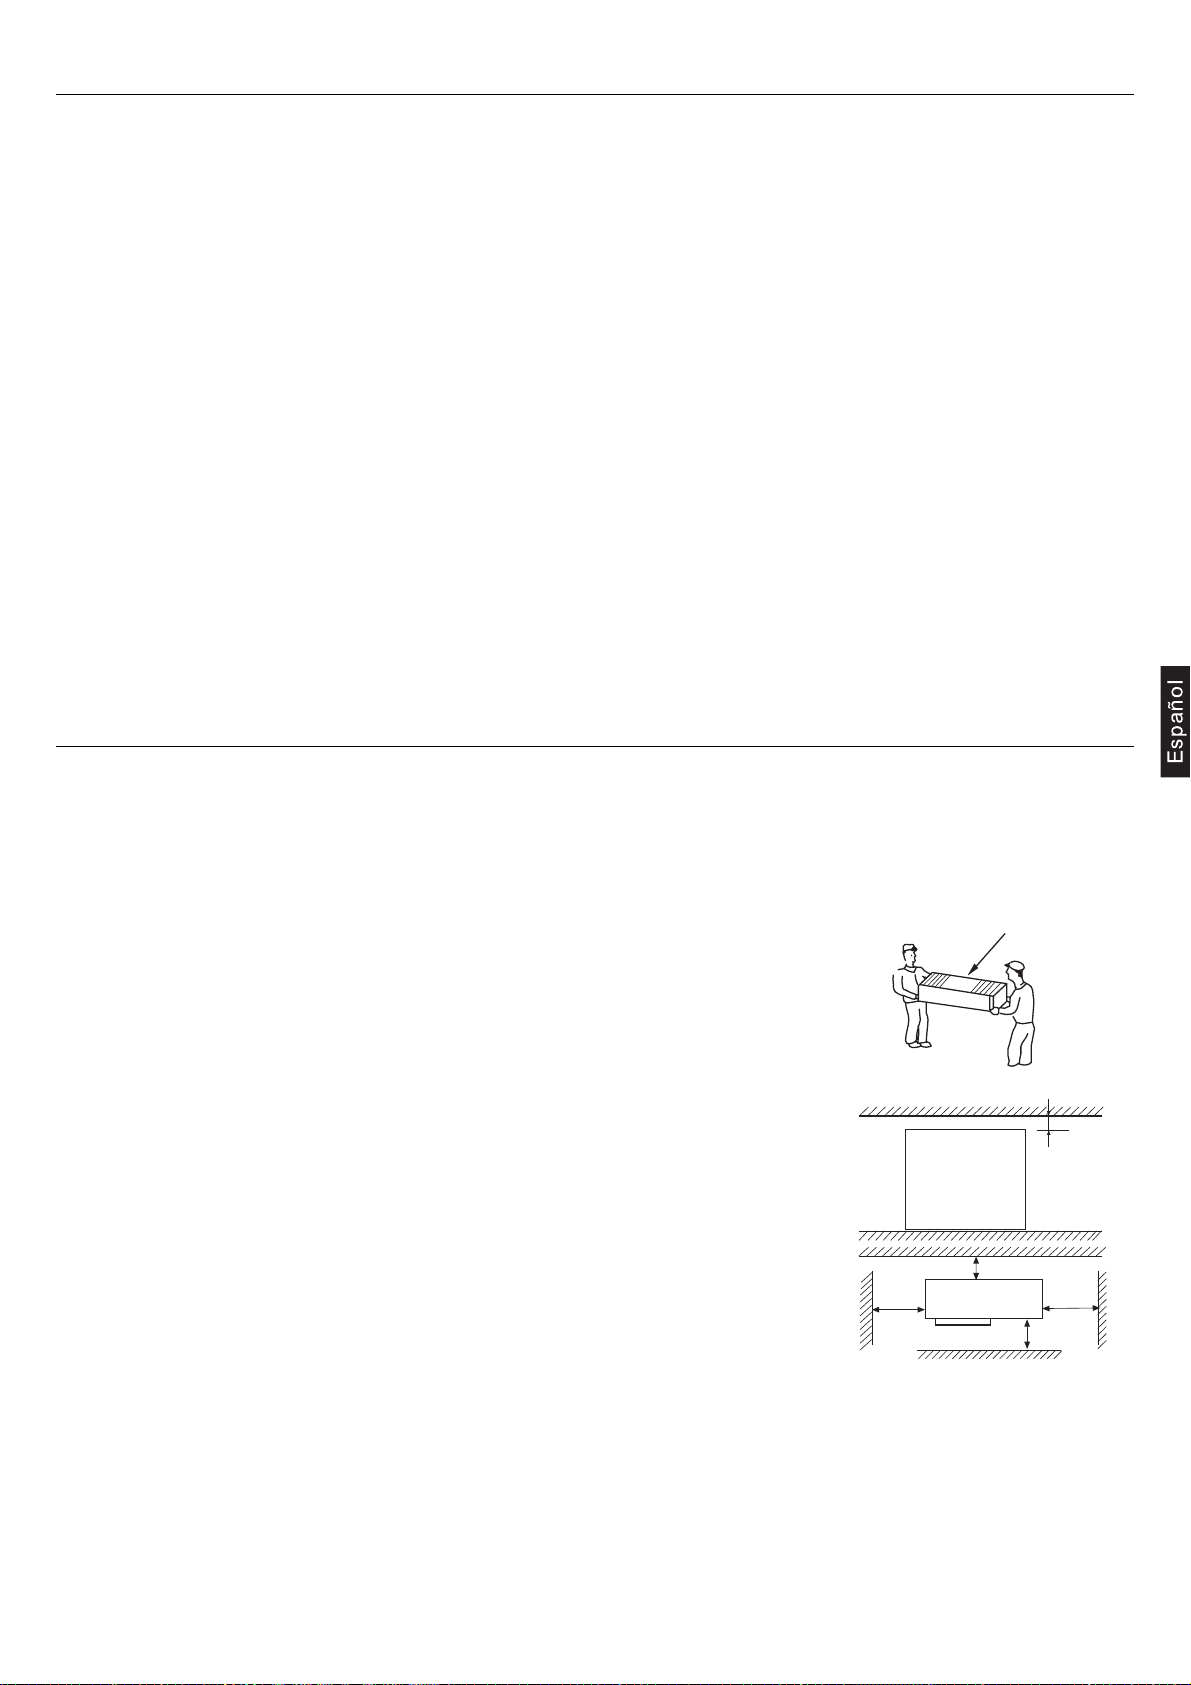
Try to bring the packed unit to the installation place.
When it is inevitable to unpack the unit, be careful not to damage the unit. Wrap it with nylon etc.
After unpacking, be sure to put it with the front side of the unit facing up.
When delivering, don't hold plastic parts like inlet and outlet grill etc.
Installation of outdoor unit
Selection of outdoor unit installation place
Place strong enough to support the unit and will not cause vibration and noise.
Place where discharged wind and noise doesn't cause a nuisance to the neighbors.
Place where is less affected by rain or direct sunlight and is sufficiently ventilated,
or to install a shield.
Place with enough space for smooth air flow.
Fixing of the outdoor unit
Fix outdoor unit using M10 bolt to concrete floor horizontally.
If installed on the wall or on top of a roof, bracket should be fixed securely
to resist earthquake or storms.
Use rubber pad during installation against unit vibration.
over
10cm
over 10cm
over 60cm
Delivery
over 30cm
over
15cm
Facing up
15
Page 18

Installation Procedure
Selection of indoor unit installation place
Place where it is easy to route drainage pipe and outdoor piping.
Place away from heat source and with less direct sunlight.
Place where cool and warm air could be delivered evenly to every corner of the room.
Place near power supply socket. Leave enough space around the unit (refer to installation drawings).
INDOOR SIDE OUTDOOR SIDE
Installation of indoor unit
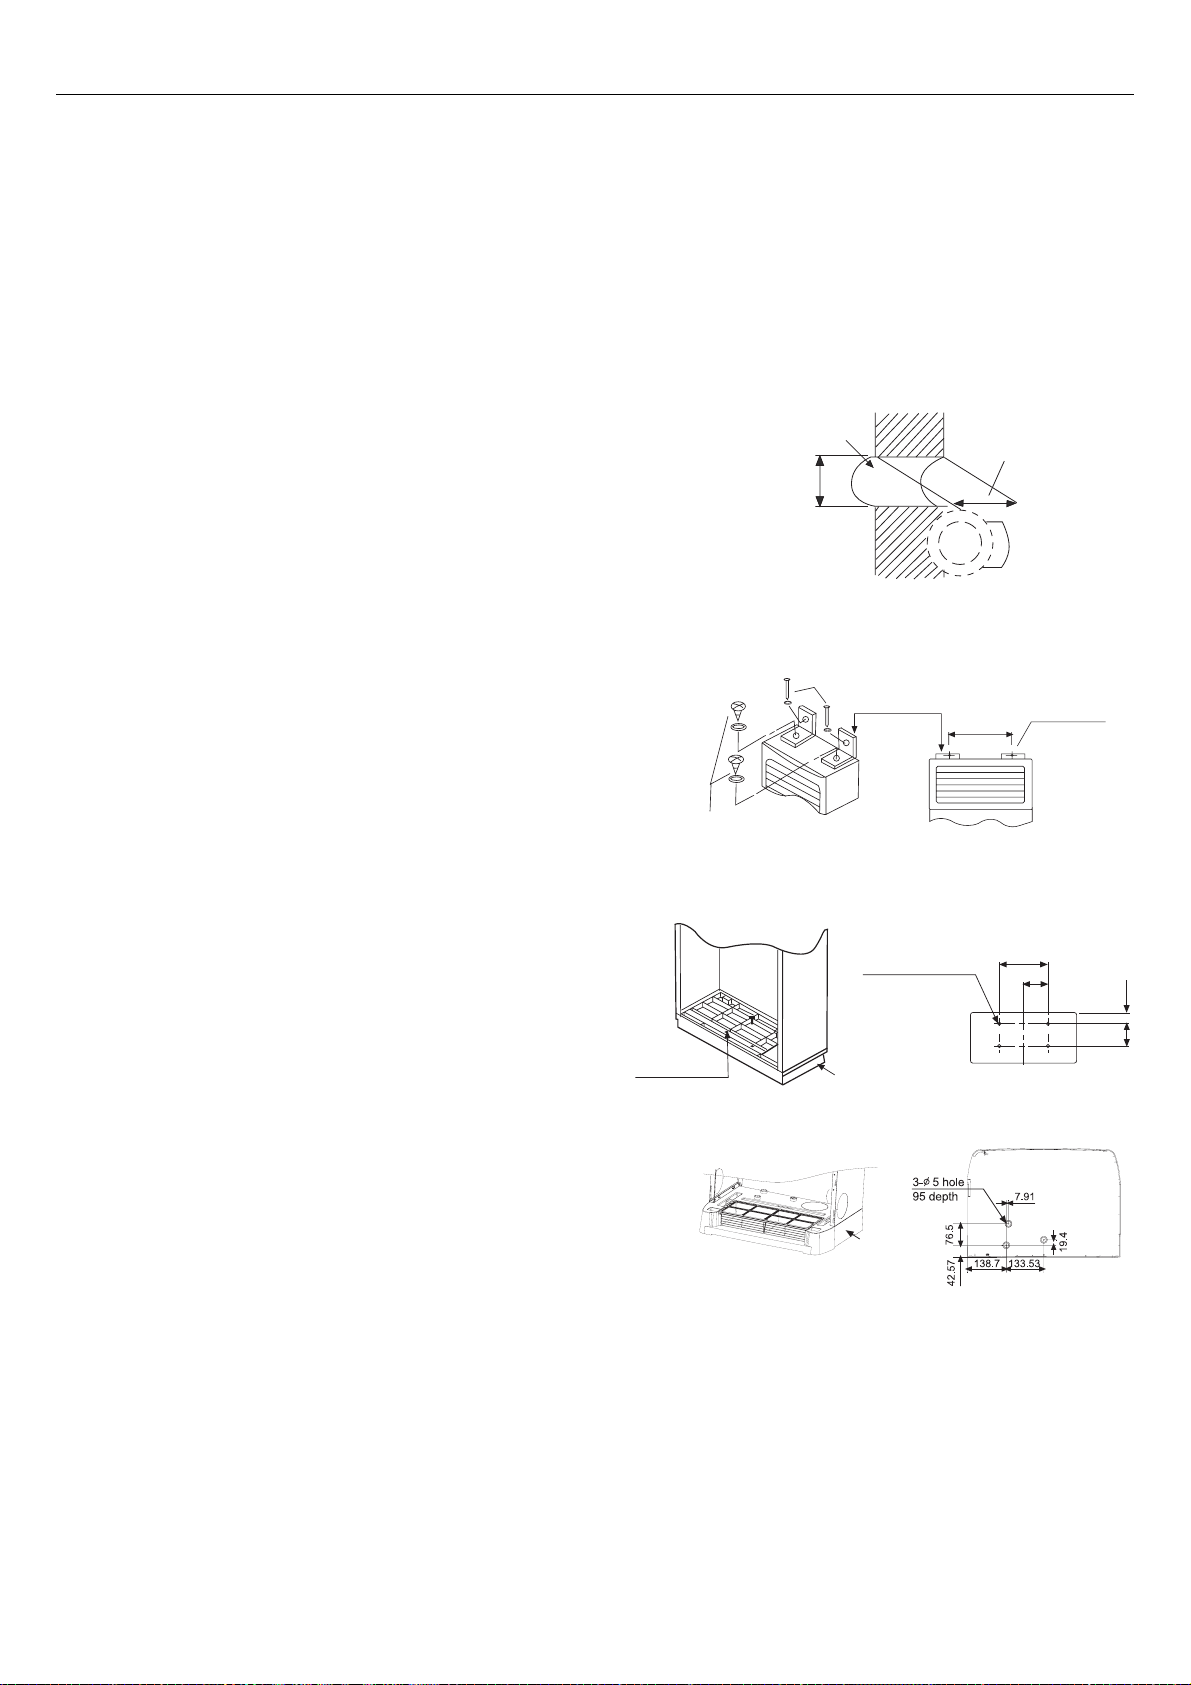
1.Position of the wall hole
Wall hole should be decided according to installtion place
and piping direction. (refer to installation drawings)
wall hole
70mm
( Cross section of wall hole )
Indoor Unit
wall thickness
2.Making a wall hole
Drill a hole of 70mm dia. with a little slope towards outside.
Install piping hole cover and seal it with putty after installation.
3.Fixing of indoor unit
With the unit set up vertically, fix the fitting metal to the unit
with screws, then fix the fitting metal to the wall with cement
nail and washer, as shown right:
Moreover, if wanting to fix the unit more firmly, you should
fix the bottom panel to the ground with concrete bolts, as
shown right:
Screw
Fitting hole
Cement nail
Fitting metal
4- 14 hole 30 depth
Bottom Panel
330
2- 10 hole
260
130
79202
(79)
(202)
16
Page 19
Installation Procedure
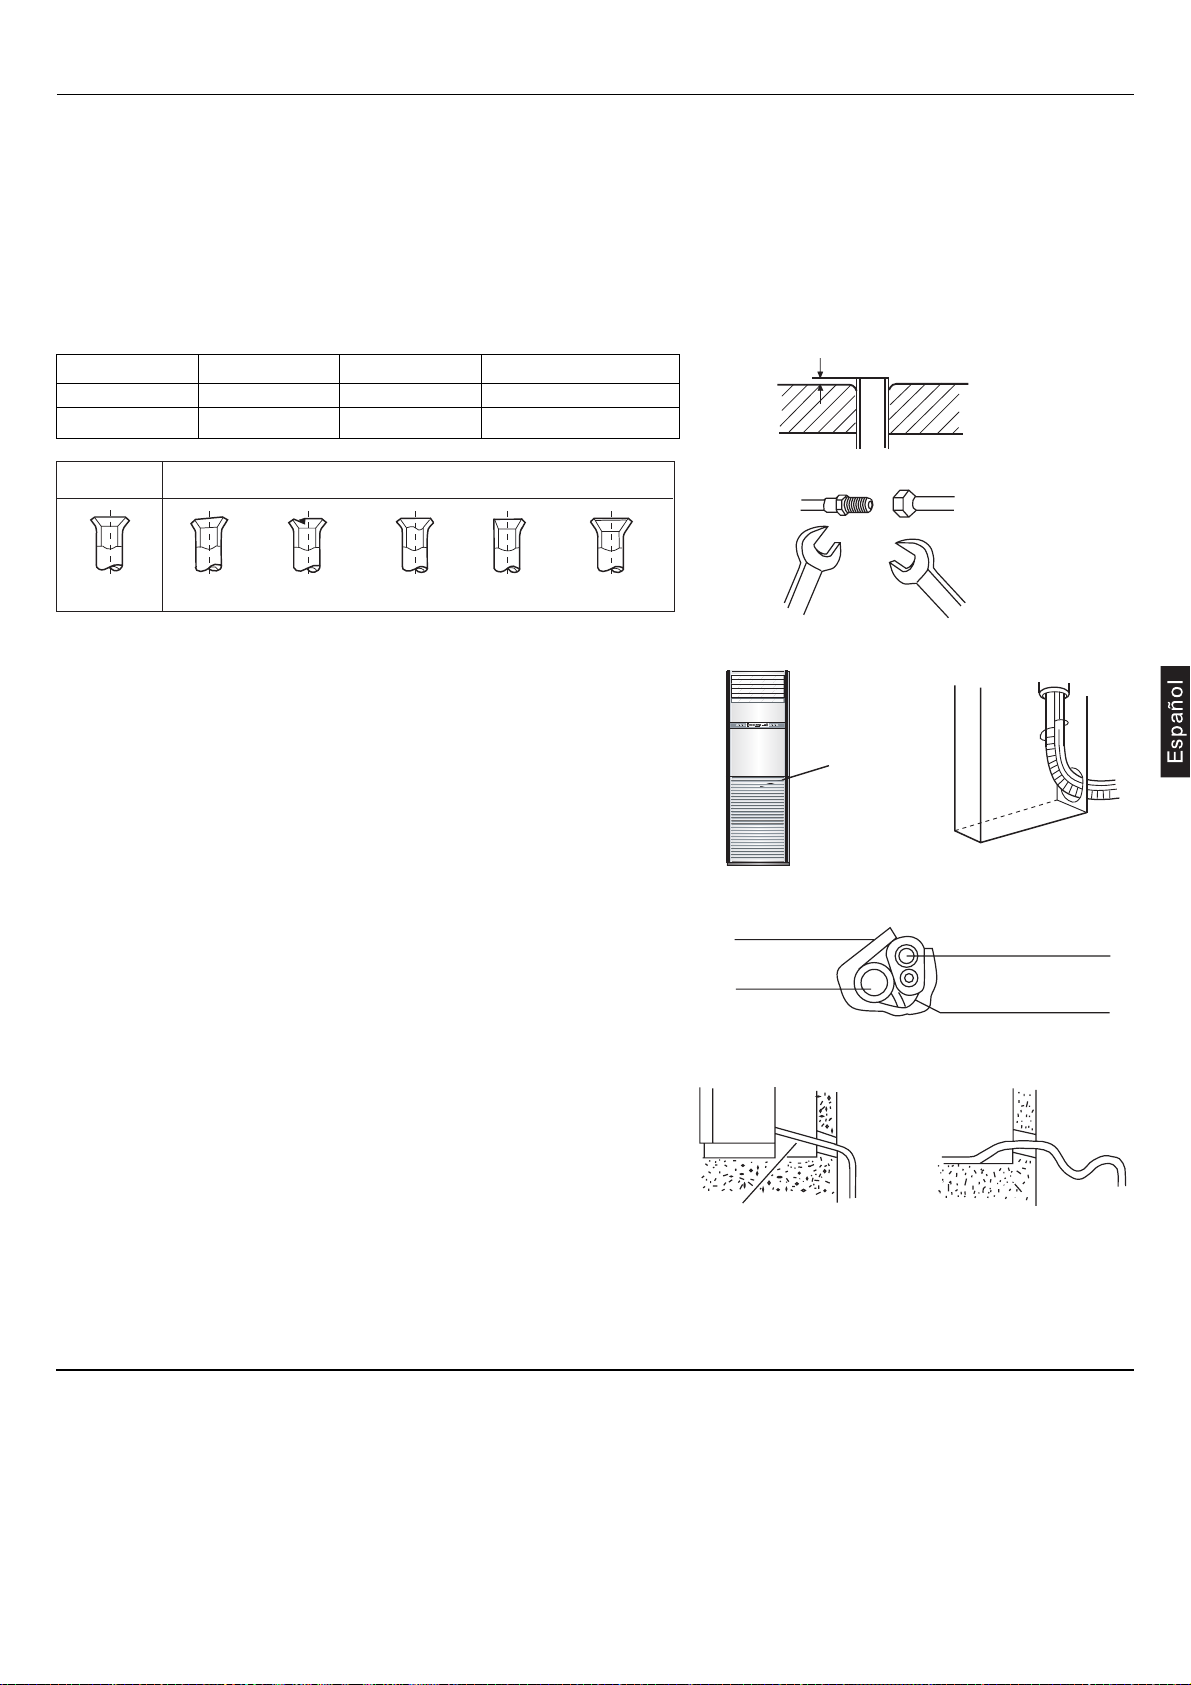
Connecting method
Apply refrigerant oil at half union and flare nut.
To bend a pipe, give the roundness as large as possible not to crash the pipe.
When connecting pipe, hold the pipe centre to centre then screw nut on by hand, refer to Fig.
Be careful not to let sundries, such as sands enter the pipe.
Piping Connection
Pipe cutting and flaring
Be sure to carry out deburring after pipe cutting with a pipe cutter.
Insert flaring tool to make a flare.
Forced fastening without centering may damage the threads and cause a gas leakage.
Fastening torque
32.7-39.9N.m
97.2-118.6N.m
FAN
MODE
ON/OFF
Liquid pipe
Gas pipe
Correct
Pipe dia.
9.52mm (3/8")
19.05mm (3/4")
Dimension A
1.0 ~ 1.8(mm)
1.4 ~ 2.2(mm)
Incorrect
Lean Damaged flare Crack Partial Too outside
Piping connection of indoor unit
1.Arrangement of piping and drainage pipe
After opening inlet grill, you will see a control box as shown in the
Fig. Remove the cover before wiring work.
Cut away, with a hammer or a saw, the lid for piping according to
piping direction.
A
SET
HEALTH
TEMP+ TEMP- HEALTH
HUMI
TIMER
SLEEP
TEMP
control box
Insulation material
Copper tube
Flaring tool
Drain hose
Connecting electric
cable for indoor and
outdoor unit
According to the piping method, connect the piping on indoor unit with union of
connecting pipe.
Arrange the piping as per the wall hole and bind drain hose, connecting electric
cable and piping together with polyethylene tape.
Insert the bound piping, connecting electric cable and drain hose through wall hole
to connect with outdoor unit.
2.Arrangement of drain hose
Drain hose shall be placed in under place.
Indoor unit
Up
There should be a slope when arrange drain hose. Avoid up and down
waves in drain hose.
If humidity is high, drain pipe( especially in room and indoor unit ) must
Slope
Good
Down
be covered with insulation material.
Piping connection of outdoor unit.
Connect the connecting pipe and inlet / outlet liquid pipe according to the piping method.
Vacuumizing
Discharge the air out of the indoor unit and the refrigerant pipe by vacuumizing.
(1)
Fasten all the nuts of the indoor and outdoor pipes to make these parts out of leakage.
(2)
Under the condition of the complete close of the indoor and outdoor valve center (both liquid and gas side), dismount
the service valve cap. Vacuumizing through the charge mouth of the service valve.
After vacuumizing, fasten the service valve and dismount the cap of the big and small stop valve, then loosen the stop
(3)
valve center completely and fasten the big and small stop valve.
Bad
17
Page 20

Installation Procedure
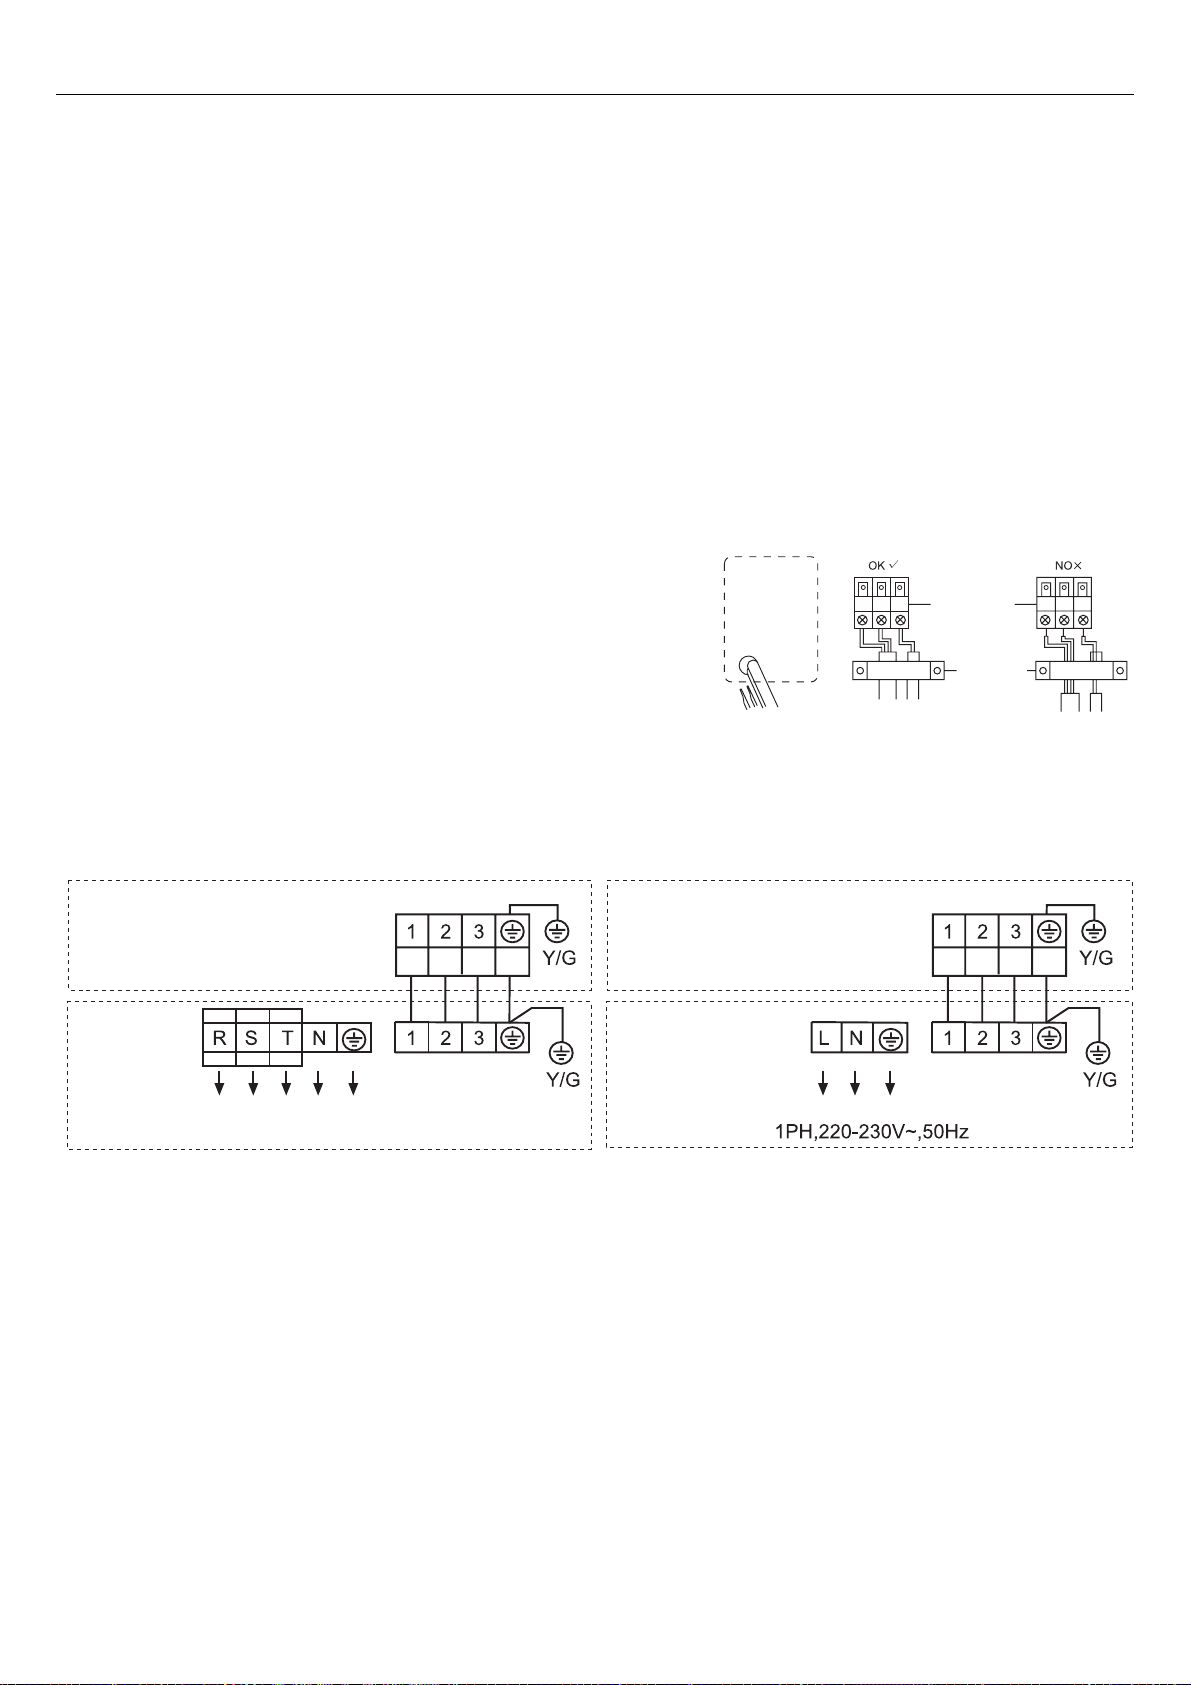
Electrical wiring
Note:
Electrical wiring must be done by qualified person.
The power supply connects from the outdoor unit.
The connecting cable and power cable are self-provided.
Use copper wire only.
Air conditioner must use an exclusive line (over 30A)
When installing air conditioner in a wet place, try to use a circuit breaker against current leakage.
When installing in other places, use circuit breaker as far as possible.
The breaker of the air conditioner should be all-pole switch; and the distance between its two contacts should be no less
than 3 mm.
Such means for disconnection must be incorporation in the fixed wiring
The parameter of connecting cable is H05RN-F 4G 2.5mm2.
The parameter of the power cable should be over H07RN-F 5G 4.0mm
Wiring of indoor unit
Insert the cable from outside the wall hole where piping already exist.
Pull it out from front.
Loosen terminal screws and insert cable end fully into terminal block,
then tighten it.
Pull the cable gently to make sure it is tight.
Replace cover after wiring.
Wiring of outdoor unit
Insert the cable from inside the wall hole where piping already exists.
Pull it out from front.
Loose terminal screw and insert cable end fully into terminal block,
then tighten it.
Pull the cable gently to make sure it is tight.
Replace cover after wiring.
2
OK NO
terminal block
table clamp
Note:
When connecting indoor and outdoor wire, check the number on indoor and outdoor terminal blocks. Incorrect wiring may
damage air conditioner's controller or cause operation failure.
18
Page 21

Installation Procedure
Installation inspection and test run:
Please operate unit according to this Manual.
Items to be checked during test run. Please made a " " in " "
Are there any gas leakage?
How is insulation at piping connection carried out?
Are electric wires of indoor and outdoor unit firmly inserted into terminal block?
Is electric wiring of indoor and outdoor securely fixed?
Is drainage securely carried out?
Is earth line ( grounding ) securely connected?
Is power supply voltage abided by the code?
Is there any noise?
Is control display normal?
Is cooling operation normal?
Is room temp. regulator normal?
Test Run
19
Page 22

Page 23

CLIMATIZADOR UNITARY SMART COLUMNA
MANUAL DE INSTRUCCIONES MANUAL DE INSTALACIÓN
Precauciones para el uso
Advertencias
Denominación de los componentes
Componentes y funciones
Funcionamiento
Ahorro energético
Mantenimiento
Guía para la búsqueda de las averías
Mantenimiento
Solucionar problemas
Precauciones de seguridad
Instalación
Preparar la instalación
Tuberías refrigerantes
Realización del vacío
Conexiones eléctricas
Prueba de funcionamiento
–¨ 1.000
3
4
5
6
7
9
9
10
11
12
13
14
15
17
17
18
19
Español
Lea detenidamente este manual antes de instalar el aparato.
Guarde este manual de uso para futuras consultas.
Page 24

Haier Industrial Park, No.1 Haier Road, Qingdao, República Popular China
CONFORMIDAD DE LOS MODELOS
SEGÚN LAS NORMATIVAS EUROPEAS
CE
Todos los productos cumplen los requisitos de las siguientes
normas europeas:
- Directiva de baja tensión 73/23/CEE
- Directiva de baja tensión 2006/95/CE
- Compatibilidad electromagnética 89/336/CEE
- Compatibilidad electromagnética 2004/108/CE
ROHS
Los productos cumplen los requisitos de la directiva 2002/95/
CEE establecida por el Parlamento Europeo y el Consejo sobre
la Restricción del uso de determinadas sustancias peligrosas en
aparatos eléctricos y electrónicos (Directiva RoHS de la Unión
Europea).
WEEE
De acuerdo con la directiva 2002/96/CE del Parlamento Europeo,
se informa al consumidor acerca de los requisitos que han de
cumplirse para deshacerse de productos eléctricos y electrónicos.
REQUISITOS DE DESECHO:
Su aparato de aire acondicionado ha sido
marcado con este símbolo que significa que
los productos de tipo eléctrico y electrónico
no deben mezclarse con la basura doméstica
sin clasificar. No intente desmontar el sistema
por sí mismo: tanto el desmontaje del sistema de aire
acondicionado como la manipulación del refrigerante, el
aceite y cualquier otro componente deben ser llevados
a cabo por un instalador cualificado, de acuerdo con la
legislación local y nacional aplicable. Los aparatos de aire
acondicionado deben ser tratados en instalaciones de
manipulación especializadas para su reutilización, reciclado
y recuperación. Al garantizar la correcta eliminación de
este producto, estará contribuyendo a evitar las posibles
consecuencias negativas que podría provocar sobre el
medioambiente y la salud humana. Póngase en contacto
con el instalador o la autoridad local pertinente si desea
obtener más información. Las pilas deben ser extraídas del
mando a distancia y eliminadas de forma independiente, de
acuerdo con la legislación local y nacional aplicable.
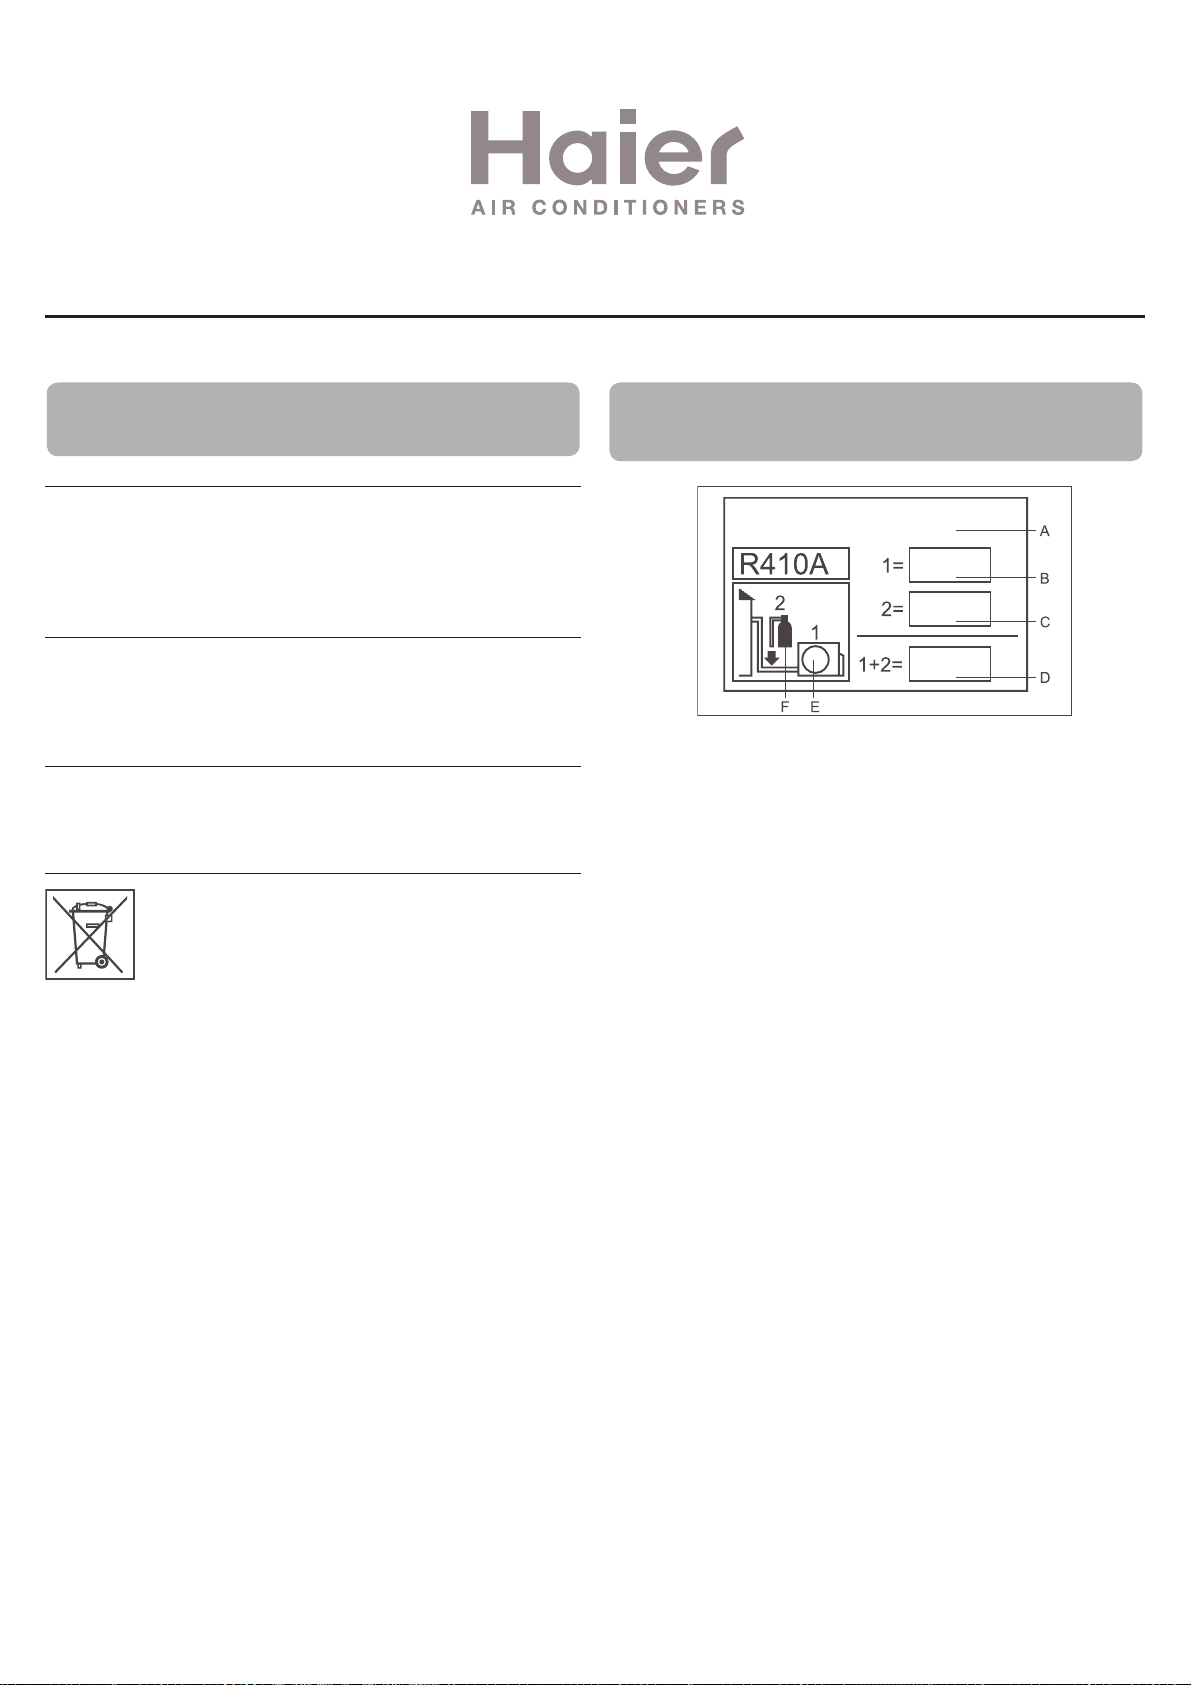
INFORMACIÓN IMPORTANTE ACERCA DEL REFRIGERANTE UTILIZADO
Contiene gases uorados de efecto invernadero
regulados por el Protocolo de Kioto.
Kg
Kg
Kg
Este producto contiene gases fluorados de efecto invernadero
regulados por el Protocolo de Kioto. No los libere a la atmósfera.
Tipo de refrigerante: R410A
Valor GWP*: 1975 1975
GWP = Potencial de contribución al calentamiento global
Escriba con tinta indeleble:
• 1 La carga de refrigerante que contiene el producto de fábrica
• 2 La cantidad de refrigerante adicional cargada in situ y
• 1+2 La carga total de refrigerante en la etiqueta de refrigerante
suministrada con el producto. Una vez escritos los datos
correspondientes, la etiqueta deberá adherirse cerca de la
conexión de carga del producto (por ejemplo, sobre la parte interna
de la cubierta de la válvula de retención).
A Contiene gases fluorados de efecto invernadero regulados por
el Protocolo de Kioto.
B Carga de refrigerante que contiene el producto de fábrica:
consulte la placa de características de la unidad.
C Cantidad de refrigerante adicional cargada in situ.
D Carga total de refrigerante.
E Unidad exterior.
F Botella de refrigerante y analizador para carga.
Page 25

• Antes de usar el climatizador lea el presente manual de instrucciones
• Las precauciones de seguridad que figuran a continuación se subdividen en PELIGRO y ATENCIÓN
La palabra PELIGRO corresponde a precauciones que, en caso de no observarse, pueden comportar serias consecuencias como
muerte, lesiones graves, etc. No obstante, la palabra ATENCIÓN también corresponde a precauciones que, en caso de no observarse, pueden causar serios problemas, según la situación. Conserve las Precauciones de seguridad siempre a mano, para que pueda consultarlas siempre que sea necesario.
PELIGRO
• Este climatizador debe ser instalado por personal especializado; no intente instalarlo personalmente.
• Para cualquier reparación, diríjase siempre únicamente a un Centro de Asistencia Técnica autorizado.
• En caso de mudanza o reubicación del aparato, diríjase a un Centro de Asistencia Técnica autorizado para el desmontaje y nueva
instalación del climatizador.
• Evite permanecer directamente expuesto al flujo de aire frío difundido por el climatizador durante mucho tiempo.
• No introduzca nunca los dedos ni ningún objeto en las rejillas de salida o de aspiración.
• No encienda ni apague el climatizador introduciendo o retirando el enchufe del cable de alimentación.
• Vigile de no dañar el cable de alimentación.
• En caso de mal funcionamiento del climatizador (olor de quemado u otro), pare inmediatamente el aparato, desenchúfelo de la toma
de corriente y diríjase a un Centro de Asistencia Técnica autorizado.
ADVERTENCIAS
• Ventile periódicamente la estancia durante el funcionamiento del climatizador.
• No dirija el flujo de aire del aparato directamente hacia chimenea u otro aparato para la calefacción.
• No apoye objetos o suba sobre el climatizador.
• No cuelgue objetos en la unidad interior.
• No coloque jarrones de flores o recipientes que contengan agua sobre el climatizador.
• No exponga el climatizador al contacto con el agua.
• No manipule el climatizador con las manos mojadas.
• No tire del cable de alimentación
• Desenchufe siempre el cable de alimentación de la toma de corriente si se prevé no usar el climatizador durante largos períodos de
tiempo.
• Controle periódicamente las condiciones de instalación para localizar eventuales daños.
• No exponga a animales o plantas al flujo de aire directo procedente del climatizador.
• No beba el agua de desagüe eliminada por el climatizador.
• Este aparato no debe usarse para otros fines, como la conservación de alimentos, instrumentos de precisión u obras de arte, el cultivo de plantas o la cría de animales.
• No ejerza fuertes presiones sobre los deflectores de aire.
• Haga funcionar siempre el aparato con el filtro del aire correctamente instalado.
• No obstruya nunca las rejillas de aspiración y de salida del aire.
• Asegúrese de mantener una distancia mínima de un metro entre eventuales equipos electrónicos y las unidades interior y exterior.
• Evite instalar el climatizador cerca de chimeneas u otras fuentes de calor.
• Durante las operaciones de instalación de las unidades interior y exterior, evite el acceso de los niños al lugar.
• No use gases inflamables cerca del climatizador.
Precauciones para el uso
3
Page 26

Temperatura interna
Temperatura exterior
Temperatura interna
Temperatura exterior
4
Límites de funcionamiento
Gama útil de las temperaturas ambiente:
BS: Temperatura con Bulbo Seco
BH: Temperatura con Bulbo Húme
do
Advertencias
Refrigeración
Calefacción
máx. BS/BH
mín. BS/BH
máx. BS/BH
mín. BS/BH
máx. BS
mín. BS
máx. BS/BH
mín. BS
32/23°C
18/14°C
46/26°C
10/6°C
27°C
15°C
24/18°C
-15°C
• Si el climatizador se usa en condiciones de temperatura superiores a las que figuran más arriba, el circuito automático de protección incorporado podría activarse interrumpiendo el funcionamiento del climatizador para no dañar los circuitos internos.
Por el contrario, en caso de uso del climatizador con temperaturas inferiores a las indicadas, el intercambiador de calor podría
congelar con las consiguientes pérdidas de agua u otras anomalías de funcionamiento.
• No use el acondicionador de aire para fines distintos a la refrigeración, calentamiento, deshumidificación o ventilación de las
estancias.
• El método de cableado debe estar en línea con el estándar
local.
• Las pilas descargadas se deben tirar a los contenedores adecuados.
• Si el fusible de la tarjeta electrónica salta, sustitúyalo por uno del
tipo T3.15A/250VAC.
• El interruptor del climatizador debe interrumpir todos los polos;
la distancia entre los 2 contactos no debe ser inferior a 3 mm.
• Use sólo cables de cobre.
• Todos los cables deben tener el certificado de autenticidad
Europea.
• Se entrega sin los cables de alimentación y de conexión.
Page 27

5
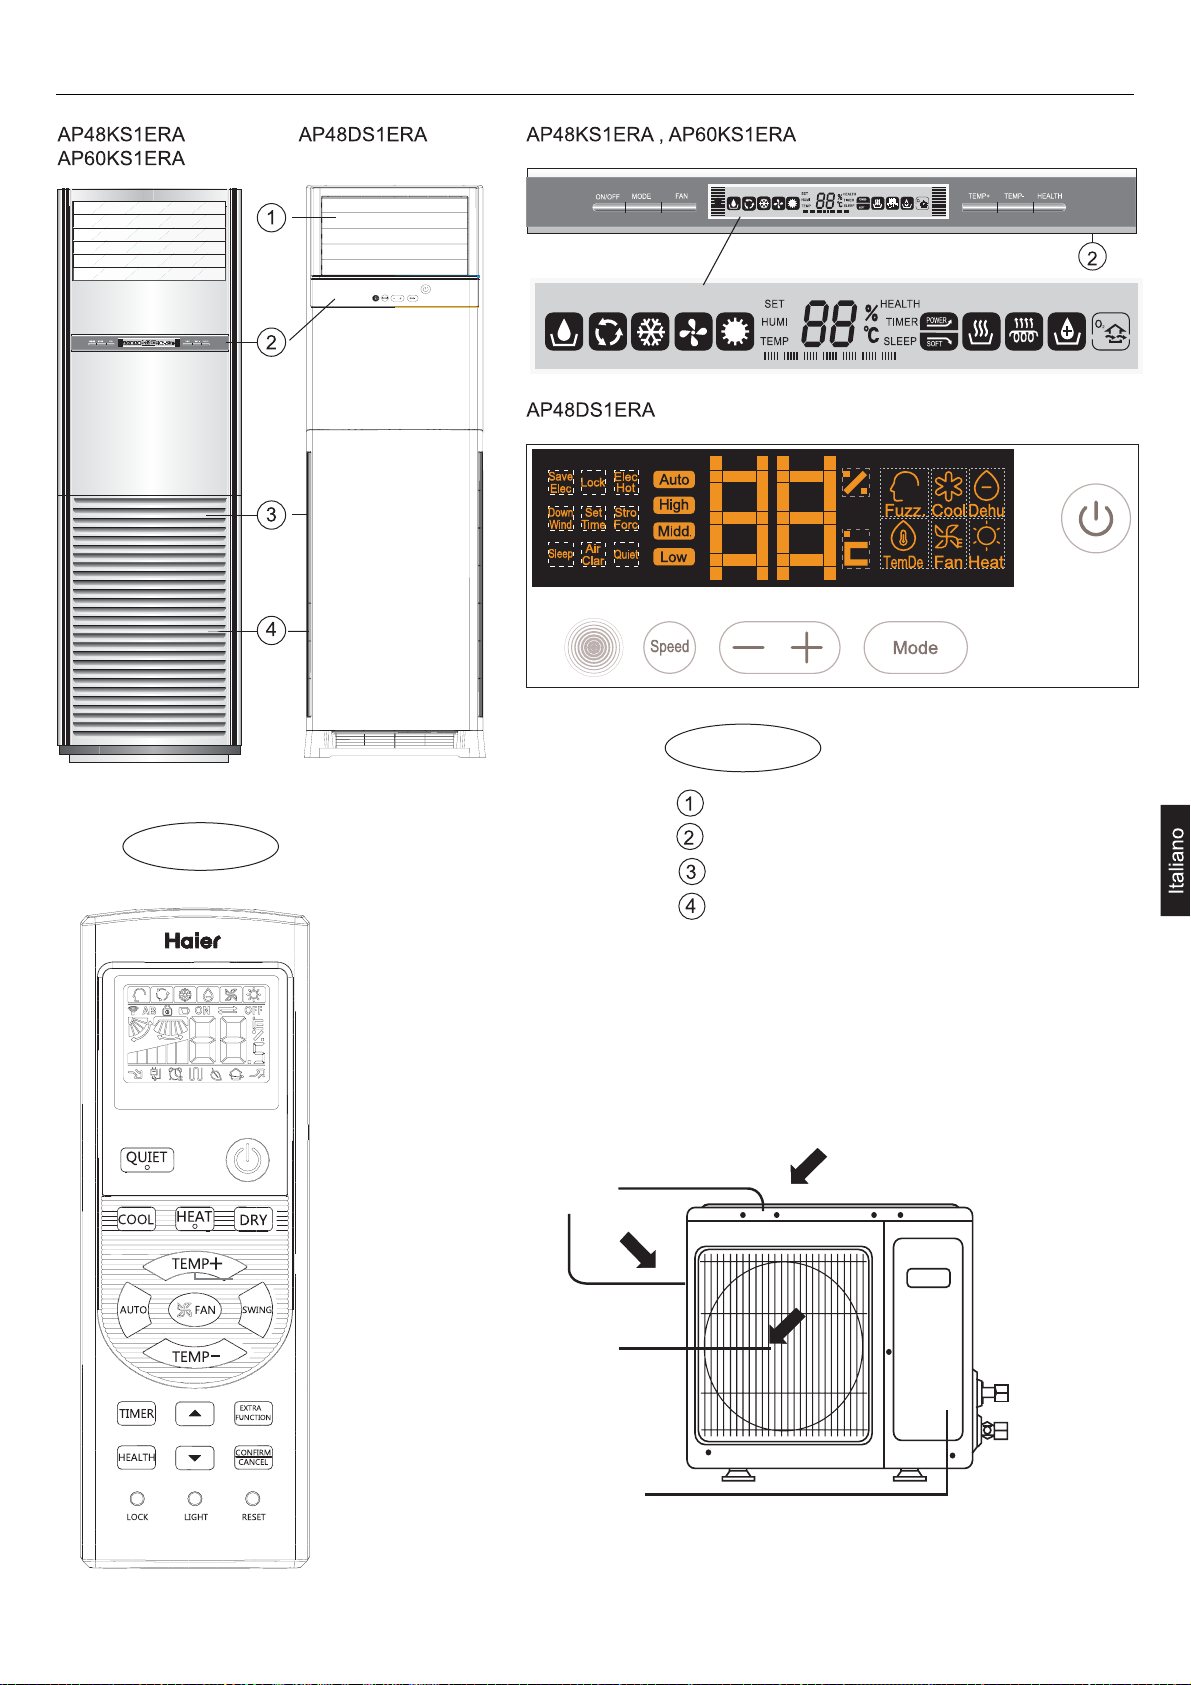
Denominación de los componentes
Mando a distancia
–¨ 1.000
Unidad interior
Rejilla salida aire
Panel de control
Rejilla entrada aire
Filtro de aire (en el interior)
Rejilla de
aspiración
Rejilla
de salida
Compresor
(en el interior)
Page 28

6
Componentes y funciones
Mando a distancia
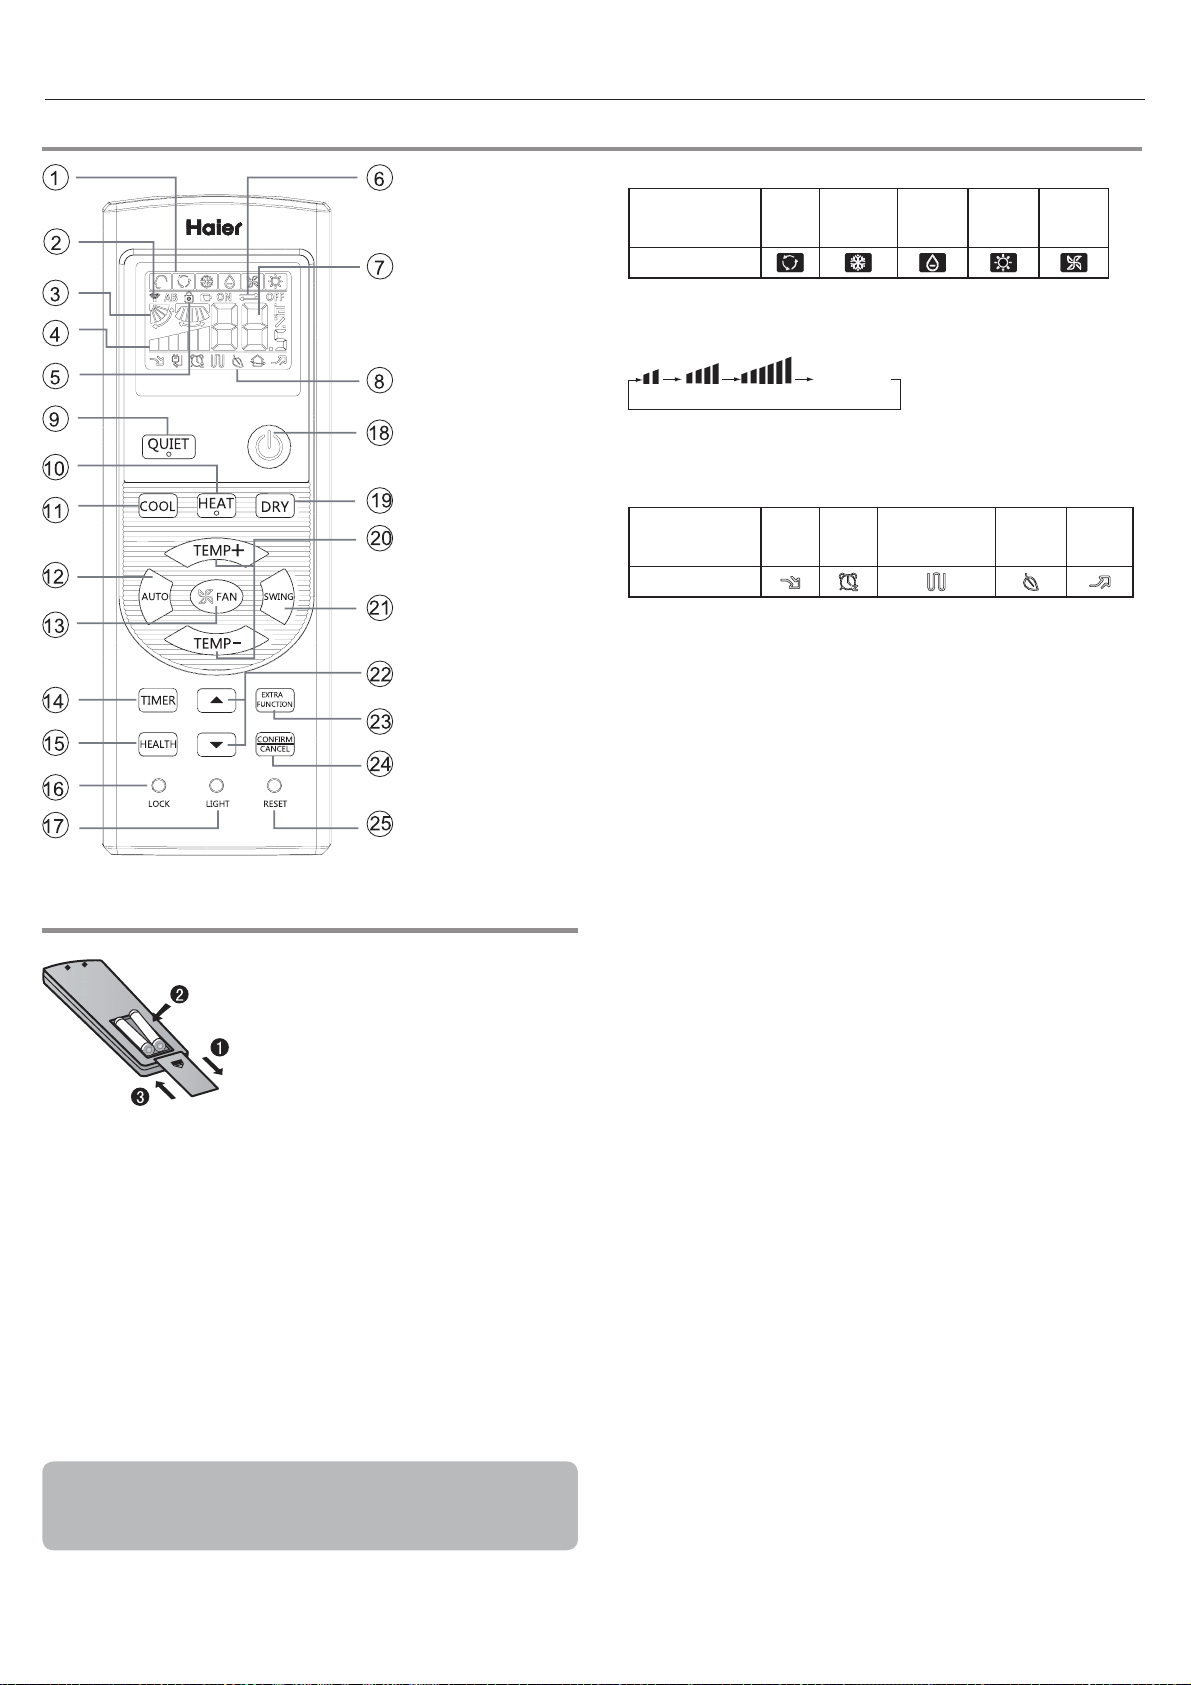
Instalación de las pilas
Extraiga la cubierta de las baterías;
1
Instale las baterías como muestra
2
la ilustración. 2 pilas R-03, botón de
restablecimiento (cilindro);
Asegúrese de que las pilas están
3
alineadas correctamente con las
polaridades "+" y "-";
Instale las pilas y vuelva a colocar de nuevo la cubierta.
4
Nota:
• La distancia entre el cabezal de transmisión de la señal y el
orificio del receptor debe ser de unos 7 m sin obstáculos.
• Si se instalan lámparas fluorescentes o se utilizan teléfonos
inalámbricos en la sala, el receptor podría sufrir interferencias
al recibir las señales, por lo que la distancia hasta la unidad
interior deberá ser menor.
• Si se activan todos los indicadores de la pantalla o no es posible
visualizarlos correctamente durante el uso, significa que las
pilas se han agotado. Por favor, cambie las pilas.
• Si el mando a distancia no funciona normalmente durante su
uso, extraiga las pilas y vuelva a instalarlas pasados unos
minutos.
1. Indicador de modo
Modo de
funcionamiento
Mando a
distancia
2. Indicador de envío de señal
3. Indicador de OSCILACIÓN
4. Indicador de VELOCIDAD DEL VENTILADOR
BAJA MEDIA ALTA AUTOMÁTICA
5. Indicador de BLOQUEO
6. Indicador TEMPORIZADOR DE APAGADO TEMPORIZADOR
DE ENCENDIDO
7. Indicador de TEMPERATURA
8. Indicador de funciones adicionales
Modo de
funcionamiento
Mando a distancia
El calor eléctrico no está disponible.
9. Botón SILENCIO
10. Botón CALEFACCIÓN
11. Botón REFRIGERACIÓN
12. Botón AUTOMÁTICO
13. Botón VENTILADOR
14. Botón TEMPORIZADOR
15. Botón SALUDABLE
(Este modelo no tiene esta función.)
16. Botón BLOQUEAR
Se utiliza para bloquear los botones y la pantalla LCD.
17. Botón LUZ
(Este modelo no tiene esta función.)
Controla la activación y desactivación de la iluminación del panel
de indicadores LED de la unidad interior.
18. Botón ENCENDIDO y APAGADO
19. Botón SECO
20. Botón TEMPERATURA
21. Botón OSCILACIÓN
22. Botón HORA
23. Botón FUNCIÓN ADICIONAL
Función: función Solo ventilador, función Envío de flujo de aire
saludable hacia arriba y hacia abajo, función Sueño, función
Renovación del aire (función reservada) y conversión de grados
Fahrenheit/Celsius
Función de establecimiento del modo Intenso, función de oscilación
hacia la izquierda y hacia la derecha,
24. Botón CANCELAR/CONFIRMAR
Función: establecer y cancelar el temporizador y otras funciones
adicionales.
25. Botón RESTABLECER
Si el mando a distancia presenta alguna anomalía, introduzca un
objeto puntiagudo a través del orificio para pulsar este botón y
restablecer el mando a distancia.
AUTOMÁTICA REFRIGERACIÓN SECO CALEFACCIÓN VENTILADOR
Visualización
circular
Ayuda
SILENCIO SUEÑO
suplementaria
con calor
eléctrico
función de calefacción de 10 °C
SALUDABLE INTENSO
Sugerencia:
Extraiga las pilas si no tiene intención de utilizar el aparato
durante un período largo de tiempo. Si observa alguna pantalla
extraña después de extraer las pilas deberá pulsar el botón
Restablecer.
Page 29

7
Funcionamiento
Funcionamiento básico
Mando a distancia
1.Puesta en marcha de la unidad
Pulse el botón de ENCENDIDO / APAGADO del mando a
distancia para poner en marcha la unidad.
2.Selección del modo de funcionamiento
Botón REFRIGERACIÓN: modo Refrigeración
Botón CALEFACCIÓN: modo Calefacción
Botón SECO: modo Deshumidicación
3. Selección de la conguración de temperatura
Pulse el botón
/ .
--Cada vez que pulse este botón, el valor de
temperatura aumentará 1 ºC. Si mantiene el botón
pulsado, la temperatura aumentará rápidamente.
--Cada vez que pulse este botón, el valor de
temperatura bajará 1 ºC. Si mantiene el botón
pulsado, la temperatura bajará rápidamente.
Seleccione la temperatura que desee.
4.Selección de la velocidad del ventilador
- -Pulse el botón VENTILADOR. Cada vez que pulse el
botón, la velocidad del ventilador cambiará de acuerdo
con el ciclo ilustrado a continuación:
Visualización
circular
BAJA MEDIA ALTA AUTOMÁTICA
- -El aparato de aire acondicionado funciona según la
velocidad de ventilador indicada.
Si el VENTILADOR se congura en el modo
AUTOMÁTICO, el aparato de aire acondicionado
ajustará automáticamente la velocidad del mismo según
la temperatura de la habitación.
Modo de
funcionamiento
AUTOMÁTICA
REFRIGERACIÓN
SECO
CALEFACCIÓN
VENTILADOR
Mando a
distancia
Nota
En el modo de funcionamiento automático, el aparato de
aire acondicionado seleccionará automáticamente el modo
Refrigeración o Calefacción según la temperatura de la
habitación. Si el VENTILADOR está congurado en el modo
AUTOMÁTICO, el aparato de aire acondicionado ajustará
automáticamente su velocidad según la temperatura de la
habitación.
En el modo SECO, cuando la temperatura de la sala
sea inferior a la temperatura congurada +2ºC, el equipo
funcionará de forma intermitente a BAJA velocidad,
independientemente de la conguración del ventilador.
En el modo CALEFACCIÓN, el equipo distribuirá aire
caliente después de un corto período de tiempo durante
el que se activará la función de prevención de distribución
de aire frío. Si el VENTILADOR se congura en el modo
AUTOMÁTICO, el aparato de aire acondicionado ajustará
automáticamente la velocidad del mismo según la
temperatura de la habitación.
En el modo VENTILADOR, la unidad no funcionará en los
modos REFRIGERACIÓN o CALEFACCIÓN, sinoúnicamente
en el modo VENTILADOR. El modoAUTOMÁTICO no está
disponible en el modo VENTILADOR. Elajuste de temperatura
quedará deshabilitado. En el modo VENTILADOR, el modo de
funcionamiento Sueño no estará disponible.
Funcionamiento en modo Sueño
Pulse el botón para acceder a opciones adicionales.
Cuando la secuencia muestre , parpadeará. A
continuación, pulse
para entrar en la función Sueño.
Modo de funcionamiento
1.Entrada Botón SECO
- -1 hora después de que se inicie el modo SUEÑO, la
temperatura aumentará 1°C por encima del valor de
temperatura establecido. Después de otra hora, la
temperatura aumentará 1°C más. La unidad funcionará
durante 6 horas más y después se detendrá. La
temperatura será mayor que el valor de temperatura,
de forma que la temperatura de la habitación no sea
demasiado baja mientras duerme.
Se iniciará el funcionamiento
en modo SUEÑO
1 h
1 h
Temperatura
congurada
En los modos REFRIGERACIÓN y SECO
Aumenta 1 °C
Se iniciará el funcionamiento
en modo SUEÑO
Aprox. 6 horas
Aumenta 1 °C
La unidad se
detiene
2.En el modo CALEFACCIÓN
- -1 hora después de que se inicie el modo SUEÑO,
la temperatura bajará 2°C por debajo del valor de
temperatura establecido. Después de otra hora, la
temperatura bajará 2°C más. Después de 3 horas más, la
temperatura aumentará 1ºC. El equipo funcionará durante
3 horas más y después se detendrá. La temperatura
será inferior a la temperatura congurada, de forma que
la temperatura de la habitación no sea demasiado alta
mientras duerme.
Temperatura
congurada
1 h
1 h
Se iniciará el
funcionamiento en
modo SUEÑO
En el modo CALEFACCIÓN
Desciende 2 °C
Desciende 2 °C
3 h
La unidad se
detiene
3 h
Aumenta1 °C
Se iniciará el
funcionamiento en
modo SUEÑO
3.En el modo AUTOMÁTICO
- -La unidad funcionará en el modo de sueño
correspondiente, adaptado al modo de funcionamiento
seleccionado automáticamente.
Page 30

8
Funcionamiento
4.En el modo VENTILADOR
No dispone de función SUEÑO.
5. Establecer el cambios en la velocidad del aire durante el
sueño
Si la velocidad del aire es alta o media antes de activar
la función SUEÑO, active esta función para que dicha
velocidad se reduzca una vez activada la función SUEÑO.
Si la velocidad del aire es baja, no se llevará a cabo
ningún cambio.
Nota
Si se establece la función TEMPORIZADOR, la función Sueño
no se podrá congurar. Después de congurar la función
Sueño, si el usuario reinicia la función TEMPORIZADOR,
la función Sueño se cancelará; la máquina recuperará su
estado de temporización de encendido.
Funcionamiento en modo
INTENSO/SILENCIOSO
(1) Funcionamiento en modo INTENSO
Utilice esta función si necesita calentar o refrigerar
rápidamente una habitación.
Pulse el botón
Cuando la secuencia muestre , parpadeará.
Presione para entrar en la función del modo Intenso.
Cuando cancele la función, vuelva a entrar en las opciones
adicionales para cancelar la función del modo Intenso.
(2) Funcionamiento en modo SILENCIOSO
Utilice esta función si desea que la unidad funcione de
forma silenciosa y le permita leer o descansar. Pulse el
botón SILENCIO. El mando a distancia mostrará
entrar en la función de silencio. Pulse de nuevo el botón
SILENCIO para cancelar la función de silencio.
Nota:
Si se selecciona el modo CALEFACCIÓN o
REFRIGERACIÓN rápido en el modo de funcionamiento
INTENSO, la habitación no presentará una distribución
homogénea de la temperatura. Si el modo de
funcionamiento SILENCIOSO se mantiene activo durante
un período prolongado de tiempo, no se alcanzarán niveles
ecaces de calefacción o refrigeración.
Ajuste de la dirección del flujo de aire
1. Indicador de estado del ujo de aire
REFRIGERACIÓN/SECO:
CALEFACCIÓN:
2
. Ajuste del ujo de aire hacia la izquierda y hacia
la derecha
(Este modelo no tiene esta función.)
para acceder a opciones adicionales.
y podrá
Estado inicial
Uso del temporizador de
encendido/apagado
1 Una vez que la unidad se encuentre en marcha, seleccione el
modo de funcionamiento que desee.
2.Pulse el botón TEMPORIZADOR para cambiar al modo
TEMPORIZADOR. Cada vez que pulse este botón, la pantalla
cambiará de acuerdo con el ciclo ilustrado a continuación: Mando
a distancia:
0,5 h
TEMPORIZADOR
DE ENCENDIDO
Seleccione a continuación el modo TEMPORIZADOR que desee
(TEMPORIZADOR DE ENCENDIDO, TEMPORIZADOR DE
APAGADO o TEMPORIZADOR DE ENCENDIDO-APAGADO).
"Encendido" o "Apagado " parpadeará.
3.Pulse
Pulse el botón para cada hora. Para las primeras 12 horas,
se aumentará 0,5 horas con cada pulsación. Después de las
primeras 12 horas, se aumentará 1 hora con cada pulsación.
Pulse el botón para cada hora. Para las primeras 12 horas,
se reducirá 0,5 horas con cada pulsación. Después de las
primeras 12 horas, se reducirá 1 hora con cada pulsación.
Puede ajustar cualquier hora comprendida en el intervalo de
24 horas.
4. Conrmar la conguración del temporizador
Después de ajustar el tiempo, presione el botón
el tiempo. El botón ENCENDIDO o APAGADO no volverá a
parpadear.
5. Cancelar la conguración del temporizador
Presione el botón del temporizador las veces que sea necesario
hasta que desaparezca el indicador del tiempo.
Sugerencias:
Después de sustituir las pilas o si se produce un fallo en el
suministro eléctrico, la conguración de tiempo se restablecerá.
Según la secuencia de conguración de hora aplicada a las
funciones TEMPORIZADOR DE ENCENDIDO y TEMPORIZADOR
DE APAGADO, podrá realizar operaciones de Inicio-Parada o
Parada-Inicio.
Funcionamiento en el modo de
0,5 h
TEMPORIZADOR
DE APAGADO
/ para congurar la hora.
0,5 h
TEMPORIZADOR
DE ENCENDIDO-
APAGADO
APAGADO-ENCENDIDO
0,5 h
TEMPORIZADOR DE
y conrme
flujo de aire saludable
1.Pulse para comenzar
Establezca las condiciones de funcionamiento confortables.
2. Conguración de la función de ujo de aire saludable
Pulse el botón
este botón continuamente. La posición de las lamas cambiará
cíclicamente entre las tres posiciones siguientes. Elija la posición
de oscilación que necesite y, a continuación, presione el botón
para conrmar la selección.
1. Cancelación de la función de ujo de aire saludable
Pulse el botón
este botón de forma continua. La posición de las lamas cambiará
cíclicamente de nuevo entre las tres posiciones siguientes. Pulse
el botón
Aviso: no cambie la dirección del deector con la mano. Si no sigue
esta indicación, la rejilla no funcionará correctamente. Si la rejilla
no funciona correctamente, detenga el funcionamiento durante un
minuto y, a continuación, vuelva a intentarlo realizando el ajuste
con el mando a distancia.
Nota:
1 .Después de establecer la función de ujo de aire saludable, la
posición de la rejilla se jará.
2. En el modo de calefacción, es mejor seleccionar el modo
3. En el modo de refrigeración, es mejor seleccionar el modo
4. En el modo de refrigeración y seco, si utiliza el aparato de aire
acondicionado durante un prolongado período de tiempo en un
entorno con alta humedad, se puede producir condensación de
agua en la rejilla.
para acceder a opciones adicionales. Pulse
Flujo de aire
saludable
hacia arriba
para acceder a opciones adicionales. Pulse
para cancelar la operación.
Flujo de aire
saludable
hacia abajo
Posición
actual
.
.
Page 31
Ahorro energético
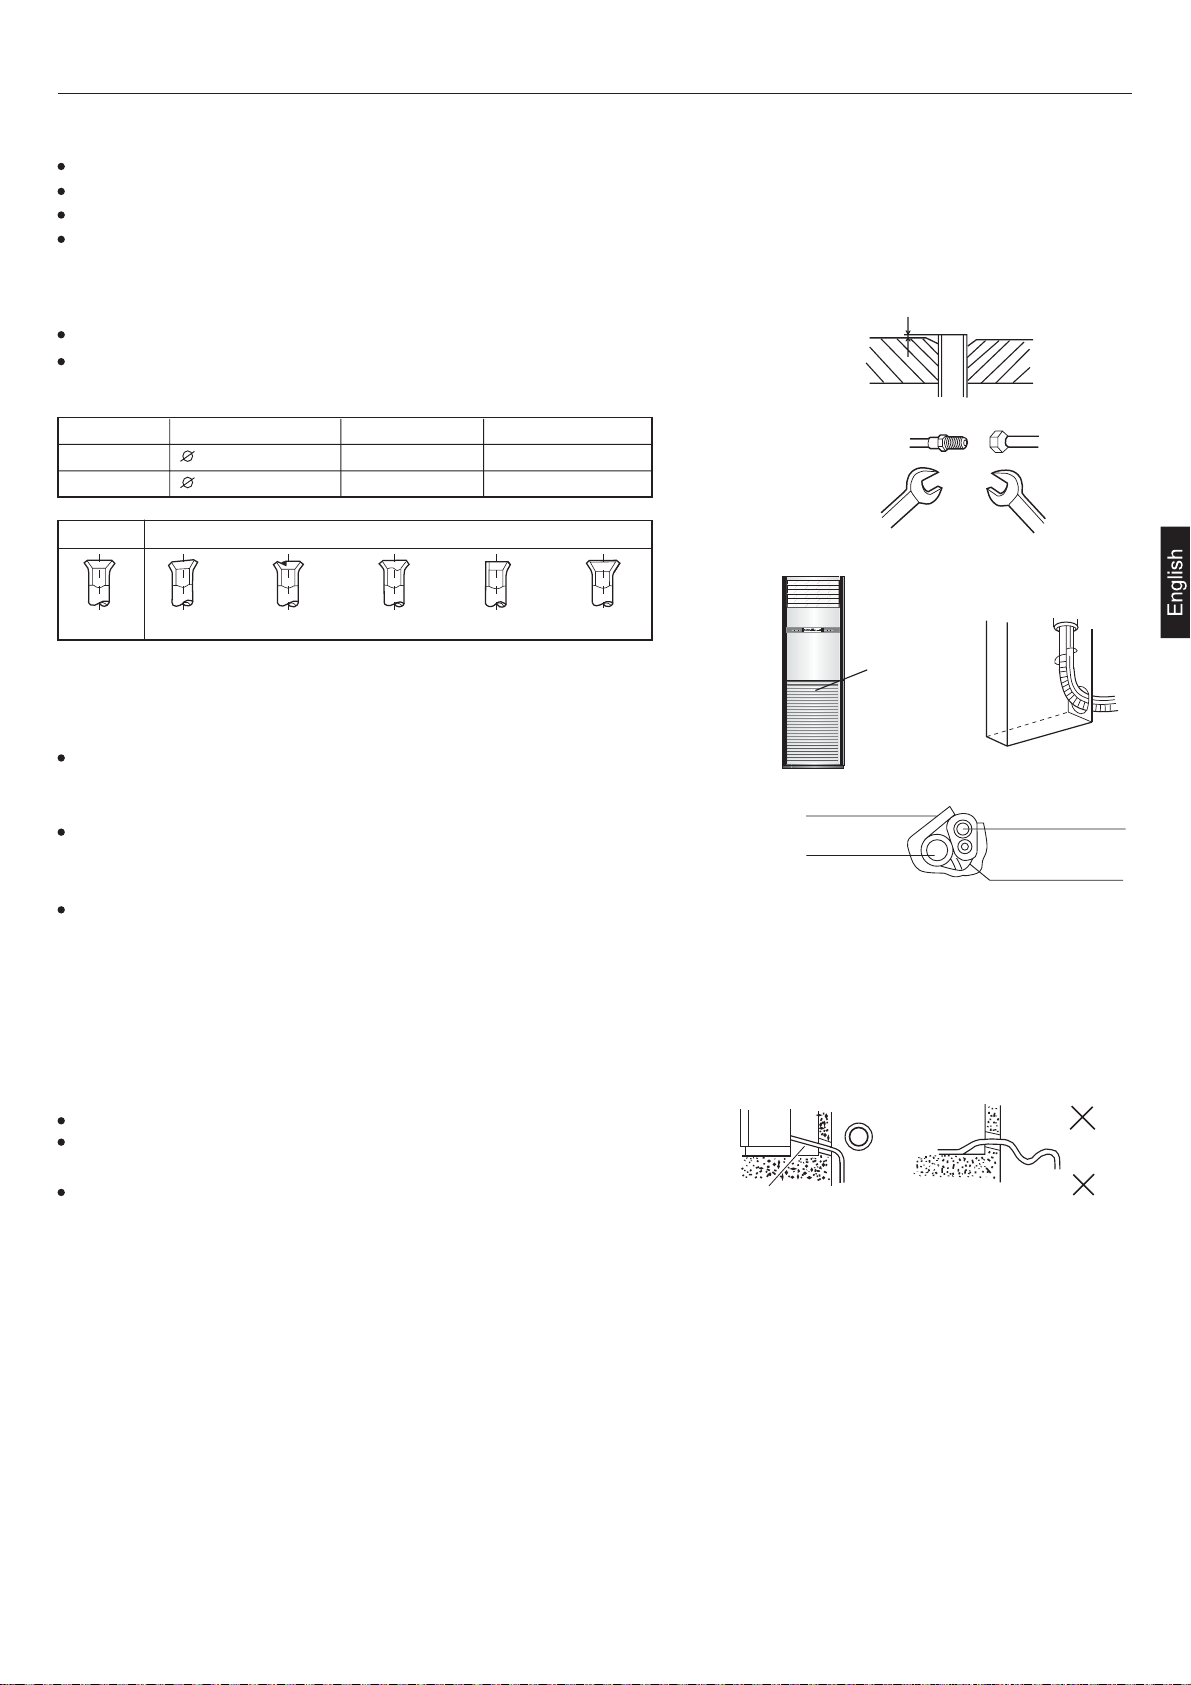
Mantener una temperatura ambiente adecuada
Mantener una temperatura demasiado caliente o demasiado fría es
nocivo para la salud y comporta un mayor consumo energético.
Limpie periódicamente el filtro de aire.
El filtro lleno comporta una disminución de la eficiencia de la calefacción y de la refrigeración, mayores consumos además de eventuales malos funcionamientos (p. ej. Pérdidas de agua en modo
refrigeración)
Uso del Timer
Gracias al uso del Timer se puede obtener la temperatura adecuada en el momento deseado, p. ej. al volver a casa.
Evitar la luz directa del sol y las corrientes de aire Regular adecuadamente la dirección del flujo de aire
Temperatura
adecuada
9
Mantenimiento
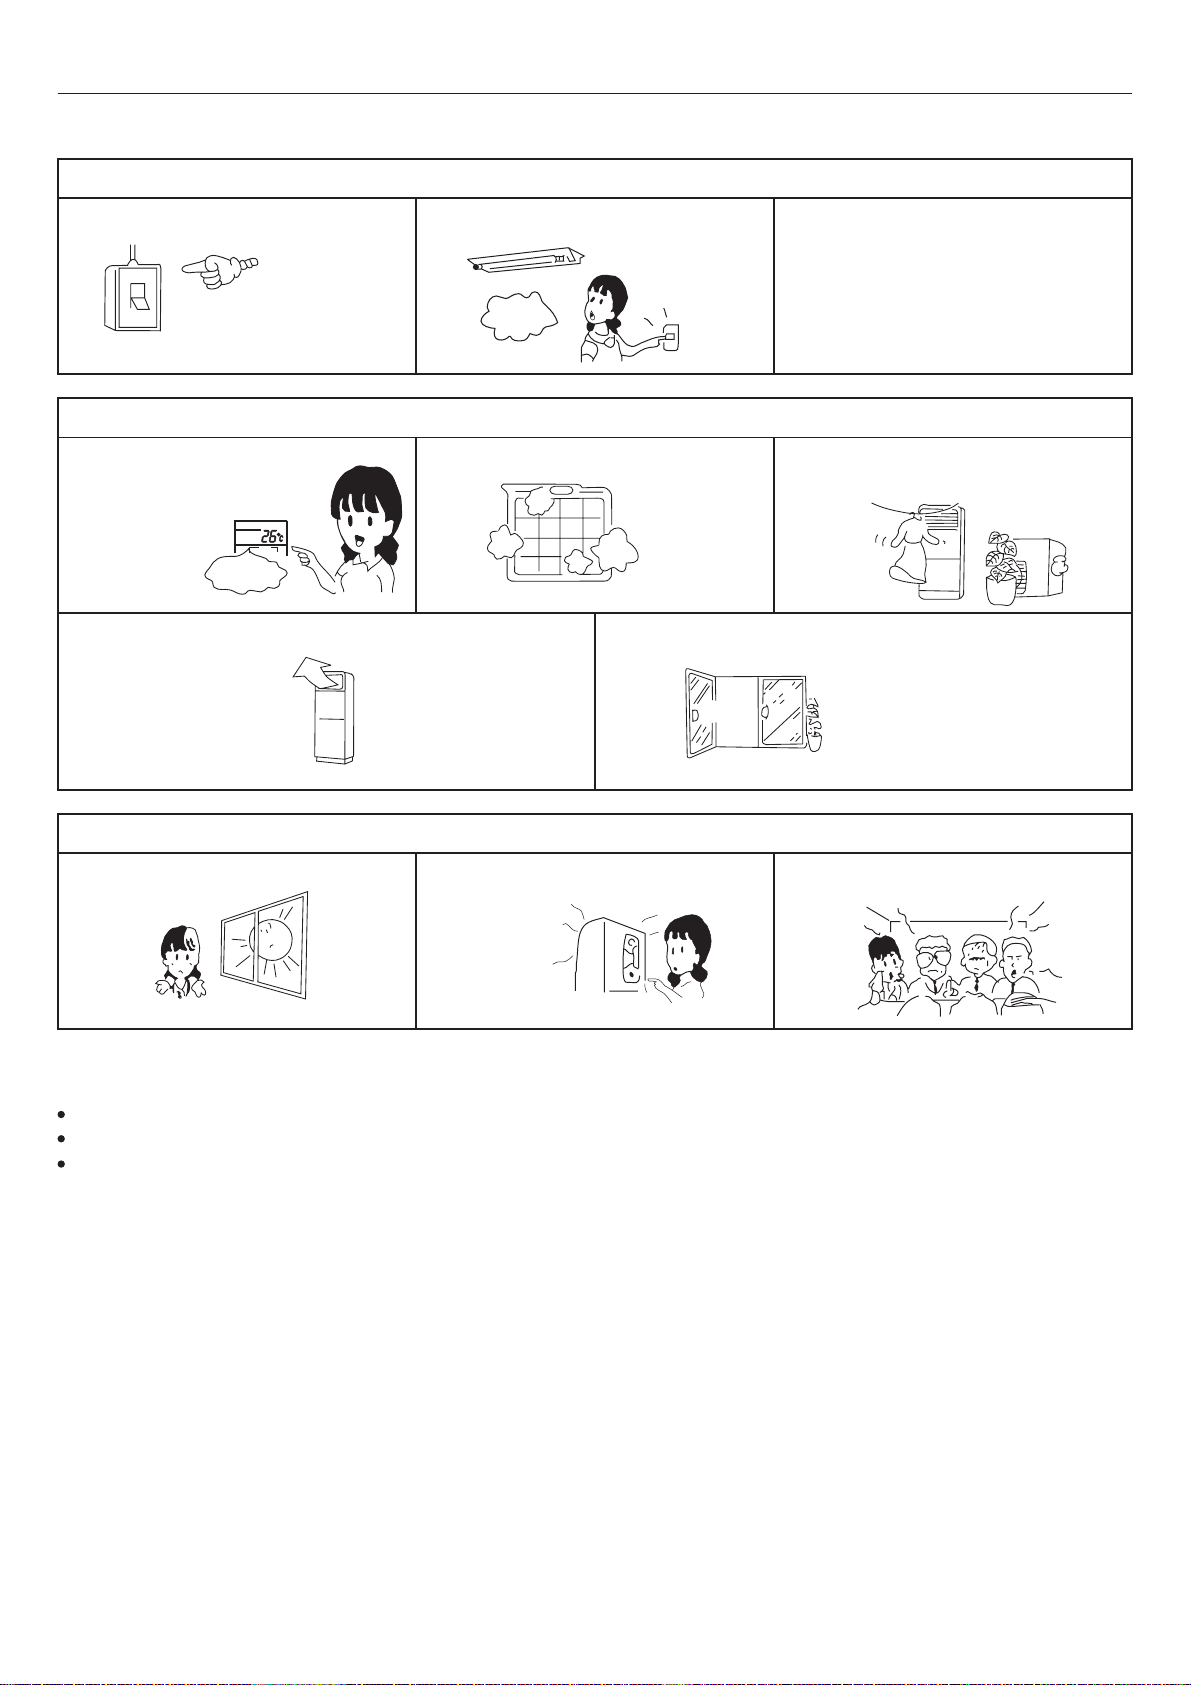
Lleve el interruptor de la alimentación
general a la posición OFF.
No toque el aparato con las manos
mojadas.
No use agua caliente o líquidos volátiles.
No vierta agua directamente sobre la unidad interior. No use spray, pinturas o insecticidas sobre la unidad.
Pueden dañar la unidad u ocasionar incendios.
Pericolo
Page 32
Mantenimiento
Limpieza del filtro del aire
• Extraiga el filtro como se indica en la figura.
• Limpie con agua o con un aspirador.
Si el filtro está muy sucio lávelo con detergente neutro.
• Aclárelo con agua limpia e instálelo sólo después de haberlo secado
completamente.
• No lo lave con agua a más de 40ºC, podría dañar el filtro.
10
Guía para la búsqueda de las averías
Rogamos que realice los siguientes controles antes de dirigirse al Servicio de Asistencia.
¿El interruptor situado más arriba de la
instalación está en ON?
¿El suministro eléctrico de la red es
normal?
¿El magnetotérmico de protección ha
saltado? Es muy peligroso: desconecte
inmediatamente la corriente y contacte
con el vendedor.
Black
out?
EL CLIMATIZADOR NO SE PONE EN MARCHA
¿El mando a distancia está
correctamente programado?
¿El deflector horizontal se halla orientado
hacia arriba? (En el modo Calefacción)
¿El filtro del aire está sucio?
¿Están las puertas o las ventanas
abiertas?
¿Hay obstáculos al flujo de aire de las
rejillas de aspiración o de salida?
REFRIGERACIÓN O CALEFACCIÓN INSUFICIENTE
Tem p .
correcta
Page 33
Guía para la búsqueda de las averías
LA REFRIGERACIÓN ES INSUFICIENTE
¿La luz solar entra directamente en la
estancia?
En el modo Calefacción se emite aire
frío. ¿El climatizador está en fase de
precalefacción?
¿Hay fuentes de calor “ocultas” en la
estancia?
¿La estancia está atestada?
Si después de haber realizado estos controles el climatizador aun no funciona correctamente, o si se verifican los siguientes
problemas, apague inmediatamente el aparato y póngase en contacto con el vendedor.
• Los fusibles o el magnetotérmico de protección se funden o saltan a menudo.
• Se forman gotas de condensación durante el funcionamiento en el modo Refrigeración o Deshumidificación.
• El funcionamiento no es normal o se oyen ruidos inusuales.
11
Mantenimiento
Mantenimiento y limpieza del aparato
• Limpie el aparato con un paño húmedo, luego séquelo con un paño suave.
• Si el aparato estuviera muy sucio, límpielo con un paño empapado de detergente neutro. Después de haber pasado el paño, eli-
mine el detergente con agua limpia.
• No use agua a más de 40ºC para no desteñir o deformar el aparato.
• No use sustancias químicas.
Mantenimiento a final de estación
• Deje el climatizador funcionando en modo Ventilación durante un día que haga buen tiempo para
que se sequen las partes interiores de la unidad.
• Desconecte el suministro eléctrico. De hecho, cuando el climatizador no funciona también hay
un consumo de energía eléctrica.
• Limpie el filtro y vuelva a colocarlo en el climatizador. Limpie la unidad interior.
Mantenimiento a principios de estación
• Verifique que no haya obstáculos delante de las rejillas de aspiración y de salida de las unidades
interior y exterior.
• Compruebe que el filtro de aire esté limpio y que esté colocado en el climatizador. Si la unidad
se pusiera en funcionamiento sin filtro, el polvo podría ocasionar daños o anomalías de funcionamiento.
• Para proteger el compresor, conecte el climatizador al suministro eléctrico al menos 12 horas
antes de ponerlo en marcha. Además, deje el interruptor de alimentación en ON durante toda la
estación.
Page 34
12
Solucionar problemas
Cuando se ocurre la falla, el ventilador de la unidad interior dejará de funcionar. El método de verificación de código de
falla se muestra en los siguentes.
Error
Temperatura incorrecta Te E3 3 0
Temperatura incorrecta Ta E3 3 2
Temperatura incorrecta Ts E3 3 1
Temperatura incorrecta Td E3 3 3
Estado anómalo del conmutador de alta presión E6 6 2
Estado anómalo del conmutador de baja presión anómalo E6 6 3
Protección de baja presión (ausencia de R410A) E6 3 6
Error de EEPROM de la unidad exterior EE 2 1
Comunicación anómala entre las unidades interior y exterior E9 3 2
Protección contra subidas de corriente del compresor entre
fases y fases erróneas
Protección de baja corriente del compresor E5 4 5
Estado anómalo del motor de CC de la unidad anterior 9000 F6 2 9
Estado anómalo del sensor de temperatura de descarga de la
unidad exterior
Inversión de la válvula de 4 vías anormal en el modo de calor F2 3 7
Protección contra voltaje demasiado alto o demasiado bajo de la
fuente de alimentación
Estado anómalo del sensor de entorno de la unidad interior E1 0 1
Estado anómalo del sensor de bovina de la unidad interior
anómalo
Error de EEPROM de la unidad interior F8 0 4
Protección contra congelación de la unidad interior F5 0 5
Comunicación errónea entre las unidades interior y exterior E9 0 7
Comunicación errónea entre el controlador cableado E8 0 8
Protección contra sobrecargas en el modo de calor F4 0 9
Estado anómalo del sistema de desagüe E0 0 12
Entrada de señal de cruce distinta de cero EF 0 13
Estado anómalo del motor del ventilador de la unidad interior E10 0 14
Error del sensor de la bovina de ayuda ED 0 15
Funcionamiento en modo anómalo de la unidad interior F3 0 16
Otros errores de la unidad exterior de conversión de frecuencia F7
1. Para la falla interior, sólo el LED de funcionamiento en receptor remoto se indicará.
2. Para la falla exterior, el LED del temporizador y el LED de funcionamiento se indicarán. El LED del temporizador del receptor
remoto se visualiza en el lugar diez, y el LED de funcionamiento se visualiza en el lugar de uno. El LED del temporizador se
destella primero, después de 2 segundos, el LED de funcionamiento también se d estella. Después, 4 segundos más tarde, se
detellarán en vueltas otra vez. Las veces de destellos se equivalen al código de falla del exterior más 20. Por ejemplo, el código
de falla del exterior es 2, la unidad interior debe visualizarse 22. Como resultado,luego el LED de funcionamiento se destella dos
veces.
3.Para obtener más detalles de falla de la unidad exterior,por favor consulte la lista de localización de averías de la unidad exterior.
Mensaje
del LED
E5 2 3
E4 2 8
E7 2 8
E2 0 2
Parpadeos del LED
temporizados(La
unidad interior PCB
LED 4)
Parpadeos del LED
en ejecución(La
unidad interior PCB
LED 3)
Page 35

Precauciones de seguridad
ATENCIÓN
• Para la instalación, diríjase al revendedor o a personal especializado. No intente instalar el climatizador usted solo. Una instalación
incorrecta puede provocar pérdidas de agua, electrocuciones e incendios.
• Le recordamos que la instalación de los aparatos debe realizarse de acuerdo con las normas para permitir el acceso directo a los
mismos para su mantenimiento. Queda excluido de la cobertura de la garantía el uso eventual de andamiajes, grúas, etc. para realizar el mantenimiento.
ADVERTENCIAS
• No instalar en lugares en los que pudieran producirse pérdidas de gas inflamable cerca del aparato para evitar el riesgo de incendio.
• Instale un disyuntor de corriente para evitar descargas eléctricas.
• Conecte el cable de toma de tierra; no conecte el cable de la masa a tubos del gas, tubos del agua o líneas telefónicas.
• Instale el tubo de desagüe del agua de condensación en modo correcto, ya que en caso contrario podrían producirse pérdidas de
agua.
• El climatizador debe estar provisto de un cable de alimentación exclusivo.
• Vigile de no rayar la superficie exterior del climatizador.
• Después de la instalación, explique al usuario final el funcionamiento del climatizador.
Lugar de instalación:
• Ubicación de fácil acceso donde el aire circule de forma adecuada.
• Ubicación no expuesta a salpicaduras de aceite o emisiones de vapor (cocina).
• Lugar no expuesto al aire salobre (orilla del mar).
• Lugar en el que no se produzcan o desprendan gases corrosivos (fuentes termales)
• Lugar no sujeto a oscilaciones frecuentes de tensión.
• Ubicar lejos de televisores, radio o aparatos que generen ondas electromagnéticas u ondas de alta frecuencia.
• Ubicar allí donde el ruido y el aire caliente emitido por la unidad exterior no molesten a los vecinos.
• Ubicación en un lugar que no esté expuesto a grandes nevadas en invierno.
• Ubicación en la que no haya obstáculos que obstruyan las rejillas de aspiración y de salida del aire.
• Ubicar en un lugar que pueda soportar el peso del climatizador sin provocar vibraciones o ruidos excesivos.
Conexiones eléctricas:
• Para una instalación de acuerdo con las normas, se ruega que siga estrictamente las indicaciones que figuran en el presente manual.
• Conecte la unidad interior y la exterior con las tuberías y los cables eléctricos entregados como accesorios.
• Si el cable de alimentación está dañado, deberá ser sustituido por personal del servicio de asistencia o en cualquier caso por per-
sonal cualificado.
• El método de cableado debe estar en línea con el estándar local.
• No corte, acorte o alargue el cable de alimentación y no sustituya el enchufe.
• No use prolongaciones.
• Introduzca el enchufe sólidamente en la toma de corriente. Si la toma de corriente está aflojada, repárela antes de empezar la insta-
lación.
• No de alimentación eléctrica al sistema antes de haber completado la instalación.
13
Page 36
Instalación
14
Dirección de los tubos
Más de 10cm
Más de 10cm
00cm
de 1
s
á
M
Más
de 10cm
izquierda
posterior
derecha
debajo
Page 37
ATENCIÓN
ASEGÚRESE DE HABER LEÍDO ATENTAMENTE LAS PRESENTES INSTRUCCIONES ANTES DE INICIAR LA INSTALACIÓN
EL INCUMPLIMIENTO DE LAS PRESENTES INSTRUCCIONES PODRÍA OCASIONAR HERIDAS GRAVES O LA MUERTE, DISFUNCIONES DEL APARATO Y/O DAÑOS A LAS COSAS.
Antes de realizar la instalación
• No retire el embalaje antes de transferir la unidad al lugar de instalación.
• En el momento de retirar el embalaje, use un material blando o una mesa de protección provista
de cuerdas para levantar la unidad sin dañarla.
• Transporte la unidad siempre con la parte frontal dirigida hacia arriba.
Elección del lugar de instalación de la unidad exterior
• Lugar que pueda soportar el peso de la unidad y no esté sujeto a vibraciones.
• Colocación en la que la salida del aire y el ruido no ocasionen molestias a los
vecinos.
• Colocación expuesta lo menos posible a la lluvia o a la luz solar directa y sufi-
cientemente ventilada.
Instalación de la unidad exterior
• Use pernos de anclaje M10 para fijar la unidad exterior al suelo.
• Si la unidad exterior se instala apoyada a la pared o en el techo, fije fuerte-
mente las abrazaderas para evitar riesgos en caso de terremoto o eventos
atmosféricos extraordinarios.
• En la fase de instalación use tapones de goma para evitar las vibraciones.
Unidad hacia arriba
más de 30 cm
más de 10cm
más de 60cm
más de
15cm
más de
10cm
Para la instalación, diríjase al revendedor o a personal especializado. No intente instalar el climatizador usted solo.
Una instalación incorrecta puede provocar pérdidas de agua, electrocuciones e incendios.
Herramientas necesarias para la instalación
1. Destornillador
2. Sierra
3. Taladro (diámetro 60 mm)
4. Llave hexagonal
5. Llave
6. Cortatubos
7. Empalmador
8. Cuchillo
9. Pinzas
10. Detector de escapes de gas o solución jabonosa
11. Metro
12. Rascador
13. Aceite refrigerante
Los siguientes accesorios no se suministran:
Cinta adhesiva
Banda de plástico para tuberías
Tubo de conexión
Tubo de desagüe del agua de condensación
Material aislante
Polvos de yeso
15
Preparar la instalación
Preparar la instalación
Page 38
Preparar la instalación
16
Elección del lugar de instalación de la unidad interior
• Posición que permita un fácil drenaje del agua de condensación y una cómoda conexión con la unidad exterior.
• Posición alejada de fuentes de calor, fuentes de vapor y luz solar directa, para evitar anomalías de funcionamiento y deformaciones
del revestimiento del climatizador.
• Emplazamiento en que el aire emitido por el climatizador pueda circular libremente por la estancia.
• Emplazamiento sin obstáculos para evitar la obstrucción de la aspiración y la salida del aire de la unidad interior.
• Emplazamiento cerca de una toma de corriente y que prevea los espacios necesarios para el mantenimiento.
Instalación de la unidad interior
1. Situación del orificio en la pared
• La situación del orificio en la pared depende del lugar de instala-
ción y de la dirección de salida de las tuberías.
• Realice un orificio de 70 mm de diámetro, ligeramente inclinado
hacia la parte exterior de la pared.
• Aplique el cubre-orificio y séllelo con mástique después de la
aplicación.
2. Fijación de la unidad interior
Para impedir que la unidad interior vuelque, fije la unidad a la pared
con las abrazaderas de metal y al pavimento con las escuadras en
forma de L.
Instale la unidad horizontalmente (pendiente máxima permitida: 1°).
3. Instalación de las abrazaderas de metal
Fije la abrazadera de metal a la pared, de manera tal que no queden rendijas en medio.
Con la unidad situada verticalmente, fije la abrazadera a la unidad
mediante los tornillos, regulando la posición de la abrazadera de
modo que no queden espacios entre el panel superior de la unidad
y la propia abrazadera.
4. Instalación de las abrazaderas en forma de L
Fije las abrazaderas en forma de L de modo que no haya rendijas entre la escuadra y la unidad interior. Después de haber verificado
que la unidad está situada verticalmente a nivel respecto al suelo, fije los tornillos a éste.
Tornillos
Clavos
Abrazadera
330
2 Orificios Ø10
Panel inferior
Orificio
de anclaje
260
79
202
130
4 Orificios Ø14 prof. 30
Panel inferior
Lado interior
Orificio en la pared
Ø70mm
Lado exterior
Grosor de
la pared
Page 39
Método para la conexión de los tubos
- Las tuberías deberán ser tan cortas como sea posible para garantizar la eficiencia del sistema.
- Aplique aceite refrigerante sobre el empalme y sobre la brida.
- Doble los tubos manteniendo un ángulo tan amplio como sea posible para evitar estrangularlos.
- Mantenga los tubos centro contra centro y atornille la tuerca manualmente, luego use una llave para apretarlos.
- Asegúrese de que no entran cuerpos extraños, como polvo, arena o agua, en las tuberías.
Un atornillado forzado sin un centrado correcto puede dañar la rosca y provocar escapes de gas.
Conexión tuberías unidad interior
1. Disposición de las tuberías refrigerante y del tubo de desagüe del agua de
condensación
• Después de haber abierto la rejilla de aspiración, se verá la caja de control (véase figura). Retire la tapadera de la caja antes de empezar el trabajo.
• Reitre con una sierra el tapón preinciso para la tuberías, según la dirección de
salida de las tuberías.
• Envuelva juntos, con cinta adhesiva, el tubo de desagüe del agua de condensación, el cable eléctrico de conexión unidad interior/exterior y la tubería refrigerante y haga pasar el conjunto por el orificio de la pared, para luego conectarse a la unidad exterior.
2. Instalación del tubo de desagüe del agua de condensación
El tubo de desagüe del agua de condensación debe instalarse con una
pendiente hacia abajo, evitando sifones.
Si la humedad es elevada, el tubo de desagüe del agua de condensación
(sobre todo en la estancia y en la unidad interior) debe estar recubierto con
material aislante.
Tuberías refrigerantes
Diámetro Medida A Momento de torsión
Lado líquido ø 9,52mm 1,0 ~ 1,8 32,7-39,9 N.m
Lado gas ø 19,05mm 1,4 ~ 2,2 97,2-118,6 N.m
17
t
O
Realización del vacío
Realice el vacío para sacar el aire de la unidad interior y de las tuberías refrigerantes.
(1) Con los grifos lado líquido y lado gas interior y exterior completamente cerrados, retire el tapón que protege la apertura de servi-
cio y realice el vacío.
(2) Apriete todas las tuercas de los empalmes abocardados de las tuberías internas y externas.
(3) Después de haber realizado el vacío, retire los tapones de los grifos líquido y gas, abra completamente el grifo del líquido y lue-
go el grifo del lado gas.
(4) Vuelva a situar y apriete los tapones en los grifos y en la válvula de servicio.
Correcto
Erróneo
A
Galga de embridado
insuficiente dañado agrietado parcial
demasiado ancho
Material aislante
Tuberías
refrigerantes
Unidad interior
Inclinación
Caja de con
CORRECTO
Tubo de desagüe del agua
de condensación
Cable de conexión
unidades interior/exterior
ERRÓNE
Sifón
Page 40
• Las conexiones eléctricas deberán ser realizadas por personal autorizado.
• Use únicamente cables de cobre.
• El suministro eléctrico se conecta en la unidad exterior.
• Use un circuito dedicado (superior a 30 A)
• Instale un disyuntor de corriente.
• El interruptor del climatizador debe interrumpir todos los polos; la distancia entre los 2 contactos no debe ser inferior a 3 mm.
• Use sólo cables de cobre.
• Todos los cables deben tener el certificado de autenticidad Europea.
• Se entrega sin los cables de alimentación y de conexión.
Especificaciones del cable de alimentación: H07RN-F 5G 4.0mm
2
Especificaciones del cable de conexión: H05RN-F 4G 2.5mm
2
Conexión eléctrica de la unidad interior
1. Pase el cable del exterior a través del orificio de la pared por el que tam-
bién pasan las tuberías refrigerantes.
2. Inserte el cable a través del panel lateral de la unidad interior.
3 Afloje los tornillos de los bornes e introduzca completamente el extremo
del cable de conexión en la caja de bornes, luego apriete los tornillos.
Tire ligeramente del cable hacia fuera para comprobar que esté bien fijado.
4. Después de haber completado las conexiones eléctricas es necesario apli-
car pasadores sujetahilo en la vaina exterior de los hilos eléctricos.
5. Finalmente, vuelva a colocar en su lugar la tapa de la caja de control.
Schemi elettrici:
Nota:
Cuando realice las conexiones eléctricas entre la unidad interior y la exterior, conecte con el mismo cable los bornes con el mismo
número en la unidad interior y en la exterior.
Una conexión errónea daña el sistema de control del climatizador e impide su correcto funcionamiento.
Conexiones eléctricas
18
Caja de conexiones
unidad interior
Caja de
conexiones
Pasador
sujetahilo
Caja de conexiones
unidad interior
Caja de conexiones
unidad exterior
Suministro eléctrico
380-400V,
3N~, 50Hz
Caja de conexiones
unidad exterior
Suministro eléctrico
Page 41

Haga funcionar el climatizador de acuerdo con lo que figura en el Manual de Instrucciones.
Durante la prueba de funcionamiento, puntee las siguientes casillas:
K ¿Hay pérdidas de gas en las juntas de las tuberías?
K ¿Las juntas de las tuberías se han aislado térmicamente?
K ¿Las conexiones eléctricas de la unidad interior y de la exterior son correctas?
K ¿El cable de conexión entre la unidad interior y la exterior está sólidamente fijado?
K ¿El drenaje del agua de condensación se realiza correctamente?
K ¿El cable de toma de tierra esta fuertemente fijado?
K ¿El voltaje de la alimentación corresponde con el previsto por las normas vigentes?
K ¿Se oyen ruidos raros?
K ¿La pantalla del mando a distancia funciona correctamente?
K ¿El funcionamiento en modo Enfriamiento es normal?
K ¿El sensor de temperatura ambiente funciona de modo correcto?
Prueba de funcionamiento
19
Page 42

Dirección: No.1 Haier Road, Hi-tech Zone, Qingdao 266101 República Popular China
Contactos: TEL: +86-532-8893-6943; FAX:
Sitio web: www.haier.com
Page 43
CLIMATIZZATORE UNITARY SMART COLONNA
MANUALE DI ISTRUZIONI MANUALE DI INSTALLAZIONE
Indice
Precauzioni per l’uso
Avvertenze
Denominazione dei componenti
Parti e funzioni
Funzionamento
Risparmio energetico
Manutenzione
Guida alla ricerca dei guasti
Manutenzione
Risoluzione dei problemi
Precauzioni di sicurezza
Installazione
Preparare l'installazione
Tubazioni refrigerante
Esecuzione del vuoto
Collegamenti elettrici
Test di funzionamento
3
4
5
6
7
9
9
10
11
12
13
14
15
17
17
18
19
Italiano
–¨ 1.000
Leggere con attenzione questo manuale prima dell'installazione.
Conservare questo manuale per riferimenti futuri.
Page 44
Haier Industrial Park, N.1 Haier Road, Qingdao, Repubblica Popolare Cinese
CONFORMITÀ AI REGOLAMENTI
EUROPEI PER I MODELLI
CE
Tutti i prodotti sono conformi alle seguenti disposizioni europee:
- Direttiva bassa tensione 73/23/CEE
- Direttiva bassa tensione 2006/95/CEE
- Compatibilità elettromagnetica 89/336/CEE
- Compatibilità elettromagnetica 2004/108/CE
ROHS
I prodotti sono conformi ai requisiti della direttiva 2002/95/CEE
del Parlamento e del Consiglio Europeo sulla limitazione dell'uso
di alcune sostanze pericolose nei dispositivi elettrici ed elettronici
(Direttiva RoHS UE).
WEEE
In conformità alla direttiva 2002/96/CE del Parlamento Europeo,
informiamo il consumatore relativamente ai requisiti per lo smaltimento dei prodotti elettrici ed elettronici.
REQUISITI PER LO SMALTIMENTO:
di condizionamento, il trattamento del refrigerante, dell’olio e
di altre parti, deve essere eseguito da un tecnico qualificato
in conformità alle norme locali e nazionali. I condizionatori
devono essere trattati presso strutture di trattamento specializzate per il riutilizzo, il riciclaggio e recupero. Assicurandosi che questo prodotto sia smaltito in mood appropriato
si aiuterà nella prevenzione di potenziali effetti negativi sull’
ambiente e sulla salute umana. Contattare l'installatore o
l'autorità locale per ulteriori informazioni. Le batterie usate
del telecomando devono essere smaltite separatamente in
conformità alle norme locali e nazionali.
Il condizionatore è marchiato con questo simbolo. Ciò significa che i prodotti elettrici ed elettronici non devono essere smaltiti insieme ai rifiuti
urbani indifferenziati. Non tentare di aprire il
sistema da soli: Lo smantellamento del sistema
IMPORTANTI INFORMAZIONI RELATIVE AL REFRIGERANTE UTILIZZATO
Questo prodotto contiene gas serra uorinato,
trattato nel Protocollo di Kyoto
Kg
Kg
Kg
Questo prodotto contiene gas serra fluorinato, oggetto del Protocollo di Kyoto. Non lasciar sfogare nell'atmosfera.
Tipo di refrigerante: R410A
Valore GWP*: 1975
GWP=global warming potential
Inserire, con inchiostro indelebile,
• 1 il carico di refrigerante del prodotto inserito in fabbrica
• 2 il quantitativo aggiuntivo di refrigerante caricato sul campo e
• 1+2 Il totale di refrigerante caricato sull'etichetta di caricamento del refrigerante fornita col prodotto. L'etichetta compilata deve
essere attaccata accanto alla porta di caricamento del prodotto (es.
all'interno del coperchio con il valore di arresto).
A questo prodotto contiene gas serra fluorinato, trattato nel Protocollo di Kyoto
B carico di refrigerante del prodotto inserito in fabbrica: vedere la
piastra con il nome dell'unità
C Il refrigerante aggiuntivo caricato durante l'installazione
D Il totale di refrigerante caricato
E Unità esterna
F F cilindro di refrigerante e collettore per la carica
Page 45

• Si prega di leggere il presente manuale di istruzioni prima di utilizzare il climatizzatore.
• Le precauzioni di sicurezza di seguito elencate si suddividono in PERICOLO e ATTENZIONE. La voce PERICOLO riguarda precau-
zioni che, se non seguite, possono portare a serie conseguenze, quali morte, gravi lesioni, ecc. Tuttavia, anche la voce ATTENZIONE riguarda precauzioni che, se non osservate, possono causare seri problemi, a seconda della situazione.
Tenere le precauzioni di sicurezza sempre a portata di mano, affinché possano essere consultate in qualsiasi momento.
PERICOLO
• Questo climatizzatore deve essere installato da personale specializzato; non tentare di installarlo personalmente.
• Per qualsiasi riparazione, rivolgersi sempre ed esclusivamente ad un Centro di Assistenza Tecnica autorizzato.
• In caso di trasloco o riposizionamento dell'apparecchio, rivolgersi ad un Centro di Assistenza Tecnica autorizzato per lo smontaggio
e la reinstallazione del climatizzatore.
• Evitare di sostare per lungo tempo direttamente esposti al flusso d'aria fredda diffuso dal climatizzatore.
• Non introdurre mai le dita od oggetti vari nelle griglie di uscita o di aspirazione.
• Non accendere e non spegnere il climatizzatore inserendo o staccando la spina del cavo di alimentazione.
• Fare attenzione a non danneggiare il cavo di alimentazione.
• In caso di disfunzioni del climatizzatore (odore di bruciato od altro), arrestare immediatamente l'apparecchio, staccare il cavo di ali-
mentazione e rivolgersi ad un Centro di Assistenza Tecnica autorizzato.
AVVERTENZE
• Areare periodicamente la stanza durante il funzionamento del climatizzatore.
• Non dirigere il flusso d'aria dell'apparecchio direttamente verso caminetti od altri apparecchi di riscaldamento.
• Non appoggiare oggetti o salire sul climatizzatore.
• Non appendere oggetti all'unità interna.
• Non appoggiare vasi di fiori o recipienti contenenti acqua sul climatizzatore.
• Non esporre il climatizzatore a contatto con l'acqua.
• Non maneggiare il climatizzatore con le mani bagnate.
• Non tirare il cavo di alimentazione.
• Staccare sempre il cavo di alimentazione dalla presa di corrente se si prevede di non utilizzare il climatizzatore per lunghi periodi di
tempo.
• Controllare periodicamente le condizioni di installazione per individuare eventuali danni.
• Non esporre animali o piante al diretto flusso d'aria proveniente dal climatizzatore.
• Non bere l'acqua di scarico eliminata dal climatizzatore.
• Questo apparecchio non deve essere adoperato per altri scopi quali la conservazione di alimenti, strumenti di precisione od opere
d'arte, la coltivazione di piante o l'allevamento di animali.
• Non esercitare forti pressioni sui deflettori dell'aria.
• Far funzionare sempre l'apparecchio con il filtro dell'aria correttamente installato.
• Non ostruire mai le griglie di aspirazione e di uscita dell'aria.
• Assicurarsi di mantenere una distanza minima di un metro tra eventuali apparecchiature elettroniche e le unità interna ed esterna.
• Evitare di installare il climatizzatore vicino a caminetti o altre fonti di calore.
• Durante le operazioni di installazione delle unità interna ed esterna, evitare l'accesso dei bambini sul luogo.
• Non usare gas infiammabili nelle vicinanze del climatizzatore.
Precauzioni per l’uso
3
Page 46
Temperatura interna
Temperatura esterna
Temperatura interna
Temperatura esterna
4
Limiti di funzionamento
Gamma utile delle temperature ambiente:
BS: Temperatura a Bulbo Secco
BU: Temperatura a Bulbo Umido
Raffreddamento
Riscaldamento
max. BS/BU
min. BS/BU
max. BS/BU
min. BS/BU
max. BS
min. BS
max. BS/BU
min. BS
• Se il climatizzatore viene utilizzato in condizioni di temperatura
superiori a quelle qui sopra riportate, il circuito automatico di
protezione incorporato potrebbe attivarsi interrompendo il funzionamento del climatizzatore in modo da non danneggiare i circuiti interni. In caso invece di uso del climatizzatore con temperature inferiori a quelle indicate, lo scambiatore di calore potrebbe congelare con conseguenti perdite di acqua o altre anomalie di funzionamento.
• Non usare il condizionatore d'aria per scopi diversi dal raffreddamento, riscaldamento, deumidificazione o ventilazione delle
stanze.
• Il metodo di cablaggio dovrebbe essere in linea con lo standard
locale.
• Le batterie scariche devono essere gettate negli appositi contenitori.
• Se il fusibile della scheda elettronica salta, sostituirlo con uno di
tipo T3.15A/250VAC.
• L’interruttore del climatizzatore deve interrompere tutti i poli; la
distanza tra i 2 contatti non deve essere inferiore a 3 mm.
• Usare solo cavi di rame.
• Tutti cavi devono avere il certificato di autenticità Europea.
• I cavi di collegamento e di alimentazione non sono forniti.
32/23°C
18/14°C
46/26°C
10/6°C
27°C
15°C
24/18°C
-15°C
Avvertenze
Page 47
5
Denominazione dei componenti
Telecomando
–¨ 1.000
Unità interna
Griglia uscita aria
Pannello di controllo
Griglia entrata aria
Filtro dell’aria (all’interno)
Griglia di
aspirazione
Griglia
di uscita
Compressore
(all'interno)
Page 48
6
Parti e funzioni
Telecomando
Installazione delle batterie
Rimuovere il coperchio della batteria;
1
Inserire le batterie come illustrato.
2
2 batterie R-03, tasto di ripristino
(cilindro);
Assicurarsi che la polarità delle bat-
3
terie corrisponda alla stampigliatura
" + "/"-";
INSERIRE LE BATTERIE , QUINDI RIPOSIZIONARE IL
4
COPERCHIO.
Nota:
• La distanza tra la testina di trasmissione del segnale ed il foro
del ricevitore deve essere compresa entro 7 m e non ci devono
essere ostacoli.
• Quando nella stanza sono installate lampade fluorescenti ad accensione elettronica o ad interruttore, oppure telefoni wireless,
il ricevitore tende ad essere disturbato quindi la distanza deve
essere ridotta.
• Una visualizzazione poco chiare delle icone sta ad indicare che
le batterie sono esaurite. Sostituirle
• Se il telecomando non funziona normalmente, rimuovere le batterie e rimetterle a posto qualche minuto più tardi.
1. Icona modalità
Modalità operativa
Telecomando
2. Icona invio del segnale
3. Icona OSCILLA
4. Icona FAN SPEED (Velocità ventilatore)
LO MED HI AUTO
(basso) (medio) (alto) (automatico)
5. Icona BLOCCO
6. Icona TIMER OFF icona TIMER ON
7. Icona TEMP (Temperatura)
8. Icona funzioni aggiuntive
Modalità operativa
Telecomando
Il riscaldamento elettrico non è disponibile.
9. Pulsante QUIET (silenzioso)
10. Tasto HEAT (Riscaldamento)
11. Tasto COOL (Condizionatore)
12. Pulsante AUTO (automatico)
13. Pulsante FAN (ventilatore)
14. Pulsante TIMER
15. Tasto HEALT (Benessere)
(Questo modello non è dotato di questa funzione.)
16. Tasto LOCK (Blocco)
Usato per bloccare i pulsanti e la visualizzazione del LED.
17. Tasto LIGHT (Luce)
(Questo modello non è dotato di questa funzione.)
Controlla l'illuminazione lo spegnimento del pannello di visualizzazione LED interno.
18. Pulsante ON/OFF (accensione/spegnimento)
19. Tasto DRY (Deumidificazione)
20. Pulsante TEMP (temperatura)
21. Pulsante SWING (oscillazione)
22. Tasto HOUR (Ore)
23. Pulsante EXTRA FUNCTION (funzione extra)
Funzione solo ventilatore, funzione di erogazione dell’aria verso l’
alto e il basso, funzione riposo, funzione aria fresca (funzione riservata), conversione gradi Fahrenheit Celsius
Funzione impostazione potenza, funzione oscillazione DA sinistra e
destra, funzione riscaldamento 10° C
24. Tasto CANCEL/CONFIRM
Imposta e annulla il timer e altre funzioni addizionali.
25. Tasto RESET (Ripristino)
Se il telecomando avesse un aspetto anomalo, usare un oggetto
appuntito per premere questo pulsante e resettare il telecomando
AUTO
(auto-
matico)
QUITE
(silenzioso)
COOL
(condizio-
natore)
Visualizza
circolazione
SOSPENSIONE
DRY
(deumidi-
catore)
Riscaldamento
elettrico integrato
HEAT
(Riscal-
damento)
BENES-
SERE
VENTI-
LATORE
ALI-
MENTA-
ZIONE
Suggerimento:
Rimuovere le batterie se l'unità non viene utilizzata per periodi
prolungati. Se dovessero apparire delle icone una volta spento,
basta premere il tasto di reset.
Page 49
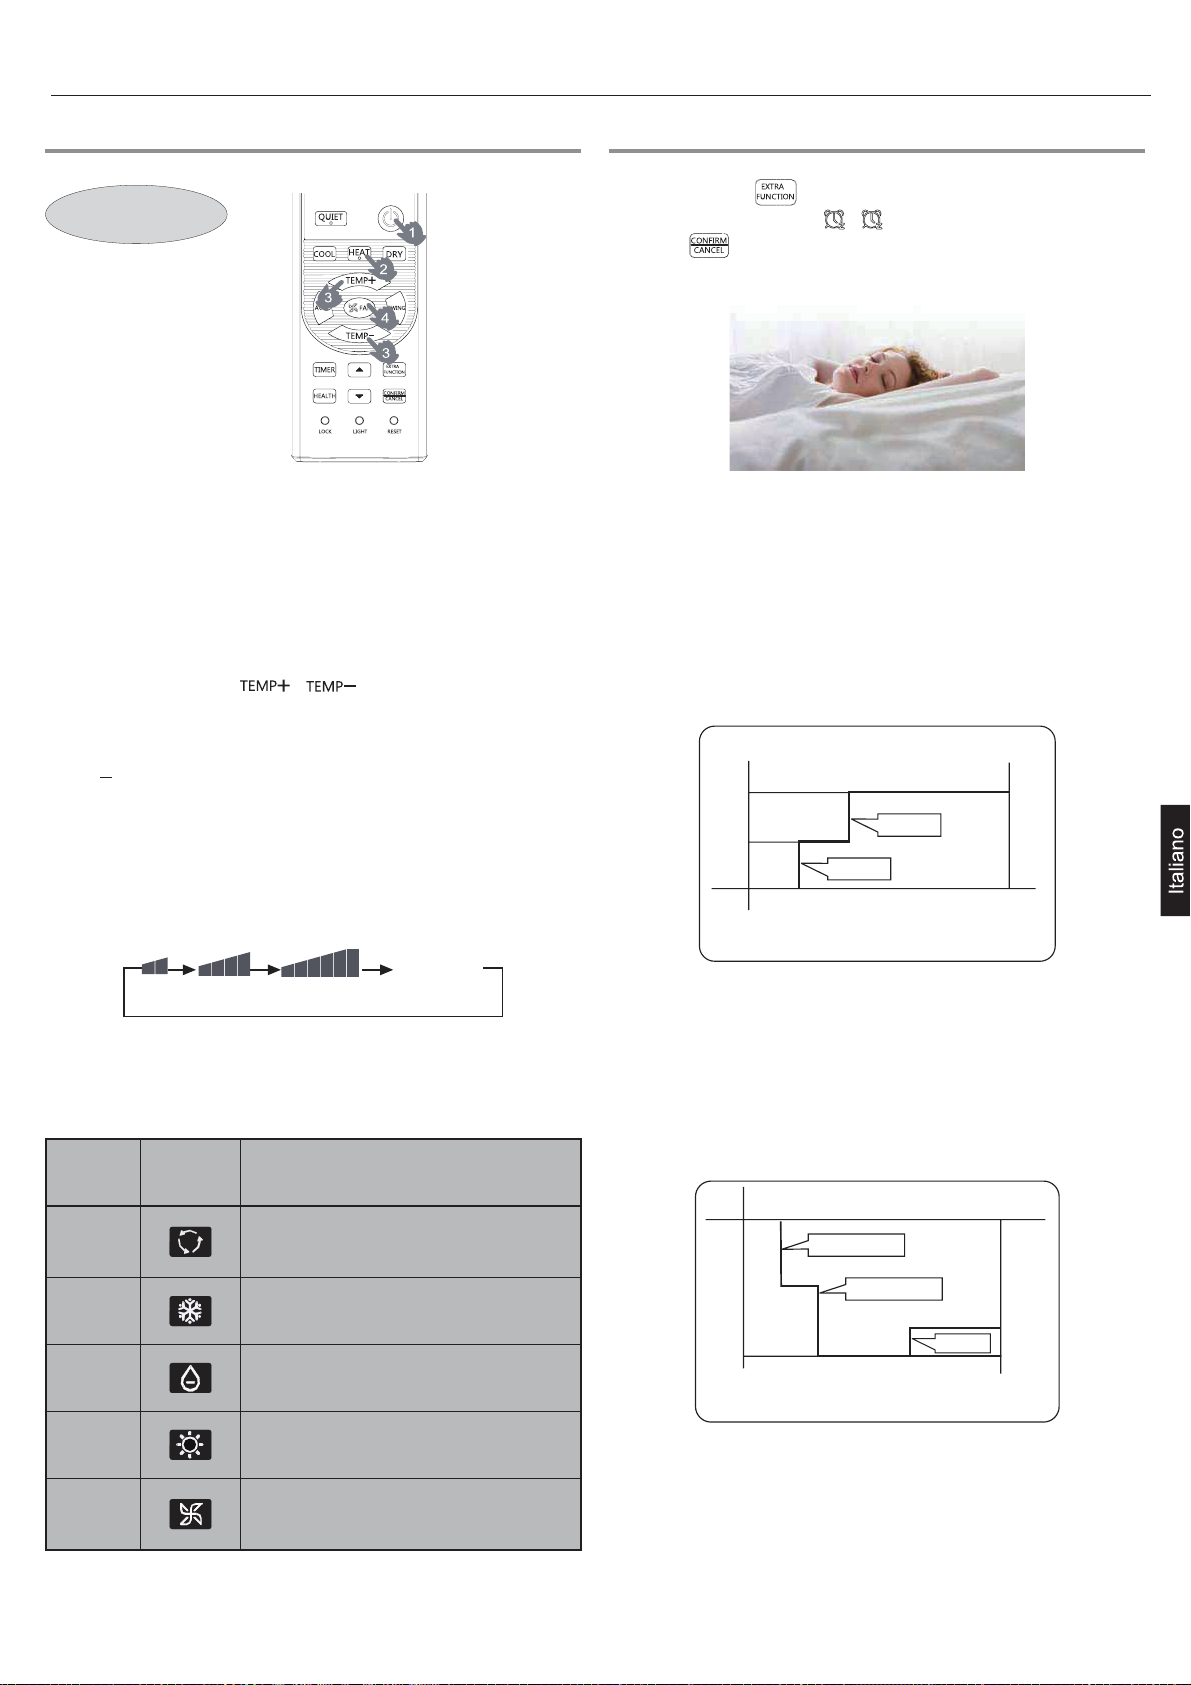
7
Funzionamento
Funzionamento di base
Telecomando
1.Avviare l’unità
Tenere premuto ON/OFF sul telecomando nché l'unità si
avvia.
2.Selezione della modalità operativa
Tasto COOL: Modalità di raffreddamento
Pulsante HEAT (riscaldamento): modalità riscaldamento
Pulsante DRY (deumidicatore): Modalità deumidicatore
3.Selezione impostazione temperatura
Premere il pulsante
/ .
Ogni volta che viene premuto il tasto, l’impostazione
della temperatura aumenta di 1° C, se il tasto è tenuto
premuto, la temperatura aumenta rapidamente
Ogni volta che viene premuto il tasto, l’impostazione
della temperatura diminuisce di 1° C, se il tasto viene
tenuto premuto, la temperatura diminuisce rapidamente
Selezionare una temperatura desiderata.
4.Selezione della velocità del ventilatore
Premere il tasto FAN. A ciascuna pressione la velocità del
ventilatore cambia come segue:
Visualizza
LO MED HI AUTO
(basso) (medio) (alto) (automatico)
circolazione
Il condizionatore funziona con la velocità visualizzataIl funziona con la
della ventola.
Quando la funzione FAN è impostata su AUTO, il condi--
zionatore regola automaticamente la velocità della ventola in base alla temperatura d’ambiente.
Modalità di
funziona-
mento
AUTO (au-
tomatico)
COOL
(condizio-
natore)
DRY (deumidicato-
HEAT
(Riscalda-
mento)
VENTILA-
TORE
re)
Telecoman-
do
Nota
In modalità di funzionamento AUTO, il condizionatore selezionerà automaticamente la modalità Cool (Raffreddamento) o Heat (Riscaldamento) in
base alla temperatura d’ambiente. Quando la funzione FAN (Ventilatore) è
impostata su AUTO il condizionatore regolerà automaticamente la velocità
della ventola in base alla temperatura d’ambiente.
In modalità DRY (Deumidicatore), quando la temperatura d’ambiente diventa inferiore di +2° C rispetto all’impostazione della temperatura, l’unità
funzionerà ad intermittenza a velocità LOW (Bassa) indipendentemente
dall’impostazione FAN (Ventilatore).
In modalità riscaldamento, l'aria calda uscirà dopo un breve periodo a
causa della funzione di prevenzione dei ussi d'aria fredda. Se ventilatore
è impostato in modalità automatica, l’unità regolerà automaticamente la
velocità del ventilatore in base alla temperatura ambiente.
In modalità FAN (Ventilatore), l’unità non funzionerà in modalità COOL
(Raffreddamento) o HEAT (Riscaldamento) ma solo in modalità FAN
(Ventilatore), la funzione AUTO non è disponibile per la modalità FAN
(Ventilatore). E l'impostazione della temperatura è disabilitata. Il modalità
FAN (Ventilatore), non è disponibile la funzione Sleep (Riposo).
Funzionamento
Premere il tasto per accedere ad altre opzioni, quando
il ciclo visualizza l’icona , l’icona lampeggerà. Quindi
premere
per entrare nella funzione sospensione.
Modalità di funzionamento
1. In modalità COOL (Raffreddamento)/ DRY (Deumidicatore)
1 ora dopo l’attivazione della modalità SLEEP (Riposo), la1
temperatura aumenterà di 1° C rispetto alla temperatura impostata. Dopo un’altra ora, la temperatura aumenta ancora
di 1° C. L’unità funzionerà per altre 6 ore e poi si arresterà,
la temperatura sarà superiore a quella impostata e quindi
non sarà troppo bassa durante il riposo.
Riposo entra in funzione Riposo entra in funzione
Circa 6 ore
Aumenta di
1° C
Aumenta di
1° C
Arresto dell’unità
1 ora
1 ora
Impostazione della
temperatura
In modalità Condizionatore, Deumidicazione
2.In modalità HEAT (Riscaldamento)
1 ora dopo l’attivazione della modalità SLEEP (Riposo), la1
temperatura aumenterà di 2° C rispetto alla temperatura impostata. Dopo un’altra ora, la temperatura aumenta ancora
di 2° C. Dopo atre 3 ore, la temperatura aumenta ancora di
1° C. L’unità funzionerà per altre 3 ore e poi si arresterà, la
temperatura sarà superiore a quella impostata e quindi non
sarà troppo bassa durante il riposo.
Impostazione della
temperatura
1 ora
Si avvia la modalità
Riposo
Diminuiscedi 2° C
1 ora
In modalità Riscaldamento
Diminuiscedi 2° C
3 ore
Arresto dell’unità
3 ore
Aumentadi
1° C
Si avvia la modalità
Riposo
3.In modalità automatica
L’unità funziona alla modalità di riposo corrispondente
adattata alla modalità automatica selezionata.
Page 50
8
Funzionamento
4.In modalità ventilatore
La funzione SLEEP (Riposo) non è disponibile.
5. Impostare il cambio d'intensità del usso d’aria durante il
riposo
Se l’intensità del usso d’aria è impostata su alta o media
prima di coricarsi, impostare il cambio d'intensità del usso
d’aria durante il riposo. Se la ventilazione è debole, non
modicarla.
Nota
Quando è impostato il TIMER, la funzione Sleep (Riposo) non
è disponibile. Dopo avere impostato la funzione Sleep (Riposo), se l’utente ripristina il TIMER, la funzione Sleep (Riposo)
sarà annullata; la macchina sarà in stato di timing-on.
FUNZIONAMENTO POWER/
QUIET
(1) Modalità POWER (Potente)
Quando è necessario un riscaldamento o raffreddamento
rapido, è possibile usare questa funzione.
Premere il pulsante per inserire opzioni aggiuntive,
quando viene visualizzato il ciclo su , lampeggerà,
quindi premere
, per entrare nella funzione alimentazione. Per annullare la funzione, inserire di nuovo opzioni
aggiuntive per annullare la funzione alimentazione.
(2) Modalità QUIET (Silenzioso)
Questa funzione può essere utilizzata quando c'è bisogno
di silenzio per riposare o per la lettura. Premere il pulsante
QUIET (silenzioso), il telecomando mostrerà
, quindi raggiungere la funzione silenzioso. Premere di nuovo il pulsante QUIET (silenzioso), la funzione silenzioso verrà annullata.
Nota:
Durante il funzionamento QUIET, in modalità Riscaldamento
o Condizionatore, la stanza sarà soggetta a una distribuzione disomogenea della temperatura. L’uso prolungato della
modalità QUIET (Silenzioso) provocherà l’effetto di non
raffreddare o riscaldare a sufcienza.
Regolazione della direzione del
flusso d’aria
1. Visualizzazione stato del usso d’aria
CONDIZIONATORE/DEUMIDIFICAZIONE:
RISCALDAMENTO:
Stato iniziale
2
. Regolazione del usso d’aria verso sinistra e
destra
(Questo modello non è dotato di questa funzione.)
Funzionamento timer On/Off
1 Una volta avviata l'unità, selezionare la modalità di funzionamento desiderata.
2.Premere il pulsante TIMER per cambiare la modalità
TIMER. Ogni volta che si preme il tasto, il display cambia
come segue: Telecomando:
0.5h Timer
accensione
0.5h
Timer spegni-
mento
0.5h
Timer accensione-
spegnimento
0.5h
Timer spegnimento-
accensione
Poi selezionare la modalità TIMER voluta (TIMER ON (Timer
accensione), TIMER OFF (Timer spegnimento) o TIMER
ON-OFF (Timer accensione-spegnimento)). La dicitura "ON"
o "OFF" lampeggerà sul display.
3.Per impostare l'ora, premere il pulsante
/ .
Premere il tasto per ogni ora, l'ora impostata nelle prime
12 ore aumenta di mezz'ora ad ogni pressione, passate
le 12 ore aumenta di 1 ora ad ogni pressione.
Premere il tasto per ogni ora, l'ora impostata nelle prime
12 ore diminuisce di mezz'ora ad ogni pressione, passate le 12 ore diminuisce di 1 ora ad ogni pressione. Può
essere regolato sulle 24 ore.
4.Conferma impostazioni timer
Dopo avere regolato l’ora, premere il tasto
per confer-
mare; il tasto ON o OFF non lampeggerà più.
5.Annullare impostazioni timer
Premere il pulsante timer per più volte nché l'ora visualizzata non viene eliminata.
Suggerimenti:
dopo avere sostituito le batterie, oppure dopo un black-out, l’
impostazione dell'ora deve essere congurata di nuovo.
In base alla sequenza di impostazione dei tempi TIMER ON
(timer accensione) o TIMER OFF (timer spegnimento), possono essere ottenuti Start-Stop o Stop-Start.
Funzionamento con flusso d'aria
benessere
1.Premere per iniziare
Impostare le condizioni di lavoro ottimali.
2. Impostazioni della funzione usso d'aria benessere
Premere il tasto per accedere ad altre opzioni. Premere questo tasto in modo continuato, la posizione dei deettori passerà ciclicamente tra le tre impostazioni che seguono,
per scegliere l’oscillazione voluta, poi premere il tasto
per confermare.
Flusso d'aria
benessere
verso l'alto
3.Annullamento della funzione benessere
Premere il tasto per accedere ad altre opzioni. Preme-
re questo tasto in modo continuato, la posizione dei deettori passerà ciclicamente tra le tre impostazioni che seguono,
poi premere il tasto per annullare.
Avviso: Non direzionare l'aletta con la mano. Altrimenti, la
griglia funzionerà in maniera errata. Se la griglia non funziona correttamente, fermare per un minuto quindi riavviare
l'unità, eseguendo le regolazioni con il telecomando.
Nota:
1. Dopo avere impostato la funzione benessere, la posizione
della griglia è ssa.
2. In riscaldamento, è meglio selezionare la modalità
3. In raffreddamento, è meglio selezionare la modalità
4. In condizionatore e deumidicatore, utilizzando il condizionatore per un lungo periodo di tempo in condizioni di alto tasso di
umidità, dalla griglia potrebbero cadere delle gocce d'acqua.
Flusso d'aria
benessere
verso il basso
Posizione
attuale
.
.
Page 51
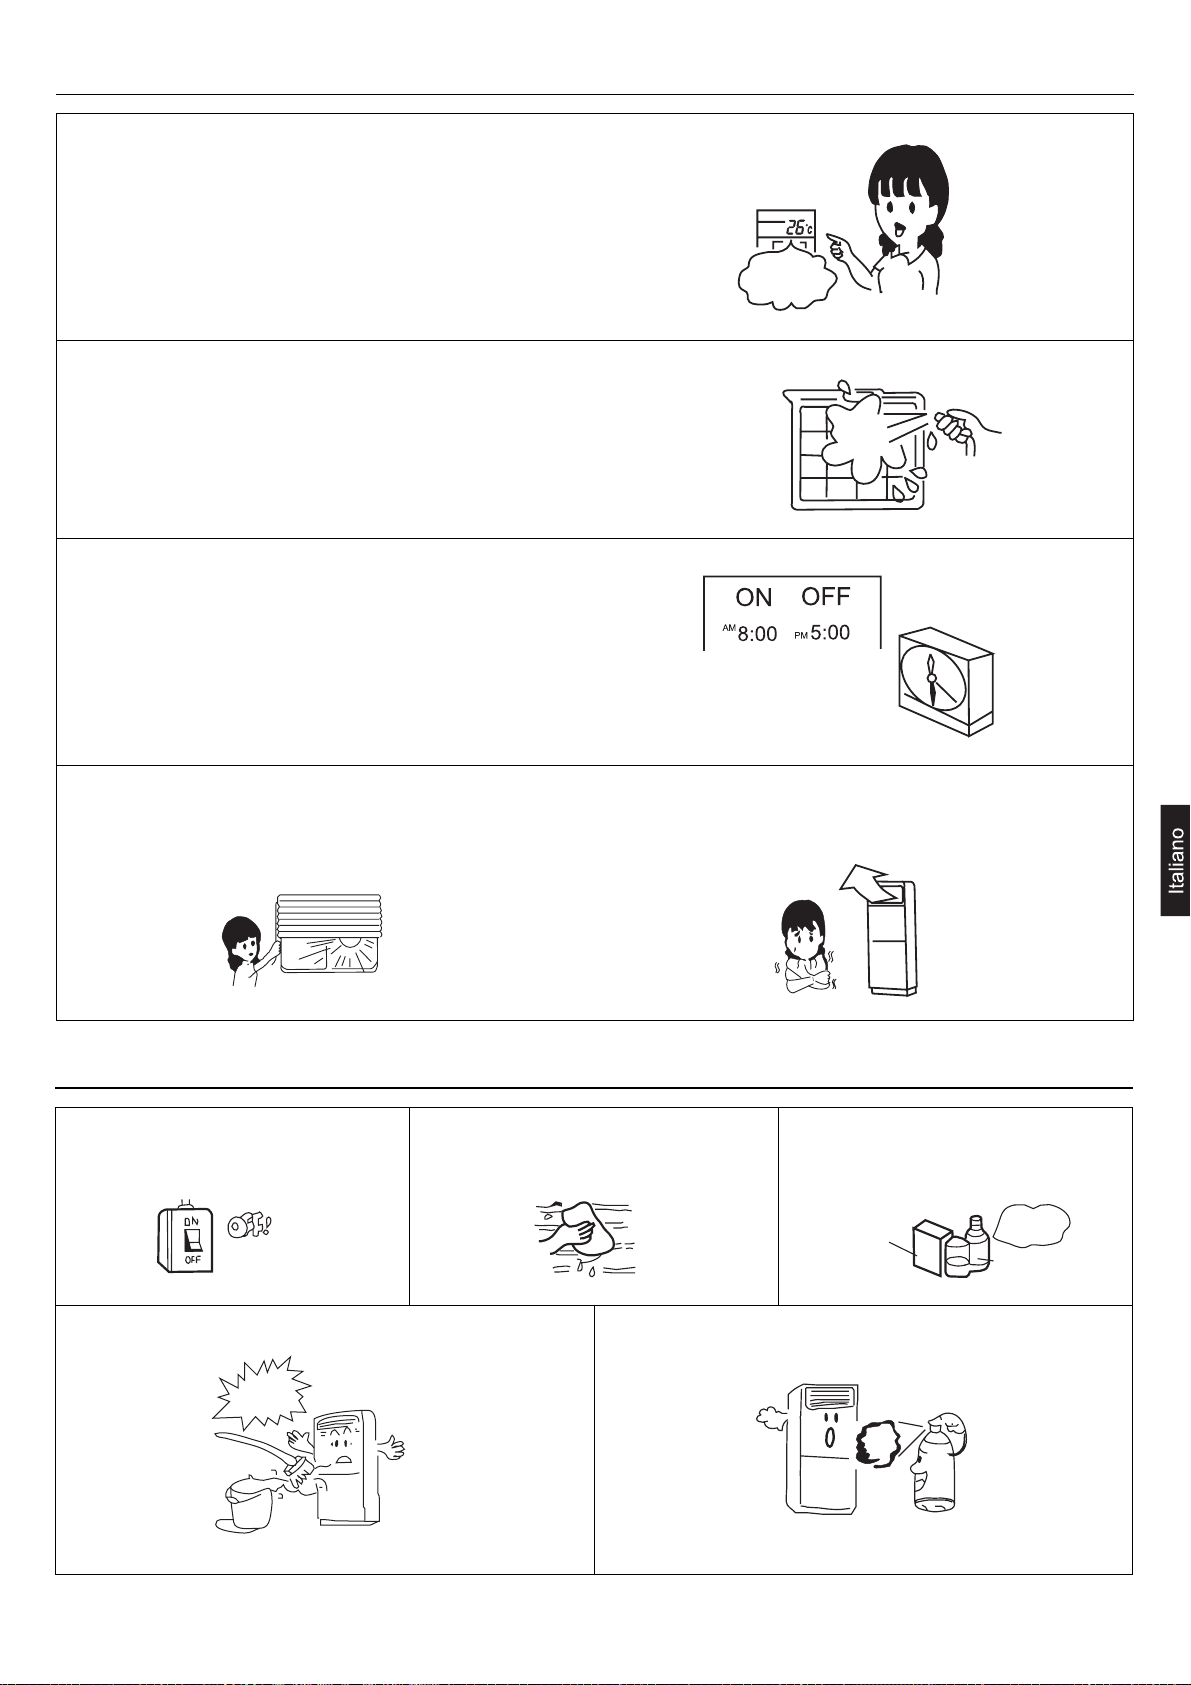
Risparmio energetico
Mantenere una temperatura ambiente adeguata
Mantenere una temperatura troppo calda o troppo fredda nuoce
alla salute e comporta un maggior consumo energetico.
Pulire periodicamente il filtro dell’aria
Il filtro intasato comporta un calo di efficienza del riscaldamento e
del raffreddamento, maggiori consumi oltre ad eventuali malfunzionamenti (es. perdite d’acqua in modalità raffreddamento)
Utilizzo del Timer
Grazie all’utilizzo del Timer è possibile ottenere la giusta temperatura ambiente al momento desiderato, es. rientrando a casa.
Evitare la luce diretta del sole e le correnti d’aria Regolare correttamente la direzione del flusso dell’aria.
Temperatura
adeguata
9
Manutenzione
Portare l’interruttore dell’alimentazione
generale in posizione OFF.
Non toccare l’apparecchio con le mani
bagnate.
Non usare acqua calda o liquidi volatili.
Non versare acqua direttamente sull’unità interna. Non spruzzare spray, vernici o insetticidi sull’unità.
Possono danneggiare l’unità o causare incendi.
Pericolo
Page 52
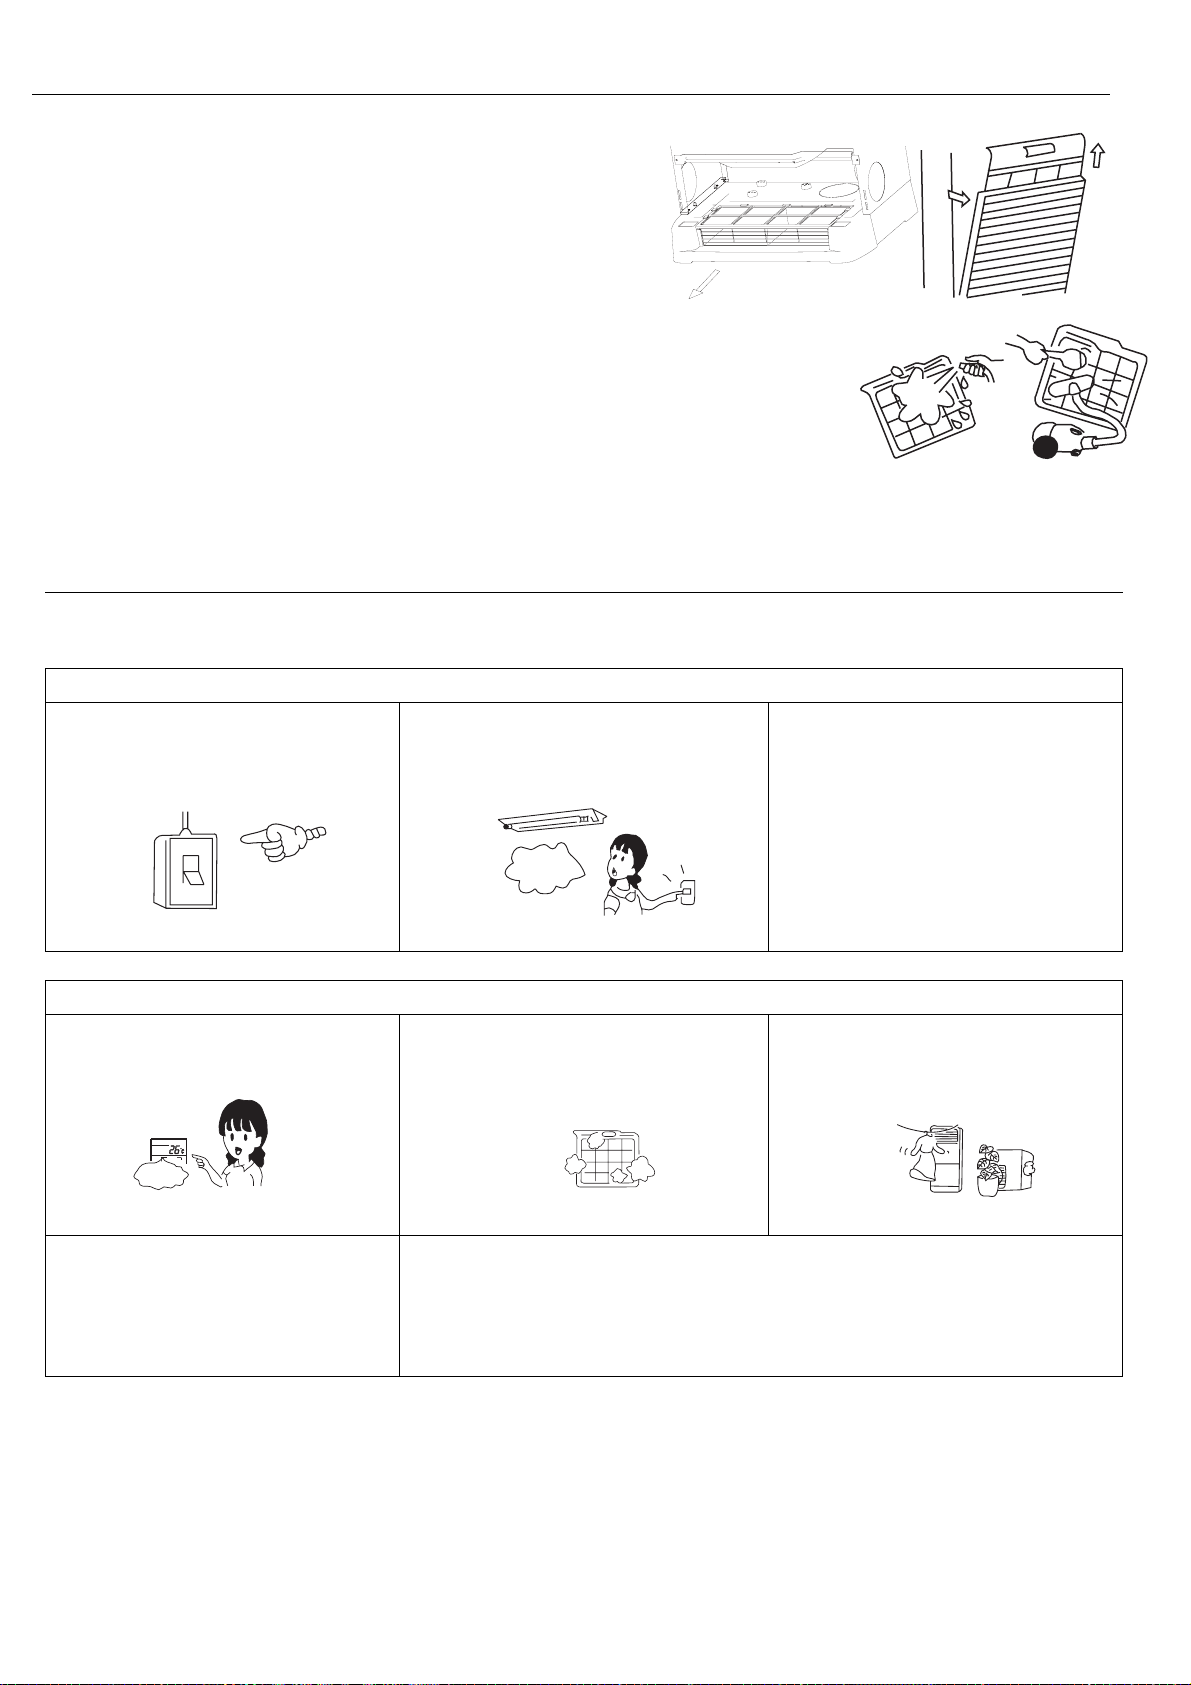
Manutenzione
Pulizia del filtro dell’aria
• Estrarre il filtro come indicato in figura.
• Pulire con acqua o con una aspirapolvere. Se il filtro è molto sporco lavare
con detergente neutro.
• Lavare con acqua pulita e installare solo dopo averlo fatto asciugare
completamente
• Non lavare con acqua a più di 40°C, potrebbe danneggiare il filtro.
10
Guida alla ricerca dei guasti
Si prega di effettuare i seguenti controlli prima di rivolgersi al Servizio Assistenza.
L'interruttore a monte dell'impianto è su
ON?
IL CLIMATIZZATORE NON SI AVVIA
La fornitura elettrica della rete è
normale?
Il magnetotermico di protezione è
scattato? È molto pericoloso: staccare
immediatamente la corrente e contattare
il proprio rivenditore.
Il telecomando è impostato
correttamente?
Il deflettore orizzontale è posizionato
verso l’alto? (In modalità Riscaldamento)
Il filtro dell’aria è sporco?
Vi sono porte o finestre aperte?
Ci sono degli ostacoli al flusso d’aria
delle griglie di aspirazione o di uscita?
Black
out?
RAFFREDDAMENTO O RISCALDAMENTO INSUFFICIENTE
Tem p .
corretta
Page 53
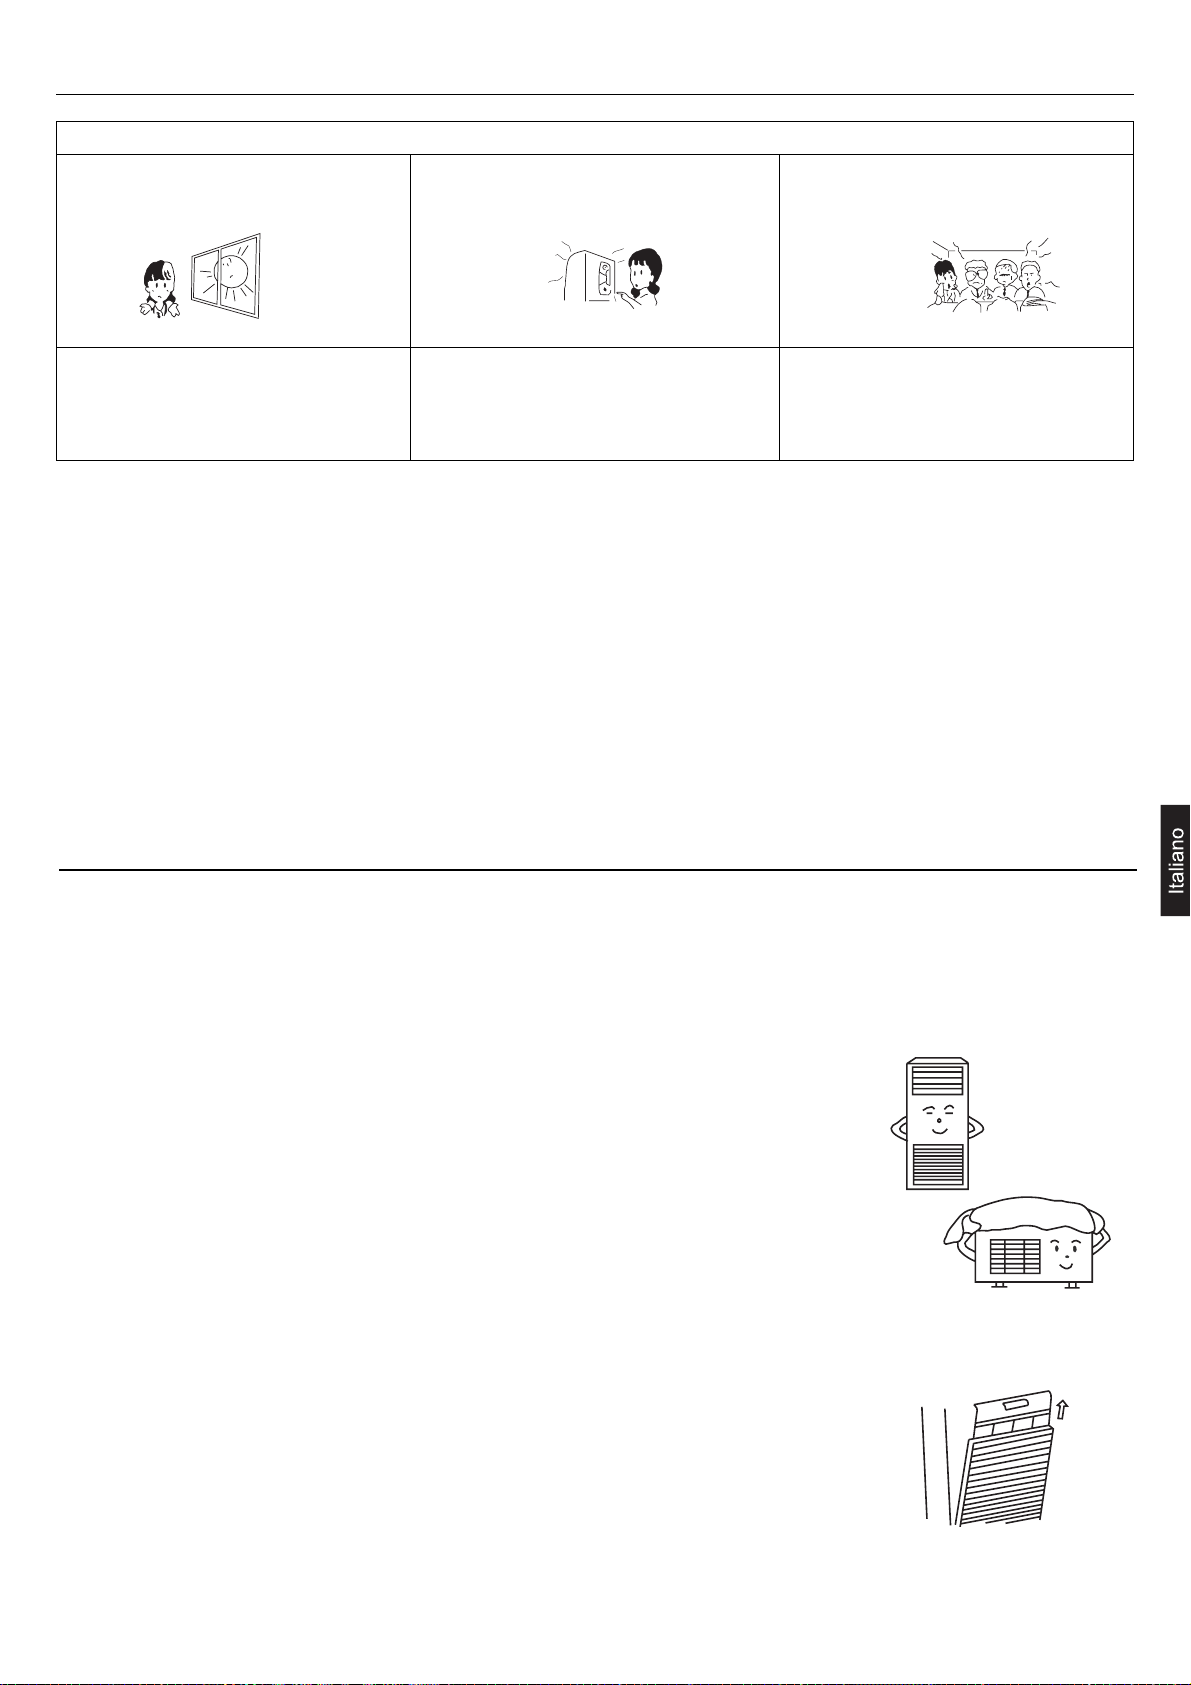
Guida alla ricerca dei guasti
IL RAFFREDDAMENTO È INSUFFICIENTE
La luce solare entra direttamente nella
stanza?
In modalità Riscaldamento viene emessa
aria fredda. Il climatizzatore è in fase di
pre-riscaldamento?
Vi sono fonti di calore “nascoste” nella
stanza?
La stanza è sovraffollata?
Se il climatizzatore ancora non funziona correttamente dopo aver effettuato questi controlli, o se si verificano i seguenti problemi, si
prega di spegnere immediatamente l’apparecchio e di contattare il proprio rivenditore.
• I fusibili o il magnetotermico di protezione fondono o saltano spesso.
• Formazione di gocce di condensa durante il funzionamento in modalità Raffreddamento o Deumidificazione.
• Il funzionamento è anormale o si sentono rumori insoliti.
11
Manutenzione
Manutenzione e pulizia dell’apparecchio
• Pulire con un panno umido, quindi asciugare con un panno morbido.
• Se l'apparecchio è molto sporco, pulirlo con un panno imbevuto di detergente neutro. Dopo aver passato il panno, rimuovere il detersivo con acqua pulita.
• Non usare acqua oltre i 40°C, per non scolorire o deformare l'apparecchio.
• Non usare sostanze chimiche.
Manutenzione a fine stagione
• Lasciare in funzione il climatizzatore in modalità Ventilazione in una giornata di bel tempo allo scopo di asciugare le parti interne dell'unità.
• Staccare l'alimentazione elettrica. Infatti, si ha un consumo di energia elettrica anche quando il
climatizzatore non è in funzione.
• Pulire il filtro e reinserirlo nel climatizzatore. Pulire l'unità interna.
Manutenzione a inizio stagione
• Controllare che non vi siano ostacoli davanti alle griglie di aspirazione e di uscita delle unità interna ed esterna.
• Accertarsi che il filtro dell'aria sia pulito e che sia inserito nel climatizzatore.
Se l'unità viene messa in funzione senza filtro, la polvere potrebbe causare danni o anomalie di
funzionamento.
• Per proteggere il compressore, inserire l'alimentazione elettrica almeno 12 ore prima di avviare il
climatizzatore. Inoltre, lasciare l'interruttore dell'alimentazione su ON durante tutta la stagione.
Page 54
12
Risoluzione dei problemi
Quando il fallimento succede, il ventilatore dell'unità interna smette di funzionare.Il metodo del codice di controllo
fallimento come segue.
Diagnosi
Guasto Display a
LED
Te temperatura falsata E3 3 0
Ta temperatura falsata E3 3 2
Ts temperatura falsata E3 3 1
Td temperatura falsata E3 3 3
Interruttore alta pressione anomalo E6 6 2
Interruttore bassa pressione anomalo E6 6 3
Protezione bassa pressione (assenza di R410A) E6 3 6
Errore EEPROM esterna EE 2 1
Comunicazione anomala tra interno ed esterno E9 3 2
Protezione da sovracorrente del compressore tra fasi/fasi errate E5 2 3
Protezione da bassa corrente del compressore E5 4 5
Motore CC esterrno anomalo F6 2 9
Sensore temp. di scarico esterno anomalo E4 2 8
Anomalia valvola inversione a 4 vie in modalità di riscaldamento F2 3 7
Protezione da tensione troppo alta/bassa sorgente di
alimentazione
Sensore ambiente interno anomalo E1 0 1
Anomalia sensore scambiatore interno E2 0 2
Errore EEPROM interna F8 0 4
Protezione anticongelamento interna F5 0 5
Errore di comunicazione tra interno ed esterno E9 0 7
Errore di comunicazione tra controller cablato E8 0 8
Protezione da sovraccarico modalità calore F4 0 9
Sistema di scarico anomalo E0 0 12
Nessun ingresso segnale zero crossing EF 0 13
Motore ventola interna anomalo E10 0 14
Errore sensore scambiatore assistito ED 0 15
Funzionamento modalità interna anomala F3 0 16
Altri errori esterni di conversione frequenza F7
1. Per il fallimento interno, funziona solo LED ON che il ricevitore remoto indicherà..
2. Per il fallimento esterno,il cronometro LED e funzionante LED indicano.Il cronometro LED di ricevitore remoto resta al luogo di dieci,
e il funzionante LED resta al luogo di uno. Il cronometro LED lampeggia a primo, fra 2 secondi, anche il funziona nte LED lampeggia.
Dopo che, fra 4 secondi,che lampeggiano a turno ancora.Lampeggia volte pari al errore codic e esterno più 20.Per esampio,il errore
codice esterno è 2, l'unità interna deve mostrare 22. Come un risultato,il cronometro LED lampeggia 2 volte a primo, poi il funzionante
LED lampeggia 2 volte.
3.Per prendere i più dettagli del fallimento esterno,per favore riferire alla lista di risoluzione dei pr oblemi dell'unità esterna.
E7 2 8
Numero di lampeggio
del LED a tempo
(Unità esterna PCB
LED 4)
Numero di lampeggio
del LED in esecuzione
(Unità esterna PCB
LED 3)
Page 55

Precauzioni di sicurezza
ATTENZIONE
• Per l'installazione, rivolgersi al rivenditore o a personale specializzato. Non tentare di installare il climatizzatore da soli. Un'installazione
non corretta può provocare perdite d'acqua, folgorazioni e incendi.
• Vi ricordiamo che l'installazione degli impianti deve essere effettuata a regola d'arte al fine di permettere l'accessibilità diretta degli
apparecchi per la loro manutenzione. Rimane escluso dalla copertura della garanzia l'eventuale utilizzo di ponteggi, gru, ecc. ai fini
della manutenzione.
AVVERTENZE
• Non installare in luoghi dove possano esservi delle perdite di gas infiammabile nelle vicinanze dell'apparecchio per evitare rischi di
incendio.
• Installare un sezionatore di corrente per evitare scosse elettriche.
• Collegare il cavo di messa a terra; non collegare il filo della massa a tubi del gas, tubi dell'acqua o linee telefoniche.
• Installare il tubo scarico condensa in modo corretto, altrimenti si possono verificare perdite d'acqua.
• Il climatizzatore deve essere dotato di un cavo di alimentazione esclusivo.
• Fare attenzione a non graffiare la superficie esterna del climatizzatore.
• Dopo l'installazione, spiegare all'utente finale il funzionamento del climatizzatore.
Luogo di installazione:
• Posizione facilmente accessibile dove l'aria circoli adeguatamente.
• Posizione non esposta a spruzzi di olio o emissioni di vapore (cucine).
• Luogo non esposto all'aria salmastra (riva del mare).
• Luogo dove non vengano prodotti o aleggino gas corrosivi (sorgenti termali).
• Luogo non soggetto a frequenti sbalzi di tensione.
• Posizione lontana da televisioni, radio o attrezzature che generano onde elettromagnetiche od onde ad alta frequenza.
• Posizione dove il rumore e l'aria calda emessa dall'unità esterna non diano fastidio ai vicini.
• Posizione non esposta a pesanti nevicate in inverno.
• Posizione dove non vi siano ostacoli che ostruiscano le griglie di aspirazione e di uscita dell'aria.
• Posizione che possa reggere il peso del climatizzatore, senza provocare vibrazioni o rumori eccessivi.
Collegamenti elettrici:
• Per un'installazione a regola d'arte, si prega di seguire scrupolosamente le indicazioni contenute nel presente manuale.
• Collegare l'unità interna e l'unità esterna con le tubazioni e i cavi elettrici forniti come accessori.
• Se il cavo dell'alimentazione è danneggiato, deve essere sostituito da personale del servizio assistenza o comunque da personale
qualificato.
• Il metodo di cablaggio deve essere in linea con lo standard locale.
• Non tagliare, accorciare o allungare il cavo di alimentazione, e non sostituire la spina.
• Non usare prolungamenti.
• Inserire saldamente la spina nella presa di corrente. Se la presa di corrente è allentata, ripararla prima di iniziare l'installazione.
• Non dare alimentazione al sistema prima di aver completato l'installazione.
13
Page 56
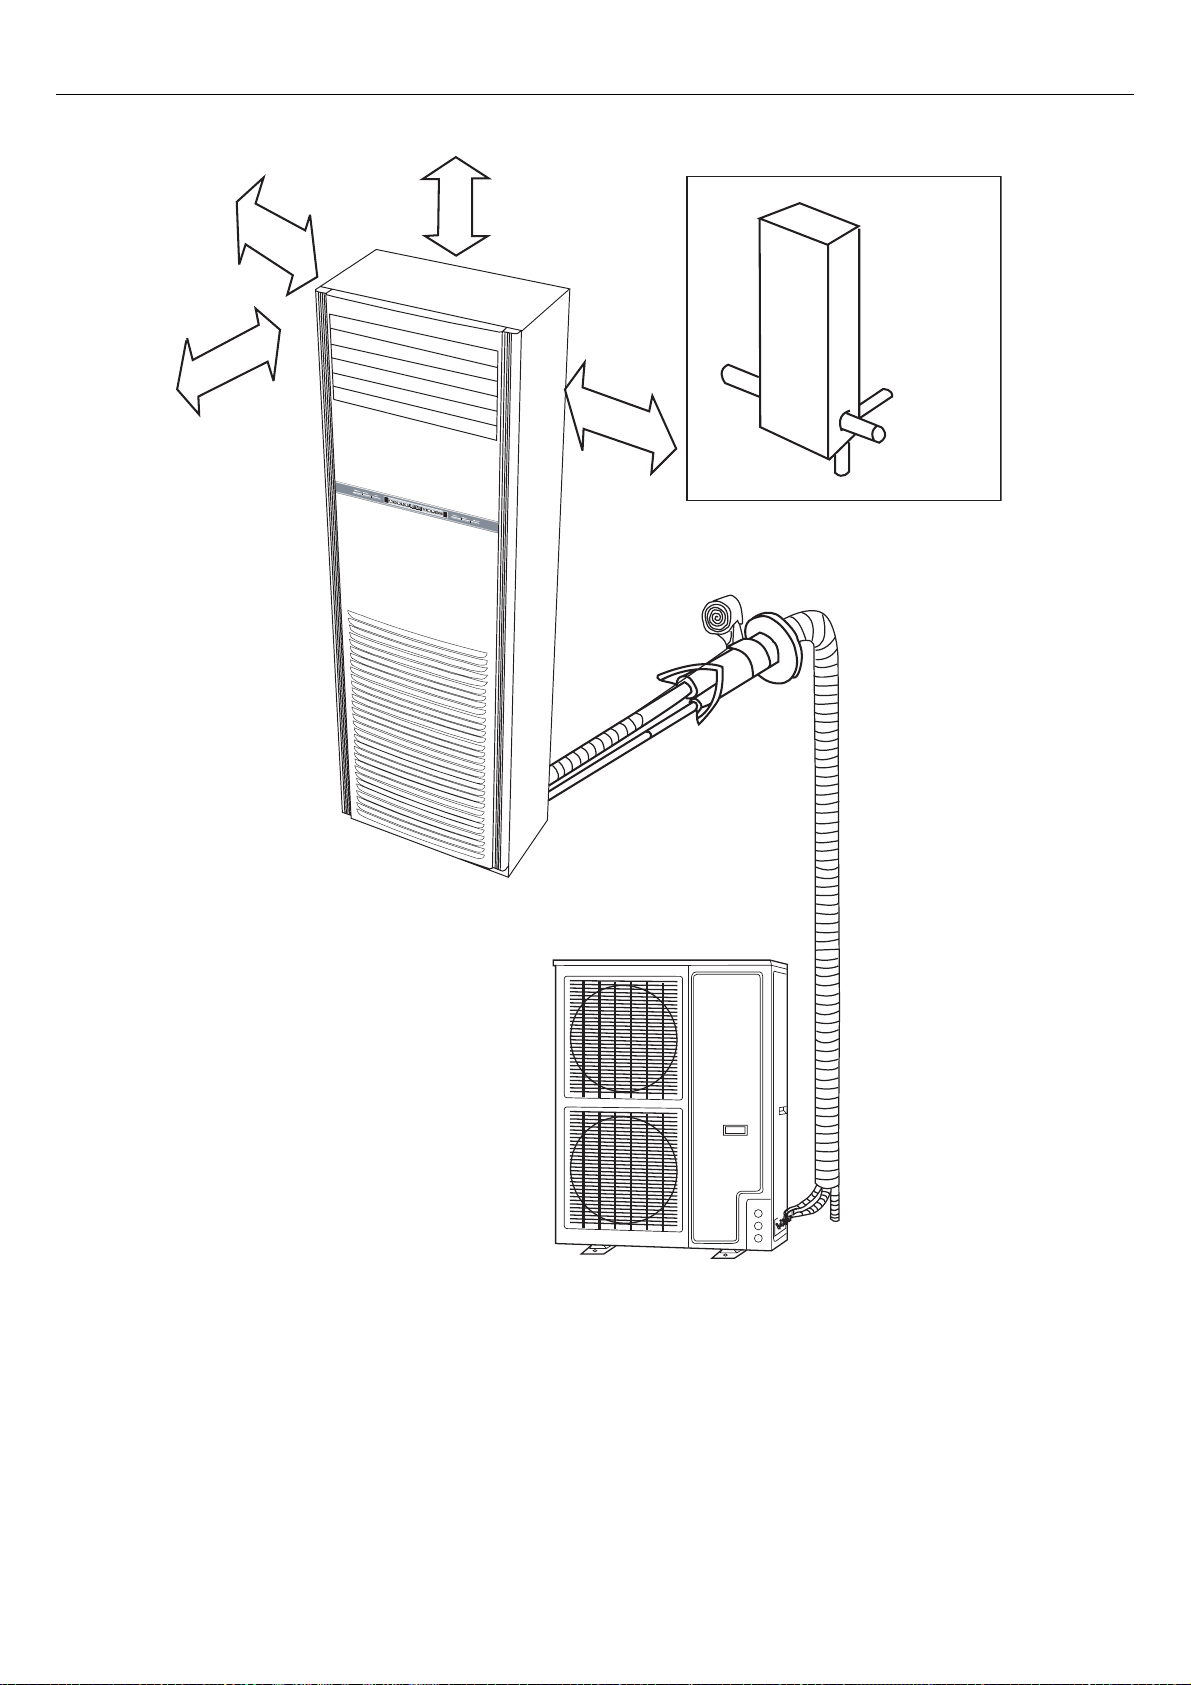
Installazione
14
più di 10cm
direzione dei tubi
più di 10cm
più
di 100cm
sinistro
posteriore
più di 10cm
destro
sotto
Page 57
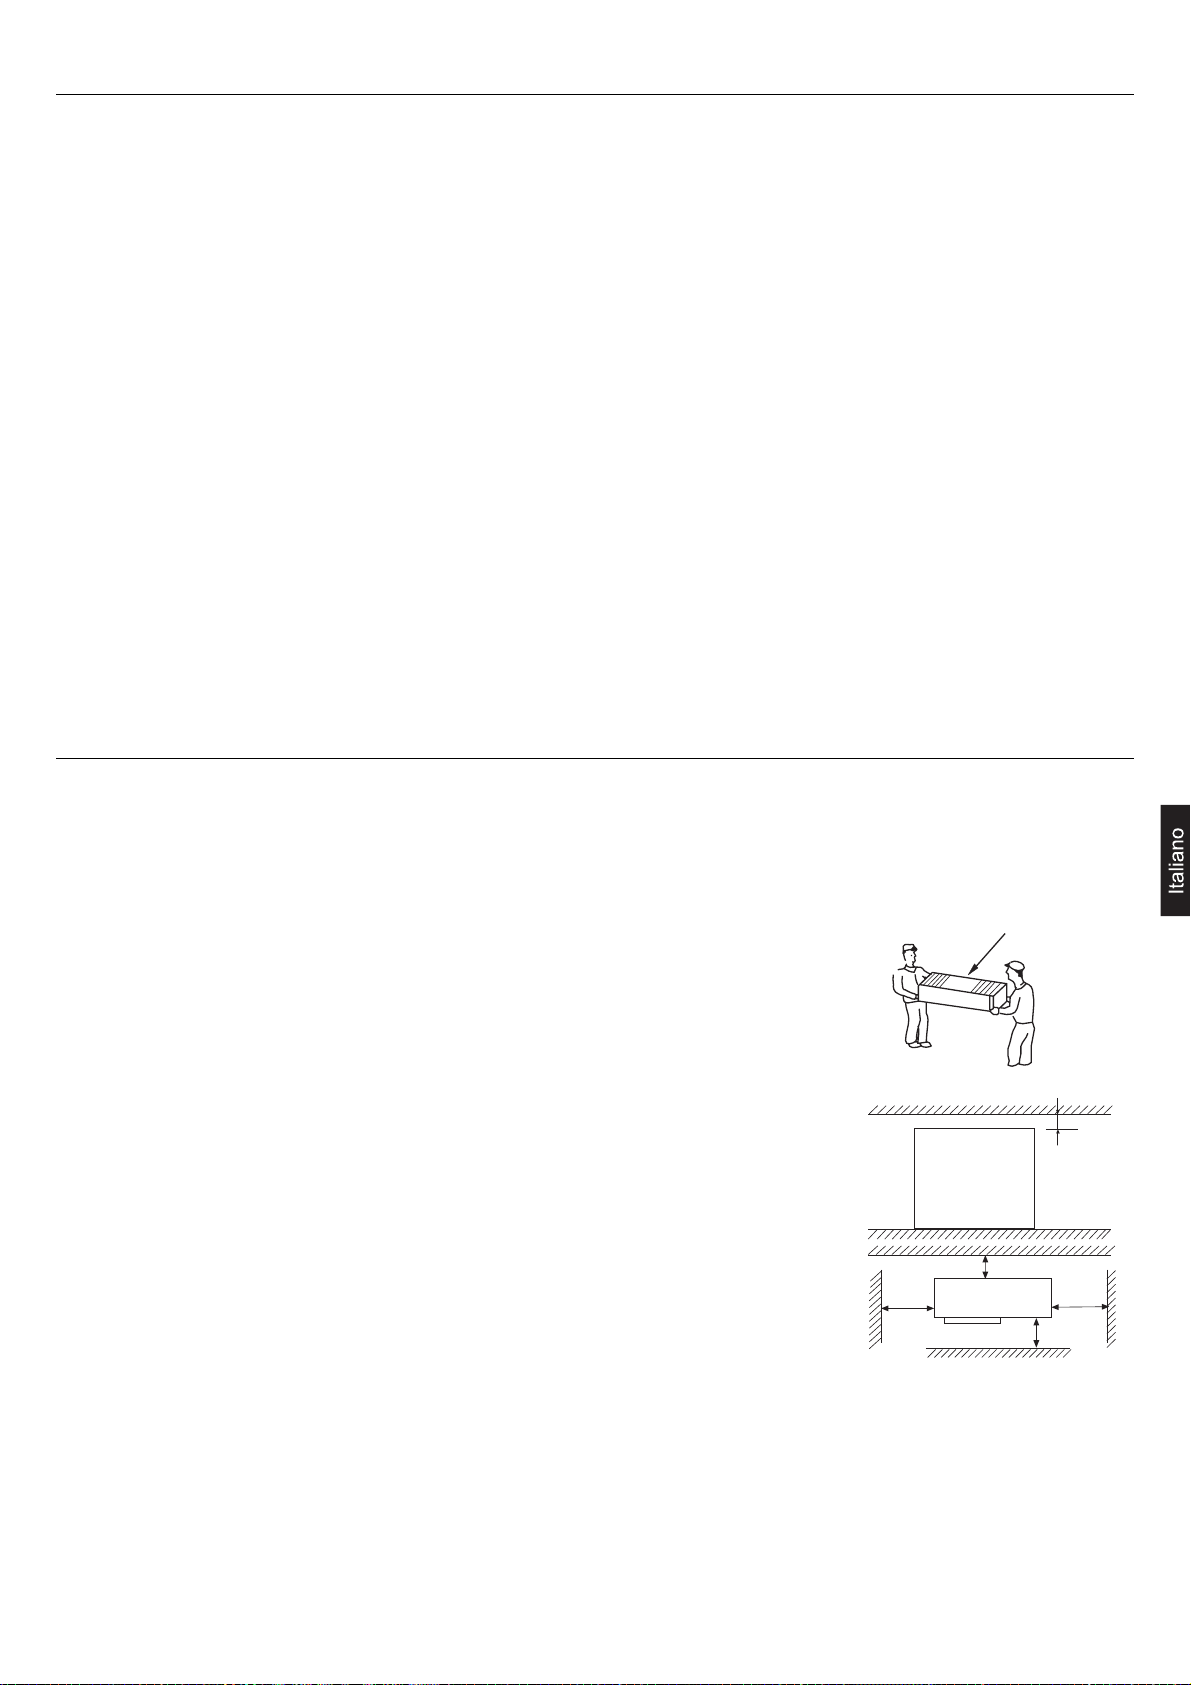
ATTENZIONE
ASSICURARSI DI AVER LETTO ATTENTAMENTE LE PRESENTI ISTRUZIONI PRIMA DI INIZIARE L’INSTALLAZIONE. L’INOSSERVANZA DELLE PRESENTI ISTRUZIONI POTREBBE PROVOCARE FERITE GRAVI O MORTE, DISFUNZIONI DELL’APPARECCHIO E/O
DANNI ALLE COSE.
Prima dell'installazione
• Prima di trasferire l'unità sul luogo di installazione, non rimuovere l'imballo.
• Al momento di rimuovere l'imballo, usare un materiale soffice o una tavola di protezione
munita di corde per sollevare l'unità senza danneggiarla.
• Trasportare l'unità sempre con la parte frontale rivolta verso l'alto.
Scelta del luogo di installazione dell’unità esterna
• Posizione che posa reggere il peso dell’unità e non sia soggetta a vibrazioni.
• Posizione in cui l’uscita dell’aria e il rumore non disturbino i vicini.
• Posizione non troppo esposta a pioggia o luce solare diretta e sufficentemente ventilata.
Installazione dell’unità esterna
• Usare bulloni di ancoraggio M10 per fissare l’unità esterna al pavimento.
• Se l’unità esterna viene installata appoggiata a parete o sul tetto, fissare sal-
damente le staffe per evitare rischi in caso di terremoto o eventi atmosferici
straordinari.
• In fase di installazione usare dei gommini anti-vibrazione.
Unità verso l’alto
oltre 30cm
oltre 10cm
oltre 60cm
oltre
15cm
oltre
10cm
Per l'installazione, rivolgersi al rivenditore o a personale specializzato. Non tentare di installare il climatizzatore da soli. Un'installazione
non corretta può provocare perdite d'acqua, folgorazioni e incendi.
Strumenti necessari per l'installazione
1. Cacciavite
2. Seghetto
3. Trapano (diametro 70mm)
4. Chiave esagonale
5. Chiave (14, 17, 27mm)
6. Tagliatubi
7. Flangiatore
8. Coltello
9. Pinze
10. Rilevatore di fughe di gas o soluzione saponata
11. Metro
12. Raschietto
13. Olio refrigerante
I seguenti accessori non sono forniti:
Nastro adesivo
Fascia di plastica per tubazioni
Tubo di collegamento
Tubo scarico condensa
Materiale isolante
Polvere di gesso
15
Preparare l'installazione
Preparare l'installazione
Page 58

Preparare l'installazione
16
Scelta del luogo di installazione dell’unità interna
• Posizione che consenta un facile drenaggio della condensa e un comodo collegamento con l'unità esterna.
• Posizione lontana da fonti di calore, sorgenti di vapore e luce solare diretta, per evitare anomalie di funzionamento e deformazioni
del rivestimento del climatizzatore.
• Posizione in cui l'aria emessa dal climatizzatore possa circolare liberamente nella stanza.
• Posizione libera da ostacoli onde evitare di ostruire l'aspirazione e l'uscita dell'aria dall'unità interna.
• Posizione vicina a una presa di corrente e che preveda gli spazi necessari per la manutenzione.
Installazione dell'unità interna
1. Posizionamento del foro nella parete
• La posizione del foro nella parete dipende dal luogo di installazione e dalla direzione di uscita delle tubazioni.
• Praticare un foro di 70mm di diametro, leggermente inclinato verso l'esterno della parete.
• Applicare il copri foro e sigillarlo con stucco dopo l'applicazione.
2. Fissaggio dell'unità interna
Per impedire il ribaltamento dell'unità interna, fissare l'unità alla parete con le staffe di metallo e al pavimento con le squadrette a L.
Installare l'unità orizzontalmente (pendenza max. consentita: 1°).
3. Installazione delle staffe in metallo
Fissare la staffa in metallo alla parete, in modo tale che non vi siano
fessure in mezzo. Con l'unità posizionata verticalmente, fissare la
staffa all'unità per mezzo di viti, regolando la posizione della staffa
in modo da non lasciare spazi tra il pannello superiore dell'unità e la
staffa stessa.
4. Installazione delle squadrette a L
Fissare le squadrette a L in modo tale che non vi siano fessure tra la squadretta e l'unità interna. Dopo aver verificato che l'unità è posizionata verticalmente in bolla rispetto al pavimento, fissare le viti al pavimento.
Viti
Chiodi
Staffe
330
2 Fori Ø10
Pannello inferiore
Foro
ancoraggio
260
79
202
130
4 Fori Ø14 prof. 30
Pannello inferiore
Lato interno
Foro nella parete
Ø70mm
Lato esterno
Spessore
della parete
Page 59
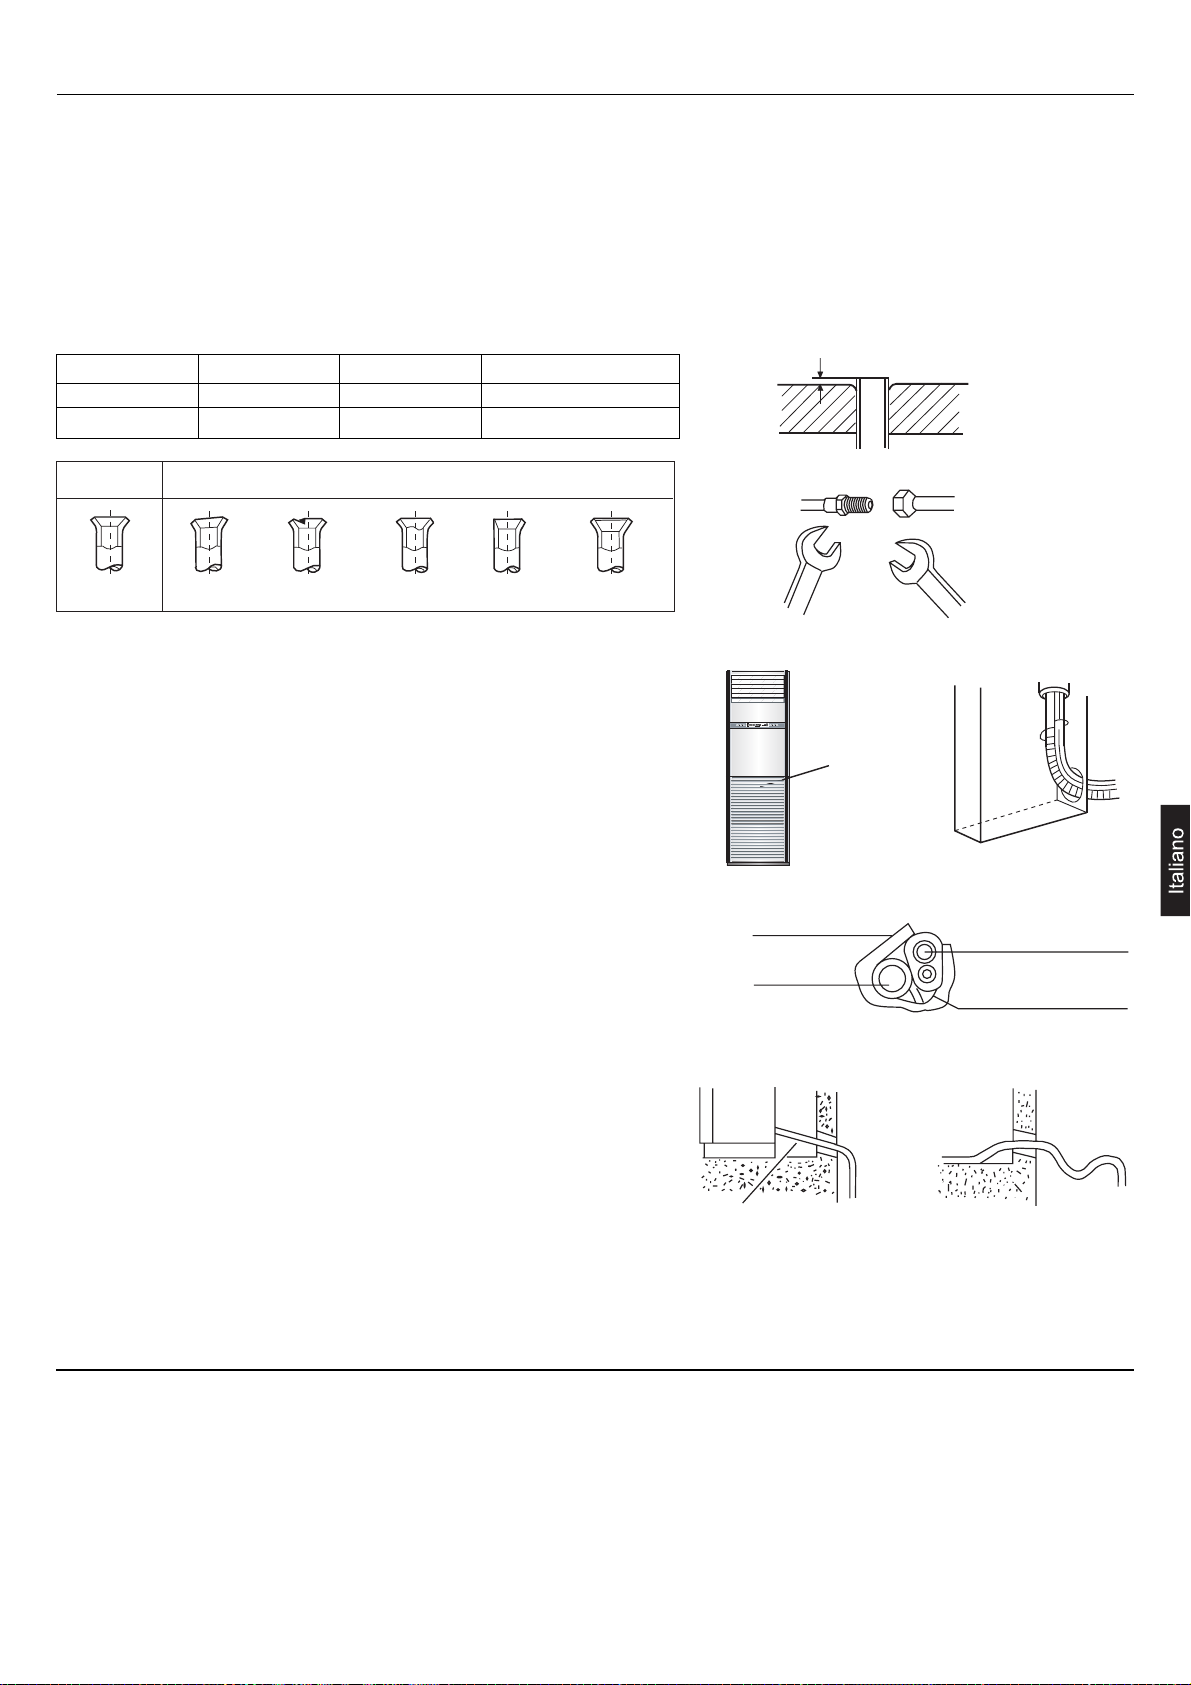
Metodo per il collegamento dei tubi
- Le tubazioni dovranno essere il più corte possibile per garantire l'efficienza del sistema.
- Applicare olio refrigerante sul raccordo e sulla flangia.
- Piegare i tubi mantenendo un angolo più ampio possibile per evitare di strozzarli.
- Tenere i tubi centro contro centro e avvitare il dado a mano, quindi usare una chiave per serrarli.
- Accertarsi che nelle tubazioni non entrino corpi estranei, come polvere, sabbia o acqua.
Un avvitamento forzato senza un corretto centraggio può danneggiare la filettatura e causare fughe di gas.
Collegamento tubazioni unità interna
1. Sistemazione delle tubazioni refrigerante e del tubo scarico condensa
• Dopo aver aperto la griglia di aspirazione, si vedrà la scatola di controllo
(vedi figura). Rimuovere il coperchio della scatola prima di iniziare il lavoro.
• Rimuovere con un seghetto il tappo pre-inciso per le tubazioni, a seconda della direzione di uscita delle tubazioni.
• Avvolgere insieme con nastro adesivo il tubo scarico condensa, il cavo elettrico
di collegamento unità interna/esterna e le tubazioni refrigerante e far passare il
tutto attraverso il foro nella parete, per poi collegarsi all'unità esterna.
2. Installazione del tubo scarico condensa
Il tubo scarico condensa deve essere installato con una pendenza verso il
basso, evitando sifoni.
Se l'umidità è elevata, il tubo scarico condensa (in particolare nella stanza
e nell'unità interna) deve essere ricoperto con materiale isolante.
Tubazioni refrigerante
Diametro Misura A Momento torcente
lato liquido ø 9,52mm 1,0 ~ 1,8 32,7-39,9 N.m
lato gas ø 19,05mm 1,4 ~ 2,2 97,2-118,6 N.m
17
Esecuzione del vuoto
Eseguire il vuoto per far uscire l’aria dall’unità interna e dalle tubazioni refrigerante.
(1) Con i rubinetti lato liquido e lato gas interne ed esterne completamente chiusi, rimuovere il tappo che protegge l'apertura di ser-
vizio ed eseguire il vuoto.
(2) Stringere tutti i dadi dei raccordi a cartella delle tubazioni interne ed esterne.
(3) Dopo aver eseguito il vuoto, rimuovere i tappi dei rubinetti liquido e gas, aprire completamente il rubinetto del liquido e successi-
vamente il rubinetto del lato gas.
(4) Riposizionare e serrare i tappi sui rubinetti e sulla valvola di servizio.
Corretto
scarso danneggiato fessurato parziale troppo ampio
Errato
A
dima di flangiatura
Materiale isolante
Tubazioni
refrigerante
Unità interna
Pendenza
Scatola
di controllo
CORRETTO
Tubo scarico condensa
Cavo collegamento
unità interna/esterna
ERRATO
Sifone
Page 60
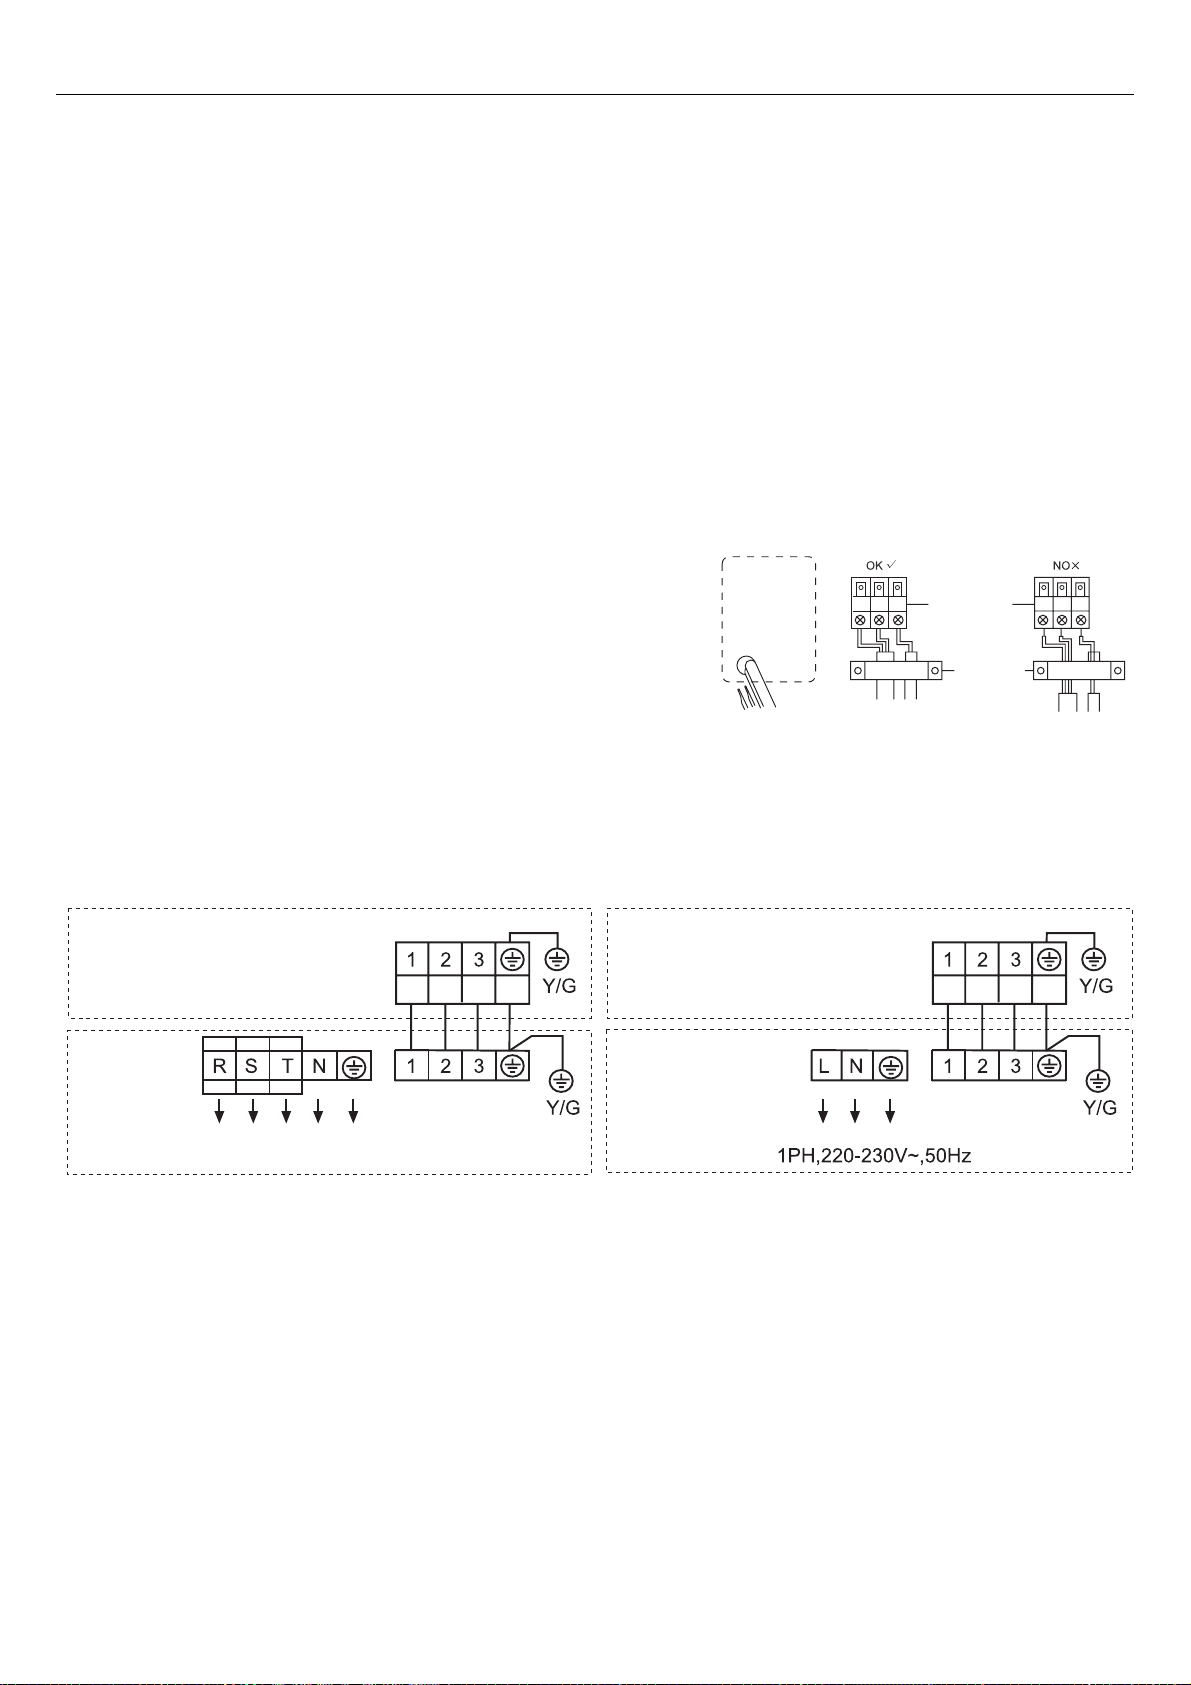
• I collegamenti elettrici devono essere effettuati da personale specializzato.
• Usare esclusivamente cavi in rame.
• L'alimentazione si collega dall'unità esterna.
• Usare un circuito dedicato (superiore a 30A)
• Installare un sezionatore di corrente.
• L’interruttore del climatizzatore deve interrompere tutti i poli; la distanza tra i 2 contatti non deve essere inferiore a 3 mm.
• Usare solo cavi di rame.
• Tutti cavi devono avere il certificato di autenticità Europea.
• I cavi di collegamento e di alimentazione non sono forniti.
Specifiche del cavo di alimentazione: H07RN-F 5G 4.0mm
2
Specifiche del cavo di collegamento: H05RN-F 4G 2.5mm
2
Collegamento elettrico dell'unità interna
1. Far passare il cavo dall'esterno attraverso il foro nella parete dove
passano anche le tubazioni refrigerante.
2. Inserire il cavo attraverso il pannello laterale dell'unità interna.
3. Allentare le viti dei morsetti, e inserire completamente l'estremità del cavo
di collegamento dentro la morsettiera, quindi stringere le viti. Tirare leggermente il filo verso l'esterno per accertarsi che sia fissato saldamente.
4. Dopo aver completato i collegamenti elettrici, è necessario applicare dei
fermagli serrafilo sulla guaina esterna dei fili elettrici.
5. Al termine, ricollocare al suo posto il coperchio della scatola di controllo.
Schemi elettrici:
Nota:
Quando si effettuano i collegamenti elettrici tra unità interna ed esterna, collegare con lo stesso filo i morsetti con lo stesso numero nell'unità interna e in quella esterna. Un collegamento errato danneggia il sistema di controllo del climatizzatore e ne impedisce il corretto
funzionamento.
Collegamenti elettrici
18
Morsettiera
unità interna
Morsettiera
Fermaglio
serrafilo
Morsettiera
unità interna
Morsettiera
unità esterna
Alimentazione
380-400V, 3N~, 50Hz
Morsettiera
unità esterna
Alimentazione
Page 61

Far funzionare il climatizzatore secondo quanto riportato nel manuale di istruzioni.
Durante il test di funzionamento, spuntare le seguenti caselle:
K Vi sono perdite di gas dai giunti delle tubazioni?
K I giunti delle tubazioni sono stati isolati termicamente?
K I collegamenti elettrici delle unità interne e dell'unità esterna sono corretti?
K Il cavo di collegamento tra unità interne ed esterna è fissato saldamente?
K Il drenaggio della condensa avviene in modo corretto?
K Il filo di messa a terra è collegato saldamente?
K Il voltaggio dell'alimentazione corrisponde a quello previsto dalle norme vigenti?
K Si sentono rumori insoliti?
K Il display del telecomando funziona correttamente?
K Il funzionamento in modalità Raffreddamento è normale?
K Il sensore temperatura ambiente funziona in modo corretto?
Test di funzionamento
19
Page 62

Indirizzo: N. 1 Haier Road, Hi-tech Zone, Qingdao 266101, Repubblica Popolare Cinese
Contatti: TEL +86-532-8893-6943; FAX
Sito Internet: www.haier.com
Page 63
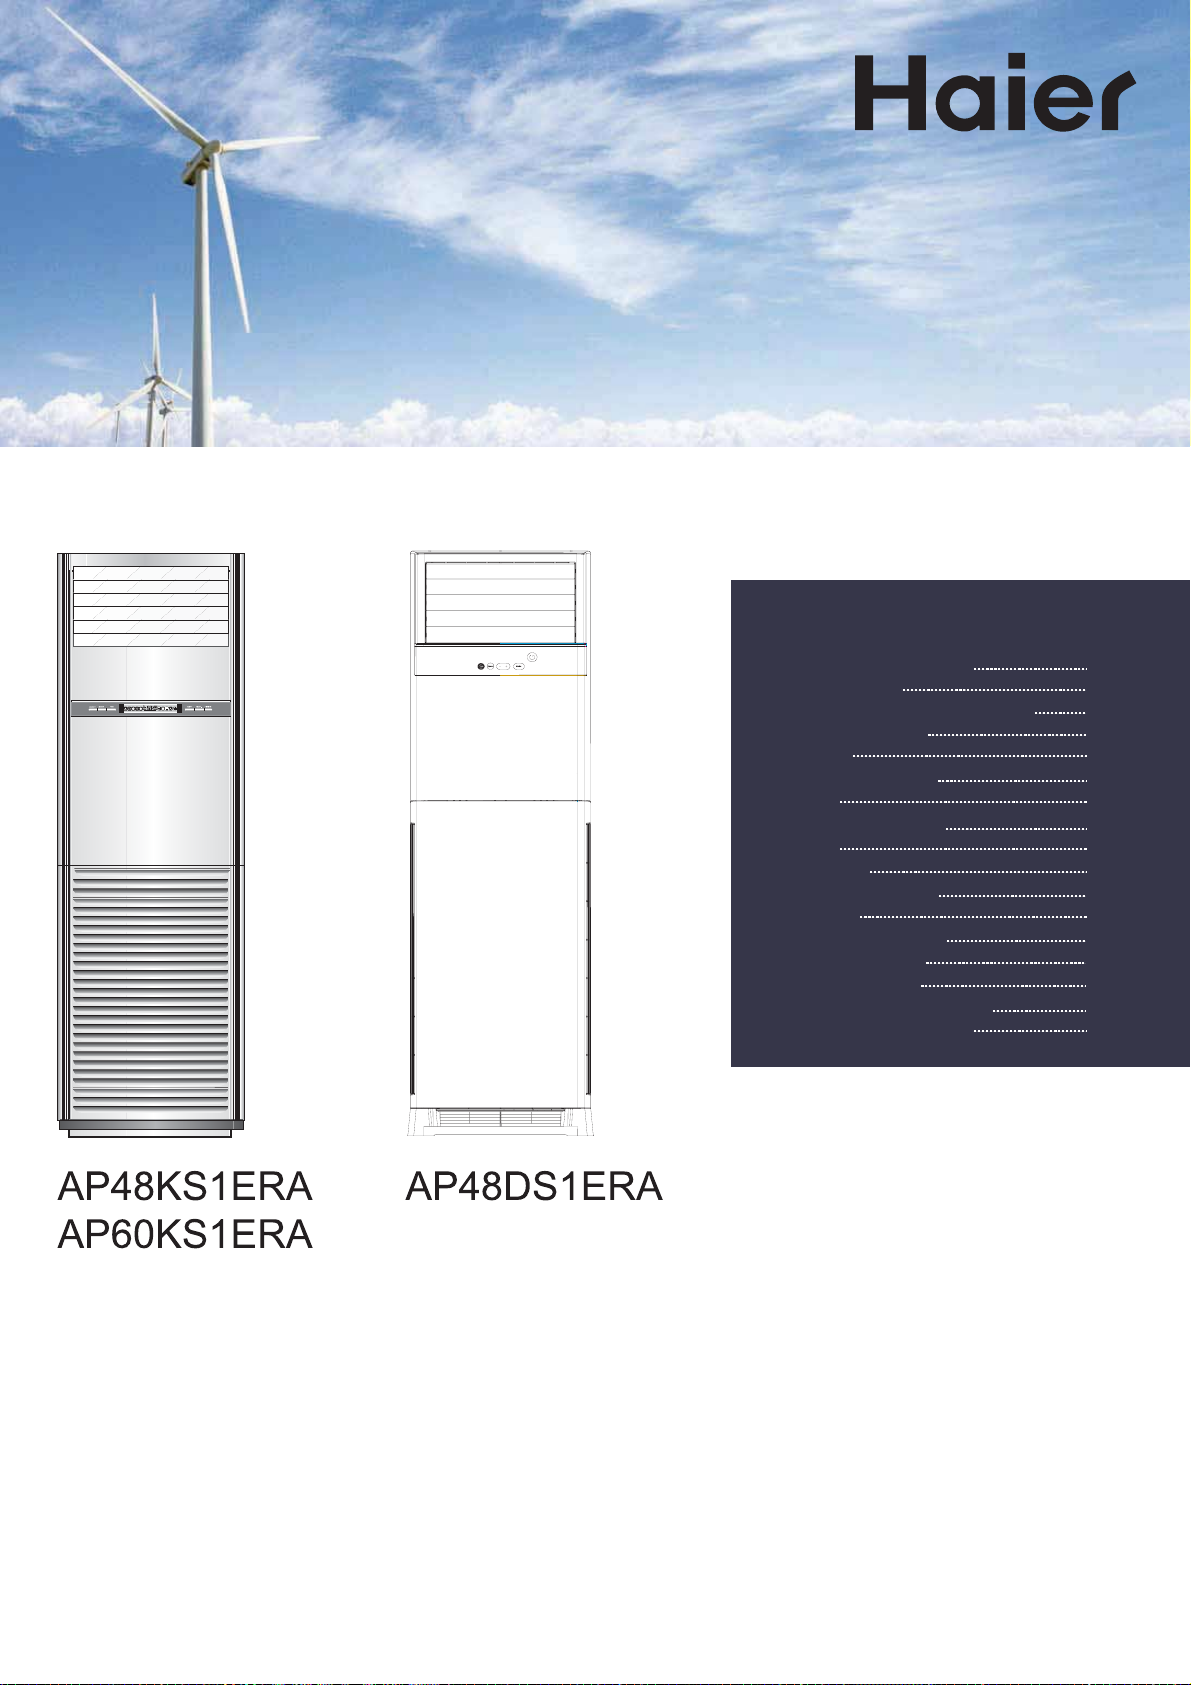
CLIMATISEUR UNITARY SMART COLONNE
MANUEL D’INSTRUCTIONS MANUEL D’INSTALLATION
Table des matières
Précautions d’utilisation
Avertissements
Dénomination des composants
Pièces et fonctions
Utilisation
Economie d’énergie
Entretien
Guide de dépannage
Entretien
Dépannage
Conseils de sécurité
Installation
Préparer l'installation
Tuyaux frigorigène
Exécution du vide
Branchements électriques
Test de fonctionnement
–¨ 1.000
3
4
5
6
7
9
9
10
11
12
13
14
15
17
17
18
19
Français
Veuillez lire ce manuel attentivement avant d'installer l'appareil.
Conservez ce manuel d’utilisation pour toute référence ultérieure.
Page 64
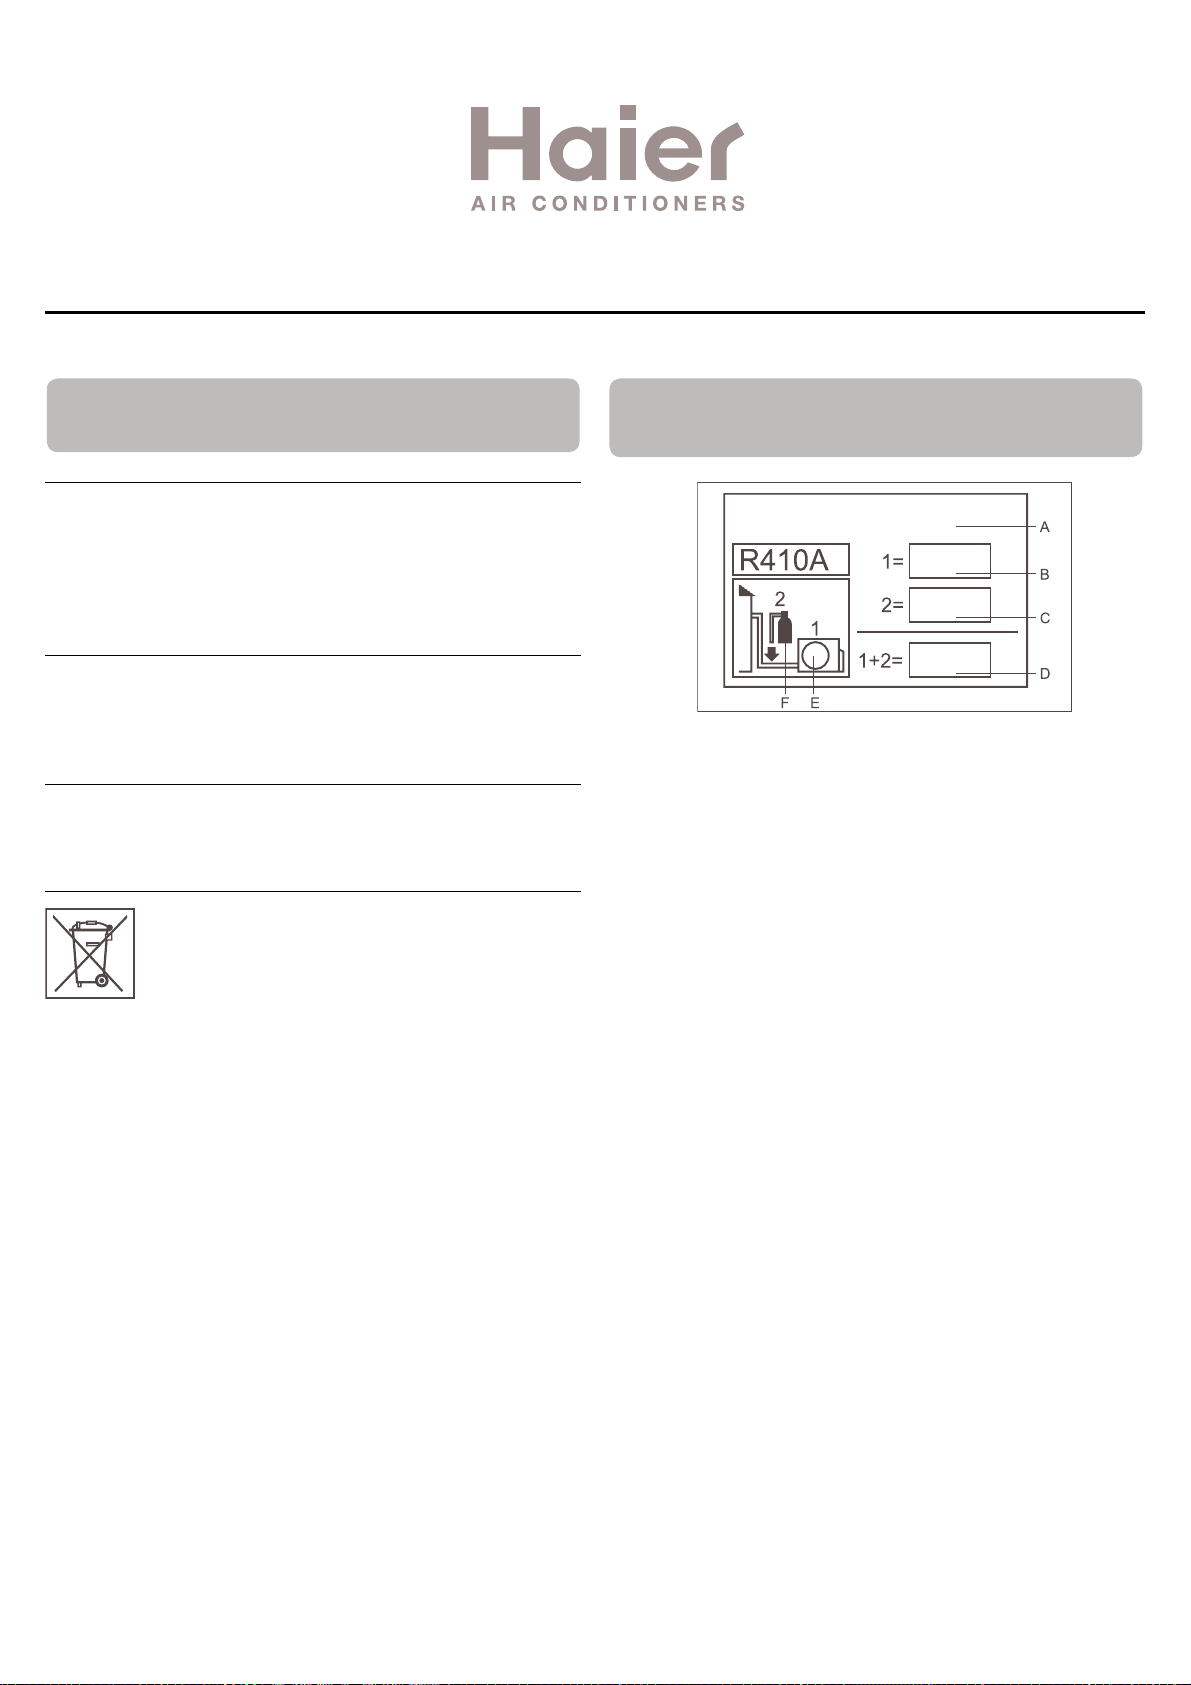
Haier Industrial Park, No.1 Haier Road, Qingdao, RR. Chine
CONFORMITÉ DES MODÈLES
À LA LÉGISLATION EUROPÉENNE
CE
Tous les appareils sont conformes aux directives Européennes
suivantes :
- Directive basse tension 73/23/CEE
- Directive basse tension 2006/95/CE
- Compatibilité électro-magnétique 89/336/CEE
- Compatibilité électro-magnétique 2004/108/CE
ROHS
Les appareils répondent aux exigences de la directive 2002/95/
CEE du parlement européen et du conseil sur la limitation des
substances dangereuses dans les Équipements Électriques et
Électroniques (Directive UE RoHS).
DEEE
Conformément à la Directive 2002/96/CE du Parlement Européen,
nous informons ici-même le consommateur des conditions d'élimination des appareils électriques et électroniques.
CONDITIONS D'ÉLIMINATION
Votre climatiseur porte ce symbole. Ceci signifie
que les produits électriques et électroniques ne
doivent pas être mis au rebut avec les déchets
domestiques non triés. Ne pas tenter de démon-
ter le système par soi-même : le démontage du
système de climatisation, le traitement du liquide réfrigérant, de l'huile et d'autres pièces doivent être effectués par
un installateur qualifié conformément à la législation locale
et nationale. Les climatiseurs doivent être traités dans des
installations spécialisées pour réutilisation, recyclage et
récupération. S'assurer que le produit est éliminé de façon
correcte permet d'aider à éviter des conséquences potentielles négatives sur l'environnement et la santé humaine. Merci
de contacter l'installateur ou les autorités locales pour plus
d'information. Les piles doivent être enlevées de la télécommande et faire l'objet d'une élimination séparée conformément à la législation locale et nationale.
INFORMATIONS IMPORTANTES CONCERNANT LE LIQUIDE RÉFRIGÉRANT UTILISÉ
Contient des gaz à effet de serre uorés
couverts par le protocole de Kyoto.
Kg
Kg
Kg
Cet appareil contient des gaz à effet de serre fluorés couverts par
le protocole de Kyoto. Ne pas ventiler à l'air.
Type de réfrigérant : R410A
Valeur de GWP*: 1975
GWP = global warming potential - potentiel de réchauffement de la
planète.
Merci de remplir à l'encre indélébile;
• 1 La charge de réfrigérant usine de l'appareil
• 2 la quantité supplémentaire de réfrigérant chargée sur place et
• 1+2 charge totale de réfrigérant sur l’étiquette de charge de
réfrigérant fournie avec le produit. L'étiquette renseignée doit être
collée à proximité du port de chargement de l'appareil (par ex.sur
l'intérieur du couvercle de valeur d'arrêt).
A contient des gaz à effet de serre fluorés couverts par le proto
cole de Kyoto.
B charge de réfrigérant usine de l'appareil : voir sur la plaque
signalétique de l'unité
C quantité supplémentaire de liquide réfrigérant chargée sur place
D Charge totale de réfrigérant
E Unité extérieure
F cylindre réfrigérant et orifice d'admission de chargement
-
Page 65

• Veuillez lire ce mode d’emploi avant d’utiliser le climatiseur.
• Les précautions de sécurité indiquées ci-après se divisent en deux catégories : DANGER et ATTENTION. Le non-respect des précautions de la catégorie DANGER peut causer de graves conséquences (mort, blessures graves, etc.). Toutefois, le non-respect des
précautions de la catégorie ATTENTION peut causer de graves problèmes en fonction de la situation. Toujours conserver les conseils
de sécurité à portée de la main pour pouvoir les consulter à tout moment.
DANGER
• Ce climatiseur doit être installé par un professionnel spécialisé; ne pas tenter de l'installer soi-même.
• Pour toute réparation, s'adresser toujours et exclusivement à un SAV agréé.
• En cas de déménagement ou de réinstallation de l'appareil, s'adresser à un SAV agréé pour démonter et réinstaller le climatiseur.
• Eviter de rester exposés trop longtemps au flux d'air froid soufflé par le climatiseur.
• Ne jamais introduire les doigts ou des objets quelconques dans les grilles d'aspiration ou de soufflage.
• Ne pas mettre en marche ou arrêter le climatiseur en branchant ou débranchant la fiche du câble d'alimentation.
• Faire attention à ne pas endommager le câble d'alimentation.
• En cas de mauvais fonctionnement du climatiseur (odeur de brûlé ou autre), arrêter immédiatement l'appareil, débrancher le câble
d'alimentation et s'adresser à un SAV agréé.
RECOMMANDATIONS
• Aérer régulièrement la pièce pendant le fonctionnement du climatiseur.
• Ne pas diriger le flux d'air de l'appareil directement vers des cheminées ou autres appareils de chauffage.
• Ne pas poser d'objets ou monter sur le climatiseur.
• Ne pas suspendre d'objets à l'unité intérieure.
• Ne pas poser de vases ou de récipients contenant de l'eau sur le climatiseur.
• Le pas mettre d'eau sur le climatiseur.
• Ne pas manipuler le climatiseur les mains mouillées.
• Ne pas tirer le câble d'alimentation.
• Débrancher toujours le câble d'alimentation en cas d'arrêt prolongé du climatiseur.
• Vérifier périodiquement l'installation et les supports pour détecter tout endommagement.
• Ne pas installer de plantes ou d'animaux devant le flux d'air provenant du climatiseur.
• Ne pas boire l'eau éliminée par le climatiseur.
• Cet appareil ne doit pas être utilisé pour d'autres applications telles que la conservation d'aliments, d'instruments de précision ou
œuvres d'art, la culture de plantes ou l'élevage d'animaux.
• Ne pas appuyer sur les déflecteurs d'air.
• Faire fonctionner toujours l'appareil avec le filtre à air correctement installé.
• Ne pas boucher les grilles d'aspiration et de soufflage de l'air.
• S’assurer de laisser une distance minimum d'un mètre entre les unités intérieure et extérieure et les éventuels appareils électroniques.
• Eviter d'installer le climatiseur près de cheminées ou autres sources de chaleur.
• Ne pas laisser les enfants approcher du lieu d'installation pendant les travaux.
• Ne pas utiliser de gaz inflammables près du climatiseur.
Précautions d’utilisation
3
Page 66
Température intérieure
Température extérieure
Température intérieure
Température extérieure
4
Limites de fonctionnement
Plage utile des températures ambiantes:
BS: température à bulbe sec
BH: température à bulbe humide
Avertissements
Refroidissement
Chauffage
max. BS/BH
min. BS/BH
max. BS/BH
min. BS/BH
max. BS
min. BS
max. BS/BH
min. BS
• Si le climatiseur est utilisé à des températures supérieures à celles indiquées ci-dessus, le circuit automatique de protection
incorporé peut se déclencher et interrompre le fonctionnement
du climatiseur afin de ne pas endommager les circuits internes.
Au contraire en cas d'utilisation du climatiseur à des températures inférieures à celles indiquées, l'échangeur de chaleur peut
geler entraînant des fuites d'eau ou autres anomalies de fonctionnement.
• Ne pas utiliser le climatiseur pour d'autres applications que le
refroidissement, le chauffage, la déshumidification ou la ventilation de locaux.
• Le câblage doit être conforme aux normes locales en vigueur.
• Les piles usagées doivent être ramenées dans un lieu où elles
sont collectées.
• Si le fusible de la carte électronique saute, le remplacer par un
fusible du type T3,15 A/250 V.
• L'interrupteur du climatiseur doit interrompre tous les pôles ; la distance entre les deux contacts ne doit pas être inférieure à 3 mm.
• Utiliser seulement des fils en cuivre.
• Tous les fils doivent avoir un certificat européen de conformité.
• Les fils de raccordement et d’alimentation ne sont pas fournis.
32/23°C
18/14°C
46/26°C
10/6°C
27°C
15°C
24/18°C
-15°C
Page 67
5
Dénomination des composants
Télécommande
–¨ 1.000
Unité intérieure
Grille sortie air
Tableau de commande
Grille entrée air
Filtre à air (à l’intérieur)
Grille
d'aspiration
Grille
de sortie
Compresseur
(à l'intérieur)
Page 68
6
Pièces et fonctions
Télécommande
Installation des piles
Enlevez le couvercle du comparti-
1
ment à piles ;
Placez les piles comme illustré. 2
2
piles R-03, touche de réinitialisation
(cylindre) ;
Veillez à bien respecter les polari-
3
tés " + "/"-" lorsque vous mettez les
piles ;
Installez les piles, puis replacez le couvercle.
4
Remarque :
• La distance entre la tête de transmission du signal et l'orifice de
réception ne doit pas dépasser 7 mètres, sans obstacle.
• Si une lampe fluorescente de type allumage électronique, une
lampe fluorescente à permutation ou un téléphone sans fil est
installé dans la pièce, le récepteur peut être perturbé dans la
réception des signaux, auquel cas la distance vers l'unité intérieure doit être raccourcie.
• Un affichage plein ou non clair durant l'utilisation indique que les
piles sont épuisées. Veuillez remplacer les piles.
• Si la télécommande ne fonctionne pas correctement, enlevez
les piles, puis remettez-les en place après quelques minutes.
1. Affichage Mode
Mode de
fonctionnement
Télécommande
2. Affichage d'envoi de signal
3. Affichage POSITION
4. Affichage VITESSE DE VENTILATION
BAS MOY HAUT AUTO
5. Affichage VERROUILLAGE
6. Affichage MINUTERIE ARRÊT Affichage MINUTERIE MARCHE
7. Affichage TEMP
8. Affichage des fonctions supplémentaires
Mode de
fonctionnement
Télécommande
Le chauffage électrique n'est pas disponible.
9. Bouton SILENCE
10. Bouton CHAUFFAGE
11. Bouton REFROIDISSEMENT
12. Bouton AUTO
13. Bouton VENTILATION
14. Bouton MINUTERIE
15. Bouton SANTÉ
(Ce modèle ne dispose pas de cette fonction.)
16. Bouton VERROUILLAGE
Utilisé pour verrouiller les boutons et l'affichage LCD.
17. Bouton VOYANT
(Ce modèle ne dispose pas de cette fonction.)
Contrôle l'allumage et l'extinction des diodes du panneau d'affichage intérieur.
18. Bouton MARCHE/ARRÊT ALIMENTATION
19. Bouton SEC
20. Bouton TEMP
21. Bouton POSITION
22. Bouton HEURE
23. Bouton FONCTION EXTRA
Fonction : fonction uniquement ventilateur, fonction envoi du souffle
d'air santé vers le haut et vers le bas, rafraîchir l'air (fonction réservée) Conversion Fahrenheit Celsius
Fonction réglage de la puissance Fonction orientation gauche et
droite, fonction chauffage 10°C
24. Bouton ANNULER/CONFIRMER
Fonction : Activez et désactivez la minuterie et autres fonctions
supplémentaires.
25. Bouton RÉINITIALISER
Si le fonctionnement de la télécommande devient anormal, utilisez
un objet pointu pour appuyer sur ce bouton afin de réinitialiser la
télécommande.
REFROIDIS-
AUTO
SILENCE VEILLE
SEMENT
Afchage
alternatif
électrique aidé
SEC
Chauffage
CHAUF-
FAGE
SANTÉ
VENTILA-
TION
ALIMENTA-
TION
Astuce :
En cas de non utilisation durant une longue période, retirer les
piles. Si quelque chose reste afché après le retrait des piles,
appuyer simplement sur la touche de réinitialisation.
Page 69
Utilisation
7
Opération de base
Télécommande
1.Démarrage de l'unité
Appuyez sur MARCHE/ARRÊT sur la télécommande,
l'unité démarre.
2.Sélectionner le mode d'utilisation.
Bouton REFROIDISSEMENT : mode Refroidissement
Bouton CHAUFFAGE : Mode Chauffage
Bouton SEC : Mode Déshumidication
3.Choisissez le réglage de la température
Appuyez sur le bouton
/ .
À chaque pression du bouton, le paramètre de température augmente de 1ºC ; appuyez sur le bouton
sans le relâcher pour augmenter rapidement cette
valeur.
À chaque pression du bouton, le paramètre de
température diminue de 1ºC ; appuyez sur le bouton sans le relâcher pour diminuer rapidement cette
valeur.
Sélectionner la température désirée.
4.Sélection de la vitesse de ventilation
Appuyez sur le bouton VENTILATEUR. À chaque pression,
la vitesse du ventilateur change de la façon suivante :
Afchage
alternatif
BAS MOY HAUT AUTO
Le climatiseur fonctionne à la vitesse afchée du ventila-
teur.
Lorsque la VENTILATION est réglée sur AUTO, le clima-
tiseur ajuste automatiquement la vitesse du ventilateur
en fonction de la température de la pièce.
Mode de fonc-
tionnement :
AUTO
REFROIDIS-
SEMENT
SEC
CHAUFFAGE
VENTILA-
TION
Télécom-
mande
Remarque
Dans le mode de fonctionnement automatique, le climatiseur
sélectionne automatiquement le fonctionnement Froid ou Chaud
en fonction de la température de la pièce. Lorsque le VENTILATEUR est paramétré sur AUTO, le climatiseur ajuste automatiquement la vitesse du ventilateur en fonction de la température
de la pièce.
En mode SEC, lorsque la température de la pièce est inférieure
de +2ºC à la température de réglage, l'appareil fonctionne de
façon intermittente à vitesse LENTE, quel que soit le réglage de
VENTILATION.
En mode CHAUFFAGE, l'air chaud soufe pendant une courte
période de temps en raison de la fonction de prévention du
tirage de froid. Lorsque la VENTILATION est réglée sur AUTO,
le climatiseur ajuste automatiquement la vitesse du ventilateur
en fonction de la température de la pièce.
En mode de fonctionnement VENTILATION, l’appareil ne
fonctionnera pas en mode REFROIDISSEMENT ou CHAUFFAGE, mais fonctionnera seulement en mode VENTILATION ;
AUTO n’est pas disponible lorsque le mode VENTILATION est
sélectionné. Et le réglage température est désactivé. En mode
VENTILATION, le fonctionnement veille n'est pas disponible.
Fonction veille
Appuyez sur le bouton pour accéder aux options supplémentaire, lorsque vous faites basculer l'écran sur ,
clignote. Puis appuyez sur pour accéder à la fonction
veille.
Mode de fonctionnement :
1.En mode FROID, SEC
1 heure après le démarrage du mode VEILLE, la température monte de 1°C par rapport au réglage de la température.
Après encore 1 heure, la température monte encore d'1°
C. L'unité va continuer à fonctionner pendant 6 heures,
puis s'arrête. La température est plus élevée que le réglage
temps. Ainsi la température de la pièce ne sera pas trop
basse pendant votre sommeil.
La fonction VEILLE
démarre
1 hr
1 hr
Réglage de la
température
En mode FROID, SEC
Augmentation
de 1°C
La fonction VEILLE
démarre
Environ 6 hr
Augmentation
de 1°C
Arrêt de
l'appareil
2.En mode CHAUFFAGE
1 heure après le démarrage du mode VEILLE, la tempé-
rature descend de 2°C par rapport au réglage de la température. Après encore 1 heure, la température descend
encore de 2°C. Après encore 3 heures, la température
monte d'un 1°C. L'unité va continuer à fonctionner pendant
3 heures, puis s'arrête. La température est plus basse que
le réglage temps. Ainsi la température de la pièce ne sera
pas trop élevée pendant votre sommeil.
Réglage de la
température
1 hr
La fonction VEILLE
démarre
Diminution de 2°C
1 hr
En mode CHAUFFAGE
Diminution de 2°C
3 hr
Arrêt de
l'appareil
3 hr
Augmentation
de 1°C
La fonction VEILLE
démarre
3.En mode AUTO
L'appareil fonctionne dans le mode de veille correspon-
dant adapté au mode de fonctionnement sélectionné
automatiquement.
Page 70
Utilisation
8
4.En mode VENTILATION
Pas de fonction de VEILLE.
5. Paramètre le changement de vitesse de ventilation durant
le sommeil.
Si la vitesse de ventilation est élevée ou moyenne au
moment de se coucher, régler an de réduire la vitesse de
ventilation pendant le sommeil. Si l'appareil est déjà réglé
sur une ventilation basse, ne rien changer.
Remarque
Lorsque la fonction MINUTERIE est activée, la fonction de
veille ne peut pas être activée. Une fois la fonction de veille
activée, si l'utilisateur réinitialise la fonction MINUTERIE, la
fonction de veille est désactivée et l'appareil revient à l'état
de minutage.
Fonctionnement PUISSANCE/
SILENCIEUX.
(1) Fonctionnement PUISSANCE
Lorsque vous avez besoin d'un chauffage ou d'un refroidissement rapide, vous pouvez utiliser cette fonction.
Appuyez sur le bouton
pour accéder aux options sup-
plémentaires, lorsque vous faites basculer l'écran sur
, clignote , puis appuyez sur pour accéder à la
fonction puissance. Pour désactiver cette fonction, veuillez
accéder à nouveau aux options supplémentaires pour annuler la fonction puissance.
(2) Fonctionnement SILENCIEUX
Utilisez cette fonction lorsque vous avez besoin de silence
pour lire ou vous reposer. Appuyez sur le bouton SILEN-
CIEUX, la télécommande afche
, puis activez la fonction
silencieux. Appuyez de nouveau sur ce bouton SILENCIEUX
pour désactiver la fonction silencieux.
Remarque :
En fonctionnement PUISSANCE, en mode de REFROIDISSEMENT ou CHAUFFAGE rapide, la pièce présentera une
distribution de température non-homogène. Une longue
période de fonctionnement SILENCIEUX produira un effet ni
trop froid ni trop chaud.
Réglage de l'orientation du souffle
d'air
Utilisation de la minuterie Marche/
Arrêt.
1 Une fois l'appareil démarré, sélectionner le mode de fonctionnement désiré :
2.Appuyer sur le bouton MINUTERIE pour changer le mode
de MINUTERIE. À chaque pression du bouton, l'afchage
change de la façon suivante : Télécommande :
MINUTEUR
ACTIVÉ 0,5h
Sélectionner ensuite le mode de MINUTERIE voulu (MINUTERIE MARCHE ou MINUTERIE ARRÊT ou MINUTERIE
MARCHE-ARRÊT). " on " ou " off " clignote.
3.Appuyez sur le bouton
À chaque fois que vous appuyez sur le bouton, le ré-
glage de l'heure augmente de 0,5 heure pour les 12
premiers heures, puis d'1 heure.
À chaque fois que vous appuyez sur le bouton, le régla-
ge de l'heure diminue de 0,5 heure pour les 12 premiers
heures, puis d'1 heure. Le réglage peut se faire sur 24
heures.
4. Conrmer le réglage de l'heure
Après avoir réglé l'heure, appuyez sur le bouton
conrmez l'heure. Le bouton MARCHE ou ARRÊT s'arrête
alors de clignoter.
5.Annuler le réglage de l'heure
Appuyez plusieurs fois sur le bouton minuterie jusqu'à ce
que l'afchage de l'heure soit effacé.
Astuces :
Après remplacement des piles ou si une coupure de courant
se produit, l'heure doit être à nouveau réglée.
Selon les horaires de MINUTERIE MARCHE ou MINUTERIE ARRÊT, Marche-Arrêt ou Arrêt-Marche se produira.
Fonction Souffle d'air sain
1.Appuyez sur pour démarrer
Réglage des conditions de travail confortables.
2. Activation de la fonction soufe d'air sain
Appuyez sur le bouton pour entrer des options supplémentaires. Appuyez plusieurs fois sur ce bouton. Les volets
se déplaceront sur l'une des trois positions suivantes. Choisissez la position voulue, puis appuyez sur le bouton
pour conrmer.
MINUTEUR
DÉSACTIVÉ
0,5h
Élévation
du soufe
d'air sain
MINUTEUR ACTI-
VÉ-DÉSACTIVÉ
0,5h
MINUTEUR DÉ-
SACTIVÉ-ACTIVÉ
0,5h
/ pour régler l'heure.
Abaissement
du soufe
d'air sain
Position
actuelle
et
1. Afchage du statut du ux d'air
REFROIDISSEMENT/SEC :
CHAUFFAGE :
2
. Réglage du ux d'air gauche et droit
(Ce modèle ne dispose pas de cette fonction.)
État initial
3. Annulation de la fonction soufe d'air santé
Appuyez sur le bouton pour saisir des options supplémentaires. Appuyez plusieurs fois sur ce bouton. Les volets se déplaceront à nouveau sur l'une des trois positions.
Appuyez ensuite sur le bouton pour annuler.
Remarque : Ne dirigez pas directement les volets à la main.
Sinon, la grille ne pourra pas fonctionnement correctement.
Si la grille ne ne fonctionne pas correctement, à l'aide de la
commande, arrêtez une minute puis redémarrez.
Remarque :
1. Lorsque vous avez activé la fonction soufe d'air sain, la
position de la grille est xe.
2. Pour le chauffage, mieux vaut sélectionner le mode
3. Pour le refroidissement, mieux vaut sélectionner le mode .
4. En modes refroidissement et sec, l'utilisation du climatiseur
pendant une durée prolongée alors que l'air est humide provoque la formation de gouttes d'eau au niveau de la grille.
.
Page 71
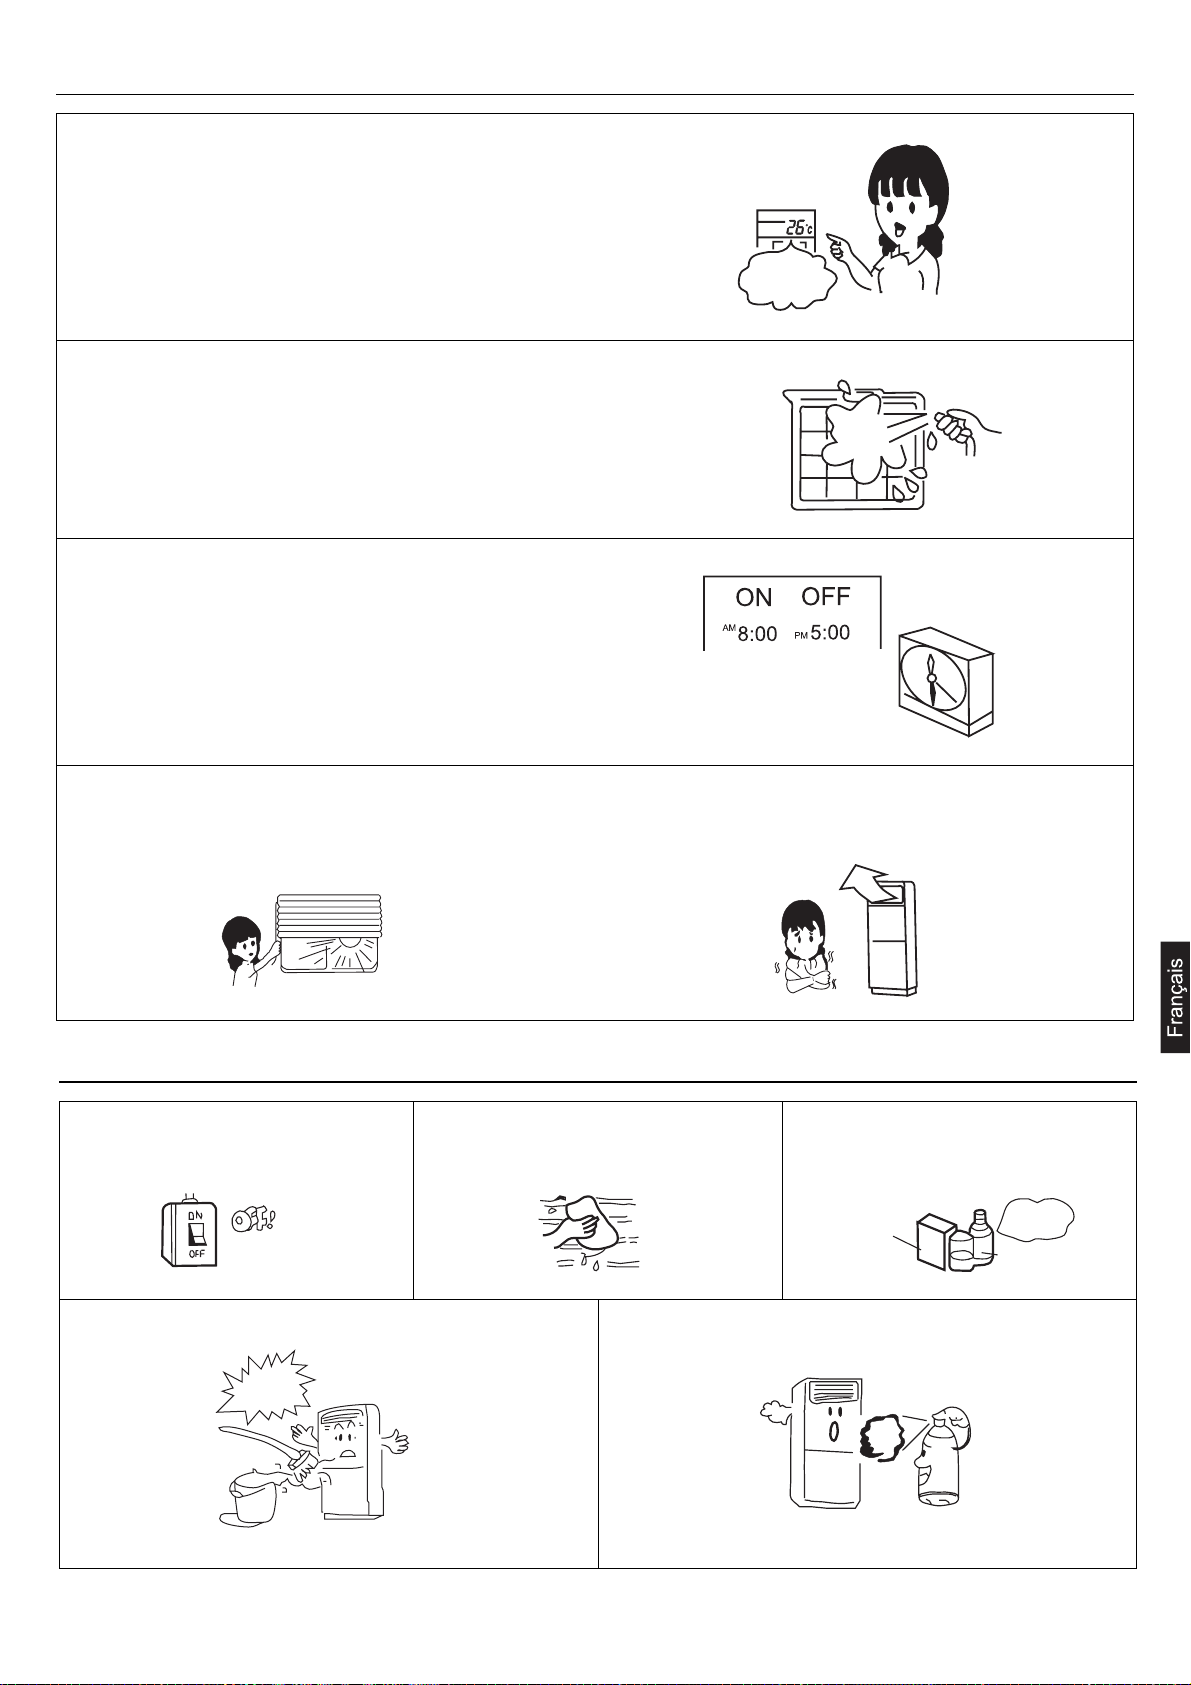
Economie d’énergie
Maintenir une température ambiante appropriée
Maintenir une température trop chaude ou trop froide nuit à la santé et entraîne une plus grande consommation d’énergie.
Nettoyer périodiquement le filtre à air
Le filtre obstrué entraîne une chute d’efficacité du chauffage et du
refroidissement, de plus grandes consommations ainsi que d’éventuels dysfonctionnements (par ex. fuites d’eau en, mode refroidissement)
Utilisation de la minuterie
Grâce à l’utilisation de la minuterie, il est possible d’obtenir la bonne température au moment désiré, par ex. en rentrant à la maison.
Éviter la lumière directe du soleil et les courants d’air Régler correctement la direction du flux d'air.
Température
appropriée
9
Entretien
Mettre l'interrupteur général sur OFF. Ne pas toucher l'appareil avec les mains
mouillées.
Ne pas utiliser d'eau chaude ou de
liquides volatiles.
Ne pas verser d’eau directement sur l’unité intérieure. Ne pas projeter d’aérosols, de peintures ou d’insecticides sur
l’unité.
Ils peuvent endommager l’unité ou provoquer un incendie.
Danger
Page 72
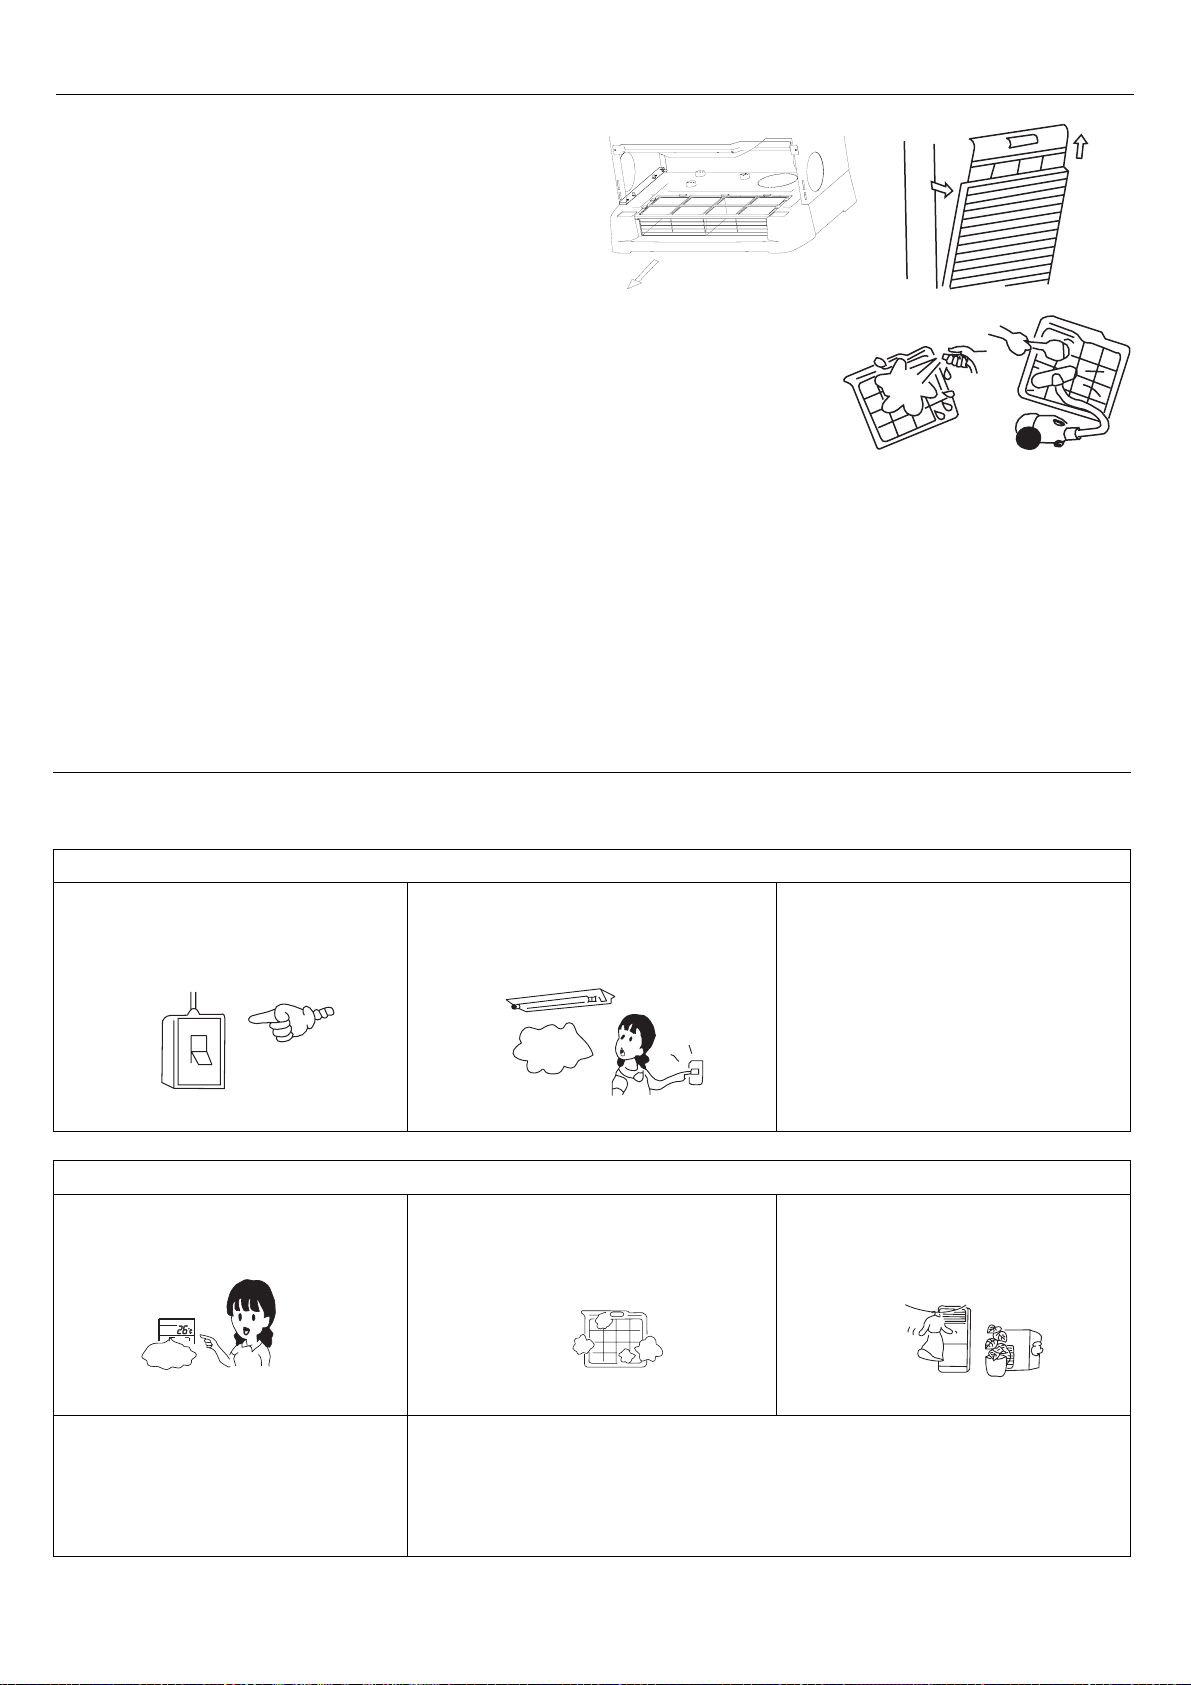
Entretien
Nettoyage du filtre à air
• Extraire le filtre comme indiqué sur la figure.
• Nettoyer à l'eau ou avec un aspirateur.
Si le filtre est très sale, le laver avec un détergent neutre.
• Laver à l’eau propre et installer uniquement après l’avoir fait sécher
complètement
• Ne pas laver à plus de 40°C pour ne pas abîmer le filtre.
10
Guide de dépannage
Effectuer les contrôles suivants avant de vous adresser au SAV.
L’interrupteur en amont est-il sur ON ? La fourniture électrique du secteur est
normale ?
La protection magnétothermique s’est
déclenchée? Danger ! Couper le
courant immédiatement et contacter le
revendeur habituel.
La télécommande est correctement
programmée?
Le déflecteur horizontal est positionné
vers le haut? (en mode Chauffage)
Le filtre à air est sale?
Il y a des portes ou des fenêtres
ouvertes?
Le flux d’air des grilles d’aspiration et de
soufflage rencontre des obstacles?
Black
out?
REFROIDISSEMENT OU CHAUFFAGE INSUFFISANT
LE CLIMATISEUR NE DÉMARRE PAS
Tem p .
correcte
Page 73
Guide de dépannage
LE REFROIDISSEMENT EST INSUFFISANT
La lumière solaire entre directement dans
la pièce?
En mode Chauffage l'appareil souffle de
l'air froid. Le climatiseur est en phase de
pré-chauffage?
Il y a des sources de chaleur "cachées"
dans la pièce?
La pièce est bondée?
Si, après ces contrôles, le climatiseur ne marche toujours pas correctement ou si les problèmes suivants se présentent, arrêter l’appareil
immédiatement et contacter le revendeur habituel.
• Les fusibles ou la protection magnétothermique brûlent ou sautent souvent.
• Formation de gouttes de condensation pendant le fonctionnement en mode Refroidissement ou Déshumidification.
• Le fonctionnement est anormal ou l’on entend des bruits étranges.
11
Entretien
Entretien et nettoyage de l'appareil
• Nettoyer avec un chiffon humide, puis sécher avec un chiffon doux.
• Si l’appareil est très sale, le nettoyer avec un chiffon imbibé de détergent neutre. Puis rincer avec de l'eau propre.
• Ne pas utiliser d'eau chaude à plus de 40°C pour ne pas décolorer ou déformer l’appareil.
• Ne pas utiliser de substances chimiques.
Entretien en fin de saison
• Laisser le climatiseur en marche en mode Ventilation un jour où il fait beau pour faire sécher les
composants à l'intérieur de l'appareil.
• Couper le courant électrique. En effet, même à l'arrêt l'appareil consomme de l'énergie.
• Nettoyer le filtre et le replacer dans le climatiseur. Nettoyer l'unité intérieure
Entretien en début de saison
• Contrôler qu'il n'y a pas d'obstacles devant les grilles d'aspiration et de sortie des unités inté-
rieure et extérieure.
• S'assurer que le filtre à air est propre et qu’il est bien inséré dans le climatiseur.
Si l’unité est mise en marche sans filtre, la poussière pourrait l’endommager ou entraîner un dysfonctionnement.
• Pour protéger le compresseur, brancher le climatiseur au moins 12 heures avant de le mettre en
marche.
Laisser également l’interrupteur de l’alimentation sur ON pendant toute la saison.
Page 74
12
Dépannage
Lorsqu’une panne se produit, le ventilateur de l’unité intérieure s’arrête de fonctionner. La méthode de vérification sur le code
de panne est comme suit.
Diagnostic
Défaillance Affichage LED Nbre de flash led
Température défectueuse Te E3 3 0
Température défectueuse Ta E3 3 2
Température défectueuse Ts E3 3 1
Température défectueuse Td E3 3 3
Interrupteur de haute pression anormale E6 6 2
Interrupteur de basse pression anormale E6 6 3
Protection de basse pression (absence de R410A) E6 3 6
Panne d’EEPROM à l'extérieur EE 2 1
Communication anormale entre l’intérieur et l’extérieur E9 3 2
Protection de surintensité du compresseur entre les phases /
mauvaises phases
Protection de sous-intensité du compresseur E5 4 5
Moteur CC anormal à l’extérieur F6 2 9
Capteur de température déchargée anormal à l'extérieur E4 2 8
Inversion valve à 4 voie anormale en mode de chauffage F2 3 7
Protection de surtension / sous-tension source d’alimentation E7 2 8
Capteur d'environnement anormal à l'intérieur E1 0 1
Capteur de bobine anormal à l'intérieur E2 0 2
Panne d’EEPROM à l'intérieur F8 0 4
Protection antigel à l'intérieur F5 0 5
Panne de communication entre l’intérieur et l’extérieur E9 0 7
Panne de communication entre les contrôleurs câblés E8 0 8
Protection de la surcharge du mode de chauffage F4 0 9
Système de drainage anormal E0 0 12
E5 2 3
chronometer(Unité
intérieure PCB LED
4)
Nbre de flash LED
en crs (Unité
intérieure PCB
LED 3)
Pas d’entrée de signal de croisement de zéro EF 0 13
Moteur du ventilateur anormal à l'intérieur E10 0 14
Panne du capteur de bobine assisté ED 0 15
Mode de fonctionnement anormal à l'intérieur F3 0 16
Autres pannes de conversion de fréquence à l’extérieur F7
1. Pour la défaillance intérieure seulement LED ON récepteur de course à distance indiquera.
2. Pour la défaillance intérieure, le chronomètre LED et LED de course indiquera le chronomètre LED du récepteur à distance
signifiant le lieu de dix, et LED de course signifie la place de Un. Le chronomètre LED clignote tout d'abord, 2 seco ndes plus tard,
LED de course clignote aussi. Puis 4 secondes plus tard, ils commencent à clignoter à tour de rôle à nouveau. Le nombre de fois de
clignotements est égal au code d'erreur intérieur plus de 20. pPar exemple, code de défaillance extérieur est 2, l'unité intérieure doit
afficher 22, ainsi, le chronomètre LED clignote deux fois, tout d'abord, puis LED de course clignote de ux fois.
3. Pour obtenir plus de détails de défaillance de l'unité extérieure, veuillez vous reporter à la la liste de dépannage d'unité extérieure.
Page 75

Conseils de sécurité
ATTENTION
• Pour l’installation, s’adresser au revendeur ou à un technicien spécialisé. Ne pas tenter d'installer le climatiseur soi-même.
Une installation incorrecte peut provoquer des fuites d'eau, des électrocutions ou des incendies.
• Nous vous rappelons que la mise en œuvre des installations doit être parfaite afin de pouvoir directement accéder aux appareils pour
l’entretien. La garantie ne couvre pas l’utilisation d’échafaudages, grue, etc. pour l’entretien.
RECOMMANDATIONS
• Ne pas installer le climatiseur dans un endroit où il peut se produire des fuites de gaz inflammable, pour éviter tout risque d'incendie.
• Installer un coupe-circuit pour éviter des décharges électriques.
• Raccorder le câble de terre. Ne pas raccorder le fil de terre aux tuyaux du gaz, de l'eau, ou aux lignes téléphoniques.
• Installer correctement le tuyau d'évacuation des condensats afin d'éviter toute fuite d'eau.
• Le climatiseur doit être pourvu d’un câble d’alimentation exclusif.
• Veiller à ne pas rayer la surface externe du climatiseur.
• Après avoir installé l’appareil, expliquer à l’utilisateur final le fonctionnement du climatiseur.
Lieu de l’installation :
• Endroit facilement accessible, avec une circulation d'air suffisante.
• Position qui n’est pas exposée aux jets d’huile ou aux émissions de vapeur (cuisines).
• Endroit non exposé à l'air saumâtre (bord de mer).
• Endroit où il n'y a pas de dégagement de gaz corrosifs ou de gaz en suspension (sources thermales).
• Endroit où il n'y a pas de fréquents sauts de tension.
• Endroit éloigné de téléviseurs, radios ou appareils qui génèrent des ondes électromagnétiques ou des ondes à haute fréquence.
• Position où le bruit et l’air émis par l’unité extérieure ne dérangent pas les voisins.
• Endroit qui n'est pas exposé à de fortes chutes de neige.
• Endroit où il n'y a pas d'obstacles pouvant boucher les grilles d'aspiration et de sortie de l'air.
• Position qui est en mesure de supporter le poids du climatiseur sans provoquer de vibrations ou de bruits excessifs.
Raccordements électriques :
• Pour une installation parfaite, veuillez suivre scrupuleusement les indications indiquées dans ce manuel.
• Raccorder l’unité intérieure et celle extérieure par les des tuyaux et les câbles électriques fournis comme accessoires.
• Si le câble d'alimentation est endommagé, il doit être remplacé par le SAV ou par un technicien spécialisé
• La méthode de câblage doit être conforme au standard local.
• Ne pas couper, raccourcir ou allonger le câble d’alimentation et ne pas remplacer la fiche.
• Ne pas utiliser de rallonges.
• Brancher solidement la fiche dans la prise de courant. Si la prise de courant est desserrée, il faut la réparer avant de commencer l’ins-
tallation.
• Ne pas alimenter le système avant d’avoir achevé l’installation.
13
Page 76
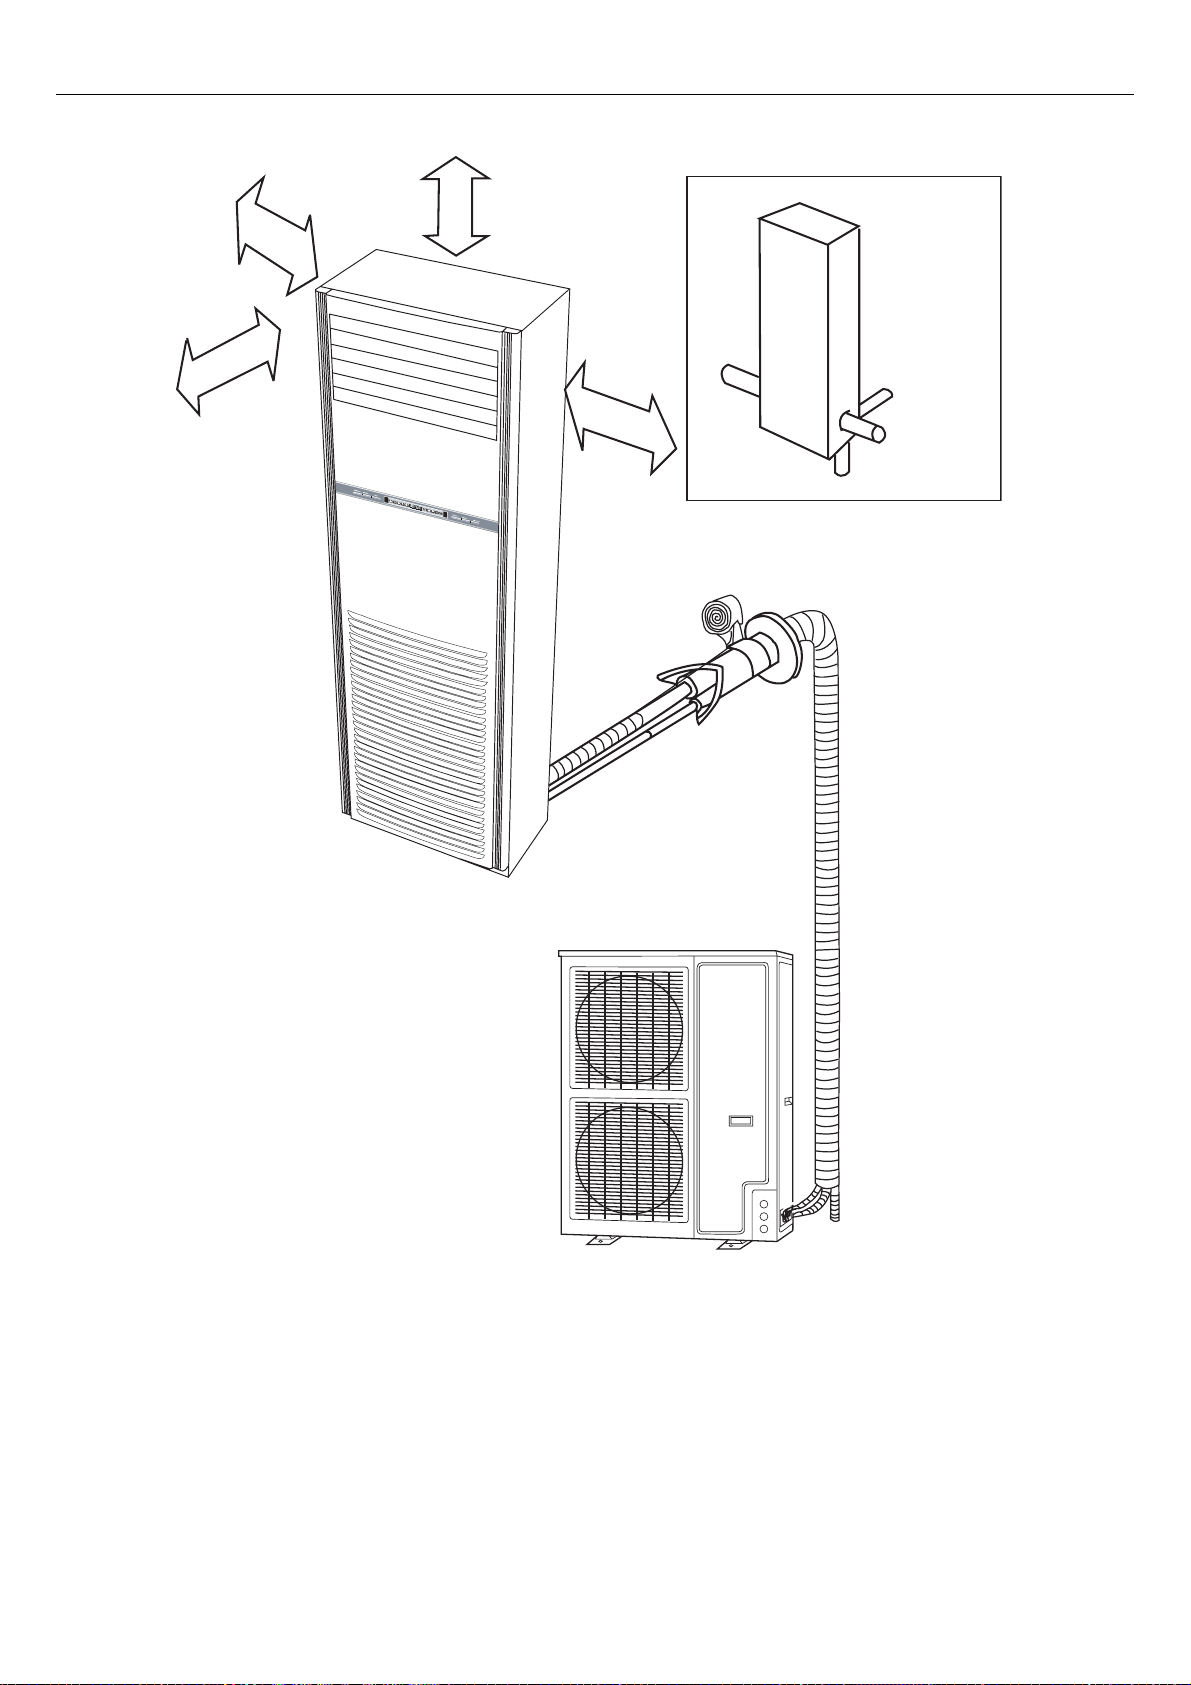
Installation
14
plus de 1
direction des tuyaux
0
cm
plus de 10cm
plus
de
cm
0
10
gauche
arrière
p
lus de 10cm
droite
dessous
Page 77
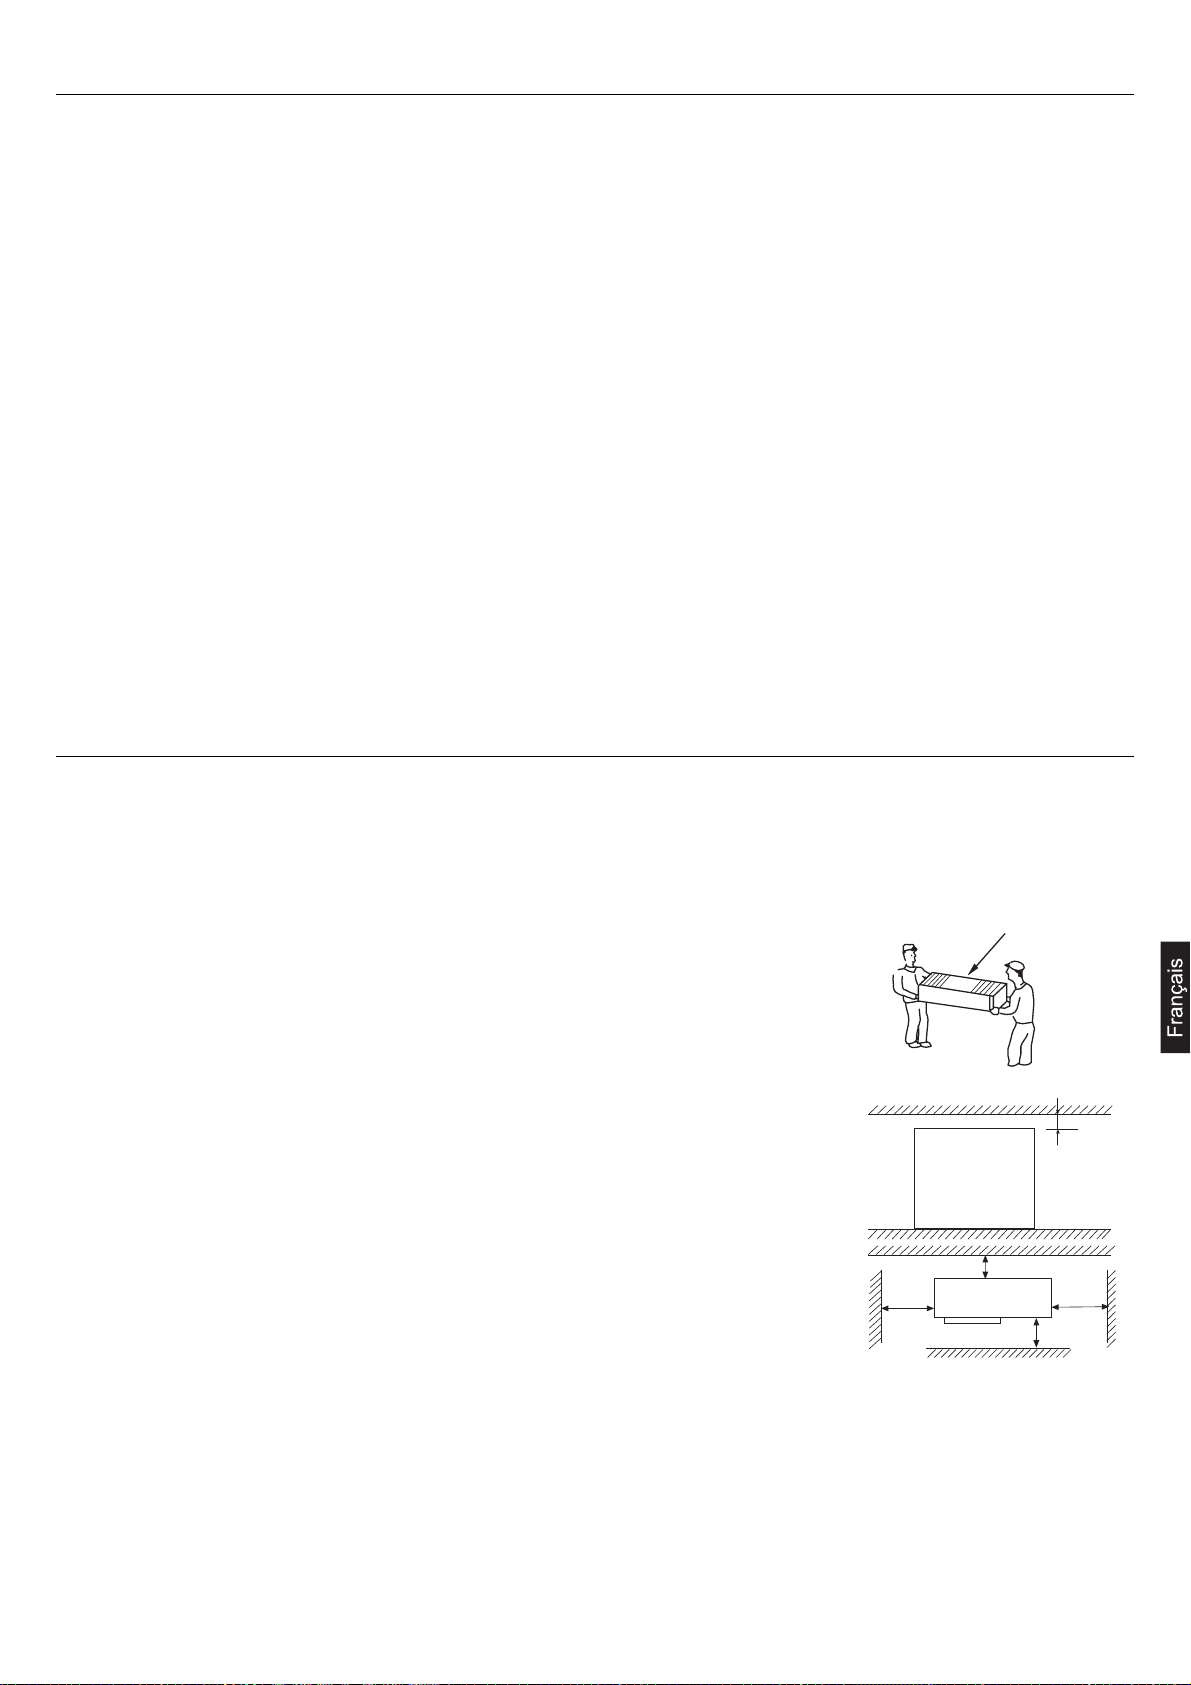
ATTENTION
S’ASSURER D’AVOIR LU ATTENTIVEMENT LES INSTRUCTIONS AVANT DE COMMENCER L’INSTALLATION. LE NON-RESPECT
DES INSTRUCTIONS POURRAIT PROVOQUER DES BLESSURES GRAVES VOIRE MEME LE DECES, DES MAUVAIS FONCTIONNEMENTS DE L’APPAREIL ET/OU DES DOMMAGES AUX OBJETS.
Avant l'installation
• Ne pas déballer l'unité avant de la placer à l'endroit où elle sera installée.
• Au moment d'enlever l'emballage, utiliser un matériau souple ou une planche de protection munie
de cordes pour soulever l'unité sans l'endommager.
• Toujours transporter l’unité avec la partie avant tournée vers le haut.
Choix du lieu de l’installation de l’unité extérieure
• Position qui est en mesure de supporter le poids de l’unité et qui n’est pas sujette aux vibrations.
• Position dans laquelle la sortie de l’air et le bruit ne gêne pas les voisins.
• Position n’étant pas trop exposée à la pluie ou la lumière directe du soleil et suffisamment venti-
lée.
Installation de l’unité extérieure
• Utiliser les boulons d’ancrage M10 pour fixer l’unité extérieure au sol.
• Si l’unité extérieure est installée contre un mur ou sur le toit, fixer solidement
les étriers afin d’éviter les risques en cas de séisme ou d’événements
atmosphériques extraordinaires.
• En phase d’installation, utiliser des amortisseurs contre les vibrations.
Unité vers le haut
plus de 30cm
plus de 10cm
plus de 60cm
plus de
15cm
plus de
10cm
Préparer l'installation
Pour l'installation du climatiseur, s'adresser au vendeur ou à un professionnel spécialisé. Ne pas tenter d'installer le climatiseur soimême. Une installation incorrecte peut provoquer des fuites d'eau, des électrocutions ou des incendies.
Outils nécessaires pour l'installation
1. Tournevis
2. Scie
3. Perceuse (diamètre 70mm)
4. Clé hexagonale
5. Clé
6. Coupe-tube
7. Dudgeonnière
8. Couteau
9. Pinces
10. Détecteur de fuites de gaz ou solution savonneuse
11. Mètre
12. Ébavureur
13. Huile frigorifique
Les accessoires suivants ne sont pas fournis:
Ruban adhésif
Collier de plastique pour tuyauteries
Tuyau de raccordement
Tuyau évacuation condensats
Matériau isolant
Poudre de craie
15
Préparer l'installation
Page 78
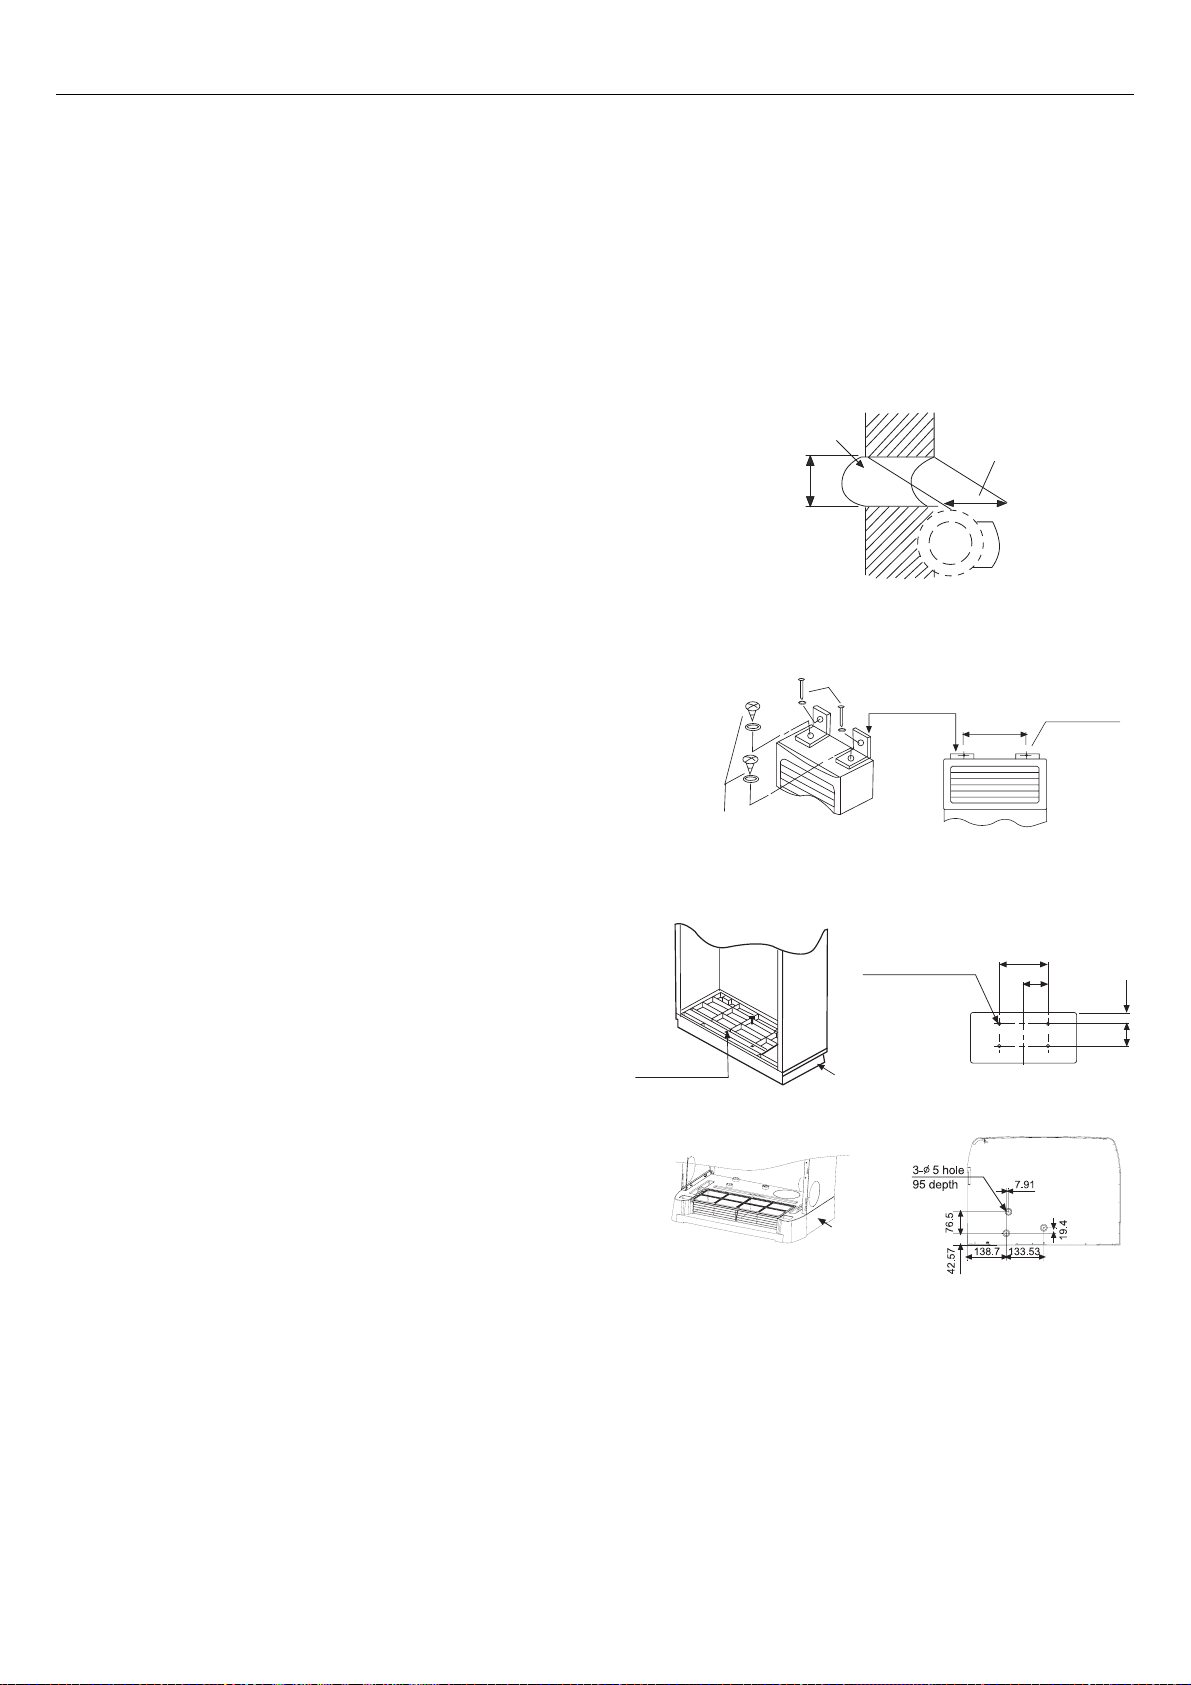
Préparer l'installation
16
Choix du lieu de l’installation de l’unité intérieure
• Position permettant une évacuation facile des condensats et un raccordement pratique avec l’unité extérieure.
• Position éloignée des sources de chaleur, de vapeur et de la lumière directe du soleil afin d’éviter les anomalies de fonctionnement
et les déformations du revêtement du climatiseur.
• Emplacement où l'air émis par le climatiseur peut circuler librement dans la pièce.
• Endroit sans aucun obstacle pouvant obstruer l'aspiration et la sortie de l'air de l'unité intérieure.
• Position proche d’une prise de courant et prévoyant les espaces nécessaires pour l’entretien.
Installation de l’unité intérieure
1. Positionnement du trou dans le mur
• La position du trou dans le mur dépend du lieu d’installation et
de la direction de sortie des tuyauteries.
• Percer un trou de 70mm de diamètre, légèrement incliné vers
l’extérieur du mur.
• Appliquer le cache-trou et le sceller avec du mastic après l’ap-
plication.
2. Fixation de l'unité intérieure
Pour empêcher le basculement de l’unité intérieure, fixer l’unité au
mur avec les étriers métalliques et au sol avec les équerres.
Installer l’unité à l’horizontale (pente max. autorisée: 1°).
3. Installation des étriers métalliques
Fixer l’étrier métallique au mur afin qu’il n’y ait aucune fente entre
les deux. Avec l’unité placée verticalement, fixer l’étrier à l’unité avec
les vis, régler la position de l’étrier afin de ne pas laisser d’espaces
entre le panneau supérieur et l’étrier.
4. Installation des équerres
Fixer les équerres afin qu’il n’y ait aucune fente entre l’équerre et l’unité intérieure. Après avoir vérifié que l’unité est placée parfaitement
verticalement par rapport au sol, fixer les vis au sol.
Vis
Clous
Étriers
330
2 trous Ø10
Panneau inférieure
Tro u
d’ancrage
260
79
202
130
4 trous Ø14 prof. 30
Panneau inférieure
Côté intérieur
Trou dans le mur
Ø70mm
Côté extérieur
Epaisseur
du mur
Page 79
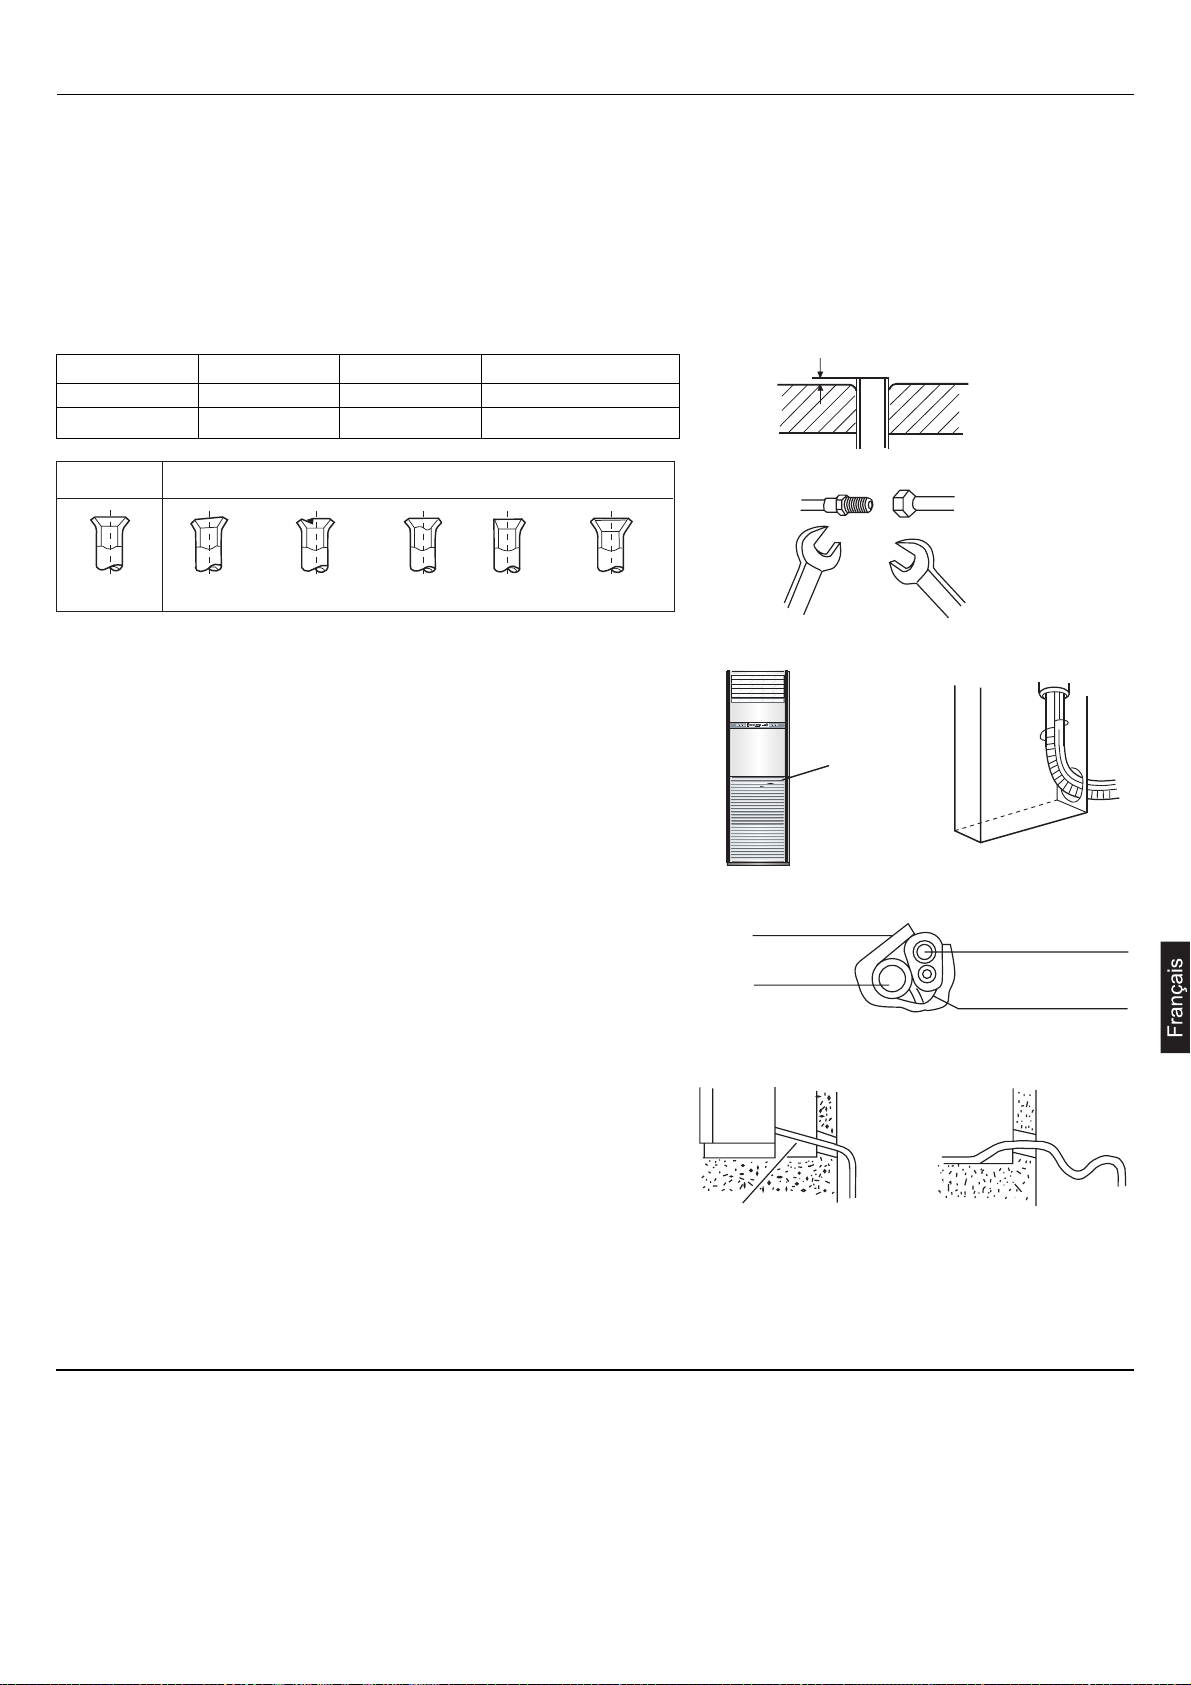
Méthode pour le raccordement des tuyaux
- Les tuyauteries devront être le plus court possible pour garantir l’efficacité du système.
- Appliquer de l’huile réfrigérante sur le raccord et sur la bride.
- Plier les tuyaux en gardant un angle le plus large possible pour éviter de les étrangler.
- Maintenir unis les centres des tuyaux et visser l’écrou à la main, puis les serrer à l'aide d'une clé.
- S’assurer que des corps étrangers ne s’insinuent pas dans les tuyaux comme de la poussière, du sable ou de l’eau.
Un vissage en force sans un bon centrage peut endommager le filet et causer des fuites de gaz.
Raccordement des tuyauteries de l'unité intérieure
1. Mise en place des tuyauteries du frigorigène et du tuyau d’évacuation des
condensats
• Le boîtier de commande est visible après avoir ouvert la grille d’aspiration (voir
figure). Retirer le couvercle du boîtier avant de commencer le travail.
• Retirer à l’aide d’une scie le bouchon prédécoupé pour les tuyauteries en fonction de la direction de sortie des tuyauteries.
• Enrouler ensemble avec un ruban adhésif le tuyau d’évacuation des condensats, le câble électrique de raccordement unité intérieure/extérieure et les
tuyauteries de frigorigène et faire passer le tout à travers le trou dans le mur en
vue des raccordements à l’unité extérieure.
2. Installation du tuyau d'évacuation des condensats
Le tuyau d’évacuation des condensats doit être installé avec une pente
vers le bas en évitant les siphons.
Si l’humidité est élevée, le tuyau d'évacuation des condensats (en particulier dans la pièce et dans l’unité intérieure) doit être recouvert de matériau isolant.
Tuyaux frigorigène
Diamètre Mesure A Moment de torsion
côté liquide ø 9,52mm 1,0 ~ 1,8 32,7-39,9 N.m
côté gaz ø 19,05mm 1,4 ~ 2,2 97,2-118,6 N.m
17
e
r
Exécution du vide
Exécuter le vide pour faire sortir l’air de l’unité intérieure et des tuyauteries de frigorigène.
(1) Avec les robinets côté liquide et côté gaz intérieurs et extérieurs complètement fermés, retirer le bouchon qui protège l’ouverture
de service et exécuter le vide.
(2) Serrer tous les écrous des dudgeons des tuyauteries intérieures et extérieures.
(3) Après avoir exécuté le vide, retirer les bouchons des robinets liquide et gaz, ouvrir complètement le robinet du liquide et ensuite
le robinet du côté gaz.
(4) Remettre en place et serrer les bouchons sur les robinets et sur la vanne de service.
Correct
mauvais endommagé fissuré Incomplet trop large
Erroné
A
gabarit de dudgeonnage
Matériau isolant
Tuyaux
frigorigène
Unité intérieure
Pente
Boîtier de
commande
OUI
Tuyau évacuation cond
Câble de raccordement
unité intérieure/extérieu
NON
Siphon
Page 80

• Les branchements électriques doivent être effectués par un professionnel agréé.
• Utiliser exclusivement des câbles en cuivre.
• L'alimentation se raccorde depuis l’unité extérieure.
• Utiliser un circuit dédié (supérieur à 30A)
• Installer un dispositif de coupure.
• L'interrupteur du climatiseur doit interrompre tous les pôles ; la distance entre les deux contacts ne doit pas être inférieure à 3 mm.
• Utiliser seulement des fils en cuivre.
• Tous les fils doivent avoir un certificat européen de conformité.
• Les fils de raccordement et d’alimentation ne sont pas fournis.
Spécifications du câble d’alimentation: H07RN-F 5G 4.0mm
2
Spécifications du câble de raccordement: H05RN-F 4G 2.5mm
2
Raccordement électrique de l'unité intérieure
1. Faire passer le câble depuis l’extérieur à travers le trou dans le mur où pas-
sent également les tuyauteries de frigorigène.
2. Insérer le câble à travers le panneau latéral de l’unité intérieure.
3. Desserrer les vis des bornes et insérer complètement l'extrémité du fil de
raccordement dans le bornier puis serrer les vis.
Tirer légèrement sur le fil pour s'assurer qu'il est bien fixé.
4. Quand les branchements électriques sont terminés, appliquer des serre-
fils sur la gaine extérieure des fils électriques.
5. Enfin, remettre en place le couvercle du boîtier de contrôle.
Schémas électriques:
Note:
Lors des branchements électriques entre l’unité intérieure et l’unité extérieure, relier avec le même fil les bornes ayant le même numéro sur l’unité intérieure et sur l’unité extérieure. Un branchement erroné endommage le système de commande du climatiseur et en
empêche le fonctionnement correct.
Branchements électriques
18
Bornier
unité intérieure
Bornier
Collier
serre-fil
Bornier
unité intérieure
Bornier
unité extérieure
Alimentation
380-400V, 3N~,
50Hz
Bornier
unité extérieure
Alimentation
Page 81

Faire fonctionner le climatiseur selon les instructions données dans la notice.
Pendant le test de fonctionnement, cocher les cases suivantes:
K Y a-t-il des fuites de gaz aux jonctions des tuyauteries ?
K les joints des tuyauteries ont-ils été calorifugés ?
K les branchements électriques des unités intérieures et de l'unité extérieure sont-ils corrects ?
K le câble de raccordement entre unités intérieures et unité extérieure est-il solidement fixé ?
K le drainage des condensats se fait-il correctement ?
K le fil de mise à la terre est-il solidement fixé ?
K la tension est-elle conforme aux prescriptions des normes en vigueur ?
K Y a-t-il des bruits insolites ?
K L’écran de la télécommande fonctionne-t-il correctement?
K le fonctionnement en mode Refroidissement est-il normal ?
K le capteur température ambiante fonctionne-t-il correctement ?
Test de fonctionnement
19
Page 82

Adresse : No.1 Haier Road,Hi-tech Zone,Qingdao 266101 P.R.Chine
Contacts : Tél. +86-532-8893-6943 ; FAX
Site Internet : www.haier.com
Page 83
KLIMAGERÄT UNITARY SMART SÄULE
BEDIENUNGSANLEITUNG INSTALLATIONSANLEITUNG
Inhalt
Vorsichtsmaßnahmen beim Gebrauch
Warnhinweise
Bezeichnung der Geräteteile
Teile und Funktionen
Bedienung
Energieeinsparung
Instandhaltung
Anleitung zur Fehlersuche
Instandhaltung
Problemlösung
Sicherheitsmaßnahmen
Installation
Vorbereitung zur Installation
Kältemittelleitungen
Erzeugung des Vakuums
Elektrische Anschlüsse
Funktionstest
3
4
5
6
7
9
9
10
11
12
13
14
15
17
17
18
19
hcst
u
eD
–¨ 1.000
Lesen Sie dieses Handbuch vor der Inbetriebnahme bitte sorgfältig durch.
Bewahren Sie diese Anleitung für eine spätere Bezugnahme gut auf.
Page 84
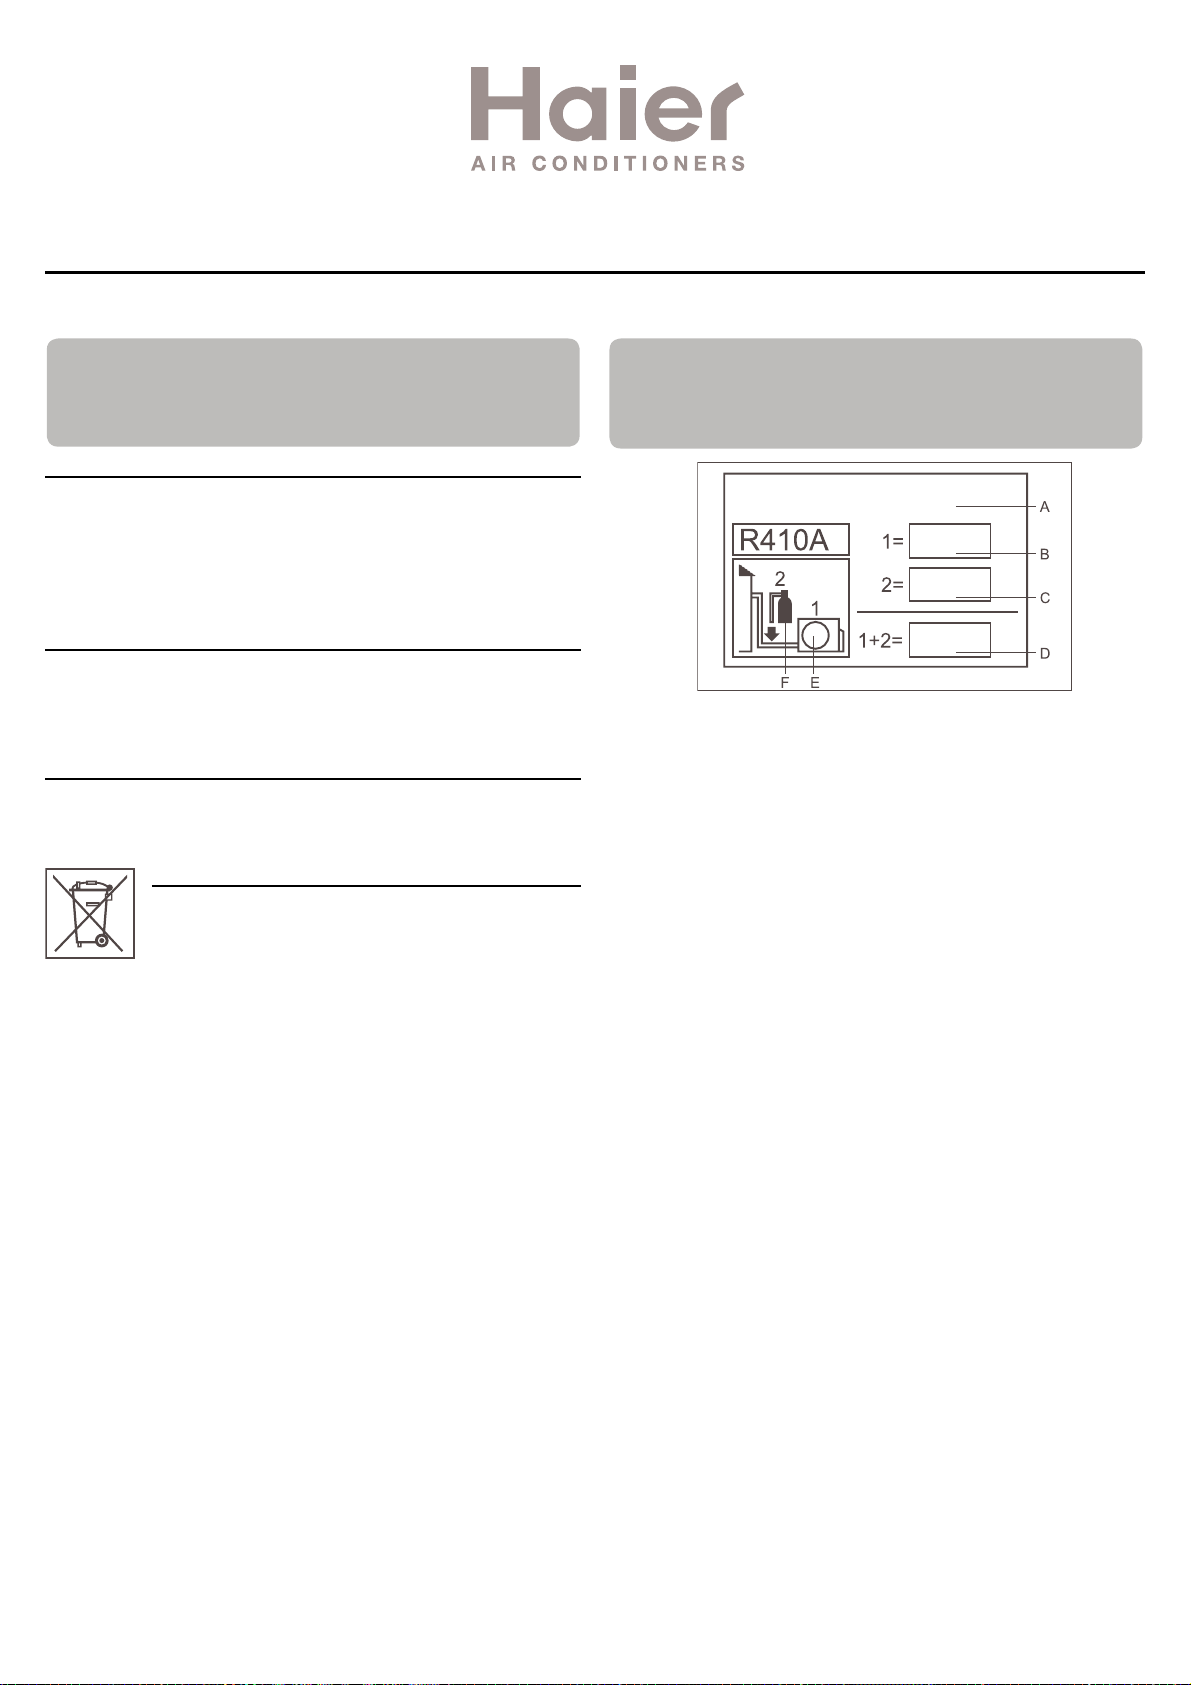
Haier Industrial Park, No.1 Haier Road, Qingdao, VR-China
ÜBEREINSTIMMUNG MIT EUROPÄISCHEN VORSCHRIFTEN FÜR DIE
MODELLE
CE
Alle Produkte stimmen mit folgenden europäischen Bestimmungen
überein:
- Niederspannungsrichtlinie 73/23/EWG
- Niederspannungsrichtlinie 2006/95/EWG
- Elektomagnetische Verträglichkeit 89/336/EWG
- Elektomagnetische Verträglichkeit 2004/108/EWG
ROHS
Die Produkte stimmen mit den Anforderungen der Richtlinie
2002/95/EWG des Europäischen Parlaments und des Rates zur
Beschränkung der Verwendung bestimmter gefährlicher Stoffe in
Elektro- und Elektronikgeräten (EG-RoHS-Richtlinie) überein.
WEEE
Gemäß Richtlinie 2002/96/EG des Europäischen Parlaments informieren wir den Kunden hiermit über die Entsorgungsvorschriften
für Elektro- und Elektronikgeräte.
ENTSORGUNGSVORSCHRIFTEN:
Ihr Klimaanlageprodukt ist mit diesem Symbol
gekennzeichnet. Dies bedeutet, dass Elektround Elektronikprodukte nicht zusammen mit
dem unsortierten Hausmüll entsorgt werden dür
fen. Versuchen Sie nicht, das System zu demontieren: Die
Demontage des Klimaanlagesystems, die Handhabung von
Kältemittel, Öl und anderer Teile muss von einem qualifizierten Installateur gemäß einschlägiger lokaler und nationaler
Vorschriften vorgenommen werden. Klimaanlagen müssen
in einer speziellen Aufbereitungsanlage für Wiederverwendung, Recycling und Rückgewinnung aufbereitet werden.
Durch Sicherstellung einer sachgemäßen Entsorgung dieses Produkts tragen Sie dazu bei, potentiell negative Auswirkungen auf die Umwelt und die menschliche Gesundheit zu
verhindern. Weitere Auskunft erteilt Ihnen gerne der Installateur oder Ihre Behörde vor Ort. Die Batterie muss aus der
Fernbedienung hergenommen und gemäß einschlägiger
lokaler und nationaler Vorschriften getrennt entsorgt werden.
WICHTIGE INFORMATIONEN ZUM
VERWENDETEN KÄLTEMITTEL
Enthält uorierte Treibhausgase, die
unter das Kyoto-Protokoll fallen
Kg
Kg
Kg
Dieses Produkt enthält fluorierte Treibhausgase, die unter das
Kyoto-Protokoll fallen. Nicht in die Atmosphäre ablassen.
Kältemitteltyp: R410A
GWP*-Wert: 1975
GWP=Treibhauspotenzial
Bitte mit dokumentenechter Tinte ausfüllen:
• 1 Die werkseitige Kältemittelladung des Produkts
• 2 Die zusätzliche Menge an Kältemittel, die im Installationsbe
reich nachgefüllt wurde, und
• 1+2 Die gesamte Kältemittelladung auf dem mit dem Produkt
versehenen Kältemittelladungsetikett. Das ausgefüllte Etikett muss
neben dem Ladeport des Produkts aufgeklebt werden (z. B. auf der
Innenseite des Sperrventildeckels).
-
A Enthält fluorierte Treibhausgase, die unter das Kyoto-Protokoll
fallen
B Werkseitige Kältemittelladung des Produkts: Siehe Typenschild
des Geräts
C Zusätzliche Menge an Kältemittel, die im Installationsbereich
nachgefüllt wurde
D gesamte Kältemittelladung
E Außengerät
F Kältemittelzylinder und Anschlussstück zum Nachfüllen
-
Page 85

• Bitte lesen Sie dieses Bedienungshandbuch vor dem Gebrauch des Klimageräts aufmerksam durch.
• Die nachfolgend aufgelisteten Sicherheitsmaßnahmen sind in GEFAHR und ACHTUNG unterteilt. Das Stichwort GEFAHR bezieht sich
auf Sicherheitsmaßnahmen, deren Missachtung ernste Folgen, wie Tod, schwere Verletzungen usw. haben kann. Auch das Stichwort ACHTUNG bezieht sich auf Sicherheitsmaßnahmen, deren Missachtung situationsbedingt schwere Folgen haben kann.
Halten Sie die Informationen über die Sicherheitsmaßnahmen immer griffbereit, damit Sie jederzeit darin nachschlagen können.
GEFAHR
• Dieses Klimagerät muss von Fachpersonal installiert werden. Installationsversuche auf eigene Faust sind zu vermeiden.
• Für Reparaturen wenden Sie sich immer und ausschließlich an ein autorisiertes Kundendienstzentrum.
• Bei Umzug oder Umstellung des Geräts ein autorisiertes Kundendienstzentrum mit Abbau und Wiedereinbau des Klimageräts beauftragen.
• Langen Aufenthalt direkt vor dem vom Klimagerät verteilten Kaltluftstrom vermeiden.
• Finger oder irgendwelche Gegenstände niemals in die Ausblas- oder Ansauggitter stecken.
• Das Klimagerät nicht durch Ein- oder Ausstecken des Netzsteckers ein- bzw. ausschalten.
• Darauf achten, dass das Netzkabel nicht beschädigt wird.
• Bei Betriebsstörungen (Brandgeruch o. ä.) das Gerät sofort ausschalten, das Netzkabel ausstecken und ein autorisiertes Kundendienstzentrum benachrichtigen.
WARNHINWEISE
• Den Raum während des Betriebs des Klimageräts regelmäßig belüften.
• Den Luftstrom nicht direkt auf offene Kamine oder andere Heizungsgeräte richten.
• Keine Gegenstände auf das Klimagerät legen und nicht auf das Gerät steigen.
• Keine Gegenstände am Innengerät aufhängen.
• Keine Blumenvasen oder Behälter mit Wasser auf das Klimagerät stellen.
• Das Klimagerät nicht mit Wasser in Kontakt bringen.
• Das Klimagerät nicht mit nassen Händen berühren.
• Nicht am Netzkabel ziehen.
• Das Netzkabel immer aus der Steckdose ziehen, wenn das Klimagerät langfristig nicht benutzt werden soll.
• Die Installationsbedingungen regelmäßig überprüfen, um eventuelle Schäden festzustellen.
• Den vom Klimagerät abgegebenen Luftstrom nicht direkt auf Pflanzen oder Tiere richten.
• Das aus dem Klimagerät beseitigte Abwasser nicht trinken.
• Das Gerät darf nur sachgemäß angewendet und nicht für die Aufbewahrung von Speisen, Kunstwerken und Präzisionsinstrumenten
bzw. für die Aufzucht von Tieren oder Pflanzen verwendet werden.
• Keinen starken Druck auf die Luftleitlamellen ausüben.
• Das Gerät nur mit korrekt eingebautem Luftfilter betreiben.
• Die Luftansaug- und Luftaustrittsgitter niemals verstopfen.
• Einen Mindestabstand von einem Meter zwischen eventuellen elektronischen Geräten und Innen- sowie Außengerät einhalten.
• Das Klimagerät nicht in der Nähe von offenen Kaminen oder anderen Wärmequellen installieren.
• Während der Installation der Innen- und Außengeräte dafür sorgen, dass Kinder keinen Zugang zum Installationsort haben.
• In der Nähe des Klimageräts keine entflammbaren Gase verwenden.
Vorsichtsmaßnahmen beim Gebrauch
3
Page 86
Limiti di funzionamento
Gamma utile delle temperature ambiente:
TK: Trockenkugeltemperatur
FK: Feuchtkugeltemperatur
Innentemperatur
Außentemperatur
Innentemperatur
Außentemperatur
4
Warnhinweise
Kühlbetrieb
Heizbetrieb
max. TK/FK
min. TK/FK
max. TK/FK
min. TK/FK
max. TK
min. TK
max. TK/FK
min. TK
32/23°C
18/14°C
46/26°C
10/6°C
27°C
15°C
24/18°C
-15°C
• Wenn das Klimagerät bei Temperaturen verwendet wird, die die
oben aufgeführten Werte überschreiten, könnte die automatische Schutzschaltung ansprechen und den Betrieb des Geräts
unterbrechen, damit die internen Schaltungen nicht beschädigt
werden. Wenn das Klimagerät dagegen bei Temperaturen verwendet wird, die unter den angegebenen Werten liegen, könnte der Wärmetauscher gefrieren. Dies würde zu Wasserverlust
und Betriebsstörungen führen.
• Das Klimagerät darf nur zum Kühlen, Heizen, Entfeuchten und
Belüften von Räumen verwendet werden.
• Die Verkabelung muss den örtlichen Vorschriften entsprechen.
• Leere Batterien sind in die entsprechenden Behälter zu werfen.
• Wenn die Schmelzsicherung an der Elektronikplatine auslöst,
muss sie durch eine Schmelzsicherung Typ T.3.15A/250VAC
ersetzt werden.
• Der Schalter des Klimageräts muss das Gerät allpolig vom Netz
trennen und muss eine Kontaktöffnungsweite von mindestens 3
mm aufweisen.
• Nur Kupferleiter verwenden.
• Alle Kabel müssen über eine europäische Konformitätsbescheinigung verfügen.
• Die Anschluss- und Netzkabel sind nicht im Lieferumfang inbegriffen.
Page 87
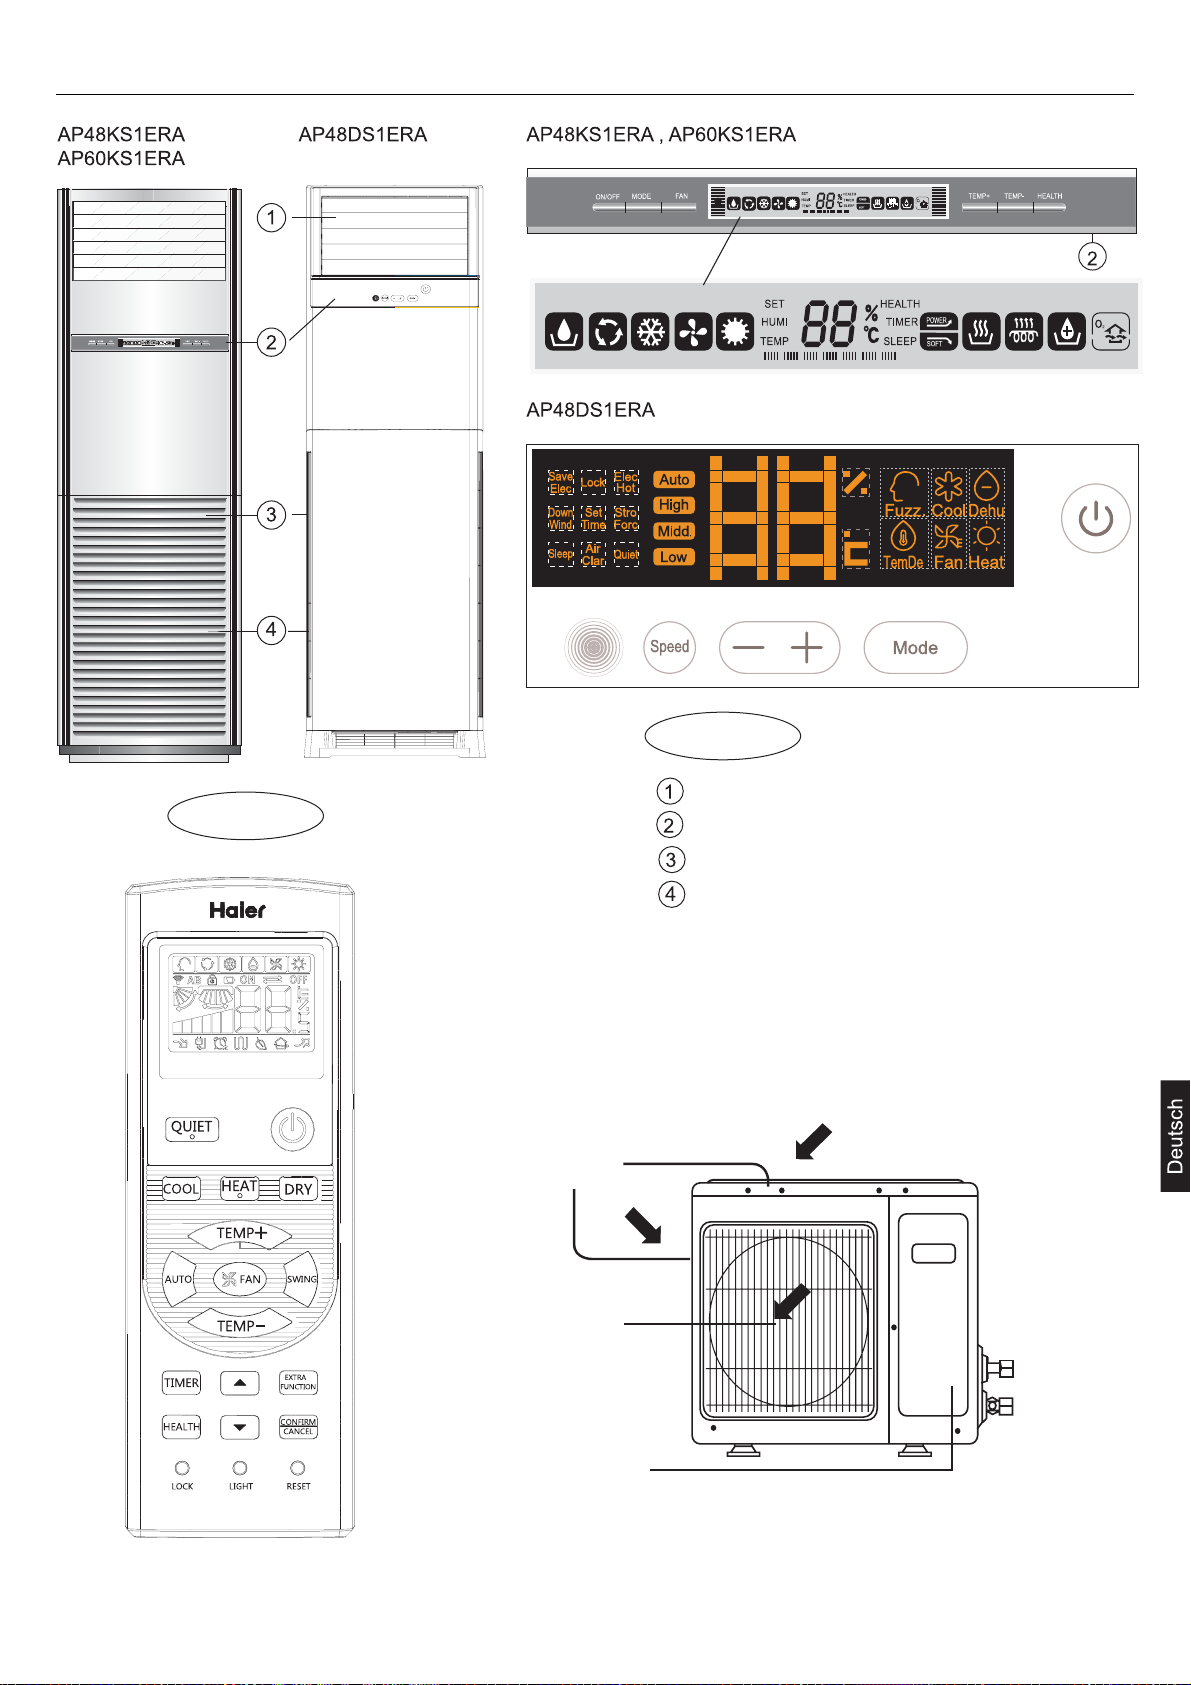
5
Bezeichnung der Geräteteile
Fernbedienung
–¨ 1.000
Innengerät
Luftaustrittsgitter
Bedienblende
Lufteintrittsgitter
Luftfilter (innen)
Ansauggitter
Ausblasgitter
Verdichter
(innen)
Page 88
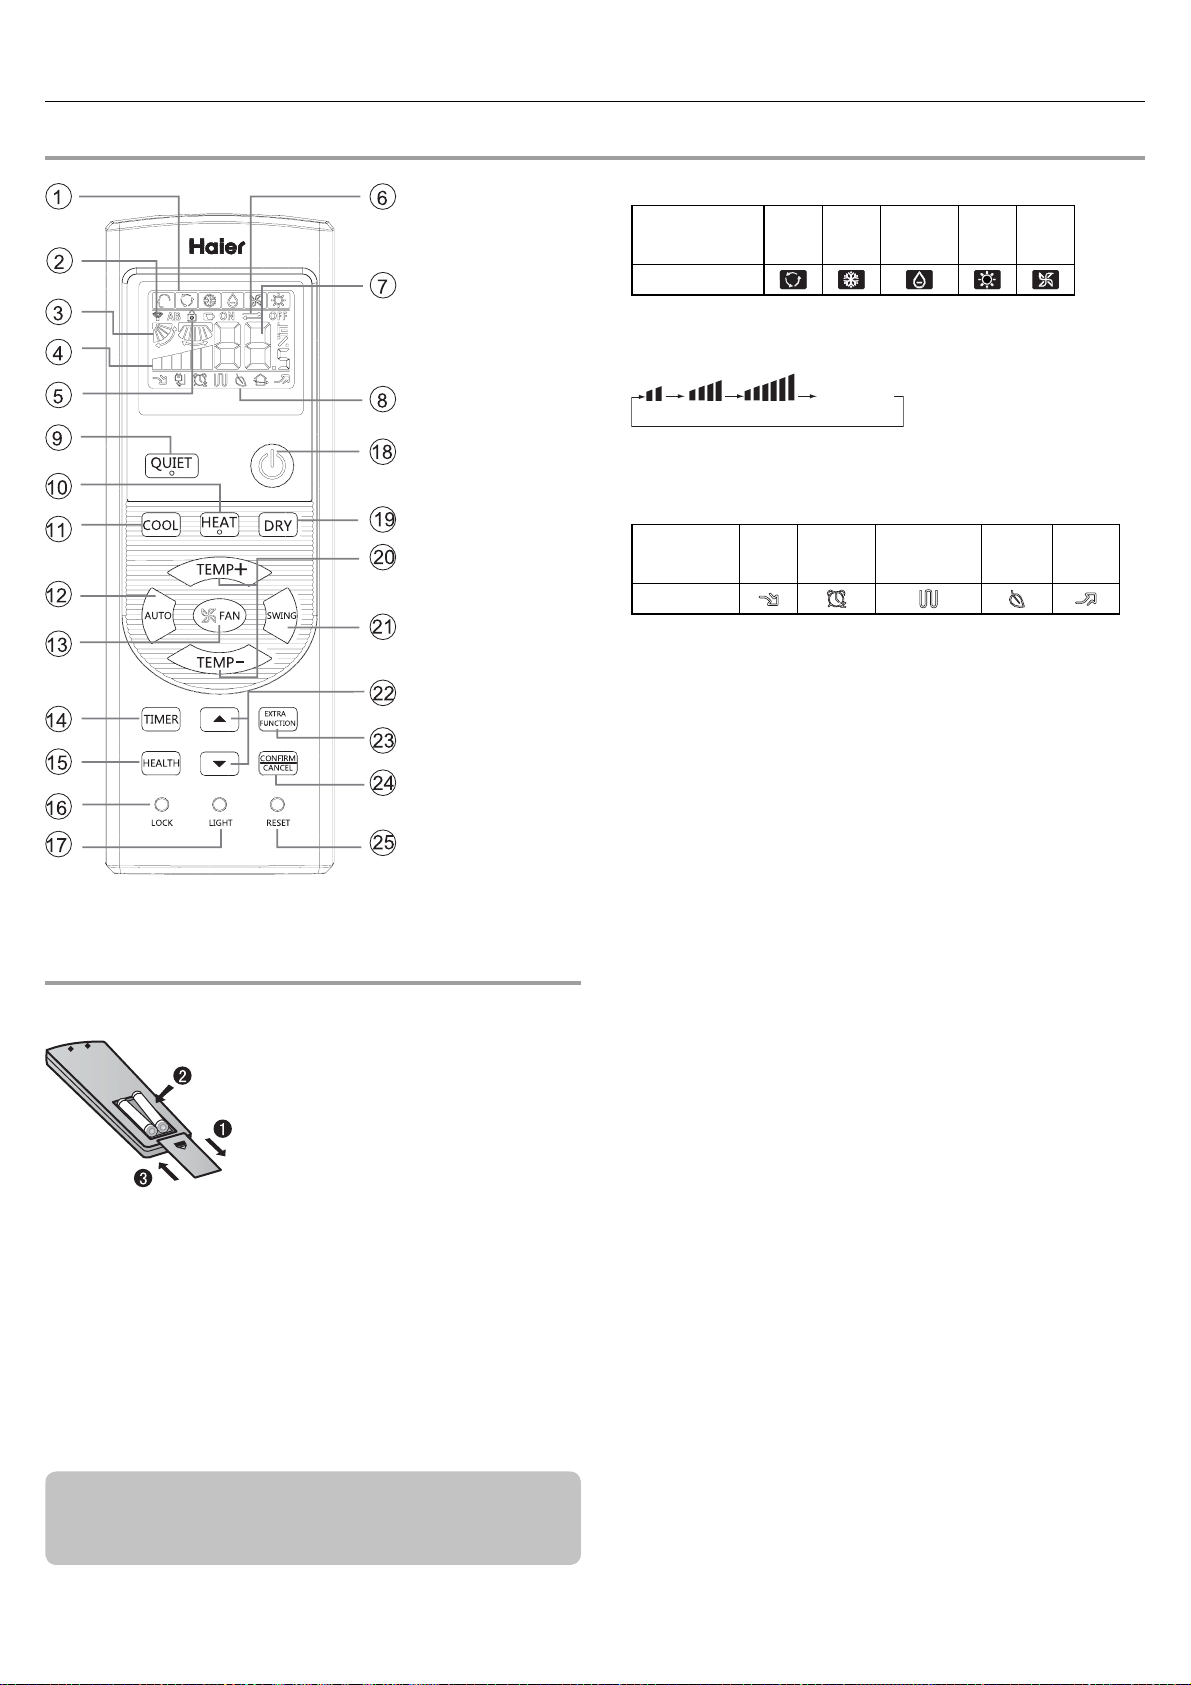
6
Teile und Funktionen
Fernbedienung
Einlegen der Batterien
Nehmen Sie den Deckel des Batteriefachs ab;
1
Hinweis:
Der Abstand zwischen Signalsendekopf und dem Empfangsloch sollte
•
maximal 7m ohne Behinderungen betragen.
• Ist in dem Zimmer eine Leuchtstofflampe mit elektronischem oder
konventionellem Vorschaltgerät oder ein schnurloses Telefon installiert,
könnte der Signalempfang des Empfänger leicht gestört werden, so
dass ein kürzerer Abstand zum Innengerät gewählt werden sollte.
• Eine volle oder eine undeutliche Anzeige deutet während des Betriebs
darauf hin, dass die Batterien aufgebraucht sind. Tauschen Sie bitte die
Batterien aus.
• Lässt sich die Fernbedienung nicht während des normalen Betriebs be
dienen, nehmen Sie bitte die Batterien heraus und legen Sie sie mehrere Minuten später wieder ein.
Tipp:
Nehmen Sie die Batterien heraus, wenn Sie die Fernbedienung längere
Zeit nicht benutzen werden. Wird nach der Batterieentnahme etwas angezeigt, betätigen Sie einfach die Reset-Taste.
Legen Sie die Batterien wie abgebildet
2
ein. 2 R-03-Batterien, Rücksetztaste
(Zylinder);
Achten Sie beim Einlegen auf die
3
richtige Ausrichtung mit den Symbolen
"+"/"-";
Setzen Sie nach dem Einlegen der Bat-
4
terien wieder den Deckel auf.
1. Modusanzeige
Betriebsart AUTO
Fernbedienung
2. Signalsendeanzeige
3. Anzeige SCHWENKEN
4. Anzeige LÜFTERDREHZAHL
NIEDRIGMITTELHOCH AUTO
5. Anzeige VERRIEGELN
6. Anzeige TIMER AUS Anzeige TIMER AN
7. Anzeige TEMPERATUR
8. Zusätzliche Funktionsanzeigen
Betriebsart RUHE SCHLAF
Fernbedienung
Elektrische Heizung ist nicht verfügbar.
9. Taste QUIET (Ruhe)
10. Taste HEAT (Heizen)
11. Taste COOL (Kühlen)
12. Taste AUTO (Automatisch)
13. Taste FAN (Lüfter)
14. Taste TIMER (Zeituhr)
15. Taste HEALTH (Gesundheit)
(Dieses Modell besitzt diese Funktion nicht.)
16. Taste LOCK (Verriegeln)
Dient zum Verriegeln der Tasten und der LCD-Anzeige.
17. Taste LIGHT (Licht)
(Dieses Modell besitzt diese Funktion nicht.)
Steuert die Beleuchtung und das Abdunkeln der LED-Anzeigetafel im Innenraum.
18. Ein-/Ausschalter (ON/OFF)
19. Taste DRY (Entfeuchten)
20. Taste TEMP (Temperatur)
21. Taste SWING (Schwenken)
22. Stundentasten
23. Taste EXTRA FUNCTION (Zusatzfunktion)
Funktion: Nur Lüfterfunktion, Gesundheitsfunktion durch Senden des Luftstroms nach oben und nach unten, Schlaffunktion, Frischluft (reservierte
Funktion), Fahrenheit-Celsius-Umwandlung
Leistungseinstellfunktion Schwenkfunktion nach links und rechts, 10°C
Heizfunktion
24. Taste CANCEL/CONFIRM (Abbrechen/Bestätigen)
Funktion: Dient zum Einstellen des Timers und weiterer Zusatzfunktionen
und zum Abbruch der Einstellungen.
25. Taste RESET (Zurücksetzen)
Wenn sich die Fernbedienung unnormal verhält, drücken Sie die Taste mit
einem spitz zulaufenden Gegenstand, um die Fernbedienung zurückzuset
zen.
-
KÜH-
LEN
Anzeigekreislauf
ENT-
FEUCH-
TEN
Elektrische
Zusatzheizung
HEIZEN
LÜF-
TER
GE-
SUND-
HEIT
LEI-
STUNG
-
Page 89
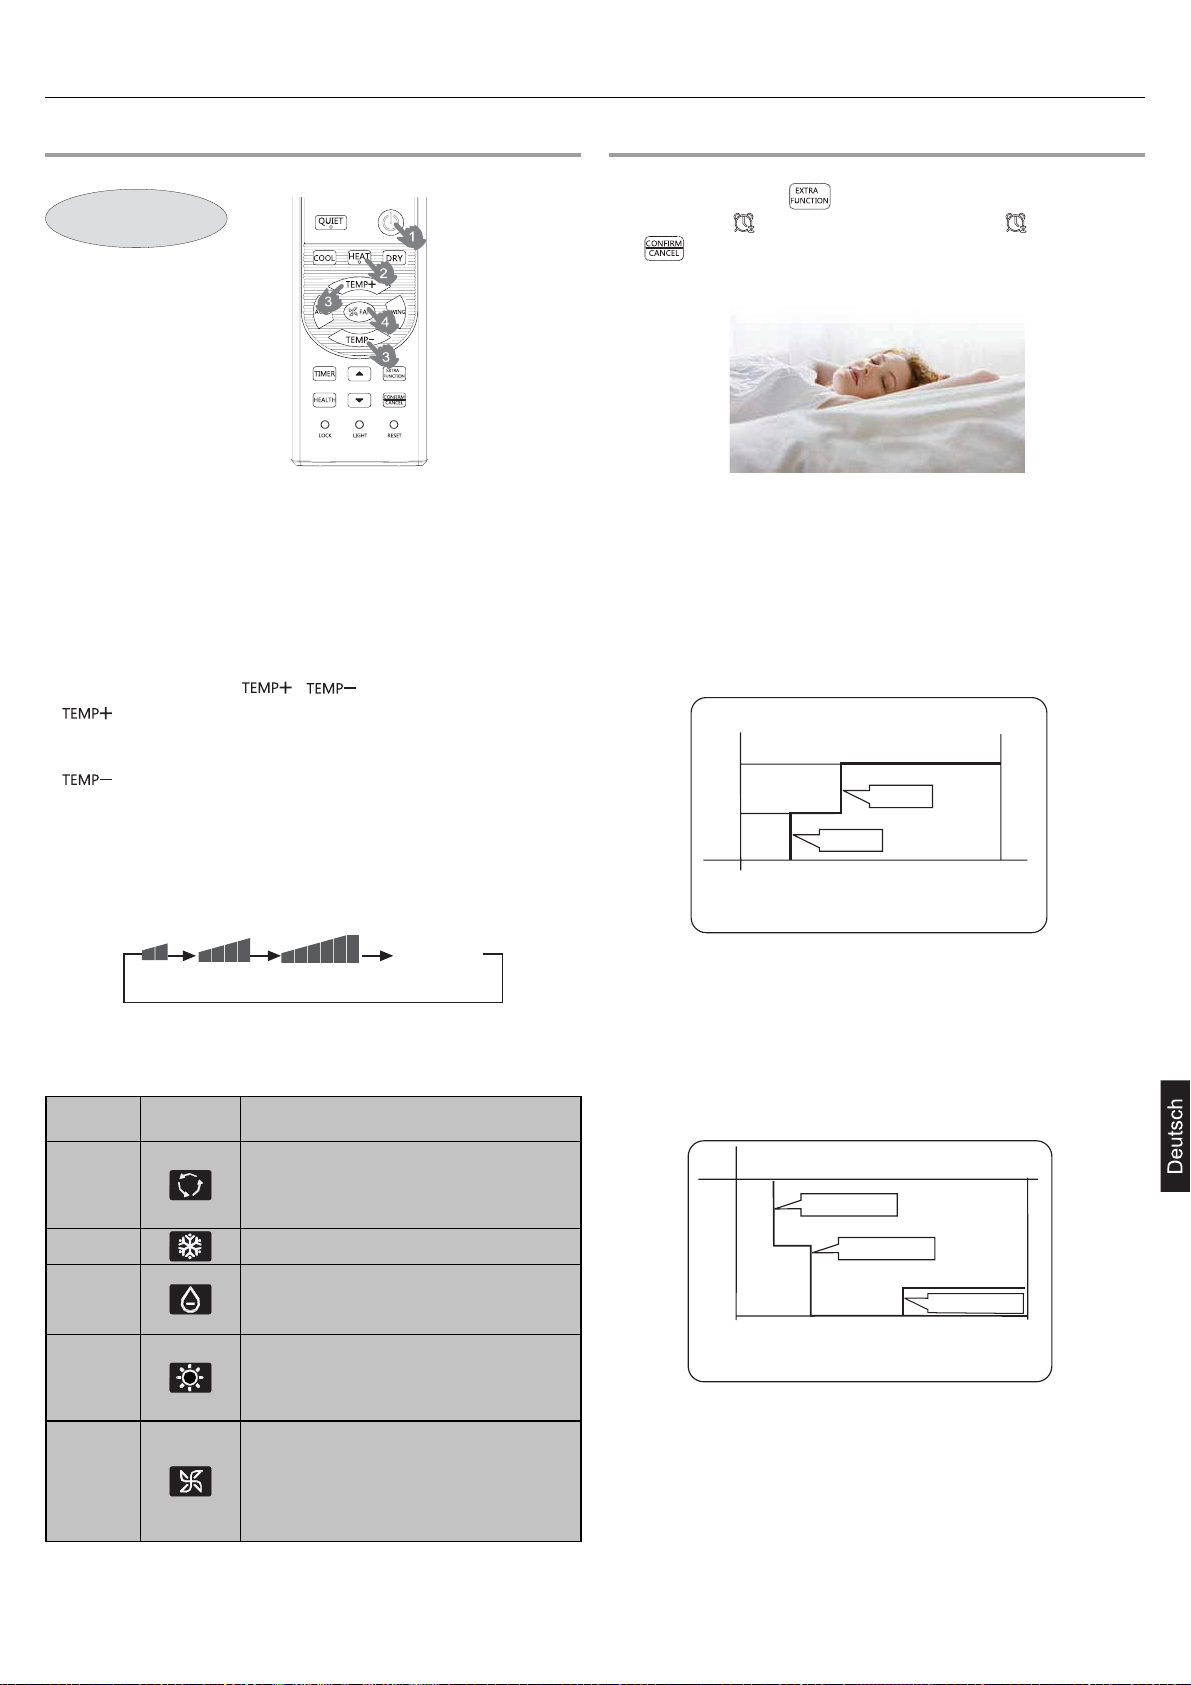
7
Bedienung
Grundbedienung
Fernbedienung
1.Gerät einschalten
Drücken Sie den Ein-/Ausschalter (ON/OFF) auf der Fernbedie
nung, um das Gerät einzuschalten.
2.Wählen Sie die Betriebsart.
Taste COOL (Kühlen): Kühlmodus
Taste HEAT (Heizen): Heizmodus
Taste DRY (Entfeuchten): Entfeuchtungsmodus
3.Wählen Sie die Temperatureinstellung.
Drücken Sie die Taste
Wählen Sie die von Ihnen gewünschte Temperatur.
4.Wählen Sie die Lüfterdrehzahl.
Drücken Sie die Taste FAN (Lüfter). Bei jedem Tastendruck än
dert sich die Lüfterdrehzahl wie folgt:
/ .
Bei jedem Tastendruck erhöht sich die Temperatureinstel-
lung um 1°C; halten Sie die Taste gedrückt, erhöht sich
der Wert schnell.
Bei jedem Tastendruck verringert sich die Temperaturein-
stellung um 1°C; halten Sie die Taste gedrückt, verringert
sich der Wert schnell.
Schlafbetrieb
Drücken Sie die Taste , um Zusatzoptionen aufzurufen; wird
in der Folge zu
nun
Betriebsart
-
, um die Schlaffunktion aufzurufen.
gewechselt, blinkt das Symbol . Drücken Sie
1.In der Betriebsart KÜHLEN, ENTFEUCHTEN
1 Stunde nach dem Start der SCHLAF-Betriebsart erhöht sich
die eingestellte Temperatur um 1°C. Nach 1 weiteren Stunde
steigt sie nochmals um 1°C. Nach weiteren 6 Stunden stoppt
das Gerät den Anstieg der Temperatur, die jetzt höher ist als die
eingestellte Temperatur, so dass die Zimmertemperatur für Ihren
Schlaf nicht zu niedrig ist.
Betriebsart SCHLAF startet Betriebsart SCHLAF startet
Ca. 6 Std.
1 Std.
1 Std.
-
Temperatureinstellung
In der Betriebsart KÜHLEN, ENTFEUCHTEN
Steigt um 1
Steigt um 1
°C an
°C an
Gerät ausschalten
Anzeigekreislauf
NIEDRIGMITTEL HOCH AUTO
Die Klimaanlage läuft jetzt mit der angezeigten Lüfterdrehzahl.
Ist FAN (Lüfter) auf AUTO gesetzt, stellt die Klimaanlage die
Lüfterdrehzahl gemäß der Zimmertemperatur automatisch ein.
Betriebsart
AUTO
Fernbedie-
nung
Hinweis
In der Betriebsart AUTO stellt die Klimaanlage den
Kühl- oder Heizbetrieb gemäß der Zimmertemperatur
automatisch ein. Ist FAN (Lüfter) auf AUTO gesetzt,
stellt die Klimaanlage die Lüfterdrehzahl gemäß der
Zimmertemperatur automatisch ein.
KÜHLEN
ENT-
FEUCH-
TEN
HEIZEN
LÜFTER
Sinkt die Zimmertemperatur in der Betriebsart ENTFEUCHTEN 2°C unter der eingestellten Temperatur,
läuft der Lüfter mit Unterbrechungen mit NIEDRIGER
Drehzahl, unabhängig von der Lüftereinstellung.
Im Betriebsmodus HEIZEN wird nach kurzer Verzögerung warme Luft ausgeblasen, um die Abgabe von
kalter Luft zu vermeiden. Ist FAN (Lüfter) auf AUTO
gesetzt, stellt die Klimaanlage die Lüfterdrehzahl
gemäß der Zimmertemperatur automatisch ein.
In der Betriebsart LÜFTER läuft das Gerät weder
in der Betriebsart KÜHLEN noch HEIZEN, sondern
nur in der Betriebsart LÜFTER; die Einstellung auf
AUTO ist in der Betriebsart LÜFTER nicht verfügbar.
Auch kann keine Temperatur eingestellt werden. In
der Betriebsart LÜFTER ist der Schlafbetrieb nicht
verfügbar.
2.In der Betriebsart HEIZEN
1 Stunde nach dem Start der SCHLAF-Betriebsart verringert sich
die eingestellte Temperatur um 2
. Nach 1 weiteren Stunde
℃
sinkt sie nochmals um 2℃. Und nach weiteren 3 Stunden, steigt
die Temperatur um weitere 1°C. Nach weiteren 3 Stunden stoppt
das Gerät den Abfall der Temperatur, die jetzt niedriger ist als die
eingestellte Temperatur, so dass die Zimmertemperatur für Ihren
Schlaf nicht zu hoch ist.
Temperatureinstellung
1 Std.
Betriebsart SCHLAF
startet
Sinkt um 2°C
1 Std.
Sinkt um 2°C
3 Std.
Gerät ausschalten
3 Std.
Steigt um 1°C an
Betriebsart SCHLAF
startet
In der Betriebsart HEIZEN
3.In der Betriebsart AUTO
Das Gerät läuft in der entsprechenden Schlafbetriebsart, die der
ausgewählten Betriebsart automatisch angepasst wird.
Page 90
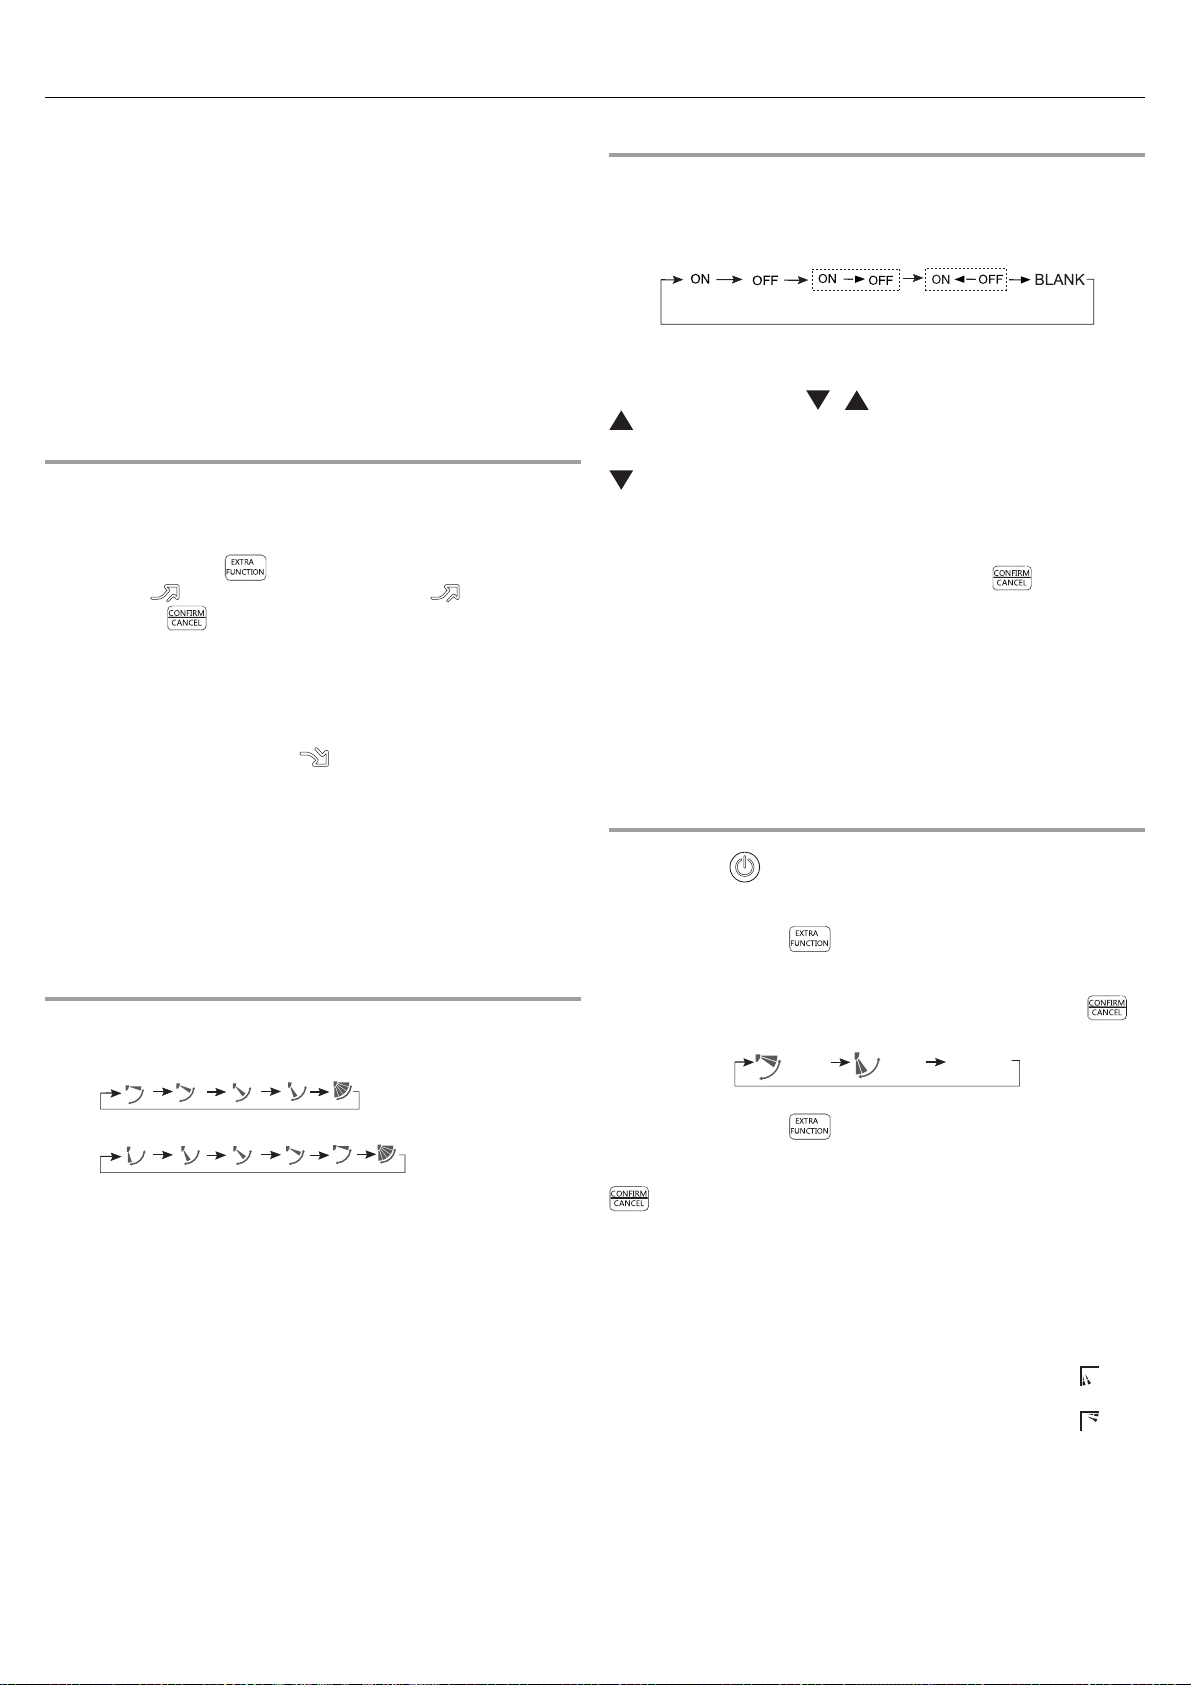
8
Bedienung
4.In der Betriebsart LÜFTER
Es gibt keine SCHLAF-Funktion.
5. Stellen Sie die Windgeschwindigkeit für den Schlafmodus ein
Ist die Windgeschwindigkeit vor dem Schlafen auf hohe oder
mittlere Stärke eingestellt, stellen Sie eine niedrigere Windgeschwindigkeit für den Schlafmodus ein. Ist bereits eine niedrigere
Windstärke eingestellt, ist keine Änderung erforderlich.
Hinweis
Wenn die TIMER-Funktion eingestellt ist, kann die Schlaffunktion
nicht eingerichtet werden. Wird nach Einrichtung der Schlaffunktion
die TIMER-Funktion eingestellt, wird die Schlaffunktion abgebro
chen und das Gerät bendet sich im Timer-Einstellungszustand.
Betriebsart LEISTUNG/RUHE
(1) Betriebsart LEISTUNG
Sie können diese Funktion verwenden, wenn Sie einen schnellen
Heiz- oder Kühleffekt wünschen.
Drücken Sie die Taste
der Folge zu
dann die Taste
Sie diese Funktion abbrechen möchten, rufen Sie bitte erneut die
Zusatzoptionen auf und brechen Sie dort die Leistungsfunktion ab.
(2) Betriebsart RUHE
Verwenden Sie diese Funktion, wenn Sie Ruhe zum Ausruhen
oder Lesen benötigen. Drücken Sie die Taste QUIET (Ruhe), zeigt
die Fernbedienung das Symbol
ruhigen Betriebsart. Drücken Sie erneut die Taste QUIET (Ruhe),
wird die ruhige Betriebsart abgebrochen.
Hinweis:
Währen der Betriebsart LEISTUNG weist das Zimmer beim schnellen HEIZEN oder KÜHLEN eine ungleichmäßige Temperaturverteilung auf. Nach längerem Betrieb in der Betriebsart RUHE wird es
entweder nicht sehr kühl oder nicht sehr warm sein.
Einstellen der Luftstromrichtung
gewechselt, blinkt das Symbol ; drücken Sie
, um die Leistungsfunktion aufzurufen. Wenn
, um Zusatzoptionen aufzurufen; wird in
an und das Gerät läuft in der
-
1. Statusanzeige des Luftstroms
KÜHLEN/ENTFEUCHTEN:
HEIZEN:
2
. Einstellen des linken und rechten Luftstroms
(Dieses Modell besitzt diese Funktion nicht.)
Anfangsstatus
Timer Ein/Aus Ein-Aus-Betrieb
1 Wählen Sie die von Ihnen gewünschte Betriebsart nach dem
Start des Geräts.
2.Drücken Sie die Taste TIMER, um in die Betriebsart TIMER zu
wechseln. Bei jedem Tastendruck ändert sich die Anzeige wie folgt:
Fernbedienung:
0,5 Std.
TIMER EIN
Wählen Sie Ihren gewünschten TIMER-Modus (TIMER EIN oder
TIMER AUS oder TIMER EIN-AUS). "On" (Ein) oder "Off" (Aus)
werden blinken.
3.Drücken Sie die Taste
Bei jedem Tastendruck erhöht sich die Zeit innerhalb der ersten
12 Stunden um jeweils 0,5 Stunde; nach 12 Stunden erhöht
sich die Zeit um jeweils 1 Stunde.
Bei jedem Tastendruck verringert sich die Zeit innerhalb der
ersten 12 Stunden um jeweils 0,5 Stunde; nach 12 Stunden
verringert sich die Zeit um jeweils 1 Stunde. Sie können bis zu
24 Stunden einstellen.
4.Bestätigen Sie die Timer-Einstellung
Drücken Sie nach Einstellung der Zeit die Taste
zu bestätigen; ON (Ein) oder OFF (Aus) blinken dann nicht mehr.
5.Brechen Sie die Timer-Einstellung ab
Drücken Sie die Taste TIMER so oft, bis die Zeitanzeige verschwin
det.
Tipps:
Nach einem Batteriewechsel oder einem Stromausfall muss die
Zeit neu eingestellt werden.
Je nachdem, in welcher Folge TIMER EIN oder TIMER AUS ein
gestellt wurde, kann das Gerät entweder gestartet-gestoppt oder
gestoppt-gestartet werden.
Gesunder Luftstrom
1.Drücken Sie , um zu beginnen
Stellen Sie eine komfortable Arbeitsumgebung ein.
2. Einstellen der gesunden Luftstromfunktion
Drücken Sie die Taste
wiederholtem Drücken dieser Taste setzen sich die Lüftungsschlit
ze auf folgende drei Positionen; wählen Sie die von Ihnen ge
wünschte Schwenkposition und drücken Sie dann die Taste
um sie zu bestätigen.
1.Abbrechen der gesunden Luftstromfunktion
Drücken Sie die Taste
wiederholtem Drücken dieser Taste setzen sich die Lüftungsschlit
ze erneut auf folgende drei Positionen; drücken Sie dann die Taste
, um den Vorgang abzubrechen.
Hinweis: Richten Sie die Klappen nicht direkt mit der Hand aus. An
dernfalls wird das Lüftungsgitter nicht richtig funktionieren Funktioniert das Lüftungsgitter nicht richtig, stoppen Sie den Betrieb eine
Minute lang und starten Sie ihn dann wieder durch Einstellen mit
der Fernbedienung. Hinweis:
1. Nach dem Einstellen der gesunden Luftstromfunktion ist das
Positionsgitter xiert.
2. Während des Heizens sollten Sie besser die Betriebsart
len.
3. Während des Kühlens sollten Sie besser die Betriebsart
len.
4. Lassen Sie die Klimaanlage bei hoher Luftfeuchtigkeit längere
Zeit zum Kühlen und Entfeuchten laufen, kann sich Kondenswasser am Lüftungsgitter bilden.
0,5 Std.
TIMER AUS
Gesunder
Luftstrom
nach oben
0,5 Std.
TIMER EIN-AUS
/ , um die Zeit einzustellen.
, um Zusatzoptionen aufzurufen. Bei
Gesunder
Luftstrom
nach unten
, um Zusatzoptionen aufzurufen. Bei
0,5 Std.
TIMER AUS-EIN
Aktuelle
Position
, um die Zeit
-
,
wäh-
wäh-
-
-
-
-
Page 91
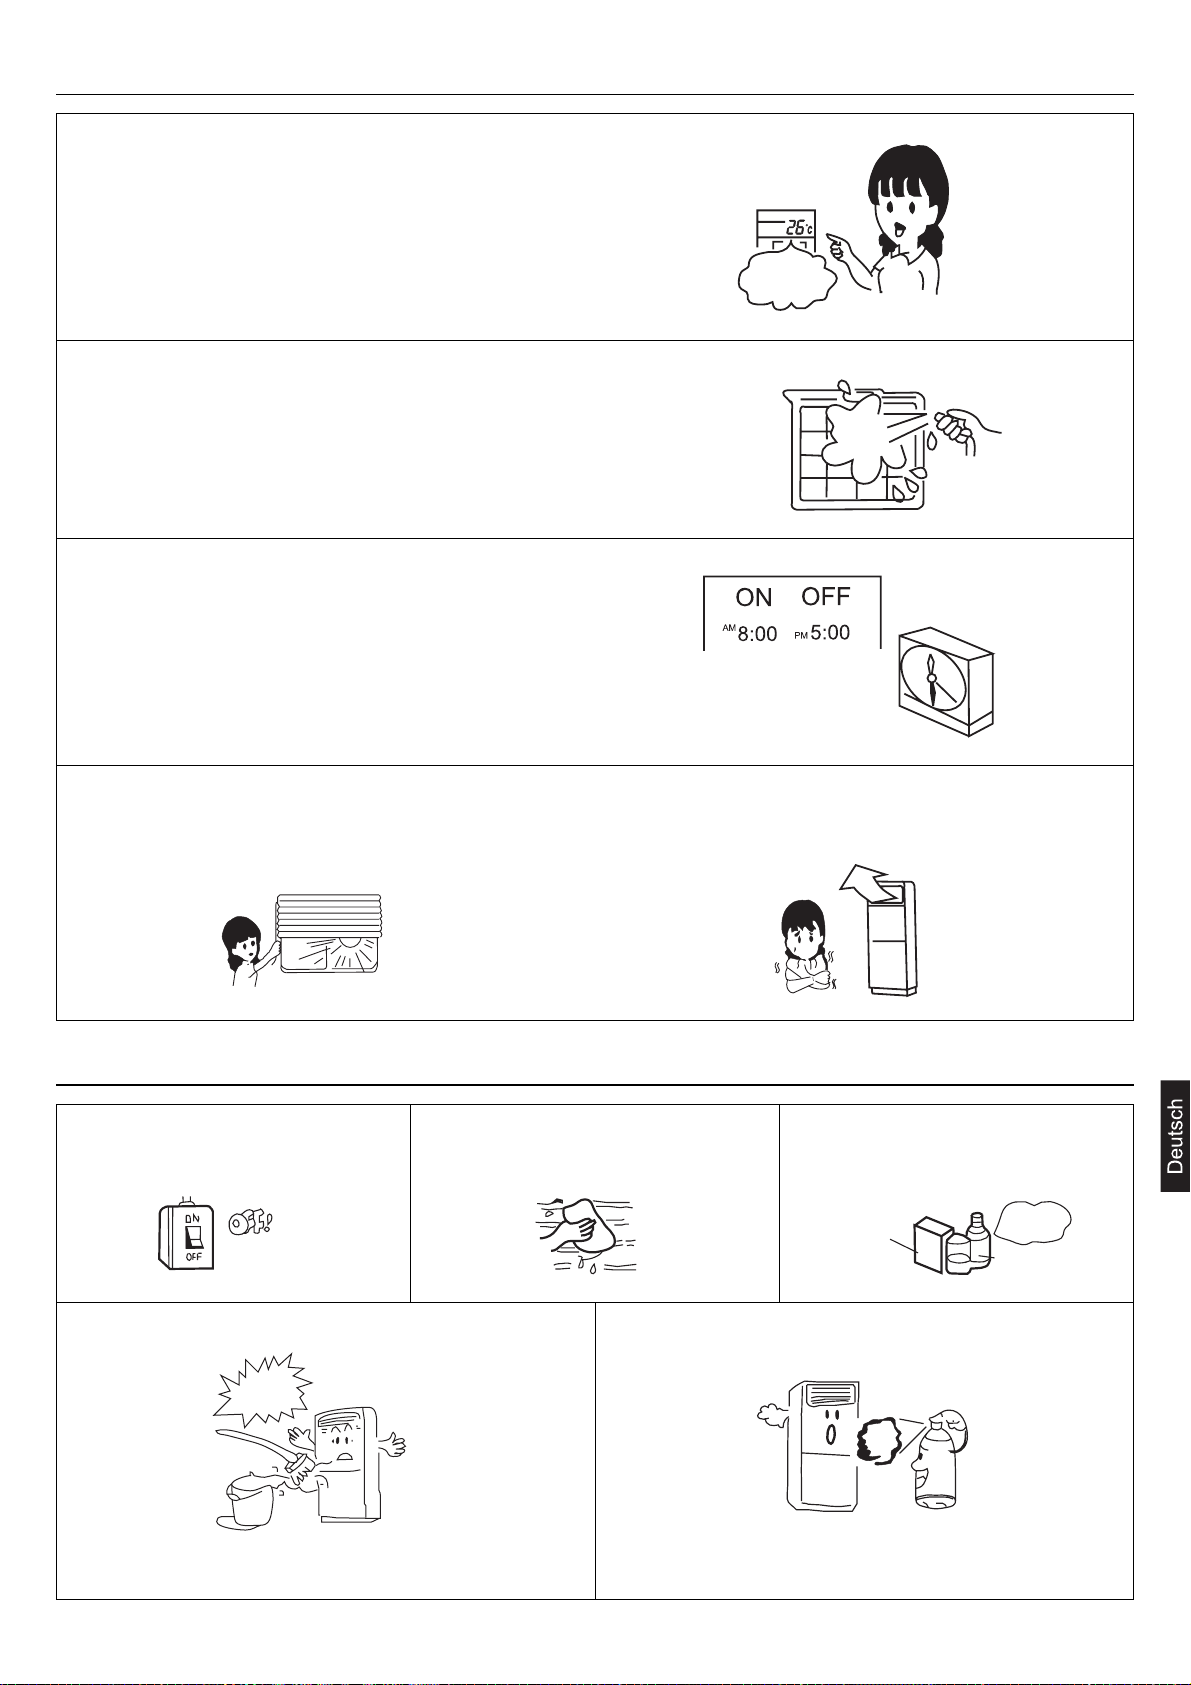
Energieeinsparung
Eine angemessene Raumtemperatur beibehalten
Zu hohe oder zu niedrige Raumtemperaturen sind gesundheitsschädlich und führen zu höherem Energieverbrauch.
Den Luftfilter regelmäßig reinigen
Ein verstopfter Filter führt zu einem Abfall der Heiz- und Kühlleistung, zu höherem Energieverbrauch und zu eventuellen Betriebsstörungen (zum Beispiel Wasserverlust im Kühlmodus).
Gebrauch des Timers
Dank des Timers kann die ideale Raumtemperatur eingestellt werden (zum Beispiel bei der Heimkehr).
Direkte Sonnenbestrahlung und Luftzug vermeiden Die Richtung des Luftstroms korrekt einstellen
Angemessene
Te mp e ra t ur
9
Instandhaltung
Den Schalter der Hauptversorgung auf
OFF stellen.
Das Gerät nicht mit nassen Händen
berühren.
Kein heißes Wasser oder flüchtige
Flüssigkeiten verwenden.
Kein Wasser direkt auf das Innengerät schütten. Keine Sprays, Lacke oder Insektenmittel auf das Gerät
sprühen
Diese können das Gerät beschädigen oder Brände
verursachen.
Gefahr
Page 92

Instandhaltung
Reinigung des Luftfilters
• Den Filter gemäß den Angaben in der Abbildung herausnehmen.
• Den Filter mit Wasser oder einem Staubsauger reinigen.
Bei starker Verschmutzung den Filter mit Neutralreiniger reinigen.
• Mit sauberem Wasser abspülen, vollständig trocknen lassen und dann erst
wieder einbauen.
• Den Filter mit max. 40 °C warmem Wasser waschen, da er sonst
beschädigt wird.
10
Anleitung zur Fehlersuche
Vor Anforderung des Kundendienstes bitte folgenden Kontrollen durchführen.
Steht der Schalter stromaufwärts des
Geräts auf ON?
Ist die Netzstromversorgung normal? Liegt ein Stromausfall vor?
Hat der thermomagnetische
Schutzschalter ausgelöst?
Dies ist sehr gefährlich: Sofort die
Stromzufuhr unterbrechen und sich an
den Händler wenden.
Ist die Fernbedienung richtig eingestellt?
Ist die waagrechte Luftleitlamelle nach
oben gerichtet?
(im Heizbetrieb)
Ist der Luftfilter verschmutzt?
Sind Türen oder Fenster geöffnet?
Ist der Luftstrom an den Ansaug- oder
Ausblasgittern behindert?
Black
out?
SCHLECHTE KÜHL- ODER HEIZLEISTUNG
DAS KLIMAGERÄT SCHALTET SICH NICHT EIN
Richtige
Temperatur.
Page 93
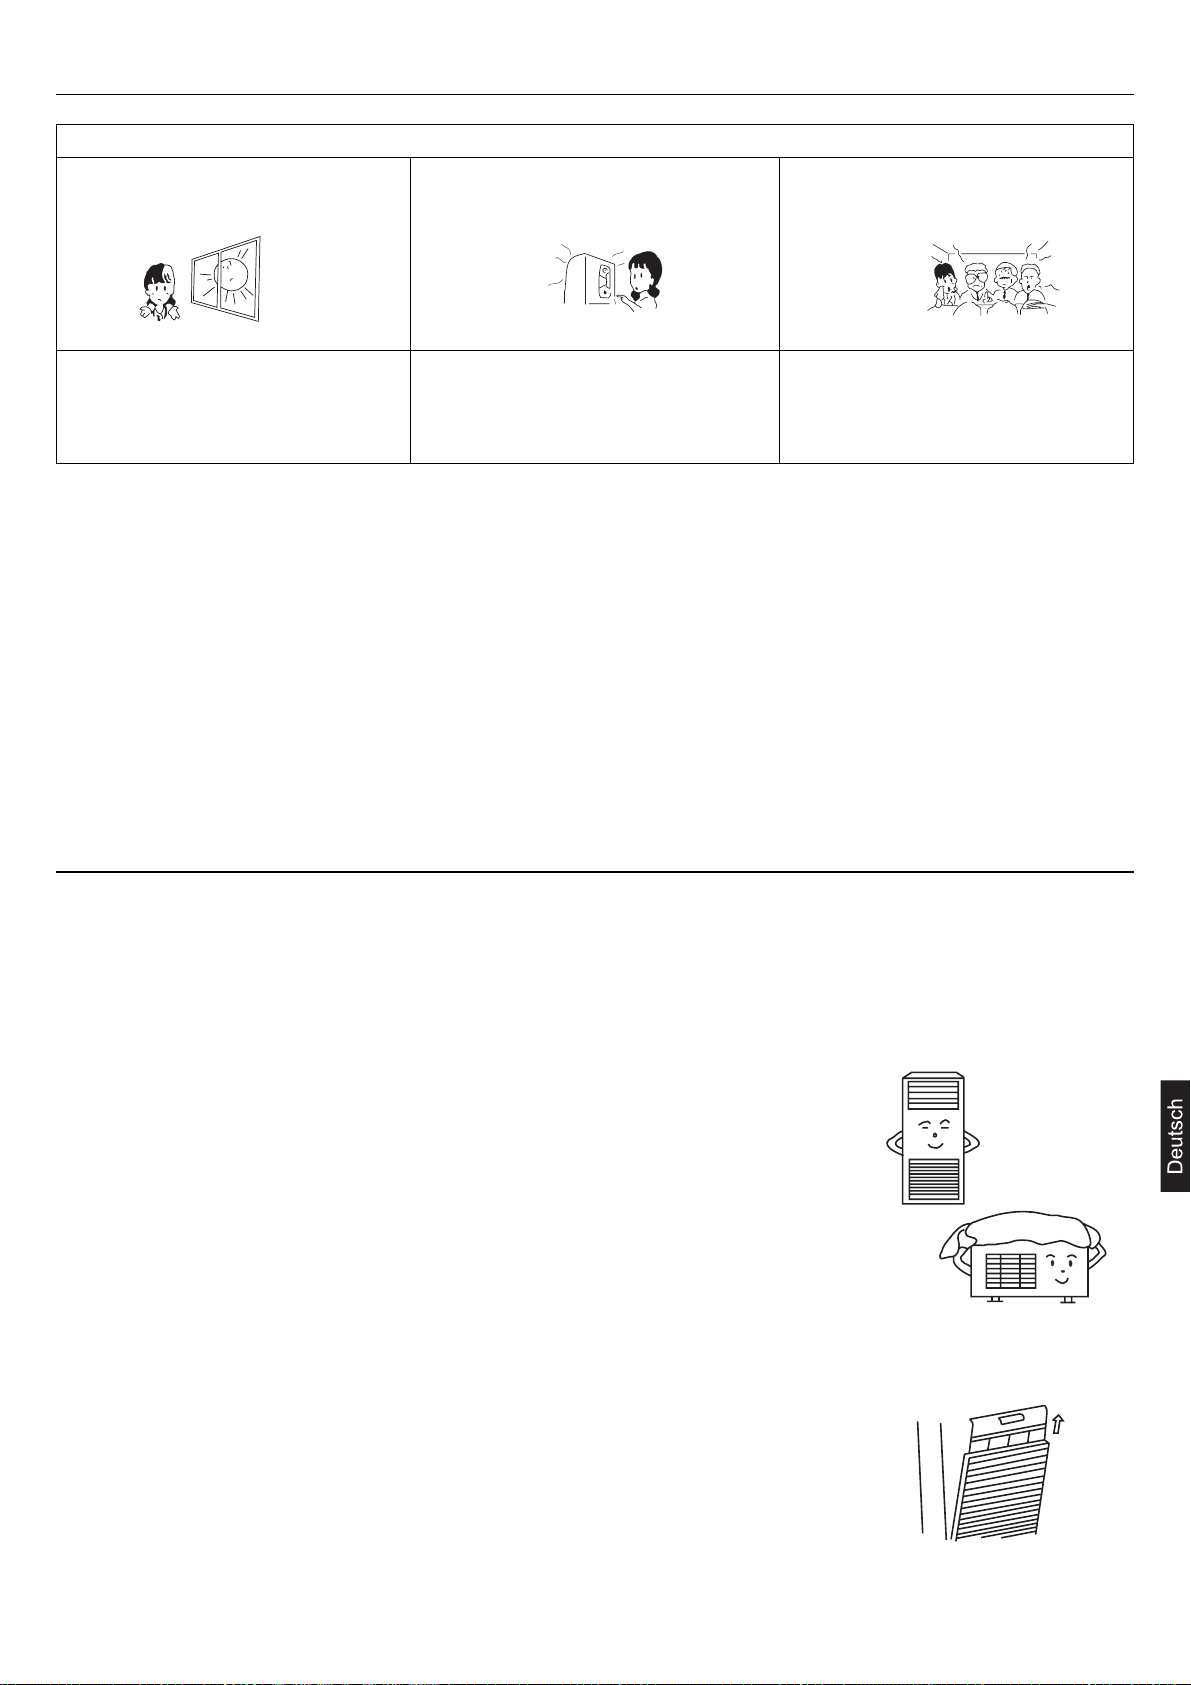
Anleitung zur Fehlersuche
DIE KÜHLLEISTUNG IST ZU SCHWACH
Ist der Raum direktem Sonnenlicht
ausgesetzt?
Im Heizbetrieb tritt kalte Luft aus.
Befindet sich das Klimagerät in der
Vorheizphase?
Gibt es im Raum “verborgene”
Wärmequellen?
Ist der Raum überfüllt?
Wenn das Klimagerät auch nach diesen Kontrollen nicht einwandfrei funktioniert oder wenn die folgenden Probleme auftreten, schalten
Sie bitte das Gerät sofort aus und wenden Sie sich an Ihren Händler.
• Die Schmelzsicherung oder der magnetothermische Schutzschalter lösen häufig aus.
• Bildung von Kondensattropfen während des Betriebs im Kühl- oder im Entfeuchtungsmodus.
• Auffälligkeiten beim Betrieb oder ungewöhnliche Geräusche.
11
Instandhaltung
Instandhaltung und Reinigung des Geräts
• Mit einem feuchten Tuch säubern und anschließend mit einem trockenen Tuch nachreiben.
• Das Gerät bei starker Verschmutzung mit einem Tuch mit Neutralreiniger säubern. Das Gerät mit dem Tuch abreiben und den Reiniger mit sauberem Wasser entfernen.
• Kein heißes Wasser verwenden (max. 40 °C), um die Farben nicht zu verändern und das Gerät nicht zu verformen.
• Keine chemischen Substanzen verwenden.
Instandhaltung bei Saisonende
• Das Klimagerät an einem sonnigen Tag im Lüftungsmodus betreiben, damit die Innenteile des
Geräts trocknen.
• Die Stromversorgung unterbrechen. Auch wenn das Klimagerät ausgeschaltet ist, verbraucht es
nämlich Strom.
• Den Filter reinigen und erneut in das Gerät einbauen. Das Innengerät reinigen
Instandhaltung bei Saisonbeginn
• Sicherstellen, dass sich keine Hindernisse vor den Ansaug- und Ausblasgittern des Innengeräts
und des Außengeräts befinden.
• Sicherstellen, dass der Luftfilter in das Klimagerät eingesetzt und sauber ist. Wenn das Gerät
ohne Filter in Betrieb genommen wird, könnte der Staub Schäden oder Betriebsstörungen verursachen.
• Zum Schutz des Verdichters die Stromversorgung mindestens 12 Stunden vor Inbetriebnahme
des Klimageräts einschalten. Den Schalter der Netzstromversorgung während der ganzen Saison auf ON lassen.
Page 94
12
Problemlösung
Beim Ausfall wird der Vertilator der Inneneinheit nicht mehr laufen.The Verfahren der überprüfung fuer Fehlercode ist
wie folgt.
Diagnose
Ausfall LED-Anz
Fehlerhafte Temperatur Te E3 3 0
Fehlerhafte Temperatur Ta E3 3 2
Fehlerhafte Temperatur Ts E3 3 1
Fehlerhafte Temperatur Td E3 3 3
Hochdruckschalter anormal E6 6 2
Niederdruckschalter anormal E6 6 3
Niederdruckschutz (R410A fehlt) E6 3 6
Außengerät-EEPROM-Ausfall EE 2 1
Kommunikation zwischen Innen- und Außengerät gestört E9 3 2
Schutz vor Kompressor-Überstrom zwischen Phasen/falschen
Phasen
Schutz vor Kompressor-Niederstrom E5 4 5
Außengerät-Gleichstrommotor anormal F6 2 9
Außengerät-Ableitungstemperatursensor anormal E4 2 8
Anormale Vierwegeventil-Umkehr im Heizmodus F2 3 7
Spannung zu hoch/Niederspannungsschutz E7 2 8
Innengerät-Umgebungssensor anormal E1 0 1
Innengerät-Wendelsensor anormal E2 0 2
Innengerät-EEPROM-Ausfall F8 0 4
Innengerät-Frostschutz F5 0 5
Fehlerhafte Kommunikation zwischen Innen- und Außengerät E9 0 7
Fehlerhafte Kommunikation mit verkabeltem Controller E8 0 8
Überlastschutz, Heizmodus F4 0 9
Ablaufsystem anormal E0 0 12
Kein Nulldurchgang-Signaleingang EF 0 13
Innengerät-Lüftermotor anormal E10 0 14
Ausfall unterstützter Wendelsensor ED 0 15
Anormaler Innengerät-Modus F3 0 16
Sonstiger Außengerät-Frequenzumwandlungsfehler F7
1. Für den Inneneinheitsausfall nur Betriebs-LED ON, Fern-Empfänger wird anzeigen.
2. Für den Aussensausfall, Zeitnahme- und Betriebs-LED wird anzeigen. Zeitnahme-LED vom Fern-Empfänger steht für Zehner und
Betriebs-LED steht für ein Platz. Zeitnahme-LED wird zunächst blinken, 2 Sekunden später Betriebs-LED wird auch blinken. Nachdem,
das heisst 4 Sekunden später, sie blinken abwechselnd wieder. Blinkszeit ist gleich der Fehlercode vom Aussensgerät plus 20. Zum
Beispiel, Fehlercode von aussensgerät ist 2, das Innengerät sollte 22 anzeigen. Infolged essen, Zeitnahme-LED wird erstens zweimal
blinken, dann wird Betriebs-LED zweimal blinken.
3. Fuer mehr Details ueber Außengerätesfehler, bitte siehe Fehlersuche-Liste des Außengerätes
eige
E5 2 3
Anzahl
Timer-LED-Blinksig
nale(Inneneinheit
PCB LED 4)
Anzahl
Running-LED-Blinksig
nale(Inneneinheit PCB
LED 3)
Page 95

Sicherheitsmaßnahmen
ACHTUNG
• Die Installation muss vom Händler oder von Fachpersonal durchgeführt werden. Versuchen Sie nicht, das Klimagerät auf eigene Faust
zu installieren. Die unsachgemäße Installation kann zu Wasserleckagen, Stromschlägen oder Bränden führen.
• Es wird darauf hingewiesen, dass die Anlageninstallation fachgerecht erfolgen muss, damit die Geräte für die Instandhaltung direkt
zugänglich sind. Der Gebrauch von Gerüsten, Kränen usw. bei der Instandhaltung ist von der Garantie ausgenommen.
WARNHINWEISE
• Um Brandgefahr zu vermeiden, das Klimagerät nicht an Orten installieren, an denen feuergefährliche Gase austreten können.
• Einen Netztrennschalter installieren, um Stromschläge zu vermeiden.
• Das Erdungskabel anschließen; den Erdungsdraht nicht an Gasleitungen, Wasserleitungen oder Telefonleitungen anschließen.
• Den Kondensatschlauch richtig installieren, um Wasserleckagen zu vermeiden.
• Das Klimagerät muss ein eigenes Versorgungskabel haben.
• Darauf achten, dass die Oberfläche des Geräts nicht verkratzt wird.
• Dem Endkunden nach der Installation den Betrieb des Klimageräts erläutern.
Installationsort:
• Eine leicht zugängliche Position mit ausreichender Luftzirkulation.
• Die Position darf keinen Ölspritzern oder austretenden Dämpfen (Küche) ausgesetzt sein.
• Der Ort darf keiner salzhaltigen Luft ausgesetzt sein (am Meeresufer).
• Es dürfen keine korrosiven Gase (Thermalquellen) entstehen oder vorhanden sein.
• Es dürfen keine häufigen Spannungsschwankungen auftreten.
• Das Gerät muss weit weg von Fernseh-, Funk- oder anderen Geräten entfernt sein, die elektromagnetische Wellen oder Hochfre-
quenzwellen erzeugen.
• Das Geräusch und die vom Außengerät abgegebene Warmluft dürfen die Nachbarn nicht belästigen.
• Der Aufstellungsort darf im Winter nicht von starken Schneefällen betroffen sein.
• Es dürfen keine Hindernisse vorhanden sein, durch die die Luftansaug- und Ausblasgitter verstopft werden.
• Der Aufstellungsort muss für das Gewicht des Klimageräts geeignet sein, ohne Schwingungen oder zu starke Geräusche zu erzeu-
gen.
Elektrische Anschlüsse:
• Für eine fachgerechte Installation müssen die Angaben in diesem Handbuch genau beachtet werden.
• Das Innengerät und das Außengerät mit den als Zubehör mitgelieferten Leitungen und Stromkabeln anschließen.
• Wenn das Netzkabel beschädigt ist, muss es durch den Kundendienst oder eine andere qualifizierte Person ausgewechselt werden.
• Die Verkabelung muss den örtlichen Vorschriften entsprechen.
• Das Netzkabel nicht abschneiden, kürzen oder verlängern und den Netzstecker nicht auswechseln.
• Keine Verlängerungen verwenden.
• Den Netzstecker fest in die Steckdose stecken. Wenn die Steckdose locker ist, muss sie vor Installationsbeginn repariert werden.
• Das System erst mit Spannung versorgen, wenn der Installationsvorgang beendet ist.
13
Page 96
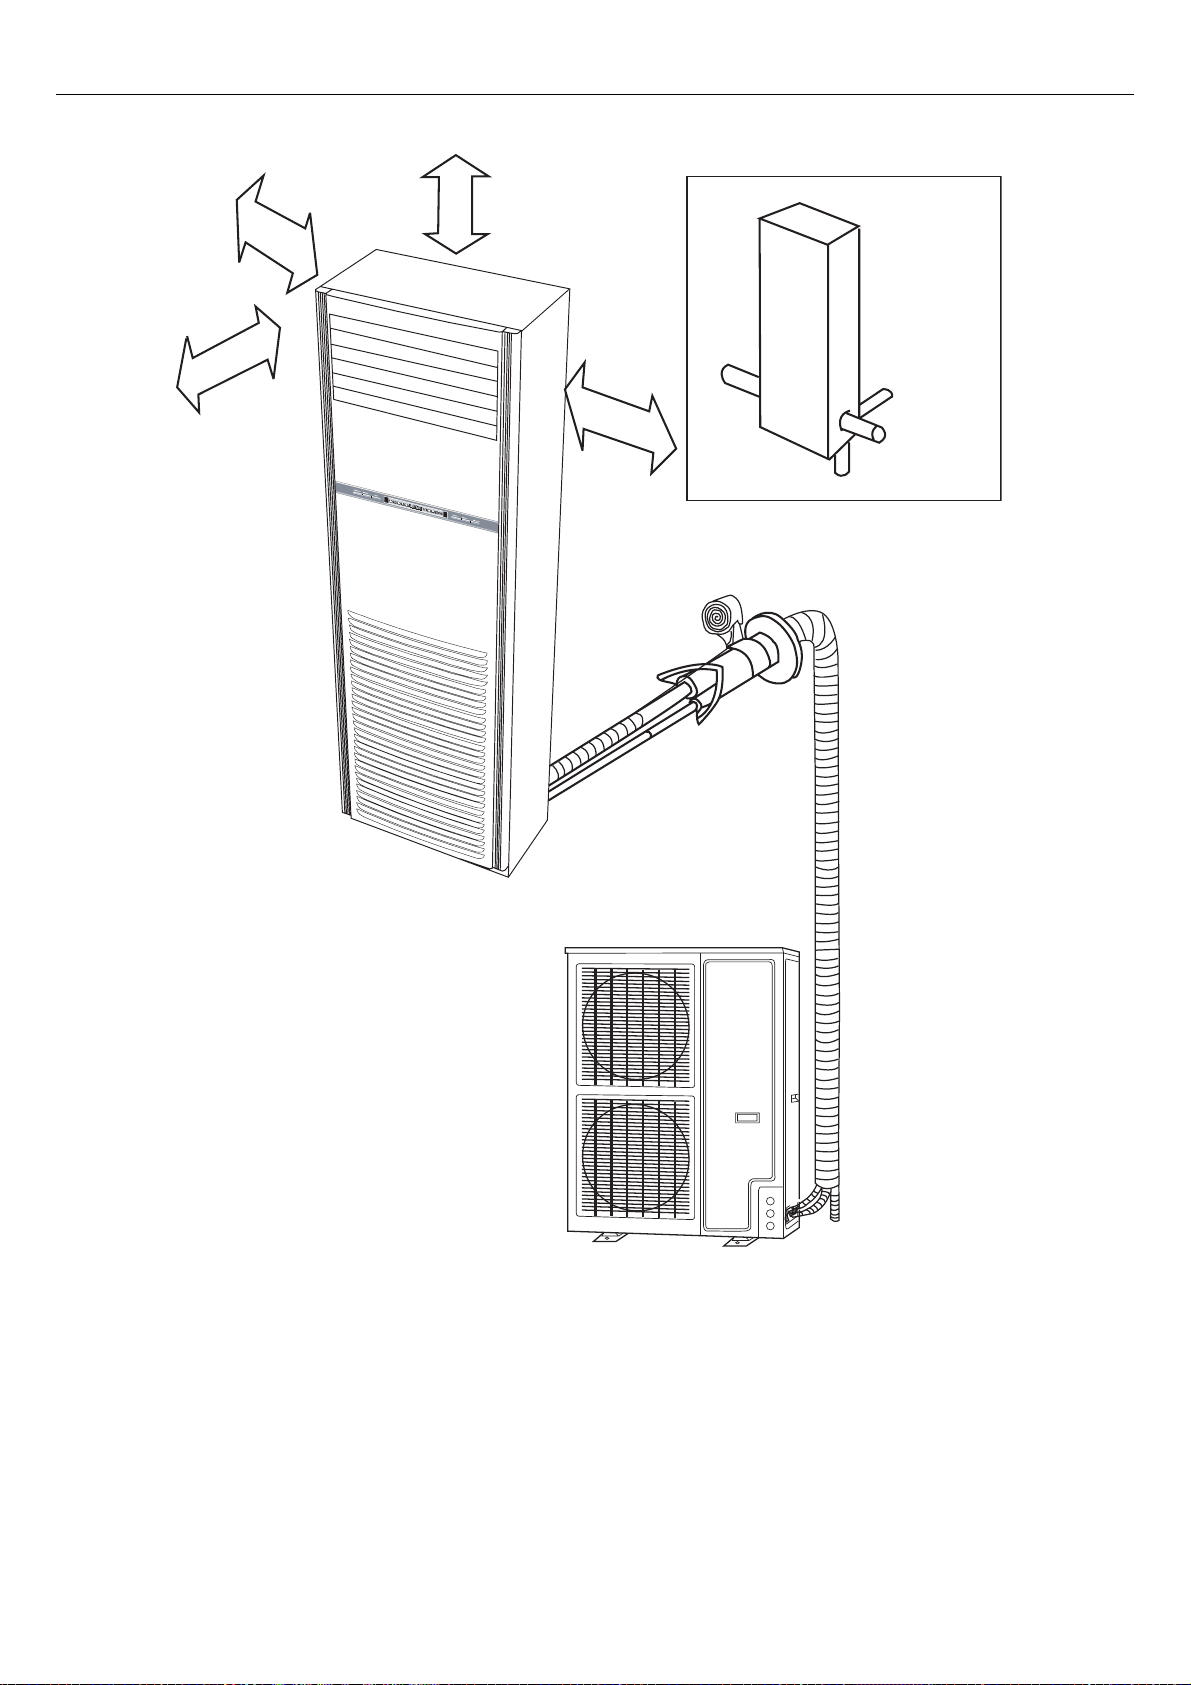
Installation
14
Richtung der Rohre
mehr als 10 cm
mehr als 10 cm
me
00 cm
s 1
r al
h
m
ehr a
l
s 10 cm
links
hinten
rechts
unten
Page 97
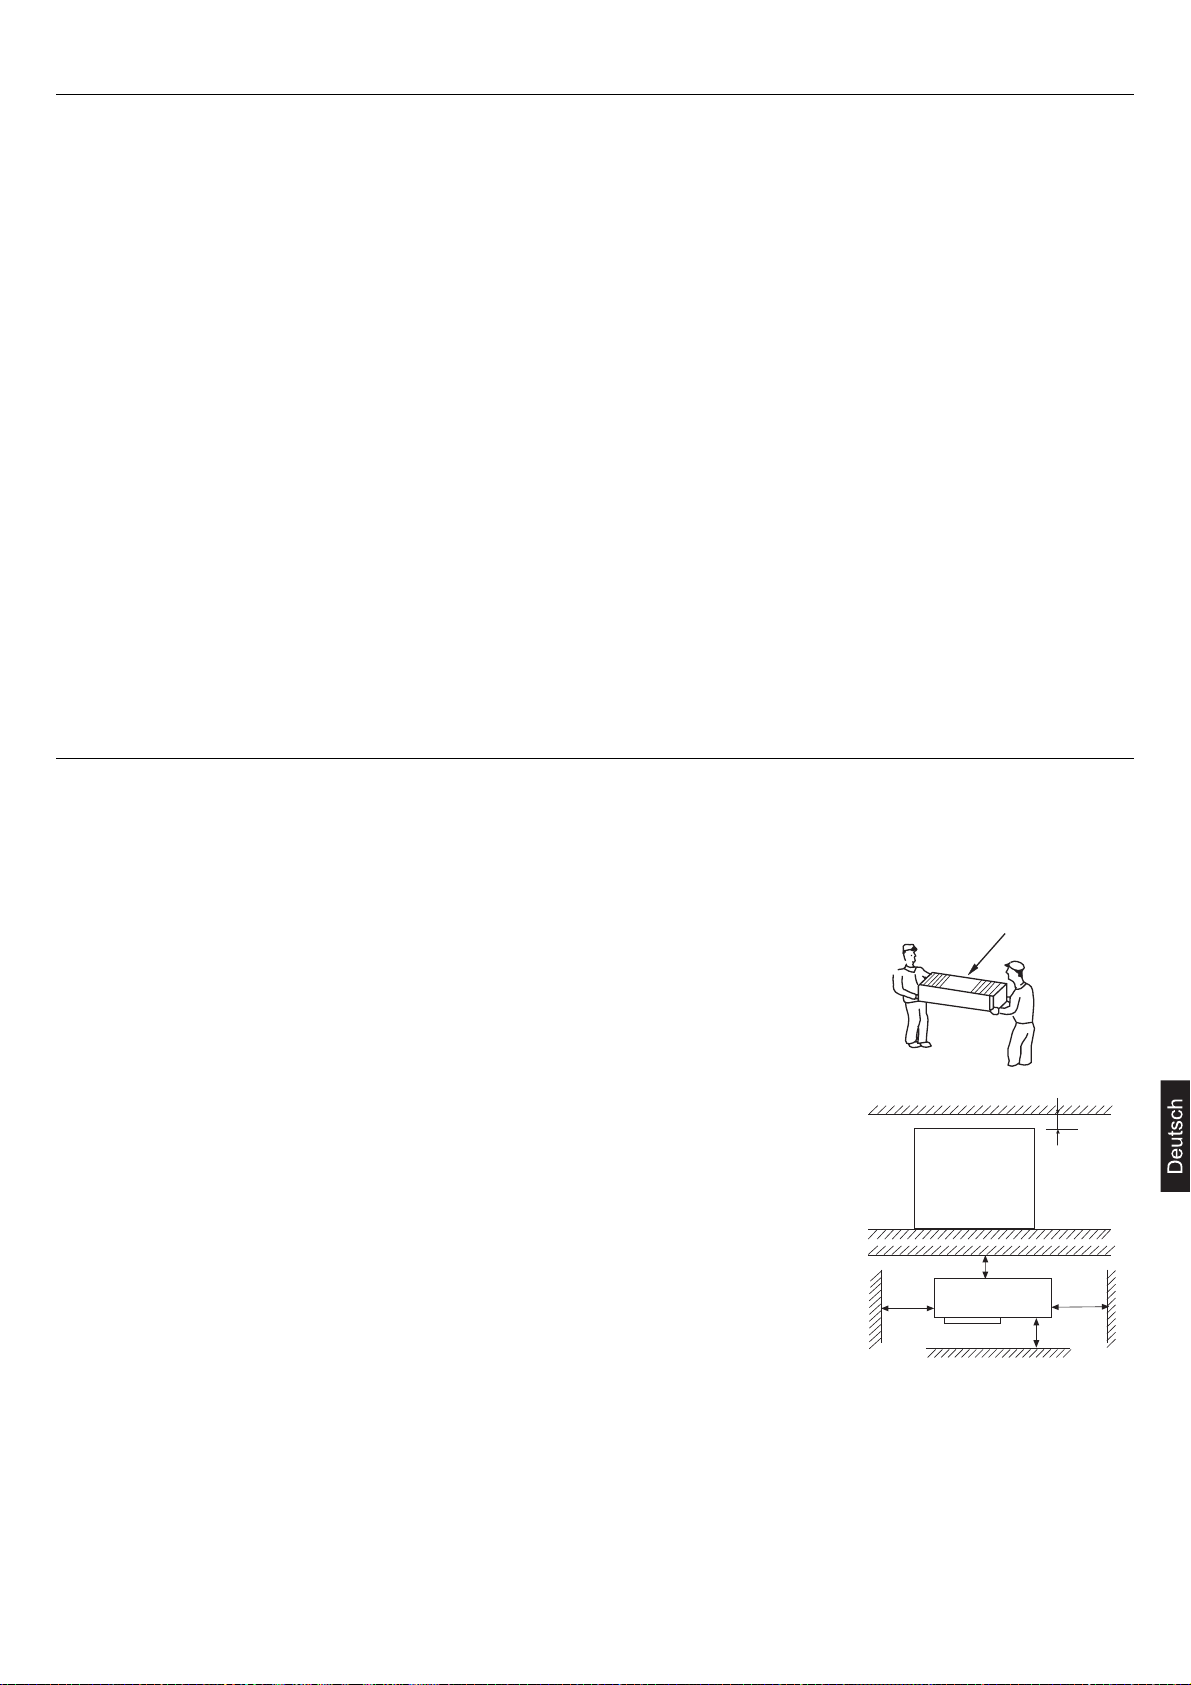
ACHTUNG
DIESE ANWEISUNGEN SIND VOR INSTALLATIONSBEGINN AUFMERKSAM DURCHZULESEN. DIE MISSACHTUNG DIESER
ANWEISUNGEN KANN ZU SCHWEREN VERLETZUNGEN ODER ZUM TOD FÜHREN BZW. BETRIEBSSTÖRUNGEN AM GERÄT
UND/ODER SACHSCHÄDEN VERURSACHEN.
Vor der Installation
• Die Verpackung erst entfernen, nachdem das Gerät an den Installationsort gebracht wurde
• Beim Entfernen der Verpackung weiches Material oder eine Schutzplatte mit Seilen verwenden,
um das Gerät anzuheben, ohne es zu beschädigen.
• Beim Transport des Geräts muss der frontseitige Teil immer nach oben gerichtet sein.
Auswahl des Installationsorts für das Außengerät
• Die Position muss für das Gewicht des Geräts geeignet sein, ohne Schwingungen zu erzeugen.
• Das Geräusch und der Luftaustritt dürfen die Nachbarn nicht belästigen.
• Der Ort muss ausreichend belüftet sein und darf nicht zu sehr dem Regen oder direkten Son-
nenlicht ausgesetzt sein.
Installation des Außengeräts
• Das Außengerät mit Verankerungsschrauben M10 am Fußboden befesti-
gen.
• Wenn das Außengerät an der Wand oder auf dem Dach installiert wird, die
Bügel gut befestigen, um Gefahren bei Erdbeben oder Unwettern zu vermeiden.
• Bei der Installation schwingungsdämpfende Gummis verwenden.
Gerät nach oben
über 30 cm
über 10cm
über 60cm
über
15cm
über
10cm
Vorbereitung zur Installation
Die Installation muss vom Händler oder von Fachpersonal durchgeführt werden. Versuchen Sie nicht, das Klimagerät auf eigene Faust
zu installieren. Die unsachgemäße Installation kann zu Wasserleckagen, Stromschlägen oder Bränden führen.
Für die Installation erforderliches Werkzeug
1. Schraubenzieher
2. Säge
3. Bohrer (Durchmesser 70 mm)
4. Sechskantschlüssel
5. Schlüssel
6. Rohrschneider
7. Flanschwerkzeug
8. Messer
9. Zange
10. Kältemittel-Lecksucher oder Seifenlösung
11. Metermaß
12. Schaber
13. Kühlöl
Das folgende Zubehör wird nicht mitgeliefert:
Klebeband
Kunststoffschelle für Leitungen
Anschlussschlauch
Kondensatschlauch
Isoliermaterial
Gipspulver
15
Vorbereitung zur Installation
Page 98
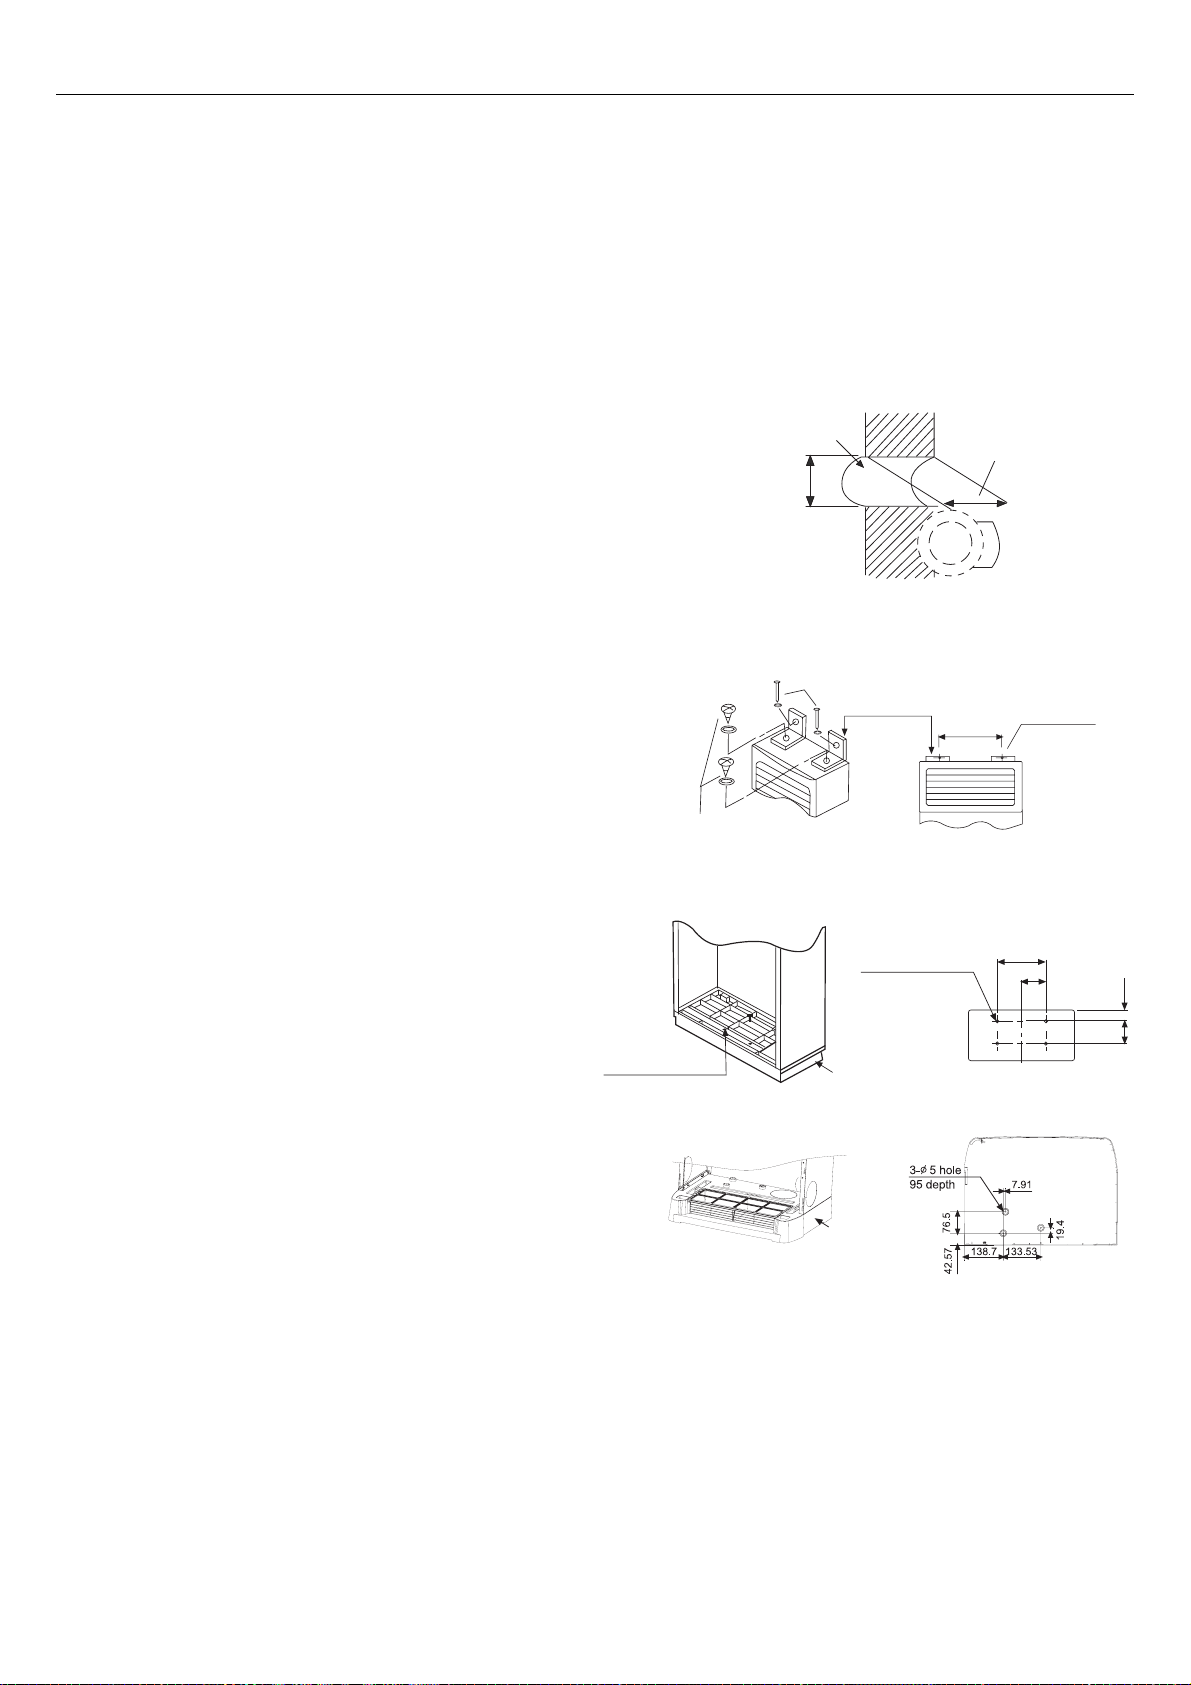
Vorbereitung zur Installation
16
Auswahl des Installationsorts für das Innengerät
• Das Kondenswasser muss ungehindert ablaufen und das Außengerät muss problemlos angeschlossen werden können.
• Das Gerät muss weit entfernt von Wärme- und Dampfquellen sowie geschützt vor direkter Sonnenbestrahlung installiert werden,
um Betriebsstörungen und Verformungen des Gehäuses zu vermeiden.
• Die vom Klimagerät abgegebene Luft muss frei im Raum zirkulieren können.
• Die Luftansaugung und der Luftausblas des Innengeräts dürfen nicht durch Hindernisse versperrt sein.
• Das Gerät muss in der Nähe einer Steckdose und an einer Position installiert werden, die den für die Instandhaltung erforderlichen
Freiraum gewährleistet.
Installation des Innengeräts
1. Lage der Deckenöffnung
• Die Position der Wandöffnung muss anhand des Installationsortes und der Austrittsrichtung der Leitungen bestimmt werden.
• Eine Öffnung mit einem Durchmesser von 70 mm herstellen, die
zur Außenseite der Wand leicht geneigt ist.
• Die Abdeckung auf der Öffnung anbringen und anschließend mit
Dichtmasse abdichten.
2. Befestigung des Innengeräts
Damit das Innengerät nicht umkippt, ist es an der Wand mit Metallbügeln und am Fußboden mit L-Winkelstücken zu befestigen.
Das Gerät waagrecht installieren (max. zulässige Neigung: 1°).
3.Befestigung der Metallbügel
Die Metallbügel so an der Wand befestigen, dass keine Schlitze in
der Mitte entstehen.
Das Gerät senkrecht positionieren, den Bügel am Gerät anschrauben und die Position des Bügels so regeln, dass kein Freiraum zwischen oberem Paneel des Geräts und dem Bügel entsteht.
4. Befestigung der L-Winkelstücke
Die L-Winkelstücke so befestigen, dass keine Schlitze zwischen Winkelstück und Innengerät entstehen. Nachdem sichergestellt wurde, dass das Gerät vertikal perfekt lotrecht zum Fußboden aufgestellt ist, die Schrauben am Fußboden befestigen.
Schrauben
Nägel
Bügel
330
2 Öffnungen Ø 10
unteres Paneel
Verankerungsöffnung
260
79
202
130
4 Öffnungen Ø 14,
Tiefe 30
unteres Paneel
Innenseite
Wandöffnung
Ø70mm
Außenseite
Wandstärke
Page 99
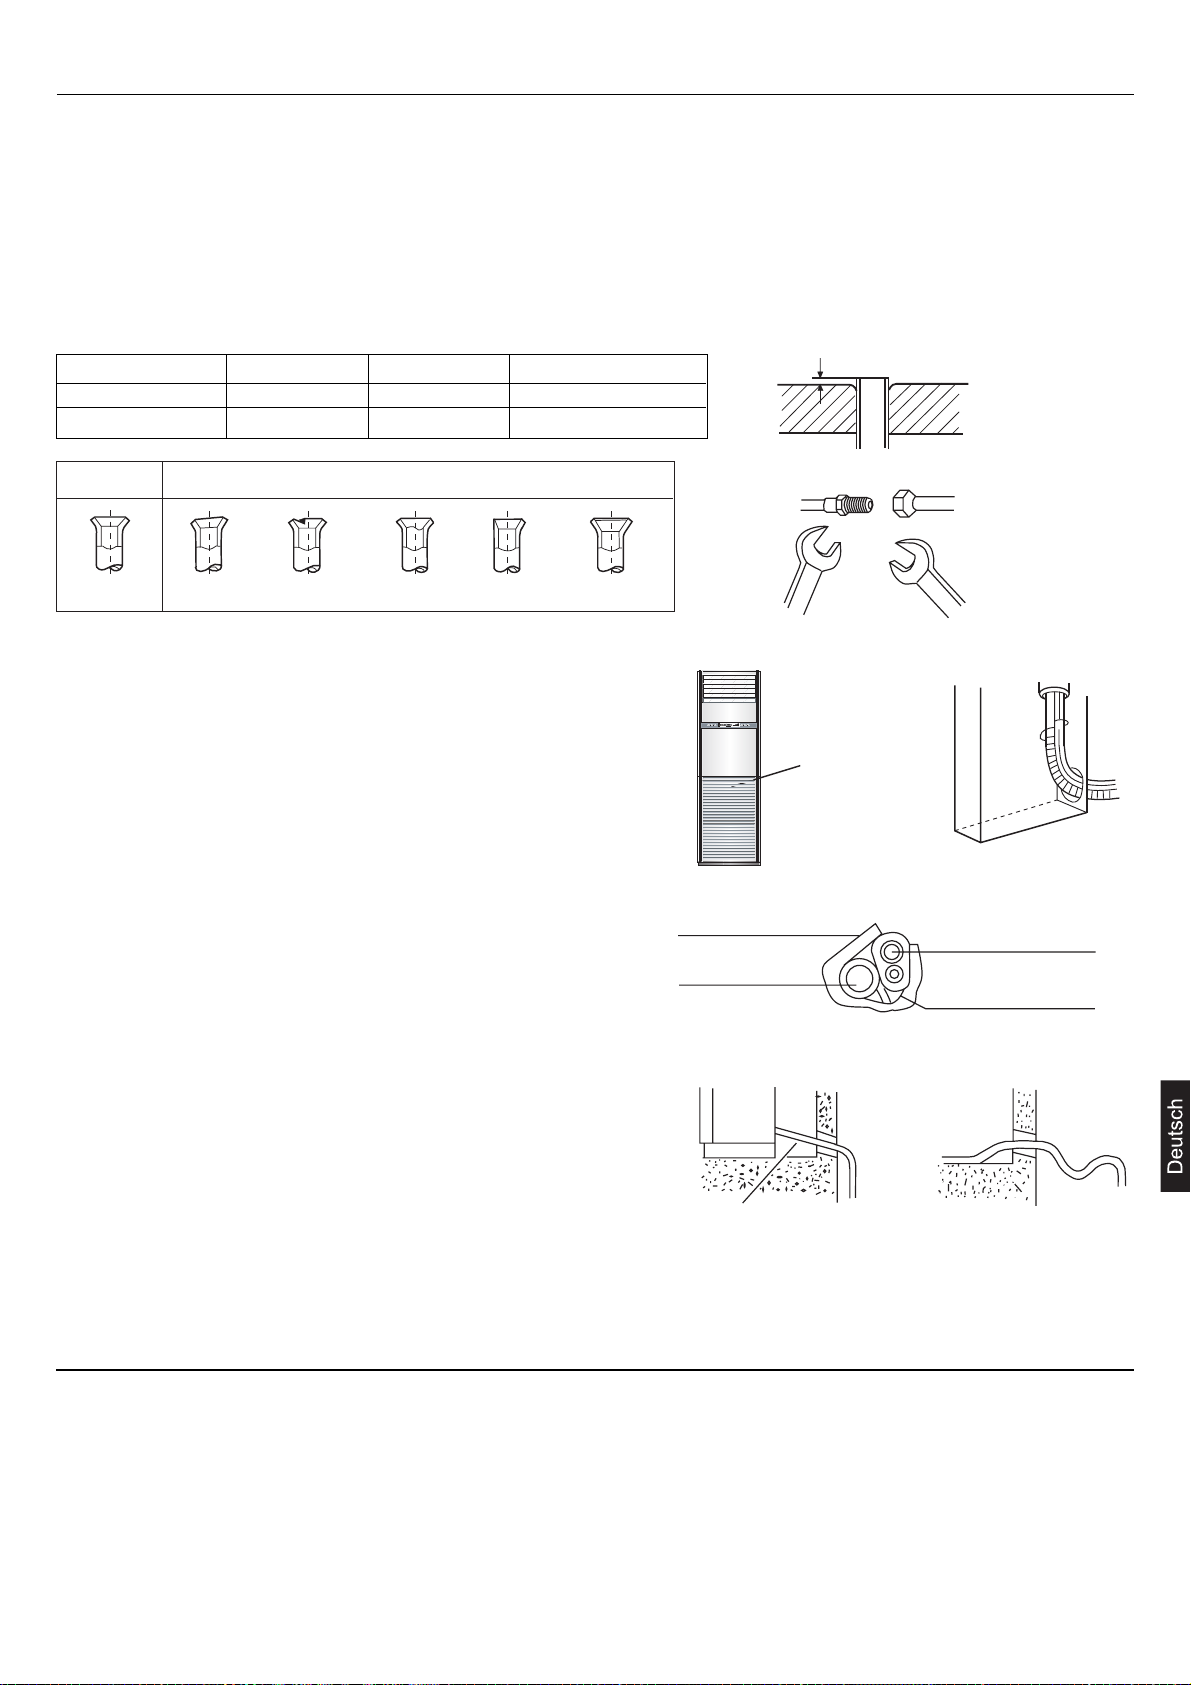
Vorgehensweise beim Anschluss der Leitungen
- Die Leitungen müssen so kurz wie möglich verlegt werden, um die Wirksamkeit des Systems zu gewährleisten.
- Auf das Anschlussstück und den Flansch Kühlöl auftragen.
- Die Leitungen in einem möglichst großen Winkel biegen, um sie nicht zu knicken.
- Die Leitungen mittig zueinander ausrichten und die Mutter von Hand festschrauben, dann mit einem Schlüssel festziehen.
- Sicherstellen, dass keine Fremdkörper wie Staub, Sand oder Wasser in die Leitungen eindringen.
Forciertes Festschrauben ohne die richtige Zentrierung kann das Gewinde beschädigen und Kältemittelleckagen verursachen.
Anschluss der Leitungen des Innengeräts
1. Verlegen der Kältemittelleitungen und des Kondensatschlauchs
• Nachdem das Ansauggitter entfernt wurde, ist der Steuerkasten zu
sehen (siehe Abbildung). Vor Beginn der Arbeiten den Deckel vom
Kasten abnehmen.
• Mit einer Säge die vorgeritzte Öffnung für die Leitungen je nach Austrittsrichtung der Leitungen ausschneiden.
• Den Kondensatschlauch, das elektrische Anschlusskabel vom Innengerät zum Außengerät und die Kältemittelleitungen gemeinsam mit Klebeband umwickeln, durch die Wandöffnung führen und dann an das
Außengerät anschließen.
2. Montage des Kondensatschlauchs
Der Kondensatabfluss muss nach unten geneigt installiert werden; hierbei
ist die Bildung von Siphons zu vermeiden.
Bei hoher Feuchtigkeit muss der Kondensatschlauch (insbesondere im
Raum und im Innengerät) mit Isoliermaterial ummantelt werden.
Kältemittelleitungen
Durchmesser Maß A Drehmoment
Flüssigkeitsseite ø 9,52mm 1,0 ~ 1,8 32,7-39,9 N.m
Kältemittelseite ø 19,05mm 1,4 ~ 2,2 97,2-118,6 N.m
17
Erzeugung des Vakuums
Das Vakuum erzeugen, um die Luft aus dem Innengerät und den Kältemittelleitungen abzulassen.
(1) Bei komplett zugedrehten Hähnen der Flüssigkeits- und Kältemittelseite intern und extern die Abdeckung der Inspektionsöffnung
abnehmen und das Vakuum erzeugen.
(2) Alle Muttern der Bördelanschlüsse der Innen- und Außenleitungen festziehen.
(3) Nach der Erzeugung des Vakuums die Stopfen der Hähne der Flüssigkeits- und Kältemittelseite entfernen, den Hahn der Flüs-
sigkeitsseite und dann den Hahn der Kältemittelseite komplett öffnen.
(4) Die Stopfen wieder auf die Hähne und das Service-Ventil setzen und festziehen.
Richtig
Knapp Beschädigt Rissig Teilweise Zu weit
Falsch
A
Flanschschablone
Isoliermaterial
Kältemittelleitungen
Innengerät
Gefälle
Steuerkasten
RICHTIG
Kondensatschlauch
Anschlusskabel vom
Innengerät zum Außengerät
FALSCH
Siphon
Page 100

• Die elektrischen Anschlüsse dürfen ausschließlich von Fachpersonal vorgenommen werden.
• Nur Kupferleiter verwenden.
• Die Netzstromversorgung wird an das Außengerät angeschlossen.
• Einen separaten Stromkreis verwenden (über 30A)
• Einen Netztrennschalter einbauen
• Der Schalter des Klimageräts muss das Gerät allpolig vom Netz trennen und muss eine Kontaktöffnungsweite von mindestens 3 mm
aufweisen.
• Nur Kupferleiter verwenden.
• Alle Kabel müssen über eine europäische Konformitätsbescheinigung verfügen.
• Die Anschluss- und Netzkabel sind nicht im Lieferumfang inbegriffen.
Spezifikationen des Netzkabels: H07RN-F 5G 4.0mm
2
Spezifikationen des Anschlusskabels: H05RN-F 4G 2.5mm
2
Elektrischer Anschluss des Innengeräts
1. Das Kabel von außen durch die Wandöffnung, durch die auch die Kälte-
mittelleitungen verlaufen, führen.
2. Das Kabel durch die Seitenabdeckung des Innengeräts einführen.
3. Die Schrauben der Klemmen lösen und das Ende des Anschlusskabels
ganz in die Klemmleiste schieben, dann die Schrauben festziehen.
Den Draht leicht nach außen ziehen, um sicherzustellen, dass er gut befestigt ist.
4. Nach der Fertigstellung der elektrischen Anschlüsse sind Kabelbinder an
der Ummantelung der elektrischen Drähte anzubringen.
5. Am Ende den Deckel des Steuerkastens wieder platzieren.
Stromlaufpläne:
Hinweis:
Bei der Durchführung der elektrischen Anschlüsse zwischen Innen- und Außengerät müssen die Klemmen mit der gleichen Nummer
und der gleichen Farbe im Innengerät mit dem gleichen Leiter belegt werden.
Bei falschem Anschluss wird das Kontrollsystem des Klimageräts beschädigt und der Betrieb des Geräts wird beeinträchtigt.
Elektrische Anschlüsse
18
Klemmleiste
Innengerät
Klemmleiste
Kabelbinder
Klemmleiste
Innengerät
Klemmleiste
Außengerät
Netzstromversorgung
380-400V, 3N~, 50Hz
Klemmleiste
Außengerät
Netzstromversorgung
 Loading...