

PORTABLE AIR CONDITIONER
ROOM AIR CONDITIONING AND DEHUMIDIFIER PRODUCTS
CLIMATISEUR PORTATIF
ACONDICIONADOR DE AIRE PORTATIL
Model#
Modèle#
Modelo#
AP076E
A Word From Amana
Thank You for buying a dependable, energy saving and easy to operate AMANA air
conditioner. This manual contains useful information for you to maintain, operate, install and
safely use your air conditioner. Your air conditioner cleans, cools and dehumidifies the air in
your room to provide you with the ultimate level of comfort.
Please read instructions carefully before using the product. Also, do not forget to fill out and
mail the
Product Registration Card.
Product Registration
Record Your Model and Serial Number.
English
Attach the sales receipt to this guide and keep for future reference. Model and serial number
can be obtained from the serial label, which is on your air conditioner. For all your service calls
during the warranty period the following information will be needed:
Model Number:....................................................................................................................
Serial Number: ....................................................................................................................
Date of Purchase: ................................................................................................................
Dealer’s Name:....................................................................................................................
Dealer’s Address: ................................................................................................................
Dealer’s Phone Number: ......................................................................................................
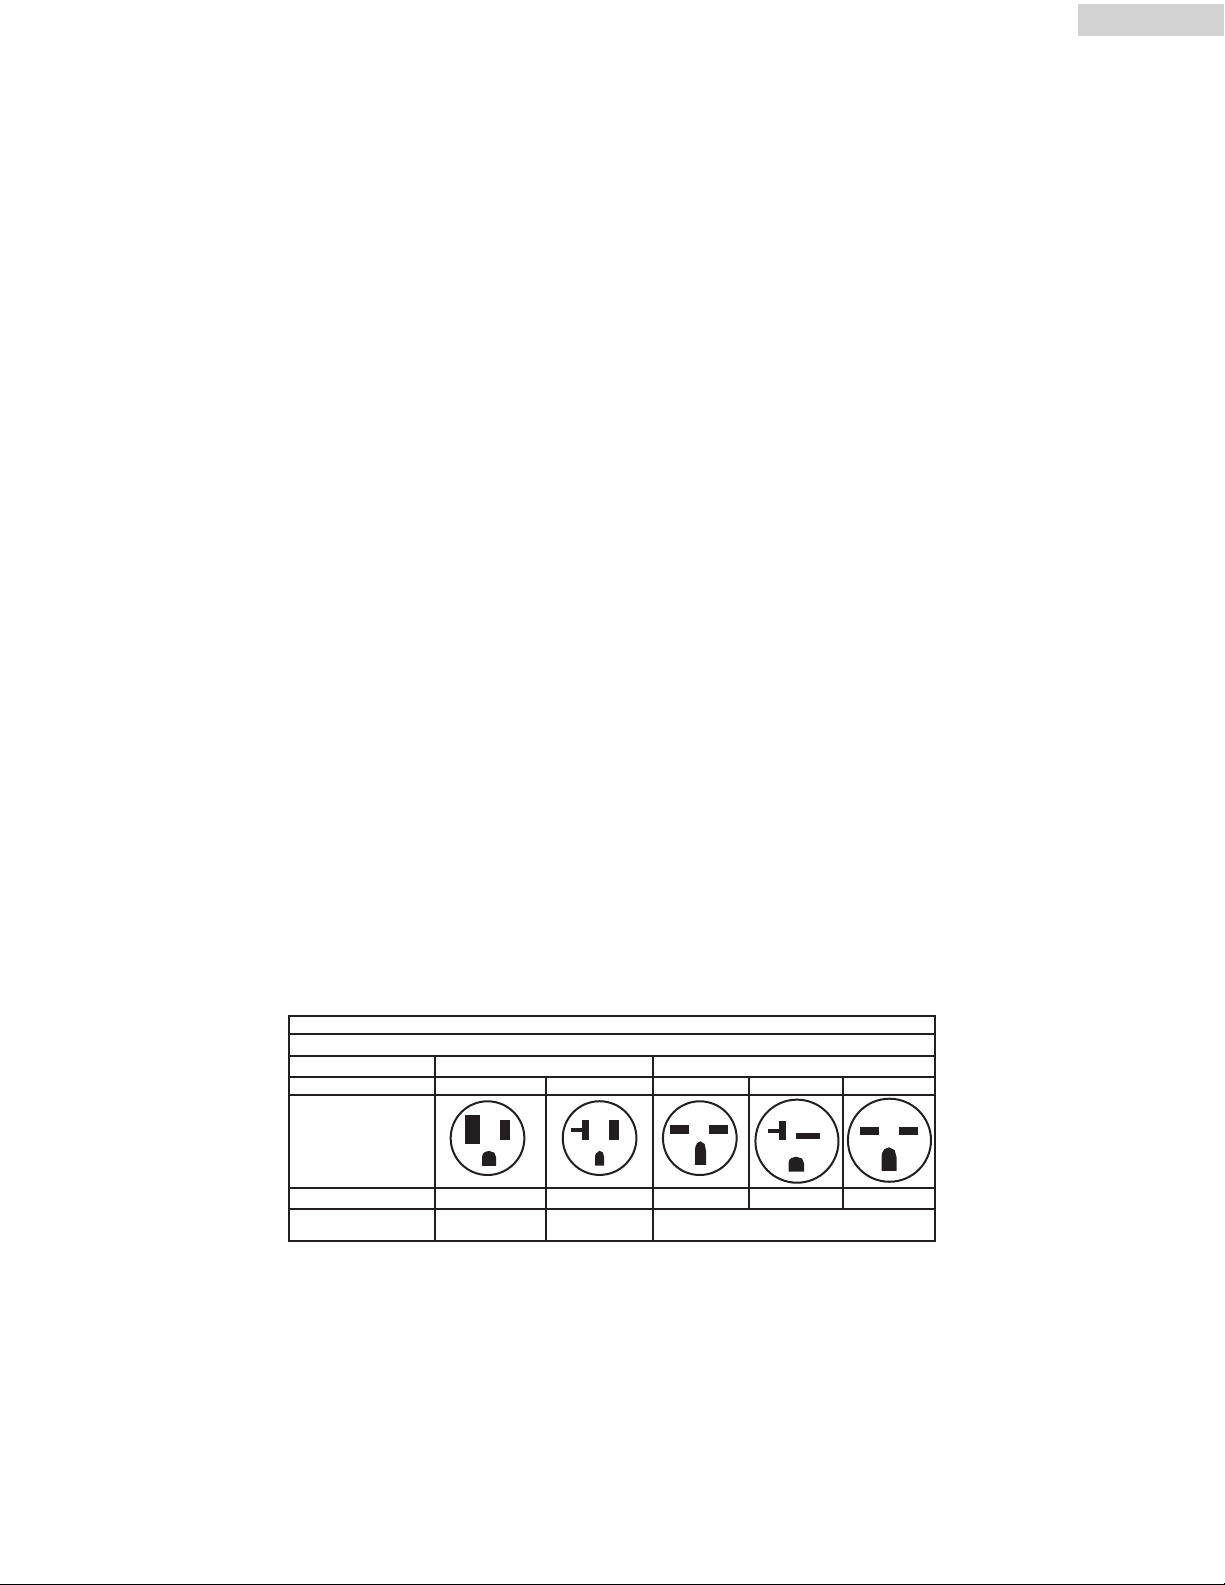
TABLE
RATED VOLTS
RECEPT
AMPS
WALL OUTLET
ACLE AND FUSE TYPES
125/60 250/60
15 20 15 20
30
FUSE SIZE
Y FUSE
TIME DELA
(or circuit brak
15 20* 15 20*
er)
Plug
Plug
Plug
30
(1)

nglish
E
SAFETY PRECAUTIONS
WARNING: Following these basic precautions will reduce the risk of fire, electrical
shock, injury or death when using your air conditioner.
1) Air conditioner must be connected to proper electrical outlet with the correct electrical
supply.
2) Proper grounding must be ensured to reduce the risk of shock and fire. DO NOT CUT OR
REMOVE THE GROUNDING PRONG. If you do not have a three-prong electric receptacle outlet in the wall, have a certified electrician install the proper receptacle. The wall receptacle
MUST be properly grounded.
3) Do not operate air conditioner if power cord is frayed or otherwise damaged. Also avoid using
it if there are cracks or abrasion damage along the length, plug connector or if the unit malfunctions or is damaged in any manner. Contact an authorized service for examination, repairs
or adjustments.
(see table previous page)
4) DO NOT USE AN ADAPTER OR AN EXTENSION CORD.
5) Do not block airflow around the air conditioner. Also the exhaust hose should be free of any
obstructions.
6) Always unplug the air conditioner before servicing it or moving it.
7) Do not install or use the air conditioner in any area where the atmosphere contains
combustible gases or where the atmosphere is oily or sulphurous. Avoid any chemicals coming
in contact with your air conditioner.
8) Do not place any object on the top of the unit.
9) Never operate the air conditioner without the filters in place.
10) Do not use the air conditioners near a bathtub, shower or wash basin.
SAVE THESE INSTRUCTIONS
(2)

Table Of Contents
Page
A Word From Amana..............................................................................................................1
Product Registration ..............................................................................................................1
Safety Precautions ..................................................................................................................2
English
Advantages
Parts and Features
Assembly and Installation
Operation
Product Specification
Care and Cleaning..................................................................................................................8
Storage
Trouble Shooting ....................................................................................................................9
Warranty Information ..........................................................................................................10
..............................................................................................................................3
..................................................................................................................4
......................................................................................................5
............................................................................................................................6-7
..............................................................................................................8
....................................................................................................................................8
Advantages of this Model
1. This model is easy to operate. The electronic control panel has a timer, thermostat, three
cooling speeds, three fan speeds and one speed dehumidification function (dry).
2. The unit has a unique design which evaporates the water. Therefore no condensation tank is
necessary, thus avoiding you to have to wake up in the middle of the night to empty the
bucket and turn on the unit.
3. Easy to install window kit is included, which consists of the exhaust hose, 2 hose adapters,
the window panel kit and window panel adapter.
4. Full directional casters are included to help the unit to be moved in almost any area.
5. The filter screen is designed for easy accessibility of the filter.
6. Portable air conditioners are easy to store when not in use.
(3)
English
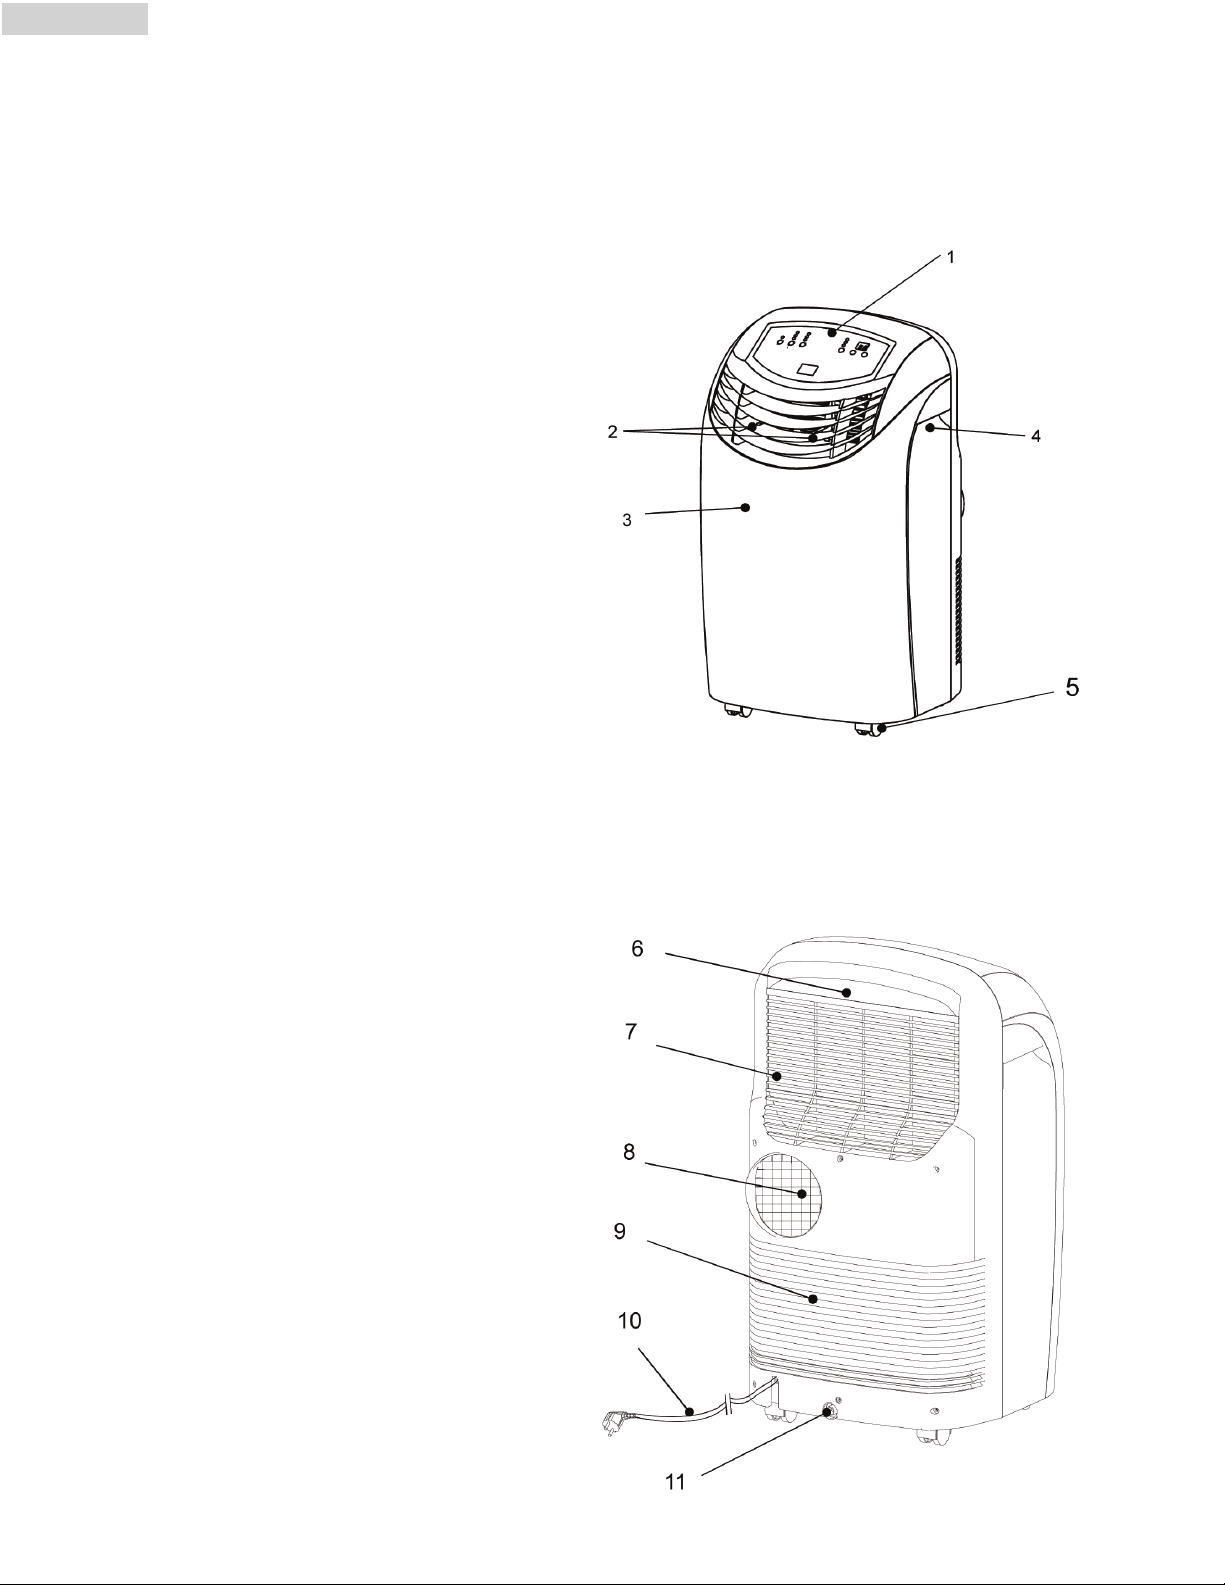
Parts and Features
1. Control Panel
2. Air Deflector (Left-Right)
3. Front Panel
4. Handle Hole
5. Castor
6. Screen Filter
7. Air Intake (Evaporator)
8. Air Outlet (Heat Exchange)
9. Air Intake (Condenser)
10. Power Supply Cord
11. Water Drain
Front
Rear
(4)
Assembly and Installation
English
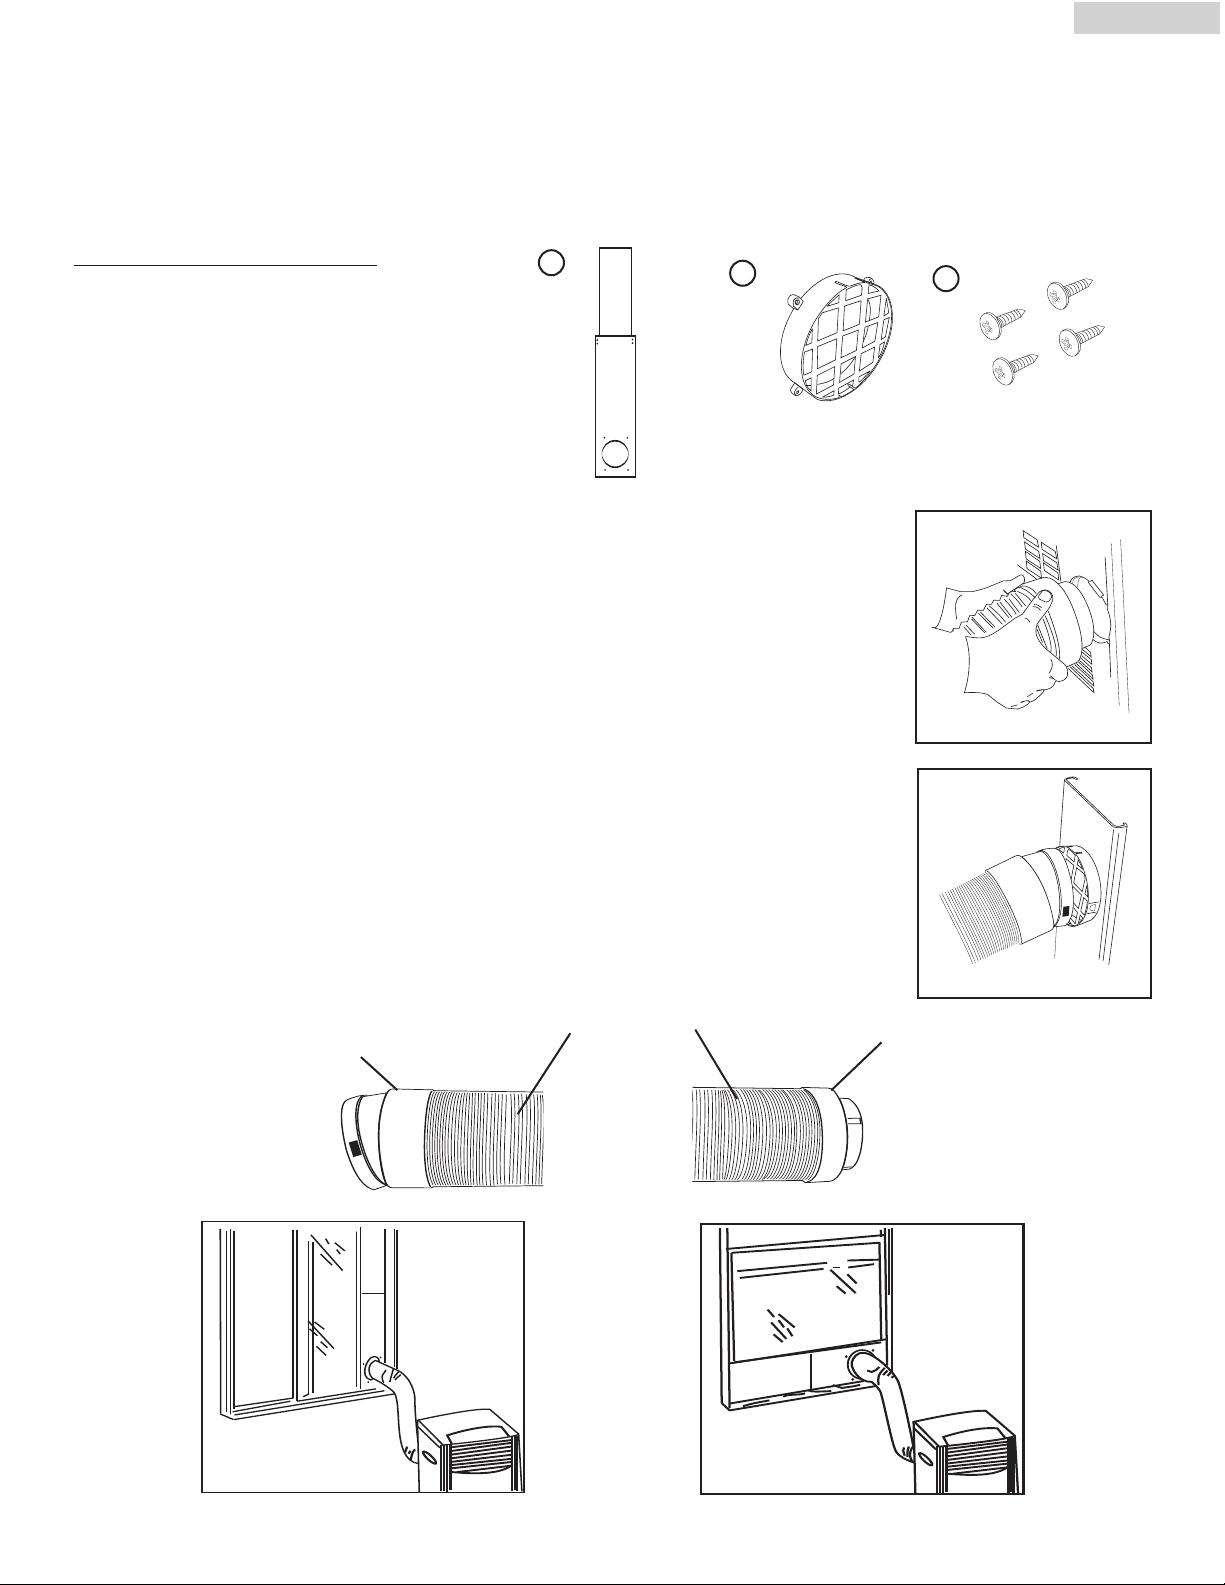
USING WINDOW PANEL KIT
1. Plastic panel - 2 pieces
2. Window Panel adapter - 1 piece
3. Screws - 4 pieces
1. Push the round Window Panel Adapter through the rear of the Plastic Panel.
Line up the holes and tighten the Adapter with 4 screws that are included in
the kit. (Tighten screws from the front).
2. Adjust the Plastic Panel to the width or height of your window and tighten
the 2 screws that are attached to the panel.
3. Install the Window Plastic Panel into the window. If necessary use duct tape
to better secure the panel.
4. Connect exhaust hose to the unit by inserting the narrower side of the Unit
Adapter that is attached to the hose into the exhaust. Turn Adapter clockwise until it locks. (See Illustration A)
5. Move the unit to the window, extend the hose and attach the other end of
the hose to the window. Align the tabs on the hose and window panel
adapters and fasten them together.
6. Plug into wall outlet to get ready for operation.
1
2
3
A
B
• NOTE: Use on Single Outlet Circuit Only.
Window Adapter
Exhaust Hose
Unit Adapter
(5)
nglish
E
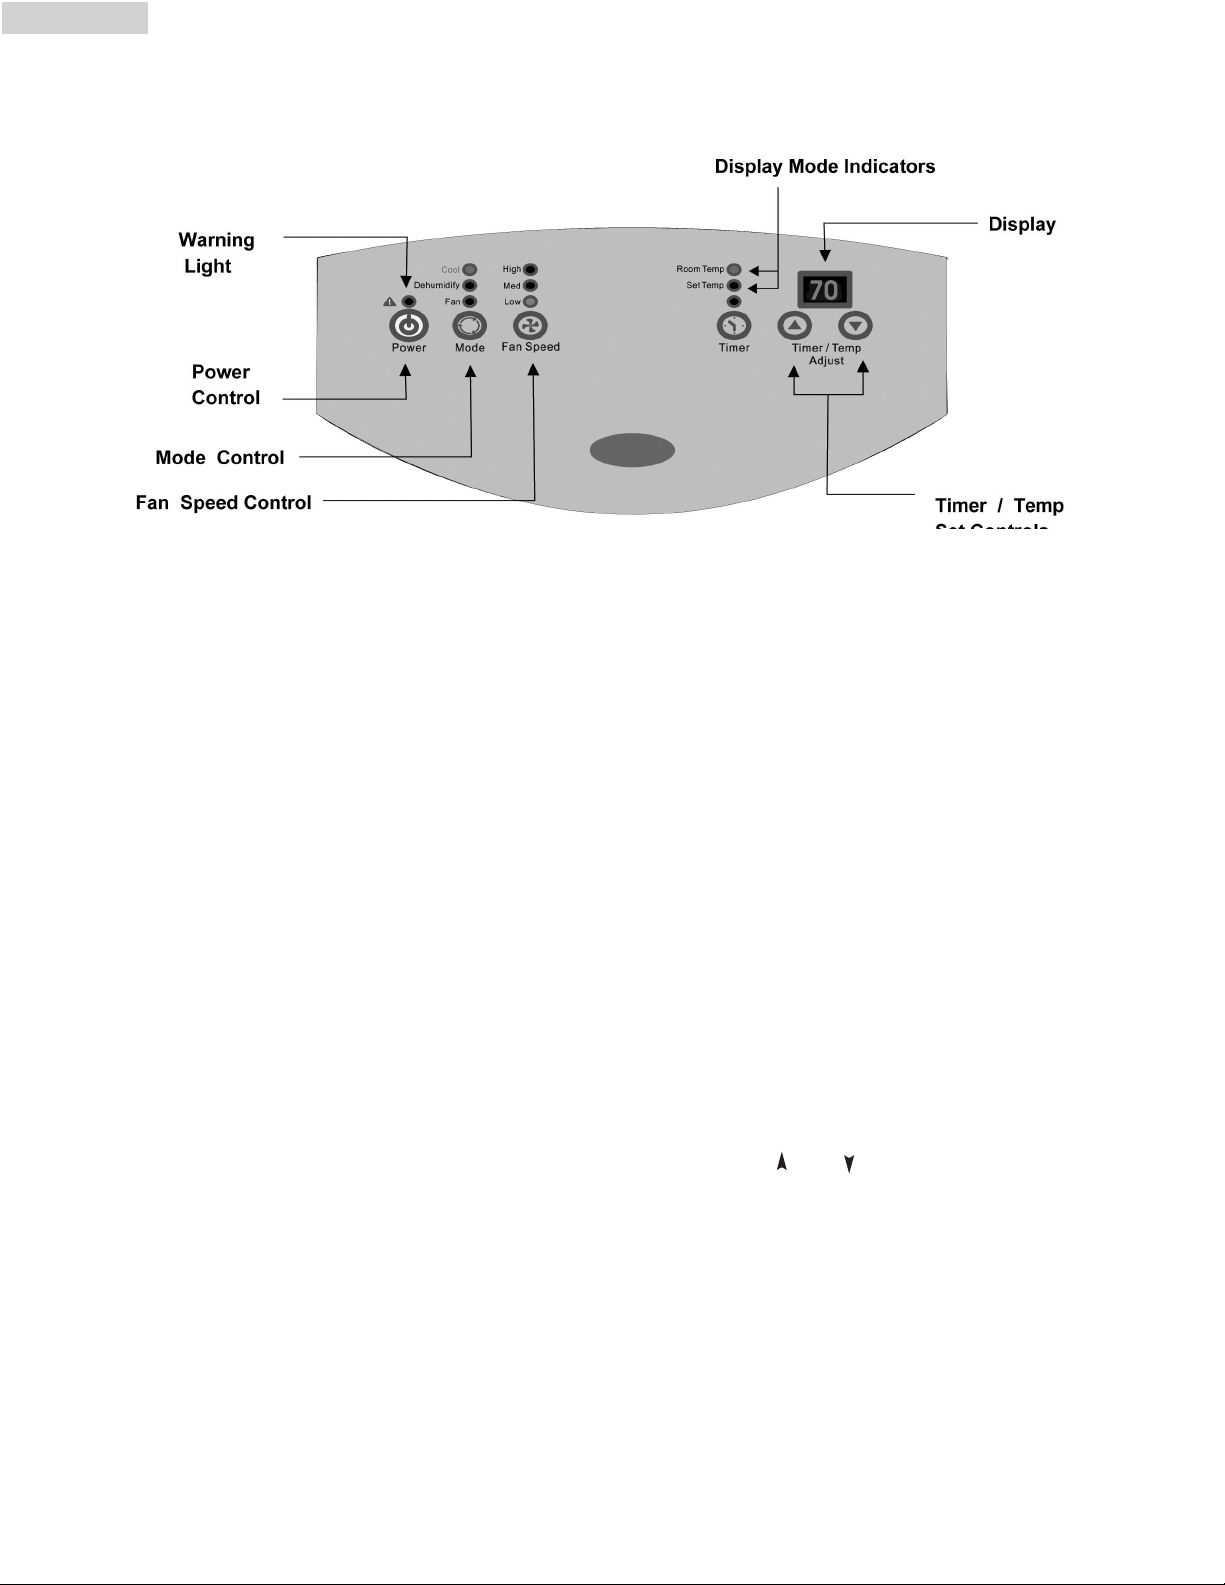
Operation Control Panel
Power Control
The power control turns the unit on and off.
Warning Light
Condensed water may accumulate in the unit. If
the internal tank becomes full, the Warring Light
will shine and the unit will not operate until the
unit has been drained.
Mode Control
The Mode Control has three settings:
Cool Dehumidify Fan
The settings are adjusted with Mode Control button. A light will indicate which setting is currently
being used.
Cool Mode
When cool mode is selected, the indicator light
will shine green. During the cooling mode the air
is cooled and hod air is exhausted to the outside
air through the exhaust tube. Adjust fan speed air
through the temperature to suit your desired comfort level.
Note: The air exchange hoses must vent outside
the room when using cool Mode.
Dehumidify Mode
When Dehumidify mode is selected, the indicator
light will shine orange. Air is dehumidified as it
passes through the unit, without being in full
cooling mode . The fan will operate in Medium
speed. Fan speed is not adjustable in Dehumidify
mode.
Fan Mode
When Fan mode is selected the indicator light will
shine yellow. Air is circulated throughout the
room with no cooling.
Note: unit does not need to de vented in Fan
mode.
Fan Speed Control
The Fan Speed Control has 3 settings:
High Medium Low
Timer Control
Auto turn off :
press timer button to select number of hours you
would like the unit to run in air conditioning
mode until it automatically shuts off.
Auto turn on : With machine powered off ,
press timer button to select number of hours until
you would like the unit to automatically start
running in air conditioning mode
Timer / Timer set Controls
Used for adjusting the timer and thermostat. The
default display is room temperature. In cooling
mode, When " " or " " button is pressed, the set
temperature is displayed and may be adjusted.
After 15 seconds the display will revert back to
room temperature. Temperature is only
adjustable in Cool and Heat mode. The time is
adjustable between 1 and 12 hours.
Note: By pressing both Temp/Timer Set buttons
at the same time, the display will toggle
between Celsius and Fahrenheit.
With machine in fan mode,
(6)

Operation
NOTE: Wait for 24 hours to turn on air conditioner if the unit has been tilted for any
reason. This is for the oils and the coolants to settle and level off.
1. After a normal shut down wait for 3 minutes before restarting the unit so as to complete the
compressor cycle.
2. Use an 115v /15 amp outlet for the air conditioner. Do not use any other electrical appliances
on this line or you may trip the fuse. Use a dedicated line for this air conditioner.
3. Do not place the air conditioner in direct sunlight or close to any heating appliances
(eg. baseboard heaters, stoves, etc).
4. Operate on a flat surface only.
5. Keep the unit free of any obstructions such as drapes, curtains, blinds, etc.
6. Keep unit at least 1 foot away from the wall.
7. Check and clean the filter once every week for highest efficiency.
NOTE: Do not use unit without filter.
8. If the unit is not being used for a long period of time, remove the plug from the water drain
pipe and drain out any condensed water.
English
When turning on the unit for the first time after plugging it into an electrical outlet, the unit will
start in a low fan cool mode. The temperature reading out on the LED will be the current room
temperature. When turning on the unit during regular usage, it will remember the last shut off set
ting. If you want to operate the air conditioner as a dehumidifier, then adjust to dry mode.
Setting The Temperature
To set the temperature, press the + or the - key to raise or lower the temperature. The temperature can be raised or lowered in the cool or dry mode. The temperature cannot be adjusted in the
fan mode.
Fan Speeds
There are 3 adjustable speeds in the cool and fan mode: Low, Medium & High. In the dry or
dehumidification mode the fan will only operate at low speed.
On/Off Time Set
The air conditioner has a 1-12 hour on/off built-in timer. To delay the start time for 1-12 hours at
1 hour intervals, simply press the time/set key and then press the + or - key to adjust the start
time. Note that the unit has to be plugged in to an electrical outlet for the timer to operate.
-
To automatically shut-off the unit, press the time/set key while the unit is running and then press
the + or - key to adjust the shut-off time. The auto shut-off switch operates in all 3 modes: Cool,
Dry & Fan.
NOTE: The temperature can be set between 60˚F to 89˚F.
(7)
English
Product Specification
Voltage and Frequency 115V / 60Hz
Input Power 850 W
Cooling Capacity 7000 BTU
Moisture Removal (pints/day) 60
Coolant R22
Timer 12 Hours
Operating Temperature Range 64˚F - 100˚F
Unit Dimensions (WxDxH) (inches) 17
Net Weight lbs. approximate 66 lbs.
Exhaust Hose 5 Feet
3/32 x 15 3/4 x 30 5/16
Care and Cleaning Guide
• Always unplug your air conditioner before cleaning.
• Air filter needs to be cleaned at least once a week for your unit to operate at optimum efficiency. Slide out the filter from the back by pulling on the tab. The filter may
be washed or vacuumed. Remove the excess water from the filter by gently shaking
the filter. This will remove dust and particles trapped in the filter. After cleaning, reinstall the filter.
• To clean the cabinet,
bleach, concentrated detergents, solvents or metal scouring pads. Some of these
chemicals may dissolve, damage and/or discolor your air conditioner.
DO NOT use your air conditioner without the air filter in place.
DO NOT use harsh chemicals, abrasives, ammonia, chlorine,
• Always use a soft cloth dampened with water or a mild soap and water solution to
wipe the front of the cabinet. Wipe dry with a soft cloth.
Storage
• To store your air conditioner when not being used for a long period of time, drain
condensed water using the drain pipe. Remove exhaust hose, clean the filters, cover
with plastic bag and store away.
(8)

Trouble-Shooting
If air conditioner does not operate:
• Check if unit is plugged in. The plug may have come loose.
• Check if the electrical wall receptacle is of proper voltage.
• Check if the circuit breaker needs to be reset or if the fuse needs to be replaced.
• Check if the unit is in “Off” mode.
• If the warning light is on, drain the water drain pipe by removing the plug.
Air conditioner working but room not cooling:
• Room may have appliances that produce heat. Use an exhaust fan to remove excess heat.
• Check exhaust hose for proper installation.
• Redirect the airflow. Remove any obstacles.
• All doors and windows need to be closed so that cool air does not escape the room.
• Air filter may be blocked or may need cleaning.
• Unit BTU may be too low for the required cooling area.
• On extremely hot & humid days, air conditioners may take a little longer to cool.
• Drain the water drain pipe by removing the plug.
• Unit may be in fan or dry mode. Put air conditioner in cool mode.
English
(9)

English
R
OOM AIR CONDITIONING AND DEHUMIDIFIER PRODUCTS
Limited Warranty
This warranty covers all defects in workmanship or
material for:
1. The mechanical and electrical parts (including labor
costs) contained in this Amana product, for a period of 12 months from the date of purchase. (For
commercial or rental application the warranty is 90
days.)
2. The sealed system and compressor contained in this
Amana product is for a period of 5 years, from the
date of purchase (excluding labor costs after the initial 12 month period). In commercial or rental use,
the additional limited compressor warranty is for 1
year and 9 months, (excluding labor costs after the
initial 90 days period).
You must keep and be able to provide your original
sales receipt as proof of the date of purchase.
Who is covered?
The original retail purchaser of this Amana product.
What will be done?
Amana will repair or replace any mechanical, electrical
part or the compressor, which proves defective in normal household, use for a period of 12 months. Amana
will repair or replace (excluding labor costs) the sealed
system and compressor (parts only) for an additional 4
year period.
Damages from improper installation.
Damages in shipping.
Damages from misuse, abuse, accident, alteration,
lack of proper care and maintenance.
Damages from service by other than an authorized
dealer or service center.
Labor, service, transportation and shipping charges for
the removal of defective parts and installation of
replacement parts beyond the initial 12-month period.
THIS LIMITED WARRANTY IS GIVEN IN LIEU OF ALL
OTHER WARRANTIES, EXPRESS OR IMPLIED,
INCLUDING THE WARRANTIES OF MERCHANTABILITY
AND FITNESS FOR A PARTICULAR PURPOSE.
The remedy provided in this warranty is exclusive and
is granted in lieu of all other remedies. This warranty
does not cover incidental or consequential damages.
Some states do not allow the exclusion of incidental or
consequential damages, so this limitation may not
apply to you. Some states do not allow limitations on
how long an implied warranty lasts, so this limitation
may not apply to you. This warranty gives you specific
legal rights and you may also have other rights, which
vary from state to state.
How can you get service?
1. Contact your nearest manufacturer authorized
Service Depot. F
nearest you, contact Amana
at 1-888-842-2440
All service must be performed by a manufacturer
2.
authorized Amana Service Depot.
THIS W
CONTINENTAL UNITED STATES, CANADA AND
PUERT
THIS WARRANTY DOES NOT COVER:
ARRANTY COVERS UNITS WITHIN THE
O RICO.
or the name of the Service Depot
Room Air Conditioners
(10)
For more information on this and other
Amana products, call Customer Affairs
Department at: 1-888-842-2440

Un mot de Amana
Merci d’avoir achete un climatiseur “Amana”qui est dependable, facile a operer et economise
de l’energie. Ce manuel contient l’information necessaire pour maintenir, operer,installer et
utiliser proprement votre climatiseur. Votre climatiseur nettoie, refroidit et dehumidifie l’air dans
votre salle pour vous fournir avec le niveau ultime de confort..
S’il vous plait lisez soigneusement les instructions avant d’installer ce produit. N’oubliez pas de
remplir et poster la carte
d’enregistrement du produit.
Registration du Produit
Registrez le model et numero de serie.
Français
Pour tous vos appels de service pendant la periode de votre garantie, les informations suivantes
vous seront necessaries. Attachez le recu de ventes a ce guide et garder pour la reference
d’avenir. Cette information peut etre obtenue de la plaque en serie, qui est sur votre climatiseur.
Numero du model: ..............................................................................................................
Numero de serie: ................................................................................................................
Date d’achats:......................................................................................................................
Nom du negociant: ..............................................................................................................
Addressed u negociant: ........................................................................................................
Numeros de telephone du negociant:....................................................................................
TABLEAU
125/60 250/60
30
TENSION
AMPÈRES
PRISE DE COURANT
MURALE
TYPES DE PRISES ET FUSIBLES
15 20 15 20
TAILLE DU FUSIBLE
FUSIBLE À FUSION
TEMPORISÉE (disjoncteur)
15 20* 15 20*
Fiche
Fiche
30
Fiche
(1)

rançais
F
CONSIGNES DE SÉCURITÉ
AVERTISSEMENT: Veuillez suivre ces précautions de base lorsque vous utilisez l'ap-
pareil afin de réduire tout risque d'incendie, d'électrocution, de
blessure, voire de mort.
1) Le climatiseur doit être branché au niveau d'une prise électrique d'une tension adéquate.
(voir tableau)
2) L'appareil doit être mis à la terre (masse) afin de réduire tout risque d'électrocution et d'incendie. NE PAS COUPER NI RETIRER LA BROCHE DE MASSE. Si votre prise murale ne peut
accueillir une fiche à trois broches, veuillez faire en sorte qu'un électricien qualifié en installe
une. La prise murale DOIT être mise à la masse.
3) Ne pas utiliser l'appareil si le cordon d'alimentation est effiloché ou fissuré, si la fiche et le connecteur sont endommagés, ou si l’appareil présente une panne ou est endommagé d’une
façon quelconque.
4) NE PAS UTILISER UN ADAPTATEUR OU UNE RALLONGE.
5) Ne pas gêner ni bloquer le flux d'air autour de l'appareil et que rien ne bouche le tuyau de
sortie.
6) Débrancher toujours le climatiseur avant de le déplacer ou d'effectuer opération de mainte-
nance.
7) Ne pas installer le climatiseur dans un endroit où l’atmoshpère est huileuse ou présente des
gaz combustibles ou du soufre. Éviter que les produits chimiques entrent en contact avec le climatiseur.
8) Ne placer aucun objet sur le climatiseur.
9) Ne jamais utiliser le climatiseur sans les filtres.
10) Ne pas utiliser le climatiseur à proximité d’une baignoire, d’une douche ou d’un lavabo ou
évier.
(2)

Table de matieres
Français
PAGE
Un mot de Amana
Registration du Produit
Precautions de Surete ............................................................................................................2
Avantages................................................................................................................................3
Parties et caracteristiques
Assemblee et Installations
Operation
Specification du Produit..........................................................................................................8
Soins et nettoyage
Emmagasinage........................................................................................................................9
Detections d’un probleme
Imformations de la garantie ..............................................................................................10
............................................................................................................................6-7
..................................................................................................................1
..........................................................................................................1
......................................................................................................4
....................................................................................................5
..................................................................................................................9
......................................................................................................9
Avantages de ce Model
1. Ce model est facile a operer. L’electronique a un minuteur, thermostat, trois vitesses pour
refroidir, trois ventilateurs et une vitesse de dehumidification (seche).
2. Ce produit a une conception unique qui evapore l’eau. Donc une tank de condensation n’est
pas necessaire. Ceci vous evitera de vous lever au milieu de la nuit pour vider le seau et
virez le
produit.
3. Une trousse de fenetre facile a installer est incluse et est constituee d’un tuyau d’echappement, de 2 jets de tuyau, d’une trousse de panneaux de fenetre, d’un connecteur du tuyau
d’echappement.
4. Roulettes directionelles sont inclus pour aider a deplacer le produit d’une maniere commode pour etre utiliser dans presque n’importe quel domaine.
5. L’ecran du filtre est concu pour l’acces facilement.
6. Les climatiseurs portatifs sont faciles a emmagasiner quand pas utilizes.
(3)

Français
Parties et Caracteristiques
1. Tableau de Commande
2. Deflecteur d’air (Gauche-Droite)
3. Panneau de devant
4. Trou de Traitement
5. Roulette
6. Filtre d’ecran
7. Entrée d’air ( Evaporateur )
8. Sortie d’air( Echange thermique )
9. Entrée d’air – (Condensation )
10. Corde d’alimentation
11. Egout pour la sortie d’eau
Avant
Arrière
(4)

Montage et Installation
UTILISANT LA TROUSSE DES
PANNEAUX POUR LA
FENETRE
1. Panneau en matiere plastique
-- 2 pieces
2. L’adapteur du panneau de la
fenetre – 1 piece
3. Vis – 4 pieces
1
2
Français
3
1. Pousser l’adapteur du panneau de la fenetre circualaire a travers le
panneau en plastique . Alignez les trous et resserrez l’adapteur avec les
4 vis qui sont inclus dans la trousse. ( Resserrez les vis du devant )
2. Ajustez le panneau en plastique a la largeur et hauteur de votre fenetre et
resserrez les 2 vis qui sont attaches au panneau.
3. Installez le panneau en plastique sur la fenetre . Si necessaire, utilisez la
bande adhesive pour assurer le panneau en place.
4. Connectez le tuyau d’echappement a l’unite en inserrant le cote plus etroit
de l’adapteur de l’unite qui est attaché au tuyau dans l’echappement. .
Tournez l’adapteur dans le sens des aiguilles d’une montre jusqu’a ce que
ce dernier se verouille. ( Voir l’illustration A )
5. Transferez l’unite a la fenetre, etendez le tuyau et attachez l’autre fin du
tuyau a la fenetre . Alignez les etiquettes du tuyau et de l’adapteur du
panneau de la fenetre et attachez les ensemble.
6. Branchez à la prise murale pour être prêt pour l'opération.
NOTE : Utilisation sur le circuit simple de sortie seulement.
Adapteur de la fenetre
Tuyau d’echappement
Adapteur de l’unite
A
B
(5)

Français
Operation Panneau de Commande
ndicateurs de Mode d'Affichage
I
Voyant d'Alarme
Commande de
Puissance
Commande de Mode
Éventez La Commande
de Vitesse
Commande de Puissance
La commande de puissance allume et eteind l’unite.
Lumiere d’alarme
L’eau condensee peut s’accumuler dans l’unite. Si le
reservoir interne est rempli d’eau, la lumiere
d’alarme s’allumera et l’unite cessera de fonctionner
jusqu’a ce qu’elle soit vidangee.
Commande de Mode
La commande de mode a 3 arrangements.
Refroidissant Deshumidificateur Ventilateur
Ils sont regles a l’aide du bouton de la commande de
mode.Une lumiere indiquera quel arrangement est
utilise.
Mode de Refroidissement
Quand la mode de refroidissement est choisie, une
lumiere verte s’allumera. P
endant la mode de
refroidissement , l’air est refroidi, l’air chaud est
epuise au dehors a travers un tuyeau d’echappement
. Ajustez la vitesse d’air du ventilateur a travers la
temperature jusqu’a ce qu’au niveau de votre confort
desire.
Note: Les tuyaux d’echange d’air doivent exhaler en
dehors de la salle quand vous utilisez la mode
de refroidissement..
Mode du Deshumidificateur
Quand la mode du deshumidificateur est choisie, une
lumiere orange s’allumera. L’air est dehumidifie en
passant a travers l’unite , sans etre en plein mode de
refroidissement. Le ventilateur fonctionnera sur une
vitesse moyenne. La temperature du ventilateur n’est
pas ajustable durant la mode du deshumidificateur.
Indicateurs
Temporisateur / Temporisateur
Placez Les Commandes
Mode Ventilateur
Quand la mode du ventilateur est choisie, une
lumiere jaune s’allumenra. L’air circule a travers la
chambre sans etre refroidi.
Note: l’unite n
’a pas besoin d’etre exhalee durant la
mode de ventilateur.
Commande de Vitesse du Ventilateur
Haute Moyenne Basse
Commande du Temporisateur
Eteinte automatiquement:
Avec la machine en
mode de ventilateur, appuyez sur le bouton du temporisateur pour choisir le nombre d’heures que vous
voudriez que votre unite fonctionne en mode de climatisation jusqu’a ce qu’elle s’eteigne automatiquement.
Allumee automatiquement: Avec la machine
eteinte appuyez sur le bouton du temporisateur pour
choisir le nombre d’heures que vous voudriez jusqu’a
ce que votre unite s’allume automatiquement dans la
mode du climatisseur.
emporisateur/ Commandes reglees du T
T
emporisateur
Ceux ci sont utilises pour ajuster le temporisateur et le
thermostat. L
’affichage de defaut est la temperature
ambiante. Durant la mode de refroidissement, quand
le bouton “ ” et “ ” sont appuyes, la temperature
choisie est affichee est peut etre ajustee. Apres 15
secondes l’afficage retournera de nouveau a la tem
perature ambiante.La temperature est ajustable seulement durant la mode de chauffage et de refroidissement. L
e temps est ajustable entre 1 et 12 heures.
Note: En appuyant sur les boutons Temp/Climatisseur
en meme temps, l’affichage basculera entre le
Celsius et le Fahrenheit.
(6)

Operation
NOTE: Attendez 24 heures pour tourner le climatiseur si le produit a ete penche pour
n’importe quelle raison. Ceci est pour regler et niveler les petrols
1. Attendez 3 minutes avant de remettre en marche le produit après une panne normale pour
completer le cycle de compresseur.
2. Utilisez un 115v 15sortie de amp pour le climatiseur. Ne pas utiliser autre appareils electriques
sur cette ligne ou vous pouverz trebucher le fusible. Utilisez une ligne dediee pour ce climatiseur.
3. Ne pas placer le climatiseur dand la lumiere du soleil directe ou pres des chauffages.
Exemples.. les appareils de chauffage, de plinth, des fours etc…
4. Operez sur une surface plate seulement
5. Gardez le produit libre d’obstructures tels que les rideaux,tentures , persiennes etc.
6. Gardez le produit au moins 1 foot eloigne du mur
7. Verifiez et nettoyez le filtre une fois chaque semaine pour recevoir la plus haute efficacite.
NOTE: Ne pas utiliser le prodruit sans le filtre.
8. Si le prodruit n’est pas utilise pur une longue periode de temps, enlevez le bouchon du tyau
d’egout d’eau et drainez l’eau condensee
.
Français
Quand vous mettez en marche le climatiseur pour la premiere fois, après l’avoir branche, le ventilateur commencera a froid bas. La temperature lue sur le LED sera la temperature de la salle. En
tournant le produit regulierement , il se souviendra du reglace du dernier eteint. Si vous voulez
operer le climatiseur comme un dehumidifier, ajustez alors pour la mode seche.
Montage de la Temperature
Pour regler la temperature appuyez sur le + ou – bouton pour elever ou abaisser la temperature.
La temperature peut etre eleverr ou abaissee dans le frais ou sec mode. La temperature ne peut
pas etre ajustee dans le mode de ventilateur.
Vitesse du Ventilateur
Il ya 3 vitesses ajustables pour le ventilateur . Bas, Moyen ou haut.. Dans la mode seche ou
dehumidificateur, le ventilateur fonctionne a une vitesse basse.
Declenchement de la minuterie
Le climatiseur a 1-12 heures ON/OFF minuteur incorpere. P
produit de 1-12 heures a un intervalle d’une heure, simplement appuyez sur le declenchement
puis pressez sur la clef + ou – pour ajuster le temps du commencement. Notez que le produit doit
etre branche dans une sortie electrique pour que le minuteur fonctionne.
our retarder le commencement du
Pour fermer le produit automatiquement simplement appuyez sur le declenchement puis presses
sur la clef + ou – pour ajuster le temps d’eteint. L’auto eteint commutateur opera dans tous les 3
modes. Refroidit, sec et ventilateur.
NOTE: La temperature peut etre reglee entre 60˚F a 89˚F.
(7)

Français
Specifications du produit
Voltage et frequence 115V / 60Hz
Les données Propulsent 850 W
Refroidir la capacite 7000 BTU
Enlever l’humidite (pints/jour) 60
Agent de refroidissement R22
Minuteur 12 Hours
Portee de temperature d’operation 16˚C - 38˚C
Dimensions (WxDxH)(mm) 435 mm x 400 mm x 770 mm
Poids net en lbs approximativement 29 kg
Tuyau d’echappement 1.5 meter
(8)

Guide de Nettoyage et de Soins
• Debranchez toujours votre climatiseur avant de le nettoyer.
• Les filtres doivent etre nettoyes au moins une fois par semaine pour que votre produit opera a l’efficacite optimum. Le filtre peut etre lave ou aspire.Enlevez l’exces
d’eau du filtre , secouez doucement. Ceci enlevera la poussiere et les particules pris
au piege dans le filtre. Apres avoir nettoye, reinstallez le filtre.
climatiseur sans lefiltre a sa place
• Pour nettoyer le placard, n’utilisez jamais les produits chimiques rauques, abrasives,
l’ammoniaque, le chlore.Une partie de ces produits chimiques peuvent dissoudre,
endommager et /ou
• Utilisez toujours un tissue doux avec de l’eau au savon et nettoyez le devant du placard. Sechez avec un tissu doux.
NE PAS decolorer votre climatiseur.
NE PAS utililiser votre
Emmagasinage
Français
• Pour emmagasiner votre climatiseur quand vous ne l’utilisez pas pour une longue
periode de temps,drainez l’eau condensee en utilisant le tuyau d’egout. Enlevez le
tuyau d’echappement , nettoyez les filtres puis couvrez le avec des sacs en plastique
et emmagasinez.
Detection de panage
Si le climatiseur ne fonctionne pas:
• Assurez que le produit est branche,la prise peut etre decrochee.
• Assurez que la prise murale est au voltage approprie
• Assurez si le disjoncteur a besoin d’etre remis a l’etat initial ou si le fusible doit etre rem
place.
• Assurez si le produit est sur le mode OFF
• La lumiere du reservoir indiquant qu’il est plein, appelez le service.
Le climatiseur en marche, mais la salle ne se refroidie pas:
• La salle peut avoir des appareils qui produisent de la chaleur. Utilisez un ventilateur
d’echappement pour enlever l’exces de la chaleur.
• Assurez la propre installation du tuyau d’echappement.
• Deviez le courant d’air. Enlevez tous les obstacles.
• Toutes les portes et fenetres doivent etre fermees pour que l’air n’echappe pas de la salle.
• Les filtres peuvet etre bloques ou doivent etre netoyes
• Le BTU de produit peut etre tres bas pour la chambre a refroidir.
• Quand la chaleur et l’humidite sont extremes , le climatiseur prendra long pour refroidir la
salle.
• Egoutez l’eau du tuyau d’egout par le debrancher.
• Le produit peut etre dans le sec ou ventilateur mode. Mettez le climatiseur sur le mode fraix.
(9)

Français
R
OOM AIR CONDITIONING AND DEHUMIDIFIER PRODUCTS
Garantie Limitee
Cette garantie couvre tous les defauts de
fabrication ou de materiaux pour :
1. Les parties electriques et mecaniques
(inclus les mains-d’oeuvre) contenues dans ce produit Amana pour une periode de 12 mois de la
date d’achat. ( La garantie est pour 90 jours pour
une application louee ou commerciale)
2. Le systeme scelle et le compresseur contenus dans
ce produit Amana est pour une periode de 5 ans de
la date d’achat ( exclus les mains d’oeuvre après
l’initiale periode de 12 mois) . Dans le cas d’usage
commercial la garantie supplementaire du compresseur est pour un an et 9 mois ( exclus les
mains-d’oeuvre après l’initiale periode de 12 mois)
. Vous devez garder et pouvoir fournir le recu
d’achat original comme preuve de la date d’achat.
Qui est couvert?
L’acheteur en detail original de ce produit Amana.
Quelles mesures seront prises?
Amana reparera et remplacera dans votre domaine
n’importe quelle partie mecanique ou electrique du
compresseur defectueuses lors d’utilisation normale
pendant la periode de 12 mois. Amana reparera et
remplacera (exclus les mains-d’oeuvre) le systeme
scelle et compresseur (parties seulement) pour une
additionale periode de 4 ans.
Dommages dus a une mauvaise utilisation, a une utilisation accessive, a un accident, a une alteration , au
manque d’entretien et propre soin.
Dommages d’un service de reparation autre qu’un
service autorise .
Les couts de main-d’oeuvre,du service,de transportation et d’expedition pour l’enlevement des parties
defectueuses et l’installation du remplacements des
parties au dela de la periode initiale de 12mois.
CETTE GARANTIE EST DONNEE AU LIEU DE TOUTE
AUTRE GARANTIE EXPRIMEE OU SUGGEREE, Y COMPRIS LA GARANTIE DE MERCHANTABILITE ET
QUALITE POUR UN BUT PARTICULIER.
Le remede fourni dans cette garantie est exclusif et est
place au lieu de toute autre remede. Cette garantie ne
couvre pas les dommages incidentals ou consequents.
Certains Etats n’autorisent pas l’exclusion d’accessoires
ou dommages consequents. Dans ce cas les limitations
ci-dessus peuvent ne pas etre applicables. Certains
Etats ne permettent pas les limitations de la duree
d’une garantie implicite , dans ce cas les applicables.
Cette garantie vous reconnait certains droits juridiques
et il se peut que vous disposez d’autres droits , qui
varient d’un etat a l’autre. to state.
Comment recevoir le service?
1. Contactez le plus proche Service Autorise Amana.
our le nom de service le plus proche de vous, con
P
tactez Amana au (877) 337-3639
2. Tous les services doivent etre effectues par un service
autorise de Amana
CETTE GARANTIE COUVRE LES APPAREILS SUR LE
CONTINENT DES ET
.
RICO
CETTE GARANTIE NE COUVRE PAS:
Dommages dus a une mauvaise installation
Dommages survenus pendant l’expedition
A
, CANAD
-UNIS
TS
A ET PUERT
(10)
-
O-
For more information on this and other
Amana products, call Customer Affairs
Department at: 1-888-842-2440

Palabras de Amana
Gracias por comprar nuestro Acondicionador de Aire AMANA, de bajo consumo de energía y
práctico de utilizar. Este manual contiene información útil para la instalación, operación, mantenimiento y uso seguro de este producto. Su Acondicionador de aire limpia, enfría y deshumidifica el aire de la habitación de manera de obtener el mayor nivel de comfort.
Por favor, lea las instrucciones cuidadosamente antes de utilizar este producto. No olvide de
completar y enviar la tarjeta de
registración del producto.
Registración del Producto
Guarde el número de modelo y de serie.
Para todos los llamados que usted realice al Centro de servicios dentro del período de garantía
será necesaria la siguiente información. Adjunte la factura de compra a esta guía y guarde
para futura referencia. Esta información se encuentra en la placa de su Acondicionador.
Español
Número de modelo: ............................................................................................................
Número de serie: ................................................................................................................
Fecha de compra: ................................................................................................................
Nombre del distribuidor: ......................................................................................................
Dirección del distribuidor: ....................................................................................................
Teléfono del distribuidor: ......................................................................................................
TABLA
125/60 250/60
ENCHUFE
ENCHUFE
30
30
VOLTIOS
AMPS
TOMA DE PARED
TAMAÑO FUSIBLE
DEMORA DEL FUSIBLE
(Corta-circuitos)
TIPOS DE RECEPTACULOS
15 20 15 20
15 20* 15 20*
Plug
(1)

Español
PRECAUCIONES PARA SU
SEGURIDAD
SEA CUIDADOSO: Siga todas las instrucciones antes de utilizar el Acondicionador de
aire para reducir el riesgo de un shock eléctrico, daños o lesiones.
1) Este acondicionador debe conectarse a la toma de corriente adecuada de acuerdo a las
instrucciones de este manual. (Ver tabla)
2) Debe asegurarse una adecuada conexión a tierra para reducir el riesgo de shock. NO CORTE
O RETIRE EL CABLE DE CONEXIÓN A TIERRA. Si usted no posee una toma de corriente con
conexión a tierra llame a un técnico calificado para que realice la instalación necesaria y correcta.
3) No utilice este Acondicionador si el cable de corriente estuviera rasgado o dañado. Evite también el uso de la unidad si existen daños de abrasión en el enchufe, el conector, o si el
Acondicionador no funcionara correctamente o estuviese dañado de cualquier manera.
Contacte a un service autorizado para la reparación o ajustes.
4) NO UTILICE UN ADAPTADOR O ALARGUE.
5) No bloquee o obstruya la corriente de aire alrededor de la unidad. Incluso la manguera de
salida debe estar libre de cualquier obstrucción.
6) Siempre desenchufe el acondicionador antes de realizar reparaciones o translados del mismo.
7) No instale u opere el Acondicionador en áreas donde la atmósfera posee gases combustibles.
Evite que cualquier químico haga contacto con la unidad.
8) No coloque ningún objeto arriba de la unidad.
9) Nunca opere el Acondicionador sin los filtros en su lugar.
10) Nunca utilice el Acondicionador cerca de una bañera, pileta de cocina o una ducha.
(2)

Indice
Pagina
Palabra de AMANA ................................................................................................................1
Registración del producto ......................................................................................................1
Precauciones de seguridad....................................................................................................2
Español
Ventajas
Partes y características ..........................................................................................................4
Ensamble e instalación
Operación ............................................................................................................................6-7
Especificaciones del producto
Cuidados y mantenimiento ....................................................................................................9
Almacenaje..............................................................................................................................9
Problemas en la operación
Información de garantía......................................................................................................10
..................................................................................................................................3
..........................................................................................................5
................................................................................................8
....................................................................................................9
Ventajas de este Modelo
1. Este modelo es fácil de operar. El panel electrónico de control manual posee termostato,
timer, tres velocidades de enfriamiento, tres velocidades de ventilación y una velocidad de
deshumidificación (Seco).
2. La unidad es de un diseño único que evapora el agua. De esta manera no necesita de un
tanque de condensación, evitando a usted el trabajo necesario de primero vaciar el recipiente de agua y luego encender la unidad.
3. Incluye un kit de fácil instalación en ventana que consta de una manguera de salida, 2
bocas de manguera, el panel para la ventana, Sistema de conexión de la manguera de
salida y cobertor del mismo.
4. Cuenta con rueditas direccionales ajustables que ayudan a mover la unidad para utilizarse
convenientemente en cualquier área.
5. El filtro es de fácil acceso y está diseñado para una limpieza fácil y rápida.
6. El Acondicionador de aire portátil es fácil de almacenar cuando no está en uso.
(3)

Español
Partes y Caracteristicas
1. Panel de control
2. Deflector de ventilación (Left-Right)
3. Panel frontal
4. Agujero De la Manija
5. Rueda
6. Filtro
7. Entrada de aire (Evaporador)
8. Salida de aire (Intercambiador de calor)
9. Entrada de aire (Condensador)
10. Cable de energía
11. Drenaje de salida de agua
(4)

Ensamble e Instalacion
spañol
E
UTILIZANDO EL KIT
PANEL DE VENTANA
1
2
3
1. Panel Plástico - 2 piezas
2. Adaptador de Panel de
Ventana - 1 pieza
3. Tornillos - 4 piezas
1. Empuje el adaptador redondeado del panel a través de la parte trasera del
mismo. Alinee los orificios y ajuste el adaptador con 4 tornillos los cuales
se incluyen en el kit (ajuste los tornillos por el frente).
2. Ajuste el panel plástico al ancho o altura de la ventana y ajuste con 2
tornillos que sujetan el panel.
3. Instale el panel plástico en la ventana. Si es necesario utilice cinta
adhesiva para asegurar el panel.
4. Conecte la manguera de salida a la unidad insertando el extremo más
angosto del adaptador de la unidad, que se encuentra atado a la
manguera, a la salida. Gire el adaptador hacia la derecha hasta que
trabe. (ver dibujo A).
A
B
5. Mueva la unidad hacia la ventana, extienda la manguera y ate el otro
extremo de la misma a la ventana. Alinee la manguera con el adaptador
del panel y ajuste ambos.
6. Tape en el enchufe de pared para conseguir listo para la operación.
NOTA: Uso en el solo circuito del enchufe solamente.
Adaptador de ventana
Manguera de salida
Adaptador de la unidad
(5)

Español
Operación Panel De Control
Indicador Del Modo De Visualización
Luz de Alerta
Control De Potencia
Control Del Modo
Control De la
Velocidad
Control de alimentación
El control de alimentación prende o apaga la unidad.
Luz de Advertencia
Se puede acumular agua condensada en la unidad.
Si el tanque interno se llena, la L
prenderá y la unidad no operará hasta que la unidad
se haya vaciado.
Control de Modo
El Control de Modo tiene tres ajustes:
Enfriar Deshumidificar Ventilador
Los ajustes se seleccionan con el botón de Control de
Modo. Una luz le indicará el ajuste que se esté utilizando.
Modo Enfriar
Cuando se selecciona el modo Enfriar, la luz
indicadora brillará de color verde. Durante el modo
Enfriar, el aire es enfriado y el aire caliente se evacua
al exterior a través del tubo de escape. Ajuste la
velocidad del ventilador y la temperatura según el
nivel de confort deseado.
Nota: Las mangueras de renovación de aire deben
ventilar afuera de la habitación cuando se usa
el modo Enfriar.
Modo Deshumidificar
Cuando se selecciona el modo Deshumidificar, la luz
indicadora brillará de color naranja. El aire se deshu
midifica al pasar por la unidad, sin estar en el modo
de enfriamiento total. El ventilador
funcionará a velocidad media. L
lador no puede ajustarse en el modo Deshumidificar.
uz de Advertencia se
a velocidad del venti
-
-
Visualización
Temporizador / Temperatura
Controles
Modo Ventilador
Cuando se selecciona el modo Ventilador la luz indicadora brillará de color amarillo. El aire circulará sin
enfriamiento por toda la habitación.
Nota:
Control de Velocidad del Ventilador
El Control de Velocidad de Ventilador tiene 3 ajustes:
Control de Temporizador
Apagado Automático:
ventilador, oprima el botón del temporizador para
seleccionar el número de horas que desea que la
unidad permanezca en modo de aire acondicionado
hasta que se apague automáticamente.
Encendido automático: Con la unidad apagada,
oprima el botón del temporizador para seleccionar el
número de horas que desea que transcurran hasta
que la unidad comience automáticamente a funcionar
en modo de aire acondicionado.
Controles de ajuste de Temperatura/Temporizador
Se utilizan para ajustar el temporizador y termostato.
El ajuste predeterminado es temperatura ambiente.
En el modo de enfriamiento, cuando se oprime el
botón " " o " " se muestra la temperatura programada la cual puede ser ajustada. L
dos, el indicador volverá a mostrar la temperatura
ambiente. Se puede ajustar la temperatura sólo en el
modo Enfriar o Calefacción. El tiempo se puede ajus
tar entre 1 y 12 horas.
Nota:
La unidad no necesita evacuación de aire
cuando está en modo Ventilador.
Alto Medio Bajo
Con la unidad en el modo
uego de 15 segun
Al presionar los botones de ajuste de
Temperatura/Temporizador al mismo tiempo, el
indicador cambiará entre Celsius y Fahrenheit.
-
-
(6)

Operación
NOTA: Espere unas 24 horas antes de encender la unidad si la misma hubiese estado
recostada o inclinada por cualquier motivo. Esto es para que el líquido refrigerante se asiente y nivele.
1. Espere unos 3 minutos antes de encender la unidad luego de haberla apagado de manera de
permitir al compresor terminar con el ciclo.
2. Utilice una toma de115volt y 15 amp. No utilice ningún otro electrodoméstico en la misma
línea de corriente para evitar saltar los fusibles. Utilice una línea de corriente separada , exclusiva para el Acondicionador.
3. No coloque el Acondicionador en la luz directa del sol o cerca de otras fuentes de calor como
estufas, calentadores, etc.
4. Opere la unidad solamente en una superficie pareja y chata.
5. Mantenga lejos de la unidad cualquier obstrucción como cortinas, persianas, etc.
6. Mantenga la unidad por lo menos un pie lejos de la pared.
7. Controle y limpie el filtro una vez a la semana para lograr una mayor eficiencia en el funcionamiento de la unidad.
8. Si la unidad no fuese utilizada por un período largo de tiempo, por favor, retire el tubo de
drenaje para que salga el agua acumulada.
Nota: No opere el Acondicionador sin el filtro.
spañol
E
Cuando encienda el Acondicionador por primera vez el mismo comenzará a opara en un modo
lento de enfriamiento. La temperatura que se leerá en la pantalla es la temperatura ambiente.
Cuando encienda la unidad una vez en uso regular siempre comenzará a operar de acuerdo a la
selección anterior. Si quiere operar la unidad como deshumidificador de aire presione entonces la
opción “seco”.
Eligiendo la Temperatura
Para elegir la temperatura deseada utilice los botones + y – para bajar o subir la misma respectivamente. La temperatura puede ajustarse estando en el modo “Frio” o en “seco”. La temperatura no puede regularse cuando está operando en el modo de ventilación.
Velocidades de Ventilación
Hay tres velocidades ajustables del ventilador y del modo de enfriamiento: Bajo, Medio y Alto. En
la función de deshumidificación o secado solo se operará a una velocidad baja.
Selección de tiempo de apagado/ encendido
El Acondicionador de aire puede ser programado para apagarse o encenderce en un tiempo de
1 a 12 horas. Para demorar el comienzo de la operación de la unidad simplemente presione la
tecla “tiempo/selección” (time/set) y presione + o – para ajustar al tiempo que desee. Note que
el Acondicionador debe estar enchufado para poder operar los controles del mismo.
Para que la unidad se apague automáticamente presione “tiempo/selección” mientras que la
unidad está en funcionamiento. Luego con + o – elija el tiempo deseado de 1 a 12 horas. El
apagado automático funciona en los tres modos de operación: Frio, Secado y ventilación.
Nota: La temperatura puede elegirse entre los 60 F y 89F
(7)

Español
Especificaciones del Producto
Consumo de energía 115V / 60Hz
Potencia 850 W
Capacidad de enfriamiento 7000 BTU
Eliminación de la humedad (pint/hr) 60
Refrigerante R22
Timer 12 Hours
Rango de temperaturas operables 64˚F - 100˚F
Dimensiones (WxDxH) 17
Peso neto aproximado (kgs) 29 kg
Manguera de escape 5 Pies
3/32 x 15 3/4 x 30 5/16
(8)

Cuidado y Mantenimiento
• Siempre desenchufe la unidad antes de limpiar.
• El filtro de aire del Acondicionador necesita ser limpiado por lo menos una vez por
semana para que la unidad pueda funcionar al máximo de eficiencia. El filtro
puede retirarse de la parte trasera deslizando hacia adelante. El filtro puede ser
lavado o aspirado. Retire el exceso de agua del filtro sacudiendolo. De esta manera
desaparecerán las partículas de tierra y polvillo atrapados. Coloque nuevamente el
filtro luego de la limpieza.
lugar.
• Para limpiar el gabinete
quedor, detergentes concentrados, solventes o esponjitas de metal. Algunos de estos
productos puede dañar el acabado o decolorar las superficies.
• Utilice un paño seco y suave o apenas humedecido con una solución de agua y
detergente. Lave y seque con un repasador o paño.
NO UTILICE el acondicionador si el filtro no está en su
NO UTILICE químicos, abrasivos, amoníaco, cloro, blan-
Almacenaje
• Para guardar el Acondicionador mientras no esté en uso por un largo período de
tiempo retire restos de agua que hayan quedado en el tubo de drenaje. Retire también la manguera de salida, limpie los filtros, cubra con una bolsa de plástico y
guarde.
spañol
E
Problemas Frecuentes
Si el acondicionador de aire no funciona:
• Controle que la unidad esté enchufada. El enchufe puede haberse aflojado.
• Controle que la toma de corriente sea del voltaje adecuado.
• Controle si se quemó algún fusible. Reemplaze el mismo.
• Verifique que la unidad esté en modo ON
• La luz indicadora de tanque lleno está encendida. Llame a un técnico.
El Acondicionador no enfría lo suficiente:
• Puede haber otros aparatos en el área que irradien calor. Utilice la opción de ventilación
para remover el aire caliente.
• Controle que la manguera de salida de calor este instalada correctamente.
• Redireccione la coriente de aire. Retire los obstáculos.
• Todas las puertas y ventanas deben estar cerradas de manera que el aire frío no escape.
• El filtro de aire puede estar bloqueado o necesita limpieza.
• La unidad BTU puede ser chica para la habitación.
• En días de calor y humedad extrema los Acondicionadores pueden demorar más tiempo
que el normal en enfriar.
• Drene el agua del tubo de drenaje desenchufando el mismo.
• La unidad puede estar en el modo de ventilación o secada. Seleccione la opción “frío”.
(9)

Español
R
OOM AIR CONDITIONING AND DEHUMIDIFIER PRODUCTS
Garantia Limitada
Esta garantía cubre todos los defectos en el funcionamiento o materiales para:
1. Las partes mecánicas y eléctricas que hacen al funcionamiento de la unidad por un período de 12
meses desde la fecha de compra (para uso comercial o renta la garantía es de 90 días)
2. El sistema sellado o compresor que se encuentra en
este producto AMANA por un período de 5 años,
desde la fecha de compra (excluyendo los gastos de
labor luego de los primeros 12 meses de la garantía) Para uso comercial o renta la garantía adicional
limitada del compresor es por 1 año y 9 meses
(excluyendo los gastos de labor luego de transcurrido el periodo inicial de 90 días)
Usted debe poseer la factura para poder demostrar la
fecha de compra de la unidad.
Quién está cubierto?
El comprador minorista original de este producto
¿Que se hará y como se obtiene el servicio?
AMANA reparará o reemplazará en su domicilio
cualquier parte mecánica, eléctrica o el compresor que
se muestre defectuosa en la operatoria normal y dentro del período de 12 meses especificado.
Daños por desuso, abuso, accidente, alteración o falta
de cuidado y mantenimiento adecuado.
Daños ocasionados por reparaciones de personal no
perteneciente a algún service autorizado.
Labor, cargos de translado, envio de partes luego de
los 12 meses iniciales
ESTA GARANTIA LIMITADA ESTA DADA EN LUGAR DE
CUALQUIER OTRA GARANTIA.
Las soluciones dadas por esta garantía son exclusivas
y otorgadas en lugar de cualquier otra solución. Esta
garantía no cubre daños incidentales o secundarios,
de modo que las limitaciones precendentes no lo
alcanzan a usted. Algunos Estados no permiten las
limitaciones de tiempo de una garantía implícita, de
modo que las limitaciones anteriores pueden no aplicarse en su caso.
Esta garantía le da derechos legales específicos, y
usted puede contar con otros derechos de acuerdo al
Estado donde se encuentre.
AMANA reemplazará o reparará el compresor y el sistema sellado (excluyendo los gastos de labor) por un
período adicional de 4 años.
Como obtener el servicio?
ara obtener el servicio lleve la unidad a su centro
P
1.
de servicios autorizado por AMANA más cercano.
Contacte al Centro de Servicios mas cercano al:
1-877-337-3639.
2. Todas las reparaciones deberán ser realizadas por
profesionales de centros autorizados por AMANA
A GARANTI A CUBRE EN LOS EEUU, PUERTO
EST
RICO Y CANADA. NO CUBRE LO SIGUIENTE
Daños por instalación impropia
Daños en translados
(10)
For more information on this and other
Amana products, call Customer Affairs
Department at: 1-888-842-2440

ROOM AIR CONDITIONING AND DEHUMIDIFIER PRODUCTS
IMPORTANT
D
o Not Return This Product To The Store
f you have a problem with this product, please contact the
I
ATED PROOF OF PURCHASE, MODEL # AND SERIAL # REQUIRED FOR WARRANTY SERVICE
D
"Customer Information Line" at 1-888-842-2440.
IMPORTANT
Ne pas retourner cet article au magasin
n cas de problème avec cet article, veuillez contacter le
E
NE PREUVE D’ACHAT DATÉE, LE NUMÉRO DU MODÈLE ET LE NUMÉRO DE SÉRIE SONT OBLIGATOIRES POUR BÉNÉFICIER DE LA COUVERTURE OFFERTE PAR LA
U
“Centre satisfaction client” au 1-888-842-2440.
ARANTIE.
G
IMPORTANTE
No Devuelva Este Producto al Establecimiento Compra.
Si tiene problemas con este producto, por favor póngase en contacto con el
PARA EL SERVICIO DE GARANTÍA SE REQUIERE PRUEBA DE COMPRA, FECHADA, No. DE MODELO Y No. DE SERIE
Centro de Atención al Cliente" en el 1-888-842-2440.
"
Amana is a registered trademark
of the Maytag Corporation
and is used under license to Haier America.
Made in China
Fabrique en Chine
Hecho en China
Issue: December 2005
Amana
New York, NY 10018
Printed in China
 Loading...