

Page 1
SERVICE MANUAL
Model No. ACD12KE
ON/OFF
MODE
SPEED
TIMER
TEMP/TIME
TEMP/TIME
UV LIGHT
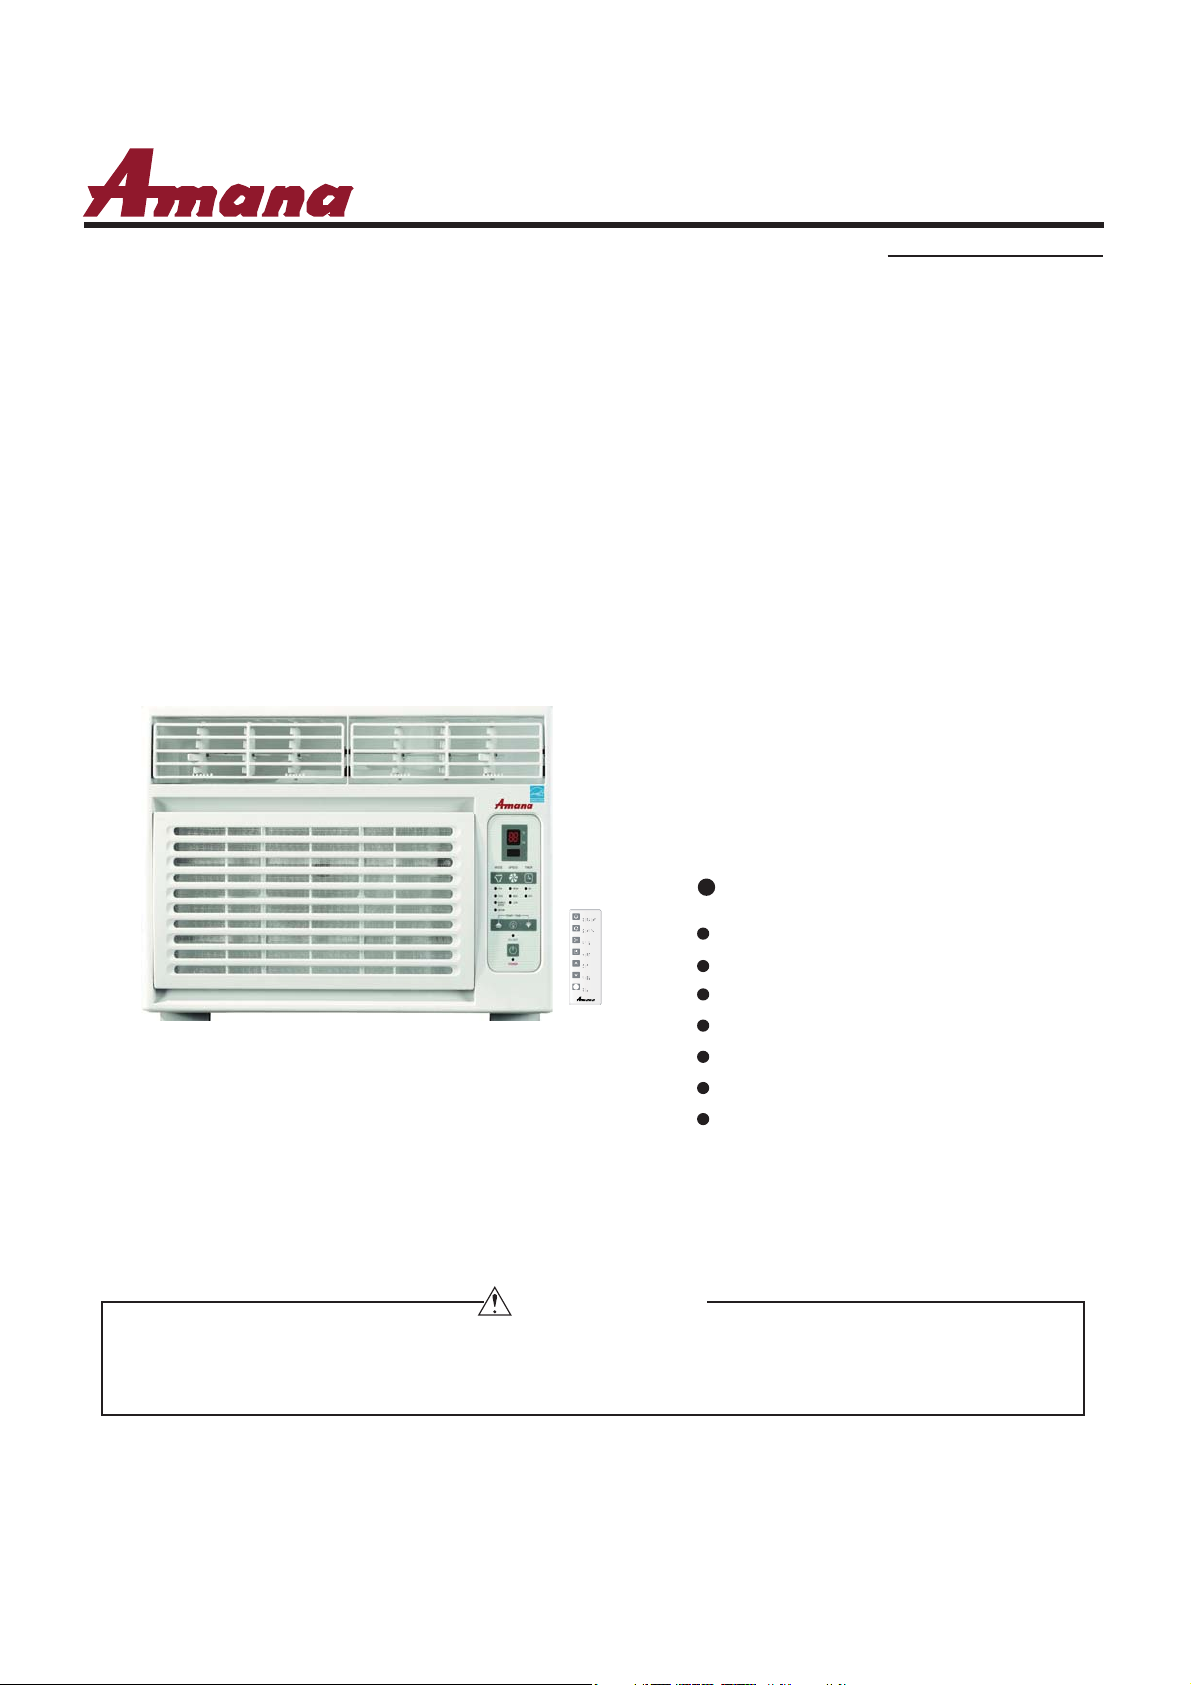
Top Discharge Airflow Pattern
Modern Family-look Design
3 Coo l Settings, 3 Fan Settings
Easy-to-ins tall Mounting Kit
Easy-Access Washable Filter
Digital Time & Temperature Display
24 Ho ur on/off Timer
WARNING
This service information is designed for experienced repair technicians only and is not designed for use by the general public.
Feature
It does not contain warnings or c
Products powered by electricity should be serviced or repaired only by experienced professional technicians. Any attempt to service or
repair the product or products dealt with in this service information by anyone else could result in serious injury or death
autions to advise non-technical individuals of potential dangers in attempting to service a product.
Page 2
Table of Contents
ACD12KE
Table of Contents
1. Product Code Illumination and Series introduction.......................................
2. Specifications....................................................................................................
3. Safety and Precaution.......................................................................................
4. Warning and Cautions.......................................................................................
5. Installation and Accessory Parts......................................................................
6. Parts and Functions.........................................................................................
7. Abnormity Diagnose.........................................................................................
14
18
8. System Flow Chart...........................................................................................
9. Circuit Diagram................................................................................................
10. Wiring Diagram..............................................................................................
21
23
2
3
4
5
6
20
1
Domestic Air Conditioner
Page 3
1. Product Code Illumination and Series Introduction
ķ˖
Ĺ
ĺ˖
Ļ˖
ĸ˖
ĸ
Ĺ
ĺ
Ļ
ļ
ķ
ļ˖
1). Model identification:
ACD12KE
Table of Contents
A C D ƶƶ
ķ˖
Air condition
ĸ˖
Cooling only
˖ Chassis
Cooling capacity (BTU/h) with the first two numbers based on one thousand unit
ĺ˖
Ļ˖
Design code
Abbreviation of Energy Star
ļ˖
Examples:
ACD12KE
It represents energy star window air conditioner. Cooling capacity is 12000 BTU/h
K E
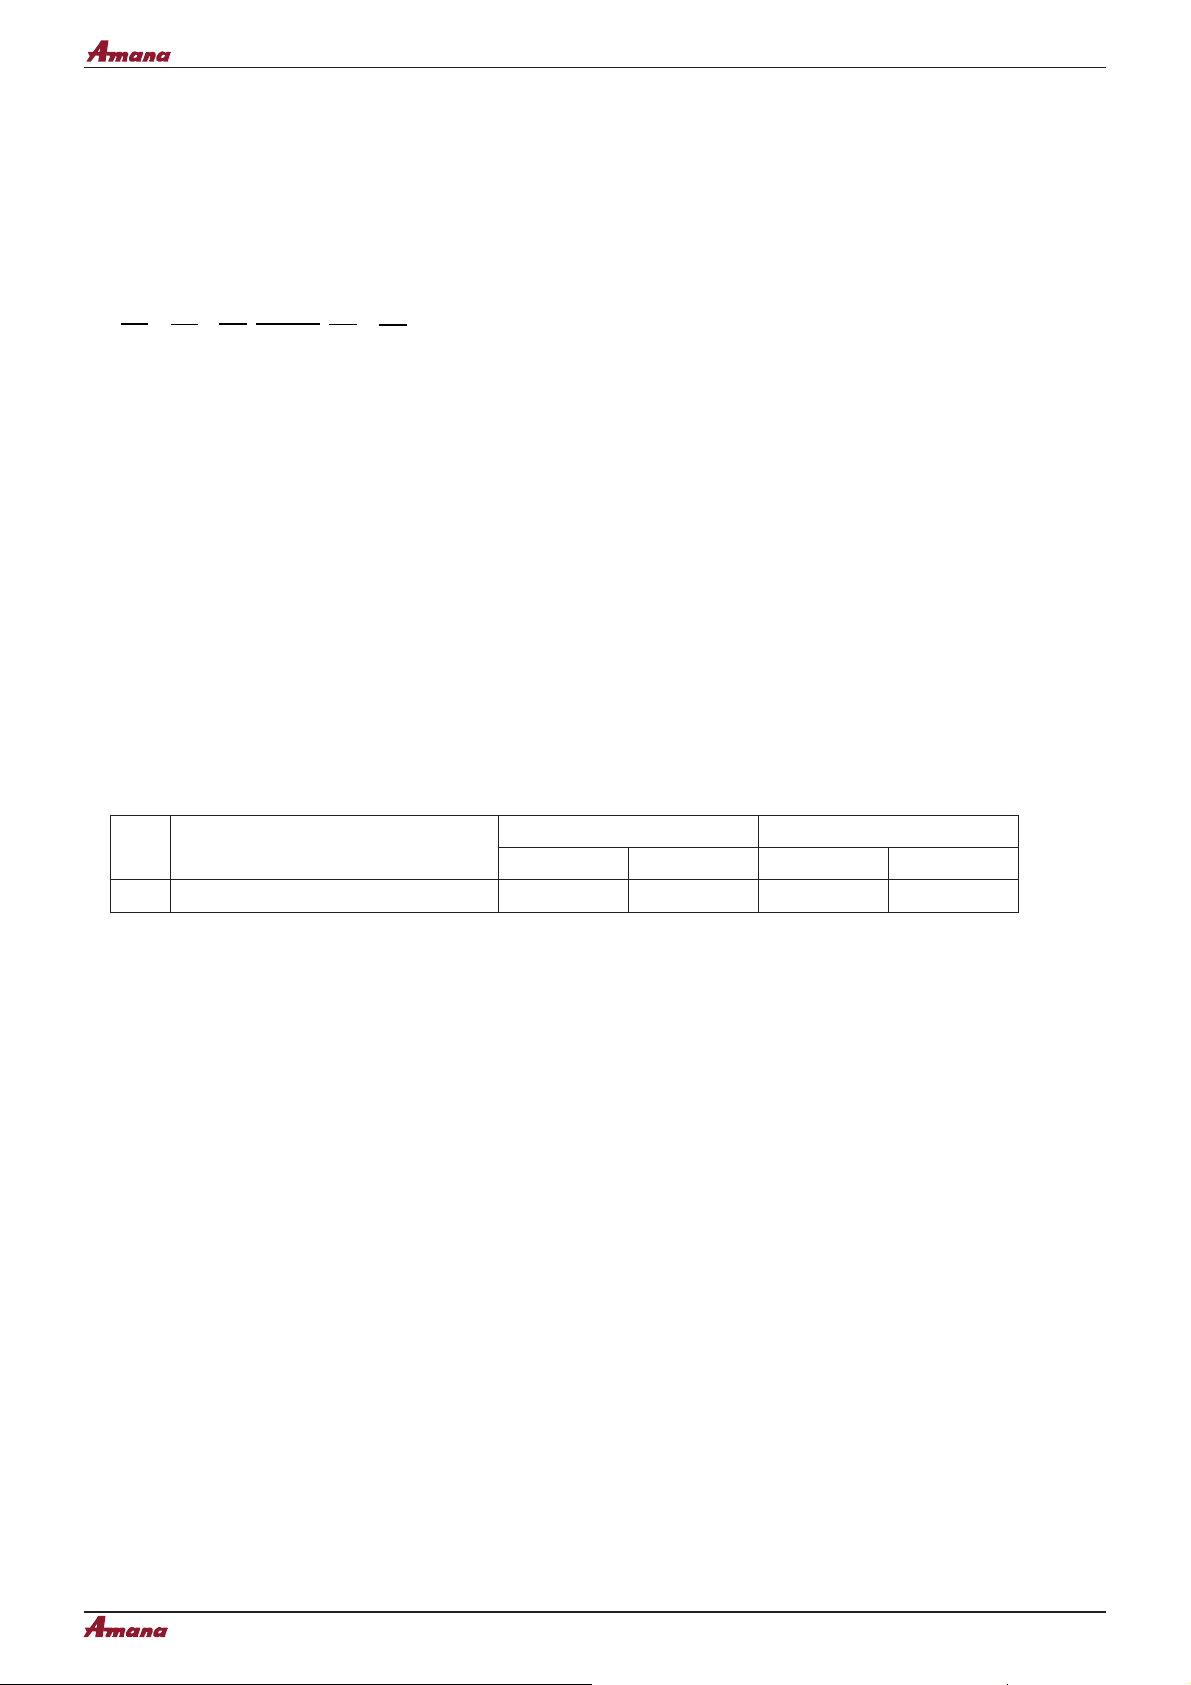
2). Standard situation/conditions
No. Operating condition
1 Nominal cooling 26.7 19.4 35 23.9
Indoor air state outdoor air state
D.B. ć W.B. ć D.B. ć W.B. ć
2
Domestic Air Conditioner
Page 4
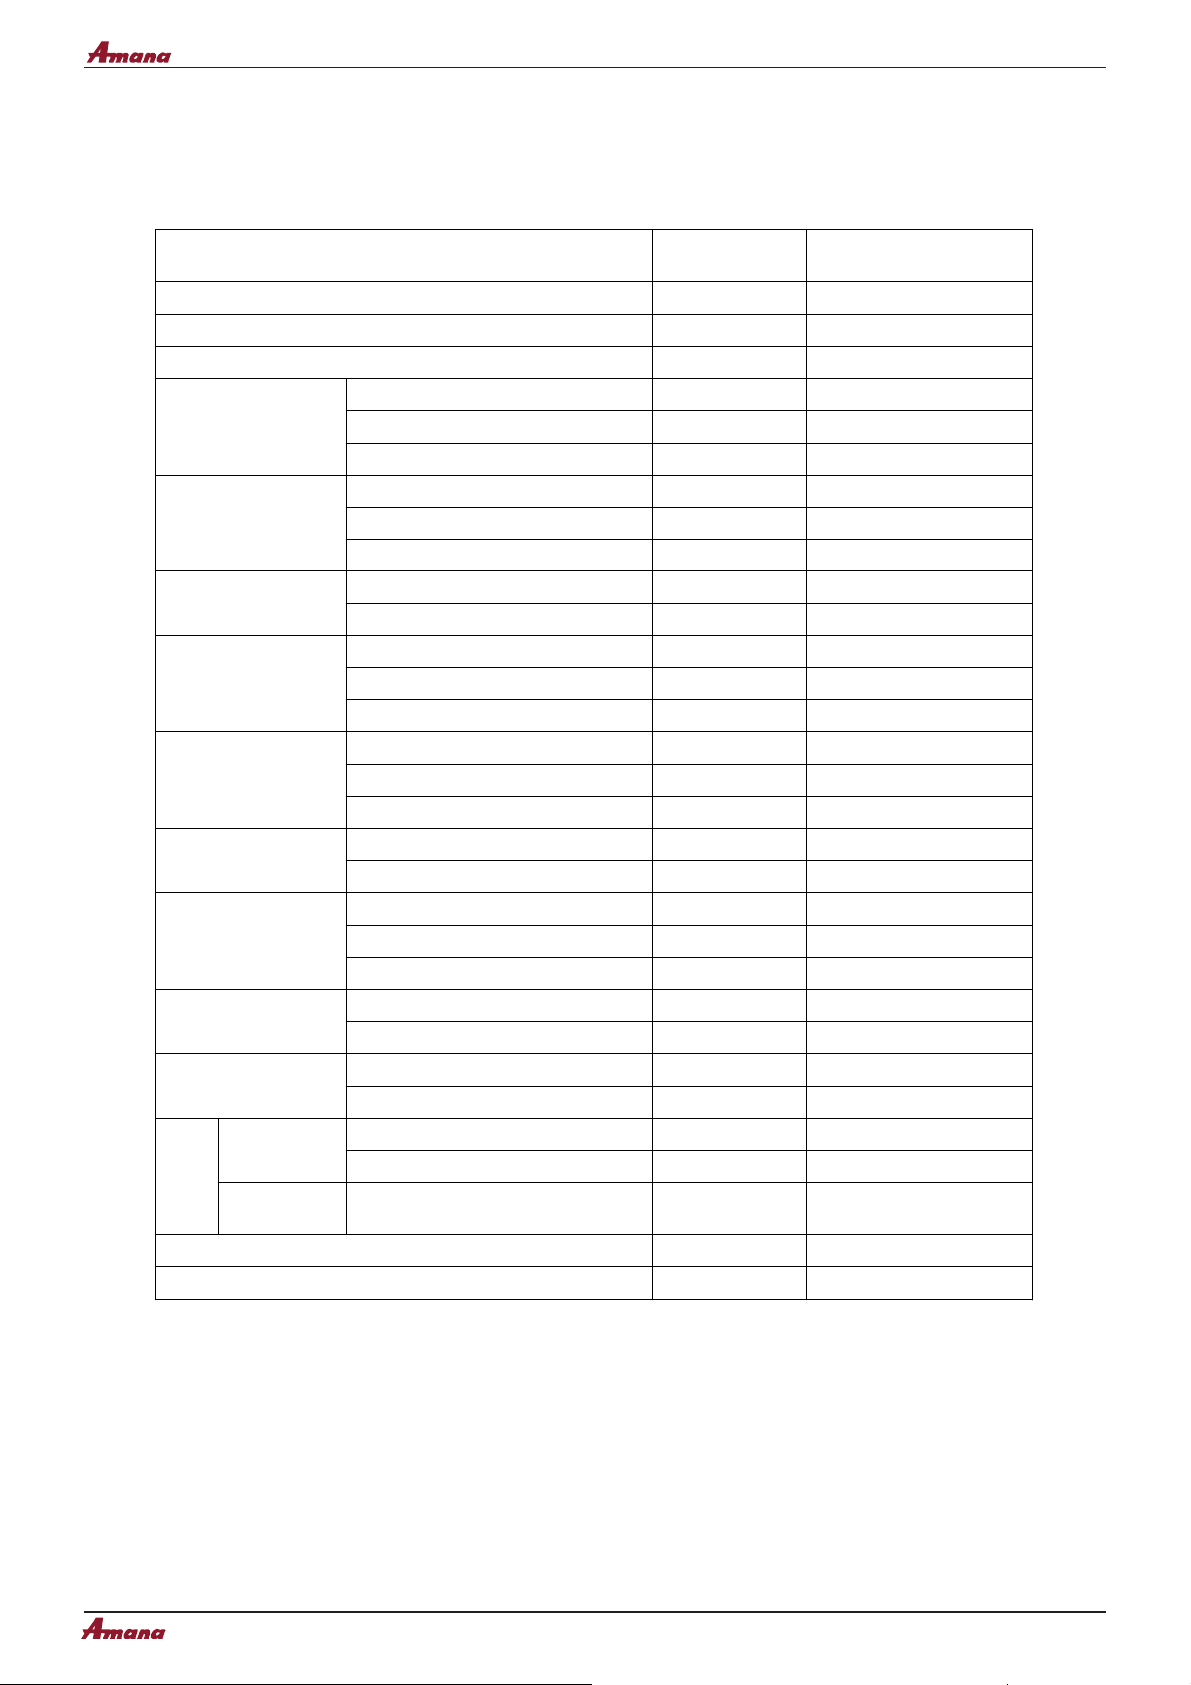
2. Specification
ACD12KE
Specification
Item Unit ACD12KE
Cooling capacity
Heating capacity /
Power supply Ph,V, Hz 1, 115, 60
Power input W 1110
Running current A 10Cooling
BTU/(h.w) 10.8
EER
Power input W /
Running current A / Heating
COP
/
Sound Level
Case
Packaging
dimensions
Weight
Compressor
Pressure
Refrigerant
Type
Fan
Fan Speed
Indoor side dB(A) 62
Outdoor side
Height inches
Width inches
Depth
Height inches
Width inches
Depth
Net lbs
Gross
Type Rotary
Model /
Running cap. For comp μF
Hi-Pressure Psig 560
Low-Pressure
Model R22 or R410A R410A
Charge
Indoor unit / centrifugal
Outdoor unit
Indoor unit r/min
67
inches
inches
lbs
Psig 240
OZ 18
/ axial
BTU/h 12000
BTU/h
BTU/(h.w)
dB(A)
14 3/8
19
18 1/8
17
21 1/4
22
65
73
44A271AG&09KC
60μF/250
1600/1500/1380
V
Air volume CFM 270/250/220
Moisture removal Pints/hr 3.5
3
Domestic Air Conditioner
Page 5
ACD12KE
3. Safety and Precaution
Safety and Precaution
WARNING:
1) Air conditioner must be connected to proper electrical outlet with the correct electrical supply .
2) Proper grounding must be ensured to reduce the risk of shock and fire .
DO NOT CUT OR REMOVE THE GROUNDING PRONG.
If you do not have a three-prong electric receptacle outlet in the wall, have a certified electrician install the
proper receptacle . The wall receptacle MUST be properly grounded .
3) DO not use if power cord is frayed or damage . Also avoid using if there are cracks or abrasion damage
along the length ,plug or connector .
4)DO NOT USE AN ADAPTER OR AN EXTENSION CORD.
5)When installing your air conditioner in a window,make sure the window is strong enough to hold the weight
of the air conditioner.You also want to secure and correctly install your air conditioner property to prevent it
from falling.Extra brackets or support may be required depending on your window.
6) Do not black airflow inside or outside the air conditioner with blinds,drapes,protective covers,shrubs or
bushes.
7)Be careful of sharp edges on the front and rear fins of the unit that could cut and cause serious injury.
8)Be careful when lifting the air conditioner to install or remove the unit . Always use two or more people
for this .
9)Always unplug the air conditioner before servicing it or moving it .
Following these basic precautions will reduce the risk of fire ,electrical shock ,injury or death
when using your air conditioner .
4
Domestic Air Conditioner
Page 6

ACD12KE
4.Warning and Cautions
Warning and Cautions
WARNINGS:
Following the safety messages is very important.
These messages can save you from being injured or killed. Warning symbols alert you to be
careful and means Danger . Always follow instructions to be safe and reduce chances of injury
or death . Warning and Danger signs will precede safety messages.
Electrical Safety
GROUNDING:
WARNING:
Do not, under any circumstances, cut or remove the third (ground) prong from the
power cord.
Adapter Plug:
This room air conditioner must be grounded. Grounding reduces the risk of electric shock by
providing an escape wire for the electric current. The power cord has a grounding wire with a
grounding plug . Plug it into an outlet that is properly installed and grounded.
Improper use of the grounding plug can result in a risk of electric shock.
Call a qualified electrician if you don’t understand the grounding instructions or if you are not sure
if the air conditioner is properly grounded. If the wall outlet is not grounded, please contact an
electrician to have it replaced with a proper grounded outlet.
We strongly advise against using an adapter plug.
5
Domestic Air Conditioner
Page 7
ACD12KE
Installation and Accessory Parts
5. Installation and Accessory Parts
IMPORTANT: Observe all governing codes and ordinances.
Check the location where the air conditioner will be installed.
Make sure you have everything necessary for correct installation.
The location should provide:
■ Grounded electrical outlet within 4 ft (122 cm) of where the power cord exits the air conditioner.
NOTE : Do not use an extension cord.
■ Free movement of air in room to be cooled.
■ A large enough opening for the air conditioner. Installation parts are supplied for double-hung windows.
■ Adequate wall support for weight of air conditioner. Air conditioner weighs 44 lbs to 76 lbs (20.0 kg to 34.5 kg).
NOTE: Cabinet louvers must not be obstructed. Air must be able to pass freely through the cabinet louvers.
■
Plug into a grounded 3 prong outlet.
■
DO NOT remove the ground prong.
■
DO NOT use an adapter.
■
DO NOT use an extension cords.
■
Failure to follow these instructions can result in death,fire, or electrical shock.
6
Domestic Air Conditioner
Page 8
ACD12KE
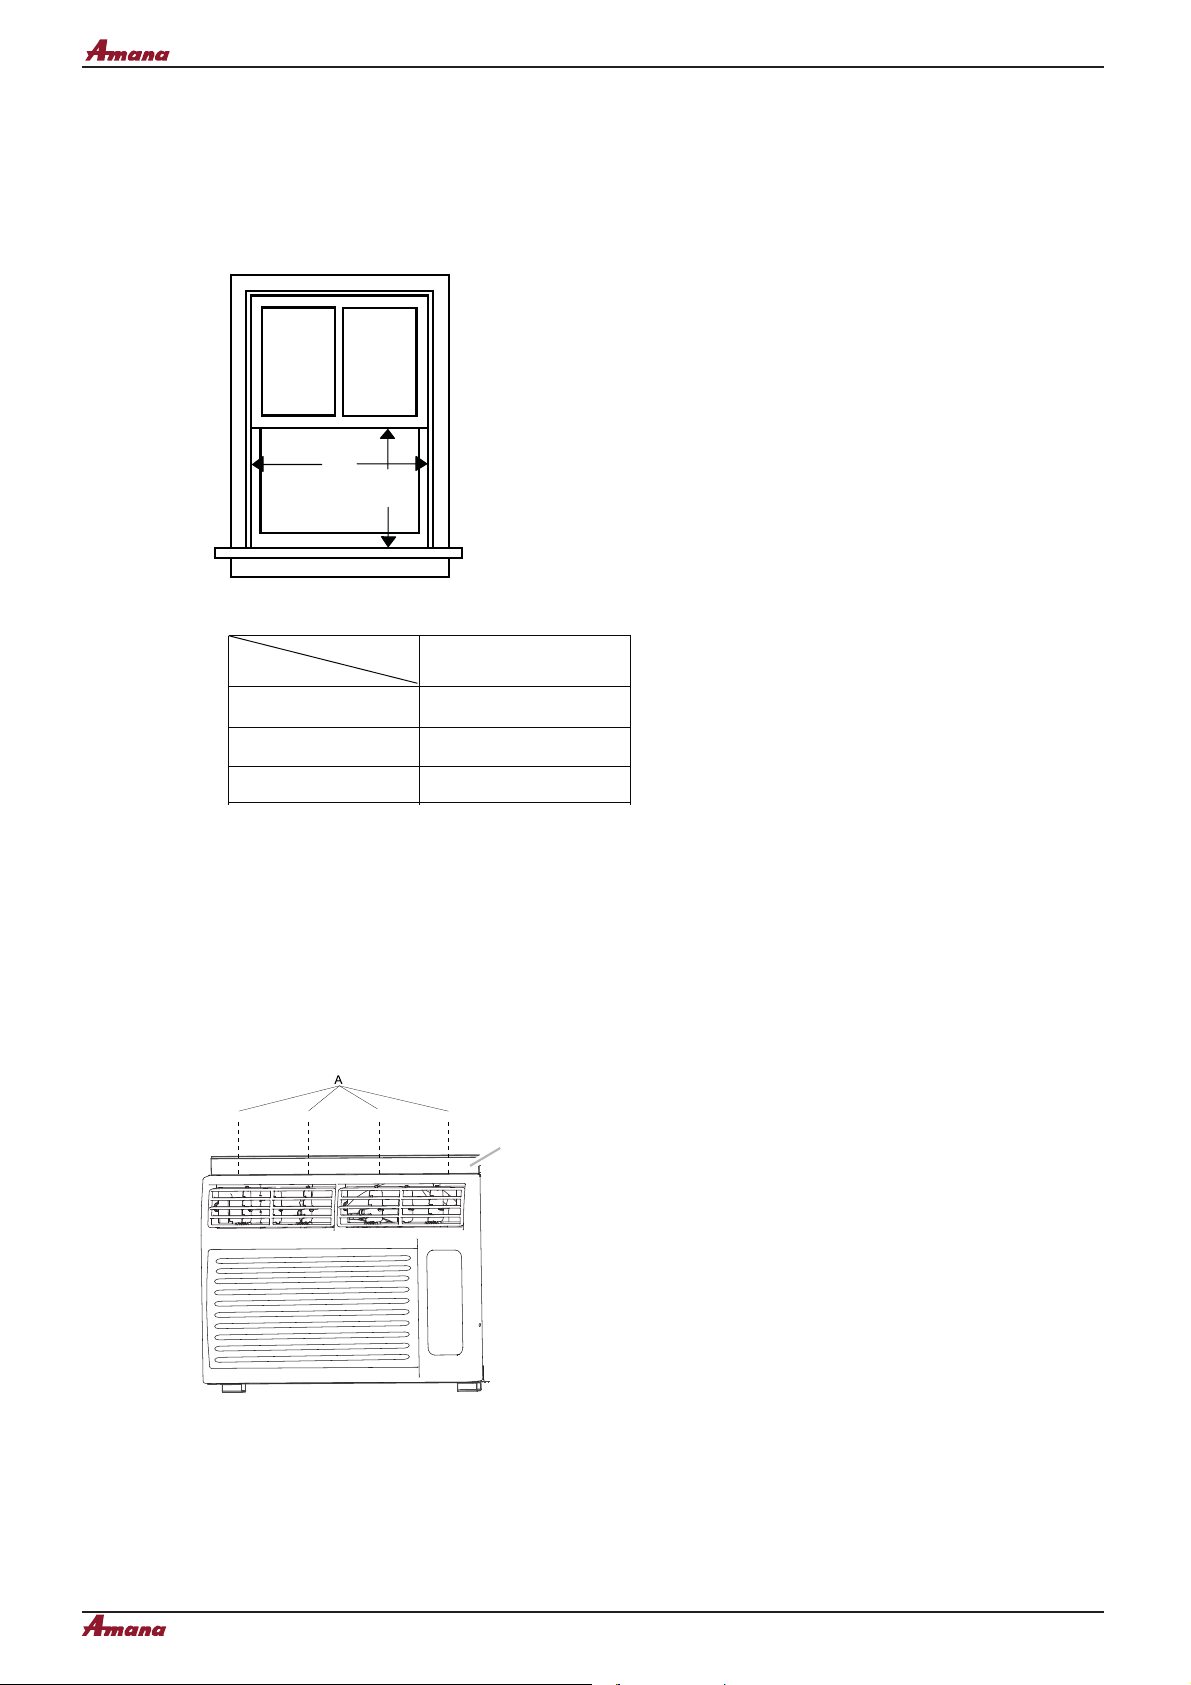
Window Installation
Window opening measurements:
■ 24 ½”minimum to 38” (62.2 cm to 96.5 cm) maximum opening width.
■ 14 9⁄16” (37 cm) minimum opening height.
Installation and Accessory Parts
$
%
MODEL
Dimension
A(inch) Min
A(inch) Max
B(inch) Min
A. 24 ” (62.2 cm) minimum
B. 14 c
ACD12KE
”(37 cm) minimum
24”(62.2cm)
38”(96.5cm)
14c”(37cm)
Prepare Air Conditioner for Installation
Install Top Channel
1. Place the top channel on the top of the air conditioner, lining up the holes in the top channel with the holes in the
p of the air conditioner.
to
2. Using four
NOTE:Your model may differ from the one shown.
©c” screws, attach the top channel to the air conditioner.
A. c” screws
B. Top channel
%
7
Domestic Air Conditioner
Page 9

ACD12KE
Installation and Accessory Parts
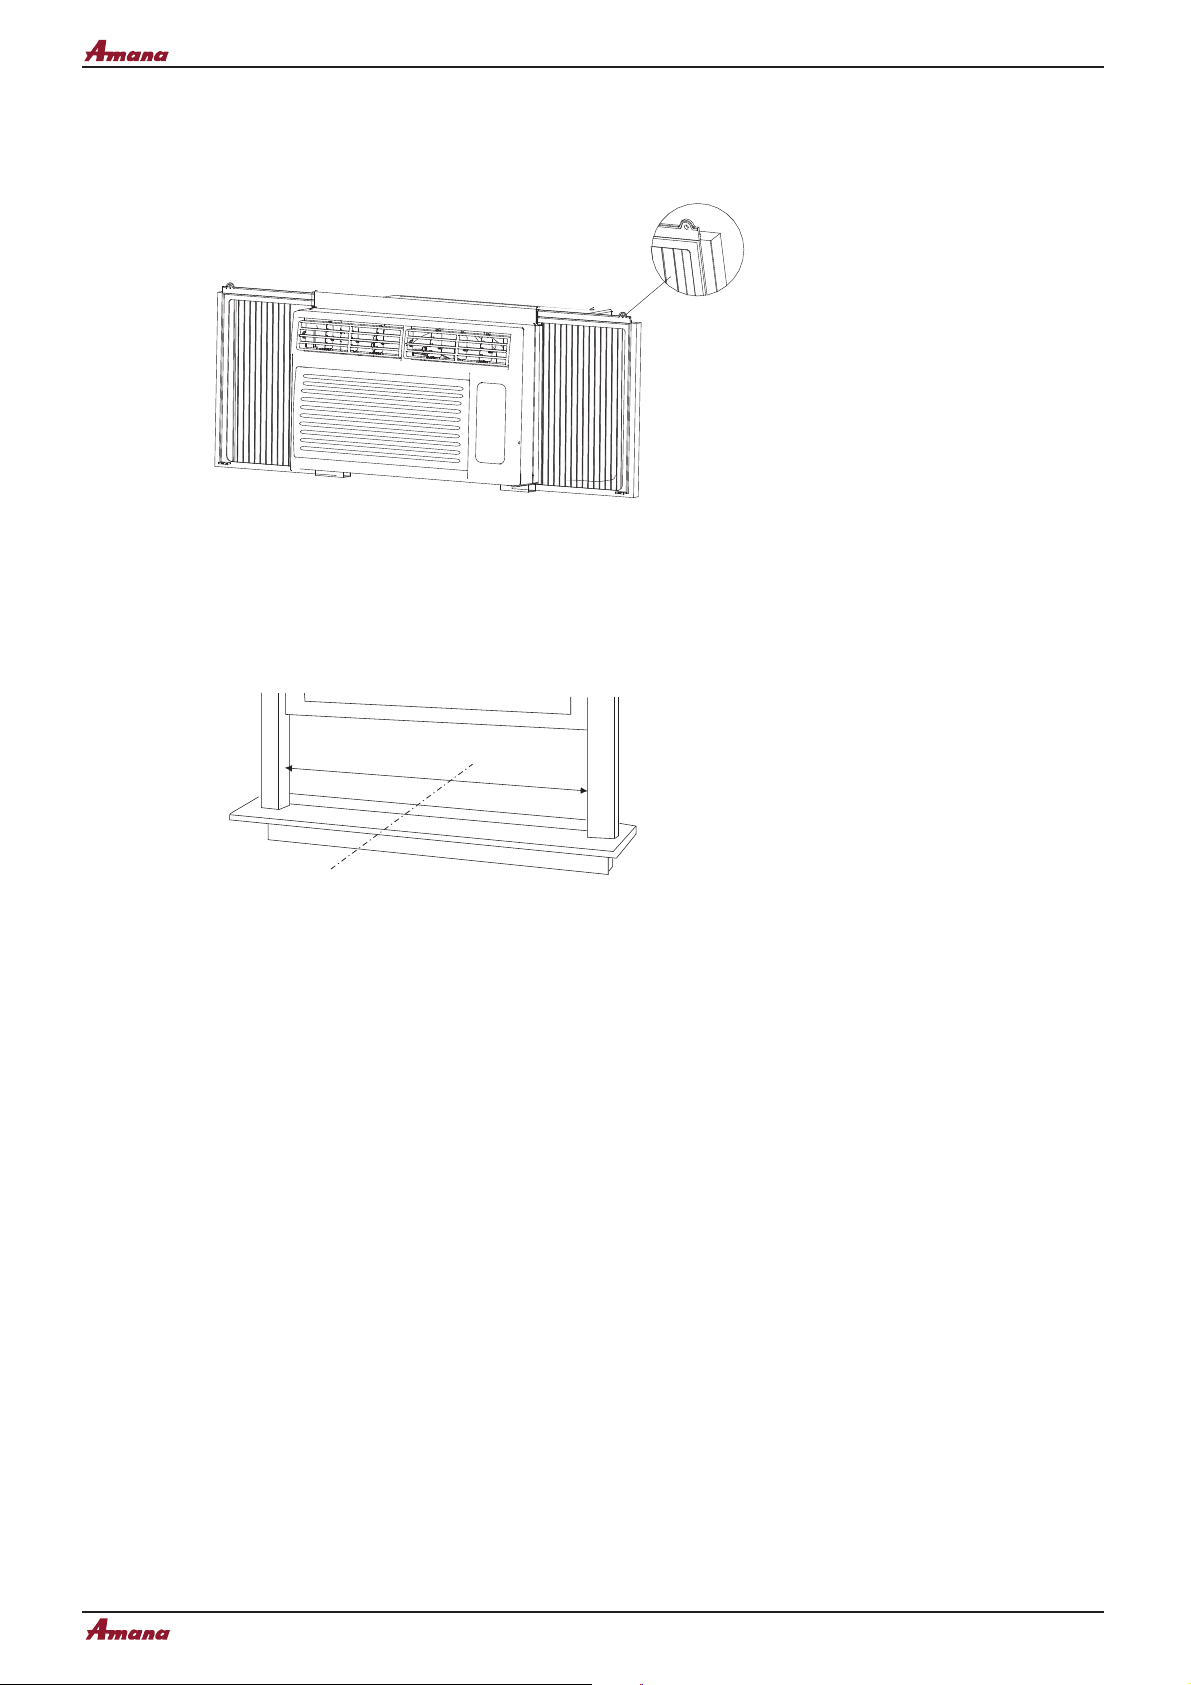
Install Side Curtains
NOTE: Attach curtains to the air conditioner before placing the air conditioner in window.
1. Place the tabbed side of the side curtain in the track on the right-hand side of the air conditioner cabinet.
$
%
A. Tabbed side of side curtain
B. Lock edge side of side curtain
2. Slide the side curtain down the track until the curtain is aligned with the top and bottom of the air conditioner
cabinet.
3. Slide the side curtain frame into the top channel on the top of the air conditioner and the track on the bottom of
the air conditioner.
8
Domestic Air Conditioner
Page 10
ACD12KE
4. Slide the side curtain frame as close to the air conditioner as necessary to lock the side curtain to the frame.
5. Repeat above steps for the left-hand side curtain and frame.
Installation and Accessory Parts
Prepare Window for Installation
1. Measure the width of the window opening.
2. Mark the center line on the inside windowsill.
$
%
A. Width of window opening
B. Center line
Position Air Conditioner
NOTES:
■ Handle the air conditioner gently.
■ Be sure your air conditioner does not fall out of the opening during installation or removal.
■ The place w
outlet.
■
Do not block the louvers in the front panel.
■
Do not block the louvers on the outside of the air conditioner.
1.Center the air conditioner in the window. Lower the window sash behind the top channel to hold the cabinet in
place
NOTE: Your model may differ from the one shown.
here the power cord exits the air conditioner should be no more than 4 ft (122 cm) from a grounded
9
Domestic Air Conditioner
Page 11

ACD12KE
Installation and Accessory Parts
%
$
&
A. Side curtain against window channel
B. Window sash behind top channel
C. Bottom channel in behind windowsill
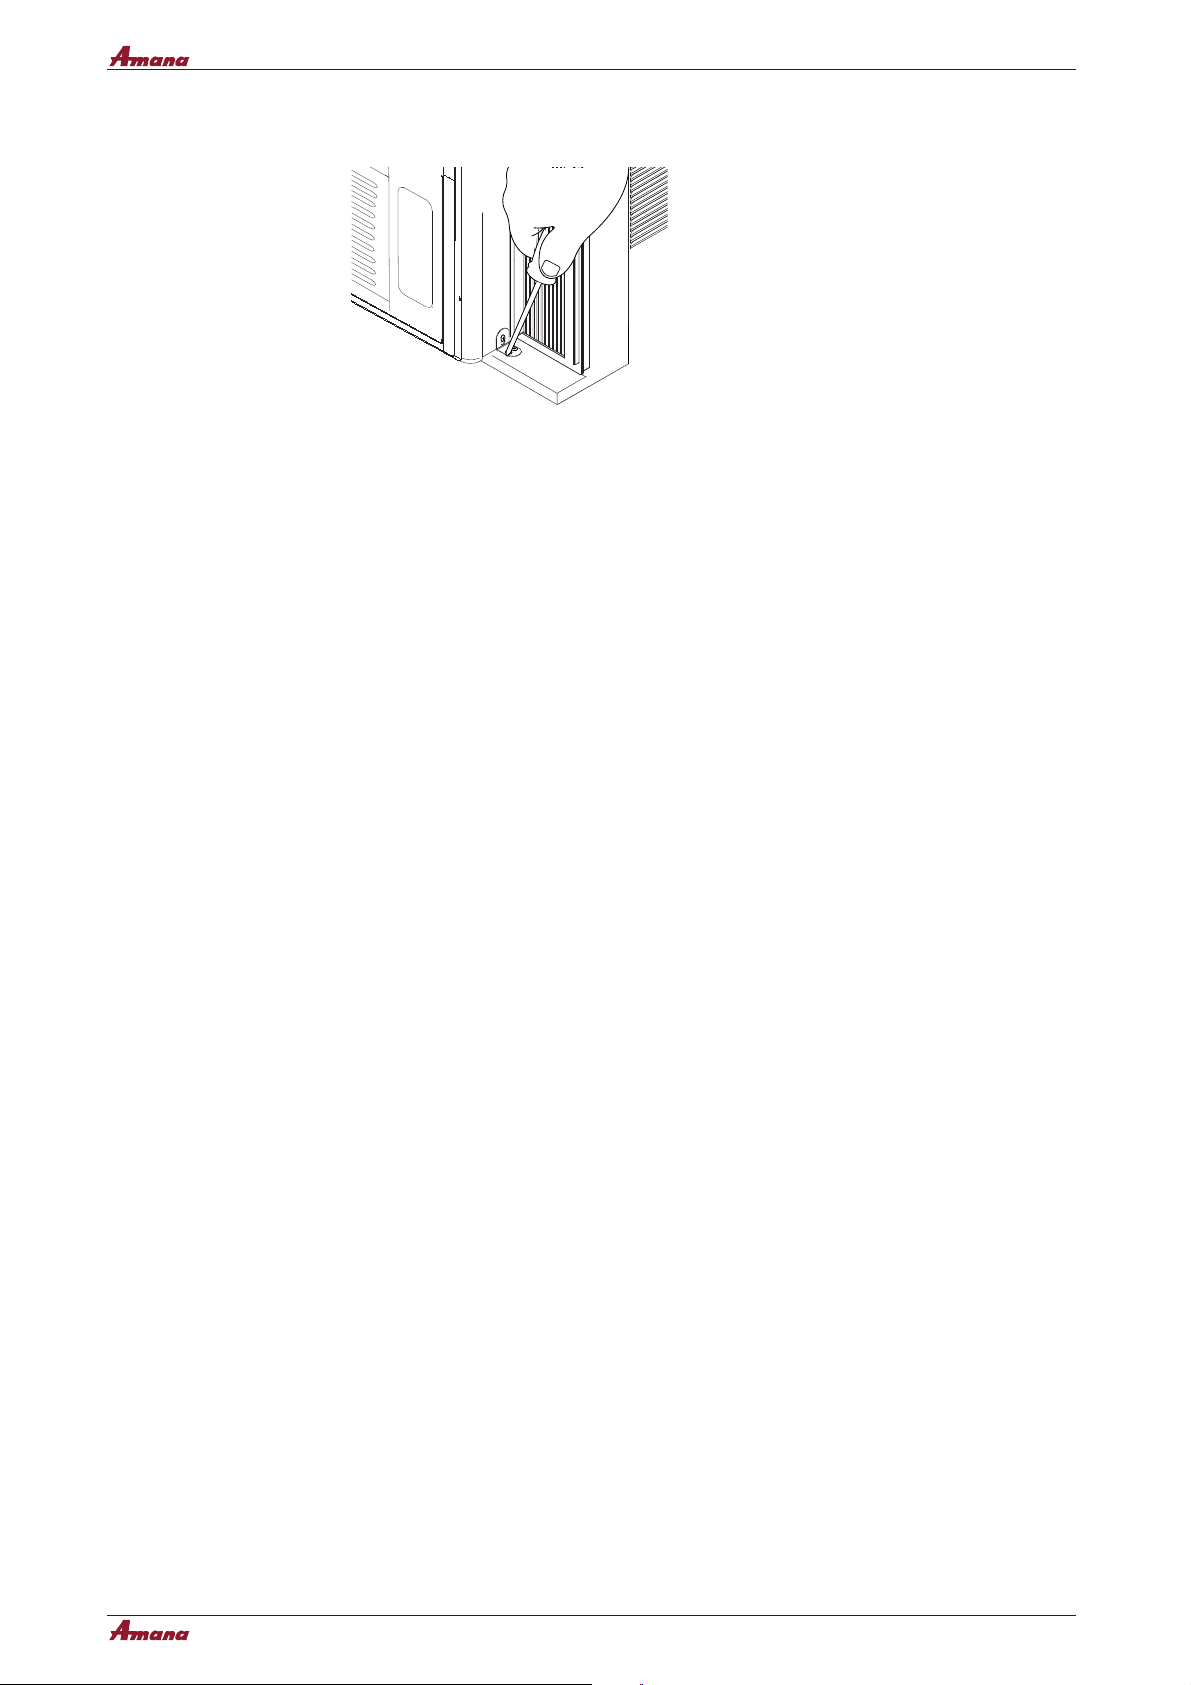
2. Loosen the screw on the right-hand side of the air conditioner cabinet near the bottom.
3. Slide the side bracket over the screw.
4. Tighten the screw. The side bracket should be resting on the windowsill.
5. Usec” drill bit to drill a starter hole through the holes in the side bracket and windowsill.
6. Using two c” screws, attach the side bracket to the windowsill.
10
Domestic Air Conditioner
Page 12
ACD12KE
7. Repeat for side bracket installation on the left-hand side of the air conditioner.
Installation and Accessory Parts
Attach Side Curtains to Window
1. Pull the left-hand curtain out until it fits into the window channel.
2. Use a ¹⁄8” drill bit to drill a starter hole through the top hole in the side curtain and into the window sash.
3. Insert one of the ³¹⁄32” screws through the top hole of the lefthand curtain and into the window sash.
4. Repeat for the right-hand curtain.
5. Use a ¹⁄8 ” drill bit to drill a starter hole through the bottom hole in the side curtain and into the window frame.
6. Insert one of the ³¹⁄32 ” screws through the bottom hole of the left-hand curtain and into the window frame.
7. Repeat for the right-hand curtain.
11
Domestic Air Conditioner
Page 13
Top View
Bottom View
ACD12KE
Installation and Accessory Parts
Complete Installation
1. Insert the foam seal behind the top of the lower window sash and against the glass of the upper window.
"
#
A. Top of lower window sash
B. Foam seal
2. Place the window lock bracket as shown. Use a
bracket and into the upper window.
3. Attach the window lock bracket to the upper window with one
4. Plug into a grounded 3 prong outlet.
5. Press RESET on the power supply cord. See “Electrical Requirements.”
c” drill bit to drill a starter hole through the hole in the window lock
©c” screw to secure the window in place.
$
%
12
Domestic Air Conditioner
Page 14
ACD12KE
Parts
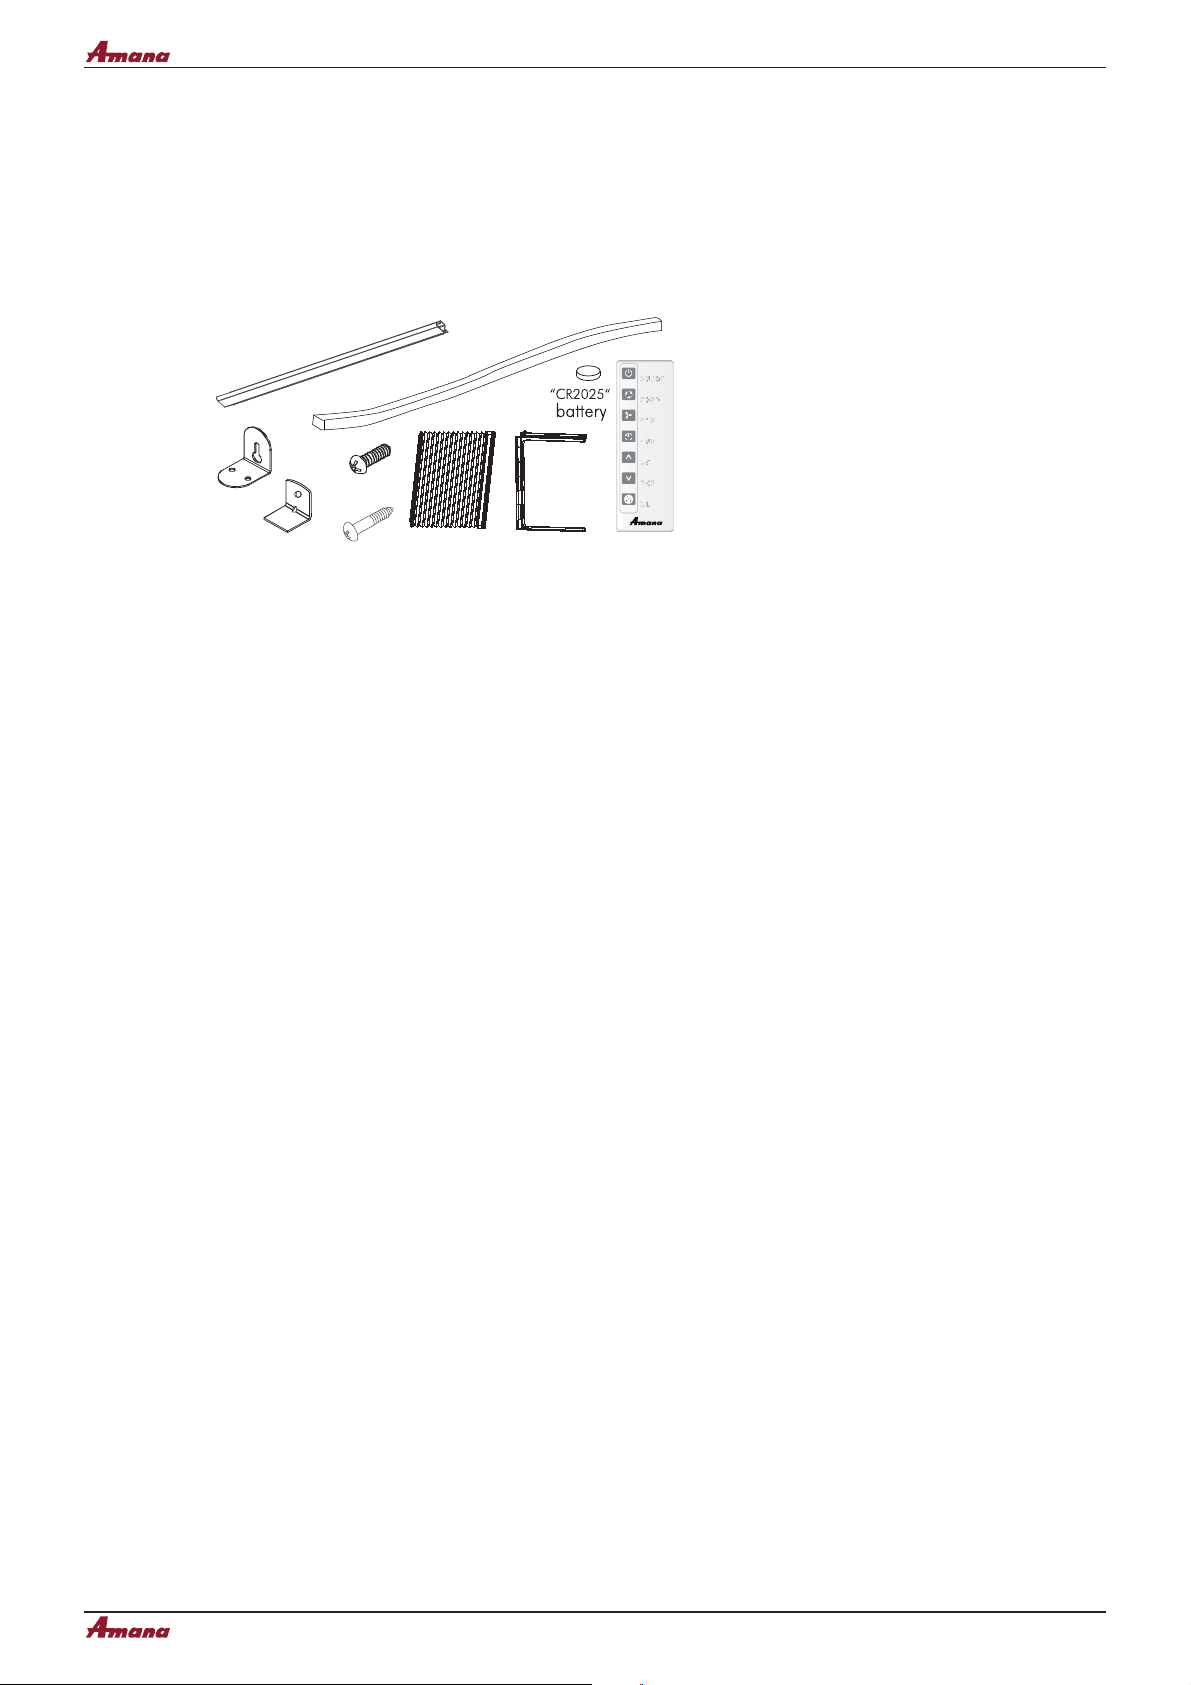
Check that all parts are included in parts package.
Installation and Accessory Parts
A
C
D
A. Top channel
B. Foam seal
C. Side brackets (2)
D.Window lock bracket
E. c ” screws (4)
Tools
■ Phillips head screwdriver
■ Flat-blade screwdriver
■ Scissors
■ Level
■ Socket wrench and sockets
Tape measure
■
■ Cordless drill and 1/8” bit
■ Pencil
■ Pliers
■ Adjustable wrench
ON/OFF
B
E
F
G
H
F. c” screws (9)
G. Side curtains (2)
H. Side curtain frames (2)
I. Remote control
MODE
SPEED
TIMER
TEMP/TIME
TEMP/TIME
UV LIGHT
I
13
Domestic Air Conditioner
Page 15

ACD12KE
Parts and Functions
6.Parts and Functions
Mode
1. Press MODE until you see the indicator light glow for the desired setting.
2. Choose Fan, Cool, Energy Saver or Dehum.
■ Fan—Only the fan runs. Press SPEED to select High, Med or Low fan speed. The display shows the
current room temperature.
■ Cool—Cools the room. Press SPEED to select High, Med or Low fan speed. Press the TEMP/TIME up
or down arrow button to adjust the temperature.
■ Energy Saver—Fan runs only when cooling is needed. Press SPEED to select High, Med or Low fan
speed. Because the fan does not circulate the room air continuously, less energy is used, but the room
air is not circulated as often.
■ Dehum—Dries the room. The air conditioner automatically selects the temperature.
NOTE: Dehum mode should not be used to cool the room.
In Dehum mode,Please do not operate the speed button.
Fan Speed
1. Press FAN SPEED until you see the indicator light glow for the desired setting.
2. Choose High, Med or Low.
■ High—for maximum cooling
■ Med—for normal cooling
■ Low—for minimum cooling
Temperature
■ Press the TEMP/TIME up arrow button to raise the temperature. Each time you press or hold the TEMP/TIME
up arrow button, the temperature will go up 1ºF until it reaches 86°F (30°C).
NOTE: After 5 seconds, the display will show the current room temperature.
14
Domestic Air Conditioner
Page 16

ACD12KE
■ Press the TEMP/TIME down arrow button to lower the temperature. Each time you press or hold the TEMP/TIME
Parts and Functions
down arrow button, the temperature will go down 1ºF until it reaches 61°F (16°C).
NOTE: After 5 seconds, the display will show the current room temperature.
Timer Delay
To set the Timer for a 1-hour to 24-hour delay until the air conditioner turns off (the air conditioner must be On):
1.
Press TIMER. Timer off indicator light will flash. Display will show remaining hours before the air conditioner
will turn off.
2. Press the TEMP/TIME up or down arrow button to change the delay time from 1 hour to 24 hours.
3. After 5 seconds, Timer off indicator light will remain on. Display will show the current room temperature.
To
set the Timer to turn on the air conditioner, keeping previous settings:
Turn off the air conditioner.
1.
2. Press TIMER. Timer On indicator light will flash. Display will show remaining hours before the air conditioner will
turn on.
3. Press the TEMP/TIME up or down arrow button to change the delay time from 1 hour to 24 hours.
4. Timer On indicator light will remain on.
To set the Timer to turn on the air conditioner, changing the previous settings:
1.
Turn on the air conditioner.
2. Adjust the mode to Fan, Cool, Energy Saver or Dehum.
3. For Fan, Cool or Energy Saver mode, adjust the fan speed to High, Med or Low
.
4. Adjust the temperature between 61ºF and 86ºF (16ºC and 30ºC).
NOTE: In Fan mode, the temperature cannot be set.
Press TIMER. Timer On indicator light will flash. Display will show remaining hours before the air conditioner
5.
will turn on.
6.
Press the TEMP/TIME up or down arrow button to change the delay time from 1 hour to 24 hours.
7.
Timer On indicator light will remain on.
To clear Timer delay program:
NOTE: Air conditioner can be either on or off.
1. Press TEMP/TIME once after it has been programmed. Display will show remaining time.
2. While the display is showing the remaining time, press TIMER until Timer Off indicator light will turn off.
To see or change the remaining time (in hours):
Timer Off :
1. Press TEMP/TIME once after it has been programmed. Display on the air conditioner control panel
will show remaining time.
2.
While the display is showing the remaining time, press the TEMP/TIME up or down arrow button to increase or
decrease the time.
3. After 5 seconds, the display on the air conditioner control panel will show the current room temperature.
15
Domestic Air Conditioner
Page 17
ACD12KE
Parts and Functions
Timer On :
1. Display on the air conditioner control panel will show remaining time.
2. While the display is showing the remaining time, press the TEMP/TIME up or down arrow button to increase or
decrease the time.
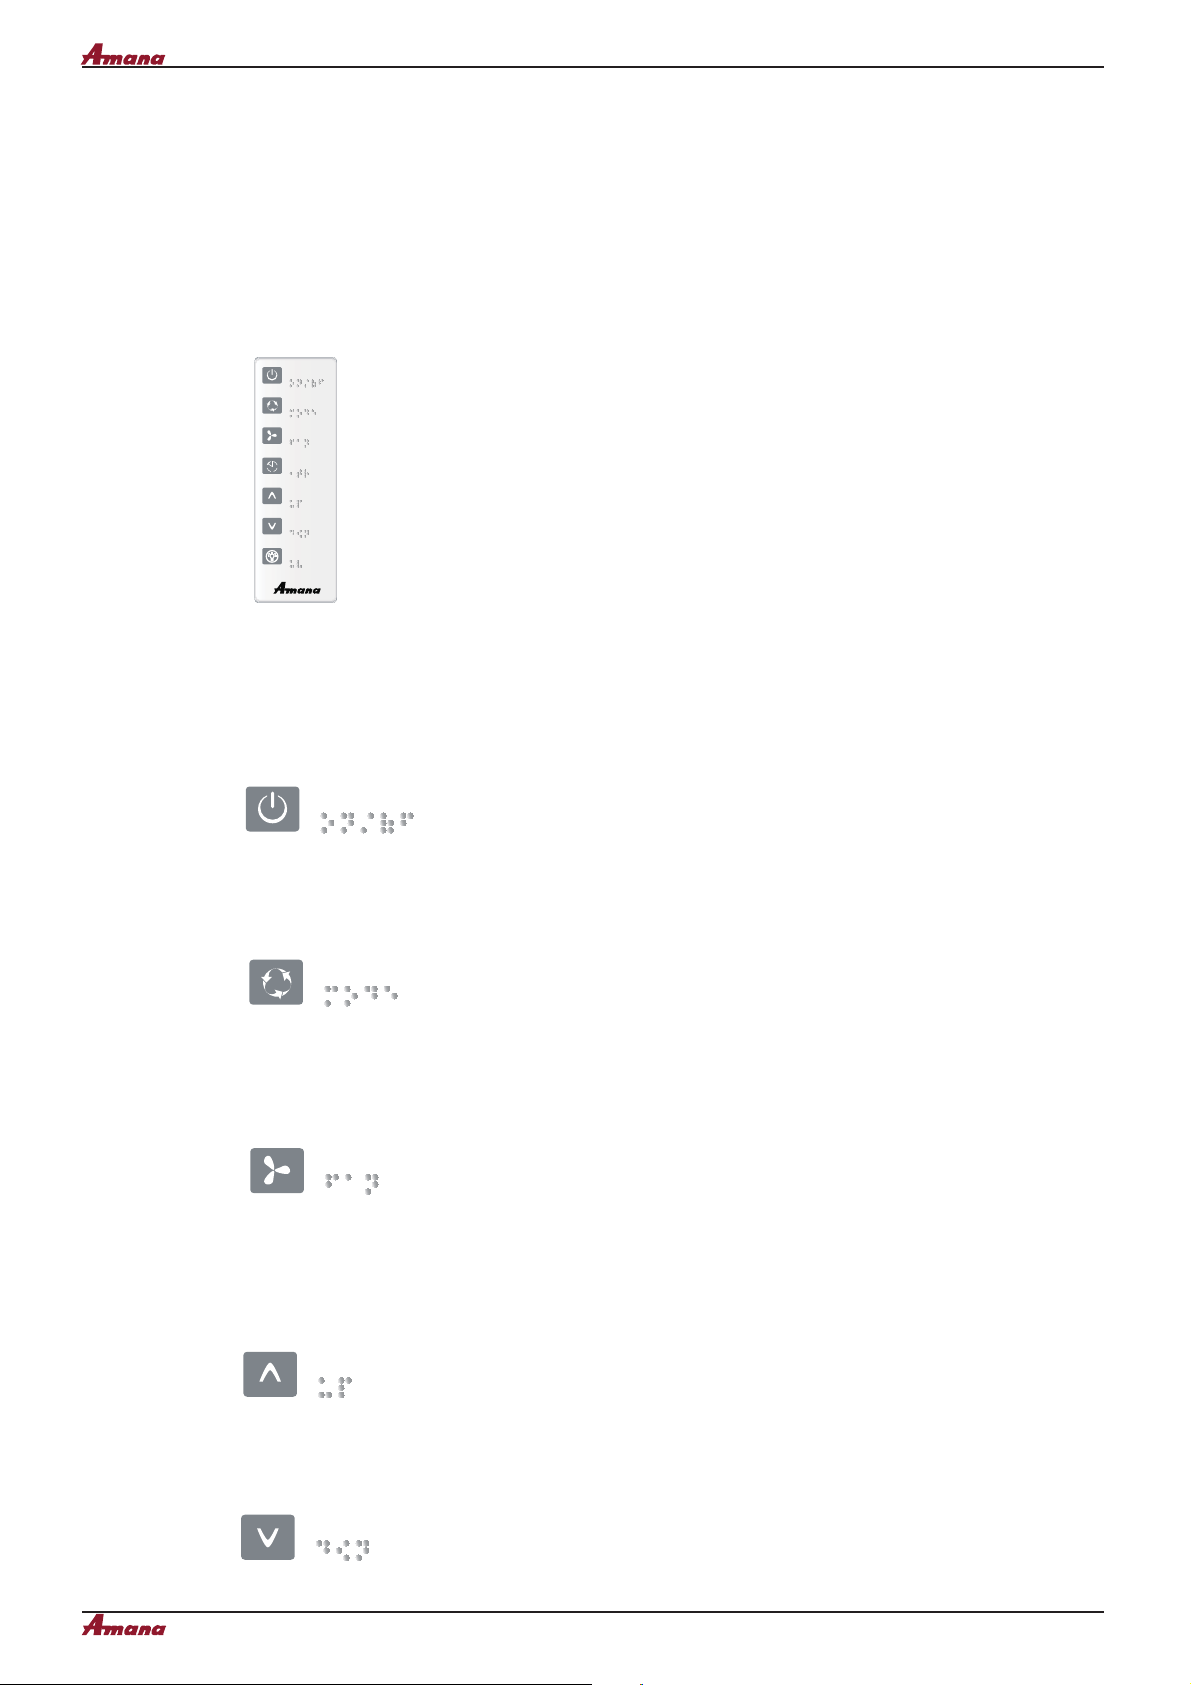
Using the Remote Control
NOTE:
Remote control may differ in appearance.
ON/OFF
MODE
SPEED
TIMER
TEMP/TIME
TEMP/TIME
UV LIGHT
NOTE: One CR2025 battery (included) powers the remote cont ol. Replace battery after 6 months of use, or
when the remote control starts to lose power.
Power
Press ON/OFF to turn on the air conditioner.
ON/OFF
Mode
Press MODE to choose Fan, Cool, Energy Saver or Dehum.
MODE
Speed
Press SPEED to choose High, Med or Low.
SPEED
Temperature
■
Press the TEMP/TIME up arrow button to raise the temperature. Each time you press or hold the TEMP/TIME up arrow button,
the temperature will go up 1ºF until it reaches 86°F (30°C).
TEMP/TIME
■
Press the TEMP/TIME down arrow button to lower the temperture. Each time you press or hold the TEMP/TIME down arrow
button, the temperature will go down 1ºF until it reaches 61°F (16°C).
TEMP/TIME
16
Domestic Air Conditioner
Page 18

ACD12KE
Parts and Functions
Timer
To set the Timer for a 1-hour to 24-hour delay before the air conditioner is turned off (the air conditioner must be On):
1. Press TIMER. Timer off indicator light on the air conditioner
control panel will flash.
TIMER
2. Press the TEMP/TIME up or down arrow button to change the delay time from 1 hour to 24 hours.
3. After 5 seconds, Timer off indicator light on the air condition control panel will remain on.
To
set Timer to turn on the air conditioner while keeping previous settings:
Turn off the air conditioner.
1.
2. Press TIMER. Timer On indicator light on the air conditioner control panel will flash.
3. Press the TEMP/TIME up or down arrow button to change the delay time from 1 hour to 24 hours.
4. After 5 seconds, Timer On indicator light on the air conditioner control panel will remain on.
To
set Timer to turn on the air conditioner, changing the previous settings:
1. Turn on the air conditioner.
2. Adjust the mode to Fan, Cool, Energy Saver or Dehum.
3. For Fan, Cool or Energy Saver mode, adjust the fan speed to High, Med or Low.
4. Adjust the temperature between 61ºF and 86ºF (16ºC and 30ºC).
NOTE:In Fan mode, the temperature cannot be set.
5.
Press TIMER. Timer On indicator light on the air conditioner control panel will flash. Display will show remaining
hours before the air conditioner will turn on.
6.
Press the TEMP/TIME up or down arrow button to change the delay time from 1 hour to 24 hours.
7.
Timer On indicator light on the air conditioner control panel will remain on.
To
clear Timer delay program:
Air conditioner can be either on or off.
NOTE:
1. Press TIMER once after it has been programmed. Display on the air conditioner control panel will show
remaining time.
2. While the display is showing the remaining time, press TIMER untill
Timer indicator light turns off.
To see or change the remaining time (in hours):
Timer Off :
1.
Press TEMP/TIME once after it has been programmed. Display on the air conditioner control panel will show
remaining time.
2. While the display is showing the remaining time, press the TEMP/TIME up or down arrow button to increase or
decrease the time.
3. After 5 seconds, the display on the air conditioner control panel will show the current room temperature.
Timer On :
1. Display on the air conditioner control panel will show remaining time.
2. While the display is showing the remaining time, press the TEMP/TIME up or down arrow button to increase or
decrease the time.
17
Domestic Air Conditioner
Page 19

ACD12KE
Abnormity Diagnose
7. Abnormity Diagnose
1. Sensor Diagnose:
2 seconds after the sensors open circuit or short circuit, the unit will turn off automatically and the LED will show
E0 until the sensors resume.
Firstly check whether Terminal CN2 on
the indoor mainboard contact well or
not?
YES
Pull the sensor out of the mainboard
1) Measure the value of resistance
between its two jumpers
2) Measure the temperature at the
room temperature sensing head.
Check the specifications of the sensor
to deside whether the sensor is
damaged or not?
NO
NO
YES
Pull out the terminals on the indoor
mainboard and reinsert them.
Replace with new sensor.
The Indoor PCB is broken.
YES
Replace with new indoor PCB
18
Domestic Air Conditioner
Page 20

ACD12KE
Abnormity Diagnose
2. Keystroke circuit error diagnose:
When power on for the first time, the PCB will check the keystroke circuit, is the sampling value is defferent
with the theory value, the LED will show E1, which means failed keystroke circuit. The keyboard is locked and
so invalid, but the remote control is working normally.
Check whether the keystroke can’t
get up with prssure.
YES
NO
PCB is broken, replace a new PCB.
Repair the keystrokes on electrical
box to keep them away from the
keystrokes on PCB.
19
Domestic Air Conditioner
Page 21

8. System Flow Chart
ACD12KE
System Flow Chart
20
Domestic Air Conditioner
Page 22

9. Circuit Diagram
ACD12KE
Circuit Diagram
21
Domestic Air Conditioner
Page 23

ACD12KE
Circuit Diagram
22
Domestic Air Conditioner
Page 24

10. Wiring Diagram
ACD12KE
Wiring Diagram
23
Domestic Air Conditioner
 Loading...