


Haler
What The World Comes Home To _
ReemAir Conditioner
DeAire
_atJual
0010551959
HWF05XC5 HWR05XC5
Readinstructionsbeforeinslallingo
Calli-877-337-3639 lot _esrlees onparts andservlees
lifo1_5instructionsnvqnttieprc_c6dorq I'installotieno
Poorroutesquestionsconcernenflospi_cesetI'eottetieo,_ompo_ezle 1-877-337-3639.
LeaInslesttuccieaes_tes eleie_olarelaparato
tl6menosal 1-877.3_7-3639sitienepreguntqssobrerepuestoso _rvicios

Thank You for buying a dependable, energy saving and easy to operate
HALERroom air conditioner. This manual contains usefulinformalion [or
you to maintain, operate, inslall and safely use your room air conditioner.
Your air condi'rioner cleans, cools and dehumidifies the air in you," room to
provide you with the ultimate level of comfort.
Please read instructions care[_lly before using the product. Also, do not
forgetto fillout and mail the Product Registration Card.
Record Your Model and Serial Number.
For all your service callsduring the warranty period the following
information will be needed. Attach the sales receipt to this guide and keep
for future reference. This information can be obtained from the serial plate,
which is on your air conditioner. This is either on the cabinet (side or back)
or you may have to remove the frollt grille to locale it.
Model Number: ..............................................................
Serial Number: ...............................................................
Dale of Purchase: ...........................................................
Dealer's Name: ..............................................................
Dealer's Address: ............................................................
Dealer's Phone Number: ...................................................
TABLE
RECEPTACLE AND FUSE TYPES
RATE D VOLTS ¶ 25/60 250/60
AM_ 15 20 15 2,0 _9
FUSE SIZE 15 20 _ 15 20" 30
TIME DELAY FUSE
(_r €ircuit braker) Plug Plug PJ_

SAFETYPRECAUTIONS
WARNING: Following these basic precautions will reduce the
risk of fire, electrical shock, injury or death
when using your air conditioner,
1) Air conditioner must be connected to proper eledrical outlet with the
correct electrical supply, lsee table)
2)
A
Proper grounding must be ensured to reduce the risk of shock and fire.
DO NOT CUT OR REMOVETHEGROUNDING PRONG. If you do
not have a three-prong electric receptacle outlet in thewall, have a
certified electrician install the proper receptacle. The wall receptacle
MUST be properly grounded.
3)
Do not use if power cord is frayed or otherwise damaged_
Also avoid using it iFthere are cracks or abrasion damage
along the leng_, plug or connector.
4) DO NOT USEAN ADAPTEROR AN EXTENSION CORD.
5)
A
When installing your air conditioner in a window, make sure lhe window
is strong enough to hold the weight of the air conditioner.
You alsowant to secure and correctly install your air conditioner properly
to prevent it from falling. Extra brackets and or support may be required
depending on your window.
6) Do not block airflow inside or outside the air conditioner with blinds,
drapes, protective covers, shrubs or bushes.
7) Be careful oFsharp edges on the front and rear fins of the unit lhat could
cut and cause serious injury.
8) Be careful when lifting the air conditioner to install or remove the unit.
Always useIwo or more people Forthis.
9) Always unplug the air condilioner be_Coreservicing it or moving ik
2
PAGE
A Word From Haler .................................................................. 1
Product Registration 1
Safety Precautions 2
Warnings 4
Electrical Safety 4
Tips 5
Energy Saving Guide 5
Features ................................................................................... 6-7
Operating Guide ................................................................. .8-1 1
Normal Operating Sounds 8
Operating Instructions 8-11
Installations ........................................................................ .12-16
Parts Supplied 13
Tools........................................................................................... 13
Sfeps for Insfallation .................................................................. 14-16
Clean and Care Guide ........................................................ .17-18
Troubleshooting .................................................................. 18-19
Warranty Information
2O
3

Following the sa_:elymessages is very important.
These messagescan save you from being injured or killed.
Warning symbols alert you to be careful and means Danger. Always
followinstructions to be safe and reduce chances of iniury or death.
Warning and Danger signs w;ll precede safety messages.
Grounding:
WARNING:
Adapter Plug:
Thisroom air conditioner must be grounded.
Grounding reduces the risk of electric shock by
providing an escape wire for the electric current.
The power cord has a grounding wire with a
grounding plug. Plugit into an outlet that is
properly installed and grounded.
Improper useof the grounding
plug con resul_in a risk oFelectric shock,
call a qualified electricia,_ if you don't understand
the grounding instructions or if you are not
sure if the air conditioner is properly grounded.
If the wall outlet is not grounded, please contact an
electrician to have it replaced with a properly
grounded outlet.
Do not, under any circumstances, cut or remove the
third (ground) prong from the power cord.
We strongly advise against using an adapter plug.
Important:
4
Test power plug before each use:
1. Press "reset "button.
2 . Press "test "button, unit should trip.
3. Press "reset" button again for use.
Do not use if above test fail.
In the event this device trips, the cause of the malfunction is to
be corrected before further use of the device.
• This Air Conditioner is designed for use in a double hung window.
• While installing unit be sure to tilt air conditioner 5 degree outward to
have the water drip outside the house.
• Install the unit on the north side as normally that is the shaded side. This
will enhance the operation of your unit.
,_,_ Window has to be strong for installalTon. Extra brackets and or support
may be required depending on your window. (Bracketsand Supports
not included in all models)
• Measure the window before installing, il: the window is too big For the
unit you may require professTonal ;nstallation.
,_• Use correct electric voltage and proper ampere for the unit to run
effeclTvely.
_I_• Only let a certified electrician do a,ly modifications to your electrical
oultet.
• Use a dedicated line for the operation of your air conditioner to avoid
the possibility of an electrical surge.
• When installing your air conditioner make sure to seal all areas where
there is a possibility of air leakage.
• Airflow should nol be blocked inside either by curtains, drapes or
furniture or outside by shrubs or bushes.
• Do not needlessly use an electrical light or other appliances thai
produce heat.
• Keep the blinds and the drapes drawn on all the other windows.
• While cooking use an exhaust J:anin the kitchen to remove the excess
heat produced.
• Always use the correct BTU size air conditioner to cool the room to
attain optimum efficiency.
5
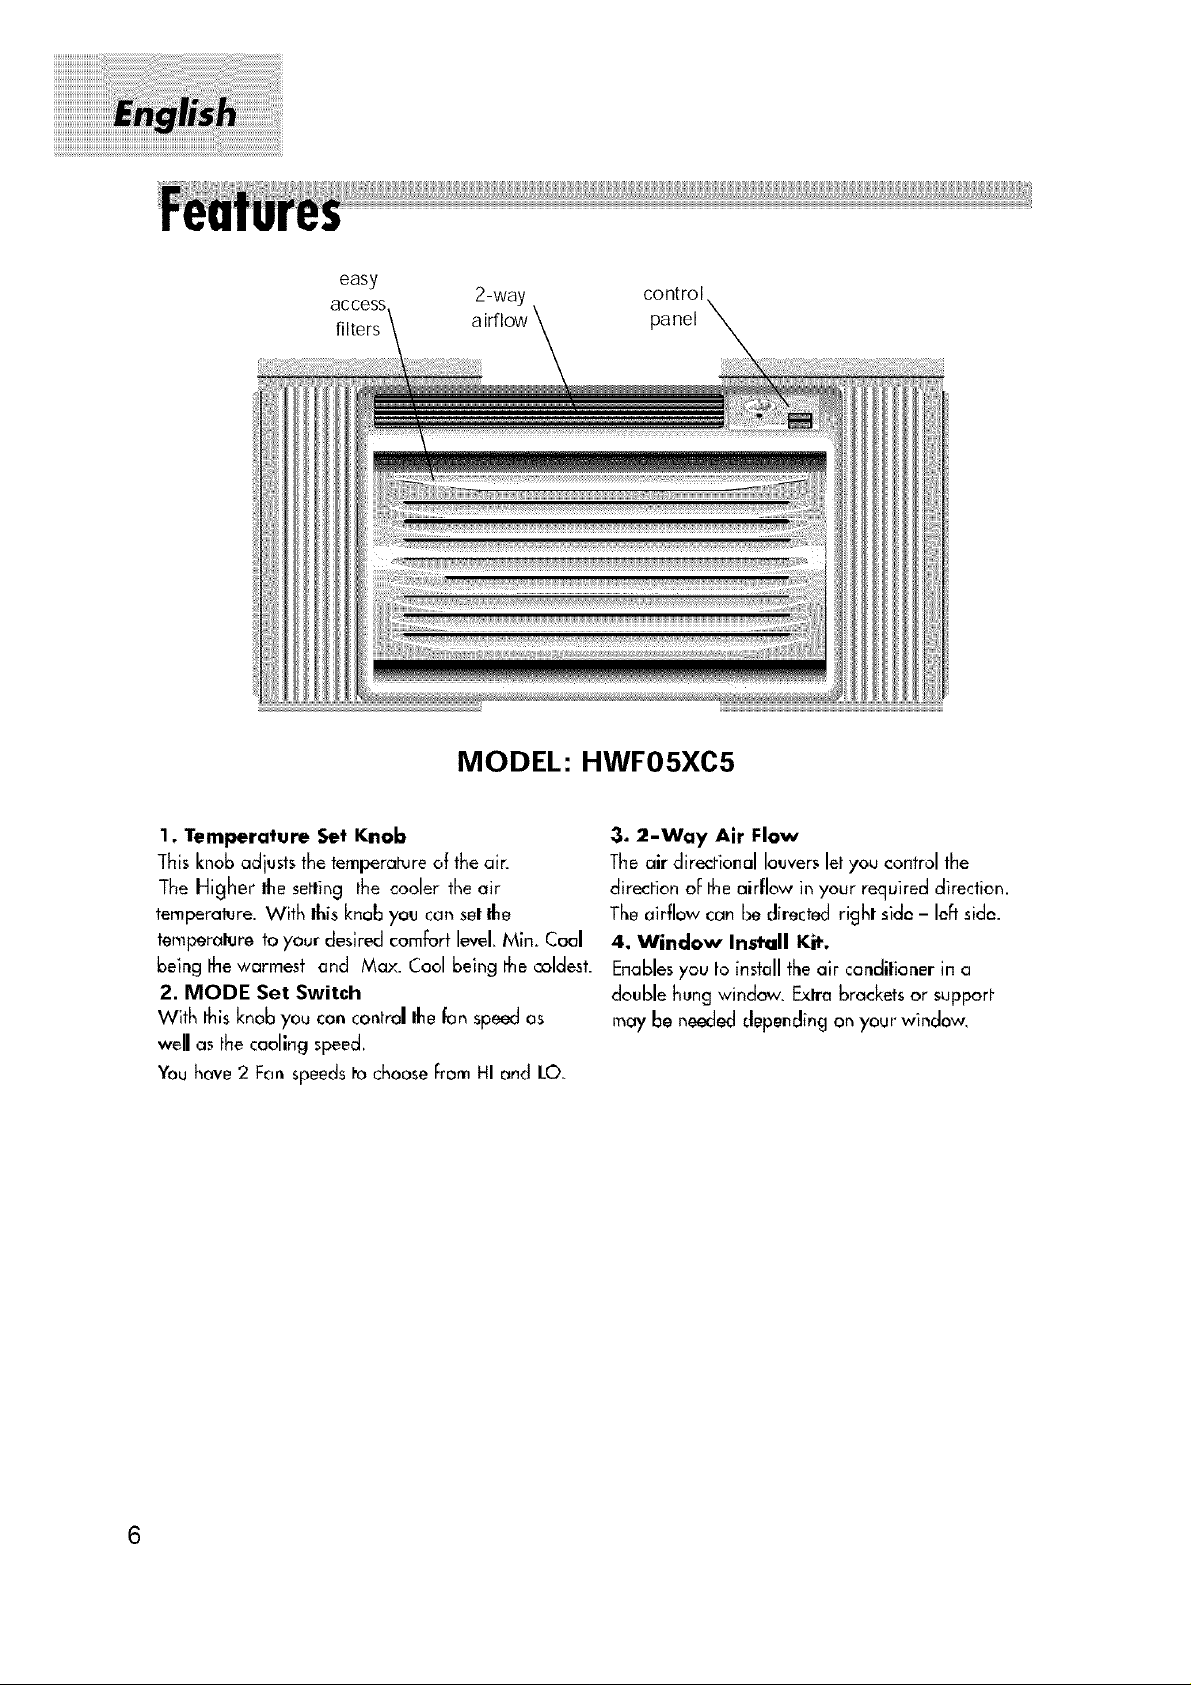
easy
access 2-way control
fiRers panel
MODEL: HWF05XC5
1, Temperature Set Knob
This knob adjuststhe temperature of the air.
The Higher the setting the cooler the air
temperature. With Ihis knob you cat_setthe
tempera_re to your desired comfort level,Min+ Coal
being thewarmest and Max. Cool being the coldest.
2. MODE Set Switch
with this knob you can cor_trolthe fan speed as
wella_ the cooling s_ed,
You hove 2 Fan speedst'ochooseI:romHI and LO.
3. 2-Way Air Flow
The air directional louverslet you control the
direction oFfile airflow inyour required direction.
Theairflow can t_ directed right side - loft side.
4. Window Install Kit.
Enablesyou to install the air conditioner in a
double h_ng window. Exlra brackets or support
may be neededdepending onyour window,
6

easy
access
filters
2-way
contro I
panel
MODEL: HWR05XC5
1, Thermostat
This allowsyou to adjust the temperatureof the air.
The lower the setting the cooler the air temperature,
With this you can _t the temperature to your
desired comfort level. You can setMe tcml0erature
between 61" Fand 86" F.
2. fan Speed
You I'_ 2 I=_ls of _n SI_ to _1 ut your
dedr_l comfortI_d.
Pressing the Fan Speed button of remote
control between High and Low speed.
3, Function,
Your air conditioner has 2 Functions,
al COOL
Here the air conditioner will Ol-_eral_the compressor
and thedesired fan speed setto give you chilled
cold air for your comfort,
b) Fan
You con run the fen only on not so hot days. The
_n can be set to run af 2 _F_eds( HIGH fan
and LOW fan.) as desir_t by you.
4. Timer
Your'air conditioner can be set to go on or off at
your desire. This carl be done up to 24 hours in
advo nce,
5. 2 Way Air Flow
Theseair' directional louvers let you control Ihe
direction oFthe airflow in your required direction.
Theairflow can be directed right side- left side.
6, Window Ins.tall Kit
E_ablesyou to install the air conditioner in a
double hung window. Extra brackets or su_9ort
may be needed depending on your window,
7, Remole Control
Thk fullfunctionalwirelessremote allowsyouto
operate your air conditio_ner['rOrna di#ar,ce. You
n_ed not have ta get up to change the settings,the
['unctior'_sor b t_rn the _nlt on or aft:.
7

Normal Operating Sounds
Following sounds are normally heard during the operation of an air conditioner.
• Thermostat clicks. As the thermostat cycles on/off you will
hear this sound,
• Cool airflow movement as dictated by the set fan speed.
• Water sounds. lhis is normal since your air conditioner ads as a
dehumidifier also. Thusyou will hear water sounds from water drops
falling on lhe condenser.
• As the refrigeranl flows through the inner sealed tubing a
rushing noise may be heard.
° Rattling or vibrating noises may be heard due to poor wall
or window installation,
• High pilch compressor sound may be heard.
Operating lnstructlons
MODEL: HWFOSXC5
/
5 6
i 4 _ 7
3 8
1 10
MIN MAX
Wait 3 Minutes Before
Restarting
I
COOL
FAN ONLY
POWER
SPEED
-II LOW
[
ON OFF
8

After installingyour air conditioner,plug it intotheproper
electrical outletin thewall.
POWER Turns air conditioner off.
SPEED "LOW" Low speed fan operation with cooling or not.
SPEED "HI" High speed fan operation with cooling or not.
This automatically controls the temperature of indoor air. Turn the knob
so that arrow points to the cooler marks for more moderate cooling,
Normal Fan
1. Turn the SPEED mode switch to the "HI" or the "LOW" setting.
2. Set the thermostat control to the temperature mark "FAN ONLY",
Normal cooling
1. Turn the SPEED mode switch to the "HI" or the "LOW" setting.
2. Set the thermostat control to the desire temperature (the mid-point
is a good starting position).
If the room temperature is not satisfactory after a reasonable time, adjust
the control to a warmer setting, as appropriate.
Maximum cooling
1. Turn the SPEED mode switch to the "HI" setting
2. Set the thermostat control to the MAX COOL temperature mark,
Quieter operation
1. Turn the SPEED mode switch to the "LOW" setting.
2, Set the thermostat control as needed,
CAUTION:
1] Remember the compressor of your air conditioner will not work
when the femperatu,e goes below 65_'F.
2] Also when you shut off the air conditioner wait for 3 minutes
before turning it on again. This is the compressor cycle _me.
3] II:you have any trouble in operaling your air conditioner please refer to
lhe Trouble Shooting section.
9

MODEL: HWR05XC5
Followingare the operating insfrudions of your electronic air conditioner.
After installing your air conditioner plug it in to the proper electrical outer
in the wall, Keep the vent in the closed posifio,_. Now set the air
conditioner at your comfort level. This DII funclional wireless remote allows
you to operate your air conditioner without having to get up and go to the
unit. The full function feature allows you to change the settings and turn the
unit on or off from the remote itself.
Alter you plug in the unit it will perform c_self test. All the display lights
will turn on for 3 seconds. The LED display will read "88". If any display
light fails to turn on you may need service on the uniL Alter the 3 seconds
sell test the unit will automatically go to the stand by mode. Now all lights
will be off and you will have to turn "ON" by pressing the On/Off key.
Alter pressing "On/Off", the unit starts to work and enters the status of
"Fan Only" with low setting.
Remote Control
Control Panel
TIM E ON
TIM E OFF
HI SPEED
LOW SPEED
FAN
POWER
ON!OFF
1
10

1. ON/OFF
To turn set ON, press the button. To turn set OFF, press the button again.
2. TIMER
Press TIMER button, for each press, TIMER mode will changes as follows:
TIMER ON -_,-TIMER OFF --,- CANCEL
Timer on or Timer off mode is used to pre-starl or shut off your unit in
advance, You can program this up to 24 hours in advance. You can use
the Timer in 2 functions i.e. Cool or Fan Only.
•"r'fmerOn.
Unit must be on to setthe timer. Unitwill shut down automatically a_r it
accepts the seltings in 5 seconds.Use Sis mode to pre-set the slart time oF
the uni124 hours in advance.
a) PressOn, LEDdisplay will show "XX" (time set last time) when power
is connected first time, LEDdisplay will show "01" •
b) Set desired number o} hours by pressing the (A) pad of the Temp/Time
buttons, one for each hour. I1you passedthe desired time usethe(v) pad
key to lower the selection.
c}AftersetTimerOn, LEDdisplaywill showthetime,This-lime
displayed: unit will staffs afterXhours.
•"llmer Off
Unit must be running to setthe timer off. Usethis to preset the time you
would like the unit to shut off.
a) PressOff:, LEDdisplay will show "XX" (time setlast time) when power
is conneded Firsttime, LED display w_llshow "01".
b) Setdesired number Bypressing the (,A)pad oFthe Iemp/Time buttons.
One br each hour. I|you passed thedesired time, use the(',') pod keyto
lower theselection.
c) After set Timer Off, LED display will show the room temperature
about 5 seconds later.
When using the timer lhe unit will use/revert to the last C_l and Fan
seeings when activated. The timer must be reset every time you choose to
use it,
3. FAN
Pressing the FAN button changes between LOW and HIGH SPEED.
4. MODE
Every time you press this button, it will change between COOL and FAN.
5. TEMR/TIME
Used to set temperature and time.
You will have to press lhe (A) or (v) key on the Ternp/Time to set the
temperature at your desired comfort. You can choose belween
61 'F and 86°F. Once the temperature is set you can raise or lower if
by pressing lhe (A) or Iv) keys, (Only when the unil is cooling,
can the temperature setting be adjusted.)
11

Beforeyou installyour air conditioner check the Following:
1)
The unit is free of all obstructions inside and outside the room eg. drapes,
curtains, furniture, plants, shrubs, bushes, trees, other structures like building,
garage etc. Air condilioner must have clear unobslrucled airflow through the
condenser to remove the heat.
2)
The window is strong enough to hold the weight of the air conditioner.
Extra brackets or supports may be needed depending on your windows.
(Brackels or Supports not provided in all models)
3) The window sill and track are strong enough to hold theweight of the
ai r conditioner.
4) The wall is strong e,_oughto holcl the unit. Extra brackets or supporls may be
needed depending on the wall, (Brackets or Supports not provided in all models).
5) There is adequate and proper power supply near the air conditioner.
6) Becareful of exposed sharp edges of the cabinet and sharp coils ({ins) on
the back olrthe unit thai could cut and cause serious injurv,.
.¢
7) DO NOT use adapter plugs.
8) DO NOT use extension cords.
9) DO NOT cut or remove lhe ground prong.
10) DO NOT modify the plug or the electrical wall outlet in any way.
If plug does not fit the electrical outlet have a certified electrician do the
necessary change,
11) DO NOT connect electrical power to the unit before installation.
12) DO NOT use if power cord is worn out, frayed or otherwise damaged.
Avoid using if there are cracks or abrasion damage along lhe length,
plug or connection.
131 DO NOT install into any existing cabinet or sleeve which does not have side
12
and lop air vents.

Parts Supplied
short screws 13/32"
PartsSupplied
%%
wood screws 31/32"
top rail
ow seal gasket
left ar_rJright __
sidecut1ams
Model: HWFO5XC5
wood screws 31/32"
top rail
leftandrightl_ _
sidecurtams _ ,_
short screws 13/32"
)w seal gasket
Model: HWRO5XC5
Remote
control
O
"CR2025" battery
Youwill need 1ohave the following toolsto help you in lhe installation of
your air conditioner.
•Scissors
• Phillips Screwdriver
•Standard Screwdriver
"Pliers
•Wrench
• Drill and Drill Bits
•Tape Measure
•Gloves
"Level
*Sockets
13

InstallingUnit intoA Window
Window Opening Requirements
The air conditioner is designed to fit into double or single hung sash b'p_ windows. Each of the
units comes with an installation kit that provides adjustable mounting louvers, to fill the gaps
between lhe sides of lhe unit, and lt_e window frame. The chart below reflecls the dimensions
of Ifle units with, and wilhc_t installation kits Measure your window opening widlh and compare
it to the chart below to ensure thai" it meets the minimum and maximum window widlh requirements.
I. _ ;I
HWFO5XC5,HWRO5XC5
A(inch) 1sl.
32
B(in,:h) 11-5"_
C(inch) 1113_
"" 16
D(inch) Max _
D(inch) Min 20_ °
Co_e High 11_--6_
Case Widlh 17_-_
Case Depth 1"_.
ASSEMBLE
CURTAINS/TOP RAIL
"-32
Install top rail with 3 short
screws13/32".
Insert the side curtains into the
top and bottom rails of the air
conditioner Fasten the curtains
to the unit with 8 short screws
1 3/3 2".
Caution: Never expose F,la_ti_:front
or grille, to extreme IO'll_OO'LIluI'._S.
14

PREPARE
WINDOW FOR
INSTALLATION
1. This unit isdesigned for installation in standard double hung windows
with actual opening widths of 21" to 35". The upper and lower sash
must open sufficiently to allow a clear vertical opening of 12"from the
bottom of the sash to the window stool.
2. Ifstorm window presents interference, fasten a 2"wide wood strip(not
included) (OUTER SILL) to the inner window sill across the full width of
the sill. The wood strip should be thick enough to raise the height of
the window sill so that the unit can be installed without interference by
the storm window frame (STORM WINDOW FRAME)or wood strip
(OUTDOORS) to help condensation to drain properly to the outside.
3. Install a second wood strip (approximately 6_ long by3/2" wide and
same thickness as first strip) in the center of the outer sill flush against
the back off the inner sill. This will raise basepan angle.
4. Ifthe distance between STORM WINDOW FRAME and WOOD STRIP
MOUNTED ON TOP OF INNER SILLis more than 1II , tWO of wood
strip are not necessary.
INNER
SILL
u
D
0
I II OUTER
WOO D STRIP
MOUNTEDON q P
TOP OF INNERSILLI I 3/4"CLEARANCE
/ I _1' _ WINDOW FRAME
INNER Iwo0 F)_TRIP k,
SILL I IFORBAfiEPAN ir--rJ
IANGLE II _ T
D I II OUTER D
o t t/ SiLL o
o o
o-q R
s s
1wMAX,
R
STORM
LOCATING UNIT IN
WINDOW
Open the window and mark center line on the
center of the inner sill.
INNER SILL
INDOOR SIDE J"
ATTACH BASEPAN
ANGLE
Install the basepan angle behind the inner window sill, with
the short side of basepan angle as shown. Use the 2 short
screws13/32" provided.
The basepan angle helps to hold unit securely in place.
Besure to place basepan angle edge flush against back
of inner sill.
INNER SILL
OUTER SILL
SHORT SIDE
OUTSIDE
BASEPANANGLE
SHORT SCREW13/32"
CENTER LINE
INSIDE
15

INSTALL THE AIR CONDITIONER
IN THE WINDOW
WINDOW FRAME
UPPERGUIDE
Carefully lift the air conditioner and slide it into the open
window. Make sure the bot[om guide of the air conditioner
drops into the notches of the basepan angle.
While steadying the air conditioner ,carefully bring the
window sash down behind the upper guide of the air
conditJoner.
f
INSTALL THE SEALGASKET
AND SASH LOCK BASEPAN
Extend the side curtains to fill the
windowopening using 4 wood screws
31/32" to secure them.
Cut the seal gasket to thewindow
width. Stuffthe sash seal between the
glass and the window to prevent air
and insects from getting into the room.
Fasten the basepan angle, using a
short screw13/32".
SHORT SCREW13/32"---.._.
WOOD SCREW31/32"
ABO UT 1/ 4II
BOTTOM GUIDE [
BASEPANANGLE
WINDOW SEAL GASKET
16

• Always unplug your air conditioner before cleaning.
The air filter behind the inlet grille should be checked and cleaned at least once
every 2 weeks (or as necessary) to maintain optimal performance of the air
conditioner.
How to remove the air filter
1. The grille may be opened from the top for easy maintenance after installation.
2. Open the inlet grille by pulling off the exposed door on the top of the unit(based
on the installation).
3. Pull the tab slightly to release the filter. Pull the filter in the same direction as
the opening.
4. Clean the filter with warm, soapy water. The water should be below 40°C(104°F).
5. Rinse off and gently shake off excess water from the filter. Let it dry before
replacing it.
DO NOT use your air conditioner without the air filter in place.
To clean the front panels or the cabinet DO NOT use harsh
chemicals, abrasives, ammonia, chlorine, bleach, concentrated
detergents, solvents or metal scouring pads.
Some of these chemicals may dissolve,damage and/or discolor your
air conditioner.
Always use a soft cloth dampened with water or mild soap
and water solution to wipe the front of the cabinet.
Wipe dry with a soft cloth.
17

Tostoreyour air conditioner,after the season,removethe unit from the
window as perthe installationguide, Repackthe unit in itsoriginal box
and storeaway, If you do hal intend to remove if from the window then
cover theoutside wilh a winter cover.
This can be purchased from the retailer where you purchased your
air conditioner or from your local hardware store_
Before putting away your unit make sure any water left in the pan is
removed and drained away. Water left in the pan could lead to Rusting
or damage 1othe eleclrical conneclions.
If air conditioner does not operate:
• Check if unit is plugged in_The plug may have come loose,
• Check if the unit is in "Off" mode.
• The fan control may be in "Off" position.
Air frommair conditioner is warm:
The A/C setting may need to be raised.
Thetemperature outside the room is below 65°F. The compressor will
not cycle on if the temperature outside is below 65°F.
Ice formation on cooling coils:
• Outside temperalure Ioo cold. Sel lhe unit on fan only
setting to defrost ice,
• Lower temperature se_ing. Temperature setting may be too cold.
• Unit BTUmay be too high for the room,
18

Air conditioner working but room not cooling:
• Room may have appliances that produce heat. Use an exhaust fan to
remove excess heal,
• Redirect the airflow. Remove any obslacles.
• All doors and windows need to be closedsocool air does
not escape ihe room.
• Air filter may need cleaning.
• Unit BTU may be too low for the required cooling area.
• On extreme hot & humid days air conditioners may fake
a liH-lelongerto cool.
Air conditioner is making noise when cooling:
You may hear sounds of air movement, water, compressor clicking on and
off or window vibrations. Please read Operating Guide - Normal
Operating Sounds. (see page 8)
Water in the air conditioner cabinet:
This is normal as your air conditioner not only coolsbut also dehumidifies
the air. If there is water dripping inside the room, check the installation of
the unit. The unit may need to be reinstalled. (see page 16)
lg

This warranty covers all defects
in workmanship or materials
for:
1. The mechanical and electrical parts
(including labor costs) contained in this
Haier product, for a period of 12
months, from the date of purchase,
(commercial or rental application, the
warranty is 90 days).
THIS WARRANTY COVERS UNITS
WITHIN THE CONTINENTAL
UNITED STATESr CANADA
AND PUERTO RICO.
THIS WARRANTY DOES NOT
COVER:
• Damages from improper installation
• Damages in shipping
2. The sealed system and compressor
contained in this Haier product is for a
period of 5 years, from the date of
purchase (excluding labor costs after the
initial 12 month period). In commercial
or rental use, the additional limited
cornp..ressorwarranty is For] year and 9
months, (excluding labor costs after the
initial 90 days period).
You must keep and be able to
provide your original sales
receipt as proof of the date of
purchase.
Who is covered?
Theoriginal retail purchaserof thisHaier
product.
What will be done?
Haler will repair or replace, in your
home, any mechanical, electrical part or
the compressor, which proves defective
in normal household, use for a period oF
12 months. Haler will repair or replace
(excluding labor costs) lhe sealed system
and compressor (parts only) for an
additional 4 year period.
How can you get service?
1, Contact your nearest Haier
authorized Service Depot. For the name
of the Service Depot nearest you,
contact Haier at (877) 337-3639.
2. All service must be pedormed, by an
authorized Haier Service Depot.
" Damages from misuse, abuse,
accident, alteration, lack of proper care
and maintenance
• Damagesfrom service,by other than
an authorized dealer or servicecenter
• Labor, service, transportation and
shipping charges for the removal of
defective parts and installation of a
replacement part, beyond the initial 12
month period.
THISLIMITED WARRANTY IS GIVEN
IN LIEU OF ALL OTHERWARRANTIES,
EXPRESSOR IMPLIED, INCLUDING
THEWARRANTIES OF
MERCHANTABILITY AND FITNESSFOR
A PARTICULARPURPOSE.
The remedy provided in this warranty is
exclusive and is granted in lieu of all
other remedies. This warranty does not
cover incidental or consequential
damages. Some states d0not allow the
exclusion of incidental or consequential
damages, so this limitation may not
apply to you_ Some states do not allow
limitations on how long an implied
warranty lasts, so this limitation may not
apply, to you. lhis warranty gives you
specific legal rights, and you may also
have other rights, which vary from stale
to state.
2O
 Loading...