

Page 1
SPLIT TYPE ROOM AIR CONDITIONER
OPERATION MANUAL
Indoor unit:
HSM07HEK03/R2(DB)
Contents
CAUTIONS
PARTS AND FUNCTIONS
OPERATION
MAINTENANCE
TROUBLE SHOOTING
Índice
PRECAUCIONES
COMPONENTES Y FUNCIONES
FUNCIONAMIENTO
MANTENIMIENTO
RESOLUCIÓN DE PROBLEMAS
....................................................
....................................................
................................................................
......................................................................
..........................................................
....................................................
................................................................
......................................................................
1
2
3
6
7
1
....................................................................
..........................................................
9
10
13
14
HSM09HEK03/R2(DB)
Contenuti
AVVERTENZE
PARTI E FUNZIONI
FUNZIONAMENTO
MANUTENZIONE
RISOLUZIONE DEI PROBLEMI
Outdoor unit:
HSM12HEK03/R2(DB)
HUM07HA03/R2(DB)
HUM09HA03/R2(DB)
HUM12HA03/R2(DB)
2HUM14HB03/R2(DB)
2HUM18HB03/R2(DB)
3HUM18HB03/R2(DB)
●
Pleasereadthisoperationmanualbeforeusingtheairconditioner.
Keep this operation manual for future reference.
Table des matières
AVERTISSEMENTS
PIÈCES ET FONCTIONS
OPÉRATION
MAINTENANCE
DÉPANNAGE
....................................................
....................................................................
................................................................
......................................................................
..........................................................
1
16
17
20
21
1
23
24
27
28
0010528241
Page 2
Parts and Functions
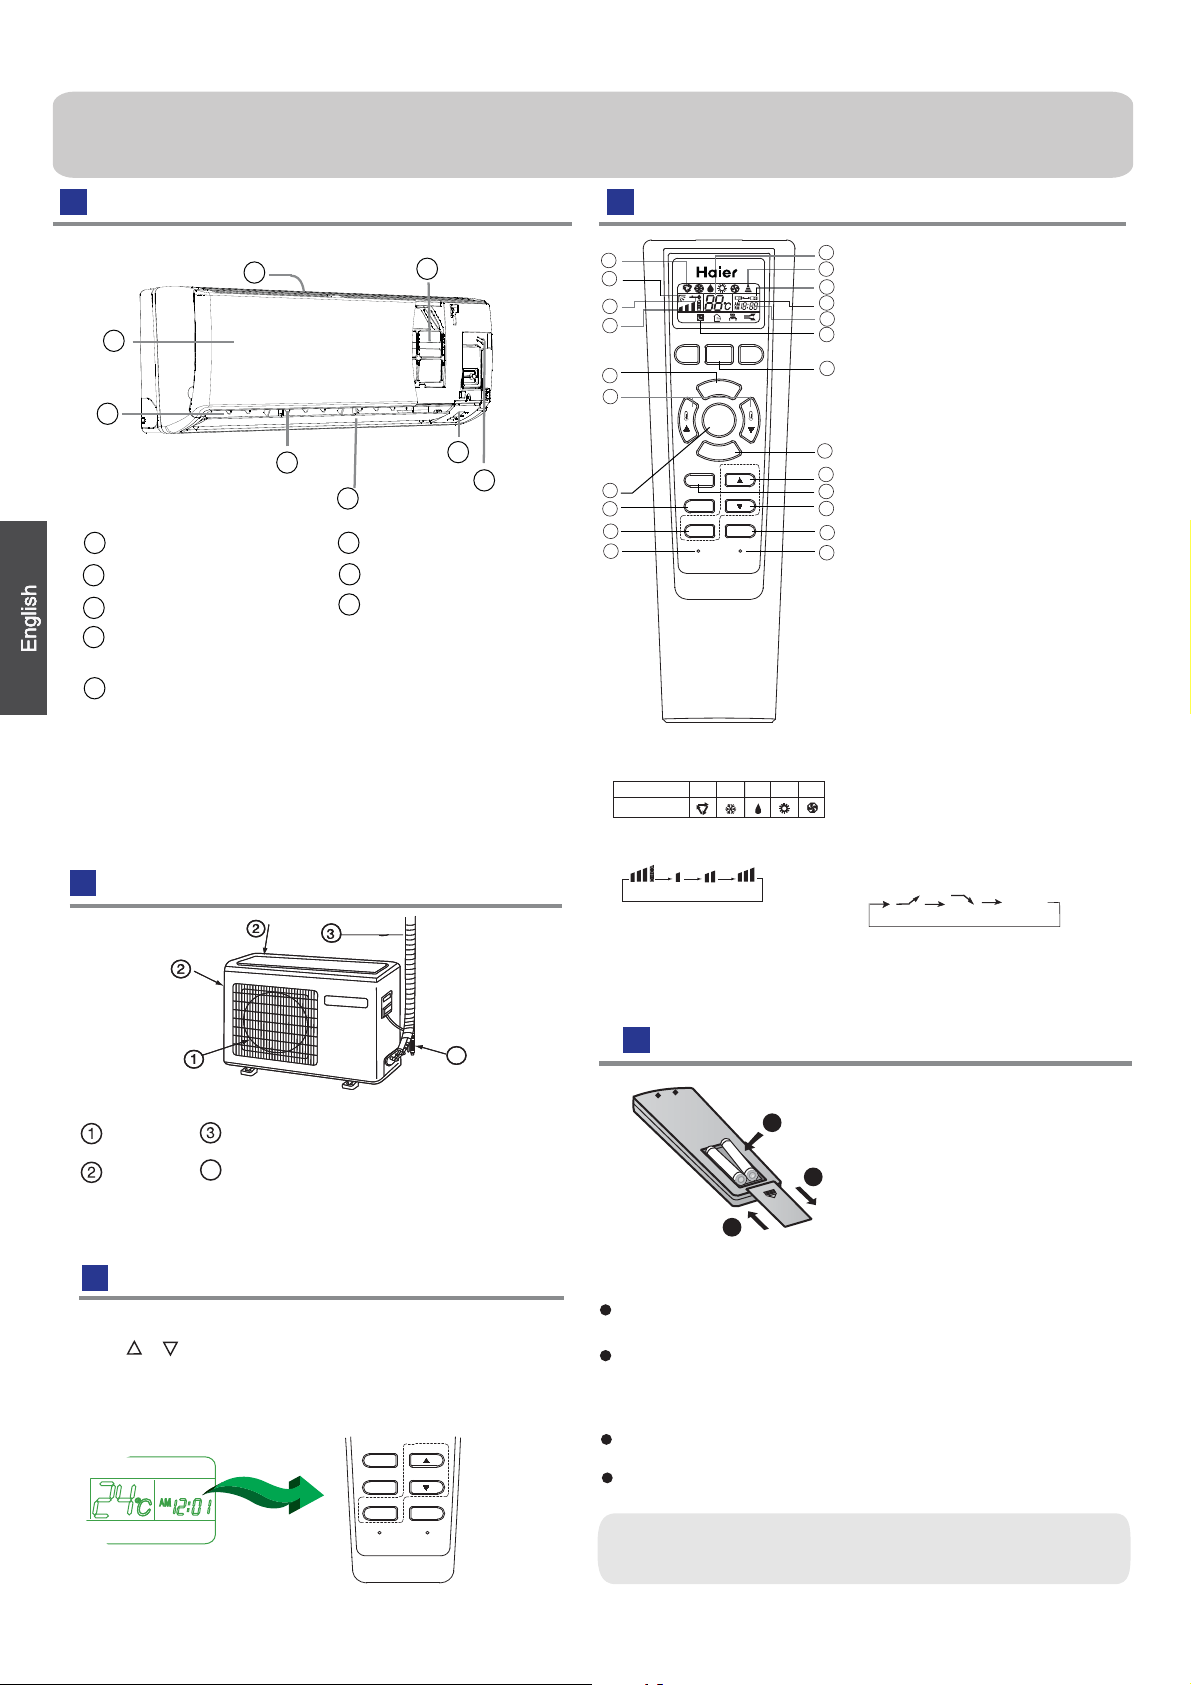
Indoor Unit
1
2
3
4
5
1
Inlet
2
Inlet grille
3
Outlet
4
Vertical blade
(adjust left and
5
Horizontal flap
right air flow)
6
7
8
(adjust up and down air flow.
Don't adjust it manually)
Please be subject to the actual produce purchased the
above picture is just from your reference
8
6
7
Display board
Emergency
Switch
Air Purifying Filter
(inside)
Outdoor Unit
Remote controller
1
2
5
3
13
18
12
21
19
17
1. Mode display
Operation mode
Remote controller
2. SWING display
3. FAN SPEED display
4. SLEEP display
5. LOCK display
6. SIGNAL SENDING
7. TIMER OFF display
8. TIMER ON display
ON/OFF
FAN
MODE
SWING
POWER/SOFT
TIMER
OCK
CL
LIGHT
SLEEP
SET
RE
SET
LOCK
COOL DRY
HEAT
AUTO
LO MED HIAUTO
10
9. CLOCK display
6
10.TEMP display
7
8
11. POWER ON/OFF button
9
12. MODE button
4
13. FAN button
11
14. HOUR button
15. SWING button
16. SLEEP button
17. LOCK button
15
23
Used to lock buttons and LCD
20
display.
14
18. TEMP.SETTIN button
16
19. SET / LIGHT button
22
20. TIMER button
21. CLOCK button
Used to set correct time.
22. RESET button
When the remote controller
appears abnormal, use a sharp
pointed article to press this
button to reset the remote
controller normal.
FAN
23. HOUR / POWER/SOFT button
Used to set clock and timer setting.
Every time the button is pressed,
display changes as follows:
BLANK
SOFT
OWER
P
4
OUTLET
INLET
CONNECTING PIPING AND ELECTRICAL WIRING
DRAIN HOSE
Please be subject to the actual produce purchased the
above picture is just from your reference
Clock set
Press CLOCK button, "AM" or "PM" flashes.
Press or to set correct time. Each press
or decrease 1min. If the
change quickly.
After time setting is confirmed,press SET,
button is kept pressed,time will
"AM "and "PM" stop flashing,while clock starts working.
CLOCK
LOCK
2
TIMER
LIGHT
SET
will increase
POWER/SOFT
SLEEP
RESET
Loading of the battery
Remove the battery cover;
1
Load the battery,then put on the cover again.
4
Note:
The distance between the signal transmission head and the receiver hole should be within 7m without any obstacle as well.
When electronic-sta rted type fluorescent lamp or change- over
type fluorescent lamp or
room, the recei
ver is apt to be disturbed in receiving
so the distance to the indoor unit should be shorter.
Full display or unclear display during operation indicates the
ries have been used up.
batte
If the remote controller can't run normally during operation, please
remove the batteries and
Hint:
Remove the batteries in case won't be in use for a long period. If
there is any display after taking-out, just press reset key.
Load the batteries as illustrated.
2
2 R-03 batteries, resetting key
(cylinder);
Be sure that the loading
3
is in line with th
wireless telephone is installed in the
Please change batteries.
reload several minutes later.
e" + "/"-";
the signals,
Page 3
Operation
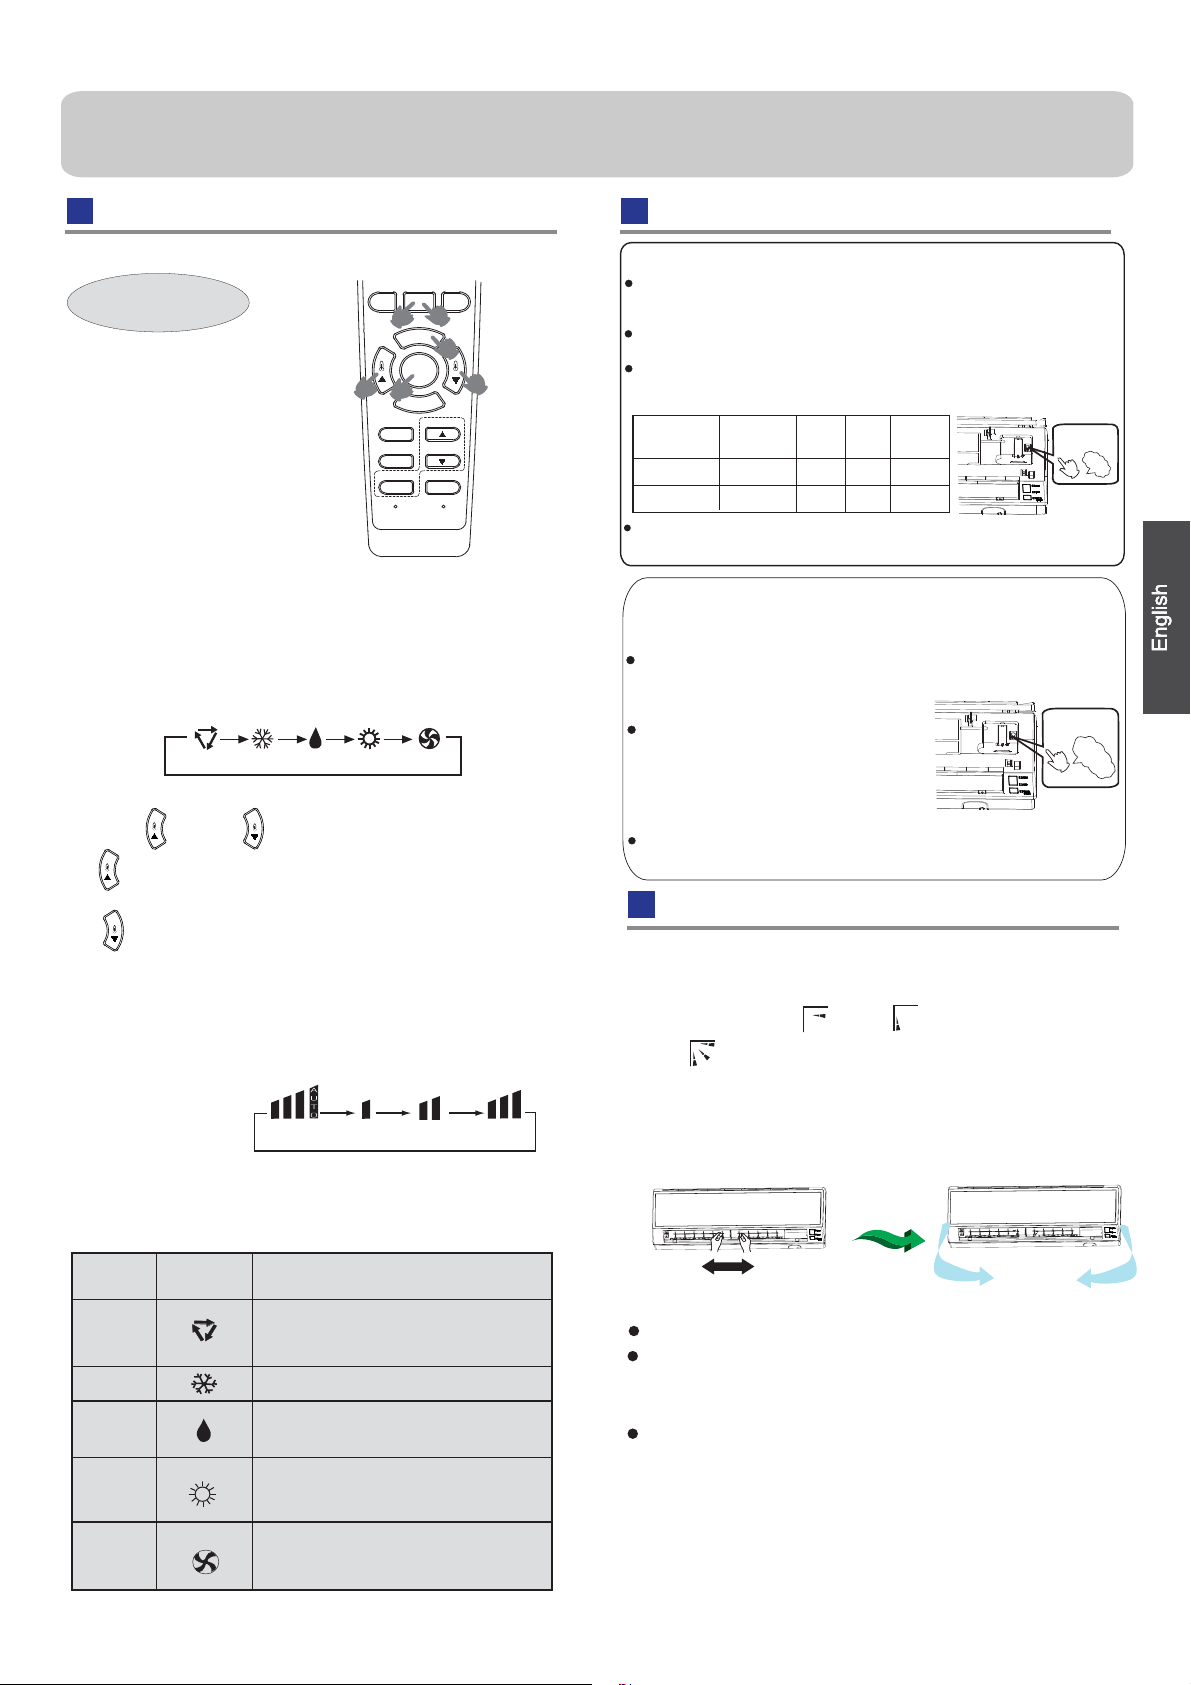
Base Operation
ON/OFF
Remote controller
1. Unit start
Press ON/OFF on the remote controller, unit starts.
2.Select operation mode
Press MODE button. For each press, operation mode
changes as follows:
Remote controller:
AUTO COOL DRY
3.Select temp.setting
Press
Every time the button is pressed, temp.setting
increase 1
rapidly
Every time the button is pressed, temp.setting
decrease 1
decrease rapidly
Select a desired temperature.
button
o
C,if kept depressed, it will increase
o
C,if kept depressed, it will
4.Fan speed selection
Press FAN button. For each press, fan speed
changes as
Remote controller:
Air conditioner is running under displayed fan speed.
When FAN is set to AUTO, the air conditioner
automatically adjusts the fan speed according to room
temperature.
follows:
AUTO LO MED HI
TIMER
CLOCK
LIGHT
LOCK
FAN
MODE
SWING
SET
POWER/SOFT
SLEEP
RESET
FANHEAT
Emergency operation and test operation
Emergency Operation:
Use this operation only when the remote controller is defective
or lost, and with function of emergency running, air conditoner
can run automatically for a while.
When the emergency operation switch is pressed, the " Pi "
sound is heard once, which means the start of this operation.
When power switch is turning on for the first time and
emergency operation starts, the unit will run automatically in
the following modes:
Room
temperature
Above 23oC
Below 23
Designated
temperature
26
o
C 23oC
Timer
Fan
speed
AUTO
AUTO
Operation
mode
COOL
HEAT
mode
o
C
No
No
emergency
operation switch
Pi
It is impossible to change the settings of temp. and fan speed,It
is also not possible to operate in timer or dry mode.
Test operation:
Test ope ration switch is the same as emergency switch.
Use this switch in the test operation when the room
temperature is below 16
normal operation.
Continue to press the test operation
switch for more than 5 seconds . After
you hear the "Pi" sound twice,
your finger from the switch: the cooling
operation starts with the air flow speed "Hi".
Under this operation mode,the fan motor of indoor
unit will run in high speed.
o
C, do not use it in the
release
test operation
switch
Pi
Pi
Air Flow Direction Adjustment
1.Status display of air flow
Vertical flap
Pos.1 blank
Pos.4
2.Left and right air flow adjustment
Move the vertical blade by a knob on air
to adjust left and right direction referring to Fig.
Pos.2
(Auto swing)
Pos.3
(manual)
conditioner
Operation
Mode
AUTO
COOL
DRY
HEAT
FAN
Remote
Controller
Note
Under the mode of auto operation, air conditioner
will automatically select Cool or Heat operation
according to room temperature
to AUTO the air conditioner
the fan speed according to room
In DRY mode , when room temperature becomes
lower than temp.setting+2
intermittently at LOW speed regardless of FAN
setting.
In HEAT mode, warm air will blow out after a short
period of the time due to cold-draft prevention function.
When FAN is set to AUTO, the air conditioner automatically
adjusts the fan speed according to room temperature.
In FAN operation mode , the unit will not operate in
COOL or
HEAT mode
AUTO is not available in
setting is disabled. In FAN mode, sleep operation
is not available.
When FAN is set
automatically adjusts
temperature.
o
C, unit will run
but only in
FAN mode ,
FAN mode.
And temp.
'
Cautions:
When adjusting the flap by hand,turn off the unit.
When humidity is high,condensate water might occur
at air outlet if all vertical louvers are
right.
It is advisable not to keep horizontal flap at downward
position for a long time in COOLor DRY
otherwise, condensate water might occur.
Note:
When restart after remote turning off, the remote
controller will automatically
memorize the previous
set swing position.
adjusted to left or
mode ,
3
Page 4
Operation
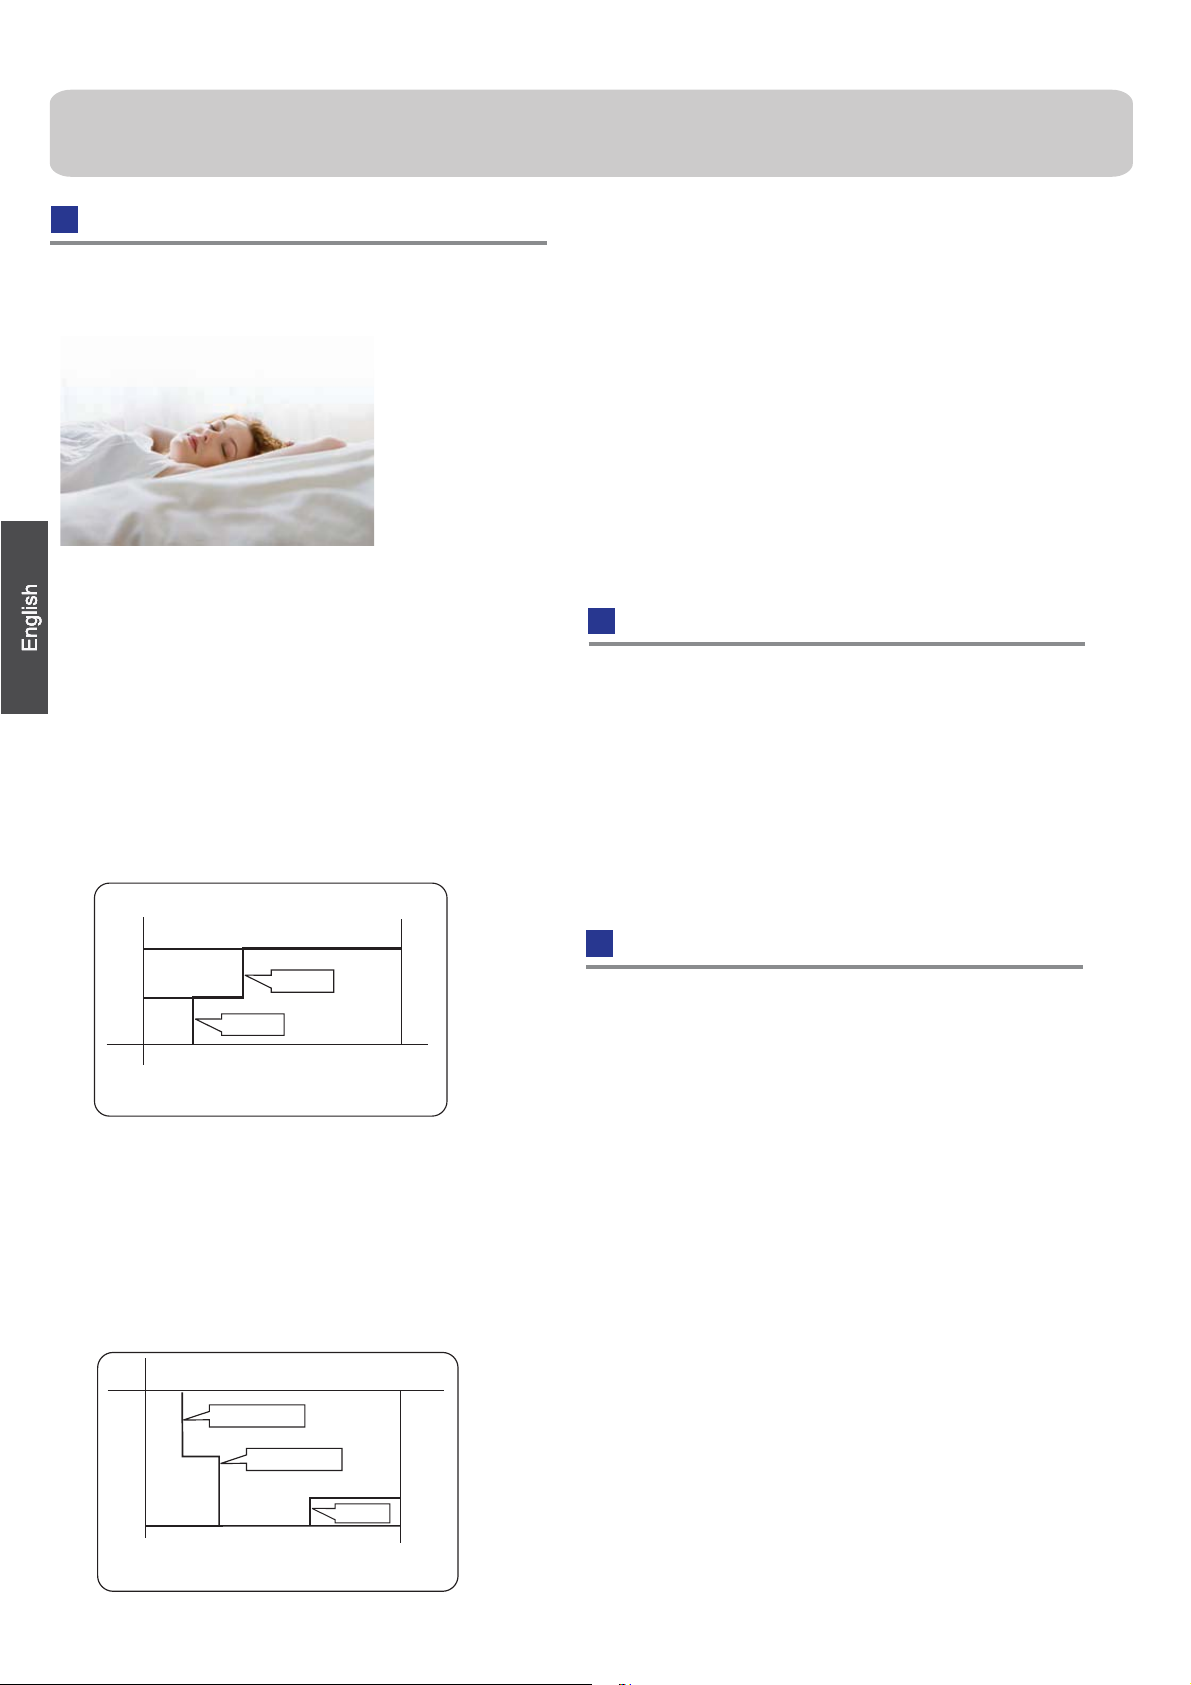
Sleep Operation
Before going to bed,you can simply press the SLEEP
button and unit will operate in SLEEP mode and bring
you a sound sleep.
Use of SLEEP function
After the unit starts,set the operation status,
then press SLEEP button before which the
clock must be adjusted and time being set.
Operation Mode
1. In COOL,DRY mode
1 hours after SLEEP mode starts,temp.will become
O
1 higher than temp.setting.After another 1 hours,
C
temp.rises by 1 futher.The unit will run for further
6 hours then stops Temp. is higher than temp.
setting so that room temperature won’t be too low
for your sleep.
SLEEP operation starts SLEEP operation stops
Temp.setting
In HEAT mode
2.
1 hours after SLEEP mode starts,temp will
become 2 lower than temp.setting.After
another 1 hours,temp decrease by 2
futher.After more another 3hours,temp.rises
O
C
by 1 futher.The unit will run for further 3
hours then stops.Temp.is lower than temp.
setting so that room temperature won’t be
too high for your sleep.
Temp.setting
O
C
Approx.6hrs
Rises 1
Rises 1OC
O
C
1 hr
1 hr
In COOL, DRY mode
O
C
Unit stop
O
Unit stop
C
In AUTO mode
3.
The unit operaters in corresponding sleep mode
adapted to the automatically selected operation
mode.
4. In FAN mode
It has no SLEEP function.
When quiet sleeping function is set to 8 hours
5.
,
the quiet sleeping time can not be adjusted.
When TIMER function is set , the quiet sleeping
function can't be set up. After the sleeping function
is set up, if user resets TIMER function, the sleeping
function will be cancelled; the machine will be in the
state of timing-on, if the two modes are set up at the
same time, either of their operation time is ended
first, the unit will stop automatically, and the other
mode will be cancelled.
Power Failure Resume Function
1. If the unit is started for the first time, the compressor
will not start running unless 3 minutes have elapsed.
When the power resumes after power failure, the unit will
run automatically, and 3 minutes later the compressor
starts running.
2. Note to the power failure resume:
press the sleep button ten times in five seconds and enter
this function after hearing four sounds. And press the sleep
button ten times within five seconds and leave this function
after hearing two sounds.
POWER/SOFT Operation
(1)
POWER Operation
When you need rapid heating or cooling, you can use this function.
In COOL mode, fan speed automatically takes high speed of
AUTO fan mode. In HEAT mode, fan speed automatically takes
medium speed of AUTO fan mode.
(2)
SOFT Operation
You can use this function when silence is needed for rest or reading.
In SOFT operation mode, fan speed
of AUTO fan mode.
Note˖
During POWER operation, in rapid HEAT or COOL modethe room
will show uniform temperature distribution. Long period
SOFT operation will cause effect of not too cool or not too warm.
To cancel POWER or SOFT operation
Press POWER/SOFT button again, POWER or SOFT
automatically takes low speed
disappears.
1 hr
Decreases 2OC
1 hr
SLEEP
operation starts
Decreases 2
3 hrs
O
C
3 hrs
Rises 1OC
SLEEP
operation stops
In HEAT mode
4
Page 5

Operation
parliament, herewith we inform the consumer about the disposal requirements of the electrical and electronic products.
DISPOSAL REQUIREMENTS:
Timer On/Off On-Off Operation
Set clock correctly before starting TIMER operation.
1.After unit starts, select your desired operation mode.
2.Press TIMER button to change TIMER mode. Every
time the button is pressed, display changes as follows:
Remote controller:
BLANK
TIMER ON TIMER OFF TIMER ON-OFF
Then select your desired TIMER mode (TIMER ON or
TIMER OFF or TIMER ON-OFF). " "or " "will flash.
3.Press / button to set time.
It can be adjusted within 24 hours.
4.After setting correct time, press SET button to confirm
" "or" " on the remote controller stops flashing.
5.Cancel TIMER mode
Just press TIMER button several times until TIMER mode
disappears.
Hints:
After replacing batteries or a power failure happens, time
setting should be reset.
Remote controller possesses memory function,when use
TIMER mode next time, just press SET button after mode
selecting if time setting is the same as previous one.
According to the Time setting sequence of TIMER ON or
TIMER OFF, either Start-Stop or Stop-Start can be
achieved.
Your air conditioning product is marked with this
symbol.This means that electrical and electronic
products shall not be mixed with unsorted
household waste. Do not try to dismantle the
system yourself : the dismantling of the air
conditioning system,treatment of the refrigerant, of oil and of
other part must be done by a qualified installer in
with relevant local and national legislation. Air conditioners
must be treated at a specialized treatment facility for reuse,
recycling and recovery. By ensuring this product is disposed
of correctly, you will help to prevent potential negative consequences for the environment and humen health. Please
contact the installer or local authority for more information.
Battery must be removed from the remote controller and disposed of separately in accordance with relevant local and
nationl legislation.
accordance
IMPORTANT INFORMATION REGARDING THE REFRIGERANT USED
Contains fluorinated greenhouse gases
covered by the Kyoto Protocol
R410A
2
1=
2=
1
1+2=
FE
kg
kg
kg
A
B
C
D
EUROPEAN REGULATIONS
CONFORMITY FOR THE MODELS
CE
All the products are in conformity with the following
European provision:
- Low Voltage Directive 73/23/EEC
- Low Voltage Directive 2006/95/EC
-Electomagnetic CompatibilitY 89/336/EEC
-Electomagnetic CompatibilitY 2004/108/EC
ROHS
The products are fulfilled with the requirements in the
directive 2002/95/EEC of the European parliament and of
council on the Restriction of the use of Certain Hazardous
Substances in Electrical and Electronic Equipment (EU
RoHS Directive)
WEEE
In accordance with the directive 2002/96/CE of the European
This product contains fluorinated greenhouse gases covered
by the Kyoto Protocol. Do not vent into the atmosphere.
Refrigerant type:R410A
GWP* value:1975
GWP=global warming potential
Please fill in with indelible ink,
• 1 the factory refrigerant charge of the product
• 2 the additional refrigerant amount charged in the field
and
• 1+2 the total refrigerant charge
on the refrigerant charge label supplied with the product.
The filled out label must be adhered in the proximity of the
product
cover).
A contains fluorinated greenhouse gases covered by the
Kyoto
B factory refrigerant charge of the product: see unit name
plate
C additional refrigerant amount charged in the field
D total refrigerant charge
E outdoor unit
F refrigerant cylinder and manifold for charging
charging port (e.g. onto the inside of the stop value
Protocol
5
Page 6
Maintenance
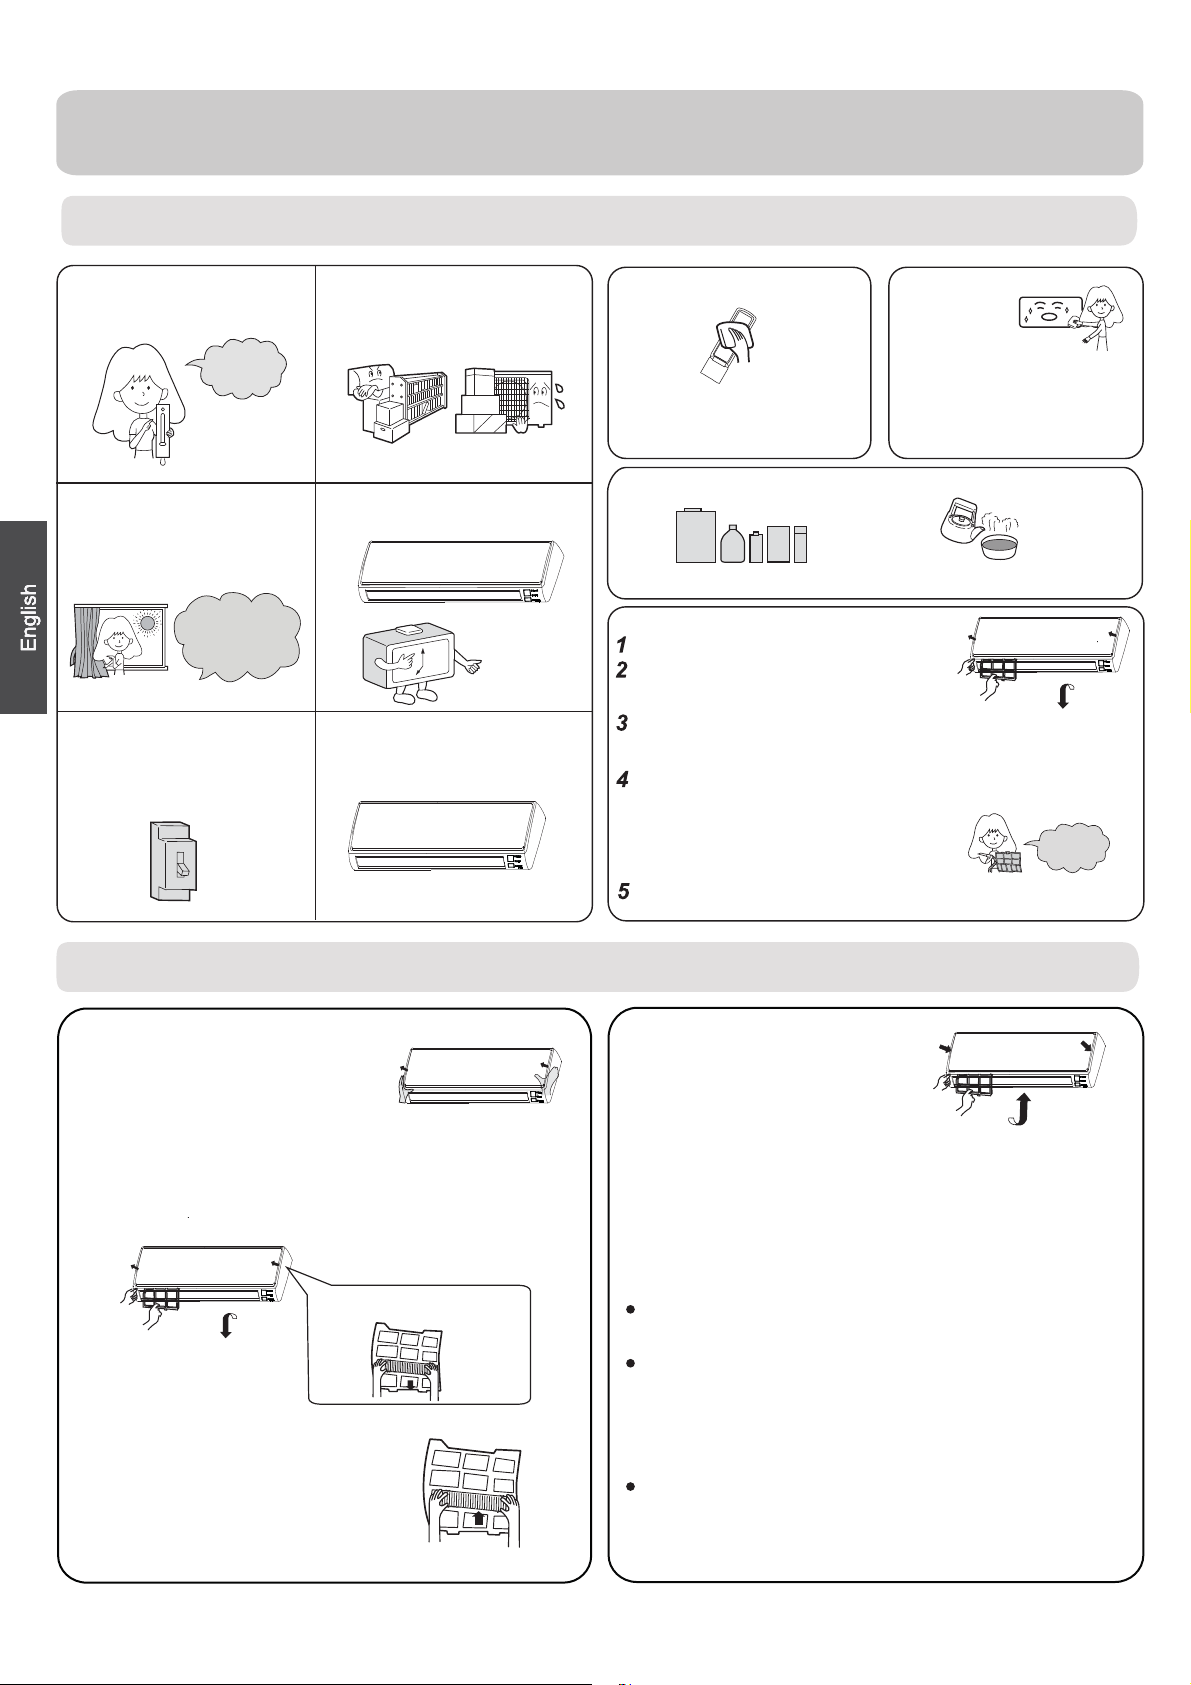
For Smart Use of The Air Conditioner
Setting of proper room
temperature
Proper
temperature
Close doors and windows
during operation
During cooling operation
prevent the penetration
of
direct sunlight with
curtain or blind
If the unit is not to be used
for a long time, turn off the
power supply main switch.
OFF
Do not block the air inlet
or outlet
Use the timer effectively
Use the louvers effectively
Remote Controller Indoor Body
wipe the air conditioner by using a
soft and dry cloth.For serious stains,
Do not usewater,wipe the controller
with a dry cloth.Do not use glass
cleaner or chemical cloth.
use a neutral detergent diluted with
water.Wring the water out of the
cloth before wiping,then wipe off the
detergent completely.
Do not use the following for cleaning
Gasoline,benzine, thinner or cleanser
damage the coating of the unit.
ay
m
Hot water over 40
cause
discoloring or deformation.
Air Filter cleaning
Open the inlet grille by pulling it upward.
Remove the filter.
Push up the filter's center tab slightly until it is
released
Clean the filter.
Use a vacuum cleaner to remove dust, or wash the filter with
water.After washing, dry the filter completely in the shade.
Attach the filter.
Attach the filter correctly so that the "FRONT" indication
is
completely
and left filters are not
may cause defects.
Close the inlet grille.
from the stopper, and remove the filter do
facing to the front.Make sure that the filter is
fixed behind the stopper.If the right
attached correctly, that
O
C(104OF) may
wnw
ard.
Once every
two weeks
Replacement of Air Purifying Filter
1.Open the lnlet Grille
Prop up the inlet grille by using a
small device named grille-support
which located in the right side of
the indoor unit.
2.Detach the standard air filter
Slide the knob slightly up
release the filter, then withdraw it.
3.Attach Air Purifying Filter
Put air purifying filter appliances into the
right and left filter frames.
ward to
Detach old Air Purifying Filter
4.Attach the standard air filter
(Necessar
y installation)
ATTENTION:
The white side of the photocatalyst air purifying filter
face outside,and the black side face the unit The green
side of the bacteria-killing medium air purifying filter face
outside,and the white side face the unit.
5.Close the Inlet Grille
Close the Grille surely
NOTE:
The photocatalyst air purifying filter will be solarized in fixed
time. In normal family,
The bacteria-killing medium air purifying filter will be used
for a long time,no need for replacement. But in the period
of using them ,you should remove the dust frequently by
using vacuum cleaner or flaping them lightly,otherwise ,
its performance will be affected.
Please keep the bacteria-killing medium air purifying filter in
the cool and dry conditions
when you stop using it,or its ability of sterilization will
reduced.
it will be solarized every 6 months.
avoidlongtimedirectlysunshine
be
6
Page 7
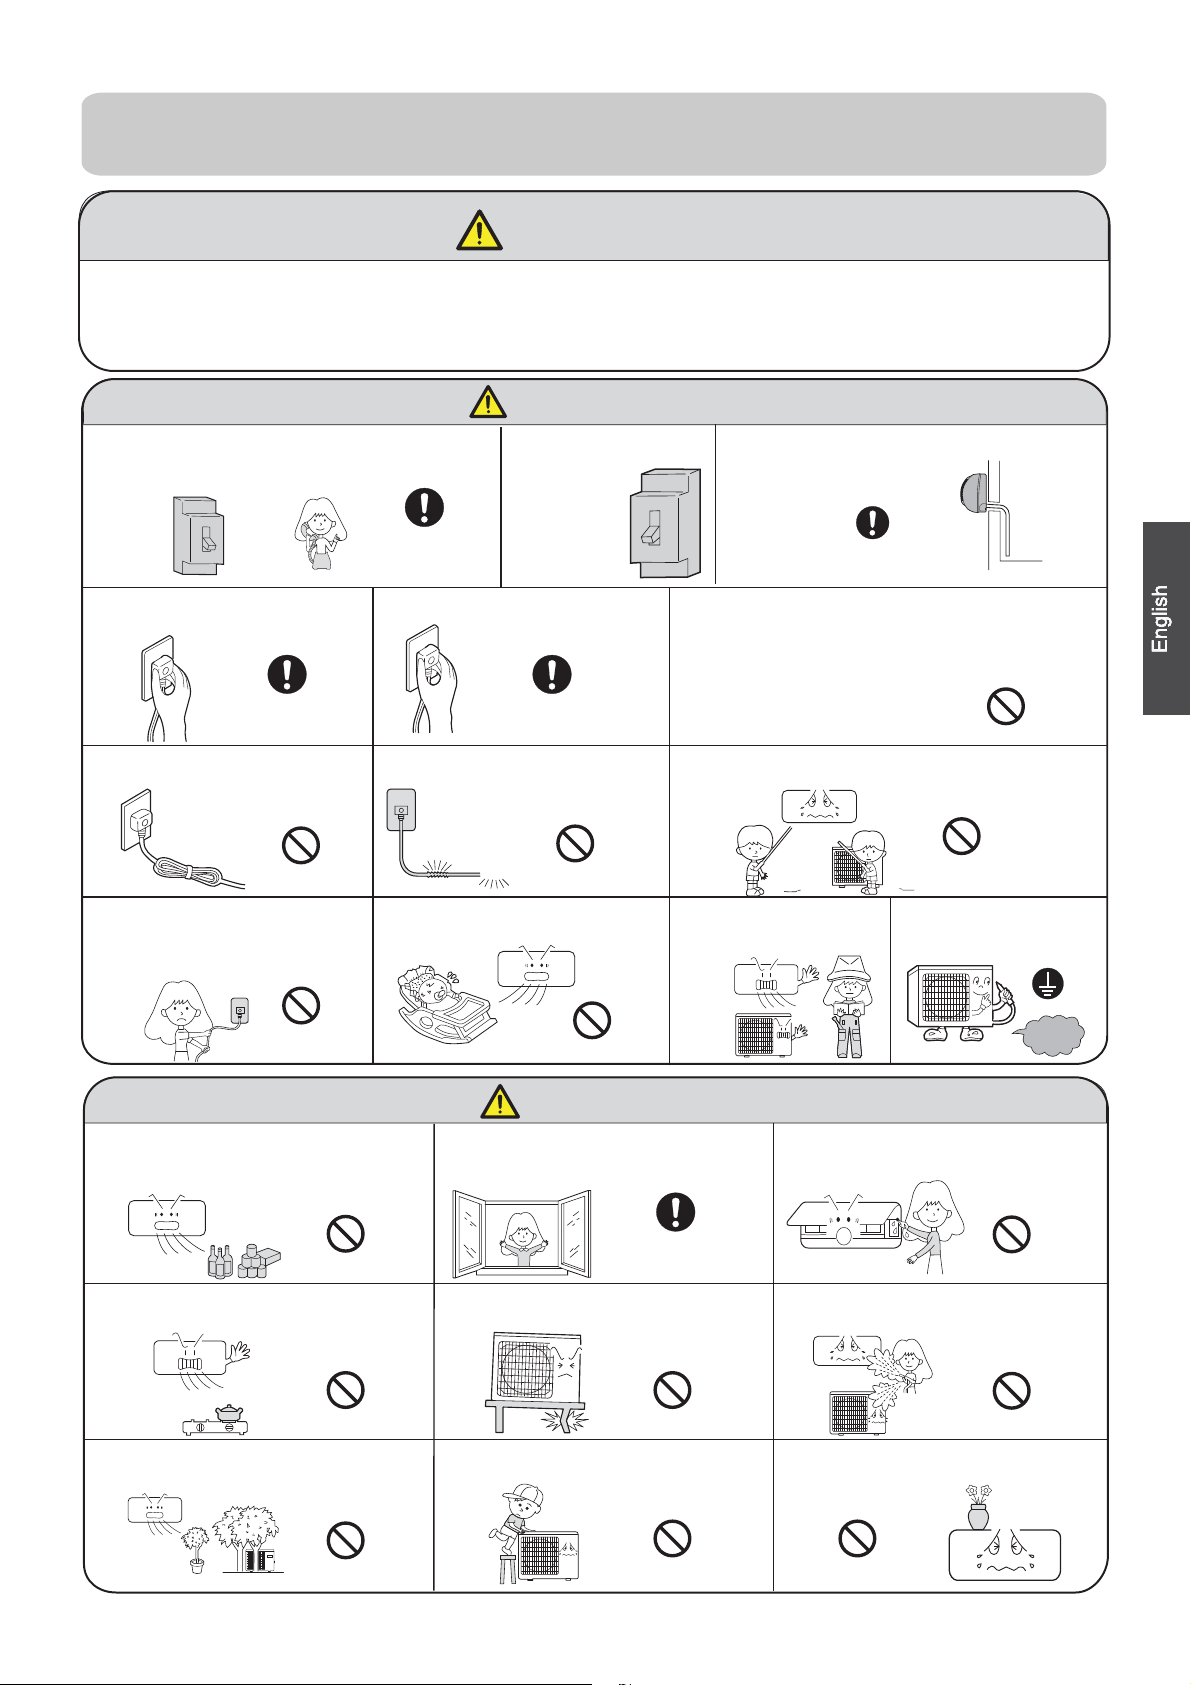
Cautions
WARNING
Please call Sales/Service Shop for the Installation.
Do not attempt to install the air conditioner by yourself because improper works
may cause electric shock, fire, water leakage.
WARNING
When abnormality such as burnt-small found,
immediately stop the operation button and
contact sales shop.
Use an exclusive
power source
with a circuit
breaker
Check proper
installation of the
drainage securely
OFF
Connect power supply cord
to the outlet completely
STRICT
ENFORCEMENT
Do not use power supply
cord in a bundle.
STRICT
ENFORCEMENT
Use the proper voltage
Take care not to damage
the power supply cord.
PROHIBITION
Do not start or stop the
operation by disconnecting
the power supply cord
and so on.
PROHIBITION
Do not use for the purpose of storage of
food, art work, precise equipment,
breeding, or cultivation.
Do not channel the air flow directly
at people, especially at infants or
the aged.
1.Do not use power supply cord extended
or connected in halfway
2.
Do not install in the place where there is any
possibility of inflammable gas leakage around the unit.
STRICT
ENFORCEMENT
PROHIBITION
PROHIBITION
3.Do not get the unit exposed
to vapor or oil steam.
Do not insert objects into the air
inlet or outlet.
Do not try to repair or
reconstruct by yourself.
CAUTION
Take fresh air occasionally especially
when gas appliance is running at the
same time.
STRICT
ENFORCEMENT
PROHIBITION
PROHIBITION
Connect the earth
cable.
earthing
Do not operate the switch with
wet hand.
PROHIBITION
Do not install the unit near a fireplace
or other heating apparatus.
PROHIBITION
Do not place animals or plants in
the direct path of the air flow
PROHIBITION
STRICT
ENFORCEMENT
Check good condition of the
installation stand
PROHIBITION
Do not place any objects on or
climb on the unit.
PROHIBITION
PROHIBITION
Do not pour water onto the unit
for cleaning
PROHIBITION
Do not place flower vase or water
containers on the top of the unit.
PROHIBITION
7
Page 8
Trouble shooting
Cautions
Before asking for service, check the following
first.
Cause or check points
When unit is stopped, it won't restart
immediately until 3 minutes have
elapsed to protect the system.
When the electric plug is pulled out
and reinserted, the protection circuit
will work for 3 minutes to protect the
air conditioner.
During unit operation or at stop,
a swishing or gurgling noise may
be heard.At first 2-3 minutes after
unit start, this noise is more noticeable.
(This noise is generated by
refrigerant flowing in the system.)
During unit operation, a cracking
noise may be heard.This noise is
generated by the casing expanding
or shrinking because of
temperature changes.
Should there be a big noise from
air flow in unit operation, air
filter may be too dirty.
This is because the system
circulates smells from the interior
air such as the smell of furniture,
paint, cigarettes.
During COOL or DRY operation,
indoor unit may blow out mist.
This is due to the sudden cooling
of indoor air.
In DRY mode, when room temperature
becomes lower than temp.
setting+2
intermittently at LOW speed
regardless of FAN setting.
Is power plug inserted?
Is there a power failure?
Is fuse blownout?
Is the air filter dirty?
Normally it should be cleaned
every 15 days.
Are there any obstacles before
inlet and outlet?
Is temperature set correctly?
Are there some doors or
windows left open?
Is there any direct sunlight
through the window during the
cooling operation?(Use curtain)
Are there too much heat sources
or too many people in the room
during cooling operation?
o
C,unit will run
Normal
Performance
inspection
Multiple
check
Phenomenon
The system
does not restart
immediately.
Noise is heard
Smells are
generated.
Mist or steam are
blown out.
In dry mode,
speed can’t be
changed.
Poor cooling
fan
Do not obstruct or cover the ventilation
conditoner.Do not put fingers
inlet/outlet and
Do not allow children to play with the air
case should children be
swing louver.
or any other things into the
allowed to sit on the outdoor unit.
grille of the air
conditioner
Specifications
The refrigerating circuit is leak-proo f.
The machine is adaptive in following
1.Applicable ambient temperature range:
Indoor
Cooling
Outdoor
Indoor
Heating
Outdoor
Outdoor
(INVERTER)
2. If the power supply cord is damaged, it
manufacturer
3. If the fuse of indoor unit on PC board is
it with the type of
broken,change it with the type of
4. The wiring method should be in line with
5. After installation, the power plug should
6. The waste battery should be disposed
7. The appliance is not intended for use
persons
8.Young children should be supervised
the appliance.
with
9. Please employ the proper power plug,
cord.
The power plug and connecting cable
10.
attestation.
11.In order to protect the units,please turn
30 seconds
or its service agent or a similar
without supervision.
later, cutting off the power.
Maximum:D.B/W.B
mum:D.B/W.B
Mini
Maximum:D.B/W.B
mum:
Mini
Maximum:D.B
mum:
Mini
Maximum:D.B/W.B
Minimum:D.B/W.B
Maximum:D.B/W.B
mum:D.B
Mini
T. 3.15A/ 250V
D.B
D.B
must be replaced
broken,please
. If the fuse of
T.25A/250V
the local wiring
be easily reached.
properly.
by young children or
to ensure that th
which fit into the
must have
off the A/C first,
situation
32oC/23oC
o
C/15oC
21
o
C/26oC
43
o
18
C
o
C
27
0oC
o
C/18oC
24
o
-
C/-8oC
7
o
24
C/18oC
o
C
-15
qualified
outdoor
acquired the local
.In no
person.
change
unit is
standard.
ey
do not play
p
ower supply
and at least
by the
infirm
Page 9
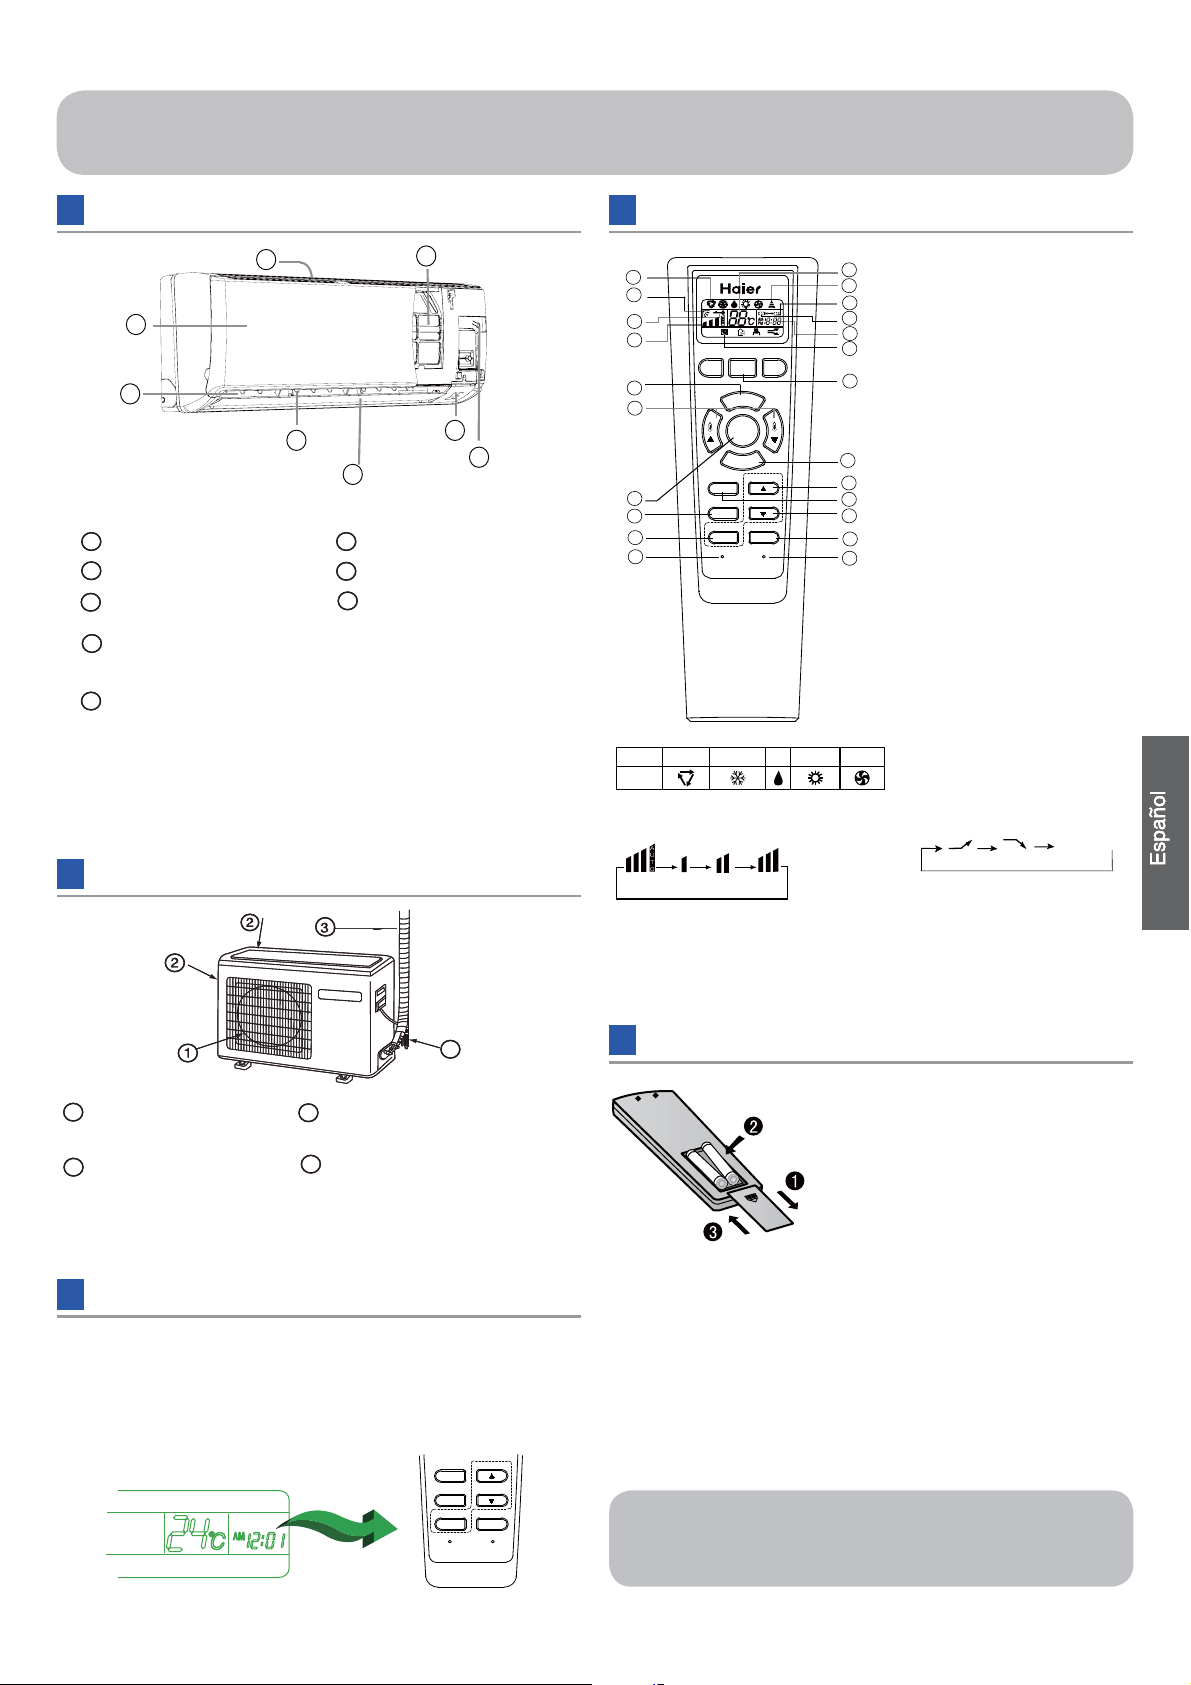
Componentes y funciones
Unidad interior
1
2
3
4
5
1
Toma de entrada Panel de indicadores
2
Rejilla de la toma de entrada Interruptor de emergencia
Toma de salida Filtro purificador de aire
3
Pala vertical (permite ajustar la
4
dirección del flujo de aire hacia
la izquierda y hacia la derecha)
Alerón horizontal (permite
5
ajustar la dirección del flujo de
aire hacia arriba y hacia abajo;
no lo ajuste manualmente)
6
7
8
Recuerde que la ilustración anterior podría no reflejar
fielmente el producto adquirido y debe utilizarse
únicamente como referencia.
8
6
7
(interior)
Unidad exterior
Control remoto
1
2
5
3
13
18
12
21
19
17
TIMER
CLOCK
LIGHT
LOCK
ON/OFF
FAN
MODE
SWING
POWER/SOFT
SLEEP
SET
RE
SET
1. Indicador de modo
Modo de
AUTOMÁTICO REFRIGERACIÓN SECO CALEFACCIÓN VENTILADOR
funcionamiento
Control remoto
2. Indicador de OSCILACIÓN
3. Indicador de VELOCIDAD DE
VENTILADOR
MEDIA
BAJA
4. Indicador de la función SUEÑO
5. Indicador de BLOQUEO
6. ENVÍO DE SEÑAL
7. Indicador de TEMPORIZADOR DE
APAGADO
8. Indicador de TEMPORIZADOR DE
ENCENDIDO
ALTAAUTOMÁTICO
10
6
7
8
9
4
11
15
23
20
14
16
22
9. Indicador de RELOJ
10. Indicador de TEMPERATURA
11. Botón ENCENDIDO /
APAGADO
12. Botón MODO
13. Botón VENTILADOR
14. Botón HORA
15. Botón OSCILACIÓN
16. Botón SUEÑO
17. Botón BLOQUEAR
Se utiliza para bloquear los
botones y los indicadores de
la pantalla LCD.
18. Botón CONFIGURACIÓN DE
TEMPERATURA
19. Botón ESTABLECER / LUZ
20. Botón TEMPORIZADOR
21. Botón RELOJ
Se utiliza para configurar la
hora correcta.
22. Botón RESTABLECER
Si el control remoto presenta
alguna anomalía, introduzca
un objeto puntiagudo a
través del orificio para pulsar
este botón y restablecer el
control remoto.
23. Botón HORA / INTENSO /
SUAVE
Se utiliza para establecer la
configuración del reloj y el
temporizador.
Cada vez que pulse este
botón, la pantalla cambiará
de acuerdo con el ciclo
ilustrado a continuación:
INTENSO SUAVE
DESACTIVADO
4
1
TOMA DE SALIDA TUBOS DE CONEXIÓN Y
3
CABLEADO ELÉCTRICO
4
2
TOMA DE ENTRADA
MANGUERA DE DRENAJE
Recuerde que la ilustración anterior podría no reflejar
fielmente el producto adquirido y debe utilizarse
únicamente como referencia.
Configuración del reloj
Pulse el botón RELOJ. A continuación, comenzará a parpadear el
indicador "AM" o "PM".
Pulse los botones o para configurar la hora correcta. Cada vez que
pulse un botón, la hora se aumentará o reducirá en 1 minuto. Si mantiene
un botón pulsado, la hora avanzará o retrocederá rápidamente. Una vez
confirmada la configuración de hora, pulse el botón ESTABLECER. Tras
hacerlo, el indicador “AM” o “PM” dejará de parpadear y el reloj se pondrá
en marcha.
TIMER
CLOCK
LIGHT
LOCK
POWER/SOFT
SLEEP
SET
RESET
Instalación de las baterías
1. Extraiga la cubierta de las baterías;
2. Instale las baterías como muestra
la ilustración. 2 baterías R-03, botón
de restablecimiento (cilindro);
3. Asegúrese de que la polaridad
de las baterías coincide con los
símbolos “+” / “-” al instalarlas;
Instale las baterías y vuelva a colocar de nuevo la cubierta.
4.
Nota:
● La distancia entre el cabezal de transmisión de señal y el orificio del
receptor debe ser inferior a 7 m sin obstáculos.
● Si se instalan en la habitación lámparas fluorescentes de activación
electrónica o de tipo alterno, o bien teléfonos inalámbricos, el receptor
podría resultar perturbado al recibir las señales, por lo que la distancia
hasta la unidad interior deberá ser menor.
● Si se activan todos los indicadores de la pantalla o no es posible
visualizarlos correctamente durante el uso, es señal de que las
baterías se han agotado. Por favor, cambie las baterías.
● Si el control remoto no funciona normalmente durante su uso, extraiga
las baterías y vuelva a instalarlas pasados unos minutos.
Sugerencia:
Extraiga las baterías si no tiene intención de utilizar la unidad durante un
periodo largo de tiempo.
Si observa alguna pantalla extraña después de extraer las baterías, sólo
necesitará pulsar el botón RESTABLECER.
Page 10

Funcionamiento
Funcionamiento básico
TIMER
CLOCK
LIGHT
SET
LOCK
ALTA
ON/OFF
FAN
MODE
SWING
POWER/SOFT
SLEEP
RESET
VENTILADOR
Control remoto
1. Arranque de la unidad
Pulse el botón de ENCENDIDO / APAGADO en el control remoto para
arrancar la unidad.
2. Selección del modo de funcionamiento
Pulse el botón MODO. Cada vez que pulse el botón, el modo
de funcionamiento cambiará de acuerdo con el ciclo ilustrado a
continuación: Control remoto:
AUTOMÁTICO REFRIGERACIÓN SECO
3. Selección de la configuración de temperatura
Pulse el botón
/ .
Cada vez que pulse este botón, la temperatura configurada
aumentará en 1°C. Si mantiene el botón pulsado, la temperatura
aumentará rápidamente.
Cada vez que pulse este botón, la temperatura configurada
descenderá en 1°C. Si mantiene el botón pulsado, la temperatura
descenderá rápidamente.
Seleccione la temperatura que desee.
4. Selección de la velocidad del ventilador
Pulse el botón VENTILADOR. Cada vez que pulse el botón, la
velocidad del ventilador cambiará de acuerdo con el ciclo ilustrado a
continuación:
Control remoto:
AUTOMÁTICO
El aparato de aire acondicionado funciona según la velocidad de ventilador indicada.
Si el VENTILADOR se configura en el modo AUTOMÁTICO, el aparato de
aire acondicionado ajustará automáticamente la velocidad del mismo según la
temperatura de la habitación.
CALEFACCIÓN
BAJA MEDIA
Funcionamiento de emergencia y
funcionamiento de prueba
Funcionamiento de emergencia:
Utilice este modo de funcionamiento sólo si el control remoto no funciona o
●
se pierde. Si el modo de funcionamiento de emergencia se encuentra activo,
el aparato de aire acondicionado podrá funcionar automáticamente durante
un tiempo.
Al presionar el interruptor de emergencia, el equipo emitirá el sonido “Pi”
●
una vez, confirmando así la activación de este modo de funcionamiento.
Al encender el interruptor de alimentación por primera vez e iniciar el
●
modo de funcionamiento de emergencia, la unidad se pondrá en marcha
automáticamente en los siguientes modos:
Temperatura de
Superior a 23°C
Inferior a 23°C 23°C NO AUTOMÁTICO CALEFACCIÓN
No es posible cambiar la configuración de temperatura y la velocidad del
●
la habitación
Temperatura
seleccionada
Modo de
Velocidad del
temporizador
26°C NO AUTOMÁTICO REFRIGERACIÓN
ventilador
Modo de
funcionamiento
Interruptor del modo
de funcionamiento de
emergencia
Pi
ventilador. Asimismo, tampoco es posible utilizar el modo de temporizador o seco.
Funcionamiento de prueba:
El interruptor de funcionamiento de prueba es similar al
interruptor de emergencia.
Utilice este interruptor en el modo de
●
funcionamiento de prueba si la temperatura de la
habitación es inferior a 16°C. No lo utilice en el
modo de funcionamiento normal.
Continúe pulsando el interruptor de funcionamiento
●
de prueba durante más de 5 segundos. Separe el
dedo del interruptor cuando el equipo emita dos
veces el sonido "Pi": el modo de refrigeración se
iniciará con el flujo de aire a velocidad "Alta".
En este modo de funcionamiento, el motor del
●
ventilador de la unidad interior funcionará a
velocidad Alta.
Interruptor del
modo de funcionamiento de prueba
Pi
Pi
Ajuste de la dirección del flujo de aire
1. Indicador de estado de envío de aire
Alerón vertical
Pos. 1 Desactivado Pos. 2
Pos. 4 (Oscilación automática)
2. Ajuste del flujo de aire hacia la izquierda y hacia la derecha (manual)
Mueva la pala vertical por medio del mando del aparato de aire
acondicionado para ajustar la dirección del flujo de aire hacia la
izquierda o hacia la derecha, según lo indicado en la ilustración.
Pos. 3
Modo de
funcionamiento
AUTOMÁTICO
REFRIGERACIÓN
SECO
CALEFACCIÓN
VENTILADOR
10
Control
remoto
En el modo de funcionamiento automático, el aparato de aire
acondicionado seleccionará automáticamente el modo de
Refrigeración o Calefacción según la temperatura de la habitación.
Si el VENTILADOR está configurado en el modo AUTOMÁTICO,
el aparato de aire acondicionado ajustará automáticamente su
velocidad según la temperatura de la habitación.
En el modo SECO, si la temperatura de la habitación desciende por
debajo de la temperatura configurada + 2°C, la unidad funcionará
de forma intermitente a BAJA velocidad, independientemente de la
configuración de VENTILADOR.
En el modo CALEFACCIÓN, el aire cálido se expulsa después de un
corto periodo de tiempo gracias a la función de prevención de frío.
Si el VENTILADOR se configura en el modo AUTOMÁTICO,
el aparato de aire acondicionado ajustará automáticamente la
velocidad del mismo según la temperatura de la habitación.
En el modo VENTILADOR, la unidad no funcionará en los modos
de REFRIGERACIÓN o CALEFACCIÓN, sino únicamente en el
modo VENTILADOR, durante el cual tampoco estará disponible
el modo AUTOMÁTICO. Además, la función de configuración
de temperatura permanece deshabilitada en el modo
VENTILADOR y la función SUEÑO no está disponible.
Nota
3D
Precauciones:
● Apague la unidad antes de ajustar la posición del alerón con la mano.
● Si el nivel de humedad es alto y se dirigen todas las tablillas verticales
hacia la izquierda o hacia la derecha, podría condensarse agua en la
toma de salida de aire.
● Es aconsejable no mantener el alerón horizontal en posición de
descenso durante un periodo prolongado de tiempo en los modos
de REFRIGERACIÓN o SECO. De lo contrario, podría generarse
condensación de agua.
Nota:
El control remoto carga automáticamente la última posición de
oscilación establecida al volver a poner en marcha la unidad después
de haberla detenido.
Page 11

Funcionamiento
Uso durante el sueño
Antes de irse a dormir, pulse el botón SUEÑO para que la unidad
funcione en el modo SUEÑO y le permita disfrutar de un sueño profundo.
Uso de la función SUEÑO
Una vez que la unidad se encuentre en marcha, configure el estado de
funcionamiento y pulse el botón SUEÑO. Para utilizar la función SUEÑO
deberá ajustar antes el reloj y la hora.
Modo de funcionamiento
1. En el modo REFRIGERACIÓN, SECO
1 hora después de que se haya iniciado el modo SUEÑO, la
temperatura aumentará 1
Transcurrida otra hora, la temperatura aumentará 1
se mantendrá en funcionamiento entonces durante 6 horas más y, a
continuación, se detendrá. La temperatura será entonces superior a la
temperatura configurada, por lo que la temperatura de la habitación ya
no será tan reducida y le permitirá dormir con tranquilidad.
Se inicia el funcionamiento en
modo SUEÑO
1 h
Temperatura configurada
En los modos de REFRIGERACIÓN y SECO
2. En el modo CALEFACCIÓN
1 hora después de que se haya iniciado el modo SUEÑO, la temperatura
descenderá 2°C por debajo de la temperatura configurada. Transcurrida
otra hora, la temperatura descenderá 2°C más. Después de otras 3
horas, la temperatura aumentará 1°C. La unidad se mantendrá en
funcionamiento entonces durante 3 horas más y, a continuación, se
detendrá. La temperatura será entonces inferior a la temperatura
configurada, por lo que la temperatura de la habitación ya no será tan
elevada y le permitirá dormir con tranquilidad.
Temperatura configurada
1 h
1 h
Se detiene el funcionamiento
en el modo SUEÑO
En el modo CALEFACCIÓN
O
1 h
Aumenta 1
Desciende 2°C
Desciende 2°C
3 h
C sobre la temperatura configurada.
Se detiene el funcionamiento
en modo SUEÑO
Aprox. 6 horas
O
Aumenta 1
C
O
C
La unidad se detiene
La unidad se detiene
3 h
Aumenta 1°C
Se detiene el funcionamiento
en el modo SUEÑO
O
C más. La unidad
3. En el modo AUTOMÁTICO
La unidad funcionará en el modo de sueño correspondiente, adaptado
al modo de funcionamiento seleccionado automáticamente.
4. En el modo VENTILADOR
No dispone de función SUEÑO.
5. Si se establece la función silenciosa de sueño en 8
horas, no será posible ajustar el temporizador silencioso
de sueño.
Si se configura la función TEMPORIZADOR, la función silenciosa de
sueño no se podrá activar. Tras configurar la función de sueño, si el
usuario restablece la función TEMPORIZADOR se cancelará la función
de sueño; el aparato pasará al estado de temporización activado, si
los dos modos se configuran al mismo tiempo, independientemente de
cuál de los tiempos de funcionamiento finalice primero, la unidad se
detendrá automáticamente y se cancelará el otro modo.
Función de reanudación tras
fallos en el suministro eléctrico
1. Si es la primera vez que se arranca la unidad, el compresor no
se pondrá en marcha a menos que hayan transcurrido 3 minutos. Al
recuperar el suministro eléctrico tras un fallo del mismo, la unidad se
pondrá en marcha automáticamente y, 3 minutos después, lo hará
también el compresor.
2. Nota para continuar después de errores de alimentación:
Pulse el botón de sueño diez veces en menos de cinco segundos y
acceda a esta función después de escuchar cuatro sonidos. Pulse el
botón de sueño diez veces en menos de cinco segundos y abandone a
esta función después de escuchar dos sonidos.
Funcionamiento INTENSO / SUAVE
(1) Funcionamiento INTENSO
Utilice esta función si necesita calentar o refrigerar
rápidamente una habitación.
En el modo REFRIGERACIÓN, el ventilador se
configura automáticamente a velocidad ALTA bajo el
control del modo de ventilador AUTOMÁTICO.
En el modo CALEFACCIÓN, el ventilador se configura
automáticamente a velocidad MEDIA bajo el control del
modo de ventilador AUTOMÁTICO.
(2) Funcionamiento SUAVE
Utilice esta función si desea que la unidad funcione de
forma silenciosa y le permita leer o descansar.
En el modo de funcionamiento SUAVE, el ventilador se
configura automáticamente a velocidad BAJA bajo el
control del modo de ventilador AUTOMÁTICO.
Nota:
Si selecciona los modos rápidos de CALEFACCIÓN o REFRIGERACIÓN
en el modo de funcionamiento INTENSO, la habitación no presentará una
distribución homogénea de la temperatura.
Si el modo de funcionamiento SUAVE se mantiene activo durante un
periodo prolongado de tiempo, no se alcanzarán niveles eficaces de
calefacción o refrigeración.
Para cancelar el modo de funcionamiento INTENSO o
SUAVE
Pulse de nuevo el botón INTENSO / SUAVE. Tras hacerlo, el indicador
del modo de funcionamiento INTENSO o SUAVE desaparecerá.
11
Page 12

Funcionamiento
Uso del temporizador de
encendido / apagado
Configure correctamente el reloj antes de usar la función
TEMPORIZADOR.
1. Una vez que la unidad se encuentre en marcha, seleccione el modo de
funcionamiento que desee.
2. Pulse el botón TEMPORIZADOR para cambiar al modo
TEMPORIZADOR. Cada vez que pulse este botón, la pantalla cambiará
de acuerdo con el ciclo ilustrado a continuación:
Control remoto:
DESACTIVADO
REQUISITOS DE ELIMINACIÓN:
Su aparato de aire acondicionado ha sido marcado con
este símbolo, el cual indica que los productos de tipo
eléctrico y electrónico no deben mezclarse con residuos
domésticos sin clasificar. No intente desmontar el sistema
personalmente: tanto el desmontaje del sistema de aire
acondicionado como la manipulación del refrigerante, el
aceite y cualquier otro componente deben ser llevados a cabo por un
instalador capacitado, de acuerdo con la legislación local y nacional al
efecto. Los aparatos de aire acondicionado deben ser tratados en
instalaciones de tratamiento especializadas y aptas para su reutilización,
reciclado y recuperación. Al garantizar la correcta eliminación de este
producto, usted contribuirá a evitar las posibles consecuencias negativas
que podría provocar sobre el medioambiente y la salud humana. Póngase
en contacto con el instalador o la autoridad local pertinente si desea
obtener más información. Las baterías deben ser extraídas del control
remoto y eliminadas de forma independiente, de acuerdo con la
legislación local y nacional al efecto.
TEMPORIZADOR DE
ENCENDIDO
Seleccione a continuación el modo de TEMPORIZADOR que desee
(TEMPORIZADOR DE ENCENDIDO, TEMPORIZADOR DE APAGADO
o TEMPORIZADOR DE ENCENDIDO-APAGADO). "Comenzará a
parpadear el indicador "
3. Pulse el botón
Puede ajustar cualquier hora comprendida dentro de un intervalo de 24
horas.
4. Una vez definida la hora correcta, pulse el botón ESTABLECER para
confirmar la operación. El indicador "
el control remoto.
5. Cancelación del modo TEMPORIZADOR
Pulse el botón TEMPORIZADOR varias veces hasta que desaparezca el
icono del modo TEMPORIZADOR.
Sugerencias:
Después de sustituir las baterías o si se produce un fallo en el suministro
eléctrico, la configuración de hora se restablecerá.
El control remoto posee una función de memoria, gracias a la cual la
próxima vez que utilice el modo TEMPORIZADOR sólo necesitará pulsar
el botón ESTABLECER después de seleccionar el modo si desea aplicar
la misma configuración de hora que la vez anterior.
Según la secuencia de configuración de hora aplicada a las funciones
TEMPORIZADOR DE ENCENDIDO y TEMPORIZADOR DE APAGADO,
podrá realizar operaciones de Inicio-Parada o Parada-Inicio.
TEMPORIZADOR DE
APAGADO
" u " ".
/ para configurar la hora.
TEMPORIZADOR DE
ENCENDIDO-APAGADO
" u " " dejará de parpadear en
CONFORMIDAD DE LOS MODELOS
SEGÚN LAS NORMATIVAS EUROPEAS
CE
Todos los productos satisfacen los requisitos de las siguientes normas
europeas:
- Directiva de baja tensión, 73/23/CEE
- Directiva de baja tensión, 2006/95/CE
- Compatibilidad electromagnética, 89/336/CEE
- Compatibilidad electromagnética, 2004/108/CE
ROHS
Los productos satisfacen los requisitos de la directiva 2002/95/CEE
establecida por el Parlamento Europeo y el Consejo sobre restricciones
a la utilización de determinadas sustancias peligrosas en aparatos
eléctricos y electrónicos (Directiva RoHS UE).
WEEE
De acuerdo con la directiva 2002/96/CE del Parlamento Europeo,
se informa al consumidor acerca de los requisitos de eliminación de
productos eléctricos y electrónicos.
INFORMACIÓN IMPORTANTE ACERCA
DEL REFRIGERANTE UTILIZADO
Contiene gases fluorados de efecto invernadero
regulados por el Protocolo de Kyoto.
R410A
2
1=
2=
1
1+2=
FE
Este producto contiene gases fluorados de efecto invernadero regulados
por el Protocolo de Kyoto. No los libere libremente a la atmósfera.
Tipo de refrigerante: R410A
Valor GWP*: 1975
GWP = Potencial de contribución al calentamiento global
Escriba con tinta indeleble:
• 1 La carga de refrigerante que contiene el producto de fábrica;
• 2 La cantidad de refrigerante adicional cargada durante la instalación; y
• 1+2 La carga total de refrigerante;
en la etiqueta de carga de refrigerante suministrada con el producto.
Una vez escritos los datos correspondientes, la etiqueta deberá adherirse
cerca de la conexión de carga del producto (por ejemplo, sobre la parte
interna de la cubierta de la válvula de retención).
A Contiene gases fluorados de efecto invernadero regulados por el
Protocolo de Kyoto.
B Carga de refrigerante que contiene el producto de fábrica: consulte la
placa de características de la unidad.
C Cantidad de refrigerante adicional cargada durante la instalación.
D Carga total de refrigerante.
E Unidad exterior.
F Botella de refrigerante y colector de carga.
kg
kg
kg
A
B
C
D
12
Page 13

Mantenimiento
Para utilizar el aparato de aire acondicionado de forma inteligente
Configure una temperatura
adecuada para la habitación.
Temperatura
adecuada
Cierre las puertas y ventanas
durante el uso.
Durante la
refrigeración, evite la
entrada de luz solar
directa utilizando
cortinas o mamparas
Si no tiene intención de usar
la unidad durante un periodo
prolongado de tiempo, apague el
interruptor principal de la fuente
de alimentación.
APAGAR
No bloquee las tomas de
entrada o salida de aire.
Utilice el temporizador de
forma eficiente
Utilice las tablillas de forma
eficiente
Control remoto
No use agua; limpie el control remoto con
un paño seco. No use limpiacristales ni
paños impregnados en productos químicos.
Equipo interior
Limpie el aparato de aire acondicionado
utilizando un paño suave y seco. Si necesita
eliminar manchas de suciedad persistentes,
utilice un detergente neutro diluido con
agua. Escurra el agua del paño antes de
pasarlo sobre la unidad. A continuación,
elimine por completo todos los restos de
detergente.
No utilice ninguno de los siguientes productos para limpiar la unidad
Gasolina, bencina, disolvente o productos de limpieza;
podrían dañar el revestimiento de la unidad.
Limpieza del filtro de aire
Agua caliente a más de 40°C (104°F); podría
provocar efectos de decoloración o deformación.
1 Abra la rejilla de la toma de entrada tirando de
ella hacia arriba.
2 Extraiga el filtro.
Presione ligeramente hacia arriba la pestaña central del filtro
hasta liberarla del tope y extraiga el filtro hacia abajo.
3 Limpie el filtro.
Utilice un aspirador para eliminar el polvo o lave el filtro con
agua. Después del lavado, permita que el filtro se seque
completamente a la sombra.
4 Instale el filtro.
Instale el filtro correctamente, de modo que la marca
"FRONTAL" quede orientada hacia delante. Asegúrese de
que el filtro encaje completamente tras el tope. La instalación
incorrecta de los filtros izquierdo y derecho podría provocar
defectos.
Una vez cada
dos semanas
5 Cierre la rejilla de la toma de entrada.
Sustitución del filtro purificador de aire
1. Abra la rejilla de la toma de entrada
Sujete la rejilla de la toma de entrada
utilizando un pequeño dispositivo
denominado soporte de rejilla, ubicado en el
extremo derecho de la unidad interior.
2. Extraiga el filtro de aire estándar
Deslice el mando ligeramente hacia arriba para
liberar el filtro y, a continuación, tire de él.
Extraiga el filtro purificador de
aire antiguo
3. Instale el filtro purificador de aire
Coloque los accesorios del filtro purificador
de aire en los soportes izquierdo y derecho
del filtro.
4. Instale el filtro de aire estándar
(Instalación necesaria)
ATENCIÓN:
La superficie de color blanco del filtro purificador de
aire fotocatalizador debe quedar orientada hacia fuera,
mientras que la superficie de color negro debe quedar
orientada hacia la unidad. Por su parte, la superficie de
color verde del filtro purificador de aire antibacterias debe
quedar orientada hacia fuera, mientras que la superficie
de color blanco debe quedar orientada hacia la unidad.
5. Cierre la rejilla de la toma de entrada
Cierre la rejilla firmemente.
NOTA:
● El filtro purificador de aire fotocatalizador se solarizará en un
periodo de tiempo fijo. En el caso de una familia normal, suele
solarizarse cada 6 meses.
● El filtro purificador de aire antibacterias disfruta de una gran
durabilidad y no es necesario sustituirlo. No obstante, durante
las temporadas de uso es recomendable eliminar el polvo con
frecuencia utilizando un aspirador o agitándolo ligeramente. De lo
contrario, su rendimiento puede verse afectado.
● Cuando no se encuentre en uso, conserve el filtro purificador de
aire antibacterias en un lugar fresco y seco y evite su exposición
a la luz solar directa durante periodos prolongados de tiempo. De
lo contrario, su capacidad de esterilización se reducirá.
13
Page 14

Precauciones
ADVERTENCIA
Llame al departamento de ventas / asistencia técnica si desea obtener más información acerca de
la Instalación.
No intente instalar este aparato de aire acondicionado personalmente. Una instalación incorrecta
podría provocar descargas eléctricas, incendios o fugas de agua.
ADVERTENCIA
Si aprecia alguna anomalía, como una pequeña
quemadura, detenga inmediatamente el funcionamiento
del aparato y póngase en contacto con su punto de venta.
APAGAR
Conecte el cable de la fuente de
alimentación completamente a la toma
de suministro eléctrico.
ACCIÓN
OBLIGATORIA
No enrolle el cable de la fuente de
alimentación.
ACCIÓN
OBLIGATORIA
Utilice un nivel de voltaje adecuado.
Extreme la precaución para evitar dañar
el cable de la fuente de alimentación.
Utilice una fuente
de alimentación
exclusiva
equipada con
un interruptor de
circuito.
ACCIÓN
OBLIGATORIA
Compruebe que la instalación
del drenaje se haya llevado a
cabo correctamente.
ACCIÓN
OBLIGATORIA
1. No prolongue el cable de la fuente de
alimentación ni lo conecte por un punto
intermedio.
2. No instale el aparato en un lugar en el
que sea posible la generación de fugas
de gas inflamable alrededor de la unidad.
3. No permita que la unidad resulte
expuesta a vapores de agua o de aceite.
PROHIBIDO
No inserte objetos a través de la toma de entrada o salida de
aire.
PROHIBIDO
No inicie ni detenga el funcionamiento
del aparato desconectando el cable de
la fuente de alimentación.
PROHIBIDO
No utilice el aparato con fines de conservación
de alimentos, obras de arte, equipos de precisión
o cultivos, ni tampoco en instalaciones agrarias.
PROHIBIDO
No instale la unidad cerca de una chimenea u
otro aparato de calefacción.
PROHIBIDO
No coloque animales o plantas en la ruta directa
del flujo de aire.
No dirija el flujo de aire directamente
hacia personas, en especial hacia niños
o ancianos.
PROHIBIDO
No intente reparar o reconstruir
el aparato personalmente.
PROHIBIDO
PRECAUCIÓN
Aspire aire fresco con frecuencia, especialmente
si hay algún aparato de gas en funcionamiento
al mismo tiempo.
ACCIÓN
OBLIGATORIA
Compruebe que el soporte de instalación se
encuentre en buenas condiciones.
PROHIBIDO
No coloque ningún objeto sobre la unidad ni se
suba a ella.
PROHIBIDO
Conecte el cable de conexión
a tierra.
Conexión
a tierra
No accione el interruptor con las manos
mojadas.
PROHIBIDO
No deposite agua sobre la unidad para
limpiarla.
PROHIBIDO
No coloque jarrones o contenedores de agua
de otro tipo sobre la unidad.
14
PROHIBIDO
PROHIBIDO
PROHIBIDO
Page 15

Resolución de problemas
Precauciones
Antes de solicitar asistencia técnica,
compruebe los siguientes puntos.
Causa o puntos a comprobar
● A fin de proteger el sistema, la unidad
no se reinicia inmediatamente después
de detenerla, sino que lo hace una vez
transcurridos 3 minutos.
● Al desconectar y volver a conectar el
enchufe eléctrico, el circuito de protección
se activa durante 3 minutos para proteger
el aparato de aire acondicionado.
● Es posible que se escuche un susurro o
gorgoteo durante el funcionamiento de la
unidad o al detenerla. El sonido es aún
más intenso después de 2-3 minutos una
vez puesta en marcha la unidad. (El origen
de este ruido se encuentra en el paso de
refrigerante a través del sistema).
● Es posible que se escuchen crujidos
durante el funcionamiento de la unidad. Este
sonido se genera como consecuencia de la
expansión o contracción de la carcasa que
se deriva de los cambios de temperatura.
● Si el flujo de aire genera un ruido de gran
intensidad durante el funcionamiento de la
unidad, es posible que el filtro de aire se
encuentre demasiado sucio.
● Esto se debe a la circulación del aire
aromatizado interior, con olor a muebles,
pintura o cigarrillos, a través del sistema.
● Durante el funcionamiento en los modos
de REFRIGERACIÓN o SECO, la unidad
interior podría expulsar vapores.
Esto se debe a la refrigeración
repentina del aire interior.
● El el modo SECO, si la temperatura de
la habitación desciende por debajo de la
temperatura configurada + 2°C, la unidad
funcionará de forma intermitente a BAJA
velocidad, independientemente de la
configuración de VENTILADOR.
● ¿Está conectado el enchufe de alimentación?
● ¿Se ha producido un fallo en el suministro
eléctrico?
● ¿Se ha fundido algún fusible?
● ¿Está sucio el filtro de aire?
Normalmente, es necesario limpiarlo cada
15 días.
● ¿Existen objetos colocados de forma
que obstaculicen las tomas de entrada y
salida?
● ¿Se ha configurado la temperatura
correctamente?
● ¿Existen puertas o ventanas abiertas?
● ¿Penetra la luz solar directamente a través
de las ventanas durante el funcionamiento
en modo de refrigeración? (Utilice cortinas)
● ¿Existen demasiadas fuentes de calor o
hay demasiadas personas en la habitación
durante la refrigeración?
Inspección de
comportamiento
normal
Pruebas
múltiples
Problema
El sistema no se reinicia
inmediatamente.
La unidad emite
ruidos.
Se aprecian olores.
El aparato expulsa
vapor o vaho.
No es posible cambiar la
velocidad del ventilador
en el modo seco.
Refrigeración
insuficiente
.
● No obstruya ni cubra los orificios de ventilación del aparato de aire
acondicionado. No introduzca los dedos a través de las tomas de entrada /
salida ni entre las tablillas móviles.
● No permita que los niños jueguen con el aparato de aire acondicionado. En
ningún caso debe permitirse a los niños sentarse sobre la unidad exterior.
Especificaciones
● El circuito de refrigerante ha sido diseñado a prueba de fugas.
La máquina puede adaptarse a las siguientes situaciones
1. Intervalos válidos de temperatura ambiental:
Interior
Refrigeración
Exterior
Interior
Calefacción
2. Si el cable de la fuente de alimentación resulta dañado, deberá ser sustituido
por el fabricante, su representante técnico u otro profesional capacitado con
similares competencias.
3. Si se funde el fusible de la placa de PC de la unidad interior, cámbielo por
otro de tipo T. 3,15 A / 250 V. Si se funde el fusible de la unidad exterior,
cámbielo por otro de tipo T. 25 A / 250 V.
4. El método de cableado debe satisfacer los requisitos de las normas locales
de cableado.
5. Después de la instalación, el enchufe de alimentación debe encontrarse
ubicado en un lugar fácilmente accesible.
6. Las baterías agotadas deben ser eliminadas correctamente.
7. Este aparato no ha sido diseñado para su uso por parte de niños o personas
discapacitadas sin vigilancia o asistencia.
8. Los niños deberán ser vigilados a fin de evitar que jueguen con el aparato.
9. Emplee un enchufe de alimentación adecuado, apto para el cable conectado
a la fuente de alimentación.
10.El enchufe de alimentación y el cable de conexión deben satisfacer los
requisitos de la normativa local.
11. A fin de proteger las unidades, apague primero el aparato de aire
acondicionado y, a continuación, desconecte la alimentación una vez
transcurridos 30 segundos.
Exterior
Exterior
(INVERTER)
Máximo: D.B. / W.B. 32°C / 23°C
Mínimo: D.B. / W.B. 21°C / 15°C
Máximo: D.B. / W.B. 43°C / 26°C
Mínimo: D.B. 18°C
Máximo: D.B. 27°C
Mínimo: D.B. 0°C
Máximo: D.B. / W.B. 24°C / 18°C
Mínimo: D.B. / W.B. -7°C / -8°C
Máximo: D.B. / W.B. 24°C / 18°C
Mínimo: D.B. -15°C
Page 16

Parti e funzioni
Unità interna
1
2
3
4
5
Ingresso Simbolo visualizzato
1
2
Griglia presa d'aria Interruttore d'emergenza
3
Uscita Filtro di purificazione dell'aria
6
7
8
(interno)
Lama verticale (regola il flusso
4
dell'aria in alto e in basso)
Aletta orizzontale (regola il
5
flusso verso l'alto o il basso.
Non regolare manualmente)
L'immagine in alto è solo di riferimento e potrebbe non
riprodurre esattamente il prodotto acquistato.
8
6
7
Unità da esterno
Telecomando
1
2
5
3
13
18
12
21
19
17
1. Icona modalità
Modalità
AUTO Condizionatore Deumidificatore RISCALDAMENTO Ventola
operativa
Telecomando
2. Icona OSCILLA
3. Icona Velocità ventola
BASSO
AUTO
4. Icona Sospensione
5. Icona BLocco
6. INVIO DEL SEGNALE
7. Icona Timer spegnimento
8. Icona Timero accensione
ON/OFF
FAN
MODE
SWING
POWER/SOFT
TIMER
OCK
CL
LIGHT
SLEEP
SET
RESET
LOCK
MEDIO ALTO
9. Icona Orologio
10
10.Icona Temperatura
6
11. Tasto Accensione/spegnimento
7
12. Tasto Modalità
8
13. Tasto Ventola
9
14. Tasto Ora
4
15. Tasto Oscilla
16. Tasto Sospensione
11
17. Tasto BLocco
Usato per bloccare i pulsanti e la
visualizzazione del LED.
18. Tasto Impostazione temperatura
15
19. Tasto Imposta/Luce
20. Tasto TIMER
23
21. Tasto Orologio
20
Usato per impostare l'ora esatta.
14
22. Tasto Reimposta
16
Se il telecomando funziona
22
in modo anomalo, usare un
oggetto appuntito per premere
questo pulsante e resettare il
telecomando.
23. Tasto Ora/Accensione/Soft
Usati per impostare l'orologio ed
il timer.
Ogni volta che si preme il tasto, il
display cambia come segue:
ALIMENTAZIONE SOFT
VUOTO
4
1
USCITA CONNESSIONE DELLE
3
TUBAZIONI E DEI CAVI ELETTRICI
2
INGRESSO TUBO DI DRENAGGIO
4
L'immagine in alto è solo di riferimento e potrebbe non
riprodurre esattamente il prodotto acquistato.
Impostazione dell'orologio
Premere il tasto Orologio, lampeggia "AM" o "PM".
Premere o per impostare l'ora esatta. Ciascuna pressione consente
di aumentare o ridurre di 1 minuto. Se si tiene premuto il tasto, i minuti
cambiano rapidamente. Premere il tasto Imposta per confermare
l'impostazione dell'ora: "AM" e "PM" smettono di lampeggiare e l'orologio
inizia a funzionare.
POWER/SOFT
TIMER
CLOCK
LIGHT
SLEEP
SET
LOCK
RESET
16
Installazione della batteria
1. Rimuovere il coperchio della
batteria;
2. Inserire le batterie come illustrato.
2 batterie R-03, tasto di ripristino
(cilindro);
3. Assicurarsi di rispettare la polarità
” + “/”-”;
Inserire la batteria, quindi riposizionare il coperchio.
4.
Nota:
● La distanza tra la testina di trasmissione del segnale e il foro del
ricevitore deve essere di massimo 7 metri, senza ostacoli.
● Se nella stanza è installata una lampada fluorescente ad avvio
elettronico o un telefono wireless, il ricevitore potrebbe essere
disturbato nella ricezione del segnale, pertanto la distanza con il
condizionatore deve essere diminuita
● Una visualizzazione di tutte le icone o poco chiara, sta ad indicare che
le batterie sono quasi esaurite. Sostituirle.
● Se il telecomando non funziona normalmente, rimuovere le batterie e
rimetterle a posto qualche minuto più tardi.
Suggerimento:
Rimuovere le batterie se l'unità non viene utilizzata per periodi prolungati.
Se dovessero apparire delle icone una volta spento, basta premere il tasto
di reset.
Page 17

Funzionamento
Funzionamento di base
Telecomando
1. Avviare l'unità
Tenere premuto il tasto Attiva/Disattiva sul telecomando finché l'unità si
avvia.
2. Selezione della modalità operativa
Premere il tasto Modalità. A ciascuna pressione la modalità cambia
come segue: Telecomando:
AUTO Condizionatore
3. Selezionare le impostazioni della temperatura
Premere il tasto
/ .
Ogni volta che viene premuto il pulsante le impostazioni
temperatura aumentano di 1°C. Se il tasto viene tenuto premuto, la
temperatura aumenterà rapidamente.
Ogni volta che viene premuto il pulsante le impostazioni
temperatura diminuiscono di 1°C. Se il tasto viene tenuto premuto,
la temperatura diminuirà rapidamente.
Selezionare la temperatura desiderata.
4. Selezione della velocità della ventola
Premere il tasto Ventola. A ciascuna pressione la velocità della ventola
cambia come segue:
Telecomando:
AUTO
Il condizionatore funziona alla velocità della ventola visualizzata.
Se Ventola è impostata in modalità Automatica, l’unità regolerà automaticamente la
velocità della ventola in base alla temperatura ambiente.
Modalità di
funzionamento
AUTO
Condizionatore
Deumidificatore
RISCALDAMENTO
Ventola
Telecomando Nota
Deumidificatore
BASSO MEDIO
Quando si è in modalità di funzionamento automatico,
il condizionatore sceglierà automaticamente se operare
in modalità raffreddamento o riscaldamento, in base
alla temperatura ambiente. Se Ventola è impostato su
Automatico, il condizionatore regolerà automaticamente la
velocità della ventola in base alla temperatura ambiente.
In modalità Deumidificatore, quando la temperatura
d'ambiente supera di +2°C la temperatura impostata, l'unità
si avvierà ad intervalli a velocità Bassa indipendentemente
dall'impostazione Ventola.
In modalità Riscaldamento, l'aria calda uscirà dopo un breve
periodo a causa della funzione di prevenzione dei flussi d'aria
fredda.
Se Ventola è impostata in modalità Automatica, l’unità
regolerà automaticamente la velocità della ventola in base
alla temperatura ambiente.
In modalità Ventilatore, l'unità non funzionerà in modalità
Condizionatore o Riscaldamento ma solo in modalità
Ventilatore. AUTO non è disponibile in modalità Ventilatore.
E l'impostazione
temperatura viene disattivata. In modalità Ventola, il
funzionamento sospensione non è disponibile.
ON/OFF
FAN
MODE
SWING
TIMER
CLOCK
LIGHT
SET
LOCK
RISCALDAMENTO
POWER/SOFT
SLEEP
RESET
Ventola
ALTO
Funzionamento di emergenza e test
Funzionamento d'emergenza:
Usare questa modalità solo quando il telecomando è difettoso o è andato perso e
●
in caso di emergenza, il condizionatore può funzionare in automatico per un pò.
Quando viene premuto l'interruttore d'emergenza, sarà emesso un bep per
●
indicare l'inizio della procedura.
Quando l'interruttore viene attivato per la prima volta e viene avviata l'operatività
●
di emergenza, l'unità si avvierà automaticamente nelle seguenti modalità:
Temperatura
ambiente
Sotto i 23°C
Sotto i 23°C
Non è possibile cambiare le impostazioni della temperatura e la velocità della
●
Temperatura
designata
ventola, inoltre non è possibile usare il timer o la modalità deumidificatore.
Modalità
Velocità
ventola
Modalità operativa
RISCALDAMENTO
timer
26°C No AUTO Condizionatore
23°CNoAUTO
interruttore di
emergenza
Pi
Test:
L'interruttore del test e quello di emergenza
corrispondono.
Usare questo interruttore per il test quando la
●
temperatura ambiente è inferiore ai 16°C, non
usarlo per il normale funzionamento.
Tenere premuto l'interruttore per il test per più
●
di 5 secondi. Una volta sentito il beep due volte,
rilasciare l'interruttore: il raffreddamento si avvia con
la velocità del flusso d'aria "Alto".
Con questa modalità, il motore della ventola
●
dell'unità chiuda funzionerà ad alta velocità.
testare
l'interruttore
Pi
Pi
Regolazione della direzione del
flusso d'aria
1. Visualizzazione dello stato dell'aria inviata
Aletta verticale
Pos.1 vuoto Pos.2
Pos.4 (Oscillazione auto)
2. Regolazione (manuale) del flusso dell'aria verso destra e sinistra
Spostare la lama verticale usando la manopola sul condizionatore per
regolare la direzione verso destra o verso sinistra, facendo riferimento
alla fig.
Attenzione:
● Quando si regola l'aletta a mano, spegnere l'unità.
● In caso di alto tasso di umidità si potrebbe avere della condensa
all'uscita dell'aria se tutte le leve verticali sono regolate a destra o a
sinistra.
● Si consiglia di non mantenere l'aletta orizzontale rivolta verso il basso
a lungo in modalità Condizionatore o Deumidificatore per evitare la
condensa.
Nota:
Quando si effettua il riavvio dopo aver effettuato lo spegnimento
remoto, il telecomando memorizzerà automaticamente la posizione di
oscillazione precedente.
Pos.3
3D
17
Page 18

Funzionamento
Funzionamento in modalità
sospensione
Prima di andare a dormire, basta premere il pulsante Sospensione, l'unità
funzionerà in modalità Sospensione consentendo all'utente di dormire
piacevolmente.
Uso della funzione Sospensione
Una volta avviata l'unità, impostare lo stato di funzionamento, quindi
premere il pulsante Sospensione prima di impostare l'orologio e l'ora.
Modalità di funzionamento
1. In modalità Condizionatore, Deumidificatore
1 ora dopo che è stata avviata la modalità Sospensione la temperatura
si alzerà di 1
temperatura salirà ancora di 1
6 ore quindi si arresterà. La temperatura è maggiore della temperatura
impostata in modo tale che la temperatura ambiente non sia troppo
bassa per il sonno.
Avvio funz. SLEEP
Impostazione temperatura
In modalità Condizionatore, Deumidificatore
2. In modalità Riscaldamento
1 ora dopo che è stata avviata la modalità Sospensione, la temperatura
si riduce di 2°C rispetto alla temperatura impostata. Dopo un'altra ora
la temperatura di riduce di altri 2°C. Dopo più di 3 ore, la temperatura
sale di 1°C. L'unità rimarrà in funzione per altre 3 quindi si arresterà. La
temperatura è inferiore della temperatura impostata in modo tale che la
temperatura ambiente non sia troppo alta per il sonno.
SOSPENSIONE
entra in funzione
O
C rispetto alla temperatura impostata. Dopo un'altra ora la
1 ora
1 ora
Impostazione temperatura
1 ora
Si alza di 1
Diminuisce di 2°C
1 ora
In modalità Riscaldamento
O
C. L'unità rimarrà in funzione per ulteriori
Arresto funz. SLEEP
Circa 6 ore
°
C
Si alza di 1
°
C
Arresto dell'unità
Arresto dell'unità
Diminuisce di 2°C
3 ore
3 ore
Si alza 1°C
SOSPENSIONE
si arresta
3. In modalità Automatico
L'unità opera nella modalità di sospensione corrispondente in base alla
modalità di funzionamento automaticamente selezionata.
4. In modalità Ventola
Non è disponibile la funzione Sospensione
5. Quando la funzione di sospensione silenziosa è
impostata su 8 ore, il tempo di sospensione silenziosa
non può essere regolato.
Quando è impostata la funzione TIMER, la funzione di sospensione non
può essere configurata. Una volta configurata la funzione sospensione,
se l'utente ripristina la funzione TIMER, la funzione sospensione verrà
annullata; la macchina sarà in funzione di temporizzazione attivata, se
le due modalità sono impostate contemporaneamente, in base al tempo
di operatività che termina prima, l'unità si spegnerà automaticamente e
l'altra modalità verrà annullata.
Funzione di recupero da black-out
1. Quando l'unità viene avviata per la prima volta, il compressore inizia
a funzionare trascorsi 3 minuti. Quando viene ripristinata la corrente
dopo il black-out, l'unità si avvia automaticamente, e dopo 3 minuti si
avvia il compressore.
2. Nota per il recupero da black-out:
premere il pulsante Sospensione dieci volte in cinque secondi e
accedere alla funzione dopo il segnale acustico. Quindi premere
il pulsante Sospensione dieci volte in cinque secondi e uscire alla
funzione dopo due segnali acustici.
Funzionamento Alimentazione/Soft
(1) Funzionamento Alimentazione
Quando è necessario un riscaldamento o raffreddamento
rapido, è possibile usare questa funzione.
In modalità Condizionatore, la velocità della ventola
raggiunge automaticamente la velocità messima della
modalità ventola AUTO.
In modalità Riscaldamento, la velocità della ventola
raggiunge automaticamente la velocità media della
modalità ventola AUTO.
(2) Funzionamento SOFT
Questa funzione può essere utilizzata quando c'è
bisogno di silenzio per riposare o per la lettura.
In modalità SOFT, la velocità della ventola raggiunge
automaticamente la velocità bassa della modalità
ventola AUTO.
Nota:
Durante il funzionamento Alimentazione, in modalità Riscaldamento o
Condizionatore, la stanza sarà soggetta a una distribuzione disomogenea
della temperatura.
Un funzionamento SOFT per un lungo periodo ha l'effetto di non
raffreddare o non riscaldare.
Per annullare il funzionamento Alimentazione o SOFT.
Premere di nuovo il pulsante Alimentazione/Soft, non vengono più
visualizzati Alimentazione o SOFT.
18
Page 19

Funzionamento
Funzionamento timer
Accensione/Spegnimento e
Accensione-Spegnimento
Prima di avviare le funzioni TIMER, impostare l'orologio in modo
appropriato.
1. Una volta avviata l'unità, selezionare la modalità di funzionamento
preferita.
2. Premere il tasto TIMER per cambiare la modalità TIMER. Ogni volta
che si preme il tasto, il display cambia come segue:
Telecomando:
REQUISITI PER LO SMALTIMENTO:
Il condizionatore acquistato è contrassegnato con questo
simbolo che sta ad indicare che le parti elettriche ed
elettroniche non devono essere mischiate con i rifiuti
domestici. Non tentare di aprire il sistema da soli: lo
smontaggio del sistema condizionatore, il trattamento del
refrigerante, dell'olio e di altre parti deve essere effettuato
da un installatore qualificato conformemente alle leggi locali e nazionali
pertinenti. I condizionatori devono essere trattati presso strutture di
trattamento specializzate per il riutilizzo, il riciclaggio e il
ricondizionamento. Garantendo che questo prodotto sia smaltito
correttamente, si aiuterà a prevenire possibili conseguenze negative per
l'ambiente e la salute umana. Contattare l'installatore o l'autorità locale
per ulteriori informazioni. La batteria deve essere rimossa dal
telecomando e smaltita separatamente in conformità alle leggi locali e
nazionali pertinenti.
VUOTO
Timer accensione
Poi selezionare la modalità TIMER desiderata (Timer accensione o Timer
spegnimento o Timer accensione/spegnimento) "
lampeggerà.
3. Premere
Può essere regolato sulle 24 ore.
4. Dopo avere impostato l'orario corretto, premere il tasto Imposta
per confermare "
lampeggiare.
5. Annullare la modalità TIMER
Premere il tasto TIMER diverse volte finché la modalità TIMER sparisce.
Suggerimenti:
Dopo avere sostituito le batterie, oppure dopo un black-out, l'impostazione
dell'ora deve essere configurata di nuovo.
Il telecomando dispone della funzione di memoria. La volta successiva
che si utilizzerà la modalità TIMER, basterà premere il tasto Imposta se le
impostazioni sono uguali a quelle della volta precedente.
In base alla sequenza di impostazione dei tempi Timer accensione o
Timer spegnimento, possono essere ottenuti Start-Stop o Stop-Start.
/ per impostare l'ora.
Timer spegnimento
" oppure " " sul telecomando smette di
Timer accensione-spegnimento
"oppure " "
CONFORMITÀ AI REGOLAMENTI
EUROPEI PER I MODELLI
CE
Tutti i prodotti sono conformi alle seguenti disposizioni europee:
- Direttiva bassa tensione 73/23/CEE
- Direttiva bassa tensione 2006/95/CE
- Compatibilità elettromagnetica 89/336/CEE
- Compatibilità elettromagnetica 2004/108/CE
ROHS
I prodotti sono conformi ai requisiti della direttiva 2002/95/CEE del
Parlamento e del Consiglio Europeo sulla limitazione dell'uso di alcune
sostanze pericolose nei dispositivi elettrici ed elettronici (direttiva RoHS
UE).
WEEE
In conformità alla direttiva 2002/96/CE del Parlamento Europeo,
informiamo il consumatore relativamente ai requisiti per lo smaltimento dei
prodotti elettrici ed elettronici.
IMPORTANTI INFORMAZIONI RELATIVE
AL REFRIGERANTE UTILIZZATO
Questo prodotto contiene gas serra fluorinato,
trattato nel Protocollo di Kyoto
R410A
2
1=
2=
1
1+2=
FE
Questo prodotto contiene gas serra fluorinato, trattato nel Protocollo di
Kyoto. Non lasciar sfogare nell'atmosfera.
Tipo di refrigerante: R410A
Valore GWP* :1975
GWP=global warming potential
Scrivere, con inchiostro indelebile,
• 1 il carico di refrigerante del prodotto inserito in fabbrica
• 2 il quantitativo aggiuntivo di refrigerante caricato sul campo e
• 1+2 il carico di refrigerante totale
sull'etichetta con il carico di refrigerante in dotazione con il prodotto.
L'etichetta compilata deve essere attaccata accanto alla porta di
caricamento del prodotto (es. all'interno del coperchio con il valore di
arresto).
A Questo prodotto contiene gas serra fluorinato, trattato nel Protocollo di
Kyoto
B Carico di refrigerante del prodotto inserito in fabbrica: vedere la piastra
con il nome dell'unità
C Quantitativo aggiuntivo di refrigerante caricato sul campo
D Carico di refrigerante totale
E Unità da esterno
F Cilindro di refrigerante e collettore per la carica
kg
kg
kg
A
B
C
D
19
Page 20

Manutenzione
Per un utilizzo intelligente del condizionatore
Impostazione della
temperatura ambiente
adeguata
Temperatura
adeguata
Chiudere le porte e
le finestre mentre il
dispositivo è in uso
Durante il
raffreddamento, evitare
che penetri la luce
solare diretta usando
tende o tapparelle
Se si prevede di non
utilizzare l'unità a lungo,
spegnere l'alimentazione
usando l'interruttore
principale.
Spegnimento
Non bloccare l'ingresso o
l'uscita dell'aria.
Usare il timer in modo
efficace
Usare le leve in modo
efficace
Telecomando
Non usare l'acqua, pulire il telecomando con
un panno asciutto. Non usare detergenti per
vetri o altri prodotti chimici.
Unità interna
pulire il condizionatore usando un panno
soffice e asciutto. Per le macchie resistenti,
usare un detergente neutro diluito con
acqua. Strizzare bene il panno prima di
passarlo, quindi togliere completamente il
detergente.
Per la pulizia non usare quanto segue
Benzina, diluenti o soluzioni detergenti possono
danneggiare il rivestimento dell'unità.
Pulizia del filtro dell'aria
Acqua calda oltre i 40°C(104°F) può
provocare scoloritura o deformazione.
1 Aprire la griglia di aspirazione tirandola verso l'alto.
2 Estrarre il filtro.
Spingere la linguetta che si trova al centro del filtro
leggermente finché non viene rilasciata dal fermo ed estrarre
il filtro spingendolo in basso.
3 Pulizia del filtro.
Usare acqua o un aspirapolvere per rimuovere la polvere
o lavare il filtro con l'acqua. Dopo il lavaggio, asciugare
completamente il filtro all'ombra.
4 Fissare il filtro.
Fissare il filtro correttamente, in modo tale che l'indicazione
"FRONT" (parte frontale) sia rivolta in avanti. Accertarsi che
il filtro sia completamente fissato sopra il fermo. Se i filtri di
destra e di sinistra non sono fissati correttamente, potrebbero
generarsi difetti.
5 Chiudere la griglia di aspirazione.
Una volta ogni
due settimane
Sostituzione del filtro di purificazione dell'aria
1. Aprire la griglia di aspirazione
Sollevare la griglia di aspirazione
usando un piccolo dispositivo nominato
supporto per griglia, che si trova nel lato
destro del condizionatore.
2. Staccare il filtro dell'aria standard
Far scorrere la rotella leggermente in
alto per rilasciare il filtro, quindi estrarlo.
Rimuovere il vecchio filtro di
purificazione dell'aria
3. Fissare il filtro di purificazione
dell'aria
Inserire i filtri per la purificazione dell'aria
nei vani di destra e di sinistra.
4. Fissare il filtro dell'aria standard
(Installazione necessaria)
ATTENZIONE:
Il lato bianco del filtro dell'aria fotocatalitico va rivolto
all'esterno e il lato nero verso l'unità. Il lato verde del
filtro di purificazione dell'aria con agente antibatterico
va rivolto verso l'esterno e il lato bianco verso l'unità.
5. Chiudere la griglia di aspirazione
Chiudere la griglia con attenzione
NOTA:
● Il filtro dell'aria fotocatalitico verrà solarizzato negli orari stabiliti.
In genere, esso viene solarizzato ogni sei mesi.
● Il filtro di purificazione dell'aria con agente antibatterico ha una
lunga durata e non ha bisogno di essere sostituito. Tuttavia,
nel periodo di utilizzo è necessario rimuovere la polvere
frequentemente usando un aspirapolvere o scuotendolo
leggermente, altrimenti la prestazione del filtro non sarà
ottimale.
● Conservare il filtro purificante dell'aria con l'agente antibatterico
in ambiente fresco e asciutto, evitando la luce del sole diretta
per periodi prolungati quando non è in uso, altrimenti la sua
capacità di sterilizzazione verrà ridotta.
20
Page 21

Attenzione
AVVISO
Per l'installazione chiamare il negozio preposto alla vendita/assistenza.
Non tentare di installare il condizionatore da soli perché i lavori inadeguati possono causare
folgorazioni, incendi, perdite d'acqua.
AVVISO
In caso di anomalie come odore di bruciato, spegnere
subito l'apparecchio e contattare il rivenditore.
Usare una presa
dedicata dotata di
salvavita
Verificare che lo scarico sia
installato adeguatamente
Spegnimento
Collegare completamente il cavo di
alimentazione alla presa
AZIONE
OBBLIGATORIA
Non usare un cavo di alimentazione
collegato a più dispositivi.
DIVIETO
Non avviare o arrestare l'unità
scollegando il cavo di alimentazione, ecc.
DIVIETO
Non utilizzare per conservare alimenti,
opere d'arte, apparecchiature particolari, per
l'allevamento o la coltivazione.
OBBLIGATORIA
AZIONE
Utilizzare la tensione giusta
AZIONE
OBBLIGATORIA
Fare attenzione a non danneggiare il
cavo di alimentazione.
DIVIETO
Non dirigere il flusso dell'aria direttamente
verso le persone, in particolare verso
bambini o persone anziane.
DIVIETO
AVVERTENZA
Cambiare l'aria di tanto in tanto, in particolare
se contemporaneamente viene utilizzata la
cucina a gas.
AZIONE
OBBLIGATORIA
1. Non usare un cavo di alimentazione
con prolunga o connesso a metà
2. Non installare dove esiste la possibilità
di perdite di gas infiammabili.
3. Non esporre l'unità a vapore acqueo o
vapore di olio.
DIVIETO
Non inserire oggetti nell'ingresso o nello scarico dell'aria.
DIVIETO
Non tentare di riparare o di
ricostruire il sistema da soli:
Non toccare l'interruttore con le mani bagnate
Connettere il cavo di messa a
terra.
messa a
terra
DIVIETO
Non installare vicino a camini o ad altri
apparecchi per il riscaldamento.
DIVIETO
Non mettere animali o piante nella direzione del
flusso dell'aria
DIVIETO
AZIONE
OBBLIGATORIA
Verificare le buone condizioni del supporto di
installazione
DIVIETO
Non posizionare nessun oggetto sull'unità o
salire su di essa.
DIVIETO DIVIETO
DIVIETO
Non versare acqua nell'unità per pulirla
DIVIETO
Non posizionare vasi di fiori o contenitori pieni
d'acqua sopra l'unità.
21
Page 22

Risoluzione dei problemi
Attenzione
Prima di richiedere l'assistenza, controllare il
seguente elenco.
Ispezione
delle
prestazioni
normali
Altri controlli
Fenomeno
Il sistema non si riavvia
immediatamente.
L'unità emette rumori
Sono generati odori.
.
Esce vapore o fumo.
In modalità
deumidificazione, la
velocità della ventola non
può essere cambiata.
Raffreddamento mediocre
Causa o punti di controllo
● Se l'unità viene arrestata, per proteggere
il sistema non potrà essere riavviata
prima che siano trascorsi 3 minuti.
● Quando la spina è scollegata e ricollegata
alla presa di coerente, il circuito di
protezione sarà attivato per 3 minuti per
proteggere il condizionatore.
● Durante l'uso della macchina o a fermo,
si potrebbero udire rumori simili a
gorgoglii o soffi. Durante i primi 2-3 minuti
di funzionamento, questi rumori sono più
distinti. (Il rumore è generato dal liquido
refrigerante che circola nel sistema.)
● Durante l'uso della macchina si
potrebbero udire rumori simili a crepitii.
Questi rumori sono generati dalle
coperture che si espandono o si riducono
in seguito al cambio di temperatura.
● Se il flusso d'aria emette un rumore
forte quando l'unità è in funzione,
probabilmente il filtro è sporco.
● Questo fenomeno accade perché il
sistema fa circolare gli odori della stanza,
come quelli dei mobili, delle vernici o delle
sigarette.
● Durante il funzionamento Condizionatore
o Deumidificatore l'unità interna può
emettere del vapore.
Questo è provocato dall'improvviso
raffreddamento dell'aria interna.
● In modalità Deumidificatore, se la temperatura
ambiente scende sotto i 2°C rispetto alla
temperatura impostata, l'unità si avvierà ad
intervalli a velocità Bassa indipendentemente
dall'impostazione Ventola.
● La spina è collegata alla presa di corrente?
● C'è un black-out?
● Si è bruciato il fusibile?
● Il filtro dell'aria è sporco?
Di norma deve essere pulito ogni 15 giorni.
● La presa e l'uscita d'aria sono ostruite?
● La temperatura è impostata correttamente?
● Ci sono porte o finestre aperte?
● La luce del sole entra direttamente
nella stanza mentre è in funzione il
condizionatore? (Chiudere le tende)
● Ci sono troppe sorgenti di calore o troppe
persone nella stanza mentre è in funzione
il condizionatore?
● Non ostruire o coprire il condizionatore. Non mettere le dita nelle nelle uscite/
ingressi e nella leva di oscillazione.
● Non lasciare che i bambini giochino con il condizionatore. In nessun caso
può essere consentito ai bambini di sedersi sull'unità esterna.
Specifiche
● Il circuito del refrigerante è a prova di perdite.
La macchina si adatta alla seguenti situazioni
1. Intervallo di temperatura ambiente applicabile:
Condizionatore
Riscaldamento
2. Se il cavo di alimentazione dovesse danneggiarsi, deve essere sostituito
dal produttore o dall'agente preposto all'assistenza o da persona similmente
qualificata.
3. Se il fusibile del condizionatore sulla scheda PC dovesse danneggiarsi,
cambiarlo con il tipo T. 3.15A/ 250V. Se il fusibile dell'unità esterna dovesse
rompersi, cambiarlo con il tipo T.25A/250V
4. Il metodo di cablaggio deve essere in linea con le normative di cablaggio
locali.
5. Dopo l'installazione, la spina deve essere facilmente raggiungibile.
6. La batteria usata deve essere smaltita correttamente.
7. L'apparecchio non è destinato all'uso da parte di bambini o di invalidi senza
una supervisione.
8. I bambini devono essere controllati così da garantire che non giochino con
l'apparecchio.
9. Usare la spina elettrica adeguata, adatta al cavo di alimentazione.
10.La spina e il cavo di connessione devono aver acquisito l'attestazione locale.
11. Per proteggere le unità, spegnere prima il condizionatore, e almeno dopo 30
secondi, disattivare l'alimentazione.
Interno
Esterno
Interno
Esterno
Esterno
(INVERTER)
Max.:D.B/W.B 32°C/23°C
Min.:D.B/W.B 21°C/15°C
Max.:D.B/W.B 43°C/26°C
Min.:D.B 18°C
Max.:D.B 27°C
Min.:D.B 0°C
Max.:D.B/W.B 24°C/18°C
Min.:D.B/W.B -7°C/-8°C
Max.:D.B/W.B 24°C/18°C
Min.:D.B -15°C
Page 23

Pièces et fonctions
Unité intérieure
1
2
3
4
5
Entrée d'air Panneau d'affichage
1
2
Grille d'entrée d'air Sélecteur d'urgence
3
Sortie d'air Filtre de purification d'air
4
Pale verticale (règle les flux d'air
gauche et droit)
5
Pale horizontale (réglage des flux
d'air vers le haut et vers le bas.
6
7
8
Ne pas régler manuellement).
Selon l'article réel acheté l'image ci-dessus est seulement
pour référence.
8
6
7
(intérieur)
Unité extérieure
4
Télécommande
1
2
5
3
13
18
12
21
19
17
1. Affichage du mode
Mode de
fonctionnement
Télécommande
2. Affichage POSITION
3. Affichage VITESSE DE
VENTILATION
BAS MOY HAUTAUTO
4. Affichage SOMMEIL
5. Affichage VERROUILLAGE
6. ENVOI DE SIGNAL
ON/OFF
FAN
MODE
SWING
POWER/SOFT
TIMER
OCK
CL
LIGHT
SLEEP
SET
RE
SET
LOCK
AUTO FROID SEC CHAUD VENTILATEUR
7. Affichage MINUTERIE
10
ARRÊT
6
8. Affichage MINUTERIE EN
7
MARCHE
8
9. Affichage HORLOGE
9
Affichage de la TEMP.
4
11. Bouton MARCHE/ARRÊT
12. Bouton MODE
11
13. Bouton VENTILATEUR
14. Bouton HEURE
15. Bouton POSITION
16. Bouton VEILLE
15
17. Bouton de VERROUILLAGE
23
20
14
Utilisé pour verrouiller les
boutons et l'affichage LCD.
18. Bouton REGLAGE TEMP.
19. Bouton VOYANT / CONF.
16
20. Bouton de MINUTERIE
22
21. Bouton d'HORLOGE
Utilisé pour pour régler
l'heure.
22. Bouton RÉINITIALISER
Si le fonctionnement de
la télécommande devient
anormal, utiliser un outil
en pointe pour presser ce
bouton afin de réinitiialiser la
télécommande.
23. Bouton ALIMENTATION /
HEURE / DOUX
Utilisé pour pour régler l'heure
et le minuteur.
À chaque pression du bouton,
l'affichage change de la façon
suivante :
PUISSANCE DOUX
VIDE
1
ÉVENT CONNEXION DE LA
3
TUYAUTERIE ET DU
CÂBLAGE ÉLECTRIQUE
2
PRISE D'ASPIRATION TUYAU DE VIDANGE
4
Selon l'article réel acheté l'image ci-dessus est seulement
pour référence.
Réglage de l'horloge
Presser le bouton HORLOGE, "AM" ou "PM" clignotent.
Presser ou pour régler l'heure. Chaque pression ajoute ou retire 1
minute. Si le bouton est maintenu enfoncé, l'heure changera rapidement.
Une fois l'heure réglée, pressez PARAMÉTRER, AM “ et “PM” arrêtent de
clignoter, et l'horloge commence à fonctionner.
POWER/SOFT
TIMER
CLOCK
LIGHT
SLEEP
SET
LOCK
RESET
Installation des piles
1. Enlever le couvercle du
compartiment à pile;
2. Placer les piles comme illustré.
2 piles R-03, touche de
réinitialisation (cylindre);
3. Assurez-vous de placer les piles
conformément aux signes” + “/”-”;
Installer les piles, puis replacer le couvercle.
4.
Note:
● La distance entre la tête de transmission du signal et l'orifice de
réception ne doit pas dépasser 7 mètres, sans obstacle.
● Une lampe fluorescente de type allumage électronique, un
changement de lampe fluorescente ou un téléphone sans fil est
installé dans la pièce, le récepteur peut être perturbé dans la réception
des signaux, auquel cas la distance vers l'unité intérieure doit être
raccourcie.
● Un affichage plein ou non clair durant l'utilisation indique que les piles
sont épuisées. Merci de remplacer les piles.
● Si la télécommande ne fonctionne pas correctement, enlevez les piles,
puis replacez-les après quelques minutes.
Conseil :
En cas de non utilisation durant une longue période, retirer les piles.
Si rien ne s'affiche après enlèvement, presser la touche de réinitialisation.
23
Page 24

Utilisation
Opération de base
Télécommande
1. Démarrage de l'unité
Presser MARCHE/ARRÊT sur la télécommande, l'unité démarre.
2. Sélectionner le mode d'utilisation.
Presser le bouton MODE. A chaque pression, le mode d'utilisation
change de la façon suivante: Télécommande
AUTO FROID SEC VENTILATEURCHAUD
3 Sélection du paramètre de température
Presser le bouton
À chaque pression du bouton, le paramètre de température
augmente de 1
rapidement cette valeur.
À chaque pression du bouton, le paramètre de température
descend de 1
rapidement cette valeur.
Sélectionner la température désirée.
4 Sélection de la vitesse du ventilateur
Presser le bouton VENTILATEUR. À chaque pression, la vitesse du
ventilateur change de la façon suivante :
Télécommande :
Le climatiseur fonctionne à la vitesse affichée du ventilateur.
Lorsque le VENTILATEUR est réglé sur AUTO, le climatiseur ajuste
automatiquement la vitesse du ventilateur en fonction de la température de la pièce.
Mode de
fonctionnement :
AUTO
FROID
SEC
CHAUD
VENTILATEUR
/ .
O
C ; maintenir le bouton pressé permet d'augmenter
O
C ; maintenir le bouton pressé permet de diminuer
AUTO
BAS MOY HAUT
Télécommande Note
Dans le mode de fonctionnement automatique,
le climatiseur sélectionne automatiquement le
fonctionnement Froid ou Chaud en fonction de la
température de la pièce. Lorsque le ventilateur
est paramétré sur AUTO le climatiseur ajuste
automatiquement la vitesse du ventilateur en
fonction de la température de la pièce.
En mode SEC, lorsque la température de la pièce
devient inférieure au paramètre de température
de plus de +2
intermittente à vitesse BASSE quel que soit le
paramétrage du VENTILATEUR.
En mode CHAUFFAGE, de l'air chaud sera
généré après quelques minutes à cause de la
fonction de prévention des courants d'air.
Lorsque le VENTILATEUR est réglé sur AUTO,
le climatiseur ajuste automatiquement la vitesse
du ventilateur en fonction de la température de
la pièce.
En mode de fonctionnement VENTILATEUR,
l’appareil ne fonctionnera pas en mode
REFROIDISSEMENT ou CHAUFFAGE,
mais fonctionnera seulement en mode
VENTILATEUR ; AUTO n’est pas disponible
lorsque le mode VENTILATEUR est sélectionné.
Et le réglage de température est désactivé en
mode VENTILATEUR, le mode SOMMEIL n'est
pas disponible.
ON/OFF
FAN
MODE
SWING
POWER/SOFT
TIMER
CLOCK
LIGHT
SLEEP
SET
LOCK
RESET
O
C, l'appareil fonctionne de façon
Fonction d'urgence et test
Fonction d'urgence :
Utilisez ce mode de fonctionnement seulement si la télécommande est
●
défectueuse ou perdue, et avec la fonction d'urgence activée, le climatiseur
peut fonctionner automatiquement pendant un moment.
Lorsque le commutateur de la fonction d'urgence est pressé, un son aigu est
●
émis, indiquant le démarrage de cette fonction..
Lorsque le bouton d'alimentation est tourné pour la première fois et
●
que le mode de fonctionnement d'urgence démarre, l'appareil passera
automatiquement dans les modes suivants :
Température
de la pièce
Au dessus
Au dessous
Il n'est pas possible de changer le réglage de température et la vitesse du
●
de 23
de 23
O
C
O
C
Température
Mode
minuterie
Vitesse du
ventilateur
fixée
O
26
C NON AUTO FROID
O
23
C NON AUTO CHAUD
Mode de
fonctionnement
Interrupteur de
fonctionnement
d'urgence
ventilateur. Il est également impossible d'utiliser le mode minuteur ou sec.
Fonction de test :
Le commutateur de la fonction de test est identique
au commutateur d'urgence.
Utiliser ce commutateur en mode test lorsque la
●
température de la pièce est inférieure à 16OC, ne
pas l'utiliser en mode de fonctionnement normal.
Maintenir le commutateur de fonction de test
●
enfoncé durant plus de 5 secondes. Une fois
que vous avez entendu 2 fois la tonalité suraiguë,
relâcher le bouton. la fonction de refroidissement
démarre avec une vitesse "Haute" de circulation
d'air.
Dans ce mode de fonctionnement, le moteur du
●
ventilateur de l'appareil intérieur tournera à grande
vitesse.
Interrupteur du
mode test
Pi
Réglage de l'orientation du flux d'air
1. Affichage de l'état d'envoi d'air
Volet vertical
Pos.1 vide Pos.2
Pos.4 (Position auto)
2. Réglage du flux d'air gauche et droit (manuel)
Déplacer la pale verticale d'un cran sur le climatiseur vers la gauche
ou la droit en se référant à l'illustration.
Avertissement :
● Lors d'un réglage manuel du volet, éteindre l'appareil.
● Lorsque l'humidité est élevée, de la condensation d'eau peut se
produire au niveau de la sortie d'air si tous les volets horizontaux sont
réglés à gauche ou à droite.
● Il est recommandé de ne pas maintenir le volet vertical en position
abaissée durant une longue période et mode FROID ou SEC, de la
condensation d'eau pouvant se produire.
Note:
Lors d'un redémarrage après arrêt par télécommande, la
télécommande mémorise automatiquement la position précédemment
paramétrée.
Pos.3
3D
Pi
Pi
24
Page 25

Utilisation
Fonction veille
Avant de se coucher, presser simplement le bouton VEILLE et l'appareil
fonctionnera en mode VEILLE pour apporter un sommeil paisible.
Utilisation de la fonction VEILLE.
Après démarrage de l'appareil, régler le mode d'état, puis presser le
bouton VEILLE une fois avoir réglé l'heure.
Mode de fonctionnement :
1. En mode FROID, SEC
1 heure après le démarrage du mode VEILLE, la température sera
O
C plus élevée que le paramètre de température. Au bout d'une
de 1
autre heure, la témpérature augmente à nouveau de 1
fonctionnera encore 6 heures puis s'arrêtera. La température est
maintenue plus élevée que le paramètre de température afin que la
température de la pièce ne soit pas trop basse durant le sommeil. .
La fonction VEILLE démarre Arrêt de la fonction VEILLE
O
C. L'appareil
3. En mode AUTO
L'appareil fonctionne dans le mode de veille correspondant adapté au
mode de fonctionnement sélectionné automatiquement.
4. En mode VENTILATEUR
Pas de fonction de VEILLE.
5. Si vous réglez la fonction sommeil tranquille sur 8
heures, le temps de sommeil tranquille ne peut pas être
réglé.
Lorsque le fonction MINUTERIE est paramétrée, la fonction de sommeil
tranquille ne peut pas être paramétrée. Une fois la fonction de sommeil
paramétrée, si l'utilisateur réinitialise la fonction MINUTEUR, la fonction
de sommeil sera annulée ; la machine sera en mode minuteur, si les
deux modes sont configurés en même temps, le premier mode dont le
temps de fonctionnement se terminera en premier provoquera l'arrêt
de l'appareil et l'annulation de l'autre mode.
Fonction Reprise après panne de
courant
1. Si l'appareil est démarré pour la première fois, le compresseur ne
se lancera pas avant 3 minutes. Lorsque le courant revient après une
panne de courant, l'appareil démarrera automatiquement et 3 minutes
plus tard, le compresseur démarrera.
2. Note concernant la reprise après une panne de courant :
appuyez sur le bouton sommeil dix fois en cinq secondes et entrez
dans cette fonction après avoir entendu quatre sons. appuyez sur le
bouton sommeil dix fois en cinq secondes et quittez cette fonction
après avoir entendu deux sons.
Approx.6 hrs
O
O
C
C
Arrêt de l'appareil
1 hr
1 hr
Paramétrage de temp.
En mode FROID, SEC
Augmente de 1
Augmente de 1
2. En mode CHAUFFAGE
1 heure après le début du mode SLEEP, la température descendra
2°C en dessous du réglage de température. Une heure plus tard,
la température descendra de 2°C de plus. Trois heures plus tard, la
température augmentera d'1°C. L'appareil fonctionnera pendant 3
heures supplémentaires puis s'arrêtera. La temp. est alors plus basse
que la temp. réglée, afin que la température ne soit pas trop haute
pendant votre sommeil.
Paramétrage de temp.
1 hr
VEILLE
Démarrage de l'opération.
Diminue de 2OC
1 hr
En mode CHAUFFAGE
Diminue de 2OC
3 hrs
Arrêt de l'appareil
3 hrs
Augmente de 1OC
VEILLE
Arrêt de l'opération.
Fonctionnement ALIMENTATION/
DOUX.
(1) Fonctionnement de l'ALIMENTATION
Lorsque vous avez besoin d'un chauffage ou d'un
refroidissement rapide, vous pouvez utiliser cette
fonction.
En mode REFROIDISSEMENT, la vitesse de ventilation
passe à la vitesse rapide du mode de ventilation AUTO.
En mode CHAUFFAGE, la vitesse de ventilation passe
à la vitesse moyenne du mode de ventilation AUTO.
(2) Fonctionnement de DOUX
Utiliser cette fonction lorsque le silence est requis pour
lire ou se reposer.
En mode de fonctionne DOUX, la vitesse de ventilation
passe à la vitesse faible du mode de ventilation AUTO.
Note:
En mode ALIMENTATION, en mode de CHAUFFAGE ou de
REFROIDISSEMENT rapide, la pièce présentera une distribution de
température inhomogène.
Une longue période de fonctionnement DOUX produira un effet ni trop
froid ni trop chaud.
Pour annuler le fonctionnement ALIMENTATION ou DOUX
presser à nouveau le bouton ALIMENTATION/DOUX, ALIMENTATION ou
DOUX disparaît.
25
Page 26

Utilisation
Utilisation de la minuterie Marche
Arrêt.
Régler correctement l'horloge avant de lancer le mode MINUTERIE.
1 Une fois l'appareil démarré, sélectionner le mode de fonctionnement
désiré :
2 Presser le bouton MINUTERIE pour changer le mode de MINUTERIE.
À chaque pression du bouton, l'affichage change de la façon suivante :
Télécommande
VIDE
CONDITIONS D'ÉLIMINATION
L'appareil de climatisation est marqué de ce symbole.
Ceci signifie que les produits électriques et électroniques
ne doivent pas être mêlés aux déchets ménagers nontriés. Ne pas tenter de démonter le système par soi-même
: le démontage du système de climatisation, le traitement
du liquide réfrigérant, de l'huile et d'autres pièces doivent
être effectués par un installateur qualifié conformément à la législation
locale et nationale. Les climatiseurs doivent être traités dans des
installations spécialisées pour réutilisation, recyclage et récupération.
S'assurer que le produit est éliminé de façon correcte permet d'aider à
éviter des conséquences potentielles négatives sur l'environnement et la
santé humaine. Merci de contacter l'installateur ou les autorités locales
pour plus d'information. Les piles doivent être enlevées de la
télécommande et faire l'objet d'une élimination séparée conformément à
la législation locale et nationale.
MINUTERIE
MARCHE
Sélectionner ensuite le mode de MINUTERIE voulu (MINUTERIE
MARCHE ou MINUTERIE ARRÊT ou MINUTERIE MARCHE-ARRÊT). "
"ou " "clignotera.
3.Presser le bouton
Elle peut être réglée sur 24 heures.
4 Après réglage de l'heure, presser le bouton de réglage pour confirmer. "
"ou" " arrête de clignoter sur la télécommande.
5. Annuler le mode MINUTERIE
Presser simplement le bouton MINUTERIE plusieurs fois jusqu'à ce que
le mode MINUTERIE disparaisse.
Remarques :
Après remplacement des piles ou si une coupure de courant se produit,
l'heure doit être à nouveau réglée.
télécommande dispose d'une fonction de mémorisation : lors de la
La
prochaine utilisation du mode MINUTERIE, presser simplement le bouton
RÉGLAGE si le réglage de l'heure est identique à la fois précédente.
Selon les horaires de MINUTERIE MARCHE ou MNUTERIE ARRÊT,
Marche-Arrêt ou Arrêt-Marche se produira.
MINUTERIE
ARRÊT
/ pour régler l'heure.
MINUTERIE
MARCHE-ARRÊT
CONFORMITÉ DES MODÈLES À LA
LÉGISLATION EUROPÉENNE
CE
Tous les appareils sont conformes aux directives Européennes suivantes :
- Directive basse tension 73/23/EEC
- Directive basse tension 2006/95/EC
- Compatibilité électro-magnétique 89/336/EEC
- Compatibilité électro-magnétique 2004/108/EC
ROHS
Les appareils répondent aux exigences de la directive 2002/95/EEC
du parlement européen et du conseil sur la limitation des substances
dangereuses dans les Équipements Électriques et Électroniques
(Directive UE RoHS).
WEEE
Conformément à la Directive 2002/96/CE du Parlement Européen, nous
informons ici-même le consommateur des conditions d'élimination des
appareils électriques et électroniques.
INFORMATIONS IMPORTANTES
CONCERNANT LE LIQUIDE
RÉFRIGÉRANT UTILISÉ
Contient des gaz à effet de serre fluorés
couverts par le protocole de Kyoto.
R410A
2
1=
2=
1
1+2=
FE
Cet appareil contient des gaz à effet de serre fluorés couverts par le
protocole de Kyoto. Ne pas libérer dans l'atmosphère.
Type de réfrigérant : R410A
Valeur de GWP* : 1975
GWP = global warming potential - potentiel de réchauffement de la
planète.
Merci de emplir à l'encre indélébiles :
• 1 La charge de réfrigérant usine de l'appareil
• 2 la quantité supplémentaire de réfrigérant chargée sur place et
• 1+2 la charge totale de réfrigérant.
sur l'étiquette de charge de réfrigérant fournie avec l'appareil.
L'étiquette renseignée doit être collée à proximité du port de chargement
de l'appareil (par ex.sur l'intérieur du couvercle de valeur d'arrêt).
A Contient des gaz à effet de serre fluorés couverts par le protocole de
Kyoto.
B Charge de réfrigérant usine de l'appareil : voir sur la plaque d'intitulé de
l'appareil
C Quantité supplémentaire de réfrigérant chargée sur place
D Charge totale de réfrigérant
E Appareil extérieur
F Cylindre réfrigérant et orifice d'admission de chargement
kg
kg
kg
A
B
C
D
26
Page 27

Maintenance
Pour une utilisation intelligente du climatiseur
Paramétrage d'une
température de pièce
appropriée
Température
appropriée
Fermer portes et fenêtre
durant utilisation.
En mode de
refroidissement,
empêcher la pénétration
d'un ensoleillement
direct avec un rideau ou
des volets.
Si l'appareil n'est pas
utilisé durant une
longue période, couper
l'alimentation principale.
ARRÊT
Ne pas obstruer l'entrée ou
la sortie d'air
Utiliser la minuterie
efficacement.
Utiliser les volets
efficacement.
Télécommande
Ne pas utiliser d'eau ; nettoyer le contrôleur
avec un chiffon sec. Ne pas utiliser de
nettoyant à vitre ou de chiffon imbibé.
Boîtier intérieur
nettoyer le climatiseur en utilisant un chiffon
doux et sec. Pour les tâches résistantes,
utiliser un détergent neutre dilué dans de
l'eau. Essorer le chiffon avant de nettoyer,
puis totalement ôter le détergent.
Ne pas nettoyer avec les produits suivants :
Essence, benzine, dliluant ou poudre à nettoyer
pouvant endommager l'enduit de l'unité.
Nettoyage du filtre à air
De l'eau chaude au delà de 40OC(104OF) peut
provoquer une décoloration ou une déformation.
1 Ouvrir la grille de l'entrée d'air en la tirant vers le
haut.
2 Retirer le filtre.
Pousser légèrement vers le haut l'onglet central du filtre
jusqu'à le libérer de la butée, et retirer le filtre par le bas.
3 Nettoyer le filtre.
Utiliser un aspirateur pour enlever la poussière, ou nettoyer
le filtre avec de l'eau. Après lavage, faire totalement sécher le
filtre à l'ombre.
4 Fixer le filtre.
Fixer le filtre correctement de façon à ce que l'indication
"FACE" soit de face. S'assurer que le filtre est complètement
fixé derrière la butée. Si les filtres droit et gauche ne sont pas
correctement fixés, des défauts peuvent se produire.
5 Fermer la grille d'entrée d'air.
Toutes
les deux
semaines
Remplacement des filtres de purification d'air
1. Ouvrir la grille d'entrée d'air
Soulever la grille d'entrée en utilisant
un petit outil nommé support de grille
situé sur le côté droit de l'appareil
d'intérieur.
2. Détacher le filtre à air
standard
Faire glisser le bouton légèrement
vers le haut pour libérer le filtre, puis
l'enlever.
Retirer l'ancien filtre de
purification d''air
3. Fixer le filtre de purification
d'air
Placer les dispositifs de filtre de
purification dans les cadres à filtre
gauche et droit.
4. Fixer le filtre à air standard
(Installation nécessaire)
ATTENTION :
Le côté blanc du filtre de purification d'air
photocatalytique face vers l'extérieur, et le côté
sombre face à l'appareil. Le côté vert du filtre de
purification d'air anti-bactérien face à l'extérieur, et
le côté blanc face à l'appareil.
5. Fermer la grille d'entrée d'air.
Fermer la grille avec soin
REMARQUE :
● Le filtre de purification d'air photocatalytique doit être solarisé à
dates fixes. Dans une famille normale, il doit être solarisé tous
les 6 mois.
● Le filtre de purification d'air anti-bactérien peut être utilisé
longtemps, inutile de le remplacer. Toutefois en cours
d'utilisation, la poussière doit être enlevée en utilisant
un aspirateur ou en les tapotant légèrement, sinon les
performances pourraient être affectées.
● Veiller à maintenir le filtre de purification d'air anti-bactérien
dans un environnement frais et sec, d'éviter une exposition
directe au soleil lors d'un arrêt d'utilisation, ceci pouvant réduire
la capacité de stérilisation.
27
Page 28

Avertissement
Avertissement
Merci de contacter le point de vente ou de maintenance pour l'installation.
Ne pas tenter d'installer le climatiseur par soi-même parce qu'une installation inadéquate peut
causer un choc électrique, un incendie ou une fuite d'eau.
Avertissement
Si une anomalie telle qu'une petite combustion se produit,
stopper immédiatement l'appareil et contacter le vendeur.
ARRÊT
Engager totalement la prise du cordon
d'alimentation.
STRICTE
OBLIGATION
Ne pas utiliser un cordon enroulé.
STRICTE
OBLIGATION
Utiliser la tension appropriée.
Prendre soin de ne pas endommager le
cordon électrique.
Utiliser
une source
d'alimentation
exclusive munie
d'un coupecircuit.
STRICTE
OBLIGATION
Vérifier soigneusement l'installation
adéquate du drainage.
STRICTE
OBLIGATION
1. Ne pas utiliser une rallonge électrique
ou de cordons raccordés.
2. Ne pas installer dans un endroit
exposé à un risque de fuite de gaz
inflammable.
3. Ne pas exposer l'appareil à de l'eau ou
de l'huile vaporisée.
Ne pas insérer d'objets dans l'entrée ou la sortie d'air.
INTERDICTION
INTERDICTION
Ne pas démarrer ou arrêter le
fonctionnement en déconnectant le
cordon d'alimentation.
INTERDICTION
Ne pas utiliser à des fins de stockage de
nourriture, de travaux d'art, d'équipement de
précision, d'élevage ou de culture.
INTERDICTION
Ne pas installer l'appareil près d'une cheminée
ou d'un autre appareil de chauffage.
INTERDICTION
Ne pas placer d'animaux ou de plantes sur le
chemin direct du flux d'air.
Ne pas diriger le flux d'air directement
vers des personnes, en particulier des
enfants ou des personnes âgées.
INTERDICTION
Ne pas tenter de réparer ou
reconstruire par soi-même.
INTERDICTION
AVERTISSEMENT
Prendre de l'air frais régulièrement,
particulièrement lorsqu'un appareil à gaz
fonctionne au même moment.
STRICTE
OBLIGATION
Vérifier le bon état du support d'installation.
INTERDICTION
Ne placer aucun objet sur l'appareil ou fixé à
l'appareil.
INTERDICTION
Connecter la prise de terre.
mise à la
terre
Ne pas utiliser le commutateur avec des
mains mouillées.
INTERDICTION
Ne pas verser d'eau sur l'appareil pour le
nettoyage.
INTERDICTION
Ne pas placer de vase à fleur ou de conteneur
d'eau sur le haut de l'appareil.
28
INTERDICTION
INTERDICTION INTERDICTION
Page 29

Dépannage
Avertissement
Avant de demander de l'assistance, vérifier
la liste suivante.
Cause ou points de contrôle
● Lorsque l'appareil est stoppé, il ne
redémarrera pas avant 3 minutes afin de
protéger le système.
● Lorsque la prise de courant est retirée
puis réinsérée, le circuit de protection
fonctionnera durant 3 minutes pour
protéger le climatiseur.
● Durant le fonctionnement de l'appareil
ou à l'arrêt, un bruissement ou un
gargouillement peut se faire entendre. Au
bout de 2 à 3 minutes après démarrage
de l'appareil, ce bruit devient plus notable.
(Ce bruit est produit par la circulation du
liquide réfrigérant dans le système)
● Durant le fonctionnement de l'appareil,
un bruit de craquement peut se faire
entendre. Ce bruit est produit par
l'expansion ou la réduction de l'enveloppe
en raison des changements de
température.
● Si le flux d'air de l'appareil en cours de
fonctionnement produit un bruit élevé,
c'est que le filtre à air peut être sale.
● Ceci se produit parce que le système fait
circuler les odeurs de l'air intérieur telles
que odeurs de meubles, peinture ou
tabac.
● En fonctionnement FROID ou SEC,
l'appareil d'intérieur peut expulser de la
vapeur. .
Ceci est dû au soudain refroidissement
de l'air intérieur.
● En mode SEC, lorsque la température de
la pièce devient inférieure au paramètre
de température de plus de 2
fonctionne de façon intermittente à vitesse
BASSE quel que soit le paramétrage du
VENTILATEUR.
● La prise de courant est-elle bien insérée ?
● Y-a-t-il une panne de courant ?
● Le fusible a-t-il grillé ?
● Le filtre à air est-il sale ?
Normalement il doit être nettoyé tous les
15 jours.
● Se trouve-t-il un obstacle devant l'entrée et
la sortie d'air ?
● La température est-elle correctement
réglée ?
● Des portes ou des fenêtres sont-elles
ouvertes ?
● Existe-t-il un ensoleillement direct venant
d'une fenêtre durant le refroidissement ?
(Utiliser un rideau)
● La pièce contient-elle trop de sources
de chaleur ou de personnes durant le
refroidissement ?
O
C, l'appareil
Inspection
normale des
performances
Vérification
multiple
Phénomène
Le système ne
redémarre pas
automatiquement.
Un bruit se fait
entendre.
Génération d'odeurs.
De la vapeur ou un
panache se dégage.
En mode sec, la vitesse
de ventilation ne peut
pas être changée.
Mauvais
refroidissement
● N'obstruez et ne couvrez pas le climatiseur. Ne mettez pas vos doigts dans
les entrées/sorties, ni dans les volets de conditionnement.
● Ne pas laisser d'enfant jouer avec le climatiseur. Ne jamais laisser un enfant
s'asseoir sur l'appareil extérieur.
Spécifications
● Le circuit de réfrigération est étanche.
L'appareil est adapté aux situations suivantes :
1. Plage de température ambiante applicable :
Refroidissement
Chauffage
2. Si le cordon d'alimentation est endommagé, il doit être remplacé par le
fabricant, un de ses agents d'entretien ou une personne qualifiée similaire.
3. Si le fusible de l'unité d'intérieur sur la carte PC a fondu, le remplacer avec un
fusible de type T. 3.15A/ 250V. Si le fusible de l'appareil d'extérieur a fondu, le
remplacer par un fusible de type T.25A/250V.
4. La méthode de câblage doit être conforme aux normes locales de câblage.
5. Après installation, la prise de courant doit être d'accès facile.
6. Les piles usagées doivent être éliminées de façon appropriée.
7. L'appareil n'est pas destiné à être utilisé par des enfants ou des personnes
infirmes sans supervision.
8. Il doit être veillé à ce que des jeunes enfants ne jouent pas avec l'appareil.
9. Veiller à utiliser une prise de courant appropriée, correspondant au cordon
électrique.
10.La prise de courant et le câble de connexion doivent disposer des
autorisations locales.
11. Afin de protéger l'appareil, veiller à éteindre d'abord le climatiseur, puis à
attendre au moins 30 secondes avant de couper l'alimentation.
Intérieur
Plein air
Intérieur
Plein air
Plein air
(INVERSEUR)
Maximum:D.B/W.B 32OC/23OC
Minimum:D.B/W.B 21OC/15OC
Maximum:D.B/W.B 43
Minimum:D.B 18
Maximum:D.B 27
Minimum:D.B 0OC
Maximum:D.B/W.B 24
Minimum:D.B/W.B -7
Maximum:D.B/W.B 24
Minimum:D.B -15OC
O
C/26OC
O
C
O
C
O
C/18OC
O
C/-8OC
O
C/18OC
 Loading...