

Page 1

34F8A-T34F8A-T
COLOUR TV RECEIVER
OWNER'S MANUAL
MAIN FUNCTIONS
Multiple picture & audio modes
Child lock
Sleep timer
Surround stereo, treble and bass boost
Program scan & program swap
Noise reduce
Black stretch
Please read this manual carefully before using this
TV set and keep it for future reference.
Page 2

Page 3

* For your enjoyment of this TV set, please read this manual carefully and
keep it good for future reference.
CONTENTS
Before Operation
Warning and cautions..........................................................................2
Installation.............................................................................................3
Antenna connection.............................................................................3
Preparation of the remote control unit.................................................3
Function buttons and external sockets..............................................4
Front panel of the TV set....................................................................4
Rear panel of the TV set......................................................................4
Buttons on the remote control............................................................5
Basic operation
Switching on/off the TV set..................................................................6
Watching TV program...........................................................................7
Watching TV program.........................................................................7
Program swap and auto scan functions..............................................8
Searching channel................................................................................9
Full automatic search mode................................................................9
Semi-automatic search.....................................................................10
Manual fine tune................................................................................11
Program skip ....................................................................................12
Convenient picture and sound control functions............................
Multiple picture modes ....................................................................13
Black stretch and noise reduce.........................................................14
Multiple audio modes......................................................................15
Surround/Woofer and mute functions...............................................16
Time functions....................................................................................17
Clock setting and on/off timer functions..........................................17
Sleep timer and program preset ....................................................18
Setup function ..................................................................................19
Screen saver and child lock functions..............................................19
AVL and calendar functions..............................................................20
Switch on/off modes ........................................................................21
Position exchange function...............................................................22
Others
Connection to the external audio and video equipments...............23
Troubleshooting..................................................................................24
Specifications......................................................................................25
13
Page 4
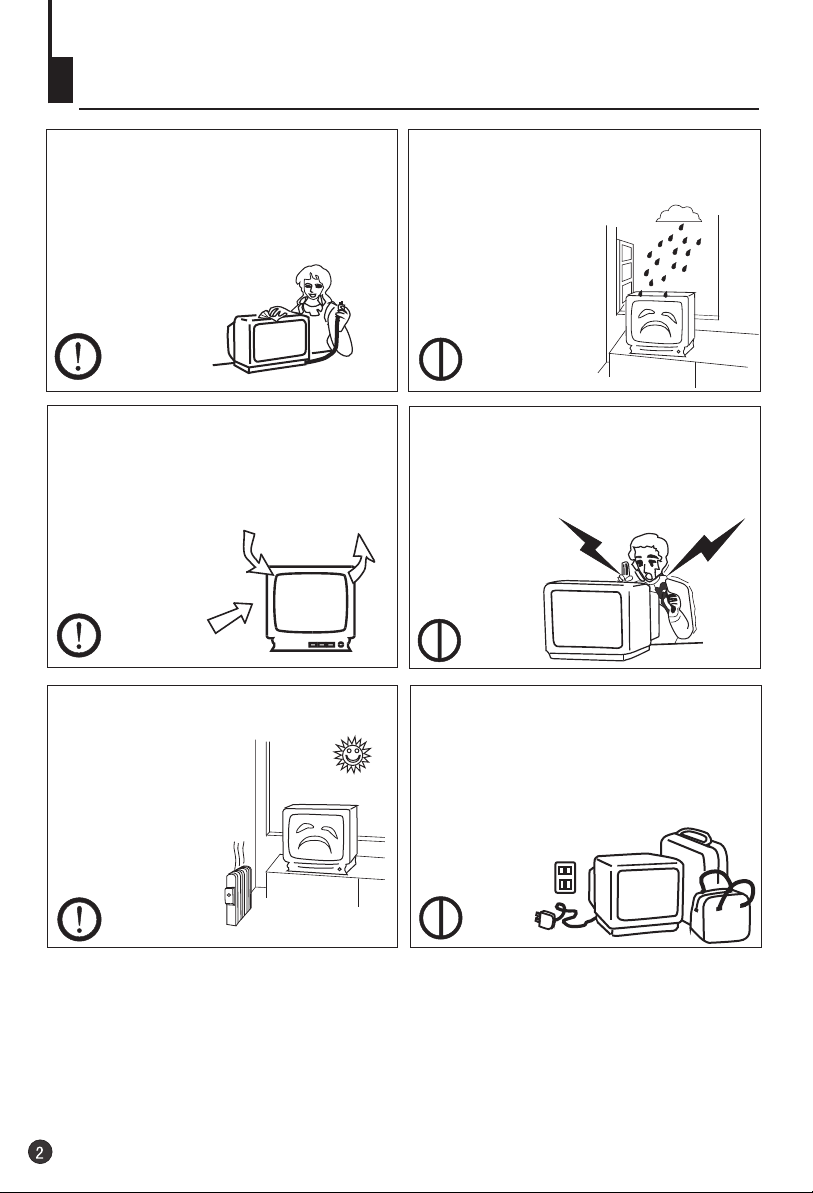
Warning and cautions
1. When you clean the TV set, please
pull out the power plug from AC outlet.
Don't clean the cabinet and the
screen with benzene, petrol and other
chemicals.
2. In order to prolong the using life of
the TV set, please place it on a
ventilated place.
3. Don't place the
TV set in the
sunshine or near
heat source.
4. To prevent the TV set from firing and
electric shock, don't
Make the TV set rain
or moisture.
5. Don't open the back cover, otherwise
it is possible to damage the
components in the TV set and harm you.
6. When the TV set isn't going to be
used for long time or it is in thunder and
lightening, please pull out the plug from
AC outlet and the antenna plug from
the cover of the TV set.
Explanation on the display tube
In general, it is not needed to clean the tube surface. However, necessary,
it's surface can be cleaned with a dry cotton cloth after cutting off the power.
Don't use any cleanser. If using hard cloth, the tube surface will be damaged.
Page 5
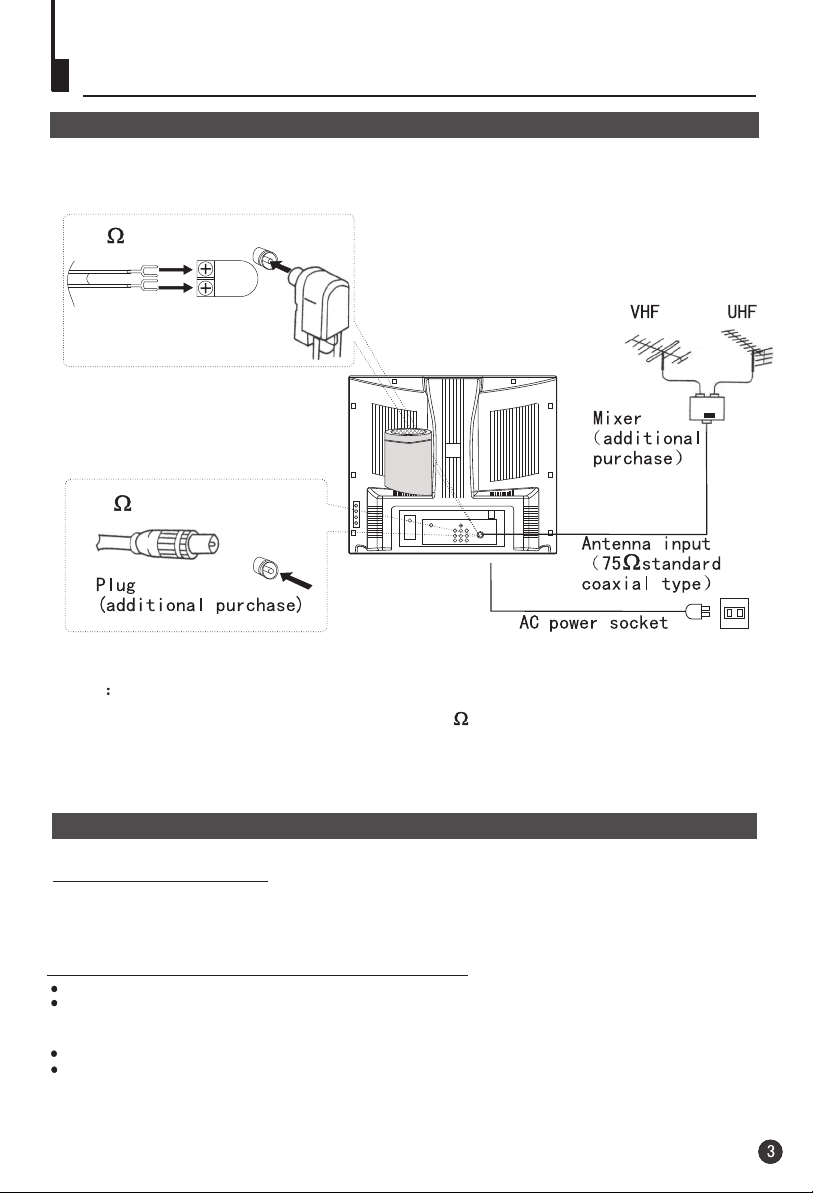
Installation
Antenna connection
Generally speaking, to enjoy a clearer picture, we recommend that you use a CATV
system or an outdoor antenna .In different places, the suitable antenna type and position
are different.
300 twin-lead cable
Antenna adapter
(additional purchase)
75 coaxial cable
Note
* It is recommended that you'd better use 75
disturbance caused by airwave.
* Don't bind antenna cable and power wire together.
coaxial cable to remove the
Preparation of the remote control unit
Battery installation
Take off the battery compartment cover. Place two AA batteries, make sure that battery
polarity matches with the +/- mark inside the battery compartment.
Operation notes for the remote control unit
Under normal conditions, the life time of batteries is one year.
If you don't intend to use the unit for a long period or the electricity of the batteries is
used up, remove the batteries to prevent batteries acid from leaking into the battery
compartment.
Don't throw your batteries into a fire. Dispose of your batteries with a specified method.
Avoid the falling and the wetting of the remote control unit.
Page 6
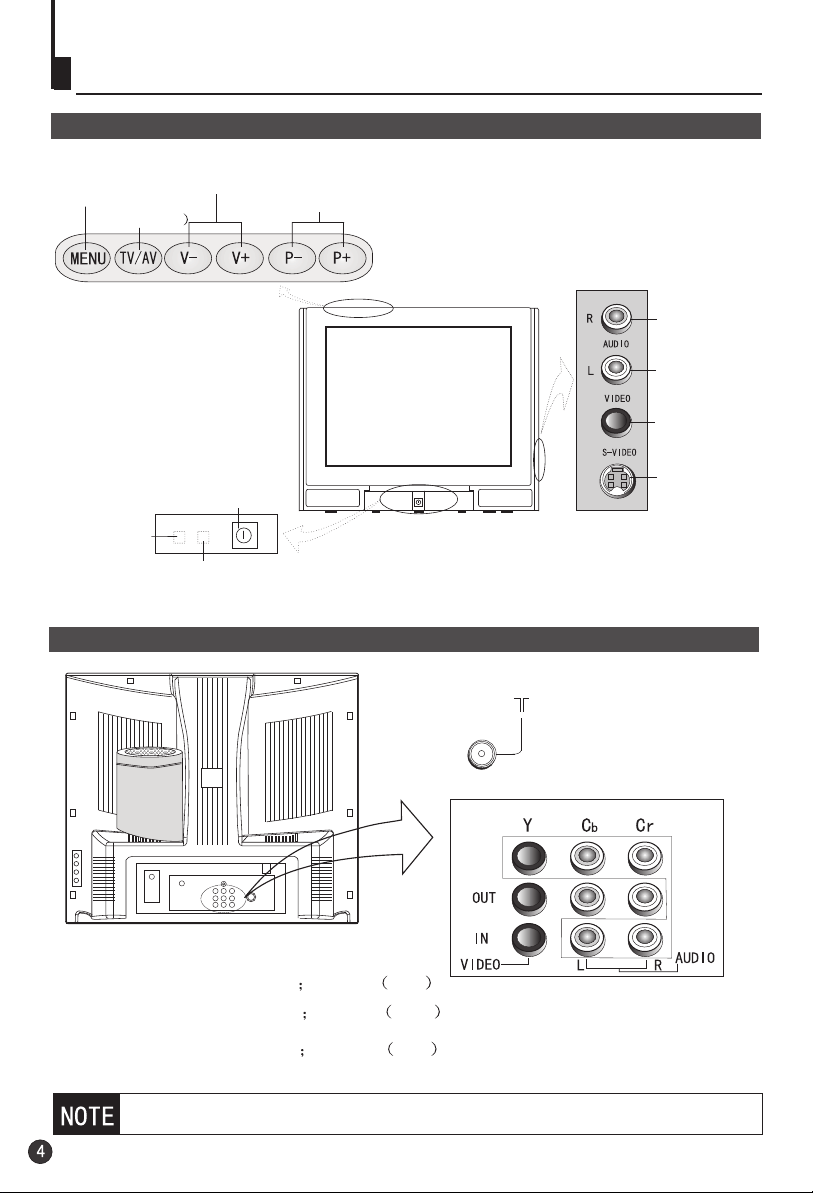
Function buttons and external sockets
Front panel of the TV set
MENU
TV/AV
(input select
Remote sensor
Volume down/up
Program down/up
Power switch
Power indicator
Rear panel of the TV set
Side-set terminals
Right sound
track
Left sound
track
Video1 input
terminal
S terminal
Antenna input
Video output terminals: VIDEO AUDIO L, R
Video 2 input terminals: VIDEO AUDIO L, R
DVD input terminals: Y, Cb, Cr AUDIO L, R
If you want to connect the TV set to the other audio/video equipments, please
refer to P23.
Page 7
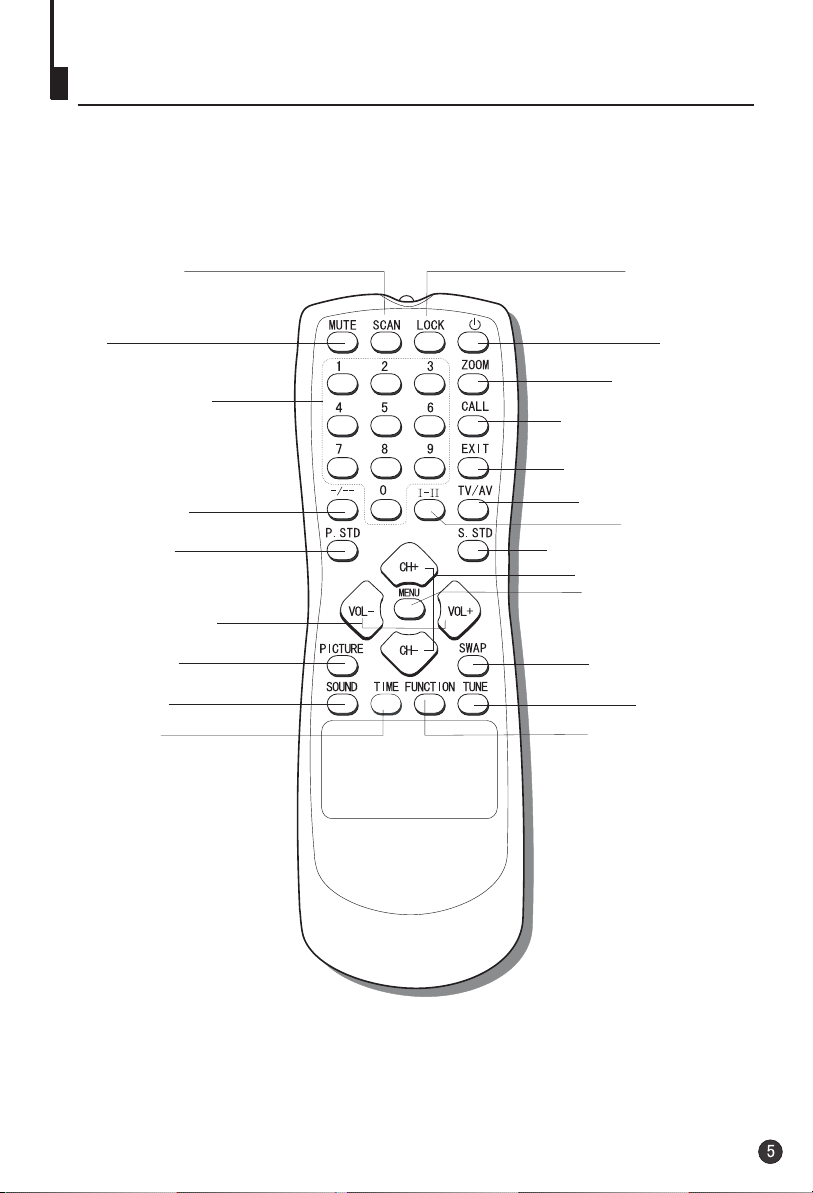
Buttons on the remote control
Program scan
Mute
Program number
Digital selector
Picture mode
selection
Volume selection
Picture menu
Sound menu
Time menu
Lock/unlock
selectable
Stand by
Zoom function
Call screen display
Exit screen display
TV/AV exchange
Mono/stereo
Sound mode selection
Channel selection
Menu selection /
adjustment
Former program
Tune menu
Function menu
Page 8

Page 9
Watching TV
You can watch TV program in a preset channel.
Watching TV program
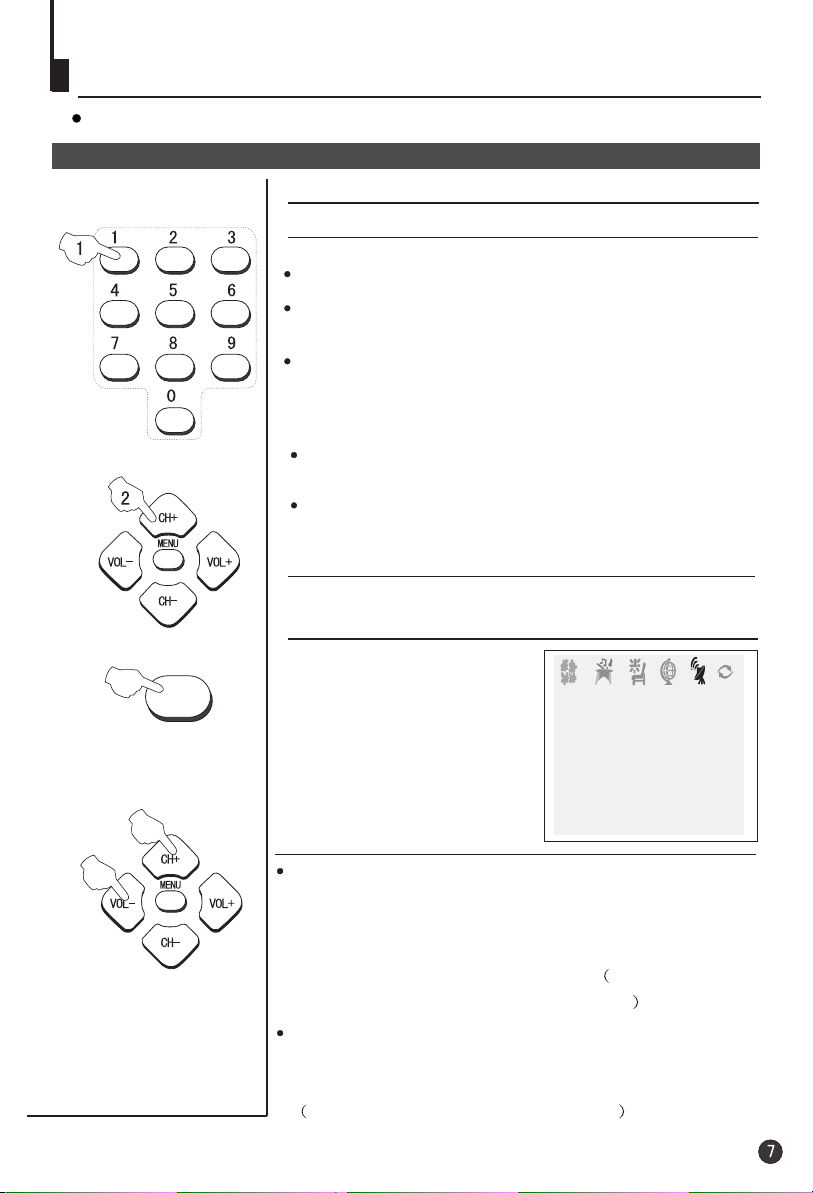
How to select TV program
Select the desired program
1 Using "Program number" buttons
When to select a channel number with one digit, please press
some a number among 0-9 to select desired channel.
When to select a channel number with two digits, please
press the [-/-- ]button to show "--" on the top left of the screenand
then press two numbers among 0-9 to select desired channel.
When to select a channel number with three digits, please press
the [-/--] button to show "---" on the top of the screen and then
press three numbers among 0-9 to select desired channel.
2 Using the CH+/- buttons
Press the CH+ button to select a channel number in number
TUNE
increasing
Press the CH- button to select a channel number in number
decreasing
Select the desired sound
Press the VOL+/- buttons to adjust volume.
If the colour or sound of some channel is abnormal
The settings of the colo r
system or the sound system
may be wrong.
Press the TUNE button and
setting menu shown on the
right will display on the screen.
direction.
direction.
u
TUNE
COLOUR AUTO
SOUND BG
BAND VHFL
SKIP OFF
PROGRAM 0
SEARCH
FINE TUNE
AUTO SEARCH
If the picture colo r is not normalu
Press the CH+/- buttons to move cursor to "COL UR",
press the o
then VOL-/+ buttons to select the correct col ur
system.
In general, you can set it as "AUTO". AUTO,PAL,NTSC ,
NTSC443 and SECAM will display in turn.
O
If the picture sound is abnormal
Press the CH+/- buttons to move cursor to "sound",then
press the VOL-/+ buttons to select the correct sound system.
In general, BG will display in turn.DK,
Page 10

Watching TV Continued
Swap function enables quick swap to the last watched program.
Auto scan function enables automatic successive scanning of all the programs in
memory with (each channel will last about 2 seconds), so that you are
"OFF" skip status
free from the trouble of pressing keys.
Program swap and auto scan functions
Program swap
Suppose the channel number
1
SWAP
you used just now is 8 and the
channel number you are using
is 18 (as shown in the figure).
2 If you want to return to the
last watched program channel
8, you can simply press the
SWAP button.
3 If you want to return to
channel 18, press the button
again. Through this function,
you can easily change
between the channel you are
using and the channel you
used last time.
18
AUTO
BG
8
AUTO
BG
18
AUTO
BG
SCAN
Auto program scan
1 If you want to select a
desirable program, you may
scan all the TV programs in
memory. You can simply press
the SCAN button to do this. The
programs will appear one after
another from beginning to end
(each channel number will last
about 2 seconds).
2 If you want to stop the function
during auto scanning, simply
press the SCAN button again.
1
AUTO
BG
SCAN
2
AUTO
BG
SCAN
3
AUTO
BG
SCAN
1
AUTO
BG
Page 11

Searching channel
This TV set has three methods to set channel, which are respectively full automatic,
semi automatic and manual fine tune.
-
In this section, how to use remote control to set channel is explained. You can also
use buttons on the TV set to set channel.
Full automatic mode
TUNE
1 Press the TUNE menu button ,
till the TUNING menu shown on
the right display on the screen.
Press the CH+/-
2 buttons to
move cursor to "AUTO
SEARCH".
TUNE
COLOUR AUTO
SOUND BG
BAND VHFL
SKIP OFF
PROGRAM 0
SEARCH
FINE TUNE
AUTO SEARCH
TUNE
COLOUR AUTO
SOUND BG
BAND VHFL
SKIP OFF
PROGRAM 0
SEARCH
FINE TUNE
AUTO SEARCH
3 Press the VOL+ buttons to
make automatic search
function work. All channels now
playing program will be
automatically preset in order .
After preset finished, the first
program number will display on
the
CALL
Display function
Press the CALL button, then
the channel number and
system will be displayed on
the screen.
3
AUTO
BG
Page 12

Searching channel Continued
Semi-automatic search
Semi-automatic search
1 Press the CH+/- buttons or
PROGRAM NUMBER 0-9
button to choose desired channels
regard channel 1 as example
TUNE
2 Press the TUNE menu button ,
till the TUNING menu shown on
the right display on the screen.
3 buttons to
Press the CH+/-
move cursor to " SEARCH".
1
AUTO
BG
TUNE
COLOUR AUTO
SOUND BG
BAND VHFL
SKIP OFF
PROGRAM 0
SEARCH
FINE TUNE
AUTO SEARCH
EXIT
4 Press the VOL-/+ buttons to
start searching.
6
VOL- down button is used
for lower side program search.
VOL+ up button is used
SEARCH
VHFL
for higher side program search.
Repeat this step, till find the
desired channels.
If you want to eliminate MENU display immediately
In general, after you press the MENU button, menu
display (PICTURE, SOUND, TIME
EXCHANGE,
ETC.) will automatically disappear within 15
seconds. If you want to eliminate these contents
immediately, please press the EXIT button.
, FUNCTION, TUNE,
item
Page 13

Searching channel Continued
Manual fine tune
Manual fine tune
Under normal conditions, it is not needed to carry out the
following adjustments. However, if it is needed to carry out
adjustments under un-ideal receiving status, please use the
fine tune function to make adjustment for receiving the
optimal pictures.
1 Press the CH+/- button or
PROGRAM NUMBER 0-9
buttons to choose desired
channels regard channel 1 as
example
TUNE
2 Press the TUNE menu button ,
till the TUNING menu shown on
the right display on the screen.
3 buttons to
Press the CH+/-
move cursor to " FINE TUNE".
4 Press the VOL-/+ buttons all
by carrying out fine tune, till the
best picture and sound are
obtained, then loosen the
button.
TUNE
COLOUR AUTO
SOUND BG
BAND VHFL
SKIP OFF
PROGRAM 0
SEARCH
FINE TUNE
AUTO SEARCH
5
FINE TUNE
VHFL
Page 14

Searching channel Continued
Program skip
Program skip
After presetting, you can skip needless channels so that
you could choose the desired channels.
TUNE
1 Press the CH+/- buttons or
PROGRAM NUMBER 0-9
button to choose desired channels
1
AUTO
BG
regard channel 1 as example
2 Press the TUNE menu button,
till the TUNING menu shown on
the right display on the screen.
3 buttons to
Press the CH+/-
move cursor to "SKIP".
TUNE
COLOUR AUTO
SOUND BG
BAND VHFL
SKIP OFF
PROGRAM 0
SEARCH
FINE TUNE
AUTO SEARCH
4 Press the VOL-/+ buttons to
turn the SKIP function "ON".
5 Press the TUNE button to close
the menu. When you use the CH /
buttons to choose channel, this
channel will be skipped. However,
TUNE
COLOUR AUTO
SOUND BG
BAND VHFL
SKIP ON
PROGRAM 0
SEARCH
+-
FINE TUNE
AUTO SEARCH
you can still use the PROGRAM
NUMBER buttons to choose skipped
channel numbers.
If you want to recover the skipped channel
1 Use the PROGRAM NUMBER buttons to select the channel
number to be recovered.
2 Repeat those steps just now.
3 Press the VOL-/+ buttons to turn the SKIP function "OFF".
Page 15

Convenient picture and sound control functions
Multiple picture modes
P.STD
PICTURE
How to select picture mode
You can quickly select the desired picture mode from
four preset modes and one customized mode.
Press the P.STD button to select the
desired picture quality. Five kinds
of picture modes (i.e.,
"STANDARD",
"RICH", "USER","LISTEN",
STANDARD
RICH
USER
"SOFT" ) can be selected in turn.
LISTEN
SOFT
How to customize your own picture status
1 Press the PICTURE menu button , till the menu
shown on the right display on the screen.
2 Press the CH+/- buttons to
move cursor to the item to be
adjusted, then press the VOL-/+
buttons to obtain the desired
effect.
PICTURE
CONTRAST 48
BRIGHTNESS 32
COLOUR 48
SHARPNESS 40
*HUE 60
BLACK STRETCH OFF
PICTURE
ITEM
CONTRAST
BRIGHTNESS
COLOUR
SHARPNESS
*Hue
Note:
The "Hue" item only appears when the colour system is NTSC.
Press VOL-
Weak
Dark
Shallow
Soft
lean to purple
Press VOL+
Strong
Bright
Deep
Sharp
lean to green
Page 16

Convenient picture and sound control functions
Continued
Black stretch and noise reduce
PICTURE
FUNCTION
How to select BLACK STRETCH
1 Press the menu
button , till the menu
shown on the right display on the
screen.
Press the CH+/-
2 buttons to
move cursor to "BLACK
STRETCH".
3 Press the VOL-/+ buttons to
turn the BLACK STRETCH
function "ON" or "OFF".
PICTURE
PICTURE
PICTURE
CONTRAST 48
BRIGHTNESS 32
COLOUR 48
SHARPNESS 40
*HUE 60
BLACK STRETCH OFF
PICTURE
CONTRAST 48
BRIGHTNESS 32
COLOUR 48
SHARPNESS 40
*HUE 60
BLACK STRETCH ON
How to select NOISE REDUCE
1 Press the FUNCTION menu
button, till the menu
shown on the right display on the
screen.
Press the CH+/-
2 buttons to
move cursor to "NOISE
REDUCE".
3 Press the VOL-/+ buttons to
turn the NOISE REDUCE
function "ON" or "OFF".
FUNCTION
FUNCTION
BACKGROUND ON
NOISE REDUCE ON
FADE ON
CHILDLOCK OFF
AVL ON
CALENDAR
FUNCTION
BACKGROUND ON
NOISE REDUCE OFF
FADE ON
CHILDLOCK OFF
AVL ON
CALENDAR
Page 17

Convenient picture and sound control functions
Continued
Multiple audio modes
How to choose sound mode
S.STD
Press the S.STD button to select the
desired sound quality. Four kinds
of sound models (i.e.,
" ","USER" and "SPEECH")
MUSIC
can be selected in turn.
"THEATER",
THEATER
MUSIC
SPEECH
USER
SOUND
Mode
THEATER
MUSIC
USER
SPEECH
Suitable for rich and full music
Musical
You can set it by yourself
Speech
Sound quality
How to customize you own sound quality
1 Press the SOUND menu button ,
till the SOUND menu shown on
the right display on the screen.
2 Press the CH+/- buttons to
move cursor to the item to be
adjusted, then press the VOL-/+
buttons to obtain the desired
effect.
ITEM
VOLUME
BASS
TREBLE
BALANCE
WOOFER VOL
Press VOL-
Weak
Weak
Weak
R down
Weak
SOUND
VOLUME 45
BASS 48
TREBLE 48
BALANCE 0
WOOFER OFF
WOOFER VOL 20
SURROUND ON
Press VOL+
Strong
Strong
Strong
L down
Strong
Page 18

Convenient picture and sound control functions
Continued
Surround/Woofer and mute functions
SOUND
How to use surround / woofer
1 Press the SOUND menu button , till the SOUND menu
shown on the right display on the screen.
2 Press the CH+/- buttons
select "SURROUND" /
"WOOFER", then press the
VOL-/+ buttons to turn the
SURROUND / WOOFER "ON".
3 Press the CH+/- buttons
select WOOFER VOL, then
press the VOL-/+ buttons to
obtain the desired effect.
SOUND
VOLUME 45
BASS 48
TREBLE 48
BALANCE 0
WOOFER OFF
WOOFER VOL 20
SURROUND ON
SOUND
VOLUME 45
BASS 48
TREBLE 48
BALANCE 0
WOOFER ON
WOOFER VOL 20
SURROUND ON
How to eliminate sound
When you need to pay attention to surround sound,
or there is a telephone calling you or there are some
guests visiting you, the sound elimination (mute)
function is very convenient.
MUTE
1 Press the MUTE button on the
remote control and "MUTE" type
face will display on the screen.
At this time, the sound of the TV
set is turned off.
2 If you want to recover sound,
press the MUTE button again or
directly press the VOL-/+ buttons.
MUTE
Page 19

Time functions
Clock setting and timer on/off functions
TIME
Clock setting
Check if the CLOCK time is identical to the standard time
of local time zone before setting the time. If not, adjusting
as follows:
TIME
1 Press the menu button,
TIME
and the TIME menu display on
the screen.
2Press the CH
+/- buttons to
move cursor to "CLOCK", then
press the VOL -/+ buttons to
adjust the time in hour position;
press again the CH+/- buttons
to select the time in minute
position, then press the VOL +/buttons to adjust the value of
minutes
.
On/off timer
Using on/off timer function, the
TV set can automatically turn on
to a preset program or shut
down in a preset time.
1 Press the TIME button
to call up the TIME menu on the
screen.
2 Press the CH+/- buttons to
move the cursor to "ON TIME",
then press the VOL -/+ buttons
to set the value in hour position;
press again the CH+/- buttons
to select the minute position and
set the value of the minute.(take
18:00 as an example)
menu
TIME
CLOCK 17:18
ON TIME 18:00
ON PROG 1
OFF TIME --:-SLEEP TIMER 0
REMIND TIME --:-REMIND PROG 1
TIME
CLOCK 17:18
ON TIME 18:00
ON PROG 1
OFF TIME --:-SLEEP TIMER 0
REMIND TIME --:-REMIND PROG 1
3 Press the CH+/- buttons to
move the cursor to "ON PROG",
then press the VOL-/+buttons or
program direct number buttons
to set your desired channel
(take 8 as an example).
4 Repeat step 1-2 to turn OFF
TIME.(take 23:00 as an example)
TIME
CLOCK 17:18
ON TIME 18:00
ON PROG 8
OFF TIME 23:00
SLEEP TIMER 0
REMIND TIME --:-REMIND PROG 1
Page 20

Time functions
continued
Sleep timer and program preset
Sleep timer
The TV set have 18 sections
for sleep timer function
TIME
option
(each section has a time
interval of 10 minutes)
chart):
1 Press the TIME button,
and the TIME menu display on
the screen.
2 Press the CH +/- buttons to
move cursor to "SLEEP
TIMER".
3 press the VOL -/+ buttons to
set the value of the SLEEP
TIMER.
REMIND PROG function
With REMIND PROG function, the TV set can
automatically change a preset program in a preset time .
menu
(See right
0
10
20
170
180
TIME
CLOCK 17:18
ON TIME 18:00
ON PROG 8
OFF TIME 23:00
SLEEP TIMER 120
REMIND TIME --:-REMIND PROG 1
TIME
1 Press the TIME button
menu
to call up the TIME menu on the
screen.
2 Press the CH +/- buttons to
move the cursor to "REMIND
TIME", then press the VOL -/+
buttons to set the value in hour
position; press again the CH+/buttons to select the minute
position, and then set the value
of the minute.(take 19:00 as an
example)
3 Press the CH+/- buttons to
move the cursor to "REMIND
PROG", then press the VOL -/+
buttons or program direct
number buttons to set the
Desired channel (take 18 as an
example).
NOTE:
take effect
is on status .
The REMIND PROG can not
when child lock function
TIME
CLOCK 17:18
ON TIME 18:00
ON PROG 8
OFF TIME 23:00
SLEEP TIMER 120
REMIND TIME 19:00
REMIND PROG 1
TIME
CLOCK 17:18
ON TIME 18:00
ON PROG 8
OFF TIME 23:00
SLEEP TIMER 120
REMIND TIME 19:00
REMIND PROG 18
Page 21

Set up function
Screen saver and child lock functions
How to start screen saver function
FUNCTION
FUNCTION
When the BACKGROUD
function is ON, the screen
NO SIGNAL
will turn automatically as
shown "NO SIGNAL" of
moving ( black background).
1 Press the FUNCTION menu
button till the menu
,
FUNCTION
shown on the right display on the
screen.
2 Press the CH+/-
buttons to move
cursor to "BACKGROUND" and
press the VOL-/+ buttons to turn the
BACKGROUND function "ON"
Child lock function
1 Press the FUNCTION menu button till the
FUNCTION
BACKGROUND ON
NOISE REDUCE ON
FADE ON
CHILD LOCK OFF
AVL ON
CALENDAR
.
,
FUNCTION
menu shown on the right display on the screen.
.
to move
FUNCTION
BACKGROUND ON
NOISE REDUCE ON
FADE ON
CHILD LOCK OFF
AVL ON
CALENDAR
2 Press the CH+/- buttons
cursor to "CHILD LOCK" and press
the VOL-/+ buttons to turn CHILD
LOCK function "ON"
LOCK
NOTE:
The menu local buttons can not work
1. when child lock
function is on status .
2.
You can also set the child lock function by pressing the
LOCK menu button on remote control repeatedly .
3.The "CHILD LOCK" become green on the screen when
the child lock is "ON" status ; the "CHILD LOCK" become
red when the child lock is "OFF" status.
Page 22

Set up function
Continued
AVL and calendar functions
AVL function
1 Press the FUNCTION menu
button till the FUNCTION
FUNCTION
,
menu shown on the right
display on the screen.
2 Press the CH+/-
cursor to "AVL"
3 Press the
the AVL function "ON" or "OFF"
buttons to move
.
VOL-/+ buttons to turn
.
FUNCTION
BACKGROUND ON
NOISE REDUCE ON
FADE ON
CHILD LOCK OFF
AVL ON
CALENDAR
FUNCTION
BACKGROUND ON
NOISE REDUCE ON
FADE ON
CHILD LOCK OFF
AVL ON
CALENDAR
FUNCTION
Calendar function
1 Press the FUNCTION menu
button till the menu
,
shown on the right display on the
screen.
2 Press the CH+/-
cursor to the "CALENDAR" , then
press the VOL-/+ buttons to the
CALENDAR display on the screen.
3 Press the CH-/+ buttons to turn
YEAR/MONTH/DAY, press the
VOL-/+ buttons to set or adjust
YEAR/MONTH/DAY.
FUNCTION
buttons to move
FUNCTION
BACKGROUND ON
NOISE REDUCE ON
FADE ON
CHILD LOCK OFF
AVL ON
CALENDAR
Page 23

Set up function
Switch on/off modes
FUNCTION
Continued
Switch on/off modes
1 Press the FUNCTION menu
button till the menu
,
shown on the right display
on the screen.
2 Press the CH +/- buttons to
move cursor to "FADE .
FUNCTION
FUNCTION
BACKGROUND ON
NOISE REDUCE ON
FADE ON
CHILD LOCK OFF
AVL ON
CALENDAR
FUNCTION
BACKGROUND ON
NOISE REDUCE ON
FADE ON
CHILD LOCK OFF
AVL ON
CALENDAR
3 Press the
the function "ON" or "OFF"
VOL-/+ buttons to turn
FADE
AVL
.
FUNCTION
BACKGROUND ON
NOISE REDUCE ON
FADE ON
CHILD LOCK OFF
AVL ON
CALENDAR
Page 24

Position exchange functions
Exchange
Exchange
Through this function, you can easily change any of the
channel numbers.
If you want to change the channel number of 6 to 9, you can
simply do the following:
1 Press the MENU button 6
times (again) till the
EXCHANGE menu display on
the screen.
2 Press the VOL+/- buttons or
PROGRAM NUMBER 0-9
buttons to set PROGRAM 1 TO 6.
3 buttons to move
Press the CH+/-
cursor to " PROGRAM 2".
4 Press the VOL+/- buttons or
PROGRAM NUMBER 0-9
button to set PROGRAM 2 TO 9.
,
EXCHANGE
PROGRAM 1 6
PROGRAM 2 2
EXCHANGE
EXCHANGE
PROGRAM 1 6
PROGRAM 2 9
EXCHANGE
5 buttons to
Press the CH+/-
move cursor to "EXCHANGE".
6 Press the VOL-/+ buttons to turn
the "EXCHANGE".
OCT
EXCHANGE
PROGRAM 1 6
PROGRAM 2 9
EXCHANGE
Page 25

Connecting the TV set to the other video and audio equipments
Connecting to the other video and audio equipments
You can connect a stereo to the AUDIO output terminals on the TV set to enjoy sounds of
higher quality. VIDEO and AUDIO output terminals output the video and audio signals being
monitored by the TV set. The electric levels of video and audio output signals are fixed.
To outside input
Woofer jack
Hook
Note:
Open the package, then take
out the woofer box. You should
connect the woofer box to the
TV set before you turn on the
TV set.
To video/audio input
DVD, VCD and other reproducing equipments
Page 26

Troubleshooting
If the TV set has breakdown, please check according to the following list.
Item
No power supply
No sound
Bad colour/ hue
Colour spot
Scramble
Double or triple
image
Snowy picture
The remote
control
do not work
Checking
If power line is connected?
Whether sound mute is used?
Whether the adjustments of contrast, colour and hue are suitable?
If the position of the TV set is changed during its work, the colour
shadow may appear.
If this case occurs, please switch off the power supply for TV set
and let it cool for about 30 minutes, then switch on the power
supply again.
If there are disturbances from automobile, motorcycle, electric car,
fluorescence lamp, blower etc?
If there are disturbances from the other TV set, PC, game machine and
wireless broadcasting station?
Whether there is any reflection of broadcasting signal from mountain or building?
Whether the antenna position is changed or not?
Whether the antenna connection is disconnected or fallen off?
Whether the antenna position is changed or not?
Whether the batteries in the remote control unit are used up or not?
Whether the installation of the batteries is correct or not?
Whether there is any barrier between the remote control and the infrared receiver?
Whether the infrared receiver is influenced by strong light?
Whether the main power supply is connected?
The cases shown below are not breakdowns:
Snapping sound from the
cabinet of the TV set
Uneven colour sometimes
appearing on a part of
the screen
If the breakdown can't be cleared after you doing by above steps,
e
t
N
o
please get in touch with the local cent r of service and don't open
the back cover yourself.
The snapping sound is caused by the telescoping of the
cabinet due to the temperature changing. It is normal,
please use it reassuringly.
This kind of uneven colour may be caused by bright picture
setting.
Even colour can be recovered by decreasing contrast.
e
Page 27

Specifications
Colour system
Sound system
Display tube
Sound output power
Power supply
Power consumption
Size mm
Supplied
accessories
PAL, SECAM
DK,
34" pure flat CRT
6W+6W & 6W
AC 160-250V 50/60 Hz
180W
850 width x725 height x585 depth
Remote control X1
Owner's manual X1
Battery(AA) X2
, AV NTSC
BG
The design and specifications may be changed without notice.
Page 28

 Loading...