

Page 1
Function buttons and external sockets
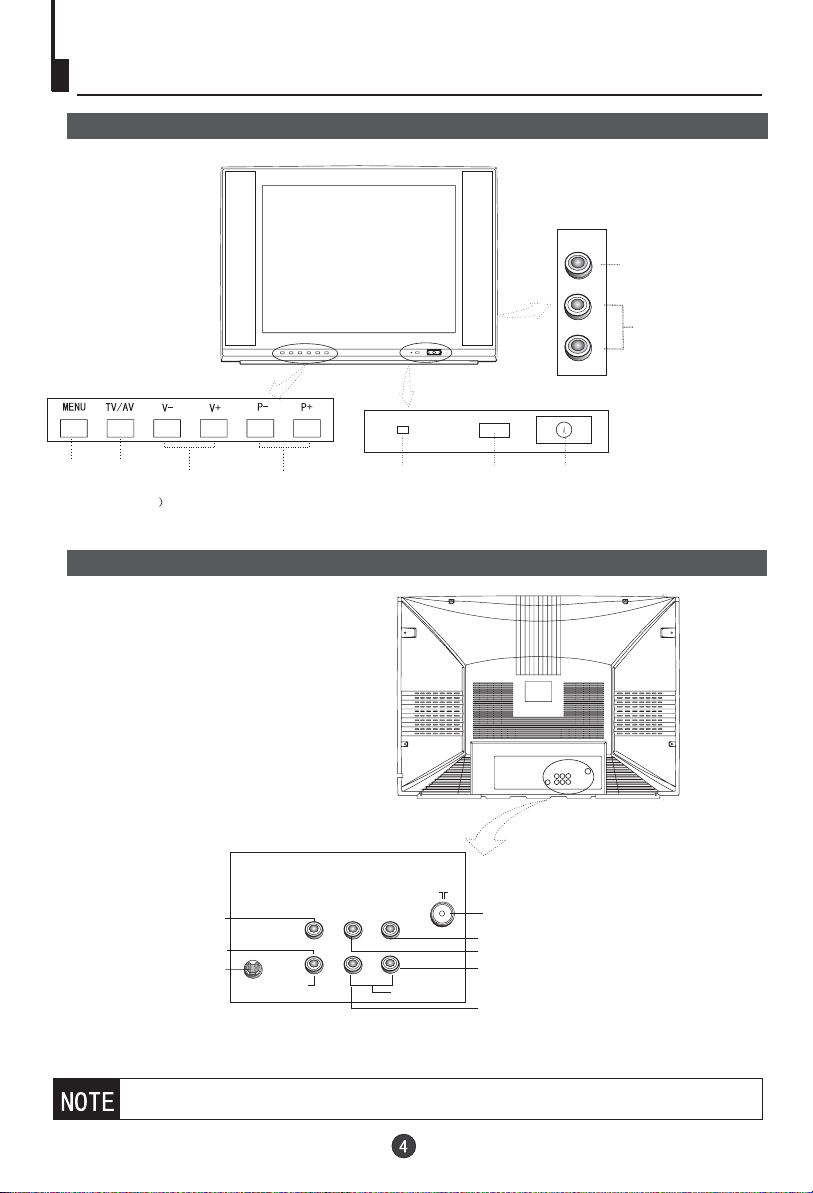
Front and side panel of the TV set
MENU
AV TV
(input selector
Back panel
/
Volume up/ down
Channel selector
Power indicator
Sensor window
VIDEO
L
AUDIO
R
Power switch
Video Input
terminal
Audio Input
terminal
Video output terminal
Video input terminal
S-Video Input terminal
If you want to connect the TV set to the other audio/video equipment, please
refer to P24.
S-VIDEO
OUT
IN
VIDEO
L R
AUDIO
Antenna input socket
Audio right channel output terminal
Audio left channel output terminal
Audio right channel input terminal
Audio left channel input terminal
Page 2

Page 3
Searching channel
Continued
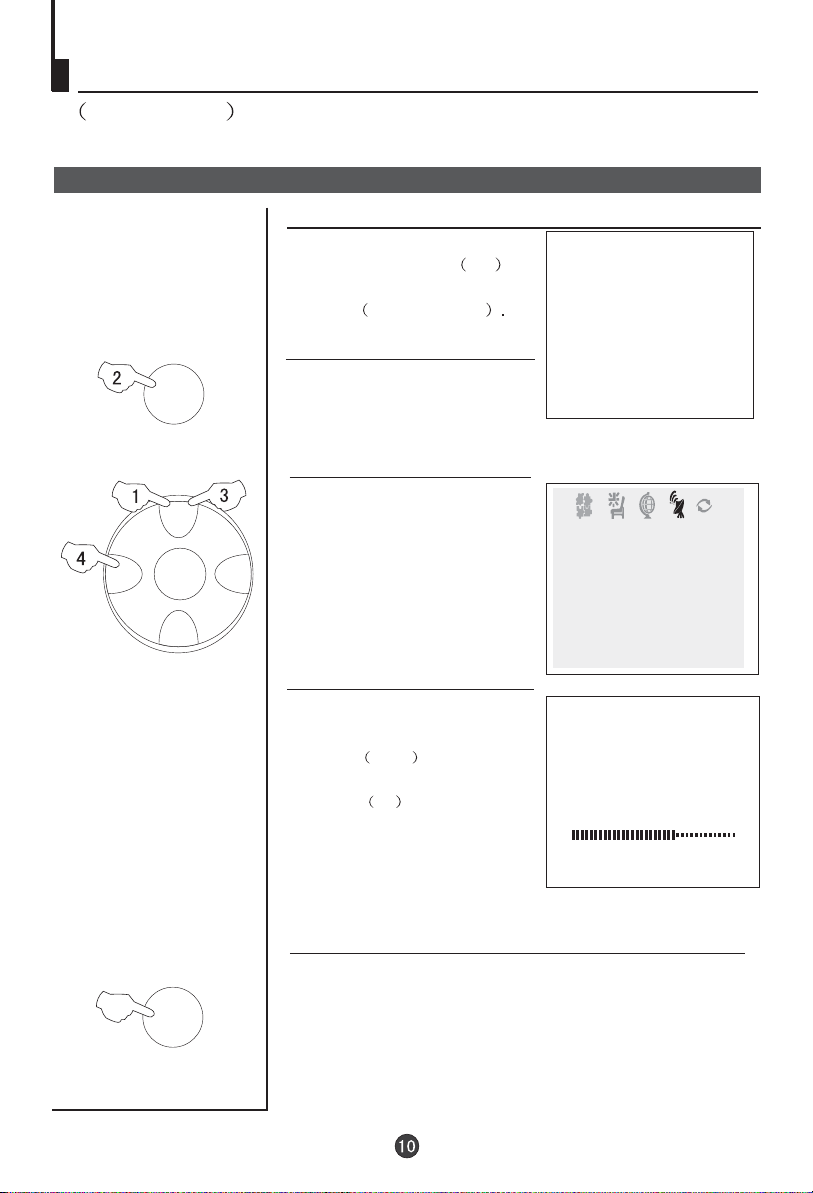
Semi-automatic search
Semi-automatic search
1 Press the CH+/- buttons or
PROGRAM NUMBER 0-9
buttons to choose desired
channels I.E. channel 1
TUNE
2 Press the TUNE menu button ,
till the TUNING menu shown on
the right display on the screen.
3 buttons to
CH+
VOL- VOL+
MENU
CH-
Press the CH+/-
select " SEARCH".
1
AUTO
DK
TUNE
COLOUR AUTO
SOUND DK
BAND VHFL
SKIP OFF
PROGRAM 0
SEARCH
FINE TUNE
AUTO SEARCH
EXIT
4 Press the VOL-/+ buttons to
start searching.
The VOL- down button is used
for lower side program search.
The VOL+ up button is used for
higher side program search.
Repeat this step, till find the
desired channel.
1
SEARCH
80.25MHz
To turn off the on-screen menu
In general, after you press the MENU button, the menu
display (PICTURE, TIME
, FUNCTION, TUNE, EXCHANGE,
ETC.) will automatically disappear within 15 seconds. If you
want to eliminate these contents immediately, please press
the EXIT button.
item
Page 4

Page 5
Convenient picture and sound control functions
Multiple picture modes
How to select picture modes
You can quickly select the desired picture mode from
P.STD
four preset modes and one customized mode.
STANDARD
Press the P.STD button to select the
desired picture quality. Five kinds
of picture modes (i.e.,
"STANDARD",
"RICH", "USER","LISTEN",
RICH
USER
LISTEN
"SOFT" ) can be selected in turn.
The 5 modes are
SOFT
Listen-This is a new feature that blacks out the TV
screen when listening to music only channels;
Soft-Designed for night time low light viewing;
Standard -Designed for rooms that have good all round
lighting;
Rich-Designed for rooms with high ambient lighting such
as daytime sport;
User-A spare setting that can be adjusted to personal
tastes.
How to customize your own picture status
PICTURE
1 Press the PICTURE menu button , till the menu
PICTURE
shown on the right display on the screen.
CH+
VOL- VOL+
MENU
CH-
2 Press the CH+/- buttons to
select the item to adjusted,
then press the VOL-/+ buttons
to obtain the desired effect.
ITEM
CONTRAST
BRIGHTNESS
COLUOR
SHARPNESS
*Hue
Note:
The "Hue" item only appears when the colour system is NTSC.
Press VOL-
Weak
Dark
Shallow
Soft
lean to purple
PICTURE
CONTRAST 48
BRIGHTNESS 32
COLOUR 48
SHARPNESS 40
*HUE 60
BLACK STRETCH OFF
Press VOL+
Strong
Bright
Deep
Sharp
lean to green
Page 6

Page 7

Convenient picture and sound control functions
Continued
Mute function
Sound mute
1 Press the MUTE button on the
MUTE
remote control and "MUTE" type
face will display on the lower part
of the screen. At this time, the
sound of the TV set is turned off.
2 If you want to recover the sound,
press the MUTE button again or
directly press the VOL-/+ buttons.
MUTE
Page 8

Page 9

Time functions
Continued
Sleep timer and program preset
Sleep timer
TIME
CH+
VOL- VOL+
MENU
CH-
TIME
CH+
VOL- VOL+
MENU
CH-
The TV set have 18 sections
for sleep timer function
option
(each section has a time
interval of 10 minutes)
(See right
0
10
20
chart):
170
1 Press the TIME button,
menu
180
and the TIME menu display on
the screen.
2 Press the CH +/- buttons to
select "SLEEP TIMER ".
3 Press the VOL -/+ buttons to
adjust the SLEEP TIMER level.
TIME
CLOCK 17:18
ON TIME 18:00
ON PROG 8
OFF TIME 23:00
SLEEP TIMER 120
REMIND TIME --:-REMIND PROG 1
REMIND PROG function
Program remind timer, that displays an on-screen reminder
prompt, when a program on a different channel is due to start.
1 Press the TIME button
to call up the TIME menu on the
screen.
2 Press the CH +/- buttons to
select "REMIND TIME", then
press the VOL -/+ buttons to
set the value in hour position;
press again the CH+/- buttons
to select the minute position,
and then set the value of the
minute.(take 19:00 as an
example)
3.Press the CH+/- buttons to
select "REMIND PROG", then
press the VOL -/+ buttons or
the program direct number
buttons to set the desired
channel (take 18 as an
example).
NOTE: For
operate
turned off.
REMIND PROG to
CHILD LOCK must be
menu
TIME
CLOCK 17:18
ON TIME 18:00
ON PROG 8
OFF TIME 23:00
SLEEP TIMER 120
REMIND TIME 19:00
REMIND PROG 1
TIME
CLOCK 17:18
ON TIME 18:00
ON PROG 8
OFF TIME 23:00
SLEEP TIMER 120
REMIND TIME 19:00
REMIND PROG 18
Page 10

Page 11

Set up function
Continued
AVL and calendar functions
AVL function
Automatic Volume Limit control reduces effect of large
volume changes such as when the ads come on.
FUNCTION
CH+
VOL- VOL+
MENU
CH-
FUNCTION
CH+
VOL- VOL+
MENU
1 Press the FUNCTION menu
button till the FUNCTION menu
,
shown on the right display
on the screen.
2 Press the CH+/-
.
"AVL"
button to select
3 Press.VOL-/+ button to turn the
AVL function "ON" or "OFF"
FUNCTION
ENGLISH
BACKGROUND ON
NOISE REDUCE ON
CHILD LOCK OFF
AVL ON
CALENDAR
FUNCTION
ENGLISH
BACKGROUND ON
NOISE REDUCE ON
CHILD LOCK OFF
AVL ON
CALENDAR
Calendar function
Enables the TV sets internal calendar to be set.
1 Press the FUNCTION menu
button till the menu
,
shown on the right display on the
screen.
2 Press the CH+/- button to select
"CALENDAR" , then press the
VOL-/+ buttons to the CALENDAR
display on the screen.
FUNCTION
FUNCTION
ENGLISH
BACKGROUND ON
NOISE REDUCE ON
CHILD LOCK OFF
AVL ON
CALENDAR
CH-
3 Press the CH+/- buttons to turn
the YEAR/MONTH/DAY, press
VOL-/+ buttons to set or adjust
the YEAR/MONTH/DAY.
Page 12

Page 13

Position exchange functions
Exchange
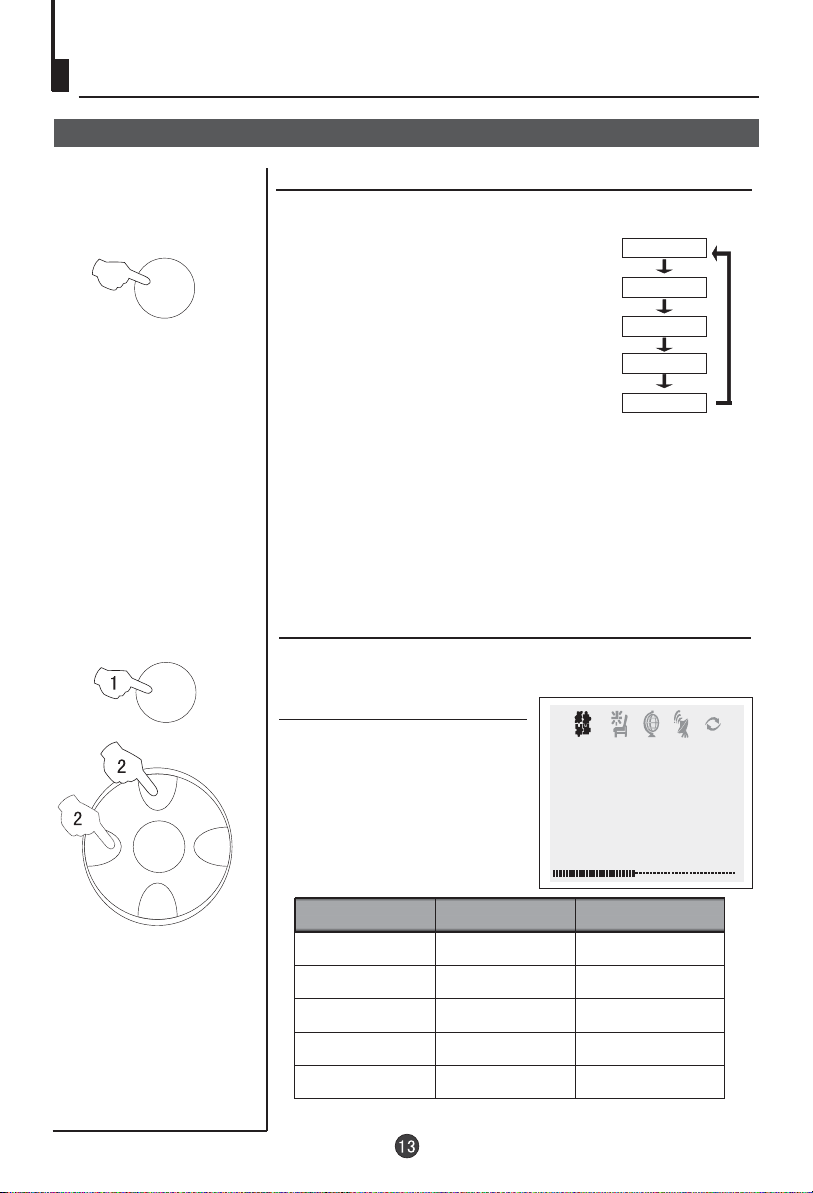
Exchange
This feature enables TV programs that may be on a wrong TV
channel number to be swapped/exchanged. This feature is
very useful when Automatic Search Tuning has been used, to
reallocate the found programs to the correct channel numbers.
CH+
1 Press the MENU button again
VOL- VOL+
MENU
CH-
(6 times) till the EXCHANGE
menu display on the screen.
2 Press the VOL / buttons or the
PROGRAM NUMBER 0-9
buttons to set PROGRAM 1 TO 6.
,
-+
EXCHANGE
PROGRAM 1 6
PROGRAM 2 2
EXCHANGE
CH+
VOL- VOL+
MENU
CH-
CH+
VOL- VOL+
MENU
CH-
3 buttons to
Press the CH-/+
select " PROGRAM 2".
4 Press the VOL / buttons or
-+
the PROGRAM NUMBER 0-9
buttons to set PROGRAM 2 TO 9.
5 buttons to
Press the CH+/-
select "EXCHANGE".
6 Press the VOL-/+ buttons to set
"EXCHANGE".
EXCHANGE
PROGRAM 1 6
PROGRAM 2 9
EXCHANGE
EXCHANGE
PROGRAM 1 6
PROGRAM 2 9
EXCHANGE
Page 14

Page 15

Teletext
Continued
Teletext
Cancel mode
This feature allows the TV picture to be displayed while next
page to be searched is entered and found. Only the top
teletext line is displayed until the page is found. Press the
button to hide the teletext information. Either press the
button or the Text button to exit the cancel display mode.
Language change
Pressing the button will change the Teletext characters to
English, German, Italian & Spanish.
Hold
Pressing the button will stop the teletext page automatically updating. This feature is very useful where there are
several teletext pages or data on the same page number.
Size
Pressing the button changes between full screen top
half bottom half full screen. This feature is very useful as it
magnifies the image making the characters easier to read.
Reveal
Pressing the button will reveal hidden text. This feature
is used to reveal information such as answers to Teletext
on-line interactive puzzles.
Subcode / Time
While in normal TV mode only, pressing the button will
display the teletext time in the top right hand corner for a few
seconds
Switch teletext on/off
Press the button on the remote control to turn teletext
On/Off.
Subtitle
Pressing the button will get the teletext decoder to
automatically search for the subtitle page. In NZ the subtitle
is usually page 801.
Fast text coloured buttons
Fast text automatically displays the four most commonly
used pages that the broadcaster thinks that you may want
to choose next. Press the same coloured button on the
remote control as the coloured link at the bottom of the
teletext page to go directly to that page.
Page 16

Troubleshooting
*To assist in location possible faults use help guide below.
BREAKDOWN PHENOMENON
PICTURE
Picture with snow
Double or Triple Image
Disturb
Normal
No Picture
SOUND
Noise
Normal
Noise
No sound
No sound
The aerial direction and connection
This is called ghosting which can be minimized with
an outside aerial, and good quality cable and
terminations. Altering the aerial direction can also
minimize this effect.
Electrical interference which can be caused by cars,
motorbikes etc, Fluorescent lamps and dirty
insulators on overhead power cables.
Volume Sound mute
Ensure that the power supply is connected to the TV
set and turned on. Also ensure that the TV set is not in
"PICTURE MUTE" or that the brightness and contrast
are not turned down
CHECKING
Adjust color control
No color
Normal volume
Adjust channel again
Scramble
Normal or Weak Volume
Colour Purity fault which can be caused by moving the
TV set, placing magnets near the TV screen or turning
on/off house hold appliances such as vacuumcleaners
Color Spot
Normal volume
near the TV set. Turn the TV off with the mains power
switch for 15 minutes. When the power is turn on again
the TV set will automatically degauss the picture. In
server cases leave the TV set turned off over night.
Note:
1.If the fault can not be repaired using the above guide consult with your local authorized service center.
2.The TV set must only be repaired by a qualified registered service person. Never attempt to remove
the back cover as the TV set has dangerous voltages in side that may cause a fatality or fire.
3. The cabinet may produce the occasional "snapping sound". This is normal and caused by the materials
in the cabinet expanding with room temperature changes.
Page 17

Specifications
*The specifications offered you here are only for reference and, with the improvement
of the products ,there may be some different between the description and the practicality.
*Design and specifications are subject to change without notice.
Model
Color system
Sound system
Picture tube
Sound output power
Power consumption
Size mm
29F9K-T, 29F9K, 29F3A-T,29F3A,29T9D,29T9D-T,29F9D,29F9D-T
PAL AV NTSC3.58 NTSC4.43
BG
29"color picture tube(the viewable dimension is 68cm)
5W+5W 7% THD
150W
724 width x600 height x550 depth
773 width x594 height x500 depth (29T9D,29T9D-T,
29F9D,29F9D-T)
Accessories
Remote control X1
Owner's manual X1
Battery(AA) X2
Power supply input list
Country or Area
Saudi Arabia
Mongolia, Moldova, Cyprus, Russia,
Turkmenstan, Ukraine, Latvia, Bulgiria
Jordan, Oman, UAE, Pakistan, Lebann,
India, Yemen, Kuwait, Bahrain
Power supply input
~90V-250V, 50Hz/60Hz
~150V-250V, 50Hz
~160V-250V, 50Hz/60Hz
Indonisia
Philippine
New Zealand, Australia,Malaysia
Hong Kong, Algeria, Nepal, Turkey
Yugoslavia
~150V-240V, 50Hz
or ~150V-250V, 50Hz/60Hz
~150V-240V, 50Hz/60Hz
~150V-250V, 50/60Hz
~220V, 50Hz
~220V-230V, 50/60Hz
The actual voltage and frenquency of the TV set is for the country or area. different
Page 18

Page 19

Page 20

 Loading...