

HTV-021TB
21" FULL MULTI TV
OWNER'S MANUAL
Please read this manual carefully
before using this TV set and keep it
for future reference.


Please read this manual carefully before using this TV set and keep it for future
reference.
CONTENTS
Before Operation
Warning and cautions...................................................................................2
Important safety instructions.......................................................................3
Installation.....................................................................................................5
Aerial connection.........................................................................................5
Preparation of the remote control................................................................5
Function buttons and external sockets......................................................6
Front panel of the TV set.............................................................................6
Rear panel of the TV set...............................................................................6
Using the remote control.............................................................................7
Basic operation
Switching on/off the TV set.........................................................................8
Using the unit in TV mode
Searching channels....................................................................................9
Auto search.................................................................................................9
Search ......................................................................................................10
Manual fine tune............................................................................................11
Program Exchange........................................................................................12
Program skip .............................................................................................13
Watching TV
Watching TV program................................................................................14
Program swap............................................................................................15
Convenient picture functions.....................................................................16
Multiple picture modes .............................................................................16
TV Set up.......................................................................................................17
Language....................................................................................................17
Blue Back....................................................................................................17
Game..........................................................................................................17
Calendar......................................................................................................18
Teletext..........................................................................................................19
Others
Connection to the external audio and video equipment.........................20
Troubleshooting guide...............................................................................21
Specifications..............................................................................................22
Warranty.......................................................................................................23
1
Warning and cautions
CAUTION:
TO REDUCE THE RISK OF ELECTRIC SHOCK, DO NOT REMOVE
COVER (OR BACK). NO USER SERVICEABLE PARTS INSIDE.
REFER SERVICING TO QUALIFIED SERVICE PERSONNEL.
DANGEROUS VOLTAGE
Uninsulated Dangerous Voltage, that may be of sufficient magnitude to constitute a risk
of electric shock, is present within the cabinet of this unit.
ATTENTION
The Owner's Manual contains important operating and maintenance instructions. For
your safety, it is necessary to refer to the manual.
Cleaning the tube
Should the picture tube require cleaning, disconnect the power and use a dry
soft cotton cloth. Do not use any cleaner or abrasive cloths.
2
Important safety instructions
1. READ INSTRUCTIONS
All the safety and operating instructions should be read before the unit is operated.
2. RETAIN INSTRUCTIONS
The safety and operating instructions should be retained for future reference.
3. HEED WARNINGS
All warnings on the unit and in the operating instructions should be adhered to.
4. FOLLOW INSTRUCTIONS
All operating and use instructions should be followed.
5. CLEANING
Unplug this unit from the wall outlet before cleaning. Do not use liquid cleaners or aerosol cleaners.
Use a damp cloth for cleaning the exterior cabinet only.
6. ATTACHMENTS
The manufacturer of this unit does not make any recommendations for attachments, as they may
cause hazards.
7. WATER AND MOISTURE
Do not use this unit near water. For example, near a bathtub, washbowl, kitchen sink, laundry tub, in
a wet basement, or near a swimming pool.
8. ACCESSORIES
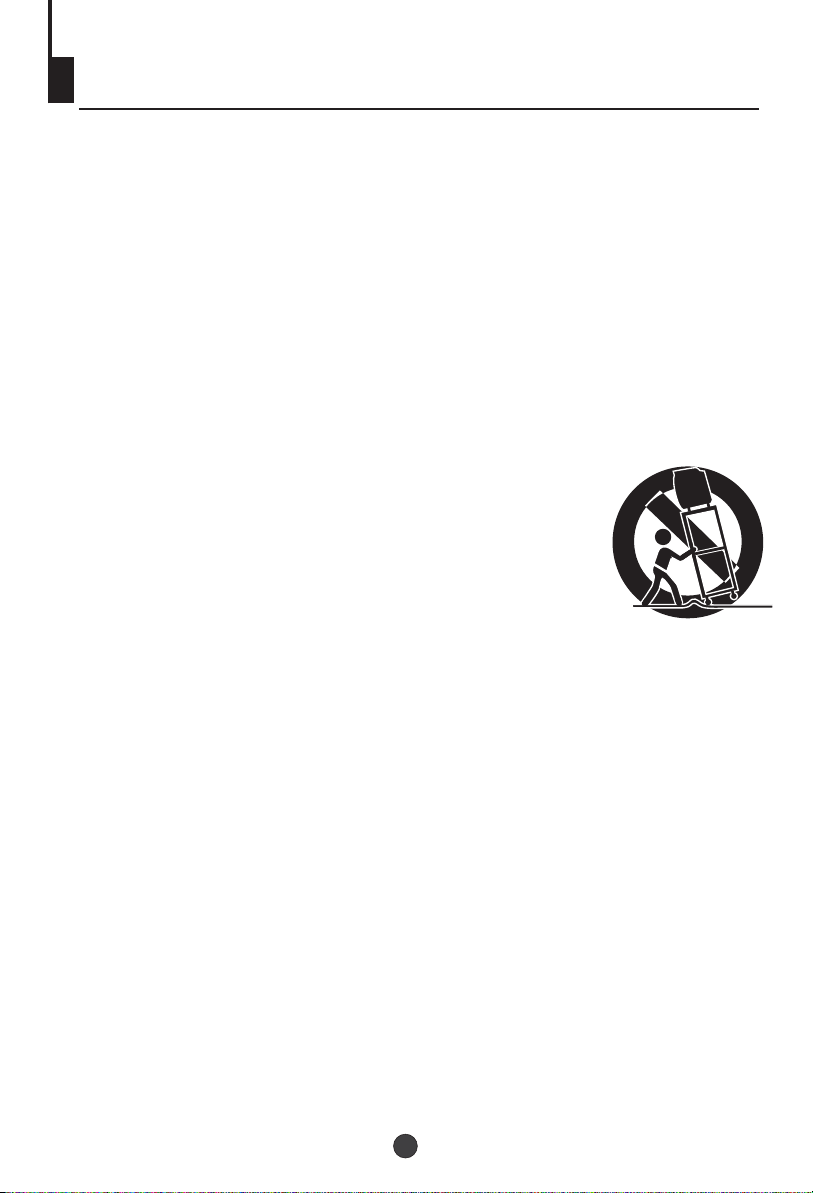
Do not place this unit on an unstable cart, stand, tripod, bracket, or table.
The unit may fall, causing serious injury, and serious damage to the unit.
When a cart is used, use caution when moving the cart / apparatus
combination to avoid injury from tip-over.
9. VENTILATION
Slots and openings in the cabinet back or bottom are provided for
ventilation, and to ensure reliable operation of the unit, and to protect it
from overheating. These openings must not be blocked or covered.
The openings should never be blocked by placing the unit on a bed,
sofa, rug, or other similar surface. This unit should never be placed near or over a radiator or heat
source. This unit should not be placed in a built-in installations such as a bookcase or rack unless
proper ventilation is provided or the manufacturer=s instructions have been adhered to.
10. POWER SOURCES
This unit should be operated only from the type of power source indicated on the rating plate. If you
are not sure of the type of power supply to your home, consult your appliance dealer or local power
company. For units intended to operate from battery power, or other sources, refer to the operating
instructions.
11. POWER-CORD PROTECTION
Power-supply cords should be routed so that they are not likely to be walked on or pinched by
items placed upon or against them, paying particular attention to cords at plugs, convenience
receptacles, and the point where they exit from the appliance.
3

Important safety instructions (continued)
12. LIGHTNING
To protect your unit from a lightning storm, or when it is left unattended and unused for long
periods of time, unplug it from the wall outlet and disconnect the antenna or cable system.
This will prevent damage to the unit due to lightning and power line surges.
13. POWER LINES
An outside antenna system should not be located in the vicinity of overhead power lines or
other electric light or power circuits, or where it can fall into such power lines or circuits.
When installing an outside antenna system, extreme care should be taken to keep from
touching such power lines or circuits, as contact with them might be fatal.
14. OVERLOADING
Do not overload wall outlets and extension cords, as this can result in a risk of fire or electric
shock.
15. OBJECT AND LIQUID ENTRY
Do not push objects through any openings in this unit, as they may touch dangerous voltage
points or short out parts that could result in fire or electric shock. Never spill or spray any type
of liquid into the unit.
16. SERVICING
Do not attempt to service this unit yourself as opening or removing covers may expose you to
dangerous voltage or other hazards. Refer all servicing to qualified service personnel.
17. DAMAGE REQUIRING SERVICE
Unplug this unit from the wall outlet and refer servicing to qualified service personnel under
the following conditions:
a. When the power-supply cord or plug is damaged.
b. If liquid has been spilled, or objects have fallen into the unit.
c. If the unit has been exposed to rain or water.
d. If the unit does not operate normally by following the operating instructions. Adjust only
those controls that are covered by the operating instructions, as an improper adjustment of
other controls may result in damage and will often require extensive work by a qualified
technician to restore the unit to its normal operation.
e. If the unit has been dropped or the cabinet has been damaged.
f . When the unit exhibits a distinct change in performance, this indicates a need for service.
18. REPLACEMENT PARTS
When replacement parts are required, be sure the service technician uses replacement parts
specified by the manufacturer or those that have the same characteristics as the original
part. Unauthorized substitutions may result in fire, electric shock or other hazards.
19. SAFETY CHECK
Upon completion of any service or repairs to this unit, ask the service technician to perform
safety checks to determine that the unit is in proper operating condition.
20. HEAT
The product should be situated away from heat sources such as radiators, heat registers,
stoves, or other products (including amplifiers) that produce heat.
21. CONNECTING
When you connect the product to other equipment, turn off the power and unplug all of the
equipment from the wall outlet. Failure to do so may cause an electric shock and serious
personal injury. Read the owner's manual of the other equipment carefully and follow the
instructions when making any connections.
22. SOUND VOLUME
Reduce the volume to the minimum level before you turn on the product. Otherwise, sudden
high volume sound may cause hearing or speaker damage.
4
Installation
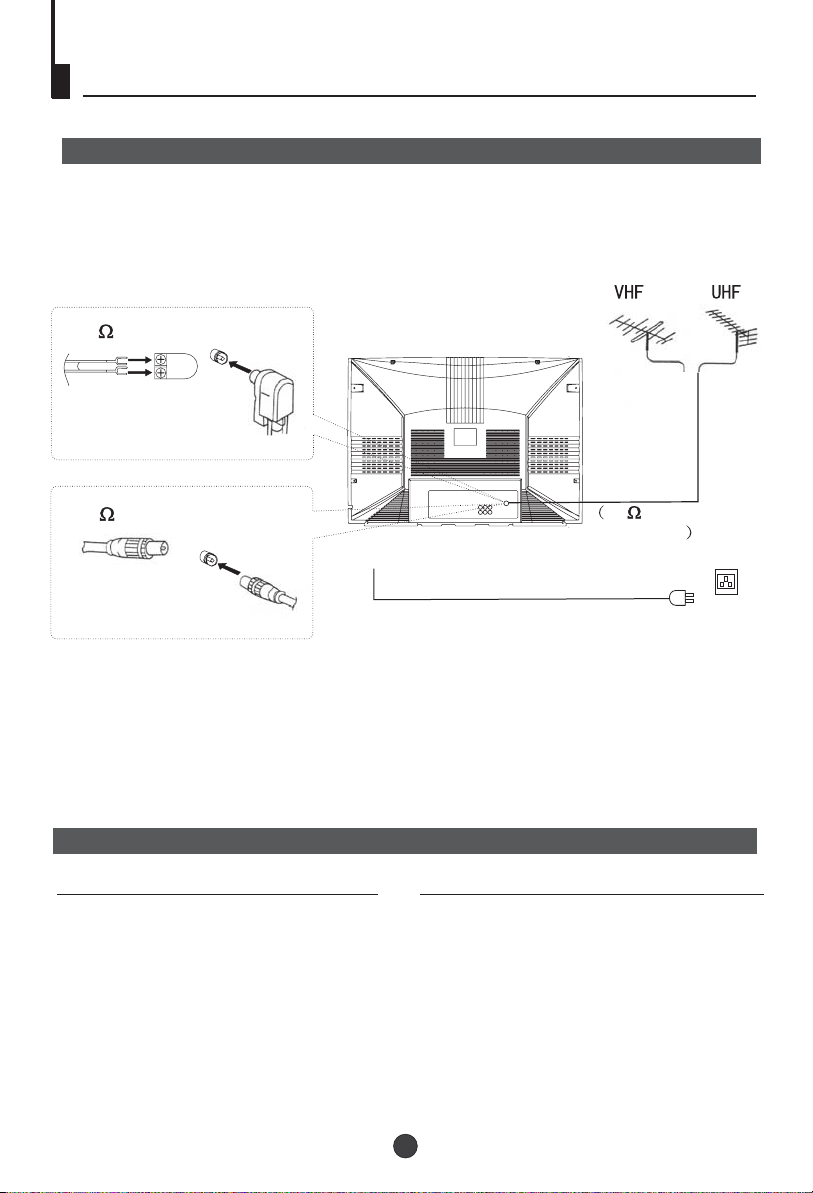
Aerial connection
To connect the aerial, plug the aerial lead into the aerial socket on the rear of the unit.
You can use an outdoor aerial. However, if you use an indoor aerial the quality of the
reception may be reduced and adjustment of the aerial may be required when changing
programmes.
300 twin-lead cable
Antenna adapter
Aerial input
75 coaxial cable
Plug
75 standard
coaxial type
AC power socket
Note:
* It is recommended that a 75 ohm coaxial antenna is used to avoid
interference.
*To avoid interference from electrical signals, do not bind the antenna
cable together with any mains lead.
!
Preparation for the remote control
Battery installation
!
Remove the batteries cover.
Insert two size AAA batteries matching
the +/-polarities of the battery to the +/marks inside the battery compartment.
Tips for remote operation
! When the remote control will not be used for a
long period of time or when the batteries are
worn out, remove the batteries to prevent the
leakage.
! Do not throw the batteries into fire. Dispose of
used batteries in the specified manner.
! Do not drop, dampen or disassemble the
remote control.
5

Function Buttons and External Sockets
Front and side panel of the TV set
S-VIDEO
VIDEO
S-Video Input
terminal
Video Input
terminal
L
Audio Input
terminal
R
MENU
/
AV TV
(input selector
Volume up/ down
Channel selector
Power indicator
Sensor window
AUDIO
Power switch
Note:
Please do not use the S-Video input terminal and the video input terminal together.
Back panel
Video output terminal
Video input terminal
OUT
IN
VIDEO
L R
AUDIO
Antenna input socket
Audio right channel output terminal
Audio left channel output terminal
Audio right channel input terminal
Audio left channel input terminal
6
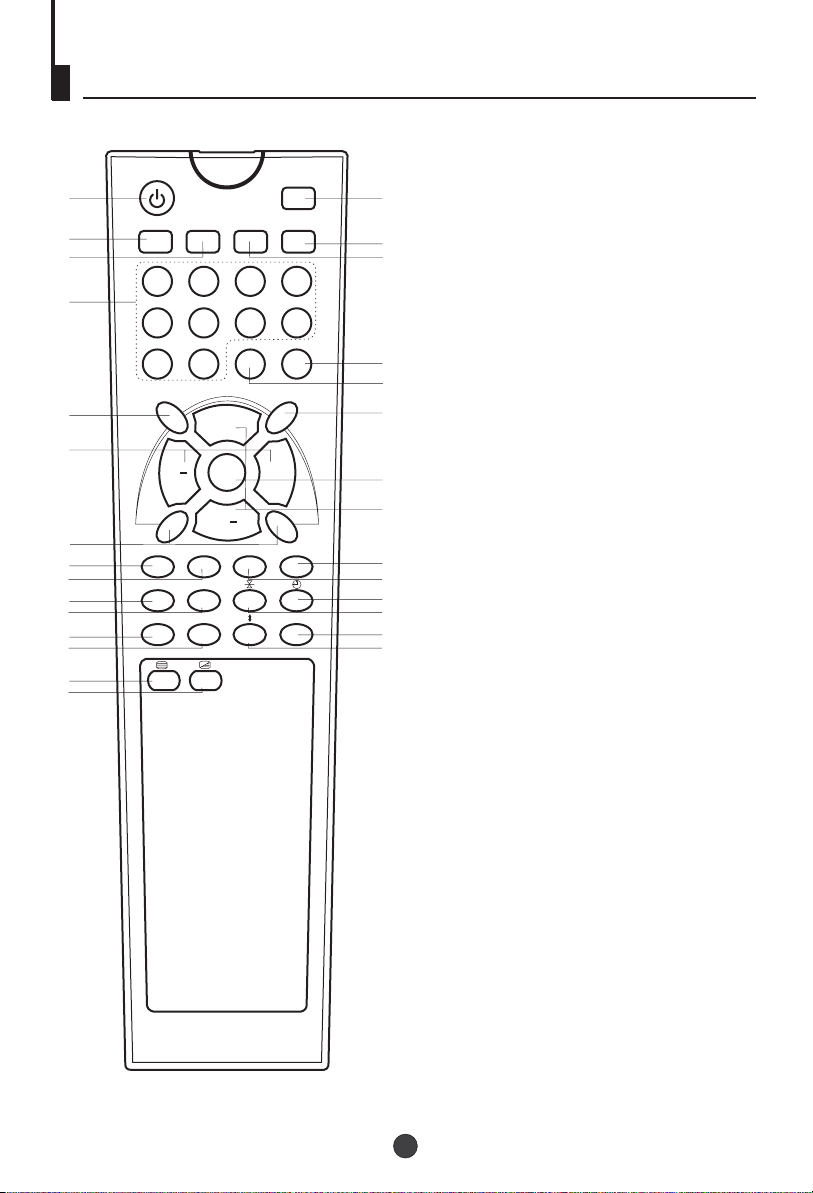
Using the Remote Control
P
V
10
12
14
16
18
20
22
24
26
28
29
STANDBY
1
PP
SLEEP
RECALL
-/--
MUTE
3
4
7
8
TV/AV
3
4
12
7
5
6
9
0
AUDIO
ST/D/I/II
P+
1. Standby Button
2. (No including)
2
3. PP Button
5
4.Sleep Button
6
5.Mute Button
6.Recall Button
7.Numeric Buttons
8
8.(No including)
9
9.Multi Digit Button
11
tereo
10.S Button
11.TV/AV Button
MENU
SOUND PICTURE SLEEP TIME
INDEX
TXT MODE/SWAP
?
X
V+
12.Volume Button
13
13.TV Menu Button
15
14.(No including)
15.Channel Button
17
19
21
23
25
27
TV Sound
16. ( Red)
17.Blue Button
TV Picture Menu
18. ( Green)
TV Sleep Time Menu
19. ( Yellow)
20.Teletext Mode/Swap Button
21.Time / Subcode
22.Index
23.Hold
24.Cancel
25.(No including)
26.Reveal
27.Enlarge
28.Teletext On / Off
29.Mix
7

P
V
Switching on/ off the TV set
Preparation
Insert the AC cord plug into the proper AC outlet
Note: .
When not in use, disconnect the plug from the main power supply
.
Switching on/ off the TV set
Switching on/ off the TV set
POWER
1
2
STANDBY
3
P+
MENU
V+
1 To turn on the TV/AV, press the Power button
on the front panel.
2 If the indicator is lighting in red, press the
P+/P- button on the panel or on the remote
control, the power indicator will become green.
After several seconds the TV would start
normal operation.
3 If you want to change to standby status,
please press the button on the remote
control. The power indicator will become red.
Auto switch-off function
If a channel with no boardcast is selected, the
sound will automatically be mute. If a station
stops broadcasting, the TV will automatically
switch to standby mode after 5 minutes.
8

P
V
P
V
Searching Channels
P
V
Tuning
The unit can tune all the channels automatically.
Auto Search
Automatic search
P+
1
MENU
V+
1 Press the TV MENU, until the
TUNE menu display.
TUNE
AUTO SEARCH
SEARCH
BAND UHF
FINE TUNE
COLOUR AUTO
SOUND I
SKIP OFF
PROGRAM 2
2
P+
MENU
V+
select AUTO SEARCH.
TUNE
AUTO SEARCH
SEARCH
BAND UHF
FINE TUNE
COLOUR AUTO
SOUND I
SKIP OFF
PROGRAM 2
3 Press V+ button to start auto
2 Press the P+/- buttons to
P+
V+
3
MENU
search. The TV will begin
memorizing all the channels
available in your area.
AUTO SEARCH
VHF-L
-
6
+
If the picture sound is abnormal
Press the P+/- buttons to select Sound, then press the
V-/+ buttons to adjust the sound system.
9

P
V
P
V
P
V
P
V
Searching Channels (continued)
Search
Search
1 Press the TV MENU, until the
P+
1
MENU
V+
TUNE menu display.
TUNE
AUTO SEARCH
SEARCH
BAND UHF
FINE TUNE
COLOUR AUTO
SOUND I
SKIP OFF
PROGRAM 2
2
P+
MENU
V+
3
P+
MENU
V+
2 Press the P+/- buttons to
select PROGRAM, then
press the V-/+ buttons to
select the program number
you want to store.
3 Press the P+/- buttons to
select SEARCH.
TUNE
AUTO SEARCH
SEARCH
BAND UHF
FINE TUNE
COLOUR AUTO
SOUND I
SKIP OFF
PROGRAM 2
TUNE
AUTO SEARCH
SEARCH
BAND UHF
FINE TUNE
COLOUR AUTO
SOUND I
SKIP OFF
PROGRAM 2
4 Press V-/+ buttons to start the
tuning search.
P+
MENU
4
V+
When the search finds a
strong channel signal it will
stop searching. The picture
and the Tune Menu will
appear.
SEARCH
VHF-L
-
6
+
5 Continue the tuning procedure
until you have tuned in all the
channels required.
To exit, press the TV MENU
button.
10

P
V
P
V
P
V
Searching Channels (continued)
Manual fine tune
Manual fine tune
Under poor reception conditions it is sometimes possible
to improve the quality of picture and sound using the fine
tune.
1Press the P+/- buttons or
PROGRAM NUMBER 0-9
button to choose desired
channels.
2 Press the TV MENU until the
TUNE menu appears.
TUNE
AUTO SEARCH
SEARCH
BAND UHF
FINE TUNE
COLOUR AUTO
SOUND I
SKIP OFF
PROGRAM 1
P+
2
V+
V+
1
MENU
P+
2
MENU
3 Press the P+/- buttons to
select " FINE TUNE".
P+
4
MENU
V+
4 Press V-/+ buttons to adjust
for the best possible picture
and sound results.
FINE TUNE
VHF-L
-
1
+
11

P
V
P
V
P
V
Searching Channels (continued)
Program Exchange
Exchange
After auto search there may be some Program numbers
duplicated and some blank. To re-order the channels:
P+
1
MENU
V+
1 Press the TV MENU until
the PROG.EXCHANGE
menu appears.
2 Press P+/- buttons to select
2
P+
MENU
V+
PROG.I, then press the V+/buttons to set desired
program.
PROG.EXCHANGE
PROG.I 2
PROG.II 0
EXCHANGE
3 Press P+/- buttons to
select PROG.II, then press
the V-/+ buttons to set
4
P+
MENU
3
V+
desired program.
PROG.EXCHANGE
PROG.I 2
PROG.II 0
EXCHANGE
4 Press P+/- buttons to select
EXCHANGE, then press the
V+/- buttons to set
EXCHANGE.
PROG.EXCHANGE
PROG.I 2
PROG.II 0
EXCHANGE
12

P
V
P
V
P
V
Searching Channels (continued)
Program skip
Program skip
After presetting, you can skip needless channels so that
you could choose the desired channels.
1
P+
MENU
P+
MENU
V+
V+
2
3
P+
MENU
4
V+
1 Press the P+/- buttons to
select the desired program
to be skipped.
2 Press the TV MENU until the
TUNE menu appears.
3 Press the P+/- buttons to
select "SKIP".
4 Press the V-/+ buttons to
TUNE
AUTO SEARCH
SEARCH
BAND UHF
FINE TUNE
COLOUR AUTO
SOUND I
SKIP OFF
PROGRAM 2
TUNE
AUTO SEARCH
SEARCH
BAND UHF
FINE TUNE
COLOUR AUTO
SOUND I
SKIP ON
PROGRAM 2
turn the SKIP function
"ON".
If you want to recover the skipped channel
1 Use the PROGRAM NUMBER buttons to select the
channel number to be recovered.
2 Repeat the above procedure 2-3.
3 Press the V-/+ buttons to turn the SKIP function "OFF".
13

P
V
P
V
Watching TV
You can watch TV program in a preset channel.
Watching TV program
Select the desired program
12
5
6
9
0
3
4
7
8
1 Using "Program number" buttons
Directly enter the program number with the numeric
keypad on the remote control.
To select program numbers between 10 and 99 press [-/-
-] button and enter the two digit channel number.
To select program numbers between 100 and 249 press
[-/--] button twice and enter the 3 digit channel number.
P+
MENU
P+
MENU
MUTE
SLEEP
V+
V+
2 Using "P+/-" buttons
Press the P+ button to increase channel number.
Press the P- button to decrease channel number.
For proper operation, before selecting channel, they
should be set into the memory. See pages 9 "Searching
Channels".
Select the desired sound
To adjust the volume, press V+ or V- button.
Sound mute
1 Press the MUTE button on
the remote control to turn off
the sound.
2 Press MUTE again to turn the
sound back on.
Sleep Timer
Press the SLEEP button to set
the required time.
The count down will start
immediately.
0
15
30
NOTE: To check timer left,
press the SLEEP button once.
To cancel the sleep timer, press
the SLEEP button to set the
225
240
timer to 0.
14

Watching TV (continued)
Program Swap
Program swap
Swap function enables quick swap to the last watched
program.
TXT MODE/SWAP
1 Suppose the channel number
you used just now is 8 and the
channel number you are using
is 18 (as shown in the figure).
2 If you want to return to the
last watched program channel
8, you can simply press the
TXT MODE / SWAP button.
3 If you want to return to channel
18, press the button again.
Through this function, you can
easily change between the
channel you are using and the
channel you used last time.
18
8
18
15

P
V
P
V
Convenient picture control functions
Multiple picture modes
How to select picture modes
You can quickly select the desired picture mode from three
factory preset modes and one customized mode.
PP
Press the PP button to select the
desired picture quality. Four kinds
of picture modes (i.e., "STANDARD",
"DYNAMIC", "PP","MILD" can be
selected in turn.
Once selection confirmed, the picture
will change instantly.
STANDARD
DYNAMIC
PP
MILD
P+
1
MENU
P+
2
MENU
V+
V+
How to customize your own picture status(PP)
1 Press the TV MENU until the PICTURE menu
appears.
2 Press the P+/- buttons to select
the item you want to adjust,
then press the V-/+ buttons to
obtain the desired effect.
ITEM
CONTRAST
BRIGHTNESS
COLOUR
SHARPNESS
*Hue
Press V- button
Weak
Dark
Shallow
Soft
lean to purple
PICTURE
BRIGHTNESS 32
COLOUR 32
CONTRAST 32
SHARPNESS 32
HUE 0
Press V+ button
Strong
Bright
Deep
Sharp
lean to green
Note:
The "Hue" item only appears when the colour system is
NTSC.
16

P
V
P
V
Set up function
P
V
P
V
TV Set Up
Language
2
P+
1
MENU
3
V+
1 Press TV MENU until SETUP
menu appears.
2. Press P+/- buttons to select
LANG.
3. Press V-/+ buttons to select
SETUP
LANG. ENGLISH
BLUE BACK ON
GAME
CALENDAR
your desired OSD language.
Blue Back
When there is no broadcasting
signal, the screen will be in blue
colour when this function is on.
2
P+
1
MENU
P+
1
MENU
2
P+
V+
3
V+
3
MENU
V+
TV/AV
4
1. Press TV MENU until SETUP
3
menu appears.
2. Press P+/- buttons to select
BLUE BACK.
SETUP
LANG. ENGLISH
BLUE BACK ON
GAME
CALENDAR
3. Press V-/+ buttons to toggle
through on and off.
Game
1. Press TV MENU until SETUP menu appears.
2. Press P+/- buttons to select GAME, then press V-/+
buttons to enter game.
3. Use MENU to rotate clockwise, P+ button to rotate
anti-clockwise.
Use V- button to move left, V+ button to move
right.
4. Press TV/AV button to quit the game.
17

Set up function (continued)
P
V
TV Set Up
Calendar function
2
P+
1
MENU
3
V+
1
Press TV MENU until SETUP
menu appears.
2. Press P+/- buttons to select
calendar.
3 Press the P+/- buttons to turn
the YEAR/MONTH/DAY, press
the V-/+ buttons to set or
CALENDAR
Y: 2004 M: 6 D: 20
S M T W T F S
1 2 3
4 5 6 7 8 9 10
11 12 13 15 16 17
18 19 21 22 23 24
25 26 27 28 29 30
14
20
adjust the
YEAR/MONTH/DAY.
18

TELETEXT
SOME BROADCAST MAY PROVIDE TELETEXT SERVICE. USE THE
TELETEXT FUNCTION TO ENTER THE TELETEXT MODE.
TELETEXT
TELETEXT FUNCTION
PRESS THE TELETEXT ON/OFF BUTTON TO
ENTER THE TELETEXT MODE. PRESS TELETEXT
ON/OFF BUTTON TO EXIT TELETEXT MODE.
TXT MODE/SWAP
TXT MODE /SWAP
PRESS THE TXT MODE /SWAP BUTTON TO CHANGE
THE VIDEOTEXT BETWEENTOP MODE AND LOF
MODE.
INDEX
PRESS THE INDEX BUTTON TO GO TO THE INDEX
PAGE OF TELETEXT.
CANCEL
PRESS ' ' BUTTON ALLOW YOU TO GO BACK TO
THE TV MODE TEMPORARY. PRESS THE BUTTON
TO RETURN TO THE TELETEXT.
HOLD
PRESS ' ' BUTTON TO HOLD THE CURRENT PAGE.
MIX
PRESS THE MIX BUTTON TO SUPERIMPOSE THE
TELETEXT ON TV PICTURE. PRESS AGAIN TO
EXIT.
TIME / SUBCODE
IN TV MODE, PRESS ' ' BUTTON TO DISPLAY THE
TIME. IN TELETEXT MODE, PRESS THIS BUTTON TO
ENTER SUBCODE.
ENLARGE
PRESS THE ENLARGE BUTTON TO ENLARGE THE
TELETEXT PAGE. PRESS AGAIN TO RETURN TO
THE NORMAL TELETEXT SIZE.
REVEALS
PRESS THE REVEALS TO DISPLAY THE HIDDEN
MESSAGES ON CERTAIN PAGE.
DIRECT PAGE
PRESS THE APPROPRIATE COLOUR TO DIRECT
ACCESS THE COLOUR PAGE.
19

Connecting the TV set to the other video and audio equipment
Connecting to the other video and audio equipment
You can connect a stereo to the AUDIO output terminals on the TV set to enjoy higher
quality sound. VIDEO and AUDIO output terminals output the video and audio signals being
monitored by the TV set. The electric levels of video and audio output signals are fixed.
To outside input
OUT
IN
VIDEO
LR
To video/audio input
AUDIO
DVD, VCD and other reproducing equipments
20

Troubleshooting guide
To assist in locating possible faults, use help guide below.
BREAKDOWN OF PHENOMENON
PICTURE
Picture with snow
Double or Triple Image
Disturb
No Picture No sound
No colour Normal volume
SOUND
Noisy
Normal
Noisy
No soundNormal
CHECKING
The aerial direction and connection
This is called ghosting which can be minimized with
an outside aerial, good quality cable and terminals.
Altering the aerial direction can also minimize this
effect.
Electrical interference which can be caused by cars,
motorbikes etc, Fluorescent lamps and dirty
insulators on overhead power cables.
Volume Sound mute
Ensure that the power supply is connected to
the TV set and turned on. Also ensure that the
TV set is not in "Mute" mode or that the
brightness and contrast are not turned down.
Adjust colour control
Adjust channel again
Scramble
Colour Spot
Note:
1.If the fault can not be repaired using the above guide, consult with your local authorized service
center.
2.The TV set must only be repaired by a qualified registered service person. Never attempt to
remove the back cover as the TV set has dangerous voltages inside that may cause a fatality or
fire.
3. The cabinet may produce the occasional "snapping sound" This is normal and caused by the
materials in the cabinet expanding with room temperature changes.
Normal or Weak Volume
Normal volume
Colour Purity fault which can be caused by moving the
TV set, placing magnets near the TV screen or turning
on/off house hold appliances such as vacuum cleaners
near the TV set. Turn the TV off with the mains power
switch for 15 minutes. When the power is on again the
TV set will automatically degauss the picture. In severe
cases, leave the TV set turned off over night.
21

Specifications
Model
Colour system
Sound system
Picture tube
Sound output power
Power requirements
Power consumption
Dimension
Remote Control x 1
Owner's Manual x 1
Accessories
Battery(AAA) x 2
75 ohm Adaptor x 1
Plug Adaptor x 1
PAL, NTSC, SECAM
BG, DK, I ,M
21"colour picture tube(the viewable dimesion is 51cm)
2W not distortional
100-240V 50/60Hz
70W
603 Width x475 Depth x430 Height mm
HTV-021TB
22

Warranty
HTV-021TB
23


02
0090506287
 Loading...