


Whole House Water Filter
Installation Instructions
MODEL HF-600
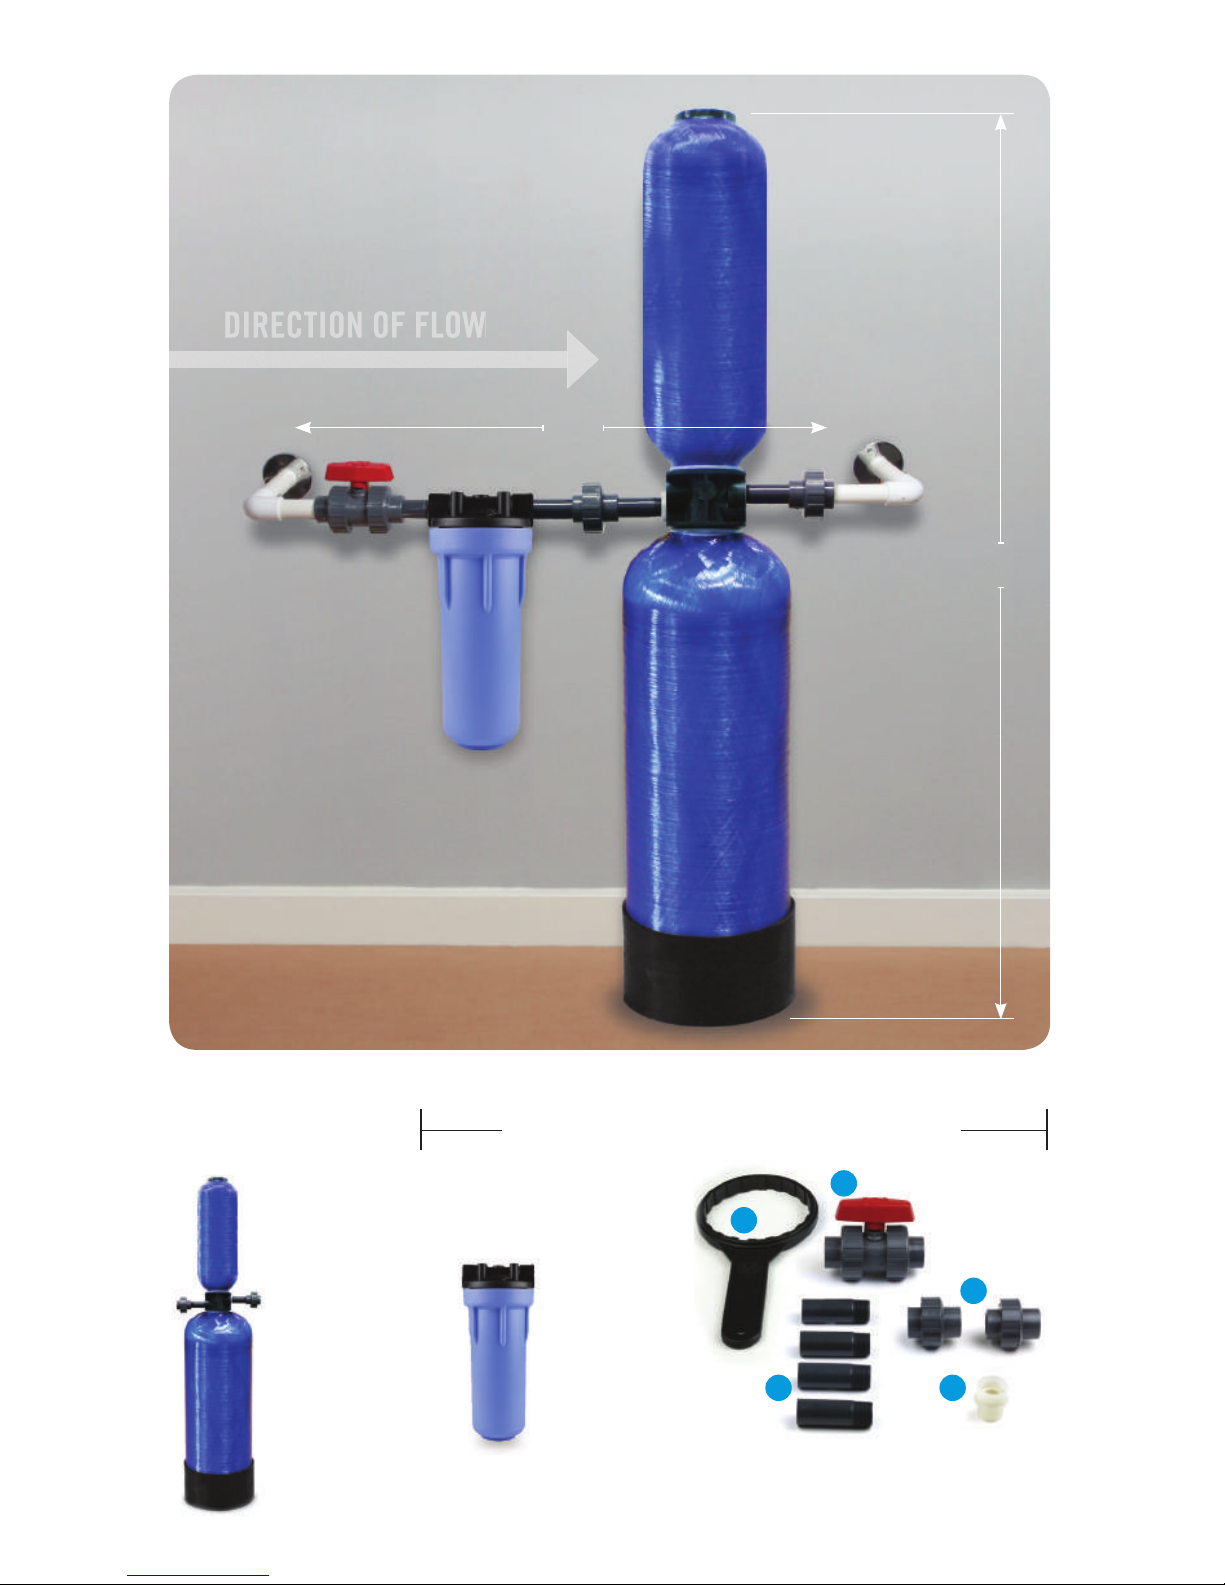
Shut-Off
Valve
5-Micron
Pre-Filter
HF-600
48"
27"
5-Micron
Pre-Filter Unit
HF-600
1
2
3
4
5
Install Kit:
1 – 1 Filter Housing Wrench
2 – 1 Ball-Type Shut-Off Valve
3 – 4 Nipples ¾ ”x3”
4 – 2 Unions
5 – 1 Hose Adaptor
Contents These items included with standalone systems
All installation
components
included.
The HF-600 Whole House
System is NSF Certi ed
to reduce chlorine.
Installation Instructions
1. KEEP THE UNIT IN AN UPRIGHT POSITION AT ALL TIMES.
2. Remove the red shipping caps from the inlet & outlet ports on the main housing.
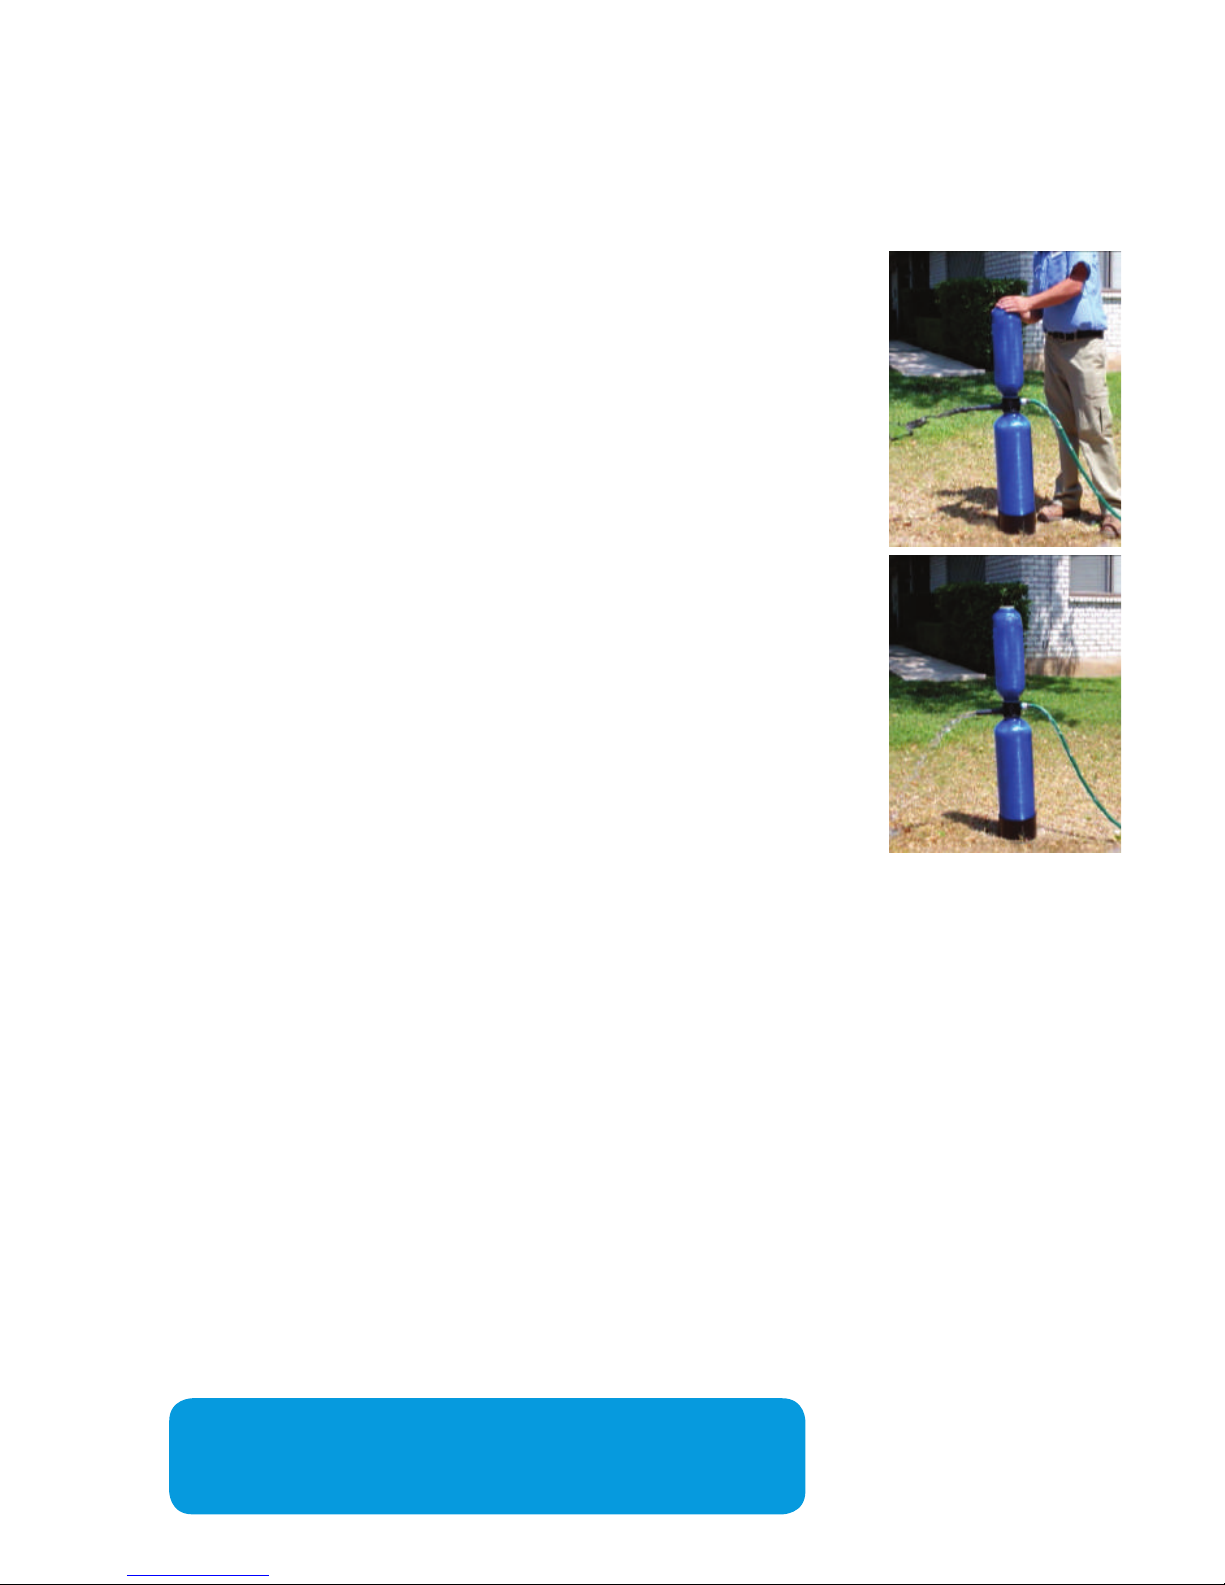
3. Precondition the unit by “surge ushing”: It is very important
that this system is ushed properly prior to nal installation.
The granular carbon media used in the bottom tank contains
1-2% by volume of carbon nes that should be ushed out
prior to use. The best method for purging these carbon nes
from the media bed is “surge ushing”:
Using the supplied adapter, connect a garden hose to the
inlet port so that the water will ow into the system and out
of the outlet port. Slowly turn on the water and allow the
discolored water to ow from the outlet into a bucket or
drain. The rst few gallons will appear black and cloudy due
to carbon nes. After an initial 2-5 minute ushing, begin a
period of “surge ushing.” Turn the water supply on for 30
seconds and then off for 30 seconds repeatedly for 5-10
minutes or until initial surge of water is completely clear and
free from discoloration and cloudiness. Once the unit has
been properly ushed, be sure the white washers are properly
set inside the inlet and outlet ports. Disconnect it from the
garden hose and position it for nal installation.
4. Turn off main source water supply prior to installation.
5. Install the unit to the main water supply using the supplied components. Do not
over tighten ttings, as this may cause leakage and broken ttings. Do NOT use
pipe dope. The use of pipe dope voids the warranty. You may use NSF-certied
pipe primer, glue and teon tape. Leave two-three threads exposed and do not
exceed seven layers of teon tape. More than seven layers will cause the nipple
to crack and leak.
6. IMPORTANT: The inlet piping assembly (valve, pre-lter, main lter unit, union
and nipples) must be rmly braced and supported.
7. Once installation is complete, slowly turn the water on and inspect for leaks.
8. Once the unit is installed and checked for leaks, open the water faucet closest
to the installed unit and allow water to run for 5-10 minutes for the nal
ushing period.
THIS UNIT MUST BE INSTALLED BY A LICENSED
PLUMBER TO VALIDATE THE WARRANTY
Check operating
specications
before installing

Use and Care
Customization options are available to address any specic concerns you may
have. The best way to establish your specic needs is to conduct a water test.
Contact us by phone: (888) 245-3114 or online: www.hahnltration.com,
to make arrangements and get recommendations.
Component One: Sediment Pre-lter (included with standalone systems)
Sediment levels vary from one location to another. During the rst year of use, a
visual inspection monthly is recommended. The sediment pre-lter is white when
you initially install it. Once you can no longer see white, it is time to replace the
lter with a new one (HF-PRE10). Allowing sediment to continue to collect can
cause clogging and prevent the ow of water into your home.
Component Two: Whole House Filter
This lter unit has a capacity of 600,000 gallons. You replace the unit in
its entirety every 600,000 gallons. Check with your plumber at the time of
installation about adding a meter to your system. Typically the average family of
four will consume that amount in 6 years. Unions are located on each side of
the tank for ease of replacement. It is not necessary to contract a plumber. The
replacement part number is HF-600-R — available at hahnltration.com.
Specications
Model: HF-600
Replacement Cartridges:
Main Tanks: HF-600-R
Pre-Filter: HF-PRE10
Rated Service Flow: 7 gpm / 26.49 lpm
Max Working Pressure: 20-100 psi / 137-689 kPa
Max Operating Temperature: 40-90° F / 4.44-32.22˚ C
Max Capacity: 600,000 gal / 2,271,247.07 L
Do not use with water that is microbiologically unsafe or of unknown
water quality without adequate disinfection before or after the system.

Operating Specications
1. Read all precautions, installation, and operating instructions carefully and
completely before installing the unit.
2. Do not install this unit where the line pressure may exceed 100 psi. Operating
pressure range: 20psi – 100psi.
3. The rated service ow is seven gallons per minute; rated capacity is
600,000 gallons.
4. Sediment pre-lter cartridges should be changed as needed. (When you can
no longer detect the original white color of the lter, it is time for replacement.
Sediment levels vary greatly, so regular visual inspections are reccommended
during the rst year.)
5. Install on cold water lines only. Operating temperature range: 40° – 90°F.
Protect unit from freezing.
6. Do not install the unit on its side or in direct sunlight. Outdoor installation
requires the use of sunproof sumps. Please contact our sales and service
department (888) 245-3114 to discuss your specic needs.
7. Installation of the system must comply with existing state and local plumb-
ing codes. Hahn is not liable for consequential or incidental damages due
to improper installation.
8. When cleaning – use only warm, soapy water to clean the outside of the hous-
ing. Rinse well with fresh, clean water. Never use chemical cleaning products
on the lter’s exterior surface because they may damage the unit housing.

* Scale reduction not NSF Certied
Clean water throughout your home, while
extending the life of your appliances by
reducing sediment and scaling.
*

Pure Satisfaction
All HAHN Filtration products offer a 90-day 100% satisfaction guarantee.
(A 6-year warranty is included, which covers defects in materials and
workmanship.) If for any reason you are not satised with your purchase,
simply call us or the dealer you purchased from. A Return Authorization
Code and a full refund will be promptly issued upon return. Thank you for
choosing HAHN Filtration!
This lter system is designed and tested for use with genuine HAHN
Filtration parts, including replacement lters and all hardware.
Use of parts from other manufacturers may result in loss of contaminant
reduction performance, system damage or failure. Use of parts from other
manufacturers will also void your warranty. Please visit hahnltration.com
for all replacement parts.

HF-600_OM_201403
Manufactured by Sink Warehouse, LP
4601 Spicewood Springs Rd, Suite 1-100, Austin, Texas 78759
(888) 245-3114
•
www.hahnltration.com
System Tested and Certied by NSF International
against NSF/ANSI Standard 42 for the reduction of
the claims specied on the Performance Data Sheet as
veried and substantiated by test data at www.nsf.org
 Loading...