

Page 1
This programmable ambient thermostat has been designed to bring you comfort and energy economy.
It allows you to program and regulate your heating system at 4 temperature levels :
- Comfort : this is the temperature you desire during the hours you are present.
- Comfort 2 : 2nd temperature level that you desire during the time you are present.
- Eco : this is the temperature you desire during short absences or at night.
- Frost protection : this is the guaranteed minimum temperature during your prolonged absences.
It protects your accommodation against the dangers of frost.
It also enables you to program and regulate your air conditioning at 2 temperature levels :
- Comfort : this is the temperature you desire during the hours you are present.
- Eco : this is the temperature you desire during short absences or at night.
1
6T 7786-02B
EK530
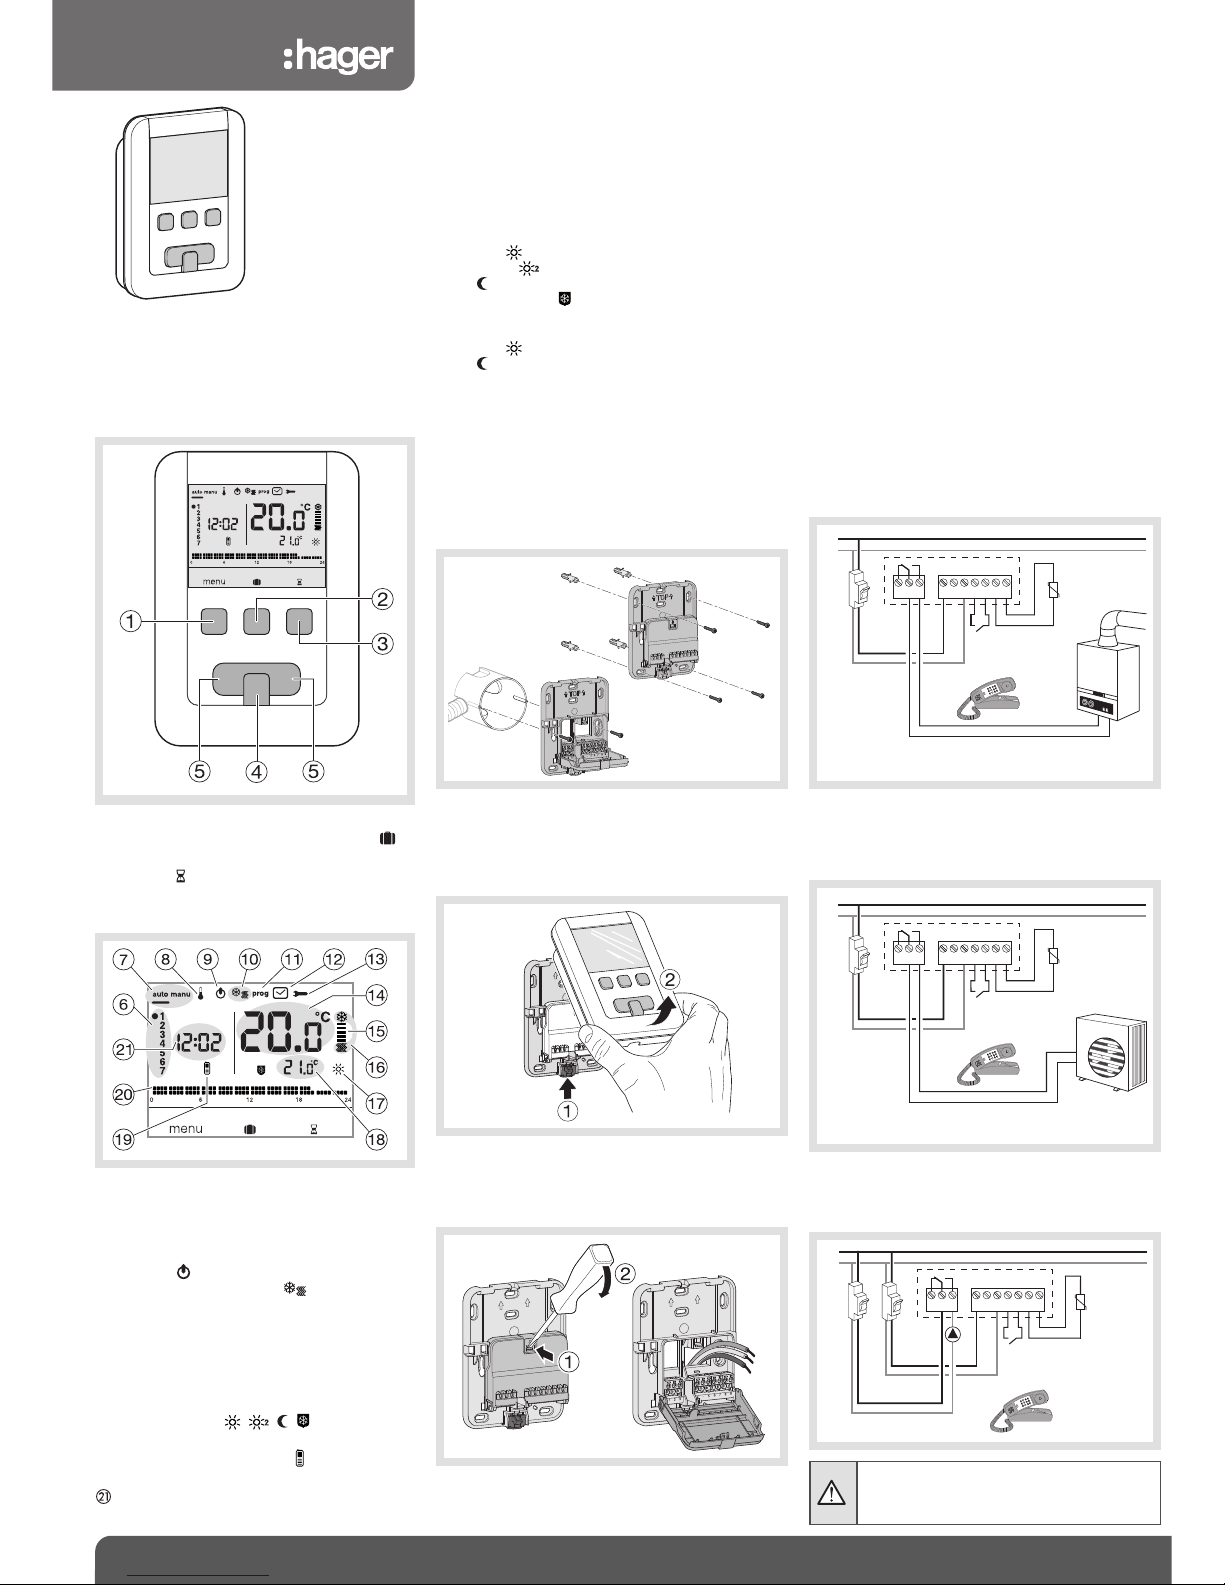
Product description
Context key for menu access
Context key for mode access holidays
Context key to access the temporary
override
Confirmation key OK
Adjustment keys + and -
Indicator for days of the week
Automatic mode/manual mode
(thermostat without program)
Temperature set-points adjustment
Standby
Heating/Air-con selector
Programming/program selection
Time and date adjustment
Adjustment of settings
Ambient temperature
Heating or air conditioning indicator
Current mode (heating or air conditioning)
Current setting (
, ,
,)
Temperature of current setting
Telephonic remote control
Profile of today’s program
Current time
o
k
–
+
§
Programmable ambient
thermostat, mains, weekly
User instructions
ok
–
+
Electrical installation and connections
To guarantee its ambient temperature-regulation
function, the thermostat should be installed around
1.3 m above the ground, on an interior wall and
away from direct sunlight or any heat source such
as a television, lamp, radiator, draft, chimney, etc.
Fix the thermostat onto the flush-mounted casing or
in the slot without a casing intended for this purpose.
For optimum quality temperature regulation, seal
the flush-mounted casing or the electrical duct.
1. Separate the product from the wall-mounted
base, by pushing on the button located under
the base.
2. Open the flap with the help of a screwdriver and
attach the wall-mounted base using the screws.
3. Next, pass the electrical cables into the holes
intended for this purpose.
4. Connect the product according to the wiring
diagram opposite.
This product must be installed according
to the local installation standards in force.
TOP
–
+
ok
TOP
T
OP
1 2 31 2 3 4 - 5 6 7 8 9
N
L
2A6A
telephonic
remote control
(ref. 61123, 61124)
external
probe
(ref. 25190)
1 2 3
input
from remote ambient thermostat
telephonic
remote control
(ref. 61123, 61124)
external probe
(ref. 25190)
1 2 3 4 - 5 6 7 8 9
N
L
2A
Connection of the thermostat to a thermostat
input on the boiler
Connection of the thermostat to the thermostat
input of a reversible or irreversible heat pump (HP)
1 2 32A1 2 3 4 - 5 6 7 8 9
N
L
input
from remote ambient thermostat
telephonic
remote control
(ref. 61123, 61124)
external probe
(ref. 25190)
Connection of a heating or air conditioning
circulator
5. Reclose the flap.
6. Clip the front face onto the wall-mounted base.
Page 2
Initial adjustment and updating
When the product is first used, the screen offers the
option to adjust the year, date and time, without
going into the parameter settings.
or
Press key
menu to place the cursor under .
•
The year flashes. Press key +, the navigation key,
to adjust the current year.
Confirm using the OK key.
• The month flashes. Now press key + or -.
Confirm using the OK then proceed in the same
manner to select the day, hour and minutes.
• AUTO flashes. Press key + to set the installation
to switch automatically between summer and
winter time (
auto) or not (OF
f
). Confirm using the
OK key.
• 24:H flashes. Press key + and select
the 12 hour or 24 hour time format.
Confirm using the OK key.
Automatic mode (auto)
In automatic mode, the thermostat adapts itself to
the rhythm of your life by applying one or more programs that you have selected.
• Press key menu to place the cursor under
auto.
Key menu allows you to return to auto mode
when the (holiday) program is running or a timed
restart is in progress.
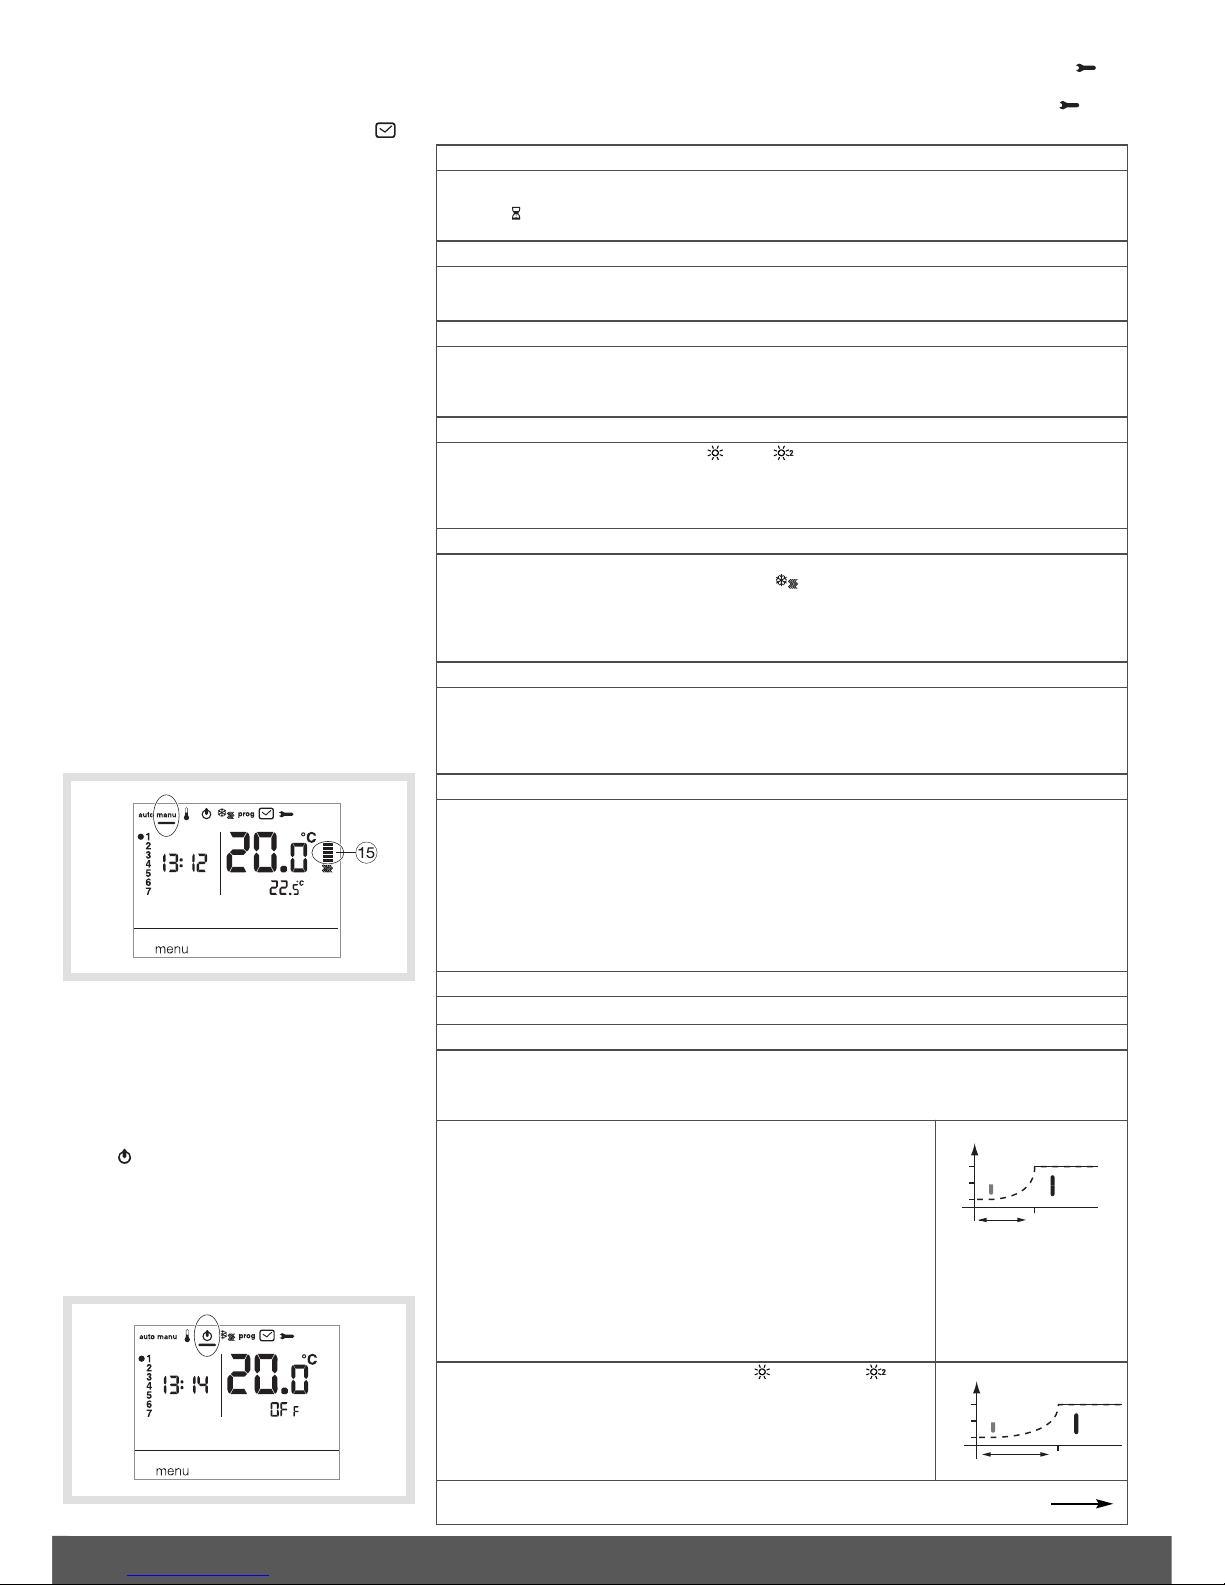
Manual mode (manu)
Manual mode transforms your equipment into a
simple thermostat. It allows you to maintain a
constant temperature in your accommodation
(adjustable from +5 °C to +30 °C) and ignores the
available program profiles.
• Press key menu to place the cursor under
manu.
• Press key + or - to adjust the desired tempera-
ture.
Example : the desired temperature is at 22.5 °C and
the ambient temperature is 20 °C.
The heating-activated indicator 15 is illuminated.
Standby mode
The heating and/or air conditioning system can be
put on standby. The thermostat is live and protects
your installation if the temperature drops below
5 °C (fixed non-modifiable instruction). It displays
the time, current day, ambient temperature and
Off information.
• Press key menu to place the cursor
under .
OF
f
flashes.
• Confirm using the OK key.
• Press key menu to exit standby mode.
From air conditioning mode, standby mode
represents a stop command and the ambient
temperature is no longer regulated.
PA:1 - Default duration of the temporary override
This parameter allows you to input a default, restart time delay. Possible delay times are the following:
1 hour, 2 hours, 3 hours, 4 hours, 5 hours and 12 hours. The restart delay is set to 1 hour by default.
• PA:1 and flash. Press key + or - to modify the restart delay.
Confirm using the OK key to pass to the next parameter.
PA:2 - Backlighting
Backlighting is activated (ON) by default.
• Press key + or - to deactivate it (OFf).
Confirm using the OK key key to pass to the next parameter.
PA:3 - Temperature calibration
This parameter lets you adjust the value displayed by the thermostat if you measure a different
ambient temperature to that which the thermostat measures.
• Press key + or - to modify the temperature within a range of +/-3 °C.
Confirm using the OK key to pass to the next parameter.
PA:4 - 2
nd
Comfort temperature level
This parameter allows you to select one or two Comfort temperature levels. It is only applicable
during programming of the free program (P4).
• Press key + or - to choose 1 or 2 .
Confirm using the OK key to pass to the next parameter.
Parameter PA:4 is set to 1 single level of Comfort by default.
PA:5 - Heating/Air-con mode
This parameter allows you to put your installation into Heating mode (H), Air conditioning mode (C)
or reversible Heating/Air-con mode (HC) (the icon is displayed).
• Press key + or - to select H, C or HC.
Confirm using the OK key to pass to the next parameter.
Parameter PA:5 is set to heating H) by default.
In HC mode, care should be taken to switch the HP suitably for the chosen thermostat mode.
PA:6 - Degumming the pump
This parameter allows you to activate/deactivate the automatic start-up of the pump at midnight
everyday, in order to avoid its jamming during the summer.
• Press key + or - to activate (ON) or desactivate (OFf).
Confirm using the OK key to pass to the next parameter.
Parameter PA:6 6 is set to OFfby default.
PA:7 - Type of heating regulation
This parameter lets you define the type of inertia of your heating installation.
• Press key + or - to select :
- On/OFf= On or off (default setting). The differential is less than 0.3°C (factory setting).
- FAS= PID regulation for installations with rapid inertia (radiator).
Minimum run time 1 minute (10% of the cycle time).
- SLo= PID for installations with slow inertia (underfloor heating).
Minimum run time 2 minutes (10% of the cycle time).
• Confirm using the OK key to pass to the next parameter.
In On/Off regulation, only the anticipation function is available, see PA:9
In PID regulation, the optimisation and anticipation functions are available, see PA:9.
PA:8 - Type of regulation for air conditioning
As PA:7 but FASused for convector fan and SLofor underfloor cooling.
PA:9 - Optimisation and anticipation
This parameter allows you to activate an optimisation or anticipation function which is deactivated
(
OFf) by default.
The optimisation function is only available with PID regulation, see
PA:7 or PA:8
The anticipation function is available with on/off and PID regulation.
Optimisation : he thermostat automatically estimates the time required
to reach the Comfort temperature and adjusts the switch-on time of the
heating so that the desired temperature is attained at the desired time.
A period of around 10 days is necessary to train the installation because
it depends on the type of inertia of your heating.
Note : only P1obenefits from the optimisation function.
• Press key + to activate (AUT) the optimisation function.
Confirm using the OK key to pass to the next parameter.
16 °C
18 °C
20 °C
7 h
x
H
(automatic calculation)
In reversible heating/air-conditioning mode (select HC for parameter
PA:5); it is possible to select a different mode of regulation for each
system.
The heating may be configured as on/off and the air conditioning as PID
regulated. In this case, the optimisation function and program P1ocan
only be applied during PID regulated air-conditioning.
Anticipation : this function allows the Comfort or Comfort 2
temperature from the personalised program (P4) to be applied, in
advance, for a configurable period of 1, 2 or 3 hours.
Note : only P4a benefits from the anticipation function.
• Press key + to select the duration (1H, 2H ou 3H) of anticipation
desired, (e.g. anticipation of 2 hours).
Confirm using the OK key to pass to the next parameter.
16 °C
18 °C
20 °C
6 h
2H
…
2
Installer parameters
To access all the parameters (from PA:1 to PA:12), press key menu to place the cursor under
and then give one long press (>5s) on OK.
To only access parameters from (
PA:1 to PA:4), press key menu to place the cursor under
and confirm using the OK key.
Page 3

PA:1 - Default duration of the temporary override
This parameter allows you to input a default, restart time delay. Possible delay times are the following:
1 hour, 2 hours, 3 hours, 4 hours, 5 hours and 12 hours. The restart delay is set to 1 hour by default.
• PA:1 and flash. Press key + or - to modify the timed restart delay.
Confirm using the OK key to pass to the next parameter.
PA:2 - Backlighting
Backlighting is activated (on) by default.
• Press key + or - to deactivate it (OFf).
Confirm using the OK key to pass to the next parameter.
PA:3 - Temperature calibration
This parameter lets you adjust the value displayed by the thermostat if you measure a different
ambient temperature to that which the thermostat measures.
• Press key + or - to modify the temperature within a range of +/-3 °C.
Confirm using the OK key.
PA:4 - 2
nd
Comfort temperature level
This parameter allows you to choose one or two Comfort temperature levels. It is only
applicable during programming of the free program (P4).
• Press key + or - to choose 1 to 2 .
Confirm using the OK key to pass to the next parameter.
Parameter PA:4 is set to 1, single Comfort level, by default.
Holiday mode
This mode protects your accommodation
against the dangers of frost and maintains a
minimum temperature during your absences,
which can be adjusted between 5 °C and
30 °C.
You can program the duration of your absence
to anticipate a rise in temperature for your
return.
• Press key , and then press key +
to select the number of days absence
(from 1 to 99 days).
The current day counts as 1.
Confirm using the OK key.
• The icon appears and the temperature
to be adjusted flashes.
• Press key + or - to indicate the desired
temperature level. Confirm using the OK key.
Leave the thermostat in this mode. To cancel
and return to automatic mode, menu.
• To modify the duration of your absence or
the temperature value, press key and
proceed to the changes.
If the thermostat is in air conditioning mode,
you can create 1 holiday programme and
define the number of days absence.
The air conditioning will stop.
The ambient temperature will not be regulated.
Heating/Air-con reversibility
This function allows your installation to switch
from Heating to Air conditioning mode.
It requires that parameter PA:5 in HC in the
menu (Heating/Air-con mode) is set
beforehand.
• Press key menu to place the cursor
under .
• flashes and the thermostat regulates the
heating.
• Press key to change from Heating
mode to Air conditioning mode.
Programming
Four programs are available to program your
week : P1, P2, P3, , which are pre-recorded and not
modifiable, and P4 P4 which is free and allows
you to create a personalised program that can be
different for each day of the week.
P1o is only available when the optimisation parame-
ter is active (PA:9) and P4a is only available when
the anticipation parameter is active (PA:9). Your
installer will perform the required parameterisation.
Assigning an existing program (P1, P2 or P3)
to one or more days of the week
You can assign any of the programs to all 7 days
of the week, to a group of five weekdays, to a
group of two days for the weekend or to an individual day.
• Press key menu to place the cursor under
prog. The indicators for the seven days of the
week flash.
• Press key + to select which day, or group of
days, to assign a program to.
Confirm using the OK key.
• P1 flashes. Press key + to select the program
to apply.
Confirm using the OK key.
As an example, to assign P2 to the group of five
weekdays and P1 to the group of two weekend days:
• Press key
menu to place the cursor under
prog. The indicators for the seven days of the
week flash.
Modification of the Comfort 2 temperature
• The Comfort temperature flashes.
• Press key
+ or - to modify the temperature.
Confirm using the OK key.
This adjustment is only available if the 2ndComfort
temperature level has been selected in the parameter menu PA:4.
Modification of the Eco temperature
• The Eco temperature flashes.
• Press key
+ or - to modify the temperature.
Confirm using the OK key.
User parameters
To access the user parameters, press key menu to place the cursor under and confirm using
the OK key.
Once adjustment of these 4 parameters is carried out, the thermostat switches to auto mode and
registers these modifications.
P1 = Comfort temperature from 06:00 to 23:00.
Eco temperature from 23:00 to 06:00.
P1 is activated 7 days per week by
default. If this fits the rhythm of your life
then remain in automatic mode; if not,
continue.
P1o = Optimisation (only with P1).
Comfort temperature from 07:00 to 23:00.
Eco temperature from 23:00 to 07:00.
P2 = Comfort temperature from 06:00 to 08:30
and from 16:30 to 23:00.
Eco temperature from 08:30 to 16:30
and from 23:00 to 06:00.
P3 = Comfort temperature from 06:00 to 08:30,
from 11:30 to 13:30 and from 16:30 to 23:00.
Eco temperature from 08:30 to 11:30,
from 13:30 to 16:30 and from 23:00 to 06:00.
P4 = a free program which allows you to create
up to 5 Comfort temperature periods and
5 Eco temperature periods, for each of the
days of the week.
flashes and the thermostat regulates the air
conditioning.
In HC mode, care should be taken to switch the HP
suitably for the chosen thermostat mode.
Adjusting the temperature set-points
By default, the thermostat is in Heating mode (H)
see installer parameters PA:5 - Heating/Air-con mode.
- If PA:5 5 is set to heating only (H). The tempera-
tures are preset:
Comfort = 19 °C, Comfort 2 = 20 °C, Eco = 16 °C.
The adjustment range for the heating set-points
is from 5 °C to 30 °C.
- If PA:5 is set to air conditioning only (C).
The temperatures are preset:
Comfort = 24 °C, Eco = 29 °C. The range of
adjustment for the air conditioning set points
is from 20 °C to 30 °C.
- If PA:5 is set to reversible heating/air conditioning
(HC), you can modify the pre-set temperatures for
each mode and .
Modification of the Comfort temperature
• Press key
menu to place the cursor under .
The Comfort temperature flashes.
• Press key + or - to modify the temperature.
Confirm using the OK key.
… cont.
PA:10 - Return to factory settings
This parameter lets you return programs and parameters to the factory settings.
• Press key + or - to choose Yes (reset) or no (pas de reset).
Confirm using the OK key to pass to the next parameter.
PA:12 - Software version
This parameter displays which version of the software is installed in the product.
Press OK to exit from parameter adjustments.
Choice of the mode of regulation as a function of the heating/air-conditioning generator.
- ON/OFF regulation: suitable for all types of installation (gas boiler with or without flue, fuel oil boiler,
heat pump, heating/air-conditioning circulation).
- PID regulation: suitable for the following installations: heating or cooling circulation, gas boiler.
The most accurate regulation.
3 www.hager.com
Page 4

Correct Disposal
of This product
(Waste Electrical
& Electronic Equipment).
(Applicable in the European Union and
other European countries with separate
collection systems).
This marking shown on the product or its
literature indicates that it should not be disposed with other household wasted at the
end of its working life. To prevent possible
harm to the environment or human health
from uncontrolled waste disposal, please
separate this from other types of wastes
and recycle it responsibly to promote the
sustainable reuse of material resources.
Household users should contact either
the retailer where they purchased this product, or their local government office, for
details of where and how they can take this
item for environmentally safe recycling.
Business users should contact their supplier and check the terms and conditions of
the purchase contract. This product should
not be mixed with other commercial wastes
of disposal.
Temporary overrides
By overriding until the next program step,
in auto mode, it is possible to modify the temperature
of the current set-point.
• Press key + or - to increase or reduce
the temperature of the displayed set-point.
The set-point temperature flashes and the override
is valid until the next step of the program.
During the override period, the current set-point
temperature flashes.
Temporary override
In auto mode, this function allows temporary
modification of the ambient temperature, at any
time, whatever the instruction in progress. The
range of duration of this function is from 15 minutes
to 12 hours.
• Press key
, the duration adjusted in PA:1
flashes.
• Press key + or - to adjust the desired duration.
Confirm using the OK key.
• Press key + or - to adjust the desired
temperature. Confirm using the OK key.
The end time of the temporary override flashes
on the bar chart of the screen and the value of
the duration of the temporary override is displayed
in place of the current time, until the return to
automatic mode.
If a temporary override is in progress, it is possible
to modify the temperature in steps of 0.5 °C using
key 0,5 °C + or -.
One press on key allows the delay time to be
modified; the last selected duration is displayed.
Accessories
Telephonic remote control
The thermostat is equipped with an input for
telephonic commands for your heating.
The symbol is displayed if the Frost protection
mode is requested telephonically. Detection of
telephonic remote commands is taken into account
in less than 1 minute. You can modify the Frost
protection temperature using the Holiday menu.
The temperature applied will be the last value
confirmed in Holiday mode. In Air conditioning
mode, during telephonic forcing the regulation is
stopped.
Remote temperature probe
The thermostat is equipped with an input for
connection of a remote temperature probe
(reference : 25190). Once this is connected, the
thermostat detects it automatically. The ambient
temperature display flashes for 10 seconds.
The thermostat then regulates the temperature
in response to the remote probe.
What to do if... ?
The symbol is displayed:
the thermostat is locked in Frost protection mode
by telephonic remote control.
Unlock the function by a telephone call or using
the remote control.
The heating does not start up, even though the
ambient temperature is less than the set point:
function of the evolution of the ambient
temperature over the last few hours.
The thermostat estimates that the temperature will
be obtained without contributing additional energy.
It does not request ignition of the generator.
Ask your installer for confirmation.
The heating starts up even though the ambient
temperature is greater than the set point
temperature:
Your installer has selected a form of regulation
known as PID which anticipates a drop in the
ambient temperature as a function of its evolution
over the last few hours.
• Press key + to select to affect the group of
five days (the group of five days flashes).
Confirm using the OK key.
• P1 flashes. Press key + to select P2 (P2
flashes). Confirm using the OK key.
• Press key + to select the group of 2 weekend
days (the group of 2 weekend days flashes).
Confirm using the OK key.
• P1 flashes. Confirm using the OK key.
The thermostat returns to auto mode.
Creation of a personalised program P4
This program allows you to adjust the heating to
suit your way of life. A 24-hour profile is composed
of 48 points (representing the set-points). You can
visualise the composition of your program at the
bottom of the display.
1 program step = 30 minutes.
Example : creating a program, P4 for a group of
days (5 weekdays + 2 weekend days).
For the 5 weekdays, we would like 3 Comfort
periods from 06:00 to 08:00, from 12:00 to 14:00
and from 18:00 to 22:00.
For the two weekend days, we would like a
Comfort period from 08:00 to 19:00, then a
Comfort 2 period from 19:30 to 22:00.
• Press key
menu to place the cursor
under prog. The indicators for the seven days of
the week flash.
• Press key + to select to affect the group of
five days (the group of five days flashes). Confirm
using the OK key.
• P1 flashes. Press key + to select P4
(P4 flashes). Confirm using the OK key.
• Press key until 6:00 appears and then key
until 8:00 appears. Then press key
until 12:00 and key until 14:00. Then press
key until 18:00 appears and finally key
until 22:00.
If you make an error, press key - to move backwards or key + to advance and correct your
programming.
• Confirm using the OK key.
• The group of 2 weekend days flashes. Confirm
using the OK key.
• P1 flashes. Press key + to select P4
(P4 flashes). Confirm using the OK key.
• Press key until 8:00 appears and
key until 19:30 appears. Then press key
until 22:00 and press key until 24:00.
Confirm using the OK key.
Note :
The latest P4 program is held in memory and automatically offered to be assigned to a new day or
group of days (whose P4 is empty).
Setting anticipation to 1 sends program
P4 => P4A.
If the anticipation function (
1H, 2H or 3H) ) in the
Installer parameters PA:9 has been confirmed, P4A is
displayed in place of P4.
during programming, proceed in the same way as
for p4 knowing that the thermostat will automatically apply the anticipation with the duration set in
pa:9. it is not useful to foresee this anticipation time
during your programming.
Hager 06.2012 OCOM 114409
Technical characteristics
Power supply : 230V 쓒 +10/-15% 50 Hz
Power reserve : 4 hours
Static differential (On/Off regulation): < 0.3 °C
Adjustment range
- Comfort temperature : +5 °C to +30 °C
- Comfort 2 temperature : +5 °C to +30 °C
- Eco temperature : +5 °C to +30 °C
Ambient temperature display range : 0 °C to +40 °C
Operating temperature : +5 °C to +45 °C
Storage temperature : -25 °C to +70 °C
Ball test temperature : 75°C and 125°C
Clock operating accuracy : drifts < 1sec/day
Trip values : 250V max. 5A resistive/3A inductive
Minimum load excepted by the relay : 12V / 10mA
Relative humidity : 90 % at 20 °C
IP : 30
IK : 04
Insulation class : II
Insulation type : 4 kV
Rigid cable cross-sections : 0,5 to 2.5 mm²
Flexible cable cross-sections : 0,5 to 1.5 mm²
Minimum pulse voltage : 4 kV
Pollution class : 3
Action type : 2B
Insulation type : reinforced insulation
Software structure : class A
Dimensions (l x h x d) : 97 x 138 x 30
Standards : NF EN 60730-1, NF EN 60730-2-1,
NF EN 60730-2-7, NF EN 60730-2-9,
NF EN 60730-2-11
EN 12098-2, EN 12098-5
30 min.
in Eco
30 min.
in Comfort
30 min.
in Comfort 2
The thermostat estimates that the ambient
temperature will be less than the setpoint
temperature if it does not contribute additional
energy. It requests ignition of the generator.
Ask your installer for confirmation.
4 6T 7786-02B
 Loading...