

hager EG293B Instructions For Use Manual
1 6E 6360.c
6E 6360.c
§
2 channel programmer
annual and weekly cycle
User instructions
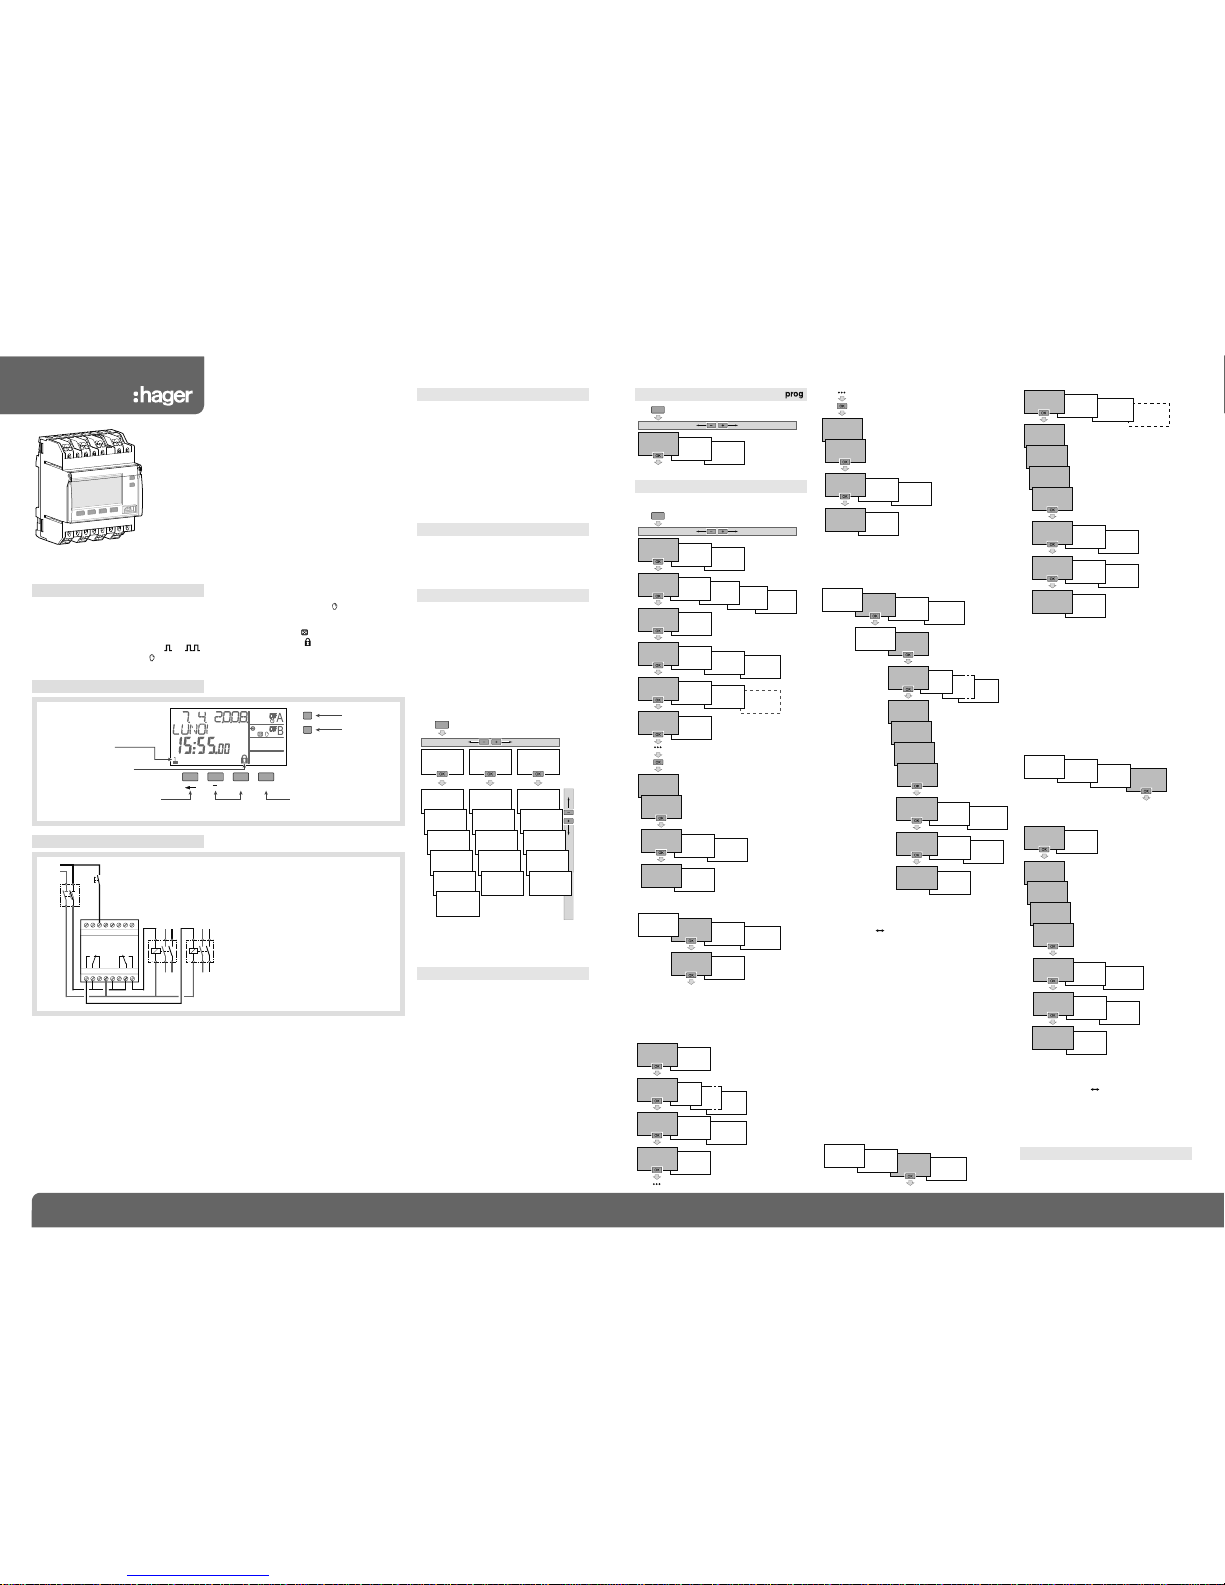
Navigation &
value setting
Validation
Enter in PROGRAMME mode &
return to previous step
Selection of days of the week
1 = Monday, 2 = Tuesday
... 7 = Sunday
Canal B command
Canal A command
Keyboard locked by PIN code
menu
+
ok
At any time, pressing the button menu allows you
to return to the previous choice level.
Programming
To do the yearly programming of the clock, you
have the following 4 types of programme :
- Basic weekly programme
This is a non-priority weekly programme.
- Sub-programmes 1 to 10
These are weekly sub-programmes which are
activated for a defined date-to-date period. As
the sub-programme number increases, so does
the priority.
- DATE/TIME
This is a programme step composed of a time
and a date which will run in addition to the usual
programme. If there is conflict between this
programme step and another programme step
(SP or weekly), this step has priority.
- Holidays
This programme allows you to define a
permanent ON or OFF from date-to-date.
This programme has the highest priority.
Product Presentation
Connection diagram
AB
135
2 4 6 8 10 12 14 16
11 13 15
79
L
N
EG293B
Menu
Press the button menu to access the programming/
setting mode.
All of the programming and adjustments are
based on the following principle :
- the 1st line and/or 2nd line of the display
indicate the requested setting,
- the buttons
+
/- allow navigation through the
menus and settings,
- the button
ok
allows validation.
Pressing the button menu allows you to access
the following settings :
PROGRAM
SETTINGS FUNCTIONS
DATE-TIME
S/W TIME
LANGUAGE
FACTORY
SETTINGS
BACK AUTO
PROGRAM
CREATE
PROGRAM
READ
PROGRAM
MODIFY
PROGRAM
DELETE
PROGRAM
COPY
BACK AUTO
COUNTER
CYCLE
PIN CODE
INPUT
BACK AUTO
menu
Electrical characteristics
⦁ Supply voltage: 230 V+10/-15%
⦁ Frequency: 50/60 Hz
⦁ Power consumption : < 2 VA
⦁ Output: 2 changeover contacts
⦁ Maximum load : AC1 μ 10A 250 V
~
Incandescent lighting : 1500 W
Halogen lighting : 230 V 1500 W
Compensated fluorescent tubes // :
(max. 45 μF) 400 W
Non compensated fluorescent tubes,
compensated in series : 1000 W
Compact fluorescent lamps : 400 W
⦁ Minimum load
AC1 100 mA 250 V
~
⦁ Galvanic insulation between power supply and
output < 4 kV
Technical specifications
Functional characteristics
⦁ Programming capacity : 300 steps
⦁ Minimum time between 2 steps : 1 minute
⦁ Running accuracy : ± 0,2 sec/ 24h
⦁ Operating reserve : lithium battery, total of 5
years autonomy (unlimited programme backup)
⦁ The product is set into standby state (display
switched-off) after 1 minute with power off.
It switches back into automatic mode as soon
as power is back on or when pressing any key.
⦁ Protection degree : IP 20 / IK 04
Environment
⦁ Operating temperature : -10 °C to
+
50 °C
⦁ Storage temperature : -20 °C to +70 °C
Connection by quick-connect terminals
⦁ Flexible : 0,75 to 2,5 mm
2
⦁ Rigid : 0,75 to 2,5 mm
2
Presentation
⦁ Product delivered with current time and date set.
⦁ Automatic change of summer/winter time.
⦁ Programming key
- For permanent overrides
- For program copy or save
⦁ 300 programme steps ; ON, OFF, pulses or .
⦁ Permanent overrides On or Off ( permanent
light on).
⦁ Temporary overrides On or Off ( flashing).
⦁ Overrides (temporary, permanent or time delayed)
remote activation possible.
⦁ Simulation of presence .
⦁ Keyboard lock function by PIN number.
⦁ Counter of operating time on every output.
⦁ Programmable with power off.
⦁ Display with backlight.
When using for the first time, the following
settings must be done :
- select the language
- select the year, month, day
- select the hour and the minutes
- select the automatic change summer/winter.
Press the buttons
+/–
to set the display.
Press
OK
to validate.
When the settings are finished, the clock goes to
automatic mode.
First commissioning
*
*
Input for external override
Pressing simultaneously the menu, –, +,okkeys
allows you to réinitialize the product.
The program is kept in memory.
Reinitializing
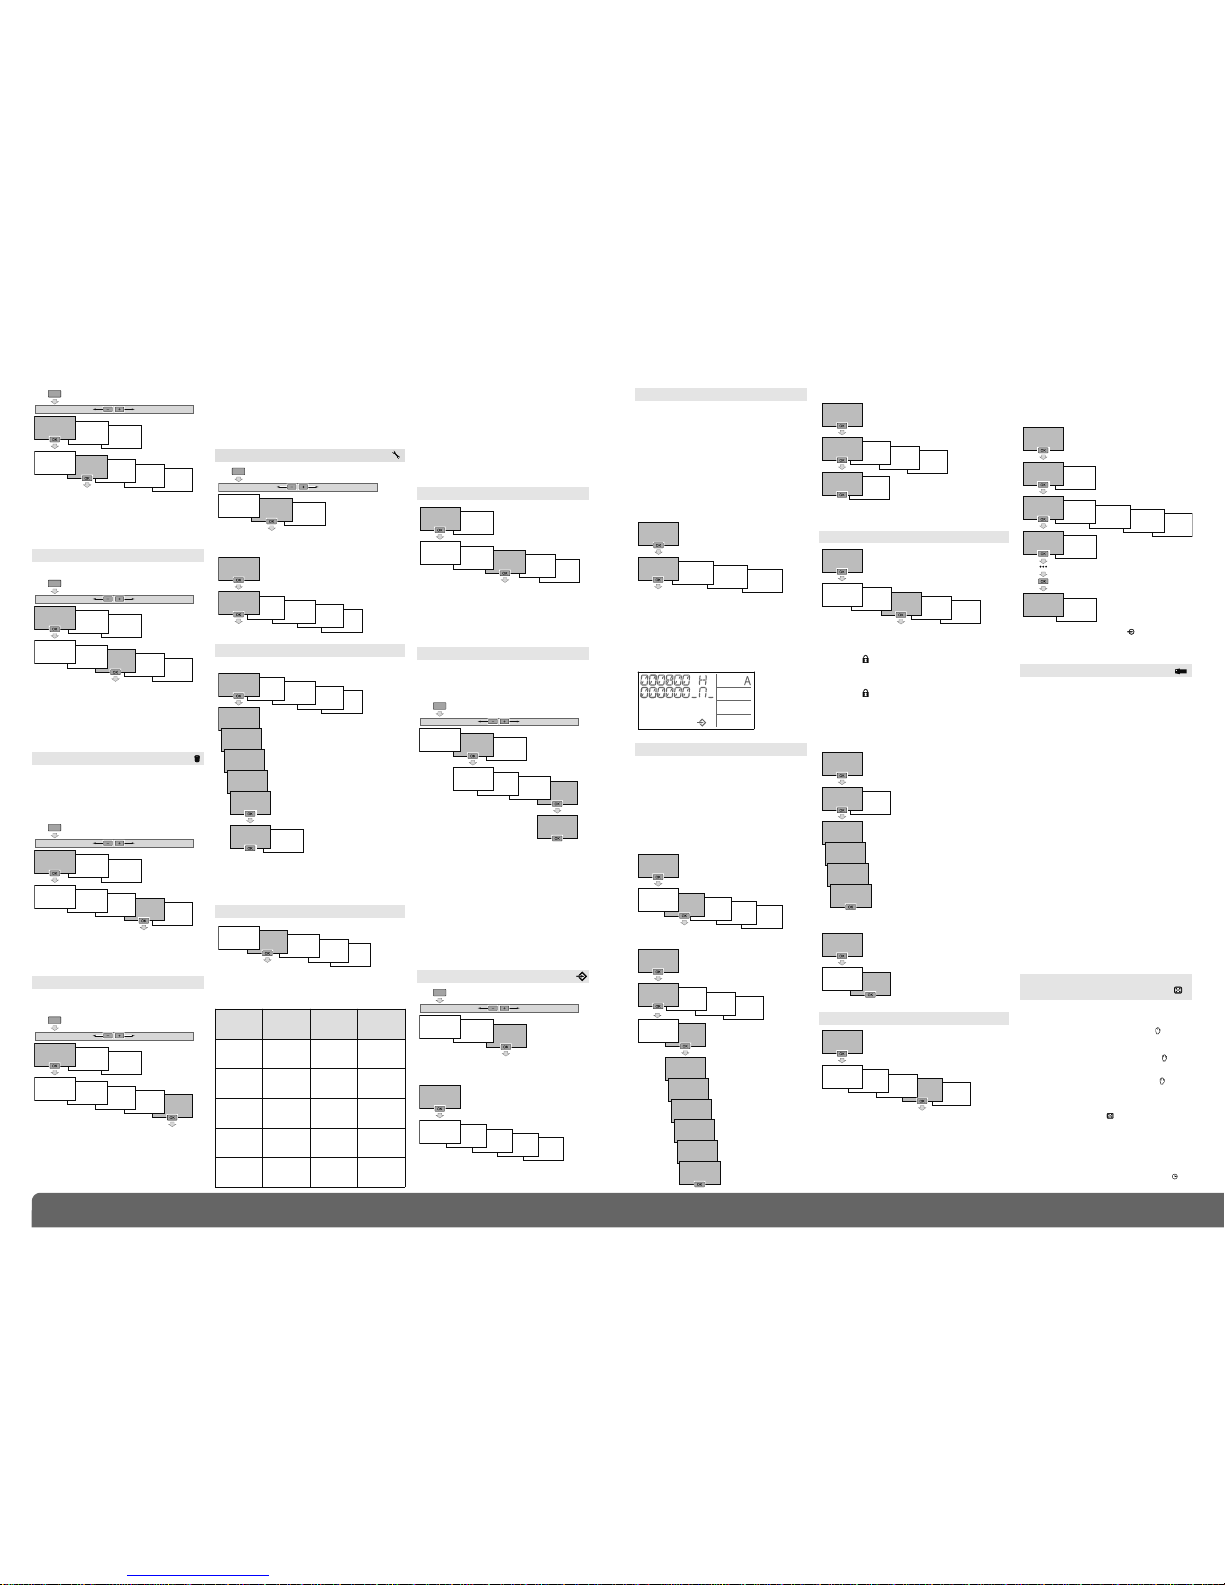
Creating a holiday programme
The Holiday programme allows you to define one
or several periods during which the output
contact is on ON or OFF.
This programme has the highest priority.
To define your Holiday programme :
To visualise a programme
To check the steps of the recorded programme
without risk of modifying or deleting.
Creating a specific programme step (day-time) :
A specific programme step is a programme step
composed of a switching time and a date.
This happens in addition to the weekly programme
type or the sub-programme. If there is conflict, this
has priority.
PROGRAMME READ
HOLIDAYS
DAY/TIME
SP1 - SP10
WEEKLY
HOLIDAYS
DATE/TIME
SP1 - SP10
WEEKLY
BACK
AUTO
DELETE
MODIFY
HOLIDAYS
OFF
NOT
REPEATED
VARIABLE
DATE
HOLIDAYS
ON
FIX
DATE
14.07 - 03.08
HOLIDAYS
CONTINUE
PROGRAM
START
MONTH
01.07
START
DAY
14.07
END
MONTH
01.08
END
DAY
03.08
DATE/TIME
CYCLE
DATE/TIME
IMPULSE
DATE/TIME
OFF
NOT
REPEATED
KEEP
DAYWEEK
BACK
AUTO
DELETE
MODIFY
DATE/TIME
ON
FIX DATE
07:00
CONTINUE
PROGRAM
EX 03.03
ON
07:00
SET
HOUR
00:00
SET
MINUTES
00:00
SET
MONTH
00:00
SET
DAY
00:00
Select :
- fixed dates : if the programme must be
repeated every year at the same dates.
- KEEP DAY WEEK : if the dates must be
recalculated every year in order to occur on
the same day of the week.
- NOT REPEATED : if the programme is to be
activated once only.
Validate by
ok
.
Select :
- FIX DATE : if the programme must be repeated
every year at the same dates.
- VARIABLE DATE ( ) if the dates must be
recalculated every year according to the dates
of Easter.
- NOT REPEATED : if the programme is to be
activated once only.
Validate by
ok
.
1.Define the weekly programme
Creating a sub-programme (SP1-10) :
Two phases are necessary to create a subprogramme :
Define the weekly programme.
Define the period when the programme will be active.
Creating the basic weekly programme:
CYCLE
FUNCTIONS
SETTINGS
CHANNEL B
HOLIDAYS
DAY/TIME
SP1 - SP10
IMPULSE
OFF
NO
MONDAY
BACK
AUTO
DELETE
MODIFY
PROGRAM
COPY
PROGRAM
DELETE
PROGRAM
MODIFY
PROGRAM
READ
PROGRAM
CREATE
CHANNEL A
WEEKLY
PROGRAM
ON
YES
MONDAY
SUNDAY
SET
MINUTE
00:00
ON
07:00
CONTINUE
PROGRAM
SET
HOUR
00:00
menu
HOLIDAYS
DAY/TIME
SP1 - SP10
SP
ACTIVATE
WEEKLY
SP
PROGRAM
BACK
AUTO
DELETE
MODIFY
SUNDAY
SET
MINUTE
00:00
SP01
ON
07:00
CONTINUE
PROGRAM
SET
HOUR
00:00
PROGRAM CREATE
PROGRAM
FUNCTIONS
SETTINGS
PROGRAM
menu
*
*
The cycle
programme is only
possible if one or
several cycles have
been defined in the
FUNCTION/CYCLE
menu.
SP
ACTIVATE
SP01
IMPULS
SP01
OFF
NO
MONDAY
SP
NUMBER
10
SP
NUMBER
...
SP
NUMBER
02
SP
PROGRAM
SP
NUMBER
01
SP01
ON
YES
MONDAY
SUNDAY
Select :
- fixed dates : if the programme must be repeated
every year at the same dates.
- variable date ( ) if the dates must be recalculated
every year according to the dates of Easter.
- NOT REPEATED : if the programme is to be activated
once only.
Validate by
ok
.
2.Activate the sub-programme.
To define the start and end of activation dates of the
sub-programme :
SP
ACTIVATE
BACK
AUTO
DELETE
MODIFY
SP
NUMBER
10
SP
NUMBER
...
SP
NUMBER
02
NOT
REPEATED
VARIABLE
DATE
SP
PROGRAM
SP
NUMBER
01
FIX
DATE
28.01 - 14.02
SP1
CONTINUE
PROGRAM
START
MONTH
01.01
START
DAY
28.01
END
MONTH
01.02
END
DAY
14.02
HOLIDAYS
DAY/TIME
SP1 - SP10
WEEKLY
A sub-programme can be attributed to several different
periods.
When the start date and the end date are identical, the
sub-programme is only valid for that day. If several
programmes are activated in the same time, at the
same date, the programme with the highest number
(eg. Pg 10) is the one that will be activated.
The other sub-progammes will be cancelled.
EG293B
http://waterheatertimer.org/Hagar-timers-and-manuals.html
_________________________________________________________________________
Hager SAS - 132 bld d’Europe - BP78 - 67 212 Obernai cedex (FRANCE) - Tél. +333 88 49 50 50 - www.hagergroup.net2 6E 6360.c
Hager 11.2009
Confirm the complete reset by ok.
At the end of the reset to zero, as for the first com-
missioning, the following settings must be done :
- language
- selection of date and time
- Automatic summer/winter change.
PROGRAMME DELETE
FUNCTIONS
The functions menu allows you to access the following functions and information :
FUNCTIONS
SETTINGS
PROGRAM
menu
FUNCTIONS
BACK
AUTO
INPUT
PIN-CODE
CYCLES
COUNTER
SETTINGS
CONTINUE
BACK
AUTO
YEAR
01.01.08
MONTH
01.04.08
DAY
30.04.08
30.04.08
HOUR
15:00
30.04.08
MINUTE
15:31
BACK
AUTO
FACTORY
SETTINGS
LANGUAGE
S/W TIME
DATE/TIME
The setting menu allows you to access the following
settings :
Press ok to go back to automatic mode.
For other settings (automatic changes summer/
winter, language, reset), press + and select
CONTINUE.
Select the type of summer/winter time change required
and then validate by ok.
Types available:
When the USER type is chosen :
Define the month, then the week of the change of
summer time.
Define the month, then the week of the change of
winter time.
The change always happens between 2 and 3 am.
The change always happens on Sunday.
*
default type
Reset to zero
To reset the product to the manufacturer’s
configuration, that is to say, erase all of the
programme as well as the settings made :
DATE-H
SUMMER/WINTER
LANGUAGE
Time and day setting
FACTORY SETTINGS
FUNCTIONS
SETTINGS
PROGRAM
menu
BACK
AUTO
FACTORY
SETTINGS
LANGUAGE
S/W TIME
DATE/TIME
BACK
AUTO
FACTORY
SETTINGS
LANGUAGE
S/W TIME
SETTINGS
DATE/TIME
Select the language required amongst the
following : FRANÇAIS, DEUTSCH, ENGLISH,
NEDERLANDS, PORTUGUES, ESPANOL,
ITALIANA.
Validate by
ok.
FACTORY
SETTINGS
LANGUAGE
S/W TIME
DATE/TIME
CONFIRM
RESET
FUNCTIONS
SETTINGS
PROGRAM
menu
FUNCTIONS
SETTINGS
PROGRAM
COPY
PROGRAM
DELETE
PROGRAM
MODIFY
PROGRAM
READ
PROGRAM
CREATE
PROGRAM
menu
Select the channel from which you wish to copy
the programme.
Select (+, – then ok) the program you wish to
copy: WEEKLY, SP1-SP10, DATE-TIME, HOLIDAY.
Select the channel into which you wish to paste
the programme copied.
Validate by pressing ok.
The copy function allows you to copy a
programme from one channel to another.
PROGRAMME COPY
The menu delete allows you to erase :
- all of the programme contained in the clock.
- All of the programme on one channels.
- A type of programme (weekly, SP1-10, specific,
holiday) for a given channel.
- A programme step.
Everything deleted must be confirmed by pressing
the button
ok.
FUNCTIONS
SETTINGS
PROGRAM
COPY
PROGRAM
DELETE
PROGRAM
MODIFY
PROGRAM
READ
PROGRAM
CREATE
PROGRAM
menu
FUNCTIONS
BACK
AUTO
FACTORY
SETTINGS
LANGUAGE
S/W TIME
DATE/TIME
SETTINGS
To modify one or several programme steps.
PROGRAMME MODIFY
FUNCTIONS
SETTINGS
PROGRAM
COPY
PROGRAM
DELETE
PROGRAM
MODIFY
PROGRAM
READ
PROGRAM
CREATE
PROGRAM
menu
The number of free program steps is displayed.
Press ok to validate.
The buttons
+ and – allow you to scroll the
programme steps.
The button
ok allows you to select the
programme step to be modified.
FUNCTIONS
SETTINGS
PROGRAM
COPY
PROGRAM
DELETE
PROGRAM
MODIFY
PROGRAM
READ
PROGRAM
CREATE
PROGRAM
menu
The number of free program steps is displayed.
Press ok to validate.
The buttons + and – allow you to scroll the
programme steps.
At the end of the visualisation, press ok.
Select CONTINUE, if you wish to copy more programs.
Select BACK AUTO to go back to the automatic mode.
In automatic mode, the symbol indicates that
an override coming from the override entry is
active.
Override input
This menu allows you to define :
• The product which operates the input (push button
or switch).
• The function activated :
- inversion of the state of output contact
- time delay ON output activated for an adjustable
time
- Permanent OFF
INPUT
FUNCTIONS
BACK
AUTO
INPUT
PIN-CODE
CYCLES
COUNTER
INPUT
CHANNEL A
NO
BACK
AUTO
WITH
PUSH BUTT
RANDOM
FUNCTION
PERMANENT
OFF
PERMANENT
ON
TIMER
FUNCTION
WITH SWITCH
FUNCTION
CHANGEOU
CHANNEL A
YES
CHANNEL B
CONTINUE
As soon as the key is present on the switch
PROG KEY appears on the screen.
Two types of operation:
A. Permanent override:
Insert the key into the switch.
After 10 seconds the program contained in the key
will be executed without clearing the program
contained in the time switch.
As soon as the key is removed the program of the
time switch is again valid.
B. Copy / Save :
The key allows you to save a program contained
in the time switch. You can also copy the contents
of the key to the clock.
1.Introduce the key PROG KEY appears on the
screen. Press ok.
2.Using + or –, select :
save on key: to save the programme contained
in the product,
Record in clock: to load the key programme
into the time switch,
apply key prog: to execute the programme
contained in the key without deleting the one
present in the device.
Key readout: to check the programme
contained in the key.
3. Validate your choice by
ok.
An error message may appear on the screen :
Check the type of key.
The error message remains on display as long as
the key is present, but the time switch programme
is the one which is executed
Key
By successively pressing the channel command
button.
If the output state is On :
1stpress : temporary override. Off and flashing.
Return to automatic mode will take
place at the next programme step.
2ndpress : permanent override. Off and are
fixed. This override must be cancelled
manually.
3rdpress : forçage permanent. On and sare
fixed. This override must be cancelled
manually.
4thpress : Random operation. For the simulation
of presence, as well as the state of
output are displayed. Must be cancelled manually.
In this case the programme steps
are staggered at random in a slot of
± 59 min.
5thpress : return to automatic mode. The state
of output as well as the symbol
are displayed.
Overrides
Random operation
The “Counter” menu allows you to visualise the
number operating hours (position ON) for every
output, as well as the number of time changes
since commissioning.
The counter also allows you to visualise the
number of operating hours of the clock (product
connected to mains supply).
The counters cannot be reset to zero (even after
activating the function factory settings).
Press the button menu.
Using the buttons
+ or –, then ok, select the
FUNCTIONS menu, then COUNTER.
The first line indicates the number of operating
hours of the output.
The second line indicates the number of time
changes (ON then OFF) done by the output.
The buttons
+ or – allow you to scroll the various
indicators.
Press the button
ok to exit this menu.
In order to create a cycle programme you must
have previously defined the operating cycle(s).
A cycle is defined by x h, x min, x sec ON then
x h, x min, x sec OFF.
This menu allows you to define, modify or
deactivate up to 4 different cycles.
During the creation of a programme step, the
active cycles appear in the choice of the state
of output.
To create or modify a cycle :
To deactivate a cycle :
Deactivating a cycle also deactivates all the
programme steps concerned.
The menu PIN CODE allows you to lock the clock
keyboard.
When the PIN number is active :
The symbol flashes to indicate that the function is
activated.
After 1 minute without action on the product, the
keyboard is locked.
The symbol indicates that the keyboard is locked.
You must enter the PIN number to reactivate the
keyboard.
To deactivate the keyboard lock by PIN NUMBER
COUNTER
CYCLE
PIN-CODE
FUNCTIONS
INPUT
PIN-CODE
CYCLES
COUNTER
FUNCTIONS
BACK
AUTO
INPUT
PIN-CODE
CYCLES
COUNTER
CYCLE
CYCLE 4
CYCLE 3
CYCLE 2
CYCLE 1
ACTIVATE
CANCEL
TEMPO ON
HOUR
00:00 00
TEMPO ON
MINUTE
00:00 00
TEMPO ON
SECOND
00:00 00
TEMPO OFF
HOUR
00:00 00
TEMPO OFF
MINUTE
00:00 00
TEMPO OFF
SECOND
00:00 00
CYCLE
CYCLE 4
CYCLE 3
CYCLE 2
CYCLE 1
ACTIVATE
CANCEL
FUNCTIONS
BACK
AUTO
INPUT
PIN-CODE
CYCLES
COUNTER
PIN-CODE
PIN-CODE
CANCEL
PIN-CODE
ACTIVATE
PIN-CODE
PROG
0000
PIN-CODE
PROG
0000
PIN-CODE
PROG
0000
PIN-CODE
PROG
0000
With the buttons + or –,
enter or modify the 4 figures
of the PIN number.
Validate by
ok.
With the buttons
+ or –,
select ACTIVATE.
Validate by ok.
PIN-CODE
PIN-CODE
CANCEL
PIN-CODE
ACTIVATE
To activate the keyboard lock by PIN code
(or modify the PIN code)
- Permanent ON
- Random function
• The channel (or channels) concerned by the
override input.
Type
Start of
Summer
time
Start of
Winter
time
Zone of
application
EURO*
SUMMER/
WINTER
Last Sunday
in March
Last Sunday
in October
European
Union
USA
SUMMER/
WINTER
Second
Sunday
of March
First
Sunday in
November
North
America
AUSTRALIA
SUMMER/
WINTER
Last Sunday
in October
Last Sunday
in March
Australia
USER
SUMMER/
WINTER
Date freely
programmed
Date freely
programmed
NO
SUMMER/
WINTER
No change No change
 Loading...