

Page 1
TOSCA
Bedienungsanleitung
Instruction Manual
Manual d´utilisation
Manuale dístruzioni
5
4
7
6
1
3
2
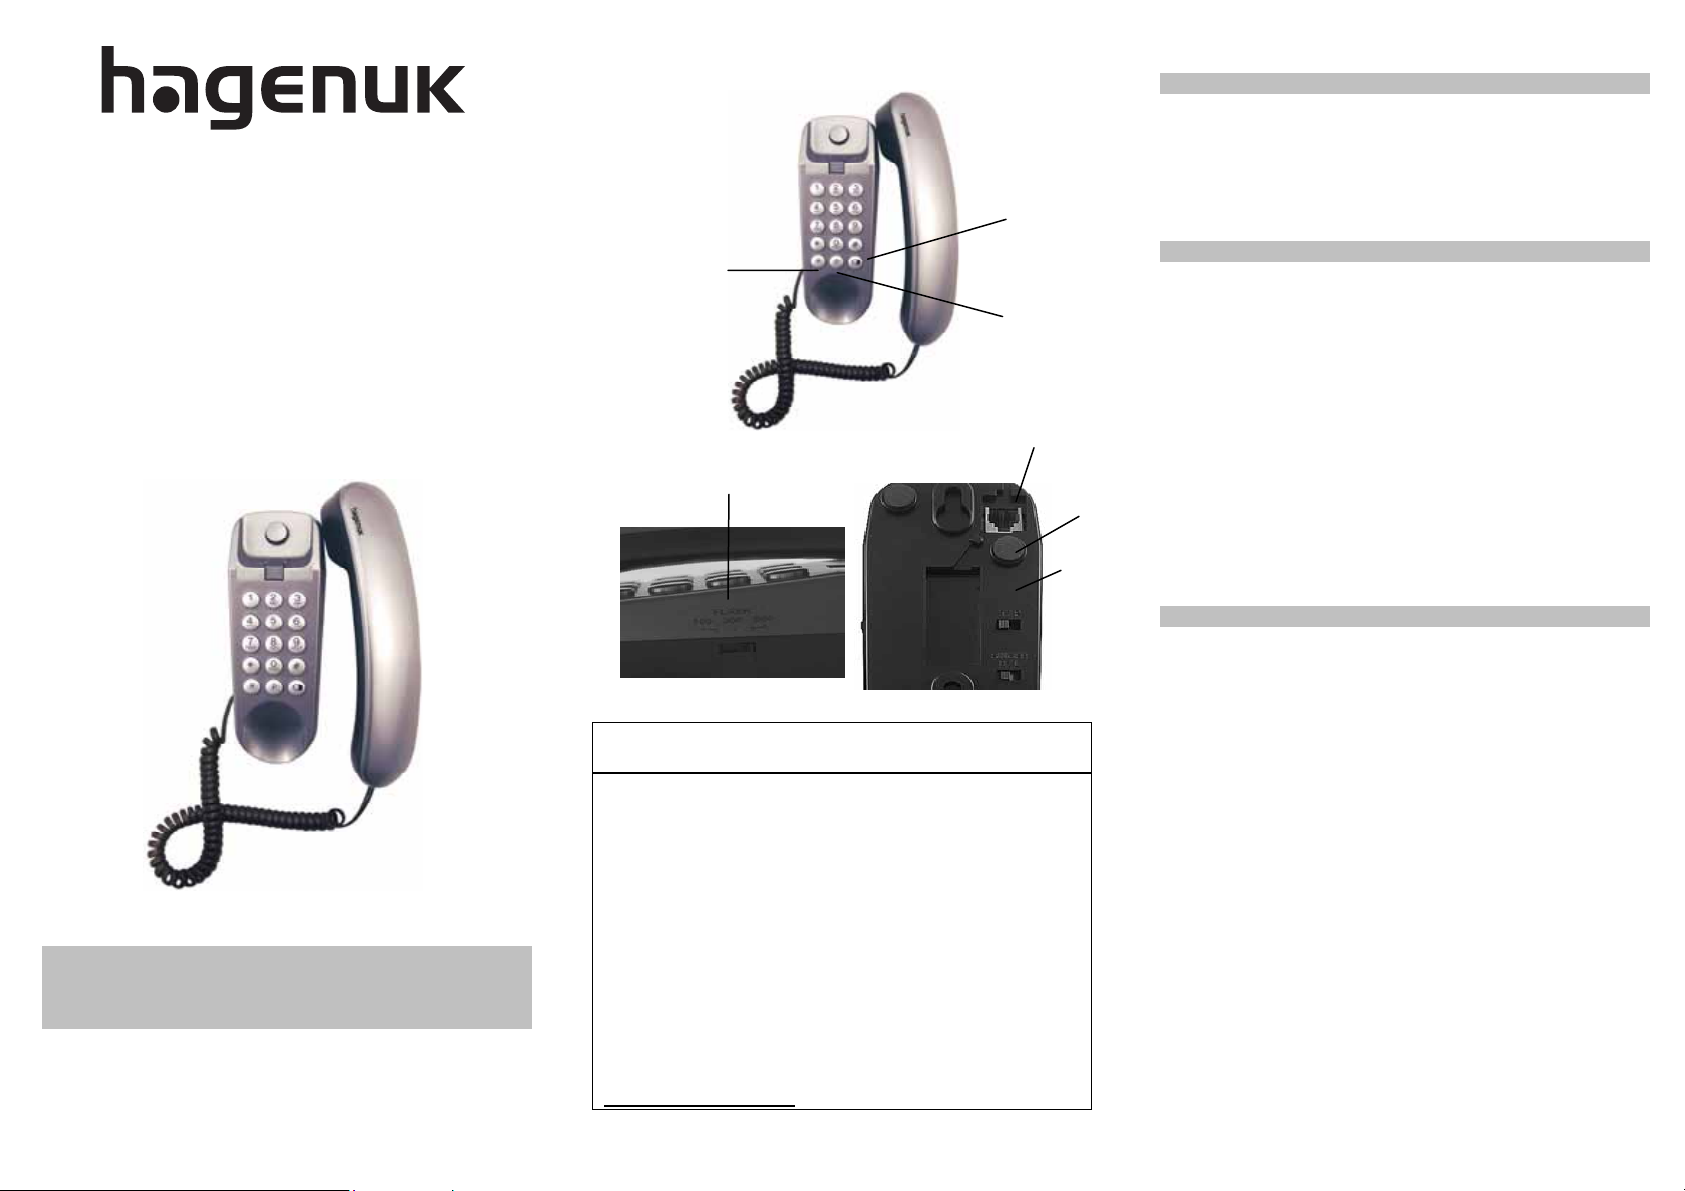
Installation
Verbinden Sie den Stecker des Telefonkabels mit Ihrer
Telefonanschlussdose. Stecken Sie das Gegenstück in den
Anschluss an der Unterseite Ihres Gerätes (1).
Verbinden Sie die gewendelte Handapparatschnur mit dem Hörer
und der Buchse auf der linken Seite des Gerätes.
Einstellungen
Ruftonlautstärke (2)
Die Ruftonlautstärke kann mit dem Schiebeschalter RINGER an
der Unterseite
Wahlverfahren (3)
Das Gerät kann mit Tonwahl- oder Impulswahlverfahren betrieben
werden. Das Wahlverfahren kann mit dem Schiebeschalter an der
Unterseite des Gerätes auf Tonwahl (T) oder Pulswahl (P)
eingestellt werden.
Flashzeit (4)
Je nach Einsatz des Gerätes (öffentliches Netz oder TK-Anlage)
können die benötigten Flashzeiten am Schiebeschalter an der
rechten Seite des Gerätes eingestellt werden (600-, 300-, und 100
ms).
Betrieb
des Gerätes verändert werden (H = laut, L = leise).
Herzlichen Glückwunsch,
Congratulation
Nous vous félicitons,
Le nostre più vive congratulazioni
zum Kauf eines Tosca Telefones
for the purchase of your Tosca telephone.
d’avoir opté pour le Tosca.
per avere acquistato un telefono Tosca
Version 17.12.03
k
Das Gerät Tosca erfüllt die Anforderungen der EU-Richtlinie :
99/5/EG für Telekommunikationsendeinrichtungen.
Bestimmungsgemäße Verwendung:
Dieses Gerät ist für die Anschaltung an das öffentliche Telefonnetz
zugelassen und ausschließlich für die im Handbuch beschriebenen
Funktionen in Wohn- und Geschäftsbereichen zu benutzen. Es
darf durch jedermann in Betrieb genommen werden. Jede andere
Nutzung gilt als nicht bestimmungsgemäß. Eigenmächtige
Veränderungen oder Umbauten, die nicht in dieser Bedienungsanleitung beschrieben sind, sind nicht zulässig.
Die vollständige Konformitätserklärung für dieses Gerät können
Sie einsehen unter:
www.hagenuk-germany.de
Weiterverbinden, Rückfrage, R-Taste (5)
Bei Verwendung mit einer TK-Anlage können mit der R-Taste auch „Flash“ oder "Recall“ genannt – Gespräche weiter verbunden
werden.
Lesen Sie die Bedienungsanleitung Ihrer TK-Anlage für die richtige
Bedienung dieser Funktion.
Pause-Taste (6)
Manche TK-Anlagen benötigen eine Pause zwischen der
Amtsholung (z.B. 0 oder 9) und der Rufnummer.
Wählen Sie die Amtskennziffer, drücken Sie die Pause-Taste und
wählen danach die Rufnummer.
Die Wahlwiederholungsfunktion berücksichtigt auch eingefügte
Pausen.
Wahlwiederholung (7)
Durch Betätigen der Wahlwiederholungstaste wird die zuletzt
gewählte Nummer wiederholt.
Page 2

Installation
Plug the telephone line cord into the telephone line jack on the
backside of the base unit (1). Plug the other end of the telephone
line cord in the telephone wall outlet (TAE)
Connect the handset coil cord with the handset and with the jack
on the left side of the base unit.
Settings
Installation
Raccordez la fiche du fil téléphonique à la boîte de raccordement
téléphonique (1). Introduisez l’autre bout dans le raccordement en
dessous de votre appareil.
Paramètres du téléphone
Installazione
Collegare la spina del cavo telefonico alla presa telefonica (1).
Inserire l'estremità opposta nella presa sul lato inferiore del vostro
apparecchio.
Impostazioni telefono
Ringer Signal (2)
With the multi switch on the back side of the base unit, the ringer
volume can be set to H = high- or L = low volume.
Dialing Procedure (3)
The device can be operated in tone- or pulse dialing mode. The
dialing mode is set with the multi switch on the back side of the
device to tone dialing (T) or pulse dialing (P).
Flash-Time (4)
Depending on the connection of the device to a public network or
to a PABX, the desired flash time can bet set by the multi switch on
the right side of the base unit (600-, 300-, and 100 ms).
Operation
Transferring a call, Flash-button (5)
If you have connected your telephone to a PABX, you can transfer
a call to another extension by pressing the Flash / Recall-button.
Please refer to the instructions of your PABX.
Pause-Button (6)
Certain PABX need the insertion of a pause after dialing the
exchange code (i.e. 0 or 9).
Dial the exchange code, press the Pause-button and dial the
telephone number.
The redial function inserts also a pause if keyed in before.
Redialling (7)
Press the redial-button. The last number dialed will be called
automatically.
Volume de sonnerie (2)
Pour régler le volume de sonnerie, utilisez le sélecteur en dessous
de votre appareil. Il y a 2 niveaux (H = fort, L = faible).
Régler le mode de sélection (3)
Vous avez le choix de configurer l’appareil sur la composition à
fréquences vocales ou par impulsions. Le mode de sélection peut
être réglé soit sur T (fréquences vocales), soit sur P (impulsions), à
l'aide du sélecteur situé en dessous de votre appareil.
Durée de la pause (4)
Si vous êtes raccordé avec un autocommutateur d’usager, il peut
être nécessaire de prévoir une pause de sélection de 600-, 300-,
et 100 ms. Utilisez le sélecteur en dessous de votre appareil.
Utilisation
Touche de transfert, touche R (5)
Lorsque vous utilisez ce téléphone sur un central privé, la touche
R – appelée aussi la touche “Flash” ou “Recall” – permet de
transmettre les communications.
Lisez attentivement le mode d’emploi pour pouvoir utiliser
correctement cette fonction.
Touche pause (6)
Lorsque ce téléphone est raccordé à un central privé et en ce qui
concerne le rappel du dernier numéro composé, il se peut qu’après
le code d’accès à la ligne extérieure il soit nécessaire insérer une
pause.
La fonction de rappel du dernier numéro composé tient aussi
compte d’une pause insérée.
Rappel (7)
Lorsque vous appuyez sur la touche de rappel (4), le dernier
numéro composé sera rappelé.
Volume della suoneria (2)
Per regolare il volume della suoneria è necessario utilizzare
l’interruttore a scorrimento, che si trova sul lato inferiore
dell’apparecchio. Sono impostabili 2 livelli (H = forte, L = debole).
Modalità di selezione (3)
L’apparecchio può funzionare a frequenza vocale oppure ad
impulsi. La modalità di selezione viene impostata premendo un
commutatore, all’interno dell’apparecchio, introducendo un oggetto
con la punta arrotondata nell’apertura che si trova sul retro. La
modalità di selezione cambia a seconda della posizione del
commutatore.
Durata del flash (4)
A seconda della modalità di utilizzo del telefono, che può essere
collegato direttamente alla rete esterna oppure passare prima per
un centralino, il tempo di flash necessario è impostabile mediante
l’interruttore a scorrimento, che si trova sul lato destro
dell’apparecchio (600-, 300-, e 100 ms).
Funzionamento
Richiamo, Tasto R (5)
Quando si utilizza un impianto telefonico si può ripristinare una
comunicazione con il tasto R – detto anche tasto "Flash" o
"Richiamo".
Leggere queste Istruzioni per l'Uso per le modalità esatte
d'impiego di questa funzione.
Tasto pausa (6)
Se il telefono è collegato ad un impianto telefonico, per ripetere la
selezione si deve inserire una pausa dopo il collegamento al
centralino (per esempio 0 oppure 9), prima di comporre il numero
desiderato.
La funzione di ripetizione della selezione tiene conto anche delle
pause inserite.
Ripetizione della selezione (7)
Premendo il tasto di ripetizione della selezione (4), si seleziona
nuovamente l'ultimo numero chiamato.
 Loading...