

Page 1
Bedienungsanleitung
Instruction manual
Mode d‘emploi
Istruzione d‘uso
Gebruikshandleiding
Kullanım klavuzu
Manual de instrucciones
Page 2

Inhaltsverzeichnis
1. Sicherheitshinweise . . . . . . . . . . . . . . . 4
2. Allgemeine Hinweise . . . . . . . . . . . . . . . 4
3. Einlegen der SIM-Karten, der Speicherkarte und des Akkus . . . 5
4. Tasten und Anschlüsse . . . . . . . . . . . . . . 8
5. Statusanzeigen. . . . . . . . . . . . . . . . . 11
6. Ein- und Ausschalten, Tastensperre, Notruf-Funktionen . . . 12
7. Telefonfunktionen. . . . . . . . . . . . . . . 14
8. Menü-Funktionen. . . . . . . . . . . . . . . 17
9. Mitgeliefertes Zubehör . . . . . . . . . . . . . 25
10. Pfl ege und Bedienungshinweise . . . . . . . . . . 26
11. Zusätzliche Sicherheitshinweise / SAR Wert. . . . . . . 27
V 1.11 24.08.09 ms
Page 3

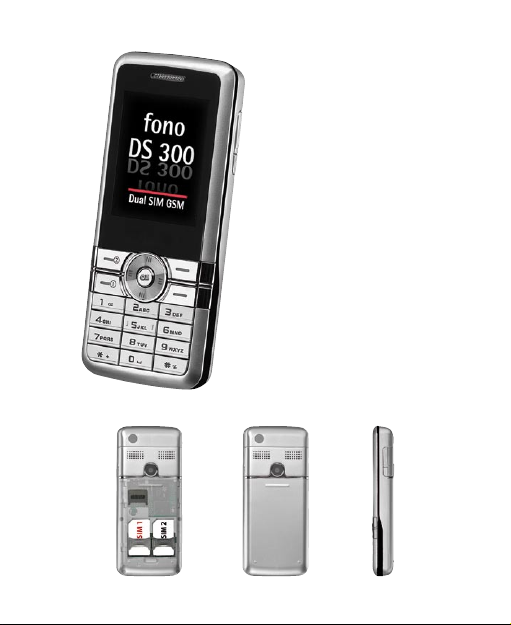
fono DS 300
GSM Frequenzen: Dual-Band Betrieb in GSM 900/1800
SIM Karten: Zwei SIM Karten, Dual Standby: Beide SIM Karten
Sprechzeit: Bis zu 4 Stunden
Standby Zeit: Bis zu 300 Stunden
Display: TFT Farb-Display, 34 x 42 mm, 220 x 176 Pixel,
Kamera: VGA Aufl ösung (0,3 M, GIF/JPEG/BMP)
Klingeltöne/
Vibrationsalarm:
Bluetooth: Bluetooth® 2.0, nutzbar für beide SIM Karten
Telefonfunktionen: Wahlwiederholung der letzten 20 Rufnummern,
SMS-Funktionen: 160 Zeichen maximale Länge pro SMS,
WAP: WAP Push, WAP download (Klingeltöne, Bilder)
Multimedia: FM Radio, MP3-Player, Video-Player
Organizer-
Funktionen:
Extras: 2 Spiele, E-Book Reader, Diktierfunktion
2
sind gleichzeitig aktiv, es kann immer nur mit einer
telefoniert werden
65.000 Farben
20 verschiedene Klingeltöne (MIDI/WAV/MP3/
AMR), Vibrationsalarm
integrierte Freisprecheinrichtung, Stummschaltung,
Tastensperre, Kurzwahltasten, Konferenz
Texteingabehilfe, MMS max. 100 kB Länge
(JPEG/GIF89a/WBMP/GIF87)
Telefonbuch mit 300 Einträgen, Kalender, Uhr mit
Alarmfunktion (auch bei ausgeschaltetem Gerät),
Taschenrechner, Stoppuhr, Zeitzonen, To-Do-Listen,
Memofunktion
Page 4

Abmessungen: ca. 106 x 46 x 14 mm
Gewicht: ca. 80 g (inkl. Akku)
Schnittstellen: Eine Mini-USB Schnittstelle für PC, Netzteil und
Headset (kann auch als USB Speicher verwendet
werden), microSD-Kartensteckplatz
Lieferumfang: AEG fono DS 300 Mobiltelefon, 900 mAh Li-Ionen
Akku, Stereo-Kopfhörer mit Mikro, 100-240V
Netzteil, Bedienungsanleitung
3
Page 5

1. Sicherheitshinweise
Benutzen Sie das Mobiltelefon nur an Orten, an denen der Einsatz nicht
verboten ist oder eine Gefahr darstellen könnte: Benutzen Sie das Telefon
nicht im Flugzeug, in Krankenhäusern, an Tankstellen, in Sprenggebieten
oder im Auto während Sie selbst das Fahrzeug lenken. Beachten Sie alle
geltenden Gebote und Verbote und bedenken Sie auch, dass sich diese im
Laufe der Zeit ändern können.
Verwenden Sie ausschließlich zugelassenes Zubehör und insbesondere zugelassene Akkus. Inkompatibles Zubehör und fehlerhafte Akkus können zu
Schäden bis hin zur Explosion führen.
2. Allgemeine Hinweise
Dieses Mobiltelefon ist für den Betrieb in EGSM 900 und 1800-Netzen entwickelt – weitere Informationen zu den Diensten in diesen Netzen erhalten
Sie von Ihrem Mobilfunk-Anbieter. Auf Anweisung des Mobilfunk-Anbieters wurden möglicherweise bestimmte Funktionen in diesem Mobiltelefon
deaktiviert oder verändert. Bitte wenden Sie sich für weitere Informationen an Ihren Mobilfunk-Anbieter.
Dieses Mobiltelefon ist nicht wasserdicht – halten Sie es daher von Flüssigkeiten fern.
Halten Sie das Telefon, das Netzteil, die SIM Karten und übriges Zubehör
von Kindern fern. Es können sich Kleinteile lösen, die möglicherweise verschluckt werden können.
Ziehen Sie beim Trennen von Kabeln immer am Stecker und nicht nur am
Kabel.
Dieses Telefon darf nur durch den autorisierten Fachhandel gewartet und
repariert werden.
4
Page 6

3. Einlegen der SIM-Karten, der Speicherkarte und des Akkus
Dieses Mobiltelefon kann gleichzeitig mit zwei SIM Karten betrieben werden. Dies bedeutet, dass Sie unter zwei verschiedenen Telefonnummern
angerufen werden können bzw. selbst mit zwei verschiedenen Rufnummern z.B. wählen oder SMS verschicken können. Diese Funktion ist sehr
praktisch, um zum Beispiel eine private und eine berufl iche SIM Karte bzw.
Telefonnummer gleichzeitig zu nutzen oder um auf einer Auslandsreise neben der eigenen SIM Karte / Telefonnummer gleichzeitig auch eine preisgünstige Pre-Paid SIM Karte aus dem jeweiligen Reiseland mit günstigen
Tarifen zu nutzen.
Dieses Mobiltelefon bietet die so genannte Dual-SIM / Dual Standby Funktion. Dies bedeutet, dass beide SIM Karten im Telefon gleichzeitig aktiv
sind, allerdings kann immer nur über eine SIM Karte telefoniert werden:
Wenn Sie mit einer SIM Karte telefonieren und einen Anruf auf der anderen SIM Karte / Telefonnummer erhalten, wird dem Anrufer signalisiert,
dass dieser Anschluss zurzeit nicht erreichbar ist. Wenn Sie nicht telefonieren, können Sie Anrufe entgegen nehmen, unabhängig davon, auf
welcher der beiden Rufnummern Sie angerufen werden. Bei ausgehenden
Telefonaten oder SMS/MMS Nachrichten können Sie die SIM Karte / Telefonnummer wählen, über die dieser Anruf getätigt bzw. die SMS/MMS
verschickt werden soll. Anrufe auf verschiedenen SIM Karten können nicht
miteinander verbunden werden.
5
Page 7
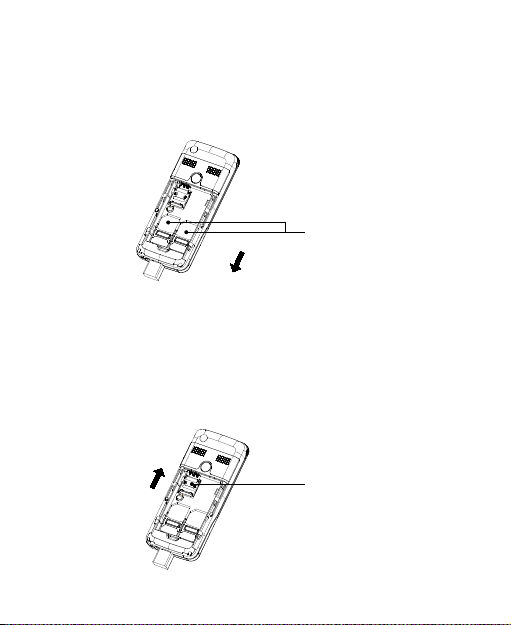
Vor der Benutzung des Mobiltelefons müssen Sie auch mindestens eine
SIM Karte einlegen. Dazu trennen Sie das Mobiltelefon vom Netzteil und
schalten Sie das Mobiltelefon ab. Nehmen Sie den Deckel auf der Rückseite ab, entfernen Sie gegebenenfalls den Akku und setzen Sie eine oder
beide SIM Karten in die dafür vorgesehenen Steckplätze ein.
SIM-Karten
Dieses Mobiltelefon verfügt auch über einen microSD-Kartensteckplatz,
mit dem der interne Speicher des Telefons erweitert werden kann, um zusätzlichen Platz für Bilder, Videos, Musikdateien, etc. zu schaffen. Bitte
achten Sie darauf, ausschließlich Speicherkarten im microSD-Format zu
verwenden, andere Speicherkarten können das Gerät beschädigen.
microSD-Karte
6
Page 8
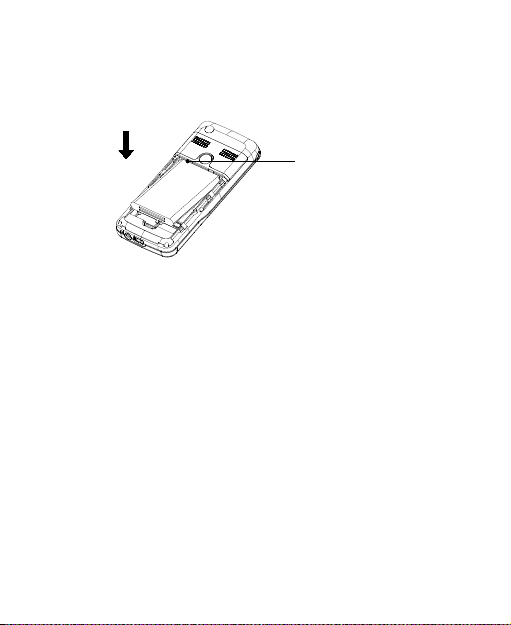
Um den Akku beim Transport zu schützen, ist dieser nicht im Mobiltelefon
eingesetzt. Wenn Ihr Handelspartner, von dem Sie das Telefon gekauft
haben, den Akku nicht bereits eingesetzt hat, dann legen Sie den Akku wie
folgt dargestellt ein:
Die gold glänzenden
Kontakte oben links
Vor der Inbetriebnahme des Mobiltelefons muss der Akku vollständig
aufgeladen werden. Verwenden Sie dazu ausschließlich das mitgelieferte
Netzteil oder den zugelassenen KFZ Ladeadapter.
Verwenden Sie ausschließlich den mitgelieferten Akku oder einen zugelassenen Ersatztyp. Entsprechende Hinweise erhalten Sie von Ihrem Fachhändler oder durch die Service-Hotline.
Der Einsatz anderer Ladeadapter oder Akkus lässt möglicherweise die Zulassung oder Garantie bzw. Gewährleistung erlöschen und kann gefährliche Folgen haben.
7
Page 9
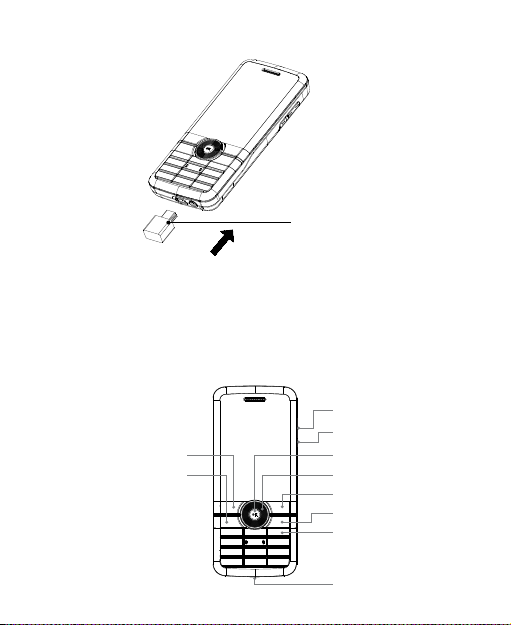
Verbinden Sie das Mobiltelefon wie nachfolgend dargestellt mit dem Netzteil.
USB Ladegerät
Wenn der Akku vollständig entladen ist, kann es einige Minuten dauern,
bevor das Telefon anzeigt, dass es geladen wird und für Telefonate benutzt
werden kann.
Das Telefon zeigt an, wenn der Ladevorgang abgeschlossen ist.
4. Tasten und Anschlüsse
Lautstärke-Tasten (+/-)
Kamera-Taste
SIM2 Anruf / Menü-Taste (LSK)
SIM1 Anruf-Taste
OK-Taste
Cursor- / Navigations-Tasten
Löschen-Taste (RSK)
Ein-/Aus-Taste
Numerisches Tastenfeld
8
Anschluss Netzteil/Kopfhörer
Page 10

4.1 SIM1 Anruf-Taste
Durch Drücken dieser Taste können Sie einen Anruf entgegennehmen
oder eine vorher eingegebene Rufnummer über die SIM1 anwählen.
Wenn kein Gespräch läuft, können Sie durch Drücken dieser Taste eine
Liste der gewählten Rufnummern aufrufen.
4.2 SIM2 Anruf-Taste (Linker Softkey, LSK)
Durch Drücken dieser Taste können Sie einen Anruf entgegennehmen
oder eine vorher eingegebene Rufnummer über die SIM2 anwählen.
Wenn kein Gespräch läuft, können Sie durch Drücken dieser Taste das
Hauptmenü aufrufen.
4.3 OK-Taste
Mit dieser Taste können Sie Ihre Eingaben oder Menüauswahl bestätigen.
4.4 Cursor-Navigations-Taste
Mit diesem Ring können Sie den Cursor in Menüs bewegen. Die vier
Richtungen (oben, unten, rechts, links) können auch mit Kurzbefehlen
für häufi g benutzte Funktionen belegt werden.
4.5 Löschen-Taste (Rechter Softkey, RSK)
Zum Löschen fehlerhafter Eingaben. Wenn kein Gespräch läuft, können
Sie durch Drücken dieser Taste das Telefonbuch aufrufen.
4.6 Ein-/Aus-Taste
Durch etwas längeres Drücken dieser Taste können Sie das Telefon einbzw. ausschalten.
9
Page 11

4.7 Numerisches Tastenfeld
Dient zur Eingabe von Ziffern oder Buchstaben.
Wenn kein Gespräch läuft, können Sie durch etwas längeres Drücken der
jeweiligen Taste die folgenden Funktionen aufrufen:
Taste 1: Kurzwahl zur Sprachbox »
Tasten 2-9: Frei belegbare Kurzwahlen für häufi g benutzte »
Rufnummern
(zur Festlegung der Rufnummern siehe 8.3.1.2)
Taste #: T elefon stumm schalten bzw. Stummschaltung »
wieder aufheben
Um internationale Anrufe vornehmen zu können, müssen Sie der Ländervorwahl ein „+“ Zeichen voranstellen, das Sie durch zweimaliges Drücken
der „*“ Taste erhalten. Einige ausländische Telefonnetze haben Nebenstellen, die nicht als Durchwahl direkt gewählt werden können, sondern
über das Tastenfeld eingegeben werden müssen. Um diese direkt mit zu
wählen, drücken Sie nach der Rufnummer dreimal kurz hintereinander
die „*“ Taste. Es erscheint dann das Zeichen „p“ und Sie können danach
die Nebenstelle (Dial Extension) eingeben.
4.8 Lautstärke-Tasten
Mit den Lautstärke-Tasten können Sie die Lautstärke beim Telefonieren
und beim Hören von Musikdateien einstellen.
4.9 Kamera-Taste
Wenn Sie die Kamera-Taste etwas länger drücken, dann springt das Telefon direkt in den Kamera-Modus. Durch kurzes Drücken der KameraTaste können Sie dann Bilder aufnehmen.
10
Page 12
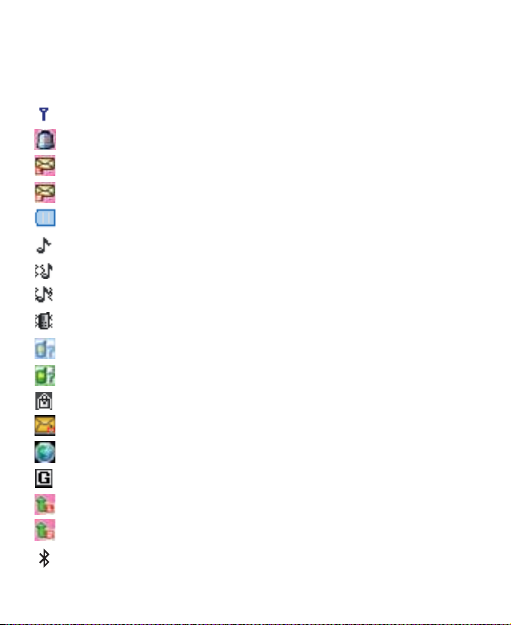
5. Statusanzeigen
Nachfolgend die Symbole mit denen das Telefon den aktuellen Status und
eingegangene Nachrichten signalisiert.
Signalstärke
Alarm eingeschaltet
SIM1 SMS erhalten
SIM2 SMS erhalten
Akku-Anzeige
Klingelton
Vibrationsalarm dann Klingelton
Vibrationsalarm und Klingelton
Nur Vibrationsalarm
SIM1: Verpasste Anrufe
SIM2: Verpasste Anrufe
Tasten gesperrt
MMS
Service Eingang
GPRS
Alle Anrufe auf SIM1 weiterleiten
Alle Anrufe auf SIM2 weiterleiten
Bluetooth aktiv
11
Page 13

Dieses Mobiltelefon verfügt über so genannte Softkeys. Dies sind die beiden Tasten rechts und links unterhalb des Displays (SIM2 Anruf Taste und
Löschen Taste). Abhängig vom Betriebszustand des Telefons und in welchem Menü Sie sich befi nden, werden mögliche Funktionen und Optionen
oberhalb dieser Tasten eingeblendet. Im Folgenden werden diese Tasten
auch als RSK (Rechter Softkey) und LSK (Linker Softkey) bezeichnet.
6. Ein- und Ausschalten, Tastensperre, Notruf-Funktionen
Vor der Benutzung des Mobiltelefons muss mindestens eine SIM Karte eingesetzt werden. Siehe dazu Kapitel 3.
Drücken Sie die Ein-/Aus-Taste bis sich das Telefon einschaltet. Sie werden
dann aufgefordert, den Telefoncode und/oder den SIM Code einzugeben.
Bestätigen Sie den SIM Code durch Drücken der OK-Taste (nicht durch
den LSK!).
Der Telefoncode kann frei von Ihnen vergeben werden und schützt das
Telefon vor unberechtigter Bedienung. Der Telefoncode lautet bei Auslieferung 1122 und braucht bei der ersten Inbetriebnahme nicht eingegeben
zu werden.
Mit dem PIN-Code, den Sie zusammen mit den SIM-Karten erhalten, können Sie die SIM-Karte vor der Nutzung durch Unbefugte schützen. Den
PIN2-Code, den Sie zusammen mit bestimmten SIM-Karten erhalten, benötigen Sie für den Zugriff auf besondere Dienste. Wenn Sie den PIN- oder
PIN2-Code drei Mal hintereinander falsch eingeben, werden Sie aufgefordert, den PUK- oder den PUK2-Code einzugeben. Wenden Sie sich an Ihren
Mobilfunkanbieter, wenn Sie diese Codes nicht kennen.
Auch wenn die Registrierung des Telefons im Mobilfunknetz über die SIM
nicht möglich ist, können Notrufe unter 112 abgesetzt werden, wenn ein
Mobilfunknetz verfügbar ist.
12
Page 14

Zum Ausschalten des Mobiltelefons drücken Sie ebenfalls die Ein-/AusTaste bis sich das Telefon abschaltet.
6.1 Tastensperre
Mit der Tastensperre verhindern Sie, dass versehentlich Tasten oder Anrufe ausgelöst werden, wenn Sie z.B. das Mobiltelefon in der Hosentasche
tragen.
Die Tastensperre wird aktiviert durch Drücken der *-Taste (unten links)
für etwa drei Sekunden.
Die Tastensperre kann auch automatisch aktiviert werden, wenn das Telefon eine bestimmte Zeit nicht benutzt worden ist. Dieser Zeitraum kann
über das Menu eingestellt werden.
Um die Tastensperre aufzuheben, drücken Sie schnell hintereinander die
Tasten RSK und „#“.
13
Page 15

7. Telefonfunktionen
7.1 Anrufe durchführen
Geben Sie über das Tastenfeld die Rufnummer mit der Ortsvorwahl +
und ggf. auch der Landesvorwahl ein.
Wahlwiederholung: Durch Drücken der SIM1 Anruf Taste erhalten Sie +
eine Liste der letzten Rufnummern, aus der Sie dann mit den Cursortasten die gewünschte Nummer auswählen können.
Drücken Sie die + RSK-Taste und wählen Sie einen Kontakt aus dem Te-
lefonbuch aus.
Um internationale Anrufe vornehmen zu können, müssen Sie der Län- +
dervorwahl ein „+“ Zeichen voranstellen, das Sie durch zweimaliges
Drücken der „*“ Taste erhalten.
Einige ausländische Telefonnetze haben Nebenstellen, die nicht als
Durchwahl direkt gewählt werden können, sondern über das Tastenfeld
eingegeben werden müssen. Um diese direkt mit zu wählen, drücken
Sie nach der Rufnummer dreimal kurz hintereinander die „*“ Taste. Es
erscheint dann das Zeichen „p“ und Sie können danach die Nebenstelle
(Dial Extension) eingeben.
Wenn Sie die gewünschte Rufnummer ausgewählt haben, können Sie
dann durch Drücken der SIM1 Anruf Taste oder der SIM2 Anruf Taste
bestimmen, über welche SIM Karte und damit Rufnummer der Anruf
ausgeführt wird.
7.2 Anrufe annehmen
Abhängig vom gewählten Profi l wird das Mobiltelefon klingeln und/oder vibrieren, wenn ein Anruf eingeht. Sie haben dann die folgenden Möglichkeiten:
14
Page 16

Um den Anruf anzunehmen, drücken Sie die SIM1 oder SIM2 An- +
ruftaste.
Um den Anruf abzuweisen, drücken Sie die Ein-/Aus-Taste. +
Wenn die Rufnummer des Anrufers übermittelt wird, zeigt das Telefon
diese Nummer unterhalb der Zeile SIM1 oder SIM2 für die jeweilige SIM
Karte an.
7.3 Kurzwahl
Die Tasten 1-9 können als Kurzwahl-Tasten belegt werden. Die Taste 1
wird dabei als Kurzwahl für Ihre Sprachbox genutzt und die Tasten 2-9
können frei vergeben werden.
Die jeweilige Rufnummer muss vorher über das Menü hinterlegt werden
und kann durch Drücken der jeweiligen Taste für etwa 2 Sekunden als
Kurzwahl ausgelöst werden.
7.4 DTMF Signal
Einige Anwendungen wie z.B. Nebenstellen-Anlagen verlangen die Eingabe von Tastentönen (DTMF). Diese können Sie während des Gesprächs
über das Tastenfeld eingeben.
7.5 Schnelles Lesen von SMS Kurznachrichten
Wenn Sie eine SMS erhalten, erscheint das
Symbol auf dem Display.
Um diese SMS zu lesen, können Sie die Taste „Lesen“ (LSK) oder die OKTaste drücken.
15
Page 17

7.6 Verpasste Anrufe
Falls Sie einen Anruf verpasst haben, erscheint das Symbol
Display. Um diese Rufnummer anzuzeigen, können Sie die Taste „Lesen“
oder die OK-Taste drücken.
7.7 Weitere Anrufe
Soweit dies durch Ihren Mobilfunkanbieter unterstützt wird, können Sie
während eines laufenden Telefonats einen zweiten Teilnehmer anrufen.
Wählen Sie dazu einfach während des laufenden Telefonats in der gewohnten Weise den zweiten Teilnehmer über das Tastenfeld an. Das erste
Telefonat wird automatisch auf „Halten“ gesetzt.
Weitere Anrufe können allerdings immer nur auf der gleichen SIM Karte
durchgeführt werden. Das Verbinden/Mischen von Anrufen auf zwei SIM
Karten ist nicht möglich.
7.8 Konferenzfunktion
Sie können zwei oder mehrere Gespräche zu einer Telefonkonferenz zusammenschalten. Drücken Sie dazu die OK-Taste, während Sie ein Telefonat führen und sich weitere Telefonate im Haltemodus befi nden. Es
erscheint dann ein Menu mit den weiteren Optionen:
Stummschaltung: Stummschalten des aktiven Anrufs
Konferenz: Alle Telefonate werden in eine Konferenz zusammen-
geführt
Alle beenden: Alle Telefonate der Konferenz werden gleichzeitig be-
endet
16
auf dem
Page 18

8. Menü-Funktionen
8.1 Kontakte / Telefonbuch
Das Mobiltelefon verfügt über ein Telefonbuch, in dem drei verschiedene Telefonnummern (z.B. Festnetz, Mobil, Büro), der Firmenname, E-Mail
Adresse, Fax-Nummer, Geburtstag, ein Bild, ein Klingelton und die Anrufergruppe gespeichert werden können.
Auch auf den SIM Karten können Kontakte gespeichert werden, wobei
auf einer SIM Karte nur der Name und eine Telefonnummer hinterlegt
werden können. Der Speicherplatz auf der SIM ist in der Regel ebenfalls
kleiner als im Telefon.
Die Funktionen im Telefonbuch erklären sich aus den entsprechenden
Menüpunkten.
8.2 Nachrichten
8.2.1 SMS Nachrichten
SMS Nachrichten werden von beiden SIM Karten getrennt verwaltet, d.h.
Sie können auf jeder SIM Karte Nachrichten erhalten und mit jeder SIM
Karte Nachrichten versenden. Die Menü Punkte für die Verwaltung der
SMS Nachrichten weisen daher die SIM Karten getrennt aus.
Wenn Sie eine SMS erhalten haben, wird dies durch ein entsprechendes
Symbol angezeigt:
Um eine SMS zu erstellen, wählen Sie den entsprechenden Menü-Punkt
aus und schreiben Sie dann die gewünschte Nachricht. Danach können
Sie auswählen, über welche SIM Karte die SMS verschickt werden soll.
17
Page 19

Hinweis: Die Länge von SMS Nachrichten ist begrenzt, in der Regel mit
160 Zeichen. Wenn Sie Nachrichten versenden, die länger sind, dann
werden diese automatisch in mehrere Nachrichten aufgeteilt, die Ihr Mobilfunkanbieter einzeln berechnet.
8.2.2 MMS Nachrichten
MMS Nachrichten sind Multi-Media-Nachrichten und können neben
Text auch Bilder und Audio Dateien enthalten. Die maximale Größe auf
diesem Mobiltelefon beträgt 90 kb. Bilder werden automatisch auf die
Größe des Bildschirms angepasst.
Bevor Sie eine MMS versenden können, müssen Sie möglicherweise Einstellungen vornehmen, deren Details Sie von Ihrem Mobilfunk-Anbieter
erhalten.
Wie auch bei den SMS Nachrichten können MMS entweder über SIM1
oder SIM2 verschickt werden.
8.2.3 Sprachmitteilungen
Sprachmitteilungen kommen aus dem elektronischen Anrufbeantworter ,
der über Ihren Mobilfunkanbieter zur Verfügung gestellt wird. Wie dieser
eingestellt wird, erfragen Sie bitte bei Ihrem Mobilfunkanbieter .
Gehen Sie ins Menü, wählen Sie Nachrichten und dann Sprachmittei-
lungen, um die Sprachmitteilungen abzuhören. Auch hier können Sie
zwischen SIM1 und SIM2 wählen.
Um die Einstellungen der Sprachbox vorzunehmen, wählen Sie bitte die
Option Bearbeiten.
18
Page 20

8.3 Telefonzentrale
In der Telefonzentrale werden alle eingehenden, ausgehenden und verpassten Anrufe verwaltet. Auch diese Funktionen sind für die beiden SIM
Karten getrennt aufgeführt.
In der Anruf-Historie fi nden Sie für beide SIM Karten getrennt die verpassten Anrufe, die gewählten Rufnummern und die erhaltenen Anrufe.
Sie können diese Listen löschen und auch Kosten und Dauer von Anrufen
kontrollieren.
8.3.1 Allgemeine Anrufeinstellungen
Unter diesem Menüpunkt können Sie – auch wieder für jede SIM einzeln – wichtige Einstellungen für die Behandlung von eingehenden und
ausgehenden Anrufen vornehmen:
Anrufer-Kennung, d.h. Übermittlung Ihrer Rufnummer +
Anruf wartet: Diese Funktion ist notwendig, um Anrufe auf warten +
zusetzen und Telefonkonferenzen durchzuführen
Weiterleitung von Anrufen +
Sperren / Blockieren von Anrufen +
Wahlwiederholung +
Hinweis: Die vorgenannten Funktionen müssen von Ihrem Mobilfunkanbieter unterstützt werden. Wenn diese falsch eingestellt werden, können
Sie möglicherweise keine Anrufe mehr durchführen.
8.3.1.1 Automatische Wahlwiederholung
Das Telefon wiederholt bis zu zehnmal die zuletzt angerufene Nummer,
wenn die Verbindung nicht zustande kommt.
19
Page 21

8.3.1.2 Kurzwahl
Mit diesem Menüpunkt können Sie die Rufnummer festlegen, die mit
den Kurzwahltasten 2-9 angerufen werden sollen.
8.4 Einstellungen
8.4.1 Dual SIM Einstellungen
Mit diesem Menüpunkt können Sie einstellen, ob beide SIM Karten aktiv
sein sollen (= Dual Standby), nur eine der beiden SIM Karten genutzt
werden soll oder beide abgeschaltet werden sollen (Flight-Modus):
Wenn beide SIM Karten abgeschaltet wurden, dann lassen sich die anderen Funktionen des Telefons wie z.B. Kamer a, Media-Player oder Organizer Funktionen noch nutzen. Weil diese Einstellung im Flugzeug nützlich
ist, wird sie auch als Flight-Modus bezeichnet.
Wenn eine SIM Karte abgeschaltet ist, erscheint es für Anrufe auf dieser
Nummer, als ob das Telefon ausgeschaltet wäre. Mögliche Funktionen
für Weiterleitung (z.B. auf eine Mailbox) können Sie unter Menüpunkt
8.3.1 festlegen.
8.4.2 Telefoneinstellungen
In diesem Menüteil können Sie unter anderem das aktuelle Datum und
das Format für Uhrzeit und Datum sowie die Menüsprache festlegen. Im
Folgenden werden nur die Unterpunkte in diesem Menü dargestellt, die
nicht selbsterklärend sind.
8.4.2.1 Ein- / Ausschalten
Sie können Zeiten festlegen, zu denen das Telefon automatisch ein- und
ausgeschaltet werden soll. Diese Einstellung gilt für das komplette Te-
20
Page 22

lefon und betrifft damit beide SIM Karten. Das Telefon lässt sich zusätzlich zu den hier festgelegten Zeiten auch immer manuell ein- und
ausschalten.
8.4.2.2 Bevorzugte Eingabe
Für einige Sprachen bietet das Telefon eine Eingabe-Hilfe an, die Worte
auf Grundlage der ersten Buchstaben automatisch vervollständigt. Dabei
wird auch nach Klein- und Großschreibung unterschieden. Wir empfehlen Ihnen auszuprobieren, ob diese Art der Unterstützung für Sie hilfreich ist oder ob Sie die Texteingaben effektiver auf die herkömmliche Art
durch mehrfaches Drücken der jeweiligen Taste vornehmen können.
8.4.2.3 Display Einstellungen
Unter diesem Menüpunkt können Sie verschiedene Einstellungen für das
Display vornehmen, z.B. den Bildschirm-Hintergrund, den BildschirmSchoner oder die Anzeige von Datum und Uhrzeit.
8.4.2.4 Favoriten
Mit diesem Menüpunkt legen Sie die fest, welche Funktionen im Telefon
über die Navigationstasten schnell aufgerufen werden können, ohne dass
Sie durch das Menü gehen müssen. Die hier angekreuzten Befehle stehen
dann im folgenden Menü zur Auswahl.
8.4.2.5 Kurzbefehle
Aus den Favoriten können vier Befehle auf die Navigationstasten Auf, Ab,
Rechts und Links gelegt werden. Wenn Sie die entsprechende Taste dann
drücken, können Sie dann die Funktion direkt aufrufen.
21
Page 23

8.4.3 Sicherheitseinstellungen
Hier können Sie verschiedene Sicherheitseinstellungen für die SIM Karten
und das Telefon vornehmen.
Bei Auslieferung ist das Telefon entsperrt, Ihre SIM Karten werden jedoch
in der Regel die Eingabe einer PIN verlangen. Um auch das Telefon zu
sperren, können Sie den Menüpunkt Telefon gesperrt wählen. Als Standard PIN zur Freigabe ist die 1122 hinterlegt.
8.4.3.1 Werkseinstellung
Die von Ihnen vorgenommenen Einstellungen werden zurückgesetzt; das
Telefon kann mit dieser Funktion in den Zustand bei der Auslieferung
versetzt werden. Alle gespeicherten Daten wie Bilder, Kontakte, AudioDateien, etc. können dabei verloren gehen. Der PIN zur Freigabe der
Werkseinstellungen lautet ebenfalls 1122.
8.5 Multimedia
Unter diesem Menüpunkt werden die Kamera (Bild & Video), der Image
Viewer, der Audioplayer , das Diktier gerät und das FM Radio verwaltet.
Bei allen Multimedia-Funktionen kann das Speichern der Dateien sowohl
auf dem Telefon als auch auf der externen microSD-Speicherkarte erfolgen (nicht im Lieferumfang enthalten). Da der Telefonspeicher begrenzt
ist, empfehlen wir Ihnen den Einsatz eine microSD-Speicherkarte, da
Multimedia-Dateien viel Speicherplatz belegen können.
22
Page 24

Die nachfolgenden Formate werden von diesem Mobiltelefon unterstützt:
Kamera: JPG Aufnahme (VGA Aufl ösung)
ImageViewer: JPG
Video: AVI, 3GP, MP4
Audio Player: MP3, AMR, MIDI
Dateien, die über den Audio Player wiedergegeben werden sollen, müssen
sich im Ordner My Music befi nden. Mit dem mitgelieferten USB Kabel
können Sie das Mobiltelefon an Ihren PC anschließen und dann Dateien
zwischen dem Mobiltelefon und dem PC kopieren wie bei einem handelsüblichen USB Speicher.
Hinweis: Der PC kann den Speicherbereich des Mobiltelefons wie eine
Festplatte verwalten. Führen Sie daher in keinem Fall Funktionen wie z.B.
Formatieren oder Reorganisieren durch, weil dadurch sämtliche Daten
auf dem Telefon gelöscht werden und das Telefon nicht mehr benutzt
werden kann.
8.6 Spiele
Für die Spiele und Themen erhalten Sie Hilfe-Texte in den entsprechenden Menüs (nur auf Englisch)
8.7 Benutzer-Profi l
Mit einem Profi l können verschiedene Einstellungen z.B. für Klingeltöne
und Lautstärke verwaltet werden. Diese lassen sich dann komfortabel
wechseln, wenn man die Umgebungsbedingungen wechselt: Das Profi l
„Draußen“ arbeitet mit einem besonders lauten Klingelton, um sicherzustellen, dass Anrufe auch bei lauteren Umgebungsgeräuschen gehört
23
Page 25

werden, während das Profi l „Besprechung“ gewählt wird, wenn keine
Störung erfolgen soll.
Die Profi le sind voreingestellt, lassen sich aber an Ihre Bedürfnisse anpassen. Wählen Sie dazu Personalisieren.
8.8 Organizer
Funktionen wie Kalender, Aufgaben-Verwaltung (To-Do Liste), Taschenrechner, Währungsrechner, ein E-Book Reader und mehr sind in diesem
Menüpunkt zusammengefasst.
Auch die Alarmfunktion kann hier eingestellt werden. Dabei können bis
zu fünf verschiedene Alarme eingestellt werden, die auch funktionieren,
wenn das Telefon ausgeschaltet ist. Dabei jedoch darauf achten, dass
noch ausreichend Akku Kapazität vorhanden ist.
8.9 Dienste
In diesem Menü fi nden Sie als erstes die Dienste und Funktionen, die
Ihnen die Mobilfunk Anbieter über die SIM Karte anbieten.
Weiterhin können Sie dort die Einstellungen für WAP und Daten-Konten
vornehmen. Diese Einstellungen können bei den verschiedenen Mobilfunkanbietern unterschiedlich sein. Setzen Sie sich daher mit dem Mobilfunkanbieter in Verbindung, um diese Einstellungen vorzunehmen.
Schließlich können Sie mit diesem Menüpunkt auch die Bluetooth
Schnittstelle verwalten. Bluetooth wird für beide SIM Karten unterstützt,
jedoch haben einige Endgeräte (Headsets, Car-Kits) mit dem schnellen
Wechsel zwischen den beiden SIM Karten Schwierigkeiten, so dass wir
Ihnen empfehlen, die häufi ger benutzte SIM Karte in den Steckplatz 1
einzulegen.
24
Page 26

Neben dem für Headsets, Car-Kit und KFZ Festeinbauten benötigte Profi l
(Headset, Handsfree) unterstützt das Mobiltelefon auch das A2DP Profi l
für Audioübertragung. Wenn über Bluetooth Multimedia-Dateien (Musik, Bilder, Videos) oder Visitenkarten verschickt wer den sollen, muss eine
microSD-Speicherkarte eingelegt sein, da ansonsten kein ausreichender
Platz für die Datenkommunikation zur Verfügung steht.
Um ein Bluetooth Gerät zu verbinden, müssen Sie zunächst die Bluetooth
Schnittstelle einschalten und dann über Suche neues Gerät die Suche
starten. Diese Geräte müssen sich im Kopplungsmodus befi nden – lesen Sie dazu die Bedienungsanleitung des jeweiligen Gerätes. Es werden
dann ein oder mehrere Geräte gefunden, wählen Sie das gewünschte aus
(Verbinden) und geben Sie ggf. die PIN ein. Für die meisten Geräte ist dies
„0000“ (siehe Bedienungsanleitung des Geräts).
9. Mitgeliefertes Zubehör
Stereo-Kopfhörer + : Mit dem Stereo-Kopfhörer können Sie sowohl Radio
hören als auch telefonieren, da es über ein integriertes Mikrofon verfügt. Sie sind damit in der Lage zu telefonieren, ohne das Telefon in die
Hand nehmen zu müssen.
Reise-Netzteil: + Das Reisenetzteil dient zum Laden des Akkus Ihres Te-
lefons und kann mit verschiedenen Eingangsspannungen von 100 bis
240 Volt betrieben werden. Wenn der Akku voll geladen ist, erhalten
Sie eine entsprechende Meldung auf dem Display.
USB-Kabel: + Dieses Kabel dient zur Verbindung zwischen Reisenetzteil
und Telefon und zum Anschluss des Telefons an einen PC.
Bitte verwenden Sie ausschließlich das mitgelieferte Zubehör oder nur
Zubehör und insbesondere Akkus, die ausdrücklich für die Benutzung mit
diesem Telefon vorgesehen und freigegeben sind.
25
Page 27

10. Pfl ege und Bedienungshinweise
Dieses Telefon wurde mit großer Sorgfalt entwickelt und pr oduziert. Bitte beachten Sie die nachstehenden Bedienungshinweise, um das Telefon
möglichst lange nutzen zu können und die Garantiebedingungen nicht
zu verletzen:
Halten Sie das Telefon von Feuchtigkeit und Flüssigkeiten fern. Das +
Telefon hat verschiedene Öffnungen (z.B. für den Lautsprecher), dur ch
die Flüssigkeiten in das Innere eindringen und damit die Elektronik
zerstören können.
Benutzen oder lagern Sie das Telefon nicht in schmutzigen Umge- +
bungen: Partikel können in das Innere eindringen und mechanische
Komponenten wie z.B. Tasten blockieren.
Benutzen oder lagern Sie das Telefon nicht bei hohen Temperaturen, +
da diese den Akku beschädigen können und Kunststoffteile sich dabei
verformen.
Halten Sie das Telefon auch von tiefen Temperaturen fern: Wenn das +
Telefon wieder auf Normaltemperatur kommt, kann sich im Inneren
Feuchtigkeit niederschlagen, die wiederum zu Beschädigungen führt.
Öffnen Sie das Telefon nicht, außer um den Akku und die SIM Karten +
einzusetzen.
Vermeiden Sie mechanische Belastungen z.B. durch Schütteln oder +
Fallenlassen: Mechanische Komponenten oder das Display könnten
dabei beschädigt werden.
Benutzen Sie keine aggressiven Reinigungsmittel, da diese die Oberfl ä- +
chen des Telefons angreifen könnten.
26
Page 28

Lackieren oder bekleben Sie das Telefon nicht, da dadurch die Mecha- +
nik blockiert werden könnte und sich Tasten z.B. nicht mehr drücken
lassen.
Nehmen Sie keine Veränderung an der Elektronik oder Mechanik des +
Telefons vor. Dadur ch gehen sämtliche Zulassungen verloren.
Wenn Sie das Telefon zur Reparatur einsenden, erstellen Sie nach Mög- +
lichkeit vorher eine Sicherung aller Daten (Telefonbuch, Notizen, etc.)
Wenden Sie die oben stehenden Hinweise auch auf das mitgelieferte Zubehör an. Wenn das Telefon nicht ordnungsgemäß funktioniert, geben
Sie es zur Reparatur ausschließlich an eine autorisierte Servicewerkstatt.
11. Zusätzliche Sicherheitshinweise / SAR Wert
Halten Sie das Telefon und das mitgelieferte Zubehör unbedingt von
Kindern fern, da sich Kleinteile lösen können, die von den Kindern dann
verschluckt werden.
Umgebungsbedingungen
Bitte beachten Sie unbedingt alle gültigen Vorschriften für die Benutzung
von Mobiltelefonen und schalten Sie es ab, wenn die Benutzung nicht gestattet ist. Benutzen Sie das Telefon nur in der üblichen Handhabung. Das
Telefon erfüllt alle Strahlungsrichtlinien, wenn es in der üblichen Weise am Ohr gehalten wird oder ein Abstand von mindestens 2,5 cm zum
Körper eingehalten wird. Wenn Sie eine Tasche oder einen Gürtelhalter
verwenden, sollte dieser kein Metall enthalten und den o.g. Sicherheitsabstand einhalten. In einigen Fällen erfolgt die Übermittlung von Daten
(z.B. SMS) erst verzögert, wenn die Verbindung zum Mobilfunknetz eine
ausreichende Qualität hat. Stellen Sie sicher, dass auch im Falle einer ver-
27
Page 29

zögerten Übertragung der o.g. Sicherheitsabstand eingehalten wird. Das
Telefon enthält magnetische Komponenten: Dadurch können metallische
Objekte angezogen werden und das Telefon sollte nicht in die Nähe von
Hörhilfen gehalten werden. Außerdem sollten Kreditkarten oder andere
magnetische Speichermedien vom Telefon ferngehalten werden, da ansonsten die Daten möglicherweise beschädigt werden.
Medizinische Geräte
Jede Form der Funkübertragung und damit auch Mobiltelefone können
die Funktion von medizinischen Geräten beeinfl ussen, insbesondere
wenn diese nicht ausreichend abgeschirmt sind. Schalten Sie daher das
Telefon in der Umgebung medizinischer Geräte aus – insbesondere wenn
Sie durch entsprechende Hinweise darum gebeten werden.
Herzschrittmacher
Die Hersteller von Herzschrittmachern empfehlen einen Mindestabstand
von 16 cm zwischen einem Mobilfunktelefon und dem Herzschrittmacher, um mögliche Störungen durch Interferenzen zu vermeiden. Diese
Empfehlung wird auch durch unabhängige wissenschaftliche Untersuchungen bestätigt.
Personen, die einen Herzschrittmacher tragen, sollten daher die folgenden Hinweise beachten:
Halten Sie immer einen Mindestabstand von 16 cm zwischen dem Te- +
lefon und dem Herzschrittmacher ein.
Transportieren Sie das Telefon nicht in einer Brusttasche oder in der +
Nähe des Herzschrittmachers.
Halten Sie zum Telefonieren das Telefon an das Ohr , das sich in größe- +
rer Entfernung zum Herzschrittmacher befi ndet.
28
Page 30

Wenn Sie Anzeichen für eine Störung spüren, schalten Sie umgehend +
das Telefon ab.
Hörgeräte und Hörhilfen
Einige digitale Hörgeräte können grundsätzlich durch Mobiltelefone
gestört werden. In diesem Fall wenden Sie sich bitte an den HörgeräteAkustiker.
Benutzung im Auto und Flugzeug
Die Radiosignale von Mobiltelefonen können grundsätzlich die elektronischen Systeme von Fahrzeugen und Flugzeugen stören. Benutzen Sie das
Telefon daher nur in Fahrzeugen, wenn dies ausdrücklich zugelassen ist
und beachten Sie die jeweils gültigen Vorschriften.
Deponieren Sie das Telefon oder andere Teile nicht in die Nähe von Airbags. Airbags werden bei einem Unfall sehr schnell aufgeblasen und das
Telefon könnte durch Umherfl iegen sehr ernste Verletzungen verursachen.
Die Benutzung von Telefonen in Flugzeug ist zum Zeitpunkt der Drucklegung generell nicht zulässig. Schalten Sie daher Ihr Telefon ab, wenn
Sie das Flugzeug betreten. Diese Vorschriften werden möglicherweise zukünftig geändert. Informationen über den aktuellen Stand erhalten Sie
von Ihrer Fluggesellschaft oder Ihrem Mobilfunkanbieter .
Explosive Umgebungen
Schalten Sie das Telefon ab, wenn Sie sich in einer Umgebung mit Explosionsgefahr befi nden. Beachten Sie strikt alle entsprechenden Vorschriften, da Spannungsspitzen in diesen Umgebungen Explosionen auslösen
können, die ernste Verletzungen bis hin zum Tod zur Folge haben könnten. Schalten Sie das Telefon daher auch in der Nähe von Tankstellen aus.
29
Page 31

Explosive Umgebungen sind in der Regel deutlich gekennzeichnet, z.B.
mit dem Hinweis, dass Fahrzeug-Motoren abgeschaltet werden müssen.
Schalten Sie in diesem Fall auch unbedingt das Telefon aus. Gefährliche
Umgebungen sind zum Beispiel Treibstoff- und Gaslager, Fabrikationsund Lagerstätten für Chemikalien, unter Deck auf Schiffen und Gebiete
in denen die Luft mit kleinen Partikeln belastet ist wie z.B. Metallstaub,
Kohlenstaub oder andere.
SAR Wert
Der SAR Wert dieses Mobiltelefons beträgt beim Telefonieren im GSM
Betrieb maximal 0,429 W/kg. Im GPRS Betrieb, der nicht beim Telefonieren, aber z.B. beim Versenden von MMS verwendet wird, beträgt der
maximale SAR Wert 1,805 W/kg.
30
Page 32

Instruction manual
fono DS 300
Page 33

Content
1. Safety information . . . . . . . . . . . . . . . 6
2. General information . . . . . . . . . . . . . . . 6
3. Inserting of SIM Cards, Memory Card and Battery. . . . . . 7
4. Keys and connections. . . . . . . . . . . . . . . 10
5. Status displays . . . . . . . . . . . . . . . . 13
6. Switching on and off, key lock, emergency call functions . . 14
7. Call functions . . . . . . . . . . . . . . . . 15
8. Menu functions . . . . . . . . . . . . . . . 18
9. Supplied accessories . . . . . . . . . . . . . . 26
10. Care and user information . . . . . . . . . . . . 26
11. Additional safety information / SAR value . . . . . . . 27
3
Page 34

fono DS 300
GSM frequencies: Dual-Band operation GSM 900/1800
SIM cards: Dual SIM, dual standby: both SIM Cards are active
Talk time: up to 4 hours
Standby time: up to 300 hours
Display: TFT colour display, 34 x 42 mm, 220 x 176 Pixel,
Camera: VGA (0.3 M, GIF/JPEG/BMP)
Ringtone / Vibration: 20 different polyphonic ringtones (MIDI/WAV/MP3/
Bluetooth: Bluetooth® 2.0, works with both SIM cards
Phone features: Re-Dial and call log for the last 20 numbers,
SMS / MMS
messaging:
WAP: WAP Push, WAP download (ringtones, pictures)
Multimedia: FM radio, Media Player (Audio & Video)
Organizer features: Phonebook with 300 entries (+ external memory),
Extras: 2 Games, E-Book reader, voice recorder
4
but only one can be used for calling at a time
65.000 colours
AMR), vibration alarm
integrated hands-free, Mute, Keypad lock, Quick
dial, Conference
160 characters per SMS, text input help, MMS max.
size 100 kB (JPEG/GIF89a/WBMP/GIF87)
calendar, stopwatch, clock with alarm (works also
when phone is switched off ), calculator, time
zones, to-do-list, memo-function
Page 35

Dimensions: approx. 106 x 46 x 14 mm
Weight: approx. 80 g (with battery)
Connectors: Mini USB connector for headset and charging,
phone can be used as USB memory, microSD card
slot
Package content: AEG fono DS 300 Dual SIM GSM phone, 900 mAh
Li-Ion battery, stereo headset with micro, 100-240
AC adapter, manual
5
Page 36

1. Safety information
Use the mobile telephone only in places where its use is not forbidden or
could not pose a danger: Do not use the telephone in airplanes, in hospitals, at fuelling stations, in demolition ranges or in an automobile whilst
you yourself are driving. Observe the valid laws and prohibitions and remember that they may change from time to time.
Use only authorised accessories and in particular approved batteries. Incompatible accessories and faulty batteries can cause damages, even explosions.
2. General information
This mobile telephone has been developed for operation in EGSM 900 and
1800 networks or US 850/1900 networks – further information on the
services in these networks are available from your mobile communications
provider. On direction of the mobile communications provider certain
functions of this mobile telephone may have been deactivated or modifi ed. For further information, please contact your mobile communication
provider.
This mobile telephone is not water proof – therefore keep it away from
liquids.
Keep the telephone, the power pack, the SIM cards and other accessories
out of the reach of children. Small parts might come loose that may be
swallowed.
When disconnecting cables, always pull it by the plug and never by the
cable.
This telephone may be serviced and repaired only by authorised dealers.
6
Page 37

3. Inserting of SIM Cards, Memory Card and Battery
This mobile phone can be used with two SIM cards. You can be called on
two different phone numbers and you can dial out or send messages with
two different phone numbers. This function is quite useful, to operate
a business and a private number at the same time or if you want to use
an less expensive pre-paid SIM abroad in combination with your standard
SIM.
This phone operates as Dual SIM / Dual Standby phone: Both SIM cards
are active at the same time but you can only use one SIM card at a time to
make calls or send messages. When you are on a call on one SIM card and
you are called on the second SIM the caller will receive a message that this
phone is temporarily not available. If you are not on a call you can receive
calls no matter on what SIM you are called. For dialing out or messages
(SMS, MMS) you can choose what SIM card you want to use for it. Calls on
different SIM cards cannot be connected to each other.
Before using the mobile telephone you also need to insert at least one SIM
card. Disconnect the mobile telephone from the power source for that and
switch off the mobile telephone. Take off the back cover and please install
your SIM card according to the fi gure below.
SIM cards
7
Page 38

This cell phone supports microSD card as the expansion storage space as
an additional memory for pictures, videos, music and others. The microSD
card is installed according to the fi gure below.
microSD card
To protect the battery during transport it is not inserted in the mobile
telephone. In case the dealer from whom you purchased the telephone has
not already inserted the battery, follow the following steps.
Golden contacts
to the upper left
8
Page 39

The battery should be fully charged before starting up the mobile phone.
Use only the supplied power pack for that or the approved vehicle charging
adapter.
Use only the supplied battery or the approved substitute type. Appropriate
instructions are available from your dealer or from the service hotline.
The usage of other charging adapters or batteries may possibly invalidate
the authorisation or guaranty/warranty and may have dangerous consequences.
Connect the mobile telephone to the AC charger.
USB charger
If the battery is completely discharged, it may take a few minutes before
the telephone indicates that it is being charged and that it can be used
for calls.
The telephone will indicate when the charging process has been completed.
9
Page 40

4. Keys and connections
Volume Up/Down
Camera Key
SIM2 Call Key (LSK)
SIM1 Call Key
OK Key
Direction Keys
Clear Key (RSK)
Power On/Off Key
Numeric Keypad
Connector for
USB power supply/headset
4.1 SIM1 Call Key
Make a call with SIM1 or answer an incoming call; in standby state, press
this key to display Dialed Call log.
4.2 SIM2 Call Key (Left Soft-Key, LSK)
Make a call with SIM2 or answer an incoming call; in standby state, press
this key to display Main Menu.
4.3 OK Key
With this key you can confi rm entered data or menu selections.
4.4 Direction Keys
Used to move the selection bar or cursor. Under standby status, you may
use the direction key to access the designated shortcut function.
10
Page 41

4.5 Clear Key (Right Soft-Key, RSK)
Used to clean out the selection mistake content, in standby state, such
keys showing phonebook, in the menu condition, it has the backtrack
functions.
4.6 Power On/Off Key
Under Power On status, you may hold down this key to turn off the cell
phone. Under Power Off status, you may hold down this key to turn on
the cell phone.
4.7 Numeric Keypad
Used to enter numbers and messages.
If you are not on a call you can start the following functions by pressing
the respective key for longer than two seconds:
Key 1: Quick dial to voice mailbox »
Keys 2-9: Quick dial for often used numbers »
(how to set see 8.3.1.2)
Key #: Mute / Unmute »
To place an international call you need to press a „+“ before the country
code, which you get by pressing the „*“ key twice.
Some foreign telephone networks have extension lines that cannot be
dialled as dial-through, but need to be entered by the key pad. To dial
these directly as well, press the „*“ key quickly three times in a row after
the telephone number. The „p“ character appear s and then you can enter
the dial extension.
11
Page 42

4.8 Volume Up/Down
You can increase or decrease the volume by pressing such keys when
calling or playing music or the call in ringing.
4.9 Camera Key
If you press the Camera Key for a longer while, the phone will start the
camera mode. To take then pictures press the Camer a Key quickly again.
12
Page 43

5. Status displays
See below the symbols that are shown to display the status of the phone
or incoming messages.
Signal Strength
Alarm on
SIM1 SMS received
SIM2 SMS received
Battery Indicator
Ring
Vibration then ring
Vibration and ring
Vibration only
SIM1: Missed calls
SIM2: Missed calls
Keypad locked
MMS
Service Inbox
GPRS
Divert all calls of SIM1
Divert all calls of SIM2
Bluetooth active
13
Page 44

This mobile phone is provided with Soft Keys which are the two keys on
the right and left below the display. Depending on the phone status and
menu position, options and functions will be displayed above these keys.
The keys are named RSK (Right Soft-Key) and LSK (Left Soft-Key) in this
manual.
6. Switching on and off, key lock, emergency call functions
At least one SIM card has to be inserted before using the mobile phone.
Refer to chapter 3.
Press the On/Off Key until the phone switches itself on. You are then requested to enter the telephone code and/or the SIM code. Confi rm the SIM
code pressing the OK key. Do not use the LSK.
The telephone code can be issued by you as you wish and protects the telephone from unauthorised use. The telephone code is 1122 at delivery and
does not need to be entered the fi rst time it is switched on.
With the PIN code that you get together with the SIM cards you can protect the SIM card from use by unauthorised persons. The PIN2 code that
you get together with certain SIM cards is needed for accessing certain
services. In case you enter the PIN or PIN2 code erroneously three times in
a row, you are requested to enter the PUK or the PUK2 code. Contact your
mobile communications provider if you do not know these codes.
In any country where digital GSM is used, you can make an emergency
call if you are in the range covered by the network (you can know about
this by checking the signal intensity indicator bar at the upper corner of
the display of the cell phone). If your network supplier does not provide
roaming service in that area, the screen will display “Emergency Calls Only”,
telling you that you can make this kind of call only. If you are in the r ange
covered by the network, you can make an emergency call even if you don‘t
14
Page 45

have a SIM card.
Note: In some areas, the service 112 (emergency call) is a service provided
by the network operator. In case of anything abnormal, you can consult
the network operator!
To switch off the mobile telephone press the On/Off Key as well until the
telephone switches itself off.
6.1 Key lock
The key lock prevents the accidental activating of keys or the making
of calls for example when carrying the mobile telephone in your pants
pocket.
The key lock is activated by pressing the „*“ key (bottom left) for about
three seconds. The key lock is indicated then by the
symbol in the
display‘s status line.
The key lock can also be activated automatically when the telephone
is not used for a certain duration. This duration can be specifi ed in the
menus.
To lift the key lock, quickly press RSK and „#“ keys in succession.
7. Call functions
7.1 Making calls
Enter the telephone number with the prefi x and if necessary the coun- +
try code as well.
Redial: Press the SIM1 Call Key to view a list of the last numbers called. +
Use the Direction Keys to select the desired number .
15
Page 46

Press + RSK and select a contact fr om the phone book.
To place an international call you need to press a „+“ before the coun- +
try code, which you get by pressing the „*“ key twice.
Some foreign telephone networks have extension lines that cannot be
dialled as dial-through, but need to be entered by the key pad. To dial
these directly as well, press the „*“ key quickly three times in a row after
the telephone number. The „p“ character appear s and then you can enter
the dial extension.
After you have entered the number you can choose by pressing SIM1
Call Key or SIM2 Call Key which SIM and number should be used to make
the call.
7.2 Accepting a call
Depending on the set mode, the mobile telephone will either ring and/or
vibrate when there is an incoming call. You have the following options
then:
To take the call press either SIM1 Call Key or SIM2 Call Key. +
To reject the call press shortly On/Off Key. +
If you have applied for the call line identity service, the calling number
will be displayed on the screen. If the number has been stored in the
phonebook, the name corresponding to the number will be displayed
on the screen.
If the call is to the SIM1, “SIM1” will be displayed in front of the incoming
call number or the name of the caller. If the call is to the SIM2, “SIM2”
will be displayed in front of the incoming call number or the name of
the caller.
16
Page 47

7.3 Speed dial
Your phone is provided with 9 hotkeys. Y ou can defi ne the corresponding
phone numbers for these keys by the menu. In this way, you may launch
a call quickly by pressing number keys under standby status. The key 1 is
specifi cally used for speed dial of the voice mailbox number. You may use
this key after setting the number of voice mailbox.
Note: For dialing a number quickly, you must press and hold the key for
more than 2 seconds. If the number key you dialed has not been defi ned
in the “function Settings/Phone Settings/Speed Dial/Speed Dial List”, you
can‘t make the call.
7.4 Sending DTMF Signal
When sending DTMF signal has been set, you can press the number key
and “*” or “#” on the screen dial keypad while in a call to send DTMF
signal to the opposite side. If this function hasn‘t been enabled, it will be
impossible to realize such functions as extension number dialing.
7.5 Speed short message read
When the user receives an unread short message, the
icon will appear
on the screen. If the SMS lock is not activated, you may click “Read” (LSK)
or press the OK Key to read this short message.
7.6 Missed call
If you have missed a call, the
icon will appear on the screen. You may
click “Read” (LSK) or press the OK Key to show the number and details
of the missed call.
17
Page 48

7.7 Additional calls
If this is supported by your mobile communications provider, you can call
a second party during the current telephone connection.
Simply dial the second party on the key pad as usual during the current
connection. The fi rst connection is put on „hold“ automatically.
Such additional calls can be only made from the same SIM card. A mix
between the two SIM cards is not possible.
7.8 Conference calls
You can connect two or more calls to one telephone conference. Press
the OK key for that while making a call and other connections are in hold
mode. A menu appears with the following options:
Mute: Mute the active call
Conference: Every call will be merged in a conference
End all: Quit every call at once
8. Menu functions
8.1 Phone book
Your phone is provided with a card folder phone book. Information of
each contact stored in the phone includes: 3 phone numbers (including
Phone Number, Family Number, and Offi ce Number), Company Name,
Email, Fax Number, Birthday, Caller Picture, Melody, Caller Group (including Family, Friends, Important P ersons, Colleague and Other s).
Only the name and phone number of the contactor stored in the SIM
card can be stored.
18
Page 49

You can also store contacts on the SIM cards but because of memory
limitations you can only save the name and number on the SIM card.
Phone book functions explain themselves by the separate menu options.
8.2 Messages
8.2.1 SMS Messages
Both SIM cards handle SMS messages separately: You can receive and
send messages from each SIM card. Therefore the menu shows all options for both SIM cards.
After you have received a SMS message the screen will show this icon:
To write a SMS, select the menu option and enter the message. After you
have fi nished the message, press the OK key and select which SIM should
be used to send the SMS.
Note: The length of text messages is limited; usually 160 characters. If
you want to send messages that are longer, then they are automatically
split up into several messages, which your provider will charge you for
individually. In the upper right corner of the display you will fi nd information on the number of characters and messages, e.g. 70/1 (70 characters, fi st message).
8.2.2 MMS Messages
A multimedia message can content character, audio chip and picture.
Multimedia message of up to 90KB is available on your phone. If the size
of a multimedia message is over the limit, the phone can‘t receive this
multimedia message.
19
Page 50

If a picture is contented in a multimedia message, the picture will be
adjusted by the phone to display the picture completely on the screen.
The display effect of the multimedia message can be different according
to the receiving device.
Note: You can use this function only when the service is supported by
your network operator or service supplier. Only the device featuring multimedia or email can receive and display a multimedia message.
As SMS also MMS can be send either thru SIM1 or SIM2.
8.2.3 Voice mail
Voice messages come from the electronic answering machine that is
provided by your mobile communications provider . Contact your mobile
communications provider to learn how it is set up.
Go to Menu, select Messages and then Voice mail server, to retrieve the
messages. Also here you can select between SIM1 and SIM2.
To confi gure the settings of the Voice mail server choose Edit.
8.3 Call Center
The Call Center manages all incoming, dialed and missed calls. All functions and records are separated between the two SIM car ds.
The Call History shows for both SIM cards missed calls, dialed calls and
received calls. You can delete the records and also manage the cost of
your calls.
8.3.1 General Call Settings
With this menu you can manage call settings for incoming and outgoing
calls. Again also these functions are separated between the SIM cards:
20
Page 51

Caller ID: Send / hide your ID +
Call waiting: This function is required to make conference calls +
Diverting calls under various conditions +
Barring calls +
Note: The above functions need to be supported by your mobile communications provider. If they ar e set in a wr ong way, it may be possible that
you cannot carry out anymore calls.
8.3.1.1 Auto Redial
The phone can redial automatically for ten times at most if the fi rst dialing fails.
8.3.1.2 Speed Dial
If the speed dial is “ON”, then you can click the corresponding key (2-9
keys) to dial the number designated to the key through the standby interface.
8.4 Settings
8.4.1 Dual SIM Settings
You can select whether both SIM cards are active (= Dual Standby) or
only one should be used or both should be swichted off (Flight Mode)
In Flight Mode most of the other features of the phone like camera, media player and organizer still can be used.
If a SIM card is switched off it will appear to a caller for this number/SIM
as if the phone has been switch off. Call divert options or voice mail can
21
Page 52

be set as described in 8.3.1.
8.4.2 Phone setup
Set current date, time, format for date and time as well as menu language. Following a short description of the menu options that are not
self explanatory.
8.4.2.1 Schedule power on/off
Set the times when the phone will be switched on and off automatically.
This setting is for the complete phone and both SIM cards. You can still
switch on and off the phone manually in addition to the settings.
8.4.2.2 Preferred input method
For some languages the phone offers text input help that completes
words based on the fi rst characters automatically. Please check if that
feature is helpful for you.
8.4.2.3 Display Characteristic
Set up wallpaper, screen saver, power on/off display, main menu style,
show date and time, show owner number.
8.4.2.4 Shortcuts
You can choose here which functions of the phone can be selected by
shortcuts instead of going thru the menu. The functions you select here
can be programmed to the dedicated keys in the next menu item.
22
Page 53

8.4.2.5 Dedicated key
Assign the shortcuts defi ned above to the Direction Keys Up, Down, Left
or Right.
8.4.3 Security Setup
Several security settings for the SIM cards and the phone.
When supplied the phone is unlocked but your SIM cards typically will
require a PIN code. To lock the phone you can select Phone lock. The
standard PIN to release this function is 1122.
8.4.3.1 Restore factory settings
All settings you have made are reset; the telephone can be returned to
the status it was in when it was delivered. All data like pictures, contacts,
music fi les, etc may be lost. The password / PIN for this function is 1 122.
8.5 Multimedia
Here you can manage the camera, image viewer, video functions, audio
player, sound recor der and the FM radio.
All data can be stored either on the phone or onto an external microSD
memory card (optional, not provided). As the phone memory is limited
and media fi les can be large we recommend to use microSD card.
The following formats are supported by the phone:
Camera: JPG (VGA Resolution)
Image Viewer: JPG
Video: AVI, 3GP, MP4
Audio Player: MP3, AMR, MIDI
23
Page 54

Please note that fi les must be stored in the folder My Music to be played
by the Audio Player. With the supplied USB cable you can connect the
phone to your PC and exchange data fi les as with common USB memory
(Win 2000 and higher).
Please don‘t use windows format command to carry on the format operation to the mobile disk of cell phone; otherwise, it will result in the
damage that can‘t be repaired any more.
8.6 Fun and Games
This mobile phone integrates up to three games. Please refer to “Instructions” in game menu for specifi c operation.
8.7 User Profi les
Various settings e.g. for ring tones and volume can be managed using a
profi le. They can be easily changed when you go into different surroundings: The „Outdoor“ profi le functions with an especially loud ring tone
to make sure that calls are heard when there are loud ambient noises,
whereas the „Conference“ profi le is selected when there should be no
interference.
The profi les are preset, but can be adjusted to fi t your needs.
Select for that User Profi les choose the one you want to change and
select then Customize.
8.8 Organizer
Functions like Calendar, To-Do Lists, Calculator, Currency converter, EBook reader and more can be accessed thru this menu.
Also alarm can be set in this menu. The phone will manage up to fi ve
24
Page 55

different alarms that also work when the phone is switched off. Please
make sure that the battery has suffi cient capacity to provide the alarm
function.
8.9 Services
The fi rst entry are services offered by the mobile phone provider of your
SIM card.
Furthermore you can enter here all settings for WAP services and data
accounts. Such settings are different with the several mobile phone providers, so you have to contact them for support on this subject.
The Bluetooth interface is also managed by this menu. Bluetooth is supported for both SIM cards, but some Bluetooth devices (Headsets, Car
Kits) have problems with the fast switch between the two SIM cards.
Therefore we recommend putting the most used SIM card into SIM1
slot.
In addition to the profi le (headset or handsfree) needed for headsets,
car-kits or fi xed installed solutions this mobile phone also supports the
A2DP profi le for high quality audio transmission. To transfer multimedia
fi les like pictures, videos, musik or exchange vCard information a microSD
memory card must be present. Otherwise the phone has not enough memory to run the communication.
To connect a Bluetooth device you must fi rst power on the Bluetooth
device, then select My device and Inquiry new device. The devices that
you try to connect must be switched into pairing mode – please follow
the instructions in the manual for these devices. A list of found devices
will appear, select the one you want to connect and confi rm it with Bond.
The Bluetooth device may require a PIN code to authorize the connection, with most devices it is set to “0000” (see also manual).
25
Page 56

9. Supplied accessories
Stereo headset: + With the stereo headphones you can listen to the
radio and media player as well as converse on the telephone because it
has an integrated microphone. This allows you to talk without having
to hold the telephone in your hand.
Travel charger: + The travel charger serves to char ge the battery of your
telephone and can be operated with various input voltages ranging
from 100 to 240 Volt. When the battery is fully char ged an appropriate
message will appear on the display.
USB cable: + To connect the phone with the travel adapter or your PC.
Please use only the supplied accessories or only accessories and in particular batteries those are explicitly intended for use with this telephone
and approved.
10. Care and user information
This telephone was developed and manufactured with utmost care. Please observe the following user instructions so that you can use it for a
long time and do not invalidate the warranty conditions:
Keep the telephone away from moisture and liquids. The phone has +
various openings (e.g. for the loudspeaker) through which liquids can
enter into the inside and thereby destroy the electronics.
Do not use or store the telephone in dirty environments: Particles may +
enter into the inside and block mechanical components such as the
keys.
Do not use or store the telephone at high temperatures, because this +
may damage the battery or cause the plastic parts to deform.
26
Page 57

Keep the telephone also away from low temperatures: When the tele- +
phone returns to normal temperatures condensation may form inside
that can cause damages.
Do not open the telephone except for inserting the battery, a memory +
and the SIM cards.
Avoid mechanical loads such as shaking or dropping: This may damage +
the mechanical components or the display.
Do not use any aggressive cleaners, because they may harm the +
telephone‘s surfaces.
Do not paint the telephone or stick things on it. This may block the +
mechanics and the keys for example can no longer be pressed.
Do not modify the electronics of the mechanics of the phone. This +
forfeits all licences.
In case you send in the telephone for repair, you should if possible +
make a backup of all data (telephone book, notes, etc.).
The notes above also apply to the supplied accessories. In case the phone does not function properly, bring it for repair only to an authorised
service shop.
11. Additional safety information / SAR value
Keep the telephone and the supplied accessories out of the hands of
children, because small parts can get loose that can be swallowed by
the children.
Ambient conditions
Please be sure to observe all valid regulations for the use of mobile tele-
27
Page 58

phones and switch it off when use is not permitted. Use the telephone
only in the usual manner. The phone meets all the radiation criteria when
it is held to the ear in the usual manner or at a distance of at least 2.5 cm
from the ear. If you ar e using a bag or a belt holster , it should not contain
any metal and keep the safety distance mentioned above. In some cases
transmission of data (e.g. text messages) is delayed until connection to
the mobile communications network has suffi cient quality. Make sure
that even in the event of a delayed transmission the safety distance
prescribed above is kept. The telephone contains magnetic components:
This can attract metallic objects and the telephone should not be held in
the vicinity of hearing aids. Furthermore, credit cards or other magnetic
storage media should be kept away from the telephone, because otherwise the data can be damaged.
Medical equipment
Any form of radio transmission, and this includes mobile telephones, can
infl uence the function of medical equipment, in particular when these
are not screened well enough. Switch the telephone off therefore in the
vicinity of medical equipment – especially when requested to do so by
appropriate signs.
Pacemakers
The manufacturers of pacemakers recommend a minimum distance of 16
cm / 7 inches between a mobile telephone and the pacemaker to avoid
malfunctions by interferences. This recommendation is also supported by
independent scientifi c research.
People that carry a pacemaker should therefore observe the following
instructions:
Always keep a minimum distance of 16 cm/ 7 inches between the te- +
28
Page 59

lephone and the pacemaker.
Do not transport the telephone in a breast pocket or near the pace- +
maker.
During the telephone call, hold the telephone against the ear that is +
further away from the pacemaker.
If there is any indication of interference, switch off the telephone im- +
mediately.
Hearing devices and hearing aids
Some digital hearing devices can basically be disturbed by mobile telephones. In this case please contact the hearing device acoustician.
Use in automobiles and airplanes
The radio signals of mobile telephones can basically interfere with the
electronic systems of automobiles and airplanes. Use the phone therefore
only in automobiles when this is explicitly permitted and observe the
respectively valid regulations.
Do not deposit the telephone or other parts in the vicinity of airbags.
Airbags are infl ated very quickly and the telephone can cause serious
injuries when being hurled about.
The use of telephones in airplanes is generally not permitted at the date
of this print. Switch off your telephone when you board an airplane. These regulations may be changed in the future. Information on the current
status can be gathered from your airline or your mobile communications
provider.
Explosive environments
Switch off the telephone if you are in an environment where there is a
29
Page 60

risk of explosion. Observe all the pertinent regulations, because voltage
peaks can trigger explosions in these environments that can cause serious, even fatal, injuries. Switch off the telephone therefore also in the
vicinity of fuelling stations.
Explosive environments are usually clearly marked, for example with the
directive that automobile motors should be switched off. In such cases
the telephone must be switched off as well. Dangerous environments
are for example fuel and gas storage, production and storage sites for
chemicals, below deck on ships and areas where the air is loaded with for
instance metallic or coal dust and the like.
SAR value
The SAR value of this mobile phone in GSM mode has a maximum of
00,429 W/kg. In GPRS mode, which is not used for phone calls, but e.g.
for sending MMS, the maximum SAR value is 1,805 W/kg.
30
Page 61

Mode d‘emploi
fono DS 300
Page 62

Sommaire
1. Consignes de sécurité. . . . . . . . . . . . . . . 6
2. Informations générales . . . . . . . . . . . . . . 6
3. Installation des cartes SIM, de la carte mémoire et de la batterie . 7
4. Clavier et connecteurs . . . . . . . . . . . . . . 10
5. Affi chage d‘état . . . . . . . . . . . . . . . 13
6. Allumer et éteindre, verrouillage de clavier, appel d‘urgence . 14
7. Fonctions téléphoniques. . . . . . . . . . . . . 16
8. Fonctions de menu . . . . . . . . . . . . . . 19
10. Entretien et conseils d‘utilisation . . . . . . . . . . 27
11. Consignes de sécurité supplémentaires / valeur SAR . . . . 29
Page 63

fono DS 300
Fréquences GSM : fonctionnement bibande en GSM 900/1800
Cartes SIM : deux cartes SIM, mode de veille double : les deux
Autonomie en
communication:
Autonomie en veille : jusqu'à 300 heures
Affi chage : affi chage couleur TFT, 34 x 42 mm, 220 x 176
Caméra : résolution VGA (0,3 M, GIF/JPEG/BMP)
Sonneries/alarme
vibrante :
Bluetooth : Bluetooth® 2.0, utilisable pour les deux cartes SIM
Fonctions
téléphoniques :
Fonctions SMS : 160 caractères max. par SMS, aide à la saisie de
WAP : mode pousser WAP, téléchargement WAP
Multimédia : Radio FM, lecteur MP3, lecteur vidéo
Extras: 2 Spiele, E-Book Reader, Diktierfunktion
4
cartes SIM sont actives simultanément, mais il n‘est
possible de téléphoner qu‘avec une seule carte
jusqu‘à 4 heures
pixels, 65000 couleurs
20 sonneries différentes (MIDI/WAV/MP3/AMR),
alarme vibrante
rappel des 20 derniers numéros, dispositif mains
libres intégré, mode silencieux, verrouillage de
clavier, numérotation abrégée, conférence
texte, 100 Ko max. par MMS
(JPEG/GIF89a/WBMP/GIF87)
(sonneries, images)
Page 64

Fonction agenda : répertoire téléphonique de 300 entrées, calendrier,
horloge avec fonction d‘alarme (même avec
appareil éteint), calculatrice, chronomètre, fuseaux
horaires, liste de tâches, fonction mémo
Extras : 2 jeux, lecteur de livres électroniques, fonction
dictaphone
Dimensions : env. 106 x 46 x 14 mm
Poids : env. 80 g (batterie comprise)
Interfaces : Interface mini-USB pour ordinateur, chargeur et kit
mains-libres (peut également être utilisée comme
clé USB) connecteur pour carte microSD
Contenu : Téléphone mobile fono DS 300, batterie Li-ion 900
mAh , casque d‘écoute stéréo avec microphone,
bloc d‘alimentation/chargeur 100-240 V, mode
d‘emploi
5
Page 65

1. Consignes de sécurité
Le téléphone mobile ne doit être utilisé que dans des endroits où son utilisation n‘est pas interdite et où elle ne présente aucun risque : n‘utilisez pas
le téléphone dans les avions, dans les hôpitaux, dans les stations services,
dans les zones de dynamitage, ni si vous être au volant d‘une voiture. Respectez toutes les recommandations et toutes les interdictions en vigueur,
et tenez compte du fait que celles-ci peuvent subir des modifi cations dans
le temps.
N‘utilisez que des accessoires homologués et tout particulièrement des
batteries homologuées. Des accessoires incompatibles et des batteries
défectueuses peuvent entraîner des dommages pouvant aller jusqu‘à
l‘explosion.
2. Informations générales
Ce téléphone mobile a été conçu pour fonctionner avec les réseaux EGSM
900 et 1800 - votre opérateur de téléphonie mobile pourra vous fournir de
plus amples renseignements au sujet des services que proposent ces réseaux. Sur demande de l‘opérateur de téléphonie mobile, certaines fonctions
de ce téléphone mobile ont pu être modifi ées ou désactivées. Pour plus de
renseignements, veuillez consulter votre opérateur de téléphonie mobile.
Ce téléphone mobile n‘est pas étanche – ne le mettez pas en contact avec
des liquides.
Le téléphone, le chargeur, les cartes SIM et les autres accessoires doivent
être gardés hors de portée des enfants. Des petites pièces peuvent se détacher et pourraient être avalées.
Pour débrancher un câble ne tirez pas sur le câble, tirez sur la prise.
6
Page 66

Ce téléphone ne doit être réparé et entretenu que par un magasin spécialisé agréé.
3. Installation des cartes SIM, de la carte mémoire et de la
batterie
Ce téléphone mobile peut être utilisé simultanément avec deux cartes SIM.
Ceci signifi e que vous pouvez être joignable sous deux numéros de téléphone différents ou que vous pouvez utiliser deux numéros différents pour
téléphoner ou envoyer des messages SMS. Cette fonction est très pratique
si vous désirez, par exemple, utiliser simultanément une carte SIM privée
et une carte SIM professionnelle. Elle vous permet également, en cas de
déplacement à l‘étranger, d‘utiliser votre carte normale et une carte SIM
prépayée achetée sur place à un tarif avantageux.
Ce téléphone mobile fonctionne en mode « Double SIM / Double veille ».
Ceci signifi e que les deux cartes SIM du téléphone sont actives simultanément mais que vous ne pouvez téléphoner que par l‘intermédiaire d‘une
carte SIM : lorsque vous téléphonez avec une carte SIM et que vous recevez
un appel sur l‘autre carte/numéro de téléphone, le correspondant reçoit
un message signalant que le numéro n‘est pas en service actuellement.
Si vous n‘êtes pas en train de téléphonez, vous pouvez prendre des appels
provenant des deux cartes. Pour les appels sortants ou les messages SMS/
MMS vous pouvez décider de la carte SIM/du numéro qui sera utilisé. Des
appels provenant de cartes SIM différentes ne peuvent pas être connectés
ensemble.
7
Page 67

Avant l‘utilisation du téléphone mobile vous devez installer au moins une
carte SIM. Pour ce faire, débranchez le téléphone mobile du chargeur et
éteignez-le. Retirez le couvercle arrière, enlevez la batterie et insérez la ou
les cartes SIM dans les logements prévus.
Cartes SIM
Ce téléphone possède également un logement pour une carte microSD permettant d‘étendre la mémoire interne du téléphone pour les fi chiers image,
vidéo, musique, etc. Veillez à n‘utiliser que des cartes mémoire de format
microSD, les autres types de carte risquent d‘endommager l‘appareil.
Carte MicroSD
8
Page 68

Afi n de protéger la batterie pendant le transport, celle-ci n‘a pas été installée dans le téléphone mobile. Si le fournisseur qui vous a vendu le téléphone n‘a pas déjà installé la batterie, veuillez suivre les étapes suivantes.
Contacts dorés en
haut à gauche
La batterie doit être complètement chargée avant la première mise en service du téléphone mobile. N‘utilisez que le chargeur fourni avec le téléphone ou l‘adaptateur homologué pour prise allume-cigares pour charger
la batterie.
N‘utilisez que la batterie fournie avec le téléphone ou une batterie de
remplacement agréée. Votre revendeur spécialisé ou le service d‘assistance
peuvent vous fournir les informations nécessaires.
L‘utilisation d‘autres adaptateurs de charge ou d‘autres batteries peut
éventuellement entraîner une annulation de l‘homologation ou de la garantie et peut avoir des conséquences dangereuses.
Branchez le téléphone mobile sur le chargeur comme illustré ci-dessous.
9
Page 69

Branchez le téléphone mobile sur le chargeur comme illustré ci-dessous.
Chargeur USB
Lorsque la batterie est complètement déchargée, il peut s‘écouler quelques
minutes avant que le témoin de chargement de la batterie ne s‘allume et
que le téléphone puisse être utilisé.
Le téléphone indique quand le chargement est terminé.
4. Clavier et connecteurs
Touches Volume (+/-)
Touche Caméra
SIM2 Touche Appel / Menu (TPG)
SIM1 Touche
Appel (TPG)
Touche OK
Touches Curseur/Navigation
Touche Effacer (TPD)
Touches Marche / Arrêt
Clavier numérique
10
Connecteurs chargeur/écouteurs
Page 70

4.1 SIM1 Touche Appel
Appuyez sur cette touche pour prendre un appel entrant ou pour appeler un numéro, composé préalablement, via la carte SIM1. En mode
de veille cette touche permet d‘affi cher la liste des numéros composés
auparavant.
4.2 SIM2 Touche Appel (touche programmable gauche, TPG)
Appuyez sur cette touche pour prendre un appel entrant ou pour appeler
un numéro, composé préalablement, via la carte SIM2. En mode de veille
cette touche permet d‘affi cher le menu principal.
4.3 Touche OK
Cette touche permet de confi rmer les entrées ou les sélections de menu.
4.4 Touches Curseur / Navigation
Cette bague vous permet de déplacer le curseur dans les menus. Des raccourcis pour des fonctions fréquemment utilisées peuvent être également attribués aux quatre directions (haut, bas, droite, gauche).
4.5 Touche Effacer (touche programmable droite, TPD)
Utilisée pour effacer les saisies erronées. En mode de veille cette touche
permet d‘affi cher le répertoire du téléphone.
4.6 Touche Marche / Arrêt
Appuyez sur cette touche pendant quelques secondes pour allumer ou
éteindre le téléphone.
11
Page 71

4.7 Clavier alphanumérique
Sert à entrer les chiffres ou les lettres.
En mode de veille les fonctions suivantes peuvent être appelées en appu-
yant sur la touche correspondante pendant plus de deux secondes :
Touche 1 : numérotation abrégée pour la boîte vocale »
Touches 2-9 : touches pr ogr ammables pour les numéros fréquem »
ment utilisés (pour l‘attribution des numéros d‘appel
voir le chapitre 8.3.1.2)
Touche # : activer ou désactiver le mode silencieux du téléphone »
Pour effectuer des appels internationaux vous devez entrer le symbole
“+” avant l‘indicatif du pays, ce symbole est obtenu en appuyant deux
fois sur la touche “*”. Certains réseaux téléphoniques étrangers ont des
postes d‘extension qui ne peuvent pas être appelés directement à l‘aide
d‘un indicatif, ils doivent alors être entrés à l‘aide du clavier . Pour les composer directement appuyez brièvement trois fois de suite la touche “*”.
Le symbole “p” apparaît alors et vous pouvez entrer le poste d‘extension
(Dial Extension).
4.8 Touches de volume
Les touches de volume permettent de régler le volume pour la conversation téléphonique ou pour l‘écoute des fi chiers musique.
4.9 Touche caméra
Appuyez sur la touche caméra pendant quelques secondes pour mettre le
téléphone en mode caméra. Vous pouvez ensuite prendre des photos en
appuyant brièvement sur cette même touche.
12
Page 72

5. Affi chage d‘état
Les symboles suivants indiquent l‘état actuel du téléphone et la réception
de messages.
Intensité du signal
Alarme activée
SIM1 SMS reçu
SIM2 SMS reçu
Affi chage de la charge de la batterie
Sonnerie
Vibreur puis sonnerie
Vibreur et sonnerie
Vibreur uniquement
SIM1 : appels en absence
SIM2 : appels en absence
Clavier verrouillé
MMS
Entrée Services
GPRS
Transférer tous les appels sur la carte SIM1
Transférer tous les appels sur la carte SIM2
Bluetooth activé
13
Page 73

Ce téléphone est muni de deux touches programmables (Softkeys). Elles se
situent à gauche et à droite sous l‘écran d‘affi chage (SIM2 touche Appel et
touche Effacer). Selon l‘état de fonctionnement du téléphone et du menu
dans lequel vous vous trouvez, les différentes fonctions et options possibles
de ces touches sont indiquées juste au-dessus de ces touches. Ces touches
seront dénommées TPD (Touche Programmable Dr oite) et TPG (Touche Pr ogrammable Gauche) dans le reste de ce document.
6. Allumer et éteindre, verrouillage de clavier, appel d‘urgence
Avant de pouvoir de votre téléphone mobile il est nécessaire qu‘au moins
une carte SIM soit installée. Voir chapitre 3.
Appuyez sur la touche Marche/Arrêt jusqu‘à ce que le téléphone s‘allume.
Vous devrez ensuite saisir le mot de passe de votre téléphone et/ou son
code PIN. Confi rmez le code SIM en appuyant sur la touche OK (pas sur
la TPG !).
Vous pouvez modifi er le mot de passe à votre choix, il empêchera toute utilisation abusive de votre téléphone. À la livraison le mot de passe est 1122,
il n‘a pas besoin d‘être entré lors de la première mise en service.
Le code PIN livré avec les cartes SIM permet de protéger la carte SIM de
toute utilisation abusive par des personnes non autorisées. Le code PIN2
fourni avec certaines cartes SIM est nécessaire pour accéder à des services
spéciaux. Si vous avez entré trois fois de suite un code PIN erroné, il vous
sera demandé d‘entrer le code PUK ou le code PUK2. Si vous ne connaissez
pas ce code veuillez vous adresser à votre opérateur de téléphonie mobile.
Même si l‘enregistrement du téléphone dans le réseau de téléphonie mobile n‘est pas possible via la carte SIM, les appels d‘urgence sous le numéro
112 peuvent être effectués tant qu‘un réseau de téléphonie mobile est
disponible.
14
Page 74

Pour éteindre le téléphone mobile appuyez de nouveau sur la touche Marche/Arrêt jusqu‘à ce que le téléphone s‘éteigne.
6.1 Verrouillage clavier
Le verrouillage clavier permet de bloquer le clavier pour éviter des manipulations involontaires (lorsque le téléphone mobile est dans une poche
par exemple).
Le verrouillage clavier est activé en appuyant sur la touche * (en bas à
gauche) pendant trois secondes environ.
Le verrouillage clavier peut également être activé automatiquement
lorsque le téléphone n‘est utilisé pendant un certain laps de temps. Ce
laps de temps peut être défi ni dans le menu correspondant.
Pour désactiver le verrouillage clavier , appuyez rapidement et successivement sur les touches TPD et “#”.
15
Page 75

7. Fonctions téléphoniques
7.1 Effectuer un appel
Composez le numéro de téléphone sur le clavier avec l‘indicatif régio- +
nal ou, le cas échéant, l‘indicatif du pays.
Rappel du dernier numéro : appuyez sur la touche Appel SIM1 pour +
affi cher la liste des derniers appels effectués ; à l‘aide des touches du
curseur vous pouvez ensuite sélectionner le numéro souhaité.
Appuyez sur la touche TPD et sélectionnez un contact dans le réper- +
toire.
Pour effectuer des appels internationaux vous devez entrer le symbole +
“+” avant l‘indicatif du pays, ce symbole est obtenu en appuyant deux
fois sur la touche “*”.
Certains réseaux téléphoniques étrangers ont des postes d‘extension qui
ne peuvent pas être appelés directement à l‘aide d‘un indicatif, ils doivent
alors être entrés à l‘aide du clavier. Pour les composer directement appuyez brièvement trois fois de suite la touche “*” . Le symbole “p” appar aît
alors et vous pouvez entrer le poste d‘extension (Dial Extension).Une fois
le numéro souhaité sélectionné vous pouvez décider quelle carte SIM
utiliser pour l‘appel en appuyant sur l‘une des touches Appel SIM1 ou
Appel SIM2.
7.2 Prendre un appel
En fonction du profi l sélectionné, le téléphone mobile sonne et/ou vibre à
la réception d‘un appel. Vous avez alors les possibilités suivantes :
Pour prendre l‘appel, appuyez sur la touche Appel SIM1 ou SIM2. +
Pour refuser l‘appel, appuyez sur la touche Marche/Arrêt. +
16
Page 76

Si le numéro de votre correspondant est transmis, il s‘affi che sous la ligne
SIM1 ou SIM2 pour la carte SIM correspondante.
7.3 Numérotation abrégée
Les touches 1-9 peuvent être utilisées pour la numérotation abrégée. La
touche 1 est réservée pour votre boîte vocale, les touches 2-9 peuvent
être programmées au choix.
Le numéro doit avoir été sauvegardé auparavant via le menu correspondant, il pourra être ensuite composé automatiquement en appuyant
sur la touche de numérotation abrégée appropriée pendant 2 secondes
environ.
7.4 Signal DTMF
Certaines applications comme les installations avec postes d‘extension
demandent l‘utilisation de tonalités de touche (DTMF). Ces tonalités peuvent être transmises via le clavier pendant l‘appel.
7.5 Lecture rapide de message SMS
Lorsque vous recevez un message SMS un symbole correspondant
s‘affi che sur l‘écran. Pour lire le SMS il vous suffi t d‘appuyer sur la touche
Lecture (TPG) ou sur la touche OK.
7.6 Appels en absence
Si vous avez reçu un appel en absence un symbole s‘affi che sur l‘écran.
Pour affi cher le numéro appuyer sur la touche Lecture ou sur la touche
OK.
17
Page 77

7.7 Appels supplémentaires
Si cette fonctionnalité est comprise dans l‘offre de votre opérateur de
téléphonie mobile, vous avez la possibilité d‘appeler un deuxième numéro
alors qu‘une communication téléphonique est déjà en cours.
Dans ce cas, tapez simplement le deuxième numéro sur le clavier pendant
la communication téléphonique en cours. La première conversation téléphonique est mise en attente.
Le deuxième appel ne peut cependant être effectué qu‘en utilisant la
même carte SIM que le premier. La connexion/tr ansmission d‘appels entre
les deux cartes SIM n‘est pas possible.
7.8 Fonction conférence
Vous pouvez combiner deux ou plusieurs appels en une conférence téléphonique. Pour organiser une conférence téléphonique appuyez sur la
touche OK pendant que vous êtes en communication avec un correspondant et que les autres correspondants ont été mis en attente. Un menu
s‘affi che avec les options suivantes :
Mode silencieux: mode silencieux de l‘appel en cours
Conférence : toutes les communications téléphoniques sont réu-
nies en une conférence
Tout terminer : toutes les communications de la conférence sont ter
minées en même temps
18
Page 78

8. Fonctions de menu
8.1 Contacts / Répertoire
Le téléphone mobile dispose d‘un répertoire permettant d‘enregistrer , respectivement pour chaque contact, trois différents numéros de téléphone
(fi laire, portable, bureau par exemple), le numéro de la société, l‘adresse
électronique, le numéro de fax, la date d‘anniversaire, une image, une
sonnerie et le groupe de numéros.
Les contacts peuvent également être enregistrés sur les cartes SIM mais
dans ce cas seuls le nom et un numéro de téléphone pourront être sauvegardés. La taille de la mémoire est généralement plus petite sur une carte
SIM que sur le téléphone.
Les fonctions du répertoire s‘expliquent par les points de menu correspondants.
8.2 Messages
8.2.1 Messages SMS
Les messages SMS sont gérés séparément par les deux cartes SIM, ce qui
signifi e que vous pouvez recevoir et envoyer des messages séparément
par le biais des deux cartes SIM. Les points de menu pour la gestion des
messages SMS sont donc spécifi ques pour chaque carte.
Lorsque vous avez reçu un SMS le symbole suivant s‘affi che :
Pour créer un SMS sélectionnez le point de menu correspondant et rédi-
gez le message souhaité. Vous pourrez ensuite sélectionner la carte SIM
par laquelle vous désirez envoyer le SMS.
19
Page 79

Remarque : la longueur des messages SMS est généralement limitée
à 160 caractères. Si vous envoyez des mess ages plus long s le mess age
sera divisé en plusieurs messages que votre opérateur de téléphonie
mobile facturera séparément.
8.2.2 Messages MMS
Les messages MMS sont des messages multimédias et peuvent contenir
des fi chiers texte, image et audio. La grandeur maximale des messages
MMS pour ce téléphone mobile est de 90 Ko. Les images sont automatiquement redimensionnées à la taille de l‘écran.
Avant de pouvoir envoyer un message MMS il peut être nécessaire de
procéder à des réglages spécifi ques dont les détails vous seront communiqués par votre opérateur de téléphonie mobile.
Comme pour les messages SMS, les messages MMS peuvent être envoyés
via les cartes SIM1 ou SIM2.
8.2.3 Messages vocaux
Les messages vocaux viennent du répondeur téléphonique électronique
que votre opérateur de téléphonie mobile met à votre disposition. Pour
plus de renseignements à ce sujet veuillez consulter votre opérateur de
téléphonie mobile.
Passez dans Menu, sélectionnez Messages puis Messages vocaux pour
écouter les messages vocaux. Là encore vous pouvez choisir entre les cartes SIM1 et SIM2.
Pour effectuer les réglages de la messagerie vocale veuillez sélectionner
l‘option Éditer.
20
Page 80

8.3 Central téléphonique
Le central téléphonique gère tous les appels entrants, sortants et en absence. Ces fonctions sont également gérées séparément pour les deux
cartes SIM.
Lorsque vous affi chez l‘historique, les numéros d‘appel composés, reçus
et en absence sont affi chés séparément pour les deux cartes SIM. Vous
pouvez effacer ces listes et contrôler les durées et les coûts des appels.
8.3.1 Réglages généraux d‘appel
Ce point de menu vous permet d‘effectuer des réglages importants pour
le traitement des appels entrants et sortants (là aussi pour de manière
individuelle pour les deux cartes SIM) :
Identifi cation de l‘appelant (transmission de votre numéro d‘appel) +
Appel en attente : cette fonction est nécessaire pour mettre les appels +
en attente et organiser une conférence téléphonique
Renvoi d‘appel +
Blocage d‘appel +
Rappel du dernier numéro +
Remarque : les fonctions indiquées ci-dessus doivent être proposées
par votre opérateur de téléphonie mobile. Si elles ont été mal réglées
il se peut que vous ne puissiez plus effectuer d‘appel s.
8.3.1.1 Rappel automatique
Le téléphone rappel automatiquement le dernier numéro jusqu‘à dix fois
de suite si la communication n‘a pas pu être établie.
21
Page 81

8.3.1.2 Numérotation abrégée
Ce point de menu vous permet de défi nir les numéros d‘appel pour les
touches de numérotation abrégée 2-9.
8.4 Réglages
8.4.1 Réglages Dual SIM
Ce point de menu vous permet de régler si les deux cartes SIM doivent
être actives simultanément (= mode de veille double), si seule une carte
SIM doit être utilisée ou si les deux cartes SIM doivent être désactivées
(mode avion) :
Même si les deux cartes SIM ont été désactivées, les autres fonctions du
téléphone telles que la caméra, le lecteur multimédia ou les fonctions de
l‘agenda peuvent continuer d‘être utilisées. Ce réglage peut être très utile
dans les avions, c‘est pourquoi il est appelé « Mode Avion ».
Lorsqu‘une carte SIM est désactivée elle se comporte comme si le téléphone était éteint pour les appels arrivant sur cette carte. Vous pouvez
régler les fonctions possibles pour le transfert d‘appel (vers une boîte vocale par ex.) sous le point de menu 8.3.1.
8.4.2 Réglages du téléphone
Cette partie du menu vous permet, entre autres, de régler la date actuelle
ainsi que le format pour la date et l‘heure et la langue des menus. Seuls
les points de menu qui ne n‘expliquent pas d‘eux même sont expliqués
ci-dessous.
8.4.2.1 Marche / Arrêt
Vous pouvez déterminer l‘heure à laquelle le téléphone doit s‘allumer ou
22
Page 82

s‘éteindre automatiquement. Ce réglage vaut pour tout le téléphone et
donc pour les deux cartes SIM. Il est cependant possible d‘allumer ou
d‘éteindre manuellement le téléphone indépendamment des horaires
défi nis ici.
8.4.2.2 Méthode d‘entrée préférée
Pour certaines langues, le téléphone offre une assistance de saisie qui
complète les mots entrés sur la base des premières lettres tapées. Cette fonction fait la différence entre les lettres majuscules et minuscules.
Nous vous conseillons d‘essayer si ce mode d‘assistance vous convient
ou si le mode de saisie conventionnel consistant à entrer chaque lettre
en appuyant le nombre de fois requis sur les touches appropriées vous
semble plus adéquat.
8.4.2.3 Réglages d‘affi chage
Ce point de menu vous permet de procéder à divers réglages d‘affi chage
tels que le fond d‘écran, l‘écran de veille ou l‘affi chage de la date et heure.
8.4.2.4 Favoris
Ce point de menu permet de déterminer les fonctions du téléphone que
vous désirez appeler rapidement, via les touches de navigation, sans passer par le menu. Les commandes cochées ici sont ensuite sélectionnables
dans le menu suivant.
8.4.2.5 Commandes de raccourcis
Quatre commandes peuvent être sélectionnées de la liste des favoris et
attribuées aux touches de navigation “Haut, Bas, Droite et Gauche”. La
fonction attribuée est ensuite directement appelée lorsque vous appuyez
23
Page 83

sur la touche correspondante.
8.4.3 Réglages de sécurité
Les différents réglages de sécurité pour les cartes SIM et le téléphone
peuvent être effectués ici.
À la livraison le téléphone n‘est pas verrouillé, cependant il est probable
que vos cartes SIM demandent la saisie d‘un code PIN. Pour verrouiller le
téléphone vous pouvez sélectionner le point de menu Téléphone bloqué.
Le code PIN par défaut pour le déverrouillage est 1122.
8.4.3.1 Réglages par défaut
Les réglages que vous avez effectués sont réinitialisés ; cette fonction
permet de retrouver l‘état initial du téléphone. Toutes les données sauvegardées telles que contacts, images, fi chiers audio, etc., peuvent être perdues lors de cette manipulation. Le code PIN pour le rétablissement des
réglages par défaut est également le 1 122.
8.5 Multimédia
Ce point de menu gère la caméra, (photo et vidéo), le lecteur d‘images
(ImageViewer), le lecteur audio, le dictaphone et la radio FM.
La sauvegarde des données des fonctions multimédias peut se faire sur le
téléphone ou sur une carte mémoire externe microSD (non fournie avec
l‘appareil). Étant donné que les fi chiers multimédias peuvent occuper beaucoup de place et que la mémoire du téléphone est limitée nous vous
conseillons l‘utilisation d‘une carte mémoire microSD.
Ce téléphone supporte les formats suivants :
Caméra : Enregistrement JPG (résolution VGA)
24
Page 84

ImageViewer : JPG
Vidéo : AVI, 3GP, MP4
Lecteur audio : MP3, AMR, MIDI
Les fi chiers audio doivent se trouver dans le dossier « My Music » pour
pouvoir être lus par le lecteur audio. Grâce au câble USB fourni avec
l‘appareil vous pouvez connecter le téléphone mobile à un ordinateur et
copier les fi chiers entre le téléphone mobile et l‘ordinateur, comme avec
une clé USB du commerce courant.
Remarque : l‘ordinateur est capable de gérer l‘espace mémoire du téléphone mobile comme un disque dur. C‘est pourquoi vous ne devez jamais
utiliser les fonctions de formatage ou de réorganisation, au risque de supprimer toutes les données du téléphone et de ne plus pouvoir l‘utiliser.
8.6 Jeux
Les textes d‘aide pour les jeux sont affi chés dans les menus correspondants (en anglais seulement).
8.7 Profi l utilisateur
Les profi ls permettent de gérer en bloc divers réglages tels que le choix
des sonneries et le volume. Ils peuvent êtres ensuite facilement modifi és
quand on change de conditions ambiantes. Le profi l “En extérieur” fonctionne avec un son de sonnerie particulièrement élevé afi n d‘assurer que
les appels seront entendus même dans des ambiances bruyantes alors que
le profi l “Silencieux” sera sélectionné lorsqu‘on ne désire pas être dérangé
par le téléphone.
Les profi ls sont préréglés, mais peuvent être adaptés à vos besoins. Pour
ce faire, sélectionnez Personnaliser.
25
Page 85

8.8 Agenda
Les fonctions telles que calendrier, liste de tâches (To-Do List), calculette, convertisseur de monnaies, lecteur de livres électroniques, etc., sont
groupées dans ce point de menu.
La fonction d‘alarme peut également être réglée ici. Cinq alarmes différentes peuvent être défi nies. Elles fonctionneront même si le téléphone
est éteint. Il est cependant nécessaire de s‘assurer que la capacité de la
batterie est suffi sante.
8.9 Services
Vous trouverez dans ce menu les services et fonctions offertes par la carte
SIM de votre opérateur de réseau mobile.
Vous pouvez également effectuer ici les réglages pour WAP et les comptes de données. Ces réglages peuvent être différents en fonction des
opérateurs de réseau mobile. Veuillez contacter votre opér ateur de réseau
mobile pour procéder à ces réglages.
Ce point de menu permet fi nalement de gérer l‘interface Bluetooth.
Bluetooth est supporté pour les deux cartes SIM, cependant, certains
appareils (kits mains libres, kits auto) ayant des diffi cultés avec le changement rapide entre les deux cartes SIM, nous conseillons d‘insérer la
carte SIM la plus utilisée dans l‘emplacement nº 1.
En plus des profi ls nécessaires pour les kits mains libres et les kits auto, le
téléphone mobile supporte également le profi l A2DP pour la transmission
audio. Si des fi chiers multimédias (musique, image, vidéo) ou des cartes
de visite doivent être transmis via Bluetooth le téléphone doit être équipé
d‘une carte mémoire microSD sinon il ne possédera pas la mémoire suffi sante pour pouvoir transmettre les données.
Pour connecter un appareil Bluetooth vous devez tout d‘abord activer
26
Page 86

l‘interface Bluetooth et ensuite lancer la recherche de l‘appareil via le
menu Recherche un nouvel appareil. Les appareils doivent se trouver en
mode de couplage. Consultez à ce sujet le mode d‘emploi de l‘appareil
concerné. Un ou plusieurs appareils seront détectés, sélectionnez
l‘appareil désiré (Connecter) et, le cas échéant, entrez le code PIN approprié. Pour la plupart des appareils il s‘agit du “0000” (consulter le mode
d‘emploi de l‘appareil).
9. Accessoires fournis avec le téléphone
Casque d‘écoute stéréo: c + e casque d‘écoute stéréo vous permet aussi
bien d‘écouter la radio que de téléphoner car il est équipé d‘un microphone. Grâce à ce système, vous pouvez téléphoner sans avoir à tenir
le téléphone contre votre oreille.
Chargeur de voyage: + le chargeur de voyage sert à charger la batterie
de votre téléphone et peut fonctionner avec des tensions d‘entrées différentes, allant de 100 à 240 volts. Quand la batterie est complètement
chargée un message apparaît sur l‘écran.
Câble USB: + ce câble sert de connexion entre le chargeur de voyage
et le téléphone et permet également de connecter le téléphone à un
ordinateur.
Veuillez n‘utiliser que les accessoires fournis lors de l‘achat ou uniquement des accessoires prévus et homologués pour l‘utilisation avec ce téléphone, ceci est particulièrement valable pour les batteries.
10. Entretien et conseils d‘utilisation
Ce téléphone a été conçu et fabriqué avec le plus grand soin. Veuillez respecter les consignes d‘utilisation suivantes afi n de pouvoir l‘utiliser le plus
longtemps possible et de ne pas enfreindre les conditions de garantie:
27
Page 87

N‘exposez pas le téléphone à l‘humidité et tenez-le à l‘écart des liqui- +
des. Le téléphone possède différentes ouvertures (pour le haut-parleur
par ex.) par lesquelles les liquides peuvent s‘infi ltrer et endommager les
composants électroniques.
N‘utilisez pas ou ne laissez pas votre téléphone dans des endroits pous- +
siéreux : des particules peuvent pénétrer à l‘intérieur du téléphone et
bloquer des composants mécaniques comme les touches par exemple.
N‘utilisez pas ou et laissez pas votre téléphone dans des zones exposées +
à des températures élevées, la chaleur peut endommager la batterie et
déformer les composants en matière plastiques.
N‘exposez votre téléphone à de basses températures : quand le télé- +
phone est ramené à une température normale de l‘humidité peut se
former à l‘intérieur et endommager l‘appareil.
N‘ouvrez le téléphone que pour changer la batterie et insérer les cartes +
SIM.
Évitez les sollicitations mécaniques (chutes ou secousses) risquant +
d‘endommager les composants mécaniques ou l‘écran.
N‘utilisez pas de produit de nettoyage agressif qui pourraient endom- +
mager l‘extérieur du téléphone.
Ne pas peindre ni enduire de colle le téléphone, ces produits peuvent +
entraîner un blocage mécanique des touches qui ne fonctionneraient
plus convenablement.
Ne procédez à aucune modifi cation de l‘électronique ou de la +
mécanique du téléphone. Vous perdriez toutes les autorisations
d‘exploitation.
Avant d‘envoyer votre téléphone pour réparation, effectuez si possible
28
Page 88

une sauvegarde de toutes vos données personnelles (répertoire, notices,
etc.)
Les consignes ci-dessus doivent également être respectées pour les accessoires fournis avec le téléphone. Si le téléphone ne fonctionne pas correctement, confi ez-le exclusivement à un service de réparation agréé.
11. Consignes de sécurité supplémentaires / valeur SAR
Ne laissez pas le téléphone et les accessoires du téléphone à la portée
des enfants, des petites pièces peuvent se détacher et risqueraient d‘être
avalées par les enfants.
Conditions ambiantes
Veuillez respecter impérativement toutes les réglementations en vigueur
concernant l‘utilisation des téléphones mobiles et l‘éteindre si son utilisation n‘est pas autorisée. N‘utilisez le téléphone que pour les usages pour
lesquels il a été prévu. Le rayonnement du téléphone est conforme aux
directives en vigueur s‘il est tenu de manière normale contre l‘oreille ou si
une distance de 2,5 cm par rapport au corps est respectée. Si vous utilisez
un étui ou un clip ceinture il ne doit pas contenir de métal et respecter la
distance de sécurité indiquée ci-dessus. Dans certains cas, la transmission
des données (par ex. SMS) est faite en différée quand la liaison au réseau
de téléphonie mobile a une qualité suffi sante. Lors d‘une transmission
différée, vérifi ez également que la distance de sécurité indiquée ci-dessus
est respectée. Le téléphone contient des composants magnétiques pouvant attirer des objets métalliques. Le téléphone ne doit pas être conservé
près d‘appareils auditifs. Les cartes de crédit et autres supports magnétiques doivent également être tenus à l‘écart du téléphone car les donées
contenues peuvent éventuellement être endommagées.
29
Page 89

Appareils médicaux
Toutes les formes de transmissions radio, et donc également les téléphones mobiles, peuvent infl uencer le fonctionnement des appareils médicaux, particulièrement s‘ils ne sont pas suffi samment protégés. Éteignez
le téléphone dans le voisinage d‘appareils médicaux et partout là où des
consignes concernant l‘utilisation des téléphones le demande.
Stimulateur cardiaque, pacemaker
Les fabricants de stimulateurs cardiaques recommandent une distance
minimale de sécurité de 16 cm entre un téléphone mobile et un stimulateur cardiaque afi n d‘éviter des perturbations liées aux interférences.
Cette recommandation est également confi rmée par des recherches scientifi ques indépendantes.
Les personnes portant un stimulateur cardiaque doivent donc suivre les
recommandations suivantes :
Maintenez toujours une distance minimale de 16 cm entre le télépho- +
ne et le stimulateur cardiaque.
Ne transportez pas le téléphone dans la poche de poitrine ou à proxi- +
mité du stimulateur cardiaque.
Pour téléphoner , tenez le téléphone près de l‘oreille se tr ouvant le plus +
à l‘écart du stimulateur cardiaque.
Éteignez immédiatement le téléphone si vous ressentez des signes de +
perturbations.
Appareils auditifs et prothèses auditives
Certains appareils auditifs numériques peuvent être systématiquement
perturbés par les téléphones mobiles. Dans ce cas, nous vous prions de
30
Page 90

consulter votre prothésiste auditif.
Utilisation dans la voiture et l‘avion
Les signaux radios des téléphones mobiles peuvent en principe perturber
les systèmes électroniques des avions et des voitures. Le téléphone ne doit
donc être utilisé que dans les véhicules pour lesquels ceci est formellement permis et en respectant les consignes en vigueur.
Ne posez pas le téléphone ou d‘autres éléments à proximité de l‘airbag.
En cas d‘accident les airbags se gonfl ent très rapidement, le téléphone
alors peut être projeté violemment par un airbag et causer de graves
blessures.
L‘utilisation des téléphones dans les avions est, au moment de la mise
sous presse de ce document, généralement interdite. Nous vous recommandons donc d‘éteindre votre téléphone au moment d‘entrer dans
l‘avion. Ces consignes seront éventuellement modifi ées à l‘avenir. Vous
obtiendrez des informations actuelles à ce sujet en consultant votre
opérateur de téléphonie mobile ou votre compagnie aérienne.
Environnements explosifs
Éteignez le téléphone si vous vous trouvez dans un environnement à
risques d‘explosion. Respectez strictement toutes les consignes de sécurité car des pointes de tension peuvent déclencher des explosions dans
ce genre d‘environnement et causer des blessures graves voir e mortelles.
Éteignez également le téléphone à proximité des stations d‘essence.
Les environnements explosifs sont généralement signalisés de façon
claire, par ex. par des panneaux signalisant que les véhicules doivent arrêter leur moteur. Dans ce cas il est impératif d‘éteindre également le
téléphone. Les entrepôts de carburants et de gaz, les lieux de fabrication
et de stockage de produits chimiques, sous les ponts pour les bateaux et
31
Page 91

les zones dans lesquelles l‘air est chargé de petites particules, comme par
ex. de la poussière de métaux, de la poussière de charbon ou autres sont
autant d‘environnements dangereux.
Valeur SAR
La valeur SAR de ce téléphone mobile est de 0,429 W/kg max. lors d‘une
communication téléphonique en mode GSM. En mode GPRS, mode qui
n‘est pas utilisé pour les appels téléphoniques proprement dit mais, par
exemple, pour l‘envoi de MMS, la valeur SAR maximale est de 1,805 W/
kg.
32
Page 92

Istruzione d‘uso
fono DS 300
Page 93

Indice
1. Avvertenze sulla sicurezza . . . . . . . . . . . . . 6
2. Avvertenze generali . . . . . . . . . . . . . . . 6
3. Inserimento delle schede SIM, della scheda memoria e batteria . 7
4. Tasti e prese del telefono . . . . . . . . . . . . . 10
5. Indicazioni di stato . . . . . . . . . . . . . . 13
6. Accensione e spegnimento, blocco tasti, chiamata d‘emergenza 14
7. Funzioni del telefono. . . . . . . . . . . . . . 16
8. Funzioni del menu. . . . . . . . . . . . . . . 18
9. Accessori in dotazione . . . . . . . . . . . . . 26
10. Indicazioni per l‘uso e la manutenzione . . . . . . . . 27
11. Ulteriori avvertenze sulla sicurezza / valore SAR . . . . . 28
Page 94

fono DS 300
Frequenze GSM: Funzionamento dual band con GSM 900/1800
Schede SIM: Due schede SIM, dual standby: entrambe schede
Autonomia
(conversazione): Fino a 4 ore
Autonomia (standby): Fino a 300 ore
Display: Display TFT a colori, 34 x 42 mm, 220 x 176 pixel,
Fotocamera: Risoluzione VGA (0,3 M, GIF/JPEG/BMP)
Suonerie e
vibrazione:
Bluetooth: Bluetooth® 2.0, utilizzabile per entrambe le schede
Funzioni del telefono: Ricomposizione degli ultimi 20 numeri di telefono,
Funzioni SMS: 160 caratteri di lunghezza max. per ogni SMS,
WAP: WAP push, WAP download (suonerie, immagini)
Multimedia: Radio FM, lettore MP3, lettore video
4
SIM attive contemporaneamente, ma chiamate
possibili solo con una delle due
65000 colori
20 suonerie diverse (MIDI/WAV/MP3/AMR),
vibrazione
SIM
sistema vivavoce integrato, mute, blocco tasti, tasti
di selezione rapida, conferenza
funzione di scrittura facilitata, MMS di max. 100
kB di grandezza
(JPEG/GIF89a/WBMP/GIF87)
Page 95

Funzioni agenda: Rubrica con 300 voci, calendario, ora con funzione
sveglia (anche ad apparecchio spento), calcolatrice,
cronometro, fusi orari, elenco impegni, funzione
memo
Extra: 2 giochi, lettore e-book, funzione dittafono
Dimensioni: circa 106 x 46 x 14 mm
Peso circa 80 g (incl. batteria)
Interfacce: Un‘interfaccia mini USB per PC, alimentatore e
auricolare (può essere impiegato anche come
memoria USB), slot per scheda micro SD
Contenuto della
confezione:
Telefono cellulare fono DS 300, batteria agli ioni
di litio 900 mAh, auricolari stereo con microfono,
alimentatore 100-240V, istruzioni per l'uso
5
Page 96

1. Avvertenze sulla sicurezza
Utilizzare il telefono cellulare solo laddove non sia vietato o non rappresenti un pericolo: non utilizzare il telefono in aereo, in ospedali, in stazioni
di servizio, in aree potenzialmente esplosive o in automobile mentre si è
alla guida. Osservare tutte le norme e i divieti considerando che potrebbero
variare nel corso del tempo.
Utilizzare esclusivamente accessori approvati e soprattutto batterie approvate. Accessori incompatibili e batterie difettose possono provocare danni
e sono a rischio di esplosione.
2. Avvertenze generali
Questo telefono cellulare è stato sviluppato per funzionare in reti EGSM
900 e 1800. Ulteriori informazioni sui servizi di queste reti saranno fornite
dal proprio operatore di telefonia mobile. Su indicazioni dell‘operatore di
telefonia mobile, è possibile che alcune funzioni di questo telefono siano
state disattivate o modifi cate. Si prega di contattare il proprio operatore di
telefonia mobile per ulteriori dettagli in merito.
Questo telefono cellulare non è resistente all‘acqua. Evitare quindi che entri in contatto con sostanze liquide.
Tenere il telefono, l‘alimentatore e le schede SIM fuori dalla portata dei
bambini. Potrebbero staccar si parti piccole con il rischio di essere inghiottite.
Nello scollegare il cavo, agire sempre sulla spina e non solo sul cavo.
Questo telefono può essere dato in riparazione e manutenzione esclusiva-
mente a centri tecnici autorizzati.
6
Page 97

3. Inserimento delle schede SIM, della scheda memoria e batte-
ria
Questo telefono cellulare può funzionare contemporaneamente con due
schede SIM. Ciò signifi ca che si possono ricevere telefonate su due numeri
di telefono diversi e quindi anche selezionare o inviare SMS usando due
numeri di telefono diversi. Questa funzione si rivela particolarmente utile ad esempio quando si desidera impiegare una scheda SIM (dunque un
numero di telefono) per telefonate private ed una per telefonate di lavoro
contemporaneamente, oppure quando ci si trova all‘estero e si desidera
usare contemporaneamente, oltre alla propria scheda SIM / numero di telefono, anche una scheda SIM prepagata più economica del Paese in cui si
soggiorna, a tariffe più convenienti.
Il presente telefono cellulare dispone della cosiddetta funzione dual SIM /
dual standby. Ciò signifi ca che entrambe le schede SIM nel telefono sono
attive contemporaneamente, ma le telefonate possono essere effettuate
sempre solo con una scheda SIM: mentre si telefona con una scheda SIM
e si riceve una chiamata sull‘altra scheda SIM / numero di telefono, il chiamante riceve l‘avviso che la linea non è momentaneamente disponibile.
Se non si sta telefonando, è possibile accettare le chiamate, indipendentemente da quale dei due numeri di telefono viene chiamato. Per effettuare
telefonate o inviare messaggi SMS/MMS è possibile scegliere la scheda
SIM / il numero di telefono che si desidera usare per telefonare o inviare i
messaggi. Le chiamate su schede SIM diverse non possono essere collegate
tra loro.
7
Page 98

Prima di utilizzare il telefono cellulare è necessario inserire almeno una
scheda SIM. Per fare ciò, spegnere il telefono cellulare dopo averlo scollegato dall‘alimentatore. Rimuovere il coperchio sul retro del telefono,
estrarre la batteria ed inserire una o entrambe le schede SIM negli slot
previsti.
Schede SIM
Questo telefono cellulare dispone anche di uno slot per scheda micro SD
che permette di ampliare la memoria interna del telefono per ottenere
maggiore spazio per fotografi e, video, fi le musicali, ecc. Osservare che devono essere impiegate esclusivamente schede di memoria di formato micro
SD; le altre schede di memoria possono invece danneggiare l‘apparecchio.
Scheda micro SD
8
Page 99

Per proteggere la batteria durante il trasporto, questa non è stata ancora
installata nel telefono cellulare. Qualora il rivenditore presso cui è stato
acquistato il telefono non abbia già inserito la batteria, seguire le istruzioni
qui riportate.
I contatti dorati in
alto a sinistra
Prima della messa in funzione del telefono cellulare è necessario caricare completamente la batteria. Per fare ciò, utilizzare esclusivamente
l‘alimentatore in dotazione o l‘adattatore per ricarica da auto approvato.
Utilizzare esclusivamente la batteria fornita in dotazione o una compatibile approvata. Le relative avvertenze sono fornite dal proprio rivenditore
o dal servizio di assistenza.
L‘uso di adattatori per ricarica o batterie diverse annulla i termini di garanzia e può avere conseguenze pericolose.
9
Page 100

Collegare il telefono cellulare all‘alimentatore, come indicato qui sotto.
Caricatore USB
Quando la batteria è completamente carica, possono trascorrere alcuni
minuti prima che il telefono informi che la batteria è carica e può essere
utilizzata per effettuare chiamate.
Il telefono indica quando il processo di ricarica è terminato.
4. Tasti e prese del telefono
Tasti volume (+/-)
Tasto fotocamera
Tasto chiamata SIM2/menu (LSK)
Tasto chiamata SIM1
Tasto OK
Tasti cursore / navigazione
Tasto cancella (RSK)
Tasto on/off
Tastiera numerica
10
Presa alimentatore/cuffi e
 Loading...