


Edition : 1.0
Date: (11/24)
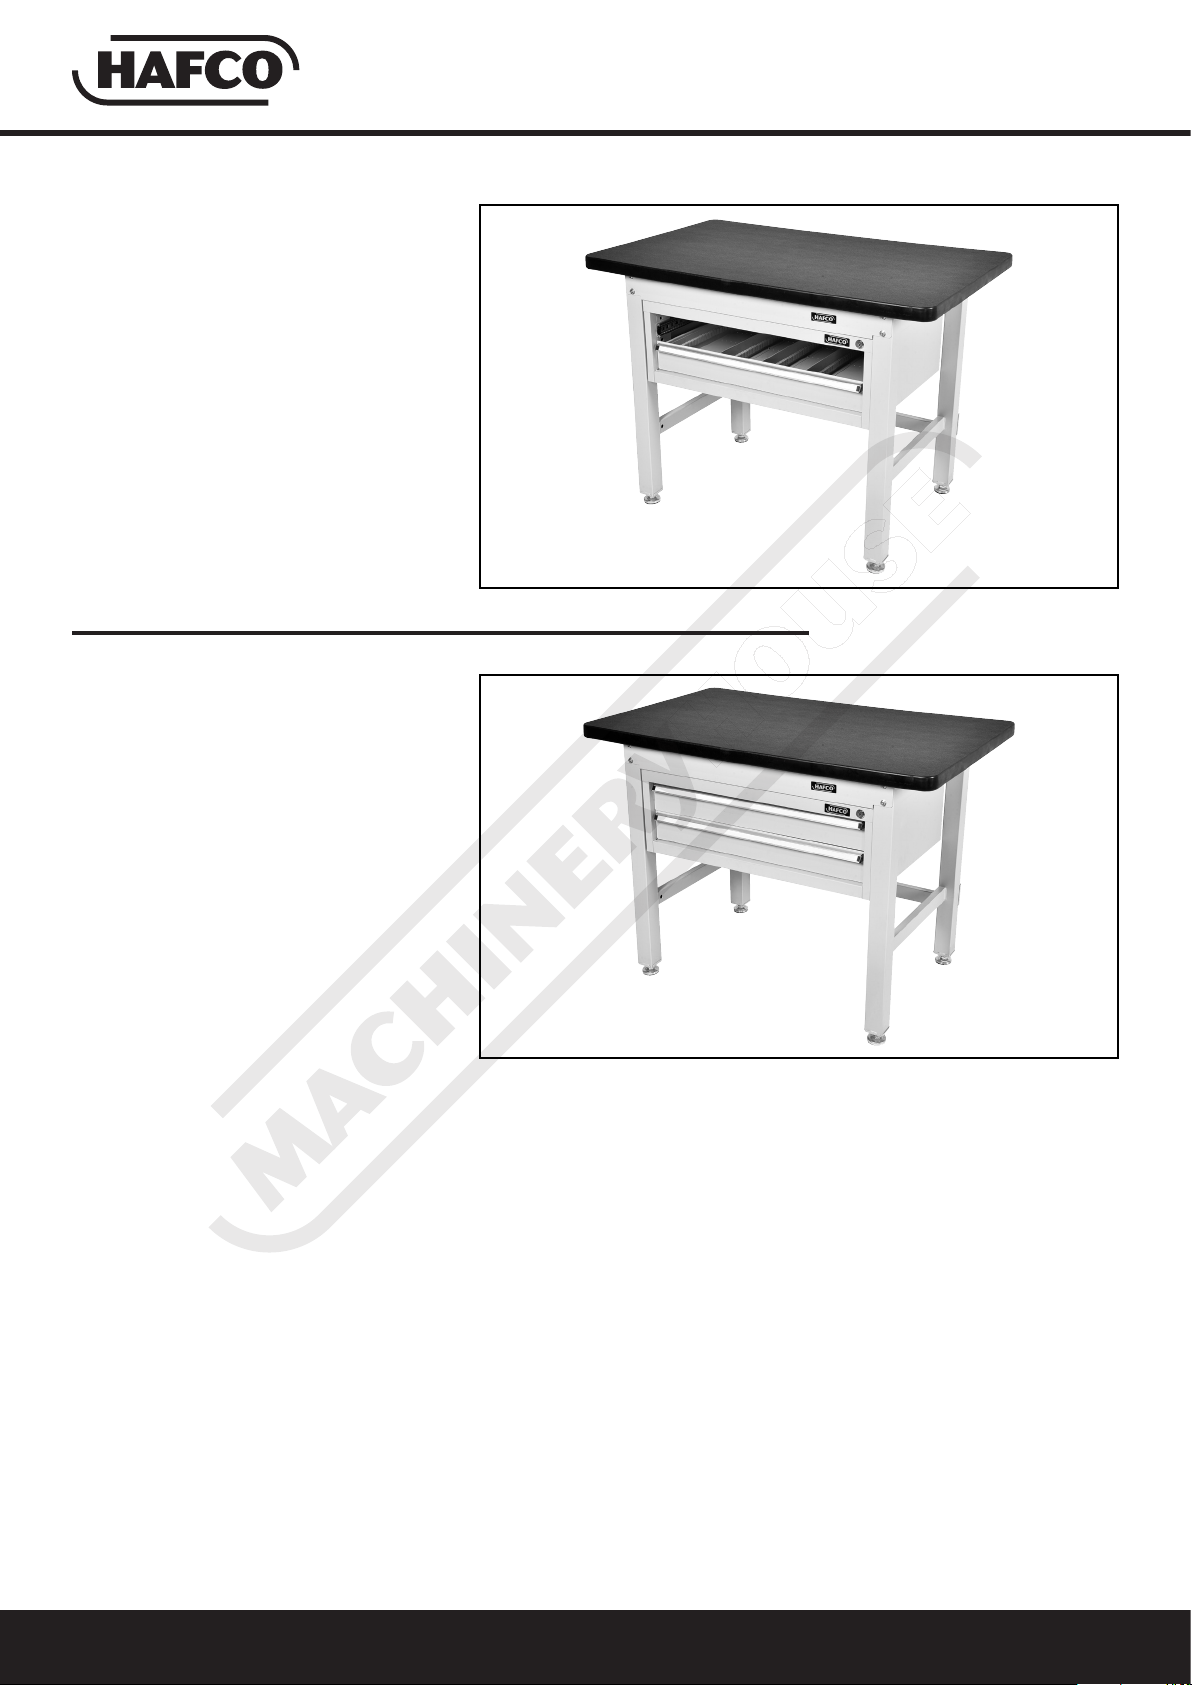
HC-3
HC-2
HC-2W
Instruction Manual
INDUSTRIAL
UNDER BENCH TOOLING CABINET
HC-2, HC-3, HC-2W
Order Code: (A422, A423, A4225)
www.machineryhouse.com.au / www.machineryhouse.co.nz
www.machineryhouse.com.au / www.machineryhouse.co.nz
1
BEFORE ASSEMBLING
OIL
DAILY
Please read this instruction manual before assembly.
Before assembly please pay attention to the following points in priority;
Conrmation of components: Before assembling, please conrm all parts arrived and are in good order.
Site for assembly:
Please assemble it on the soft oor such as smooth carpet and annel blanket. When you
assemble on wooden oor, please put thin towels on the oor.
Points for attention when assembling: Please wear gloves to ensure that it can be assembled safely, and use
two persons to help in the assembly process.
Matters needing attention for operation:
- Do not use for in proper use.
- Do not use it on inclined surface or uneven places.
- Do not use it when screw are loosened.
TOOLS REQUIRED FOR ASSEMBLY
- M6 & M8 spanners
- Phillips Head Screwdriver
2

PARTS LIST
HC-2
1
HC-3
1
Part No.
Description
Cabinet
1
Mounting Brackets
2
Fixing Tab
3
Screw - for boom
4
100mm Drawer
5
100mm Divider Set
6
Qty
1
2
2
6
2
2
5
2
6
3
4
5 7
100mm Drawers
Part No.
Description
Cabinet
1
Mounting Brackets
2
Fixing Tab
3
Screw - for boom
4
100mm Divider Set
5
100mm Drawer
6
150mm Divider Set
7
150mm Drawer
8
Qty
1
2
2
6
2
2
1
1
HC-2W
1
2
6 8
3
4
100mm & 150mm Drawers
Part No.
Description
Cabinet
1
Mounting Brackets
2
Fixing Tab
3
Screw - for boom
4
100mm Drawer
5
100mm Divider Set
6
Qty
1
3
3
9
2
2
5
2
6
3
4
100mm Drawers
3

MOUNTING UNDER BENCH - INSTRUCTIONS
CAUTION
10 - 16
kg
Use proper lifting techniques
CAUTION
16 - 40
kg
Use proper lifting techniques
40kg +
Use proper lifting techniques
WARNING
OVERSIZE
This product requires a mechanical lifting aid
WARNING
CAUTION
10 - 16
kg
Use proper lifting techniques
CAUTION
16 - 40
kg
Use proper lifting techniques
CAUTION
10 - 16
kg
Use proper lifting techniques
CAUTION
16 - 40
kg
Use proper lifting techniques
40kg +
Use proper lifting techniques
WARNING
WARNING
OVERSIZE
This product requires a mechanical lifting aid
Due to the weight of the table, it is highly recommended that you have a second person to
40kg +
Use proper lifting techniques
WARNING
Suggestion of what you will need
Note - this assembly guide is merely a recommendation and should not be followed blindly, if you do not have the
equipment or the experience necessary to complete this project you should consider seeking advice from a
professional.
• 1/2" spanner or 1/2" socket wrench
NOTE: You may consider to use other methods and tools to help complete you project, the above list is
just a suggestion. read through these instructions before starting the assembly process.
Getting Started
Before starting the assembly ensure you have the correct tools & equipment to successfully assemble the table
whilst making sure you are wearing the appropriate Safety PPE.
assist during the build of the table, being made from steel it is heavy and help should be
obtained to avoid any injuries.
Tooling cabinets suit Bench models:
IWB-12, MWB-1275, IWB-40, IWB-2275
IWB-12 MWB-1275
IWB-40 IWB-2275
HC-2
HC-2W
HC-3 HC-2W
IWB-12
4

Step 1
Remove the top drawer of tooling cabinet
as shown.
Step 2
Using a 1/2" spanner or 1/2" socket wrench
assemble the 3 x mounting brackets. Then
bolt on the 3 x clamps as shown below.
Note: Leave clamp bolts loose for now.
Step 3
Flip tooling cabinet upside down as
shown.
NOTE:
Example shows HC-2W
with 3 x Mounting Brackets
5

Step 4
If work bench is already assembled,
remove one leg frame and the rear leg
cross support as shown.
Step 5
Slide the tooling cabinet onto the work
bench while keeping the rear clamps above
the table frame as shown below.
SLIDE-IN
Step 6
Proceed to slide the tooling cabinet unit
onto the work bench as shown.
SLIDE-IN
6

Step 7
Slide the drawer unit to desired location
or in the case of this model as shown all
the way to the end until touches the legs.
Step 8
Re-assemble the work bench rear leg cross
support as shown.
SLIDE-IN
RE-ASSEMBLE
Step 9
Using a 1/2" spanner, tighten all rear clamps
as shown.
7
Step 10
Flip table to the upright postion as
shown.
MOUNTING INSTRUCTIONS
Step 11
Install the top drawer of the tooling cabinet
as shown.
The work bench with under bench tooling
cabinet is now ready for use.
8

NOTES:
9
OIL
DAILY
ENVIRONMENT PROTECTION
Recycle unwanted materials instead of disposing of them as waste. All tools, accessories and packaging should
be sorted, taken to a recycling centre and disposed of in a manner which is compatible with the environment.
When the product becomes completely unserviceable and requires disposal, drain any uids (if applicable) into
approved containers and dispose of the product and uids according to local regulations.
Imported by
Australian Distributor
Hare & Forbes
Machineryhouse
Sydney - Melbourne
Adelaide - Brisbane - Perth
Ph: 1300 202 200
www.machineryhouse.com.au
www.machineryhouse.com.au / www.machineryhouse.co.nz
New Zealand Distributor
Machineryhouse
Auckland
Christchurch
Ph: 0800 142 326
www.machineryhouse.co.nz
 Loading...