
DOC023.52.90171
TSS EX1 sc
User Manual
07/2013, Edition 5A
Turbidity and Solid matter sensor TSS EX1 sc
II 2G Ex d IIC T6 Gb Ta = –10 to 50 °C
II 2D Ex tb IIIC T 80 °C Db Ta = –10 to 50 °C
0820 IBExU09 ATEX 1156
© HACH-LANGE GmbH, 2009, 2011, 2012, 2013. All rights reserved. Printed in Germany


Table of contents
Section 1 Specifications ........................................................................................................................ 5
1.1 Dimensions ......................................................................................................................................... 6
Section 2 General information............................................................................................................... 7
2.1 Safety information............................................................................................................................... 7
2.1.1 Hazard warnings in this manual................................................................................................. 7
2.1.2 Warning labels ........................................................................................................................... 8
2.2 Areas of application ............................................................................................................................ 8
2.3 Measuring principle............................................................................................................................. 8
2.3.1 Turbidity according to DIN standards......................................................................................... 8
2.3.2 Measurement of solids according to plant-specific curves......................................................... 8
2.4 Handling.............................................................................................................................................. 9
2.5 Scope of delivery ................................................................................................................................ 9
2.6 Function check.................................................................................................................................... 9
Section 3 Installation............................................................................................................................ 11
3.1 Installation overview of basin sensor................................................................................................ 11
3.2 Installation sensor pipe installation option ........................................................................................ 12
3.3 Grounding ......................................................................................................................................... 12
3.4 Connect the sensor cable ................................................................................................................. 12
3.4.1 Cable extension with terminal box LZY586.............................................................................. 13
3.5 Installation of the sc controller .......................................................................................................... 13
Section 4 Operation.............................................................................................................................. 15
4.1 sc controller operation ...................................................................................................................... 15
4.2 Sensor setup..................................................................................................................................... 15
4.3 Sensor data logger ........................................................................................................................... 15
4.4 Menu structure.................................................................................................................................. 16
4.4.1 SENSOR STATUS................................................................................................................... 16
4.4.2 SENSOR setup........................................................................................................................ 16
4.5 CALIBRATE...................................................................................................................................... 18
4.5.1 Calibration of the TURBIDITY (TRB) parameter...................................................................... 19
4.5.1.1 Select TURBIDITY (TRB) parameter .............................................................................. 19
4.5.1.2 FACTOR ......................................................................................................................... 19
4.5.1.3 OFFSET.......................................................................................................................... 19
4.5.1.4 1 to 3 point calibration..................................................................................................... 19
4.5.2 Calibration of the SOLID (TS) parameter................................................................................. 20
4.5.2.1 Select the SOLID (TS) parameter................................................................................... 20
4.5.2.2 FACTOR ......................................................................................................................... 20
4.5.2.3 1 to 3 point calibration..................................................................................................... 21
4.5.3 General information about calibration...................................................................................... 21
4.5.3.1 Delete recorded points.................................................................................................... 21
4.5.3.2 Delete a calibration point ................................................................................................ 22
Section 5 Maintenance ......................................................................................................................... 23
5.1 Maintenance schedule...................................................................................................................... 23
3

Table of contents
5.2 Clean the measurement windows .....................................................................................................23
Section 6 Malfunctions, causes, resolution........................................................................................25
6.1 Error messages.................................................................................................................................25
6.2 Warning messages............................................................................................................................25
Section 7 Replacement parts and accessories ................................................................................27
7.1 Replacement parts ............................................................................................................................27
7.2 Accessories.......................................................................................................................................27
Section 8 Contact information ............................................................................................................29
Section 9 Warranty and liability...........................................................................................................31
Appendix A Modbus register ..............................................................................................................33
Index.......................................................................................................................................................35
4
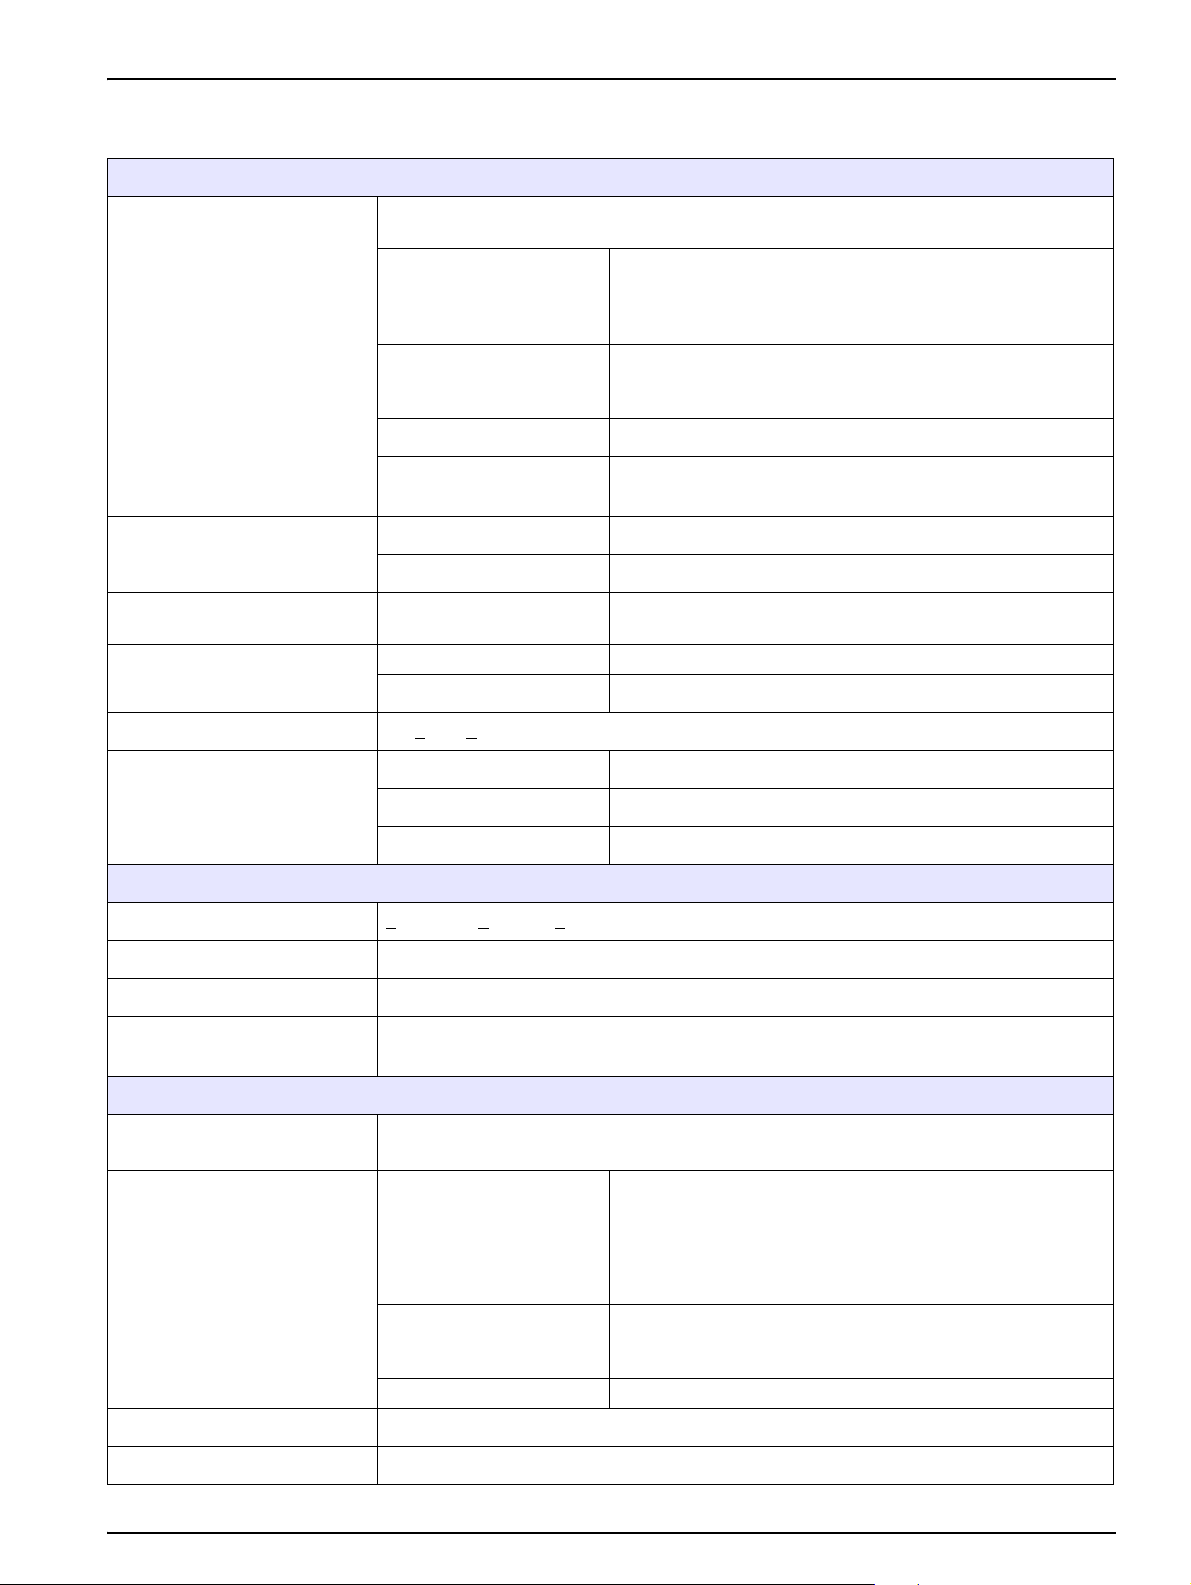
Section 1 Specifications
Specifications are subject to change without notice.
Measurement
Combined multiple-beam alternating light technique with IR diode system and beam
focusing
Turbidity (TRB)
Measurement method
Solid matter (TS)
Air-bubble compensation Software-based
2-channel 90° scattered light measurement in accordance
with DIN/EN 27027/ISO7027, wavelength = 860 nm
additional measurement value verification through
eight-channel multiple-angle measurement
Modified absorption measurement:
Eight-channel multiple-angle measurement,
wavelength = 860 nm
Measurement value
compensation
Measurement range
Measurement accuracy Turbidity (TRB)
Reproducibility
Response time 1 s <
Calibration
Environmental conditions
Pressure range <
Flow rate Maximum 3 m/s (air bubbles created affect measurement)
Ambient temperature –10 to 50 °C (14 to 122 °F)
Distance:
Sensor — Wall/Floor
Turbidity (TRB) 0.001 to 9999 FNU
Solid matter (TS) 0.001 to 500 g/L
Turbidity (TRB) < 3 %
Solid matter (TS) < 4 %
T90 < 300 s (adjustable)
Turbidity (TRB) Calibrated before shipping
Solid matter (TS) To be calibrated on site by the customer
Zero point Calibrated permanently before shipping
10 bar or < 100 m (< 145 PSI)
Solid matter (TS) > 10 cm, turbidity (TRB) > 50 cm
Software-based (process-adaptable)
Up to 1000 FNU/NTU: < 5 % of measurement
value ± 0.01 FNU/NTU
Instrument properties
Dimensions
Materials
Weight Basin sensor, installation sensor (TriClamp): approximately 2.7 kg
Cable length 10 m (32.81 ft)
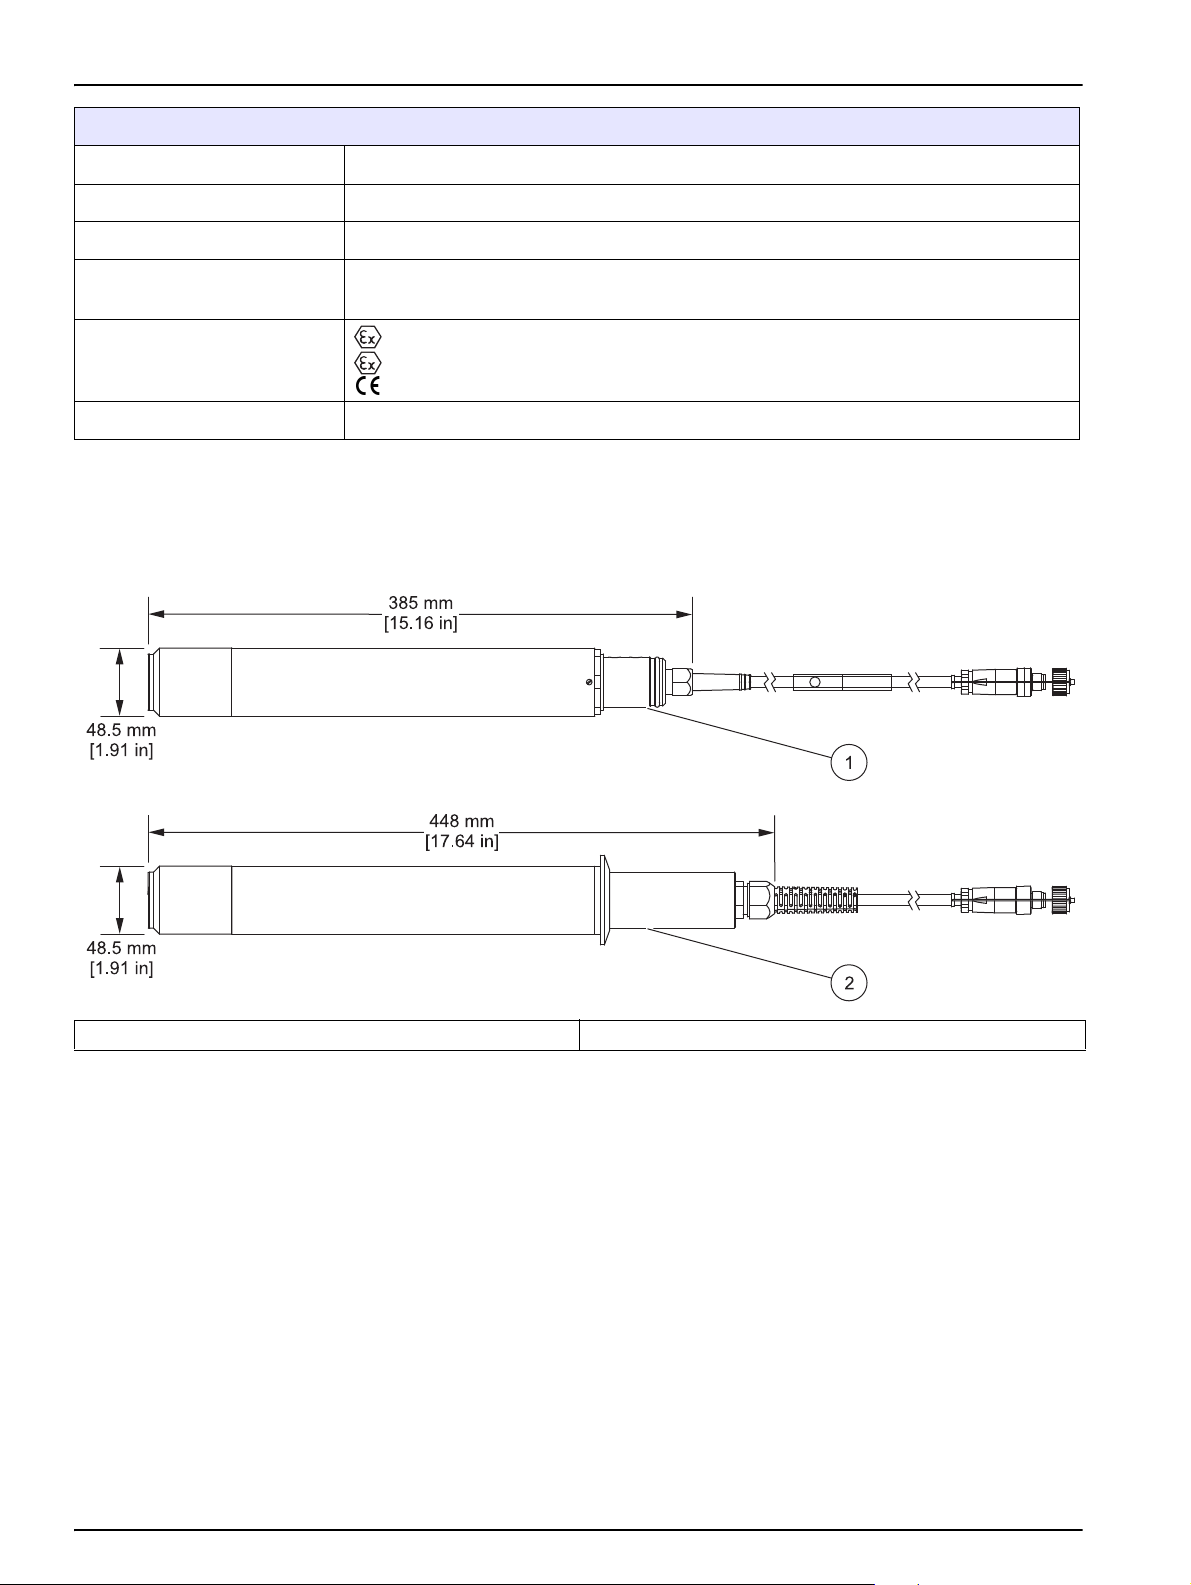
Basin sensor: Ø × L 48.5 mm × 385 mm (1.91 in × 15.16 in)
Installation sensor (TriClamp): Ø × L 48.5 mm × 448 mm (1.91 in × 17.64 in)
Head: stainless steel DIN 1.4460
Parts in contact with
medium
Sensor connection cable
(permanently connected),
Semoflex (PUR):
Cable hardware stainless steel 1.4305
Sleeve: stainless steel DIN 1.4404
Shank: stainless steel DIN 1.4571
Sapphire glass
Gaskets: FPM
1 AWG 22/12 V DC twisted cable pair,
1 AWG 22/data twisted cable pair,
shared cable screen
5
Specifications
Miscellaneous
Inspection interval upon request 1/year service contract with warranty extension to 5 years
Maintenance requirements 1 hour/month, typical
Declarations of conformity CE, GS from the Technical Inspection Association, UL/CSA, ATEX/FM
Classification of instrument
type and ATEX zone
Ignition protection type
Equipment group II, category 2, only for use up to ATEX zones 1 and 21
II 2G Ex d IIC T6 Gb Ta = –10 bis 50 °C
II 2D Ex tb IIIC T 80 °C Db Ta = –10 bis 50 °C
0820 IBExU09 ATEX 1156
Grounding Ground wire 4 mm
1.1 Dimensions
Figure 1 Dimensions
2
minimum
1 Basin sensor 2 Installation sensor (TriClamp)
6
Section 2 General information
2.1 Safety information
Please read this entire manual before unpacking, setting up, or operating this equipment.
Pay attention to all danger and caution statements. Failure to do so could result in serious
injury to the operator or damage to the equipment.
To ensure that the protection provided by the equipment is not impaired, do not use or
install this equipment in any manner other than that specified in this manual.
The probe is tested for the zone in which there is a risk of explosion. Equipment group II,
category 2, only for use up to ATEX zones 1 and 21.
The probe (especially the type plate) must not be cleaned with or come into contact with acetone
or p-Xylene, or any liquids containing these solvents.
The free end of the feed hose must be connected either outside of the zone at risk of explosion or
within equipment approved for the equipment category in question.
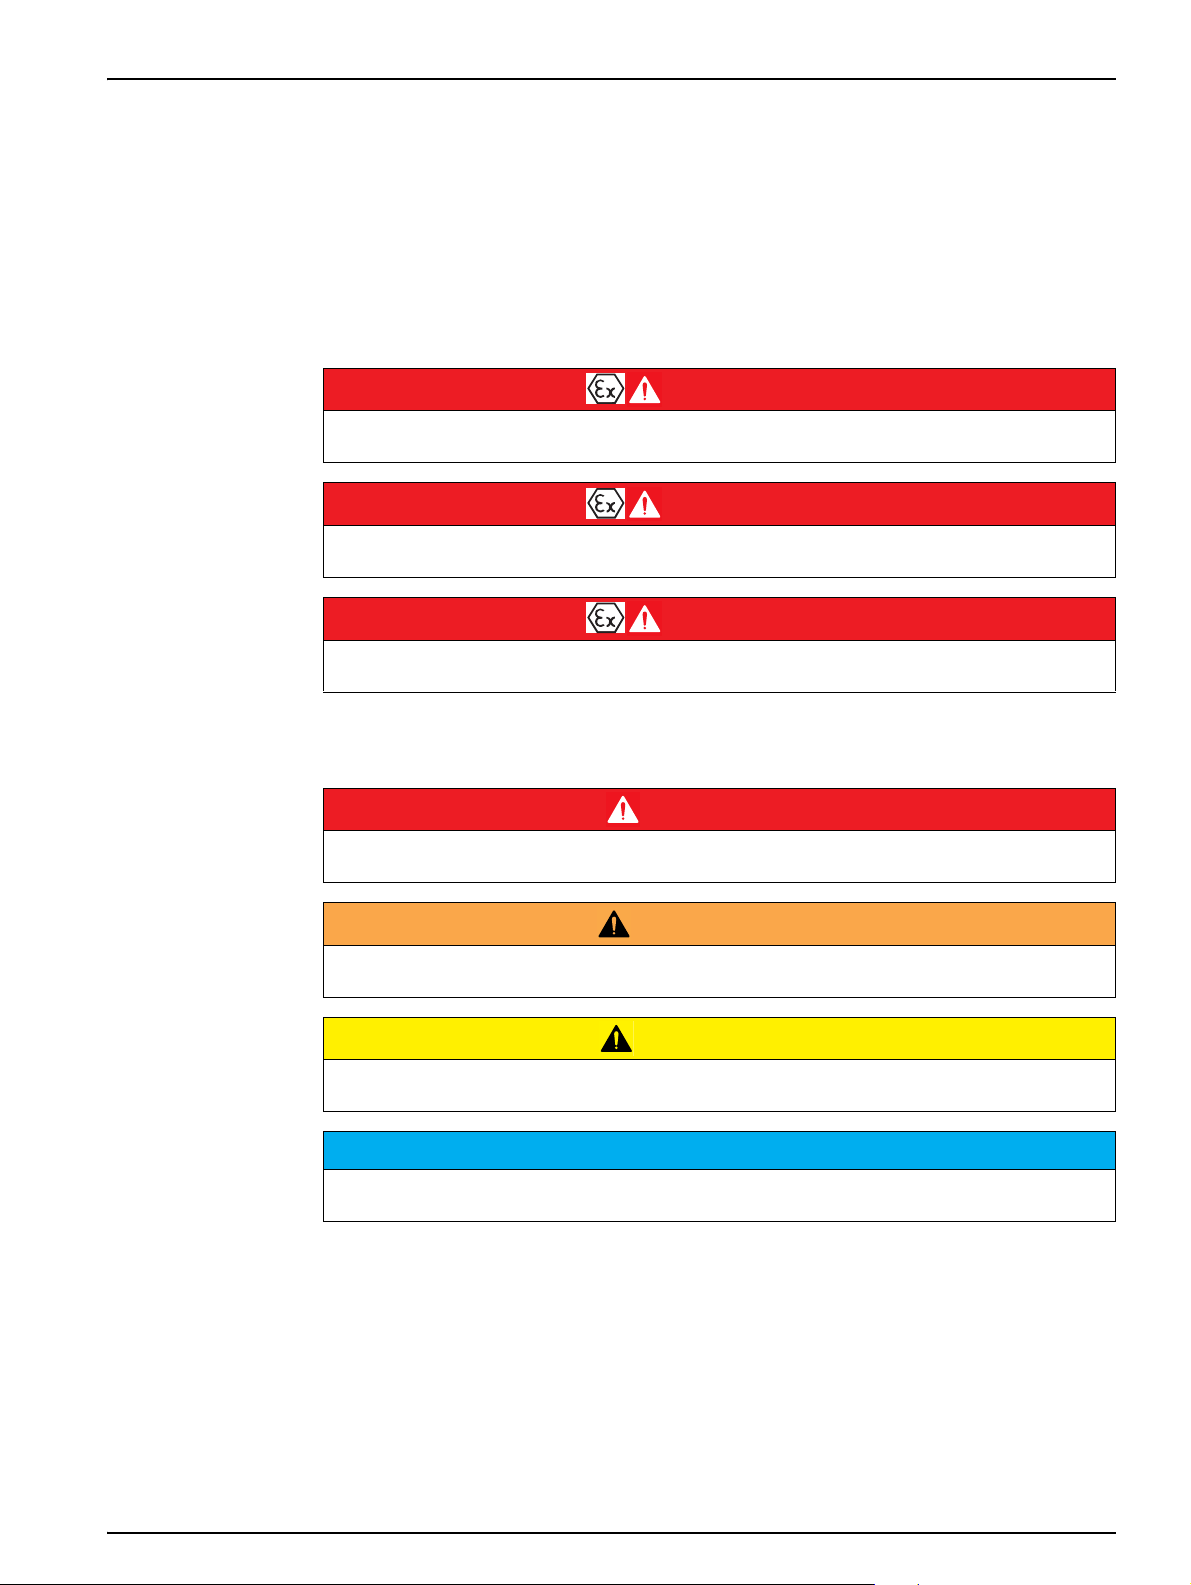
DANGER
DANGER
DANGER
2.1.1 Hazard warnings in this manual
Indicates a potentially or imminently hazardous situation that, if not avoided, can result in death or
serious injury.
Indicates a potentially or imminently dangerous situation that, if it is not avoided, can lead to
death or to serious injuries.
Indicates a potentially hazardous situation that may result in minor or moderate injury if it is not
avoided.
Indicates a situation that, if it is not avoided, can lead to damage to the device. Information that
requires special emphasis.
Note: Information that supplements points in the main text.
DANGER
WARNING
CAUTION
NOTICE
7
General information
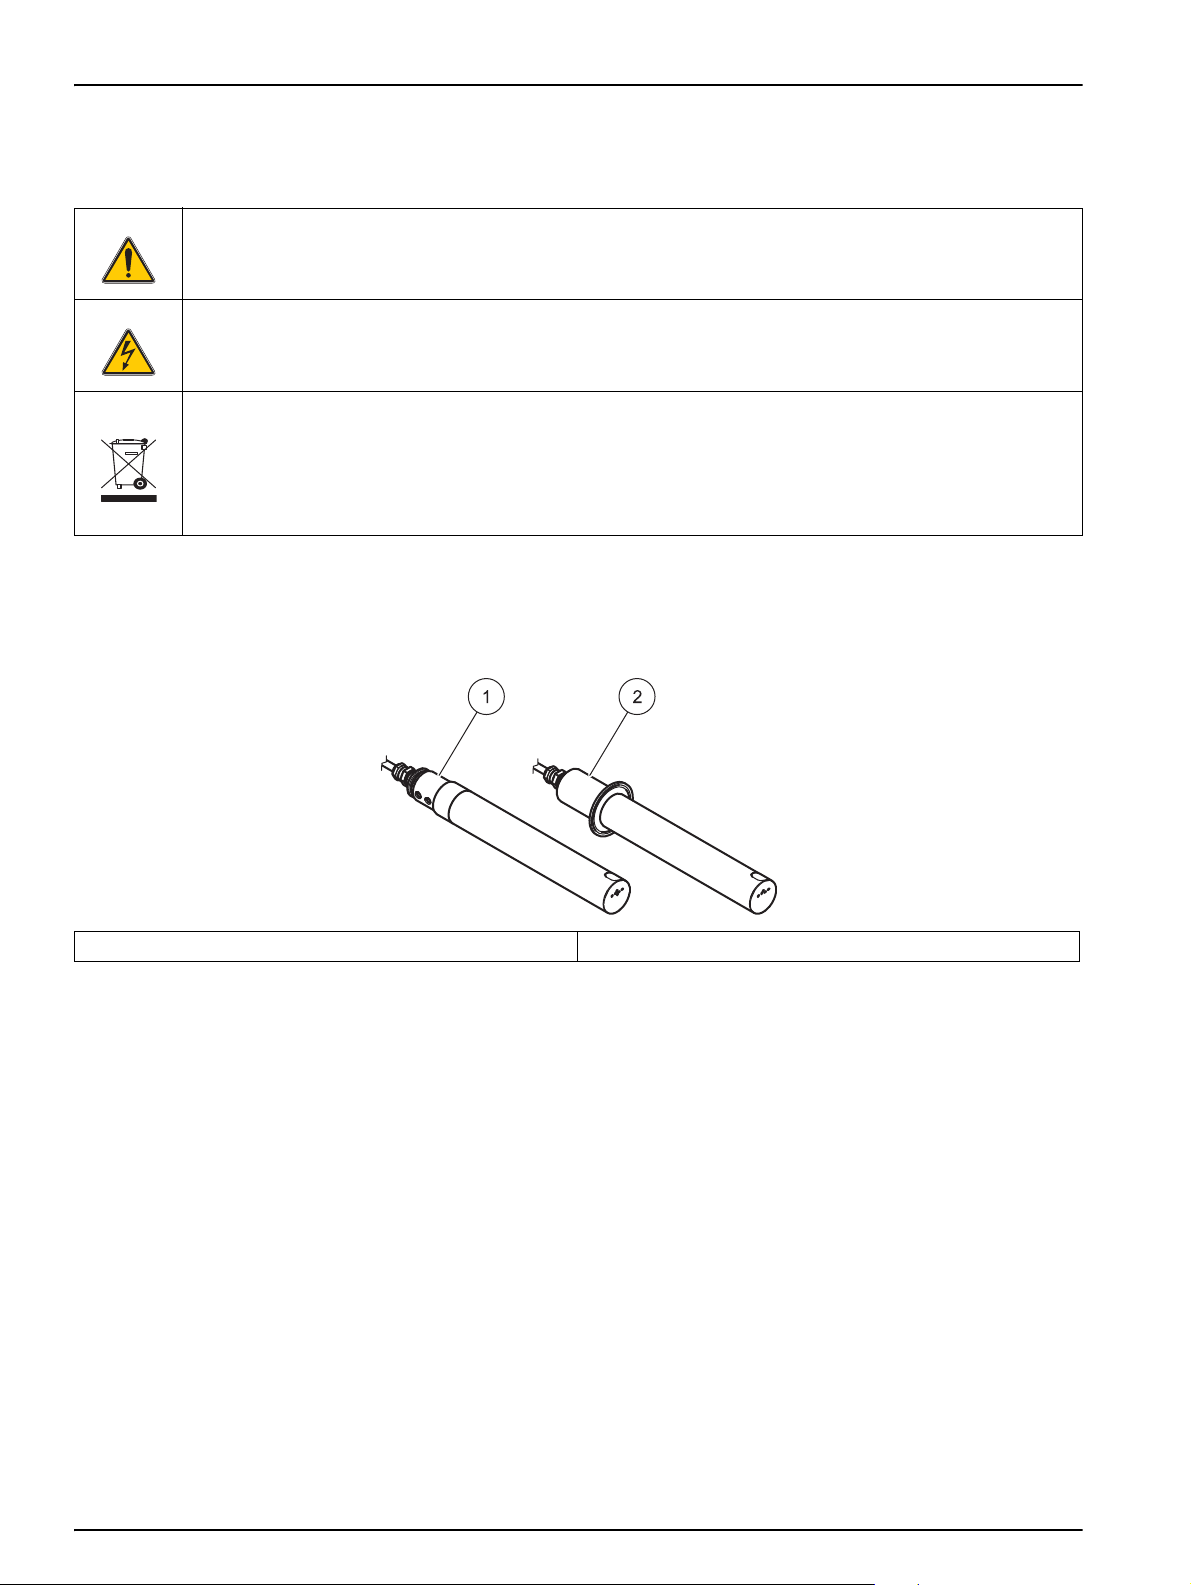
2.1.2 Warning labels
Read all labels and tags attached to the instrument. Failure to do so may result in personal
injury or damage to the instrument.
This symbol may have been attached to the device, and in such cases it references the instruction manual for
operating and/or safety information.
This symbol may have been attached to a housing or barrier in the product and warns that there is a risk of
electric shock and/or danger of death by electrocution.
Electrical equipment marked with this symbol may not be disposed of in European domestic or public disposal
systems after August 12, 2005. In conformity with European local and national regulations (EU Directive
2002/96/EC), European electrical equipment users must now return old or end-of life equipment to the
manufacturer for disposal at no charge to the user.
Note: Instructions on the correct disposal of all (marked and unmarked) electrical products supplied or
manufactured by Hach-Lange may be obtained from your local Hach-Lange sales office.
2.2 Areas of application
Figure 2 Overview
1 Basin sensor 2 Installation sensor (TriClamp)
The TSS EX1 sc sensor is an extremely accurate turbidity and solid sensor made from
stainless steel for color-independent measurement of highly concentrated sludges.
This sensor was specially developed for use in ATEX zones up to 1 and 21 maximum
(equipment group II, category 2) and is available in a basin version or an installation
version (TriClamp).
2.3 Measuring principle
2.3.1 Turbidity according to DIN standards
Turbidity is measured in accordance with DIN standard EN 27027 (ISO 7027) and is
calibrated by the manufacturer. Measurement is exceptionally simple and accurate.
2.3.2 Measurement of solids according to plant-specific curves
Software-based optimization routines enable extremely precise simulation of
medium-specific calibration curves with few calibration points. Usually, a single calibration
point is sufficient.
8
Up to three calibration points can be defined for a strongly fluctuating medium. The
combined multiple-beam alternating light technique records solids in the medium with
even greater accuracy.
2.4 Handling
Switch off the sc controller before connection or disconnection of the probe and sc controller.
Protect the probe from impacts and never rest the probe on the measurement head.
Never operate the probe within powerful magnetic fields! (EN50021 6.4)
2.5 Scope of delivery
General information
DANGER
NOTICE
NOTICE
• TSS EX1 sc sensor
• Test l o g
• Operating instructions
2.6 Function check
After unpacking and checking for any transport damage, perform a function check for all
components outside the ATEX zone.
1. Connect the sensor to the sc controller (refer to 3.3, page 12).
2. Switch on the power supply to the sc controller.
3. If no warning or error messages are displayed, the function check is complete.
The display is activated and the sensor enters measurement mode.
Note: The measurement value that is shown in air is not relevant.
9

General information
10
Section 3Installation
Observe the requirements for installation in ATEX zones.
This system must only be installed by qualified experts in accordance with all local safety
regulations.
DANGER
Observe the requirements for installation in hazardous zones.
This system must only be installed by qualified experts in accordance with all local safety
regulations.
Note: Depending on the area of application, the sensor may have to be installed with additional
optional accessories
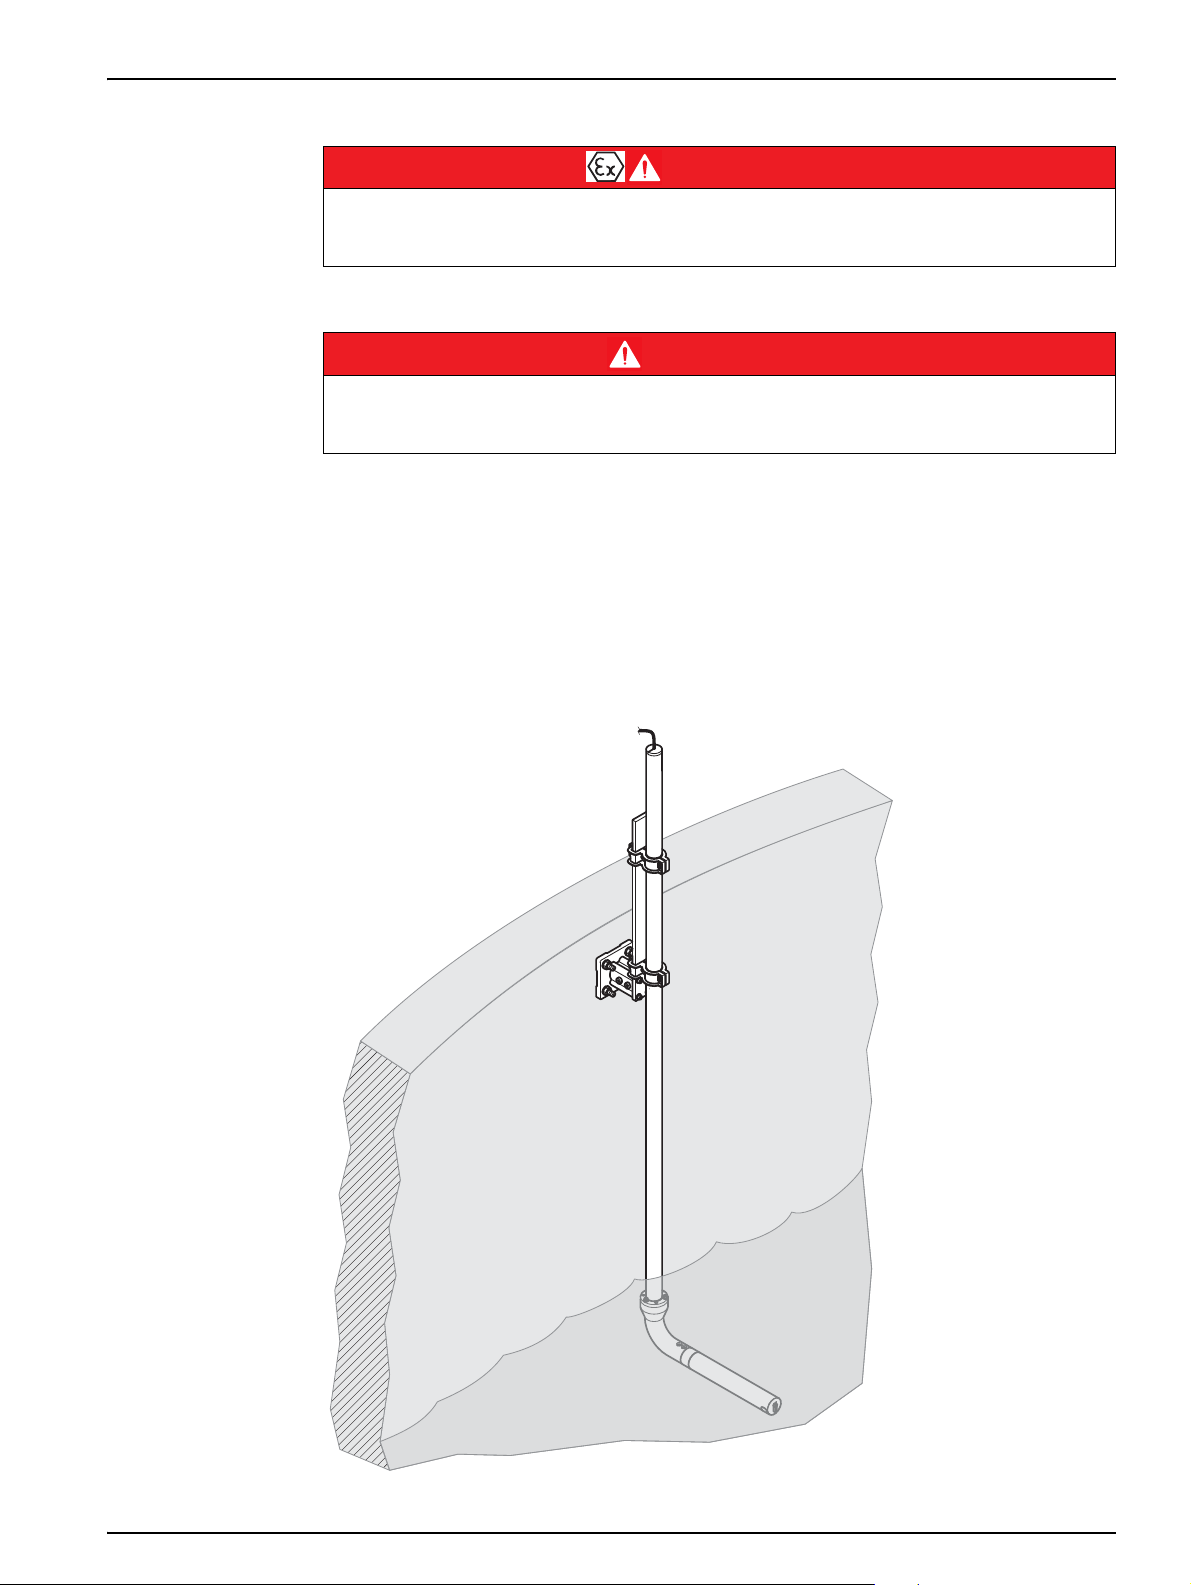
3.1 Installation overview of basin sensor
Figure 3 Example of installation with optional accessories
DANGER
11
 Loading...