

Page 1
®
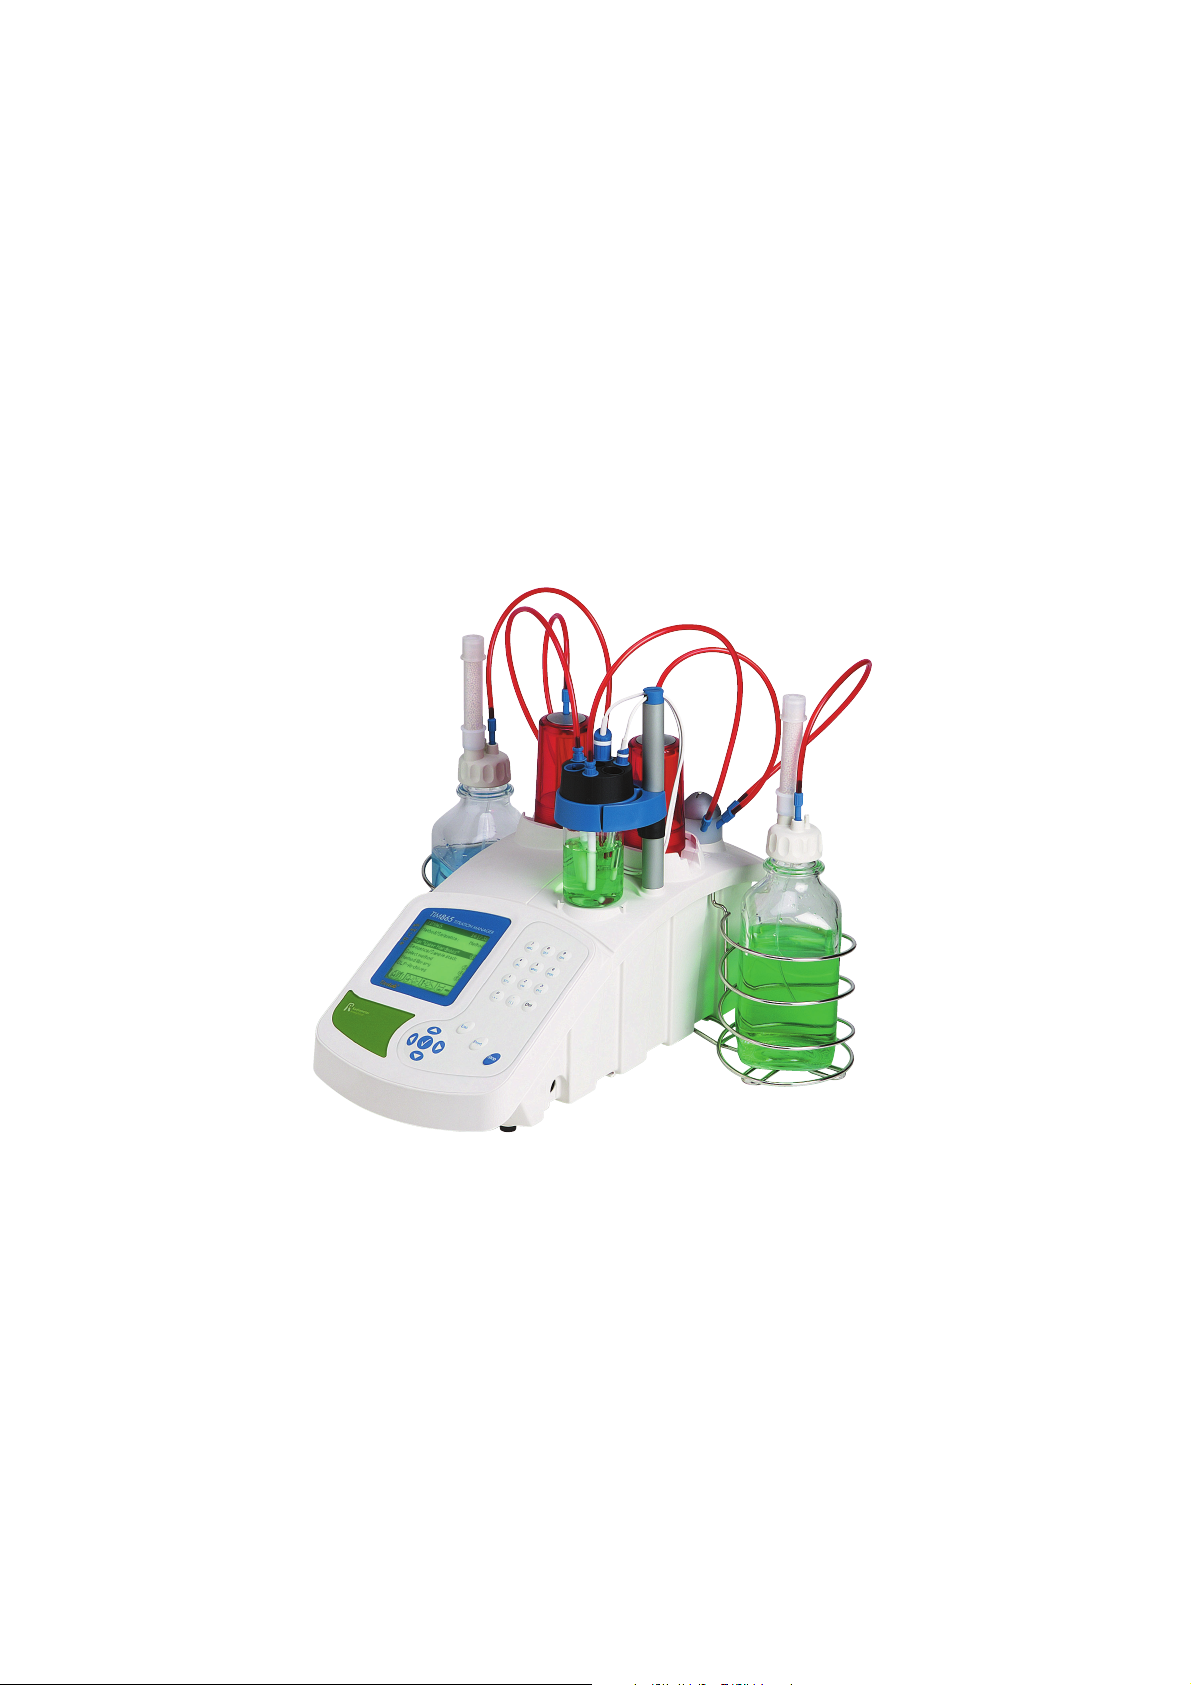
TitraLab
860 and 865
pH/EP/IP Titration Workstations
D21T050
Reference Manual
Page 2

D21T050 • Printed by Radiometer Analytical SAS • 2008-02I
Page 3

TitraLab
®
TitraLab 860 and 865 Reference Manual
Contents
Contents..................................................................................................................3
Introduction ..........................................................................................................15
General Information .............................................................................................16
Starting up instructions.......................................................................................17
Read me! ...............................................................................................................18
Practical examples ..............................................................................................23
Programming electrodes ...........................................................................................25
Programming reagents .............................................................................................27
Programming methods ..............................................................................................29
Programming TIM sequences ...................................................................................33
Programming SAC sequences ..................................................................................35
Programming tips ................................................................................................38
Glossary ...............................................................................................................41
0IP (result indicator) ...................................................................................................43
ABU1/ABU2 .................................................................................................................43
Accept a result ............................................................................................................43
Acceptance criteria ....................................................................................................44
Acceptation .................................................................................................................45
Access routine mode .................................................................................................45
Active electrode unknown in "method ID" ...............................................................45
Add method menu ......................................................................................................46
Add. reagent = Titrant ................................................................................................46
Addition .......................................................................................................................47
Addition delay .............................................................................................................48
Addition method - definition .....................................................................................49
Addition method - programmation ...........................................................................50
Addition volume .........................................................................................................51
Address .......................................................................................................................51
Alarm: Locked .............................................................................................................51
Alarm: Unlocked .........................................................................................................52
Aliquot .........................................................................................................................52
Alphanumeric characters ..........................................................................................53
Amount unit ................................................................................................................53
Applied signal (AC/DC) ..............................................................................................53
Archives data lost - Cal. Data lost - Methods kept ..................................................53
Assistant function ......................................................................................................54
Page 3
Page 4

TitraLab
Autochaining ...............................................................................................................54
Auxiliary input .............................................................................................................55
Auxiliary output ..........................................................................................................56
Aux. action / Aux. on for ............................................................................................57
Back reagent = Titrant ................................................................................................57
Back reagent unknown ..............................................................................................57
Back titration ...............................................................................................................57
Back titration - ID ........................................................................................................57
Back titration No/Manual/Automatic .........................................................................58
Balance cables - A95Z201, A95Z202 .........................................................................59
Balance cables - A95Z204, A95Z205 .........................................................................60
Balance cables - A95Z206, A95Z207 .........................................................................61
Balance cables - A95Z208 ..........................................................................................62
Balance connection ....................................................................................................63
Balance in use ............................................................................................................64
Bar code reader connection ......................................................................................64
Batch number .............................................................................................................64
Beaker detection .........................................................................................................65
Beaker detection minimum height ............................................................................66
Beaker menu ...............................................................................................................67
Beakers: [F;L] .............................................................................................................68
Beep .............................................................................................................................68
Blank (Yes/No) ............................................................................................................68
Blank not required ......................................................................................................68
Blank on inflection no. ...............................................................................................68
Blank required ............................................................................................................68
Blank volume ..............................................................................................................69
Burette functions menu .............................................................................................69
Burette speed ..............................................................................................................69
Burette volume ...........................................................................................................70
Calculate with EP no. .................................................................................................70
Calculate with IP no. ...................................................................................................70
Calibrate electrodes ...................................................................................................70
Calibrate reagents ......................................................................................................70
Calibration delay elapsed ..........................................................................................70
Calibration parameters ..............................................................................................71
Calibration request .....................................................................................................71
Calibration results parameters ..................................................................................71
Calibration sequence .................................................................................................71
Calibration stack .........................................................................................................71
Catalogue list ..............................................................................................................71
®
TitraLab 860 and 865 Reference Manual
Page 4
Page 5

TitraLab
Cell grounding ............................................................................................................72
Cell window .................................................................................................................72
Change electrode name .............................................................................................72
Change method name ................................................................................................73
Change reagent name ................................................................................................73
Change sequence name ............................................................................................73
Check command .........................................................................................................74
Check electrodes ........................................................................................................74
Check reagents ...........................................................................................................75
Communication failure (SAC error) ..........................................................................75
Concentration .............................................................................................................75
Concentration unit ......................................................................................................75
Configuration menu ...................................................................................................76
Connections ................................................................................................................76
Continuous IP method ...............................................................................................77
Contrast .......................................................................................................................78
Controlled by TTL IN ..................................................................................................78
Copy electrode ............................................................................................................79
Copy method ...............................................................................................................80
Copy reagent ...............................................................................................................80
Coupled method .........................................................................................................81
Create electrode .........................................................................................................82
Create method ............................................................................................................82
Create reagent ............................................................................................................83
Current value ..............................................................................................................83
Curve ...........................................................................................................................83
Curves data lost - Cal. Data kept - Methods kept ....................................................83
Customise ...................................................................................................................84
Date entry ....................................................................................................................84
Default parameters .....................................................................................................84
Delay after addition ....................................................................................................85
Delete electrode ..........................................................................................................85
Delete method .............................................................................................................85
Delete reagent .............................................................................................................85
Demand: Locked .........................................................................................................86
Demand: Unlocked .....................................................................................................86
Derivative ....................................................................................................................86
Detailed ........................................................................................................................87
Dilution (Yes/No) .........................................................................................................87
Dilution or sample unit incompatible .......................................................................88
Direction ......................................................................................................................88
®
TitraLab 860 and 865 Reference Manual
Page 5
Page 6

TitraLab
Direct measurements .................................................................................................88
Disconnect electrodes ...............................................................................................88
Display contrast ..........................................................................................................88
Display measurement ................................................................................................89
Dyn. rinse ....................................................................................................................90
Dynamic dose .............................................................................................................91
Dynamic IP method ....................................................................................................92
Dynamic rinses ...........................................................................................................93
Edit electrode menu ...................................................................................................94
Edit method menu ......................................................................................................95
Edit reagent menu ......................................................................................................96
Edit sequence menu ...................................................................................................97
Electrode calibration ..................................................................................................98
Electrode calibration (SAC sequence) .....................................................................99
Electrode calibration not required ..........................................................................100
Electrode calibration parameters ............................................................................100
Electrode calibration stack ......................................................................................101
Electrode connection ...............................................................................................102
Electrode connection - Important ...........................................................................103
Electrode function ....................................................................................................103
Electrode icons .........................................................................................................104
Electrode ID ...............................................................................................................105
Electrode identification ............................................................................................105
Electrode library .......................................................................................................105
Electrode not calibrated ...........................................................................................105
Electrode system ......................................................................................................106
Electrode type ...........................................................................................................106
Electrode window .....................................................................................................107
Electrodes are different ...........................................................................................107
Empty burette ...........................................................................................................107
Empty sequence .......................................................................................................107
End point ...................................................................................................................108
End point delay .........................................................................................................108
End point method .....................................................................................................108
Enter titre ...................................................................................................................109
Equation formula ......................................................................................................110
Equation formula ......................................................................................................111
Equation ID ................................................................................................................111
Equation unit .............................................................................................................112
Equivalent point determination (IP methods) ........................................................113
Equivalent point determination (IP methods) ........................................................114
®
TitraLab 860 and 865 Reference Manual
Page 6
Page 7

TitraLab
ERR#32 (SAC error) ..................................................................................................115
Error messages ........................................................................................................116
Error in equation formula ........................................................................................117
Excess reagent ID .....................................................................................................117
Excess titre ...............................................................................................................117
Excess volume ..........................................................................................................117
Expiry date ................................................................................................................118
Expiry date elapsed ..................................................................................................118
Fill burette .................................................................................................................118
Final dil. amount .......................................................................................................118
Flush burette .............................................................................................................119
Format (printouts) ....................................................................................................119
Function ....................................................................................................................120
Fuses .........................................................................................................................120
Global flush burettes ................................................................................................121
Global variable ..........................................................................................................121
GLP-Archives menu .................................................................................................122
Ground conflict .........................................................................................................122
Help ............................................................................................................................122
High (result indicator) ..............................................................................................122
Icons ..........................................................................................................................123
ID ................................................................................................................................124
Increment ..................................................................................................................124
Inflection Point (IP) ...................................................................................................124
Input address conflict ..............................................................................................124
Insert method menu .................................................................................................125
Install burette ............................................................................................................125
Install reagent ...........................................................................................................126
Insufficient number of beakers ...............................................................................126
IP filter .......................................................................................................................126
IP reject ......................................................................................................................127
IP>1 (result indicator) ...............................................................................................127
Iso pH .........................................................................................................................127
Keyboard connection ...............................................................................................128
Language ...................................................................................................................129
Low (result indicator) ...............................................................................................129
Main window .............................................................................................................129
Mains frequency .......................................................................................................129
Man. stop (result indicator) .....................................................................................130
Manual dosing ..........................................................................................................130
Max. stab reached ....................................................................................................130
®
TitraLab 860 and 865 Reference Manual
Page 7
Page 8

TitraLab
Max. stab time ...........................................................................................................131
Max. volume ..............................................................................................................131
Max. vol - Predose > Bur. vol ...................................................................................131
Max. volume reached ...............................................................................................131
Maximum dose ..........................................................................................................132
Measure type conflict for a reprocessing in "Method ID" ....................................132
Measurement ............................................................................................................132
Method .......................................................................................................................133
Method ID ..................................................................................................................133
Method library ...........................................................................................................134
Method parameters menu ........................................................................................134
Method results menu ...............................................................................................135
Method type incompatible for a reprocessing .......................................................135
Method wrong type ...................................................................................................135
Min. ordinate Max. ordinate .....................................................................................136
Min. ordinate Max. ordinate - Blank ........................................................................137
Min. pH0(25) - Max. pH0(25) .....................................................................................137
Min. sensitivity - Max. sensitivity ............................................................................137
Min. speed - Max. speed ..........................................................................................138
Min. Temp. - Max. Temp. ..........................................................................................138
Minimum value - Maximum value ............................................................................139
Missing beaker (SAC error) .....................................................................................139
Missing EP ................................................................................................................140
Missing IP ..................................................................................................................140
Mode ..........................................................................................................................140
Molar weight ..............................................................................................................140
Monotonic IP method ...............................................................................................141
Nb lines per page (printouts) ...................................................................................141
No curve generation for a reprocessing ................................................................141
No curve stored within the instrument ...................................................................142
No stirrer (SAC error) ...............................................................................................142
Notification message ...............................................................................................142
Number of additions .................................................................................................143
Number of buffers ....................................................................................................143
Number of cycles ......................................................................................................143
Number of decimals .................................................................................................143
Number of digits .......................................................................................................144
Number of dynamic rinses ......................................................................................144
Number of EP ............................................................................................................144
Number of equations ................................................................................................144
Number of IP .............................................................................................................145
®
TitraLab 860 and 865 Reference Manual
Page 8
Page 9

TitraLab
Number of results .....................................................................................................145
Number of static rinses ............................................................................................146
Number of tests ........................................................................................................146
OK (result indicator) .................................................................................................147
Others list ..................................................................................................................147
Parameters menu .....................................................................................................147
PC cable - A95X501 ..................................................................................................147
PC connection ..........................................................................................................147
PC keyboard ..............................................................................................................148
Periodicity .................................................................................................................148
Periodicity for QC samples ......................................................................................148
pH0(25) ......................................................................................................................149
pH buffer ....................................................................................................................149
pH calibration results parameters ..........................................................................149
pH calibration solutions parameters ......................................................................149
pH int .........................................................................................................................150
Potential versus SHE ...............................................................................................151
Predose mode, Predose until ..................................................................................152
Preprogrammed list ..................................................................................................152
Printer ........................................................................................................................153
Printer cables - A95P201, A95X506 .........................................................................154
Printer connection ....................................................................................................155
Print in table ..............................................................................................................155
Printouts ....................................................................................................................156
Printouts detailed .....................................................................................................157
Printouts menu .........................................................................................................157
Printouts setup .........................................................................................................157
Printouts title ............................................................................................................158
Programming method ..............................................................................................158
Programming sequence ...........................................................................................159
Proportional band .....................................................................................................160
QC (result indicator) .................................................................................................160
QC analysis required ................................................................................................160
QC data menu ...........................................................................................................161
QC ID ..........................................................................................................................161
QC not required ........................................................................................................161
QC periodicity elapsed .............................................................................................161
QC sample .................................................................................................................162
QC sample (Yes/No) .................................................................................................162
Reaction X Exc. + Y Titr ...........................................................................................163
Reaction X Smp + Y Titr ...........................................................................................164
®
TitraLab 860 and 865 Reference Manual
Page 9
Page 10

TitraLab
Reaction X Smp + Y Exc ..........................................................................................165
Reaction X Std + Y Titr ............................................................................................166
Reagent addition ID .................................................................................................167
Reagent addition volume .........................................................................................167
Reagent calibration ..................................................................................................168
Reagent calibration (SAC sequence) ......................................................................169
Reagent calibration not required ............................................................................170
Reagent calibration parameters ..............................................................................170
Reagent calibration stack ........................................................................................171
Reagent icons ...........................................................................................................172
Reagent ID .................................................................................................................173
Reagent identification ..............................................................................................173
Reagent library .........................................................................................................173
Reagent not calibrated .............................................................................................173
Reagent system ........................................................................................................174
Reagent titre not entered .........................................................................................174
Reagent unit ..............................................................................................................174
Reagent window .......................................................................................................174
Recalculate results ...................................................................................................175
Ref. electrode conflict ..............................................................................................176
Reject a result ...........................................................................................................176
Remove burette ........................................................................................................176
Remove method from a sequence ..........................................................................176
Remove reagent ........................................................................................................176
Replace burette .........................................................................................................177
Replace electrodes ...................................................................................................177
Replace reagent ........................................................................................................178
Replacing reagent bottle ..........................................................................................178
Reprocessing a curve ..............................................................................................179
Reprocessing a curve (rules) ..................................................................................180
Reprocessing a curve (Automatic mode) ...............................................................181
Reprocessing a curve (Manual mode) ....................................................................182
Reprocessing a reagent calibration curve .............................................................183
Reset memory ...........................................................................................................183
Reset to factory settings ..........................................................................................183
Result accepted (Yes/No) ........................................................................................184
Result ID ....................................................................................................................185
Result indicators ......................................................................................................185
Result unit .................................................................................................................186
Results .......................................................................................................................186
Results by difference/cumulate ..............................................................................187
®
TitraLab 860 and 865 Reference Manual
Page 10
Page 11

TitraLab
Results factor (Yes/No) ............................................................................................187
Results menu ............................................................................................................188
Rinse aux. output .....................................................................................................188
Rinse burette .............................................................................................................189
Rinse time .................................................................................................................189
Routine mode ............................................................................................................190
Run window ..............................................................................................................191
Running a manual dosing ........................................................................................192
Running a method ....................................................................................................193
Running a reagent calibration sequence ...............................................................193
Running a SAC sequence ........................................................................................194
Running a TIM sequence .........................................................................................195
Running an electrode calibration sequence ..........................................................195
SAC arm obstructed (SAC error) ............................................................................196
SAC ext. cell GND .....................................................................................................196
SAC Method ..............................................................................................................196
SAC option missing (SAC error) .............................................................................196
SAC Sequence ..........................................................................................................196
SAC switch Off/On (SAC error) ...............................................................................196
SAC80/SAC90/SAC850/SAC950 ..............................................................................197
Same buffer change buffer ......................................................................................197
Sample amount .........................................................................................................197
Sample changer ........................................................................................................198
Sample changer cable - A95A202 (SAC80/SAC90) ................................................199
Sample changer cable - A95X501 (SAC850/SAC950) ............................................199
Sample dilution conflict ...........................................................................................200
Sample ID ..................................................................................................................200
Sample menu ............................................................................................................200
Sample preparation no. ............................................................................................201
Sample stack .............................................................................................................202
Sample type incompatible .......................................................................................202
Sample unit ...............................................................................................................203
Sample unit conflict .................................................................................................203
Select electrode ........................................................................................................203
Select method ...........................................................................................................203
Select reagent ...........................................................................................................204
Select sequence .......................................................................................................204
Sensitivity ..................................................................................................................204
Sequence/SAC sequence ........................................................................................205
Sequence/Sample stack menu ................................................................................206
Sequence end in Park (Yes/No) ...............................................................................206
®
TitraLab 860 and 865 Reference Manual
Page 11
Page 12

TitraLab
Sequence ID ..............................................................................................................206
Serial number ............................................................................................................207
Setup menu ...............................................................................................................207
Simultaneous additions (Yes/No) ...........................................................................208
Skip empty position .................................................................................................208
Smoothing parameter ..............................................................................................209
Software version .......................................................................................................209
Solution menu ...........................................................................................................210
Speed .........................................................................................................................210
Stability ......................................................................................................................211
Standard amount ......................................................................................................211
Standard ID ...............................................................................................................211
Standard menu .........................................................................................................212
Standard unit incompatible .....................................................................................212
Start addition ............................................................................................................213
Start from ..................................................................................................................213
Start timer ..................................................................................................................213
Static rinses ..............................................................................................................214
Static rinse time ........................................................................................................214
Statistics ....................................................................................................................214
Stirring .......................................................................................................................215
Stoichiometric coefficients ......................................................................................216
Stop after last IP .......................................................................................................216
Stop analysis ............................................................................................................216
Stop point ..................................................................................................................217
Supervisor code .......................................................................................................218
Supervisor mode ......................................................................................................219
T°C minimum/maximum value ................................................................................219
Target titre .................................................................................................................219
Temperature Probe/ Fixed at 25°C/Entered ............................................................220
Temperature sensor ID ............................................................................................220
Test amount ..............................................................................................................220
The sequence is empty ............................................................................................220
TIM cell external Gnd ...............................................................................................221
Time max (result indicator) ......................................................................................221
Title ............................................................................................................................221
Titrant ID ....................................................................................................................221
Titre Enter/Calibrate .................................................................................................222
Tray missing (SAC error) .........................................................................................222
TTL 5 V OUT/TTL 12 V OUT (sockets) .....................................................................222
TTL IN (sockets) .......................................................................................................223
®
TitraLab 860 and 865 Reference Manual
Page 12
Page 13

TitraLab
Turntable blocked (SAC error) ................................................................................223
Type of method .........................................................................................................223
User ID (Yes/No) .......................................................................................................224
User list .....................................................................................................................224
User’s rights ..............................................................................................................225
Viewing global variables ..........................................................................................225
Volume .......................................................................................................................226
Working mode ...........................................................................................................226
Wrong buffer .............................................................................................................226
Wrong type (SAC error) ...........................................................................................226
Zero pH ......................................................................................................................226
®
TitraLab 860 and 865 Reference Manual
Appendixes ........................................................................................................227
Appendix 1: Preprogrammed methods ..................................................................229
Appendix 2: General information ............................................................................231
Appendix 3: Result calculations .............................................................................235
Appendix 4: Technical specifications ....................................................................241
Page 13
Page 14

TitraLab
®
TitraLab 860 and 865 Reference Manual
Page 14
Page 15

TitraLab
®
TitraLab 860 and 865 Reference Manual
Introduction
The TitraLab 860 and 865 Titration Workstations are dedicated for routine use. They offer two
distinct user levels:
• Supervisor
Dedicated for operators who wish to edit their methods to fit their specific needs. They can
also assign a password to protect the programmed data from eventual changes.
•Routine
Dedicated for operators wishing to use the routine functions to guide them step by step
through the analyses.
The TIM860 and TIM865 can store up to 50 methods, 30 electrodes and 30 reagents. In addition 30 electrodes and 20 titrants have been pre-defined to help you save time setting up your
application.
Thanks to the preprogrammed applications, the Titration Manager is ready for use as soon as
it has been installed. Refer to "Appendix 1: Preprogrammed methods", page 229.
The TIM860 and TIM865 also allow you to automatically sequence and repeat measurements
- ideal for direct measurements followed by a titration.
The purpose of the TitraLab 860 and 865 Reference Manual is to give detailed information on
the Titration Workstation and the data displayed during operations. The information is listed in
alphabetical order for quick access and cross-references are listed in italics.
In addition to this handbook, a general User’s Guide (part no. D21T043) is available giving descriptions and overviews of the workstation menus and operating concepts to guide you
through programming and running of the analyses.
Page 15
Page 16
TitraLab
®
TitraLab 860 and 865 Reference Manual
General Information
Safety Information
Please read this entire manual before unpacking, setting up, or operating this equipment.
Pay attention to all danger and caution statements. Failure to do so could result in serious injury
to the operator or damage to the equipment.
To ensure that the protection provided by this equipment is not impaired, do not use and do not
install this equipment in any manner other than that specified in this manual.
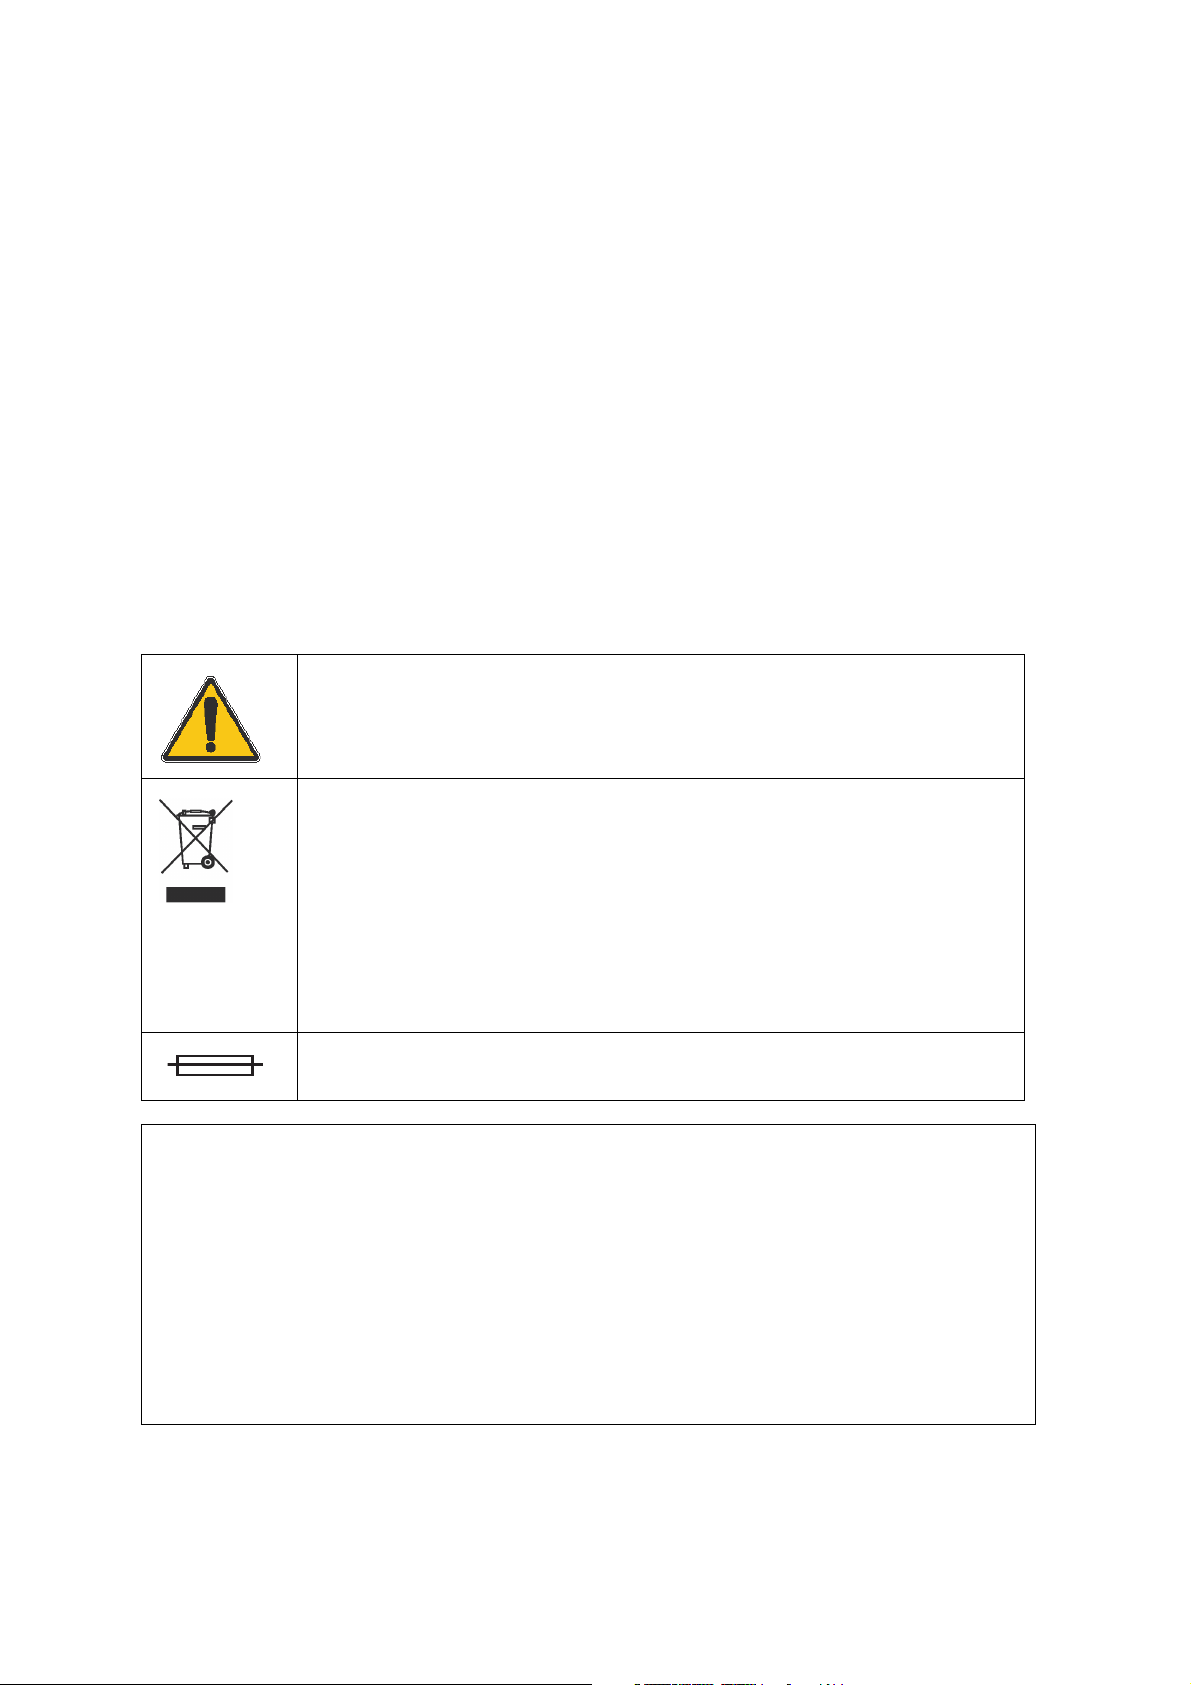
Precautionary Labels
Read all labels and tags attached to the instrument. Personal injury or damage to the
instrument could occur if not observed.
This symbol, if noted on the instrument, references the instruction manual
for operation and/or safety information.
Electrical and electronical equipment marked with this symbol may not be
disposed of in European public disposal systems after 13 August of 2005.
In conformity with European local and national regulations (EU Directive
2002/96/EC), European electrical equipment users must now return old
or end-of life equipment to the Producer for disposal at no charge to the
user.
Note: For equipment supplied or produced by "Radiometer Analytical",
please contact www.hach-lange.com and select your country for instructions on how to return your equipment for proper disposal."
This symbol, when noted on the product, identifies the location of a fuse
or current limiting device.
Warning!
The TitraLab 860 and 865 have been developed to meet the requirements of volumetric
titration applications. It is therefore aimed at experienced users who have the knowledge
required to operate the instrument and implement the security instructions enclosed.
Please remember that the Titration Manager must not, under any circumstances, be used
to perform tests on living beings.
We accept no responsibility for using theTitration Manager and its peripheral
devices under conditions that are not specified in this Reference Manual and its associated
User’s Guide (part no. D21T043).
Page 16
Page 17
TitraLab
®
TitraLab 860 and 865 Reference Manual
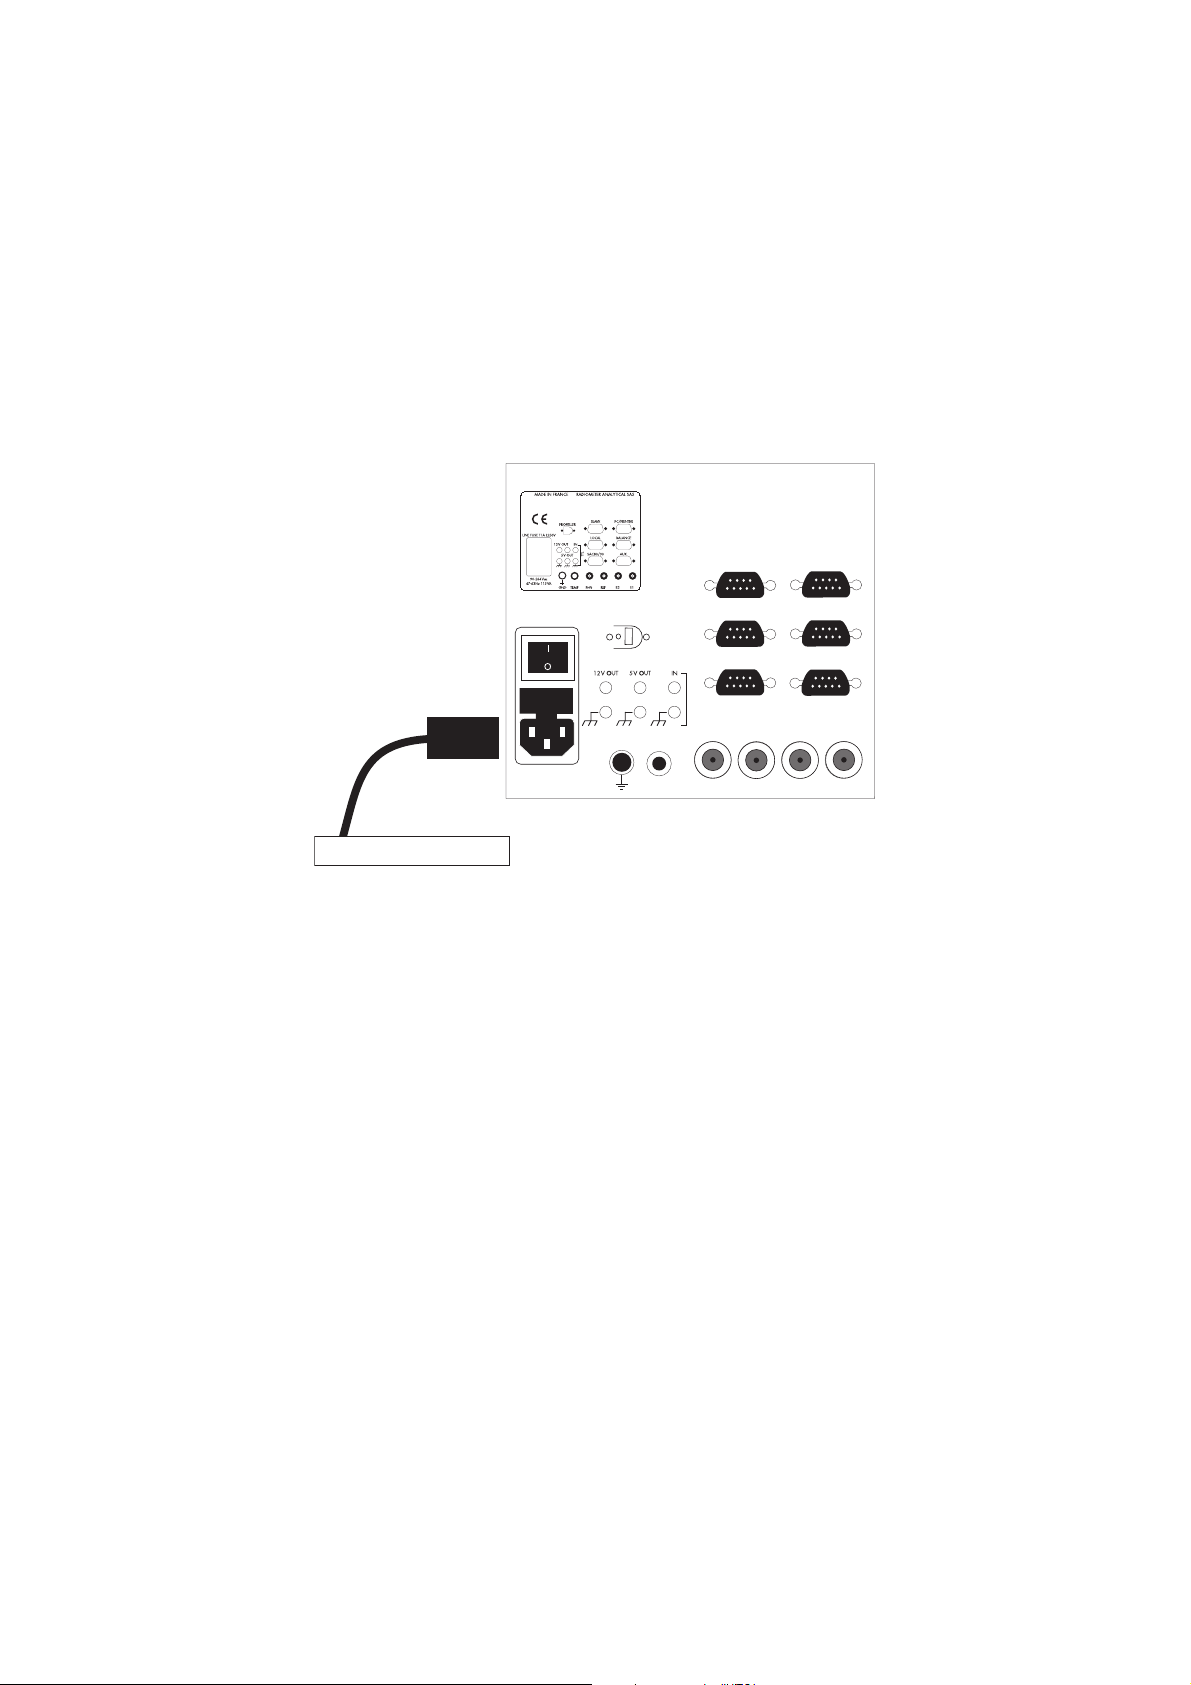
Starting up instructions
Set up the instrument in a properly ventilated place. The power supply connector on the rear
panel must remain accessible and close to the user (2 m maximum) so that you can quickly
disconnect the cables in case of emergency.
The room temperature must be between 5 and 40°C.
The relative humidity must be between 20 and 80°C.
To a mains supply socket
Connect the mains socket of the Titration Manager to the mains supply using the 3-lead power
cord provided. The Titration Manager must be connected to an earthed mains socket for safety
reasons. Efficient grounding is essential for reliable measurements and security.
In the USA or Canada, use a UL listed power cord only.
Switch on the Titration Manager (O/I power switch set to "I")
The Titration Manager displays during a few seconds an identification screen (name and
embedded software version) followed by the Main window, see "Main window", page 83.
Page 17
Page 18

TitraLab
®
TitraLab 860 and 865 Reference Manual
Read me!
An important feature of this Titration Manager interface is that it controls the presence of different elements necessary to run the defined application for a selected method/sequence, before
the method/sequence is run.
Working in Supervisor mode
A Supervisor has access to all the libraries for creation purposes.
When programming the Titration Manager in “SUPERVISOR” mode, it is recommended to
work in stages. These stages must be carried out in the order described below:
A.To program method
1. Define your electrode(s)
Identify electrodes (including temperature sensors) to be used for the analysis:
Electrodes can be created from the following lists:
Catalogue, see "Catalogue list", page 71.
Other, see "Others list", page 147.
Copy from, see "Copy electrode", page 79.
When creating the electrode, define if electrode calibration is required (or not), if yes specify
the "periodicity" of the calibrations and the pH standards to be used. Refer to "Calibrate elec-
trodes", page 70.
2. Define reagent
Identify reagents to be used for the analysis
Reagents can be created from the following lists:
Catalogue, see "Catalogue list", page 71.
Other, see "Others list", page 147.
Copy from, see "Copy reagent", page 80.
When creating the reagent, define if reagent calibration is required (or titre entered manually),
if yes specify the "periodicity" of the calibrations and the calibration method. Refer to "Reagent
calibration", page 168.
If a sample changer is to be used, define the sample changer in the Configuration menu before
selecting a SAC sequence.
If you are to perform a calibration, make sure that the electrode(s) used for the calibration are the same as those used in the method.
Page 18
Page 19

TitraLab
®
TitraLab 860 and 865 Reference Manual
3. Create new method or Edit a pre-programmed one
Create the measurement or titration method to be used for the analyses. Enter the parameters
required to calculate the results, see "Programming methods", page 29.
When you have finished programming, select the method/sequence or pre-programmed application, see "Select method", page 203 or see "Select sequence", page 204.
If your methods are to be performed in a sequence, program the sample stack, see "Sample
stack", page 202.
4. Check icons
The following icons indicate the exact state of your working system:
Sunny icon:
Everything is OK. Run the method or sequence.
Cloudy icon:
Action required within 12 or 24 hours (for a calibration) and 1 week (for
a reagent replacement).
Stormy icon:
Electrode/reagent calibration date elapsed or electrode(s)/reagent(s)
not installed.
Question mark:
Programming error.
Calculator icon:
Reprocessing mode (Working mode = Reprocessing) is set on the
instrument.
Refer to "Electrode icons", page 104.
Refer to "Reagent icons", page 172.
Sunny icons are needed in order to run the selected method.
If Cloudy/Stormy/Question mark icons are displayed in the Reagent/Electrode window
press 1 to activate the “Check” command. The Titration Manager will automatically
guide you through the operations required to solve the errors encountered.
Page 19
Page 20

TitraLab
®
TitraLab 860 and 865 Reference Manual
B.Running methods
To run a method or sequence, see "Working in Routine mode", page 21.
Page 20
Page 21
TitraLab
®
TitraLab 860 and 865 Reference Manual
Working in Routine mode
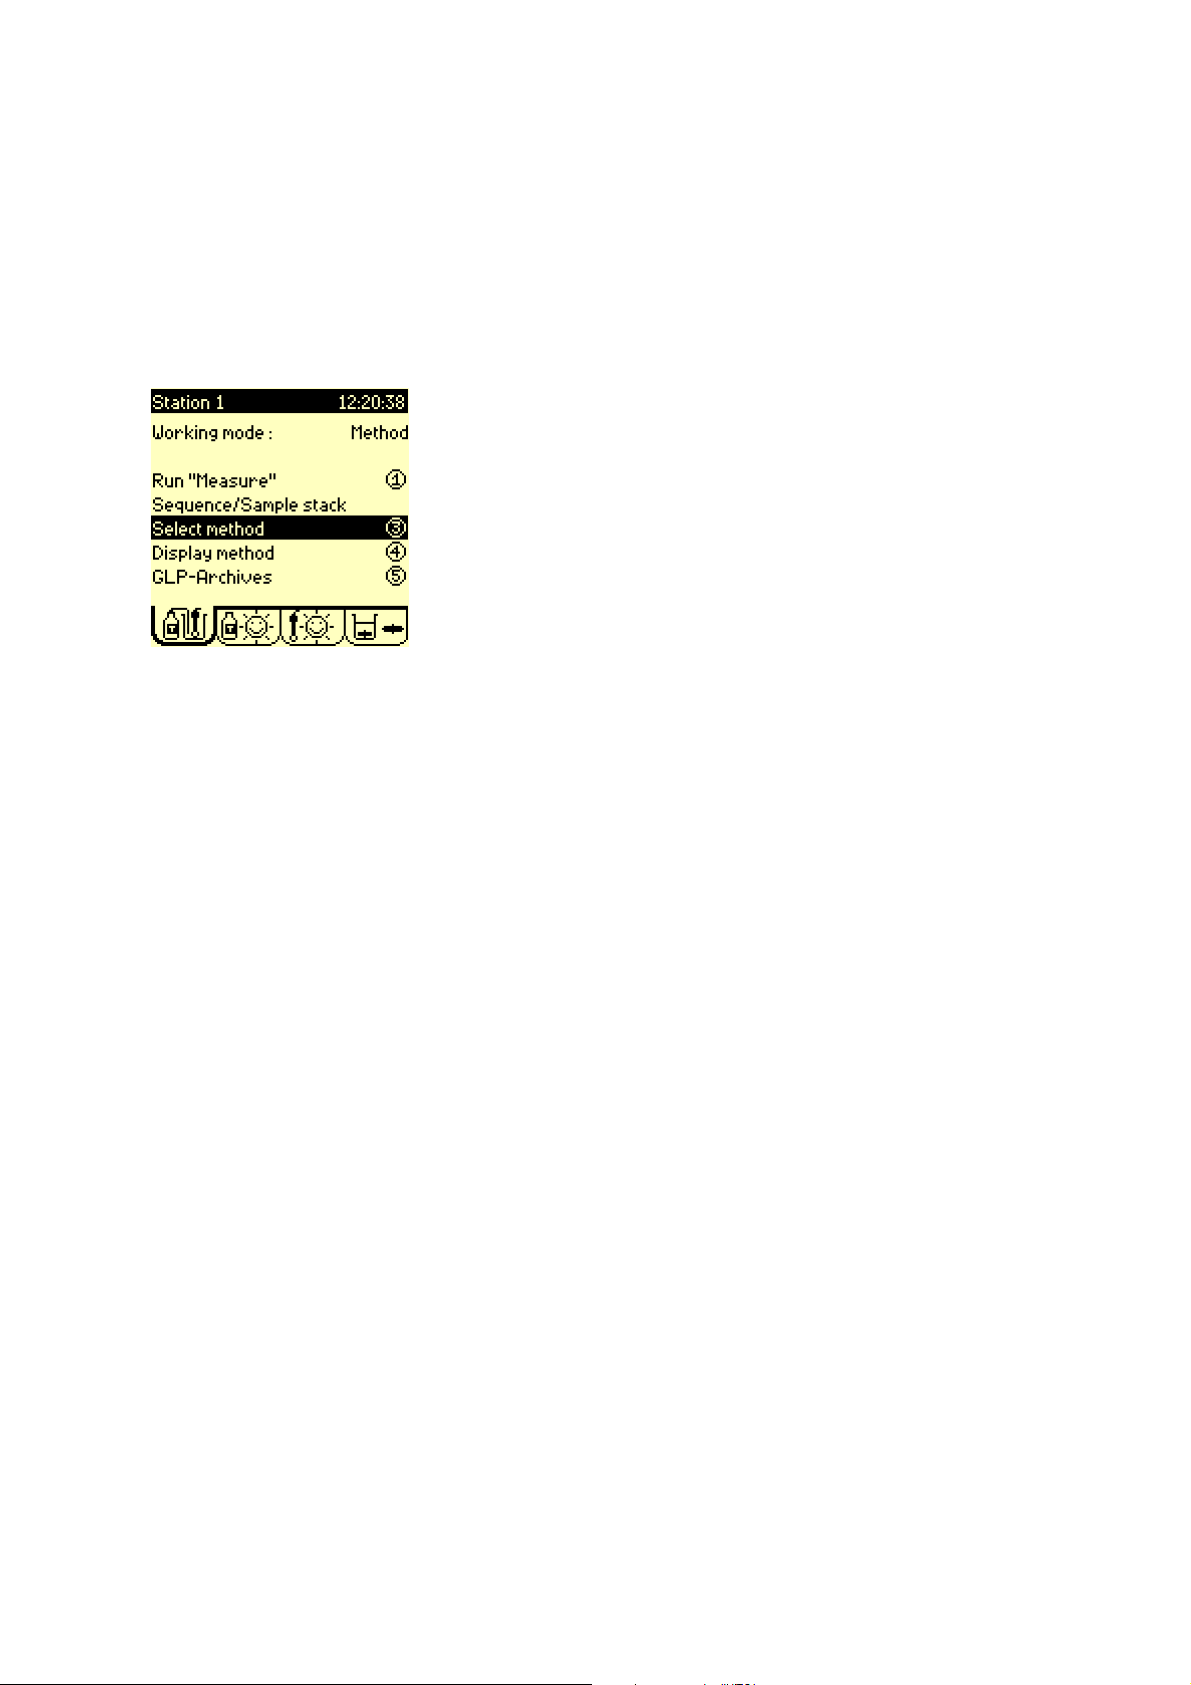
A.Access methods
A Routine operator has access to all the methods “Select method” and programmed parameters “Display method” for checking purposes
B.Running methods
When working in “ROUTINE” mode, it is necessary to install your titration system according to
the selected method or sequence, prior to running a method or sequence.
1. Select the method or sequence
Refer to "Select method", page 203.
Refer to "Select sequence", page 204.
2. Check icons
Refer to "Check icons", page 19.
Depending on the icons displayed, the Titration Manager will automatically guide you through
the steps necessary to run the analysis, see below:
a. Connect the electrode(s)
Connect/install electrodes and temperature sensors, Refer to "Electrode connection",
page 102.
b. Install regents(s)
Check that the burette is installed, if not, see "Install burette", page 125. Now, install
the reagent, see "Install reagent", page 126.
c. Calibrate electrode(s)
Now, run the calibration, see "Calibrate electrodes", page 70.
d. Calibrate reagent(s) or Enter titre
Now, run the calibration or enter the titre.
Refer to "Reagent calibration", page 168.
Refer to "Enter titre", page 109.
e. Run the method or the sequence
Refer to "Running a method", page 216.
Refer to "Running a TIM sequence", page 218.
Refer to "Running a SAC sequence", page 217.
Page 21
Page 22

TitraLab
®
TitraLab 860 and 865 Reference Manual
Page 22
Page 23

Practical examplesxamples
Page 24

Page 25
TitraLab
®
TitraLab 860 and 865 Reference Manual
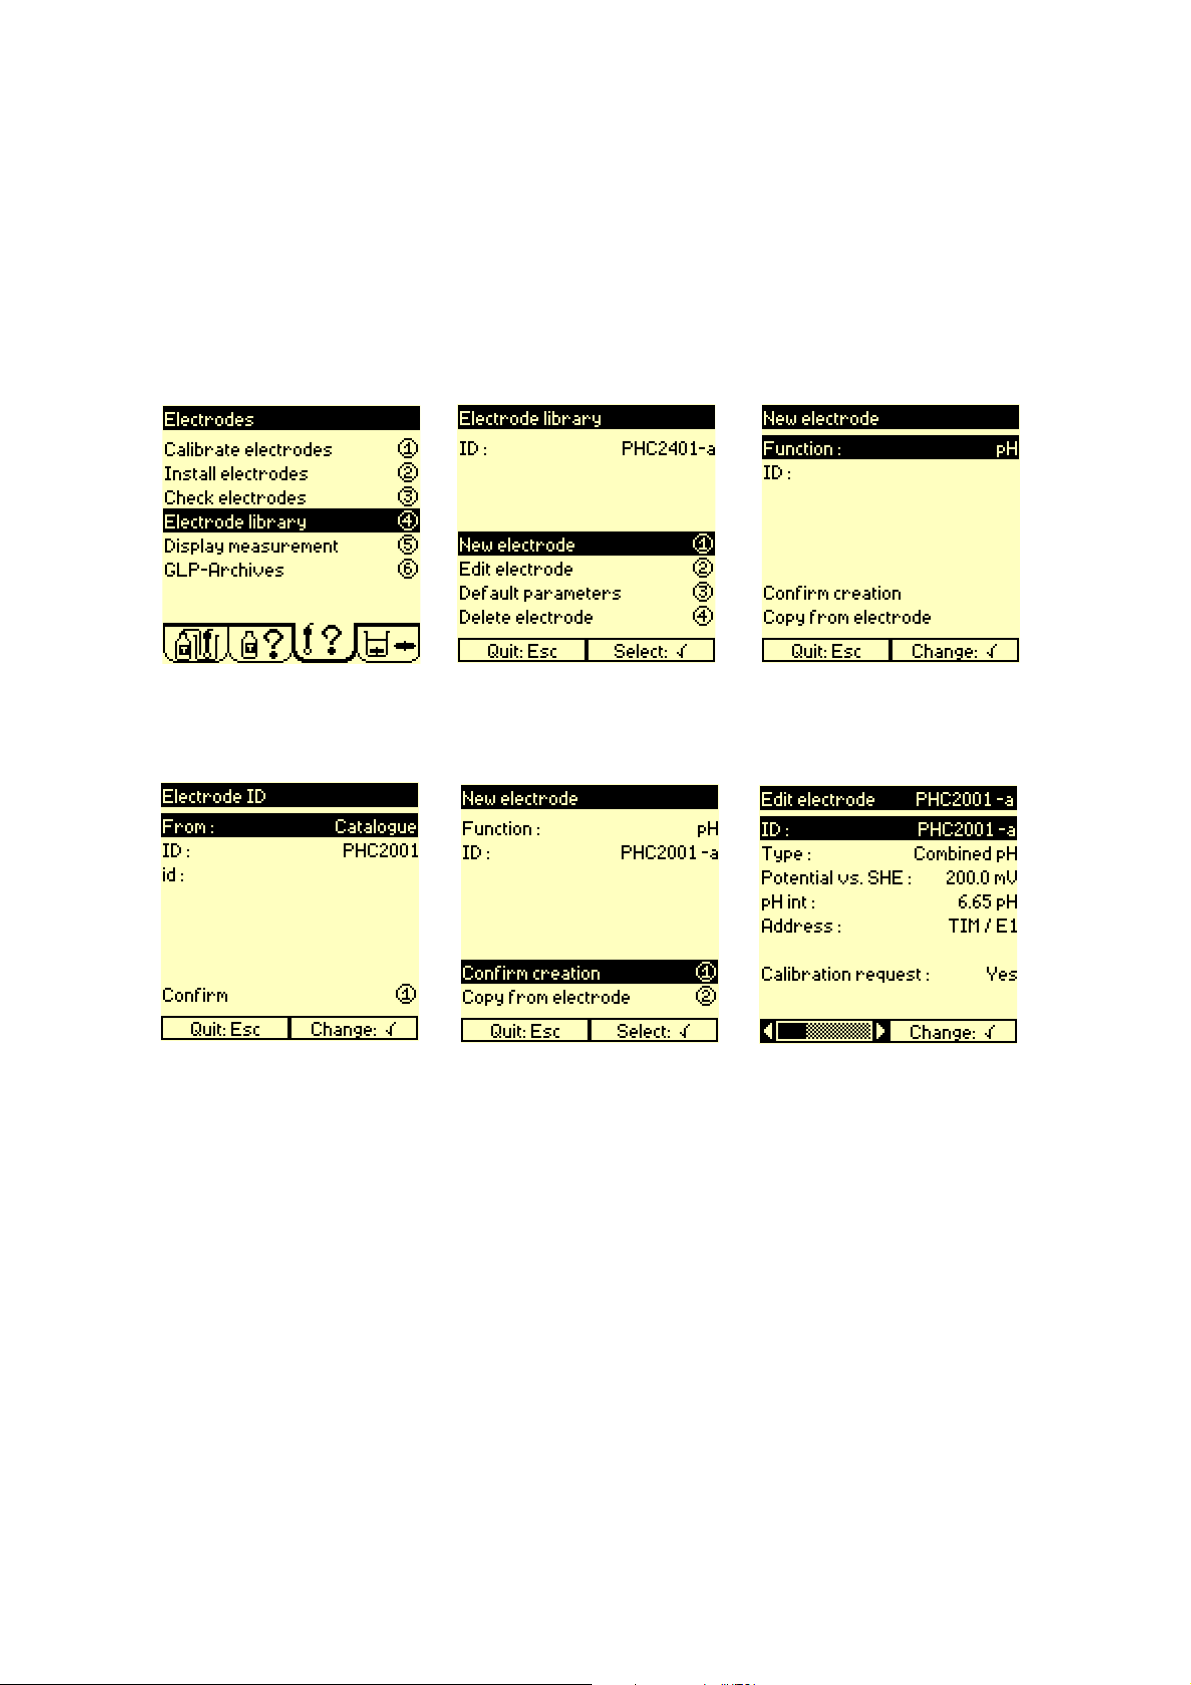
Programming electrodes
1.
Press 4.
4.
2.
Press 1.
5.
3.
Select function.
Select ID.
6.
Select ID from Catalogue or
Others list.
Press 1 to confirm.
Press 1 to confirm the creation
of the new electrode.
For a combined or a simple
electrode or for a reference
electrode, enter the potential (in
mV) of the reference versus the
Standard Hydrogen Electrode
(SHE).
For a combined or a simple
electrode if you have selected
the Others list, enter the internal pH of the electrode.
Enter the address of the electrode.
Select Yes if a calibration is required, go to step 7.
Select No, for no calibration,
press Esc to leave the menu.
Programming is completed.
Page 25
Page 26
TitraLab
®
TitraLab 860 and 865 Reference Manual
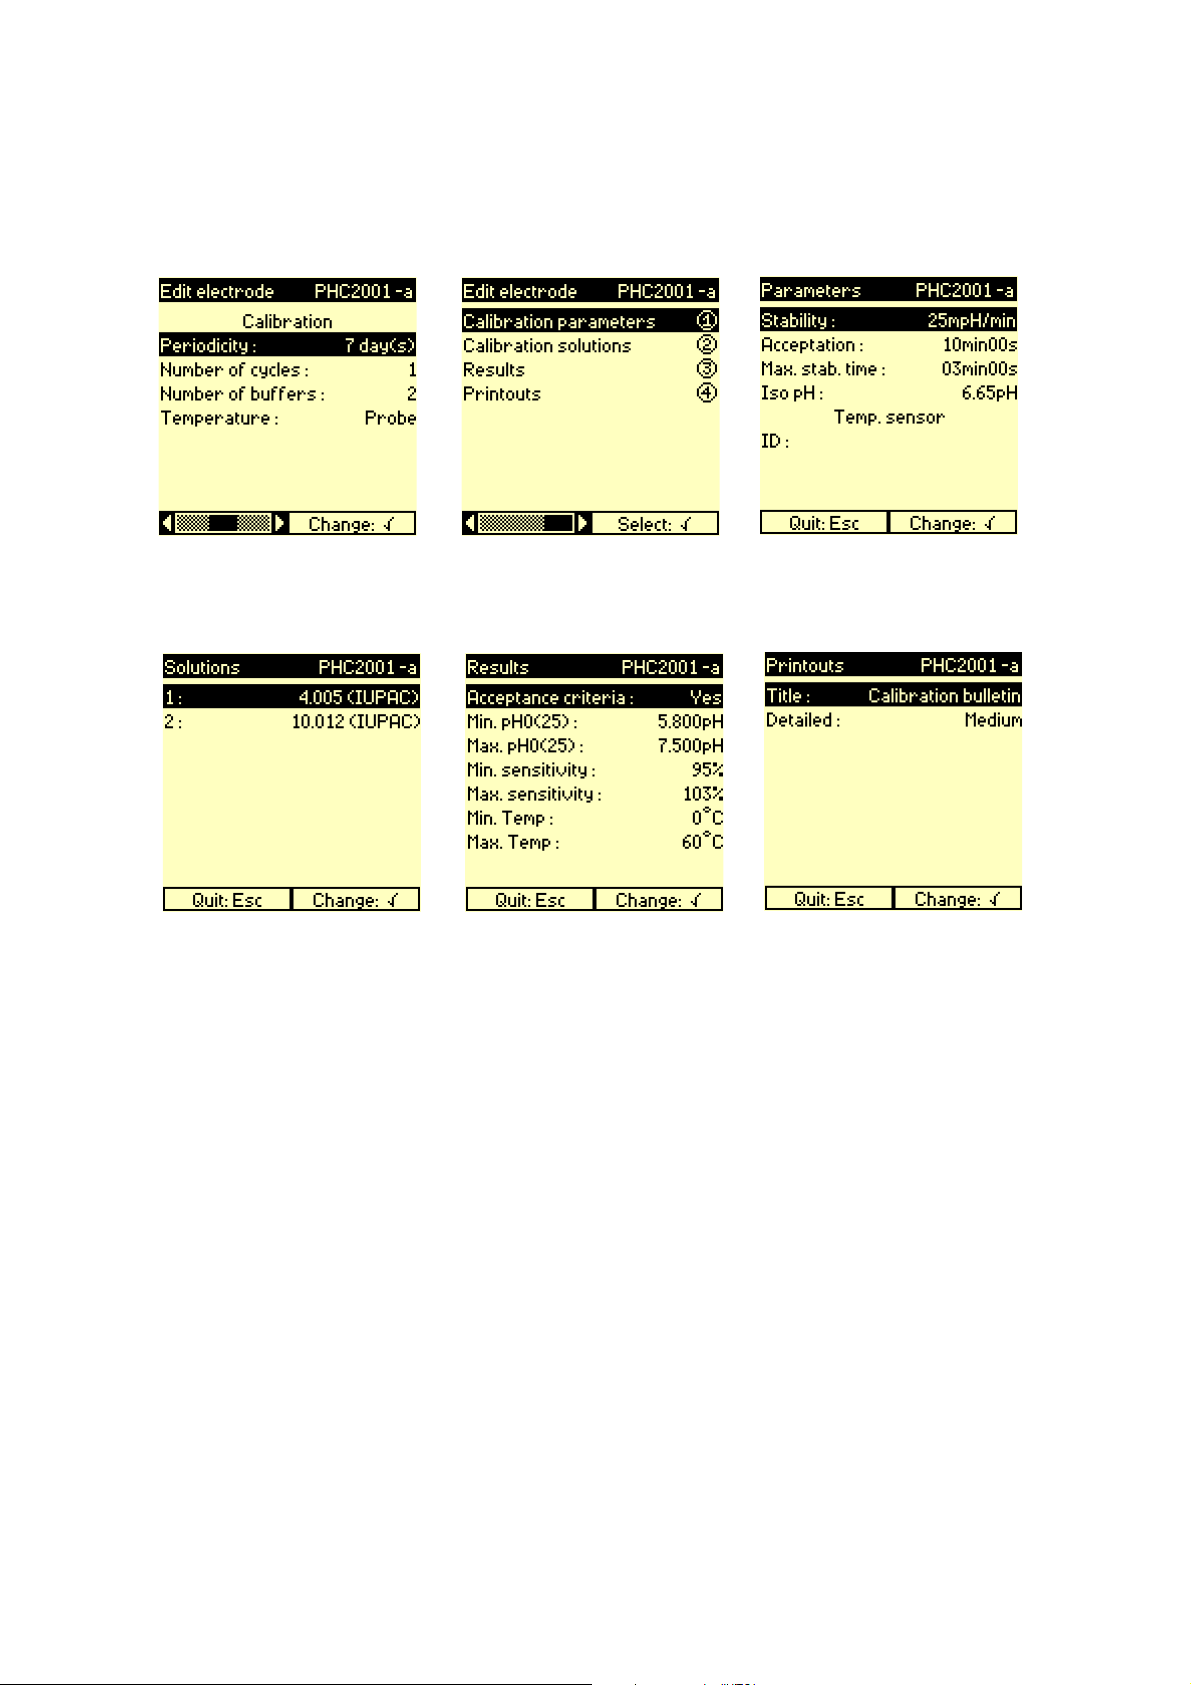
7.
Enter the calibration parameters.
10.
8.
Press 1.
11.
9.
Enter the electrode calibration
parameters. Press Esc then 2.
12.
Select the buffer solutions
used. Press Esc then 3.
Enter the results parameters.
Press Esc then 4.
Enter the printouts parameters.
Press Esc twice. Electrode
programming is completed.
Page 26
Page 27
TitraLab
®
TitraLab 860 and 865 Reference Manual
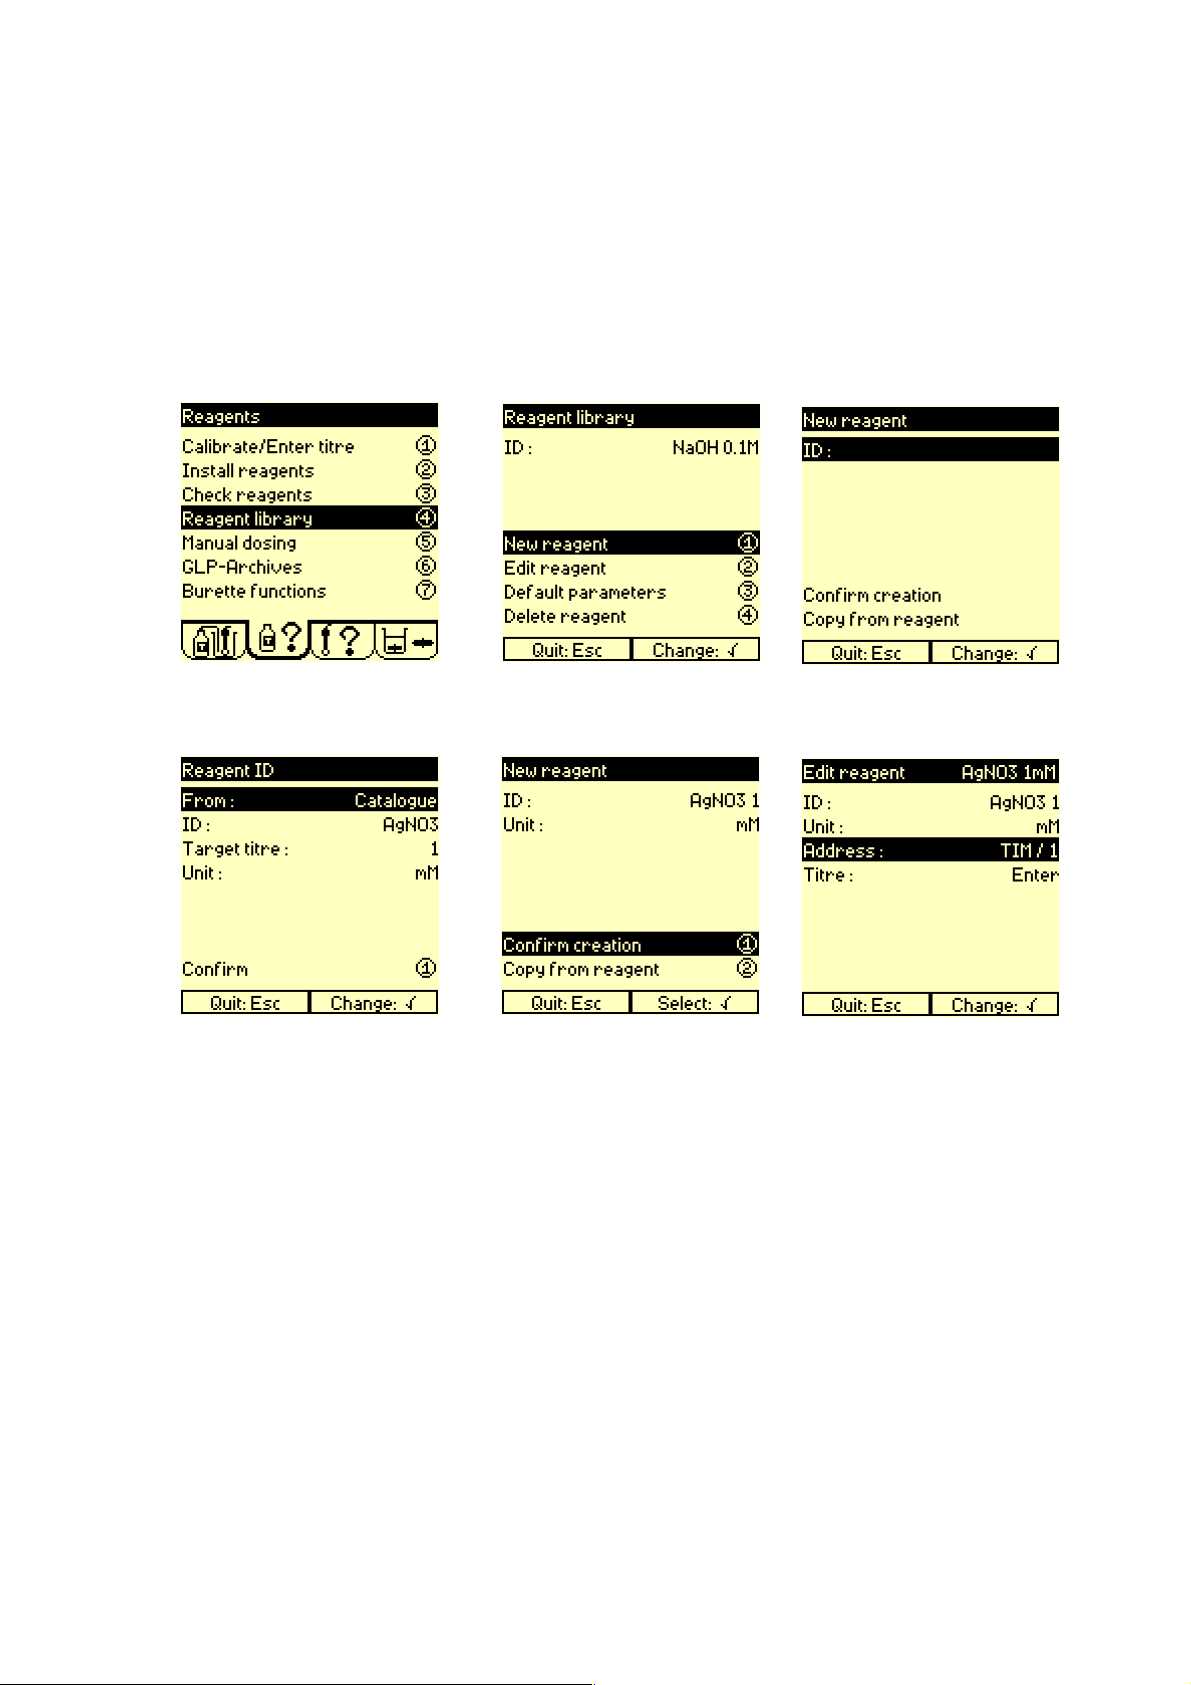
Programming reagents
1.
Press 4.
4.
2.
Press 1.
5.
3.
Press ✓.
6.
Select ID from Catalogue list or Others list.
Enter the target titre and unit.
Press 1 to confirm.
Confirm the creation of the new
reagent.
Enter the burette address.
Select Titre = Calibrate if a calibration is required, go to step 7.
Select Titre = Enter to enter the
titre manually. Press Esc to
leave the menu. Programming
is completed.
Page 27
Page 28
TitraLab
®
TitraLab 860 and 865 Reference Manual
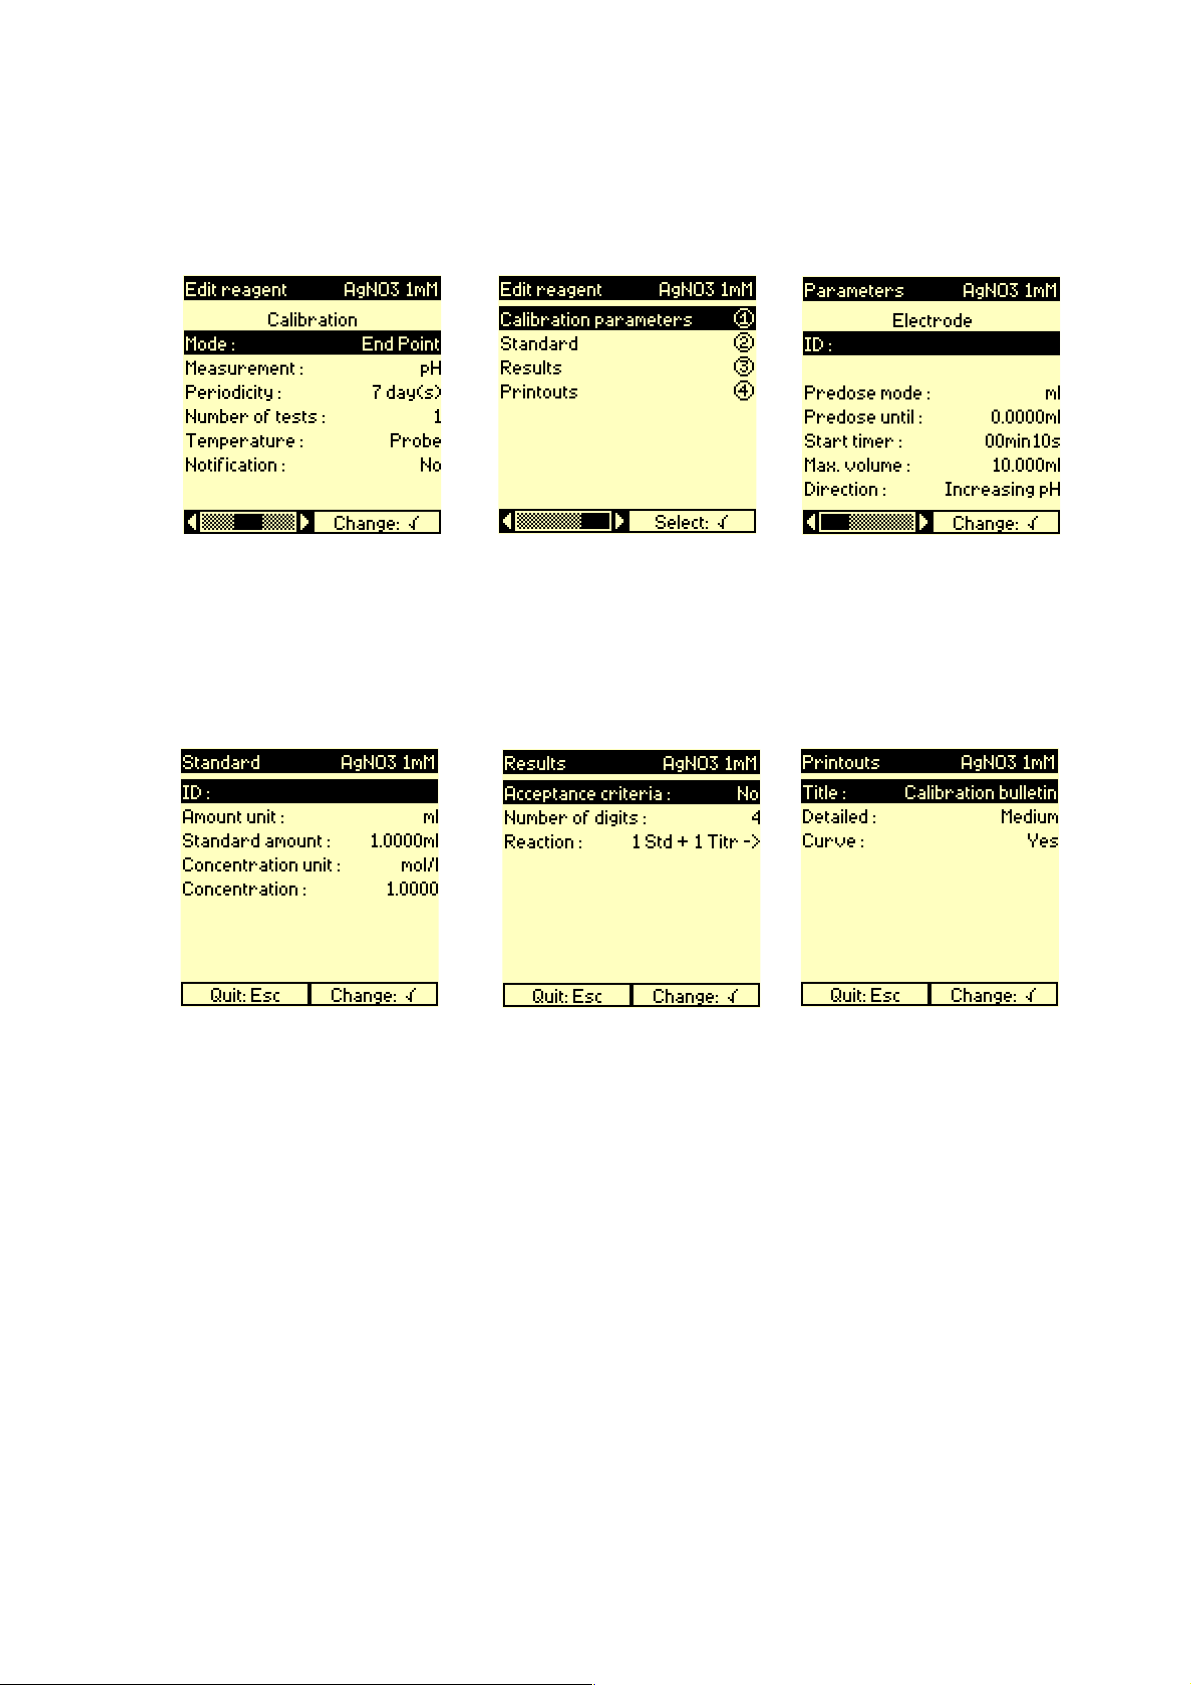
7.
Enter the calibration parameters.
10.
8.
Press 1.
11.
9.
Select the electrode used for
the calibration. This electrode
must be the one defined in the
method using this reagent.
Enter the calibration parameters. Press Esc then 2.
12.
Enter the parameters of the standard used for the calibration. Press
Esc then 3.
Page 28
Enter the Results parameters.
Press Esc then 4.
Enter the printouts parameters.
Press Esc twice. Reagent programming is completed.
Page 29
TitraLab
®
TitraLab 860 and 865 Reference Manual
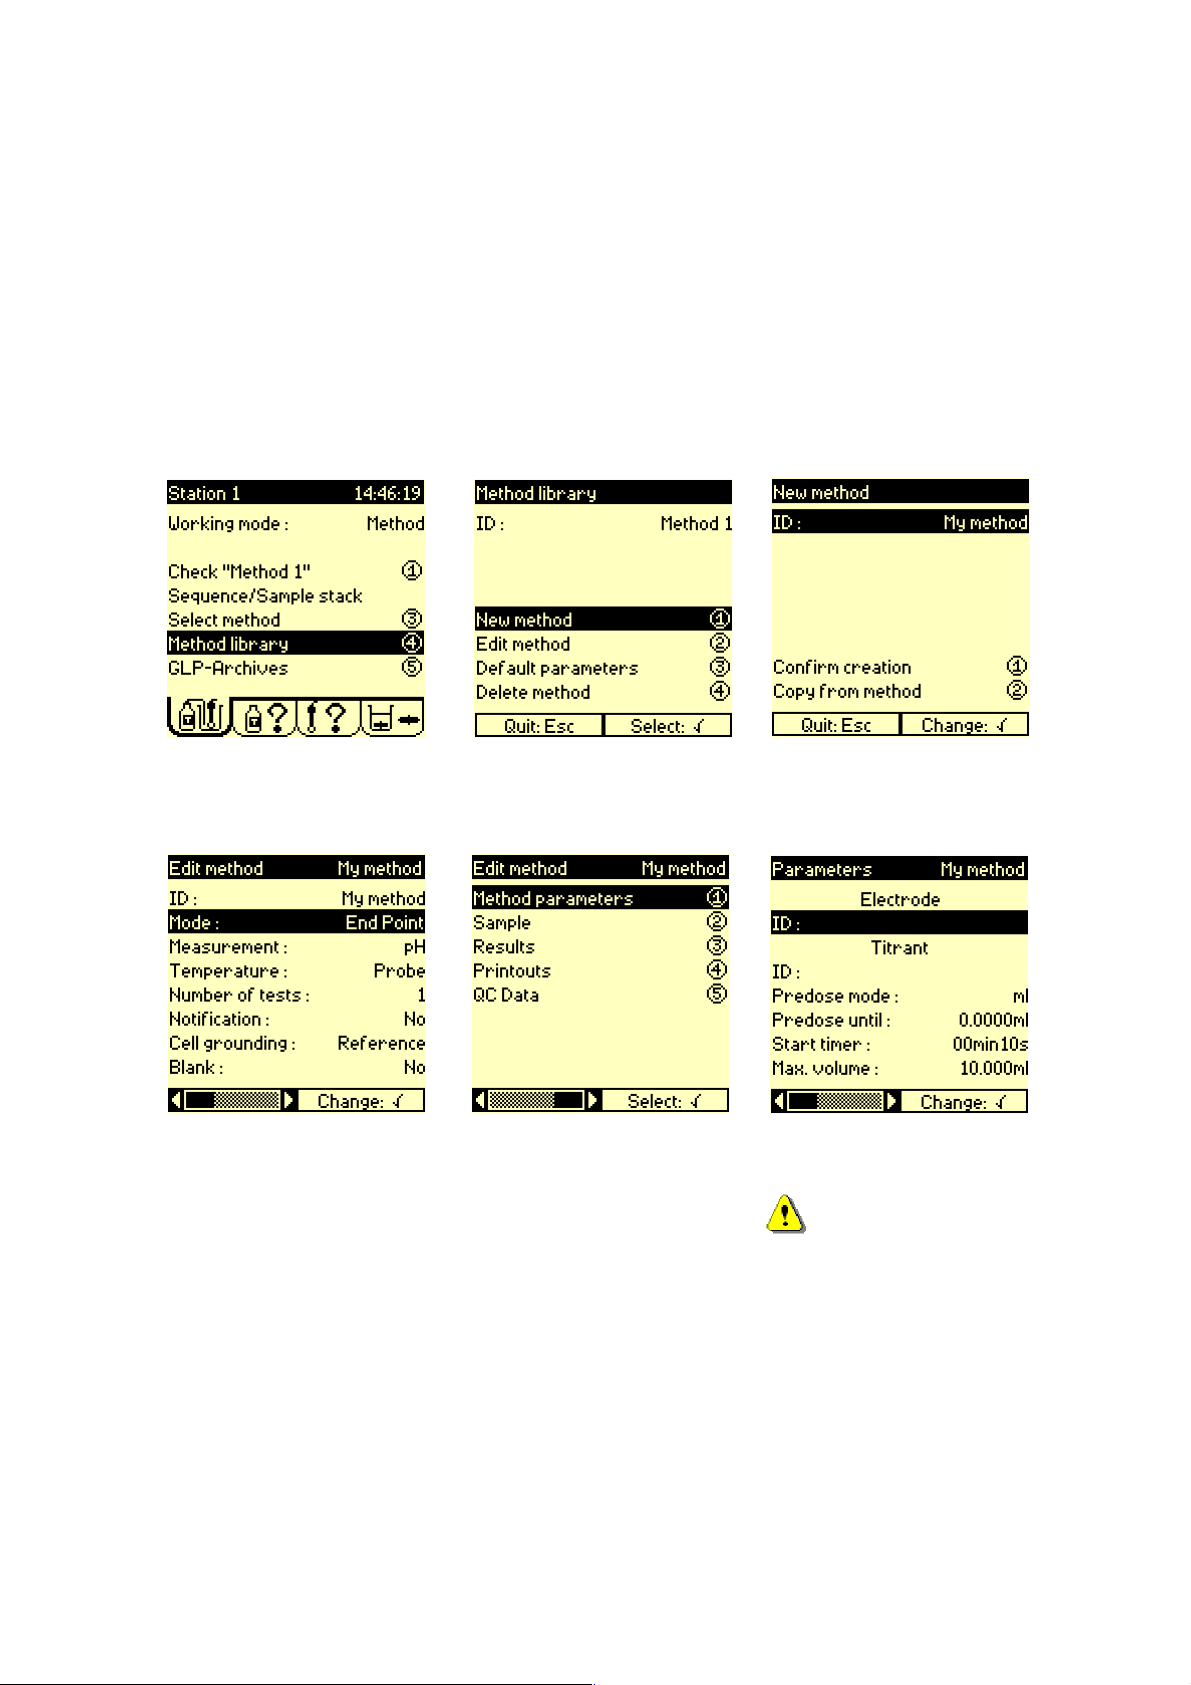
Programming methods
Creating and editing a method
1.
Press 4.
4.
2.
Press 1.
5.
3.
Enter ID.
Press 1 to confirm.
6.
Enter method parameters.
Specify the Mode, see "Mode",
page 140.
Press 1.
Press ✓ and select the
electrode(s) from the list(s).
Do not forget to select
the same electrode(s)
as the one(s) created in the
reagent calibration method.
Enter the other method parameters. Press Esc then 2.
Page 29
Page 30

TitraLab
®
TitraLab 860 and 865 Reference Manual
7.
Enter the Sample parameters.
Press Esc then 3.
10.
8.
Enter the results parameters.
Press Esc then 4.
9.
Enter the printouts parameters.
If a QC sample has been
defined in step 4, press Esc
then 5.
Enter the QC data. Press Esc
twice. Method programming is
completed.
Page 30
Page 31

TitraLab
®
For a Coupled method
TitraLab 860 and 865 Reference Manual
1.
Press 4.
4.
2
Press 1.
3.
Enter the Method ID and press
1 to confirm.
Select Mode = Coupled.
Enter the method to be linked.
Press Esc twice.
Method programming is
completed.
A Coupled method can include a so-called “Reprocessing“ method to reprocess automatically
the last curve obtained by the instrument, see "Reprocessing a curve (Automatic mode)",
page 181.
Page 31
Page 32

TitraLab
®
TitraLab 860 and 865 Reference Manual
Page 32
Page 33

TitraLab
®
TitraLab 860 and 865 Reference Manual
Programming TIM sequences
A TIM sequence is a sequence of methods with manual change of the beakers. No sample changer
is used.
1.
Select Sequence.
4.
2
Press 2.
5.
3.
Enter a name for the sequence.
6.
Press 3.
Press 1 to add a method.
Select the type of method.
Page 33
Page 34

TitraLab
®
TitraLab 860 and 865 Reference Manual
7.
Select a method in the list of
available methods.
10.
8.
Press 1 to add the method to
the sequence.
9.
If Sample has been selected in
step 6, enter the number of
samples (number of times you
wish to repeat the method in
the sequence).
Press 1 to add a second
method to the sequence.
Repeat steps 6 to 9.
Up to 10 methods can be
chained in a sequence.
After having added the last
method, press Esc twice.
Sequence programming is
completed.
Page 34
Page 35

TitraLab
®
TitraLab 860 and 865 Reference Manual
Programming SAC sequences
A SAC sequence is a sequence of methods with automatic change of the beakers. A sample
changer (SAC80, SAC90, SAC850 or SAC950) is used.
1.
Press Stop for 3 seconds to
enter the Setup menu.
4.
2
Press 1.
5.
3.
Select a Sample Changer
(SAC80, SAC90, SAC850 or
SAC950). Enter the parameters
of the sample changer selected
(number of rinses, rinse time,
etc.).
Press Esc then 5 (Exit) to quit
the Setup menu.
6.
Select SAC Sequence.
Press 2.
Enter a name for the sequence.
Page 35
Page 36

TitraLab
®
TitraLab 860 and 865 Reference Manual
7.
Press 3.
10.
8.
Press 1 to add a method.
11.
9.
Select the type of method.
12.
Select a method in the list of
available methods.
Press 1 to add the method to
the sequence.
If Sample has been selected in
step 9, enter the number of
samples (number of times you
wish to repeat the method in
the sequence).
If a SAC850 or SAC950 has
been selected in step 3, enter
the sample preparation
number.
Page 36
Page 37

TitraLab
®
13.
Press 1 to add a second
method to the sequence.
Repeat steps 9 to 12.
Up to 10 methods can be
chained in a sequence.
After having added the last
method, press Esc twice.
Sequence programming is
completed.
TitraLab 860 and 865 Reference Manual
Page 37
Page 38

TitraLab
®
TitraLab 860 and 865 Reference Manual
Programming tips
• Do not forget to declare electrode(s) while setting up reagent parameters, if calibrated.
• Do not forget to declare electrode(s) and reagents(s) when programming your method
parameters
• If reagents are calibrated, the same electrode must be used in both sample analysis
method and reagent calibration.
• If a Sample Changer is used, do not forget to declare one in the Configuration menu.
If no sun icons appear after the method has been selected, check the following points:
1. Install electrode(s) for selected method, see "Check electrodes", page 74.
2. Install reagent(s) for selected method, see "Install reagent", page 126.
3. If required, calibrate electrode, see "Calibrate electrodes", page 70.
4. Calibrate/enter reagent titre,
see "Titre Enter/Calibrate", page 222.
see "Reagent calibration", page 168.
If Sunny icons appear
These are required to run the selected method.
If the Cloudy icon appears:
The electrode/reagent calibration should be performed within 24 hours. The expi-
ry date of one of the reagents in the system will expire in less than one week.
This is a simple warning, it will not stop you from running the analysis.
If the Stormy icon appears:
Titrant and/or electrode required in the selected method is/are not installed or
have not been calibrated.
If the Question mark icon appears:
It is a programming error, reagent and/or electrode is/are not defined in the select-
ed method. Revise the method programming.
If the Calculator icon appears:
Reprocessing mode (Working mode = Reprocessing) is set on your instrument.
Change the working mode if you want to run a method or a sequence.
Refer to "Working mode", page 226.
Page 38
Page 39

TitraLab
®
When a Stormy or a Question mark icon appears, press 1 “Check” . The Titration
Manager will automatically guide you through the operations necessary to solve
the errors encountered.
TitraLab 860 and 865 Reference Manual
Page 39
Page 40

TitraLab
®
TitraLab 860 and 865 Reference Manual
Page 40
Page 41

Glossary
Page 42

Page 43

TitraLab
E2
TEMP
GND
PROPELLER
90-264
ac
47-63
Hz 115VAVA
PC/TIM
AUX.
MADE IN FRANCE
RADIOMETER ANALYTICAL SAS
REF
Pt-Pt
SLAVE
LINE FUSE T1A L250V
E2
TEMP
GND
PROPELLER
90-264
ac
47-63
Hz 115VAVA
PC/TIM
AUX.
MADE IN FRANCE
RADIOMETER ANALYTICAL SAS
REF
Pt-Pt
SLAVE
LINE FUSE T1A L250V
E2
TEMP
GND
PROPELLER
V OUT
V OUTININ
TTL
90-264
ac
47-63
Hz 115VAVA
PC/PRINTER
BALANCE
LOCAL
SAC80/90
AUX.
MADE IN FRANCE
RADIOMETER ANALYTICAL SAS
REF
Pt-Pt
SLAVE
LINE FUSE T1A L250V
®
TitraLab 860 and 865 Reference Manual
0IP (result indicator)
ABU1/ABU2
Refer to "Result indicators", page 185.
ABU1 means an ABU52 connected to the Local socket of the Titration
Manager.
ABU2 means an ABU52 connected to the Slave socket of a second
ABU52 itself connected to the Local socket of the Titration Manager.
Titration Manager
MADE IN FRANCE
RADIOMETER ANALYTICAL SAS
PC/PRINTER
SLAVE
PROPELLER
BALANCE
LOCAL
LINE FUSE T1A L250V
1212V OUT
SAC80/90
AUX.
5V OUT
TTL
90-264
Vac
47-63
Hz 115
E1E1E2
TEMP
REF
Pt-Pt
GND
I
O
5V OUT12V OUT IN
Cable, part no. A95X501
MADE IN FRANCE
LINE FUSE T1A L250V
MADE IN FRANCE
RADIOMETER ANALYTICAL SAS
PC/TIM
SLAVE
PROPELLER
AUX.
90-264
Vac
47-63
Hz 115
E1E1E2
TEMP
REF
Pt-Pt
GND
I
O
LINE FUSE T1A L250V
RADIOMETER ANALYTICAL SAS
PC/TIM
SLAVE
PROPELLER
AUX.
90-264
Vac
47-63
Hz 115
E1E1E2
TEMP
REF
Pt-Pt
GND
I
O
ABU52 Number 2
"ABU2"
ABU52 Number 1
"ABU1"
Figure 1: ABU1 and ABU2
ABU1 and ABU2 identify the ABU52 used for electrode connections
and burette installations, see "Address", page 51.
Two ABU52 Biburettes can be connected to one Titration
Manager.
Accept a result
Refer to "Result accepted (Yes/No)", page 184.
Page 43
Page 44

TitraLab
®
TitraLab 860 and 865 Reference Manual
Acceptance criteria
Acceptance criteria = Yes
Enables the user to enter preset minimum and maximum values for
measurement results. If the result lies outside these values an alarm
message appears and the results are rejected by the instrument. The
Supervisor is the only person allowed to accept a result that has been
rejected by the instrument, see "Result accepted (Yes/No)", page
184.
Therefore, acceptance limits can be set on:
• the result value such as a pH, a potential,
see "Minimum value - Maximum value", page 139.
• the response slope of a pH electrode,
see "Min. sensitivity - Max. sensitivity", page 137.
• the pH0 of a pH electrode,
see "Min. pH0(25) - Max. pH0(25)", page 137.
Acceptance criteria = No
The Supervisor or Routine user is free to accept/reject the results.
Enter in:
Edit method > Results
Edit method > QC data
Edit reagent > Results
Edit electrode > Results
Irrespective of the Yes or No option selected for the
Acceptance criteria parameter, acceptance limits must be set
for the sample or the standard measured temperature,
see "Min. Temp. - Max. Temp.", page 138,
see "T°C minimum/maximum value", page 219.
Page 44
Page 45

TitraLab
®
TitraLab 860 and 865 Reference Manual
Acceptation
Access routine mode
Result acceptance time limit.
When the time entered for the Acceptation has elapsed the
measurement will be accepted whether stable or not.
For the signal to be accepted once the Acceptation has
elapsed, the Max. Stab. time must be greater than the Accep-
tation time.
Enter in:
Edit method > Parameters menu
Edit reagent > Calibration parameters menu
Edit electrode > Calibration parameters menu
Range available:
0 to 59:59 min:s
Press Stop for 3 seconds from the Main window then press 2.
These rules can be set by the Supervisor to allow the routine user access to certain operations.
Active electrode unknown in "method ID"
Enter in:
Setup menu > Access routine mode
The method in use, has at least one electrode which has not been
defined. Press ✓ and declare the electrode in the Electrode ID field of
the Method parameters screen.
The reagent in use, uses an electrode which has not been defined for
the reagent calibration. Press ✓ and declare the electrode in the
Parameters screen of the reagent calibration, Electrode - ID field.
Page 45
Page 46

TitraLab
®
TitraLab 860 and 865 Reference Manual
Add method menu
Add. reagent = Titrant
Use this menu to set the ID and type of method to be added to a
sequence.
In the title bar, x/y (eg. 1/1) indicates the position "x" of the method in
the sequence and "y" the total number of methods in the sequence.
When a sequence is created <1/1> is displayed.
To access:
Press 1 in the Edit sequence menu.
The reagent used for addition is the same as the titrant used for the
titration.
Press ✓ and define an addition reagent different from the titrant in the
Parameters screen of the method.
Page 46
Page 47

TitraLab
®
TitraLab 860 and 865 Reference Manual
Addition
Option available with TitraLab 865 or TitraLab860 with one or two
ABU52 connected.
Select Yes to carry out a reagent addition at the start of the titration or
a reagent calibration. This addition takes place before the titration
starts (predose included).
The reagent is added using a second burette controlled by the Titration
Manager. This second burette can be installed on the Titration
Manager or on an ABU52 connected to the Titration Manager, see
"ABU1/ABU2", page 43.
Edit an Addition method when you want to perform 2 or 3
reagent additions successively or simultaneously.
Refer to "Addition method - definition", page 49.
Use a sample preparation when you want to add a solvent
using a pump installed on a SAC850 or SAC950 Sample
Changer. Refer to "Sample preparation no.", page 201.
Enter in:
Edit method > Parameters
Edit reagent > Calibration parameters
Page 47
Page 48

TitraLab
®
TitraLab 860 and 865 Reference Manual
Addition delay
Option available with TitraLab 865 or TitraLab860 with one or two
ABU52 connected.
Parameter of an Addition method, see "Addition method - definition",
page 49.
For a 1-addition method or a multi-addition method with the
Simultaneous additions = Yes option selected, the
Addition delay is counted down at the end of the reagent
addition(s).
For a multi-addition method with the Simultaneous
additions = No option selected, an Addition delay is
to be set for each addition. An Addition delay is counted
down at the end of an addition and before the next addition is initiated.
While an addition method is running, you can carry on
regardless this delay by pressing key Del.
Enter in:
Edit method (Addition method).
Range available:
00:00 to 99:59 min:s
Page 48
Page 49

TitraLab
®
TitraLab 860 and 865 Reference Manual
Addition
method definition
An Addition method performs 1 to 3 reagent additions. These
additions can be runned simultaneously or one after the other with or
without a delay between 2 additions. No measurements are performed. An example of use is to place an Addition method in a
Coupled method before a Measurement method.
Programming an Addition method
1. In the Edit method menu, select Mode = Addition.
2. On the next line, enter the number of additions to be done (1 to 3).
For a 1-addition method
Select the addition reagent name.
Enter the reagent volume to be added (1 µl
to 999 ml)
Enter the delay to wait at the end of the
addition (00:00 to 99:59 min:s).
For a 2 or 3-addition method
Refer to "Addition method - programmation", page 50.
Page 49
Page 50

TitraLab
®
TitraLab 860 and 865 Reference Manual
Addition
method programmation
For a 1-addition method
Refer to "Addition method - definition", page 49.
For a 2 or 3-addition method
At the Simultaneous additions, select whether you want
to perform the additions simultaneously or one after th other.
• In the case of simultaneous additions:
Enter the delay to wait at the end of the 2 or 3 additions (00:00 to 99:59 min:s).
Enter for each addition, the reagent name and the volume to be added (1 µl to
999 ml).
• In the case of additions performed one after the other:
Enter for each addition, the reagent name, the volume of reagent to be added
(1 µl to 999 ml) and the delay to wait at the end of the addition (00:00 to
99:59 min:s).
For the Auxiliary output parameter, see "Auxiliary output", page 56.
In an Addition method, it is not possible to run 2 additions of
the same reagent.
In an titration method, it is also possible to run one reagent
addition before the titration starts, see "Addition", page 47.
Page 50
Page 51

TitraLab
®
TitraLab 860 and 865 Reference Manual
Addition volume
Address
Refer to "Reagent addition volume", page 167.
The position where the electrode and burette are placed during operation:
Electrode
The electrode address is defined using the format “xxx/y” where “xxx”
corresponds to the instrument (TIM, ABU1 or ABU2) where the
electrode is connected and “y” corresponds to the socket.
For example TIM/E1, indicates that the electrode is connected to E1
socket on the Titration Manager.
It is always recommended to connect an indicating electrode
and its associated reference to the same instrument (TIM,
ABU1 or ABU2).
Refer to "Electrode connection", page 102.
Burette
The burette address is defined using the format “xxx/y” where “xxx”
corresponds to the instrument (TIM, ABU1 or ABU2) where the burette
is placed and “y” corresponds to the position. For example TIM/1, indicates that the burette is placed on the Titration Manager in position 1.
Alarm: Locked
Position 2
Figure 2: Burette positions
Refer to "ABU1/ABU2", page 43.
The user cannot bypass an electrode, reagent calibration and/or QC
sample analysis if the last result obtained lies outside the acceptance
range.
Enter in:
Setup menu > Access routine mode
Position 1
Page 51
Page 52

TitraLab
®
TitraLab 860 and 865 Reference Manual
Alarm: Unlocked
Aliquot
Enables the user to bypass an electrode, reagent calibration and/or
QC sample analysis when the last result obtained lies outside the acceptance range.
Enter in:
Setup menu > Access routine mode
Amount that is taken from the diluted sample. This amount is used for
analysis.
y ml (or g) of sample + solvent
The quantity of species present in the sample is calculated
1.
Sample amount
2.
Dilution under stirring
with a solvent to obtain
a final amount of x ml (or g)
3.
Titration
using the result obtained at the end of the titration.
Quantity of species in sample = Result
x = Final dil. amount
y = Aliquot
x
x
y
Figure 3: What is an aliquot?
Enter in:
Edit method > Sample
Range available:
0.001 to 100000 (unit = Sample unit)
Page 52
Page 53

TitraLab
®
TitraLab 860 and 865 Reference Manual
Alphanumeric characters
The following alphanumeric characters can be obtained using the
Titration Managers Keypad:
Keys Characters
7 7, A, B, C, a, b, c, @
8 8, D, E, F, d, e, f
9 9, G, H, I, g, h, i
4 4, J, K, L, j, k, l
5 5, M, N, O, m, n, o, µ
6 6, P, Q, R, p, q, r
1 1, S, T, U, s, t, u
2 2, V, W, v, w
3 3, X, Y, Z, x, y, z
0 0, -, +, *, ^, =, #, <, >, .
space, /, (, ), [, ], |, ?, !, %, °
Amount unit
Applied signal (AC/DC)
Archives data lost - Cal. Data lost - Methods kept
Table 1: Entering alphanumeric characters
Unit of the amount of standard used to calibrate the titrant. The standard can be expressed as a weight (g or mg) or a volume (ml or µl).
Enter in:
Edit reagent > Standard
Specifies the current type (alternative AC or direct DC) to be sent to
the Pt-Pt socket on the Titration Manager. The AC signal frequency is
1.67 Hz. This option is available if mV(i>0) has been selected for
Measurement in the Edit method or Edit reagent menus.
Enter in:
Method parameters menu
Reagent parameters menu
Instrument internal failure. Only the method parameters have been
kept.
Page 53
Page 54

TitraLab
®
TitraLab 860 and 865 Reference Manual
Assistant function
Autochaining
Embedded instructions on the Titration Manager display to guide the
user step-by-step through electrode and titrant installations. These instructions appear at the start of a run method if the working system has
not been correctly installed.
By default this option is set to Yes. It is recommended to use
the default setting at all times!
If the setting is set to No, the Titration Manager considers that the
working system is correctly installed at the start of a run method.
However, this may not be the case, the user must know the status of
the working system at all times!
Enter in:
Setup menu > Configuration menu
This option is valid for a Coupled method which is not part of a
sequence.
Autochaining = No
At the end of each method run, you must confirm the result in order to
perform the next method. If a Notification message has been
selected, a message is displayed between each method of the
Coupled method.
Autochaining = Yes
At the end of each method run, The methods are chained
automatically in the Coupled method. If a Notification message has
been selected, a message is displayed upon starting the first method
(no message is displayed after).
Refer to "Notification message", page 142.
Enter in:
Edit method menu (for a Coupled method)
Page 54
Page 55

TitraLab
®
TitraLab 860 and 865 Reference Manual
Auxiliary input
The auxiliary input socket can be connected to an external device unit
used to send an analysis start command to the Titration Manager. The
analysis is a sequence of methods with manual change of the titration
beakers (Working mode = Sequence, see "Working mode", page
226).
The external device unit is to be connected to the red and black IN
banana sockets of the Titration Manager. The red banana socket
receives the TTL 0 ± 5 V auxiliary signal and the black banana socket
is connected to the instrument electrical zero.
Proceed as follows to trigger a sequence of methods by an auxiliary
signal input:
• In the Configuration menu, select
Controlled by TTL IN = Yes.
• Connect the auxiliary control unit to red and black IN banana
sockets of the Titration Manager.
• Run the sequence. The Titration Manager displays a waiting for
auxiliary signal message. The sequence is started as soon as the
auxiliary signal is received.
Spécifications of the auxiliary input signal
Refer to "TTL IN (sockets)", page 223.
Page 55
Page 56

TitraLab
®
TitraLab 860 and 865 Reference Manual
Auxiliary output
The auxiliary outputs are used to control external equipment such as
valves or pumps during titrations. This signal is sent between the red
and black banana sockets 5V OUT or 12V OUT of the Titration
Manager.
Auxiliary output (5 V, 12 V, No)
Activate to 5 V or 12 V or disable the auxiliary signal.
Specifications of the auxiliary ouput signal:
see "TTL 5 V OUT/TTL 12 V OUT (sockets)", page 222.
Aux. action
Titration start
The auxiliary signal is initiated at titration start (before predose if relevant). Duration is set by Aux. on for.
Titration end
The auxiliary signal is initiated at titration end. Duration is set by
Aux. on for.
Whole titration
The auxiliary signal is initiated at titration start (before predose if relevant), and lasts the whole titration.
Aux. on for
Time during which the auxiliary signal is set to 5 V or 12 V when the
Titration start or Titration end is selected for
Aux. action.
Enter in:
Method parameters menu
Reagent parameters menu
Range available:
Aux. action: Titration start, Titration end or Whole titration
Aux. on for: 0 to 99:59 min:s
Measurement and Addition methods:
The Aux. action parameter is not available in a
Measurement or an Addition method. An auxiliary output can
be activated:
•at the measurement start or before the first reagent addition
(duration set by Aux. on for)
or during the whole measurement including measurement
stabilisation delay or during all the reagent addition(s). In this
case, select a 5 V or 12 V auxiliary output and set
Aux. on for = 0.
Page 56
Page 57

TitraLab
®
TitraLab 860 and 865 Reference Manual
Aux. action / Aux. on for
Back reagent = Titrant
Back reagent unknown
Back titration
Refer to "Auxiliary output", page 56.
The reagent used for the back titration is the same as the titrant used
for the titration.
Press ✓ and define a back reagent different from the titrant in the
Parameters screen of the method.
The method uses a back reagent which has not been defined.
Press ✓ and enter a back titration ID in the Parameters screen of the
method.
An excess of reagent is added to the sample and after a short time, the
excess is then back-titrated using the titrant.
In volumetric analysis, back titrations are useful when a direct titration
runs too slowly.
Back titration ID
Name of the excess reagent to be added during the titration. This
name is entered directly using the keypad (max. 20 alphanumeric
characters), with the unit (mM, M, mN or N).
Enter in:
Edit method > Parameters menu (back titration method)
Page 57
Page 58

TitraLab
®
TitraLab 860 and 865 Reference Manual
Back titration No/Manual/ Automatic
Back titration = No
This is a direct titration.
Back titration = Manual
This is a back titration where the excess reagent is added using a
separate burette or a pipette not controlled by the Titration Manager.
This reagent is defined using its titre and volume in the Parameters
screen. This reagent is not selected in the Reagent library.
Back titration = Automatic
Option available with TitraLab 865 or TitraLab860 with one or two
ABU52 connected.
This is a back titration where the excess reagent is added using a second burette controlled by the Titration Manager. This second burette
can be installed on the Titration Manager or on an ABU52 connected
to the Titration Manager, see "ABU1/ABU2", page 43.
The excess reagent is created or selected from the User list.
Enter in:
Edit method > Parameters menu
Page 58
Page 59

TitraLab
®
Balance cables A95Z201,
A95Z202
TitraLab 860 and 865 Reference Manual
1 m
Titration
Manager
Balance
socket
A95Z201
BALANCE
METTLER
1
RxD
2
3
TxD
4
DTR
5
GND
6
DSR
RTS
7
8
CTS
9
DTE
Female 9-pin
Figure 4: Balance cable, A95Z201
1 m
Titration
Manager
Balance
socket
A95Z202
1
TxD
3
RxD
2
CTS
5
7
GND
4
RTS
DSR
6
20
DTR
DCE
Male 25-pin
BALANCE
SARTORIUS
1
RxD
2
3
TxD
DTR
4
5
GND
6
DSR
RTS
7
CTS
8
9
DTE
Female 9-pin
Figure 5: Balance cable, A95Z202
1
TxD
2
RxD
3
CTS
5
7
GND
Gnd
4
Return
20 DTR
25
DTE
Male 25-pin
Page 59
Page 60

TitraLab
®
Balance cables A95Z204,
A95Z205
TitraLab 860 and 865 Reference Manual
2 m
Titration
Manager
Balance
socket
A95Z204
BALANCE
SARTORIUS
1
RxD
2
3
TxD
DTR
4
5
GND
6
DSR
RTS
7
CTS
8
9
DTE
Female 9-pin
Figure 6: Balance cable, A95Z204
2 m
Titration
Manager
Balance
socket
RxD
TxD
1
2
3
A95Z205
1
TxD
2
RxD
3
CTS
5
7
GND
Gnd
4
Return
20 DTR
25
DTE
Male 25-pin
BALANCE
METTLER
1
TxD
3
RxD
2
Page 60
4
DTR
5
GND
6
DSR
RTS
7
8
CTS
9
DTE
Female 9-pin
Figure 7: Balance cable, A95Z205
CTS
5
7
GND
4
RTS
DSR
6
20
DTR
DCE
Male 25-pin
Page 61

TitraLab
®
Balance cables A95Z206,
A95Z207
TitraLab 860 and 865 Reference Manual
1 m
Titration
Manager
Balance
socket
A95Z206
BALANCE
METTLER
Female 9-pin
RxD
2
3
TxD
4
DTR
5
GND
6
DSR
RTS
7
CTS
8
9
DTE
Figure 8: Balance cable, A95Z206
1.20 m
Titration
Manager
Balance
socket
RxD
TxD
1
2
3
A95Z207
TxD
12
RxD
2
CTS
3
13
GND
METTLER PLUG
15-pin
BALANCE
PRECISA
1
TxD
2
RxD
3
4
DTR
5
GND
6
DSR
RTS
7
CTS
8
9
DTE
Female 9-pin
Figure 9: Balance cable, A95Z207
CTS
5
7
GND
4
RTS
25
20
DTR
DTE
Male 25-pin
Page 61
Page 62

TitraLab
®
Balance cables A95Z208
TitraLab 860 and 865 Reference Manual
1 m
Titration
Manager
Balance
socket
RxD
TxD
DTR
GND
DSR
RTS
CTS
1
2
3
4
5
6
7
8
A95Z208
BALANCE
PRECISA
1
TxD
2
3
4
5
GND
6
RxD
7
8
9
DTE
Female 9-pin
Figure 10: Balance cable, A95Z208
RJ45
Male 8-pin
Page 62
Page 63

TitraLab
®
TitraLab 860 and 865 Reference Manual
Balance connection
Connect the balance to the Titration Manager using the cable corresponding to the type of balance used, see table below:
Balance Type Cable Cable
length
Mettler PE + option 016
AE + option 012 or 011
AM, PM, SM, AT, MT,
A95Z201
A95Z205
1 m
2 m
A95Z206 1 m
UMT, PJ, AJ
Sartorius MasterPro, QC, MP8-4
BP110S, CT224S,
LE244S-OCE
A95Z202 1 m
A95Z204 2 m
Precisa All models (except XB220) A95Z207 1 m
XB220 A95Z208 1 m
Table 2: Balance types
Cables can be made to your desired specifications. Please contact our
sales representative if you require information regarding the type of
cable to use with your balance.
Format of messages accepted by the Titration Manager:
•Messages end: LF or CR, LF+CR,
• Units, g, mg, kg,
• The character “g” of the unit is required to mark the end of the data
recognised by the instrument,
• Spaces are ignored,
• The number of characters situated between the first character in the message and the “g” in the unit must not be more than 30, (spaces not
included),
• The number of characters received after the “g” and before the end of the
message LF, is insignificant,
• The numeric data of the weight must be transmitted before the unit.
RS232C parameters (to set on the balance):
2400 baud, even parity, 7 data bits and 1 stop bit
Example of a message transferred from a balance, type Mettler
SI 12.3456 gCRLF
data received: 12.3456 g
The units selected in the Titration Manager must be identical to the
units used by the balance.
Page 63
Page 64

TitraLab
®
TitraLab 860 and 865 Reference Manual
Balance in use
When using a balance connected to the Titration Manager, proceed
as follows:
1. Press 1 to run the method.
2. If required, enter a User ID, confirm.
3. If required, enter a Sample ID.
4. Place the sample in the sample container.
5. Place the sample container on the balance and set the balance to
zero “tare”.
6. Introduce the sample into the titration cell.
7. Weigh the “empty” sample container
8. Press ✓ in the field Test 1.
Bar code reader connection
Batch number
9. Press ✓ to accept the sample amount.
10. Press 1 to continue the titration.
Make sure that the sample amount unit is expressed in g or
mg.
Connect a bar code reader to the Titration Manager via the 6-pin mini
DIN port situated on the right hand side of the instrument.
Up to 16 alphanumeric characters can be entered when installing or
replacing a reagent. It is the reagent identification number given on
the reagent bottle.
Page 64
Page 65

TitraLab
®
TitraLab 860 and 865 Reference Manual
Beaker detection
On a SAC850 or SAC950, a Beaker detection module (ultrasonic
transducer) makes it possible to detect beakers containing liquid
sample with a height higher than the minimum detection limit
(10 mm), see "Beaker detection minimum height", page 66.
In all other cases, the beaker positions are not detected, that is to say:
a. empty positions (positions not occupied by beakers),
b. empty beakers or beakers considered as empty (i.e. beakers
with heights of liquid less than the minimum detection limit),
c. beakers containing solid or powder samples.
In case of a position not detected, you can ask the workstation to
jump the position (analysis not performed on that position): tick both
options Beaker detection and Skip empty posi-
tion. Refer to "Skip empty position", page 208
Case of a SAC950 sample changer with the Beaker cover module
already installed
On a SAC950 with the Beaker cover module installed, the Beaker
detection module is also able to detect all beakers covered by appropriate metal lids (the sample changer User’s Guide, chapter 7 "Accessories" gives a list of the metal lids part numbers). By this way, you
can detect beakers with heights of liquid less than the minimum
detection limit) or beakers containing solid or powder samples.
You have just to tick the option Beaker detection.
The option Beaker detection
If you tick the option Beaker detection, then you can ask the
workstation to jump or not the positions which will be not detected
(depending on your selection for the option Skip empty posi-
tion).
If you clear the Beaker detection option, the ultrasonic transducer is disabled. All the positions between the first and the last
beaker of the sample stack (including the static rinse and park
beakers) will be regarded as occupied by a beaker.
Thus, place beakers on all these positions. In this case, the Skip
empty position option is not available (option is greyed).
Enter in:
Setup menu > Configuration
If Sample changer = SAC850 or SAC950
Page 65
Page 66

TitraLab
®
TitraLab 860 and 865 Reference Manual
Beaker detection minimum height
The table below reports the minimum height of liquid that must be
present in the beaker in order to detect the beaker as not empty, see
also "Beaker detection", page 65.
Beaker type
diameter x height (mm)
400 ml tall form 70 x 131 10 mm (40 ml)
250 ml low form 70 x 95 10 mm (40 ml)
250 ml tall form 60 x 120 10 mm (30 ml)
125 ml, Gosselin, PP,
54 x 73
180 ml, Gosselin, PP,
54 x 103
150 ml tall form 60 x 80 10 mm (30 ml)
150 ml low form 62 x 81 10 mm (30 ml)
40-100 ml, PP 60 x 80 10 mm (30 ml) 904-490 (pack of 50)
100 ml tall form 48 x 80 10 mm (20 ml)
Detection minimum
height
10 mm (25 ml) X31T087 (pack of 50)
10 mm (25 ml) X31V005 (pack of 50)
Part no.
50 ml low form 42 x 60 10 mm (15 ml) 904-489 (pack of 50)
22-45 ml, PP 44 x 70 10 mm (15 ml) 904-489 (pack of 50)
8-25 ml, PP 44 x 70 10 mm (15 ml) 904-488 (pack of 50)
Page 66
Page 67

TitraLab
®
TitraLab 860 and 865 Reference Manual
Beaker menu
Use this menu to prepare a sample or calibration stack. It defines
individual data for all samples/standards used in the sequence.
Figure 11: Beaker menu (for a sample stack)
To access (for a sample stack):
1. Select Working mode = Sequence or SAC Sequence in the Main
window.
To get access to a SAC sequence, a Sample Changer must
be declared in the Configuration menu. Refer to "Sample
changer", page 198.
2. Press 2 Sequence/Sample stack.
3. Press 1 Sample stack.
The sequence must have been edited in the Edit sequence
menu. Refer to "Edit sequence menu", page 97.
Refer to "Sample stack", page 202.
To access (for a reagent calibration stack):
1. Select Working mode = SAC Sequence in the Main window.
2. In the Reagent window, press 1 Calibrate/Enter titre.
3. Press 3 Calibration sequence.
The reagent calibration method must have been edited.
Refer to "Edit reagent menu", page 96.
Refer to "Reagent calibration stack", page 171.
To access (for an electrode calibration stack):
1. Select Working mode = SAC Sequence in the Main window.
2. In the Electrode window, press 1 Calibrate electrodes
3. Press 2 Calibration sequence.
The electrode calibration method must have been edited.
Refer to "Edit electrode menu", page 94.
Refer to "Electrode calibration stack", page 101.
Page 67
Page 68

TitraLab
®
TitraLab 860 and 865 Reference Manual
Beakers: [F;L]
Beep
Blank (Yes/No)
The beakers information is displayed in the Edit sequence menu of a
sequence.
It indicates the First and Last positions occupied by the beakers in the
sequence.
If Yes has been selected, three beeps will sound when a result is
obtained.
Enter in:
Setup menu > Configuration
Select Yes to subtract the volume of reagent used to titrate the solvent
from the volume found for the dissolved or diluted sample.
When you run for the first time a method with a blank, you start with
the determination of the blank. The blank volume is saved with the
method. If you start again this method, you have the choice between
running an analysis with the blank alone or running an analysis of the
sample with subtraction of the blank volume to the result.
Blank not required
Blank on inflection no.
Blank required
Enter in:
Edit method menu
This message appears at the start of a sequence, if a method
sequence programmed with a blank titration has now been reprogrammed without a blank.
Go to Sequence/Sample stack, Edit sequence menu and remove the
blank titration method from the sequence.
Inflection point number (1 to Number of IP) on which the blank volume
will be subtracted.
Enter in:
Edit method > Results (for Monotonic IP, Dynamic IP or Continuous IP
method).
This message appears at the start of a titration when a blank has
been programmed in the method, but a blank value is not available.
Page 68
Press ✓ and run blank.
Page 69

TitraLab
®
TitraLab 860 and 865 Reference Manual
Blank volume
Burette functions menu
Volume of titrant consumed by the titration on a blank sample.
If you run an End point titration with several E.P., a blank volume is
found for each E.P. If you run an Inflection point titration, one blank
volume is found irrespective of the number of Inflection points found
for the method. This blank volume is determined on a particular inflec
tion point of the titration curve, see "Min. ordinate Max. ordinate -
Blank", page 137.
When you run a method with a blank for the first time, the blank is
determined and stored along with the method. If the method is
restarted, you will be given the choice to run a sample analysis or a
blank analysis.
For a sample analysis using an End point method, a blank volume will
be automatically subtracted from each end point found.
For a sample analysis using an Inflection point method, a blank
volume will be automatically subtracted from the Inflection point
selected by the user, see "Blank on inflection no.", page 68.
These functions can be activated during the preparation of the
burette, before installing the reagent.
To access, press 7 in the Reagents window. To run a burette function,
select the burette in the Address field, then press 1 to 6 corresponding to the required procedure. The title bar shows the volume of
the burette in use. You can replace (key 5) or remove this burette (key
6).
Burette speed
Figure 12: Burette functions menu (burette installed/not installed).
The maximum burette speed (in ml/min) is three times the nominal
value of the burette per minute. However, for the 50 ml burette the
maximum burette speed is 1.5 times the nominal value, i.e. 75 ml/min.
Page 69
Page 70

TitraLab
®
TitraLab 860 and 865 Reference Manual
Burette volume
Calculate with EP no.
Calculate with IP no.
The burette volume is entered while installing or replacing the burette.
This volume is indicated on the burette.
Enter in:
Install burette or Replace burette menu.
Range available:
1 ml, 5 ml, 10 ml, 25 ml or 50 ml.
End point number (1 to Number of EP) for which the volume will
be used to calculate the result. Depending on the option selected for
Results by cumulate or difference, this will be the volume delivered
from the titration start to the end point no. "n" or the volume delivered
between the end points no. “n-1” and “n”.
Enter in:
Edit method > Results
Inflection point number (1 to Number of IP) for which the volume
will be used to calculate the result. Depending on the option selected
for Results by cumulate or difference, this will be the volume delivered
from the titration start to inflection point no. "n" or the volume
delivered between the inflection points no. “n-1” and “n”.
Calibrate electrodes
Calibrate reagents
Calibration delay elapsed
Enter in:
Edit method > Results
Refer to "Electrode calibration", page 98.
Refer to "Electrode calibration (SAC sequence)", page 99.
Refer to "Reagent calibration", page 168.
Refer to "Reagent calibration (SAC sequence)", page 169.
This message appears at titration start. A new electrode or reagent
calibration is required. The delay Periodicity entered in the Edit electrode or Edit reagent screen has elapsed, see "Periodicity", page
148.
Press ✓ and perform a calibration.
Page 70
Page 71

TitraLab
®
TitraLab 860 and 865 Reference Manual
Calibration parameters
Calibration request
Calibration results parameters
For an electrode calibration method, see "Electrode calibration
parameters", page 100.
For a reagent calibration method, see "Reagent calibration parame-
ters", page 170.
Available if Electrode type = pH
Select the option Calibrate request = Yes to calibrate
electrodes.
The corresponding calibration parameters and pH standards will be
displayed.
Enter in:
Edit electrode menu
Refer to "Results menu", page 188.
Calibration sequence
Calibration stack
Catalogue list
To run an electrode calibration sequence, see "Electrode calibration
(SAC sequence)", page 99.
To run a reagent calibration sequence, see "Reagent calibration (SAC
sequence)", page 169.
To prepare an electrode calibration stack, see "Electrode calibration
stack", page 101.
To prepare a reagent calibration stack, see "Reagent calibration stack",
page 171.
For an electrode calibration method, see "Electrode calibration
stack", page 101.
For a reagent calibration method, see "Reagent calibration stack",
page 171.
List of Radiometer Analytical names of electrodes and commonly
used reagents. This list cannot be modified.
Page 71
Page 72

TitraLab
®
TitraLab 860 and 865 Reference Manual
Cell grounding
Cell window
Defines the grounding of the measuring cell. Select one of the following options:
Reference
Grounding is ensured by a reference electrode - general use.
Metal
Grounding is ensured by a metal electrode connected to the GND
socket on the Titration Manager. Use this option in case of high resistive solutions in order to avoid measuring background noise at the
electrodes.
Others
Grounding is not ensured by the reference electrode and is defined
outside the method.
Enter in:
Edit method menu
Use LEFT/RIGHT arrow keys to access.
This window controls the stirring function of the measurement cell.
Change electrode name
Select the instrument having the stirrer
(TIM for Titration Manager, ABU1 or ABU2
for an ABU52).
Start/stop stirrer
Select stirring speed: 100 to 1100 rpm
Animated icon: indicates when stirrer
or propeller is in operation
An external stirrer (propeller) can be connected to a Titration Manager
or an ABU52.
Refer to "Stirring", page 215.
1. Display the Electrode window.
2. Press 4 then 2.
3. In the ID field, enter the new name for the electrode (16 charac-
ters maximum).
Page 72
Page 73

TitraLab
®
TitraLab 860 and 865 Reference Manual
Change method name
Change reagent name
Change sequence name
1. Display the Main window.
2. Press 4 then 2.
3. In the ID field, enter the new name (16 characters maximum).
1. Display the Reagent window.
2. Press 4 then 2.
3. In the ID field, enter the new name (20 characters maximum).
1. Display the Main window.and select Sequence or SAC sequence.
If the SAC Sequence command is not available,
declare a Sample Changer (SAC80, SAC90, SAC850,
SAC950) in the Setup > Configuration menu
(Supervisor access only).
Refer to "Sample changer", page 198.
2. Press 2 Sequence/Sample stack
3. In the Sequence/Sample stack menu, select ID.
4. Enter the new name (16 characters maximum).
Page 73
Page 74

TitraLab
®
TitraLab 860 and 865 Reference Manual
Check command
If a Stormy or a Question mark icon appears in the Reagent/Electrode
windows, press 1 to run the “Check” command. The Titration Manager
will automatically guide you through the operations required to solve
the problems encountered.
For example:
Press 1
Press ✓
Check electrodes
Press 1 to start the Electrode
Installation procedure.
Press 3 in the Electrode window to display the parameters of the current electrode used in the system. For example, electrode ID and
address.
Page 74
Page 75

TitraLab
®
TitraLab 860 and 865 Reference Manual
Check reagents
Communication failure (SAC error)
Concentration
Press 3 in the Reagent window to display the parameters of the current reagent used in the system. For example, reagent ID, date of next
calibration, expiry date etc.
The data transmission between the sample changer and the workstation cannot be performed properly.
Check the cable connections and make sure that the sample changer
is switched on and connected to the workstation via the RS232 serial
cable.
Press the workstation key ✓ or Stop and restart the sequence. It is
not possible to continue the sequence from the point it stopped.
Concentration of the titrated species present in the standard.
Enter in:
Edit reagent > Standard
Range available:
0.001 to 100000 (unit = Concentration unit)
Concentration unit
Standard concentration unit.
Enter in:
Edit reagent > Standard
Range available:
If Amount unit = ml or µl: eq/l, meq/l, mol/l, mmol/l, g/l, mg/l, mg/ml
If Amount unit = g or mg: eq/kg, meq/kg, mol/kg, mmol/kg, mg/g,
mg/kg,%
Page 75
Page 76

TitraLab
®
TitraLab 860 and 865 Reference Manual
Configuration menu
Connections
Press Stop 3 seconds in the Main window then press 1.
Contains the configuration parameters for the instrument. .
Refer to "Setup menu", page 207.
ABU52: Refer to "ABU1/ABU2", page 43.
Balance: Refer to "Balance connection", page 63.
Bar code reader: Refer to "Bar code reader connection", page 64.
Electrodes: Refer to "Electrode connection", page 102.
PC keyboard: Refer to "Keyboard connection", page 128.
PC: Refer to "PC connection", page 147.
Printer: Refer to "Printer connection", page 155.
Sample changer: Refer to "Sample changer", page 198.
Page 76
Page 77

TitraLab
®
TitraLab 860 and 865 Reference Manual
Continuous IP method
For this type of method, the titration is carried out using continuous
addition of titrant.
The titrant addition speed is regulated between two user selectable
limits (Min. speed and Max. speed). The addition speed decreases
when the slope of the E or pH = f(Volume) titration curve increases
and vice versa. This prevents overshooting the equivalent point.
Speed
E or pH
V max
V min
Volume
Figure 13: Continuous IP - Titrant addition speed
Using a Continuous IP method, higher the slope of the titration curve
is, higher the number of measurements saved will be. A great majority
of points are saved close to the inflection point. This allows an accurate determination of the equivalent point.
E or pH
Figure 14: Continuous IP - Number of points saved
The Continuous IP method can be stopped after a given number (1 to
8) of equivalent points has been detected.
Page 77
Page 78

TitraLab
®
TitraLab 860 and 865 Reference Manual
Contrast
The contrast of the display can be adjusted in the Main window.
• press 0 to increase the contrast
• press 7 to decrease the contrast
Proceed as follows to adjust the contrast of the ABU52 display from
the Titration Manager:
• Display the Cell window.
• At the line Instrument, select the ABU52 (ABU1 or ABU2) you
want to adjust the display contrast.
Refer to "ABU1/ABU2", page 43.
Controlled by TTL IN
• press 0 to increase the contrast
• press 7 to decrease the contrast
Refer to "Auxiliary input", page 55.
Page 78
Page 79

TitraLab
®
TitraLab 860 and 865 Reference Manual
Copy electrode
This procedure is used to create an electrode, without having to enter
data nor program the corresponding calibration method.
1. Enter the Electrodes window.
2. Press 4 then 1.
3. In the Function field, select the function according to the elec-
trode type then press ✓, see "Electrode type", page 106.
4. Press ✓ .
5. Select From = Catalogue.
6. In the ID field, select an electrode name from the Catalogue list.
7. In the id field, you can identify the electrode by assigning a sec-
ond id name. This electrode will be called "ID id".
8. Press 1 to confirm then 2 Copy from electrode.
9. In the Library field, select the Preprogrammed or User list.
10. In the ID field, select the electrode to be copied from the list of
available electrodes.
11. Press 1 to confirm. The electrode is created and saved in the
User list.
If you selected the option Preprogrammed, the list is limited to
electrodes of the same type as the "copied" electrode.
If you selected User, the list is limited to electrodes having the
same function (pH, mV (i=0), mV(i>0), T°C, Reference or
Ground) as the "copied" electrode.
It is not necessary to select Catalogue to create an electrode using the copy function. An electrode ID created from
Other can also use the copy function.
Page 79
Page 80

TitraLab
®
TitraLab 860 and 865 Reference Manual
Copy method
Copy reagent
1. Switch to Main window.
2. Select Method.
3. Press 4 then 1.
4. Press 3 in New method menu.
5. Enter a method name.
6. Press 2 Copy from method.
7. In the Library field, select the Preprogrammed or User list.
8. In the ID field, select the method to be copied from the list of avail-
able methods.
9. Press 1 to confirm. The method is created and saved in the User
list.
This procedure is used to create a reagent (new reagent ID), without
having to enter data nor program the corresponding calibration
method.
1. Enter the Reagents window.
2. Press 4 then 1.
3. Press ✓ in the New reagent menu.
4. Select From = Catalogue.
5. In the ID field, select a reagent name from the Catalogue list.
6. Enter the "approximate" titre for the reagent (between 0.001 and
99 999) in the Target titre field.
7. Enter the unit indicated on the reagent bottle (mM = mmol/l,
M = mol/l, mN = meq/l or N = eq/l).
8. Press 1 to confirm then 2 Copy from reagent.
9. In the Library field, select the Preprogrammed or User list.
10. In the ID field, select the reagent to be copied from the list of
available reagents.
11. Press 1 to confirm. The reagent is created and saved in the User
list.
It is not necessary to select Catalogue to create a rea-
gent using the copy function. A reagent ID created from
Other can also use the copy function.
Page 80
Page 81

TitraLab
®
TitraLab 860 and 865 Reference Manual
Coupled method
A Coupled method is a combination of methods performed in the
same beaker. When using a coupled method, the instrument runs all
these methods on the same sample.
If you wish to run a series of methods in different beakers, it is necessary to program a Sequence instead of a Coupled method.
Example: Combination of method 1 and method 2.
The number of test portions (for example 3) is entered during programming. The method is then repeated in the number of beakers
specified.
Sample 1
2
Method 2
Test portion 3
3
3
Method 2
Method 1
Test portion 1
1
1
Method 2
Method 1
= beaker number 1
1
Test portion 2
2
Method 1
Figure 15: Coupled method with three tests
Page 81
Page 82

TitraLab
®
TitraLab 860 and 865 Reference Manual
Create electrode
1. Enter the Electrode window.
2. Press 4 then 1.
3. Select the electrode function, see "Electrode type", page 106.
4. Press ✓ in the ID field.
5. Select From = Other.
The option From = Catalogue allows you to create an
electrode from a list of Radiometer Analytical electrodes.
6. Enter the electrode name (up to 16 alphanumeric characters).
7. In the Confirm creation screen:
• For electrodes with pH or mV functions only; select the electrode
type. Refer to "Electrode type", page 106.
• For combined pH or single pH electrodes; enter the internal pH
(pH int) of the electrode. Refer to "pH int", page 150.
• For combined pH, Metal/Redox or ISE electrodes, select if the
electrode has a built-in temperature sensor or not.
• For reference electrodes or combined pH, Metal/Redox or ISE
electrodes, enter the potential of the reference (in mV) versus the
Standard Hydrogen Electrode.
Refer to "Potential versus SHE", page 151.
Create method
8. Press 1 to create the electrode. The Edit electrode menu is dis-
played. Enter the electrode definition parameters.
1. Enter the Main window.
2. Select Working mode = Method.
3. Press 4 then 1.
4. Press ✓ in the New method screen.
5. Enter a method name (up to 17 alphanumerical characters).
6. Press 1 to create the method.
Go to Edit method screen and enter the method parameters.
Refer to "Programming method", page 158.
Page 82
Page 83

TitraLab
®
TitraLab 860 and 865 Reference Manual
Create reagent
Current value
1. Enter the Reagents window.
2. Press 4 then 1.
3. Press ✓ in the New reagent menu.
4. Select From = Other.
The option From = Catalogue allows you to create a reagent
from a list of commonly used reagents.
5. In the ID field, enter the reagent name (up to 14 alphanumeric
characters). It is advised to enter the chemical formula of the reagent followed by its concentration (e.g. HCl 0.1).
6. Enter the "approximate" titre of the reagent (5 characters) in the
Target titre field.
7. Enter the unit indicated on the reagent bottle (mM = mmol/l, M =
mol/l, mN = meq/l or N = eq/l).
8. Press 1 twice to create the reagent.
9. Enter the reagent parameters.
This is the current sent to the Pt-Pt socket on the titration system
(Titration Manager or ABU52). This parameter is available if
mV(i>0) has been selected for Measurement in the Edit
method or Edit reagent menus.
Curve
Curves data lost
- Cal. Data kept Methods kept
Enter in:
Method parameters menu
Reagent parameters menu
Range available:
-1000 to +1000 µA in steps of 1 µA
Select if you want to print the pH/mV = f(volume) titration curve at the
end of each test.
Enter in:
Edit method > Printouts
Edit reagent > Printouts
The last curve data acquisition is lost. Generally, this error occurs
when the instrument is switched off while an analysis is in progress.
Page 83
Page 84

TitraLab
®
TitraLab 860 and 865 Reference Manual
Customise
A name (max. 16 alphanumeric characters) can be assigned to the
Titration Manager. This name will be displayed in the title bar of the
Main window.
If required, a maximum of 4 lines (32 characters) is available to enter
personal information, or your company’s address. This information will
appear as a header at the start of the report printout.
Enter in:
Setup menu > Customise
Date entry
Default parameters
Enter current date in following format: dd:mm:yyyy.
Use the Up/Down arrow keys to jump to the month.
Enter in:
Setup menu > Configuration
Reset the parameters programmed in the method, reagent, or electrode. Use this command to reset the preprogrammed methods, reagents or electrodes to the Titration Manager’s default values.
Proceed as follows:
1. Display the Main, Reagent or Electrode window.
2. Press 4.
3. Select the method, reagent or electrode ID.
4. Press 3 Default parameters.
5. Press ✓ to confirm the reset.
Page 84
Page 85

TitraLab
®
TitraLab 860 and 865 Reference Manual
Delay after addition
Delete electrode
Option available with TitraLab 865 or TitraLab860 with one or two
ABU52 connected.
This delay is counted down after a reagent addition. This time allows
the solution to stabilise after a reagent addition and before the next
titration starts.
While an addition method is running, you can carry on
regardless this delay by pressing key Del.
Enter in:
Edit method > Parameters (titration method if Addition = Yes)
Edit reagent > Calibration parameters (titration method if Addition
= Yes)
Range available:
00:00 to 99:59 min:s
1. Select the electrode to be deleted.
2. Press 4.
3. Press ✓ to confirm or ESC to leave the menu with deleting.
Delete method
Delete reagent
It is not possible to delete an electrode which is part of a
sequence or Coupled method. Modify the method or sequence, e.g. change electrode ID or remove the electrode,
before deleting.
1. Select the method to be deleted.
2. Press 4.
3. Press ✓ to confirm or ESC to leave the menu with deleting.
It is not possible to delete a method which is part of a
sequence or coupled method. Remove the method from the
sequence or from the coupled method before deleting.
1. Select the reagent to be deleted.
2. Press 4.
3. Press ✓ to confirm or ESC to leave the menu with deleting.
It is not possible to delete a reagent which is used in another
method or sequence. Modify the method or sequence, e.g.
change reagent ID or remove the reagent, before deleting.
Page 85
Page 86

TitraLab
®
TitraLab 860 and 865 Reference Manual
Demand: Locked
Demand: Unlocked
Electrode or Reagent calibration
The routine user is not allowed to bypass an electrode and/or reagent
calibration demand before continuing measurements. It means that
the electrode and/or reagent calibration periodicity has(have) been
elapsed.
QC sample analysis
If a QC sample periodicity has been reached, the next run of the
method must be performed on a QC sample.
Sequence edition
The routine user is not allowed to create, edit or delete sequence of
methods.
Enter in:
Setup menu > Access routine mode
Electrode or Reagent calibration
The routine user is allowed to bypass an electrode and/or reagent calibration demand and continue measurements. This happens when the
electrode or the reagent calibration periodicity has elapsed.
Derivative
QC sample analysis
If a QC sample periodicity has been reached, the routine user is able
to run the method without having to use a QC sample.
Sequence edition
The routine user is allowed to create, edit or delete sequence of
methods.
Enter in:
Setup menu > Access routine mode
Specify if you want to print the derivative curve at the end of each test.
Enter in:
Printouts menu of Monotonic IP, Dynamic IP or Continuous IP method.
Page 86
Page 87

TitraLab
®
TitraLab 860 and 865 Reference Manual
Detailed
This parameter sets level of details of report printouts.
Detailed = Low
• The header only comprises the analysis name, time and date and
the instrument serial number. These data are printed on the same
line.
• Reagent or electrode calibration method: results are printed.
Detailed = Medium
This is the printout level selected by default.
• The header comprises the analysis name, time and date, the
instrument serial number and the laboratory coordinates.
• Reagent or electrode calibration method: results are printed.
Detailed = High
This is the printout level selected by default.
• The header comprises the analysis name, time and date, the
instrument serial number and the laboratory coordinates.
• Electrode data, electrode serial number, electrode calibration data
and results, burette serial number, reagent data and reagent
calibration data and results are printed.
Dilution (Yes/ No)
• The buffer data (name and batch number, potential value) are
printed.
• End point/Inflection point coordinates (potential, volume) are
printed (except for a reagent calibration).
Enter in:
Edit method > Printouts
Edit reagent > Printouts
Edit electrode > Printouts
Select Dilution = Yes when you are analysing samples which
have been diluted. The Final dil. amount and Aliquot
are to be entered next.
Enter in:
Edit method > Sample menu
Page 87
Page 88

TitraLab
®
TitraLab 860 and 865 Reference Manual
Dilution or sample unit incompatible
Direction
Manual reprocessing error: The method used for reprocessing has
a sample definition different from the curve generated.
Example: you run a titration with a sample dilution programmed and
try to reprocess this curve in manual mode with no dilution
programmed for the sample.
Edit the Sample parameters of the method to be reprocessed.
Refer to "Reprocessing a curve (Manual mode)", page 182.
Determines whether the addition of titrant increases or decreases the
pH or mV value.
This parameter informs the Titration Manager if the end point or the
Stop point is already passed before the start of the titration.
Example:
If the titration is performed with an acidic titrant on an alkaline sample,
the addition of titrant will decrease the pH value. In this case, select
Direction = Decreasing pH.
Enter in:
Edit method > Parameters menu
Edit reagent > Calibration parameters menu
Direct measurements
Disconnect electrodes
Display contrast
Refer to "Display measurement", page 89.
Disconnect all connected electrodes.
Proceed as follows:
1. Press 2 in the Electrode window.
2. Press 2 Disconnect electrodes.
3. Disconnect electrode from rear panel.
4. Press ✓ to confirm.
5. Repeat steps 3 and 4 for all other electrodes to be disconnected.
Refer to "Contrast", page 78.
Page 88
Page 89

TitraLab
®
TitraLab 860 and 865 Reference Manual
Display measurement
Press 5 in the Electrode window.
The signal measured of a connected electrode in the current system
is displayed. If several electrodes are connected, select the electrode
at the ID line.
Depending on the type of electrode connected, the display shows:
• pH and corresponding potential difference in mV (pH electrodes)
• potential difference in mV (metal/redox or ISE electrodes)
• temperature in °C (temperature sensors)
• potential difference in mV and polarisation current in µA (mV(i>0)
measurement mode for a double metal electrode). The polarisation
signal parameters are entered in the Method parameters or
Reagent parameters menus.
Refer to "Applied signal (AC/DC)", page 53.
Refer to "Current value", page 83.
Press 1 to apply or stop stirring.
Press Esc to stop measurements.
Page 89
Page 90

TitraLab
®
TitraLab 860 and 865 Reference Manual
Dyn. rinse
You have the choice between rinsing dynamically the electrodes :
• N-1/st in Park: in previous (just analysed) beaker except
1st and calibration beakers
• N-1/st in Rinse 2: in previous (just analysed) beaker
except 1st and calibration beakers
• In Park: in park (all dynamic rinses performed in the park
beaker).
For the first dynamic rinse of sample changer cycle run, we have the
choice between rinsing dynamically the electrodes in the Park beaker
or in the R2 beaker (static rinse beaker no.2). If R2 is selected, it
means that only 1 beaker remains available for static rinses (static
rinse beaker no.1 (R1)).
Refer to "Number of static rinses", page 146.
At the end of a dynamic rinse, the electrodes are left above a
nearly emptied rinse beaker. The beaker contains a little
solvent which has been used to rinse the end of the electrodes and the addition tips.
Refer to "Dynamic rinses", page 93.
Dynamic rinses can not occur in calibration beakers. When
an electrode or a reagent calibration beaker is found in the
sequence, the dynamic rinse which follows the measurement
will occur in the Park or Rinse 2 beaker depending on the
option selected for
in park,
in R2 (static rinse beaker no.2),
Dyn. rinse
.
Static rinse beakers and Park beakers: Refer to User’s
Guide of the SAC850/950 sample changer (part no.
D21T085).
Enter in:
Setup menu > Configuration
Range available:
N-1/1st in Park, N-1/1st in Rinse 2 or In Park.
If Sample changer = SAC850 or SAC950
Page 90
Page 91

TitraLab
®
TitraLab 860 and 865 Reference Manual
Dynamic dose
During Incremental IP titration the size of the increments is controlled
by the Dynamic dose. Small increments will be added in the vicinity of
the curve inflections, and larger increments will be added at the flat
part of the curve. The size of the increments cannot be greater than
the Maximum dose.
The higher the value is, the larger the increments will be. Decreasing
the Dynamic dose value slows down the titration, but leads to more
accurate titration. However, too small a value can lead to the detection
of false inflection points.
The standard value, 10, will be appropriate for standard applications. If you want to use increments of the same size, select
an IP Monotonic method.
Enter in:
Method parameters menu of a Dynamic IP method.
Range available:
1 to 999
Page 91
Page 92

TitraLab
®
TitraLab 860 and 865 Reference Manual
Dynamic IP method
A volume of titrant (increment) of varying size is added to the solution
as soon as the electrode response satisfies the measurement variations satisfy the stability criterion or once the preset Acceptation time
has elapsed. The increment size is inversely proportional to the slope
of the titration curve.
In Dynamic IP, one measurement is saved per increment added.
E or pH
Figure 16: Dynamic IP method - size of the increments
Select a Dynamic IP method when you want to optimise the ratio titration duration/accuracy of the EP/IP points detected. Dynamic IP is well
adapted to single EP/IP titrations or to titrations with well-defined EP/
IP points.
The Dynamic IP method is stopped after a given number of equivalent
points (1 to 8) has been detected.
Page 92
Page 93

TitraLab
®
TitraLab 860 and 865 Reference Manual
Dynamic rinses
Dynamic rinses are performed by a SAC850 or SAC950 Sample
Changers if the Dynamic rinsing module is installed on the sample
changer.
A Dynamic rinse performed in a Park or Rinse beaker consists of the
following operations:
1. The electrode are positioned above the Park or Rinse beaker.
2. The electrodes are dipped into the beaker. The beaker is emptied
to a waste in the same time. At the end, the electrodes are
located in the emptied beaker at their downmost position.
3. The electrodes are washed with rinse solution (usually demineral-
ised water) then start to move up under rinsing. At the end, the
electrodes are located above a beaker filled with rinse solution
and some remaining impurities.
4. Steps 2 and 3 can be repeated up to 8 times as up to 9 dynamic
rinses can be programmed. Steps 2 and 3 are performed under
stirring.
A Dynamic rinse performed in a Sample beaker consists of the following operations:
1. The electrodes are dipped into the Sample beaker. The beaker is
emptied to a waste in the same time. At the end, the electrodes
are located in the emptied beaker at their downmost position.
2. The electrodes move up and are washed in the same time with
rinse solution (usually demineralised water). At the end, the electrodes are located above a beaker filled with rinse solution and
some remaining impurities.
3. The sample beaker is emptied to a waste.
4. A last rinsing of the electrodes and delivery tips is carried out. At
the end, the electrodes are located above a nearly emptied
beaker containing a little solvent that was used to flush the electrodes and delivery tips.
5. Steps 1 to 3 can be repeated up to 8 times as up to 9 dynamic
rinses can be programmed. Steps 1 to 3 are performed under
stirring.
Page 93
Page 94

TitraLab
®
TitraLab 860 and 865 Reference Manual
Edit electrode menu
In this menu, you can rename the electrode (line ID), revise electrode
data, decide if you want to calibrate the electrode
(line Calibration request) and enter the electrode
calibration data if relevant.
To access:
1. Press 4 in the Electrode window.
2. Press 2 Edit electrode.
The following menus are accessible using the arrow keys:
Calibration parameters.
Refer to "Electrode calibration parameters", page 100.
Calibration solutions.
Refer to "Solution menu", page 210.
Results.
Refer to "Results menu", page 188.
Printouts.
Refer to "Printouts menu", page 157.
Page 94
Page 95

TitraLab
®
TitraLab 860 and 865 Reference Manual
Edit method menu
In this menu, you can rename the method (line ID), revise and enter
method data.
To access:
1. Press 4 in the Main window.
2. Press 2 Edit method.
The following menus are accessible using the arrow keys:
Method parameters.
Refer to "Method parameters menu", page 134.
Sample.
Refer to "Sample menu", page 200.
Results.
Refer to "Results menu", page 188.
Printouts.
Refer to "Printouts menu", page 157.
QC Data
Refer to "QC data menu", page 161.
Page 95
Page 96

TitraLab
®
TitraLab 860 and 865 Reference Manual
Edit reagent menu
In this menu, you can rename the reagent (line ID), revise reagent
data, decide if you want to calibrate the reagent
(line Titre) and enter the reagent calibration data if relevant.
To access:
1. Press 4 in the Reagents window.
2. Press 2 Edit reagent.
The following menus are accessible using the arrow keys:
Calibration parameters.
Refer to "Reagent calibration parameters", page 170.
Standard.
Refer to "Standard menu", page 212.
Results.
Refer to "Results menu", page 188.
Printouts.
Refer to "Printouts menu", page 157.
Page 96
Page 97

TitraLab
®
TitraLab 860 and 865 Reference Manual
Edit sequence menu
1. Perform steps 1 to 6 of the "Programming sequence" procedure.
Refer to "Programming sequence", page 159.
2. In the Sequence/Sample stack window (access: press 2
Sequence/Sample stack from the main window),
press 3 Edit sequence.
Select the methods to be included in
the sequence. Use the Add method
(key 1)/ Insert method (key 2)
procedures.
In the title bar, “x/y” (1/1) indicates the
position "x" occupied by the method in
the sequence and "y" the total number
of methods listed in the sequence.
The ID and type of the selected
method cannot be modified at this
level. They are defined in the Add
method or Insert method
menu.
Refer to "Add method menu", page 46.
Refer to "Insert method menu", page 125.
3. At the line Number of samples, enter the number of times a
method must be repeated within the sequence.
At the line Beakers: [F;L], the instrument displays the positions F
and L occupied by the first and last beakers In the sequence.
4. If a SAC850 or SAC950 is used and declared in the Configuation
menu, you can also choose a sample preparation number used
for the selected method, see "Sample preparation no.", page 201.
The last step of the sequence programmation consists of editing the
sample stack, see "Sample stack", page 202.
Page 97
Page 98

TitraLab
®
TitraLab 860 and 865 Reference Manual
Electrode calibration
1. Select the method which uses the electrode to be calibrated.
2. Connect the electrode system, see "Electrode connection", page
102.
3. Press 1 Calibrate electrodes in the Electrode window.
4. Select the electrode from the list.
5. Press 1 to Run, and follow the messages on the display.
Measurements start in buffer no.1.
The instrument displays the potential
measured. The displayed temperature is
the temperature measured, entered or is
equal to 25°C according to the
calibration method programmed.
The electrode zero pH and sensitivity are calculated at the end of
a multi-point calibration. For a 1-point calibration, only the zero pH
is calculated, the slope comes from the last calibration performed
or is equal to the default value (59.16 mV/pH unit). The calibration
results are saved with the electrode.
To consult the calibration results, see "GLP-Archives menu",
page 122.
It is recommended to maintain all your standards at the same
temperature. Then the temperature entered at the start of a
calibration cycle is valid for all your standards.
Page 98
Page 99

TitraLab
®
TitraLab 860 and 865 Reference Manual
Electrode calibration (SAC sequence)
In a calibration sequence, the standard solution beakers are handled
automatically using a sample changer. A SAC80, SAC90, SAC850 or
SAC950 Sample Changer must be connected and declared in the
Configuration menu.
1. Select the SAC Sequence option in the Main window. This SAC
Sequence must use the electrode to be calibrated.
2. If a Question mark "?" is present in the Electrode and/or Reagent
tabs, it means that the sequence needs to be programmed - a
reagent or an electrode is missing. Review programming in
Supervisor mode. Refer to "Programming sequence", page 159.
3. Install the sample changer and connect it to the SAC socket of the
Titration Manager using the cable, part no. A95A202 or A95X501.
Refer to the User’s Guide of the sample changer
(part no.: D21T002 for a SAC90, D21T013 for a SAC80, D21T085
for a SAC850 or SAC950).
4. Connect the electrode system, see "Electrode connection", page
102.
5. Press 1 Calibrate electrodes in the Electrode window.
6. Select the electrode from the list of the electrode system.
7. Press 2 Calibration sequence.
8. Prepare the electrode calibration stack, see "Electrode calibration
stack", page 101.
9. Press Esc then 1 to run the calibration sequence. Follow the
messages on the display.
10. The sample changer cycle is initiated.
- 1 to 9 dynamic rinses (if programmed with a SAC850/SAC950)
- 1 to 3 static rinses (if programmed).
- Electrodes are dipped into the first standard solution.
Measurement starts.
- Between each standards (beakers), 1 to 9 dynamic rinses (if
programmed with a SAC850/SAC950) then 1 to 3 static rinses are
performed (if programmed to do so).
11. At the end, the Titration Manager displays the calibration results.
The calibration results are saved with the electrode.
To consult the calibration results, see "GLP-Archives menu",
page 122.
When running a calibration sequence with a SAC80 Sample
Changer, do not use the STOP key of the SAC80.
Page 99
Page 100

TitraLab
®
TitraLab 860 and 865 Reference Manual
Electrode calibration not required
Electrode calibration parameters
Message appears at the start of a sequence, if a method sequence
has been programmed with an electrode calibration. The electrode
used has been programmed without calibration Calibration
request = No.
Go to Sequence/Sample stack, Edit sequence menu and
remove the electrode/reagent calibration method.
This menu contains the general parameters concerning the
pH electrode calibration method (measurement stabilisation criteria
in particular).
To access:
1. From the Electrode window, press 4.
2. Select the electrode to be edited.
3. Press 2 Edit electrode and check that the Calibration
request = Yes option has been selected.
4. Edit the electrode calibration general parameters.
5. Use the LEFT/RIGHT arrow keys to move to the last Edit
electrode display.
6. Press 1 Calibration parameters.
Page 100
 Loading...