

Page 1
Conveyor System - Troubleshooting Guide
Introduction
LAST UPDATED: 11/26/2018
Conveyor System - Troubleshooting Guide
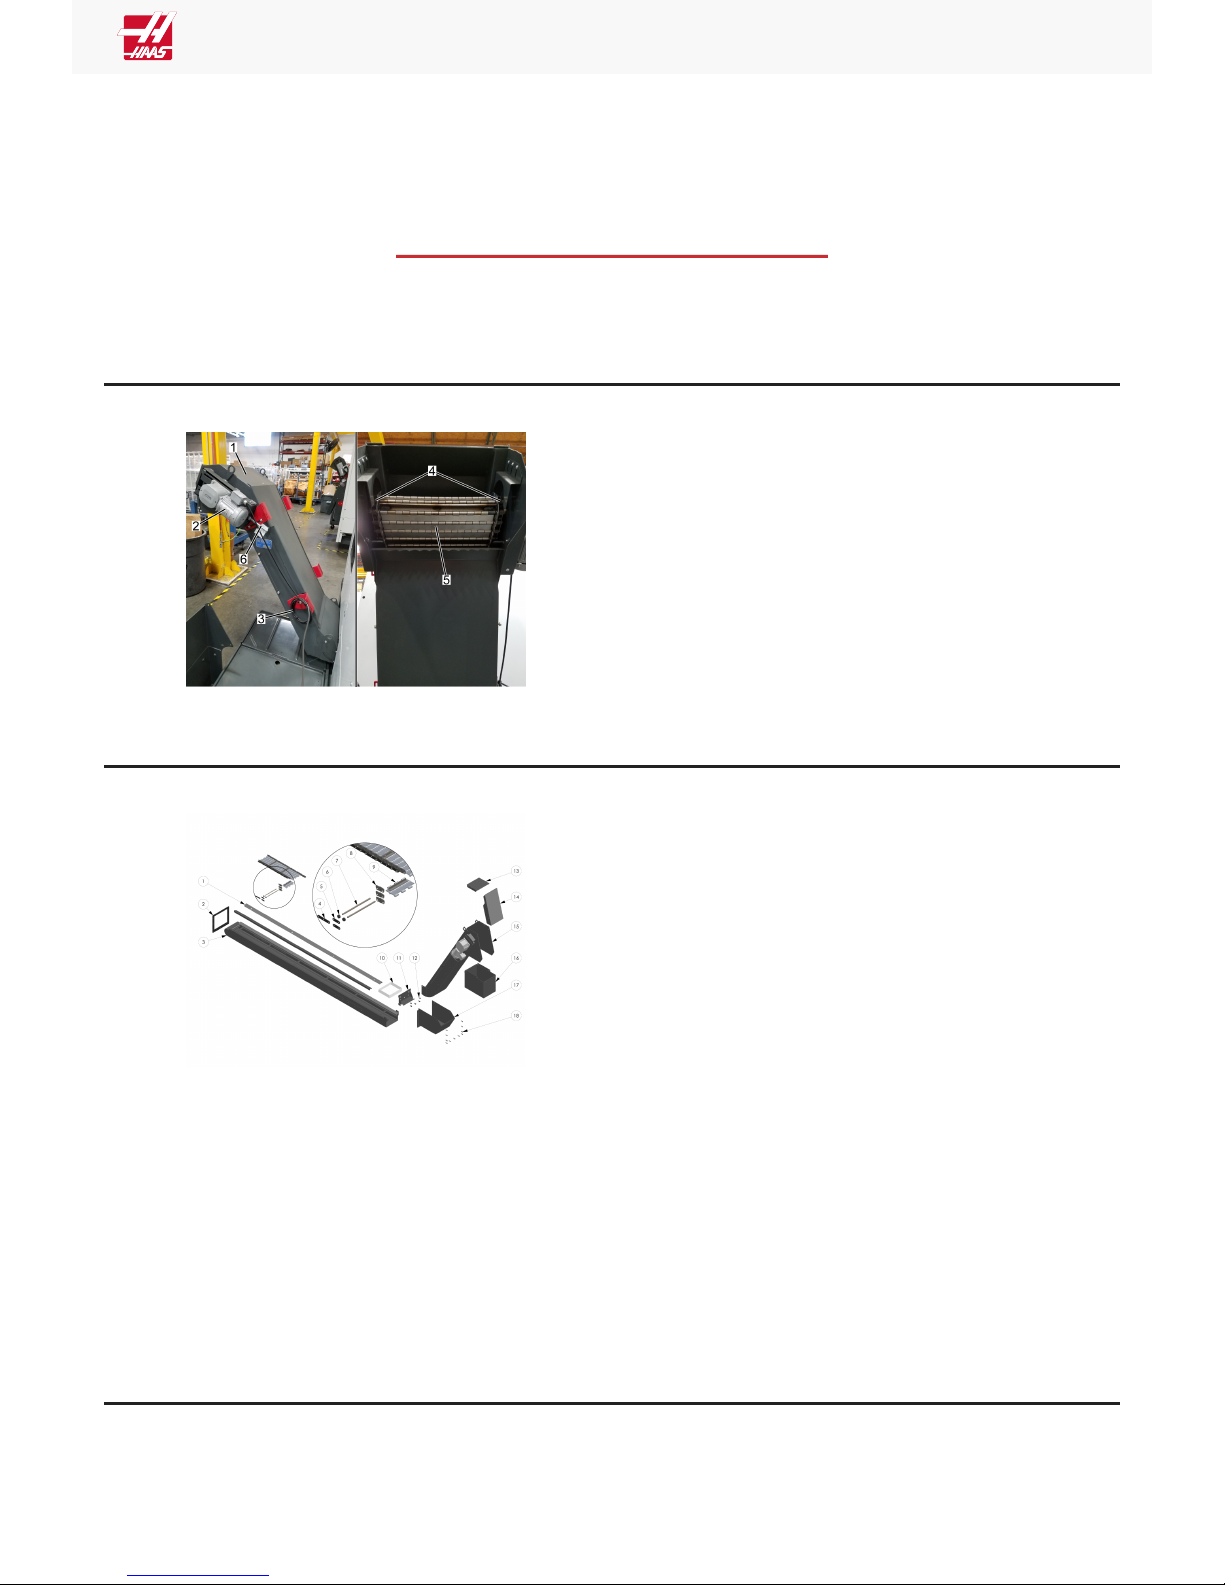
1. Conveyor
2. Drive Motor
3. Power Cord
4. Conveyor Drive Shaft /Sprockets
5. Belt
6. Belt Tensioning Screws
Exploded View
1. CONVEYOR TROUGH COVER
2. GASKET
3. CONVEYOR TROUGH
4. DOUBLE CHAIN LINK OUTER
5. SINGLE CHAIN LINK OUTER
6. CHAIN SPACER
7. BELT PIN
8. CHAIN LINK INNER
9. BELT PLATE
10. CONVEYOR TUNNEL INSERT
11. CONVEYOR BRACKET
12. HHB 5/16-18 X 1
13. CONVEYOR RAMP COVER TOP
14. CONVEYOR RAMP COVER SIDE
15. CONVEYOR RAMP
16. CONVEYOR CHUTE
17. CONVEYOR TROUGH EXTENSION
18. BHCS 5/16-18 X 1 SS
Symptom Table
Page 1 of 5 pages
Page 2

Conveyor System - Troubleshooting Guide
SYMPTOM POSSIBLE CAUSE CORRECTIVE ACTION
The conveyor does not start.
Conveyor is noisy or oscillates between forward and
reverse.
Motor Cable Inspection
The circuit breaker is tripped.
No power from I/O PCB to the motor.
Blown fuses (I/O-version R and
earlier).
The conveyor motor capacitor is
defective.
There is a build up of chips.
The conveyor belt is damaged.
The conveyor belt tension is incorrect. Adjust the belt tension.
Check for a short in the motor or the
cable.
Verify voltage at I/O PCB and the
motor.
Check the fuses on the I/O PCB.
Inspect motor capacitor for damage.
Clear excessive chips and any
obstructions.
Inspect conveyor belt and repair or
replace.
Corrective Action:
Inspect the motor cable for any sign of damage.
Check for burn marks at the plug. This could be
caused by coolant contamination.
Measure the Ohms the across the motor power
cable leads [1] at the plug. There should be
resistance leg to leg. An open reading suggests a
bad motor or cable.
Measure the Ohms on the motor power cable from
each power leg to the ground leg [2] of the plug.
This reading should be open.
If cable shows a short leg to ground at the plug,
disconnect the power cable at the motor and check
each motor power lead to the motor chassis [3]. If
reading is open, the cable is at fault. If any lead
tests short, the motor is motor is shorted.
Page 2 of 5 pages
Page 3

Voltage
Conveyor System - Troubleshooting Guide
Corrective Action:
Find the chip conveyor motor cable 140 at the I/O
PCB. Press [CHIP FWD]. Use a multimeter with
needle tip probes to measure the voltage between
the black and red wires on the cable.
Have someone press and hold [CHIP REV].
Measure the voltage between the black and white
wires. When the I/O PCB operates correctly, each
voltage reading is 240 VAC.
If the voltage at the I/O PCB is correct, open the
conveyor motor junction box. Use a multimeter with
needle tip probes to check for voltage on the power
leads at the motor.
If there is no voltage, check the motor and the
cable. If there is voltage, check the capacitor. If you
verify the voltage and capacitor are correct, inspect
the motor drive shaft and keyway.
Fuses
Corrective Action:
Check these fuses at the bottom right corner of the
I/O PCB (Fuse type: AGC 5 amp):
• Single phase motors: FU2 [1] /FU3 [2].
There should be no fuse in FU4 [3].
• 3 phase motors: FU2 [1] /FU3 [2] /FU4 [3]
A short in the motor or the cable could have blown
the fuse
Page 3 of 5 pages
Page 4

Capacitor
Conveyor System - Troubleshooting Guide
Corrective Action:
Inspect the conveyor motor capacitor for damage.
A damaged capacitor will usually have signs of
deformation or bubbling on the capacitor casing.
This could be caused by a short in the motor or in
the cable.
Open the motor junction box. Check the capacitor.
Look for burn marks on the case.
Measure the capacitor. Most multimeters can
measure capacitance upon manual activation (turn
to the correct units of measurement, and push the
yellow button). It should be 6 or 9 microfarad as
noted on the capacitor's case.
Chips
Corrective Action:
Clear chips and obstructions. Make sure the conveyor settings are optimized for the chips that are produced.
Belt Inspection
Corrective Action:
Inspect the conveyor belt for damage.
Page 4 of 5 pages
Page 5

Conveyor System - Troubleshooting Guide
Belt Tension
Electrical Diagram
Corrective Action:
Make sure the belt tension is correct. Refer to the
decals on the side of the machine. The correct belt
slack for Jorgensen conveyors is 0.25" - 0.38" (6 10 mm). The correct belt slack for Hennig
conveyors is 0.12" - 0.25" (3 - 6 mm).
Page 5 of 5 pages
 Loading...