

Page 1
• Operating instructions
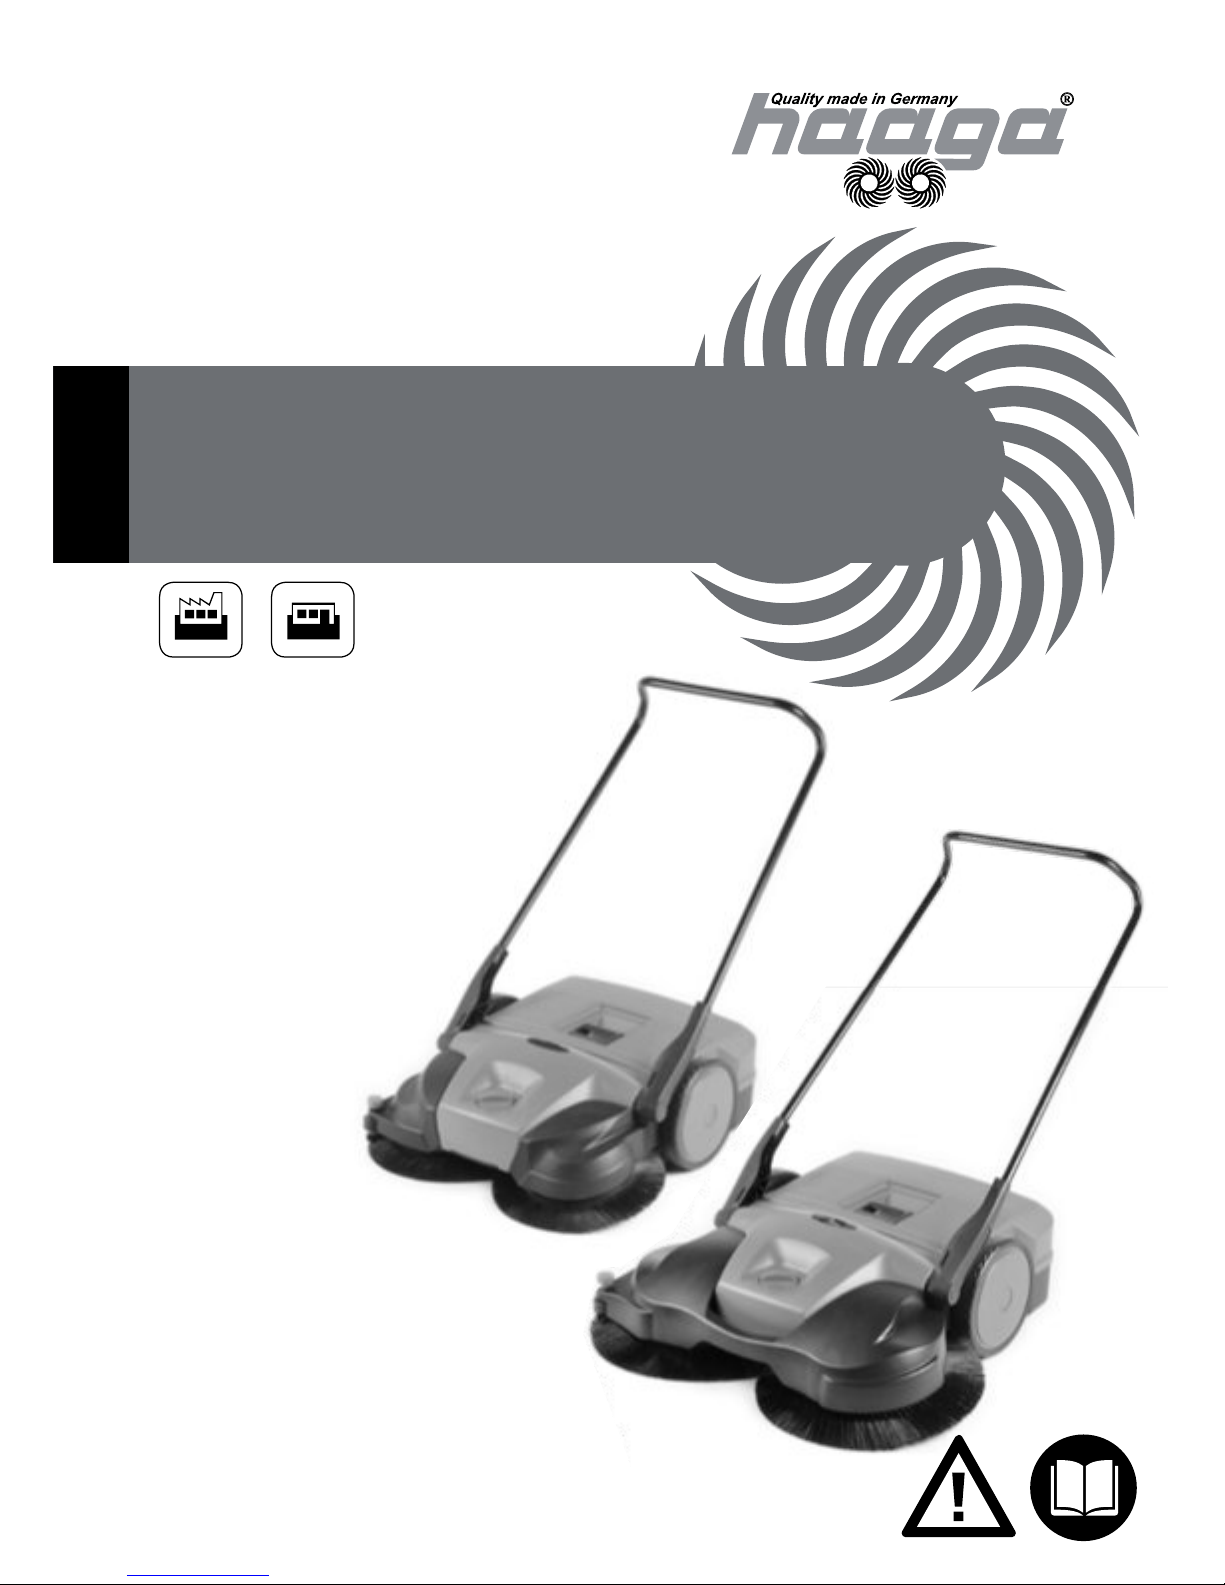
haaga 677/ 697
SPEEDY SWEEP® Janitorial Equipment
SALES & SERVICE 1-877-977-3339
Page 2

28
Contents
1 About these instructions..............................................................................................................30
2 Safety instructions......................................................................................................................... 31
3 Design and function......................................................................................................................40
4 Putting into operation.................................................................................................................. 41
5 Using the sweeper..........................................................................................................................42
6 Transport...........................................................................................................................................46
7 Putting out of operation and storage.......................................................................................47
8 Maintenance and care..................................................................................................................48
9 REACH................................................................................................................................................ 51
10 ECDeclaration of Conformity...................................................................................................51
11 Technical data...............................................................................................................................52
12 Troubleshooting............................................................................................................................53
Page 3

English
29
Publisher'snotice
Dear customer, thank you for purchasing
a quality product from Haaga. Thisproduct hasbeen manufactured using modern
production processeswith comprehensive
quality assurance measures.
If you have any questions about your
sweeper, please ask your specialist dealer
or contact usdirectlyat:
Haaga Kehrsysteme GmbH
Wielandstr. 24
D-73230 Kirchheim/Teck
Tel. +49 (0)7021 3642
Fax. +49 (0)7021 74325
[email protected]
www.haaga-gmbh.de
These instructionswill allow you touse
the sweeper safely and efciently.
Beforeusing the sweeper for the rst
time, please carefullyread the "Safety
instructions" chapter.
These instructionsform part of the
sweeper and must be kept in the vicinity
of the sweeper at all times for reference
by the user.
These instructionsmust remain with the
sweeper if the machine is lent out or sold.
Illustrationsin these instructions areprovided for the purpose of general understanding and maydiffer fromthe actual
sweeper version.
Model designation:
haaga 677/iSweep
haaga 697/iSweep
haaga 697 plus/iSweep
Revision history
Version 1.0:
February 2015, Creation
Copyright
©2015 Haaga Kehrsysteme GmbH
All rightsreserved
Page 4

30
1.1 Symbolsused
Warning!
Awarning informsyou about possible
health risksor risks of fatal injuryto
yourself and other personsthat may
occur when handling or using the
sweeper.
CAUTION!
Indicatesa possiblydangeroussituation.
Thiscan lead to damage to propertyor
the environment if not prevented.
NOTE
Highlights useful tipsand recommendationsaswell as information for efcient
and trouble-free operation.
1.2 Technical further
development
We are continuouslyworking on further development of all our products.
We therefore reserve the right to make
changesin the scope of deliverywith
respect to form, technology and equipment.
No claimscanthereforebe derived from
information and illustrationscontained in
these instructions.
1.3 Warranty
• The relevant national regulationsapply
ineach country. Excepted fromthisare
wearing partssuch assweeping lip,
angled wheelsand running wheels.
• Please enclose a copy of the invoice in
the event of a warranty claim.
• Only genuine Haaga spare partsmust
be used.
• No technical modicationsmust be
carried out on the sweeper.
• All claimsunder guarantee andwarranty will be rendered voidif the
machine isnot operated properly.
1.4 Target group
These instructionsareintended for the
person using thissweeper.
Prerequisites
• Personswho operate the sweeper must
be informed about the dangersrelated
to use of the machine.
• Personswho operate the sweeper must
be rested, healthy and in good physical
condition.
• Only passon or loan the sweeper to
personswho are familiar with this
model and itshandling – alwaysprovide the instructions with the machine.
• Personswho are using the sweeper for
the rst time must have safe operation of the machine explained to them
by the salesperson or another qualied person before they operate the
sweeper.
• Children should be supervised to ensure
that they do not play with the sweeper.
1 About these instructions
Page 5

English
31
• Minorsmust not operate the sweeper –
except for juvenilesover the age of 16
who are trained under supervision.
• Thissweeper isnot intended for use
by persons(including children) with
restricted physical, sensor or mental
capacity or personswho lack experience and/or knowledge, unlessthey
are supervised by a person responsible
for their safety or received instructions
from thisperson on how to use the
machine.
• Personswho are prohibited from
strenuousphysical activityfor health
reasons should ask a doctor for advice
on whether working with the sweeper
ispossible.
• The sweeper must not be operatedafter
consumption of alcohol, medicinesthat
impair reaction timesor drugs.
2 Safety instructions
Safety instructionsprevent danger to life
and limb and also avoiddamage to propertyor the environment due to improper
use of the sweeper.
For thisreason, you must read these
instructions carefully and follow the
safety instructionscontained in them
before using and working on the sweeper.
The user of the sweeper isresponsible for
injuriesand damage that are caused due
to non-compliance with these instructions.
2.1
Intended use
Thissweeper isdesigned inaccordance
withthe state of the art and recognised
safety regulations.
Nevertheless, use of the sweeper can lead
to dangersfor the user or third partiesor
damage to the sweeper and other material assets.
The sweeper isintended for commercial
use, e.g. in hotels, schools, hospitals, factories, shops, ofcesand the equipment
hire trade.
The sweeper isintended exclusivelyfor
removal of road dirt, leaves, grass, paper
and similar debris.
Sweeping snow with the sweeper isnot
permitted.
Any other use will be deemed asimproper
use. The manufacturer will not be liable
for damage caused asa result of this.
The user issolelyliablefor the associated
risks.
Claimsof any kind due to damage caused
by improper use areexcluded.
The following information must also be
observed when operating the sweeper:
• the safety instructionsinthese operating instructions.
SPEEDY SWEEP® Janitorial Equipment
SALES & SERVICE 1-877-977-3339
Page 6

32
• the chapter "Technical data" in these
instructions.
• compliance with the operating, maintenance and storage conditionsprescribed by the manufacturer.
• compliance with accident prevention
regulationsaswell ascountry-specic
safety regulations, e.g. asissued by
employers' professional liability associations, social security authorities,
occupational health and safety bodies
and others.
• national and local regulationson
time restrictionsfor operation of
noise- emitting equipment.
The sweeper must not be used, for
example, for sweeping substancesthat
are hazardousto health, ammable or
glowing (e.g. cigarettes, matches), liquids,
explosive or hazardousdusts(Ex),
acidsor
solvents. The sweeper must not be used
inexplosion-hazard areasor asa means
of transport.
2.2 Safety instructions for
operation/ Maintaining
operating safety
The user must not wear open long hair,
tie, loose clothing or jewellery, including
rings.
There isa risk of injury, e.g. getting
caught up or pulled into the machine.
Use personal protective equipment if necessaryor required by regulations!
• Wear sturdyshoeswith a high-grip,
anti-slip sole.
• Alwayswear a dust protection mask in
dusty conditions.
• Wear sturdygloves.
Use the machine onlyin technically perfect condition for itsintended purpose
and paying attention to safety and the
environment.
Have any faultsthat affect safety rectied immediatelyby a specialist dealer.
Observe all safety and danger instructions
on the sweeper.
The user must ensurethe presence and
legibility of all warning and information
noticesthroughout the entire service life
of the sweeper.
Use only genuine sparepartsand accessoriesthat have been approved by the
manufacturer. These guarantee that the
machine can be operated safelyand
without faults.
Do not carryout anymodications,
attachmentsor conversionson the
sweeper that couldimpair safety without
the approval of the manufacturer! The
manufacturer excludesall liability for
injuriesor material damage caused by
use of attachmentsthat have not been
approved.
The maintenance work described in
these instructionsmust be carried out
completelyand at the specied intervalseither bythe user or at a specialist
dealer.
Page 7
English
33
2.3 Information on battery and
charging socket
Warning
• Protect the batteryagainst direct sun-
light, heat, naked ame and electric
sparks.
Warning
• Do not smoke in the immediate vicinity
of the battery.
• Do not eat or drink in the area of the
charger.
• Avoidspark formation when handling
cables and electric devices.
• Do not expose the battery to micro-
wave radiation or high pressure.
• Do not throw into a re.
Risk of accident!
• Never charge or use faulty, damaged or
deformed batteries.
• Do not open, damage or drop the bat-
tery.
• Store the batteryout of the reach of
children.
Health risk!
• Fluid canescape from the battery if it
isdamaged or used incorrectly – avoid
skincontact!
• Leaking battery uidcan cause skin
irritation, burnsand corrosive injuries.
In case of accidental contact, wash the
affected skin areaswith plenty of soap
and water.
• If the uidcomesinto contact with
the eyes, donot rub and rinse out the
eyeswith plenty of water for at least
15 minutes. Also consult a doctor.
CAUTION!
Damage to the machine due to improper
battery handling.
• Use only the genuine batteryfromthe
manufacturer.
• Use the battery onlywith the sweeper
and charger from the battery.
• Do not short-circuit the battery
terminals.
• Do not cause a short circuit in the
charging socket.
• Do not connect (short-circuit) the batterycontactswith metal objects. The
battery may be damaged by a short
circuit.
• When not in use, keep the battery away
from metal objects (e.g. nails, coins,
jewellery).
• Do not use metal transport containers.
• Protect the batteryagainst rain –
do not immerse in uids.
• Maximum temperatures:
- Operation: -10 °Cto +50 °C
- Charging: 0 °Cto +40 °C
- Storage: -10 °Cto +40 °C
NOTE
• Fully charge a discharged battery.
• In order to achieve the optimum service
life, charge the battery for approx. 10
hoursat least every 2 months.
Page 8
34
• Alwayskeep the batteryclean and dry.
• Observe the technical data.
• Fullycharge the battery before use.
• Batteriesaresubject to a natural
ageing process. The service life is
around 3 to 5 yearsunder ideal conditions.
• The sweeper issupplied with disconnected battery cable in order to avoid
self-discharge of the battery.
The sweeper cannot be operated without thiselectrical connection. The batterycannot be charged.
• Connect the battery cable before putting the sweeper into operation for
the rst time (see Connecting battery
cable).
2.4 Information about the
charger
Danger of fatal injury due to
electric shock!
• Do not use a faulty or damaged
charger.
• Do not open the charger.
• Regularlycheck the charger connecting cable for damage. Disconnect the
mainsplug immediatelyif the connecting cable isdamaged.
• Do not insert objectsinto the ventilation openingsof the charger. Danger of
electric shock or short circuit.
• Ensurethat the insulation of the connecting cable and plug isin perfect
condition.
• Electrical connection ispermitted only
to a properly installed socket.
• After use of the charger, disconnect the
mainsplug fromthe socket.
Danger of explosion!
Chargerscan produce sparksthat are
capable of igniting dust or vapours.
• Do not operate in an explosion-hazard area, i.e. in an environment where
thereare combustible uids (vapours),
gasesor dust (Ex).
Danger of re!
• Do not operate on an easily combustible surface (e.g. paper, fabrics) or in
an easily combustible environment.
• Never operate inan easily combustible
environment.
• Disconnect the mains plug immediately
if there issmoke or re in the charger.
• Avoidspark formation when handling
the cable and electric devices.
• Do not cover the charger so that it can
cool down unobstructed.
Risk of accident!
• Never charge the battery if it is faulty,
damaged or deformed.
• Never use a faulty or damaged charger.
• Connect the charger onlyto an easily
accessible socket.
• Store the charger out of the reach of
children.
Page 9

English
35
• Never eat or drink inthe area of the
charger – gasesmaybe produced when
charging the battery.
• Never use connecting cables which do
not complywith the applicable regulations.
• Route and mark connecting cablesso
that they cannot be damaged and do
not pose a risk to anyone – avoidcreating a trip hazard!
CAUTION!
Damage to the machine due to improper
handling of the charger.
• Use only the genuine charger from the
manufacturer.
• Use only for charging geometrically
matching batteriesinaccordance with
the valuesspecied inthe Technical
data.
• Connect the charger only to the mains
voltage and mainsfrequency specied on the rating plate – connect the
charger only to an easily accessible
socket.
• Do not pull the mainsplug out of the
socket by pulling the connecting cable,
but alwaysgrasp the mainsplug. Have
a damaged connecting cable repaired
by anelectrician.
• Use and storethe charger onlyin
closed and dryrooms.
• Protect the charger against rain and
moisture.
• Operate the charger at ambient temperatures between +5 °Cand +40 °C.
• Never connect (short-circuit) the contactsof the charger with metal objects
(e.g. nails, coins, jewellery). The charger
may be damaged by a short circuit.
• Never use the connecting cable for any
other purpose, e.g. tocarryor hang up
the charger.
NOTE
• Use only the supplied charger.
2.5
Instructions for transport
NOTE
• Do not carrythe sweeper by the handle
of the waste bin.
• In vehicles: Secure the sweeper to prevent it from tipping, slipping or being
damaged.
2.6 Instructions for putting into
operation for the rst time
NOTE
• The sweeper issupplied with disconnected battery cable in order to avoid
self-discharge of the battery.
• Connect the battery cable before putting the sweeper into operation for the
rst time since the sweeper will not
function electrically and the battery
cannot be charged without thiselectrical connection.
• Fully charge the battery using the original charger beforeputting into operation for the rst time.
Page 10

36
2.7 Instructions for work
preparation
Danger of injury
• The sweeper must be operated only in
operationallysafe condition.
• Put the sweeper into operation onlyif
all the componentsare undamaged.
• Check the sweeper to ensurethat it
isin operationallysafe condition –
observe the corresponding chaptersin
the instructions.
2.8 Instructions for operation
Danger of re!
• Do not sweep up any burning or
glowing items, e.g. cigarettes, ash or
matches.
Risk of accident!
• Use the sweeper only for itsintended
purpose.
• Do not climb on the sweeper or use it
asa meansof transport.
• Do not operate the sweeper without
tted waste bin.
• Never reach into the rotating brushes.
• Never reach into the running sweeper.
• When operating the sweeper, take into
account the local conditionsand pay
attention to other persons, particularly children, when working with the
machine.
• Take carein slippery, wet or snowy
conditions. There isa risk of slipping on
slopesor uneven ground.
• Make surethat the sweeper doesnot
collide with objects, e.g. shelves, scaffolding during operation – danger due
to objectstipping over or falling down.
• Take breaksin good time in order to
avoidfatigue and exhaustion.
• In the event of a blocked disc brush or
blocked ne dirt sweeping roller, interrupt work and clear the blockage. Wear
sturdy glovesin order to avoidcut injuriesdue to sharpobjects.
• If the sweeper hasbeen subject to
loadsother than those that occur
during normal use (e.g. forcescaused
by impactsor falling), alwayscheck
to ensure that it isstill in operationally safe condition beforecontinuing
work– also see "Instructionsfor work
preparation". Payattention in particular to correct functioning of the safety
devices.
• Do not continue to use machinesthat
are no longer operationallysafe. Consult a specialist dealer in case of doubt.
Danger of explosion!
Sparkscanignite dust or vapoursin
explosion-hazard areasandcause explosions.
• Never operate the sweeper in areas
wherethereisan explosion hazard.
• Never operate the sweeper in the
vicinityof combustible uids(vapours),
gasesor dust.
SPEEDY SWEEP® Janitorial Equipment
SALES & SERVICE 1-877-977-3339
Page 11

English
37
Danger of injury!
• The sweeper isdesigned for operation
by one person only – do not allow any
other persons into the working area.
• Keep children, animalsand spectators
away from the sweeper.
• The user isresponsible for accidentsor
risks that occur with respect to other
personsor their property.
CAUTION!
Damage to the sweeper due to improper
use.
• In the case of noticeable changesin
running behaviour (e.g. higher vibrations, sluggish movement), interrupt
workand rectifythe causesof the
changed behaviour.
• Do not leave the sweeper in the rain.
NOTE
• If the brushesstart to rotate more
slowly or the charge indicator lights
up red, switch off the sweeper and
charge the battery. The warranty will
be rendered void in the event of deep
discharge!
• If the sweeper should already be
switched off by the electronicsafter a
short time, thisisdue to anexcessively
high motor load. The ne dirt sweeping
roller and the disc brushesmust then
be checked for free movement and
any blockagessuch astrapped stones,
wound up threadsand similar must be
removed.
• When sweeping up leaves, improve the
capacity of the waste bin by briey
placing the sweeper on the rear side of
the waste bin.
• Guide the push handle with both
hands.
• Push the sweeper forwardsand adapt
the speed to the conditions.
• The sweeper can be pushed over small
bumpswith a height of 2-3 cmby
pushing down slightly on the push
handle.
• Pushing against or over obstacles,
e.g. kerbs, can lead to damage to the
sweeper.
• If the cleaning performance deteriorates, check whether the waste binis
full or if the disc brushesor ne dirt
sweeping roller areblocked or worn.
2.8 Information on ll level in
waste bin
NOTE
• The waste bin isfull if dirt ispushed
infront of the machine and no dirt is
swept up.
• In order to continue working for a short
time, lift the sweeper at the front to
move the dirt to the rear of the waste
bin. Thismakesit possible to make
better use of the waste bin capacity.
2.9 Instructions for cleaning
NOTE
• Cleaning ensuresproper functioning
and a long service life for your sweeper.
Page 12
38
• Accumulated dirt depositsand
wound-up threadsetc. behind the
roller mounting can lead to sluggish
operation of the sweeper andimpair
functioning.
Danger of injury!
• Wear sturdyglovesin order to avoid
cut injuries, e.g. due to glass shards,
metal or other sharp-edged materials.
CAUTION!
Damage to the sweeper due to improper
cleaning.
• Do not use grease removersfor cleaning.
• Do not use aggressive detergents.
• Do not clean with compressed air.
• Do not spray-clean with water or
immerse in water. Moisturewill
damage the electrical componentsand
can lead to short circuits.
• Clean plastic partswith a damp cloth.
2.10 Instructions at the end of
work
NOTE
• Empty the waste bineach time after
use.
Health risk!
• Empty the waste binoutdoorsif possible in order to avoid production of
dust.
2.11 Instructions for storage
Risk of accident!
• Do not reach into the swivel area of
the push handle – partsof the body
may be trapped between the push
handle and housing if the push handle
fallsover unintentionally.
• When storing the sweeper, position it
so that no personsareendangered.
• Securethe sweeper toprevent unauthorised access.
• Securethe sweeper toprevent it from
falling over and so that the push
handle cannot fold down inanuncontrolled manner.
CAUTION!
• Damage to the sweeper due to
improper storage.
• The battery cable must be disconnected
from the battery if the sweeper is
stored for longer than 2 monthswithout recharging the battery, otherwise
self-discharge due to the installed
components can lead to deep discharge
and can therefore damage the battery.
NOTE
• Store the sweeper securelyina dry
room.
Page 13

English
39
2.12 Instructions for
maintenance and repair
NOTE
• Carry out maintenance of the sweeper
regularly. Performonly the maintenance workdescribed in the instructions.
• Have repairscarried out onlyby the
manufacturer'sauthorised dealers.
Danger of fatal injury!
• Maintenance work must be performed
onlywith disconnected power supply.
Disconnect the cable from the battery
before starting maintenance work.
CAUTION!
Damage to the sweeper due to improper
maintenance.
• Repairsmust be performed onlyby
authorised service centresor by specialistsin thiseldwho are familiar
withall relevant safety regulations.
2.13 Instructions for disposal
CAUTION!
• Incorrect handling of environmentally hazardousmaterials, particularly
incorrect disposal of replacement parts
and batteries, can cause considerable
damage to the environment.
SPEEDY SWEEP® Janitorial Equipment
SALES & SERVICE 1-877-977-3339
Page 14
40
2
3
4
5
6
7
8
1
13
14
3 Design and function
9
11
12
15
16
17
18
9
6
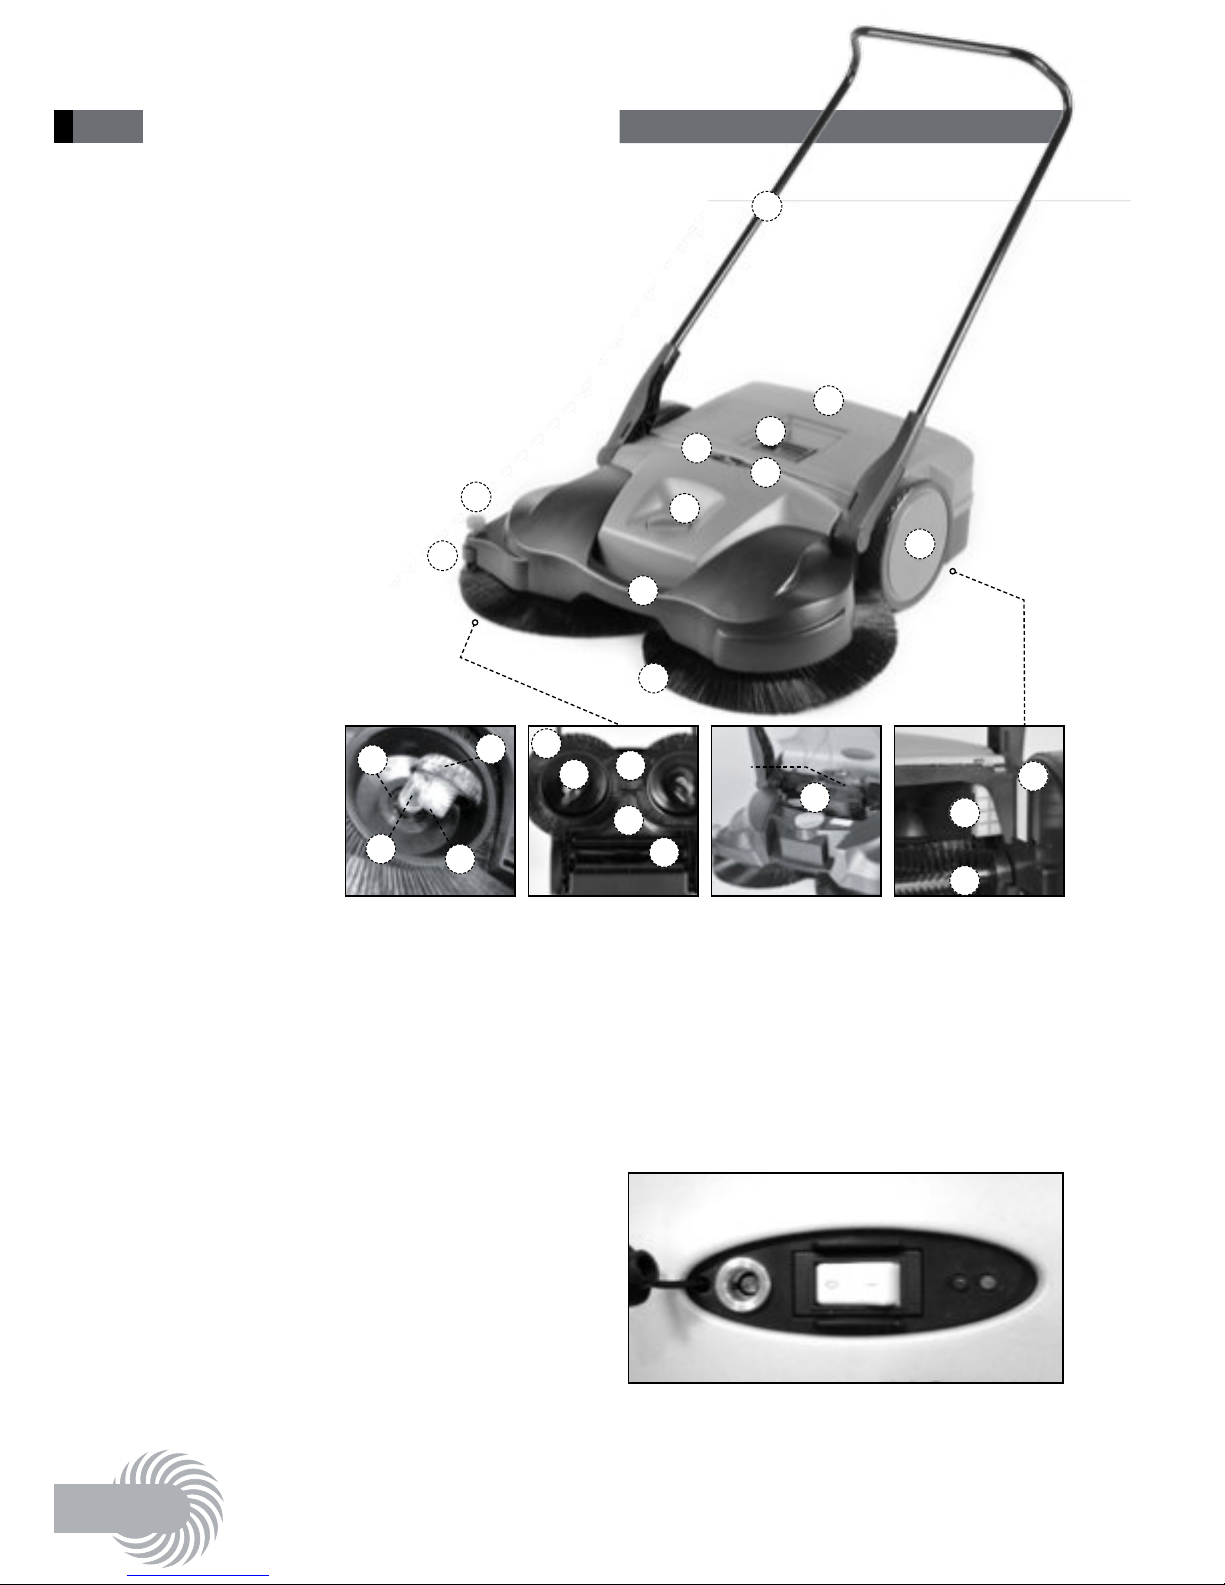
3.1 Important components
1. Push handle
2. Waste bin
3. Waste bin handle
4. Disc brush height adjustment
5. Carrying handle
6. Disc brush
7. Side guide roller
8. Running wheel
9. Fine dirt sweeping roller
10. Holding-down device
11. Dust lter
12. Machine number
13. On/Off switch
14. LED indicators
15. Battery
16. Angled wheel
17. Sweeping lip
18. Sweeping plate
19. Clutch
20. Toothed sleeve
21. Gear protection
19
20
21
16
3.2 LED indicators
The LEDsnext to the ON/OFFswitch on
the sweeper show the stateof charge of
the batteryduring battery operation.
• Red and green LEDs ash:
The sweeper wasautomatically
switched off by the built-inelectronics
since the batterycharge wastoo low.
1.Switch off sweeper
(see Switching off the sweeper).
2.Charge battery
(see Charging the battery).
3.3 Overload protection
The motorsareequipped with overload
protection in order to prevent damage.
The sweeper switchesoff automatically
inthe event of overloading (e.g. due to
blocked brushes).
10
Page 15
English
41
4 Putting into operation
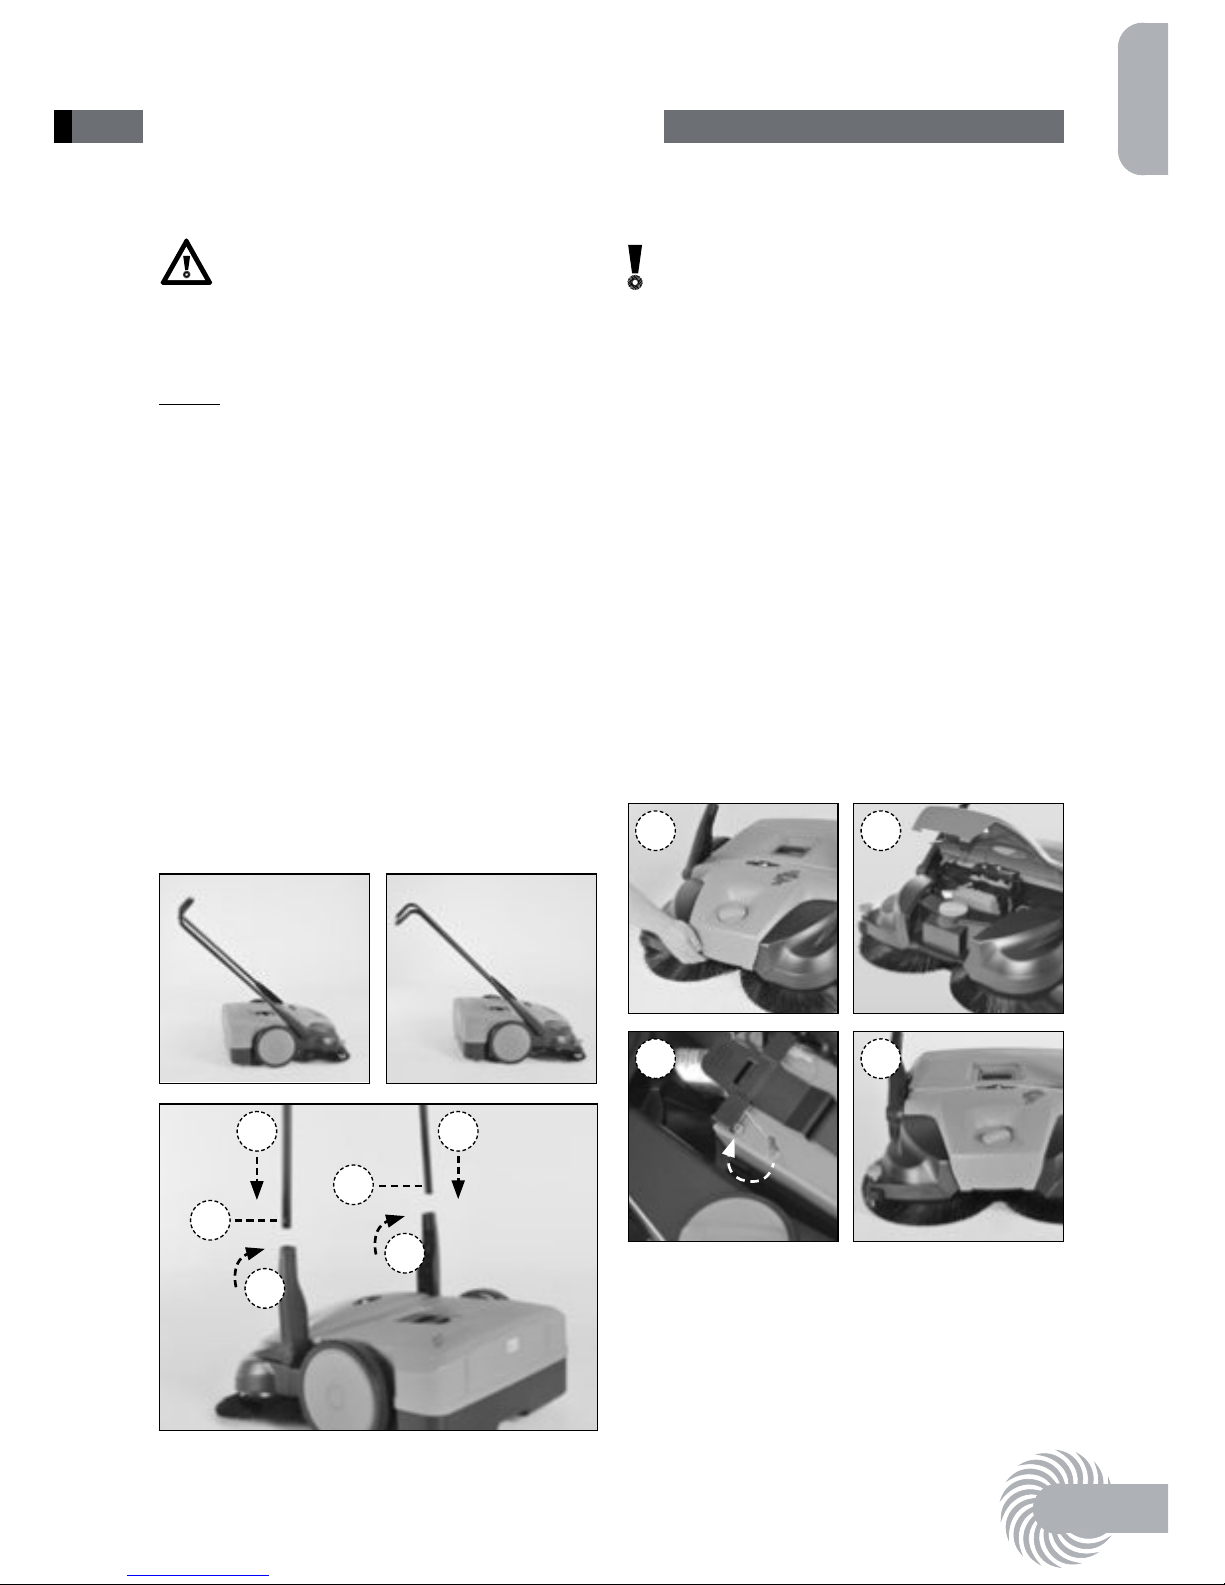
4.1 Fitting the push handle
Danger of injury!
• Avoid injurydue to push handle accidentallyfalling over.
NOTE
The push handle canbe tted in two different positionsdepending on the body
height of the user.
1. Turnhandlettings(1) so that they are
positioned vertically upwards.
2. Press locking springs(3) on push
handle(2).
3. Push the push handle (2) simultaneously into the two handle ttings(1).
4. Press the push handle into the handle
ttings until the locking springs
engage.
22
1
1
3
3
4.2 Connecting battery cable
CAUTION!
Damage to the sweeper due to improper
connection.
• The sweeper may be damaged and the
warranty rendered voidif the cables
are mixed up on the battery.
1.Pull cover forwardsat the front bottom
edge (1).
2.Swivel cover up (2).
3.Plug battery cableonto contact tab on
the battery(3).
red = positive terminal (+)
blue = negative terminal (-)
4.Close cover (4).
1 2
3 4
Page 16
42
4.3 Charge battery
NOTE
The charger hasa fullyelectronic voltage and current limitation function.
Thisensuresthat a connected battery
isalwayskept at the optimum state of
charge. Thispreventsovercharging of the
battery.
NOTE
• The battery isnot fully charged on
delivery.
• Do not switch on the sweeper during
charging.
• It isrecommended to fully charge the
battery before putting the sweeper into
operation for the rst time.
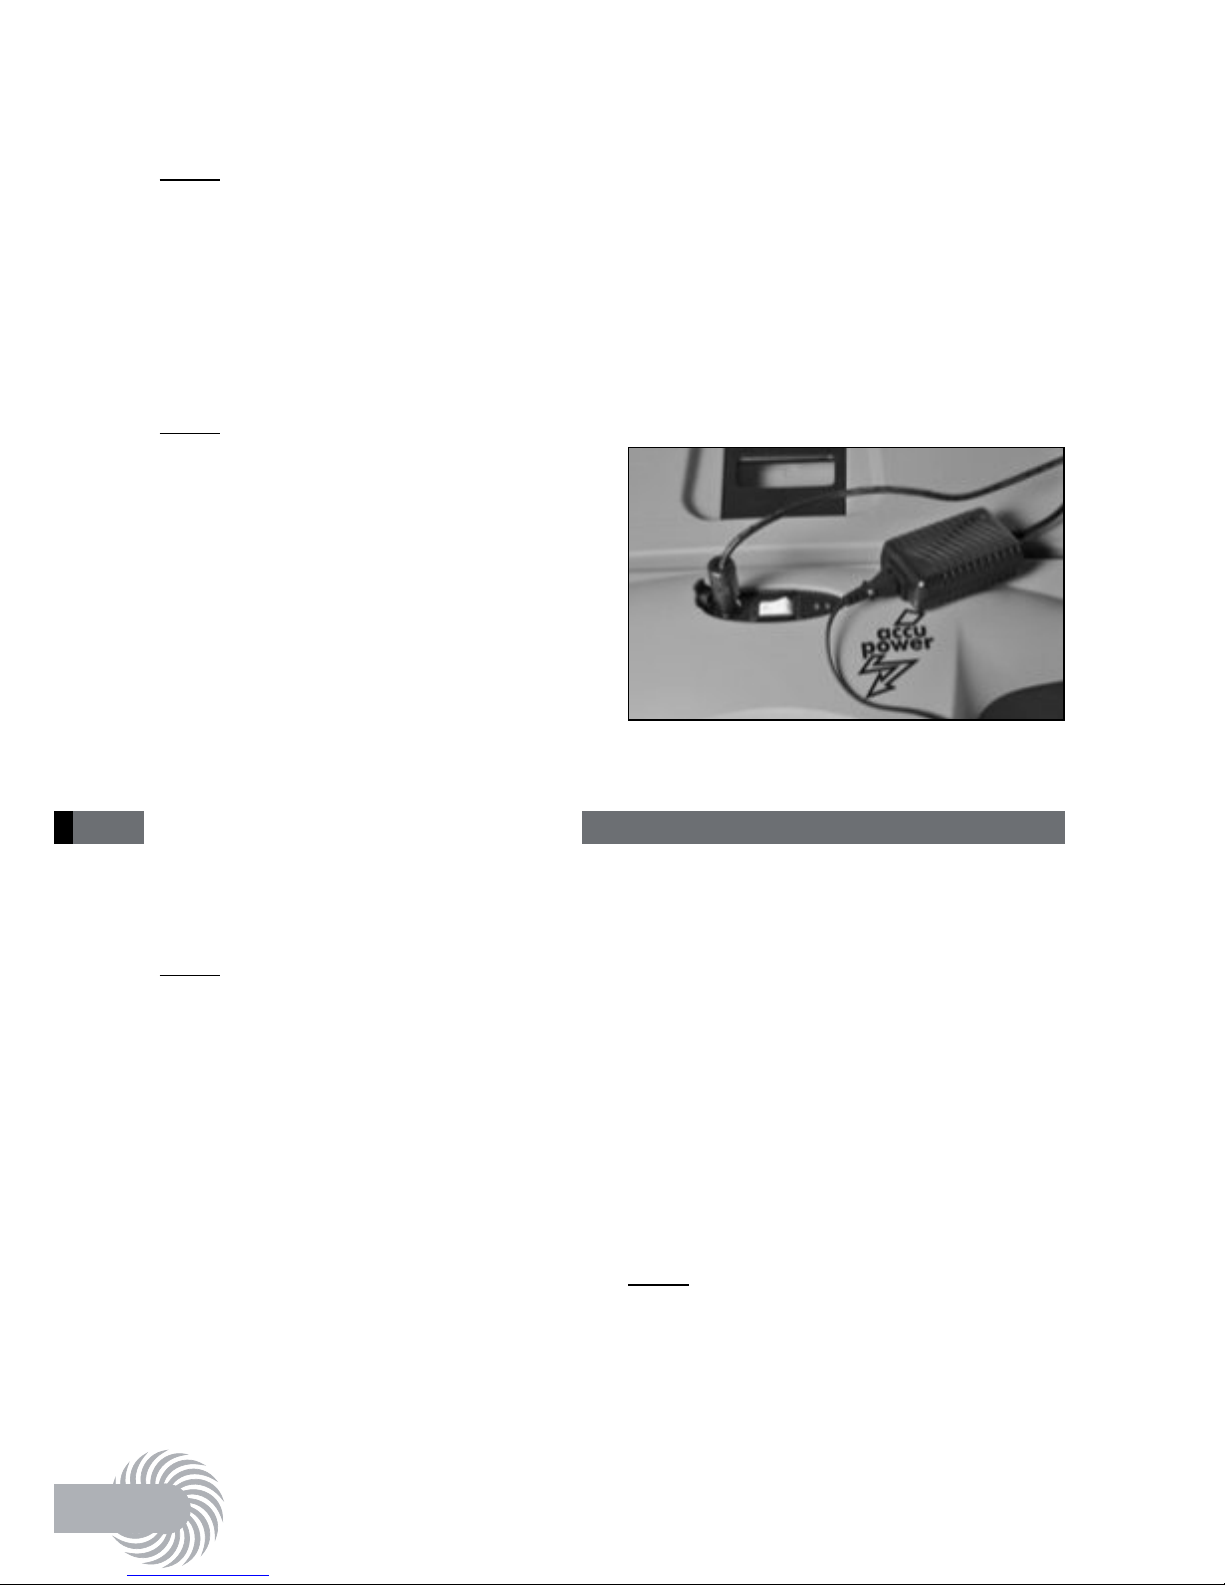
1.Plug the charger plug into the charging
socket on the sweeper.
2.Plug the charger into a 230 Vpower
outlet.
• The LED indicator on the charger lights
up red during charging.
• The complete charging operation takes
approx. 7 hours(LED indicator on the
charger lights up green).
5 Using the sweeper
5.1 Battery operation
NOTE
• If the disc brushesstart to rotatemore
slowly or the charge indicator lights
up red, switch off the machine and
charge the battery. The warranty will
be rendered void in the event of deep
discharge!
1.Check the sweeper
(see Maintenance andcare).
2.Adjust the sweeper
(see Adjusting the sweeper).
3.Switch on the sweeper
(see Switching on the sweeper).
4.Guide the push handle with both
hands.
5.Push the sweeper forwardat normal
walking pace.
6.Empty the waste bin asrequired
(see Emptying the waste bin).
7.Switch off sweeper
(see Switching off the sweeper).
5.2 Manual operation
NOTE
The sweeper can also be operatedtemporarilywithout motor assistance.
1.Check the sweeper
(see Maintenance andcare).
Page 17
English
43
2.Adjust the sweeper
(see Adjusting the sweeper).
3.Guide the push handle with both
hands.
4.Push the sweeper forwardat normal
walking pace.
5.Empty the waste bin asrequired
(see Emptying the waste bin).
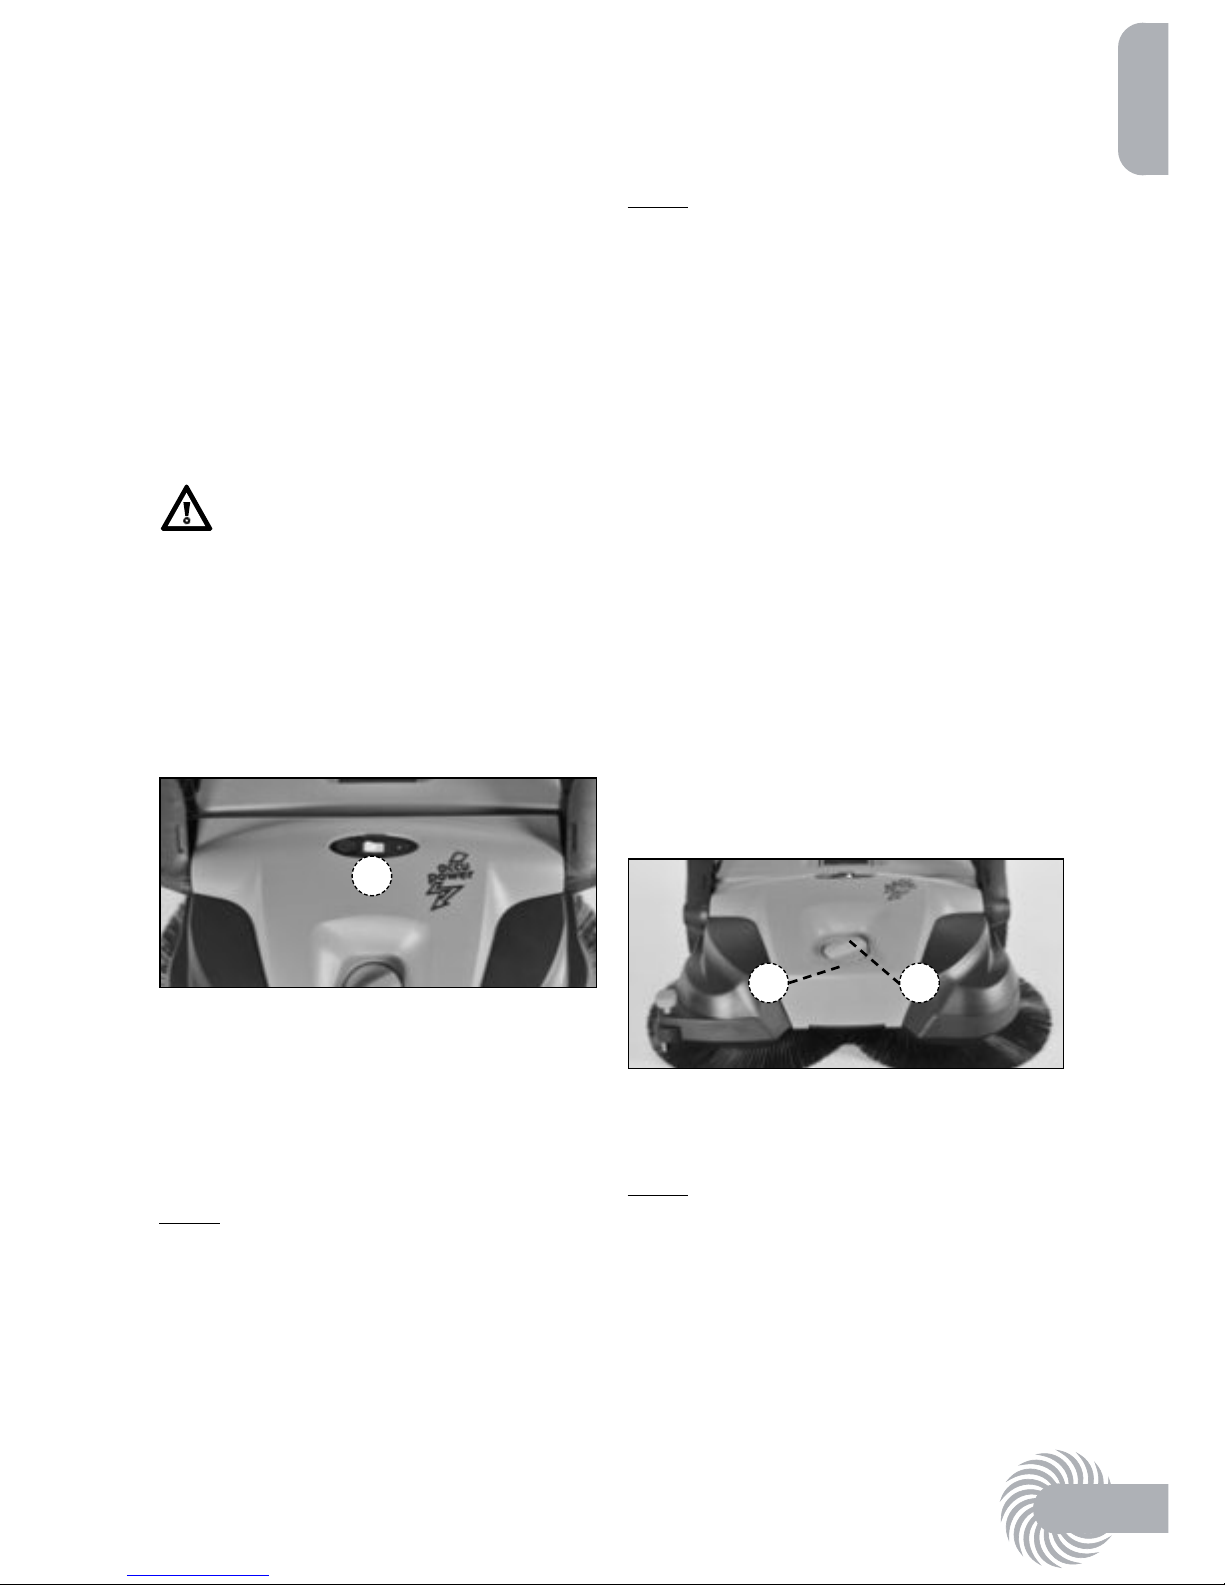
5.3 Switch on the sweeper
Risk of accident!
• Do not operate the ON/OFFswitch with
your foot.
1.Check the sweeper (see Maintenance
and care).
2.Switch the ON/OFFswitch (1) to"I"
position.
1
The disc brushesand ne dirt sweeping
roller start torotate.
5.4 Adjusting the sweeper
Height adjustment
NOTE
• Do not press the disc brushesonto the
ground too rmly.
• An excessive contact pressure will not
achieve a better cleaning result but will
increase the wear.
• An excessive contact pressure will
increase the pushing resistance.
NOTE
The knob for height adjustment of the
disc brushesislocated in the middle
of the front section. The height adjustment knob allowsthe height of the disc
brushesto be adjusted tothe ground to
be swept.
1.Adjust to the required level (1):
• Level 1-2: for all at, hardsurfaces
(e.g. asphalt, concrete, slabs…)
• Level 3-4: for damp leaves, sand,
uneven surfaces(e.g. washed concrete
slabs)
• Level 5-8: for heavy soiling and very
uneven surfaces
2.To do this, turn the knob (2) anti-clockwise or clockwise to the desired position.
1 2
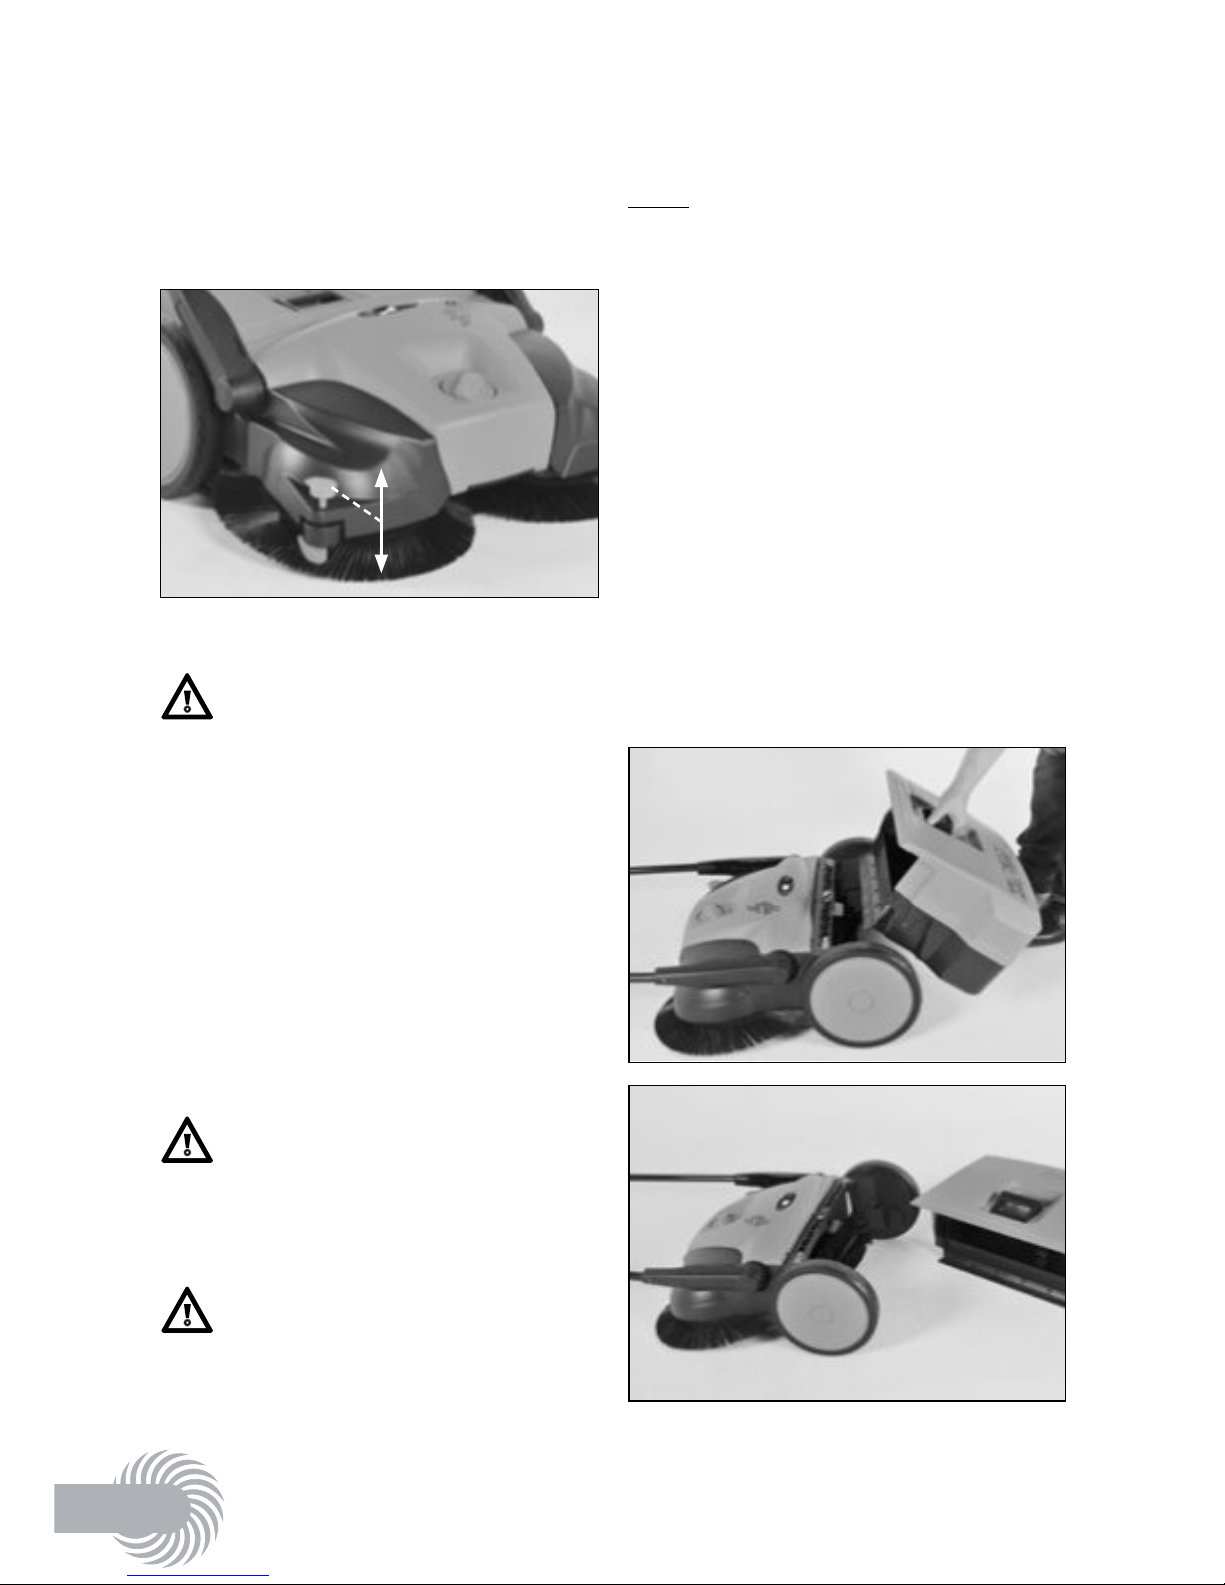
Adjusting the brush holdingdown device
NOTE
The brush holding- down device adjusts
the right disc brush to the edge areas to
be swept, e.g. wallsor kerbs.
Excessive wear can occur in the event of
unsuitable adjustment at lower edges.
The holding-down device must not scrape
on the ground.
Page 18
44
• Sweeping edgesand corners:
Pressthe handle of the brush holding-down device down.
• Operation on surfaces: Pull the handle
of the brush holding-down device up.
5.5 Switching off the sweeper
Risk of accident!
• Do not operate the ON/OFFswitch with
your foot.
1.Switch the ON/OFFswitch (1) to"0"
position.
2.Check the sweeper
(see Maintenance andcare).
3.Charge battery
(see Charging the battery).
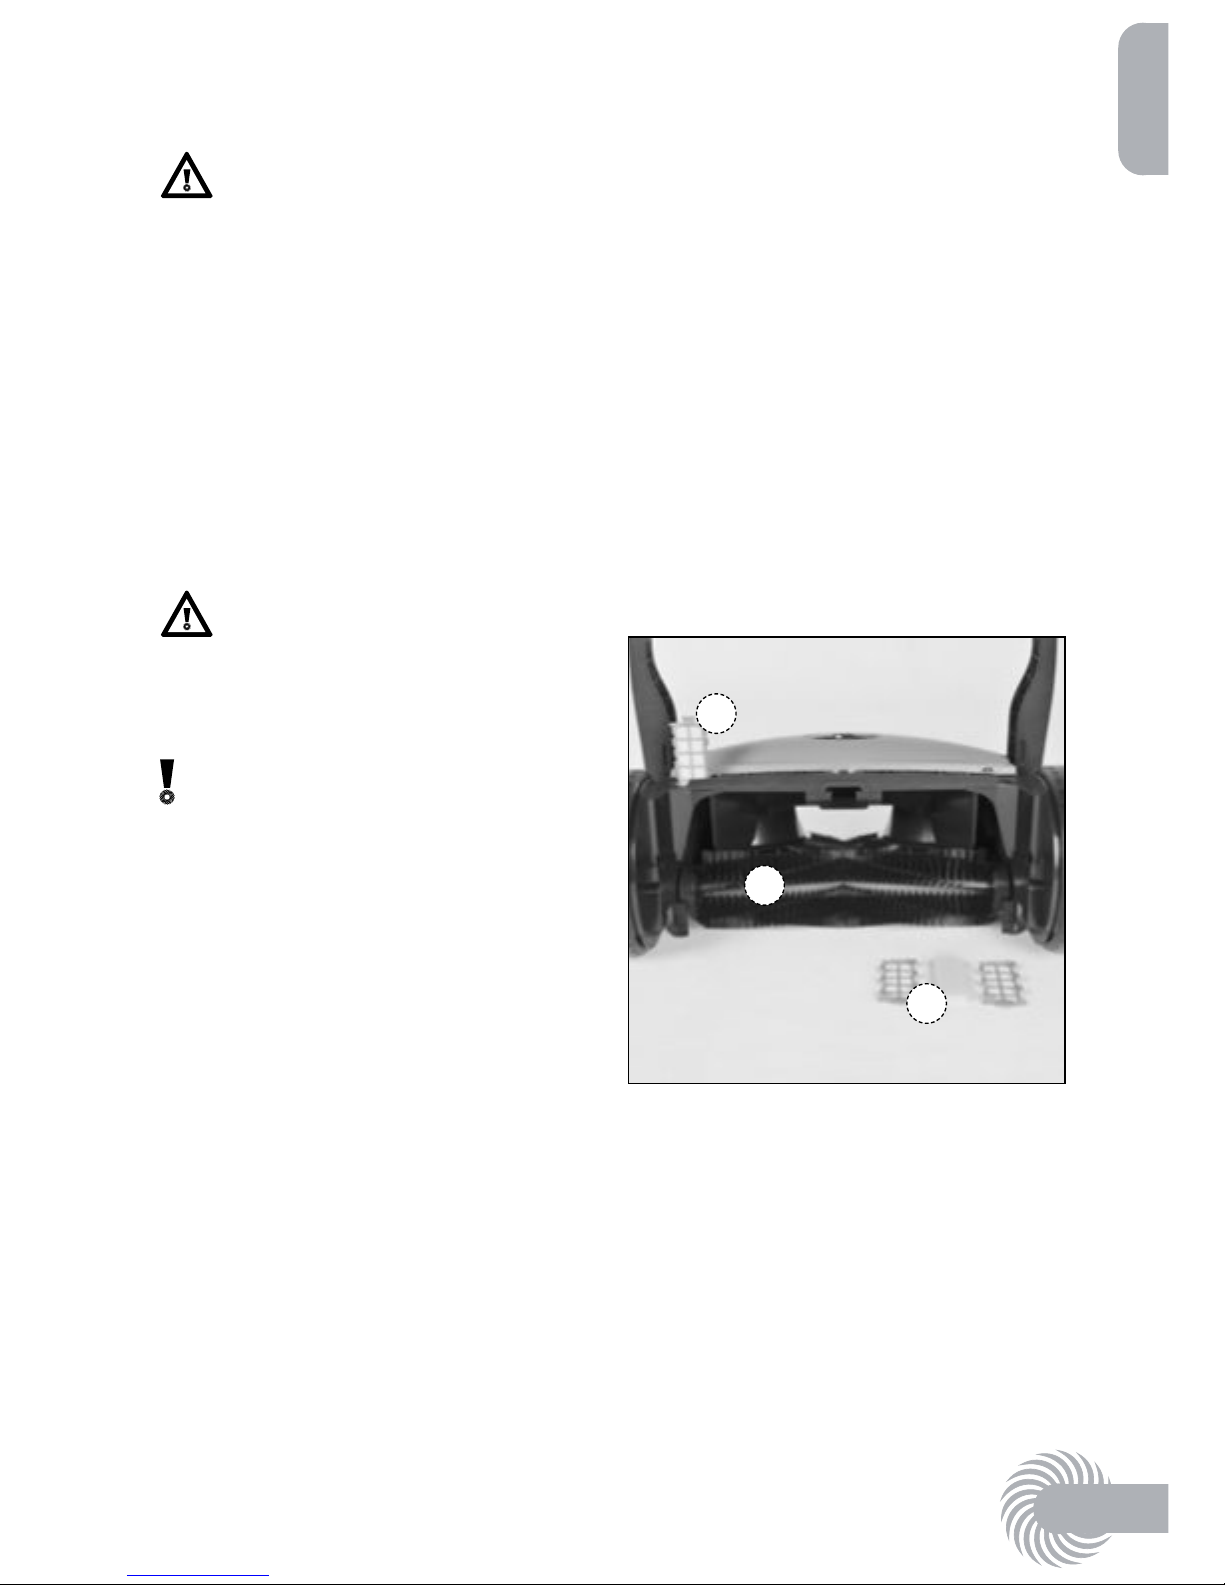
5.6 Emptying the waste bin
Danger of injury!
• Wear sturdyglovesin order to avoid
cut injuries, e.g. due to glass shards,
metal or other sharp-edged materials.
Health risk!
• Empty the waste binoutdoorsif possible in order to avoid production of
dust.
• Wear a dust protection maskin dusty
conditions.
NOTE
Empty the waste bineach time after use.
Empty the waste binat regular intervals
inorder to achieve optimum sweeping
performance.
1.Foldthe push handle forwards so that
it isin at position.
2.Pull the handle of the waste bin
upwards.
3.Remove the waste binand empty.
4.Fit the empty waste bin on the
sweeper, making sure that the housing
edgesarefree of dirt.
5.Lock the waste bin handle.
Page 19
English
45
5.7 Cleaning the sweeper
Risk of accident!
Risk of injurydue to accidental starting
of the sweeper!
• The sweeper must be switched off and
disconnected from the power supply
when performing all work.
• Do not carryout any workwith running
motor.
• Disconnect the sweeper from the power
source while cleaning. Disconnect the
cable from the battery.
Danger of injury!
• Wear sturdyglovesin order to avoid
cut injuries, e.g. due to glass shards,
metal or other sharp-edged materials.
CAUTION!
Damage to the sweeper due to improper
cleaning.
• Clean the sweeper to remove dust and
dirt.
• Do not use grease removersfor cleaning.
• Do not use aggressive detergents.
• Do not clean with a high-pressure
cleaner.
• Protect bearings against moisture.
• Do not clean the disc brushesand ne
dirt sweeping roller with compressed
air. The hardair jet coulddamage the
bristles.
• Clean plastic partswith a damp cloth.
• Do not spray-clean with water or
immerse in water. Moisturewill
damage the electrical componentsand
can lead to short circuits.
• Cleaning interval after 8 hoursof operation.
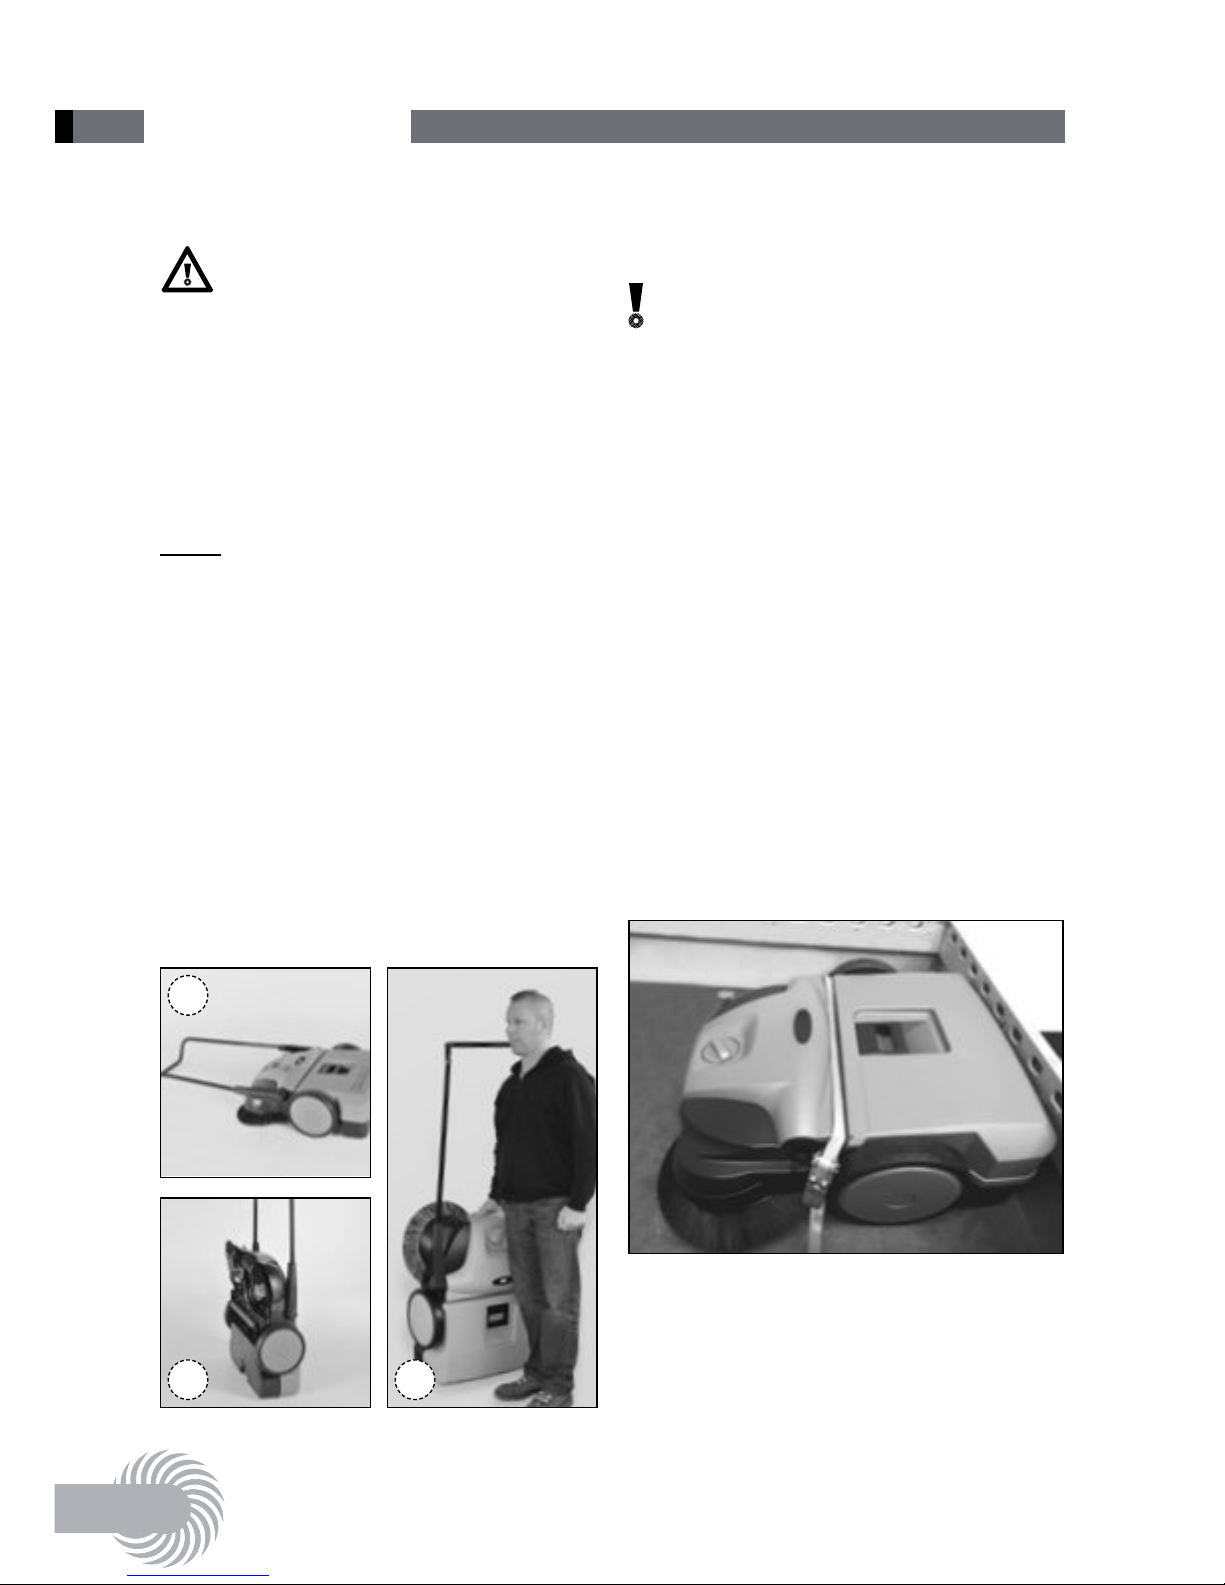
1.Cleanthe disc brushes, ne dirt sweeping roller (1) and driveswith a wet
cloth.
2.Clean plastic partswith a damp cloth.
3.Cleanthe dust lter (3).
Recommendation: applya thin coating
of Haaga genuine lubricant spray to the
brush drives.
1
3
3
Page 20
46
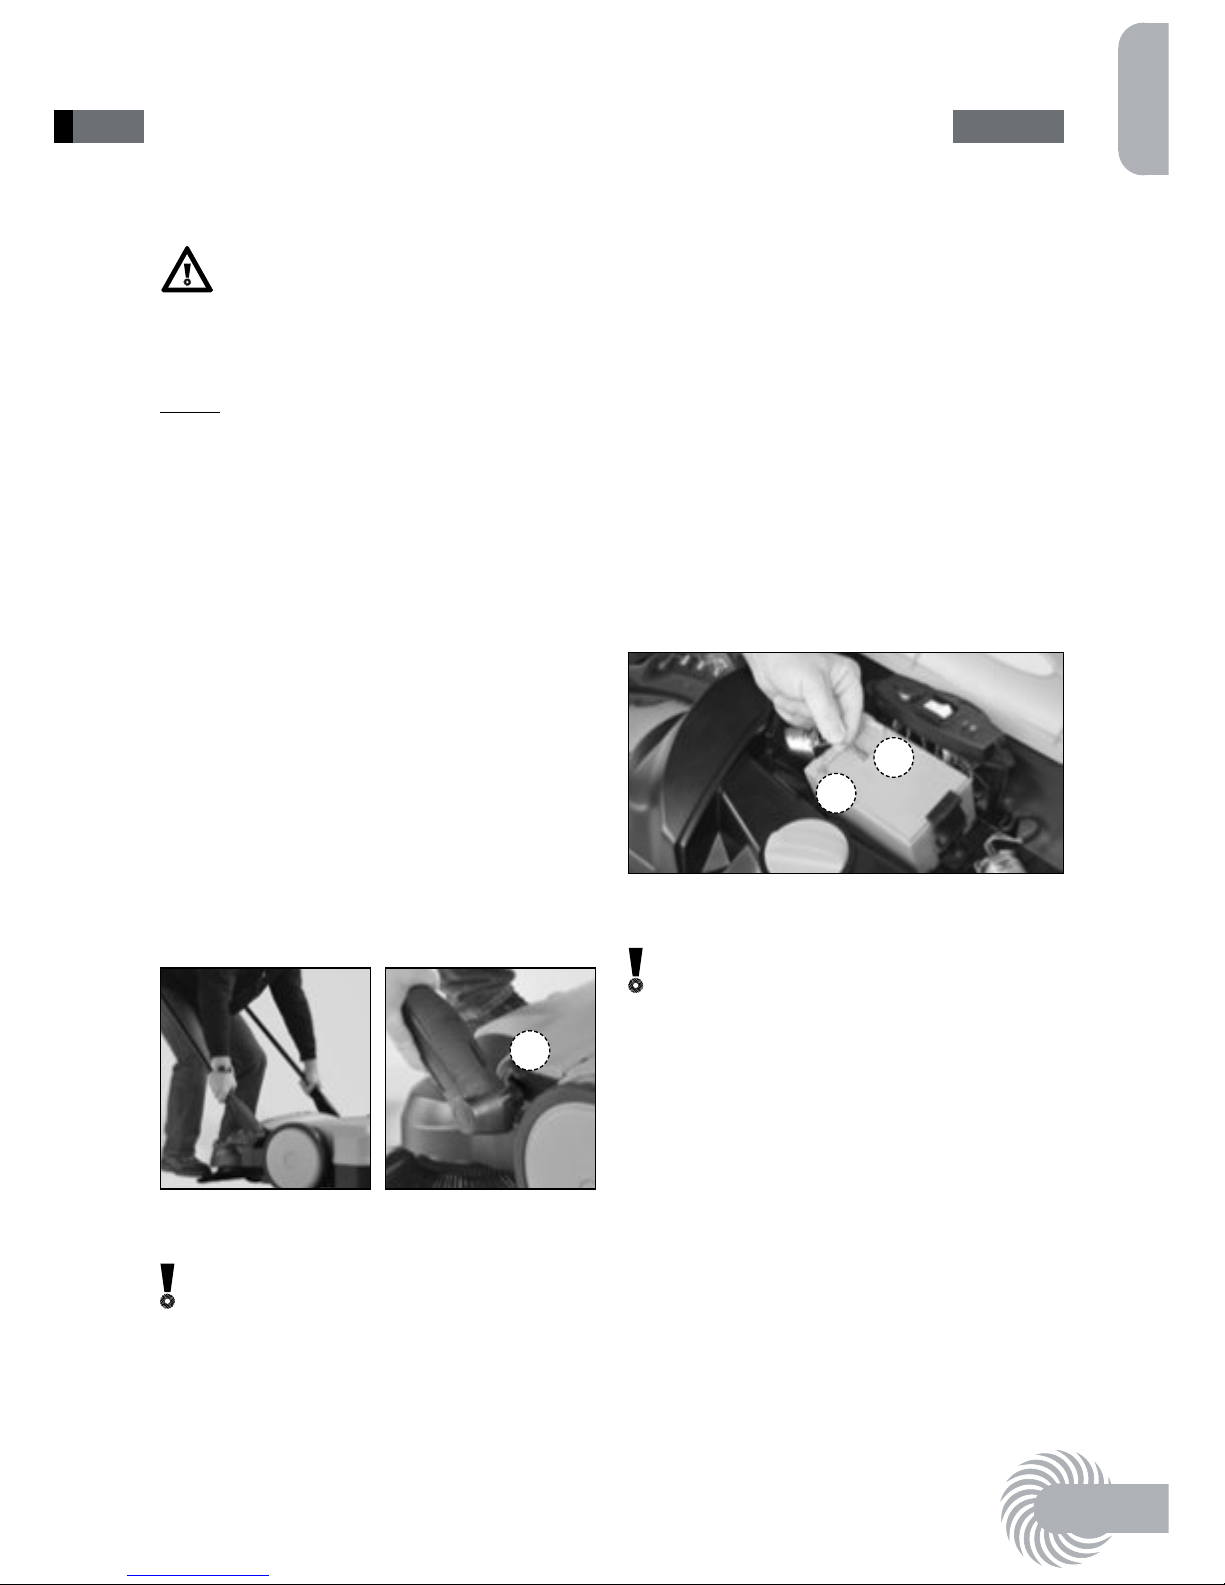
6 Transport
6.1 Carrying the sweeper
Danger of injury!
• Holdthe sweeper so that falling over
or tipping down of the push handle
cannot cause injuriesto the user or
other persons.
• Do not carrythe sweeper by the handle
of the waste bin.
NOTE
Carry the sweeper by meansof the carrying handle at the front.
Do not drop the sweeper.
1.Foldthe push handle (1) forwardsso
that it isin at position.
2.Grasp the sweeper at the carrying
handle(2).
3.Carry the sweeper so that the disc
brushesarefacing awayfromthe
body (3).
1
2 3
6.2 Transporting the sweeper in
a vehicle
CAUTION!
Damage to the sweeper due to improper
transport.
• Position the sweeper so that the bris-
tlesof the disc brushesare not kinked
or bent.
• Securethe sweeper toprevent it from
tipping, slipping or being damaged.
• Securethe sweeper with a suitable
lashing strap to prevent it fromslipping.
1.Remove the push handle
(see Removing the push handle).
2.Position the sweeper in the vehicle.
3.Securethe sweeper by meansof a lash-
ing strap.
Page 21
English
47
7.1 Removing the push handle
Danger of injury!
• Avoidinjury due to push handle accidentallyfalling over.
NOTE
The push handle can be removed fromthe
sweeper to permit space-saving transport
invehicles.
1.Adjust so that the arrows(1) on the
housing are ush with the lugson the
handlettings.
2.Position yourself in front of the
sweeper inside the push handle.
3.Grasp both handlettingswith your
hands.
4.Carefullypressboth handle ttings
outwards.
5.Simultaneously pull the handle ttings
out of the two mountson the sweeper.
1
7.2 Disconnecting battery cable
CAUTION!
Damage to the sweeper due to improper
disconnection.
• For storage periodsof longer than
2 months: disconnect battery cable to
protect the battery against deep discharge.
• The sweeper may be damaged and the
warranty rendered voidif the cables
are mixed up on the battery.
1.Pull cover forwardsat the front bottom
edge.
2.Swivel cover up.
3.Pull battery cable (blue) (1) off contact
tab (2).
1
2
7.3 Storing the sweeper
CAUTION!
Damage to the sweeper due to improper
storage.
• Position the sweeper so that the bristlesarenot kinked or bent.
• Securethe sweeper toprevent it from
tipping, slipping or being damaged.
• Switch the ON/OFFswitch to "0" position.
• Do not store the sweeper outside or in
a damp place.
7 Putting out of operation and storage
Page 22
48
NOTE
• Empty the waste bin.
(see Emptying the waste bin).
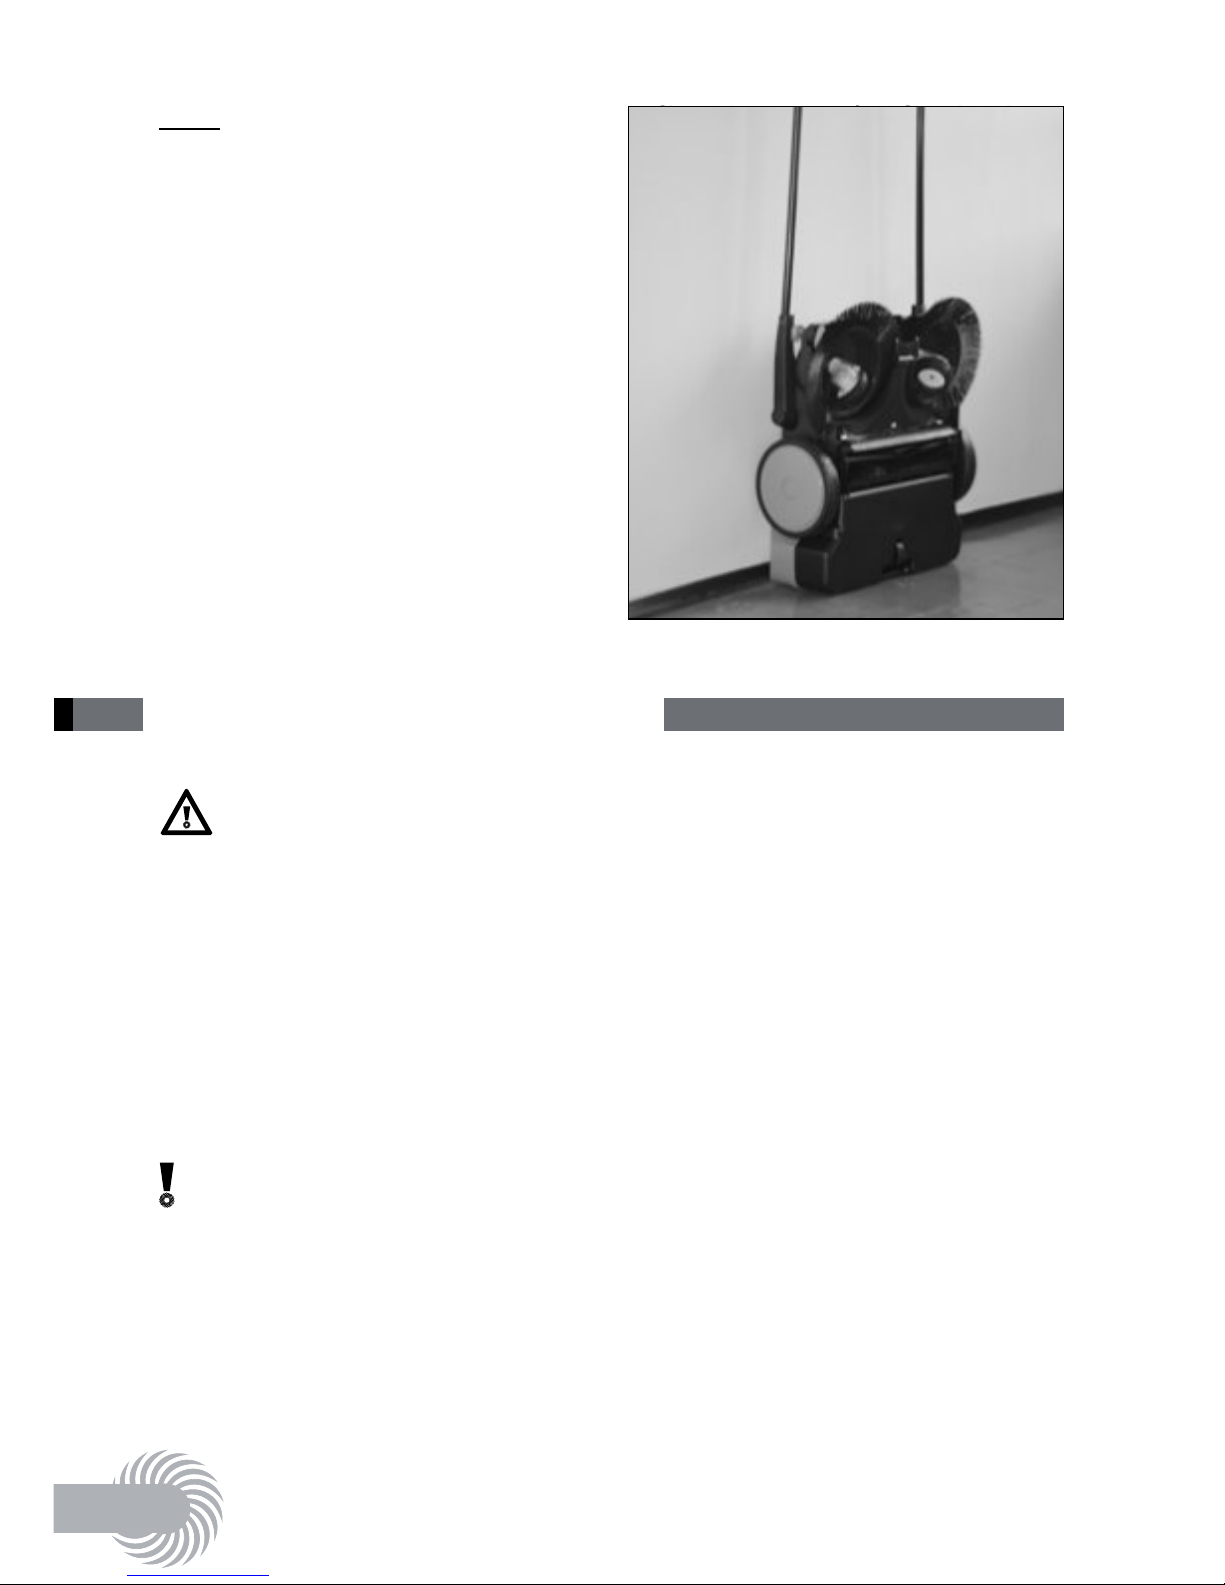
• When storing, ensure that the push
handle and sweeper are secured to prevent them fromfalling over.
• The battery cable must alwaysbe disconnected for longer storage periods
asfromapprox. 2 months(e.g. winter
break) without batteryrecharging. Risk
of deep discharge.
• Disconnect battery cable
(see Disconnecting battery cable).
• Clean the sweeper (see Cleaning the
sweeper).
8 Maintenance and care
Risk of accident
Risk of injurydue to accidental starting
of the sweeper.
• The sweeper must be switched off and
disconnected from the power supply
when performing all work.
• Disconnect the cable from the battery.
• Do not carryout any workwith running
motor.
CAUTION!
Damage to the sweeper due to improper
maintenance.
• Carry out maintenance of the sweeper
regularly.
• Perform onlythe maintenance work
and repairsdescribed in the instructions.
• Have all other workperformed by a
qualied specialist dealer.
• Use only genuine Haaga spareparts.
Otherwise there isa risk of accidentsor
damage to the sweeper.
• In the event of queriesrelated to this,
please consult a specialist dealer.
8.1 Regular maintenance
8.1.1 Before the start of work
Check the condition of the sweeper.
Check to ensurethat the push handle is
securelyattached to the sweeper.
Page 23
English
49
Check condition of waste bin and ensure
that it issecurelyattached.
Check the disc brushesand ne dirt
sweeping roller for stuck partsand
embedded dirt – bristlesmust move
freely.
Check the disc brushesand ne dirt
sweeping roller for wound-up threads
and string – remove if necessary.
Check height adjustment of the disc
brushesand adjust to the ground to be
swept.
Check sweeping pressure adjustment –
adjust to the ground to be swept.
Clean handles– they must be clean and
dryand free of oil and dirt.
Check the sweeper for damage, and contact Service if necessary.
Check the height adjustment
(see Height adjustment).
It must be possible to easily move the
sweeper switch to "0"position.
Check charger connecting socket for foreign matter.
CAUTION!
• No not insert any electricallyconductive objectsinthe charging socket and
the sweeper may be damaged by a
short circuit inthe charging socket.
• Disconnect the cable at the battery
before carrying out maintenance and
cleaning work.
Danger of re!
Ashort circuit in the charging socket can
lead to a cable re in the sweeper.
• Do not use any ammableuidsto
clean the charging sockets.
8.1.2 After the end of work
Clean the dust lter
(see Cleaning the dust lter).
Clean the sweeper
(see Cleaning the sweeper).
Charge battery(see Charging the battery).
8.1.3 Every 8 hoursof
operation:
Clean the brush drives
(see Cleaning the sweeper).
Recommendation: Applya thin coating
of Haaga genuine lubricant spray to the
brush drives(see Spraying the brush
driveswith lubricant).
8.1.4 Every 2 months:
Charge battery(see Charging the battery).
8.2 Cleaning the dust lter
Danger of injury!
• Do not clean with compressed air.
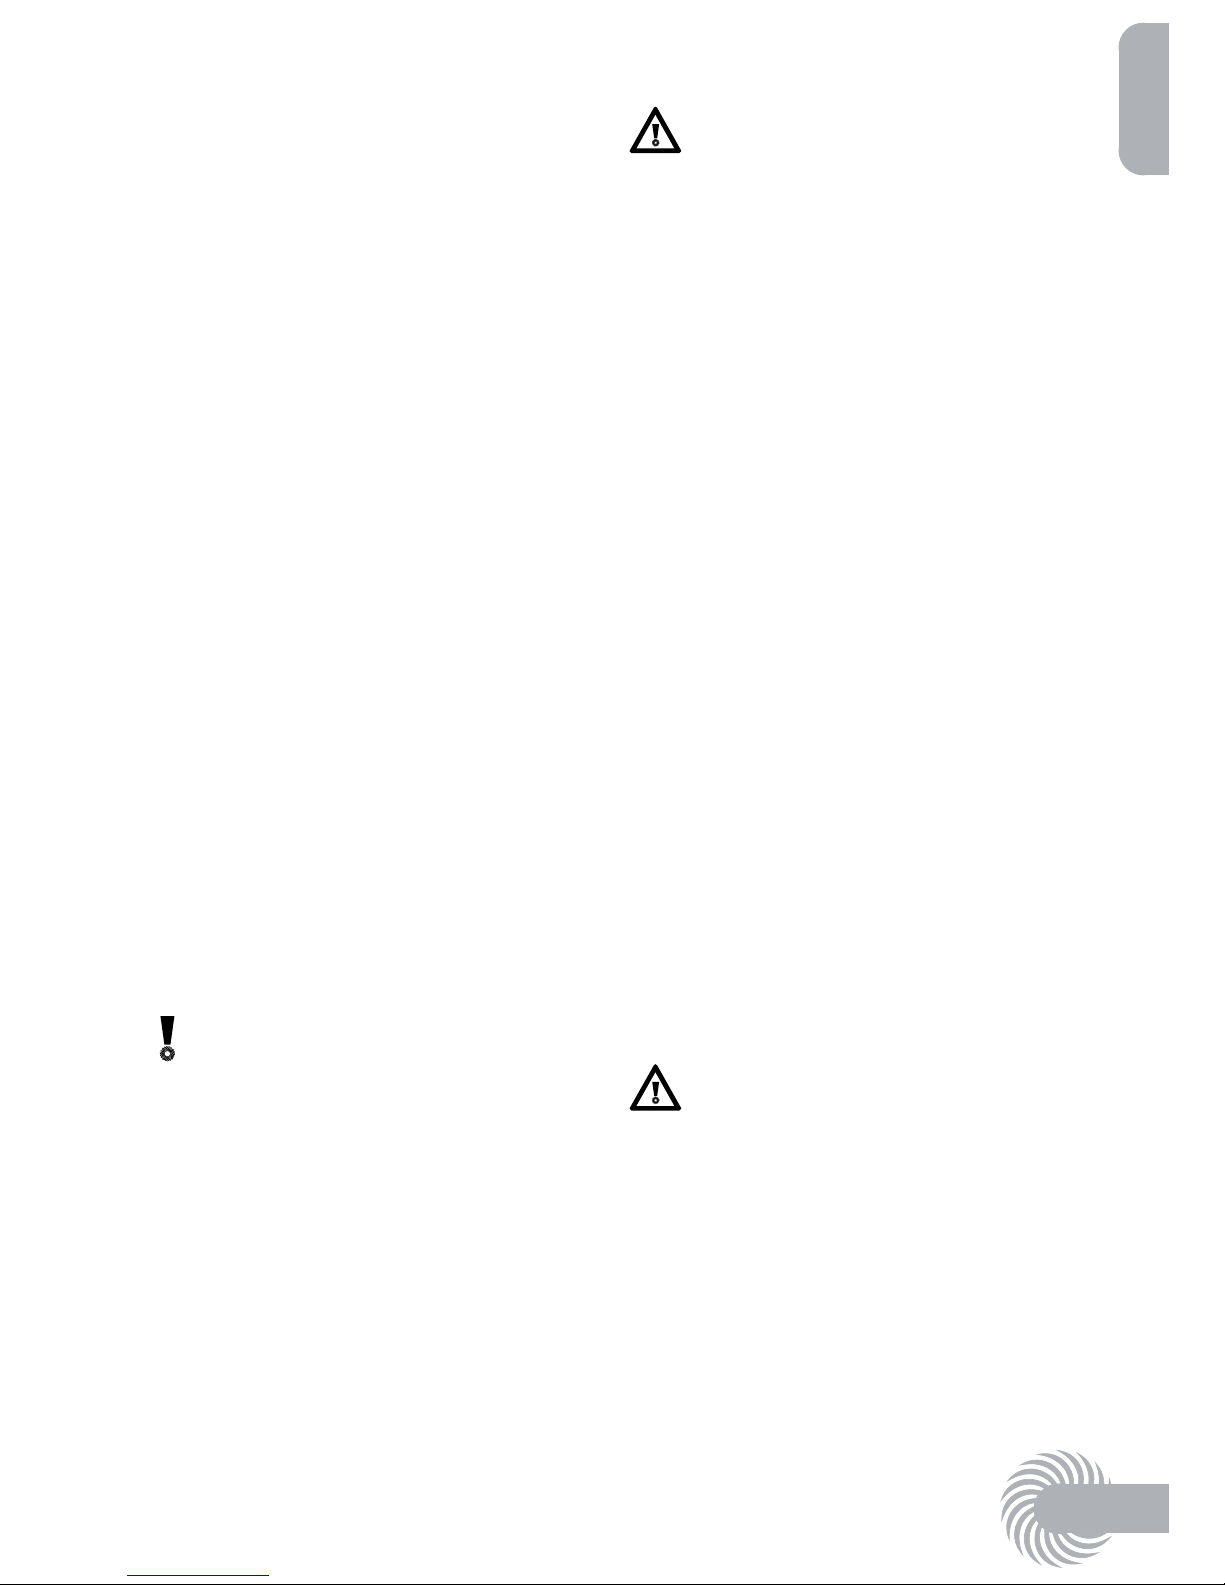
1.Remove the waste bin.
2.Pull both lter elementsout of the
guides.
3.Remove the foam insert fromthe lter
element.
Page 24
50
4.Knock out the foam insert.
5.Cleanthe foam insert with water and
allow to dry.
6.Insert the cleaned foam insert in the
lter element.
7.Insert both lter elementsinthe
guides.
8.Fit the waste bin.
8.3 Eliminating blockages
Danger of injury!
• Wear sturdyglovesin order to avoid
cut injuries, e.g. due to glass shards,
metal or other sharp-edged materials.
1.Remove wound-up material (e.g.
threads, string…) from brushesand
axles.
2.Remove any jammed material (e.g.
stones, branches, …).
8.4 Spraying the brush drives
with lubricant
CAUTION!
• Damage to the sweeper due to
improper lubrication.
• Use only Haaga genuine lubricant
spray. Use of other oils or greasescan
impair functioning of the brush drives.
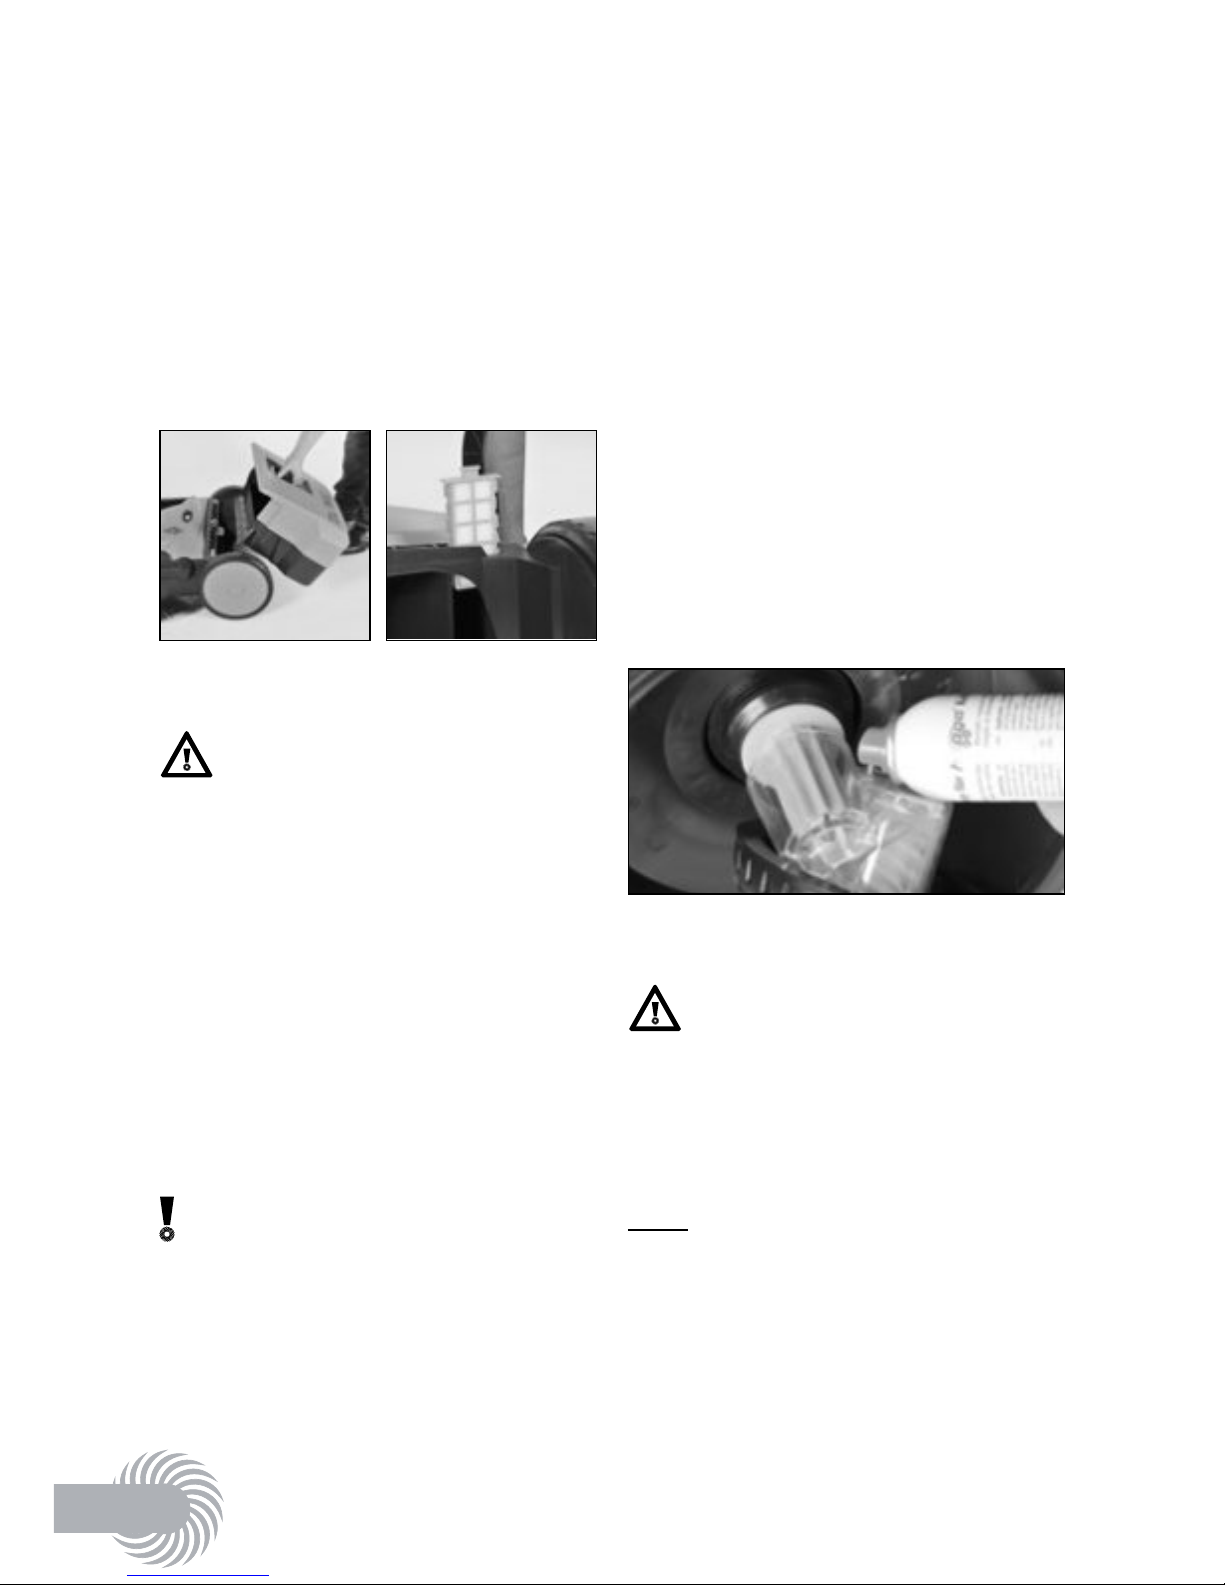
1.Position the sweeper so that it isvertical.
2.Recommendation: spraya sparing
amount of Haaga lubricant spray onto
the brush drivesthrough the opening in
the housing.
3.Remove excesslubricant.
• Recommendation: Every8 hoursor
operation or asrequired.
• Haaga genuine lubricant spray is
available asan accessory (articleno.
923000).
8.4 Straightening bristles
Danger of re!
• Do not use naked amesor burnersto
heat the bristles!
• Do not use a heat gun. The brushes
may melt due to the excessivelyhot air.
NOTE
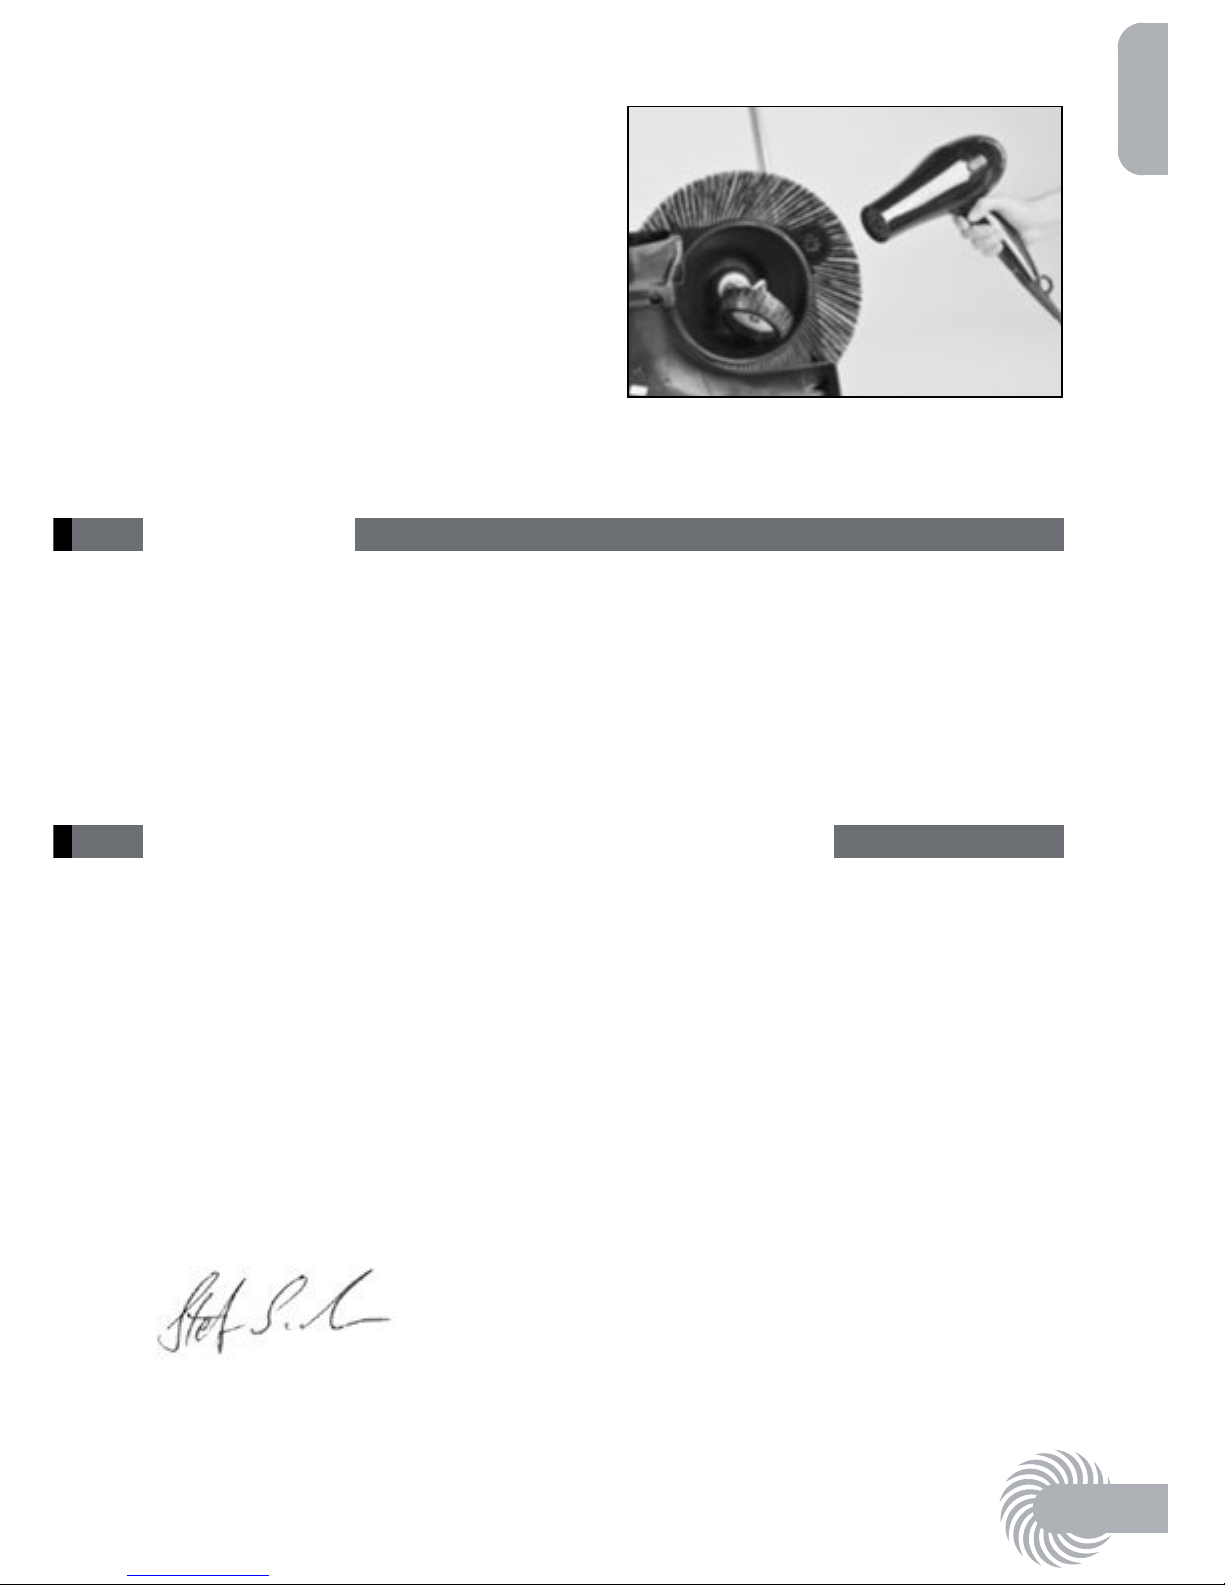
Bent bristles can be straightened again
by heating with a hot- air blower.
Page 25
English
51
9 REACH
REACH isthe European chemicalsregulation for registration, evaluation, authorisation
and restriction of chemicals.
Information on compliance with the REACH regulation (EU) No. 1907/2006 can be
found at www.haaga- gmbh.de
10 EC Declaration of Conformity
haaga 677 / haaga 697
Haaga Kehrsysteme GmbH, Wielandstr.
24, 73230 Kirchheim/ Germany hereby
conrmsthat the sweeper haaga
677/ 697 incl. charger conformswith
the Directives2006/42/EC, 2006/95/EC,
2011/65/EU and hasbeen developed and
manufactured in accordance with the applicable standards.
Stefan Sander
Managing Director
Heat the bristles using a hot-air
blower (e.g. hair dryer). The bristles will
straighten themselves.
Page 26
52
*Determined inoperating state withnominal maximum speed/ dependent on surface type
Battery
677 697 697 plus
Voltage 12V 12V 12V
Power 12Ah 12Ah 15Ah
Weight in kg 3.8 3.8 3.8
Temperaturerange
- Operation:
from-10°Cto50°C from-10°Cto50°C from-10°Cto50°C
- Charging: from 0°Cto40°C from 0°Cto40°C from 1°Cto40°C
- Storage:
from-10°Cto40°C from-10°Cto40°C from-10°Cto40°C
Charger
677 697 697 plus
Input voltage 230VAC/
50 Hz
230VAC/
50 Hz
230VAC/
50 Hz
Output voltage 12V 12V 12V
End-of-chargevoltage 13.8V 13.8V 13.8V
Chargingcurrent 2,500mA 2,500mA 2,500mA
Temperaturerange
- Operation: from 0°Cto25°C from 0°C
to
25°C from 0°Cto25°C
- Storage:
from-25°Cto 70°C from -25°Cto70°C from-25°Cto 70°C
Weight 540g 540g 540g
11 Technical data
Technical data
haaga 677 haaga 697 haaga 697
plus
Sweeping width approx. cm 77 97 97
Sweeping performance approx. m²/hour 3,600 4,100 4,100
Wastebincapacity (litres) 50 50 50
Weight in kg 21 22 22
Operating time with full battery power*,
min. approx.
90
90 120
Noise and vibration information (measured inaccordance with EN 60335-2-72): measuredin accordance withEN60745-2-6
Sound pressurelevel L
p
(EN60335-2-72)*
64
dB(A) 64dB(A) 64dB(A)
Sound power level L
w
(EN60335- 2-72)*
80
dB(A) 80dB(A) 80dB(A)
Uncertainty for specied sound levels
(2006/42/EC)
2.5
dB(A) 2.5dB(A) 2.5dB(A)
Vibration information
measuredin accordancewithEN60335-2-72
Left handle, a
h
< 2.5m/s² < 2.5m/s² < 2.5m/s²
Right handle, a
h
< 2.5m/s² < 2.5m/s² < 2.5m/s²
Uncertainty(K) (Directive2006/42/EC)
2.0
m/s² 2.0m/s² 2.0m/s² 131
Page 27

English
53
12 Troubleshooting
Problem Cause
Remedy
Sweeper dirty Clean the sweeper
(see Cleaning the sweeper)
Brushes blocked Eliminate blockage
(see Eliminating blockages)
Brush drives dirty Clean the brushdrives
(see Cleaning the sweeper)
Sweeper moves
sluggishly
or does not run
smoothly
Lubricate brush driveswithlubricant spray
• Height adjustment isset too
low
• Contact pressure of disc
brushes istoo high
Adjust height
(seeHeight adjustment)
Disc brushes do not rotate Contact Service
Sweeper switchesoff
• Height adjustment isset too
low
• Contact pressure of disc
brushes istoo high
Adjust height
(seeHeight adjustment)
• Brushesblocked Clean the sweeper
(see Cleaning the sweeper)
• Overloadprotection active Eliminate blockage
(see Eliminating blockages)
• The LED indicator on the
sweeper lights up red
• Check thestateof chargeof
the battery
• Charge battery
Brushes arebent Improper storage Straighten brushes
Inadequate sweeping
performance
Sweeping lip ismissing, loose
or heavilyworn
Replace sweeping lip
 Loading...