

Page 1
H3C SecPath F1020/F1030/F1050/F1060/F1070/F1080 Firewall Installation Quick Start – 5PW102
H3C SecPath F1020/F1030/F1050/F1060/F1070/F1080 防火墙 快速安装指南 - 5PW102
BOM: 3104A0E5
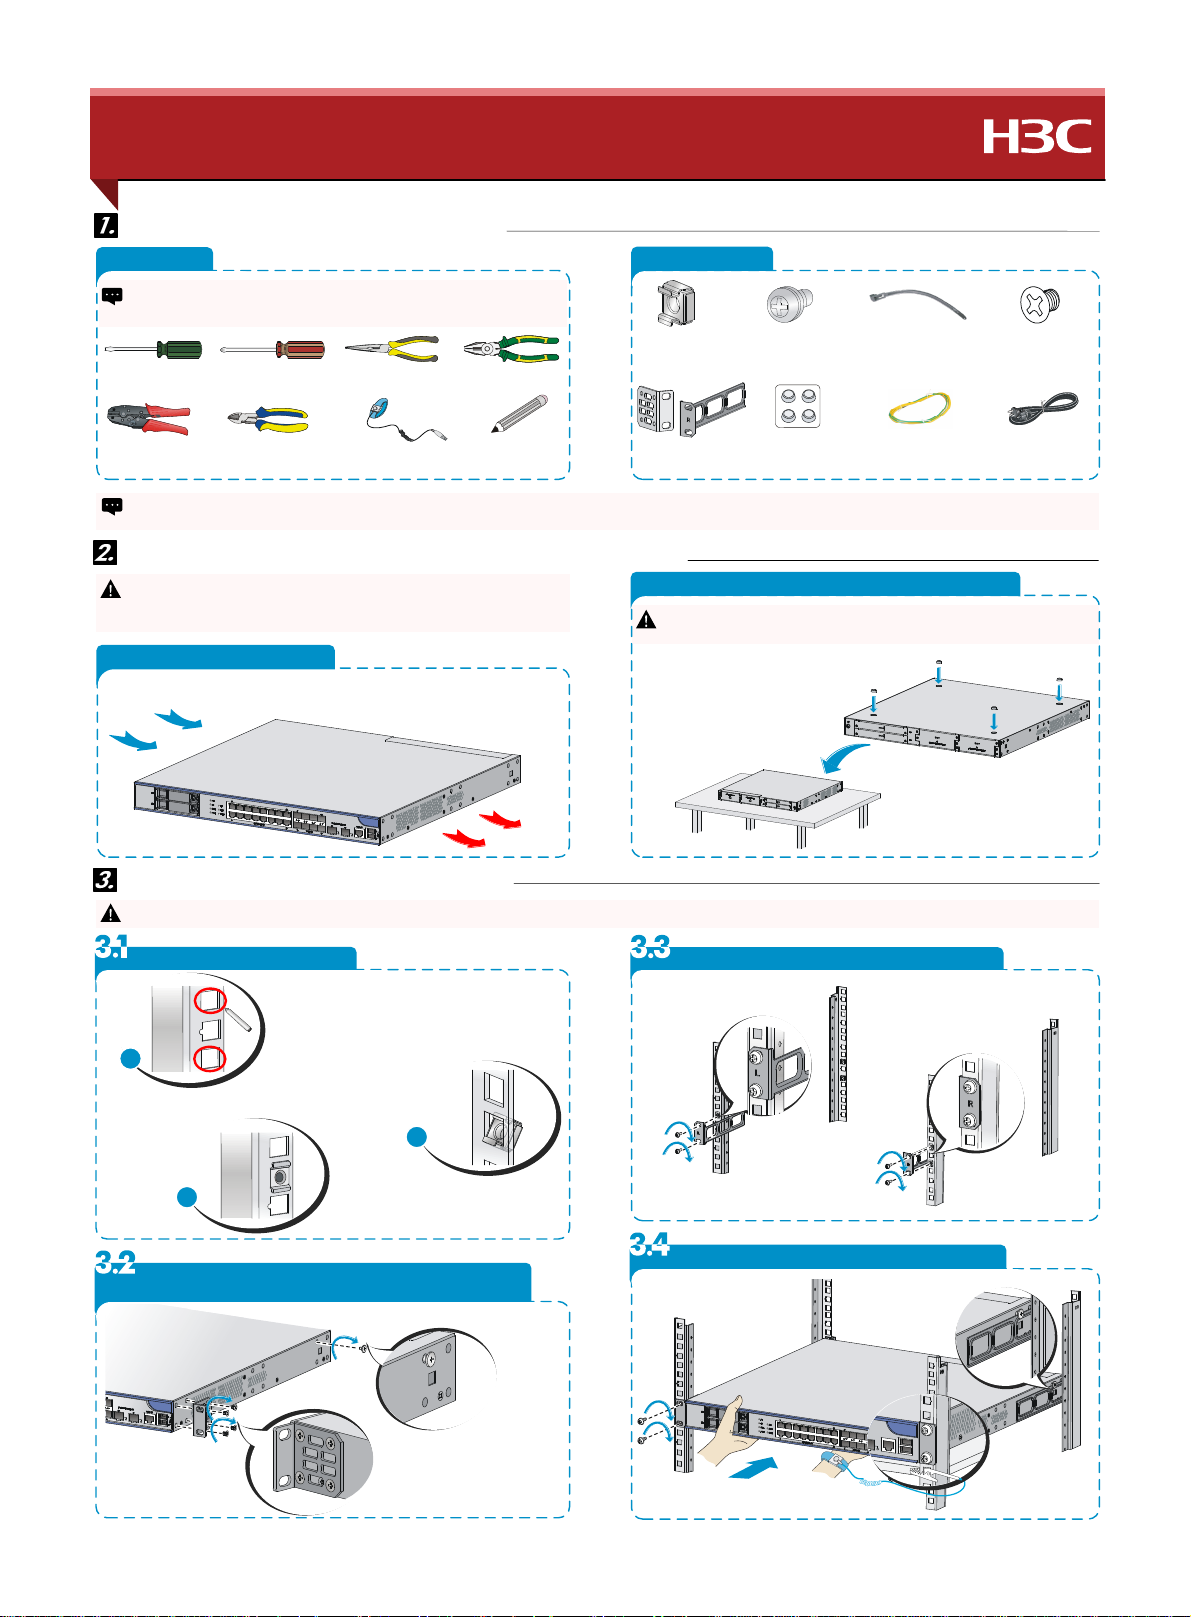
Installation tools and accessories 安装工具与附件
Tool list 工具
The installation tools are not provided with the firewall. Prepare them yourself.
防火墙不随机提供安装工具,请用户根据实际安装需求自备安装 工具。
r
d
e
e
r
w
r
r
d
e
w
i
P
h
v
e
r
e
d
t
la
F
s
la
-b
c
字
螺
丝
刀
一
e
r
W
i
r
e
p
c
r
im
压
线
钳
The installation procedures are similar for the F1020, F1030, F1050, F1060, F1070, and F1080 firewalls, This guide uses the F1080 firewall as an example.
F1020/F1030/F1050/F1060/F1070/F1080防火墙安装方法类似,本手册仅以安装F1080举例说明。
D
iv
s
i
s
c
r
llip
字
螺
丝
刀
十
l
li
p
e
r
s
i
o
g
n
a
a
斜
口
钳
s
e
li
p
e
r
N
e
e
E
s
o
-n
d
le
尖
嘴
钳
r
S
D
t
w
is
防
静
电
腕
W
s
a
tr
p
带
g
in
li
p
e
r
i
r
e
-s
s
tr
i
p
p
剥
线
钳
e
r
M
a
r
k
记
号
笔
Firewall airflow and workbench-mounting 设备风向设计及安装到工作台
Wear an ESD wrist strap, and make sure the wrist strap makes good skin contact
!
and is reliably grounded.安装设备时 ,操作者需佩戴防静电腕带,确保防静电腕带
与皮肤良好接触,并确认防静电腕带已经良好接地。
Airflow of the firewall 风向设计
-r
i
to
g
h
t
i
a
r
f
w
L
e
f
t-
设
备
lo
设
计
进
右
出
采
用
左
。
的
风
道
Accessories 附件
u
t
e
g
a
C
n
u
s
e
r
s
u
p
p
li
e
)
d
(
动
螺
浮
M
)
母
(
用
户
自
备
k
e
o
ts
u
n
ti
n
g
r
b
c
a
r
e
)
d
o
v
id
(
p
挂
耳
(
标
配
)
w
M
6
s
c
r
e
s
e
r
s
u
p
li
p
e
(
u
6
螺
钉
(
用
户
M
R
u
e
b
b
r
f
r
o
v
i
e
d
(
p
垫
贴
(
标
胶
R
e
)
d
自
备
e
e
t
d
)
配
m
(
)
卸
可
拆
)
le
b
a
ti
e
o
v
a
le
b
c
u
s
e
r
s
u
p
p
li
e
)
d
自
式
扎
带
(
用
户
b
le
r
o
G
u
n
d
i
n
g
c
a
r
o
v
i
e
d
)
d
(
p
地
线
(
标
配
)
Mounting the firewall on a workbench 安装到工作台
Make sure the workbench is stable and reliably grounded. Do not place heavy
!
objects on the firewall.保证工作台的平稳与良好接地,并且不要在设备上放置重物。
r
r
o
u
n
f
e
e
t
to
h
e
th
r
u
b
c
tta
A
c
h
s
h
o
le
i
n
e
th
i
w
th
a
ll
u
w
f
i
r
e
垫
到
设
粘
贴
胶
。
到
工
作
台
上
th
e
b
r
m
s
a
s
i
s
o
b
tto
d
e
u
p
o
n
p
s
i
,
将
备
设
底
部
d
e
f
o
u
.
c
e
P
e
la
th
o
r
w
k
e
b
n
c
h
.
e
th
备
翻
转
后
平
放
M
4
s
备
)
M
e
n
d
a
k
-h
c
r
o
u
n
te
s
u
r
e
w
(
p
r
o
v
i
e
d
d
c
4
)
)
沉
P
电
头
螺
钉
(
标
配
e
r
o
w
c
le
b
a
r
o
v
i
d
e
)
d
(
p
源
线
(
标
配
)
Mounting the firewall in a rack 安装设备到机柜
To avoid bodily injury and firewall damage, use a minimum of two people to mount the firewall in a rack.由于设备较重,安装到机柜时至少需两人配合完成,以免 造成设备及人身伤害。
!
Install cage nuts 安装浮动螺母
M
th
k
a
r
p
o
k
a
c
r
耳
挂
用
记
用
并
ta
s
n
i
e
lla
s
u
y
b
ts
机
出
对
比
号
出
标
笔
o
ti
i
s
o
p
n
o
ti
n
a
g
n
i
s
m
ti
n
u
o
立
柜
条
孔
方
柱
。
n
g
a
e
c
r
o
f
s
a
r
b
g
n
c
浮
上
动
th
e
n
o
ts
u
t.
e
k
位
的
母
螺
,
置
Install the rear mounting brackets 安装后挂耳
1
In
ta
s
ll
a
t.
u
n
g
a
e
c
装
安
u
n
a
g
e
c
A
n
i
浮
s
i
t
ta
s
lle
.
d
装
安
母
螺
动
。
毕
完
。
母
螺
动
浮
2
3
Install the mounting brackets and load-bearing screws
安装前挂耳与承重螺钉
Install the firewall in the rack 安装设备到机柜
Page 2
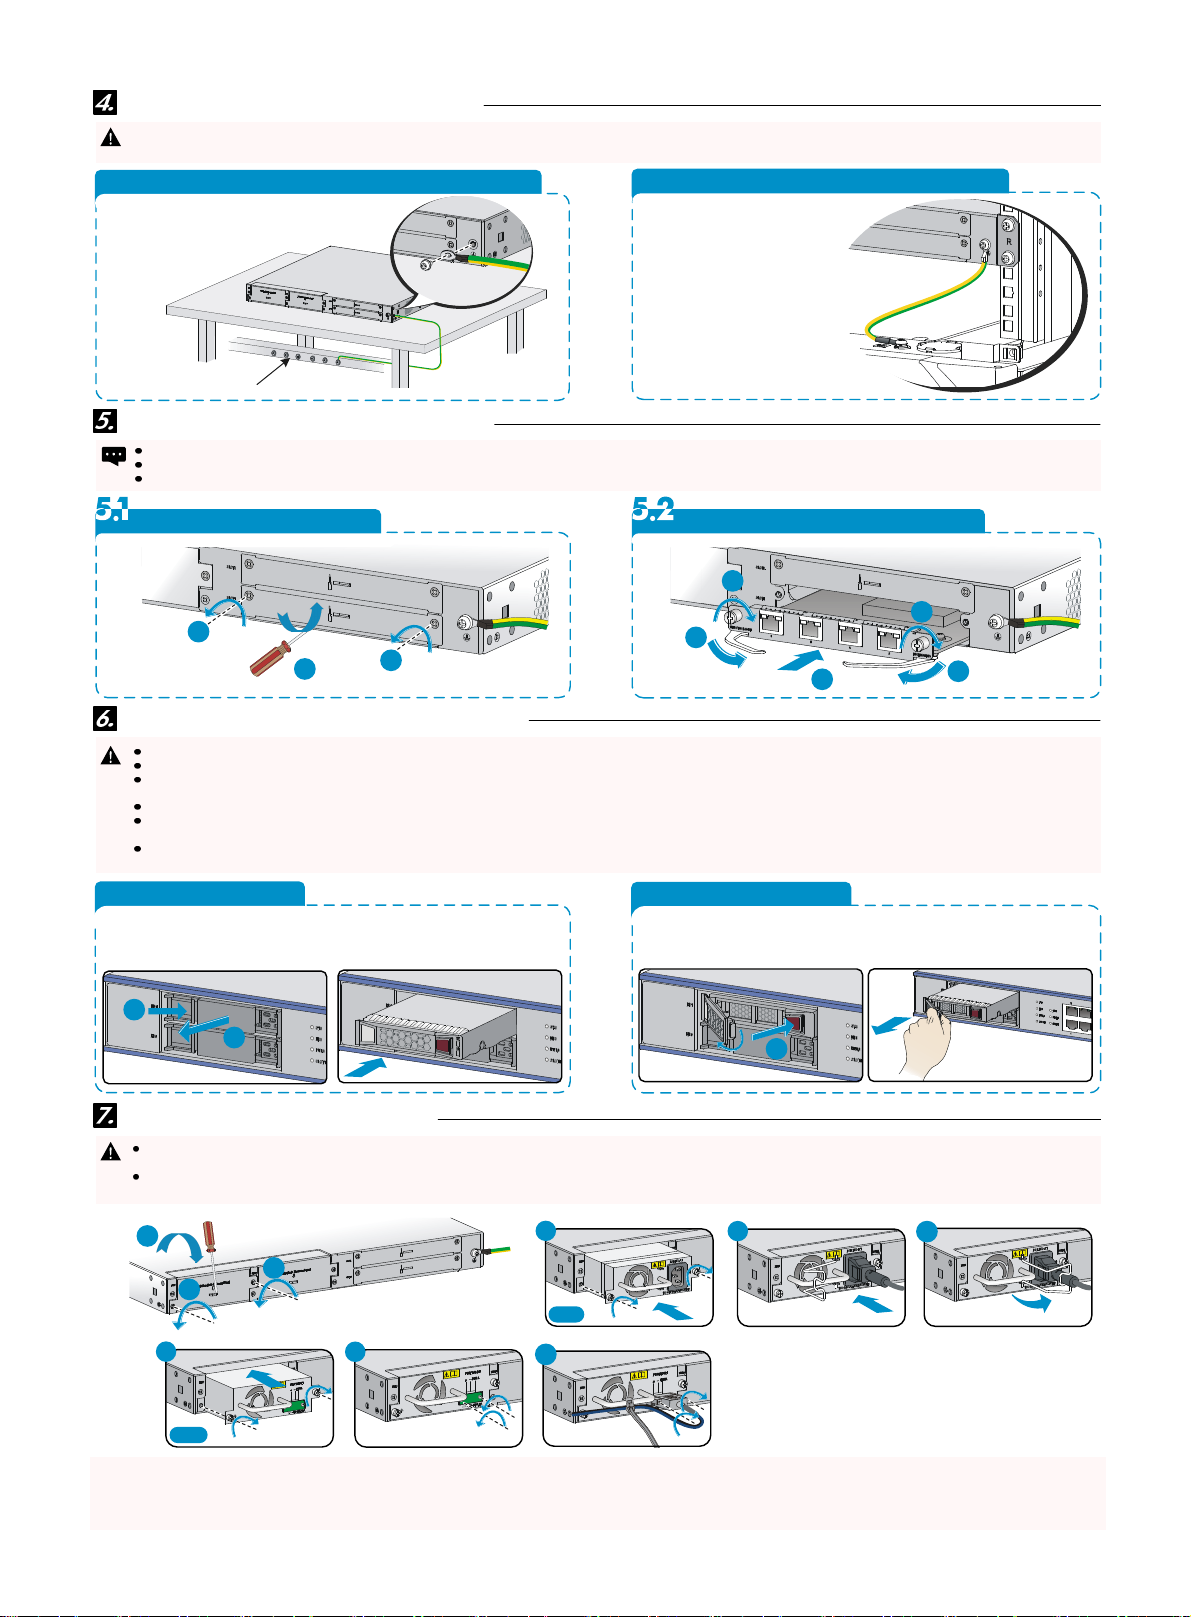
Connecting the grounding cable 连接保护地线
Correctly connecting the grounding cable is crucial to lightning protection and EMI protection. To guarantee the grounding effect, use the grounding cable provided with the firewall.
!
设备保护地线的正确连接是防雷、防干扰的重要保障,请使用防火墙随机提供的保护地线正确接地。
Ground the firewall mounted on a workbench 工作台方式接地
grounding strip接地排
Ground the firewall mounted in a rack 机柜方式接地
m
u
o
y
n
e
h
W
a
r
r
g
te
如
护
o
,
k
c
n
a
c
u
o
y
in
d
n
u
o
g
a
c
r
l o
a
n
th
m
i
n
墙
火
防
果
安
到
接
连
线
地
w
ir
e
f
th
t
n
u
e
n
o
c
t
c
e
n
th
to
le
e
b
e
.
k
c
a
r
柜
机
在
装
机
地
接
柜
a
n
ll
a
i
th
e
g
n
i
d
n
u
o
r
g
保
将
以
可
,
。
子
端
Installing a PFC interface card 安装PFC接口模块
PFC interface cards are not provided with the firewall. Prepare them yourself if required.设备不随机提供PFC接口模块,请您根据需求自行选购。
On the F1020 firewall, you can only install the PFC interface card in slot 1.F1020仅支持槽 位SLOT1安装PFC接口模块。
PFC interface cards are not hot swappable.PFC接口模块不支持热插拔。
Remove the filler panel 拆卸假面板
Install the PFC interface card 安装接口模块
3
3
1
2
Installing and removing a hard disk 安装与拆卸硬盘
Hard disks are not provided with the firewall. Prepare them yourself if required.设备不随机提供硬盘,请您根据需求自行选购。
!
For the system to identify the hard disk, use the hard disk from H3C.请采用H3C公司的硬盘,否则系统无法识别。
The hard disk is hot swappable. To avoid damaging the hard disk, unmount the hard disk before you remove it.硬盘支持热插拔,但在拔出存储介质前,请先执行umount卸载操作,以
免损坏存储介质。
Wear an ESD wrist strap when you install or remove a hard disk to protect the disk from ESD damage.安装和拆卸硬盘时,请佩戴防静电手腕以避免硬盘受到静电放电的损害。
Hold the hard disk by its two edges. Do not touch the components on the hard disk. Do not squeeze, rock, or hit the hard disk. 手接触硬盘时拿硬盘的两侧,不要触碰元器件或挤压、
振动、撞击硬盘。
Install a filler panel in the empty hard disk slot to prevent dust and other objects from entering the firewall.若不再安装硬盘时,请安装假面板,以避免灰尘或异物进入设备内部造成
静电吸附或损坏。
Install a hard disk 安装硬盘
r
d
d
i
e
l
f
r
o
e
th
f
i
.
1
R
e
.
2
P
u
缓
慢
的
lle
o
v
e
m
h
a
r
d
s
d
h
e
th
进
插
槽
。
推
m
r
p
a
n
to
ly
in
i
s
k
w
s
lo
s
e
th
h
a
o
t
a
lo
e
th
s
l
1
假
面
板
下
硬
盘
k
s
lo
n
g
th
卡
t.
拆
u
i
d
e
r
a
ils
e
g
。
槽
.
将
硬
导
轨
水
盘
沿
着
平
插
槽
2
1
Remove a hard disk 拆卸硬盘
e
th
n
e
th
o
n
b
u
.
1
P
v
e
le
.
H
2
tto
r
e
s
s
tr
a
y
.
按
下
硬
r
o
f
e
th
e
o
ld
th
e
盘
r
e
c
to
v
e
le
r
j
o
h
r
e
t
s
ig
id
托
架
面
板
上
e
th
p
u
d
ll
to
2
l
to
r
k
is
tr
f
e
th
侧
右
u
k
is
o
a
h
a
r
d
d
弹
的
出
按
钮
,
用
t
o
f
e
th
t.
s
lo
e
y
p
a
n
e
拉
手
。
拉
手
将
硬
盘
1
2
1
e
e
j
r
e
c
to
a
s
le
e
从
硬
th
拉
出
盘
槽
。
位
里
Installing a power module 安装电源模块
Only the F1070 and F1080 firewalls support both AC and DC power modules. Do not install AC and DC power modules on the same firewall. 仅F1070、F1080款型支持可插拔
!
交、直流电源,但不支持交、直流电源模块混插。
Before connecting the power cord, make sure the firewall is reliably grounded and is powered off. 在连接电源线前,需保证设备已正确接地。在连接电源线时,请确认设备电源开
关处于关闭状态。
2
1
2
3
1
1
AC
21
DC
3
For more information about the product and installation procedures, log in to www.h3c.com
Copyright © 2015 杭州华三通信技术有限公司 版权所有,保留一切权利。
如需了解产品及安装方面的更多信息,请登录H3C网站 www.h3c.com.cn
Copyright © 2015, Hangzhou H3C Technologies Co., Ltd.
Page 3

进入系统视图
配置防火墙名称
开启防火墙的Telnet服务方
便远程管理
进入以太网接口视图
配置接口IP地址
创建并且进入安全域视图
向安全域中添加接口
system-view
sysname sysname
telnet server
enable
interface interface-type interface-number
ip address ip-address { mask-length | mask } [ sub ]
security-zone name zone-name
添加三层接口成员:
import interface layer3-interface-type layer3-interface-number
添加二层接口成员:
import interface layer2-interface-type layer2-interface-number vlan vlan-list
该命令在用户视图下执行
该命令在系统视图下执行
缺省情况下,防火墙名称为H3C
该命令在系统视图下执行
缺省情况下,防火墙未开启该服务
该命令在系统视图下执行
缺省情况下,接口GE1/0/0的IP地址为
192.168.0.1
当首次执行创建安全域、创建域间策略或者进
入缺省安全域的命令时,系统会自动创建4个缺
省安全域:Local、Trust、DMZ和Untrust
该命令在安全域视图下执行
缺省情况下,安全域中不存在任何成员
可以通过多次执行本命令,向安全域中添加多
个接口
创建安全域间实例并进
入安全域间实例视图
配置同一安全域内接口
间报文处理的缺省动作
保存当前配置
显示当前配置
完成基本配置后,如果需要进一步配置各种业务功能,还需要将相关接口加入安全域和配置安全策略。详细介绍请参见产品配套的配置指导、命令参考。
!
zone-pair security source { source-zone-name | any }
destination { destination-zone-name | any }
permit动作:
security-zone intra-zone default permit
deny动作:
undo security-zone intra-zone default permit
save [ safely ]
display current-configuration
该命令在系统视图下执行
缺省情况下,无任何安全域间实例存在
该命令在系统视图下执行
缺省情况下,属于同一个安全域的各接口之间
的报文缺省会被丢弃。一个安全域中的接口与
一个不属于任何安全域的接口之间的报文,会
被丢弃
该命令在任意视图下执行
可以同时设置下次启动的配置文件
该命令在任意视图下执行
[Firewall-obj-grp-ip-webserver] quit
某公司以Firewall作为网络边界防火墙,连接内网和Internet。公司需要对外提
供Web服务。内网属于可信任网络,可以自由访问服务器和外网。内网地址
为10.10.10.0/24,公司拥有202.38.1.1/24一个公网IP地址。需要实现外
部主机可以访问内部服务器。使用202.38.1.1作为公司对外提供服务的IP地
址,服务器采用80端口。
Firewall
GE1/0/2
GE1/0/4
Trust
202.38.1.1/24
GE1/0/3
10.10.10.10/24
Internet
Untrust
DMZ
Web server
10.10.10.1/24
5. 配置服务对象组web,其支持的协议为HTTP。
[Firewall] object-group service web
[Firewall-obj-grp-service-web] service tcp destination eq 80
[Firewall-obj-grp-service-web] quit
6. 配置对象策略规则,允许任意访问Web服务器的报文通过。
[Firewall] object-policy ip access-server
[Firewall-object-policy-ip-access-server] rule pass source-ip any destination-ip
webserver service web
[Firewall-object-policy-ip-access-server] quit
7. 配置对象策略规则,允许源地址为内网地址的报文通过。
[Firewall] object-policy ip access-internet
[Firewall-object-policy-ip-access-internet] rule pass source-ip internal_user
[Firewall-object-policy-ip-access-internet] quit
8. 配置域间实例,允许内、外网用户访问Web服务器,且内网用户能访问外
网。
[Firewall] zone-pair security source trust destination dmz
当首次执行创建安全域、创建对象策略或者进入缺省安全域的命令时,系统会自动
!
创建4个缺省安全域:Local、Trust、DMZ和Untrust。缺省的安全域中没有接口,需
要手工向其中添加接口。而且缺省安全域一旦生成,就不能被删除。
[Firewall-zone-pair-security-Trust-DMZ] object-policy apply ip access-server
[Firewall-zone-pair-security-Trust-DMZ] quit
[Firewall] zone-pair security source untrust destination dmz
[Firewall-zone-pair-security-Untrust-DMZ] object-policy apply ip access-server
[Firewall-zone-pair-security-Untrust-DMZ] quit
[Firewall] zone-pair security source trust destination untrust
因产品软件版本不同,特性支持情况也会有所不同,请以产品实际情况为准。
!
1.按照组网图配置各接口的IP地址,具体配置过程略。
2.向安全域DMZ中添加接口GigabitEthernet1/0/3。
[Firewall] security-zone name dmz
[Firewall-security-zone-DMZ] import interface gigabitethernet 1/0/3
[Firewall-security-zone-DMZ] quit
3.向安全域Untrust和Trust中分别添加接口GigabitEthernet1/0/2与
GigabitEthernet1/0/4,配置过程略。
4.配置IP地址对象组internal_user和webserver。
[Firewall] object-group ip address internal_user
[Firewall-obj-grp-ip-internal_user] network subnet 10.10.10.0 24
[F
irewall-obj-grp-ip-internal_user] quit
[Firewall] object-group ip address webserver
[Firewall-obj-grp-ip-webserver] network host address 10.10.10.1
[Firewall-zone-pair-security-Trust-Untrust] object-policy apply ip access-internet
[Firewall-zone-pair-security-Trust-Untrust] quit
9. 配置内部Web服务器,允许外网用户使用202.38.1.1访问。
[Firewall] interface gigabitethernet 1/0/2
[Firewall-GigabitEthernet1/0/2] nat server protocol tcp global 202.38.1.1
80 inside 10.10.10.1 http
[Firewall-GigabitEthernet1/0/2] quit
10. 配置NAT转换,允许内网主机访问Internet,内网转换后的源地址使用
GigabitEthernet1/0/2的接口地址。
[Firewall] acl number 2000
[Firewall-acl-basic-2000] rule permit source 10.10.10.0 0.0.0.255
[Firewall-acl-basic-2000] interface gigabitethernet 1/0/2
[Firewall-GigabitEthernet1/0/2] nat outbound 2000
[Firewall-GigabitEthernet1/0/2] save
Page 4
Step
Enter system view.
Configure a name for the firewall.
Enable the Telnet server function.
Enter interface view.
Assign an IP address to the interface.
Configure a security zone and
enter its view.
Add an interface to the security zone.
Create a zone pair and enter zone
pair view.
Specify the default action for
packets exchanged between
interfaces in the same security zone
Save the running configuration.
Display the running configuration.
at the CLI
Command
system-view
sysname sysname
telnet server enable
interface interface-type interface-number
ip address ip-address { mask-length | mask } [ sub ]
security-zone name zone-name
Add a Layer 3 interface:
import interface layer3-interface-type layer3-interfacenumber
Add a Layer 2 interface:
import interface layer2-interface-type layer2-interfacenumber vlan vlan-list
zone-pair security source { source-zone-name | any }
destination { destination-zone-name | any }
Set the default action to permit:
security-zone intra-zone default permit
.
Set the default action to deny:
undo security-zone intra-zone default permit
save [ safely ]
display current-configuration
Remarks
Available in user view.
By default, the firewall name is H3C.
By default, the Telnet server function is disabled.
N/A
By default, the IP address of GE1/0/0 is
192.168.0.1.
When the first command for creating a security
zone, creating a security policy, or entering the
view of a default security zone is executed, the
system automatically creates four default security
zones: Local, Trust, DMZ, and Untrust.
By default, a security zone does not have any
interfaces.
To add multiple interfaces, perform this step multiple
.
times
Available in system view. By default, no zone pair
exists.
Available in system view. By default, the default
action for packets exchanged between interfaces in
the same security zone and between interfaces from
a security zone and a non-security zone is deny.
This command also specifies the next startup
configuration file.
Available in any view.
Available in any view.
For further configuration tasks, see the firewall configuration guides and command references.
!
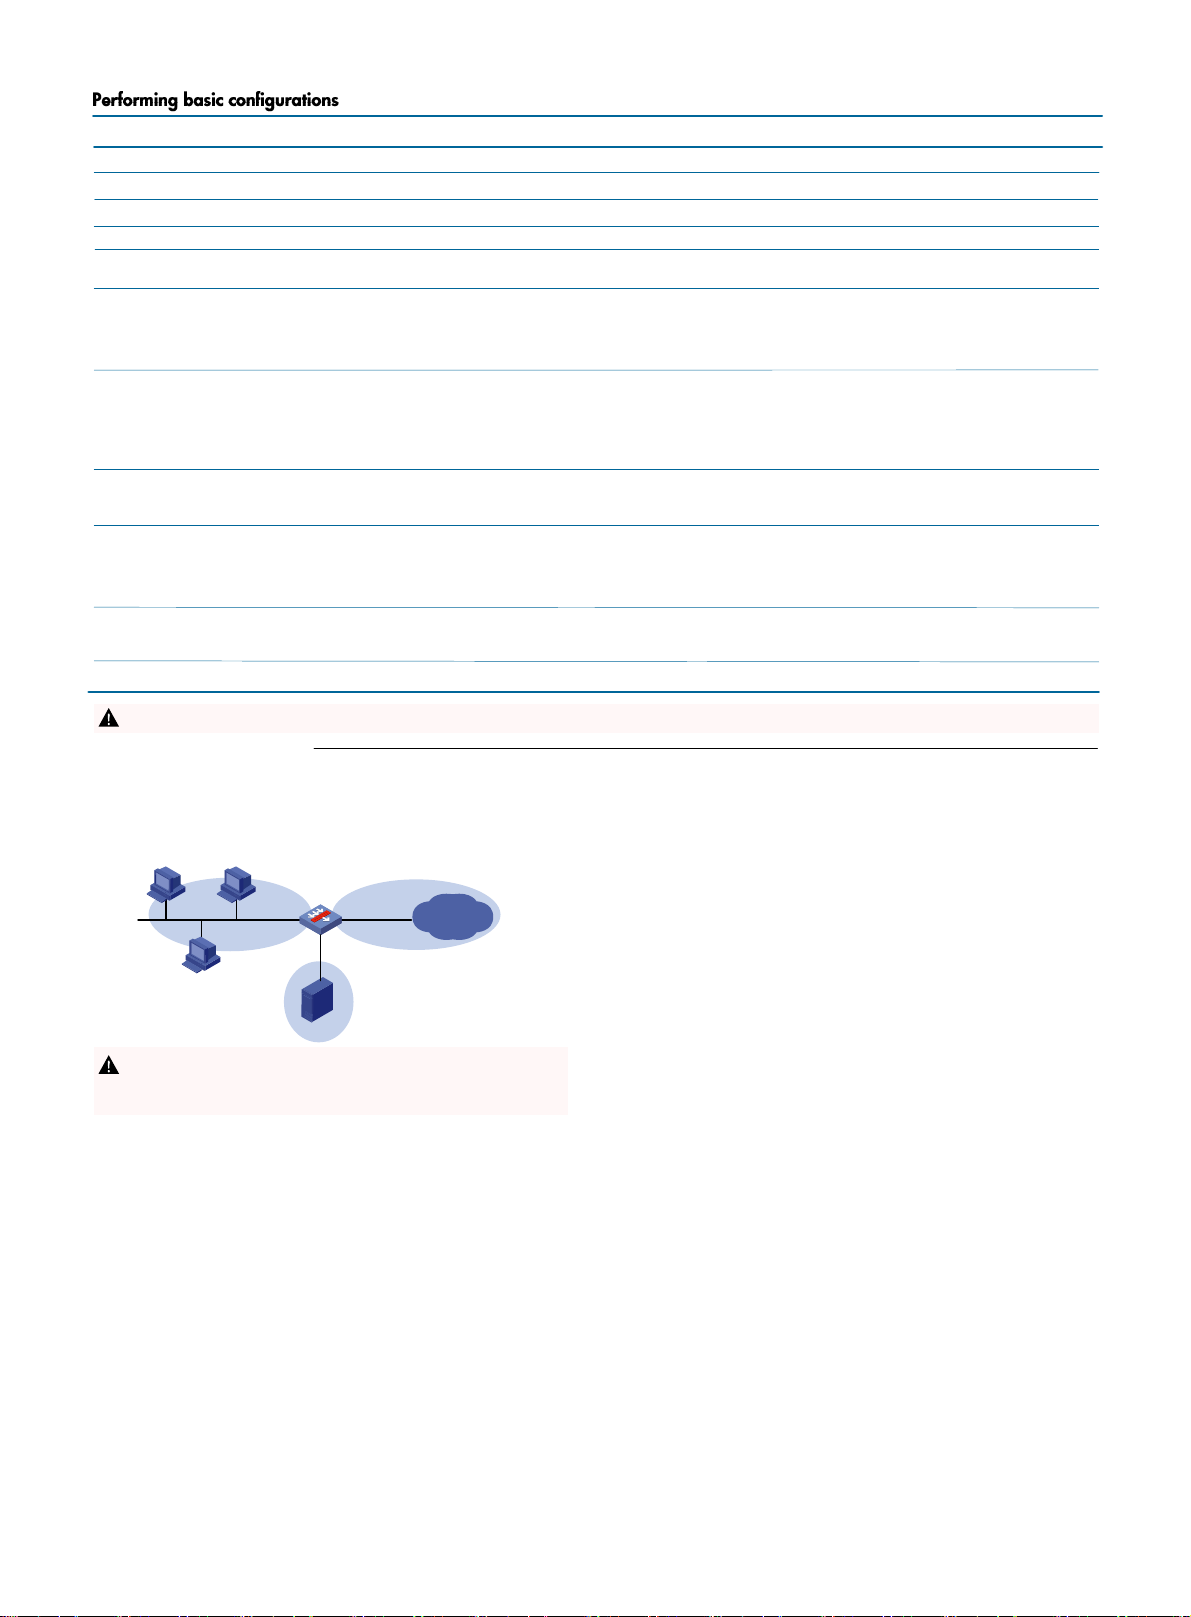
Configuration example
Network requirements
As shown in the figure, the private network address and public IP address for
the hosts of the LAN are 10.110.10.0/24 and 202.38.1.1/24,
respectively. The LAN users can access the Web server and Internet. The
users from the external networks can access the Web server in the LAN
through the port number 80.
Firewall
GE1/0/4
Trust
When the first command for creating a security zone, creating a security policy, or
!
entering the view of a default security zone is executed, the system automatically
creates four default security zones: Local, Trust, DMZ, and Untrust, which cannot be
deleted. By default, a security zone does not have any interface.
Configuration procedures
The firewall features vary depending on the software version.
# Assign an IP address to each interface as shown in the figure. (Details not
shown.)
# Add GigabitEthernet 1/0/3 to security zone DMZ.
[Firewall] security-zone name dmz
[Firewall-security-zone-dmz] import interface gigabitethernet 1/0/3
[Firewall-security-zone-dmz] quit
# Add GigabitEthernet 1/0/2 and GigabitEthernet 1/0/4 to security zones
Untrust and Trust, respectively. (Details not shown.)
# Create an IP address object group named internal_user with the network
address 10.110.10.0/24.
[Firewall] object-group ip address internal_user
[Firewall-obj-grp-ip-internal_user] network subnet 10.110.10.0 24
[Firewall-obj-grp-ip-internal_user] quit
# Create an IP address object group named webserver with the host address
10.110.10.1.
[Firewall] object-group ip address webserver
[Firewall-obj-grp-ip-webserver] network host address 10.110.10.1
[Firewall-obj-grp-ip-webserver] quit
# Create a service object, specifying its name as web and protocol as HTTP.
[Firewall] object-group service web
[Firewall-obj-grp-service-web] service tcp destination eq 80
[Firewall-obj-grp-service-web] quit
# Configure an object policy so that any hosts can access the Web server.
GE1/0/2
202.38.1.1/24
Untrust
GE1/0/3
10.110.10.10/24
DMZ
Web server
10.110.10.1/24
Internet
[Firewall] object-policy ip access-server
[Firewall-object-policy-ip-access-server] rule pass source-ip any destination-ip
webserver service web
[Firewall-object-policy-ip-access-server] quit
# Configure an object policy to allow any packets from the LAN to pass
through.
[Firewall] object-policy ip access-internet
[Firewall-object-policy-ip-access-internet] rule pass source-ip internal_user
# Create a zone pair with source zone Trust and destination zone DMZ.
Apply the object policy so that LAN users can access the Web server.
[Firewall] zone-pair security source trust destination dmz
[Firewall zone-pair-security-trust-dmz] object-policy apply ip access-server
[Firewall-zone-pair-security-trust-dmz] quit
# Create a zone pair with source zone Untrust and destination zone DMZ.
Apply the object policy so that external network users can access the Web
server.
[Firewall] zone-pair security source untrust destination dmz
[Firewall-zone-pair-security-untrust-dmz] object-policy apply ip access-server
[Firewall-zone-pair-security-untrust-dmz] quit
# Create a zone pair with source zone Trust and destination zone Untrust.
Apply the object policy so that LAN users can access the external networks.
[Firewall] zone-pair security source trust destination untrust
[Firewall-zone-pair-security-Trust-Untrust] object-policy apply ip accessinternet
[Firewall-zone-pair-security-Trust-Untrust] quit
# Allow external users to access the internal Web server at 10.110.10.1 on
the LAN through http://202.38.1.1 80.
[Firewall] interface gigabitethernet 1/0/2
[Firewall-GigabitEthernet1/0/2] nat server protocol tcp global 202.38.1.1
80 inside 10.110.10.1 http
[Firewall-GigabitEthernet1/0/2] quit
# Configure ACL 2000, and create a rule to permit packets only from
segment 10.110.0.0 0.0.0.255 to pass through.
[Firewall] acl number 2000
[Firewall-acl-basic-2000] rule permit source 10.110.0.0 0.0.0.255
[Firewall-acl-basic-2000] rule deny source any
# Configure an outbound dynamic PAT rule on interface GigabitEthernet
1/0/12 to use the IP address of GigabitEthernet 1/0/2 as the NAT
address.
[Firewall-acl-basic-2000] interface gigabitethernet 1/0/2
[Firewall-GigabitEthernet1/0/2] nat outbound 2000
[Firewall-GigabitEthernet1/0/2] quit
[Firewall] save
 Loading...