

Page 1

Aolynk EP302 IP Phone
User Manual
Hangzhou H3C Technologies Co., Ltd.
http://www.h3c.com
Manual Version: T2-UM-20070410-1.00
Page 2

Copyright © 2006-2007, Hangzhou H3C Techn ologies Co ., Ltd.
All Rights Reserved
No part of this manual may be reproduced or transmitted in any form or by any means
without prior written consent of Hangzhou H3C Technologies Co., Ltd.
Trademarks
H3C, , Aolynk, , H3Care,
, TOP G, , IRF, NetPilot,
Neocean, NeoVTL, SecPro, SecPoint, SecEngine, SecPath, Comware, Secware,
Storware, NQA, VVG, V
2
G, VnG, PSPT, XGbus, N-Bus, TiGem, InnoVision and
HUASAN are trademarks of Hangzhou H3C Technologies Co., Ltd.
All other trademarks that may be mentioned in this manual are the property of their
respective owners.
Notice
The information in this document is subject to change without notice. Every effort has
been made in the preparation of this document to ensure accuracy of the contents, but
all statements, information, and recommendations in this document do not constitute
the warranty of any kind, express or implied.
To obtain the latest information, please access:
http://www.h3c.com
Technical Support
soho@h3c.com
http://www.h3c.com
Page 3

About This Manual
Purpose
This document is used to guide you through installing, setting up and using this product.
Please read it carefully before your operation.
Intended Audience
This document is intended for ordinary business users.
Organization
This document is organized as follows:
Chapter Content
1 Product Overview
This chapter describes the main functions and
features of the Aolynk EP302 IP Phone
(hereinafter referred to as the EP302).
2 Installation and Initial Setup
This chapter describes the safety instructions on
installing and using the EP302, the installation
steps and the initial setup.
3 Getting Started
This chapter describes the basic knowledge on
using the EP302, including the keypad, the LEDs
and the menus.
4 Using the Phone
This chapter describes how to use the common
functions of the EP302, such as placing a call
and transferring a call.
5 Phone Settings
This chapter describes how to set up the EP302,
such as the account information and the speed
dial function.
6 FAQs
This chapter describes the problems that you
may encounter in setting up or using the EP302,
and the solutions to them.
7 Appendix – Technical
Specifications
This chapter describes the technical
specifications of the EP302.
8 Appendix - Glossary
This chapter describes the glossary in relation to
the EP302.
Page 4

Conventions
The manual uses the following conventions:
I. Command conventions
Convention Description
Boldface
The keywords of a command line are in Boldface.
italic
Command arguments are in italic.
[ ]
Items (keywords or arguments) in square brackets [ ] are
optional.
{ x | y | ... }
Alternative items are grouped in braces and separated by
vertical bars. One is selected.
[ x | y | ... ]
Optional alternative items are grouped in square brackets
and separated by vertical bars. One or none is selected.
{ x | y | ... } *
Alternative items are grouped in braces and separated by
vertical bars. A minimum of one or a maximum of all can be
selected.
[ x | y | ... ] *
Optional alternative items are grouped in square brackets
and separated by vertical bars. Many or none can be
selected.
&<1-n>
The argument(s) before the ampersand (&) sign can be
entered 1 to n times.
# A line starting with the # sign is comments.
II. GUI conventions
Convention Description
Boldface
Window names, button names, field names, and menu
items are in Boldface. For example, the New User window
appears; click OK.
>
Multi-level menus are separated by angle brackets. For
example, File > Create > Folder.
→
Simple operation steps are connected by the arrow symbol.
For example, Speed Dial → select a number → press the
Call soft key, which means to select the Speed Dial menu
first, then select a speed dial number, and finally press the
Call soft key.
Page 5

III. Symbols
Convention Description
Caution
Means reader be careful. Improper operation may cause
data loss or damage to equipment.
Note Means a complementary description.
Environmental Protection
This product has been designed to comply with the requirements on environmental
protection. For the proper storage, use and disposal of this product, national laws and
regulations must be observed.
Page 6

User Manual
Aolynk EP302 IP Phone Table of Contents
i
Table of Contents
1 Product Overview.............................................................................................................. 1
1.1 Introduction......................................................................................................................1
1.2 Product Appearance ........................................................................................................2
1.3 Main Features and Functions ..........................................................................................2
1.4 Functions Available when Working with an XE Series IP PBX ........................................2
2 Installation and Initial Setup .............................................................................................. 5
2.1 Packing List .....................................................................................................................5
2.2 Safety Instructions on Installing and Using the Phone ....................................................5
2.3 Installation and Cable Connection ...................................................................................6
2.3.1 Installation.............................................................................................................6
2.3.2 Cable Connections ................................................................................................7
2.3.3 Attaching the Handset Cord ..................................................................................8
2.3.4 Attaching the Power Cord .....................................................................................9
2.3.5 Adjusting the Footstand.......................................................................................10
2.4 Initial Setup....................................................................................................................11
3 Getting Started................................................................................................................ 17
3.1 Keys and Functions .......................................................................................................18
3.2 LEDs..............................................................................................................................20
3.3 LCD Display and Description .........................................................................................21
3.4 Menu Structure ..............................................................................................................22
3.4.1 Call Features Menu Structure .............................................................................24
3.4.2 Advanced Features Menu Structure ....................................................................24
3.4.3 Advanced Settings Menu Structure .....................................................................25
3.5 Input Method..................................................................................................................25
4 Using the Phone ............................................................................................................. 26
4.1 Place a Call ...................................................................................................................26
4.2 Speed Dial .....................................................................................................................27
4.3 Redial the Last Called Number ......................................................................................27
4.4 Answer a Call ................................................................................................................27
4.5 Switch Between the Handset and the Speaker Phone ..................................................27
4.6 Adjust the Volume .........................................................................................................27
4.7 Use the User Directory ..................................................................................................28
4.7.1 View the User Directory Entries ..........................................................................29
4.7.2 Dial from the User Directory................................................................................29
4.7.3 Find a Telephone Number in the User Directory .................................................29
4.8 Use the Call History.......................................................................................................30
4.8.1 View/Dial out a Placed Call .................................................................................30
Page 7

User Manual
Aolynk EP302 IP Phone Table of Contents
ii
4.8.2 View/Dial out a Received Call .............................................................................30
4.8.3 View/Dial out a Missed Call.................................................................................30
4.8.4 Delete the Call History ........................................................................................31
4.9 Three-Party Conference ................................................................................................ 31
4.9.1 Announced Three-Party Conference ...................................................................31
4.9.2 Unannounced Three-Party Conference...............................................................32
4.10 Call Hold ......................................................................................................................33
4.11 Call Waiting .................................................................................................................35
4.12 Call Transfer................................................................................................................36
4.13 Call Park ......................................................................................................................37
4.14 Call Forward to Voice Mailbox .....................................................................................39
4.15 Voice Mails ..................................................................................................................40
4.16 Retrieve Voice Mails ....................................................................................................40
4.17 Email Prompt ...............................................................................................................41
4.18 Mute.............................................................................................................................41
4.19 View Phone Settings ...................................................................................................41
4.20 Bridging a PC to the Network ......................................................................................41
5 Phone Settings ............................................................................................................... 43
5.1 Speed Dial Settings .......................................................................................................43
5.2 Common Call Settings ...................................................................................................44
5.2.1 Auto Answer ........................................................................................................ 44
5.2.2 Do Not Disturb.....................................................................................................44
5.2.3 Call Forward........................................................................................................45
5.2.4 Directed Call Pickup............................................................................................46
5.2.5 Call Forward to Voice Mailbox .............................................................................47
5.3 Advanced Features .......................................................................................................47
5.3.1 View Feature Codes ............................................................................................47
5.3.2 Execute Feature Functions .................................................................................48
5.4 Advanced Settings.........................................................................................................48
5.4.1 Network Settings .................................................................................................48
5.4.2 Volume Settings ..................................................................................................48
5.4.3 Ringing Tones .....................................................................................................48
5.4.4 Account Information ............................................................................................49
5.4.5 Registration Status..............................................................................................49
5.4.6 Language Settings ..............................................................................................49
5.4.7 Software Version.................................................................................................49
5.5 Restore the Default Settings..........................................................................................50
6 FAQs............................................................................................................................... 51
7 Appendix – Technical Specifications................................................................................ 54
8 Appendix – Glossary ....................................................................................................... 55
Page 8

User Manual
Aolynk EP302 IP Phone 1 Product Overview
1
1 Product Overview
1.1 Intr
ned
IP world to users.
he EP302 provides different functions, LCD displays and menu items when working
with different IP PBXs (XE2000 series and XE7000 series).
oduction
Aolynk EP302 IP Phone (hereinafter referred to as the EP302) is specially desig
for business users. With elegant appearance and rich features, the EP302 works
together with an XE series IP PBX to present a wonderful Vo
T
Note:
This manual describes the functions and menus of the EP302 when working with an
enario that the
EP302 works with an XE7000 series IP PBX, and use “EP302-XE2000” to refer to
e scenario that the EP302 works with an XE2000 series IP PBX.
XE7000 series IP PBX. It also describes the slight differences in functions and
menus when the EP302 works with an XE2000 series IP PBX.
To simplify description, we use “EP302-XE7000” to refer to the sc
th
Page 9

User Manual
Aolynk EP302 IP Phone 1 Product Overview
2
1.2 Product Appearance
Figure 1-1 The EP302 appearance
1.3 Main Features and Functions
z Supports the session initiation protocol (SIP).
z Provides a large-size LCD panel. By following the text-graphic instructions, you
can use or set the phone with ease.
z Provides common function keys such as redial, conference call, call hold,
speaker, volume adjustment, speed dial, line switching and so on.
z Supports two concurrent call lines.
z Supports two operating languages, Chinese and English.
z Supports various custom ring tones.
z Provides one LAN port and one PC port. The LAN port is PoE-capable so that
the phone can be powered through the Ethernet. The PC port allows the phone
to bridge a PC to the network.
z Supports various encoding and decoding schemes, such as G.711 (µ/a), G.729,
G.723 and G.722, to provide top voice quality.
1.4 Functions Available when Working with an XE Series IP
PBX
The following table lists the main functions of EP302-XE7000, including the functions
that are not supported or are different in EP302-XE2000.
Page 10

User Manual
Aolynk EP302 IP Phone 1 Product Overview
3
Note:
To use the functions of the EP302 that are available when it works with an XE series
IP PBX, proper settings should be configured and enabled on the XE series IP PBX.
Table 1-1 Main functions of the EP302
Function/Feature Description
User Directory
(Not supported by
EP302-XE2000)
Managed at the server end and read through the
network
10 received calls
10 placed calls
Call History
10 missed calls
9 speed dial numbers
4 speed dial keys
Dialing from the call history
Dial features
Dialing from the user directory
Auto-Answer (incoming calls are automatically
answered in speaker phone mode)
Do not disturb
Call forward
Directed call pickup
Call hold
Call park
Call transfer
Call features
Conference call
Voice mailbox
Not supported in
EP302-XE2000)
Record and check voice messages, call forward to
voice mailbox (one-touch operation)
Regular value-added
features (different in
EP302-XE2000 and
EP302-XE7000)
EP302-XE7000: remote call forward, hotline,
warmline, music on hold, backup server, blacklist, call
coverage, call restriction, dial policy, anonymous call,
custom ring tone, busy lamp field and so on.
These features are to be configured by the network
administrator. Consult your network administrator for
how to use these features.
Page 11

User Manual
Aolynk EP302 IP Phone 1 Product Overview
4
Function/Feature Description
EP302-XE2000: centralized assignment of telephone
numbers, load balancing, backup server, abbreviated
dialing, clock service, time check service, call-back,
directed call pickup, time-based call restriction and so
on.
These features are to be configured by the network
administrator. Consult your network administrator for
how to use these features.
Feature codes
You can implement a function by entering the
corresponding feature code.
Speaker phone
Allows you to answer a call without picking up the
handset.
Volume adjustment
Adjusts the volumes for the ringer, the handset, the
speaker and the microphone.
Mute
Disables the opposite side from hearing any sound
from your side during a call, and you can still hear the
opposite side.
Automatic time update
The time and time zone settings are automatically
updated to the server, without any need for manual
setting.
Page 12
User Manual
Aolynk EP302 IP Phone 2 Installation and Initial Setup
5
2 Installation and Initial Setup
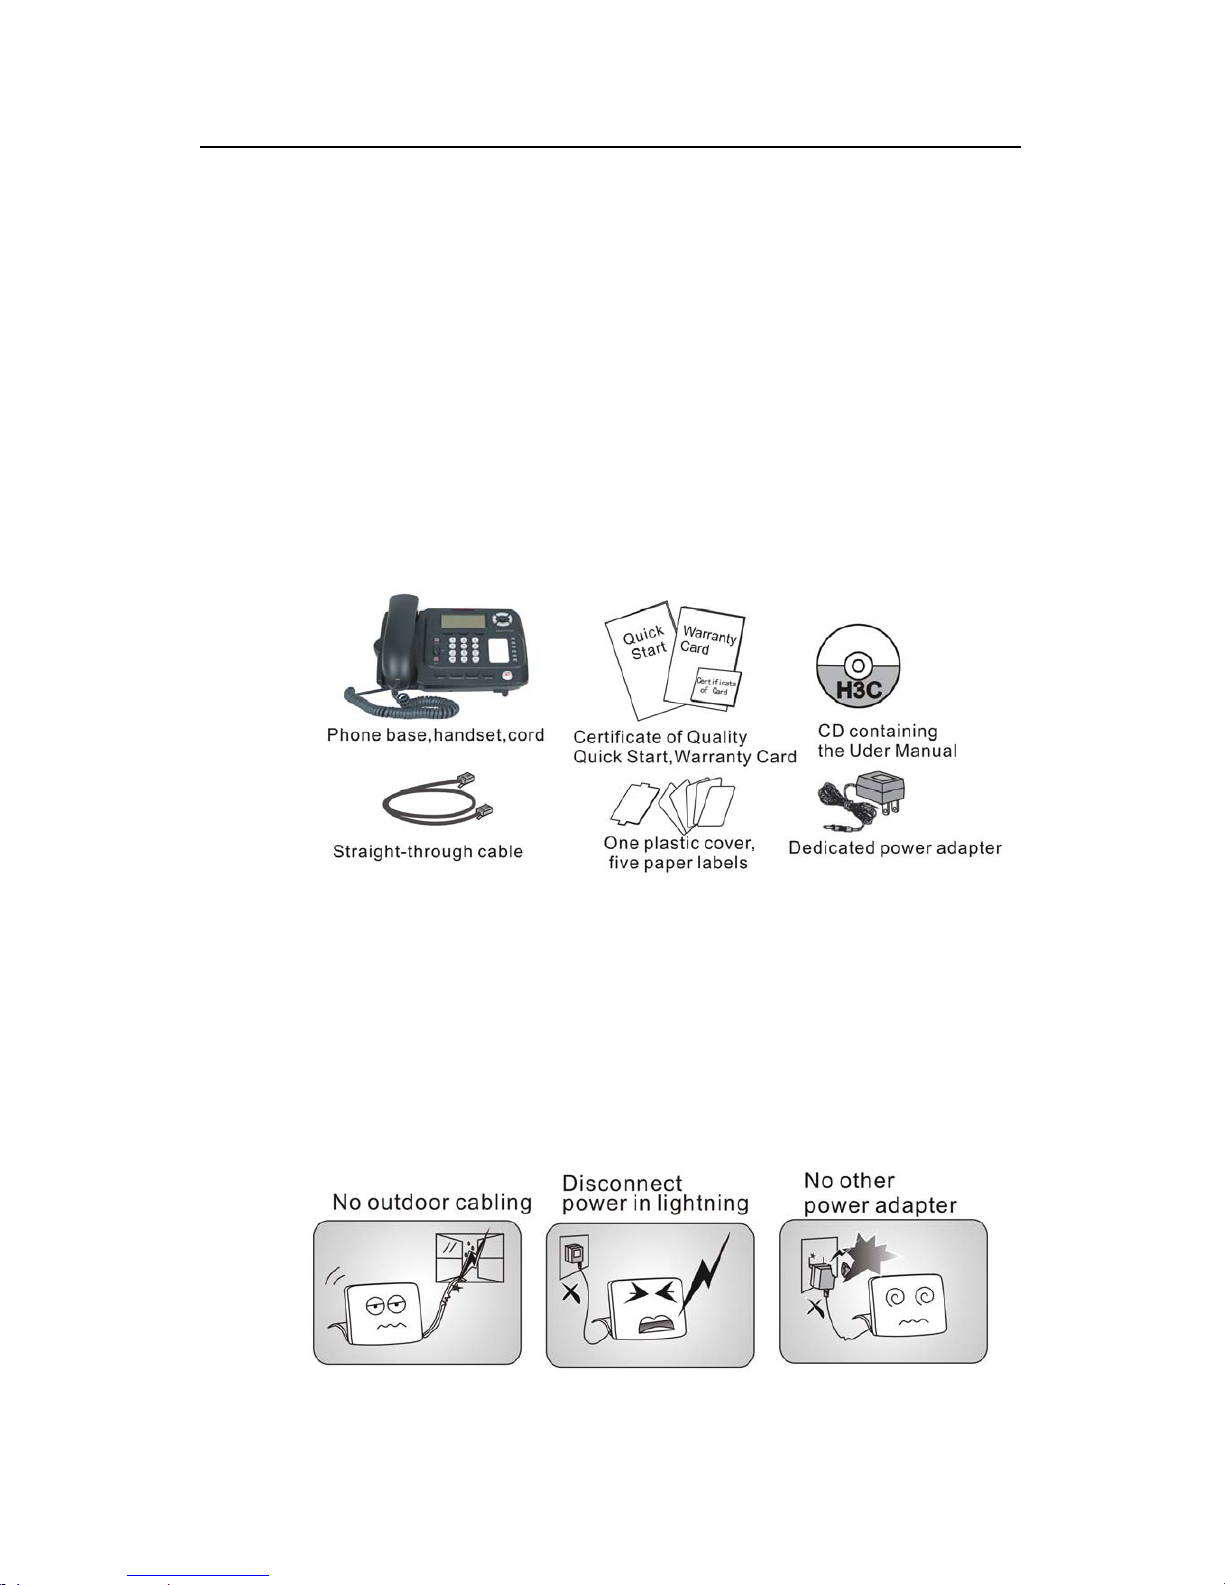
2.1 Pac
ntents against the
king List
Unpack the shipping carton with caution and check the co
following packing list:
2.2 Saf
prohibited. Read the technical
one, and follow the
Figure 2-1 Packing list
If any item is broken or missing, contact your local dealer timely.
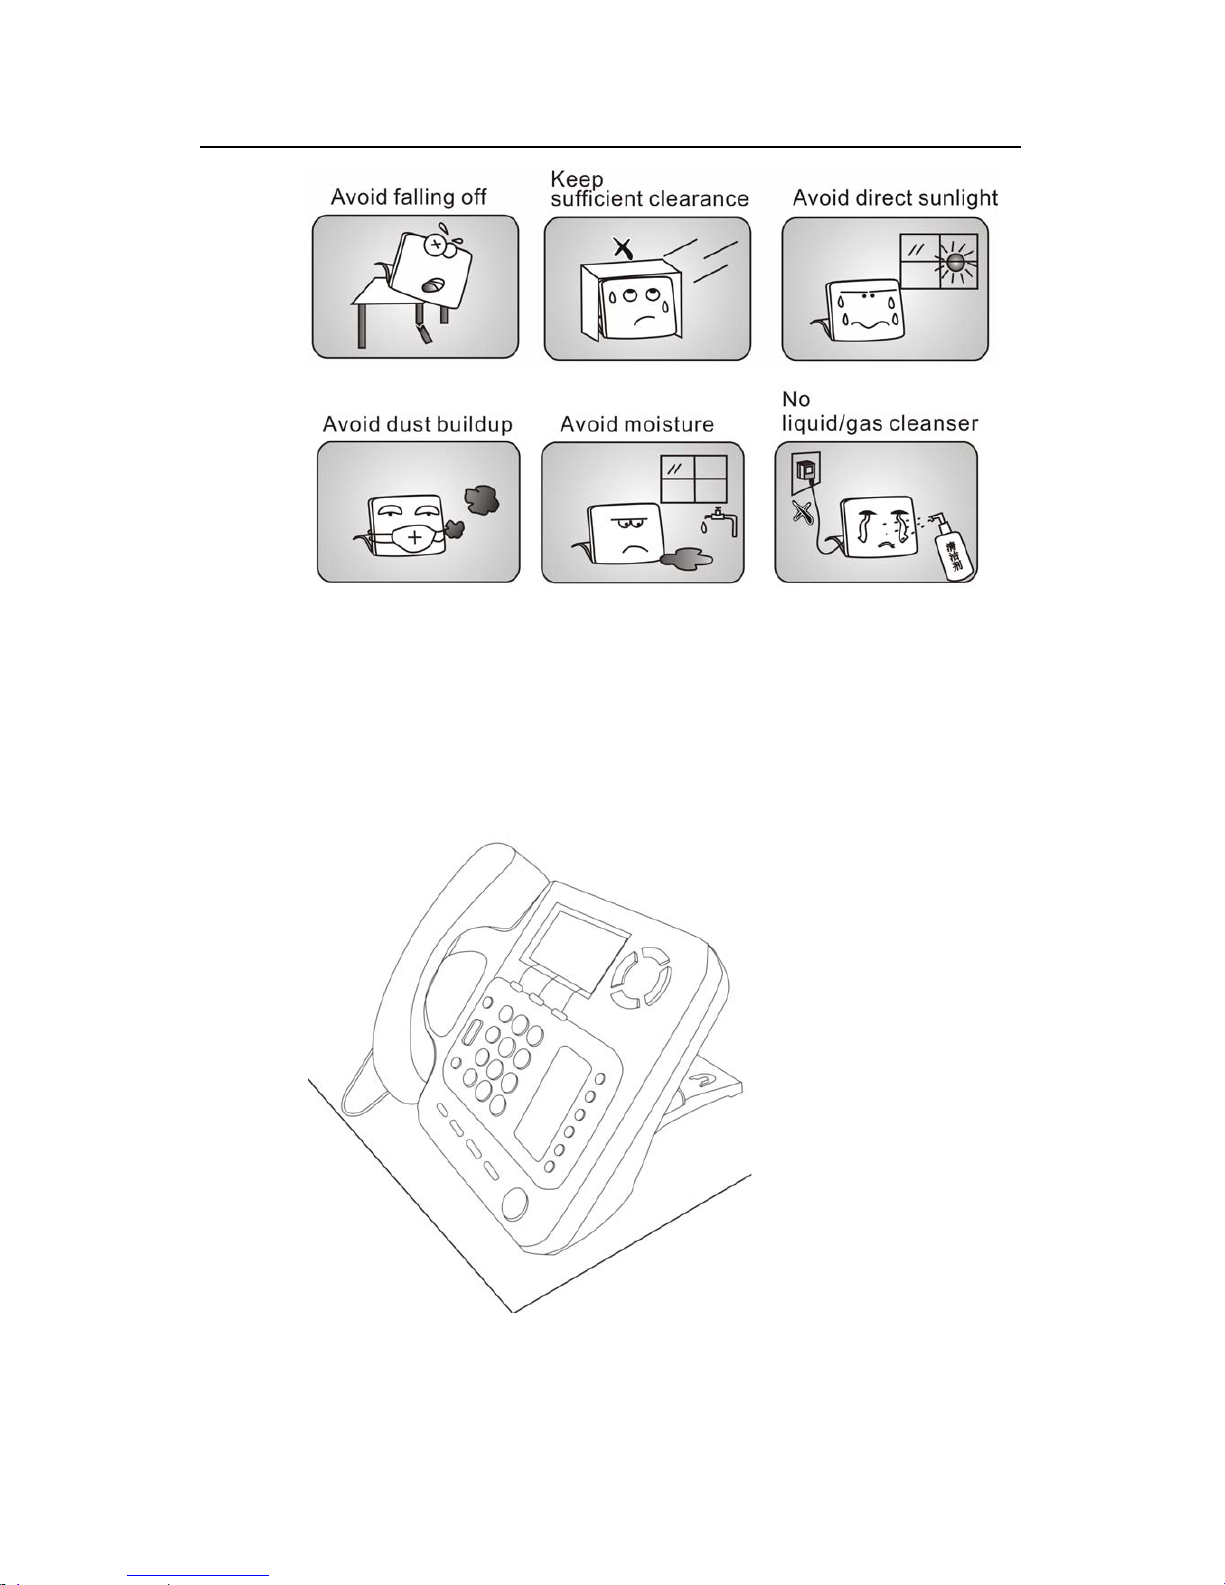
ety Instructions on Installing and Using the Phone
Use the phone indoors only. Outdoor cabling is
specifications of the phone before installing and using the ph
instructions below to ensure its proper operation.
Page 13
User Manual
Aolynk EP302 IP Phone 2 Installation and Initial Setup
6
Figure 2-2 Safety instructions on installing/using the EP302
2.3 Installation and Cable Connection
2.3.1 Installation
You can place the EP302 on a desktop or mount it on a wall.
Figure 2-3 Place the EP302 on a desktop
Page 14

User Manual
Aolynk EP302 IP Phone 2 Installation and Initial Setup
7
Figure 2-4 Mount the EP302 on a wall
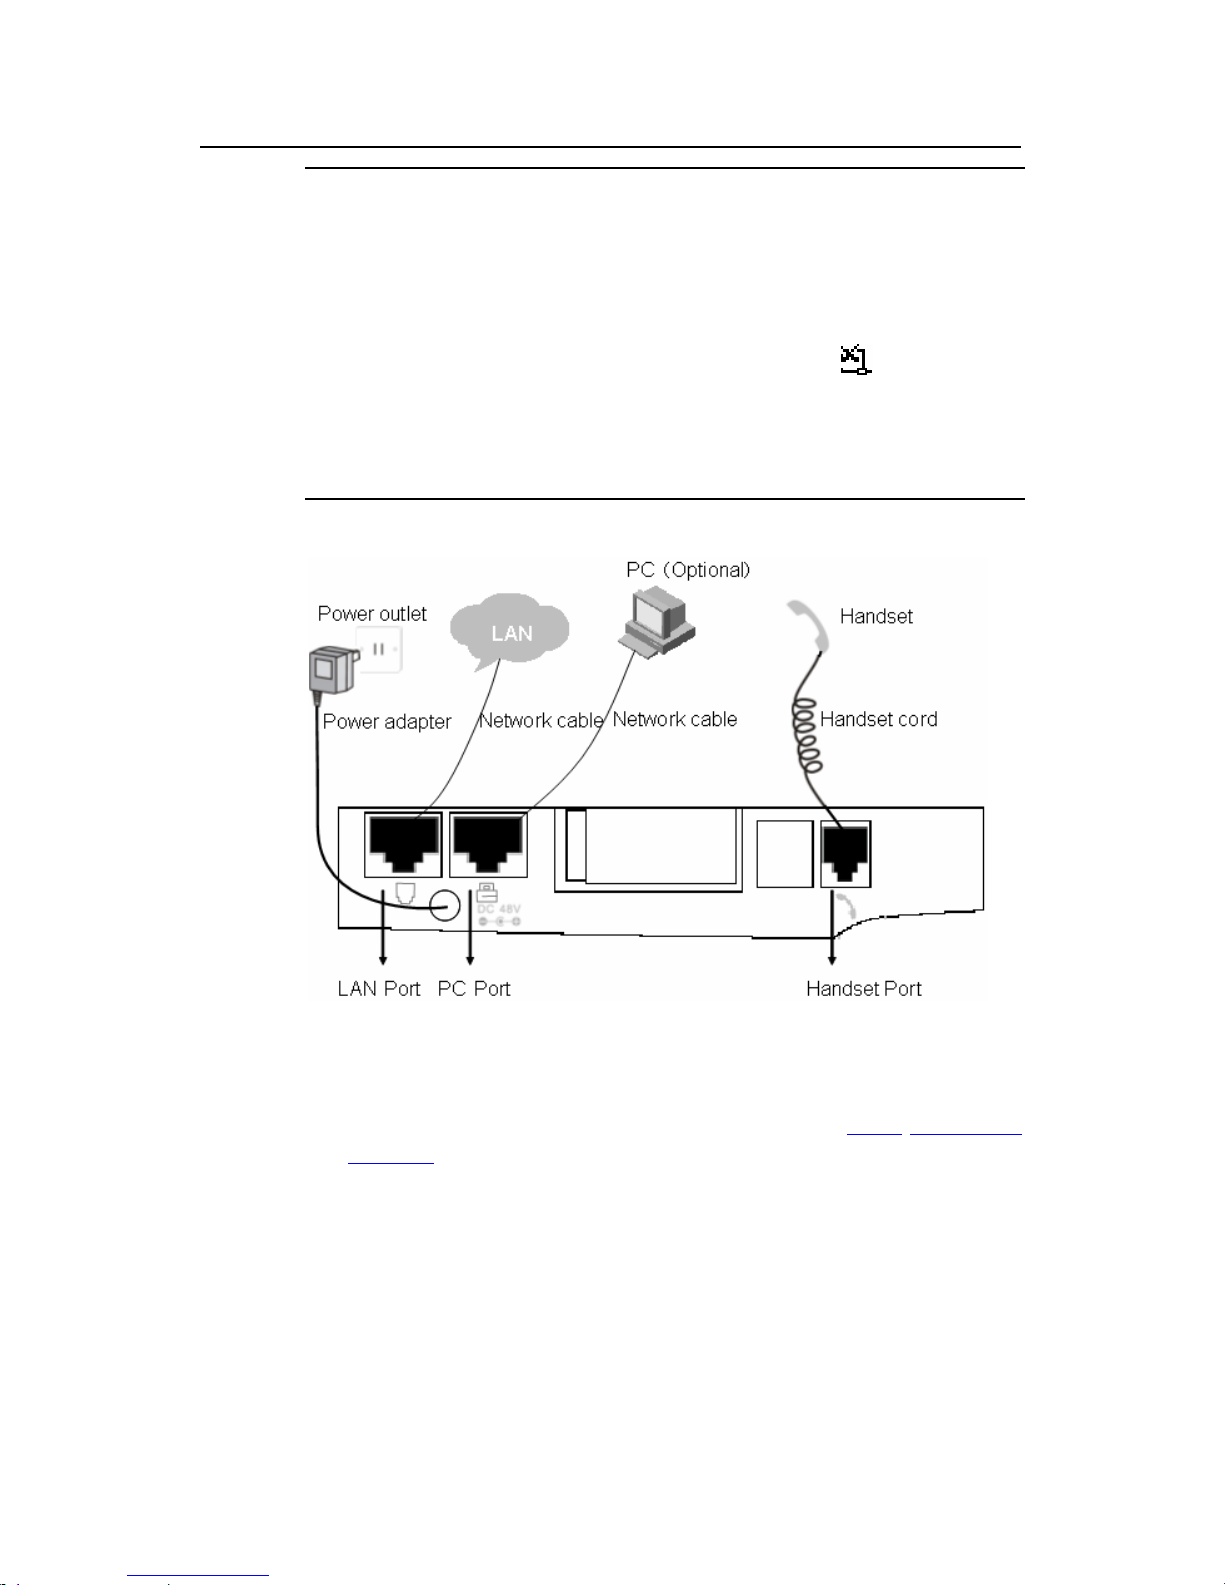
2.3.2 Cable Connections
Complete cable connections on the EP302 and connect the EP302 to your LAN by
following these steps:
1) Connect one end of the network cable that came with the phone to the LAN port
on the back of the EP302, and the other end to an Ethernet outlet of your work
area. You can connect a PC to the PC port on the back of the EP302 or connect
nothing to it.
2) Connect one end of the handset cord to the handset and the other end to the
handset port on the back of the EP302. The handset cord should be attached to
the phone base. For detailed information, refer to section
2.3.3 “Attaching the
Handset Cord
”.
3) Connect one end of the power adapter that came with the phone to the power
jack on the back of the EP302, and plug the other end to a power outlet.
Page 15
User Manual
Aolynk EP302 IP Phone 2 Installation and Initial Setup
8
Note:
z The LAN port of the EP302 supports PoE. So the EP302 can be powered through
the Ethernet without the need of an external power source, provided that the
device connected to the EP302 LAN port is PoE-capable.
z The PC port does not support PoE. So it is recommended to connect the LAN port
of the EP302 to your LAN. If the LAN port is not used, the “
” icon appears on
the upper left corner of your phone’s LCD panel.
z Both the PC port and the LAN port on the EP302 are auto-sensing. So, you can
use either straight-through cables or crossover cables for connection.
Figure 2-5 Cable connections
4) If needed, you can place your EP302 at an angle by adjusting the footstand on
the phone back. For detailed information, refer to section
2.3.5 “Adjusting the
Footstand
“.
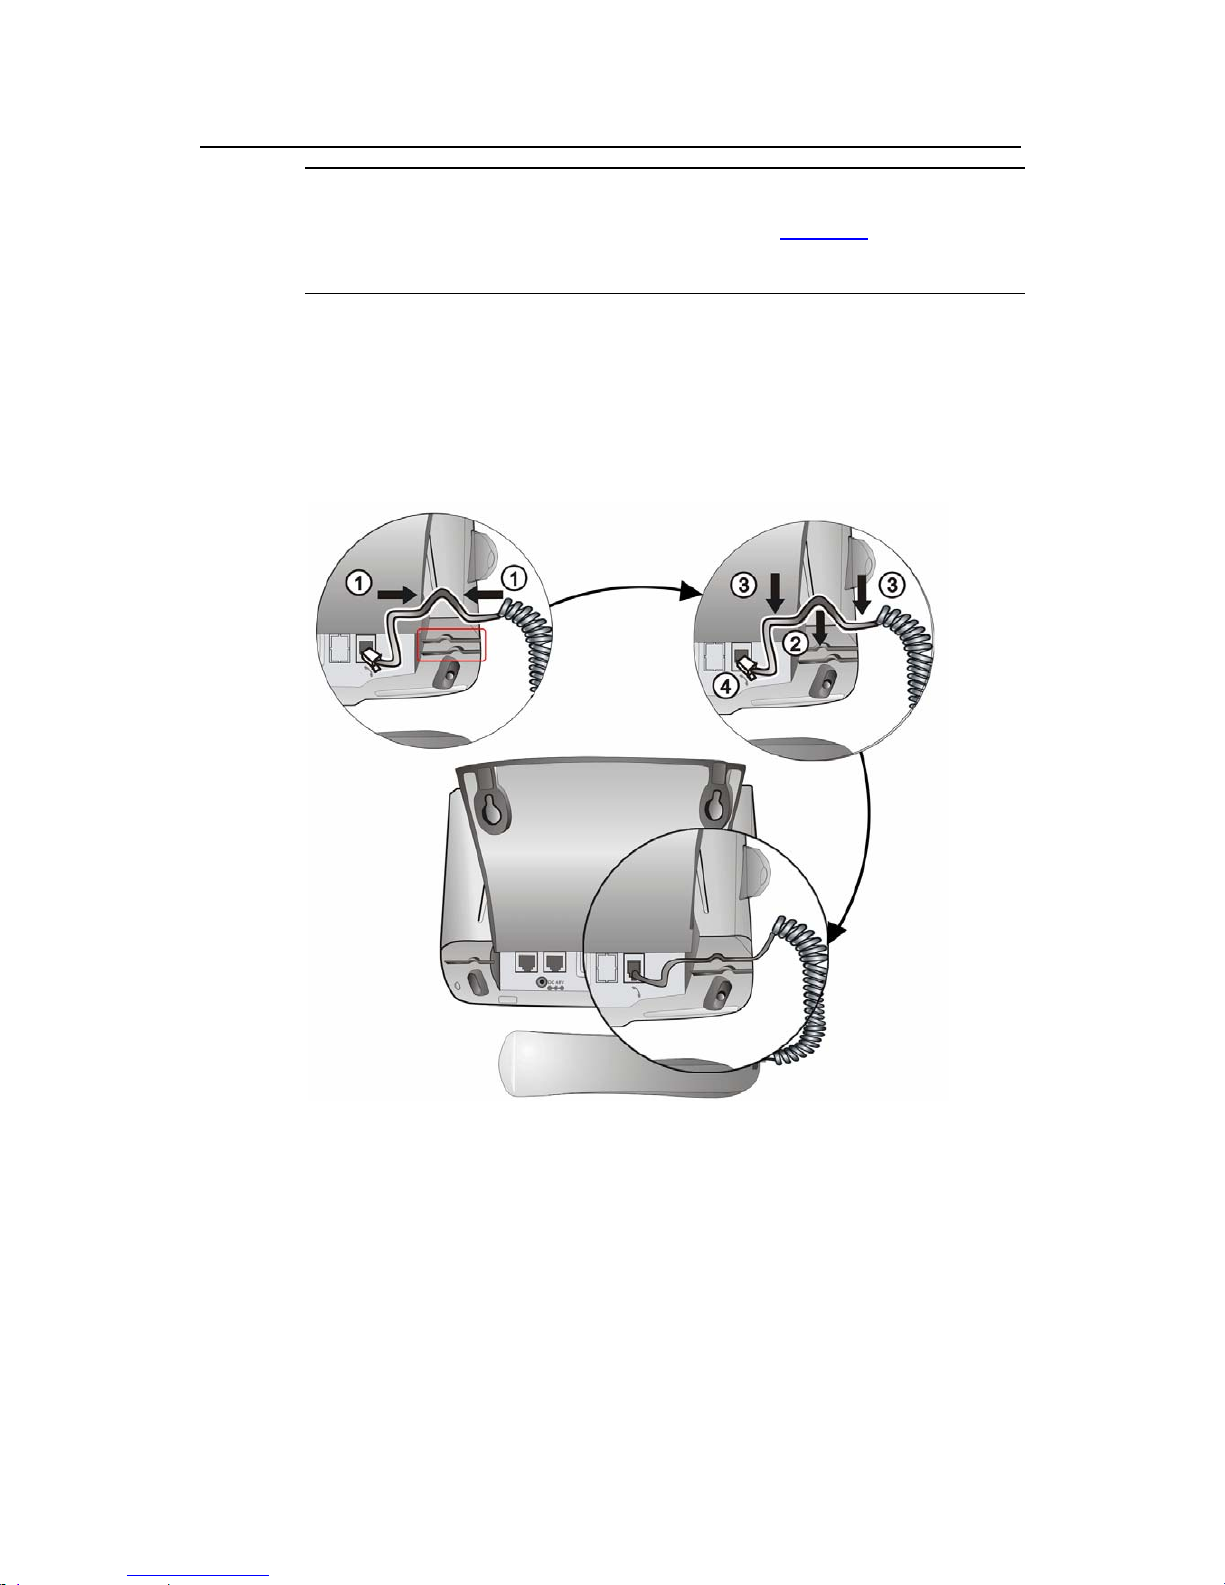
2.3.3 Attaching the Handset Cord
To attach the handset cord to a groove on the bottom of the phone base, proceed as
follows.
Page 16
User Manual
Aolynk EP302 IP Phone 2 Installation and Initial Setup
9
Note:
There are two grooves (marked in the red rectangle in Figure 2-6) on the bottom of
the phone base. You can use either one.
1) Curve the end with a bigger straight length of the coiled cord into the same
shape of the groove (①).
2) Press the curved part into the groove (②).
3) Press the two sides (③) of the curved part into the groove.
4) Plug the connector to the handset port of the phone.
Figure 2-6 Handset cord connection
2.3.4 Attaching the Power Cord
To attach the power cord to the groove on the bottom of the phone base, proceed as
illustrated in the following figure.
Page 17

User Manual
Aolynk EP302 IP Phone 2 Installation and Initial Setup
10
Figure 2-7 Attach the power cord
2.3.5 Adjusting the Footstand
You can adjust the footstand of the phone to an angle of 0° to 60°.
Press the button marked (①) with one hand, and adjust the footstand to the desired
position, as shown below ( )② with the other hand. Then, release the button to lock
the footstand.
Figure 2-8 Adjust the phone base
Page 18

User Manual
Aolynk EP302 IP Phone 2 Installation and Initial Setup
11
2.4 Initial Setup
After the installation, complete the following steps to set up your phone.
This section describes how to connect the EP302 to the network and how to set a
VLAN.
Your EP302 must have an IP address before it can access and work in the network.
This IP address can be either automatically obtained through DHCP or statically
configured. Ask your network administrator for the access method of your EP302
and set up your phone accordingly.
I. Access through DHCP
Note:
z Each menu item has a number before it. You can display a screen by entering the
corresponding number.
z Between step 2 and step 6 (before you come to the standby screen), you can
return to the upper level menu or cancel the current settings by pressing the
MENU key, or save the settings by pressing the # key.
z Make sure that you have obtained all necessary information from your network
administrator for configuring the EP302, and that you configure the settings
correctly. If any mistakes are made during the setup or if you cannot reach the
final standby screen, repeat the steps listed in the following table.
If your phone accesses the network through DHCP, set up your phone as follows (the
following table uses EP302-XE7000 for description and the IP addresses shown in
the following figures are only for demonstration purpose):
Table 2-1 Setup steps (DHCP)
Step Description LCD Display
1
Ask your network administrator for
your account information (phone
number, password, and so on), the
NCP server IP address and the PBX
IP address.
Note: if you need to set up the NCP
server address (provided by the
network administrator), go to the
next step. Otherwise, go to step 6.
—
2
Power on the EP302 (or power cycle
it if it is already powered on). Press
MENU when the message on the
right appears.
H3C Model ep302Wait for NCP M
Page 19
User Manual
Aolynk EP302 IP Phone 2 Installation and Initial Setup
12
Step Description LCD Display
3
Press 3 on the keypad to select 3
NCP IP (this option is shown on the
next screen).
H3C Test Menu
Scroll – Options
1 View Settings
2 Network Settings
4
Press 1 to select 1 NCP IP, and
enter the IP address of the NCP
server. Then press the # key to save
the settings. To cancel the settings,
press MENU.
Note:
1. To enter the IP address, enter the
number(s) to where the cursor is.
The cursor automatically moves
backward when a number is entered.
You can also move the cursor by
using the left and right direction
keys. After entering the entire
address, press the # key to save it.
2. This menu item 2. Alt Srvr IP sets
the IP address of the alternative
NCP server and is optional.
1 NCP IP
192.168.1.32
2 Alt SrvrIP
0.0.0.0
5
Press MENU twice to return to the
screen shown on the right.
H3C Model EP302Wait for NCP M
6
Wait while the EP302 downloads
programs automatically.
H3C Model EP302Downloading…
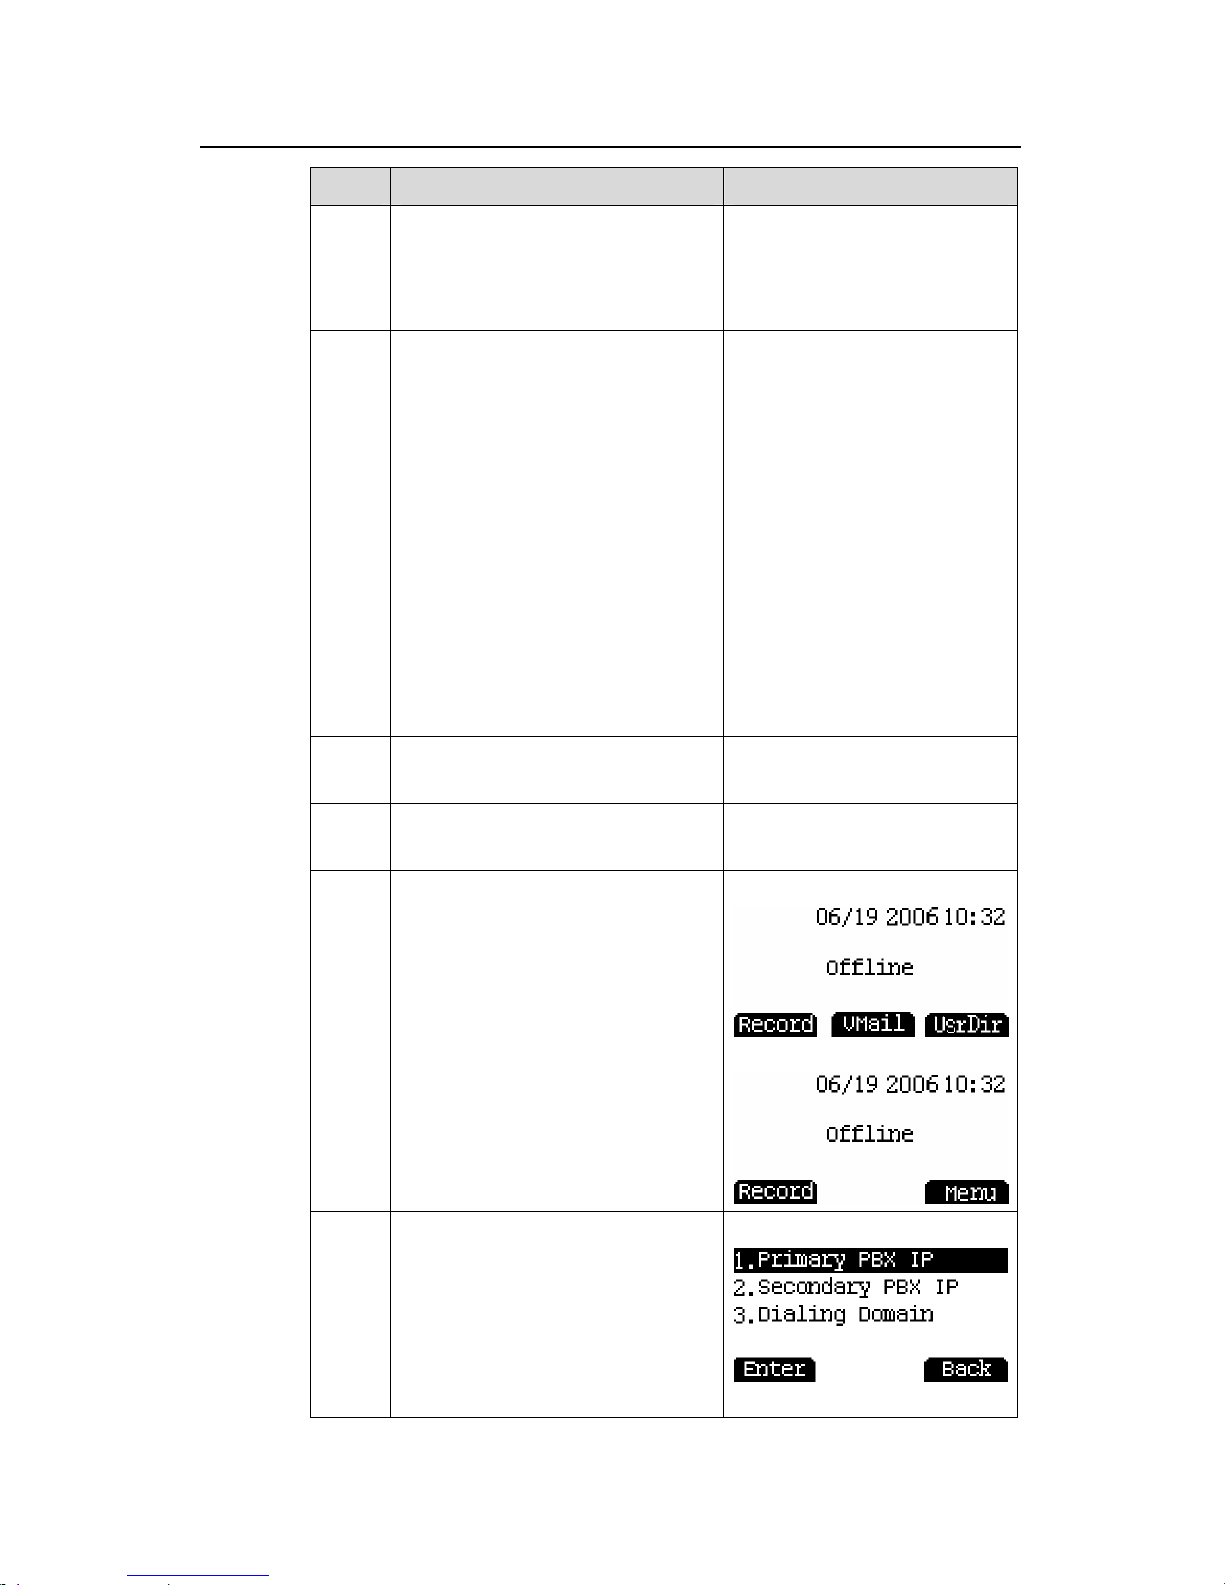
7
When the standby screen appears,
configure the registration information
of the phone.
EP302-XE7000:
EP302-XE2000:
8
Press MENU and select 6.
Advanced Settings > 1. Network
Settings > 1. Primary PBX IP. Input
the primary PBX IP address and
press OK to save your setting.
Note: The item 1. Primary PBX IP is
required, and the other two items 2.
Secondary PBX IP and 3. Dialing
Domain are optional.
Page 20
User Manual
Aolynk EP302 IP Phone 2 Installation and Initial Setup
13
Description LCD DisplaStep y
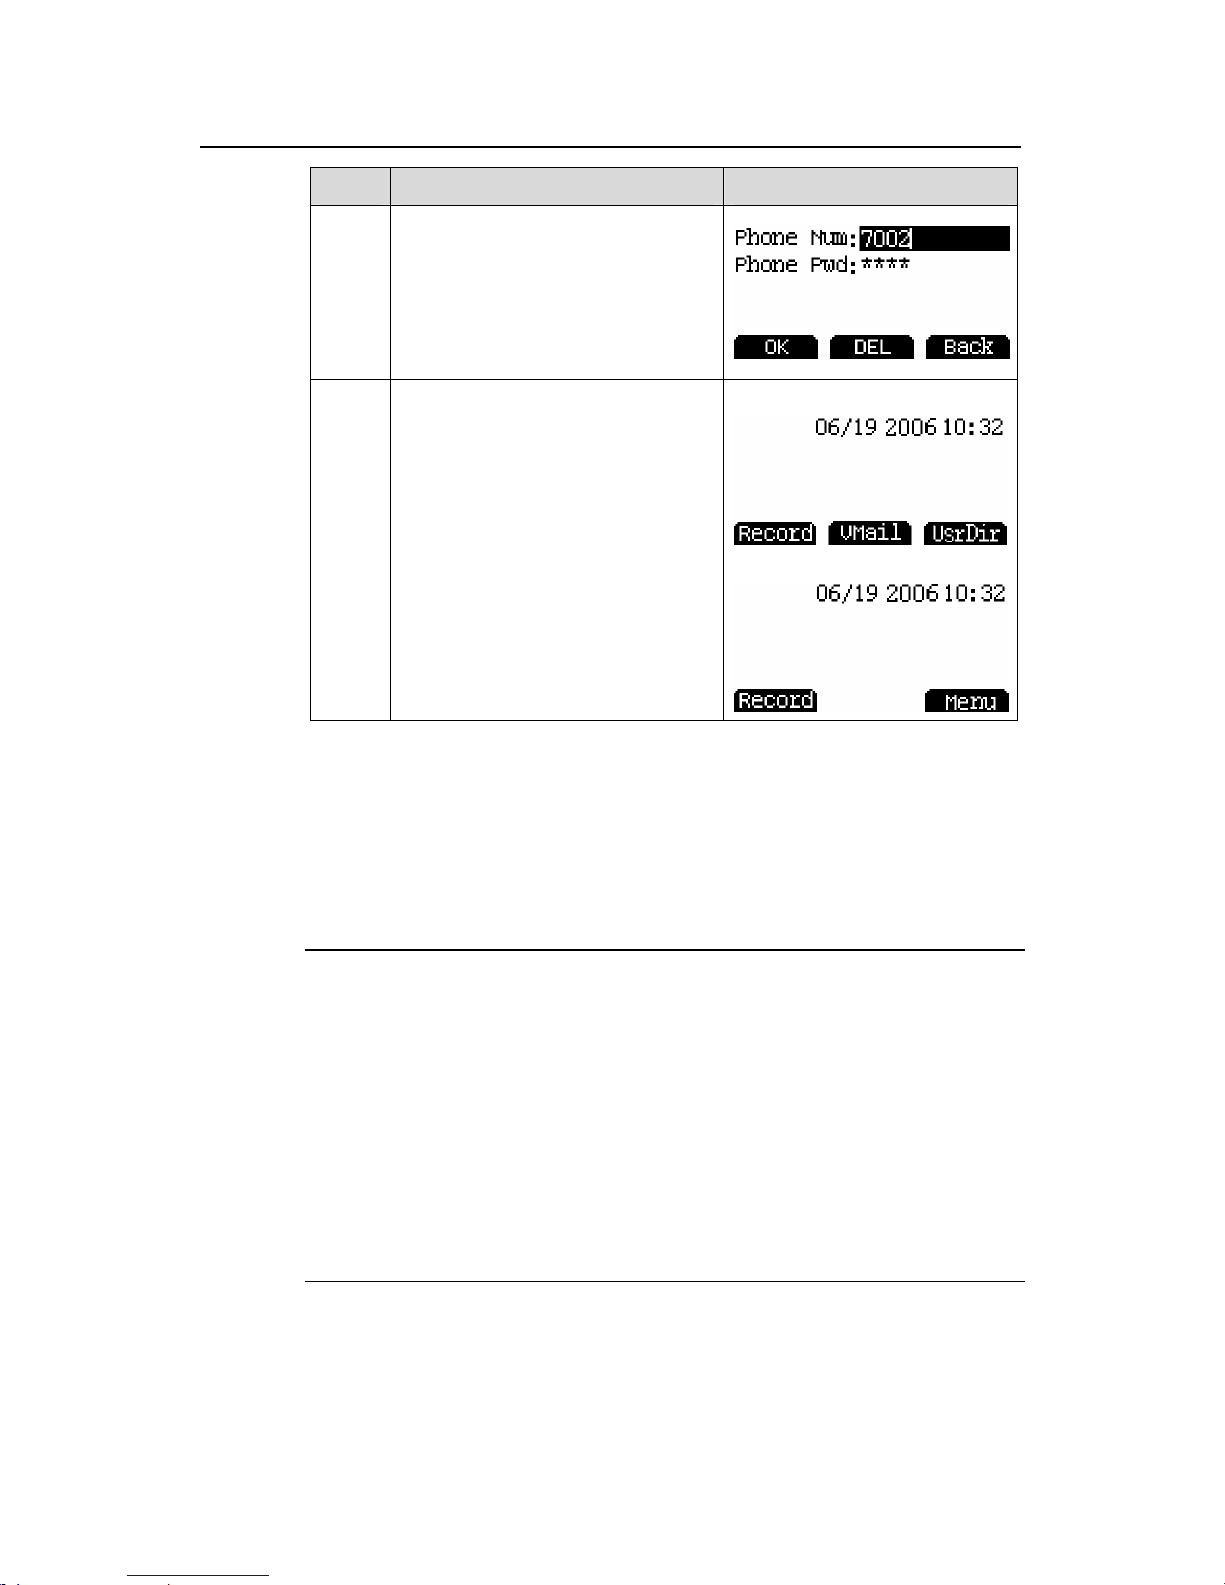
9
Return to 6. Advanced Settings
and select 4. Account Info. Enter
the phone number and password,
and then press OK.
Note: For EP302-XE2000, you also
need to enter information for the
phone user.
10
Press the Back soft key twice. The
message “Registration Succeeded”
appears and then the phone returns
to the standby mode. The initial
setup is now complete and the
phone is ready for use.
EP302-XE7000:
EP302-XE2000:
II. Access with a static IP address
If the phone accesses the network with a static IP address, set up your phone as
follows (the IP addresses in the following figures are only for demonstration
purpose):
Note:
z Each menu item has a number before it. You can display a screen by entering the
corresponding number.
z Between step 2 and step 11 (before you come to the standby screen), you can
return to the upper level menu or cancel the current settings by pressing the
MENU key, or save the settings by pressing the # key.
z Make sure that you have obtained all necessary information from your network
administrator for configuring the EP302, and that you configure the settings
correctly. If any mistakes are made during the setup or if you cannot reach the
final standby screen, repeat the steps listed in the following table.
Page 21

User Manual
Aolynk EP302 IP Phone 2 Installation and Initial Setup
14
Table 2-2 Setup steps (static IP address)
Step Operation LCD Display
1
Ask your network administrator for
your account information (phone
number, password, and so on), the
NCP server IP address and the PBX
IP address.
—
2
Power on the EP302 (or power cycle
it if it is already powered on). Press
MENU when the message on the
right appears.
H3C Model ep302Wait for NCP M
3
Press 2 on the keypad to select 2
Network Settings.
H3C Test Menu
Scroll – Options
1 View Settings
2 Network Settings
4 Press 2 again to select 2 Static IP.
Network Set Menu
1 DHCP Config
2 Static IP
3 VLAN Config
5
Press 1 on the keypad to select 1
Static IP.
Static IP Menu
1 Static IP
0.0.0.0
2 Submask
6
Enter the static IP address for the
EP302 through the keypad and then
press # to save the setting.
Note:
1. To enter the IP address, enter the
number(s) to where the cursor is.
The cursor automatically moves
backward when a number is
entered. You can also move the
cursor by using the left and right
direction keys. After entering the
entire address, press the # key to
save it.
2. To save the settings, press the #
key; to cancel the settings, press
MENU.
Set Static IP
#-Save, Menu-Cancel
000.000.000.000
7
Press 2 on the keypad to select 2
Submask and set the subnet mask.
Then, press # to save the setting.
Press 3 on the keypad to select 3
Gateway IP and set the gateway IP
address. Then, press # to save the
setting.
2 Submask
255.255.255.0
3 Gateway IP
0.0.0.0
Page 22

User Manual
Aolynk EP302 IP Phone 2 Installation and Initial Setup
15
Step Operation LCD Display
8
Press MENU twice to return to the
screen shown on the right. Press 3
on the keypad to select 3 NCP IP
(this option is on the next screen
page).
H3C Test Menu
Scroll – Options
1 View Settings
2 Network Settings
9
Press 1 to select 1 NCP IP, and
enter the IP address of the NCP
server. Then, press # to save the
setting.
Note: 2. Alt NCP IP sets the IP
address of the alternative NCP
server and is optional.
1 NCP IP
192.168.1.32
2 Alt SrvrIP
0.0.0.0
10
Press MENU twice to return to the
screen shown on the right.
H3C Model EP302Wait for NCP M
11
Wait while the EP302 downloads
programs automatically.
H3C Model EP302Downloading…
12
When the standby screen appears,
configure the registration
information of the phone.
EP302-XE7000:
EP302-XE2000:
13
Press MENU and select 6.
Advanced Settings > 1. Network
Settings > 1. Primary PBX IP.
Enter the primary PBX IP address
and press OK to save your setting.
Note: The item 1. Primary PBX IP is
required, and the other two items
2.
Secondary PBX IP
and
3. Dialing
Domain
are optional.
14
Return to 6. Advanced Settings
and select 4. Account Info. Enter
the phone number and password,
and then press OK.
Note: For EP302-XE2000, you also
need to enter information for the
phone user.
Page 23

User Manual
Aolynk EP302 IP Phone 2 Installation and Initial Setup
16
Step Operation LCD Display
15
Press the Back soft key twice. The
message “Registration succeeded”
appears and then the phone returns
to the standby mode. The initial
setup is now complete and the
phone is ready for use.
EP302-XE7000:
EP302-XE2000:
III. Setting a VLAN
You can set up a VLAN to segregate voice data from other data, thus to ensure the
quality of voice calls.
To set up a VLAN, ask your network administrator for a VLAN ID and VLAN priority.
Then, take the following steps.
Table 2-3 VLAN setup steps
Step Operation LCD Display
1
Go to the screen as displayed in step
4 in
Table 2-2 ”Setup steps (static IP
address)
”.
Press 3 on the keypad to select 3
VLAN Config.
Network Set Menu
1 DHCP Config
2 Static IP
3 VLAN Config
2
Press 1 on the keypad to select 1
Phone Port Config.
Vlan Config Menu
1 Phone Port Config
3
Set the three items in the screen
shown on the right.
Set Phone Vlan
1 VLAN Status:disable
2 VLAN ID:0001
3 VLAN Priority:3
Page 24

User Manual
Aolynk EP302 IP Phone 3 Getting Started
17
3 Getting Started
ing the EP302. If you are using the
arefully.
This chapter introduces the basic knowledge of us
EP302 for the first time, please read this chapter c
2
4
3
1
d
e
7
7
a
5
6,b
8
c
arance
Figure 3-1 The EP302 appe
Page 25

User Manual
Aolynk EP302 IP Phone 3 Getting Started
18
3.1 Keys and Functions
Table 3-1 The EP302 keys and functions
Ite
Key Description
m
1 0 to 9, *, #
umbers 0 to 9 and symbols
2 to 9 and letters A(a) to
Z(z). Key is for the number 0 only, and key is for
e setup, the # key is
ond character,
Used to enter the n
asterisk (*) and pound (#). Among these keys, 2 to 9
can be used to enter numbers
0 1
the number 1 and some special characters,such as
dot (.) and hyphen (-). At phon
used to save settings.
To enter the first character on a key, press the key
once in the text mode; to enter the sec
press the key twice quickly; to enter the third
character, press the key three times quickly.
2 Soft key
There are three soft keys below the LCD pane
you press a soft key, you will run
l. When
the corresponding
number, enter the telephone number and
then press the Call soft key.
command currently displayed on the LCD, such as
enter the menu, return to the menu, view, search, call,
delete and so on.
To dial out a
3 MENU key
Surrounded by the d
used to enter the ma
irection keys, the MENU key is
in menu.
4 Direction key
Four direction keys: Up, Down, Left, Right. Used to
scroll the menu or m
ove the cursor.
5 Speed dial key
. From the
ur numbers (1 thro speed dial menu.
ou can dial out a nu
corresponding speed
Four keys top down, they correspond to the
ugh 4) in the
fo
Y
mber by pressing the
dial key.
6 Line key
Two keys. From the b
s (line
tween ach line
as a call.
ottom up, they correspond to the
1 and line 2 respectively). You
these two lines when e
two voice line
can switch be
h
(Speaker)
During a call or in the standby
mode, press this key to enter the
speaker phone mode.
7
Co nction
key
REDIAL
DIAL after picking up
t or in the standby
mode to redial the last number
you called.
Refer to section 4.3
mmon fu
Press RE
the handse
“Redial the
Last Called Number
” for details.
Page 26

User Manual
Aolynk EP302 IP Phone 3 Getting Started
19
Ite
m
Key Description
TRANSFER
You can use this key to transfer
a call to a third party.
Refer to section
4.12 “Call
Transfer
” for details.
CONFERENCE
use this key to let a third
tion 4.9
You can
party join in an existing call.
Refer to sec
“Three-Party Conference” f
details.
or
HOLD
arty
During a call, press the HOLD
key to put the call on hold. When
a call is on hold, neither p
can hear the other. To resume
the conversation, press HOLD
again.
Refer to section
4.10 “Call Hold”
for details.
MUTE
you
ection 4.18
If you press the MUTE key
during a call, the opposite side
will no longer hear you while
can still hear the opposite side.
The mute function stays
effective during the call until you
press MUTE again or the call
ends.
Refer to s
“Mute” for
details.
VMAIL
Call Forward to
Voice Mailbox
(Not supported by
00)
nce to
oice mailbox after the
EP302-XE20
Press the VMAIL key o
activate the Call Forward to
Voice Mailbox function. Any
incoming call will be forwarded
to your v
first ring. The caller will hear a
voice prompt, asking him/her to
leave a message in the voice
mailbox.
To disable the Call Forward to
Voice Mailbox function, press
the VMAIL key again.
Refer to section
4.14 “Call
Forward to Voice Mailbox” for
details.
Page 27

User Manual
Aolynk EP302 IP Phone 3 Getting Started
20
Ite
m
Key Description
ntrols)
Handset: Pick up the handset,
press VOL+ to increase the
- to
decrease the volume.
Ringer: Without picking up the
hands + to
increa and press
ker: Press the Speaker
e
L- to
the volume.
VOL+/VOL-
(Volume Co
volume and press VOL
et, press VOL
se the volume
VOL- to decrease the volume.
Spea
key. Press VOL+ to increase th
volume and press VO
decrease
8
Footstand
adjustment
button
Press and ho to adjust the angle of
the phone ba 2.3.4
ld this button down
se. Refer to section
“Attaching the
d
Power Cor ” for details.
3.2 LEDs
The status and descrip EDs a
Table 3-2 LEDs of the EP302
tion of the L re listed in the following table.
No. LED Status Description
ON
There are one or more unchecked voice
messa
ges.
Blinking There is an incoming call.
a Call status
OFF Other situations.
ON This line is in use.
OFF This line is not in use.
Slow blinking
every 3
seconds)
(once A call is on hold.
b
h
(2 LEDs)
Fast blinking
(twice per
second)
This line has an incoming call.
Line switc
ON
The Speaker phone function is being
used.
c Speaker
OFF
The Speaker phone function is not being
used.
ON The Mute function is being used.
d MUTE
OFF The Mute function is not being used.
Page 28

User Manual
Aolynk EP302 IP Phone 3 Getting Started
21
No. LED Status Description
ON
The Call Forward to Voice Mailbox
function is enabled.
e
VMAIL
(Voice
Mailbox)
OFF
The Call Forward to Voice Mailbox
function is disabled.
Note: EP302-XE2000 does not support
the Call Forward to Voice Mailbox
function, so this LED is always off.
3.3 LCD Display and Description
The based on the standby following description of the displayed information is
screen and the on-call screen.
MessageMessage
Figure 3-2 Standby screen (EP302-XE7000)
Note:
z tory.
The VMAIL soft key is used to retrieve voice mails.
The UsrDir soft key is used to view the user directory.
ter of the LCD displays call/voice mail information, and the function
The Record soft key is used to view the call his
z
z
z The cen
currently enabled (such as Call Forward Busy).
MessageMessage
Figure 3-3 Standby screen (EP302-XE2000)
Page 29

User Manual
Aolynk EP302 IP Phone 3 Getting Started
22
Note:
z In the case of EP302-XE2000, th
there is no VMAIL soft key and no
z The Record soft key is used to view
z The Menu soft key is used to enter
z The center of the LCD displays ca
e voice mailbox function is not supported, so
message information on the LCD.
the call history.
the main menu.
ll/voice mail information, and the function
currently enabled (such as Call Forward Busy).
Date and Time
Soft keys
Call i
Time elapse
ndicator
d
Phone number
Date and Time
Soft keys
Call i
Time elapse
ndicator
d
Phone number
g
Note:
Fi ure 3-4 On-call screen
indicates ringing, indicates a call is going on, indicates a call is on
hold.
In a call:
z The Oper soft key is used to park the on-going call.
z The Hold soft key is used to hold the on-going call.
z The Hangup soft key is used to end the on-going call.
3.4 Menu Structure
The EP302 offers a menu-based phone setup capability.
Press MENU to enter the main menu. In the menu mode, use the direction keys
(keys marked “4” in Figure 3-1
) to view the menu items, and use the soft keys (keys
marked “2” in Figure 3-1
) to perform corresponding operations. Alternatively, you
can press the corresponding number key directly to enter the desired submenu or to
Press the MENU key to enter the main menu, as shown below.
perform the desired operation.
Page 30

User Manual
Aolynk EP302 IP Phone 3 Getting Started
23
Figure 3-5 Main menu (EP302-XE7000)
Figure 3-6 Main menu (EP302-XE2000)
In
Figure 3-5, the menus corresponding to the icons from left to right are:
z User Directory (refer to section 4.7 “Use the User Directory” for details)
Note:
In the case of EP302-XE2000, the user directory function is not supported, so the
main menu does not have this item. Its main menu is shown in
Figure 3-6.
4.8
z Call History (refer to section “Use the Call History” for details)
z Speed Dial (refer to section 5.1 “Speed Dial Settings” for details)
z Call Features (refer to section 5.2 “Common Call Settings” for details)
z Advanced Features (refer to section 5.3 “Advanced Features” for details)
z Advanced Settings (refer to section 5.4 “Advanced Settings” for details)
The following sections present the menu structure of Call Features, Advanced
Settings and Advanced Features. You can find the item you want to set from the
following figures and then go to the corresponding menu.
Page 31

User Manual
Aolynk EP302 IP Phone 3 Getting Started
24
3.4.1 Call Features Menu Structure
Auto Answer
Call Features
Do Not Disturb
Call Forward
Directed Pickup
Forward to Vmail
FWD Busy
FWD Universal
FWD Ring No Answer
Remote FWD Universal
Auto Answer
Call Features
Do Not Disturb
Call Forward
Directed Pickup
Forward to Vmail
FWD Busy
FWD Universal
FWD Ring No Answer
Remote FWD Universal
Call Features menu structure
Note:
Figure 3-7
EP302-XE2000 does not support “Forward to Vmail” and “Remote FWD Universal”.
3.4.2 Advanced Features Menu Structure
Advanced Features
View Feature Code
c Feature Func
Exe
Advanced Features
View Feature Code
c Feature Func
Figure 3-8 Advanced Features menu structure
Exe
Page 32

User Manual
Aolynk EP302 IP Phone 3 Getting Started
25
3.4.3 Advanced Settings Menu Structure
Figure 3-9 Advanced Settings menu structure
Note:
In the case of EP302-XE2000, the “Account Info” submenu has an additional item
“Phone Usr”.
3.5 Input Method
The EP302’s input method for English characters is similar to that of mobile phones.
The number keys on the keypad can also be used to input letters. To be specific, the
number keys 2 to 9 are also for letters A(a) to Z(z), the number key 0 is for the
number 0 only, and the number key 1 is also for some special characters, such as dot
(.) and hyphen (-).
For example, the number key 2 can be used to input “2”, and also letters a, b, c, A, B,
and C. Press 2 once to enter “2”, and press 2 quickly two, three, four, five, six, and
seven times to enter letters a, b, c, A, B, and C respectively.
If you want to enter two different characters that are located on the same key, input
the first one and wait a while (about one second) before inputting the second one.
Page 33

User Manual
Aolynk EP302 IP Phone 4 Using the Phone
26
4 Using the Phone
nu.
efore starting to use the phone, make sure that the phone is already online (Refer
to 2.4
This chapter describes how to use the phone and how to use common and advanced
features through the me
B
“Initial Setup”).
Note:
z By default, the operations described in the following sections start from the
standby mode.
You can perform operations either by selecting menu items with the directio
z n
keys and soft keys or by using number keys directly. The following sections
primarily describe phone operations by means of direction keys and soft keys.
4.1 Placee a Call
Aft r the initial setup, your phone displays the standby screen (shown in Figure 3-2),
z up the handset → dial a number → press the Call soft key
ress
z ok (without dial tone): Dial a number → press the Call soft key.
Dial with a particular line: Press the line key → dial a number → press the Call
soft key.
and you can place a call with it.
Dial off-hook: Pick
z Dial on-hook (with dial tone): Press the Speaker key → dial a number → p
the Call soft key
Dial on-ho
z
Note:
Whether or not you need to press the Call soft key to place a call depends on the dial
les on the IP PBX.
ru
Page 34

User Manual
Aolynk EP302 IP Phone 4 Using the Phone
27
4.2 Speed Dial
With the speed dial function enabled, you can place a call by pressing only one key.
Refer to section
5.1 “Speed Dial Settings” for how to set the speed dial function.
Method 1: Press MENU → select Speed Dial → select a number → press the Call
soft key.
Note:
Use the up and down direction keys to view the records line by line; use the left and
right direction keys to view the records page by page.
Method 2: Press a speed dial key to dial a number directly. From the top down, the
four speed dial keys (refer to section
3.1 “Keys and Functions”) correspond to four
telephone numbers (1 through 4 respectively) that you have set on the speed dial
table (MENU → Speed Dial).
4.3 Redial the Last Called Number
To redial the last number you called, press the REDIAL key ( ).
4.4 Answer a Call
You can answer an incoming call by one of the following ways.
z Answer off-hook: Pick up the handset.
z Answer on-hook: Press the Speaker key.
z Answer with a soft key: Press the Accept soft key.
z Answer with the line: Press the corresponding line key.
4.5 Switch Between the Handset and the Speaker Phone
z To switch from the handset mode to the speaker phone mode, press the
Speaker key and hang up the handset.
z To switch from the speaker phone mode to the handset mode, simply pick up the
handset.
4.6 Adjust the Volume
The EP302 provides 10 volume levels, from 0 to 9 upward.
You can adjust the volume of the speaker, the ringer, the handset, the keypad tones
and the microphone. For how to use the menu to adjust the volume, refer to section
Page 35

User Manual
Aolynk EP302 IP Phone 4 Using the Phone
28
5.4.2 “Volume Settings” for details. You can also use the following methods to adjust
the volume of the speaker, the ringer and the handset through the keypad.
z Speaker: Press the Speaker key and then press VOL+ to increase the volume
and press VOL- to decrease the volume. Level 0 is mute.
z Ringer: Without picking up the handset, press VOL+ to increase the volume and
press VOL- to decrease the volume. Level 0 is mute.
z Handset: Pick up the handset, and press VOL+ to increase the volume and
press VOL- to decrease the volume. Level 0 is mute.
Table 4-1 Operation step
Step Operation LCD Display
1
Press VOL+/VOL-
(
) to adjust the
volume.
Note:
The EP302 can save the volume adjustment result. The new volume setting will stay
effective until the next volume adjustment, even if the phone is powered off and
powered on again.
4.7 Use the User Directory
Note:
If working with an XE2000 series IP PBX, the EP302 does not support the user
directory function described in this section, so the UsrDir soft key does not appear in
the main menu and the standby screen.
You can search or dial a number from the user directory. Chinese characters are
presently not supported in the user directory.
Page 36

User Manual
Aolynk EP302 IP Phone 4 Using the Phone
29
4.7.1 View the User Directory Entries
Press the UsrDir soft key in the standby mode to select and enter the global
directory or local directory. Use the Up and Down direction keys to view the entries
line by line, and use the Left and Right keys to view the entries page by page.
The local directory refers to the user directory stored on one XE series IP PBX, and
the global directory refers to the user directory stored on a cluster of XE series IP
PBXs.
Note:
z The user directory of the EP302 is not stored on the phone, but on the network
server. When you turn to another page of the user directory, if “Loading Data...” is
displayed, it indicates that the phone is downloading data from the server. The
EP302 downloads a maximum number of 20 entries at a time.
z You can only view numbers in the user directory and dial out numbers from the
user directory. To modify an entry, you need to contact your network
administrator.
4.7.2 Dial from the User Directory
Dial from the user directory: Press the UsrDir soft key → select Glo bal
directory/Local directory → select a number → press the Call soft key.
4.7.3 Find a Telephone Number in the User Directory
You can find a person’s telephone number by the first letter of his/her surname. The
screen displays nothing if no match is found.
Find a telephone number in the user directory: Press the UsrDir soft key → select
Global directory/Local directory → press the Seek soft key → enter the first letter
of the surname.
Note:
The letter you enter here is not case sensitive.
Page 37

User Manual
Aolynk EP302 IP Phone 4 Using the Phone
30
4.8 Use the Call History
The call history contains detailed information about the placed calls, received calls,
unviewed missed calls and already-viewed missed calls, including the number of
calls, telephone numbers and so on.
Note:
z The following sections describe the operations to use the call history when there
is no unviewed missed call.
z When there is a prompt of missed calls on the screen, pressing the Record soft
key will come to the record of unviewed missed calls. To view the other records,
press the Back soft key.
4.8.1 View/Dial out a Placed Call
You can view the telephone number, date and time, and duration of each placed call.
View a placed call: Record soft key → Placed Calls → Enter soft key → View soft
key.
You can dial out a placed call from the list of placed calls directly.
Dial out a placed call: Record soft key → Placed Calls → Enter soft key → Call soft
key.
4.8.2 View/Dial out a Received Call
You can view the telephone number, date and time, and duration of each received
call.
View a received call: Record soft key → Placed Calls → Enter soft key → View soft
key.
You can dial out a received call from the list of answered calls directly.
View a received call: Record soft key → Placed Calls → Enter soft key → Call soft
key.
4.8.3 View/Dial out a Missed Call
You can view the telephone number, and the date and time of each missed call.
When there is a prompt of missed calls on the screen, you can view the unviewed
missed calls. Record soft key → View soft key.
When there is a prompt of missed calls on the screen, you can dial out the unviewed
missed calls. Record soft key → Call soft key.
Page 38

User Manual
Aolynk EP302 IP Phone 4 Using the Phone
31
View an already-viewed missed call: Record soft key → Missed Calls → Enter soft
key → View soft key.
You can dial out a call from the list of missed calls directly.
Dial out an already-viewed missed call: Record soft key → Missed Calls → Enter
soft key → Call soft key.
4.8.4 Delete the Call History
Note:
You can delete all entries of a call history category on the EP302 at one time, rather
than entry by entry.
When there is no entry in a certain call history category, the DEL soft key does not
appear on the screen.
Delete the call history entries: Record soft key → Placed Calls/Received
Calls/Unv Missed Calls/Missed Calls → DEL soft key.
4.9 Three-Party Conference
The EP302 supports the three-party conference function.
There are two types of three-party conferences: announced and unannounced. They
are described separately in the following sections.
4.9.1 Announced Three-Party Conference
To start an announced conference, you need to call the required participants and ask
them to join the conference call. Then, the callee can decide whether or not to join
the conference call. The operation steps are listed in the following table.
Table 4-2 Operation steps (announced three-party conference)
Step Operation Illustration
1
Place a call to one party (user
A).
—
2
Press the CONFERENCE key
to put the call with user A on
hold. A prompt appears
asking you to enter the
telephone number of another
party (user B).
Page 39

User Manual
Aolynk EP302 IP Phone 4 Using the Phone
32
Operation IllustratiStep on
3
Enter user B’s telephone
number and press Call.
4
After user B answers the call
and agrees to join the
conference call, press the
CONFERENCE key to start
the three-party conference
call.
5
A conference call indicator
and the time duration appear.
Note:
In step 3, if the call connection with user B fails or if user B does not answer the call,
and if user B has the voice mailbox function, you will come to user B’s voice mailbox
(you can press the Hangup soft key to exit the voice mailbox). If user B does not
have the voice mailbox function, the line will be automatically switched to the call
hold state between you and user A. You can then press the Resume soft key to
resume conversation with user A.
4.9.2 Unannounced Three-Party Conference
In an unannounced three-party conference, you can let a call recipient join a
conference call without prior notification. The operation steps are listed in the
following table.
Table 4-3 Operation steps (unannounced three-party conference)
Step Operation Illustration
1
Place a call to one party (user
A).
—
Page 40

User Manual
Aolynk EP302 IP Phone 4 Using the Phone
33
Step Operation Illustration
2
Press the CONFERENCE key
to put the call with user A on
hold. A prompt appears
asking you to enter the
telephone number of another
party (user B).
3
Enter user B’s telephone
number and press
CONFERENCE.
4
A conference call indicator
and the conference call
duration appear after user B
answers the call (or after the
call is forwarded to the voice
mailbox).
Note:
In step 3, if the call connection with user B fails or if user B does not answer the call,
the line will be automatically switched to the call hold state between you and user A.
You can press the Call soft key to resume conversation with user A.
4.10 Call Hold
The call hold function allows you to answer or place a new call without terminating
the on-going call. When this function is used, neither party of the original call can
hear the other side.
To put a call on hold, use one of the following two methods.
Method 1:
Table 4-4 Operation steps
Step Operation Illustration
1 You are on an active call.
—
Page 41

User Manual
Aolynk EP302 IP Phone 4 Using the Phone
34
Operation IllustratiStep on
2
Press the Hold soft key to put
the call on hold.
3
To resume the call, press the
Resume soft key.
Method 2:
Table 4-5 Operation steps
Step Operation LED Status
1 You are on an active call.
The corresponding line switch LED
is ON.
2
Press the HOLD key to put the call
on hold.
The corresponding line switch LED
starts blinking.
3
To resume the call, press the HOLD
key again.
The corresponding line switch LED
turns ON.
If you are on a call and you want to place a new call, but you do not want to lose the
current call, you can use the call hold function by doing as follows:
1) Press the HOLD key or the Hold soft key to put the current call (with user A) on
hold. The corresponding line switch LED starts to blink slowly.
2) Press the line key of the new call (that is, the line key whose line switch LED is
off).
3) Enter the target number of the new call (user B’s telephone number) and press
the Call soft key.
4) Wait for the call connection with user B to be established.
Page 42

User Manual
Aolynk EP302 IP Phone 4 Using the Phone
35
5) When finishing talking with user B, press the Hangup soft key to end the call
with user B, and return to the call hold status with user A. Press the Resume
soft key to resume the call with user A. Alternatively, when finishing talking with
user B, you can press the line key corresponding to the call with user A to
resume the call with user A directly and end the call with user B at the same
time.
Note:
In step 4 above, if the call connection with user B fails or if user B does not answer
the call, you can press the line key corresponding to the call with user A to resume
the call with user A directly and end the call connection with user B at the same time.
4.11 Call Waiting
This feature allows you to answer a new call (the call status LED and line switch LED
start to blink) without terminating the on-going call, and switch between these two
calls.
Note:
z Before you switch to another line, you need to put the current line on hold.
Otherwise, the current line will be terminated.
z To switch to a desired line, press the corresponding line key.
z The two numbers 1 and 2 on the left side of the LCD correspond to the two line
keys from the bottom up (the two keys labeled 6 in
Figure 3-1).
Table 4-6 Operation steps
Step Operation Illustration
1
You are on a call with the
number 7001. A second
call (number 7002) comes
in.
Press the Hold soft key (or
HOLD key) to put the call
with 7001 on hold.
Page 43

User Manual
Aolynk EP302 IP Phone 4 Using the Phone
36
Operation IllustratiStep on
2
Press the line key (labeled
6 in
Figure 3-1)
corresponding to line 2 to
answer the call from the
number 7002.
3
To resume the original call,
put the current call on hold
first and then switch back
to the original call line.
You can switch between
these two lines by this
method.
4.12 Call Transfer
This feature allows you to transfer an on-going call with one party to another party, so
that a call is established between the other two parties.
Note:
EP302-XE2000 only supports the unattended transfer.
Table 4-7 Operation steps
Step Operation Illustration
1
You are on an active call with one
party (user A).
—
2
Press the TRANSFER key. The
call is put on hold now.
3
Enter the transfer number (user
B’s telephone number).
Note: For EP302-XE2000, the
screen only has the DEL soft key.
Page 44

User Manual
Aolynk EP302 IP Phone 4 Using the Phone
37
Step Operation Illustration
4
There are two transfer modes
supported by the EP302:
z Attended transfer: Press the
Call soft key. When user B
answers the call (or when the
call is forwarded to the voice
mailbox), press the
TRANSFER key. Your phone
returns to the standby mode
and you can hang up.
z Unattended transfer: Press
the TRANSFER key directly.
Your phone returns to the
standby mode and you can
hang up.
Note:
z For EP302-XE7000, if the call connection with user B fails or if user B does not
answer the call in step 4 above, your phone will return to the call hold state. You
can press the Resume soft key to resume the call with user A.
z For EP302-XE7000, if you hang up the phone before completing the call transfer
to user B, your phone will return to the call hold state with user A.
z For EP302-XE2000, if the call connection with user B fails or if user B does not
answer the call, your phone will resume the original call with user A.
z For EP302-XE2000, if you hang up the phone before completing the call transfer
to user B, the original call with user A will also be ended and your phone will
return to the standby mode.
4.13 Call Park
This feature allows you to put a call on hold so that you or another person can
retrieve the call from any phone on the system.
For example, you are on a call and you want to continue the call on another phone
because you are presently in a noisy place, but the call transfer does not give you
enough time. In situations like this, the call park function can be very helpful.
Page 45

User Manual
Aolynk EP302 IP Phone 4 Using the Phone
38
Note:
z When you park a call, the system will generate a call park number, or you can
specify a call park number by yourself. The default call park number range is 800
to 899. Consult your network administrator about the available call park number
range.
z If the park number you specified conflicts with the park number being used by
another person, the IP PBX will assign a new park number for you. So, use the
park number displayed on your phone screen.
z If a parked call is not retrieved for a certain length of time (configured on the IP
PBX), the phone that parked the call will begin to ring. The call will then be
resumed if picked up, or will be terminated if not picked up within a certain period
of time.
Table 4-8 Operation steps
Step Operation Illustration
1
Press the Oper soft key during
a call.
2 Press OK to park the call.
3
Enter the park number and
press OK. The call is parked
now and you can hang up.
Page 46

User Manual
Aolynk EP302 IP Phone 4 Using the Phone
39
Operation IllustratiStep on
4
Your phone returns to the
standby mode. Now you can
retrieve the parked call by
entering the park number on
any phone in the same system.
4.14 Call Forward to Voice Mailbox
Note:
In the case of EP302-XE2000, the call forward to voice mailbox function is not
supported.
With this function enabled, all incoming calls will be forwarded to the voice mailbox.
Note:
z With this function enabled, the phone will ring once when an incoming call comes
(if there is already an active call, the phone will display a short indication for an
incoming call on its LCD panel), and the call is then forwarded to the voice
mailbox. The caller will hear a voice prompt asking him/her to leave a message in
the voice mailbox.
z There is no difference in placing a call on the phone with or without this function
enabled.
z The priority of Call Forward to Voice Mailbox is lower than Call Forward Universal,
but higher than Call Forward Busy and Call Forward No Answer.
To enable/disable the Call Forward to Voice Mailbox function, press the VMAIL
(
) key on the phone.
After this function is enabled, the VMAIL LED is ON and the LCD displays “FWD to
Vmail”.
You can also enable/disable the call forward to voice mailbox through the menus. For
detailed operation, refer to the section
5.2.5 “Call Forward to Voice Mailbox”.
Page 47

User Manual
Aolynk EP302 IP Phone 4 Using the Phone
40
4.15 Voice Mails
Note:
In the case of EP302-XE2000, the Voice Mails function is not supported.
In situations such as you enabled the call forward to voice mailbox function on your
EP302, or, an incoming call to your phone is not answered (the “call forward to voice
mailbox when no answer” function is configured on the IP PBX), the caller will hear a
beep sound, prompting him/her to leave a message.
4.16 Retrieve Voice Mails
Note:
EP302-XE2000 does not support the function of retrieving voice mails.
When you have unchecked voice mails, the LCD displays the total number of voice
mails (including checked and unchecked voice mails) and the number of new (that is,
unchecked) voice mails.
Figure 4-1 Prompt of voice mails
When there is no unchecked voice mail, the LCD displays no information about voice
mails.
To retrieve voice mails, press the VMail soft key and follow the voice prompt.
Page 48

User Manual
Aolynk EP302 IP Phone 4 Using the Phone
41
Note:
z When you retrieve voice mails for the first time, you need to modify the password
by following the voice prompt.
z After you sign in to the voice mailbox; you can retrieve, save, delete and reply
voice mails.
4.17 Email Prompt
Note:
EP302-XE2000 does not support the email prompt function.
When there is a new email, the LCD displays a prompt (for example “1 Emails”).
Consult your network administrator for how to use this function.
4.18 Mute
By using the Mute function during a call, you can turn off your microphone so that the
other party cannot hear you.
To enable/disable the Mute function, press the MUTE key (
) during a call.
When the Mute function is enabled, the MUTE LED is ON.
4.19 View Phone Settings
You can view the information of phone settings, such as version, PBX IP address,
account information and so on.
View the phone settings: MENU → Advanced Settings.
4.20 Bridging a PC to the Network
Connect the LAN port on your EP302 to the network, and connect your PC to the PC
port on your EP302 to bridge the PC to the network. The cable connection is shown
in the following figure.
Page 49

User Manual
Aolynk EP302 IP Phone 4 Using the Phone
42
Figure 4-2 Cable connection
Page 50

User Manual
Aolynk EP302 IP Phone 5 Phone Settings
43
5 Phone Settings
w to set up common call features, phone settings and
5.1 Spe
d telephone numbers as Speed Dial numbers for easy
This chapter describes ho
advanced settings.
ed Dial Settings
With the Speed Dial function enabled, you can place a call by pressing only one key.
You can set the frequently use
and quick operation. For the description of how to use the Speed Dial function, refer
to section
4.2 “Speed Dial”.
You can assign a telephone number to each of the number keys 1
to 9 so that you
escribes how to add, modify and delete a Speed Dial number.
ber →
ial out a Speed Dial number on the Speed Dial setting page.
ial a Speed Dial number: MENU → Speed Dial → select a telephone number →
Call soft key
can dial any of these telephone numbers with the corresponding key. The following
list d
Add a Speed Dial number: MENU → Speed Dial → select a blank line → Modify soft
key
Modify a Speed Dial number: MENU → Speed Dial → select a telephone number →
Modify soft key
Delete a Speed Dial number: MENU → Speed Dial → select a telephone num
Modify soft key → Delete soft key
You can also d
D
Page 51

User Manual
Aolynk EP302 IP Phone 5 Phone Settings
44
Note:
z In the case of EP302-XE7000, the Speed Dial settings are saved on the server,
not on the phone. The result of a
dding, modifying and deleting a Speed Dial
still perform Speed Dial settings when the phone is off line.
number must be saved to the server. Therefore, you cannot perform Speed Dial
settings when the phone is off line.
z In the case of EP302-XE2000, the Speed Dial settings are saved on the phone.
Therefore, you can
5.2 Common Call Settings
ed on the LCD.
Universal > Do Not
orward to Voice Mailbox > Auto Answer > Call Forward Busy > Call
wer.
5.2.1 Aut
the LCD displays “Auto Answer”.
5.2.2 Do Not Disturb
“Do Not Disturb” when the phone is in the Do Not Disturb mode.
Enable/disable the Do Not Disturb function: MENU → Call Features → Do Not
isturb → Enable/Disabl e.
If multiple call settings are configured on the phone, only the setting with the highest
priority will be display
The priorities of call settings from high to low are: Call Forward
Disturb > Call F
Forward No Ans
o Answer
With the Auto Answer function enabled, incoming calls are automatically answered
in the speaker phone mode.
Enable/disable the Auto Answer function: MENU → Call Features → Auto Answer
→ Enable/Disable.
After this function is enabled,
In the Do Not Disturb mode, the phone will not ring and no indication will be given on
the LCD when there is an incoming call. All incoming calls will be sent to the voice
mailbox of your EP302 by default. Whether or not this function is enabled does not
affect placing calls on the EP302.
The LCD displays
D
Page 52

User Manual
Aolynk EP302 IP Phone 5 Phone Settings
45
Note:
In the case of EP302-XE2000, when the Do Not Disturb function is enabled, there is
e LCD
nction has been enabled on the phone
a voice prompt saying that the Do Not Disturb function has been enabled. Th
has no indication. The caller who places a call to your EP302 will hear a voice prompt
telling him/her that the Do Not Disturb fu
he/she is calling.
5.2.3 Call
O t 3 four
types f Call Fo l Forward Busy, Call Forward No
Answer a m
E t ures orward
→ select a Call Forward type → Enable and specify the forward number/Disable.
le/disable the Remote Call Forward Universal function: MENU → Call
Call Forward →Remote Call Forward Universal → Enable and specify
the
Ta
Forward
nce enabled, ohis function applies to all incoming calls. The EP
rward: Call Forward Universal, Cal
02 supports
nd Re
nable/disable
ote Call Forward Universal.
he Call Forward function: MENU → Call Feat
→ Call F
Enab
Features →
remote call forward number/Disa b le .
ble 5-1 Call forward types
Type Description LCD Display
Call Forward
niversal
All incoming calls are immediately forwarded to
the preset telephone number, with no ring.
FWD
Universal
U
Call Forward
usy
When the maximum number of call lines (two
lines) are be
forwarded to
B
ing used, new incoming calls will be
the preset number.
FWD Busy
CNall Forward
o Answer
An incoming call will be forwarded to the preset
number if it is not answered within a certain
period of time.
FWD No
Answer
Page 53

User Manual
Aolynk EP302 IP Phone 5 Phone Settings
46
Note:
z The priority levels of Call Forward types from high to low are: Call Forward
Universal, Call Forward Busy a
nd Call Forward No Answer.
Call Forward type(s).
lows you to use your EP302 to
enable the Call Forward Universal function of another phone set. Before the
you need to make sure that you are authorized to access the remote
et to set this function. Contact your network administrator for how to
z The priority of Call Forward to Voice Mailbox is lower than Call Forward Universal,
but higher than Call Forward Busy and Call Forward No Answer.
z After the Call Forward function is enabled, the LCD displays the currently enabled
z If multiple Call Forward types are enabled, only the type with highest priority level
is displayed on the LCD.
z The Remote Call Forward Universal function al
setting,
phone s
obtain the authorization.
Note:
In the case of EP302-XE2000, when the Remote Call Forward Universal function is
nabled, there is a voice prompt saying that the function has been enabled. The LCD
has no indication about this function.
e
5.2.4 Dire l Pickup
same pickup group.
xample, you and your colleague have phones in the same pickup group. When
colleague has an incoming call on his phone but he cannot answer the call for
ed Call Pickup: MENU → Call Features → Directed Pickup → enter the
urity code.
cted Cal
This feature allows you to use any phone to answer an incoming call to any other
phone in the
For e
your
the moment, you can answer the call on your own phone by doing the following:
Direct
phone number for which the call is to be picked up (in the example above, it is your
colleague’s phone number) and the sec
Page 54

User Manual
Aolynk EP302 IP Phone 5 Phone Settings
47
Note:
z Call pickup groups and the corresponding security codes are set on the server by
the network administrator. Consult your network administrator for information
about your call pickup group and the corresponding security code. (In the case of
EP302-XE2000, no security code is required).
z The default range of security codes is 10 to 99.
5.2.5 Call
Note:
Forward to Voice Mailbox
In the case of EP302-XE2000, the Call Forward to Voice Mailbox function is not
supported.
Once enabled, the Call Forward to Voice Mailbox function applies to all incoming
calls.
Enable/disable the Forward to Voice Mailbox function: MENU → Call Features →
Forward to VMail → En able /Disab le .
The Call Forward to Voice Mailbox can also be enabled/disable
d by using the VMAIL
key on the phone. Refer to section
4.14 “Call Forward to Voice Mailbox” for more
information.
5.3 Adv
5.3.1 View
ou can view all feature codes that are supported by the EP302. Each feature code
corresponds to a function, such as display the IP address of the phone.
e codes: MENU → Advanced Features → View Feature Code
anced Features
Feature Codes
Y
View featur
Page 55

User Manual
Aolynk EP302 IP Phone 5 Phone Settings
48
unctions
5.4 Adv
s
ary
address of
the primary PBX server. The secondary PBX IP address is the IP address of the
and is optional. The dialing domain is also optional and
defaults to 0.0.0.0, meaning it is the same as the primary PBX IP address. You can
View/modify the primary PBX IP address: MENU → Advanced Settings → Network
ettings → Primar y PBX I P
y the secondary PBX IP address: MENU → Advanced Settings →
ain: MENU → Advanced Settings → Network
Settings → Dialing Domain
5.3.2 Execute Feature F
You can execute a function quickly by entering its corresponding feature code.
Execute a feature code: MENU → Advanced Features → Exec Feature Func
For example, the feature code 320 is used to display the IP address of the phone.
anced Settings
5.4.1 Network Setting
On the Network Settings menu, you can set the primary PBX IP address, second
PBX IP address and dialing domain. The primary PBX IP address is the IP
secondary PBX server
enter an IP address or a domain name in the dialing domain.
S
View/modif
Network Settings → Secondar y PBX IP
View/modify the dialing dom
Note:
The dialing domain defaults to 0.0.0.0, and you can enter an IP address or a domain
domain name, delete all the original numbers first and enter
the domain name. For information about entering characters, refer to section 0
name here. To enter a
“
Input Method”.
5.4.2 Volu ngs
just the volume for the speaker, ringer, handset, keypad tones and the
Yo tailed information, refer to
me Setti
You can ad
microphone in the Volume Settings menu. The EP302 supports 9 volume levels.
u can also adjust the volume through the keypad. For de
section 4.6
“Adjust the Volume”.
just the volume: MENU → Advanced Settings → Volume Settings.
Ad
5.4.3 Ringing Tones
You can play and select a ringing tone for your EP302 from 10 available tones.
Page 56

User Manual
Aolynk EP302 IP Phone 5 Phone Settings
49
: MENU → Advanced Settings → Ringing Tone
5.4.4 Acc
ph a
Select a ringing tone
ount Information
You can view and modify your one number and p ssword obtained from your
network administrator.
Note:
In the case of EP302-XE2000, there is another item “Phone Usr”, which is specified
by the network administrator.
View or modify the phone number: MENU → Advanced Settings → Account Info
Modify the password: MENU vanced Settings → Account Info
5.4.5 Regi ation
You can vi
S the reg d S n Status →
Online/Of
Note:
→ Ad
str Status
ew/change the registration status.
istration status: MENU → Advance
fline
et ettings → Re gistra tio
z “Online” means the phone is successfully co PBX. The call
ture one is
z Offline is not connected or h the IP PBX.
In the o “Offline creen, and the
nnected to the IP
fea“s are available only when the ph
” means the phone
online.
as failed to connect to
ffline state, the LCD will display
tures are not available.
” on the standby s
call fea
5.4.6 Language S
The EP30 lish and Chinese. You can set the display
language to either one of them.
t the language: MENU → Advanced Settings → Language Settings →
English/Chinese.
5.4.7 Software Version
View the software version: MENU → Advanced Settings → Software Version
ettings
2 supports two languages: Eng
Se
Page 57

User Manual
Aolynk EP302 IP Phone 5 Phone Settings
50
5.5 Restore the Default Settings
Table 5-2 Steps to restore the default settings of the EP302
Step Operation LCD Display
1
Power on the EP302. Press the
MENU key when the message on the
right appears.
H3C Model e
Wait for NCP M
p302-
2
Press the Down direction key. When
the LCD display is the information
sh
8 Restore Default
own on the right, press 8 on the
7 Net Test
Menu Key - Exits
keypad to select 8 Restore Default.
** End Menu **
3 Press the key.
Restore Defau#lt
# -- Restore Default
MENU –– Exits
4
Wait while the EP302 restores
Restore
default settings.
Default
Clearing Config…
5
After the defaulted settings are
restored, the information appears as
on the right. Press MENU to reboot
the phone.
Restore Default
Config Set Finished
MENU – Restore Default
6 use the phone, you need to set up
y referring to the
The default settings are restored
after the phone reboots. Before you
your phone b
section 2.4
“Initial Setup”.
system is rebooting…
Restore Default
Page 58

User Manual
Aolynk EP302 IP Phone 6 FAQs
51
I. rt?
upports two network access methods: DHCP and static IP address.
II
The s not. So the EP302
f the Ethernet access device to which the EP302 is attached
supports PoE, you can connect one end of the network cable to the LAN port of the
E port of the access device. In this case, the
II
The EP302 works with an IP PBX (XE series server). The PBX IP is the IP address of
IV
6 FAQs
Contact your network administrator first if you have any problem in installing or using
the EP302.
Sections below describe the frequently asked questions and answers.
What network access methods does the EP302 suppo
The EP302 s
. How can I have my EP302 powered through PoE?
LAN port of the EP302 supports PoE, while the PC port doe
can be powered through the LAN port and the network cable without the need of an
external power supply. I
EP302 and the other end to the Po
EP302 is powered by the Ethernet access device through the network cable.
I. What is a PBX IP?
the IP PBX.
. How can I enter alphabetic characters in the LCD configuration mode?
Please refer to section 0“
Input Method”.
y doesn’t the V. Wh LCD light up after the power adapter is connected to the
z A possible reason is that the output voltage of the power adapter does not meet
d
requirement.
phone?
the phone’s requirement. Check whether the AC input is within the require
range and whether the power adapter meets the
z Another possible reason is that the LCD is faulty. Please contact the network
administrator for LCD troubleshooting and maintenance.
Page 59

User Manual
Aolynk EP302 IP Phone 6 FAQs
52
V? I. What is the difference between the global directory and the local
directory
Note:
EP302-XE2000 does not support the user directory function. This question is for
EP302-XE7000 only.
The global user directory is a user information sharing service based on distributed
database, generally employed in a network consisting of multiple IP PBXs. The
central station controls the user information of all stations within the domain and can
VII. Why does my phone still display “Offline” or “Logging in” or “Logging
lp.
VIII. How to update the software?
The software upgrade is handled by the network administrator. If your network
administrator informs you to upgrade the phone software, you simply need to restart
the phone (plug off the power supply and plug it on).
IX. Why can’t the phone download application programs upon startup?
Run TFTP Server program on the download server and specify the file path of the
starting program. If no application programs are downloaded, check that:
1) The network cable connection is correct.
2) The settings on the EP302 are consistent with the network administrator’s
requirements.
If all items are correct and the problem still exists, please contact your network
administrator for help.
deliver the user information in real time.
The local user directory is delivered and controlled by each individual station, that is,
operations like adding a user are conducted by a branch station.
out” after I complete the registration configuration?
Check that:
1) The network cable connection is correct.
2) The account information and network settings that you configured are
consistent with the network administrator’s requirements.
If both items are correct and the problem still exists, please contact your network
administrator for he
Page 60

User Manual
Aolynk EP302 IP Phone 6 FAQs
53
X. What should I do if the message “Loading Data...” is long displayed on
the LCD when I try to view the user directory?
The data in the user directory is stored on the IP PBX, so it needs to be downloaded
to your phone whenev
problem may exist. P
network.
XI. Why can’t the second incoming call be f
with the call forw ard bu sy fu ncti on enab led ?
The EP302 supports up to two call waiting lines. The incoming call on the second line
, and you can answer it by using the call
waiting function. Only a third incoming call will to the target number.
XII n’t I do som hen the phone is offline?
Many voice service settings of ions
concerning setup modifi
XII do I switch to going call?
If you want to keep the nnected, press HOLD and then press the
corresponding line key ( ng
c
If line
k nswer the new call. The current call will be terminated automatically.
XIV. ew the IP y EP302?
Y the IP address of your EP302 by selecting 1 View Settings in the H3C
T n your E hone is in the standby mode,
you can use MENU → Advanced Settings → Exec Feature Func and enter the
F
er you view it. If no data is loaded after a long time, a network
ress the Return soft key and try again after checking the
orwarded to the target number
will not be forwarded to the target number
be forwarded
. Why ca e settings w
the EP302 are stored on the IP PBX, so operat
cation are not supported in offline state.
I. How a new incoming call when I am on an on-
current call co
the key with a fast blinking LED) to answer the new incomi
all.
it is not necessary to k
ey directly to a
eep the current call connected, press the corresponding
How do I vi address of m
ou can view
est Menu whe
P302 starts up. Or when the p
eature code 320.
Page 61

User Manual
Aolynk EP302 IP Phone 7 Appendix – Technical Specifications
54
7 Appendix – Technical
Specifications
T EP spable 7-1 302 technical ecifications
Item Description
Memory
4 M F
16 M
LASH
SDRAM
Port
Two ,
10 uto-sensing,
E iant, duplex mode
auto-negotiation. The LAN port supports PoE
EEE
One ts the phone and the handset
Ethernet ports: RJ-45, 10Base-T/100Base-TX
0 Mbps auto-negotiation, MDI/MDIX a
802.3/802.3u compl
10/
IEE
(I 802.3af)
handset port: connec
Power supply
48 VDC , 0.25 A
Physical dim
(H × W × D)
7 ×
ensions
10
260 × 193 mm (4.2 × 10.2 × 7.6 in.)
Weight
1.1 kg (2.4 lb.)
Power cons < 5 Wumption
Operating
temperature
0°C t
o 40°C (32°F to 104°F)
Storage tem °perature –10 C to +70°C (14°F to 158°F)
Operating humidity
(noncondensing)
20%
to 85%
Storage hum
(nonconden
idity
sing)
10%
to 90%
Page 62

User Manual
Aolynk EP302 IP Phone 8 Appendix – Glossary
55
8 ary
Table 8-1 Glo
Appendix – Gloss
ssary
Acronym Item Explanation
802.1 P 802.1 P
e
dded to it. For packets
802.1 P defines the concept of priority. When a fram
is sent, a 3-bit priority field is a
with high real-time requirement, the priority level
defined in the priority field is high.
802.1 Q
ocol, namely, the VLAN (virtual local
802.1Q
The 802.1 Q prot
area network) protocol, mainly defines the
implementation of VLANs.
AEC
Acoustic
Cancellation
Echo
AEC eliminates echoes caused by insufficient
coupling between the microphone and
speaker/earphone.
ARP
Address
Resolution
Protocol
ARP maps IP addresses to MAC (media access
control) addresses.
Announced
Conference
ber, ask
is willing to participate in the
To invite a third party into an announced conference,
the caller party needs to dial the person’s num
whether he/she
three-party conference, and then decides whether to
add it into the conference.
Attended
Transfer
only after
For attended transfer, the call is transferred
the called party agrees.
Auto-Answer/
Handsfree
er can answer the call
essing
When a call comes, the user is prompted by a special
ring tone, and the phone automatically enters the
handsfree mode so that the us
without the need of picking up the handset or pr
any button.
AGC
Automatic
olume of the receiver
olume of the receiver
Gain Control
AGC automatically adjusts the v
during a call so that the output v
is neither too high nor too low.
Barge in
This is to intervene in a monitored call to set up a
three-party call.
Page 63

User Manual
Aolynk EP302 IP Phone 8 Appendix – Glossary
56
Acronym Item Explanation
and
pick up the handset of any
Bridged Line
A bridged line is formed by a primary telephone
multiple secondary telephones. When a call is placed
to the primary telephone, all the secondary
telephones will ring together with the primary
telephone, and you can
secondary telephone to answer the call, with the same
effect as you do with the primary telephone.
BLF
d with a Speed Dial number.
Busy Line
Field
BLF shows the real-time status (busy/idle) of a
telephone associate
CFB
Call Forward
Busy
oming call
ed
When the CFB service is enabled, an inc
will be forwarded to the specified number if the call
party is busy.
CFNA
Call Forward
No Answer
led, an incoming call
When the CFNA service is enab
will be forwarded to the specified number after the
pre-set answer time expires.
CFU
Call Forward
Universal/Un
incoming calls
conditional
When the CFU service is enabled, all
will be forwarded to the specified number
unconditionally.
Call History Records of recent incoming and outgoing calls.
CH/Hold
is
calling and called parties cannot hear
Call Hold
When the CH service is enabled, the call is
suspended temporarily while the call connection
sustained. The
each other when this feature is in effect.
Call k
caller/called party to suspend
Par
This feature allows the
the call and then resume it on any other telephone by
dialing the proper access code. This feature is useful
when the caller/called party wants to continue the
current call on a different telephone without
terminating it.
n
This feature is used to permit/prohibit calls between
Call
Restrictio
specific numbers only.
CW Call Waiting
When a third party places a new call to the
caller/called party of an ongoing call, the called party
of the new call can use this feature to answer the new
call while keeping the current line connected and
switch between the two calls.
Called Party
Also known as “callee”, this term refers to the
terminating party of a call.
The terminating party of a call.
Callee
Caller The originating party of a call.
CID
Display
e
Caller Identity CID displays the telephone number of the caller on th
telephone of the called party.
Calling Party
Also known as “caller”, this term refers to the
originating party of a call.
Page 64

User Manual
Aolynk EP302 IP Phone 8 Appendix – Glossary
57
Acronym Item Explanation
CoS
Class of
Servi
ce
sers.
r by allowing/prohibiting international calls, toll
In telephony, CoS refers to a parameter set or
common feature set that applies to a group of u
CoS is used to control the call type of users on the
serve
calls and/or local calls.
CNG
he
nd,
es of
Comfort
Noise
Generation
CNG is the low-frequency, soft noise sent from t
phone terminal at one end of a call to the other e
when there is no sound over the line (both parti
the call are silent).
Conference
Multiple parties can have conversations
simultaneously to realize a telephone conference.
Dial Plan
s
A dial plan is a policy that combines multiple dial rule
to ease users’ dialing process.
Dial Rule
By setting dial rules for specific users, the
administrator can prohibit/permit specific types of calls
and ease the users’ dialing process.
DSP
Digital Signal
Processor
oice activity detection), EC (echo cancellation),
As the core unit of the voice coder and modem, the
DSP can implement tasks such as voice compression,
VAD (v
delay/jitter correction and clock synchronization.
Directed Call
Pickup
This feature allows a user to answer the call to
another user.
Directory
sponding telephone
List of users and the corre
numbers in a network.
DND
Do Not
Disturb
e. In
s
the pre-selected target,
When this feature is in effect, the telephone blocks
incoming calls and the caller will hear a busy ton
some systems, the incoming calls to a user using thi
feature will be forwarded to
such as the called party’s voice mailbox.
DNS
Domain
Name
Service
DNS translates domain names into IP addresses.
DTMF
ne set and the switch.
Dual Tone
Multi-Freque
ncy
DTMF is a telephony terminology that means a user
signaling used to send the called number between the
telepho
DHCP
l
s for hosts in
Dynamic
Host
Configuration
Protoco
DHCP dynamically assigns IP addresse
the network.
EC
Echo
Cancellation
smission methods, telephone,
router, or QoS (quality of service).
EC is used mainly to eliminate various delay echoes
caused by hybrid tran
Page 65

User Manual
Aolynk EP302 IP Phone 8 Appendix – Glossary
58
Acronym Item Explanation
Emergenc
Call
y
p the
When a pre-defined emergency number is dialed
(such a call is an emergency call), the system
automatically selects a voice gateway to set u
call.
FWD
MAIL
Forward to
in effect, incoming calls are
Voice Mail
When this feature is
forwarded to the voice mailbox unconditionally.
Global
Directory
List of users and the corresponding telephone
numbers in a global network.
line number is configured on a phone, it
er
Hot Line
When a hot
automatically places a call to the hotline numb
immediately after the handset is picked up.
Hunt Group
A group of users. When the hunt group number is
dialed, telephones of all online users in the group will
ring, and the call can be answered on any of these
telephones to stop the rin
ging of all these telephones.
ITU-T
G.711A/µ G.711A/µ
ITU-T
A voice coding standard defined by the ITU
(international telecommunications union), with the
coding type of PCM and the bit rate of 56 kbps and 64
kbps.
ITU-T
G.722
2
ding standard defined by the ITU
ITU-T G.72
A voice co
(international telecommunications union), with the
coding type of ADPCM and the bit rate of 64 kbps, 56
kbps, and 48 kbps.
ITU
G.723
-T
on), with the
Q, and the
ITU-T G.723
A voice coding standard defined by the ITU
(international telecommunications uni
coding type of CELP and MP-ML
corresponding bit rate of 5.3 kbps and 6.3 kbps
respectively.
ITU-T
G.729
ITU-T G.729
G.729 is often used for low-bit-rate, narrowband
A voice coding standard defined by the ITU
(international telecommunications union), with the
coding type of CS-CELP and the bit rate of 8 kbps.
communications.
LCD
n display on the telephone
set.
Liquid Crystal
Display
LCD screen for informatio
LAN
Local Area
Network
A LAN is typically an intranet inside a family, an office,
a small building and so on.
Log
In
Process that a user obtains authority to use the
telephone system through authentication.
Log Out
Process that a user exits the telephone
using the telephone.
system after
MOS n
Score
TU-T P.800.
Mean
Objectio
A qualitative method for voice quality evaluation
developed by the I
Page 66

User Manual
Aolynk EP302 IP Phone 8 Appendix – Glossary
59
Acronym Item Explanation
MAC
address
Media
Control
address
5. The MAC address for a device is
Access
Permanent physical address that the manufacturer
assigned for a device. A MAC address consists of six
bytes of hexadecimal numbers, for example,
00-0F-E2-80-65-2
globally-unique.
MWI
Waiting
Indication/Ind
erver
er,
and display the current message status through the
Message
icator
If a telephone is registered with the message s
for message notification, it can obtain the current
message status information from the message serv
MWI on it.
alls
Missed C
Records of recent incoming calls that are not
answered.
party at one time.
Multi-Lines
A user can set up multiple call connections and switch
between these lines. The user can talk to only one
MOH
Music on
Hold
old,
r music streamed from a MOH server.
In an ongoing call when party A puts party B on h
party B can hea
Mute Mute
During a call, any party can use the mute functio
temporarily shield the other party from
n to
the voice of this
side.
NAT
Network
Address
n
n share the
Translatio
Through NAT, multiple PCs in a LAN ca
same public IP address to access the Internet. In this
way, network security is ensured because LAN users
are shielded. NAT is widely used by broadband
routers for shared network access.
s Records of recently dialed calls.
Placed Call
PoE
er
ndard LAN infrastructure. It
allows a network device, such as a switch, an IP
h
Power ov
Ethernet
Power over Ethernet (PoE) is a technology that
integrates power into a sta
phone or a network camera, to be powered throug
the same cable as that used for network connection.
PSTN
Switched
Telephone
s
Public
Network
A telephone system that provides call service
through circuit switching.
QoS
Quality of
ch as
ngestion. It prevents traffic flows with
n
S
ntly.
Service
A technology used to solve network problems su
delay and co
high priorities from being delayed or dropped whe
overload or congestion occurs to the network. Qo
also ensures that the network operates efficie
Received
Calls
Records of recently answered calls.
Redialing is used to rapidly dial the last number dialed
Redial
on the telephone.
Page 67

User Manual
Aolynk EP302 IP Phone 8 Appendix – Glossary
60
Acronym Item Explanation
RJ-11
six pins and usually connects
RJ-11
The standard connector used to attach devices such
as analog telephones, fax machines and modems. An
RJ-11 connector has
with four cables.
RJ-45
o attach devices such as
ten attached to the RJ-45 connector.
RJ-45
An eight-pin connector used t
Ethernet switches, hubs, routers and network
telephones. Straight-through cables and crossover
cables are of
SIP
Session
Initiate
Protocol
sessions.
An application layer control protocol that is used to set
up, modify and terminate multimedia
Silence
Suppressio
n
e the occupied bandwidth.
The basic concept of silence suppression is to reduce
transmitted voice frames when the parties of the call
do not speak, so as to sav
Silent Monitor
Silent monitor is to monitor the ongoing call of a
specified user.
Speed Dial
ly pressing one key.
This feature allows a user to dial a pre-defined
number by simp
Three-Party
Conference
Three parties can participate in one call to have a
three-party conference via telephones.
Transfer
ransfer the call to a
third party, so that the call is continued between the
other party and the third party. The party transferring
the call will exit the call.
Any party of an ongoing call can t
TCP
Transfer
Control
Protocol
A connection-oriented, reliable protocol that operates
on the transport layer.
TCP/IP
Transmission
Control
Protocol/Inter
net Protocol
Basic communications protocol suite for network
communications. TCP/IP defines a group of protocols
other than the TCP and IP protocols.
Unannounce
d Conference
To invite a third party into an unannounced
conference, you can dial the person’s number to
directly add him/her into the three-party conference
without asking whether the person is willing to
participate.
Unattended
Transfer
With unattended transfer, the call is transferred
without asking for the called party’s consent.
URI
Uniform
Resource
Identifier
A complete identifier of a resource on the Internet.
Unviewed
Missed Calls
Record of unchecked missed calls.
Page 68

User Manual
Aolynk EP302 IP Phone 8 Appendix – Glossary
61
Acronym Item Explanation
UDP
User
Datagram
Protocol
A connectionless-oriented protocol that operates on
the transport layer.
User
Directory
List of users and the corresponding telephone
numbers in a local network.
UI
User
Interface
Interfaces used for interactions between users and
the system.
VLAN
Virtual Local
Area Network
In brief, a VLAN is a broadcast domain that can form a
logical LAN across physical devices.
VAD
Voice Activity
Detection
VAD implements voice data analysis to distinguish
non-voice frames generated when the parties of the
call do not speak from voice frames generated when
the parties are speaking.
VoIP
Voice over
Internet
Protocol
IP telephone services that send voice information via
IP-based networks.
Volume
Control
This is to adjust the volumes output by components on
the telephone.
Warm Line
When a warmline number is configured on a phone, if
no key is pressed within a pre-defined period after the
handset is picked up, the phone will place a call to the
warmline number automatically.
 Loading...