

Page 1

OpticalBar USB
SimplyTouch
TM
make it interactive
User's Guide
Page 2

Copyright © 2003 h2i technologies S.A.. All rights reserved. SimplyTouch is a registered trademark of h2i technologies S.A. All other names and trademarks mentioned in this documentation belong to their respective owners.
H2i technologies S.A. and its suppliers decline a ll liability for any damage or losses resulting from the use of the
guide, the SimplyTouch Media Launcher software or the OpticalBar peripheral.
Page 3

Table of Contents
1. Welcome.......................................................................................... 5
2. Box Contents................................................................................... 6
3. Installation........................................................................................ 7
4. Using the Software for the First Time: Installing and Adjusting your
OpticalBar............................................................................................ 8
4.1. Positioning the OpticalBar....................................................................................8
4.2. Adjusting your Screen........................................................................................10
4.3. Positioning the Window......................................................................................10
5. The SimplyTouch Touch Palette.................................................... 11
6. Changing Shortcuts....................................................................... 12
6.1. Window Description............................................................................................13
6.2. Choosing an Action............................................................................................14
6.2.1. Starting an Application..............................................................................14
6.2.2. Opening a Document................................................................................16
6.2.3. Sending e-mail..........................................................................................17
6.2.4. Web Site ..................................................................................................17
6.2.5. Keyboard Shortcuts..................................................................................18
6.2.6. Standard Actions.......................................................................................19
6.3. Changing an Icon's Appearance........................................................................19
6.4. Validating Changes............................................................................................20
7. Preferences.................................................................................... 21
7.1. Advanced Options..............................................................................................22
8. Hardware Installed......................................................................... 25
9. Care and Contact Information........................................................ 26
9.1. Care During Use.................................................................................................26
9.2. Contact and Support Information.......................................................................26
Page 4

Page 5

English
OpticalBar User's Guide :: Welcome
1. Welcome
It's so easy to make your screen interactive with the SimplyTouch OpticalBar. The links
made available to you will simplify the use of your computer. Easier, faster and simpler,
are the advantages the OpticalBar brings you.
You will have 14 icons always ready for you to use, while others are made available to
you directly and a infinite number can be customized and configured as you please.
SimplyTouch :: 5
Page 6
OpticalBar User's Guide :: Box Contents
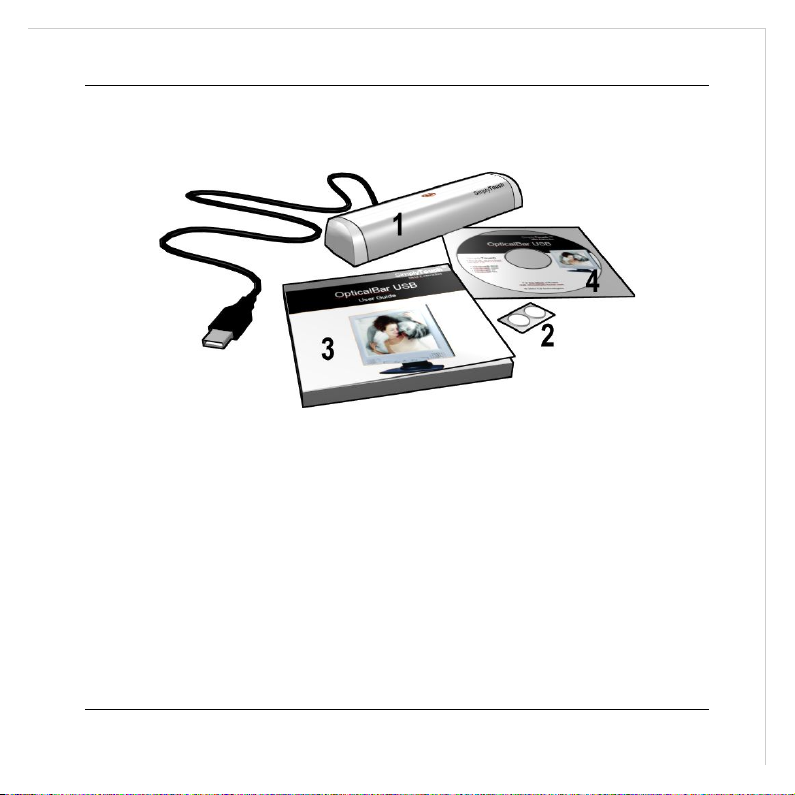
2. Box Contents
Your SimplyTouch OpticalBar box contains the following items:
1: OpticalBar USB
2: Adhesive pads
3: User guide
4: SimplyTouch Media Launcher software on CD-ROM
6 :: SimplyTouch
Page 7

English
OpticalBar User's Guide :: Installation
3. Installation
Insert the SimplyTouch Media Launcher CD-ROM into your drive. The software installation process should start automatically. If you have disabled the CD autorun function,
double-click on the My Computer icon, then on your CD icon to start the installation.
Then follow the step by step instructions on-screen.
SimplyTouch :: 7
Page 8
OpticalBar User's Guide :: Using the Software for the First Time: Installing and Adjusting your
OpticalBar
4. Using the Software for the First Time:
Installing and Adjusting your OpticalBar
As soon as the software is installed, it will guide you through the installation and configuration of your OpticalBar. Three steps must be completed before you can use your OpticalBar:
•
Correctly position it over the screen.
•
Adjust your screen if necessary.
•
Tell the software exactly where the OpticalBar is located.
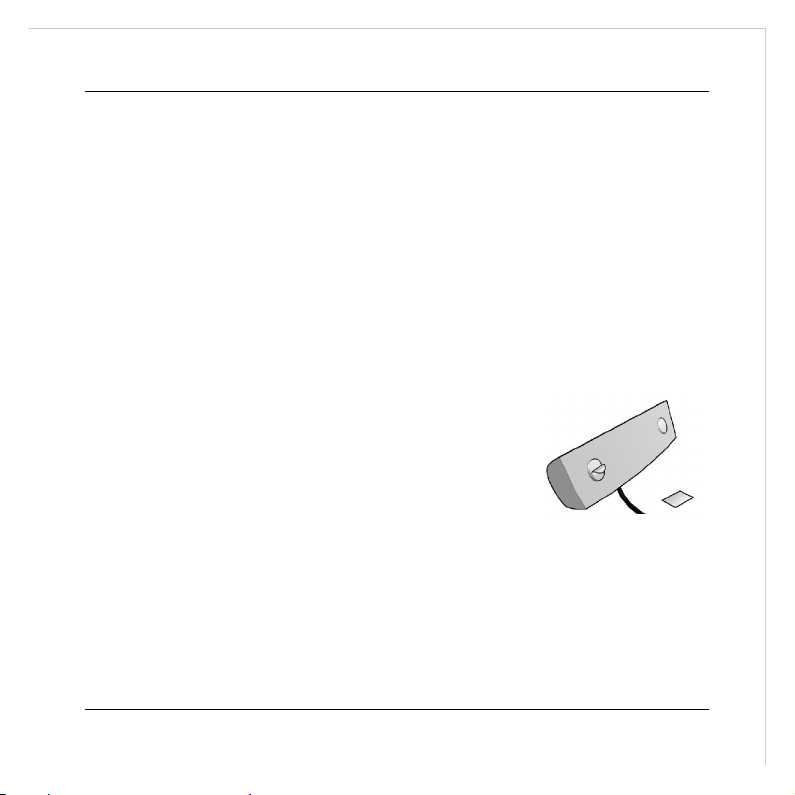
4.1. Positioning the OpticalBar
Use the self-adhesive pads to position the OpticalBar as
shown below:
· Position the adhesive pads on the back of the OpticalBar, then remove the protect-
ive film.
8 :: SimplyTouch
Page 9

English
OpticalBar User's Guide :: Using the Software for the First Time: Installing and Adjusting your
OpticalBar
· Mount the OpticalBar on the screen edge as follows:
· Right at the edge of the display area (but not on it)
· Parallel to the display area
•
Connect the OpticalBar to the USB port on your PC
SimplyTouch :: 9
Page 10

OpticalBar User's Guide :: Using the Software for the First Time: Installing and Adjusting your
OpticalBar
4.2. Adjusting your Screen
If the display area does not cover your entire screen, and especially if there are black
stripes at the top of your screen that are too wide, you will not be able to correctly position the shortcut window. Make sure that the distance between your OpticalBar and the
screen's display area does not exceed five millimeters. If not, you will have to adjust
your screen so that the display area occupies as much screen area as possible.
Once the screen is adjusted, press the “Next” button to move onto the next step.
4.3. Positioning the Window
This third step displays a positioning window.
Move this window so that it occupies the following position:
•
The left and right hand window edges must be aligned with the left and right hand
edges of the OpticalBar.
•
The lower edge of the window must be located three centimeters from the screen
casing.
To make adjustment easier, you can use the marker found at the back of this guide to
position the window.
Choose “Validate” to validate once the window is positioned.
10 :: SimplyTouch
Page 11

English
OpticalBar User's Guide :: The SimplyTouch Touch Palette
5. The SimplyTouch Touch Palette
The palette is split into five zones:
1, 2: the two shortcut bars
These two bars comprise the shortcuts that you have chosen. Point a finger at one of
these shortcuts and the related action (starting an Internet link, sending e-mail, starting
a program, etc.) will start immediately.
3: the message bar
The text displayed in this bar shows the action currently taking place.
4: The “Minimize” icon
This icon minimizes the palette on your screen. Simply point a finger in front of your
SimplyTouch optical bar and it will reappear.
5: The “Configure” icon
This icon lets you configure and change the shortcuts displayed in your palette.
SimplyTouch :: 11
Page 12

OpticalBar User's Guide :: Changing Shortcuts
6. Changing Shortcuts
To configure your palette, use your mouse to click on the icon. The following win-
dow appears below it:
First click on the palette, then on the icon you wish to change or configure. The window
will appear as shown on the next page.
12 :: SimplyTouch
Page 13

English
English
English
English
OpticalBar User's Guide :: Changing Shortcuts
6.1. Window Description
1. Action types
This zone lets you choose which action types will be triggered when you choose the selected icon.
2. Help
This window zone displays information reminding you what to do when configuring the
chosen icon.
3. Configuring the chosen action
This window zone is the one where you can configure the action that you have chosen.
4. Configuring the icon's appearance
SimplyTouch :: 13
Page 14

OpticalBar User's Guide :: Changing Shortcuts
This zone lets you choose the appearance that your icon will have on screen (see page
19).
6.2. Choosing an Action
To choose the action that will be assigned to the icon that you have chosen, click on the
desired action in the action bar.
Start an application: this type of action creates a shortcut that will directly
open any application, program or game (see page 15).
Open a document: to gain direct access to any of your documents (see page
16).
Send an E-mail: to quickly send an e-mail message to an addressee (see
page 17).
Go to a Web site: to access your favorite web sites or other Internet services
(see page 17)
Keyboard shortcut: to define “keyboard shortcut” type links like performing a
“Copy” action with its “Control+C” shortcut (see page 18).
Standard actions: so that you can directly use preset actions often used in
Windows, such as “Copy”, “Paste” or “Print” (see page 19).
14 :: SimplyTouch
Page 15

English
OpticalBar User's Guide :: Changing Shortcuts
6.2.1. Starting an Application
When you choose the “start an application” action, the action configuration zone looks
like this:
You have three choices, depending on the button you choose:
•
“My applications...”: This button lets you choose from among the applications installed just for you and not for other computer users.
•
“Common applications...”: This button lets you choose from among the applications
installed for all computer users.
•
“Browse...”: This button lets you browse your computer's directory; you can use it if
you know exactly where the application you wish to start is located.
The “Advanced options...” button provides access to advanced options for users who
wish to run an application in a specific way:
SimplyTouch :: 15
Page 16

OpticalBar User's Guide :: Changing Shortcuts
•
“Open application window”: lets you configure how the window will open when the
link is activated: normal, maximized or minimized.
•
“Program parameters”: lets you specify parameters which will be sent to the program.
6.2.2. Opening a Document
When you choose the “open a document” action, the action configuration zone looks
like this.
You have two choices, depending on which button you choose:
16 :: SimplyTouch
Page 17

English
OpticalBar User's Guide :: Changing Shortcuts
•
“A document...”: lets you browse a list of your files; the application will open the
corresponding document.
•
“A folder...”: lets you browse the folders; the application will open an explorer
within the selected folder.
6.2.3. Sending e-mail
When you choose the “send an e-mail” action, the action configuration zone looks like
this:
Type the required e-mail address in the “Recipient” field.
6.2.4. Web Site
When you choose the “Start a web site” action, the action configuration zone looks like
this:
SimplyTouch :: 17
Page 18

OpticalBar User's Guide :: Changing Shortcuts
Type the address of the web site you wish to open in the “Web” field. If you would like to
open another kind of Internet address (FTP for example), choose the “Other” button and
type the required address in the corresponding field.
6.2.5. Keyboard Shortcuts
You can assign a keyboard sequence (keyboard shortcut) to an icon in the bar. When
you choose the “Keyboard shortcut” action, the action configuration zone looks like this:
To assign a keyboard shortcut to an icon in the palette that you have chosen, click on
“Type a shortcut”, then enter your key sequence from the keyboard.
18 :: SimplyTouch
Page 19

English
OpticalBar User's Guide :: Changing Shortcuts
6.2.6. Standard Actions
The so-called standard actions comprise actions that are common to a number of programs, such as Cancel, Copy, Paste, Print, Save, etc. When you choose the “Standard
actions” action, the action configuration zone looks like this:
Click on the action you would like to assign to the chosen icon.
6.3. Changing an Icon's Appearance
For each of the actions described above, there is an “Appearance” box under the action
box that looks like this:
It lets you change the appearance of the corresponding icon.
Three options are available:
SimplyTouch :: 19
Page 20

OpticalBar User's Guide :: Changing Shortcuts
•
Automatic: Lets the application automatically choose a description text and/or picture.
•
Text: Enter a text to briefly describe your shortcut. This text will be displayed in the
center of the palette when you activate it and in the shortcut button if no picture is
assigned.
•
Image: Click on the “Browse...” button to browse the list of pictures available for display in the shortcut button.
6.4. Validating Changes
Once you have finished configuring one of the programmable shortcuts, you can configure a new shortcut by clicking on its icon in the palette and by proceeding as described
above.
Once the required changes have been made, you can validate all of the changes by
choosing the OK button or return to the previous palette status by choosing the Cancel
button.
20 :: SimplyTouch
Page 21

English
OpticalBar User's Guide :: Preferences
7. Preferences
Just like for shortcuts, you can also customize the behavior and the appearance of the
palette itself. To customize the palette, choose the icon, then click on the “Prefer-
ences” tab.
•
Palette options: use these options to change palette visibility.
•
Hide automatically: automatically hides the palette which disappears from the
screen after a set number of seconds.
SimplyTouch :: 21
Page 22

OpticalBar User's Guide :: Preferences
•
Transparency: lets you set the palette transparency level. If the cursor is not all the
way to the left (“Opaque”), it will be possible to see through the palette. Note than a
completely invisible palette will be invisible.
•
Background: palette dressing uses background pictures to decorate the palette. You
can use the default dressing provided by the palette or use your own pictures.
Choose “Use a background” to activate this function and “Browse...” to browse al-
ternative dressing pictures.
•
Advanced settings: (for advanced options, see below).
•
Alignment: This button repeats the configuration and alignment procedure which is
run when the program is used for the first time. You can use this function if you think
that the palette was not correctly aligned when it was used for the first time or if you
have moved your OpticalBar.
•
Exit application: This button lets you quit the SimplyTouch Media Launcher. Note
that if you quit the application, you cannot recall the palette simply by pointing a finger in front of the OpticalBar; you will first need to restart the application to access
your links and shortcuts.
7.1. Advanced Options
The so-called “advanced” configuration options are options reserved for advanced users. The following options are available.
22 :: SimplyTouch
Page 23

English
English
English
English
OpticalBar User's Guide :: Preferences
•
“Run at Windows startup”: chosen by default, disabling this option means that the
application will not start automatically when Windows starts.
•
“Show icon in system tray”: by default, a SimplyTouch icon appears in the taskbar.
Disable this option if you do not want to see this icon.
•
“Ask before Exiting application”: By default, the application prompts you to confirm
when quitting the application. Disable this option if you do not want to eliminate this
message.
•
“Ask before discarding Shortcuts changes”: By default, the application prompts you
to confirm when you cancel any changes made to the shortcuts. Disable this option
if you do not want to eliminate this message.
SimplyTouch :: 23
Page 24

OpticalBar User's Guide :: Preferences
•
“Ask before discarding Setting changes”: By default, the application prompts you to
confirm when you cancel the changes made to palette preferences. Disable this option if you do not want to eliminate this message.
•
“LED Mode”: Lets you configure or disable the blinking of the LED that lights the OpticalBar.
24 :: SimplyTouch
Page 25

English
OpticalBar User's Guide :: Hardware Installed
8. Hardware Installed
Choose the “Hardware” tab to see the list of SimplyTouch hardware connected to your
computer. You may be asked to provide this information if you contact technical support.
SimplyTouch :: 25
Page 26

OpticalBar User's Guide :: Care and Contact Information
9. Care and Contact Information
9.1. Care During Use
Due to the optical technology that it uses, this product cannot work if the lighting conditions are too intense, such as for example when subject to direct sunlight. Lighting that
is too intense will not cause damage to the system, simply move it to another location
where lighting conditions are less intense and it will return to normal operation.
In compliance with USB standards, this product must be directly connected to a microcomputer or to a USB hub. Using extension cables is not at all advisable and is not supported; this may interfere with correct equipment operation and cause electromagnetic
interference.
9.2. Contact and Support Information
H2i technologies S.A.
125, rue de l'Hostellerie
30900 Nîmes
France
Sales contact: contact@h2i-technologies.com
Technical contact (hotline): support@h2i-technologies.com
26 :: SimplyTouch
 Loading...