

Gude Expert PDU Energy 8311 Series Manual
Manual
Expert PDU Energy 8 311 Series
© 2017 Gude Analog- und
Digitalsysteme GmbH
Manual Ver. 1.0.0
from Firmware Ver. 1.0

2
Expert PDU Energy 8311 © 2017 Gude Analog- und Digitalsysteme GmbH

Table of contents
1. Device De scription 5
1.1 Secu r i t y Ad v ic e .............................................................................................................. 6
1.2 Conten t of Deliv er y ........................................................................................................ 6
1.3 Description ..................................................................................................................... 6
1.4 Installation ...................................................................................................................... 7
1.5 Techn i c al S pecification s ................................................................................................ 8
1.5.1 Electrical Measuremen t ........................................................................................... 8
1.6 Sensor ............................................................................................................................. 9
2. Operating 11
2.1 Opera t i n g t he dev ic e directly ..................................................................................... 12
2.2 Contr ol Panel ................................................................................................................ 13
2.3 Maintenance ................................................................................................................ 13
2.3.1 Mainten ance Page ................................................................................................. 15
2.3.2 Configuration Management ................................................................................... 17
2.3.3 Boot loader Activation ............................................................................................. 18
3. Configuration 20
3.1 Ethernet ........................................................................................................................ 21
3.1.1 IP Addr ess ............................................................................................................... 21
3.1.2 IP ACL ..................................................................................................................... 23
3.1.3 HTTP ....................................................................................................................... 24
3.2 Protocols ....................................................................................................................... 25
3.2.1 Console ................................................................................................................... 25
3.2.2 Syslog ..................................................................................................................... 26
3.2.3 SNMP ...................................................................................................................... 26
3.2.4 Radius ..................................................................................................................... 28
3.2.5 Mo dbu s TCP ........................................................................................................... 29
3.3 Sensors .......................................................................................................................... 30
3.4 E-Mail ............................................................................................................................ 32
3.5 Front Panel ................................................................................................................... 33
4. Specifications 34
4.1 IP ACL ............................................................................................................................ 35
4.2 IPv6 ................................................................................................................................ 35
4.3 Radius ............................................................................................................................ 36
4.4 Aut omated A ccess ....................................................................................................... 36
4.5 SNMP ............................................................................................................................ 37
4.5.1 Device MIB ............................................................................................................. 39
4.6 SSL ................................................................................................................................. 41
3
Expert PDU Energy 8311 © 2017 Gude Analog- und Digitalsysteme GmbH

Table of contents
4.7 Console .......................................................................................................................... 43
4.7.1 Cmd 8311 ............................................................................................................... 45
4.8 Modbus TCP .................................................................................................................. 50
4.9 Messages ....................................................................................................................... 54
5. Support 5 6
5.1 Data S ec urit y ................................................................................................................ 57
5.2 Contact .......................................................................................................................... 57
5.3 Declaration o f Con fo r mity .......................................................................................... 58
5.4 FAQ ................................................................................................................................ 59
Index
60
4
Expert PDU Energy 8311 © 2017 Gude Analog- und Digitalsysteme GmbH

Device Description

Device Description
1 Device De scription
1.1 Security Advice
·
The device mus t be installed only by qualified personnel acc ording to the following installation and operating instructions.
·
The manufac turer does not acc ept responsibilit y in cas e of improper use of the devic e
and particularly any us e of equipment that m ay cause personal injury or material damage.
·
The device c ontains no user-maintenable parts. A ll maint enance has to be performed
by factory trained servic e personnel.
·
This devi c e contains potentially hazardous voltages and should not be opened or disassembled.
·
The device c an be connected only to 230V AC (50 Hz or 60 Hz) power supply s oc kets.
·
The power cords, plugs and sock et s have to be in good condition. Always connect the
device t o properly grounded power sock et s .
·
The device is intended for indoor use only. Do NOT install t hem in an area where excessive m ois t ure or heat is present.
·
Because of safety and approval issues it i s not allowed to modify the device without
our permiss ion.
·
The device is NOT a toy . It has to be used or st ored out or range of children.
·
Care about packaging material. Plasti c s has t o be st ored out of range of children.
Please recycle the packaging materials.
·
In case of further questions, about inst allat ion, operation or usage of the device, which
are not c lear after reading the manual, please do not hesitate to ask our support team.
·
Please, never leave connected equipment unattended, that can cause damage.
·
Connect only elect rical devic es t hat do not have limited on-time. I.e. i n c as e of failure,
all connected appliances have to cope with a continuous on-time without causing
damage.
1.2 Content of Delivery
The package includes:
·
Expe rt PDU Energy 8311
·
CD-ROM with Manual and Softwaretools
1.3 Description
The Expe rt PDU Energy 8311 multiple sock et outlet with 7 load outputs. The devi c e
has the following features:
·
Metering of energy, c urrent, power factor, phase angle, frequency, voltage and active/apparent/reactive power
·
Two energy meters, one meters c ontinously , the other energy meter is reset t able
·
Measurement of residual current type A (model 8311-2).
6
Expert PDU Energy 8311 © 2017 Gude Analog- und Digitalsysteme GmbH
Device Description
·
Illuminated two-line LCD display
·
Interface for optional s ensors for environmental monitoring (temperature and humidity)
·
Easy c onfiguration by web browser, W indows or Linux tool
·
Firmware update via Ethernet during operation
·
Generation of messages (e-mail, Syslog and SNMP traps) and relay switching depending on the energy measurement limits, resp. ex t ernal sensors
·
IPv6 ready
·
HTTP/HTTPS , e-mail (SSL, S TARTTLS), DHCP, S yslog
·
SNMPv1, v2c, v3 (Get/Traps)
·
TLS 1.0, 1. 1, 1.2
·
Radius and Modbus TCP protocol s upported
·
Console Commands with telnet s upport.
·
IP Acc es s Control List
·
Low internal power consumption
·
Developed and manufactured in Germany
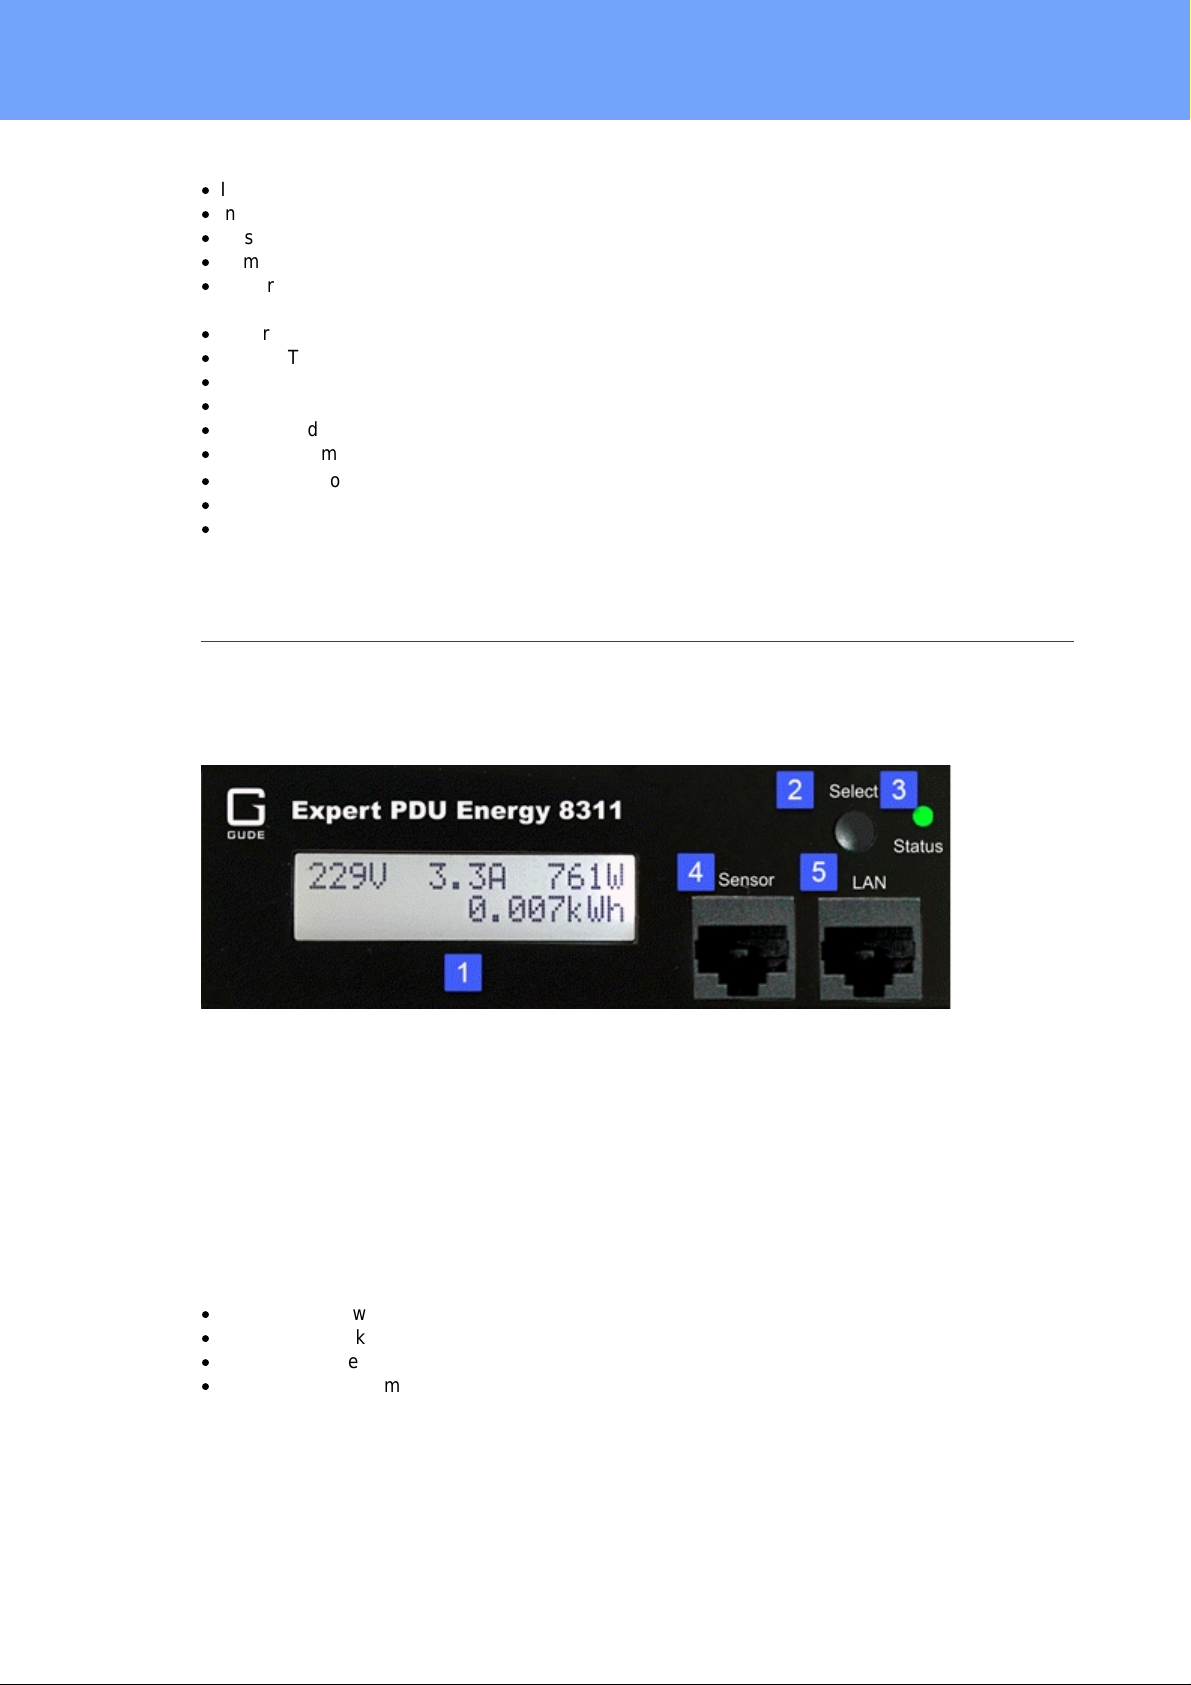
1.4 Installation
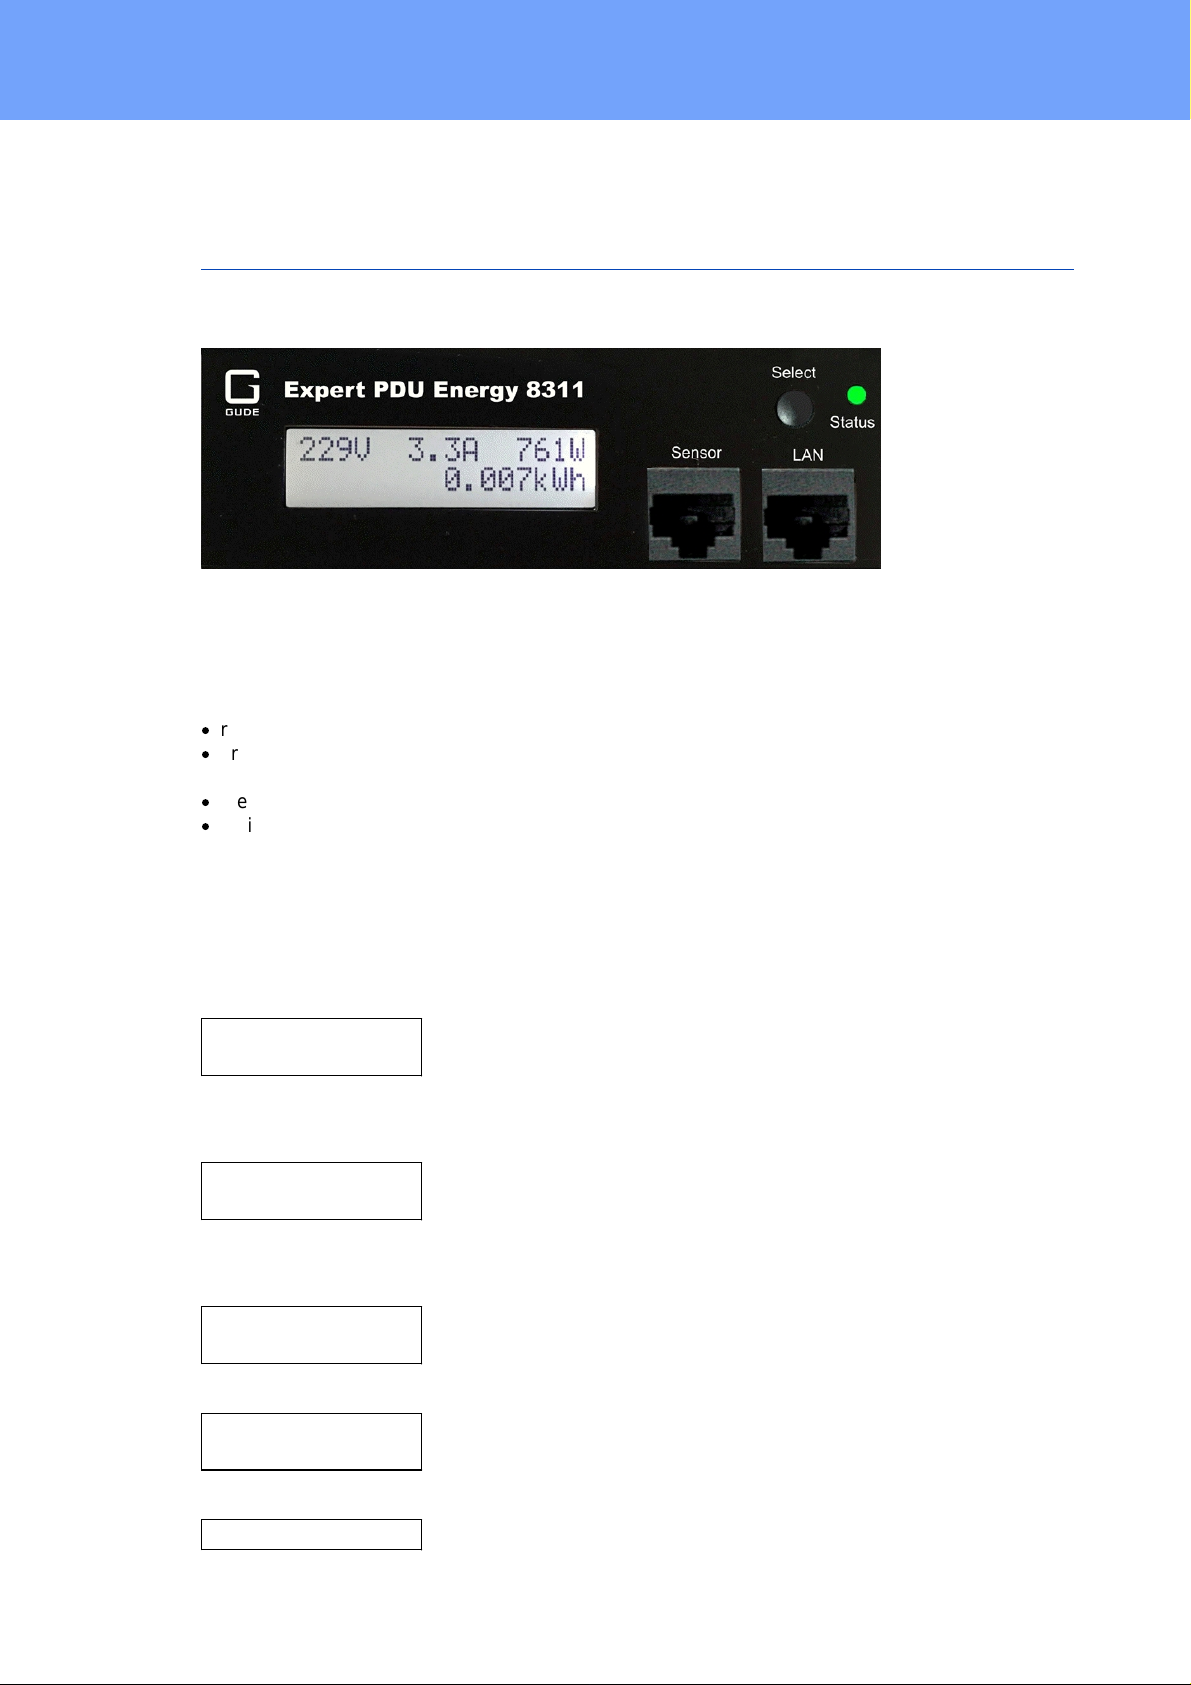
1. Illuminated two-line LCD display (16 x 2)
2. Butt on "Select"
3. St atus LED
5. Ex t ernal sensor connector (RJ45)
6. Et hernet connector (RJ45)
Start-up the device
·
Connect the power cord (CEE 7/4, max. 16 A) to the mains supply.
·
Plug the network cable into the Ethernet connector (RJ45).
·
Insert optional ext ernal sensor into the sensor connector.
·
Connect the consumers to t he protective soc k et s (CEE 7/3, max . 16 A).
7
Expert PDU Energy 8311 © 2017 Gude Analog- und Digitalsysteme GmbH

Device Description
Interfaces
1 x Ether net connector (RJ45)
1 x Mains s upply (CEE 7/3 type F,
max.16 A)
1 x Ex t ernal sensor connector (RJ45)
7 x Load outputs (CEE 7/3 ty pe F, max.
16 A)
Network c onnectivity
10/100 MBit/s 10baseT E thernet
Protocols
TCP/IP, HTTP / HTTPS, S NMP v1/v2c/ v3,
SNMP t raps, S yslog, E -Mail (SMTP)
Power Supply
internal power supply (90-265V AC / -
15% / + 10%)
Environment
·
Operating temperature
·
Storage temperature
·
Humidity
0°C - 50 °C
-20°C - 70 °C
0% - 95% (non-condensing)
Case
aluminium / plast ic
Measurements
19" (inches), 1 Rack Unit,
depth: 4,4 cm
Weight
approx. 1.5 k g
1.5 Technical Spec if ications
1.5.1
Elect r ic a l Measur ement
typical fault tolerances for Ta=25°C, I=1Arms...16Arms, Un=90Vrms...265Vrms
Expert PDU Energy 8311 © 2017 Gude Analog- und Digitalsysteme GmbH
8
Device Description
Electrical Me asurement Spe ci fication
Category
Range
Unit
Resolution
Inaccuracy
(typical)
Voltage
90-265
V
0.01
< 1%
Current
0 - 16
A
0.001
< 1.5%
Frequency
45-65
Hz
0.01
< 0.03%
Phase
-180 - +180
°
0.1
< 1%
Active power
0 - 4000
W1< 1.5%
Reactive power
0 - 4000
Var1< 1.5%
Apparent power
0 - 4000
VA1< 1.5%
Power factor
0 - 1-0.01
< 3%
Energy Counter
Active E nergy
(total)
9.999.999,999
kWh
0.001
< 1.5%
Active E nergy
(temporary)
9.999.999,999
kWh
0.001
< 1.5%
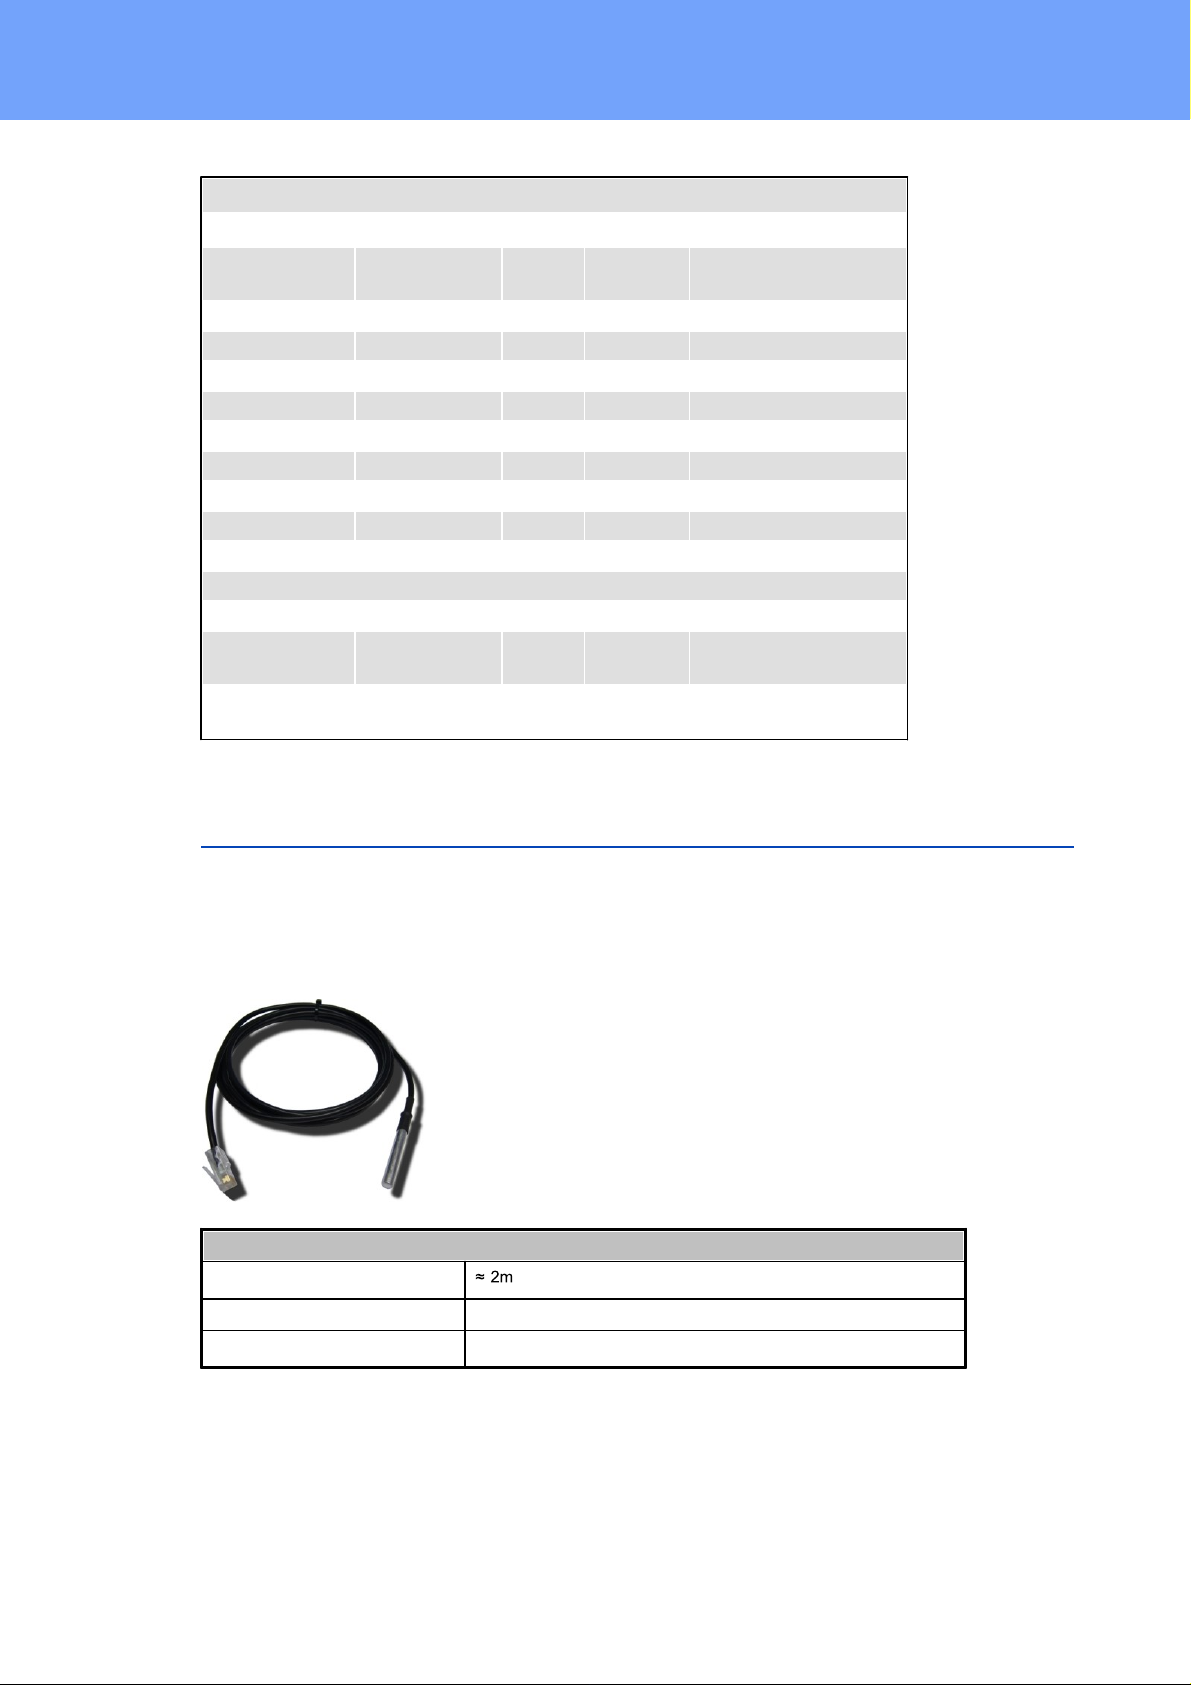
Temperature-Sensor 7101
Cable length
Connector
RJ45
Measureme nt range
-20°C to +80°C at ±2°C (maximu m) and ±1°C (typical)
1.6 Sensor
Two external sensors can be connected to the Expert PDU Energy 8311. The following
sensors are currently available
9
Expert PDU Energy 8311 © 2017 Gude Analog- und Digitalsysteme GmbH
Device Description
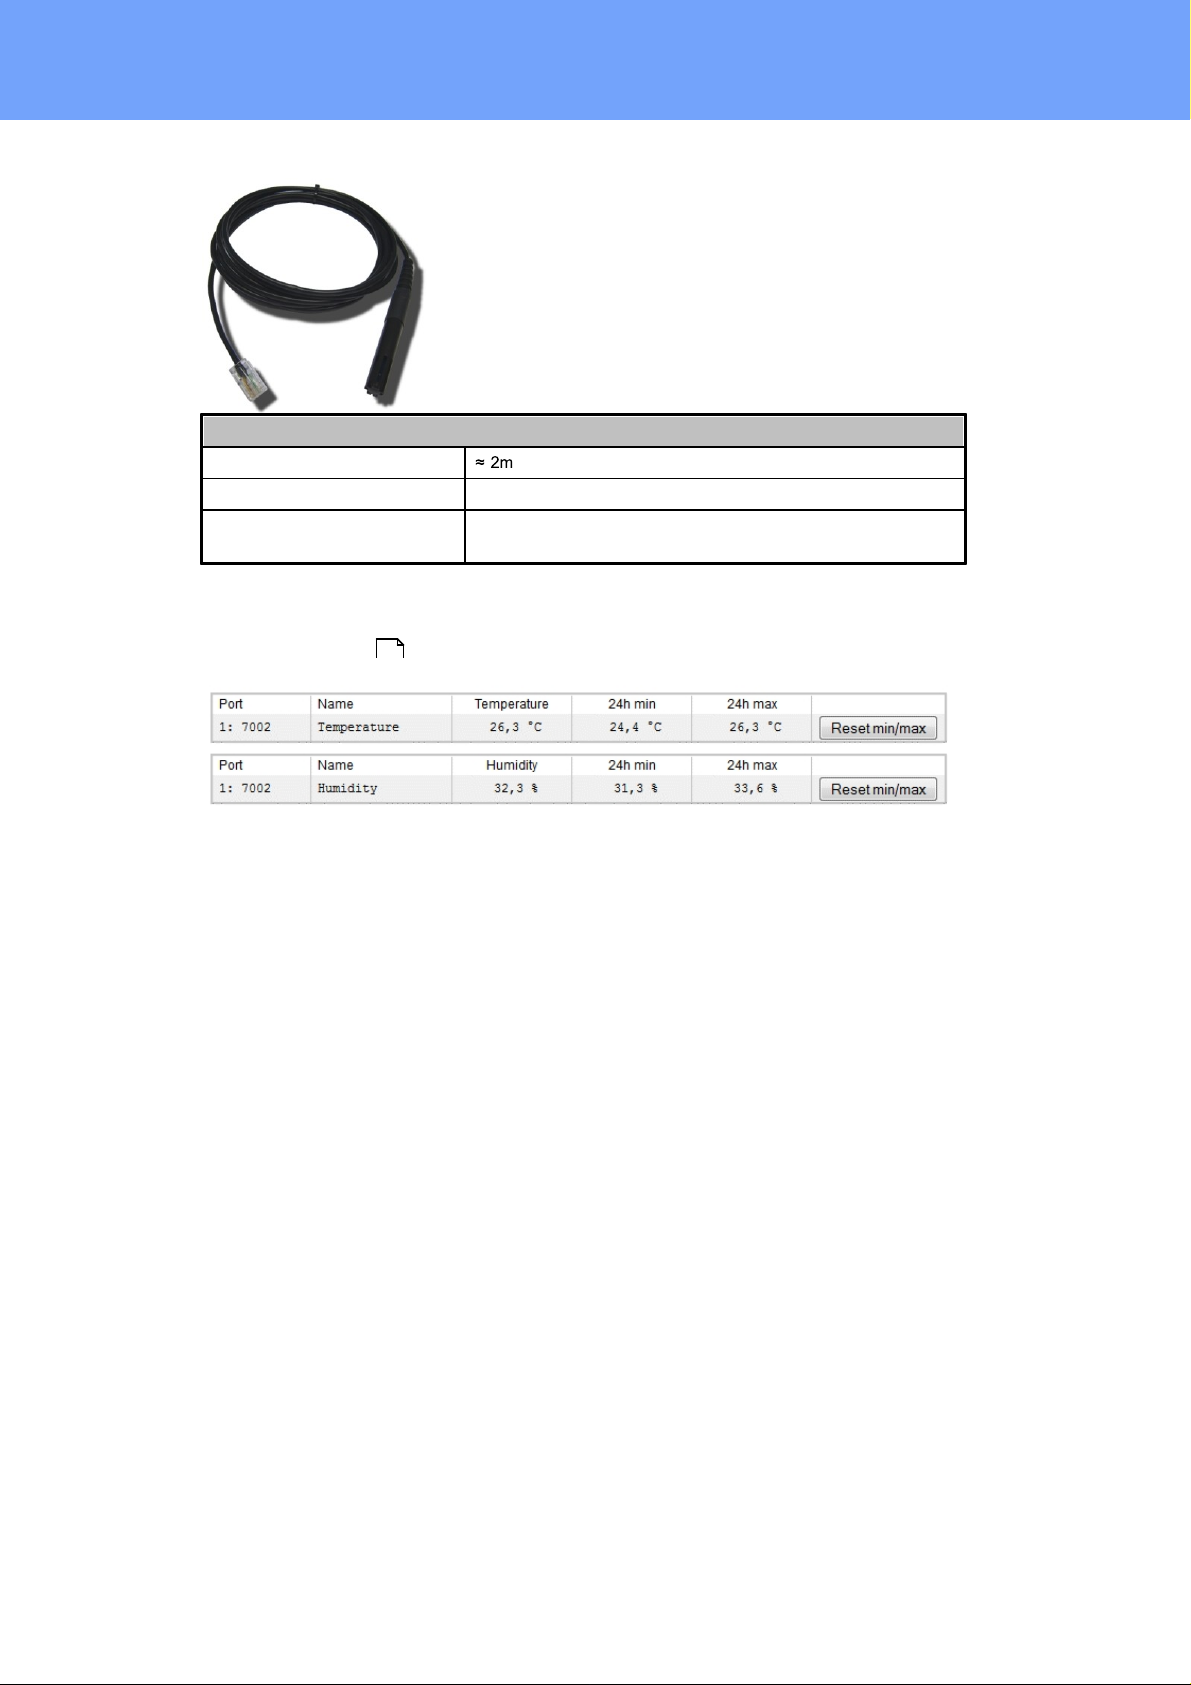
Humidity/Temperature-Sensor 7102
Cable length
Connector
RJ45
Measureme nt range
Temp: -20 to +80°C, ±0,5°C (maximum) and ±0,3°C (typical)
Humidi t y: 0-100%, ±3% (maximum) and ±2% (typical)
The sensors are automatically detec t ed after connect . The sensor values are displayed
at the Control Panel web page:
9
Expert PDU Energy 8311 © 2017 Gude Analog- und Digitalsysteme GmbH
10

Operating
Operating
228V 0.0A 0W
0.000kWh
The normal energy display. There, voltage, current and
power are output in the upper line. The lower line shows
the energy c onsumed. A fter 5 seconds of waiting time,
all displays return to this view.
7:48:59 h:m:s
0.000kWh
This shows the energy meter in the bottom line and the
time interval i n t he upper line. The values ??are stored in
the EEP ROM every 5 minutes or every 0. 1 k Wh and are
thus retained even during a power failure.
VRMS 225.3V
IRMS 0.000A
Voltage
Current
Residual AC rms
0.0mA
Residual Current
Active 0W
Active P ower
2 Operating
2.1 Operating the de vice directly
Status-LED
The Status LE D shows t he different states of the device:
·
red: The device is not connected to the Ethernet.
·
orange: The device is connected to t he Et hernet and waits for data from the DHCP
server.
·
green: The devic e is connected to t he Et hernet and the TCP/ IP s ett i ngs are allocated.
·
periodic blink ing: The devi ce is in B ootloader mode.
Display indicators
By pressi ng the "select" butt on, various information and measured values c an be displayed on the display. Eac h t im e y ou press the button, a new page appears on the LCD:
Expert PDU Energy 8311 © 2017 Gude Analog- und Digitalsysteme GmbH
12
Operating
Reactive 0VAR
Reactive P ower
Apparent 0VA
Phase -83.5deg
Apparent Power
Phase Angle
Freq 50.02Hz
Powerfact -0.3
current Frequ ency
Power Fact or
PDU 8311
192.168.1.123
Product name
IP address
PHY state
100mb fullduplex
PHY state
Firmware 1.0.0
MAC:001932003f09
Firmware version number
MAC Et hernet address
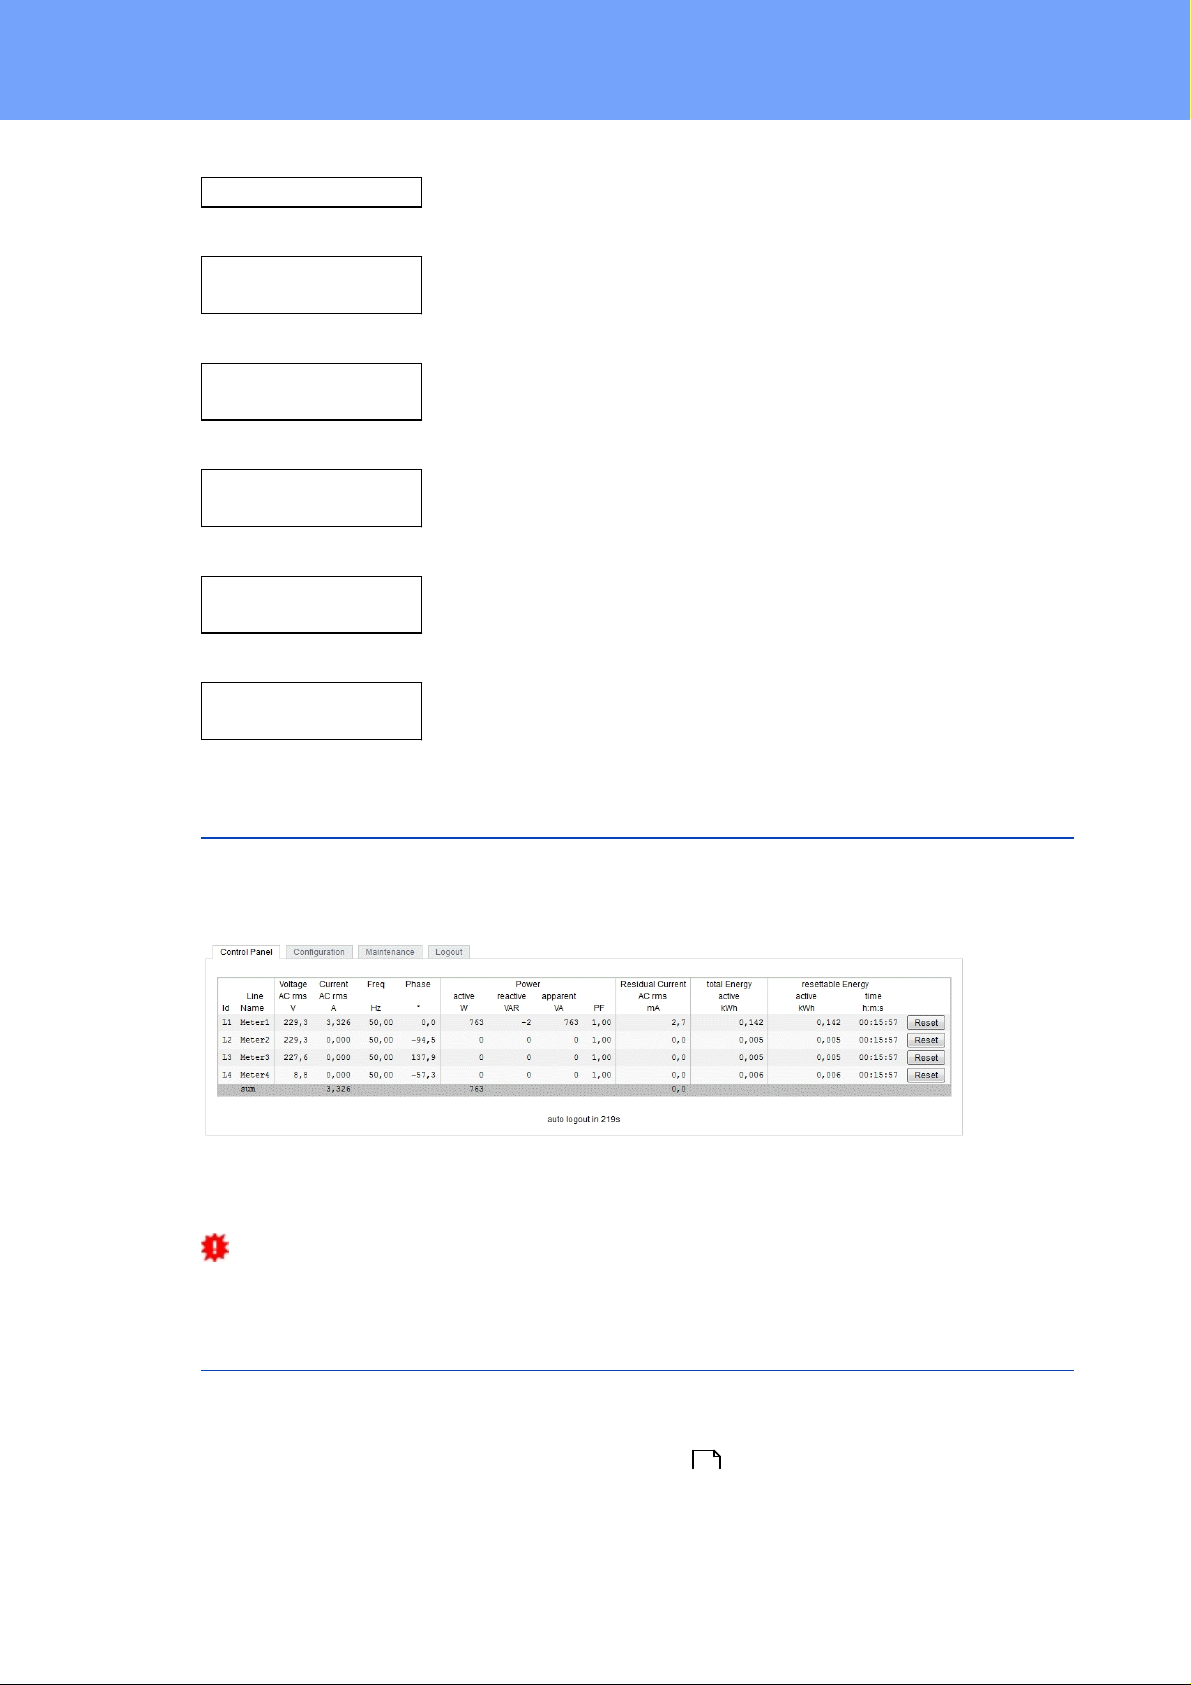
2.2 Control Pane l
Access the web interface: htt p: / /"IP-address" and log-in.
The web page provides an overview of the energy measurement values of all phases , as
well as the external sensors, provided that they are connected.
The column "Residual Current" is only visible on models that support this feature.
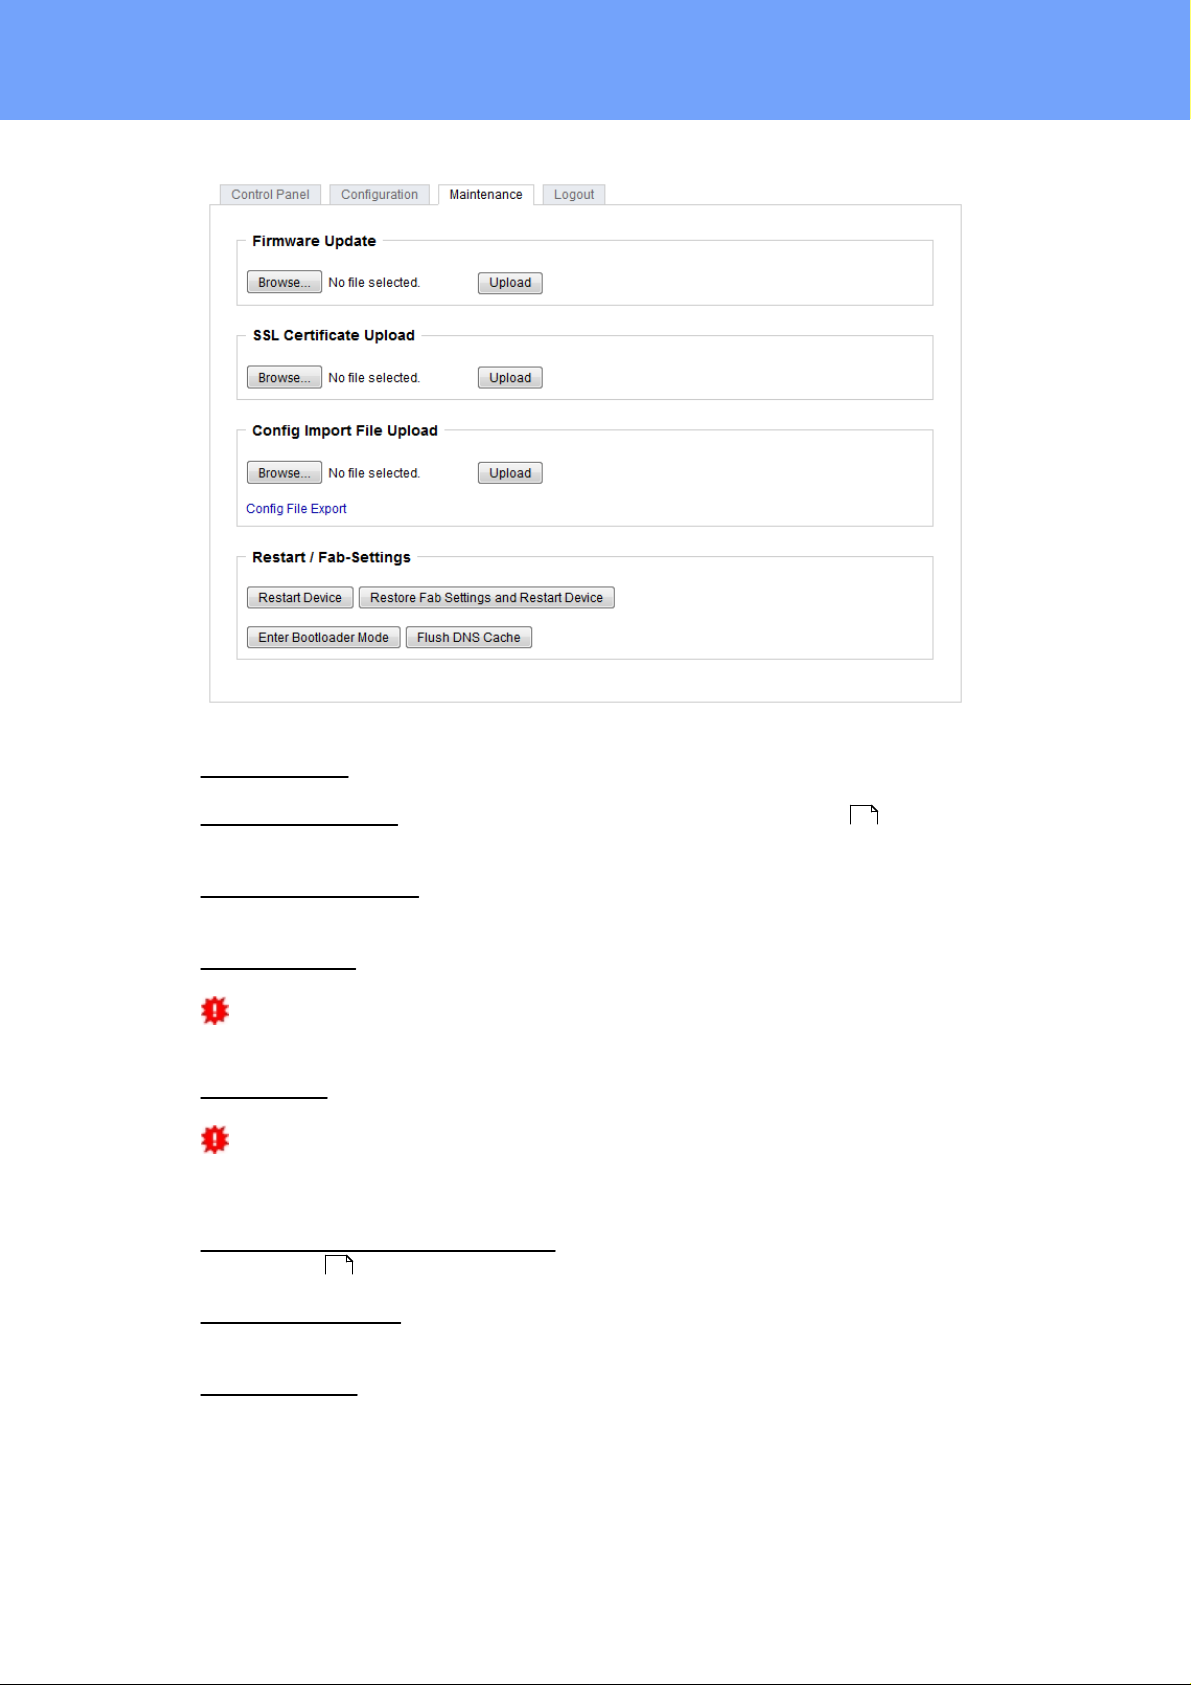
2.3 Maintenance
13
Expert PDU Energy 8311 © 2017 Gude Analog- und Digitalsysteme GmbH
The actual devic e generation with IPv6 and SSL allows all maintenance functions in the
web interface to be carried out on the Maintenance Page .
15
Maintenance in the web interface

Operating
The following functions are available from the maintenance web page:
·
Firmware Update
·
Change the SSL certificate
·
Load and save the c onfiguration
·
Restart the devic e
·
Factory Reset
·
Jump into the Bootloader
·
Delete the DNS cac he
Upload Firmware, Certificate or Configuration
On the Maintenance Page , selec t the required fi le with " B rowse .. " i n t he sec t i ons
"Firmware Update", "S SL Certificate Upload" or "Config Import File Upload" and press
"Upload". The file is now transferred to the update area of the devic e and the contents
are checked. Only now, pressing the "A pply " button will permanently update the data, or
abort with " Cancel".
Only one upload funct ion c an be initiated with a reboot, eg. you cannot transmit firm-
ware and configuration at t he s ame ti me.
If after a firmware update, the web page is not displayed c orrectly any more, this may
be related to the interacti on of Javascript with an outdated browser cache. If a Ctrl-F5
does not help, it is recomm ended that you manually delete the cache in the browser options. A l t ernatively , you c an tes t start t he browser in "privat e mode".
15
Acti ons i n Bootloader mode
If t he web interfac e of the device is no longer acces sible, the device can be put into
Bootloader mode (see chapter Bootloader activat ion ). The following funct ions c an be
executed using the GBL_Conf.exe application:
·
Set IPv4 address, net-mask and gateway
·
Turn HTTP password on and off
·
Turn IP-ACL on and off
·
Factory Reset
·
Jump into the bootloader (can be switc hed on and off)
·
Restart the devic e
18
For devices with relays , entering or exiting the bootloader mode does not c hange
the st ate of the relays as long as t he operating voltage is maintained.
The GBL_Conf.exe program is available free of charge on our website www.gude.info and
can also be found on the enclos ed CD-ROM.
14
Expert PDU Energy 8311 © 2017 Gude Analog- und Digitalsysteme GmbH
Operating
Interface GBL_Conf
To check the network settings with GBL_Conf.exe, start the program and choose "All
Devices" in the "Search" menu. From the lis t selec t the appropriate devic e. The lower
part of the left half of the window now shows the current network s ettings of the device. If
the IP address i s dis play ed with the default s et t ings (192.168.0.2), either no DHCP
server is present on the network, or there could be no free IP address ass i gned to it.
·
Activate the Bootloader Mode (see Chapter Bootloader Mode) and choose in menu
"Search" t he it em " B ootloader-Mode Devices only"
·
Enter the desired settings in the edit window and save them with "Save Config".
·
Deactivat e the boot loader mode for the changes to take effect. Select again "All
Devices" in the "Search" menu of GBL_Conf .exe.
The new network configuration is now displayed.
Factory Reset
The device can be reset to the factory default via t he web interface from the Maintenance
15 18
Page or f rom the Bootloader mode (see chapter Bootloader act ivation ). All TCP/IP
sett ings are reset in this operation.
If a unit is s et to factory defaults, an uploaded certificate or updated firmware will be
preserved.
2.3.1
Maint en a n c e Page
This section provides access to important functi ons such as Firmware Update or Rest art
Device. It is advis able to s et an HTTP password for this reason.
15
Expert PDU Energy 8311 © 2017 Gude Analog- und Digitalsysteme GmbH
Operating
Firmware Update: S tart a firmware update.
SSL Certificate Upload: S aves y our own SS L c ertificate. S ee c hapter "SSL " for the
generation of a certificate in t he right format.
Config Import File Upload: Loads a new confi guration from a text file. To apply t he new
configuration, a "Restart Device" must be executed after the "Upload".
Config Fil e Export: Saves the c urrent configuration in a text file.
Saving the configuration should only be c arried out in an SS L c onnection, since it
contains sensitive password information (even if it is encrypted or hashed).
Restart Device: Rest arts the device without changing the status of the relays.
Some functions s uch as a firmware update or changing of the IP-address and HTTP
sett ings require a restart of the device. A j ump to t he boot loader or a restart of the
device lead by no means to a change of the relay st at es .
Restore Fab Settings and Restart Device: Performs a restart and resets t he devic e t o
factory default .
Enter Bootloader Mode: Jumps into bootloader mode, where additional settings can be
made with GBL_Conf.exe.
19
42
Flush DNS Cache: All entries in t he DNS cache are discarded and address resolutions
are requested again.
16
Expert PDU Energy 8311 © 2017 Gude Analog- und Digitalsysteme GmbH

Operating
2.3.2
Configu ratio n Management
The device configuration can be saved and restored in the maintenance area .
The "Confi g File E xport" function can be used to save t he current configuration as a text
file. The syntax us ed in the configuration file corresponds to t he comm ands of the Telnet
console. If the configuration of a devi c e is to be restored from a text file, load the file with
"Upload" and restart the device with "Restart Device".
Saving the configuration should only be c arried out in an SS L c onnection, since it
contains sensitive password information (even if it is encrypted or hashed). For the same
reasons, it i s advi s able to c arefully handle the generated configuration files when archiving.
15
Editing the configurati on fi le
It is poss i ble to c us tomize a s aved configuration file with a text edit or for your own
needs. For example, one sc enario would be to use a script language to automate t he
creation of many c us t omi z ed versions of a configuration, then equip a large number of
devices wit h an individualized configuration. A lso Upload and rest art with CGI commands
can be done in sc ripting languages. Wit h use of the comment s i gn "#" y ou c an quick ly
hide single commands or add personal notes .
If you modify a c onfiguration file manually, it is not always c l ear which limits are allowed
for parameters. A fter uploading and restarting, commands with invalid parameters are ignored. Therefore, the generated configuration includes comments describing the boundaries of the parameters. Where "range:" refers to a numeric value, and "len:" t o a t ex t
parameter. E. g:
email a u th set 0 #rang e : 0..2
email u s er set "" #len : 0 . .100
The command "syst em fabsettings " from the beginning of a generated configuration file
brings the device into t he factory state, and then executes the individual commands that
modify the configuration state. It may be desirable to make the changes relative t o t he
current configuration, and not out of the fact ory state. Then the "s yst em fabsetti ngs"
should be removed.
Confi gurati on via Tel net
The configuration files can in principle also be transferred in a Telnet session, but then
the sett i ngs are changed during operation, and not c ompletely when restarting, as it
would have been the case with an upload. It can happen that events are triggered at the
same tim e as t he devic e is configured. One should therefore:
a) dis able the function
17
Expert PDU Energy 8311 © 2017 Gude Analog- und Digitalsysteme GmbH

Operating
b) c ompletely parametrize
c) reactivate the funct i on
An example:
email e n abled s et 0
email s e nder se t "" #le n: 0..1 00
email r e cipien t s e t "" #le n: 0..1 00
email s e rver se t "" #le n: 0..1 00
email p o rt set 25
email s e curity set 0 #r ange: 0 ..2
email a u th set 0 #rang e : 0..2
email u s er set "" #len : 0 . .100
email p a sswd ha sh set " " #len: 0 . .100
email e n abled s et 1 #ra nge: 0. .1
2.3.3
Bootload er A c t ivation
The configuration of the device from the application "GBL_Conf. ex e" is only poss ible, if
the device is in Bootloader Mode.
Acti vat i on of t he Bootloader Mode (1-Button)
1) via push button:
·
Press and hold the button for 3 seconds until t he St at us LED flashes s lowly. If a display is available, "Press again to jump to BOOTLOADER" appears. Then briefly press
the button again to activate the boot loader, or if you wait 3 s ec onds ins tead, the
device returns to t he initial state.
2) or
·
Remove the power supply
·
Hold down the "Select" button. If the push button is reces sed, use a pin or paper clip
·
Connect the operating voltage
3) by Software: (only if "Enable FW t o B L" was previously acti vated in the
"GBL_Conf.exe" applicati on)
·
Start t he "GB L_Conf.exe" program
·
Do a network search with the "Search" menu acti on
·
Activ a te in menu "Program Device" the item "Enter Bootloader"
4) via web interface:
Press "Enter Bootloader Mode" on the maintenance web page.
Whether the device is in Bootloader mode, is indicated by t he flashing of the st atus
LED, or it is shown in "GB L_Conf.exe" applicati on after a renewed device s earch (appendix " B OOT-LDR" after the devic e name). In Bootloader mode the program
"GBL_Conf.exe" c an disable the pass word and the IP ACL, perform a firmware update,
and rest ore the fact ory s et t i ngs.
15
18
Expert PDU Energy 8311 © 2017 Gude Analog- und Digitalsysteme GmbH

Operating
For devices wit h relays, entering or exiti ng the bootloader mode does not change the
stat e of the relays as long as t he operating voltage is maintained.
Abandonment of the Bootl oader Mode (1-Button)
1) via push button:
·
Hold down the button for 3 seconds until the s t at us LED flashes in a long-on, s hort-out
rhythm. If a display is available, "P ress again to jump to FIRMWARE" appears. Then
briefl y press t he button again to activate the boot loader, or if you wait 6 seconds instead, t he device returns t o t he initi al s tate.
2) or
·
Remove and connect t he power supply without operating a butt on
3) by Software:
·
Start t he "GB L_Conf.exe" applicat ion
·
Do a network sear ch with the "Search" menu act ion
·
In menu "Program Devic e" activa te the item "Ent er Firmware"
Factory Reset (1-Button)
If t he device is in bootloader mode, it can always be put back to its factory default. All
TCP/IP set t i ngs are reset in this operation.
If a unit is s et to factory defaults, an uploaded certificate or updated firmware will be
preserved.
1) via push button:
·
Activat e t he Bootloader Mode of the devi c e
·
Press and hold the button for 6 seconds. A fter the first 3 sec onds, t he s t at us LED
flashes in a long-on, short-out rhythm, and if a display is present, " P ress again to
jump to FIRMWARE" appears. Wait another 3 seconds, and the st atus LE D flashes in
a twice short, and once long rhyt hm. For devices with a display " P ress again to
FABS E TTINGS" is shown. At t his moment briefly press t he button again to activate
the factory reset, or if you wait 6 seconds ins t ead, the device returns to the initial
state.
·
During reset to fabsetting, t he st at us LE D flashes rapidly, please wait until the LED
flashes slowly (approx. 5 s ec onds).
2) by Software:
·
Activat e t he Bootloader Mode of the devi c e
·
"St art t he GBL_Conf.exe" program
·
In menu " P rogram Device" ac t ivate the item "Reset to Fab Set t ings"
·
The stat us LED will blink in a fast rhyt hm, please wait until the LED blinks s lowly
(about 5 sec onds)
19
Expert PDU Energy 8311 © 2017 Gude Analog- und Digitalsysteme GmbH
 Loading...