

Page 1

DHH 1050/11 T ECO
English
# 02012
© Copyright Güde GmbH & Co. KG - Birkichstrasse 6 - 74549 Wolpertshausen - Germany
Page 2
1a
1b
1
2
ON OFF
RUN CHOKE
3
OFF
ON
4
5
Page 3
6
8
7
10
12
7a
9
7
5
6
4
11
1
3
2
9
8
Page 4

GB
Thank you for purchasing the Güde wood splitter and enjoying confidence in our products.
!!! Please read carefully the Operating Instructions before putting the appliance into operation!!!
A.V. 2 Any reprints, even partial, are subject to approval. Technical changes reserved.
Pictures just an illustration
Appliance
Robust wood splitter, special-steel splitting knife, all steel parts with high-quality powder painting including high-quality
hydraulic pump.
The supply includes:
splitting table with 3 setting options,
two-hand operation with safety handles, optional splitting lift setting, big wheels including two-hand mobile handle,
four-sided post sliding
Motor 4-Takt Power- Engine,
4,1 KW/5,6 PS
The appliance is designated exclusively for work with firewood.
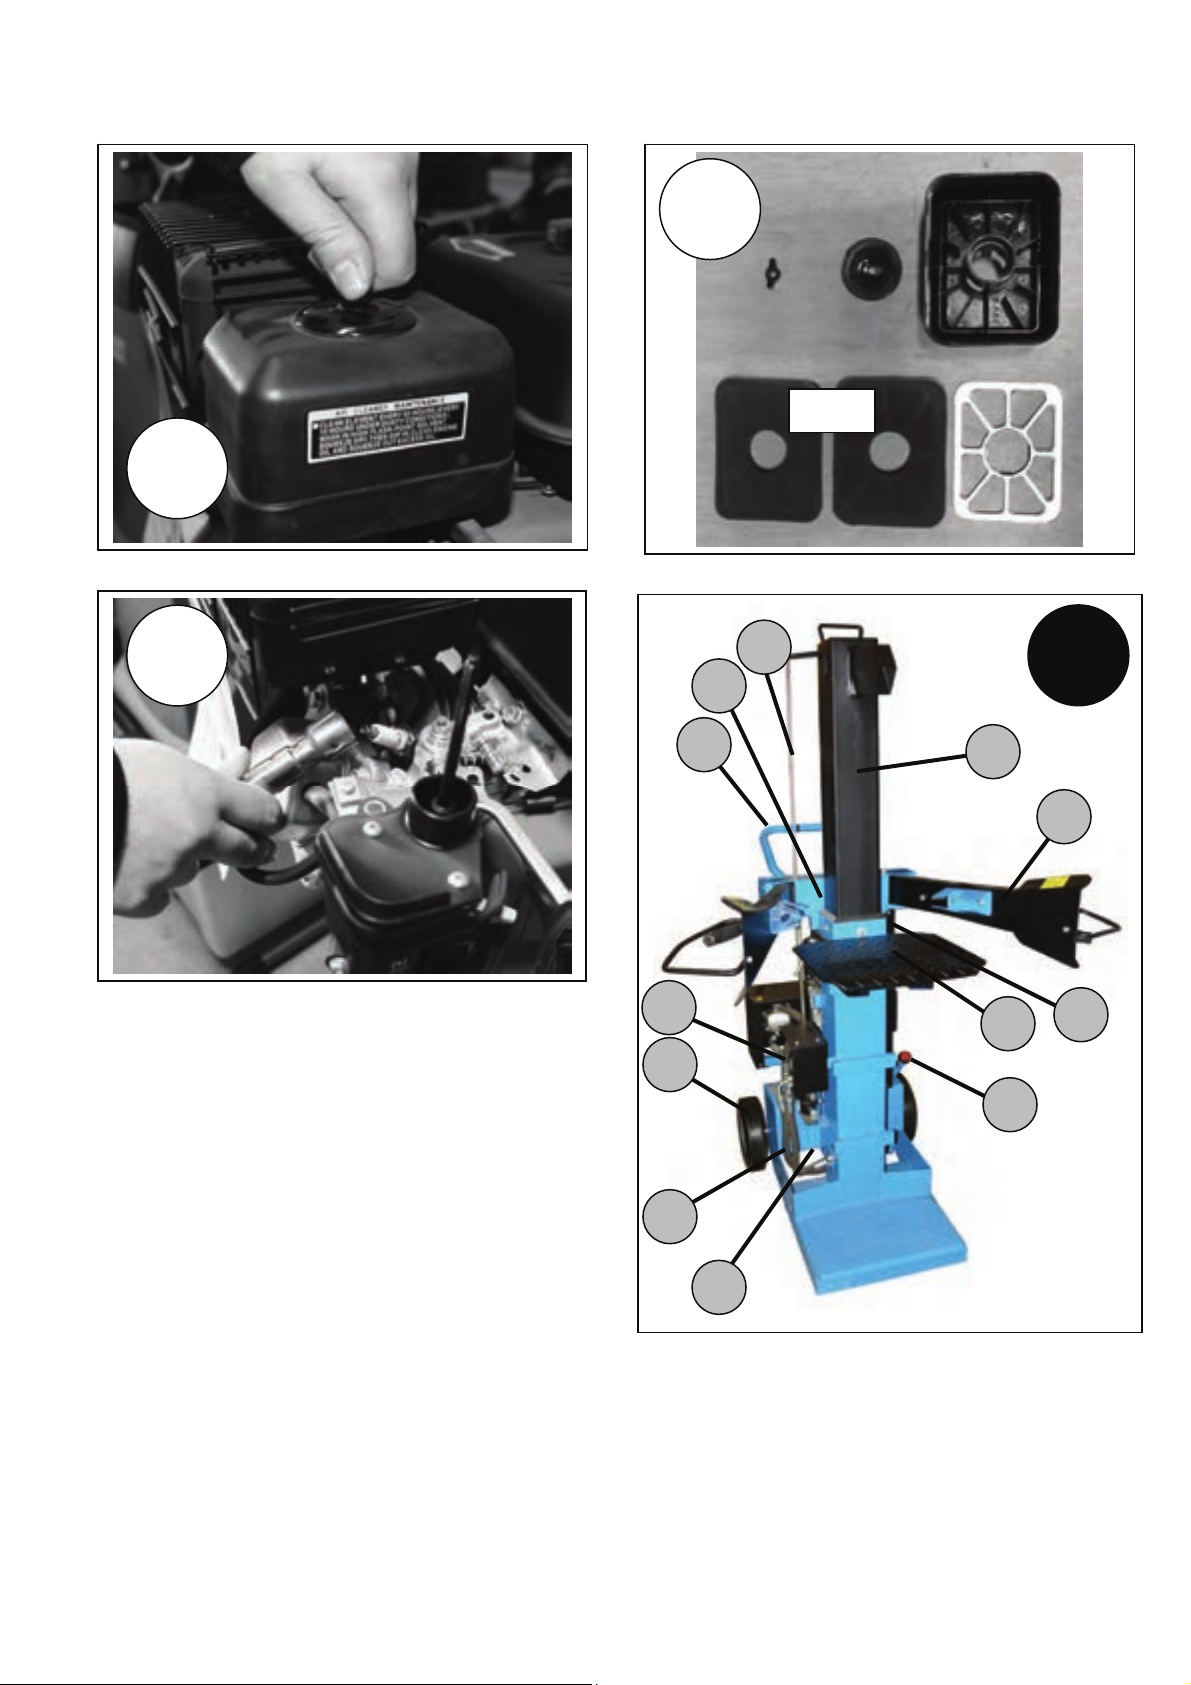
Appliance description (pic. 9)
1. splitting post
2. operating arms
3. splitting table
4. transport handle
5. transport wheels
6. hydraulic hose
7. hydraulic valve
8. hydraulic oil gauge
9. combustion engine
10. operating bracket
11. hydraulic oil drain screw
12. trigger rod
Guarantee
Guarantee claims as per the guarantee card attached.
General safety instructions
You must carefully and thoroughly read the Operating Instructions before using the appliance for the first time. If you have any doubts
concerning the appliance connection and operation, please contact the producer (service department).
Protect the appliance against moisture, rain and dust.
TO ENSURE A HIGH SAFETY LEVEL, FOLLOW CAREFULLY THESE INSTRUCTIONS:
ATTENTION!
1. Follow the producer's instructions.
2. The appliance must not be exposed to climatic influences, rain and snow.
3. Prevent children or any unauthorised persons from using the appliance.
4. Do not leave the appliance unattended when running as it could represent a threat.
5. Make sure other people are in a reasonable distance from the appliance.
6. Your workplace should be flat, stable and provide sufficient free movement.
7. To bring and take the appliance away, items you could tumble over must be removed from the path.
8. Make sure the workplace is lit sufficiently.
9. The appliance is designated exclusively to be used just by one person. Machine operation by two or more persons
strictly prohibited.
10. Refuel the appliance only when the engine has cooled down.
11. Wear close-fitting clothes. Take away all jewellery, rings and wristwatch.
12. Wear protective glasses when working.
Page 5

13. Wear working gloves when working.
14. Wear safety boots when working.
15. Appliance alteration, adjustment, cleaning and maintenance and failure recovery can only be executed when the engine
is switched off.
16. Keep the place where the appliance is operated clean, with no wood, waste wood and bark.
Behaviour in case of emergency
Provide first aid appropriate to the injury and call qualified medical help as soon as possible.
Keep the injured person from other injuries and rest him/her.
Precautionary Instructions and Accident Prevention
General
For safety reasons, precautionary instructions contained in this manual and instructions on the machine
regarding operation, maintenance and repairs should be respected and observed.
Operators
Any use of the cleaving machine may entail hazards. Therefore, only well-instructed and experienced
persons should be allowed to handle the machine and to work on it. Operators should be required to
wear tight-fitting clothes and protective shoes. No persons bellow 18 years of age should be allowed to
work with the machine. It is permitted however, to have people above 16 yrs of age working with the
machine provided that it is necessary for educational reasons and professional supervision is
guaranteed.
Working Area
It is an imperative for a safe cleaving job that the floor in the working area is flat and firm-based and sufficient
freedom of movement is secured. Ways for bringing and removing the machine in/from the area should be free of
any disturbances. Sufficient lighting should be provided in the working area.
Job Preparation
When doing repairs or maintenance or when leaving the cleaning machine unattended, the current supply should
be cut off by pushing the red button on the switch and unplugging the machine. It is not sufficient to cut the
power supply off by mere switching off. GÜDE cleaving machines are always delivered with hardened
cleaving knives. However, light deformation of the cleaving knife cutting edge may arise in result of cleaving
wood with unexpected foreign bodies in it – concrete, steel etc.- and whetting or filing must remove it. The knives
sharpness maintenance will increase working capacity.
TIP: Grease the cleaving knives every now and then (for problem wood).
Safety devices (primarily two-lever control) must be checked on prior to being put in operation for
the first time and the function must be examined.
Warning! Make sure that cleaving bench us safely fitted to the machine prior to any starting the
operation.
• Keep the place of your work clean at all times and remove any wood remains fallen down.
• Keep in mind that wood is a natural raw material and may get out of control when being split
(unexpectedly thrown-off wood pieces)
• Safety shoes should always be worn.
• Keep your hands outside the wood face or splitting knife entry at all times.
• Faces of the split wood must be rectangular if possible so that wood stays safely on the supporting
table and cannot slip to the side.
• Safety equipment of the appliance must not be disassembled or put out of operation.
• Remove wood, wood waste and bark from the place of appliance operation.
• Check the feeder cables. Do not use feeder cables that are faulty.
• Check whether the two-handed operation works properly before putting the appliance into ope ration.
• Wear closefitting clothes. Remove jewels, rings and wristwatch.
• Wear protective clothes.
• Attention during work: Risk of injury to fingers and hands caused by the splitter.
• All the protective equipment and covers must be fitted to the appliance and function faultlessly
when working with the appliance.
Page 6

• Use an appropriate supporting tool for splitting heavy or big pieces.
• Tool change, adjustment, cleaning, maintenance and fault removal must only be performed when the
engine is switched off. Pull the plug out of socket!
• All protective and safe equipment must be refitted immediately after repair and maintenance are
finished.
• Put the splitter on a flat and nonslip operating surface before using it. Ensure sufficient free movement.
• Never use the wood splitter when raining.
• Line voltage must correspond to the details on the appliance type label.
• Unwind the cable to the full extent when a cable drum is used to prevent it from heating.
• The socket must be fitted with a safety switch against stray current when working outdoors.
• The processed piece of wood must always be put on the appliance surface in a stable position to
prevent it from moving.
• Do not split soaked wood.
• Only one piece of wood should always be split.
• Do not split wood containing foreign items.
Marking on the appliance
Symbol explanation
The following symbols are used in these Instructions and/or on the appliance:
Product safety:
Product corresponds to
appropriate European
Community standards
Prohibitions:
General prohibition (in
connection with
another icon)
Do not touch inside the
appliance
No cable pulling
Warning:
Warning/Attention
Warning against
dangerous voltage
Warning against hand
injury / contusion
Warning against hot
surfaces
Warning against
dangerous voltage
Appliance can only be
used outside enclosed
spaces
Keep safe distance
Commands:
Use vision protection
aids
Use head protection
aids
Use hearing protection
aids
Use safety shoes with
safety steel toe
Use protective gloves
Unplug the appliance
before opening it
Read the Operating
Instructions before use
Page 7

Environment protection:
Dispose waste
professionally so as not
to harm the
environment
Packing cardboard
material may be
delivered to collecting
centres for recycling.
Any damaged and
disposed electric or
electronic appliances
must be delivered to
appropriate collecting
centres.
Package:
Protect against
moisture
This side up Fragile
Use as designed
The wood splitter has exclusively been designed for splitting of firewood pieces already cut by a saw, with a
maximum length of 1,430 mm (without the splitting cross).
The appliance must not be used to any other works than those for which it has been designed and that are
described in the Operating Instructions.
Should any provision of the generally valid regulations and provision contained in these Operating
Instructions be breached, the producer cannot be held liable for any damage. Never split any wood laid
down or over the fibre
.
Residual risks and protective measures
Warning!!!
Taking out of service, changing, blocking, disassembling, altering or adding any parts of safety and
protective devices strictly prohibited. Failing to comply with this condition can lead to injuries
dangerous to life.
The producer cannot be held liable for any material damage or injuries of persons caused by
negligence.
Any guarantee claim towards the producer expires with the negligence described above.
Mechanical residual risks
Threat Description Protective measures Residual risk
Contusion Parts of body can be contused
or amputated due to hydraulic
knife starting when splitting.
Risk of split material getting
stuck. When releasing the wood
please be aware the wood is
exposed to big stress and your
fingers can get squeezed in the
slot created by wood cracking.
Cut Parts of body can be contused
or amputated due to hydraulic
knife starting when splitting.
General injury Fierce splitting can lead to
serious injury when processing
dry wood.
Always use the two-hand safety
control. Do not interfere in the
splitting process.
Never work in two on the
machine.
Jammed wood needs to be
knocked out. At doing so, make
sure the falling piece of wood
does not injure your legs.
Always use the two-hand safety
control. Do not interfere in the
splitting process.
Never interfere in the splitting
process.
Always keep a sufficient safety
distance from the splitter.
Always operate the machine
with care and deliberately.
Any worn-out or damaged aid
must immediately be replaced.
Look out for bystanders!
Always wear safety boots when
working.
Any worn-out or damaged aid
must immediately be replaced.
Any worn-out or damaged aid
must immediately be replaced.
Always look out for bystanders.
Page 8

Wood chips created during the
splitting proceed can fall down
and injure especially legs of the
operator.
Getting caught, winding up Loose clothes, jewellery or long
Threat by noise
Threat Description Protective measures Residual risk
Hearing damage Longer working with the
Negligence of ergonomic principles
Threat Description Protective measures Residual risk
Negligent use of personal
protective equipment
Inadequate local lighting Insufficient lighting represents a
Other risks
Threat Description Protective measures Residual risk
Thrown-away items or liquids Small mechanical parts can
hair can get caught in mobile
parts of the appliance.
appliance can lead to hearing
damage.
Operating the appliance without
corresponding protective
equipment can lead to serious
internal and external injuries.
high safety risk.
injure your eyes when splitting.
Always wear specified
protective clothes and work
cautiously.
Always wear protective glasses
when working with the
appliance.
Always wear specified
protective clothes and work
cautiously.
Always wear safety boots
suitable to the specified
protective clothes.
Always wear close-fitting
clothes and remove jewellery
before work. Protect your hair
with a hairnet.
Always use hearing protection
aids.
Always wear specified
protective clothes and work with
care.
Always ensure sufficient lighting
when working with the
appliance.
Always wear protective glasses
when working with the machine.
Disposal
The disposal instructions are based on icons on the appliance or its package. The descriptio n of all
meanings can be found in the “Marking on appliance“ chapter.
Handling requirements
The operating staff should carefully read these Operating Instructions before using the appliance.
Qualification
Apart from the detailed instruction by a professional, no special qualification is necessary for using the
appliance.
Minimum age
The appliance can only be operated by persons older than 18 years of age.
An exception includes youngsters if they work within their professional education the purpose of which is to
obtain knowledge supervised by a trainer.
Training
Corresponding training is only necessary for using the appliance. No special training necessary.
Page 9

Transport and storage
Wood splitters are fitted with big wheels. Grab the handle on the splitting post with both hands and slightly
tilt the splitter back when transporting the machine. To make tilting easier, stand on the curved caliper
under the engine.
To prevent hydraulic oil leak, never transport the splitter laid down.
Always move the splitting knife absolutely down
during transportation.
Technical data
Maximum output: 4,1 kW/5,6 PS
Capacity: 206 ccm
Engine design: Power- Engine 4-Takt OHV
Fuel / tank capacity: unleaded/4 l
Consumption: 0.75 l an hour
Starting system: reversing starter
Maximum hydraulic pressure: 240 bar
Splitting post: 100 x 100 mm
Max. splitting pressure: 11 t
Max. splitting lift: 520 mm
Max. length of split material: 1,430 mm (without splitting cross)
Max. length of split material: 1,170 mm (with splitting cross)
Table size: app. 385 x 320 mm
LWA noise: 95 dB(A)
Weight app. 192 kg
Dimensions L x W x H in mm: 1,240 x 582 x 1,284
EAN: 4015671 22045 5
Article number: 02012
Assembly and first starting up
Operating arms
10
2. Insert the operating arm and take the tube to the cross joint hole (pic. 11)
Left operating arm is marked by letter “L“ and right one by “R“!!!
1. Unscrew the operating arm bracket (pic. 10)
11
Fetten
11a
Page 10

Tip: Lubricate sheet foots up and down first!
3. Now put screws through the bracket and operating arm from
above (pic. 12)
4. Secure the screw with a lock nut. (pic. 13)
5. Now you can tighten the operating arm.
14
13
15
Now insert the safety pins included in the supply to the back of the bracket with operating arm as illustrated
in (pic. 15).
Finally you need to screw down the bracket cover! (pic. 16)
16
Splitting wedge extension
ATTENTION!!!
Before you start working with the splitting
wedge extension you need to disassemble the
short wood table.
Fix the splitting knife extension by tightening the
screw manually at first. Then tighten it with a
socket-screw key.
Page 11

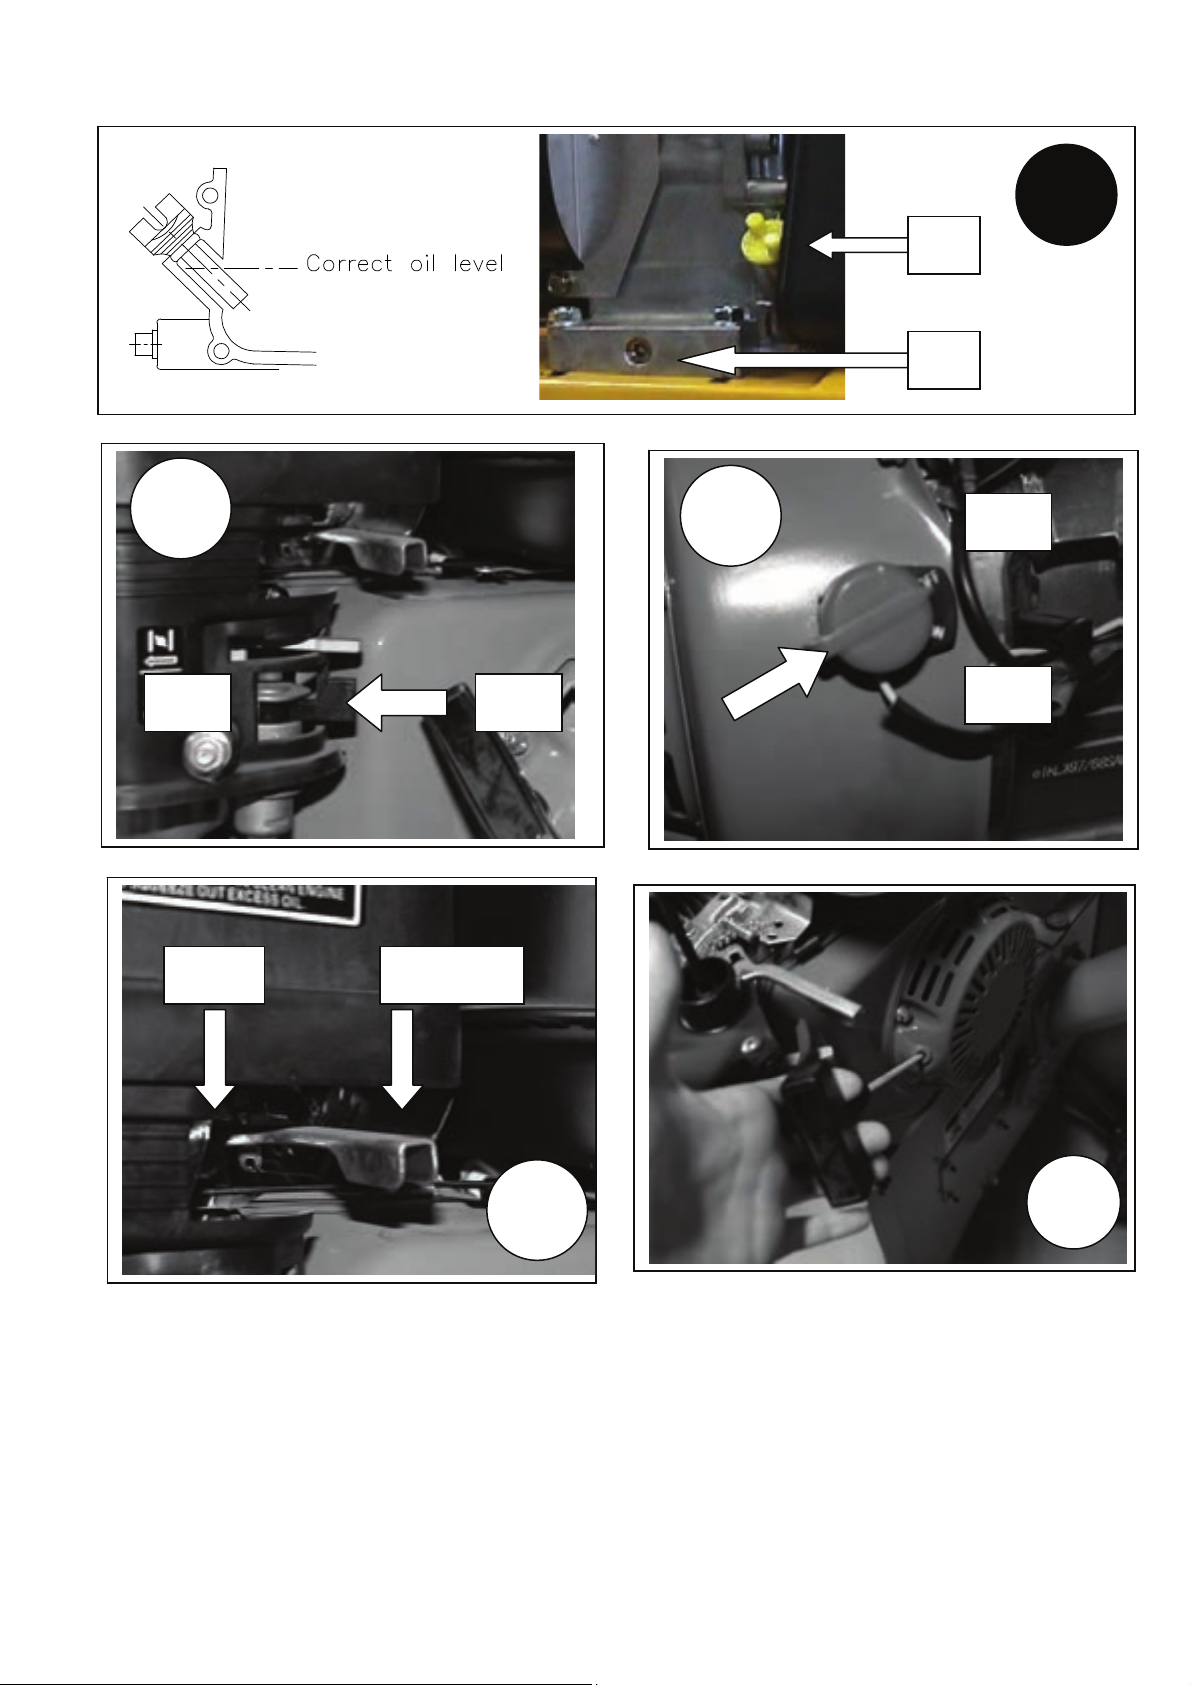
Engine monitoring (pic. 1)
The engine oil quality is decisive for correct output of the driving unit and operation life. Use only suitable
and high-quality lubricants; unsuitable lubricants cause damage to the appliance and lead to immediate
warranty expiry (SAE 10 W 40 specification multi-purpose semi-synthetic lubricant recommended). There
might be no engine oil or just a small amount of it (filling for factory test) when dispatching the appliance.
Oil level must necessarily be checked
before the appliance is put into operation!
The appliance should always be put to a flat surface when inspecting the oil level. Always consider the
environment when filling and emptying the engine oil and fuel: use appropriate filling and emptying tools.
Prevent uncontrolled fuel or oil leak in any case!
Screw the oil dipstick (pic. 1a) out or pull it out.
Add oil up to the "Correct oil level" marking (pic.1) and check the correct level (engine oil level must touch
the final oil filling neck thread). Make sure not to overfill the appliance when standing on an uneven surface!
Screw, or push, the oil dipstick again.
If you want to empty the engine oil (oil change, maintenance, etc.), pull the oil dipstick out (pic. 1a) and
screw the oil drainage screw out (pic. 1b). Keep the oil dipstick, oil filling hole, oil drainage hole and oil
drainage screw clean at all times! Use appropriate containers and prevent environment pollution by
lubricants and fuels.
Fill with fuel / air filter check:
Refuelling
The engine is maintenance-free and common unleaded Normal and Super petrol is adde d in it. If
environment-friendly unleaded petrol is used, fuel must be completely drained at engines put out of
operation for more than 30 days to prevent resinous deposits in the carburettor, fuel filter and tank or fuel
stabilizer mixed to the fuel.
Do not add oil to petrol
Refuelling is done by removing the tank lid (pic. 1; pos. 9) and adding the fuel up to the fuel screen marking
as maximum (the fuel screen is located in the tank filling hole). Prevent fuel from contacting your skin!
Make sure fuel is always clean with no dirt! Close the tank lid appropriately after each refuelling or
inspection.
Take the appliance to the surface you want to sweep.
Check all components if tightened well and not damaged.
Check the entire air filter for any dirt. Pic.15 shows air filter components from the engine with the air filter lid
being unscrewed (pic. 14). All air filter components, especially the air filter insert (pic. 15a) must be clean –
cleaning agent: cleaning petrol (adhere to the safety sheet of the given manufacturer!).
Open the fuel tap (pic. 8; pos. “ON“). Check if the socket plug is tightened.
Hydraulic oil check
With the splitting column inserted, use the oil gauge (pic. 9; pos. 8) to check whether the filler volume is
appropriate. The hydraulic oil level must always be between both markings on the oil gauge. If necessary,
add commercially available hydraulic oil, e.g. HLP46 or any other one with the same viscosity.
Page 12

Handling
Lift setting
The working output can be increased by reducing the
splitting knife reverse running for pieces of wood smaller
than app. 50 cm and when more wood needs to be split.
Proceed as follows:
Put a short piece of wood on the splitting table, move the
splitting knife approximately 2 cm above the wood and
switch the knife off (press the red button on the switch and
pull the plug out of socket). Using a side rod, you can now
shorten the reverse running by fixing the rod in the desired
height by adjusting screw.
Safety instructions for first starting up
Check the functionality of safety devices (especially the two-lever control) before starting your work.
Safety instructions for handling
• Use the machine only after you have carefully read the Operating Instructions.
• Follow the safety instructions specified in the manual.
• Behave responsible towards other persons.
• Wood can only be split along the fibre.
• Risk of getting jammed when splitting knotty wood.
Jammed pieces of wood to be released by knocking on them.
Cutting out these pieces prohibited!
• Risk of split wood getting jammed. When releasing please be aware the wood is heavily stressed
and your fingers can get squeezed in the split slot.
• The machine has been designed to be operated by one person only; operation by two or more
Make sure the splitting table is always secured properly. A falling splitting table or falling piece of
wood can injure your legs.
persons strictly prohibited.
Caution: Hard wood can strongly hit y ou when splitting.
Working without the splitting cross is recommended for long pieces of hard wood.
Caution: Never use the splitting wedge extension along with the short wood table in
the highest position.
Tip: More problem wood can be split after knife lubricating!
Page 13

Open the fuel tap
Put the engine switch to the “ON“ position (pic. 3)
Make sure the engine is cold when being started.
Turn on the engine choke (pic. 4; pos. “CHOKE“)
Turn the speed control lever (pic. 4; pos. “START“) to full speed.
First, pull shortly the starting cable so that it is stretched. Now pull the starting cable slowly to the stretched
position with your left hand resting on the engine and one more strong pulling the starting cable. Turn the
engine choke off as soon as the engine gets started (pic. 4; pos. “RUN“)
Give full throttle using the speed control lever (pic. 4; pos.”HARE”)
To be provided
The starting cable must not reel automatically. It must always be reeled back by hand. If the engine fails to
start even after several attempts, check whether the tank has been refuelled properly. Maybe there is too
much fuel in the roll, which has caused the spark plug to get damp.
Switching off the engine
Put the speed control level to the idle gas position (pic. 4; pos. Želva).
Use the engine switch (pic. 3; pos. “OFF”) to switch off the engine. Never leave the appliance unattended
when the engine is running. Never switch the engine off when the choke is on as the engine could get
damaged. Close the fuel tap (pic. 2; pos. “OFF“). Pull slowly the starter handle until you feel resistance. By
this, valves get closed.
This step is necessary to prevent moist air from entering the combustion chamber from outside.
1. Put the wood to be split on the table as short or long logs and set the backward movement
accordingly (see Lift setting).
2. Now clasp the split wood with both operating arms (see Stop screw setting) and press them down
at the same time.
3. Remove the split wood from the working area and put another wood on the table.
4. If the splitting knife is greased from time to time, more difficult wood can also be split.
Start the splitter and wait until the splitting column gets to the starting position.
Now press both operating levers to make the splitting column go down. Press just the right or left operating
lever in turn. If the splitting column stands each time, you can use the splitter with no worry.
.
If the splitting column keeps going down, the two-hand operation must be subject to new
calibration.
For that purpose, contact an authorised workshop.
V nebezpečných situacích a při nehodách musíte dát páku pro regulaci otáček co možná nejrychleji
do polohy „STOP“ a motor vypnout spínačem motoru (obr. 3; poz. „OFF“).
Hydraulic
Hydraulic
Hydraulic hoses and joints need to be checked for tightness after app. 4 hours of operation and
tightened if necessary.
Hydraulic oil/tank
Regularly sold hydraulic oil (e.g. HLP 46) or any other product of identical viscosity can be used for all
splitters.
Page 14

Failures - causes - removal
Failure Cause Removal
Splitter without
necessary output
Hydraulic pump
whistling, splitting knife
jiggling
Engine does not start
Engine switches off after
being started
Engine stalls
Engine stalls in high
revolutions
Engine with too low
power
Engine runs too warm
Too little hydraulic oil
Starting rod and lever system bent; hydraulic follower
at the valve not pushed inside to full extent.
Too little hydraulic oil in the tank Hydraulic oil to be filled in
Engine switch not in “I“ position (on)
Fuel tap closed
Choke open
Spark plug not fitted
Spark plug dirty or faulty
Wrong distance of spark plug electrodes
Fuel tank empty
Fuel is old
Air filter dirty
Too big distance of spark plug electrodes
Spark plug dirty or faulty
Loose plug or spark plug cable
Fuel screen dirty
Ventilation in tank cover clogged
Air filter dirty
Old fuel
Too small distance of spark plug electrodes
Air filter dirty
Limited functionality of the cooling system
Too little engine oil
Air filter dirty
Hydraulic oil to be filled in
Rod and lever system to be readjusted,
appropriate nuts to be tightened.
Put the engine switch to “I“
Open the fuel tap
Close the choke lever
Fit the spark plug
Clean or replace the spark plug
Adjust the distance of electrodes to 0.7 – 0.8 mm
Refuel
Drain the old fuel, fill in new one
Clean the air filter
Adjust the distance of electrodes to 0.7 – 0.8 mm
Clean or replace the spark plug
Fit the plug firmly on the plug, fix the cable
Clean the fuel screen
Replace the tank cover
Clean the air filter
Drain the old fuel, fill in new one
Adjust the distance of electrodes to 0.7 – 0.8 mm
Clean the air filter
Clean the air grid and cooling ribs
Add engine oil
Clean the air filter
Safety instructions for inspection and maintenance
Engine must always be switched off and the spark plug disconnected by unplugging during repair or
maintenance works (pic. 8).
If you leave the splitter, the engine must be switched off, too!!!
Inspections and maintenance
Splitters are dispatched on principle with hardened splitting knives. If, however, you detect any slight
deformation of the splitting knife edge after splitting wood with invisible foreign particles (concrete, steel,
etc.), the deformation needs to be removed by grinding off or filing. Continuous keeping the splitting knife
edge sharp increases the working output.
Only an appliance regularly maintained and with a corresponding level of care can be a satisfactory
assistant. Insufficient maintenance and care can lead to unpredictable accidents and injuries.
Page 15

Keep the splitter clean at all times. Use regularly sold hydraulic oil (HLP 46 #
42004 or any other product of identical viscosity) for changing the hydraulic oil.
The oil level in the splitter must always be between min. and max marks. Make
sure the splitter is always in an erected position.
Hydraulic oil change:
Put a suitable container (pic. 8 Art. 11) under the hydraulic
oil drain screw and screw the drain screw out.
Caution! Old oil must be disposed in accordance with valid
regulations.
To that end, please get in touch with old oil disposal centres.
Disposing oil in any other manner strictly prohibited. Such acting would be
subject to prosecution and considerable punishment.
Now screw up the drain screw again. Caution! No impurities can get in any
circumstances in the hydraulic oil tank. Now fill in the hydraulic oil tank and check whether there is a
correct hydraulic oil level in the tank using a gauge. Attention: Always fill the oil only when the splitting
post is inserted
!
Only original spare parts can be used when changing or replacing any construction parts. Regularly check
hydraulic hoses and hose joints for tightness.
Inspection and Maintenance Plan
Time interval: Description Any other
details
Before each use
App. after 4 hours of operation
App. after 500 hours of
operation
Lubricate the splitting post / check the engine oil level
Check hydraulic hoses and joints for tightness; tighten
them if necessary.
Change the hydraulic oil. Clean the oil filter in the tank,
replace if necessary.
Service
Do you have any technical questions? A claim? Do you need spare parts or the Operating
Instructions?
You will be helped quickly and without needless bureaucracy at our webpage www.guede.com in the
Service part. Please help us be able to assist you. To be able to identify your appliance when claimed, we
need to know its serial No., order No. and year of production. All these details can be found on the type
label. Enter the details below for future reference.
Serial No.:
Order No.:
Year of production:
Tel.: +49 (0) 79 04 / 700-360
Fax: +49 (0) 79 04 / 700-51999
E-Mail: support@ts.guede.com
Page 16

EG-Konformitätserklärung
EC Declaration of Conformity
Hiermit erklären wir, Güde GmbH & Co. KG
We herewith declare, Birkichstraße 6, 74549 Wolpertshausen, Germany
Dass die nachfolgend bezeichneten Geräte aufgrund ihrer Konzipierung und Bauart
sowie in der von uns in Verkehr gebrachten Ausführungen den einschlägigen,
grundlegenden Sicherheits- und Gesundheitsanforderungen der EG-Richtlinien
entsprechen.
That the following Appliance complies with the appropriate basic safety and health requirem ents
of the EC Directive based on its design and type, as brought into circulation by us.
Bei einer nicht mit uns abgestimmten Änderung der Geräte verliert diese
Erklärung ihre Gültigkeit.
In a case of alternation of the machine, not agreed upon by us, this declaration will loose its
validity.
Bezeichnung der Geräte: - DHH 1050/11 T ECO
Machine desciption:
Artikel-Nr.: - 02012
Article-No.:
Einschlägige EG-Richtlinien: - 2006/42 EG
Applicable EC Directives: - 2004/108 EG
- 2002/88 EG
Angewandte harmonisierte
Normen: - EN 609-1:1999+A2
Applicable harmonized - EN ISO 14982:2009
Standard:
Datum/Herstellerunterschrift: 06.05.2011
Date/Authorized Signature:
Angaben zum Unterzeichner: Hr. Arnold, Geschäftsführer
Title of Signatory:
Technische Dokumentation: J. Bürkle FBL; QS
 Loading...